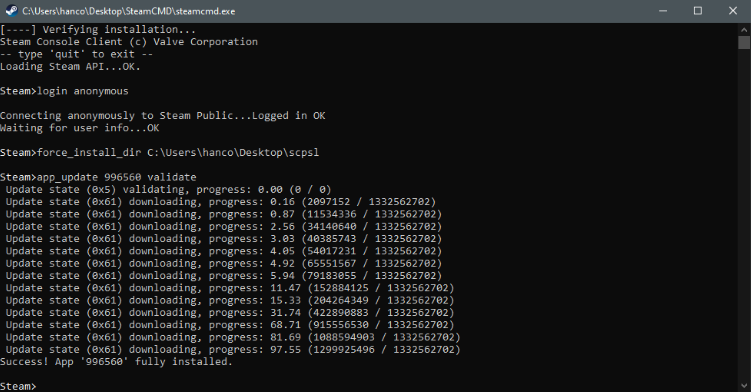
SCP: Secret Laboratory

SCP: Secret Laboratory

122 ratings
How To Setup an SCP:SL Server on Windows 10
By Takail
This guide will tell you how to install an SCP:SL server on a Windows10 machine and will also show you how to get your server verified.
2
11
   
Award
Favorite
Favorited
Unfavorite
Mono
Before we get started be sure to install mono as not having it can cause issues with things such as voice chat. Install Mono(64-Bit) here[www.mono-project.com].
SteamCMD
Before you do anything, you’ll need to install SteamCMD which we will be using to install the SL server itself. To do this simply follow this link: https://steamcdn-a.akamaihd.net/client/installer/steamcmd.zip
Once that’s downloaded drag ‘Steamcmd.exe’ to a new folder and run it. It will perform a first time setup and, if all goes well, you will be greeted with this screen:

Server install with SteamCMD
Once that’s done, you’ll need to make a new folder for your SCP server. For this tutorial, I will be making the folder on my desktop and I’ll be calling it ‘scpsl’. Now that you’ve made your new folder, run these commands in the steamcmd console:
force_install_dir (your server directory)
‘Your server directory’ should be the directory you created for the server, for me this: C:\Users\hanco\Desktop\scpsl so my command would be
force_install_dir C:\Users\hanco\Desktop\scpsl
login anonymous
app_update 996560


and the folder you created for your server should look like this:
Config Setup
If all the previous steps went off without a hitch, then you now have an SCPSL server. However, before it is ready for players, you will need to configure it. First run ‘LocalAdmin.exe’ in the server folder once and just press enter when it asks for a port, this will make it use the default port of 7777. Once the server gets to the ‘Waiting for players…’ line you can type ‘exit’ in the console, this will close the server. Now that you have run the server once, it will have generated the default configs which were going to go and edit now.
Open up your Start Menu and search ‘%appdata%’, this will open your ‘appdata roaming’ folder where the SCPSL configs are stored. Now navigate to the ‘SCP Secret Laboratory’ folder and open it then open the “config” folder then finally open the “7777” folder where all the configs for servers you host on the 7777 port are stored.


Config Gameplay
The first file we’ll edit is config_gameplay.txt so open that up and we’ll get started. In this tutorial we’ll only change the configs that have to be changed to host a server properly you can however you can have a look over all the other config options and change them whenever you want, just always make sure to restart the server to make the new configs take affect.

server_name: You’ll have to change this to the name that you want, for me ill be calling it “Takail’s server so the i’d put “server_name: Takail’s Server”.

serverinfo_pastebin_id: You’ll need to set this to a pastebin of your rules and info on how someone can contact you such as your discord name+number or an invite to your Discord server. Here’s an example: https://pastebin.com/V7B2zTGP if this was used then the config would be: serverinfo_pastebin_id: V7B2zTGP

contact_email: This isn’t required in order for your server to work however it is a prerequisite for server verification so if you intend to have you server on the public server list you’ll want to set this to your primary contact email that the verification team can reach you with.

Config Remoteadmin
In this config file all you’ll need to do is remove the placeholder members and add yourself to the owner rank. So delete these entries:


and add “ - YourSteamID64@steam: owner” or if you launch the game with Discord “ - yourdiscordID@discord: owner”. You can get your SteamID64 on this website: https://steamid.io/
As my SteamID64 is 76561198067357008 mine would look like this:


Port Forwarding
In this section im not able to help you much as port forwarding is different for every router so below I will link a video and a guide, both are useful for helping you understand how to port forward. You can also google "how to portforward on (my router name here)" if you know the name and model of your router.
Once you’ve figured out how you’ll need to create a port forward rule to allow traffic through port 7777 (or whatever port you want to use for your server) on the UDP protocol.
https://www.lifewire.com/how-to-port-forward-4163829
https://www.youtube.com/watch?v=ExrSULINq9c
Getting your server verified
Once you have completed all the above steps and you want your server on the public server list all you have to do is email server.verification@scpslgame.com with your servers IP address and the type of IP it is, static or dynamic. If your server is hosted on a home PC then your IP will likely be dynamic whereas if it your server is hosted on a VPS/VDS then chances are it’s a static IP. So as my IP for this guide is 216.58.206.110 and i am hosting the server from my home PC I would simply email the following to the verification team:
Hello, id like my server to be verified the IP is 216.58.206.110 and the address is dynamic.
Updating your server
Updating your server couldn't be easier. Simply create a new file called “update.bat” and place it in the same folder that you put steamcmd in earlier. Right click the update.bat file and click “Edit” this will open a blank notepad paste this line into it:

steamcmd.exe +login anonymous +force_install_dir (YOUR SERVERS FILE PATH HERE) +app_update 996560 +quit
Make sure to replace the placeholder name with your servers file path so for me i would type:
steamcmd.exe +login anonymous +force_install_dir C:\Users\hanco\Desktop\scpsl +app_update 996560 +quit
Whenever you need to update your server simply run the “update.bat” file and your server will begin updating.
Plugins
Installing plugins with SCP:SL is pretty easy and there are plenty of guides already available for you on the the various plugin servers. At the moment there are 2 main ways to get an use plugins: the Northwood API or NWAPI which comes packaged with the game and will work straight away with your server with no setup needed. The other way is with Exiled, a third party plugin loader which is used by many server owners. You can join their discords here:
Northwood API (recommended): https://discord.gg/c8kC3pdPsk
Exiled: https://discord.gg/PyUkWTg

All the information and help you could need for plugins you can find there.
203 Comments
Takail  [author] Feb 27 @ 11:31am 
twitch.tv/d3ths1mple Feb 25 @ 12:11pm 
What ip to use for the server?
i wanna make it public :)
Takail  [author] Feb 2 @ 12:48am 
chances are if its installed straight into your C drive you missed or did something wrong with the "force_install_dir" part of the tutorial
3 testicle guy Feb 2 @ 12:15am 
so get this: i wake up today and boot up my computer and see some error about renaming a folder C:\program and i wonder "wth is that"
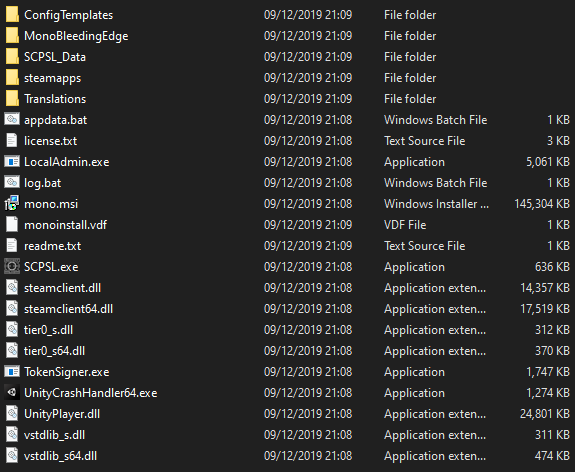
i open my c disk and open the program folder because i dont know what it is, and surprise surprise! it's magically the scpsl server program!
so yeah im gonna be following the rest of the tutorial now and give some updates later
3 testicle guy Feb 1 @ 1:37pm 
does this guide just not work anymore cuz the server doesnt install in my folder even tho i do everything right :/
Takail  [author] Nov 16, 2024 @ 11:59pm 
yes
bumpyjumpy120 Nov 16, 2024 @ 6:43pm 
do i need to do force install dir (directory) if i already put it into the folder?
Takail  [author] Oct 4, 2024 @ 3:05pm 
If you have any issues please seek help either on the steam forum for the game or in the tech-support channel of our discord @ discord.gg/scpsl
Avarage war criminal Sep 28, 2024 @ 5:19am 
Do i need some kind of vpn to let my friends join
BenitoV2 Sep 4, 2024 @ 7:38pm 
my friend got a server up and running and all of us but him can join, is there a way around this?