Lobotomy Corporation

Lobotomy Corporation

220 个评价
[2019] Spoiler Free guide for Lobotomy Corporation
由 spitnik11 制作
An updated guide on the early game mechanics of Lobotomy Corporation as well as some basic strategy for succeeding through mid to late.
2
15
   
奖励
收藏
已收藏
取消收藏
Overview
Lobotomy Corporation has little to no updated information on the basics available to players. The frustration of navigating the awkward mechanics coupled with the inaccurate translation may discourage newbies. This guide is intended to neatly explain the basic mechanics of the game as well as some basic gameplay strategies. Keep in mind that half of this games fun comes from what you don't know. I encourage you to play for a few hours before reading a guide. Or not. I'm not your mom.

Gameplay basics
Deployment Phase:
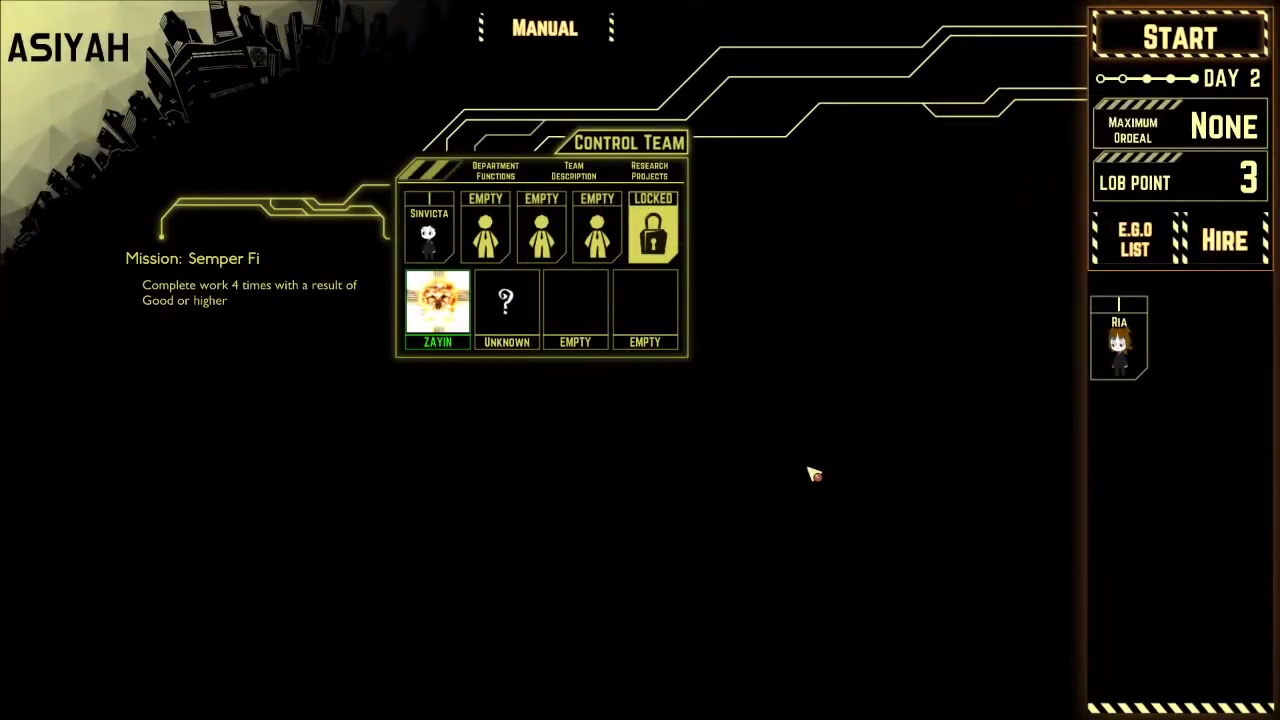
The first screen you see in game.

Manual:
Can be clicked to read up on the games mechanics.
I recommend reading it. Especially after reading this guide as it will make much more sense.

Hire button:
Can be used to hire new employees using "LOB Points" or Character points.

Department screen:
This is where you will assign your employees. You can view a Description of the department’s functions, team functions, and research projects. Most importantly however you can view all currently gathered info on the department’s abnormalities

Clicking on the abnormality will bring up its information screen.

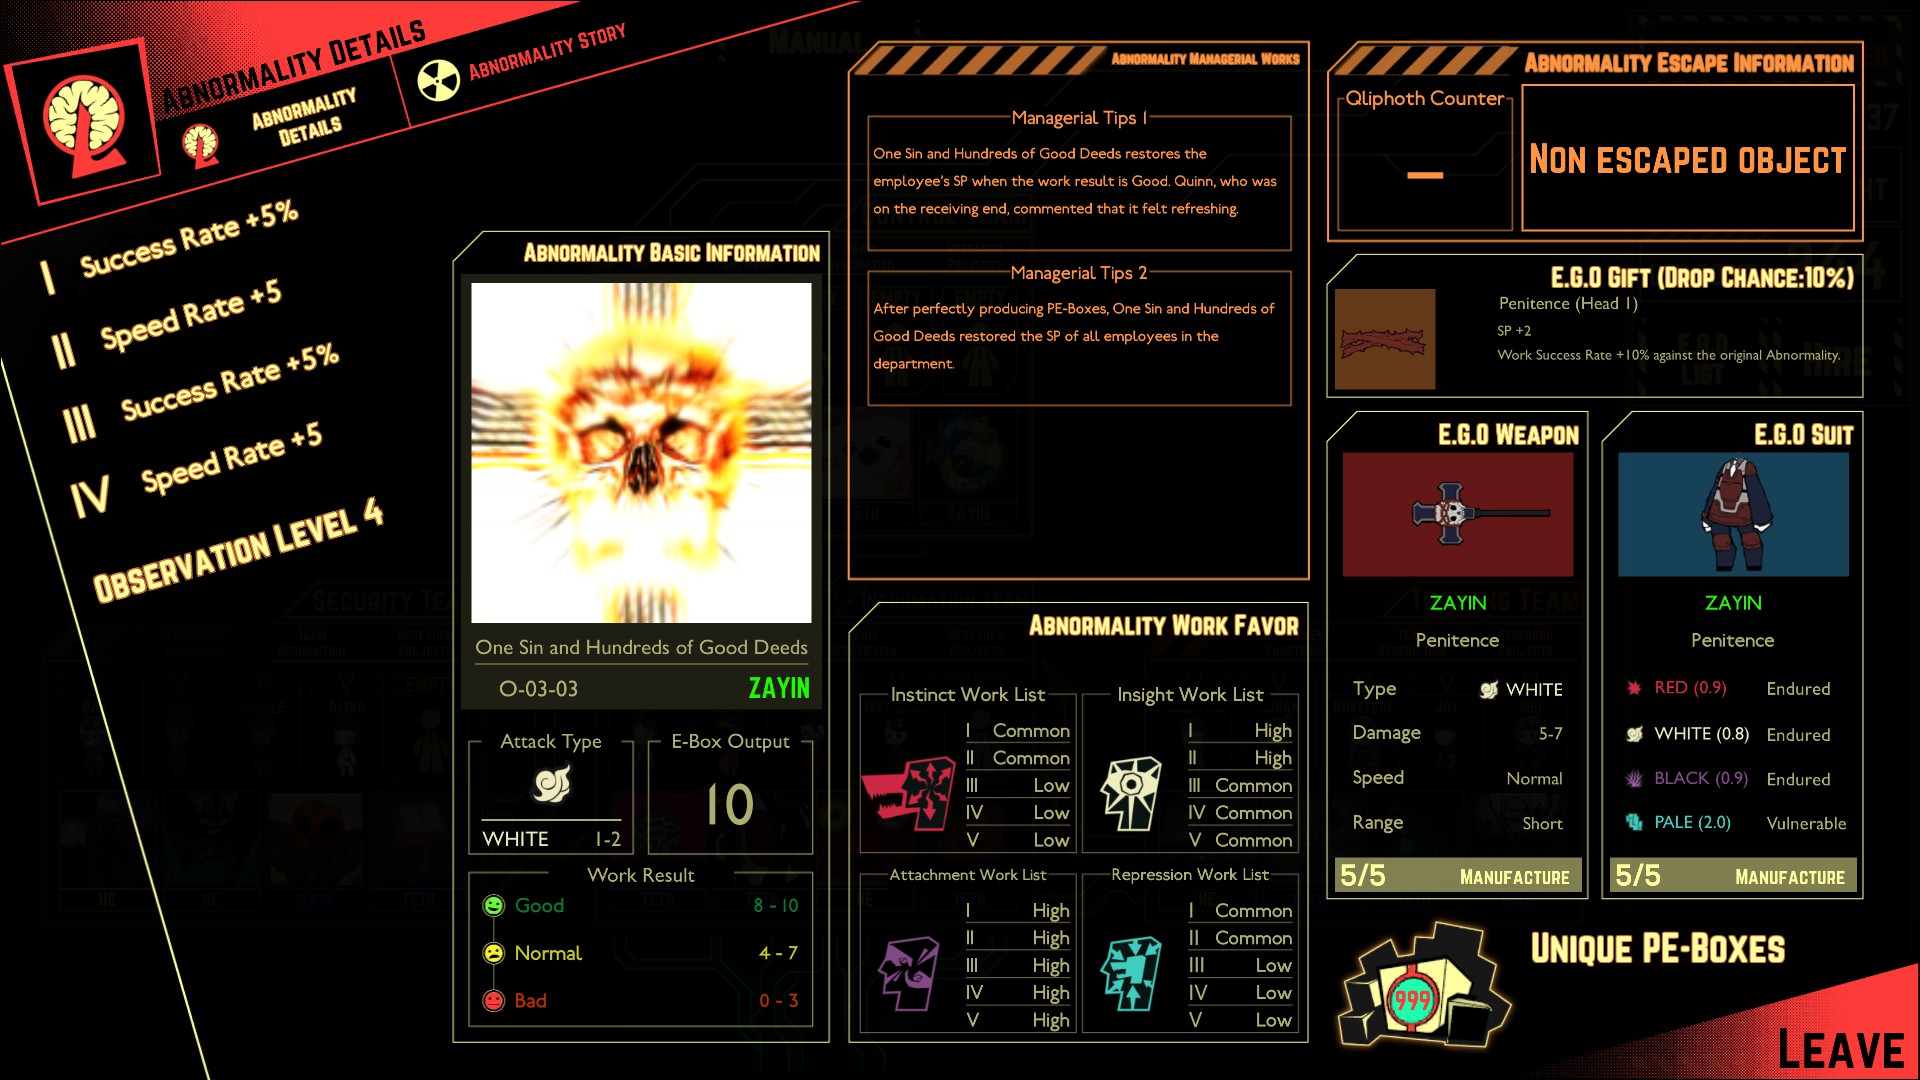
Basic information:
Shows the abnormalities name and ID number as well as its risk Level.

One Sin and Hundreds of Good Deeds
He's of the Zayin risk level which is the lowest threat level.
His damage type is White Which is the damage your employee will take while working on him.

Observation level
Increases as you purchase more information on the abnormality and provides bonuses at each level.

Story
Will progressively unlock as the observation level increases.

Work favor:
These will give you hints on which work type has a higher chance at producing a "PE box" or success.

To the right of that you have your total PE boxes.
Above that you have E.G.O suit E.G.O weapon and E.G.O gift. These will become available as you progress the abnormalities observation level.

And above those is the Qliphoth Counter.
Pronounced Ke-lee-Pot or kellypot (I've checked multiple sources on this)
It's the abnormalities meltdown counter. Like a 3 strikes and you’re out deal.
One sin doesn't have a negative effect and thus has no counter.

Manager tips:
These will explain how the abnormality reacts to your work.
I will explain one of the most common phrases present in these.

When the work result was good/normal/bad, Qliphoth counter has decreased with a high/normal/low probability

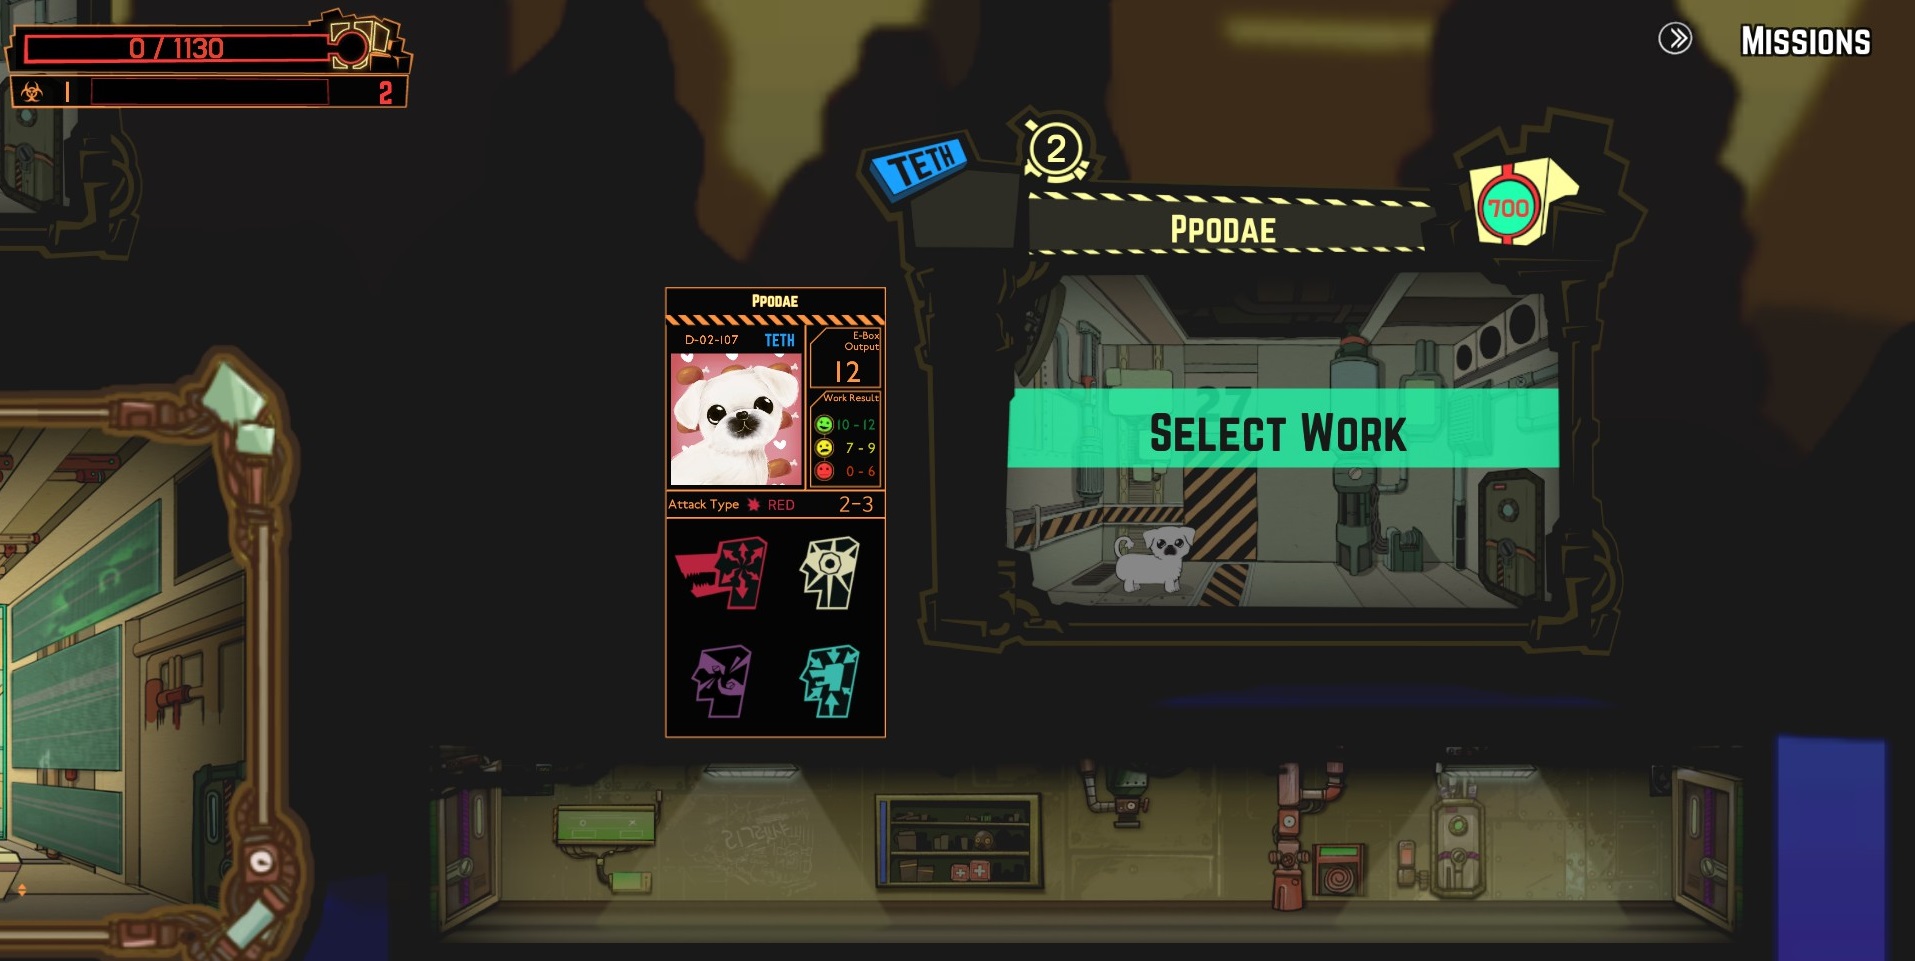
As discussed above Depending on how you research an abnormality determines whether this countdown decreases or not; indicated by the 2 above PPodae's name.

If the manager tip says "When the work result was bad, Qliphoth counter has decreased with a high probability" It means receiving a bad work result has a high chance at reducing the counter by one. Reduce the counter to zero and get ready for a bad time.
Selecting a work will give 4 options.
These correspond with the work favor stat back on the abnormality information screen.
High means a better chance at producing a PE box; low means a lower chance.
The work result tells you how many PE boxes are required for each result.
In Ppodae's case getting at least 10 is a good result.
Ppodae has a maximum output of 12.

Energy Quota
PE output also corresponds with your daily .
At most Ppodae can give us 12 towards our goal.
Under the daily quota is the work counter.
Each work performed on an abnormality will add to the counter.
When the counter is full the next work performed will activate a Qliphoth Meltdown.
The number 2 indicates how many abnormalities will meltdown.
Once the meltdown is activated, 2 random abnormalities will receive a 60 second countdown regardless if they have a Qliphoth counter or not.

Note: If an employee is working an abnormality that receives a counter the counter will not activate until the employees work has finished.

If an employee isn’t sent to work on the abnormality before the counter reaches zero an amount of energy will be depleted from the daily energy quota and the abnormalities Qliphoth counter will be reduced by 1.

With all this info in mind the basic approach to working on an abnormality is
Experiment with the four work types.
Unlock work favors and manger tips.
Work on said abnormality more efficiently.
Fail.
Repeat.

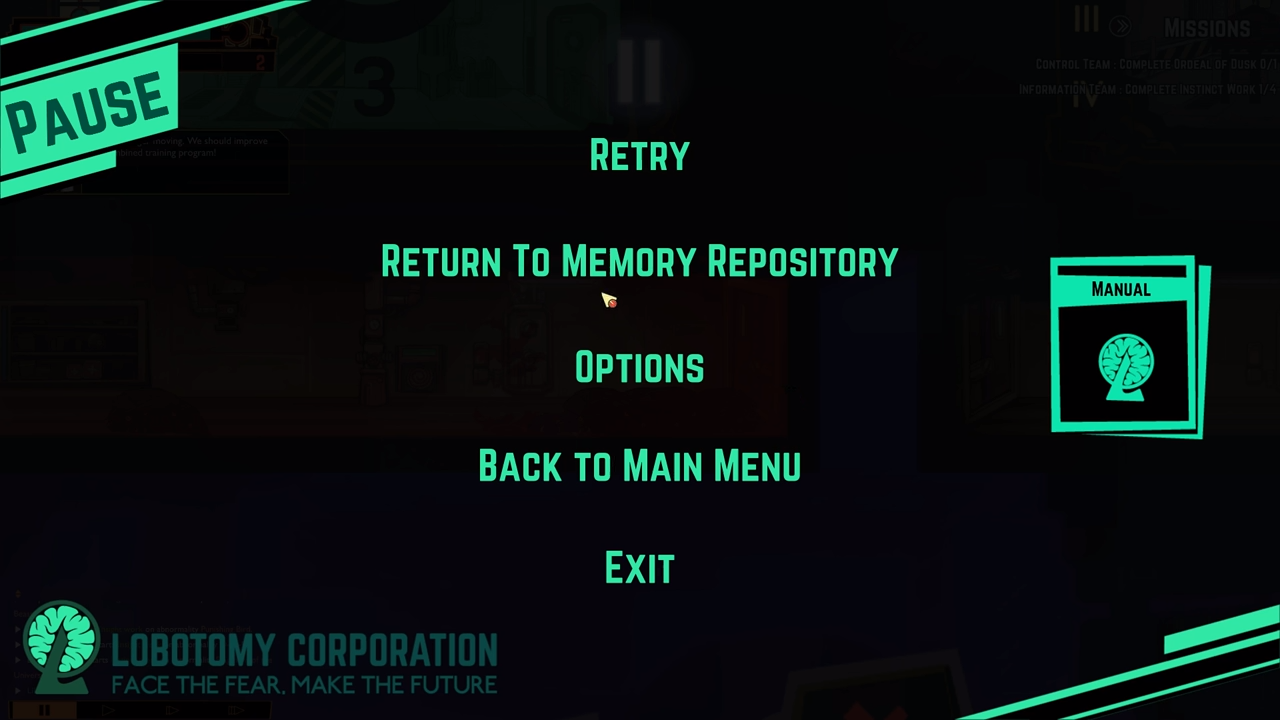
Lastly there is the pause screen

Retry
All dead employees will be alive and all abnormality information gained throughout the reset day will be lost.

Return to Memory Repository
Every 5 days days you will receive a memory imprint.
The first imprint will be on day 6.
Hitting Return Memory Repository will take you back to this saved point.
So hitting the button on day 8 will take you back to day 6.
Things you will keep: Abnormalities research info, Abnormality weapons and suits equipped or not.
(Exception: if an employee dies and you return to repository, whatever he had equipped will also be lost.)
Things you will lose: Any newly made employees, newly picked abnormalities, and newly acquired E.G.O gifts.

The idea being that the game does not punish resetting, it encourages it.

That'll wrap up basics for now. Up next is stats.
Stats
This section will not take too much time.
It will serve as a basic overview of the 4 stats and damage types

Employees have 2 basic stats that determine their health.
HP
and
SP


If HP reaches zero they’re dead and cannot be brought back outside of a reset.
If SP reaches zero they will panic and become uncontrollable.
Depending on the panic type they may be saved by having they're SP brought back to 100 percent.
This can be achieved by having an employee attack them with a white damage type weapon.


This brings us to the 4 stats, 2 of which were just mentioned
They each have a corresponding work type of the same color
They are as follows

Fortitude - Instinct
Prudence - Insight
Temperance - Attachment
Justice - Repression

Fortitude increases the employees HP and levels up by preforming Instinct work.
Prudence increases the employees SP and levels up by preforming Insight work.
Temperance increases the employees overall Work Success and levels up by preforming Attachment work.
Justice increases the employees Attack and movement speed and levels up by preforming Repression work. This stat is very powerful at higher levels and thus can be expensive to level.

There are 4 damage types.
Red
White
Black
Pale

Red damage will only damage your employees HP.
White damage will only damage your employees SP.
Black will damage both HP and SP.
Pale will damage the employees HP according to a percentage of the employee's Max HP.

E.G.O suits and weapons can be worn by employees to resist and deal certain damage.
Each ego suit has a level of resistance to each damage type.
Each weapon has a different damage type and range.

Each ego suit has a range of damage absorption from -2.0 to 2.0
The lower the number the less damage the employee will receive from that damage type.
The higher the number the more damage they will receive.

Vulnerable is high damage against you
Normal is average damage against you
Endured is low damage against you

There is a few more resistances however as long as you remember that when dealing with armor, low number is good and high number is bad.

Weapons are probably self-explanatory by now.
Just as an employee’s resist damage so does an abnormality.
You can check an abnormalities resistances by viewing they're escape information on their info screen.
You’re looking for Weak and vulnerable damage to use for suppressing.
If the abnormality is weak to white and endures red then go for a white damage weapon.

That about covers the stat section.
Gameplay Tips
From this point on all information is optional.
This section serves as small collection of helpful tips to optimize gameplay.
It may be best to play for a while before reading these but, again, I’m not your mom.
Some abnormality names will be used while avoiding there abilities.
They are as follows in no particular order.

- A department will usually only have 3 abnormalities and one tool. With this in mind 3 employees per department early on is optimal. One for each active abnormality as well as enough to cover meltdowns and ordeals.

- Which stat to focus on leveling is based on which abnormalities you pick. Generally you want to level temperance first when working with Zayin's.
Then either prudence or Insight when working on Teth's.
Then depending on which HE you get determines which employee to level first. While making sure to take the abnormalities requirements into consideration, If the HE does high red damage level an employee with high prudence. Level 3 or higher is ideal but you can sometimes get away with 2. Some of the HE level abnormalities are the best leveling tools in the game, so make sure to learn how to use the ones you have.

-Then there's gift farming.
Once a certain observation level is reached you gain access to the abnormalities gift. Some have a lower drop chance than others, all give free stat increases.
And they stack.
The idea goes like this. You have a chance of getting a gift after the work is finished. Early game you can get away with farming days a lot longer than you can late game. Around 6 abnormalities is a good number to start with. If a gift drops for an employee swap him out with another.
Don’t worry if both employees received a gift or not.
As long as one employee received a gift your good. Considering the drop chances, It’s much more efficient to stack as many gifts on one employee as possible.
Minmaxing is rewarded in this game.
Remember that each gift has a slot such as head, mouth, eyes, head2.
A gift can be replaced by another if they both use the same body slot.
This is good if the new gift has better stats but horrible if it’s worse so pay attention to what gifts your stacking as well as who you send to handle a meltdown.
Nothing is worse than replacing a 2% drop chance gift with penitence.
Early game you could spend an hour in one day farming for a gift.
A good stopping point is ordeal 3 depending on how good your gear is.

- If you level with abnormalities efficiently you may find yourself with excess LOB points.
Lob points are wasted on new employee’s early game.
They are best saved to jumpstart new employees for Justice leveling.
If you have a good justice abnormality such as The Child of Galaxy you can hire a new employee, put 3 point into prudence and fortitude, 2 into Temperance, and nothing in justice.
As mentioned earlier 3 points in HP and SP is good enough for most of the HE's depending on who you’re working on.
Level temperance to at least 4 first for success rate then work on justice.
Once justice is high enough move the employee to an abnormality with a better justice success rate such as Der Freischütz.
Remember to min max; since you can only have one employee working on an abnormality at a time get that employee to justice level 5 before rotating someone else in.

-If an abnormality is giving you trouble you can farm points at the risk of your employees and purchase info on it.
Then just memorize what you learned and reset the day.
With this strategy I prefer to check the abnormalities work preferences first.

-You can purchase abnormality weapons and info from the deployment screen.

-Some abnormalities trigger what’s called a Qliphoth Overload which will decrease the chance of success after the work is performed. This overload will reset once a Qliphoth meltdown event is triggered. However it will not decrease if the meltdown is started while an employee is still working on an overloaded abnormality. Avoid activating meltdowns while someone is working on an overloaded abnormality, and try not to cause a meltdown by working on an overloaded abnormality.

-The game encourages resetting. Returning to memory repository or even day one while keeping all your department upgrades, gear, and abnormality progress is never a bad idea.
Hit a wall? Cut your losses.
Spend all your PE boxes on gear and info and yeet yourself back to day one.
Discover new abnormalities while taking advantage of your powerful gear and info from the last time around.
The early game will go faster and faster the more your able to progress each time.
And for the love of god manager, don't get attached to your cute customized employees.
your're here to make energy, not save a few insignificant lives.
That’s all the tips for now.

Conclusion and sources
That about covers the basics.
I didn't go over combat controls so let me know if you would like me to add that.
Feel free to suggest any other kinds improvements as well.
Thank you for reading.
And good luck manager!


art sources
leti[www.deviantart.com]
Scorched Girl relaxing[www.deviantart.com]
ppodae[www.deviantart.com]
Swinging Punishing Bird[www.deviantart.com]


video used for a few screenshots
LOBOTOMY CORPORATION - Episode 1 - FIRST LOOK!

Edit 1/7/2020:
Fixed grammar mistakes in Gameplay Basics & Made contents more readable.
25 条留言
Nrol21 2024 年 7 月 15 日 下午 8:09 
Hey what about the request work?
Watereaters 2024 年 2 月 1 日 下午 1:42 
Thanks for the guide, though I choose to keep employees alive for the tasty S rank (and the amount of time it took to train them).

@PenumbralPeridoxide I disagree, since some abnoms get stronger when they kill employees, so a few strong ones is better than a full house of weak ones (since fewer are easier to train). Though I do see 'fodder' employees being useful for certain items which have a chance to instakill but have to be interacted with due to QM.
Peridoxide 2024 年 1 月 26 日 下午 4:06 
i'd actually advise against the whole '3 employees per department' thing
manpower is always a good thing if you can manage that many employees at once. better to have multiple people who can work on a picky abnormality than just one. helps immensely for suppression of events too
Aeolian the Composer 2022 年 8 月 22 日 下午 2:19 
Another fun fact: You can kill the punishing bird if you try hard enough (the bird only tries to kill the employee who damaged it first, and completely ignores the rest) in which case it will just disappear and return to it's containment unit as normal.
Luck 2022 年 8 月 21 日 下午 12:12 
Fun fact the punishing bird can also restore sanity to your employees when they are panicking and bring them back to being normal
Brettashton 2022 年 8 月 8 日 上午 12:20 
much like fire emblem I would sooner die than let my precious babies get hurt, god bless rewind timer and sacrifical employees.
Aeolian the Composer 2022 年 7 月 28 日 上午 8:09 
I think it's prudence and fortitude. Lower levels have to suppress quite a lot of abnormalities and survive heavy work damage, therefore it's reasonable to make them tanky if possible.
rorogogoz 2022 年 7 月 27 日 下午 4:47 
@Spectrainly Maybe they meant "or" as in "same"? I'm not sure, maybe they made a mistake and meant prudence and fortitude
Aeolian the Composer 2022 年 6 月 21 日 上午 4:18 
"Generally you want to level temperance first when working with Zayin's. Then either prudence or Insight when working on Teth's."
What do you mean by PRUDENCE or INSIGHT? These 2 are the same thing.
The Stone Mason 2022 年 2 月 26 日 上午 12:12 
Responding to Kervex: Yes, i'd say that grinding for gifts is really useful. A small increase to a few stats may not be useful on its own, but once you stack them up, they really make an impact.