Monster Sanctuary

Monster Sanctuary

276 voti
Beginner Tips and Detailed Explanation
Di Rilvenar e altri 1 collaboratori
Hey there o/

After playing this game since the demo and helping people out in the discord, I decided to start writing a guide \o/

Included in this guide are some core mechanics explanations and tips to make the start of the game that much more enjoyable for your first playthrough!
4
3
12
3
2
2
   
Premio
Aggiungi ai preferiti
Preferito
Rimuovi dai preferiti
Who I Am and Why I Created This Guide


Welcome fellow keepers, and thanks for reading this guide!

Rilvenar's introduction:

As of August 2021 I'm happy to say I've joined the team at moi rai games!

Ever since playing the demo I fell in love with this game and started trying out all the different monsters as much as possible. Since I was so impressed with the demo, I helped kickstart the game and have played every version of it so far!

I can say with confidence that I have a decent understanding of the game mechanics and know what's important to understand as you start your journey through the Sanctuary. I have gathered this knowledge through replaying the game multiple times, helping people in the discord channel, and answering the questions of streamers.

It has been my observation that a lot of "basic" information can at times be a little difficult to fully-grasp early on in the game, so I figured I'd help my fellow players out by creating an easy-to-read guide with the goal of making their experience more enjoyable!

To help achieve this goal, I have teamed-up with Conan The Librarian, Monster Sanctuary Community Manager, who is most known for his assistance as the forum moderator (and a guide-creator) for the indie game Fell Seal: Arbiter's Mark and his popular guide for XCOM 2. Between the two of us, we hope that we can create something which will be of great value to the Monster Sanctuary community.

Feel free let us know if you have questions in the comments!
Core Combat Mechanics:
While the game's tutorials do a good job of explaining how things work, having an out-of-game reference guide can be handy in case you want to review.

Combo Meter


The combo meter increases with every action taken. This means that every move will increase the damage of each subsequent move during a round.

Example: if you have an attack that does 4x 80% damage then the combo meter will get 4 "stacks". Each stack is worth 5% extra damage. Therefore, that would be 20% increased damage for your next monster.

Tip: If one of your monsters has a skill that applies buffs or heals to your party, it is recommend to use the buffing (or healing) move first during the round as this doesn't benefit from combo, but still adds to your combo counter. Then, make sure to have your "heaviest hitter" go last so as to get the most benefit from the combo meter bonus.

Scoring System


In Monster Sanctuary, winning the battle isn't all that counts. Instead, winning them in an efficient manner is what really matters.

As you can see in the screenshot above, there are four main categories which you should concern yourself with: Combat Duration, Healthiness, Buffs / Debuffs and Execution.

Duration: Winning the fight in a smaller number of turns.

Healthiness: How much health your monsters have at the end of each turn.

Buffs / Debuffs: How many Buffs / Debuffs you've used during the fight.

Execution: how well you played during the fight.

On one hand, this is pretty self-explanatory, however, there are a few clarifications that you will want to know:

For Duration, every move that each individual monster makes is considered 0.33 of a turn. This means that if you can finish the battle with just one or two of your monsters making a move in the final round, your score will say X.33 or X.66 turns. This will of course increase your score by having a lower turn count number.

  • capped at 6000 (or up to 7000 if you win with "only one action")

For Healthiness, the key part is "health at the end of each turn". This means that it's ok to take a few hits during battle, as long as you heal them up before each turn ends. Depending on how badly wounded your monsters are, sometimes it's worth taking that "one extra action" from your healer to drastically improve your Healthiness score. If you're "hardly wounded", however, it's likely best to end the battle "that much sooner" and increase your Duration score. Since Healthiness only measures "health", using shields is an effective way to protect your health (and Healthiness score) since the damage your monsters take are applied to shields first before their "actual health bar".

  • capped at 3500

For Buffs / Debuffs, add points based on how many Buffs / Debuffs the player applied throughout combat and how many DOT (damage over time) effects enemies received.

  • capped at 4000

For Execution, Does multiple things: first, it grants points for the first two acting Monsters based on their combo counter - so for every hit / heal / Buff that your first two Monsters land, your "Execution" rating goes higher. Secondly, "Execution" rewards the last acting Monster based on how much damage it deals relative to the enemies' health. Lastly, "Execution" grants additional points whenever any of your Monsters exploit an enemy's weakness.

  • capped at 4500

Note: bleed damage's score value is halved compared to direct damage. For example, this means that a bleed tick for 2,000 damage would yield 50% of the execution score value compared to your third monster dealing 2,000 direct damage with its attack.

So Why Should I Care About Score?

As seen in the above screenshot with the scoring breakdown, the higher the score you get, the better loot that you find! More importantly, this effects egg drops from monsters. The higher star rating you get, the higher chance an egg will drop from a wild monster.

Something special to note, however, is that when fighting Champion monsters, you must achieve a 5-star-rating to get its egg to drop! Champion rewards are different from regular encounters since they're only awarded once for the entire save file. For example, if you get a 3 star rating on a champion, and fought it again later, no matter how good or bad of a rating you get, you will never get the rewards for stars 1, 2, and 3 again since you've already collected them. The only way to get more rewards is to achieve a higher rank than you've done before (essentially, a new "high score").

Thankfully, you can rechallenge champion creatures which you've already defeated at the Keeper's Stronghold.

Secret Sixth Star!


As of the Mystical Workshop update (July 22, 2020) a "secret sixth star" rating has been added to the game! This was done to give players who have mastered the game "an extra challenge to aim for" with some additional rewards.

How Sixth Star Works -- obtaining 5 stars in an encounter requires 10,000 points, and the 6th one requires 12,000 points.

So what do you get?
  • In Regular Encounters with wild monsters, the 6th star gives a small bonus to gold gains and increases the chance to get double common/rare drops.

  • In Champion Encounters, the 6th star gives 3-5 Reward Boxes, with the type depending on which Champion monster you're facing.
Keeper battles


Keeper battles are similar to PvP, with the rules being a bit different compared to fighting wild monsters:

  • Each Keeper uses their full team of 6 monsters, but there will only 3 monsters active as usual.

  • If a monster gets knocked out, its keeper must switch in one of their reserve monsters (pending they have any left in their active team of 6 monsters).

  • The Keeper who goes first only gets two actions as a drawback for the advantage of going first. (Note that vs NPCs the player always goes first for keeper battles. In online PvP, the game randomly selects who acts first).

  • You win the duel by defeating the 6 monsters of your opponent.
The Infinity Arena


The Infinty Arena is a great place to test your team or farm items, but there are a couple things to note.
  • There is a limit of 5 Reviving Actions (items / Revive Spell) per battle.

  • Used consumables are refunded after you're done in the Infinity Arena.

  • Note that the Infinity Arena drops Reward Boxes, so you can farm them there. See the possible loot Here.[monster-sanctuary.fandom.com]
Small Tips and QOL Info


- You can "donate" extra eggs and monsters at the Keepers Stronghold by talking to the blue person in the screenshot. This process gives smaller rewards upon donation, and larger rewards on getting a certain threshold of army strength donated. Donation is also great to keep your monster inventory clean if you don't need extra copies of common monsters.

- There is a Monster farm in the Beach area where you can leave your monster and also retrieve them. This does not give exp, or any other rewards. It's just a way to clear your inventory or create a Collection gallery!

- Stores will sell better items the higher your Keeper's rank is.

- You can can reorganize your skills in battle (by pressing "Select" on your controller, for example).

- Monsters respawn after you've done three battles. Repawn is NOT based on a time period or walking around.

- If you're ever lost and want a tip on how to proceed, open the menu and select Talk. This will show a "quest log" of sorts, where your Spectral Familiar will give you further info.

- There is a name-changer NPC standing in the same area as the Evolution Tree. So if you change your mind on a name, no worries, you can always change it.

- You've likely noticed how your monsters still gain exp at level 42. There are no additional levels higher than 42, however, whenever a monster "gains a level" at this point, you will obtain a Level 42 Badge, which allows you to level-up a monster from level 41-42. Remember that the normal Level Up Badges can only go up to "one level below your max level monster", so these badges allow you to get the last bit easily.

- If you ever make a mistake and want to quickly "undo it", note that the game only saves in two instances:
  • When you go to the menu and select "save and quit"

  • When you "change an exploration screen". When changing screens, you will notice in the bottom corner of the screen "autosaving".
As long as you don't trigger either of these "save conditions" you can press "Alt - F4" on your keyboard to fully-close the game without saving. BE WARNED: be very careful with this so as to only quit without saving when you want to. Thankfully, the game auto-saves so often, that even if you end up in a situation where you "accidentally" closed the game without saving, you'll likely lose only a few minutes of playtime.

- In options you can change the combat speed up to 3x, this will save a good amount of time if you are grinding or just enjoy a faster pace!

-Food gives a semi-permanent buff. Each monster may have up to 3 food-bonuses active at a time. For every new food given to a monster, the oldest food bonus will be removed and the new one gets placed at the beginning of the food list. Since you will find better quality food as you progress in the game, if you're going to feed your monster (for example) "two lesser bonus foods and one higher bonus one", it is best to use the weaker food first, then the stronger one, so the weaker ones will get overridden first when you give it better food later on.

- The default save file location is:

Windows: C:\Users\User\Documents\My Games\Monster Sanctuary
Mac: ~/Library/Application Support/Monster Sanctuary
Linux: ~/.local/share/Monster Sanctuary

Why would you want to know this? Well it is always a good thing to make a back-up every once in a while. Alternatively, if there is an issue with your firewall or antivirus program and you need to make an exception for the file location.

- Back-up save file location (only for windows as this is only used when saves couldn't be created in the documents folder):

C:\Users\USER\AppData\LocalLow\moi rai games\Monster Sanctuary
Shifting Tips


This section includes a few bits of info on how to best use your Shift Stones

- While there might be a limited number of Shift and Switch Stones available to find in the wild, they can also be found in Reward Box Level 3, 4, and 5 Remember that Reward Boxes can be farmed at the Infinite Arena.You are able to get ~19 shift stones without RNG from reward boxes. Reward boxes level five have double the chance for a shift stone as you can donate Mad Lord's egg to the army for a shift stone and skill potion.

- Shifted monsters spawn with a 25% chance per encounter (not per monster)
(equal chance to be light or dark shifted), alternating between dark and light (per monster group).

- After you beat a certain boss alchemist at the top of the Sun Palace by the Sun , you will obtain an egg which will hatch a Koi This will give you a monster exploration power which will allow you to travel through / jump out of water. When you have this, make sure to go check a variety of other areas in the game that you've been to before because this opens up some new options.

- Normal monsters will be farmable for shifted versions when you have "shifting" unlocked. Note that shifting becomes available after you beat the alchemist boss at the top of the Sun Palace .

Therefore, you might want to hold out on using shift stones on monsters whose eggs you can easily obtain in the wild. Some "shifted" Champion monster eggs are farmable as well, notably being Monk, Minitaur, Qilin, Raduga, Beetloid, Specter and Steam Golem in the wild.

- Because of the above, it is generally "most efficient" to use your shifting items on:
  • Your Starter (Spectral Familiarl)

  • Champions which don't have their eggs farmable in the wild (as listed in the spoiler above)

  • Skorch and Plague Egg, because they're not available in the wild (though both are available as potentially-shifted in Reward Box Level 4).

Good news: as of the Mystical Workshop update (July 22, 2020) any monsters found in Reward Boxes will have a 50% chance to be shifted! Note that you must have the shifting feature unlocked have defeated Zosimos at the top of the Sun Palace area before this chance is enabled.

Check out this cool guide for details on finding Shift Stone here:
https://steamcommunity.com/sharedfiles/filedetails/?id=2326800740
Advanced Mechanics
Enemy monster scaling works as follows; I will quote the devs since they explain it well:

https://steamcommunity.com/app/814370/discussions/0/1637543304843161398/#c1637543304843263050
Messaggio originale di Ntonisthier:
The enemy scaling is based on the number of rooms you have discovered that have a Monster encounter inside of them. The more you explore, the stronger wild Monsters become.
This also means that, if you missed a path in one of the earlier areas, and later come back to it, the Monsters there will be at your level.

There's also a minimum level for some areas. The minimum level of Sun Palace is 18.
Messaggio originale di Sersch:
Also note that once a level is assigned to a room with monsters, they will stay at that level on that savegame. The idea of this system is to have similar experiences independent of the order the player explores the areas. (once you complete blue caves you are free to either explore stronghold dungeon, ancient woods or snowy peaks first). The level of your own monsters is not relevant for the enemy spawn levels.

Minimum Levels for Each Area
Any areas not listed have no minimum level.
Blue caves: 6
Sun Palace: 18
Extra encounters in Ancient Woods (dark caves): 20
Extra encounter in Snowy Peaks: (Targoat 20 / Dracozul 22)
Horizon Beach 21
Magma Chamber: 21
Mystic Workshop: 24
Blob Burg: 25
Underworld: 30
Forgotten World: 30
Abandoned Tower: 35


Buff / Debuffs vs "Stacks"


While playing the game you might notice how some abilities refer to number of buffs or debuffs on a monster. Since this subject can be a little confusing, I'll explain how things work.

Using the above screenshot as an example, it says that your enemies will take extra damage based on how many "debuffs" they have on them.

Debuffs include things such as: Burn / Poison / Chill / Armor Break etc.

Debuffs do NOT include things such as: Bleed / Wound /Blind / Tether.


See this screenshot for example


You will notice how "debuffs" are in red on the enemy while the bleed "stacks" are in yellow above the debuffs. This is done to indicate that they are mechanically separate from each other. Therefore, the Fungi's ability for enemies to take extra damage per debuff doesn't count things such as bleed or wound "stacks" on an enemy, but just the number of "debuffs" they have on them.

Things become further complex when you add in multiple instances of the same debuff / buff. Note that under base game rules, each buff / debuff can only be applied once to a monster. However, with certain special talents from monsters, certain buffs / debuffs can have more than one instance. See the below screenshot:


Notice how it says that it can go to three instances of poison, but that each additional instance of that debuff is only half as effective. This applies not only to the effect that the debuff itself has, but is also applied to the "number" of them as well.

With this being the situation (same for buffs and debuffs) the calculations go with this when multiple instances of the same buffs / debuffs exist on a monster:

1 buff / debuff = 1

2 buff / debuff = 1.5

3 buff / debuff = 2

Therefore, using the Fungi as an example, if an enemy had 3 instances of poison on it, it would be equal to 2 "debuffs" in terms of calculating its [Dominance] power, and thus 6% extra damage that the monster would take.

Note that active abilities that count each instance of a debuff, like [Poison Eater], [Deep Freeze] etc. Will work per instance of the respective debuff and not the "effectiveness"!

Ok, but what about bleed / wound (etc) then? Why do they count as "stacks" and not "debuffs", they look a lot like debuffs to me?

The answer really comes down to "because of game balance". Since (through various methods) it's quite simple to get very large stacks of bleed / wound on enemies, if these were counted for the calculations for "per number of debuff" abilities....it would be extremely broken and overpowered.

Remember that everything is same is true on the flipside with buffs, look at this example:


So if Catzerker had two instances of regeneration buff on it, it would only count as 1.5, and would thus be a bonus of 3% from [Heroism].

Also on the positive side, "Charge" and "Age" stacks don't count as "buffs" for the above-stated reasons of "game balance".

Lastly, since stacks aren't buffs or debuffs, they aren't cleansed by abilities which say they cleanse those.
Basic Teambuilding Advice
At this moment, we are not planning on including extensive discussion on "how to build a team of monsters", because that is a large subject. However, for some basic info on that, see below:

Messaggio originale di Conan The Librarian:
In Monster Sanctuary, things are pretty flexible since all of the monsters are good and worth using. What’s important is team composition. There are of course multiple ways to build a team, but the most basic formula is making sure to have Tank / Support / Healer / DPS between your three monsters.

As a classic early game example of this:

Yowie (tank / healer)

Vaero (support)

Catzerker (DPS)

The answer lies really in which monsters YOU want to use, as long as you’re building a balanced team.

Another classic example could be:

Rocky (support healer)

Frosty (shield / buffer support)

Monk (DPS)

So yeah, just learn to look at monsters and what they do so you can identify which roles they can fulfill. Since monsters have talent trees, usually they can be built in a variety of ways.
Skillpoint Allocation Tips

Like mentioned above, it's not the goal of this guide to go in-depth on strategy, however, here are a few tips on "how to use your skill points" which can help in many situations:
  • When there are multiple active moves in a single skill branch, it is oftentimes best to take only one of those skills. The main reason why this is the case is because the passive abilities, which are unlocked every 10 levels, are really where the strength of your monster comes from. Active skills are just the vehicles for unleashing all of your passive prowess.

    There are times when you might need both skills on the same branch -- this is 100% on a "monster to monster basis". You have to ask yourself "am I REALLY going to use this skill often? Will I miss it if I don't have it?"

    To ensure a varied-enough toolkit when taking one skill per branch: perhaps take a single-target ability in this branch, and an AoE in this other branch. Take a fire move here, take a neutral move there, etc. Allow for a good variety of moves for "the least amount of skill points"

  • When you reach a new tier of abilities (level 20 / 30 especially), sometimes it's fine to NOT take the newest level of an active ability immediately. This is due to the mana costs sometimes being a bit large when you first are able to use it. Instead, perhaps pick up that active skill once you've gotten 3 or 4 levels in, when you have a little more mana.

  • Focus on taking actives and passives which are relevant to the role of your monster. Is you monster trying to Heal? Don't take a bunch of damage boosts. Is you monster trying to deal damage? Don't take a bunch of healing boosts or buff moves.


Notice how I take a single target move [Claws] in one tree, then an AoE [Long Slash] in the next, [Air Sickle] to get good passives and another element (wind), just one level of [Fire Claws] to get the much-needed [Improved Mana Regeneration], and [Regeneration] JUST to grab the key passive of [Heroism]. Alongside all that? A bunch of passives which increase my damage.

General Hierarchy of Skill Importance

For a "quick and dirty" order of importance, consider this:
  1. Actives for your core skills; enough to unlock the different parts of the skill tree which house you key passives.

  2. Key passives and auras; abilities which REALLY make your build come alive and give it strength.

  3. With any points leftover, this is where you take various "Stat Plus" nodes. Which nodes to prioritize?

    Check to see if your monster likes a specific stat, like health for things like [Life Overload], or crit damage with [Critical Defense], etc.

    Maybe your monster has low natural health or defense, you can shore that up with a few skill points.

    Is this monster your main DPS? If not, (such as a healer / buffer / combo builder) then focus on stats to stay alive instead of dealing damage.

What About A Team Of Six?

At the beginning of this section, we discussed how the basic formula for a team of three is to use a Healer / Support / DPS. Well, what about the backline of your other three? Do the same!

Just use a backup healer, backup support, and backup DPS.

Ok, but how do I choose? Try to pick monsters which use "similar kinds of strategies" as your front three. Is your strategy more buff-oriented? Debuff-oriented? Crit-based? etc -- just try to make it so if one of your monsters is defeated, that its backup can go into battle and still synergize well with your other two.
Game modes and Difficulty
Intro

Since 2.0 (30th of June 2022) there are three more game modes. These are available by either beating the final boss or enabling them through an option in the main menu.

Note: If you can make NG+ saves, you can make any save a NG+ save regardless of which modes it had.

Bravery

Conditions:
  • Get a monster that can destroy hidden Walls among your starting 3 / Mountain Path / Blue Caves

  • Get a Mount variant among your staring 3 / Mountain Path / Blue Caves / Snowy Peaks / Ancient Woods / Stronghold Dungeon / Sun Palace

  • Get a flying monster OR a mount amongst your starting 3 / Mountain Path / Blue Caves / Stronghold Dungeon / Ancient Woods

  • Get a random Swimming or Improved swimming monster in the sun palace story event

  • Get an Improved Flying Monster or Lofty Mount in Snowy Peaks / Horizon Beach / Magma Chamber / Sun Palace / Stronghold Dungeon / Ancient Woods

  • Get a Secret Vision Monster

  • You cannot obtain a Improved Flying monster in Mountain Path or Blue Caves if Randomization option is used
Chests have a 50% chance to contain a shifted monster after completing the sun palace event.

Monster Army NPC:

In Bravery mode, the Monster Army guy will give you Eggs in exchange for certain items now. You can receive 7 Eggs with key explore abilities there. Making it possible to access all Champions.
1. Fire/Ignite
2. Light/Sonar
3. Crush/Charging Mount
4. Big Rock
5. Grappling
6. Blob Form
7. Levitate
If in the Bravery run any of the other monsters provide any of those abilities already, the Eggs are replaced with a random monster instead.

Randomizer

When combined with bravery, it will also randomize the monster egg inside the bravery chests.

Items dropped by randomized monsters are not changed, so you can find some really fun / powerful items early on, even things like shift stones.

Permadeath

PvP is disabled in this game mode.

Dead Monsters cannot be traded/evolved.

New Game Plus

After completing the game, you will have the option to start a New Game Plus save file. This can be done using either the same completed save file, or can be copied over to a new save slot, if you'd rather keep the completed file around for a reason (such as PvP).


Difficulty settings

Since April 2021, the game now has difficulty settings. These CAN be changed at any time outside of battle, so you won't be locked into / out of a difficulty setting based on what you selected when you started your save file. Note that there are no rewards nor achievements tied to difficulty, so you can play on the desired challenge level without fear of "missing out" on something

Note that in the champion challenge you can switch between the different difficulties, meaning there is a separate high score for every difficulty setting.

For more in-depth information about New Game Plus, see this guide:
https://steamcommunity.com/sharedfiles/filedetails/?id=2496193675
Links
Don't forget about the wiki, it's very useful!

https://monster-sanctuary.fandom.com/wiki/Monster_Sanctuary_Wiki


Join the community on the Monster Sanctuary Discord!
https://discord.gg/vDg6jwR

I would recommend also checking out this guide as it has good information on where to find things in Monster Sanctuary:

https://steamcommunity.com/sharedfiles/filedetails/?id=1849909203

If you want a cool map made in Google Sheets, see this one made by KungFuSandshrew!:


https://steamcommunity.com/id/KFSandshrew/

Sandshrew's Map[docs.google.com]

Lastly, check out Conan's two other guides if you like:

https://steamcommunity.com/sharedfiles/filedetails/?id=♥♥♥♥578363

https://steamcommunity.com/sharedfiles/filedetails/?id=619697756
40 commenti
Conan The Librarian  [autore] 18 lug 2023, ore 15:28 
Breakthrough! Excellent :ImoriBlep:
kiddickerus 18 lug 2023, ore 15:24 
Hi there! I actually was coming back to amend my comment! I wish I could reply directly to you, Conan, but I actually JUST finally grokked the system, and it was thanks to the a combo with Crystal Snails and Vaeros. It took me this long to understand that the creatures with shield buff moves up the combo for as many shields as they apply, smh. I may just take you up on that offer and see what others are creating. Great game! Looking forward to your next project!
Conan The Librarian  [autore] 18 lug 2023, ore 14:38 
Hey Kiddickerus-

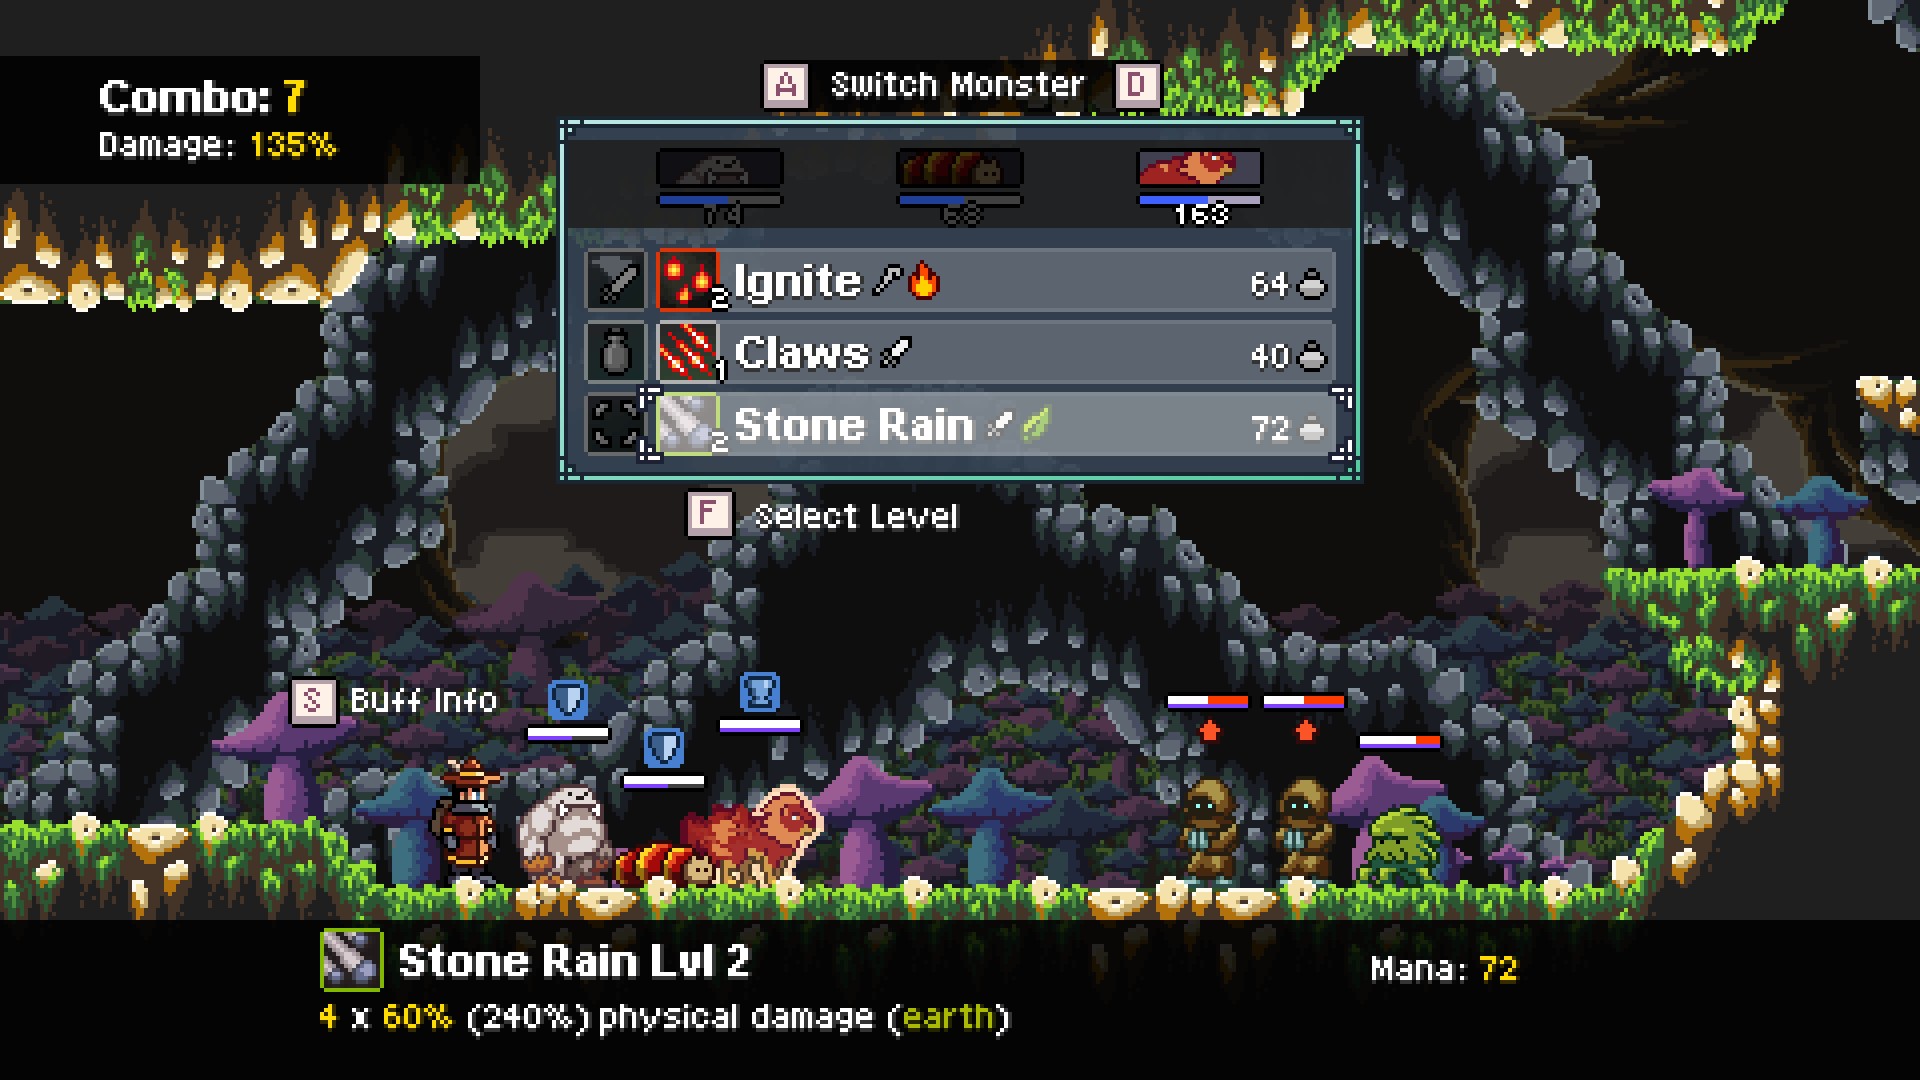
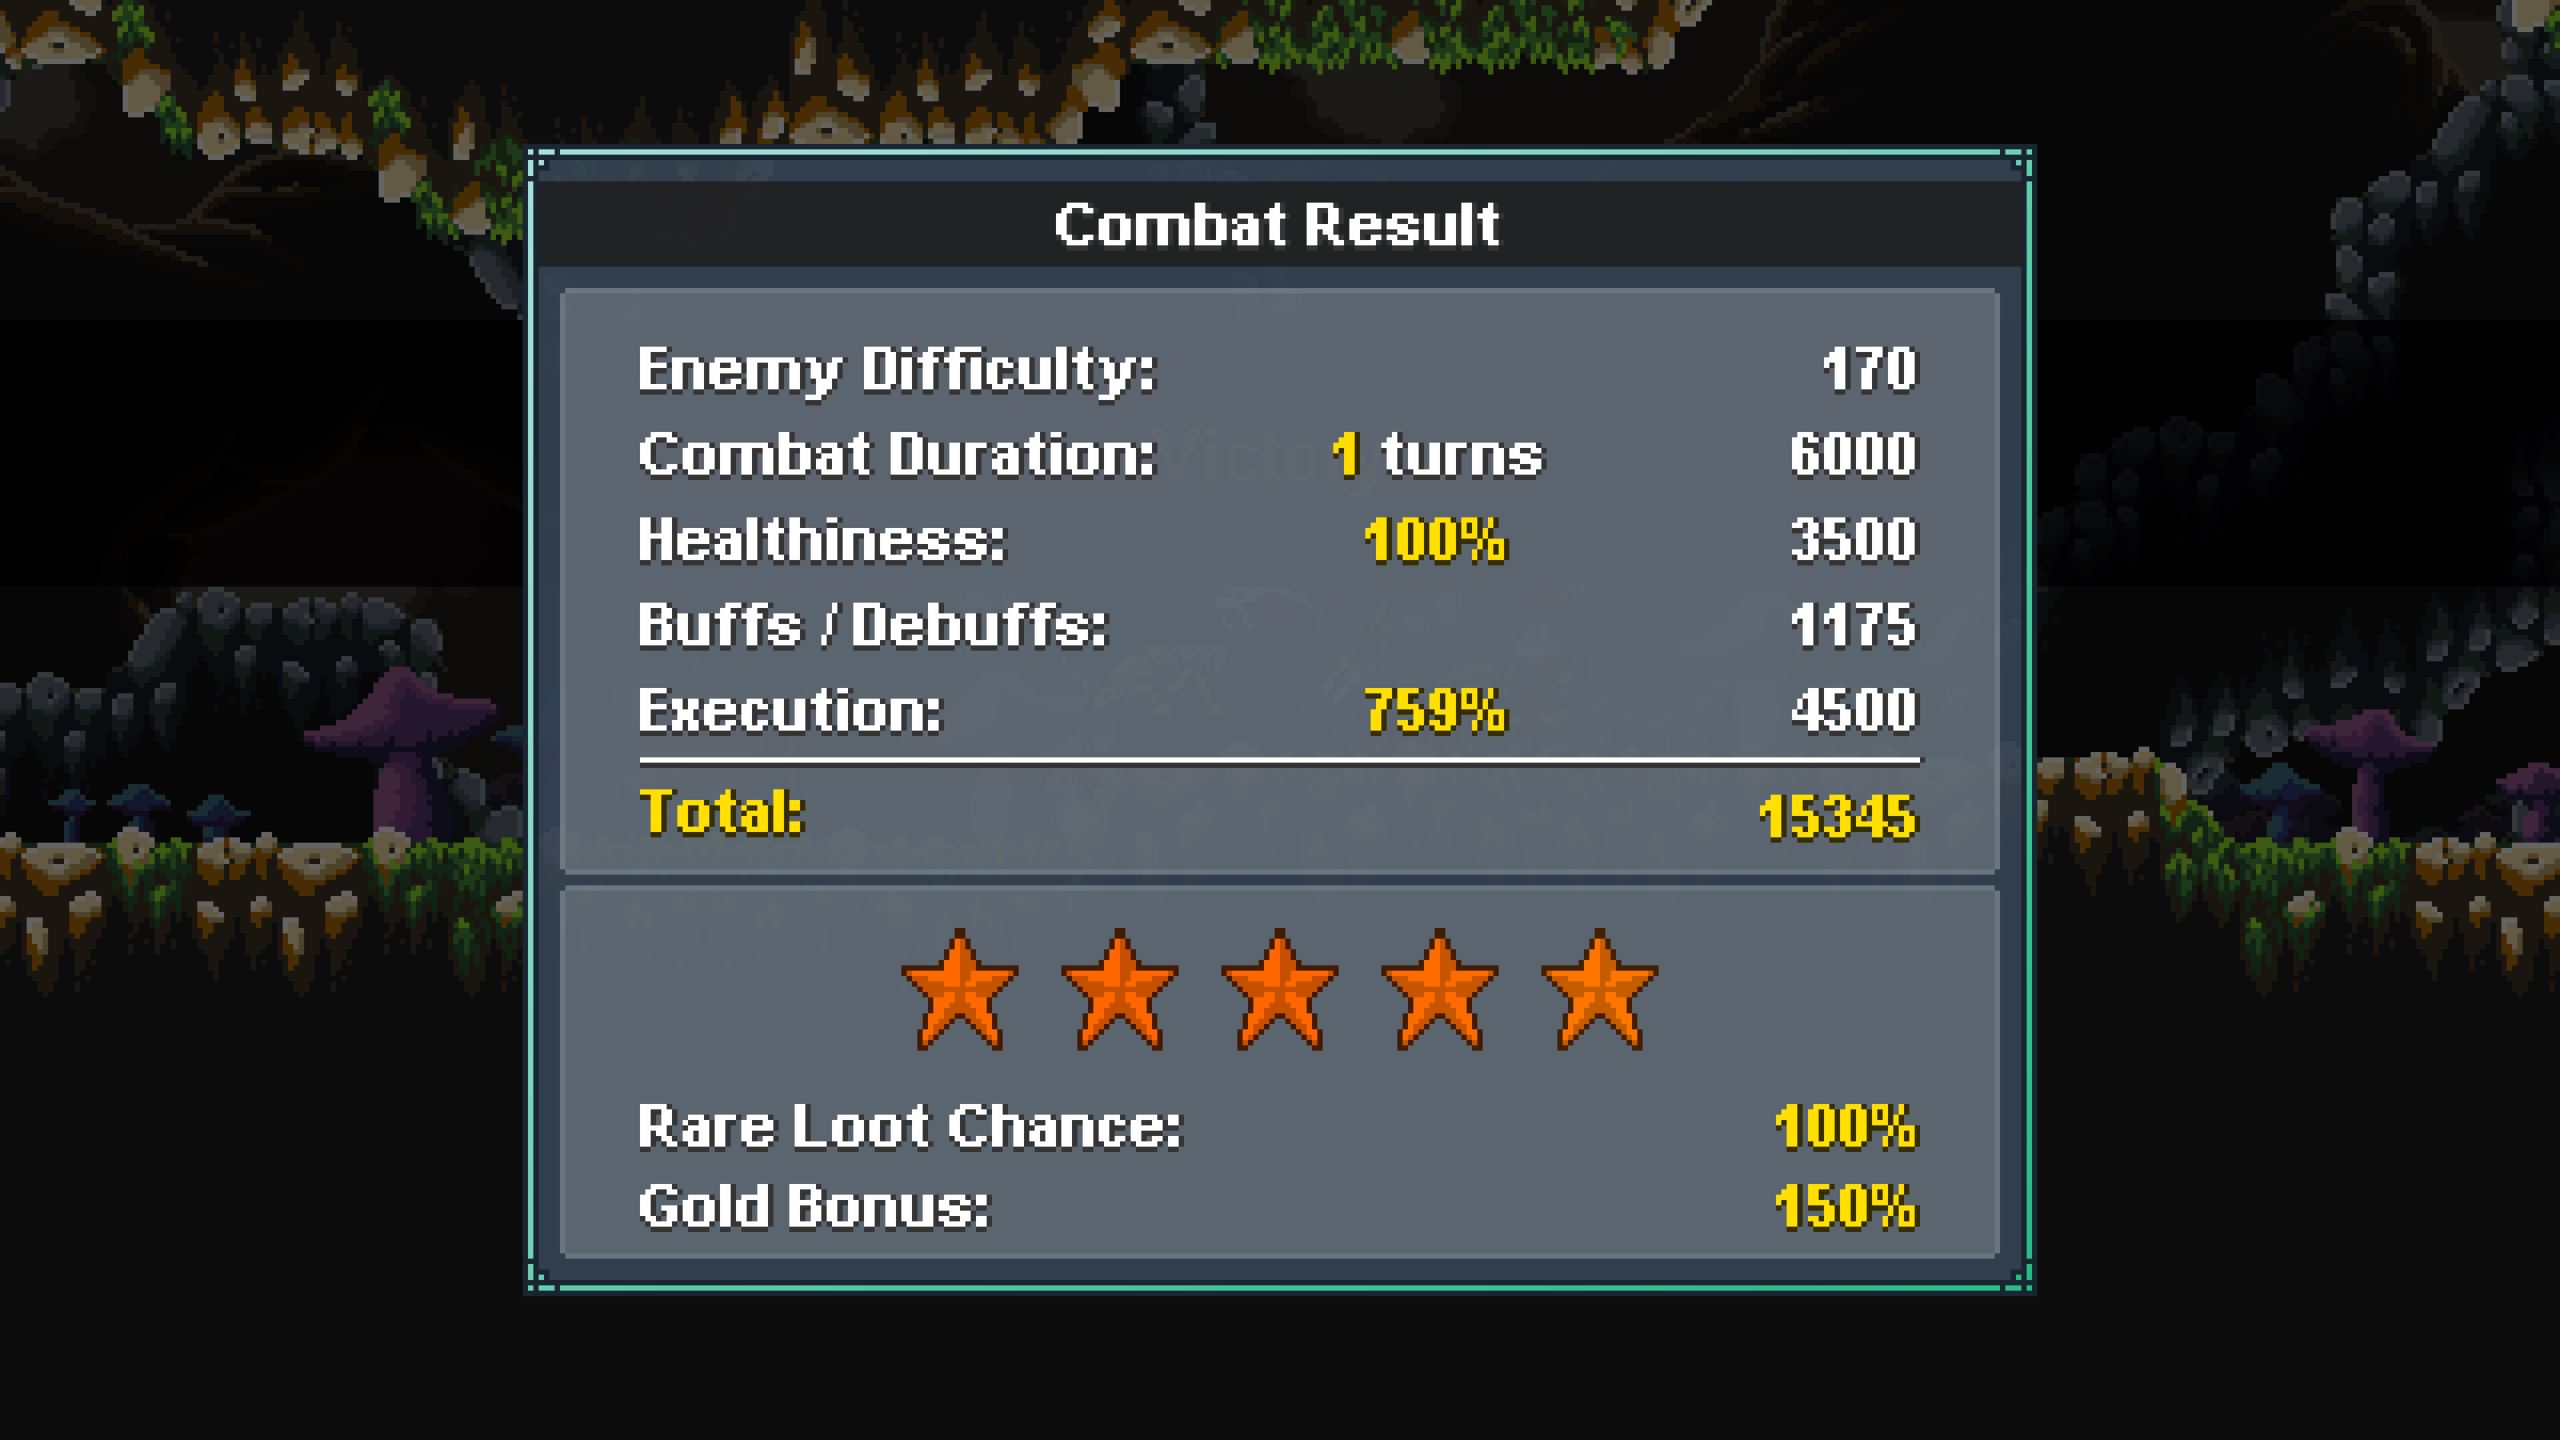
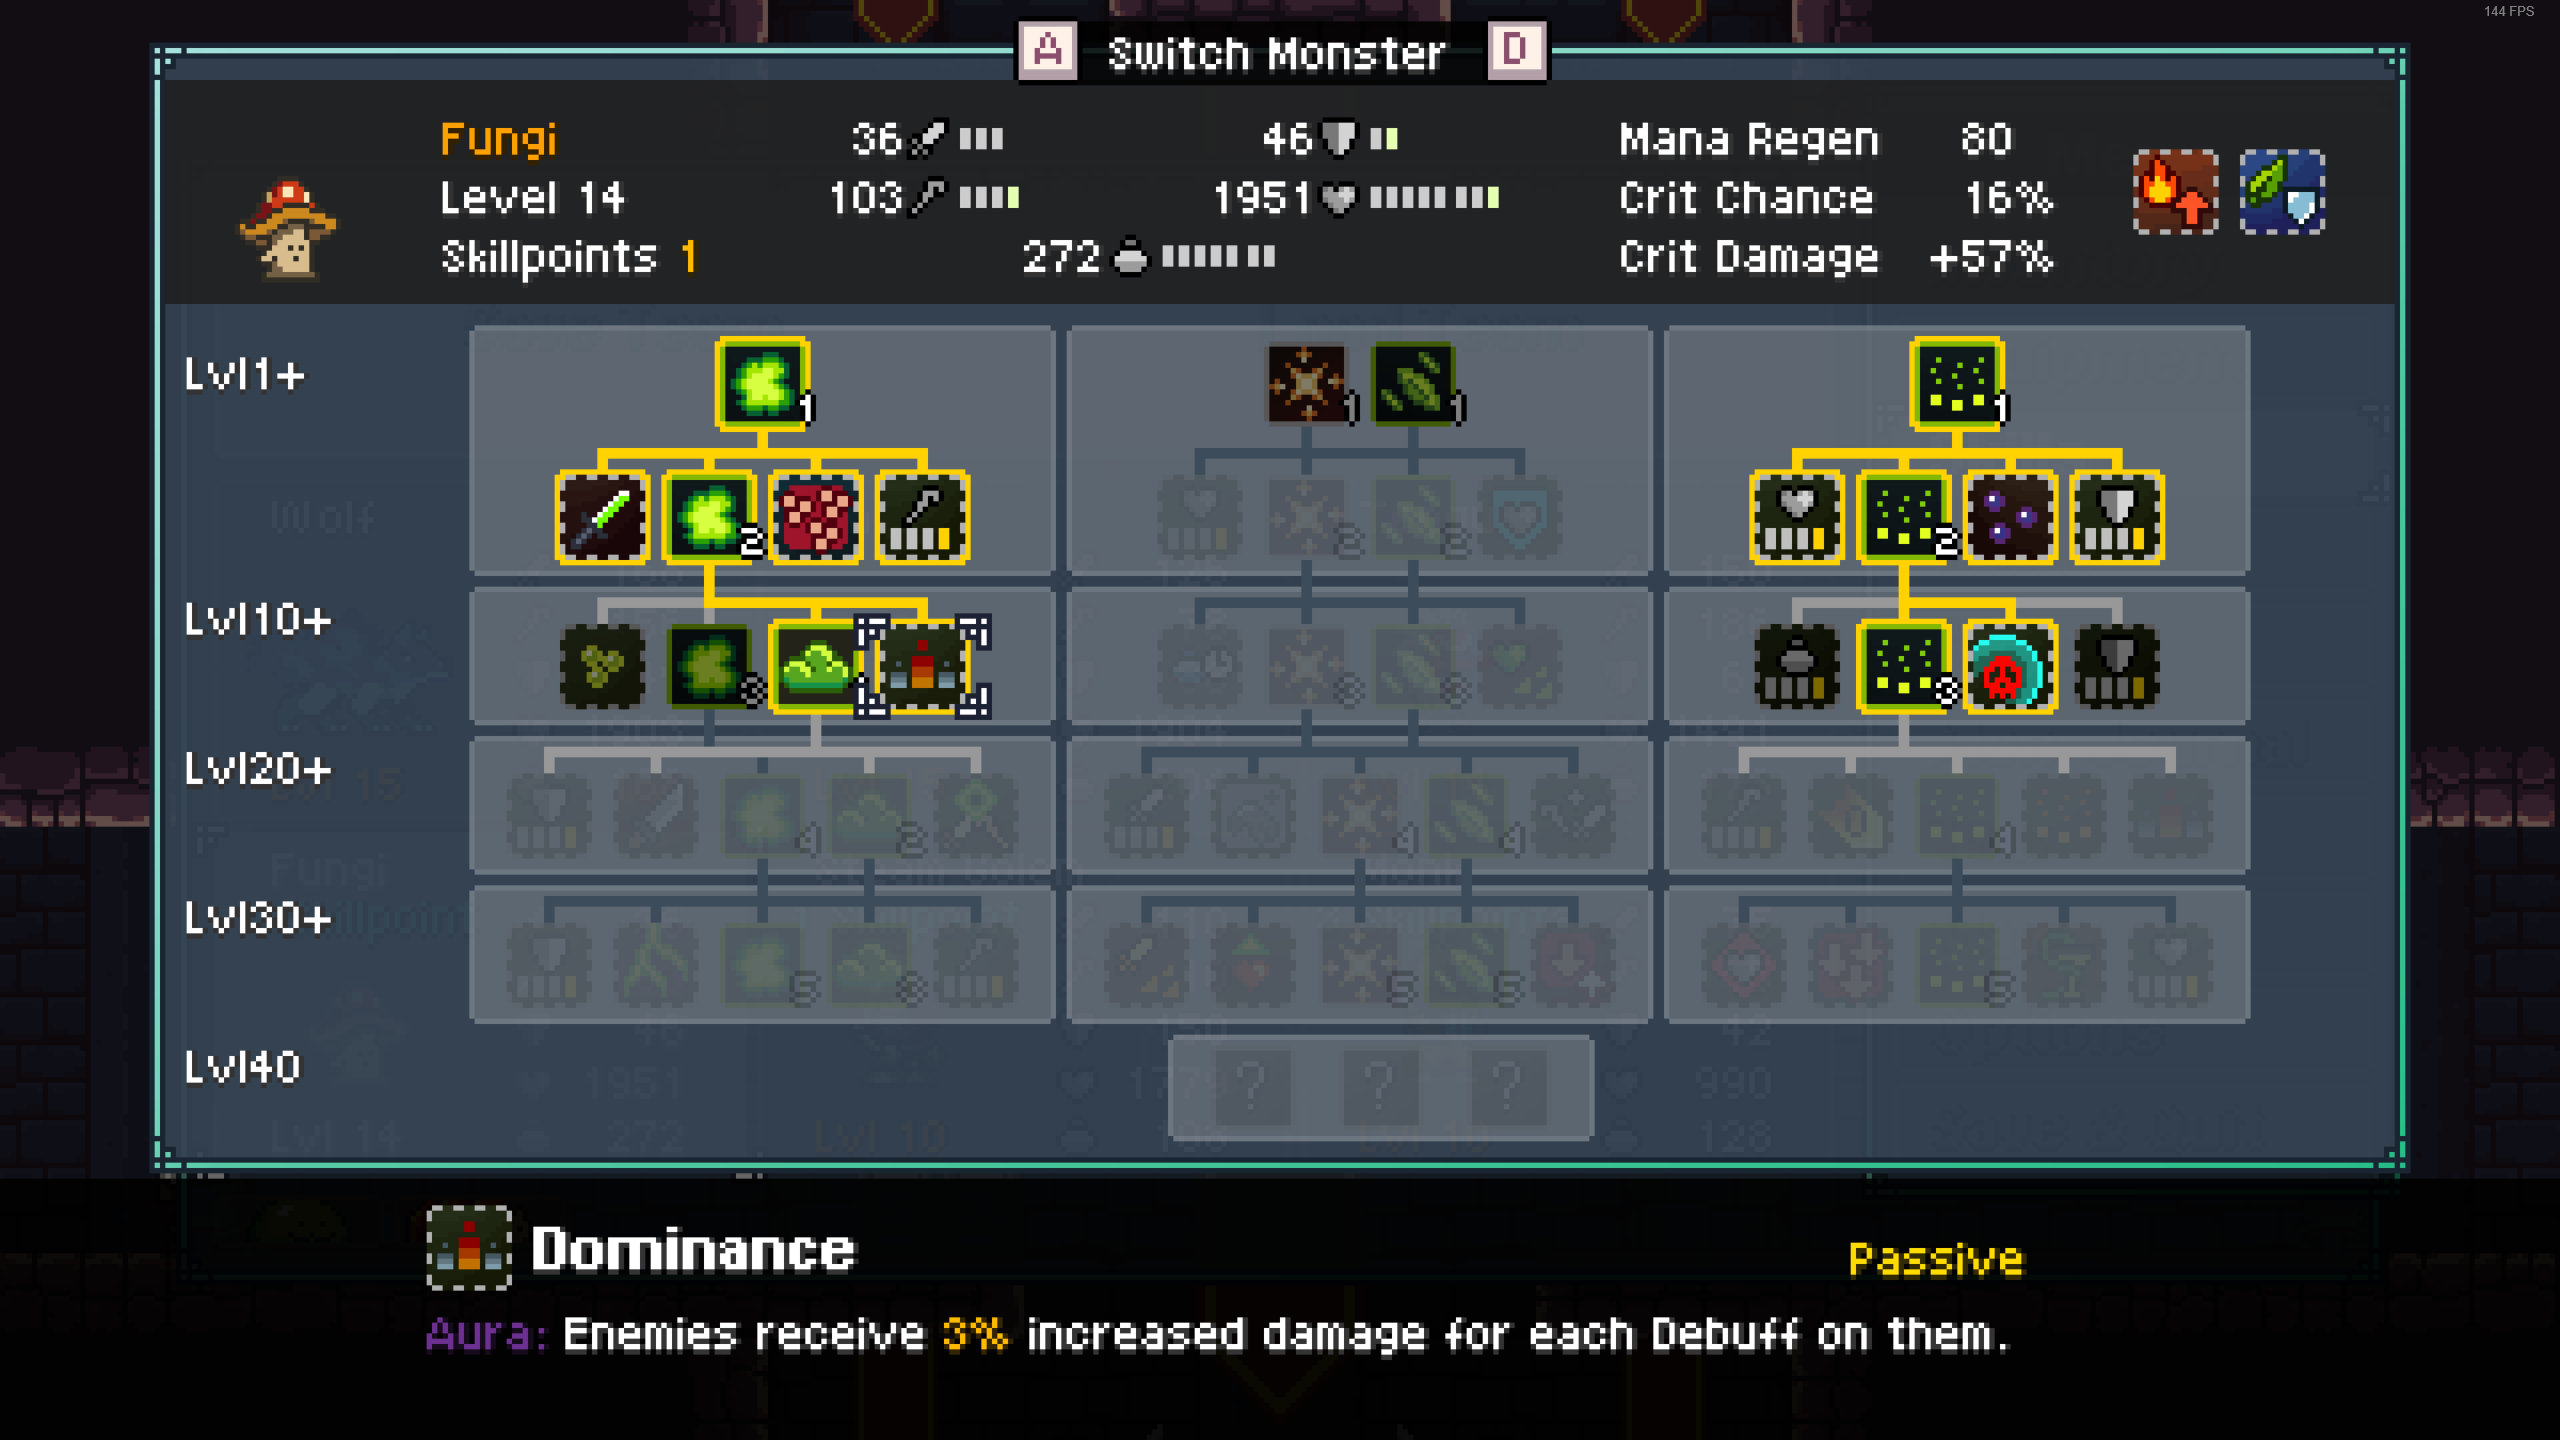
While I get what you mean, it's only true if the game was "zero sum strength". Some people make the assumption you have to sacrifice defense for more offense (thus speed) and that isn't true. The idea is you CAN utilize your three monsters in differing roles (Healer / Support / DPS) AND still have very strong defense and offense. So no, "rush rush rush" isn't the only way to play -- a well-crafted team will still win in 3 - 5 turns, AND have survivability.

The reason why "every resource says that" is because it's true.

Feel free to pop by the Discord server if you feel like chatting strategy, and glad you been enjoying things so far :MonkThumbsUp:
kiddickerus 18 lug 2023, ore 14:32 
I'm a goodly amount of hours in, and I've read this advice, on top of making sure to read all the notes and things in the game itself (which, btw, is very good and thorough, too!)

I adore this game, and only really have one thing that is frustrating the bajeezus outta me: Every resource says to split your party up over the traditional Tank, DPS, Heal roles... except in my experience, the only times I'm getting 5-6 stars is when I essentially build a rushdown team of powerhouses, making sure one or two have cleansing and restore options, but mostly focusing on KILL KILL KILL KILL.

Because the turns are weighed as so important compared to every other part of the grading system, I'm just not getting good star grades if I engage with the traditional roles everyone suggests :C Which is kind of upsetting, there's tons of builds I see that would be fun if it weren't for that.
Conan The Librarian  [autore] 30 giu 2022, ore 14:45 
The level-up tokens basically allow you to go to one level below your max level monster.
Lûte the Goblin 30 giu 2022, ore 14:43 
"There are no additional levels higher than 40, however, whenever a monster "gains a level" at this point, you will obtain a Level 40 Badge, which allows you to level-up a monster from level 39-40. Remember that the normal Level Up Badges can only go up to "one level below your max level monster", so these badges allow you to get the last bit easily."

So I can get to skip level 39 whenever a monster reaches level 38? What am I missing?
Conan The Librarian  [autore] 31 ott 2021, ore 19:13 
Screenshots are there -- likely some kind of error on loading the page on your end.

Glad it's been useful for ya :monstertrainyay:
atoshax 31 ott 2021, ore 19:12 
The screenshots are missing? I cant see them.

Thanks for the guide. Its really intresting and helpfull. :ironfist:
Conan The Librarian  [autore] 3 set 2021, ore 7:18 
Hey Digimon-

I recommend making a post on the forums with what you wrote, as it’s not the really the right kind of subject for discussion in the comments of this guide.

Short answer: the game has mechanics, and the player has to interact with them to succeed, not just at level 30, but even before then.
Digimon OR Unknown monster 3 set 2021, ore 0:29 
(Part 2)

Before 30 lvl I didn't even use equipment, I just set whatever I had and that was all. After 30 I used good eq, instead of start game eq and I can't do anything. I barely win. I have no idea how to counter damage from enemies. Even though they use attack that is not effective on my monster.

I really don't want to continue because of that. The game get a sudden difficulty spike, where everything from completely easy became impossibly hard. Why?