Total War: WARHAMMER II
Оценок: 66
TWW2: THE PLANS!! (A Learner's Guide to Skaven Strategy & Tactics)
От Angraug
Strategies & tactics for Skaven nations in Total War: Warhammer 2 (Mortal Empires). I will be compiling notes and PLANS!! as I begin Long Campaign playthroughs with the Skaven lords.
2
   
Наградить
В избранное
В избранном
Удалить
THE MOST GARGANTUAN OF PLANS!! (Overview & First Impressions)
I have just begun playing as the Skaven (Lord Skrolk), but already I can tell that they take a lot of subtlety and preparation to play properly. Coming right from the Vampire Counts, I thought I knew what a long-term game was, but the Skaven take this to a whole new level. At least in the early game, they simply cannot match another army 1:1 (or sometimes, not even 2:1), so avoiding battle becomes a necessity rather than an option.
My plan for this, then, is to use a lot of heroes, Skaven Corruption, and establishing Under-Cities to work under and around my enemies, instead of through. (This is probably exactly how the developers want Skaven to play, and matches the lore of the Skaven race.)
The problem with this is that lore-wise, they never ever ever fight conventional battles - yet in TWW2, we are forced to fight conventional battles every single time. On top of this natural weakness, Skaven have no cavalry**, no flying units, tend to be glass cannon, and their morale is as fragile as it gets. Their three advantages are: numbers, speed, and sometimes truly stupendous ranged damage.

**if you have "The Twisted and the Twilight" DLC, you unlock Brood Horrors, which are the closest thing Skaven get to cavalry. I wouldn't even count Rat Ogres as cavalry, because they are not numerous or maneuverable enough.

UPDATE
I have started a co-op campaign with a friend of mine, and I chose Clan Skryre after purchasing The Prophet & the Warlock DLC for 50% off.
I love Clan Skryre. Lore-wise, they are probably my favorite Skaven Clan, and in TWW2, they are hands-down the best Skaven army, even surpassing Clan Pestilens. (Don't tell Lord Skrolk that I said so!)(Seriously!)
With the DLC come numerous upgrades, including unlocking Skaven Weapons Teams for all of your Skaven factions. You will have to construct the Engineering building chain in order to get the weapons teams, and you do not get the special Clan Skryre bonuses if you play as any other Clan, but it was definitely worth the real-money investment. I will leave this overview of first impressions with one last word:

DOOMROCKET

Second Impressions
Now that I am a long ways into my Ikit Claw/Clan Skryre campaign, I am falling into the habit of fighting conventionally, and ignoring the basic Skaven strategies that made me successful in the early game. I am trying to keep planting more Undercities, and will have to use the Vermintide building chain more, especially against the Dwarfs. Why go through when I can go around and stab them in the back?
My alliances with other races are only rarely useful - I have a few trade agreements and two Military Alliances. My income is secure without the trade agreements, and the war-coordination power granted by the Military Alliance is pretty useless because my allies' battlefronts are so far away from my territory (and one of those alliances is with a faction that has next to no power).

Don't fall into the same trap as me, no-no! When playing as Skaven, make sure to keep using all the underhanded tricks you learned as a ratling! Use heroes to spread Skaven Corruption and cause rebellions! Assassinate heroes and block armies! Skeedaddle with Underway Stance! And especially, BRING THE FURLESS LOW WITH UNDERCITIES!!
DASTARDLY PLANS!! (Heroes & Abilities)
THE PLAN!!: Use Plague Priests to create Skaven Corruption in enemy provinces, cause rebellions, and take over weakened settlements.
Execution: SUCCESS SO FAR! With the Spread Corruption skill for the Plague Priest, Skaven Corruption increases over about 6 turns, until hitting 50% or higher. Public Order took about 15 turns to get to -100, when a Skaven Rebels army was spawned and attacked a lizard-thing town. Using the same strategy to infect the next lizard-thing town over.
Counsel: Also put points into the Wound skill for Plague Priests, to assassinate enemy Heroes before enemy Heroes kill the Plague Priest. Mere presence in a province is enough to start building Skaven Corruption. Recommend using "Damage Walls" campaign ability on cities to grind up levels for Plague Priests & other heroes. Damage Walls has a high base chance of success and prepares the city for invasion by an army (your own, or a Skaven Rebels army). Using this ability every turn is very expensive in the early game.
I have just read that one can accelerate rebellions by putting an Assassin with the "Public Order" skill in an enemy province. This applies up to a -4 penalty to local Public Order.

THE PLAN!!: Create many Warlock-Engineers, and seed them across the world to create Under-Cities for wealth generation.
Execution: Good success so far, yes-yes! Two Warlock Engineers spawned, one through the SCHEME OF DOOOOOM! Seeded a new Warlock Laboratory in the dead-thing lands of Khemri, and am going to seed more under all nearby cities when finances permit.
Counsel: This PLAN! becomes doubly effective if you build a Subterranean Pit in the Excavation chain in under-cities; this gives a 5-10% chance per turn to spread under-cities into nearby provinces with no further cost in money or Warlock Engineers! Create new under-cities in central areas that border several other provinces to take the most advantage of this strategy.

THE PLAN!: Divide & conquer enemy armies using the Lighting Strike campaign ability.
Execution: Limited success! You must still be careful which army you attack in a given turn, because the enemy may still be strong enough to defeat you. Conserve your troops as best you can, because another nearby army will almost certainly attack you the following turn (even garrisoned units in a settlement!).
Counsel: Skaven have some nice campaign abilities, including "Corruptive", which increases Skaven corruption in the current province, and "Bonded Service", which reduces recruitment cost for the army - these will lead you to the Lightning Strike skill.
CUNNING PLANS!! (Army Movement & Strategy)
THE PLAN!!: Divide & conquer through use of Lightning Strike and Use Underway stance
Execution: Lightning Strike has already proven its usefulness, and I would highly recommend taking it on any aggressive Lord (in the blue campaign skills at the bottom of the tree). Even if your Ambush fails, Lightning Strike will still work (except in siege/garrison battles).
Using Underway stance to maneuver around armies is a great way to plunder enemy cities while picking fights that you can (easily) win. The only danger is if you are intercepted, which is a fairly low chance against enemy Army Lords that are equal to or less than your Army Lord's level. If their Army Lord level is higher, and they have a racial ability to intercept, then you are faced with an extremely risky battle, because if you lose, your army is wiped out.
Counsel: Theoretically, enemies can intercept Skaven armies who use the Underway - and if they do, only the successfully intercepting army attacks, meaning it's a 1:1 army battle. Theoretically. You can use this in place of the Lightning Strike ability if you don't want to spend the skill points to get it on your Army Lord. You may have to reload the game several times before an enemy can successfully intercept your army.
Enemies which can intercept using the Underway include: Skaven, Dwarfs, Greenskins. Potentially also Wood Elves, with their similar power, the Worldroots. Possibly any army can intercept you in the Underway Stance if they are extremely lucky.
Lightning Strike DOES NOT work against armies near towns - the garrison of the town will always join the defender's side!!

THE PLAN!!: Send 2 cheap armies deep into enemy territory to capture/pillage/raze their cities out from under them & destroy their economy
Execution: In progress! Good-good results expected! Cities come in two flavors - hard and soft. (I know "hard and soft" are not real flavors! Shut your traitorous mouth, traitor-mouse!) "Hard" cities are those with very powerful garrisons including artillery. "Soft" targets have garrisons with mostly infantry. I think-plan to pillage & raze the soft targets with these cheap armies. I will save my powerful armies to counter enemy armies (preferably at least 2:1).
Counsel: These armies need to be just strong enough to consistently defeat garrisons - if a city is guarded by an army, move on to another target. The Underway Stance gives you almost unmatched army mobility, so use it! If these cheap armies die, make more! Keep churning out as many as you can afford. You'll be getting your money back through pillaging villages, so your Army Lord should be putting points into mobility, casualty replenishment, and income from raiding and pillaging. If you can replenish casualties over a turn or two, you spend less down-time being a sitting duck. If you can spare them, put a Warlock Engineer (for mobility) and an Assassin (for replenishment) in each of these armies.

The Value of Ambushes
All Skaven army Lords have a base chance to Ambush an enemy army when attacking. This can be raised with Lord skills, research, and Undercity buildings in the local province. However, the ambush chance can be lowered through certain enemy Hero skills, research, and a large difference between the level of the attacking Skaven Lord and defending enemy Lord.
The exact kind of Ambush map varies on the terrain & climate, but generally you get 1 of 2 kinds of map: a wooded area with cliffs that block ground movement, or several hills with valleys in between. You can easily set up artillery on either kind of map, though you will have to change how you place infantry & ranged units to cover the artillery. In either case, you can position your troops to open fire on the enemy with extreme long-range weapons the moment the battle begins.

Once, when defending Fort Soll, I had 2 Skaven armies with some artillery and backup Heroes, facing 3 full Empire armies with artillery and some backup heroes. The odds were no better than 50/50 if I fought conventionally, and waited for the Empire to attack in a siege.
However, I used my non-garrisoned Skaven army to aggressively attack each Empire army in turn, and thankfully got an Ambush battle every time (using Ikit Claw with the Ancient Cunning blue campaign skill). Amazingly, it allowed me to attack from ambush with Ikit Claw and my garrisoned army led by a Warlord Lord, three times in a row. I auto-resolved all three battles with a 90%+ win chance (minimal losses, and replenished my troops with "Eat Captives").
As of the Earth-year 2024, they may have changed it so only 1 of your armies can Ambush at a time. Requires more testing.

If a Skaven army with a sufficient amount of artillery and ranged units (such as 4 Warplock Jezzails and 4 artillery pieces) can trigger an ambush battle, there should be no real contest, since you can position your troops to fire on the enemy's most powerful units from the first second of battle. If you can obtain a height advantage to slow down cavalry or draw ranged units in closer, the battle is even easier.

Underway Stance
Underway stance will be your saving grace in any area with large amounts of otherwise-impassable terrain, such as mountains, large forests (such as found in the north of the Empire, or the Lustrian jungles), and territory that you plain just don't want to have to cross (such as an ally's territory when you want to raid somebody).
Bonuses to campaign movement distance (such as "Route Marcher" in the blue campaign skills at the bottom of a Lord's skill tree) also seem to affect Underway Stance.
ESCAPE PLANS!! (Dealing with Stronger Enemies in Battle)
THE BATTLE-PLAN!!
Artillery is your saving grace as Skaven; you first unlock Plagueclaw Catapults which, when upgraded through research or Hero abilities (Warlock Engineers), become your primary damage-dealers at extreme range. Use them against massed enemy troops and to pepper and demoralize the enemy while they are approaching.
Warp Lightning Cannon are tower-destroyers and monster-smashers. Just one unit of Cannon is useful in a siege, because they deal more damage per shot than Plagueclaw Catapults. Use them to destroy towers, while your Catapults damage the enemy cowering on top of or behind walls. In an open battle, use Cannon at extreme-to-mid range to target huge monsters such as Prometheans and Arachnarock Spiders.
The second most powerful Skaven units are the Heroes & Lords, and their abilities (such as Warp Lightning from the Warlock Engineers). These abilities can heavily damage weaker units within a good radius around the Hero or Lord.

If you are fielding Skaven Weapons Teams, during Deployment phase, take a horizontal look at the battlefield to get an idea of its topography. Minor variations in terrain height can wreak havoc with Weapons Teams' line of sight and ability to target enemy units. Situate your Weapons Teams at the peaks of hills and ridges, so they are not blocked by shallow sand dunes or especially bumpy cobblestones. I really wish I was being facetious about this, but it's a serious problem. I cannot tell you how many times I've ordered my Weapons Teams to shoot a unit, only to have them scuttle forward to get line of sight - usually bringing them straight into range of the enemy, and sometimes rushing into melee for no reason besides to make me pull my fur out.

THE PLAN!!: Surround the enemy and strike from all sides to cause morale damage!
Execution: LIMITED SUCCESS! (And more failure!) An effective tactic to use against units of large numbers of weak troops, like Orc Boyz or Skinks. Very limited effectiveness against armies with a strong leader-lord, or units with naturally high leadership. Skaven melee units cannot out-damage other units enough to cause sustained morale damage, but they can tie units down long enough for you to... impact... the enemy with ranged damage.
Counsel: Divide your massed Skaven troops into many small groups, and use these to run around the major battle and strike from the sides and rear to prevent enemies from running away, and to cause better morale damage.

THE PLAN!!: Assassinate enemy Lords in battle to cause morale damage!
Execution: MOSTLY UNMITIGATED SUCCESS! Using a Warlord, Pestilent Priest, a Warlock Engineer, and two Assassins in a group, these units can assassinate an enemy Hero or Lord relatively quickly. The only real danger is losing members of your kill-squad to an enemy Lord or Hero who is good at killing them. A large group (4-5) of Lords and Heroes on your side lets them chew through enemy units (literally!) to reach the Lord.
Counsel: The Assassins can out-run almost any other Hero, so they can even chase down routed heroes. More Assassins is better! You can level up members of your kill-squad through using campaign skills such as Wound and Damage walls, then spend points in their combat abilities (yellow skills).
Given a choice, however, I would rather take 3 Warplock Jezzail units instead of a kill-squad. The Warplock Jezzails can strike at long range, including at huge units and flying units.

THE PLAN!!: Maintain army cohesiveness & high morale!
Execution: Mostly failure in the beginning! Even when the Skaven outnumbered the Orc enemy 2:1, and the Skaven units stayed mostly within the Leadership Auras of the lords, the orcs still out-damaged the Skaven and caused almost all units to rout, leading to defeat. The two Skaven Army Lords are the only units which never had their morale broken.
Counsel: Try to fight in the middle of the map, so routing Skaven units won't reach the edge of the map and escape before they can recover their morale. Spec heavily into Leadership abilities for Warlord army Lord. Stronger troops such as Stormvermin also come with higher base leadership. Morale becomes manageable after acquiring research, Hero & Lord skills, and better units.

THE PLAN!!: Demoralize the entire enemy army by sniping down their Lords & Heroes with Warplock Jezzails
Execution: GREAT-GOOD UNPARALLELED SUCCESS, VERY MUCH YES! Having 3 Warplock Jezzails in my main army is more than sufficient to snipe enemy Heroes and Lords. This has been very effective against all kinds of Empire-based and High-Elf-based heroes & lords. (Dwarf lords are extremely tough, and take much more punishment than other lords.) After that, breaking the army with more conventional battle tactics becomes MUCH easier! Then I added the Warplock Jezzail Regiment of Renown, "Natty Buboes Sharpshooters", and it got even better.
Counsel: Point and shoot! Jezzails are so accurate that they can snipe down hero units even if those units are engaged in melee. If fighting in heavy forest terrain, try to position your Jezzails in cover. If you are having a hard time spotting the enemy at maximum range, you can use Death Runners or other Stalking units ahead of your main army to give you line of sight. Use battle-skill-specced Warlock Engineer heroes in your army to give your Jezzails all necessary boosts - damage, range, and accuracy.

THE PLAN!!: Use heroes as bait-meat to sucker in large groups of enemy units, then smash-burn-explode them with a well-placed DOOMROCKET!!
Execution: I have seen this tactic play out over the normal course of battle several times, and have tested it on purpose a couple times. If I put my Lord/Hero out in the open in front of my army, the AI will usually divert a substantial force to try to take out the Lord/Hero. Make sure your Lord/Hero is strong/agile enough to survive being surrounded by hordes of enemies.
Counsel: This tactic is based on two patterns I have noticed about how the AI and DOOMROCKETs work. The AI is usually happy to gang up on your Lords and Heroes to try to remove them from the fight, so the AI will usually pile several of their units, Lords, or Heroes on yours if your Lord or Hero seems vulnerable. I've also noticed that DOOMROCKETS DEAL NO DAMAGE TO LORDS OR HEROES, so your own Lord/Hero should be perfectly safe even at ground zero - however, it will also not damage the enemy Lords or Heroes. Because that would be unfair, and we all know how much Skaven value fairness.
I have also had SOME luck by spawning a unit of Clanrats with the Menace Below ability right into the middle of enemy lines (or somewhere where the enemy is likely to gather to defend, such as artillery units or the Lord). If and when the enemy closes in to surround and destroy the Clanrats, launch a DOOMROCKET on their massed troops. You can usually wipe out several enemy units this way (and your Clanrats, but who will miss a bunch of clanrats, hmmm? You see-see what I mean!).
The trade-off to this tactic is that both Menace Below and the DOOMROCKET start battle on a long cooldown (about 45s), so you have to maneuver and plot in order to use both at the right time.
You can use this same tactic to a lesser extent by putting your Lord/Hero out as bait, backed up by Plague Wind Globadiers. The plague wind globes seem to do minimal damage to your own Lords/Heroes.
LONG-RANGE PLANS!! (Sieges)
Laying siege to a city in conventional battle is the best-best-BEST way to play as Skaven-things. With just a few investments in long-range assault units such as those listed below, you-thing can easily destroy and/or rout enemy units stationed on walls and behind them!


Assault units used to destroy enemy units at range include:
  • Plagueclaw Catapults
  • Warp Lightning Cannon
  • Poison Wind Globadiers / Death Wind Bombardiers
  • [Poison Wind Mortars] (The Shadow & the Blade DLC)
  • Warplock Jezzails (The Prophet & the Warlock DLC)
  • Ratling Guns (in a more limited way, The Prophet & the Warlock DLC)
  • Warpfire Throwers (in an even more limited way, The Prophet & the Warlock DLC)

I-I always use Plagueclaw Catapults & Warp Lightning Cannon to destroy towers first, then destroy gates or sections of wall to isolate enemy units. If needed, I can use Plagueclaw Catapults to hit units on the far side of the wall, and Warp Lightning Cannon to sometimes hit flying units.
Ratling Guns & Warpfire Throwers are limited by their comparatively short range, which will certainly bring them in range of any shooty units on the walls. They are also hindered by the crenelations (little man-sized blocks of stone barricades) on top of the walls, which completely block some shots. Shots from Warplock Jezzails are also blocked by crenelations on the walls, so position them carefully if you-you are shooting at a single unit such as a Hero or Lord. Poison Wind Globadiers or Death Wind Bombardiers have very short range, which means they will be in range of enemy shooty units on the wall - but they have an AoE explosive attack that is thrown in an arc, which means they are still very effective against units stationed on a higher wall. If you can take the wall & position your Poison Wind Globadiers on that wall, they will decimate anything on the ground that comes in range. You can station one of your own units on the ground (like Clanrats Spears & Shields) as bait to draw in units like enemy cavalry.
Warplock Jezzails are extremely useful when shooting flying units, since your Skaven-Snipers can often get in range of such units and simply shoot over the wall.

Gate-breakers include:
  • Rat-Ogres
  • Brood Horrors (The Twisted & the Twilight DLC)
  • Bonesplitters (The Twisted & the Twilight DLC)
If your sieging army is primarily melee troops, then you-you will need to break down the gates as soon as possible to make a path for your heavier units like Rat-Ogres. A single unit of Rat-Ogres takes maybe a little more than 1 minute to break down a gate; similar time for a Brood Horror.

Infiltrators behind-over walls include:
  • Assassins (heroes)
  • Death Runners
  • Master Assassins (The Shadow & the Blade DLC)
Be careful of any units you send over the wall ahead of your main force - they will be alone, and subject to losing leadership extremely quickly. A strike-team of at least one Hero/Lord + a unit is more effective. All-in-all, though, I cannot suggest-recommend using a strike force if you have any effective ranged units at all.
KILLER PLANS!! (Battling Specific Races I)
"Morale" refers to a given unit's or army's leadership.
Most tactical advice and army compositions presume that you have "The Prophet & The Warlock" DLC, which gives access to Weapons Teams. If you do not have Weapons Teams, you can use artillery (Plagueclaw Catapults or Warp Lightning Cannon) or poison wind globadiers instead.
In any battle situation, make sure to TURN OFF "Skirmish Mode" on your Warplock Jezzails, Ratling Guns, and Poison Wind Globadiers. If Skirmish mode stays on, these units will pull back away from the enemy right when you need them to do damage the most. Weapons Teams like Ratling Guns & Warplock Jezzails will not be able to outrun any unit charging them, anyway. In fact, Ratling Guns need to stay put because they deal increased damage/accuracy the closer the enemy gets.

AGAINST THE LIZARD-THINGS!! (Lizardmen)
Threats: Tough units, giant monsters, occasionally powerful spells & abilities
Weaknesses: some units can "frenzy", which means they attack anything nearby (including other Lizardmen units), but this does not happen nearly often enough to really exploit it
Tactics: I have not yet found a really good counter to the numbers of giant monster units (carnosaurs and bastilodons) fielded by Lizardmen. I will set up a pile of Stormvermin Halberds or Clanrat Spears, and hope that stalls the monsters long enough for Warp Lightning Cannon to get off a few good shots. Even when I ambush a Lizardman army, these heavy monsters sometimes still cause enough havoc to make me regret engaging in battle. I will have to test whether the Hell Pit Abominations can hold their own against Lizardmen monsters.
Fighting the main body of a Lizardmen army can turn into a slugfest if I let it. I MIGHT win a slugfest if I have higher-tier units, but my army won't be in good shape. I rely on the tried-and-true Skaven tactics of dealing as much damage as I can with artillery, Warplock Jezzails, and globadiers before closing with the Lizardmen. Shields count for nothing against explosive catapult shells!

AGAINST THE FURLESS MANS!! (Empire, Border Princes, Estalia, Tilea)
Threats: Artillery, shock cavalry, high morale
Weaknesses: often weak in melee
Tactics: Bombard them from a distance as much as you can; you can easily out-power their artillery if you bring twice as much as they do. Use the "Menace Below" army power to take out their artillery if left unprotected. In siege battles against Man cities, they usually protect their artillery with cavalry, lords & heroes, or ranged units. I have often damaged the artillery enough by using "Menace Below" so that they dropped their artillery pieces, before the Clanrats fled or were slain.
I snipe down their leaders with Warplock Jezzails whenever I can - this breaks most of their morale. Failing this, I'll send a couple of Assassins after one of their lords or heroes at a time. I have had some success separating their army into parts by splitting mine, so the lords & heroes don't offer morale boosts to their whole army. The drawback is, my lords & heroes can't offer morale bonuses to my whole army, either.
A unit of Clanrats, Stormvermin, or a melee version of Runners can hold their own against an average unit of Spearmen or Greatswords. I tie down their more valuable units with swarms of melee units while damaging them from range with a backup unit. If I can get their army locked into a defensive position, I have all the advantages.

AGAINST THE FURLESS RIDERS!! (Bretonnia)
Threats: shock cavalry, armored units, lords & heroes
Weaknesses: Low morale (especially infantry or those outside the leadership aura of a lord)
Tactics: Bretonnian AI usually fields high amounts of cavalry, so keep a strong defensive line of Stormvermin or Clanrats Spears & Shields. After stalling the charge, toss some Death Wind Globadiers and poison-melt their stupid helmets off!

AGAINST THE PRETENDER-BEASTS!! (Beastmen)
Threats: tough & strong units
Weaknesses: masses of weak troops, low morale
Tactics: The only true threats in Beastmen armies are Minotaurs, Cygors, and lords & heroes. I usually auto-resolve any battle against the Beastmen even early in the game. Wipe these abominations in the eyes of the Horned Rat from the face of the earth!

AGAINST THE BEARDY THINGS!! (Dwarfs)
Threats: armored units, unbreakable units, lords & heroes
Weaknesses: slow speed for most units
Tactics: While Dwarfs have artillery, it's usually only a few pieces of nothing special. I use the "Menace Below" ability to kill as many artillery workers as I can, and to tie up the already-slow Dwarf army. while pelting them from extreme range. (With any luck, the artillery workers will drop their artillery pieces to confront the Clanrats, and never pick them up again.)
I field as many armor-piercing units as I can, such as Death Wind Globadiers, Warplock Jezzails, and Stormvermin Halberds.
Since Dwarfs can use the Underway, I can sometimes force a 1:1 army confrontation by having one army intercept another. Typically, the Dwarfs fight very defensively unless they have an overwhelming advantage, so this gives me time & space to bombard them in my favorite ways, such as with artillery, armor-piercing ranged units, spells, or a DOOMROCKET.

AGAINST THE BLACK DEAD-THINGS!! (Vampire Counts)
Threats: flying units, healing/reanimation
Weaknesses: often weak morale, weak masses of units
Tactics: Don't give these dead-things any breathing room! (So to speak - it's a metaphor, small-brain!) Wait to attack their flying units until they are engaged on the ground. While they are flapping about in the air, in ways the Horned Rat never intended, they are surprisingly hard to hit even with Warplock Jezzails.
The major weakness of Vampire Count units is their tendency to disintegrate when at low-no morale. Target their Lords & Heroes with prejudice and clear them out first; the rest of the army should crumble easily. To counter this, the Counts often bring several Heroes per army, so make sure you-you have enough guns-boom.

AGAINST THE DRY DEAD-THINGS!! (Tomb Kings)
Threats:
Weaknesses:
Tactics: In this campaign, the dead-things of Khemri have played it smart-wise and chosen to ally themselves with me-me! I have not had an opportunity to see-test their battle skills.

AGAINST THE WET DEAD-THINGS!! (Vampire Coast)
Threats: powerful monsters, ranged units, healing/reanimation
Weaknesses: masses of weak units
Tactics: Take out their lords & heroes ASAP. You can snipe them down with Warplock Jezzails or send an assassination squad after them. If you can eliminate them quickly, chances are the entire army will disintegrate shortly.
The only other real threats are the large monster units such as Necrofex Colossi and Prometheans. Warplock Jezzails do pretty well against these large monsters, particularly if you can get 2-4 units of Warplock Jezzail on the same target. Warp Lightning Cannon are also extremely useful against these large targets.
Ranged Vampire Coast units are actually not much of a problem if you can out-range them with Plagueclaw Catapults or Warplock Jezzails. If you can damage them enough, they may very well rout or disintegrate before they get your troops in range.

AGAINST THE GREEN THINGS!! (Greenskins)
Threats: strong in melee, tough & armored units, lords & heroes
Weaknesses: sometimes weak morale
Tactics: Avoid melee as much as possible. I've had decent success with an all-ranged Skaven army made of Warplock Jezzails, Death Wind Globadiers, Ratling Guns, and Plagueclaw Catapults against infantry. If the orcs are fielding huge units such as Giants, replace a few of the Plagueclaw Catapults with Warp Lightning Cannon.
MURDER-PLANS!! (Battling Specific Races II)
AGAINST THE SHINY POINTY-EARS (High Elves)
Threats: ranged units, (magic?), shields, lords & heroes, flying units
Weaknesses: They do not always slaughter us poor rats from range
Tactics: You'll need ways to defend against 3 major problems: ranged fire, flying units, and Lords/Heroes. Though the High Elves field a lot of wizard heroes, so far I've seen that they only rarely use spells (facing Hard AI). See FOOL-PROOF PLANS!! for tactics to use against flyers.
Sniping down High Elf Lords/Heroes is more difficult than it needs to be, and does not have as much effect on the army as it does against other races. You might try to stall-halt Lords/Heroes by swarming them with a melee unit until you can defeat other threats in the army & then bring ranged power to bear against them. If that Lord has the Sword of Khaine, hope-pray-beg that the melee unit(s) lasts long enough.

AGAINST THE SPIKY POINTY-EARS (Dark Elves)
Threats: ranged units, strong Lords/Heroes, morale damage
Weaknesses: occasionally low morale
Tactics: Freakin' Darkshards Shields, am I right-right? Batter them to smithereens with Plagueclaw Catapults or Poison Wind Mortars (if you have The Shadow & The Blade DLC). Sniping down Lords/Heroes is pretty effective, though some of these have good defense, and it can take longer than you want it to. Since I almost always fight the enemies of the Dark Elves, they are usually willing to make treaties, or at least not declare war, so I haven't had TOO much practice against them-things.

AGAINST THE LEAFY POINTY-EARS (Wood Elves)
Threats: Flying units, long-range damage, Lords & Heroes
Weaknesses: often weak in melee combat, isolationist & few in number, no artillery
Tactics: You might be able to out-damage Wood Elves at range if you have numerous Plagueclaw Catapuls, Warp Lightning Cannon, or Warplock Jezzails. Nothing else will come close to their range, accuracy, & damage output. They also come with cavalry and flying units, which will engage and destroy your ranged units like artillery. Keep a squad or three of Stormvermin Halberds / Clanrats Spears & Shields near your vulnerable back line.
They also have some very nasty long-range, high-damage Heroes - Glade Captains & Waystalkers (yes-yes, just like of Vermintide fame. You traitor-mouse.) who can counter-snipe your Lords & Heroes. Beware, and strike first if you possibly can! Wood Elves have high defense against Ambush attacks, so it would be good to reload the game if necessary to make sure you get an Ambush. Wood Elf cities never have walls, so you are always forced into using open-field tactics.

AGAINST THE WILD MANS!! (Norsca)
Threats: mobility, decent melee, monsters
Weaknesses: frenzy (?)
Tactics: Like most other races, you-you simply don't want to get stuck in melee with the Norscans. If you focus down their monsters, their infantry will close in. If you focus down their infantry, their monsters will go around & strike your back lines. Spread your ranged units out, so if one becomes engaged, the other(s) can still shoot effectively. Some Norscan units (Berserkers, monsters) have frenzy, which spells no-no good at all for you, but can distract the frenzied units until you can kill them at range. If you're stuck in a frenzied melee slog, you can use Poison Wind Globadiers against the frenzied unit, since you may lose your defending melee unit anyway.

AGAINST THE WARP-TAINTED ONES!! (Chaos Warriors)
Threats: armored units, monsters, lords & heroes
Weaknesses: uhhhh... economics? Few-no ranged units
Tactics: Bring all the armor-piercing units you have. I may-may have seen that blocks of armor-piercing units do better against Chaos than single units like Bonesplitters or Brood Horrors. The blocks of units can at least hold the line long enough for you to Poison Wind or artillerize the blocks of armored units to murder-death! For all their strengths, Chaos Warriors fight extremely conventionally, so go around, over, or under them for victory-ry! It is honestly quite unlikely that you can deal enough damage to them at range to prevent them from closing in, but focus your fire on one unit at a time, and have a unit that can shoot into melee effectively (Poison Wind Globadiers, flanking Warplock Jezzails, etc.).
FOOL-PROOF PLANS!! (Fighting Against Game Mechanics)
Skaven have a hard existence. They are born as rats, live underground with scarce resources, and in a conventional battle, they get torn to shreds if they don't flee first. On top of this, the very mechanics of the game itself will work against you. These PLANS!! include some examples of how to avoid those mechanics and succeed in spite of all the odds stacked against you.

THE PLAN!!: More of a complaint. Underway Stance DOES NOT WORK ON ULTHUAN??!!
Yet it works fine in the New World?? I assume-sume that this is because there has never been a Skaven, Dwarf, or Greenskin presence on Ulthuan, so there has not been millennia of building tunnels there. Apparently the Skaven and dwarf-things have been in the New World long enough to completely tunnel through that entire continent, though. You can't see-tell, but my eyes are rolling. Beware-ware about army mobility if you invade Ulthuan.

THE PLAN!!: Seize the unassailable high ground and obliterate the entire enemy army with long-range fire.
Execution:
Counsel: Note that I have seized the high ground, and there is full, perfect line-of-sight on the approaching Reikland army. However, in spite of millennia of military strategy, physics, and decades of practicing game logic, the game insists that my Warplock Jezzails (Group 1) don't have line of sight - and so the game is dictating that the units break position and move closer (conveniently into melee range). Group 2, the last unit of Warplock Jezzails, simply sat there doing nothing. Later, I positioned those 3 units of Plagueclaw Catapults just behind the Warplocks, but their range was somehow cut down by the height difference, and they couldn't hit anything but the closest Reikland troops. But of course the Reikland War Wagon Mortars had line of sight and range, as they soon proved.
To avoid this, don't trust the game if it looks like it gives you unassailable high ground - there is no such thing in this game. Gently-sloping hills that are easily surmounted by cavalry charges might be good for your ranged units, but everything else is suspect. The game forces you to fight as conventionally as humanly (not Skavenly) possible, which gives the micro-managing AI all the advantages, so deploy your units accordingly.

THE PLAN!!: Deal with those pesky high-damage flying units by any means necessary! Sub-plan A is to take them down at range with Warp-Lightning Cannon, Warplock Jezzails, and if I'm lucky, the Howling Gale spell.
Execution: Warplock Jezzails are the best at targeting flying units because of their accuracy & range. One major drawback has been that, even if the flying unit is "standing still", when it takes a hit, it will falter in the air for a moment, causing additional Jezzail shots to miss. Warp-Lightning Cannon are hugely useful against large flying Monsters like dragons - if they can hit one. Ratling Guns deal tons of damage if they can focus their fire, but their range is comparatively short, making them vulnerable to being attacked by the flying unit before they can kill it. The Howling Gale spell freezes flying units in the air, making them much easier to hit.
Counsel: Only Warplock Engineers have the Howling Gale spell**, so recruit as many as possible when you're fighting races with flying units (High Elves, Vampire Counts, occasional Lords & Heroes). However, you will need to station your Warlock Engineer far in front of the ranged unit you are using to take down the flyer, because Howling Gale has much more limited range. You will also have to be careful of timing to make sure the spell is cast before the flyer starts to descend to attack your units - once the descent starts (or if the flyer is already aground), the spell cannot target it. If the flyer is already aground & you really don't care about the unit it is engaged with, you can also target the flyer with Warpfire Throwers for insane mostly-focused damage (but the splash will almost certainly destroy the unit being attacked, if the flyer doesn't get them first). If the enemy has more than one flyer, station your ranged units further apart, so one unit can shoot if another is being attacked. (Also protect these units form cavalry charges!)
**probably - certain Grey Seer Lords might also have the spell, but I don't remember which school gives it to them.

THE PLAN!! Deal with those pesky high-damage flying units by any means necessary! Sub-plan B is to station a unit of Stormvermin Halberds next to vulnerable ranged units (like artillery).
Execution: Surprisingly good-good results! Halberds & other anti-large weapons are perfect to face just about any melee-based flyer, since the flyer has to land in order to attack. Halberds are obviously less useful against flyers with ranged attacks, fool-rat! (This includes a few Wood Elf units). Higher-tier & more damaging units like Halberds (as opposed to Clanrats Spears) are obviously better once you can afford them.
Counsel: This tactic assumes you haven't stopped the flyers in-air (with the Howling Gale spell). Melee flyers love going for your strongest ranged units, like artillery, Warplock Jezzails, and Ratling Guns, so station your Stormvermin Halberds next to these vulnerable units. Once the flyer lands to engage the ranged unit, try to pull the ranged unit out and rush the Halberds/Spears in. At the very least, you should be able to deal good damage a) while the flyer waddles after your retreating ranged unit, and/or b) before the flyer lifts into the air again. If you're fighting flying units early in the game (against Vampire Counts & Wood Elves), Clanrats Spears will do.
AMBITIOUS PLANS!! (Individual Unit Review)
Skavenslaves & Skaveslave Slingers
I have never used Skavenslaves if I had any other choice in the entire world. They have no attack, no defense, and no morale. Occasionally they are useful as bait, but if their job is to stay put and be attacked, they can't even do that, because they will break and run as soon as they engage.

Wolfrats, Poison & Armor-Piercing
Wolfrats actually have surprisingly utility as interceptors and harassers - if you can keep them alive and their morale up. Like other war beasts, Wolfrats can keep a fleeing or routing enemy out of the fight, and finish off powerful fleeing enemies that you really want to make sure get dead. I've wielded armor-piercing wolfrats with particular effectiveness against engaged or fleeing Dwarf units, since wolfrats are the first armor-piercing units Skaven get. They are also crazy-stupid fast, maybe having the highest base speed in the game (though upgraded Brood Horrors give them a run for their warp-tokens. Pun intended).
I generally go for regular (armor-piercing) wolfrats over poison wolfrats, but if you can micro-manage well, you can hit multiple enemy units with the poison effect of the poison wolfrats, and still keep them alive to harass fleeing enemies.

Clanrats, Clanrats Spears, Clanrats Shields, Clanrats Spears & Shields
Clanrats are the most mediocre infantry units. Their primary weakness is low morale, but this can be bolstered with Lord proximity, Lord skills, and maintaining ranks.
I would recommend Clanrats Spears & Shields as the single best option to hold the line before you get Stormvermin. Clanrats are also much much cheaper than Stormvermin, and more quickly replenished. Their combat effectiveness can be somewhat improved by more Lord skills.

Poison Wind Globadiers & Death Wind Bombardiers
I cannot sing the praises of Globadiers & Bombardiers enough. They are the single best all-around Skaven unit, in my humble (not-humble) opinion. They are Armored, deal Armor-Piercing ranged damage, and deal that damage in a small AoE (with damage-over-time if you have Clan Skryre Workshop upgrades). They are comparatively maneuverable, don't take too long to set up/reorient direction, and don't die immediately in melee. They are even useful against Large and Monstrous targets. Their only drawbacks are their short range & low speed compared to other ranged units like High Elf or Wood Elf archers.
If you can keep Globadiers at range, I would pit Globadiers against just about any other unit in the game.
  • Have a front line of some reasonably durable troops such as Clanrats Spears with Shields or Stormvermin Halberds. Set 2+ units of Globadiers behind this rank, so any unit in melee with the front rank is in range of the Globadiers.
  • If you can keep a group of Globadiers in reserve, you can move them around as needed to support other engagements. One or two volleys from the Globadiers are usually enough to at least even the odds of the engagement, and often to change the tide of the engagement in your favor.
  • If you don't mind losing units, Globadiers can even take out heavily-armored Heroes and Lords stuck in melee - but you will also deal very heavy damage to any of your units around the enemy Lord or Hero.
  • If you have at least 2 units of Globadiers expecting a melee charge (such as from infantry or cavalry), station one behind the other. If the front unit becomes engaged in melee, they can usually live long enough for the second group to deal insane damage. Rotate these units front<>back as needed.

Stormvermin & Stormvermin Halberds
Stormvermin are the toughest infantry units Skaven get - and that's still not saying much compared to other melee-focused infantry of the same tier like Chaos Chosen or Swordmasters of Hoeth. The biggest advantage Stormvermin have is their option to take Halberds (which give them Charge Defense against Large) and their much higher morale. The Stormvermin Regiment of Renown "Council Guard" is Unbreakable (never lose morale/leadership).

Rat Ogres
Rat Ogres seem like a good investment, since they have Armor Piercing and Frenzy, but more and more I find myself replacing them with Stormvermin.
Some out there might call Rat Ogres cavalry, but they don't have the speed of proper cavalry, and they don't have the impact, since there are only 12 Rat Ogres in a unit, compared to the ~40 you get in a normal cavalry unit. Oh, and they are also officially listed as "Monstrous Infantry".
All this being said, Rat Ogres are the closest thing Skaven get to cavalry (unless you get "The Twisted and the Twilight" DLC, which gives you Brood Horrors). You can use them in similar ways - hit-and-run attacks to take advantage of their great Weapon Strength & Charge Bonus, and to kite slower units like massed infantry blocks. Likewise, if you can plough your Rat Ogres into the back ranks of an enemy already engaged, they can deal great damage. I wouldn't put them toe-to-toe in an extended melee engagement unless you have no better options.
Rat Ogres are useful at busting apart units of weaker infantry, since they don't have the armor to go up against stronger units. You may as well send them against Armor-Piercing ranged units, since they won't take any more special damage from these units, and can outrun many of them. If you micro-manage your Rat Ogres, you can drive away enemy ranged units long enough for the rest of your army to get around to them.

Gutter & Night Runners
The Runners, to me, are a big pile of "meh". Their sole real advantage is their ability to fire on the move (even backwards!), so toggling on Skirmish mode actually works for them. In the early game, their best use is to kite around enemy melee infantry - but most cavalry can outrun them, so they'll still get taken to pieces by faster units. You MIGHT pair Runners with a squad of Wolf-Rats or Rat-Ogres: kite the enemy with the Runners, and chase them down with the Wolf-Rats.
Otherwise, Runners simply don't do enough damage to make them worthwhile in my humble (again, not-humble) opinion.
TRAITOROUS PLANS!! (Politics & Diplomacy)
I had to restart my Clan Skryre campaign in order to take advantage of the DLC from "The Twisted and the Twilight" pack, including new Clan Moulder-themed units.
In this campaign, I miraculously avoided most wars, and ended up being able to pick and choose my enemies for the most part.

Things I Did Do:
  • I did exterminate the Beastmen wherever I found them! This gave me small diplomatic bonuses with most race-nations of the Old World.
  • I did only provoke active enemies with Hero actions, increasing diplomatic bonuses with the enemies of my enemies, and saving my money long-term.
  • I did declare war on some small, far-off rogue armies (Doomseekers, in northern Naggaroth, for example) to gain diplomatic bonuses with several race-nations.
  • I did let other powerful race-nations do their thing, taking out other powerful enemies. I was able to bribe certain race-nations to stay on their friendly side so they would not declare war.
Things I Did Not Do:
  • I did not ally myself with every Brom, Dickie, and Hairy who asked (especially not the rogue armies or tiny factions). This meant I did not take any additional diplomatic penalties to large race-nations.
Things I Took Advantage Of
  • I took advantage of Reikland getting killed off super-early by the Vampire Counts, so they were never a threat to the north.
  • I took advantage of Bretonnia fighting with the Vampire Counts in the later game to sneak in from below them and position armies so seize several of their cities on the same turn. I did take some diplomatic penalties for trespassing, but they were so occupied with the Vampire Counts that they did not declare war.
  • I took advantage of the Chaos invasion to seize many new territories, by Colonizing razed towns that were well behind the Chaos warfront. I used Underway Stance to sneak past enemy armies with large but cheap armies of my own.

Avoiding War
Hero actions seem to be more provocative than trespassing, so in order to avoid war, carefully pick and choose your targets of hero actions. If you keep a low number of heroes, and only perform actions against active enemies (ones you are at war with), you might not ever get war declared on you.
This strategy worked very well against Bretonnia, Tilea, and the High Elves until other powers had whittled them down or exterminated them.

The Ultimate Weapon!
When all else fails, use the DOOMROCKET to settle diplomatic grievances.

THE PLAN!!: Be at war with the Beastmen & rogue armies to gain diplomatic bonuses with potential allies
Execution: Moderate success! I had to be at war with several Rogue Armies at once before the diplomatic bonuses started adding up, so I committed Hero Actions against the rogue armies and Beastmen to add to those bonuses.
Counsel: Kill-slay the beastmen wherever you find them! They are useless as allies, since they do not have the strength or cunning to be a threat to more than isolated towns.
Rogue armies that spawn from defeated race-nations are usually no trouble either. You can declare war on anybody on the map, so when a rogue army spawns, you can declare war on it and murder-kill-kill with no remorse! The only race you might not get a diplomatic bonus with are those that share a race type with the rogue army (for example, if you declare war on the Doomseekers [Dwarfs] you might NOT get a diplomatic bonus with Dwarf race-nations).

Not-Enemies-Yet: A short list of potential allies who don't automatically hate you to death.
  • Other Skaven Clans (ex: Pestilens, Moulder, Eshin)
  • Khemri
GREEDY PLANS!! (Wealth Generation & Management)
THE GET-RICH-QUICK PLAN!!
Skaven seem to make great traders, as several research options ("Masters of Infiltration" under Oppressive Plans) and Hero skills ("Envoy of the Council" for your Legendary Lord & Grey Seers) increase relationships (especially with other Skaven), and one very nice under-city building (Subterranean Strip-Mine) gives faction-wide trade bonuses. Each Warlock Engineer Hero has a skill, "Arms Dealer", that can improve income through trade by 3% each!
The difficulty is in getting other race-nations to like you enough to start a Trade Agreement, so use these PLANS! to get enough money to bribe them into liking you!

THE PLAN!!: Use one province as wealth-generation, use another province as recruitment center.
Execution: VERY MUCH SUCCESS, YES-YES! After securing the entire province, and regions around it, using the Headhunters Jungle province for wealth generation has been extremely successful. The ports at Mangrove Coast and Chupayotl give great income, and is boosted further with the Energy chain buildings in Oyxl. Most Skaven buildings provide small boosts to income, but a few in the early game give large bonuses (+300 income from Corrupted Spawning Pool at Oyxl, or up to +300 from each port).
Counsel: Secure the entire province both for protection, and to use the Efficient Planning or Exploitative Planning commandments.

THE PLAN!!: Bribe the things with gifts, and create a massive trade under-empire!
Execution: Poor success! Most effective only with fellow Skaven (who tend to get themselves killed off sooner or later) and other "evil" races, who either do not have a capitol (necessary to trade) or who do have the ability to trade (as a minor faction).
Counsel: Seize a port (an anchor symbol next to the city banner) before turn 20 or so, to gain knowledge and location of all port-holding civilizations. Bribe potential allies with large gifts to overcome the natural Aversion to Skaven, or use Hero skills or Research to improve relationships with other Skaven nations. Taking the city of Itza gives +100 trade goods with the Emerald Pools building (tier 4).

THE PLAN!!: Seed Warlock Engineers throughout the world to create under-cities and generate wealth!
Execution: GREAT-STUPENDOUS SUCCESS! All I need is a constant source of Warlock Engineers! (Also see DASTARDLY PLANS!!) So far, the under-cities I have established have been very good aditions to my money and food income. The only draw-back is that I have not found any interface to keep track of my undercities, so I have to manually go back and spot the green Skaven symbol that shows an Undercity, and upgrade each of them individually.
Counsel: The Scheme of DOOOM! can only be used every 30 turns, at most, so building the Engineering chain in a few cities should give more than enough Warlock Engineers to seed across the world. Then the only issue becomes affording to spread the Under-Empire everywhere! (the Excavation chain in under-cities gives a +5% or +10% chance per turn to expand into nearby towns, creating new under-cities for free).
Playing as Clan Skryre with The Prophet & The Warlock DLC makes recruiting and utilizing Warlock Engineers more efficient. A special building in Skavenblight, your capitol, The Shattered Tower (tier 5), will also allow you to expand Under-Cities at an increased rate!
SUBTLE PLANS!! (Undercities & Their Functions)
The major campaign mechanic of the Skaven is developing "Undercities" underneath any city you do not already own.
Undercities have numerous benefits - in the short term, they generate wealth & food. In the long-term, they provide excellent bonuses to your local armies, and can even raze the city they are built beneath.

Money & Food

Local Army Bonuses

CRAFTY PLANS!! - Clan Skryre Developments
If you have The Prophet and the Warlock DLC, you have access to Clan Skryre as a playable faction. Clan Skryre is the Clan of ingenious dastardliness and Warpstone-powered engineering. They can build a unique Warlock Laboratory in any of their undercities, which gives intellectual-themed bonuses to your faction, such as +5% Research rate. Undercities built with a Scheme of DOOOM! Warlock Engineer can also build a unique Warlock Laboratory that gives +10% Research rate.

EXPLOSIVE PLANS!! - Attacking an Over-City
Destroying the over-city can happen one of two ways: The first way is to craft a bomb and completely raze the city (though your Undercity will be revealed as soon as you finish the first bomb-construction building, no matter how many sneaky buildings you have constructed). The second way is to spawn a Vermintide army, and fight a battle to seize the city.

The Vermintide
Throughout the research tree, you will see technologies that "add XYZ unit to the army summoned with the Vermintide Undercity building". This means that when you build the right buildings in an Undercity, and after those buildings are finished constructing, it will automatically summon a Skaven army of your faction, made up of pre-determined units. The more technologies you have unlocked, the better the army functions. There are a handful of Lord skills that also grant bonus units to Vermintide army.

THE BOMB
"AHAHAH! AHAHAHAHAH! AHAHAHAHAHAHAAHAAAAA!" - Ikit Claw, Chief Engineer of Clan Skryre

THE PLAN!!: Use Raiding Stance and sieges to lock a city down so its owner cannot get enough money or wiggle room to destroy an Undercity that is building up the Warp-Bomb or a Vermintide
Execution: To be determined! I plan to use this strategy against the Dwarf-things of the eastern mountains. In theory, raiding will cut off income from that province, which might be enough to make the AI think twice about spending money to destroy an Undercity. Sieging a city blocks that city from further interaction until the siege is lifted. This will hopefully prevent the owner of the city from being able to destroy the Undercity before the Warp-Bomb or Vermintide is complete.
Counsel: I have my suspicions that the AI will still be able to destroy my Undercity even if the over-city is being besieged, because the AI is full of sneaky tricks like that. I have another, nastier suspicion that if I use the Warp-Bomb in a besieged city, the Warp-Bomb will also damage the sieging army. I will squeak-tell more after I try this a couple times.

Discovering Undercities
Any time you finish building in an Undercity, your "discoverability" rating goes up. This means that the faction whose over-city you are tunneling under has a chance to realize what you are doing. They can discover this with a Lord garrisoned in the over-city, with a Hero action, and by constructing special garrison buildings.
If discovered, it costs a significant amount of money for the enemy to destroy your Undercity - completely, in one turn. Not only does this undo all of your hard work, it also cuts off any resources that you were getting from that Undercity (natch).
If you carefully manage your buildings, you should not have to reach 100% discoverability (when the enemy automatically discovers your Undercity, with or without special actions). Constructing food & wealth generation buildings shouldn't ever put you over the edge - but if you are getting close, you can construct two chains of buildings that lower your discoverability by a good amount.
To avoid being discovered, therefore, construct only the buildings you need. I decide whether I want to use the Undercity for wealth generation, or for attacking, and only construct those buildings. I also usually build the Deeper Tunnels to lower my discoverability, and still have 1 construction slot left over.
See "Explosive Plans" above if you plan to attack the over-city. Your Undercity will be discovered while doing so.
ACQUISITIVE PLANS!! (Unique Building Chains)
Subterranean Sanctums
Ghrond city, The Chill Road province, northern Naggaroth, extreme N of the New World


Ransacked Convent of Sorcery
Ghrond city, The Chill Road province, northern Naggaroth, extreme N New World


Shrine of Widowmaker
Shrine of Khaine, N edge of Ulthuan


Vault of Nagash
Black Pyramid of Nagash city, Great Mortis Delta province, central Khemri / Lands of the Dead, S Old World


Copper Mountain
Karak Izor city, The Vaults province, central Old World


The Oak of Ages (Pacified)
The Oak of Ages city, Yn Edri Eternos province, W-central Old World


Peg Street Pawnshop
Sartosa city, Sartosa province, SW-central Old World


Warpstone Tractor Beam (only available as Clan Skryre, Skaven)
Skavenblight city, Skavenblight province, SW-central Old World


Council Chamber of the Thirteen (only available as Skaven??)
Skavenblight city, Skavenblight province, SW-central Old World


The Shattered Tower (only available as Skaven??)
Skavenblight city, Skavenblight province, SW-central Old World


Corrupted Spawning Pools
Oyxl city, Headhunter's Jungle province, extreme S New World


Stellar Pyramids of the Southern Skies
Hexoatl city, Isthmus of Lustria province, south-central New World
MOST EXPLOSIVE OF PLANS!! (Ikit Claw Hard Campaign)
Ikit Claw starts in great position - Skavenblight itself is a hugely powerful city, though it will take a long time to fully upgrade. It can be a major recruitment and economic base. There are two human nations, a Vampire Coast nation, and usually some Beastmen nearby to conquer, and in the early game this should not prove very difficult. Lastly, there are numerous ports around to launch raiding parties far and near.

Tilea and Estalia never prove a real challenge if I have a full army. Throw in some Rat Ogres or Warp Grinders to take down gates & walls, and I usually don't even need to wait for Plagueclaw Catapults to siege their cities. Base Skaven chance of Ambushing usually lets me take an army on the open field after a few attempts.
Aranessa Saltspite of Sartosa usually doesn't interfere unless I strike first - sometimes I've tried to ally with her, sometimes just crush her as easy prey. The only danger her army represents in the early game are Rotting Prometheans and Carronades (artillery). I stall the Prometheans until I can take out the Army Lord, which usually means the rest of the army disintegrates. I summon Clanrats with the Menace Below army ability to take out the Carronades. Personally, I think it's worth seizing Sartosa city for its unique building alone - the Peg Street Pawnshop (see ACQUISITIVE PLANS!! above).

War Campaigns
From here, I've learned it's best to hold the line to the north, where the Wood Elves, Bretonnians, Empire, and a few Dwarf nations all stand in my way, and are more than happy to declare war on me simultaneously.
To the South!
Instead of poking the beast, then, I use my ports to launch a campaign to the south, east, or occasionally west to the New World (I skip Ulthuan, but take the Galleon's Graveyard city at the Great Maelstrom if I can). The cities to the south are easy to take individually, but hard to hold collectively because there are so many small factions, and they all declare war on me, so I spend most of that campaign re-seizing cities that the enemy retakes behind my back. If I have a spare army to defend cities, I can use an aggressive army to zig-zag down and up and take territory systematically, with less of a chance of a sneaky lizard-thing or beardy-thing jumping my lines and capturing a town. After all this, the Tomb Kings nations usually love me for being a Great Power and for destroying their rivals, and are willing to make Trade Agreements and military agreements.
To the East!
In the east, I can usually prey on the Border Princes with no serious repercussions from the Empire. Akendorf, their major city at the south-east end of Black Fire Pass, is a pretty good base of operations (and will allow me to threaten the Empire from two directions if I later decide to take them on). Barak Var is an even better one, since it gives me an "inland" port for faster travel. However, this means activating the hornets nest of Dwarf race-nations and their powerful political ties. Often, if I attack Barak Var, it means setting off all Dwarfs, including those just north of Skavenblight. It's conceivable to make friends with the Greenskins by attacking the Dwarfs, and soon enough I can get tons of armor-piercing units to handle Dwarf armies, where every single unit is Armored. Dwarfs are short and stumpy and have no serious long-range weaponry that's not easily countered by Plagueclaw Catapults, Warplock Jezzails, and the Menace Below power.

Economic Campaigns
The two secrets to Clan Skryre financial success lie in spreading Undercities and making trade agreements with the few race-nations who don't hate me. The non-secret parts are income from post-battle loot and Sacking cities, both of which add sizable bonuses to my treasury.
Undercities
I can spawn Warlock Engineers through buildings, the Rite of DOOM!!, or if I'm lazy, the game will give me a free Warlock Engineer in a few dozen turns. Then, I send my little diabolical underminers across the map, building a new Undercity whenever the cooldown is finished. It takes roughly 7,000 monies to build an effective Undercity with +Food, +Money, +chance to spread Undercity to nearby regions, and -Discoverability. The +Food given by my Undercities are usually enough to prevent me from starting to starve, and if I have a surplus, this gives a Public Order bonus to all of my regions, countering the -2 Public Order penalty I get from playing on hard mode.
Trade
I may have lied a teeeensy little bit when I said Skaven make great traders - it's true, but the margins are much smaller than I predicted. There are tiny bonuses from some Warlock Engineer Hero skills, but the meat of money from trade comes from rare resources. There are a TON of rare resources to collect in the lands of Araby to the south (see To the South!, above for campaign tips). The added bonus of heading south from Skavenblight is that it puts me in contact with Khemri/the Tomb Kings, who are the only race-nation I've ever encountered that likes me for being a Great Power. Between this and squashing their rivals, it's usually more than enough to get a trade agreement going.

THE LAB!
Or as it's more formally known, the Clan Skryre Forbidden Workshop. (Found in the lower-right corner of the UI.) The upgrades and DOOMROCKETS produced here are definitely forbidding to behold.
I favor Warlock Jezzails, Plague Wind Globadiers, and Ratling Guns for ULTIMATE! RANGED! DEVASTATION!, but you-thing do you-thing. There are some nice upgrades for every technological unit. The cost in Warp Fuel isn't too bad, especially if I have more than one Warlock Engineer Army Lord running around collecting more for me. (Master Warlock Engineer Army Lords have a chance to collect more Warp Fuel after every battle win.) If I have enough Undercities going, and using the Exploitative Planning commandment for my regions, I'm usually pretty good on Food to spend on these upgrades, as well.
THE PLAN OF DESTRUCTION INCARNATE!! (The DOOMROCKET)
I know you-you have been waiting with bated mouth-breath for me to reveal the secrets of the DOOMROCKET. Read-know what I have discovered herein.

PRODUCTION
The DOOMROCKET is produced only in the Clan Skryre Warp Laboratory - which means you-you must play Clan Skryre to use it! Other Clans have their own gimmicks, like Throt's Creature Lab. However, if you have The Prophet & The Warlock DLC, you still gain access to all other Clan Skryre features like Weapons Teams.
ANYWAY. Each DOOMROCKET costs Warp Fuel and Food to produce - minimum of 4 Warp Fuel and something around 20 food. This can be prohibitively expensive in the early game, and Warp Fuel is never a common resource UNLESS...

THE PLAN!!: Utilize many-many Master Engineer Lords & Warlock Engineer Heroes to rack up large amounts of Warp Fuel!
EXECUTION: Middling-okay, but expensive! There is a small chance of gaining Warp Fuel when your Master Engineer Lords win a battle or siege - emphasis on winning! There is also a small chance of your Warlock Engineer Heroes finding Warp Fuel with any action they take on the campaign map - Steal Technology, Wound, Destroy Walls, and of course Build Undercity Here-Now.
COUNSEL: It can be very-much expensive to field numerous Master Engineer Lords, and you may prefer to diversify your Lords a little (especially if you get Master Assassins from The Shadow & The Blade DLC). You can help offset this cost by using your Master Engineer army to garner gold to pay for itself and to pay for the Hero actions of your Warlock Engineers. Never-never forget to Sack an enemy settlement first, then Occupy or Raze it on your next turn! If you can spare the time, first Sack, then Raze, then reColonize with a weak army to maximize gold and minimize Public Order penalties. Make sure to use-whip your Warlock Engineer Heroes to Build Undercities in non-threatened areas as often as you can, and use these Undercities as resource income.

DEPLOYMENT
You-you will squeak-hiccup with mad laughter the first many-many-MANY times you deploy your very own DOOMROCKETS!!!!!!
Then you will notice certain failures-drawbacks. (And keep in mind that the Chief Engineer does NOT HANDLE CONSTRUCTIVE CRITICISM WELL-WELL.) First of all, you can only launch one DOOMROCKET per battle, no matter how many you have stockpiled.
Second, the radius of the DOOMROCKET is very limited. Many spells have larger radii. Radiuses. Radicals. Circle-area-of-effect-things! The DOOMROCKET excels at destroying closely-packed enemy troops. Its radius is significantly smaller than you might expect, and at most I've destroyed 4 enemy units with one launch. These units will be about 99% destroyed, and will most likely rout off the battlefield. The DOOMROCKET is not exactly an army-killer, but it can be used to destroy certain high-value army units made of numerous troops. The enemy units have to be made of numerous troops because...
The DOOMROCKET DOES NOT DAMAGE LORDS OR HEROES! Like, at ALL. It also only deals light damage to enemy Huge or Monstrous creatures like Kroxigor, dragons, or Phoenixes. Phoenixi. Phoenixsssss. The fire-flying bird-things. However, it deals full damage to normal cavalry units like Reiksguard and Black Lancers. I have tried-sought NOT to hit my own units with the DOOMROCKET, so I cannot say for sure how much damage it deals to your own troops, but I would be willing to bet-bet that it deals full damage.
This is something called "balance", which here means "something that doesn't work the way it should work because the developers want to make things harder on you because they can't design real balance otherwise".
You can improve the lethality of the DOOMROCKET with Clan Skryre Workshop upgrades, including one that deals damage-over-time in the radius.

THE PLAN!!: Use a sacrificial unit to draw in enemy units, then wipe out several at once with a well-placed DOOMROCKET!
Execution: I've had great success drawing in troops by using a sacrificial unit of Clanrats from the Menace Below power. The AI can't resist an easy victory, so they often swarm their cavalry & spear units onto the Clanrats - and cavalry are exactly the units you want to obliterate with the DOOMROCKET. I have to be careful with the timing, because it takes the DOOMROCKET a few seconds to wind up and 5 seconds to impact the area - fast units like cavalry can move out of the way within those 5 seconds.
Counsel: I recommend using only units that you are fine losing, or those which theoretically take no damage from the DOOMROCKET, like your Lords & Heroes. If you can bait in the enemy with your Lord or a small kill-squad, then they should be easily able to kill-rout any survivors (again, who are NOT enemy Heroes, Lords, or individual units).
MOST MUTABLE OF PLANS!! (Throt the Unclean, Hard Campaign)
Watch out - even though Frozen is a suitable climate for Clan Moulder, most of the Norscan cities have a "Chaos" climate.

THE PLAN!!: Bide my time until I harvest-take a good batch of Vat creatures.
Execution: Good-great! Waiting until I get a batch of 1 Hellpit Abomination, 1 Brood Hororr, and 3 Rat-Ogres gives me the armor-piercing units I need to attack-gnaw the heavily-armored Kraka Drak dwarves, and the heavier units among the Norsemen and Kislev.
Counsel: Bide-wait until you have an army with several armor-piercing units (which include all of the heavier Clan Moulder units). Since you can recruit Vat units for free, your recruitment buildings at Hell Pit can be focused on ranged units such as Plagueclaw Catapults and Poison Wind Globadiers to give your armies even more of an edge.

THE PLAN!!: Seize a port city to raid far-far away, such as the rotten-ripe lands south past the Empire.
Execution: By the time I got enough armies to afford to send one off to the south, the Empire and Dwarfs had declared war, and my relationship with Norsca wasn't the best. I did take Erengrad, which is a great port city, but had to confine my explorations to the Sea of Claws in order to keep my armies closer to home in case the Empire made a push. Then Chaos invaded...
Counsel: The closest port-city is Sjotkraken, just to the north-east across the mountains. It is controlled by the Kraka Drak Dwarfs, which you should be able to easily quash. However, the Kislev city of Erengrad to the south-west, or the World-Walkers city of Bay of Blades to the west are better targets, since they give you access to the Great Western Ocean faster. In the early game (before Chaos spawns), the World-Walkers are probably an easier target, since the Norscans always fight amongst themselves. Attacking the World-Walkers might also give you diplomatic bonuses with Kislev and/or the Empire (if such alliances stroke your whiskers the right way).
Seizing the Bay of Blades also gives you direct access to other port-cities such as Longship Graveyard and Norden, which can dramatically increase your income in the early game. Since you will have declared war on Kislev or the World-Walkers anyway, you may as well seize their other port-cities.

THE PLAN!!: When in need of a powerful strike-force, recruit units from the Growth Vats for no base cost, attack a given target, then recycle the recruited units before having to pay upkeep.
Execution: In progress!
Counsel: Theoretically will work. The only drawback is having to wait for the Growth Vats to recharge with powerful units in between strike forces.
Like Regiments of Renown and Raise Dead, the Growth Vat can be used while an army is on the move, allowing for sudden reversals on a pursuing enemy, or city assault.

THE PLAN!!: Heal units after battle by giving units time to regenerate while enemies finish fleeing the field, and by using the Thirteenth Scheme to summon the Moulder Clanstone to heal groups of units en masse.
Execution: Moderate success! The greatest bonus is having more-fully-healed troops if I am forced to fight back-to-back battles. The greatest drawback is the time-sink after battle.
Counsel: If you really feel like waiting after every battle for an extra 5 minutes, many of your units WILL recover health, but the amount of health recovered by regeneration is negligible at best. The Moulder Clanstone dramatically increases healing for a very short period of time, so if you can save up 1-2 uses of this until after the battle, your units will be healthier by the time the battle concludes. The Clanstone is also supposed to be able to resurrect dead units, but I have not seen-smelled proof of this yet! After-battle waiting is a great-good time to get some snack-meats and fizzy drinks!
Always-never forget the option to "Eat Captives" after a battle, for extra replenishment!
Philosophical Questions of Great Import & Sobriety
What if we strapped a Poison Wind Mortar to the back of a Rat Ogre?

What DOESN'T Throt the Unclean eat?

Why are there no space-Skaven in Warhammer 40K?

Does it hurt when I do THIS?

If wolf-rats are wolves + rats, and rat ogres are ogres + rats... what are pirates?

Man-things worship Sigmar, who was once a man-thing. They worship a thief-god. They worship a giant sunflower-she-god-thing. Why do man-things not worship Morgan Freeman, He of the Voice?

DOOOOOMROCKET??!!
Комментариев: 15
Angraug  [создатель] 3 сен. 2024 г. в 21:40 
>:D
Black_Sansrival 7 июл. 2024 г. в 20:24 
Recently I'm starting to understand the whole Skaven operations and tactical engagements more on my own. Thanks to your guide, I can polish the stuff I learned heuristically. Thanks bro! :dealerrizz:
Angraug  [создатель] 7 июл. 2024 г. в 14:03 
That is how I-I sought to deal with some feral orcs many, many moons ago. I brought TWO armies of skavenslaves & clanrats and surrounded the green-things! ... but they killed half my armies and routed the other half. Boyz will be boyz, and skavenslaves will be supper!
rudi v0ller 6 июл. 2024 г. в 13:11 
Easy strategy: make 5 armies of skavenslaves and send them at the enemy. Very bad, very fun
Angraug  [создатель] 11 окт. 2021 г. в 16:58 
Sure, you can skip over a port city and go raiding wherever you want. But if you're raiding through territory just to get to the ocean and points abroad, that creates enemies you probably don't need. There's no monetary impact on the raiding itself (monetary impact comes through research and Lord skills), but there are side bonuses to economics and politics by capturing a port.
freyland 11 окт. 2021 г. в 13:04 
Okay, thank you. I was concerned I was missing some economic relationship between ports and raiding, like losing X% of money from raiding unless you had a port and line to your capital.
Angraug  [создатель] 11 окт. 2021 г. в 12:46 
Three good reasons:
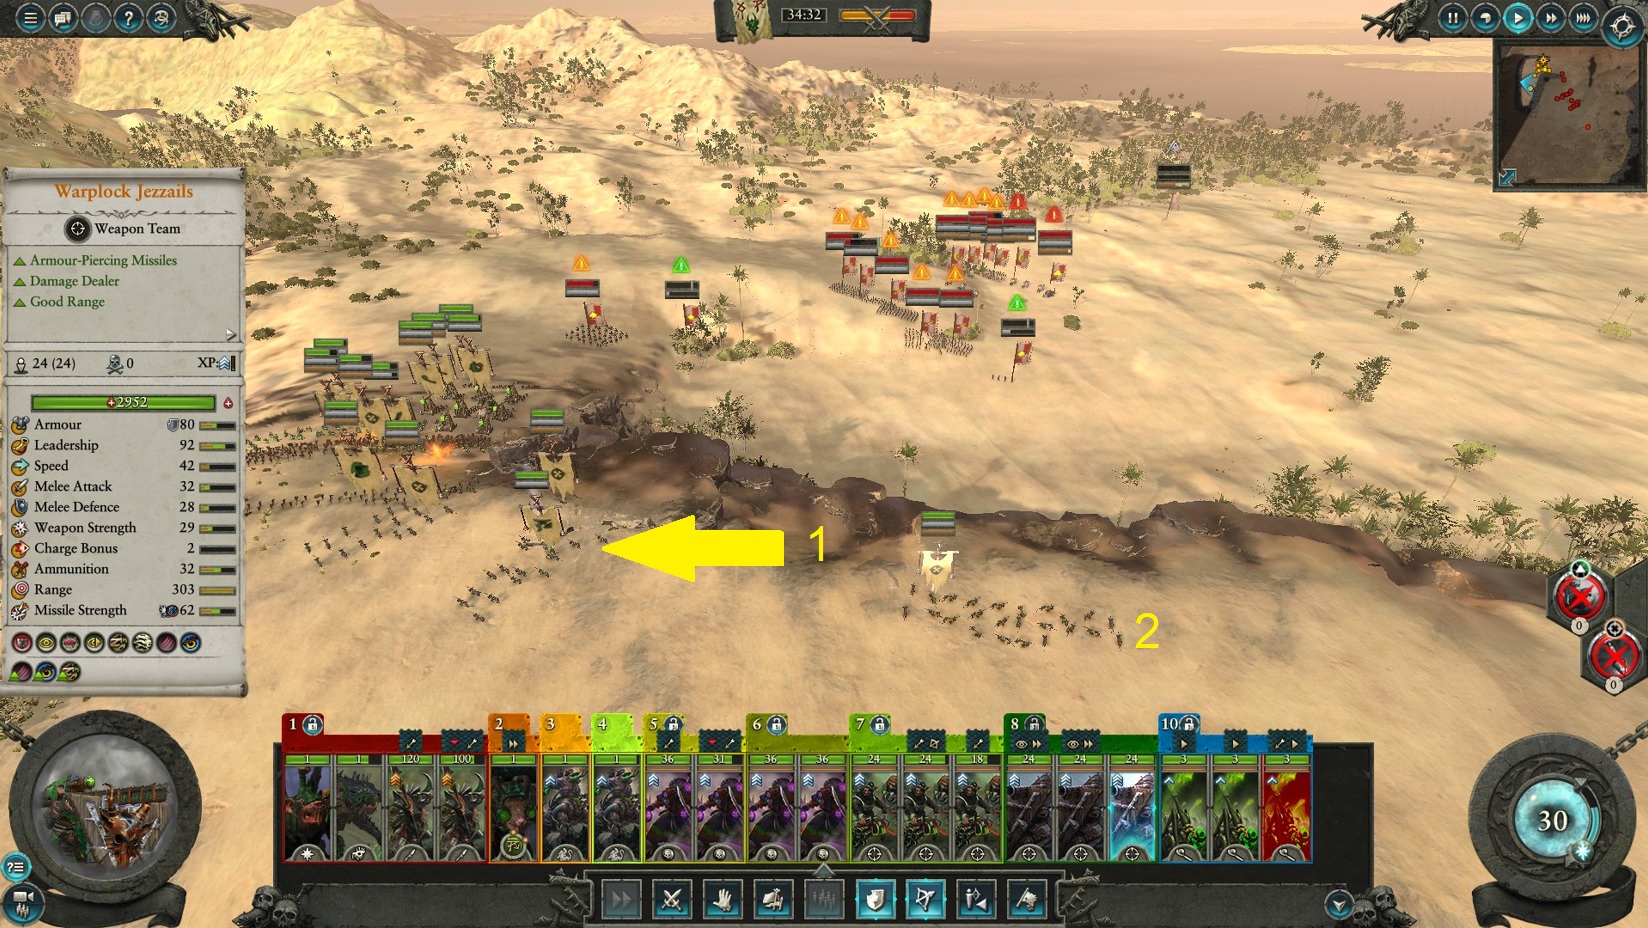
#1): Ports have special building chains that give tons of income per turn (300-400 per port, usually).
#2) Ports allow you to embark armies onto the ocean without wasting movement points, so you get a head start on transitioning from water <=> land.
#3) If you capture a major port by turn 20 or so, this opens up diplomacy options with race-nations around the world. As far as raiding goes, this can allow you to declare war on enemies that will never bother attacking you [which you could use on Skaven Lords such as Queek Headtaker], or create allies that can double-team the places you want to raid. For example, you could ally with Khemri to take out the Knight-Errant civilizations.
freyland 11 окт. 2021 г. в 10:52 
THE PLAN!!: Seize a port city to raid far-far away, such as the rotten-ripe lands south past the Empire

Could you explain this? Why do I need a port city to raid far away lands? How does it improve things over me raiding other continents without a port?
Blackeye 14 июн. 2021 г. в 5:18 
Good-good plans you made, yes-yes. Clan Mors... steal-borrow these.
Space Dust 2 фев. 2021 г. в 8:12 
Good plan-guide yes-yes. You are a smart-wise leader, yes-yes. :WHII_Dominate: