Project: Gorgon

Project: Gorgon

56 ratings
Mechanics Minutiae
By ☆Telixnth
A collection of the inner-workings of Project Gorgon. Contains tips, tricks, calculations, and general game knowledge and guides to assist with surviving and leveling skills!
5
2
9
2
   
Award
Favorite
Favorited
Unfavorite
Intro - Table of Contents
[This guide is currently not being maintained. Until such time as Telixnth returns to Project Gorgon, it will remain that way. Hopefully enough stays relevant for now.]

My goal here is to document the finer workings and mechanics of Project: Gorgon. I will add to this as I learn new topics, and it is all subject to change upon any given patch. Please leave a comment if you have any tips or things you would like me to look into!

I try to keep this roughly organized, but due to the scope of this guide, finding specific skill mentions may best be suited to using Ctrl+F to search for them, using the side-bar to jump to sections, or Crtrl+F'ing the table of content's codes for each section.

Combat Skill information, bit by bit
C-01 - Combat Skills for newbies: Which to start with, which to work towards later
C-02a - Pros and Cons of each DPS skill
C-02a - Pros and Cons of each Tank skill
C-02c - Pros and Cons of each Support skill
C-03 - Beast Forms and their unique properties
C-04 - Mentalism details
C-05 - Pets and their mechanics

Damage Types - Or how I realized everything does Trauma damage
D-01 - The Damage Types of each Combat Skill
D-02 - Listing of treasure mods that modify ability damage types
D-03 - Cross-skill combat synergies
D-04a - Damage Type effectiveness in dungeons (Serbule Crypt through Dark Chapel)
D-04b - Damage Type effectiveness in dungeons (Labyrinth and Gazluk Keep)

Mechanics and how the game works under the hood
M-01 - How and when monsters decide to attack you
M-02 - How combat experience is granted
M-03a - Crowd control abilities - a detailed list
M-03b - Crowd control abilities - a detailed list (continued)
M-04 - Crowd control and diminishing returns
M-05 - Direct versus indirect damage
M-06 - Armor mitigation and effective health as defenses
M-07a - High-tier armor comparisons
M-07b - High-tier armor comparisons (continued)
M-08 - Small mechanics and synergies between skills

Trade Skills and other non-combat leveling
T-01 - Fletching guide
T-02a - Gaming (Skills and Enemies)
T-02b - Gaming (Events)
T-02c - Gaming (Hats and Perks)
T-02d - Gaming (Strategy Tips)
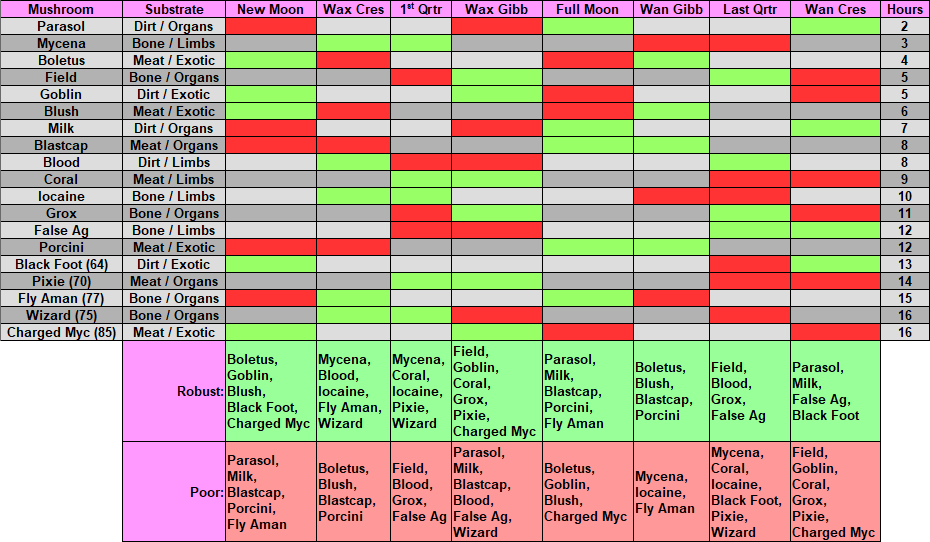
T-03 - Gardening guide
T-04 - How to train Instruments, Dancing, and Howling
T-05 - Learning new languages
T-06 - Leatherworking guide
T-07 - Surveying, Mining, and Geology tips and tricks
T-08 - Sushi Preparation guide
T-09 - Tailoring and Textile Creation guide
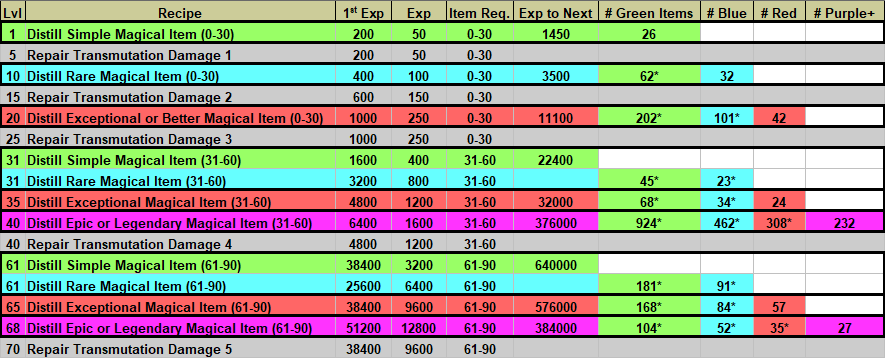
T-10 - Transmutation guide
T-11 - Any other skills that are quite simple to master

General tips and community content
TIP-01 - How to navigate tundra and desert without dying
TIP-02 - Notes on boss curses that aren't all-bad
TIP-03 - Miscellaneous tips and tricks
TIP-04 - In-game chat channels to help you out
TIP-05 - Graphics settings advice
TIP-06 - Useful external resources, websites, etc.
TIP-07 - Planned features confirmed by developers (plus speculation)
C-01 - Combat Skills - Ease of Training
Very Simple to Learn
Animal Handling: A great skill for new players: it is strong early on without needing specific gear. It is invaluable for leveling other combat skills, since the pet keeps its level even if your abilities are downscaled.

Beginner Friendly
Mentalism: This can be unlocked fairly early with Echur in Serbule. It is a good support skill that mixes damage and buffs.
Psychology: Being unlocked at the very start of the game, this is the first support skill players will learn. With a range of crowd-control abilities, this is recommended alongside any damage-focused skill.
Shield: A defensive and tanking skill. Unlocking it with Tyler Green in the Serbule Hills inn is relatively easy. This is also the earliest skill that obtains sprint speed boosts.
Sword: Granted to all new characters, this skill has potent damage and some of the best Rage management available.
Unarmed: Also granted to all new characters, this skill has both damage and crowd-control. However, limiting yourself to unarmed weapons in both hands is a pretty large drawback, making Psychology or Mentalism easier to use for newbies.

Simple -- But Need Progression To Unlock
Bard: This skill requires more investment to unlock -- you will need to gain favor with Rappanel in the Serbule Hills inn as well as buy a beginner's Lute from Marna in Serbule to practice playing instruments. This skill also basically requires use of both hands to be potent, giving a similar drawback to Unarmed. That aside, its mechanics are simple to learn, with the biggest hurdle being only to remember not to move around while playing a song.
Staff: Another defensive and tank-oriented skill. Favor with Hogan in Eltibule is a little tougher to gain, as well as Eltibule in general being a mid-level zone, but the skill is very straightforward.

Intermediate -- Game Knowledge And Familiarity Required
Archery: Despite being unlocked on Anagoge Island, this skill is a trap for newer players. Obtaining arrows is not simple, either having prohibitive cost or requiring Fletching to create your own. However, Fletching also requires Carpentry, Blacksmithing, Fishing, Foraging, Alchemy, and other skills, or at least the money to buy the materials. Past this, Archery is a versatile and high-damage skill.
Beast Forms -- Cow, Deer, Giant Bat, Lycanthropy, Pig, Rabbit, and Spider: Each of these are easily obtainable with help from other players, but they restrict some gameplay. Most NPCs in Serbule and Eltibule will not talk to animals, which will heavily restrict storage and merchants. Storage can be gained through favor beforehand, but merchant workarounds will be necessary. Animal Town in Sun Vale is of great assistance, but it is a higher level zone, making it difficult to actually reach the town. On top of this, beasts will find themselves unable to do many other trade skills: Carpentry, Foraging for wood, Armor Patching, and Sigil Scripting are impossible without hands. You will not be able to learn or train many trade skills due to NPC restrictions. Your secondary combat skill will also be limited to Animal Handling, Mentalism, Necromancy, Priest, Psychology, or Unarmed. Some forms allow Druid or Ice Magic, but most combat skills are impossible to use. Despite all this, the downsides are not too drastic to stop a new player from enjoying the game. Lycanthropy players will be able to shift into human form, negating most of these downsides, but Lycanthropy is permanent and will force you into wolf-form 3 days of every month. Giant Bat players will also only be able to obtain some of their abilities from Halloween events, and Rabbit Juice is only obtainable during events or from other players.
Druid: Requires a combat skill of at least level 50 in order to unlock. It will also subject players to random events that are all-but-necessary, stopping all experience gain until they are completed or have passed. Druidism is also a permanent choice -- so if you do not like the idea of these events, be careful picking this.
Hammer: This skill has a fair barrier to entry, needing you to befriend an NPC in Sun Vale, as well as requiring a hammer to function, which is a particularly rare weapon type.
Knife Fighting: While you can learn this early on in Serbule, this skill requires use of throwing knives that come from Blacksmithing. These are much more difficult to create and maintain a steady supply of compared to arrows, making a fair bit of work for upkeep.
Necromancy: New players will not be able to unlock this on their own until they are very proficient at another combat skill or gain the assistance of other players. Necromancy also requires you to wear at least one piece of equipment that has a necromantic gem embedded in it, which is fairly rare, making gear upgrades difficult. You are limited to summoning your skeletons in cemeteries, making you impotent should they die at any time, and you can only heal them with Necromancy abilities. It also suffers from dropping off at higher levels like Animal Handling.

Proficiency Required
Battle Chemistry: You will need 50 Alchemy to even learn it, and you will also require high levels in Meditation, Fishing, First Aid, and Unarmed to even unlock most of the abilities. On top of this, it is a very Area-of-Effect focused skill, with lacking single-target damage and no real utility. It does offer a large sprint speed boost, and in AoE situations it is unmatched.
Fire Magic: Alluring to new players and easily unlocked, this skill will hit a brick wall in progression very quickly. Researching new abilities and ability levels requires materials: Fire Dust, Sulfur, Saltpeter, Explosive Runestones, and Flame Nibs. Of these, only Fire Dust is easily obtainable, with Sulfur and Saltpeter being in mid-level areas while your Fire Magic level is limited to 10. The latter two materials are exceptionally rare, requiring either a huge amount of cash to buy from other players or other high-level combat skills in order to obtain them yourself. Quite simply, this skill is impossible to train without significant investment in other combat or trade skills.
Ice Magic: Similar to Fire Magic, this skill will take various materials to train abilities. Unlocking the skill is much more difficult, and the materials are exclusive to Kur Mountains and Gazluk. Not many players pursue this skill, so do not expect help in acquiring the materials necessary to train.
Priest: Requiring traversal of Kur Mountains and likely a fair number of Lapis Lazuli to train, there is a fair barrier to entry. On top of that, it is a support skill that is more oriented towards group-play (as its heals are channeled), rather than being directly useful in solo scenarios. Its best attack is also limited to skill books dropped from monsters -- these can be very expensive from other players due to their rarity.
C-02a - DPS Skill Overview
DPS Skills
These skills are the general favorites of most players, offering lethal power and oftentimes a few bits of utility. Any skill pairing that is not specifically designed to tank or heal will usually have one (or even two) of these skills.
Weapon-Based
These skills require a certain type of weapon to be equipped, and are generally very straight-forward damage-dealers. Press button, dish out pain.
  • Archery: A very high-DPS skill, Archery offers diverse methods of damage at the cost of having to fletch and carry your own arrows. Archery can do large spikes of damage, apply different types of DoTs, directly damage armor, and perform decent AoE. The mixture of damage types helps overcome any enemies resistant or immune to certain types. It also adds utility with a mesmerize attack, a stun, a grapple to pull enemies towards you, and a minor heal for allies.
  • Battle Chemistry: Focused heavily (almost entirely) on AoE attacks, this skill allows for fighting groups of enemies easily. Will struggle against single, strong foes. Its attacks have substantial cooldowns, but it also allows you to summon a programmable golem that will contribute attacks or healing. Battle Chemistry offers sprint speed, damage mitigation, power regeneration, and healing as well. Fairly versatile, but not the strongest in the damage rankings.
  • Fire Magic: Considered the highest-damage skill, Fire Magic also comes at a cost: difficult to train, high power usage, little utility, and almost exclusively dealing fire damage, making it weak against some foes and quickly filling any enemy's rage meter. But with these downsides comes raw power, ready to smite almost every foe.
  • Hammer: Hammer deals high damage with high power usage. It does not output as much DPS as Fire Magic, but it diversifies its damage with crushing and electric typed attacks, as well as offering stuns, a knock-down ability, and some regeneration.
  • Knife Fighting: A very situational skill, but with above-average damage when those situations are met. Many attacks only work fully when the target is attacking someone else, feared, or mesmerized. Some attacks also require smithed throwing knives or crystal ice. Offers heavy poison and bleeding DoTs, with a bit of self-healing and rage reduction.
  • Sword: The tried and true, a sharp sword will cut down any foe. Consistent but average damage, sword attacks focus on reducing the enemy's rage more than any other skill in the game. Simple, easy, and effective.
Pet-Based
Pet skills range from being solely about their pets to being a damage-based skill with pets as a bonus. The power of direct attacks and pets are inversely proportional: the stronger your pets are, the weaker your own attacks are, generally.
  • Animal Handling: The truest pet-skill in the game, focusing solely on a single pet to the point of only having one weak direct attack. You must tame animals in the wild, add them to your stables, and raise their own levels and stats as you fight alongside them, issuing commands, buffing, and healing your pet. Cats will do high damage, rats and bees will evade enemy attacks, bears will tank for you. Note that Animal Handling is one of the few skills that require no special gear to function, making it pair with everything in the game.
  • Battle Chemistry: The golem summon is programmable, giving it instructions to use various different abilities when conditions are met: anything from health values of it or yourself, rage meters, its owner being crowd-controlled, and much more. After programming though, the golem operates without your input, outside of a single 'trigger' ability that can be linked in the conditionals. The golem makes up for the long cooldowns on Battle Chemistry attacks, but can be a hassle to deal with.
  • Necromancy: A 50/50 split skill, offering both moderately strong pets and spells. A pain to deal with, Necromancy skeletons require being in a graveyard or surrounded by player graves to summon your skeletons, and the zombie requires corpses to be summoned and healed. The spells focus on darkness and psychic damage (with optional additional DoTs), with any undead foe being completely immune to darkness spells. Necromancy pets also cannot be healed by anything other than Necromancer abilities. Often considered more trouble than its worth, Necromancy can still be a respectable skill in the right conditions.
  • Spider (Beast Form): Spiders generally do most of their own damage, but their summoned Baby Spiders can add a significant amount of DPS. Consider this a damage-dealer with pets as a bonus. See Beast Forms section for detail on the non-pet aspects.
  • Notable Mentions: Deer, Fire Magic, and Ice Magic all have a pet summon, but these are generally fairly weak and do not influence the rest of the skill much. Also, the maximum number of simultaneous pets comes from Spider and Necromancy: two Baby Spiders, two skeletons, and a zombie, for one full-fledged army.
Beast Forms
  • Giant Bat: With the ability to fly, Bats offer unique gameplay alongside a standard set of attacks. Includes a fear, AoE attacks, AoE knock-back, and stuns - as well as flight-speed boosts. One major downside is that three abilities are locked behind halloween event-only recipe books - but of these, only the epic attack is of much use. Bat can be used reliably even without its epic attack, so feel free to try it even if halloween is months away.
  • Lycanthropy: Bite and claw your way to bloody victory through sheer power. Wolves are almost entirely damage-focused, but excel in the category. Notably, one attack debuffs enemies so that they take increased damage from that same attack - applying to not just you, but all other wolves attacking them. Running in a pack is not just aesthetic, it is advantageous. Wolves also can utilize stealth to engage enemies, and can slightly heal themselves. Wolves can wear specialized armor, giving them very high armor values to make up for their otherwise lacking defenses.
  • Rabbit: Only obtainable through a spring-time event or other players, Rabbit is not very accessible. But if you want hard-hitting kung-fu and Unarmed just isn't cutting it, Rabbit is what you want. It also offers a fair bit of utility: reducing rage, stuns, stealth, healing, evasion, and even playing dead so enemies stop attacking you. Notably, Rabbits can also wear a special tiara that allows them to use Ice Magic without a staff.
  • Spider: If you are not an arachnophobe, Spiders can deal both bursts of damage and sustained attacks, as well as summon Baby Spiders to assist them. Spiders can spit acid to damage armor, apply posion DoTs, stun, pull enemies towards them, fear, and repeatedly kick for more damage each time. More versatile than other beast forms, and with solid damage output.
  • Warden (Not a beast form itself, but only usable by beasts): Warden straddles the line between DPS and utility, adding much-needed diversification to beasts' ability sets. With solid damaging attacks, armor damage, stun traps, a grapple, damage buffs for the whole party, and even temporary flight, Warden can pair with any other beast form to create a complete package.
C-02b - Tank Skill Overview
Tank Skills
Tank skills deal only moderate damage, but make up for it with defensive abilities, mitigation, regeneration, and even complete invulnerability buffs. Very useful for surviving harder or longer fights.
  • Cow (Beast Form): Fulfilling the main-tank role for beasts, Cow offers a complete package of mitigation (both self and target debuffing), taunt to all attacks, health/armor/power regeneration, increased healing received, a stun, a knockback, and even thorns that heal yourself. Cows can also wear specialized armor, boasting superior defenses to other tank skills.
  • Deer (Beast Form): Deer focuses on damage bit more than Cow, losing some defense in the process. Deer can still be a reliable tank, or more suited to off-tanking. Still, it includes solid physical mitigation, three taunts, rage reduction, health/armor/power regeneration, a stun, a knockback, and projectile evasion. Deer can also summon a pet deer, though its effectiveness is minimal.
  • Ice Magic: Ice Magic is a hybrid between tank and utility, coming with the cost of higher power usage (but also higher power regeneration). It has an invulnerability ability to block physical, cold, fire, and poison damage - but to balance its comprehensive coverage, it completely stuns you for the duration. With slightly weaker passive mitigation, Ice Magic provides some taunt to all attacks, health/armor/power regeneration, multiple stuns, an immobilize, a slow, and a mesmerize. Another downside is that almost everything outside in Kur and Gazluk is immune to cold, and most enemies in the dungeons there resist cold as well. Not a very popular skill, but offers utility other tank skills do not.
  • Shield: If you like wearing heavy metal armor and keeping your armor topped off, Shield has you covered (literally). A notable aspect of Shield is that it enhances your natural armor mitigation: instead of mitigating 1 point of damage for every 25 armor remaining, Shield decreases that to every 20 armor. With a fire, cold, and electricity invulnerability ability, moderate mitigation, a buff to taunt heavily with all attacks, rage reduction, high armor regeneration and moderate power regeneration, a stun, an AoE knockback, fire thorns, and the ability to occasionally evade AoEs, knockback, stuns, and even death itself, Shield makes sure your armor doesn't go to waste.
  • Staff: Staff struggles to keep the aggro of enemies, but it offers the most comprehensive mitigation of any tank skill. Staff gives an ability for invulerability to all physical types and an ability that reduces ALL damage for 35%, as well as a buff to mitigate flat damage of all types. Add in good rage reduction, armor/health regeneration, multiple stuns, a slow, and an epic attack with added fire thorns, and that stick you previously used for casting magic becomes one of the best defensive tools around.
  • Unarmed: Unarmed is a tricky beast. On one hand, it offers permanent percentage mitigation of physical, dark, psychic, acid, poison, and nature damage, as well as permanent taunt to all attacks - but on the other, it lacks in damage, regeneration, and restricts both weapon slots for full functionality. Works exceptionally well with Cow or Deer, and offers multiple ways to reduce rage, stun, knockback, and slow enemies. If you only keep one hand unarmed, you lose access to the more damaging attacks of Unarmed, making its DPS even worse, but retain the defensive and utility benefits.
C-02c - Support Skill Overview
Support Skills
Support skills are for healing health, armor, and power of yourself and allies, as well as offering different buffs or even resurrection from death. While they will not keep yourself alive as well as a tank skill, these skills benefit an entire party of players as well as keeping the tank alive. These skills can also deal moderate to low damage, sometimes with few damaging attacks, so plan to bring heavier firepower alongside them.
  • Bard: Bard is a skill of two minds: a Lute in the main hand offers most of your support, and a Horn in the offhand supplies damage. Similarly, Bards can build themselves to be self-sufficient damage-dealers or strong group supports, but a mix of the two can be accomplished as well. Bards have three songs played with their Lute, only one at a time, and disallowing movement or they will end. One song does continuous damage to everything around you (with potential to stun and reduce rage), one causes all allies to regenerate health and a bit of power, and the last reduces ability power costs for allies, boost their damage, and help them restore armor. The Horn abilities deal moderate damage and can also reduce rage or steal health/armor from enemies. Independent of instrument(s) chosen, Bard also offers a burst heal, group evasion buff, a mesmerize, and a short group DPS buff. Keeping the instrument restrictions in mind, Bard's power lies in their Lute, as their Horn attacks are not particularly strong, being a support skill. A Bard using a Lute alongside a different offhand can keep most of the support/sustain benefits while also granting access to a Shield to tank or Archery, Knife Fighting, or Battle Chemistry to add DPS.
  • Druid: Druid offers a mix of potent healing and enemy debuffs. Between four healing spells, one of which being a stationary sanctuary that repeatedly heals all inside, there is no excuse for a Druid's allies to die outside of dire circumstance. Druid can also reduce an enemy's mitigation and damage output by a significant amount. They can transform into Deer or various birds on command, granting them easy access to a beast form and flying travel forms. But with these potent abilities, comes the downside of Druidic Emergencies: randomly, multiple times a day, chaotic events will occur in the world that Druids must attend to, fighting tough enemies and fulfilling other objectives. If a Druid does not attend these emergencies, they will receive zero experience in every skill until the emergency is concluded, and they will also not receive points needed to unlock transformation abilities. Note that Druid requires a wooden main-hand weapon, or special enabling equipment for Cow, Deer, or Spider, and will not work otherwise.
  • Mentalism / Fairy Magic (Fairy Magic is a sub-skill of Mentalism, known only by Fairy players): Mentalism seeks to replenish allies consistently, washing over them with sustained health, armor, or power regeneration, or even increased damage. Its healing output is limited, but it makes up for that in the form of granting its allies various types of mitigation. Mentalists can also contribute to party DPS by placing a bubble around an enemy, which absorbs damage to a point, then discharges and amplifies that damage. Do not expect much damage from Mentalism, unless you are a Fairy. Fairy Magic's additions to Mentalism are much more focused on damage, as well as adding an ability to drop a stationary conduit of power regeneration to all allies standing within, potentially also restoring health and increasing damage. Note that Mentalism is one of the few skills that require no special gear to function, making it pair with everything in the game.
  • Pig (Beast Form): Pig is the beast form of support, with a focus on damage. Pig can buff allies' evasion, restore a moderate amount of health, buff allies' melee damage, and knockback and fear enemies. Owing to these traits, Pig is both effective at group support and also self-sufficient, creating a robust profile without the downsides of something like Priest or Bard.
  • Priest: Priest offers consistent damage and amazing group-support capability, but its group-support abilities have channeling times, interrupting them if you are being attacked at all. It can restore health, armor, and power consistently, resurrect allies, remove poison and fire DoTs and reduce the severity of all other DoTs, and has a heal ability that automatically targets the most-damaged ally in your party. Also offering a strong epic attack (though only learned through rare books) and an ability that causes enemies to be stunned when they use their rage attack, Priest manages to excel in all categories as long as you have friends watching your back.
  • Psychology: Psychology is one of the skills that any newcomer will start with, making it an early option for healing and crowd-control. It offers a more damage than Mentalism, as well as a fear, rage reduction, and even taunts. Its healing output is more focused on bursts, with no passive regeneration, but also restores a bit of armor and power. Note that Psychology is one of the few skills that require no special gear to function, making it pair with everything in the game.
C-03 - Beast Forms
When obtaining Beast forms, the forms (minus Lycanthropy) stack like a totem-pole. If you drink a Spider juice, then a Pig juice, you'll be a Pig -- but if you drink an Un-Pig Juice, you will return to Spider form. These forms 'replace' your human form, whereas shape-shifted forms such as Lycanthropy and Druid travel forms (not Deer) are 'on top' of your human/base form. Drinking a beast juice while in either of these forms will change your base form but not your current form. Similarly, Lycanthropes are immune to beast forms during the full moon -- if, for example, Ciervos curses you, you will stay in wolf form.

As a general rule, Beasts can only use Animal Handling, Mentalism, Psychology, Necromancy, Priest, and Unarmed alongside their respective Beast skill. While Battle Chemistry is technically able to be used, you cannot equip weapons to enable its attacks, limiting it to Mutations and the summoned Golem, making it mostly useless.

Notable exceptions: Cow, Deer, and Spider can use Druid, and Rabbit can use Ice Magic (via an equipable head-slot item). Rabbit allows players to equip Ice Magic without a staff, which enables Rabbits to be the only form in which Ice Magic and Unarmed can be used together while still allowing use of all of Unarmed's abilities.

Spiders can also use an Illusion spell that consumes a Moonstone to temporarily disguise one's self as a human, which bypasses NPC Beast Speech restrictions.

For leveling Beast Speech, you earn experience for each time your speech is affected, with a cooldown of 1 minute. If your cooldown is expired, you can safely spam chat until your text is altered, which will grant an experience gain and then start the cooldown again. A useful tip is to right click on your chat tabs, add a new tab, and "Add Channel" to create a personal chat room, where you can spam chat without forcing other players to hear it. Also, at the max of 50 Beast Speech, your text will still be altered a small amount.

Giant Bat has three abilities locked behind Halloween event items: Bat Stability, Smoldering Gaze, and Confusing Double.

Lycanthropes will notice that you have to kill enemies before you can change shape back out of wolf-form. This starts at around 10 kills, and decreases as you level up, until level 53, where no kills are required.
C-04 - Mentalism
Evaluating Pain Bubble
Since Pain Bubble multiplies damage of other abilities, it can be hard to evaluate when it is worth it and when it is not. Thankfully, due to it having a limited amount of additional damage, a timer, a power cost, and requiring a Global Cooldown activation, it can be compared to time/damage efficiency of other abilities.

Pain Bubble (1):
Duration: 5 seconds
Max Absorption: 200 damage
Multiplier: 150%
Power Cost: 25


Assuming you can deal 200 damage within 5 seconds, the 150% multiplier adds 50% to your direct damage, giving 100 damage. Under assumption of equal weighting in enemy type resistance, this level of Pain Bubble can translate to a generic ability with the following stats:

Damage: 100
Cooldown: 20 seconds
Power Cost: 25


Now you can directly compare it to other abilities, and you can see whether it's worth using compared to simply using other damaging abilities. This format continues:

Pain Bubble 2:
Duration: 6 seconds
Max absorption: 300
Multiplier: 175%
Power Cost: 34

----------------------------
Damage: 225
Cooldown: 20 Seconds
Power Cost: 34


Pain Bubble 3:
Duration: 7 seconds
Max absorption: 500
Multiplier: 200%
Power Cost: 39

----------------------------
Damage: 500
Cooldown: 20 Seconds
Power Cost: 39


Pain Bubble 4:
Duration: 8 seconds
Max absorption: 700
Multiplier: 225%
Power Cost: 44

----------------------------
Damage: 875
Cooldown: 20 Seconds
Power Cost: 44


Pain Bubble 5:
Duration: 8 seconds
Max absorption: 1000
Multiplier: 250%
Power Cost: 54

----------------------------
Damage: 1500
Cooldown: 20 Seconds
Power Cost: 54


Critical Hits and Heals
By leveling Phrenology, both Mentalism and Psychology are granted chance to critically hit and heal based on the target's race and your Phrenology level for that race. Patch notes confirm that critical heals for Mentalism exist with +25% heal amount (but Psychology critical healing needs confirmation).
C-05 - Pet Interactions
Animal Handling and Necromancy pets work as expected, needing you to have their skill equipped for the summons to stay. Note that a pet attacking things in combat will NOT tag that skill for experience gain from monsters dying -- you will need to cast at least one ability from the skill to get experience from combat. This is especially strange since the starter ability is a pet heal. Healing the pet isn't necessary when fighting monsters, but players will only gain experience if they use an ability, so using the heal will be required to gain experience.

It is also worth noting that Animal Handling allows you to use fully leveled pets (currently level 80, plus Bond levels) with any other level skill, allowing you to level up something from level 1 with level 70 killing power. This is a valuable way to skip out on the normal restriction of only being able to use abilities up to 25 levels above your lower equipped skill's level.

Spider has the ability to use Incubate to create up to two Baby Spiders. These follow the same rules as other pets, but with an additional interesting tidbit. As long as Spider is one of your active skills, the Baby Spiders will remain -- even if you take a different beast form! This is of limited use for other beast forms (since the babies are quite temporary), but it does enable you to level up something like Lycanthropy with max-level Baby Spiders assisting you when you would not otherwise be able to benefit from your Spider skill level.

Necromancers can also summon their skeletons if they are near 3 player gravestones. A handy way to accomplish this is to carry Fuel Oil (from Fainor in Serbule) with you and drink it to suicide, letting you create a graveyard anywhere.

As a minor note, some gear may have mods that are awkwardly worded. For example, there is a mod that affects Baby Spider damage, and it is worded such that it adds "damage with each attack." This does not stack or build up, despite how it is worded, and only adds a modification to their base damage once.
D-01 - Damage Type Reference
This will list the skills and each of their associated damage types. My ranking of damage typing is based on throughput of damage -- so even if a skill has an epic attack of a different damage type, its ability to output that damage type on demand is limited. This is useful for checking what skills can effectively combat monsters that are immune or highly resistant to certain damage types. Take the Spy Portals in Winter Nexus, for example; Spy Portals are immune to everything except Piercing, Nature, and Darkness. If you only have one attack that does one of these damage types, and that attack has a high cooldown, it does not matter how strong it is because you will be waiting on that cooldown should two or more attack you, leaving you useless against them in the meantime.

Exceptions to this evaluation method lie with Animal Handling and Necromancy. Animal Handling has five effective pet types, with the type of pet determining the major source of Animal Handling's damage. Rats deliver Crush damage with Sic 'Em providing Slash. Fire Rats have, well, Fire damage. Felines (non-Grimalkin) provide Slash damage. Grimalkins split their basic attacks between Crush and Slash, with their Sic 'Em attack doing Trauma damage. Bears split their basic attacks between Crush and Slash, with their Sic 'Em attack doing Crush damage. Fae Bees and Wasps deal Poison and Cold damage. As for Necromancy, their three summons each do different basic attacks, denoted on the chart with their names. Another note is that Bard's Song of Discord does Trauma damage, despite not being listed as such.

Also, Fae Mentalism will be listed as the entire completed Mentalism ability pool, rather than only the Fae additions.


In addition to the base types included in each skill, various treasure mods can also add or change damage types of various abilities. The following chart includes these changes, with the deviations from the baseline bolded and italicized.
  • (+) notes addition of damage type(s)
  • (*+) and (*-) notes that abilities in that type are modified rather than added, with +/- added to note the direction of the change
  • (^) indicate an additional damage method of the same type (e.g. adding a Fire DoT to an ability that already did direct Fire damage)
Specific listings of added types and modified types can be found in the next guide section -- type-identical additions will not be listed, as they are more akin to buffs than modifications.


Noteworthy changes from treasure mods: Trauma is added to most skills and becomes the most common damage type. Necromancy gains a good deal of Psychic damage across the board, helping to offset the downsides of Darkness. Rabbit's abilities have their types shuffled and changed significantly. Fae Mentalism can change nearly 1/3 of your move-set into Fire damage.


Various skills also include abilities that can be put on your side-bar. These offer great utility for covering weaknesses in your combat skill types, but some are heavily limited by their cooldowns (marked with a 'CD' on the chart). Note that these are ranked compared to each other, and not to combat skills as a whole. For Fire Magic, I am referring to the Spontaneous Fireball ability that is placed on the side-bar. Gardening's ability is Spade Assault, taught by Tavilak in the Casino (this ability is not properly listed in the wiki [yet]).

D-02 - Treasure Mod Type Effects
Archery: Mangling Shot adds Trauma DoT
Bard: Entrancing Lullaby adds Trauma damage after a long delay
Bard: Thunderous Note changes damage from Trauma to Nature
Battle Chemistry: Adds fire DoT to all bomb attacks
Cow: Bash adds Nature DoT
Cow: Clobbering Hoof adds Nature DoT
Cow: Tough Hoof inflicts Trauma damage to attackers
Deer: Additional Deer Kicks add Nature DoT
Druid: Heart Thorn changes damage from Nature to Poison; adds Poison DoT
Druid: Heart Thorn adds Nature DoT -- Is not converted by above mod
Druid: Rotskin adds Trauma DoT
Fire Magic: Room-Temperature Ball changes damage from Crushing to Darkness
Giant Bat: Deathscream adds Trauma DoT
Giant Bat: Virulent Bite adds Trauma DoT
Knife Fighting: Backstab adds Trauma DoT
Knife Fighting: Blur Cut adds Poison DoT
Knife Fighting: Slice adds Poison DoT
Knife Fighting: Surge Cut adds Trauma DoT
Lycanthropy: After using See Red, all other Lycanthropy attacks add Trauma DoT
Mentalism: Mindreave changes damage from Psychic to Electricity
Mentalism: System Shock adds Trauma DoT
Mentalism (Fae): Astral Strike changes damage from Electricity to Fire and adds Fire DoT
Mentalism (Fae): Fairy Fire changes damage from Psychic to Fire and adds Fire DoT
Mentalism (Fae): Pixie Flare changes damage from Electricity to Fire
Necromancy: Death's Hold adds Fire DoT
Necromancy: Life Steal adds Psychic DoT
Necromancy: Spark of Death adds Psychic DoT
Necromancy: Wave of Darkness adds Psychic DoT
Pig: Squeal adds Trauma DoT
Priest: Castigate changes damage from Psychic to Fire
Rabbit: Bun-Fu Strike changes damage from Crushing to Cold
Rabbit: Bun-Fu Blast changes damage from Psychic to Cold
Rabbit: Love Tap adds Trauma damage after a delay
Rabbit: Play Dead adds Psychic damage after a delay
Rabbit: Rabbit Scratch changes damage from Slashing to Trauma
Rabbit: Thump adds Trauma DoT
Shield: Stunning Bash adds Trauma DoT
Spider: Grappling Web adds Poison DoT
Spider: Terrifying Bite adds Poison DoT
Staff: Double Hit adds Fire DoT
Staff: Redirect adds Trauma DoT
Sword: Hacking Blade and Debilitating Blow add Trauma DoT
Unarmed: Barrage and Headbutt add Fire DoT
Unarmed: Bruising Blow changes damage from Crushing to Trauma
Unarmed: Infuriating Fist changes damage from Crushing to Trauma
Unarmed: Infuriating Fist adds Trauma DoT
Unarmed: Slashing Strike adds Trauma DoT
Warden: Apprehend changes damage from Fire to Electricity
Warden: Lethal Force adds Fire DoT
Warden: Privacy Field adds Fire DoT
Warden: Aggression Deterrent adds Fire DoT
D-03 - Skill Synergies
This list includes all minor synergistic buffs, treasure mods, and effects that assist the performance of other specific combat skills. Generic synergies such as boosting Nice Attack damage are not included, since they are self-evident and common. Effects from treasure mods with a 'x2' next to them are mods that you can have on two different slots, doubling the effects. There are a fair number of interactions here, so stick to your preferred skill and pick your secondary skill by using the damage typing chart to see what skills it will synergize with.

Animal Handling: Drunk Sewer Rat's Clever Trick ability is to inflict a poison vulnerability debuff (20% for 20 seconds). Treasure mods buff direct Piercing and/or Electricity damage by 14%.

Archery: Poison Arrow treasure mod inflicts a Poison vulnerability debuff (17% for 10 seconds [x2]). Mangling Shot treasure mod inflicts a Piercing vulnerability debuff (10.5% for 10 seconds).

Bard: Thunderous Note treasure mod inflicts a Nature vulnerability debuff (12% for 15 seconds [x2]).

Battle Chemistry: Knee Spikes Mutation grants +22% damage to Kick abilities (plus additional +18% from a treasure mod)

Cow: Treasure mod buffs indirect Nature damage by 36% (x2).

Druid: Rotskin reduces target's mitigation (-48 for 30 seconds; assists DoTs and low-damage repeated attacks particularly; treasure mod adds -42). Fill With Bile buffs target's direct and indirect Poison damage (+40/+5 respectively (duration?)). Treasure mod buffs indirect Nature damage by 36% (x2).

Fire Magic: Calefaction inflicts a Fire vulnerability debuff (20% for 60 seconds). Treasure mod grants up to +101 damage to all fire spells (x2). Treasure mod buffs indirect Fire damage by 47% (x2). Super Fireball treasure mod inflicts an indirect Fire vulnerability debuff (+53% (duration?)).

Giant Bat: Treasure mod enables combo (Sonic Burst + Any Bat Attack + Any Ranged Attack + Any Ranged Attack) that causes the last step to deal +34% damage (x2). Treasure mod buffs Nature damage by 28%.

Hammer: Way of the Hammer buffs targets' Crushing damage (+35% for 10 seconds; treasure mod adds buff to Slashing and Piercing damage by +30%; treasure mod adds buff to Electricity damage by +31%).

Ice Magic: Chill treasure mod inflicts a Crushing vulnerability debuff (+14% for 6 seconds [x2]). Ice Armor treasure mod buffs Cold damage by +22 (x2). Ice Lightning mod inflicts a Fire vulnerability debuff (15% for 7 seconds [x2]).

Knife Fighting: Poisoner's Cut buffs direct and indirect Poison damage (+40/+8 respectively; treasure mod adds +14 to indirect [x2]) for 5 seconds. Abilities that have effects for when your target is not focused on you, having other players or pets is an obvious choice -- however, fear and mesmerize also trigger this effect. Treasure mod buffs indirect Poison damage by 42% and indirect Trauma damage by 42% (x2). Marking Cut treasure mod inflicts a Trauma vulnerability debuff (20% for 10 seconds [x2]). Hamstring Throw treasure mod inflicts a Trauma vulnerability debuff (15% for 20 seconds [x2]). Fan of Blades treasure mod inflicts a Poison vulnerability debuff (20% for 30 seconds [x2]).

Lycanthropy: Treasure mod buffs Trauma damage by 48% (x2). Sanguine Fangs treasure mod inflicts a Slashing vulnerability debuff (12% for 15 seconds). Skulk treasure mod buffs next attack by +43% damage if it is a Crushing attack (x2).

Mentalism: Treasure mod buffs Psychology (and Mentalism) critical hit damage by +140% (x2). Treasure mod for Psi Health/Armor/Power Waves buff targets' Psychic damage by +6 for 60 seconds. Psi Adrenaline Wave treasure mods buff targets' Slashing, Crushing, and/or Electricity damage by +8% for 20 seconds.

Necromancy: Spleen's Power grants 200 max Power for 2 minutes (synergizes with power-heavy skills such as Fire Magic and Hammer). Spark of Death treasure mod inflicts an Electricity vulnerability debuff (10% for 30 seconds [x2]). Death's Hold treasure mods inflict Slashing and/or Electricity vulnerability debuffs (12% for 15 seconds). Treasure mod buffs indirect Psychic damage by 36% (x2). Treasure mod buffs indirect Fire damage by 36% (x2). Heal Undead treasure mod buffs next attack by +35 damage if it is a Darkness attack (x2).

Pig: Frenzy buffs targets' melee attack damage by +60 for 10 seconds (treasure mod adds buff to indirect damage by +7 for 10 seconds).

Priest: Treasure mod buffs direct Fire damage by +31 (x2). Admonish treasure mod inflicts a Psychic vulnerability debuff (7% for 10 seconds, does not stack). Give Warmth treasure mod buffs target's next attack damage by +182 if it is a Fire attack (x2). Give Warmth treasure mod buffs target's indirect Fire damage by +9 for 60 seconds (x2).

Psychology: Psychoanalyze treasure mod inflicts a Psychic vulnerability debuff (+16 damage to attacks for 60 seconds [x2]). Treasure mod buffs Mentalism (and Psychology) critical hit damage by +150% (x2). You Were Adopted treasure mod triggers Vulnerability status on target (synergizes with abilities that apply effects or do more damage during Vulnerability status).

Rabbit: Treasure mod buffs Trauma damage by 35% (x2). Treasure mod buffs indirect Psychic damage by 35% (x2). Treasure mod buffs direct Cold damage by +53 (x2). Thump treasure mod inflicts a Cold vulnerability debuff (14% for 10 seconds [x2]). Bun-Fu Blitz treasure mod inflicts a Trauma vulnerability debuff (14% for 20 seconds [x2]). Hare Dash treasure mod buffs next attack by +205 damage if it is a Crushing attack (x2). Play Dead treasure mod buffs Psychic attack damage by +70 for 20 seconds (x2). Carrot Power treasure mods buff Cold and/or Crushing damage by 30% for 10 seconds. Carrot Power treasure mod buffs Kick damage by +108 for 10 seconds (x2).

Shield: Disrupting Bash treasure mod inflicts a Crushing vulnerability debuff (9% for 8 seconds [x2]).

Spider: Premeditated Doom treasure mod buffs indirect Poison damage by +8 for 20 seconds (x2). Treasure mod buffs indirect Poison damage by 70% (x2). Spit Acid treasure mod buffs Poison damage by 24% for 30 seconds (does not stack). Terrifying Bite treasure mod inflicts a Poison vulnerability debuff (+14% to attacks for (duration?) [x2]). Grappling Web treasure mod inflicts a Poison vulnerability debuff (14% for both direct and indirect for (duration?) [x2]).

Staff: Treasure mod causes all Staff attacks to have a 5% chance to trigger Vulnerable status (synergizes with abilities that apply effects or do more damage during Vulnerability status; [x2]). Phoenix Strike treasure mod buffs direct Fire damage by 18% for 30 seconds. Double Hit buffs next attack damage by +90 if it is a Crushing attack (x2). Double Hit treasure mod inflicts a Slashing vulnerability debuff (9% for 15 seconds). Blocking Stance treasure mod buffs direct Cold damage by 13.5% for 30 seconds (x2). Blocking Stance treasure mod buffs Mentalism attack damage by +14 for 30 seconds (x2). Phoenix Strike treasure mod triggers Vulnerable status.

Unarmed: Bruising Blow inflicts a Crushing vulnerability debuff (15% for 30 seconds). Bruising Blow treasure mod inflicts a Poison vulnerability debuff (21% for 20 seconds; does not stack). Barrage and Headbutt treasure mod inflicts a Psychic vulnerability debuff (17% for 20 seconds; does not stack). Various treasure mods buff all Kick attacks: +54 damage (x2), +11% damage, +16% damage, +30% damage when you are at 33% armor or less (x2).
D-04a - Dungeon Damage Types
This section will attempt to give a general overview of which damage types work in each dungeon. The dungeons become increasingly complex as you move up in level, so trying to choose what damage type is "best" becomes more about knowing the weaknesses of your types and what you will need to overcome them.

Serbule Crypt
Very Effective: Crush
Good: Cold, Fire
Neutral: Piercing, Psychic, Acid, Nature
Resisted: Poison, Slashing, Trauma
Immune: Dark, Electricity (Energy Keys and Cold Elementals)
Notes: Very similar typing throughout, making it easy to expect how things will work out.


Carpal Tunnels
Very Effective: None
Good: Cold (minus Ice Slick), Fire
Neutral: Dark, Electricity, Piercing, Poison, Trauma
Resisted: Crushing, Nature, Slashing
Immune: Acid, Cold (Ice Slick), Psychic (Brain Bug)
Notes: Another simple dungeon in terms of typing.


Myconian Cavern
Very Effective: Acid (except Spiders), Cold
Good: Crushing
Neutral: Dark, Piercing, Slashing
Resisted: Acid, Nature, Poison, Psychic
Immune: Electricity (Cold Elementals), Nature (Tidal), Poison (Slugs, Tornadoes), Psychic (Brain Bugs), Trauma (Tornadoes)
Notes: Other than the Bosses, the biggest threats here are the Sentry Spiders and the Myconians. Using Cold or avoiding Poison will keep you safe from them.

Goblin Dungeon / Boarded-Up Basement
Very Effective: None
Good: Acid, Cold (except for Fog & Ciervos), Nature (except Nature Elementals), Piercing
Neutral: Crushing, Dark, Psychic (minus Brain Bugs), Slashing
Resisted: Fire, Poison, Trauma
Immune: Electricity (All Elementals), Nature (Nature Elementals, Fog), Psychic (Brain Bugs, Nature Elementals)
Notes: The first half of the dungeon is not too difficult, but resistances become more severe further in. Fire and Electricity are not recommended past The Fog.


Animal Nexus
Very Effective: Acid, Electricity
Good: Fire, Dark, Poison
Neutral: Cold, Piercing, Psychic, Slashing
Resisted: Crushing, Nature, Trauma
Immune: None, except Spy Portals
Notes: Must have at least one attack with Piercing, Nature, or Dark for the Spy Portals. A very simple dungeon if you can deal with them. Quite small though, not worth the price of admission unless you need to kill Fey creatures.


Kur Tower
Very Effective: Fire
Good: Acid, Crushing, Poison (Strigas), Slashing
Neutral: Electricity, Nature, Piercing, Psychic
Resisted: Cold, Poison (Skeletons, Corpses), Trauma
Immune: Dark, Cold (Ice Slicks)
Notes: Dungeon is split up into two parts. Poison is bad in the first and good in the second. Ranged attacks, Knock-back, or Fear are recommended for the Preserved Corpses.


Necromancer's Courtyard
Very Effective: None
Good: Acid, Fire (except Lomas), Poison, Psychic
Neutral: Crushing, Electricity, Nature, Piercing, Trauma
Resisted: Cold, Poison, Slashing
Immune: Dark
Notes: Enemies have strange typing in this section. Half are vulnerable to Poison, and half resist Poison. This seems like a running theme alongside Kur Tower.


Yeti Cave
Very Effective: Slashing
Good: Acid, Crushing (Skeletons, Yaks, Hook Beasts), Fire (Skeletons, Ice Slicks, Spiders), Piercing, Poison (Yetis)
Neutral: Electricity
Resisted: Cold, Crushing (Gnashers, Grottofang), Fire, Piercing (Ogres), Poison, Psychic (Injectors and Ice Slicks), Nature (Gaz-Uraks), Trauma
Immune: Acid (Ice Slicks), Cold (Yetis, Ice Slicks), Dark (Ghouls and Gazelles)
Notes: Very hard to pin down the typing for this dungeon. Many types in this dungeon are effective against half of the enemies, and resisted by the other half. This is the first dungeon where most types are used and no single type is good across the board.


Wolf Cave
Very Effective: Poison, Trauma
Good: Piercing
Neutral: Acid, Crushing, Dark, Nature, Psychic
Resisted: Electricity, Fire, Cold, Slashing
Immune: None
Notes: While Injectors and Mantids are weak to cold attacks, the rest of this dungeon resists cold, and the Injectors and Mantids are sparse in comparison. Surprisingly simple usage of types despite the dungeon's level range.


Borghild
Very Effective: None.
Good: Crushing (Skeletons), Fire (Skeletons, Faces of Death, Golems), Piercing (Injectors, Loading Golem), Psychic (Ghosts)
Neutral: Acid, Electricity, Nature
Resisted: Crushing (Ghosts, Injectors, Loading Golem), Fire (Ghosts, Skeleton Mages), Piercing (Ghosts), Poison, Psychic (Injectors, Golems), Slashing (Ghosts, Injectors, Loading Golem), Trauma
Immune: Dark, Psychic (Loading Golem)
Notes: Must have Stun(s) for the Ghosts, and must have ranged attacks for the Faces of Death. This is another dungeon where weaknesses and resists are mixed throughout. Unless you really need to take advantage of a specific enemy's weakness, it would be best to simply not bring any type on this list. It's easy to imagine why players tend to avoid this place.


Winter Nexus
Very Effective: Fire (except Bonfire Puck)
Good: Crushing (Bosses), Nature (Ogre, Worgs, Overseer, Dementia Puck), Trauma (except Bonfire Puck)
Neutral: Acid, Electricity, Piercing, Psychic
Resisted: Dark (Bosses), Crushing (Trolls and Ogres), Nature (Face of Death, Trolls, Autumn Healers), Poison, Slashing
Immune: Fire (Bonfire Puck), Cold (Dementia Puck), Dark (Bonfire Puck and Face of Death)
Notes: Must have at least one attack with Piercing, Nature, or Dark for the Spy Portals. Must have ranged attacks for the Faces of Death. Ogres will break bones with their Rage attack. Nature typing is split between weaknesses and resists -- with Trolls in the first half and Ogres in the second, Nature is likewise bad and then good. Crushing is resisted by the basic enemies, yet is powerful against the bosses.


Dark Chapel
Very Effective: Cold (Very!), Nature (minus Basilisks), Trauma (minus Gazers and Sedgewick)
Good: Piercing, Poison (Terry, Haridius)
Neutral: Acid, Crushing, Electricity, Piercing, Psychic, Slashing
Resisted: Fire, Nature (Basilisks), Poison (Basilisk, Gazers, Scion of Discord), Trauma (Gazers)
Immune: Dark (Lamia, Skeletons, Katarina, Sedgewick), Poison & Trauma (Sedgewick)
Notes: A stun is needed to kill Katarina (summoned by Lord Sedgewick). This dungeon contains a large variety of weaker monsters, most of which did not factor much into the general typing of this dungeon. Compared to the bigger threats, a sufficiently geared player can easily overcome any resistances the weaker enemies have. The enemies to look out for are Droaches, Basilisks, Gnashers, and Dark Gazers.
D-04b - Dungeon Damage Types (Cont.)
Labyrinth
Very Effective: Cold (minus Skeleton Mages)
Good: Fire, Piercing, Trauma
Neutral: Acid, Crushing, Slashing
Resisted: Electricity (minus Beetles and Claudia), Nature (minus Claudia and Cockatrices), Poison (Cockatrices, Basilisks, Rakshasa, Scorpions), Psychic (minus Claudia)
Immune: Cold (Skeleton Mages), Dark (Lamia, Flapskull, Skeletons, Claudia, Mien of Quietus), Electricity (Ice Elementals), Psychic (Myrmidons)
Notes: You must have Knock-Back for Scorpions. You must have ranged attacks for the Mien of Quietus [a Face of Death]. Another dungeon with a mix of weaker creatures sprinkled in. As long as you have something other than Poison, the weaker monsters will not be a big deal. Minotaurs have a very heavy-hitting Rage attack. Claudia's Mien of Quietus will spawn in the hallway, so make sure to have everyone move into the boss room at the same time, or they risk dying instantly when it spawns. Oddly enough, the two bosses have polar opposite typing: Asterion is weak to fire and resists Psychic, Nature, and Electricity - yet Claudia is weak to Psychic, Nature, Electricity, and resistant to Fire (as well as physical types and Cold). If you plan a full run, keep this in mind.


Gazluk Keep
Notes: If you haven't guessed by now, the damage typing of dungeons gets progressively complicated as you move up in level. Gazluk Keep is no exception to this -- in fact, it has so much diversity that a simple overview of it will not work. To attempt to circumvent this, I tallied each time a damage type was effective or resistant. While it does not account for which enemies tend to be grouped with each other or the relative density of each enemy type, it's the fairest general look at the entire dungeon. Suffice to say, taking a decently varied group is ideal, but if you are working with fewer (or weaker) players, read on. Note that Gargoyles and Zukelmux are immune to Crushing, Slashing, and Piercing. Of course, this is not a substitute to learning the Bosses' stats individually, but rather a way to predict how your preferred skills will interact in Gazluk Keep.

Elite Enemies:
Positive types (More often effective than not): Piercing
Neutral types (Low incidence of usage either positive or negative): Crushing, Dark, Psychic, Trauma
Negative types (More often resisted than not): Electricity, Nature, Poison, Slashing
Controversial types (High variance in usefulness): Acid, Cold, Fire

Bosses:
Positive types: Piercing
Neutral types: Acid, Crushing, Dark, Psychic, Slashing, Trauma
Negative types: Electricity, Poison
Controversial types: Cold (mostly resisted), Fire (mostly resisted), Nature (split even)
M-01 - Monsters and Aggression
Enemies that are aggressive have their own radius at which they will pursue you. Small spiders with only 18 health will be hesitant to attack you, but the Rakshasa in Ilmari will chase you down from quite a long ways. This radius does not seem affected by player level in any meaningful fashion.

When an enemy is hit with a damaging attack, they will shout for assistance if any allies are near. This is denoted with a large blue exclamation mark above them. It should be noted that shouts will work through walls and even above or below the area you are currently in, so be careful about pulling enemies to safe locations before attacking.

These two effects end up making aggro control a bit different than other games. Best practice is to walk slowly forward until the enemy targets you, and then back up a fair distance before attacking it. This moves it out of range to summon allies, making the fight much simpler. Note that if you have pets, you will want to set them to Stay or Follow, or else they will attack when you are hit, thus causing the enemy to shout. For ranged enemies, run around a corner or behind something to cause them to have to get closer to get a shot on you.

There is an exception to the rule of enemies shouting when hit. Some abilities will "Suppress Monster Shout," such as quite a few of Unarmed's abilities. These can be used without the monster shouting for help, allowing you to damage or crowd-control them before you have positioned yourself correctly. This is seemingly not noted in-game, so check the wiki for whichever skill you choose to use. Generally speaking, abilities that mesmerize, stun, knock-back, frighten, or reduce rage tend to suppress monster shout.

Animal Handling pets' ability to hold aggro has been buffed/patched, testing required.
Also, Animal Handling and other pets do not seem to work properly within the threat system currently. Upon autopsy of a dead enemy, you can find that your pet could have as high as 85% threat (all the way up to 100%, had you not hit them at all!), and yet the enemy will still choose to attack you. Even if an enemy starts attacking a pet, it could switch targets at any time, seemingly randomly. Because of this, I would not recommend using pets to tank enemies at this time.
M-02 - Experience Gain in Combat
There are three ways in which the game determines whether or not you gain experience in combat skills when a monster is slain.

The first way is the most obvious one: using skills in combat. When you enter combat, an in-combat status is placed on your buff bar. It usually sits as the first icon, a washed-out sword with orange and white swing effect. When you use an ability that initiates combat or is used within combat, your combat status takes note of which skills you have used. Simply put, using at least one ability from an active skill while in combat is enough to grant experience in that skill when an enemy is killed. This lasts for as long as the in-combat status persists -- if more monsters die from you, your pet, or your group, you will continue to gain experience in whatever skills have been "tagged" in your combat status. Using an ability against each monster is not necessary; you can simply use one ability from your active skill(s) and then sit back as your pet kills everything, and you will get full experience for all of them.

The second way is related to on-going buffs and effects caused by players. An example of this would be Mentalism's various "wave" abilities. If you have a buff active that you have cast previously (as in, before combat begins), that skill will immediately be tagged for experience when you enter combat. You do not need to refresh the buff at all to continue gaining experience. This is particularly handy when following a very fast group or being carried through a dungeon -- as long as you have a buff running, you will gain experience in that skill even with monsters immediately dying through group member's one-hit kills.

The final way is related to First Aid, Armor Patching, and Survival Instincts. These skills seem to have their own built-in timer that will automatically tag the skill when in combat, similar to an invisible buff. Casting these before combat and then getting into combat (or casting it in combat) will grant experience upon every monster death. Even casting these after combat expires can still give experience for the enemy you just killed. However, if combat status wears off and not too much time has passed, a second combat engagement will also be tagged for those skills. The length of time that this effect lasts is longer than the cooldowns of these skills, so it is hard to say exactly how long it works for.
M-03a - Crowd Control Ability List
Note: Equipment mods that can be on multiple slots and that have stats affected by stacking will be marked with an 'x2'.

Stuns -- Leaves the enemy unable to act for a period of time and negates evasion for 6 seconds
Archery: Mangling Shot
Bard: Song of Discord -- Requires an equipment mod to enable; 5%(x2) chance to stun all enemies
Carpentry: Stake The Heart -- Stuns corporeal undead (not ghosts)
Cow: Bash
Deer: Deer Bash
Fire Magic: Scintillating Flame & Scintillating Frost -- Requires an equipment mod to enable
Giant Bat: Combo: Screech+melee+melee+Bat Stability -- Requires an equipment mod to enable
Giant Bat: Virulent Bite -- Inflicts a moderate concussion, causing random self-stuns (duration?)
Giant Bat: Wing Vortex -- Requires an equipment mod to enable; 30%(x2) chance to stun all enemies
Hammer: Hurl Lightning -- Requires an equipment mod to enable; Inflects a moderate concussion, causing random self-stuns (duration?)
Hammer: Reverberating Strike -- Requires an equipment mod to enable; Inflicts a mild concussion, causing random self-stuns (duration?)
Ice Magic: Frostbite -- Causes random stuns over 30 seconds
Ice Magic: Tundra Spikes -- Requires an equipment mod to enable; Stuns after 10 second delay
Knife Fighting: Surprise Throw -- Requires an equipment mod to enable; stuns if target is not focused on you
Knife Fighting: Venomstrike -- Requires an equipment mod to enable; 44%(x2) chance
Lycanthropy: Pouncing Rake/Rend -- Stuns if armor is under 33%
Mentalism: Electrify -- Requires an equipment mod to enable
Mentalism (Fae): Astral Strike -- Requires an equipment mod to enable
Mentalism (Fae): Fairy Fire (incorporeal only) -- Requires an equipment mod to enable
Necromancy: Swordsmen Skeletons -- Rage attack stuns target
Priest: Castigate -- Requires an equipment mod to enable; 25%(x2) chance only against Undead
Priest: Corrupt Hate -- Stuns the enemy when they next use their Rage attack
Psychology: But I Love You -- Requires an equipment mod to enable
Rabbit: Bun-Fu Strike -- Stuns after 5 second delay
Shield: Stunning Bash
Spider: Gripjaw
Staff: Combo: Suppress+melee+melee+Headcracker -- Requires an equipment mod to enable
Staff: Headcracker -- Stuns if the target is vulnerable
Staff: Redirect -- Requires an equipment mod to enable
Sword: Many Cuts -- Requires an equipment mod to enable; Stuns if armor is under 33%
Unarmed: Barrage -- Single target; With an equipment mod can Stun all in an area
Unarmed: Cobra Strike -- Stuns if armor is under 33%
Warden: Stun Trap

Knock-Back
Archery: Hook Shot -- Pulls enemy to you, but counts as Knock-Back
Archery: Bow Bash -- Requires an equipment mod to enable
Bard: Blast of Fury -- Requires an equipment mod to enable
Cow: Deadly Emission -- Requires an equipment mod to enable
Crossbow: Knockback Bolt
Deer: Deer Bash -- Requires an equipment mod to enable
Hammer: Thunderstrike -- Requires an equipment mod to enable; Knocks back all enemies in an area
Knife Fighting: Fan of Blades -- Requires an equipment mod to enable; Knocks back all enemies in an area
Mentalism: Panic Charge -- Requires an equipment mod to enable; Knocks back all enemies in an area
Pig: Pig Punt
Rabbit: Thump -- Requires an equipment mod to enable
Shield: Emergency Bash
Shield: Fight Me You Fools -- Stuns enemies in an area around you
Spider: Grappling Web -- Pulls enemy to you, but counts as Knock-Back
Staff: Lunge -- Requires an equipment mod to enable
Staff: Redirect
Sword: Many Cuts -- Requires an equipment mod to enable; Knocks back if armor is under 33%
Unarmed: Front Kick
Unarmed: Hip Throw -- Equipment mod can Knock back all in an area
Warden: Apprehend -- Equipment mod; Pulls enemy to you, but counts as Knock-Back
Warden: Privacy Field -- Equipment mod affects first(?) melee attacker

Mesmerize -- Enemy cannot act for a period of time, interrupted by attacks (but not DoTs)
Archery: Snare Arrow -- 20 seconds
Bard: Entrancing Lullaby-- 25 seconds
Ice Magic: Freeze Solid -- 25 seconds
Psychology: Tell Me About Your Mother -- 25 seconds

No-Target -- Enemy will not attack you, but can still act
Pig: Harmlessness -- Lasts 5 to 10 seconds
Rabbit: Play Dead -- Lasts 17 seconds, interrupted if you attack them

Knock-Down -- Enemy cannot act, also takes +25% from attacks
Hammer: All attacks -- Requires an equipment mod to enable; 14% chance against targets that have at least 66% Rage
Hammer: Leaping Smash

Slowed Movement
Archery: Mangling Shot -- Requires an equipment mod to enable; 25% slow for (duration?)
Battle Chemistry: Freezing Mist -- Affects all enemies in a 10 meter radius. (%?, duration?)
Fire Magic: Frostball -- Requires an equipment mod to enable; 25% slow for (duration?)
Gardening: Spade Assault -- 25% slow for (duration?)
Hammer: Seismic Impact -- 90% slow for 11 seconds
Ice Magic: Blizzard -- 35% slow for 15 seconds
Knife Fighting: Hamstring Throw -- 90% slow for 5 seconds
Pig: Pig Punt -- Requires an equipment mod to enable; 45% slow for (duration?)
Rabbit: Thump -- 25% slow for 20 seconds
Staff: Pin -- 90% slow for 11 seconds
Unarmed: Bodyslam -- Requires an equipment mod to enable; 45% slow for (duration?)
Unarmed: Kick -- Requires an equipment mod to enable; 45% slow for (duration?)

Immobilize -- Enemy is completely unable to move and negates evasion
Ice Magic: Tundra Spikes -- 7 seconds
Necromancy: Death's Hold -- 5 seconds

Fear -- Enemy runs away and does not attack
Ice Magic: Blizzard -- Requires an equipment mod to enable; 70% chance, (duration?)
Necromancy: Deathgaze -- 11 seconds
Pig: Squeal -- 10 seconds, Affects all in an area around you
Psychology: Cause Terror -- 8 seconds
Spider: Terrifying Bite -- 8 seconds
Sword: Decapitate -- Requires an equipment mod to enable; (duration?)
M-03b - Crowd Control Ability List (Cont.)
Rage Reduction
Animal Handling: Shrill Command -- Requires an equipment mod to enable; -310(x2)
Animal Handling: Sic 'Em -- Requires an equipment mod to enable; Pet's attacks generate -195(x2) Rage for 10 seconds
Archery: Acid Arrow -- Requires an equipment mod to enable; -495
Archery: Snare Arrow -- Requires an equipment mod to enable; Needs 1100 more Rage to perform Rage attacks
Bard: Blast of Despair -- -600; With equipment mod, additional -150(x2)
Bard: Song of Discord -- Requires an equipment mod to enable; -144(x2) per 2 seconds
Deer: Deer Kick -- Requires an equipment mod to enable; -175(x2)
Druid: Cosmic Strike -- Requires an equipment mod to enable; -495(x2)
Druid: Delerium -- -640; With equipment mods, additional -570(x2) and/or -320(x2)
Ice Magic: Frostbite -- Requires an equipment mod to enable; Needs 61%(x2?) more Rage to perform Rage attacks
Ice Magic: Blizzard -- Requires equipment mod(s) to enable; -675(x2), -120(x2)
Knife Fighting: Fending Blade -- -530; With equipment mod, additional -420(x2); With equipment mod, additional -280(x2) after 5 second delay
Lycanthropy: Smell Fear -- -500; With equipment mod, additional -350(x2)
Mentalism: Electrify -- Requires an equipment mod to enable; -1000(x2)
Mentalism: System Shock -- Requires an equipment mod to enable; -290(x2)
Pig: Strategic Chomp -- Requires an equipment mod to enable; -310(x2)
Psychology: Fast Talk -- Requires an equipment mod to enable; -700(x2)
Psychology: Psychoanalyze -- Needs 50% more Rage to perform Rage attacks
Psychology: Soothe -- -1100; With equipment mod, additional -810(x2)
Psychology: Strike A Nerve -- Requires an equipment mod to enable; -430(x2)
Rabbit: Bun-Fu Strike -- Requires an equipment mod to enable; -420 and -570 after 5 second delay
Rabbit: Love Tap -- Needs 50% more Rage to perform Rage attacks
Shield: Disrupting Bash -- -700; With equipment mod, additional -620(x2)
Shield: Infuriating Bash -- Requires an equipment mod to enable; -605(x2)
Staff: Headcracker -- Requires an equipment mod to enable; -168(x2)
Staff: Pin -- Requires an equipment mod to enable; -750(x2)
Staff: Redirect -- -500; With equipment mod, additional -960(x2)
Staff: Suppress -- -520 in an area around you, With equipment mod, additional -350(x2)
Sword: Hacking Blade -- Requires an equipment mod to enable; -255(x2)
Sword: Heart Piercer -- Removes up to 540 Rage and converts 20% into Trauma damage; With equipment mod, additional -186(x2) to this effect
Sword: Parry -- -600; With equipment mod, additional -600(x2)
Sword: Precision Pierce -- -510, With equipment mod, additional -210(x2)
Sword: Riposte -- -660; With equipment mod, additional -600(x2)
Unarmed: Bodyslam -- Requires an equipment mod to enable; -320(x2)
Unarmed: Hip Throw -- Requires an equipment mod to enable; -320(x2)
Unarmed: Infuriating Fist -- Requires an equipment mod to enable; -520(x2)
Unarmed: Jab -- -280

Honorable Mention -- Pet Taunt abilities that are a bit unreliable
Animal Handling: Grimalkin's Clever Trick -- Taunts enemy and runs away, inciting the enemy to chase it
Giant Bat: Confusing Double -- Creates an illusionary copy of yourself that heavily taunts for 23 seconds
M-04 - CC Diminishing Returns
Stuns are subject to diminishing returns. Each successive stun will stun the enemy for shorter periods of time. The first stun lasts for about 5 seconds, with successive stuns lasting around 4, 2.5, 1, and then only momentarily (a few ticks). While the enemy will not become immune to stuns, the stuns will effectively do nothing, as no enemies use channeled attacks that could be interrupted. The "Flat-Footed" debuff that stuns apply negates evasion for 6 seconds, regardless of stun length.

Elite and Boss monsters that apply stuns do have diminishing returns on those stuns, but they will never reduce below 2 seconds.

Abilities that cause random stuns for the length of a debuff, such as Ice Magic's Frostbite or various inflicted concussions, are not subject to diminishing returns. By that example, Frostbite's stuns will always last for 2.5 seconds.

Independently of stun duration, stuns are counted individually on a target, allowing multiple stuns to coexist. If one stun wears off, the monster will continue to be stunned if other stuns are currently active. Note that all applied stuns will count down together, so overlapping stuns will be wasted duration. This can be used tactically -- if a monster's normal attacks are strong, stunning only when the current stun wears off is best so as to maximize stun duration efficiency. If a monster's rage attack is being delayed, stuns should be reapplied immediately before the current stun wears off, so as to extend the stun timer.

Immobilize also is impacted by repeated uses. Only the first immobilize on an enemy will fully immobilize them, with successive immobilizes inflicting around 75% slowed movement speed and then 50% the third time. Duration is also impacted: by testing with Tundra Spikes (which has a 7 second duration), the second cast seems to last for around 5-5.5 seconds, and the third for 4 seconds or so.
M-05 - Direct vs Indirect Damage
You may notice that some gear explicitly affects direct or indirect damage. The general rule is that if an ability lists up-front damage (as in, "Damage: 100" or "Damage Health: 100"), that amount of damage is direct. If the damage is a lingering Damage Over Time (DoT), such as poison being applied over 12 seconds, that is indirect damage.

Modifiers that affect either direct or indirect damage will only apply to that part of the damage, so +indirect damage on Spider's Inject Venom ability will only have effect on the DoT portion. Modifiers to poison damage will affect both direct and indirect poison damage on abilities. However, equipment mods that boost the damage of a specific ability will only affect the direct damage.

This is also important for abilities such as Pain Bubble, which only multiply the damage of direct damage, letting indirect damage bypass its effect.

On top of these two damage classifications, there is a third classification: burst damage. This seems to be another term for direct damage done by Area of Effect (AoE), though it is rarely referenced. Note that burst damage is an additional classification and not a replacement: a direct AoE attack is both direct damage and burst damage. Also, AoE abilities start to lose effectiveness after 3 or 4 enemies hit - the more enemies you attack, the lower damage it does.
M-06 - Armor and Health
By default, an attack dealing damage to an enemy will do 50% of its damage to their health, and 50% to their armor. However, armor reduces all incoming damage by a percent, depending on how much of the enemy's max armor is left. Full armor grants 20% damage reduction, scaling linearly down to 0% as their armor is damaged. There are also enemies with "Thick Armor", which reduces armor damage they receive by 50%, also scaling linearly to 0% as their armor depletes. Elite and Boss enemies also have between +10-20% additive "Thick Armor", potentially raising their armor damage reduction to 70%. Attacks that deal specifically health or armor damage directly will bypass these resistances.

Player's armor bonuses work differently, reducing the possible incoming damage by 1 point per 25 armor remaining. As a simplistic example, a target with 500 remaining armor will negate 20 damage of an incoming hit entirely, at which point the remainder will damage armor and health as normal.

This lends value to two types of attacks against more heavily-armored opponents: high value attacks and armor-specific attacks. Having a giant up-front number of damage works by simply overcoming their armor's damage negation, as expected. Attacks that only (or primarily) damage armor are still subject to negation, but they have the added bonus of effectively damaging armor at twice the rate of other attacks (since 50% is not going towards health damage). Opening an instance of combat by taking out as much armor as possible is an excellent move. But as a fight draws on, pure armor damage becomes less useful -- if the enemy is already close to dead, you will only be adding a small amount of damage by ripping out their armor, which is time (and power) that could have been used on straightforward attacks to end the fight quicker.

On the other side of combat -- in terms of your own defense -- armor should be considered carefully. Extra armor means extra negation, but keep in mind that once your armor drops, its bonus is gone. Opting for heavier armor, you may survive for an extra hit or two, but if you used evasive cloth equipment and simply evaded a hit or two, the effective boon to your defenses is identical. The general rule is that a harder an enemy hits, the less that extra armor will do for you. For lower level enemies, a high armor value can render their attacks ineffective, or even make you literally immune to damage against the weakest of foes.

As an aside to choosing how much armor is needed, keep in mind that metal, leather, and cloth armor have different benefits. Combat Refreshes with metal armor grant only armor, leather grants mostly health/armor and some power, and cloth will grant a near-even amount of power and health. Organic armor offers an even amount of armor, health, and power, but at the cost of a lower total value. Cloth can grant melee evasion (through player-crafted cloth gear from Tailoring), and Leather armor from Leatherworking can grant projectile evasion. As a prominent example, cloth nimble shoes offer evasion from burst attacks -- many enemies have burst rage attacks, letting you negate their most powerful ability, which puts a high value on adding nimble shoes to any setup.

If at least three pieces of your armor are made of the same material (cloth, leather, metal, or organic), you get a special set bonus:
3+ Cloth Items: If your power is below 20% of max, your Basic Attack restores Power equal to 20% of your Max Power. (Max once per minute.)
3+ Leather Items: If your health is below 33% of max, your Basic Attack restores Health equal to 33% of your Max Health, plus your Combat Refresh Healing amount. (Max once per minute.)
3+ Metal Items: Gain 1 universal mitigation per 50 points of Max Armor.
3+ Metal Items as Fae: Fae gain the normal metal set bonus, but if they are wearing 3+ non-fairy metal armor pieces, they will be penalized with a -15% direct damage debuff.
3+ Organic Items: Your Combat Refresh happens every 12 seconds (instead of every 15 seconds). This equates to roughly +20% of listed refresh values.
M-07a - Armor Sets
This section is to record armor sets that excel in certain areas or are notable results of trade skills. I won't pretend this is a comprehensive list, since there's just so many items in game.

General formatting rules: Combat refresh values will be listed as #/#/#, meaning Armor/Health/Power values for combat refreshes. Note that combat refresh values seem to be assigned by tier and material type, leaving most high-level gear of the same material with the same refresh values. This list is in descending order of total armor value for simplicity, but keep in mind that armor values are not the only thing that matters. Also, crafted gear sets have 120 enchantment points instead of 100 and can be maximized, letting them have an additional treasure modification.

Winter Court Murder Set (obtained from drops; metal; hardcore-only)
Head: 135 Armor, 48/0/0 (+10% Electricity Damage (direct & per-tick); +10% Psychology base damage)
Chest: 270 Armor, 96/0/0 (+10% Electricity Damage (direct & per-tick))
Legs: 225 Armor, 80/0/0 (+10% Cold Damage (direct & per-tick))
Hands: 135 Armor, 48/0/0 (+10% Cold Damage (direct & per-tick))
Feet: 135 Armor, 48/0/0 (+10% Electricity Damage (direct & per-tick); +1 Sprint)
Totals: 900 Armor, 320/0/0 Refresh (+30% Electricity Damage (direct & per-tick); +20% Cold Damage (direct & per-tick); +10% Psychology base damage; +1 Sprint)
Notes: Requires hardcore mode to be active in order to wear. Absolutely huge armor rating, well worth the hardcore downside.

Winter Court Battle Set (obtained from drops; metal)
Head: 113 Armor, 45/0/0 (+8% Electricity Damage (direct & per-tick))
Chest: 225 Armor, 90/0/0 (+8% Electricity Damage (direct & per-tick))
Legs: 182 Armor, 75/0/0 (+8% Cold Damage (direct & per-tick))
Hands: 113 Armor, 45/0/0 (+8% Cold Damage (direct & per-tick))
Feet: 113 Armor, 45/0/0 (+8% Electricity Damage (direct & per-tick))
Totals: 746 Armor, 300/0/0 Refresh (+24% Electricity Damage (direct & per-tick); +16% Cold Damage (direct & per-tick))
Notes: Fantastic armor rating and great damage boosts.

Snowblood Misery Trooper set (obtained from drops; metal)
Head: 105 Armor, 42/0/0
Chest: 202 Armor, 84/0/0 (+10 Max Body Heat)
Legs: 167 Armor, 70/0/0 (+10 Max Body Heat)
Hands: 97 Armor, 42/0/0 (+10 Max Body Heat)
Feet: 85 Armor, 42/0/0 (+20 Max Body Heat)
Totals: 656 Armor, 280/0/0 Refresh (+50 Max Body Heat)
Notes: Very high armor set with a considerable boost to max body heat, but lacks any other benefit.

Astounding Leather set (crafted)
Head: 96 Armor, 36/36/15
Chest: 192 Armor, 72/72/29
Legs: 160 Armor, 60/60/24
Hands: 96 Armor, 36/36/15
Feet: 96 Armor, 36/36/15
Totals: 640 Armor, 240/240/98 Refresh
Notes: Highest armor value from crafted gear equippable by humanoids.

Amazing Werewolf set (crafted; metal)
Head: 81 Armor, 42/0/0 (+8 Lycanthropy Damage)
Chest: 210 Armor, 84/0/0
Legs: 175 Armor, 70/0/0
Hands: 57 Armor, 42/0/0 (+16 Lycanthropy Damage)
Feet: 105 Armor, 42/0/0
Totals: 625 Armor, 280/0/0 Refresh (+24 Lycanthropy Damage)
Notes: Highest armor value from crafted gear (in its tier). Can only be equipped by Lycanthropes in wolf form.

Misery Trooper set (obtained from drops; metal)
Head: 85 Armor, 42/0/0 (+10% Chance to ignore stun)
Chest: 185 Armor, 84/0/0 (+20 Max Body Heat; +20 Max Hydration; +10% Chance to ignore stun)
Legs: 160 Armor, 70/0/0 (+15 Max Body Heat; +15 Max Hydration)
Hands: 85 Armor, 42/0/0 (+10 Max Body Heat; +10 Archery Damage)
Feet: 90 Armor, 42/0/0 (+20 Max Body Heat; +20 Max Hydration)
Totals: 605 Armor, 280/0/0 Refresh, (+65 Max Body Heat; +45 Max Hydration; +20% Chance to ignore stun; +10 Archery Damage)
Notes: Quite high armor set with great boosts to both max body heat and max hydration, although it offers no cold mitigation.

Scorpiclaw set (obtained from drops; organic)
Head: 88 Armor, 12/12/12 (Reflect 4% of physical attack damage)
Chest: 176 Armor, 24/24/24 (Reflect 5% of physical attack damage)
Legs: 146 Armor, 20/20/20 (Reflect 5% of physical attack damage)
Hands: 88 Armor, 12/12/12 (Reflect 4% of physical attack damage)
Feet: 88 Armor, 12/12/12 (Reflect 4% of physical attack damage)
Totals: 586 Armor, 80/80/80 Refresh (Reflect 22% of physical attack damage)
Notes: Organic gear has an evenly-distributed combat refresh, and the damage reflecting on this set makes it unique. Adding this to a thorns build (Druid, Shield as examples) can provide interesting results.

Astounding Evasion set (crafted; leather)
Chest: 170 Armor, 72/72/29 (+11% Chance to evade ranged attacks)
Legs: 138 Armor, 60/60/24 (+11% Chance to evade projectiles)
Feet: 82 Armor, 36/36/15 (+7% Chance to evade projectiles)
Totals: 390 Armor, 168/168/68 Refresh (+11% Chance to evade ranged attacks; +18% Chance to evade projectiles)
Totals when equipped with other Astounding Leather gear: 582 Armor, 240/240/98 Refresh (+11% Chance to evade ranged attacks; +18% Chance to evade projectiles)
Notes: I am not sure what the difference is between "ranged" and "projectiles". Works well with skills that keep enemies at a distance.

Amazing Bard set (crafted; leather)
Head: 70 Armor, 32/32/13 (+14% Chance to ignore stun)
Chest: 135 Armor, 63/63/26 (+11 Direct Nature Damage)
Legs: 126 Armor, 53/53/21 (+11 Direct Nature Damage Reduction; +1 Indirect Nature Damage Reduction)
Hands: 63 Armor, 32/32/13 (+7 Direct Nature Damage)
Feet: 78 Armor, 32/32/13 (+3% Chance to evade projectiles)
Totals: 472 Armor, 212/212/86 Refresh (+14% Chance to ignore stun; +18 Direct Nature Damage; +11 Direct Nature Damage Reduction; +1 Indirect Nature Damage Reduction; +3% Chance to evade projectiles)
Notes: This has lower armor values than both other Amazing Leather sets. The boots are a side-grade to Amazing Evasion Boots, trading a bit more armor for reduced evade chance. You may be better off with regular Amazing Leather legs.

Amazing Winter set (crafted; leather)
Head: 67 Armor, 32/32/13 (+15 Max Body Heat; +3 Indirect Cold Damage Reduction)
Chest: 135 Armor, 63/63/26 (+15 Max Body Heat; +5 Indirect Cold Damage Reduction)
Legs: 120 Armor, 53/53/21 (+5 Indirect Cold Damage Reduction)
Hands: 71 Armor, 32/32/13 (+25 Max Body Heat)
Feet: 74 Armor, 32/32/13 (+20 Max Body Heat)
Totals: 467 Armor, 212/212/86 (+85 Max Body Heat; +13 Indirect Cold Damage Reduction)
Notes: Although this is the weakest crafted leather set, it is the best winter gear.

Astounding Cloth set (crafted)
Head: 72 Armor, 0/48/42 (-7% Taunt from attack damage)
Chest: 144 Armor, 0/96/84
Legs: 120 Armor, 0/80/70
Hands: 66 Armor, 0/48/42 (-6% Taunt from attack damage)
Feet: 72 Armor, 0/48/42 (-7% Taunt from attack damage)
Totals: 474 Armor, 0/320/280 Refresh (-20% Taunt from attack damage)
Notes: Astounding power refresh. Probably one of the best armor sets if you have a tank or crowd-control abilities.
M-07b - Armor Sets (Cont.)
Amazing Snail set (crafted; organic)
Head: 80 Armor, 13/13/13 (+5 Acid Damage Reduction)
Chest: 117 Armor, 26/26/26 (+12 Crushing Damage Reduction)
Legs: 98 Armor, 21/21/21 (+10 Slashing Damage Reduction)
Hands: 80 Armor, 13/13/13 (+5 Nature Damage Reduction)
Feet: 65 Armor, 13/13/13 (+5 Piercing Damage Reduction)
Totals: 440 Armor, 86/86/86 Refresh (+Various Damage Reductions)
Notes: The spread of damage reduction seems to want to make this a general-use armor set, but if you face anything that isn't using these types, you're better off with just a higher armor value for true general use.

Camouflaged Astounding set (crafted; cloth)
Chest: 112 Armor, 0/96/84 (-16% Taunt from attack damage)
Legs: 86 Armor, 0/80/70 (-17% Taunt from attack damage)
Totals: 198 Armor, 0/176/154 Refresh (-33% Taunt from attack damage)
Totals when equipped with other Astounding Cloth gear: 408 Armor, 0/320/280 Refresh (-52% Taunt from attack damage)
Notes: Adding in the pieces of Astounding Cloth gear with taunt reduction, you end up with about -50% taunt generation, which is huge. Since the combat refresh is the same, this may be the superior option for groups. Oh, and it's made with vegetables for some reason.

Astounding Spring Fairy set (crafted; cloth)
Chest: 114 Armor, 0/96/84 (+20% Nature and Electricity Damage)
Legs: 75 Armor, 0/80/70 (+18% Nature and Electricity Damage)
Feet: 42 Armor, 0/48/42 (+16% Nature and Electricity Damage)
Totals: 231 Armor, 0/224/196 Refresh (+48% Nature and Electricity Damage)
Totals when equipped with Amazing Cloth gear: 360 Armor, 0/320/280 Refresh, (+54% Nature and Electricity Damage; -12% Taunt from attack damage)
Notes: The armor and combat refresh values are most similar to cloth gear, despite being crafted with leather. Offers an absolutely massive damage boost not available elsewhere.

Amazing Nimble set (crafted; cloth)
Head: 55 Armor, 0/42/37 (+5% Chance to ignore stun)
Chest: 96 Armor, 0/84/74 (Every 12 seconds evade the first melee attack)
Legs: 75 Armor, 0/70/62 (Every 12 seconds evade the first ranged attack)
Hands: 55 Armor, 0/42/37 (+5% Chance to evade ranged attacks)
Feet: 33 Armor, 0/42/37 (Every 12 seconds evade the first burst attack)
Totals: 314 Armor, 0/280/247 Refresh (Every 12 seconds evade the first [of each] melee/ranged/burst attack; +5% Chance to evade ranged attacks; +5% Chance to ignore stun)
Notes: Guaranteed evade without any RNG is a nice feature here. Head and hand gear aren't great, so I would substitute them.
M-08 - Minor Mechanic Notes
Combat
Certain abilities cannot be used in water but work while jumping, such as Archery. Other abilities cannot be used in water or while jumping, such as Priest's fire attacks. However, since having flight allows you to control the height of your regular jump, you can actually jump very briefly in shallow water and cast your ability so that you land early, at which point the game will check to see if you're on solid ground, letting the ability cast successfully. This is possible with regular jumping, but requires more precise timing as you come down from your jump.

For abilities depending on an opponent's attacks, such as Priest's Corrupt Hate with rage attacks, it should be noted that there is a delay between the opponent starting its attack server-side and it actually showing on your end, so last-second casts will not apply the debuff quick enough.

A technique I like to call 'Rage Stalling' can be used when you have little way to reduce an opponent's rage consistently. Since a rage attack only occurs when both the rage meter is full and the enemy performs an attack, you can time your rage-draining attack to right before a rage attack is supposed to happen. Doing this successively will further delay the rage attack. Abilities like Bard's Song of Discord are a good example of this: SoD repeatedly lowers rage slightly with a treasure mod - not enough to deplete the rage meter much, but enough to constantly keep the enemy just a hair away from successfully rage attacking.

Rakshasa's racial bonus (base +/- 1% combat exp depending on number of sentient creatures killed) is not affected if your pet lands the killing blow.

Enemies that cannot reach the player will flee and restore all of their health and armor. Slightly buggy though, be careful jumping over obstacles.

When your combat refresh becomes available, it will make a sound and the icon will flash a few times. After that, you can tell if the refresh is available by looking for a blue outline around your basic ability.


Monsters and NPCs
Some monsters will spawn allies, such as the Infinite Slimes inside Rahu's Sewers. Since these are spawned as a 'pet' belonging to that monster (and not just a generic monster spawn), burying the 'parent' monster will despawn the pet(s) as well.

Monsters can have different types of evasion. Some will simply have "Evasion," which can evade everything. Some may have "Melee Evasion; Projectile Evasion" for instance, meaning spells will always hit. Keep this in mind for applying debuffs to break evasion (such as stuns or immobilize).

Completing NPC favors that reward you with an item will use whichever two skills you have equipped. If you have a performance skill equipped, it will count that as 'generic', giving the item the same mods as if a rubywall crystal was used in making it.


World and Environment
Scrolls found in the world (simply named "Scroll" until picked up) contain random rewards. These Scroll spawns can contain junk notes, rare recipes, ability books, poetry books, Goblin battle plans, or work orders. While they are almost always worthless, it is worth picking them up just for the chance of something good, such as finding the book for Bodyslam 2, which is worth 2000 councils! In some dungeons, scroll spawns are static (the bottom level of Carpal Tunnels will only ever spawn scrolls), and some scroll spawns are actually generic spawn locations that can be other objects. An example would be the storerooms in Eltibule's Goblin Dungeon -- food, scrolls, plates, cheese, and strongboxes can be found on the shelves in random quantities. If you want to grind scroll spawns (or anything else), you should pick up all of these and drop the junk, freeing up the spawns to generate new contents.

Foraging also follows a similar rule. Mushrooms, flowers, wood logs, and other foraging materials share spawn points. If you want to farm any of them, collect all of them to maximize respawn rates.


Miscellaneous
Holding 'alt' will make tooltips show more detailed information.

You can move around by using arrow keys or WASD, but you can also right click to move to locations. Normally inferior to direct movement (sometimes taking weird paths), this can be used to auto-route to interactable objects, such as corpses, loot, and more. A smaller trick, one that I am not sure is intentional, is for when interacting with something stops you from moving. Right clicking to move will move your character even when you're supposed to be locked from moving. Right-click movement is also not affected by drunkenness spinning you around.

The equippable ring that acts as a skull extractor does not need to be worn to use it.

Broken bones can be mended with Set Broken Bone obviously, but there are other methods too. Treat Disease 3, Moss Bone Repair, Battle Chemistry's Strechy Spine, and Priest's Remedy (with treasure mod) can also cure bones.

Food restoring power/health/metabolism operates on a global timer. Values are not restored during combat or flight. This timer can be observed by exiting combat or flight and noticing that the time before regen varies every time. Exiting flight also adds a delay of 4 seconds before the food global timer is allowed to affect you.

It is commonly stated that 'movement speed' affects flight speed, but 'sprint speed' will not. Maybe that is meant to be true, but certain skills break this rule. Cow's Graze mod, Necromancer's Deathgaze mod, Rabbit's Hare Dash, Pig's Terror Dash and Squeal's mod, Shield's Take The Lead (and/or it's mod), and Spider's Web Trap mod all contain the keyword 'Movement Buff' in their buff code, which causes them to affect flight speed despite the descriptions saying 'sprint'.

Fairies who die and choose to use a Fairy Soul Anchor will not be counted as having 'died'. No tombstone is generated, and hardcore players will not incur items breaking.
T-01 - Fletching
Fletching reference charts follow; Final products' material counts include all precursor materials (including arrowheads and shafts) that are unpurchasable, as well as the cumulative experience for crafting all materials from scratch.


Notes:
  • Starting out, Beginner Arrowheads and Beginner Arrows give zero experience after the first-time bonus.
  • Generally speaking, each part of an arrow grants similar experience. For example, Basic Arrowheads are 40, Basic Shafts are 44, Fletchings are 48, and Basic Arrows average 64.
  • Fletchings are a great time-efficient way to grind experience, since it requires zero shaft-drying. This also goes for Arrowheads, if you prefer to buy Flinty Rocks instead of gathering Feathers. Creating shaft-drying boxes and simply not deploying them is also a zero-time method, but it costs too much wood to be viable.
  • Barbed Arrows offer a sizable boost in experience rates, but once arrowheads start to require acid, it becomes less appealing.
  • Fish Scales are annoying to get (compared to wood and materials gained through combat), so spamming Fletchings to get to Advanced arrows may be desired.
  • Dense Arrows, starting at Advanced level, require Copper, which is also painful to grind. Same with Barbed Arrows needing Bone Hooks.
  • Long Arrows require double the time investment (two sets of shafts to dry) for minimal experience gain.
  • Snare Arrows only require Spiderweb as their additional material, making them very appealing to grind Fletching with.

This all being said, my recommended way of leveling Fletching would be as follows:
  • Craft materials for one of each type of Beginner Arrows, since the first-time bonuses are (almost) enough to earn you the next recipe.
  • Craft materials for one of each type of Basic Arrows, but spam Fletchings inbetween each first-time bonus and the next recipe. This is to avoid Fish Scale usage.
  • Then, choose a method:
  • Method 1: Continue to utilize all first-time bonuses while continually crafting the highest level Snare Arrow you can make. Not very time-efficient, but material-efficient, and you can sell the arrows to NPCs to recoup cost.
  • Method 2: Utilize first-time bonuses, but other than that, spam the highest level Arrowheads you can make, optionally substituting Elegant Fletchings in place of Expert (and potentially Master) Arrowheads and Precision Fletchings in place of Amazing/Astounding Arrowheads. Very time-efficient, but will incur higher council costs.
T-02a - Gaming
This section will cover managing probability within Monsters & Mantids. Match-3 will not be covered, since it is straightforward and too heavily luck-based to affect outside of basic playfield setup. The section on random events within M&M is almost certainly incomplete - if you encounter something not listed, please screenshot it for me!

Monsters and Mantids - Skill Selection
The first thing you encounter in M&M is your three random attack skills. Before we dig into this, below is a chart showing the average dice rolls for each level of each skill.


Since all outcomes of these attacks are directly determined by what your dice roll (there's no player stats, dice-holding, roll-up, etc), an average outcome can be determined for all skills.
  • Mindgnaw, Crush, and Skewer more-or-less follow similar principles: They start at rolling around an 8, and build up to around 13.
  • Lurk front-loads damage for the fight, at which point it drops off. While it's lowered damage is not great, the guaranteed roll at the start of the fight is valuable, as it can take out the majority of an opponent's health right away. Paired with something to mop up the remainder, Lurk is a strong contender.
  • Skewer and Crush follow similar ideas. Crush has just over half chance to roll up to 5 dice, whereas Skewer will roll up to 4 dice if the enemy's health is at an odd number, letting you know if you'll get a high or low roll before you choose to attack. If viewed from the perspective as a main damage-dealer, Crush offers extremely high-roll potential, but Skewer allows strategic use such as jabbing or throwing bombs to nudge the opponent's health from even to odd, allowing you to line up successive huge hits against the toughest of opponents. Crush's perk starts very lackluster, adding less than half a point of damage to your average roll, but scaling up to a respectable addition at higher Crush levels. Taking this perk early will not grant much of an advantage, but taking it later is a noticeable difference.
  • Mindgnaw is particularly underpowered in the beginning, with its second level barely affecting the average outcome - this leads to spending more time taking damage and needing to eat corpses, which hurts progression very heavily. Other than that, it has fairly consistent damage, which no other skill grants. But with consistency comes no potential for lucky high-damage rolls. Its perk is also very useful, bringing its damage up much more than Crush's perk does for Crush, and giving it a real boost early-game if acquired.
  • Prey is amazing, especially with its perk. Prey can easily lead to winning a game. It does the same damage as Lurk on damaged enemies -- which isn't a very high number, but not too low either. Outside of the usual strength of healing hats, Prey is paired well with damage hats, as the increased max health and the slower health loss in combat adds up. Multiple runs have been won with Lurk & Prey, so don't underestimate it. If you get the Prey perk and a bit of max health, you can even win with only Prey+! Note that using Prey at full health is still a good idea -- any healing you roll will counteract incoming damage.
  • Execute is an excellent attack that is also a key element of a winning run. Execute stops the enemy from attacking if you kill it, which effectively means you kill any enemy a turn earlier than you would have otherwise, saving you a lot of health over many fights. Pairing Skewer, Lurk, or Crush with Execute will give you a solid chance of winning. If an enemy is low health, throwing a bomb to put them into Execute range (or guaranteed Execute range) can be a wonderful saving grace.

Monsters and Mantids -- Skill Pairings
Now that you know what each skill does and what to expect from them, now is the time to choose which two you will level up. Leveling three skills is quite uncommon (and wouldn't be very helpful compared to upgraded potions), so you will stick to just two.
  • Execute is very powerful, and it should be paired with a skill that does high damage. Take any of these skills, in this order of preference: Skewer, Lurk, Crush, and (hopefully not) Mindgnaw.
  • Prey is also very powerful, so it also receives high priority. The problematic part, though, is that it does not pair well with anything except Lurk. Lurk plus Prey can be overwhelmingly powerful, and is a top contender. Pairing Prey with Crush, Skewer, or Mindgnaw is awkward, since you want to use Prey as often as possible to keep your health up, so alternating it with another attack is not of much benefit. It is very possible to win with just un-perked Prey, just significantly less likely than with Prey+.
  • If you get Execute, Skewer, and Crush, the safe option would be Execute plus Skewer, especially if you get Jabby. But if you're feeling risky, you can use Skewer and Crush to try to high-roll opponents into the grave instantly, using Execute (mostly) unleveled to mop up the remainder. When you get Crush and Skewer without Execute, this strategy still works for the most part, but either way is going to require very good luck.
  • Lacking Execute, Lurk plus Skewer or Crush can work well. Lurk's front-loaded damage followed by a high-roll from Skewer or Crush can end a fight very quickly.
  • But mainly, just don't use Mindgnaw. Almost anything else is a better pick.

Monsters and Mantids - Enemies' Max Hits
Level 1
Ornery Sheep, Lost Pig: 1D = 6; Average 3.5
Ranalon Scout, Giant Maggot, Sentient Sheep: 1D+1 = 7; Average 4.5
Apprentice Wizard, Malnourished Mimic: 1D+2 = 8; Average 5.5
Murdevex the Goatmaster: 1D+3 = 9; Average 6.5
Arch-Wizard Desdurella: 2D = 12; Average 7

Level 2
Ambushed Human Rogue: 1D-1 = 5; Average 2.5
Zombie: 1D+1 = 7; Average 4.5
Giant Cave Asp, Human Rogue, Feral Wolf: 1D+2 = 8; Average 5.5

Level 3
Cave Bear, Skeleton Swordsman: 1D+3 = 9; Average 6.5
Clever Mimic: 1D+4 = 10; Average 7.5
Fiendish Lobster: 2D-1 = 11; Average 6
Cunning Mimic: 1D+5 = 11; Average 8.5
Orc Berserker (and Injured): 2D = 12; Average 7

Level 4
Questing Knight, Bloodfang Spider: 1D+4 = 10; Average 7.5
Cave Drake, Human Sorceress: 2D+1 = 13; Average 8
Bloodfang Spider And Babies: 2D+4 = 16; Average 11

Level 5
Mummy: 2D-1 = 11; Average 6
Skeletal Dragon: 1D+5 = 11; Average 8.5
Enraged Golem, Dwarf Warlord, Angry Skeletal Dragon: 2D+2 = 14; Average 9

Level 6
Yeti Ascendant Priest, Chosen of Harukita: 1D+6 = 12; Average 9.5
Terror Knight, Ultrasnail: 2D+3 = 15; Average 10
Master Mimic: 1D+7; Average 10.5

Level 7
Council Assassin: 1D+7 = 13; Average 10.5
Enterprising Demon, Scion of Gulagra: 2D+4 = 16; Average 11
Cave Dragon: 2D+5 = 17; Average 12

Level 8
Remnant of Zek: 75 health; 2D+4 = 16; Average 11
T-02b - Gaming (Cont.)
Monsters and Mantids - Random Events
Various Mushrooms: These are scaled to the level of the dungeon you are in, starting with requiring an 8+ Saving Throw and granting +/-3 Max Health at the beginning, up to 11+ Saving Throw for +/-5 Max Health. Critical Failure is instant death. Generally worth taking, potentially skipping later on if you already have good max health. If you get this in the first level or two, always take it. Critical success gives you a very powerful hat, with the second version taking you through 2/3 of the game easy.

Chests: Sometimes these contain free gold, sometimes they are Mimics that initiate Saving Throws. Both the amount of gold, the required throw, and the Mimic's stats increase the deeper in the dungeon you are. Failing a Saving Throw will hurt you slightly and start a fight with a Mimic. Worth taking early on (which also seems to have lower chance for a mimic) in order to afford hat upgrades, but can be considered at any time in order to level skills with the extra fight.

Sheep: Various forms of sheep are found early on, each being somewhat randomized. Some can be eaten, some can be talked to, and sometimes you get both options. Eating is straightforward: succeed in a throw and your health is replenished - fail, and you'll lose max health or start a battle, or perhaps the sheep just runs away. Notably, sometimes devouring and rolling a critical success will give you +1 to all Saving rolls. Talking to the sheep is always the better option though, since there is a chance to get 2 healing potions from the event. Always worth taking this event. If you are exceptionally (un)lucky, critical failure can force you to fight a wizard, which gives you a hat afterwards -- the Wool Hat of Archwizardry is one of these, and it can carry you through an entire run on its own.

Rogues: Seemingly similar, the Rogue can appear in three forms. If you can avoid or counter-ambush the Rogue, your counter-ambush either subtracts 10 health (throw lost), starts a fight with advantage (throw won; Rogue has 1D-1 damage), kills the rogue and gives you a bomb and a potion (critical success), or kills you instantly (critical failure). Worth taking to advance your skill levels. If you can attempt to intimidate the Rouge back, you can escape with your gold (throw won), lose your gold anyway (throw lost), gain 3 bombs (critical success), or die instantly (critical failure). Always worth intimidating the Rogue, since loss of gold can cost you a spider or beetle hat, which are valuable. Lastly, you can choose to give the Rogue your gold and hat or try to trick them: either you keep both and fight a weakened rogue (throw won), or lose only your gold (throw lost), or lose both anyway (critical failure). Always worth tricking, since hats can decide your fate.

Non-threatening Bloodfang Spider: Choosing to attack the spider will sometimes start a fight against a weak enemy, or cause a 11+ Saving Throw. Failing will cause -10 Max Health and put you into a tough fight, or outright killing you if you critically fail. Succeeding will inform you that the spider is surrounded by baby spiders - at which point, it is wise to leave. Critical success in detecting the spiders will add a gold reward to the fight. If you do choose to fight after detecting the spiders, you will receive the Poison-Resistant Visor hat. The outcomes of this event are fairly mixed, but generally it works best to skip it unless you are desperate for upgrades.

Injured Orc: Helping the Orc by giving up a potion incurs a 9+ Diplomacy check, whereas helping without a potion takes 11+ Diplomacy. If either succeeds, you will be granted a buff for +1 to all Saving Throws. Failing simply starts a fight against a low-health (but normal-damaging) Orc. Wasting the potion isn't a great idea, and even without a potion, the buff is weak. Generally, you should pick to fight a weak enemy for a free skill level.

Distant Orc: If ambushed, immediately fight an Injured Orc. If parlayed with, a Diplomacy roll (10+) occurs, with success resulting in the option to buy 2 potions and 2 bombs for 280 gold. With a critical success, the Orc throws a cultural artifact into the offer for no extra cost. Both options here can be really good, favoring the parlay option if you're not hideously under-leveled.

Delicious Fairy: These fairies appear on multiple levels of the dungeon, with their rolls and rewards scaled to match. Devouring results in restoring all health. Requesting their blessing requires Diplomacy (~9+), which gives you the perk of saving you from your next critical failure in Diplomacy, but a critical failure has the fairy stealing your gold. Following to the water gives you ~2 potions, sometimes requiring a roll, where failure will have you take damage and get zero potions. If you critically succeed in this roll, you will get potions and a max health boost. Demanding to know their secret will give you a pendant that adds 1 culture, which interacts with the Fairy Scion event. All of these except the Diplomacy buff are useful. Note that if you devour or fight the Fairy for any reason, you will receive a Fairy Wing -- making parlay with the Fairy Scion impossible.

Fairy Scion: Attacking or having a Fairy Wing results in a fight (40 HP, 2D+1 damage). Parlaying rolls Diplomacy (13+), with success giving you 2 bombs, and critical success giving you up to 6. If you have the Delicious Fairy's pendant, they will ask to examine it -- letting them will give you the ability Fairy's Blessing, a one-time use ability that heals for 3D+9 and lets you go again.

Skeletal Dragon Parlay: Parlaying causes an 11+ Diplomacy roll. Failure results in a fight with an Angry Skeletal Dragon, which is particularly difficult. Success results in ?, and critical success results in the Dragon asking you to impress him (with the option of running away). Impressing them takes a second Diplomacy roll (10+), with success causing ?, and critical success causing you to get a crown token (if your run concludes safely by winning or cashing out) and an optional hat (Crown of Bravery), and critical failure damaging you for 10 and starting the fight anyway. The hat is weak, and the extra crown token is not worth potentially ending your run. Ignore this one.

Support Golem: There are two versions. One will simply offer to sell the Amulet of Harm to you for 200 gold, which can be used only once, taking a turn and rolling 5D+10 damage (average 27.5). The other version can be attacked, parlayed with, or ignored. Attacking results in a fight (45 HP, 2D-1 damage). Parlay rolls Diplomacy (11+), with success letting you trade 2 bombs for the amulet, failure making you fight a Fairy Scion, critical success giving you the Amulet of Harm for free, and critical failure having you take 7 damage. Critical fail on parlay can also result in fighting an Explorer Golem (45 HP, 2D-1 damage).

Centipedes: Various levels of these exist, with the version in the first level of the dungeon requiring a Saving roll (10+) and granting +1 to all Saving rolls. Critical success will also grant max health. Later versions require higher rolls. Failure results in losing max health, and critical failure debuffing your saving throws. Generally not worth the risk, as only the critical success is of any importance.

Shopkeepers: Goblin sells a hat or sometimes a potion for 40 gold. Spider sells a hat or sometimes offers 3 bombs for 240 gold (but requires a Diplomacy roll (13+) or they simply steal your gold; critical failure steals both your gold and hat), or offers 3 potions for 200 gold with a similar Diplomacy roll (11+). Critical success on either will throw in another potion/bomb for free. Beetle sells a hat or sometimes 2 bombs for 160 gold. The hats are usually useful, and the potions/bombs should always be taken, even the spider's version.
T-02c - Gaming (Cont.)
Monsters and Mantids - Hats, Hats, Hats!
(Note: For the sake of brevity, attributes listed "+x dmg" or "+x heal" mean "on rolling doubles", unless otherwise specified)
Level 1
Pigskin Hat (+3 heal)
Slightly-Explosive Wool Hat (+4 dmg, +1D-3 max hp on corpse eating)
Moist Towel (+5 max hp, +1 max hp on corpse eating)
[Mimic Fight Event] Shoddy Hat of Mimicry (+1 Diplomacy, +13 dmg, +2 max hp on corpse eating)
[Mushroom Event] Very Poisonous Mushroom Cap (+1 dmg to all attacks, +1D max hp on corpse eating, -1 to all saving throws)
[Suspicious Sheep Event] Wool Hat of Wizardry (+chance of events, +1 to diplomacy and saving throws)
[Sick Sheep Event] Wool Hat of Archwizardry (+6 damage to all attacks, +chance of events, +2 to diplomacy and saving throws, leaderboard score +500 if kept)
[Sentient Sheep Fight Event] Magical Wool Hat (+5 max hp, +4 dmg)
Fancy Hat (+5 max hp, +1 Diplomacy, eating a corpse gains 1D-3 max hp)
Level 2
Comfortable Cap (+7 heal)
Wolfskin (+8 max hp, +1 max hp on corpse eating)
Tophat of Backstabbing (+8 dmg, +1D-2 max hp on corpse eating)
[Goblin Shop Event] Nice Goblin Helm (+5 max hp, +4 heal)
[Mushroom Event] Mildly Poisonous Mushroom Cap (+2 dmg to all attacks, +1D max hp on corpse eating, -1 to all saving throws)
Level 3
Helm of Regeneration (+10 heal)
Coif of Criticals (+12 dmg, +2 max hp on corpse eating)
Bearskin (+11 max hp, +1D-1 max hp on corpse eating)
[Spider Shop Event] Spider-Knit Cap (+9 max hp, +9 heal)
[Beetle Shop Event] Felt Hat of Healthiness (+6 max hp, +6 heal)
[Mimic Event] Decent Hat of Mimicry (+17 dmg, +2 to diplomacy throws)
Level 4
Visor of Life (+14 max hp, +2 max hp on corpse eating)
Tiara of Vitality (+14 heal)
Murderhelm (+16 dmg, +1D max hp on corpse eating)
[Spider Shop Event] Spider-Silk Hood (+11 max hp, +11 heal)
[Beetle Shop Event] Elegant Bonnet of Healthiness (+8 max hp, +8 heal)
[Spider with Babies Event] Poison-Resistant Visor (+20 max hp, +2 to saving throws)
Level 5
Wig of Eternity (+17 max hp, +3 max hp on corpse eating)
Dwarven Helm (+17 heal)
Wrappings of Disease (+20 dmg, +1D+1 max hp on corpse eating)
Crown of Bravery (+25 max hp, +2 saving throws, +1 diplomacy throws)
Level 6
Snail Helm (+20 max hp, +3 max hp on corpse eating)
Helmet of Hate (+24 dmg, +1D+2 max hp on corpse eating)
Galero of Miracles (+21 heal)
Level 7
Mask of Despair (+28 dmg, +1D+3 max hp on corpse eating)
Helmet of Wishful Thinking (+24 heal)
Dragonskin Helm (+23 max hp, +4 max hp on corpse eating)

Monsters and Mantids - Perks
You will select a perk when your character (not attacks) hit level 2, 3, and 5. Some perks will occasionally offer an upgraded or additional perk after being taken, sifted into the possible picks of your next perk.
  • Boastful: Learn the ability Boast (gain +2 max hp and restore +1D hp). Usable once per combat.
  • Careful Drinker: If a potion rolls a 1, it is not consumed. Healing still applies. Upgraded version, Precise Drinker: If a potion rolls a 1 or 2, it is not consumed.
  • Careful Thrower: Gives you a bomb. If a bomb rolls a 1, it is not consumed. Damage still applies.
  • Enthusiastic Executor: +1 damage to Executes. Effectively an extra level-up.
  • Focused Meditator: Recover +2 hp when meditating (upgrading an attack/ability).
  • Glass Pincers: -10 max hp, all attacks deal +1 damage. Upgraded version, Fragile Berserker: -8 max hp, all attacks deal another +1 damage.
  • Jabby: Learn the ability Jab (deal 1 damage to enemy and go again). Requires charges. Charges are given when descending a level or eating a corpse.
  • Lucky: +1 to Saving throws, and prevents the next critical failure Saving or Diplomacy roll. Upgraded version, Robust and Lucky: +1 to Saving and Diplomacy rolls, prevents next critical failure.
  • Master Crusher: Crush now rolls extra damage when the initial dice are >5, instead of >6.
  • Mind Gnawer: +1 damage to all Mindgnaws. Doubles when appropriate. Does not influence whether a roll is doubled or not.
  • Perfect Breather: Learn the ability Breathe (If monster is unharmed, restore 1D-2 hp and go again). Requires charges. Charges are given when descending a level or eating a corpse.
  • Preying Mantis: Prey deals -1 damage, but adds another die to healing when you roll a 1.
  • Tough: Gain +1D max hp and restore all hp. Upgraded version, Super Tough: Gain +2D max hp (stacks with previous) and restore all hp. Upgraded version (again), Ultra Tough: Gain +3D max hp (stacks) and restore all hp.

My perk observations:
  • Tough is really good. Really really good. It allows you to immediately upgrade an attack/ability, can give a respectable amount of max hp, and overcomes the usual downside of gaining max hp by restoring all health.
  • The bomb and potion perks are amazing. The fact that the bomb/potion still has its effect when not being consumed essentially means you gain a free bomb/potion, which is even better when your ability is leveled up.
  • All the attack upgrade perks are good. Preying Mantis almost guarantees a winning run. Master Crusher is pretty weak in the early game, but otherwise worth taking. Mind Gnawer will never be picked (despite being a good upgrade) because you should not be running Mindgnaw.
  • Jabby with Skewer is very, very good. Depending on circumstance, you can use Skewer on odd almost every single time. If you are using Skewer, this is a must-pick, no questions asked. Jabby can also be used as a mock-Execute (or to get within Execute range), but this use is less compelling.
  • Focused Meditator is useful if you are behind on upgrades. It gives you more room to get more upgrades in, but only marginally.
  • Boast can be slightly useful if taken as your first perk, but will become completely unusable later on (without getting yourself killed). A last choice if nothing else will assist you, generally not worth taking.
  • Breathe is situational. Breathe is acceptable if you save up the charges and use it to compensate for lack of healing later on. But like Boast, its effects are so little that it likely won't make enough of a difference.
  • Glass Pincers and Lucky seem terrible. Glass Pincers could be worth it if you could take perks in late-game, when you've already built up your max hp, but that is not the case. Low max hp just means more corpse-eating, or simply death. Lucky is just not enough of an effect on a run to justify taking over other options, but isn't terrible.
T-02d - Gaming (Cont.)
Monsters and Mantids - Strategy Walkthrough
  • Level your main damage dealer after the first fight and level your secondary skill after the second, no matter your health. The progression is essential, and dying will waste little time. In the case of Lurk plus DPS skill, level Lurk first, as its guaranteed roll is much more useful than your main DPS skill's possibility to high-roll.
  • For your second round of upgrades, eat a corpse if you are below 10 hp and have not received Tough, otherwise prioritize your main damage skill again. However, if you get Prey+ and are using Lurk, start upgrading Prey+ before Lurk. This is so you can go into fights while severely injured and open with Prey+ instead of Lurk to get your hp back up.
  • You will want to find a damage or max-health hat first. Raising max health is critical. Damage hats are much better than max-health hats, unless the damage hat is one where you can roll zero when eating a corpse. Also, start snatching up every potion and bomb you can.
  • If you find yourself with a weak damage hat (such as a paltry +8 damage and 1D-2 max health boost), temporarily swapping for a healing hat (+10 or more) can be good. But switch back to a damage hat as soon as you can for that max health.
  • Every time your attacks are at their current max levels and you have a comfy amount of health remaining, upgrade potions (even if you don't have any). Play a little risky in early-game to upgrade potions, otherwise late-game will be even more risky. Potion levels over 6 do not offer much extra benefit. As for leveling bombs... Generally, don't. Unless you are doing a Prey+ only run, and your potions are level 6+, and you do not have a hat that increases max health -- then you can upgrade bombs, since that's the only choice left. Even Careful Thrower does not influence this choice.
  • Once you are over ~50 max health, swapping to healing hats is optimal. If you find yourself with only damage hats, and you have maxed attack levels and level ~3 potions, start eating corpses every fight. Your max health will outpace the corpse healing, but you need every point of health you can get, especially when you inevitably come up against Ultrasnails and Cave Dragons.
  • When your health lowers below an enemy's max hit, weigh your options. If they are close to death, use bombs. If not, use potions only enough to pass the max-hit threshold. If you are against an enemy with a lot of health and you are out of potions, use Fairy's Blessing if you have it.
  • If your starting health is low and you are against a high health enemy such as Ultrasnails or Cave Dragons, consider using the Amulet of Harm. These fights are harder than the final boss, so the amulet has much higher worth against these foes. Try not to use it against an Ultrasnail unless you have no other option, but using it against a Cave Dragon is high value.
  • For levels 6 and 7, eat most corpses, and use your potions and bombs as needed to stay safe from enemy max-hits. It is better to empty your supply here then try to risk dying just to reach the boss with useless consumables. If given a choice between using your last potions or last bombs, roll the bombs if there's any chance of it leading to a kill. The only thing you will need for the boss is 1 or 2 leveled potions, with bombs not making much of a difference.
  • Do not quit even if you do not get a healing hat. With the max health boosts, continually eating corpses, and a fair number of potions, the final boss fight is still very winnable. It might be unlikely, but with a good damage hat, you can get lucky and kill the boss in 3 (or even 2!) turns.
  • Do not quit before the final boss, ever. In my experience, over 90% of runs that get to the boss will end up winning the fight, even if you are in rough shape. Builds that can't beat the boss simply die on the level 7 enemy fights, since they're much harder.

    Monsters and Mantids - General Tips
  • Healing shows up before an enemy's attack, but you will still be healed after their attack (or perhaps the healing cancels out their damage, who knows?). So do not worry about ever 'wasting' heals, because that is never the case.
  • Always keep track of an enemy's max hit. If you're split between using a potion or potentially dying to 2D coming up both 6s, it may be best to take the gamble and save the potion unless you're fairly far into the dungeon. Enemies that roll fewer dice are more dangerous than enemies that roll multiple dice to get to the same max hit. 2D versus 1D+6 is a huge gap: the latter is as if the 2D enemy always rolled one 6, cutting your chances of survival in half.
  • In early levels of the dungeon, 10 health is about where you can decide to heal or level a skill. Further down, you may want to stay cautious, only leveling up if you're above 20-25 health. If you have a perk coming up, you can always risk it and hope you get Tough.
  • If you find yourself with two maxed skills (or Execute 4, since 5 isn't necessary), leveling potions or (maybe) bombs can be a great idea - it could be the difference between needing 1 or 2 or more to get the job done. Throwing levels in to potions before you even have a supply of them is still a good idea, because you will get potions and you will need them.
  • Once your attack skills are leveled, don't be afraid to simply heal after every fight, especially in the later levels where you are almost guaranteed to be soaking lots of damage every fight.
  • Prioritize hats that offer healing. Max Health versus Damage hats is a more difficult discussion: the extra damage is very useful compared to simply more max health, but the max health hats give more consistent max health boosts when eating corpses. Still, damage is preferable.
  • Playing a little risky is better than cashing out. Losing 650-900 councils on a run is preferable to losing a shot at over 15,000 councils. If you do not have an Execute, Lurk, or Prey+ build, cashing out can be considered when you have a large number of cultural artifacts - a potential table buff is much more useful than a guaranteed failed run.
  • The high-stakes room costs an additional 250 councils to play, but in return gives you +5 Max Health and a free health potion - this can make a very big difference!
  • All dungeon levels contain 3 natural monster fights. A random number of events can spawn in a level, limited to 1 between each monster fight. Since events (and their monsters) can be tied to the level you're on, some are worth fighting in order to level up quicker!
  • The value of healing and extra damage (hats and Prey) is proportional to how much it cancels out an enemy's turn. Any healing or damage becomes much more useful once it has negated at least one turn. Healing an entire attack or doing damage at (or above) your attack's average damage is equivalent to removing a turn from the fight. Keep fight length in consideration when picking hats.
  • Hats that boost "all attack damage" are very high value with Execute. The added damage will count towards Execute cancelling an enemy's attack, unlike the standard "damage on doubles" hats, which do not.
  • Tipping your friendly game-master mantis (when Gaming level 15 or above) will make them randomly roll dice much faster for you. (Not sure what higher tips do differently?)
  • There is currently a purely visual bug with the dungeon level progression. If an event is encountered after the third monster fight, the event and the monster after it will play out before the "descend to the next level" screen pops up. This is purely cosmetic, as any monsters shifted before this message (such as a Zombie appearing in "level 1") will still count towards the 3 encounters for the next level.
  • Another bug exists, in that Prey's healing will say that it gets capped by your Max Health, but this does not have any effect. It can even say that it is capped to zero, yet it still heals.
T-03 - Gardening
Gardening is a skill most people level passively while working on Cooking, Tailoring, or Flower Arrangement. It's highly possible to max Gardening while just growing cotton for Tailoring. But if you are not interested in these skills, or wish to power-level Gardening directly, there are some considerations to be had.


Growing Limits
  • All veggies have a plant-limit of 2.
  • You can plant every type of veggie simultaneously, except for special groups: Red & Green Peppers, Cantaloupes & Pumpkins, and Cabbage & Escarole.
  • You may only plant 3 flowers total.
  • Cotton has a plant-limit of 5.
  • Sugar and Barley are a special group, with a limit of 2 total.

Optimizing for Time
  • The straight-forward fastest method is to plant every veggie group simultaneously, along with the highest-level flower you can grow. But unless you have 6,000 pockets for water bottles, unlimited fertilizer, and intimate experience with Cookie Clicker, this method is implausible.
  • A more sane approach is to plant Beets, Carrots, your highest level flower, Cotton, and Barley. These are the fastest individual crops, which equates to the fastest experience rate for a limited growing selection.

Optimizing for Fertilizer
In general, plant the highest level 1-fertilizer veggies and flowers that you can grow. 2-fertilizer crops have severe diminishing returns. Sugar and Barley have comparable experience/fertilizer rates to veggies of the same required level. Note that Cotton, while very fast for experience, has a very low experience/fertilizer ratio.


Please note that some information is missing. Until my new Fae can plant these crops or someone else contributes the information, these experience values are unknown. However, all veggies and flowers follow clear scaling rules, so it's safe to infer their values. Flower grow-times and experience are directly related to level, so the progression is likely the same. Veggies requiring 2 fertilizer scale much more slowly than their 1-fertilizer counterparts, but extrapolating leads to Peas perhaps having a similar experience/second ratio to Carrots -- though costing 2 fertilizer makes them strictly inferior to Carrots regardless.
T-04 - Performance Skills
The first half of Instrument skills and Interpretive Dancing work the same. Each experience drop is 25 experience. You must then wait a random amount of time before the experience occurs again. Playing other songs/dances or restarting a song/dance does not affect the cooldown. The second half of each Instrument skill requires use of the second instrument in that skill (Harp for Stringed Instruments, for example), and will grant 50 experience each time, with the same cooldown effect.

Lycanthropy Howling has a different experience granting method. When starting to howl, experience gain will begin at 10 exp, with 10 more added each minute (10, then 20, then 30, etc) until it caps at 100 exp, for a total of 460 experience per cycle. You must then wait a random amount of time before this experience cycle starts again. Restarting howling does not affect this. This pseudorandom experience gain can be frustrating, so if desired, you can stop howling after the experience cycle ends, do something else for a while, and by then your random cooldown on howling will have passed and you can howl again for another instant cycle. Sitting and howling continuously will result in fairly large periods of time where no experience is gained, but seeing as you have to wait the invisible cooldown to matter what, it is still the fastest way to gain experience.

All this being said, there is still one way to gain instrument experience that is quite odd, and perhaps a bug. Since instrument skills and dancing are equipped as combat skills, they can become tagged for combat experience. Should you somehow be playing an instrument or dancing when you enter combat, killing that enemy will grant the typical combat experience to your performance skill as well.

For levelling Dancing when no players are around, you can go to Serbule Hill's inn and pay Rappanel to play music, or head to Rahu's inn during daytime to dance to Percussa's music for free.
T-05 - Language Training
When training Goblinese, experience is gained in one of two ways. The first, and most obvious, way is to kill Goblins and take their Calling Cards. Every unique Calling Card you read will grant 50 experience, with repeats granting between 1 and 4 experience depending on the level required to read it. The other way is to scavenge through scrolls found in the world for Goblin Battle Plans, which can be translated for 10(?) experience, with no penalty for repetition. Of course, seeing just how many Calling Cards there are, it's still best to just read every single one you are able to.

Orcish is similar in its pattern of unique items giving large amounts of experience for the first time read and a lower amount all other times. Items like Orcish Military Phrasebook, "Demands of The Deceased", and Orcish Reference Sheet are dropped by Orcs in Kur, with each item giving 100 experience the first time read and 5 experience all times after.
T-06 - Leatherworking
As Leatherworking is a fairly straightforward skill, not much can be said on the best ways to level it. Determining the acquisition time of each type of animal skin is going to vary greatly by player and grinding locations, as well as being complicated by passive skin collection during other tasks. Rather than try to surmount the incalculable, I applied a rudimentary weighting system to each of the skin levels (seeing as lower skins can be farmed quicker). I have highlighted the most 'efficient' recipes in each level bracket in green, with yellow denoting that a previous level recipe that uses the same skins grants better results. The same rule follows for the Council costs columns, which are the costs of buying Tannin Powder. The last columns are for relative cost when including both Tannin and Rubywall. Note that recipe levels are not the same as the level required to purchase the recipes: recipes level 53 and below come in a big "pack", making the lower-level recipes (level 10, 20, etc) require a higher level to purchase (13, 23, etc).


Notes are as follows:
  • Practice recipes at the start are the best for covering gaps in early levels after first-time bonuses. The Rough Practice recipe can be used to reach Decent gear (instead of crafting Crude gear) with little cost.
  • As a general rule, boots seem to be the most skin-efficient item to craft. Exceptions: Decent Helm is vastly better than Decent Boots, and Nice Gloves are slightly better than Nice Boots.
  • Tannin costs for the skin-efficient items vary from time-to-time. If you are willing to grind a few more animals for the sake of saving Councils on Tannin, look towards the items with their weighting marked in yellow and their Councils in green.
  • As another general rule, Tannin costs only increase as you move up in level. Rough Practice may be the most Tannin-efficient, but good luck grinding that many skins while keeping your sanity.
  • Determining when to use Rubywall for crafting gear above Crude will be largely up to the player's preference.
  • When factoring in a cost for Rubywall (estimated here as 150c per -- though I am not sure on the actual going-rate for Rubywall, though costs relatively close to that do not impact the trend of the data), there is an inverse effect to the costs of Tannin. While Tannin costs increase, Rubywall costs offset this. The cost of Rubywall remains constant, so higher tier recipes offer more experience return per crystal used.
  • With all this in mind, determining which recipes to use is hardly clear. I would recommend picking whichever method frustrates you the most -- grinding skins or paying upfront for Tannin. Whichever you prefer to avoid, use the associated columns to choose which recipes are most efficient in that regard, so as to fit your playstyle.
T-07 - Surveying, Mining, Geology
When you complete a regular (non-motherlode) Survey, a hidden timer starts that is a couple minutes long, depending on the zone, with higher level zones having a longer timer. "For Serbule and Eltibule, the timer is randomly chosen from a number between 1.5-3.5 minutes. In Kur, it's 2.5-4.5" [credit to the editors of the P:G wiki]. If you complete another Survey within this time period, you achieve a "speed bonus," which grants additional rewards (an example being Rubywall Surveys granting other gems as a speed bonus). A good idea is to create as many surveys as your inventory can hold and draw yourself a map of all the locations, taking the shortest route to get a guaranteed speed bonus each time.

For motherlodes, there is also a general strategy. Short of determining the zone's dimensions and triangulating the distances, you can check your initial distance, then run a bit in a cardinal direction and check the distance again. Try to run the same distance in each of the directions, noting how much the distance changes. The more it changes, the closer that direction is to the end result -- if it changes quickly while moving north and slowly while moving east, run north-northeast. When you are closer to the destination, this method will have you running in circles, so do something different: Go back to testing cardinal directions, but this time stick to one. Move in that direction until the number stays the same and then starts to increase again. Turn 90 degrees and you will eventually run directly into the destination.

Surveys in water -- such as the Kur ocean -- can be troublesome. For a regular survey, simply hold your swim/fly-up key (default R) and double click your survey and you will be able to check/turn-in surveys without having to be on ground. This also applies to motherlodes in an odd fashion. If you're treading water and you reach the motherlode destination, it will spawn the motherlode at the surface of the water with you. Just jump on top of it and mine away!

Leveling advice for these three skills is as follows: Surveying only grants experience when creating maps, but there is no reason to create and discard maps since you will naturally make more than enough just by leveling either of the two sub-skills. Geology and Mining experience are both granted when turning in a regular survey map. Motherlodes grant Mining experience two-fold: one larger amount for spawning the motherlode, and then a smaller amount for actually mining it. For example, Kur Mountain Basic Metal Motherlode Maps grant 300 Mining exp when spawning the motherlode, and 130 exp when mining it.
T-08 - Sushi Preparation
When creating sushi, there are three considerations in each recipe: the cost of vendor-only materials (rice and vinegar), the type of fish, and the additional ingredient. Of these three, the additional ingredient is what matters most. Watercress, Oregano, Mint, and Dill are drops from monsters, and thus unreliable. Foraging seeds for Peas and Escarole can be more of a chore than simply collecting Swampweed and Seaweed from Rahu Sewers. Thus, two methods for leveling immediately stand out -- simply focusing on every new recipe, or sticking to the Swampweed and Seaweed recipes for ease of bulk collection (while still getting first-time bonuses). These methods will be listed step-by-step, followed by a grand total of all resources needed.


Sequential Method
  • 33 Clownfish Nigiri -- 66 Clownfish, 66 Rice, 33 Watercress -- 2,442c
  • 17 Crab Nigiri -- 34 Crab, 34 Rice, 17 Basic Vinegar, 17 Watercress -- 1,598c
  • 15 Clownfish Sushi -- 30 Clownfish, 15 Rice, 15 Basic Vinegar, 15 Watercress -- 855c
  • 31 Grapefish Nigiri -- 61 Grapefish, 62 Rice, 31 Basic Vinegar, 31 Swampweed -- 2,914c
  • 12 Crab Sushi -- 36 Crab, 12 Rice, 12 Basic Vinegar, 12 Watercress -- 684c
  • 26 Perch Nigiri -- 78 Perch, 52 Rice, 26 Fancy Vinegar, 26 Oregano -- 3,484c
  • 10 Eel Nigiri -- 20 Eel, 30 Rice, 10 Fancy Vinegar, 10 Oregano -- 1,710c
  • 10 Grapefish Sushi -- 20 Grapefish, 20 Rice, 10 Basic Vinegar, 10 Swampweed -- 940c
  • 10 Flounder Nigiri -- 20 Flounder, 20 Rice, 10 Expert Vinegar, 10 Seaweed -- 1,940c
  • 10 Cavefish Nigiri -- 20 Cavefish, 20 Rice, 10 Fancy Vinegar, 10 Mint -- 1,340c
  • 10 Perch Sushi -- 20 Perch, 30 Rice, 10 Fancy Vinegar, 10 Oregano -- 1,710c
  • 9 Shark Nigiri -- 18 Shark, 18 Rice, 9 Expert Vinegar, 9 Mint -- 1,746c
  • 9 Eel Sushi -- 18 Eel, 18 Rice, 18 Fancy Vinegar, 9 Oregano -- 1,746c
  • 9 Vexfish Nigiri -- 18 Vexfish, 18 Rice, 9 Expert Vinegar, 9 Seaweed -- 1,746c
  • 9 Flounder Sushi -- 18 Flounder, 18 Rice, 18 Expert Vinegar, 9 Seaweed -- 2,826c
  • 9 Cavefish Sushi -- 18 Cavefish, 18 Rice, 9 Fancy Vinegar, 9 Expert Vinegar, 9 Mint -- 2,286c
  • 21 Amberjack Nigiri -- 42 Amberjack, 42 Rice, 21 Expert Vinegar, 21 Dill -- 4,074c
  • 21 Shark Sushi -- 42 Shark, 42 Rice, 42 Expert Vinegar, 21 Mint -- 6,594c
  • 20 Vexfish Sushi -- 40 Vexfish, 40 Rice, 40 Expert Vinegar, 20 Seaweed -- 6,280c
  • 32 Crelpin's Sushi -- 64 Vexfish, 32 Rice, ~16 Expert Vinegar, 32 Peas & Escarole -- 3,104c
  • Total Fish: 96 Clownfish, 70 Crab, 81 Grapefish, 98 Perch, 38 Eel, 38 Flounder, 38 Cavefish, 60 Shark, 122 Vexfish, 42 Amberjack
  • Total Bought Ingredients: 607 Rice, 85 Basic Vinegar, 83 Fancy Vinegar, 174 Expert Vingar -- 50,019c
  • Total Gathered Ingredients: 77 Watercress, 41 Swampweed, 55 Oregano, 28 Seaweed, 49 Mint, 21 Dill, 32 Peas & Escarole

    Sewers-Lover Method
  • 33 Clownfish Nigiri -- 66 Clownfish, 66 Rice, 33 Watercress -- 2,442c
  • 17 Crab Nigiri -- 34 Crab, 34 Rice, 17 Basic Vinegar, 17 Watercress -- 1,598c
  • 15 Clownfish Sushi -- 30 Clownfish, 15 Rice, 15 Basic Vinegar, 15 Watercress -- 855c
  • 103 Grapefish Nigiri -- 206 Grapefish, 206 Rice, 103 Basic Vinegar, 103 Swampweed -- 10,044c
  • 1 Crab Sushi -- 3 Crab, 1 Rice, 1 Basic Vinegar, 1 Watercress -- 57c
  • 1 Perch Nigiri -- 3 Perch, 2 Rice, 1 Fancy Vinegar, 1 Oregano -- 134c
  • 1 Eel Nigiri -- 2 Eel, 3 Rice, 1 Fancy Vinegar, 1 Oregano -- 171c
  • 10 Grapefish Sushi -- 20 Grapefish, 20 Rice, 10 Basic Vinegar, 10 Swampweed -- 940c
  • 49 Flounder Nigiri -- 98 Flounder, 98 Rice, 49 Expert Vinegar, 49 Seaweed -- 10,199c
  • 1 Cavefish Nigiri -- 2 Cavefish, 2 Rice, 1 Fancy Vinegar, 1 Mint -- 134c
  • 1 Perch Sushi -- 2 Perch, 3 Rice, 1 Fancy Vinegar, 1 Oregano -- 171c
  • 1 Shark Nigiri -- 2 Shark, 2 Rice, 1 Expert Vinegar, 1 Mint -- 194c
  • 1 Eel Sushi -- 2 Eel, 2 Rice, 2 Fancy Vinegar, 1 Oregano -- 314c
  • 9 Vexfish Nigiri -- 18 Vexfish, 18 Rice, 9 Expert Vinegar, 9 Seaweed -- 1,746c
  • 62 Flounder Sushi -- 124 Flounder, 124 Rice, 124 Expert Vinegar, 62 Seaweed -- 20,230c
  • 1 Cavefish Sushi -- 2 Cavefish, 2 Rice, 1 Fancy Vinegar, 1 Expert Vinegar, 1 Mint -- 254c
  • 1 Amberjack Nigiri -- 2 Amberjack, 2 Rice, 1 Expert Vinegar, 1 Dill -- 194c
  • 1 Shark Sushi -- 2 Shark, 2 Rice, 2 Expert Vinegar, 1 Mint -- 314c
  • 53 Vexfish Sushi -- 106 Vexfish, 106 Rice, 106 Expert Vinegar, 53 Seaweed -- 16,739c
  • 1 Crelpin's Sushi -- 2 Vexfish, 1 Rice, 1 Expert Vinegar, 1 Peas & Escarole -- 157c
  • Total Fish: 96 Clownfish, 37 Crab, 226 Grapefish, 5 Perch, 4 Eel, 222 Flounder, 4 Cavefish, 4 Shark, 124 Vexfish, 2 Amberjack
  • Total Bought Ingredients: 709 Rice, 146 Basic Vinegar, 7 Fancy Vinegar, 294 Expert Vingar -- 64,793c
  • Total Gathered Ingredients: 66 Watercress, 119 Swampweed, 4 Oregano, 173 Seaweed, 4 Mint, 1 Dill, 1 Pea(s) & Escarole
T-09 - Tailoring and Textile Creation
For leveling Textile Creation, chances are that you will max it just through creation of Carded Cotton. If interested in power-leveling it to rush to Master-level Carded Cotton, prioritize the following crafts (in this order) after making base materials: Butter Muslin, Flower Wraps, Cheesecloth, Viole Muslin, and then either Flower Banding or Fine Cheesecloth.

For leveling Tailoring, first reference the following table. Items that are better to craft than previous crafts will be highlighted in green, with yellow marking areas with caveats (detailed below).


Notes on best leveling practices:
  • Skip Shoddy and Rough cloth gear, as the practice recipes are much more efficient.
  • Adding pockets to leather gear is appealing for a bit, but needing to actually acquire leather gear hampers this.
  • Crude, Decent, and Nice gear follows a similar pattern: craft cowls, gloves, or slippers and skip out on shirts and pants.
  • Quality, Great, and Amazing gear will find massive cotton-efficiency with slippers, opposed to all else.
  • Astounding gear starts to require Fae Silk, which is limited to 4 collections every hour. This creates a split: slippers are by far the most cotton-efficient, but it requires twice as much Fae Silk. Otherwise, Pants and then Cowls only use 1 Fae Silk, but offer smaller cotton-returns. The choice is thus: craft half the gear at twice the cotton-efficiency, or twice the gear at half cotton-efficiency. This is up to preference, but leans towards Pants and Cowls.
T-10 - Transmutation
Transmutation is a simple skill to master, but it is unique in Project Gorgon for having a pseudo-exponential experience curve. This means that you are intended to fully switch over to a new level-bracket once unlocked: recipes for level 0-30 gear will give almost no relevant experience after you have unlocked 31-60 recipes.

The following graph is an estimation of how many items of each type are needed to get to the next distillation recipe. Repair recipes are listed but not calculated into the figures - they are too prism-hungry to actually use for leveling, so only use them for first-time exp if desired. An asterisk (*) means that it is assumed that you will also complete the first-time bonus(es) for that level.

T-11 - Minor Trade Skills
Mushroom Farming
Since the only variable in mushroom farming that cannot be affected is the time taken to grow your boxes, all box types can be viewed in terms of time-efficiency.
  • Practice Box (25% slower growing time, 33% more experience per harvest): Compared to using a regular box (faster grow-time interval), the practice box only nets +6.4% experience. Higher yield or faster grow times do more to boost experience gain than this box's straight experience buff.
  • Epic Box (100% slower growing time, +200% mushroom yield): Net difference is +50% yield when counting for time taken.
  • Fast Box (20% faster growing time, -50% experience per harvest): +25% yield per time taken. The only non-standard box that does not replace the Practice Box for experience gain.
  • Very Fast Box (40% faster growing time, -50% experience per harvest): +66% yield per time taken. This outpaces the experience penalty, so Very Fast Box cycles will still net higher experience than standard or practice boxes.
  • Lucky Box (+33% chance per mushroom to grow a lower-level mushroom as well): Not sure how to quantify this, as mushroom value varies. Consider it less than +33% yield, perhaps +25% or so.
  • High-Yield Box (50% slower growing time, +100% mushroom yield, 15% 'lucky'): +33% yield per time taken, plus +15% 'lucky' mushrooms. If you want to estimate that 15% as closer to 10% of the primary mushroom value, this box is worth approximately +44% yield per time taken.
Note that this doesn't factor in cost of wood, substrate, or even being able to log in every time you need to cycle your boxes. However, some degree of leeway exists: using a more efficient box and then not being able to harvest right away (going over by an hour or two) may still be more efficient than a box lined up with your schedule.

Also, here's a chart of the mushroom/moon phase data. Nothing new, I just made it because I have trouble reading the one on the wiki. Numbers in parentheses are additional Mycology level requirements.


Phrenology
Phrenology is straight-forward to level. All sub-skills are the same, minus the race used, so the following applies:
  • From level 0 to 12, normal skulls are your only option - 113 will be needed.
  • From level 12 to 28, 193 impressive skulls are needed.
  • From level 28 to 50, 170 astonishing skulls are needed.
  • Continuting to use lower-level skulls after you unlock the next level is not recommended. Level 12 to 28 with normal skulls takes 492, and level 28 to 50 with impressive skulls takes 522.
  • Buffs to crafting experience apply to Phrenology recipes, despite it being dubiously related to 'crafting'.
Tips for acquiring skulls:
  • Goblins in the Goblin Dungeon drop a mix of regular and impressive skulls.
  • Dark Chapel's starting caves are filled with normal human skulls still stuck inside cultists.
  • Orcs in Kur have normal skulls.
  • Skeletons and Ghouls can have any humanoid skull type. Kur Tower is good for normal skulls, Windy View Cave is good for impressive skulls as well as astonishing goblin skulls.
  • Rakshasa in Rahu and Ilmari have astonishing skulls.
  • A few fairies exist in Serbule Hills' goblin camps and the Boarded-Up Basement for normal skulls. Fae in the Fae Realm have astonishing skulls.
  • Yeti Cave is the best place for normal giant skulls.
TIP-01 - Hazardous Climates
Currently in the game there exists several zones that have hazardous climate and weather that threatens to kill unprepared travelers. Such zones currently are Kur Mountains, Gazluk, Rahu, and Ilmari Desert.

Kur Mountains features an exceptionally harsh cold and snowy land. Unprepared travelers will find themselves freezing to death very quickly. There are many ways to deal with this cold, and this will explain them.
  • There are campfires in quite a few locations in the zone (which can be seen on the map of Kur featured on the wiki). These campfires are normally unlit and useless until a player adds wood (in the form of harvested logs from foraging with a saw), which will light the campfire, with higher level wood having the flame last longer.
  • Textile Creation allows you to create Simple Blankets, which are single-use consumables that restore 20 body heat and cure hypothermia and frostbite immediately.
  • Alchemy has various potions that stave off the cold. Cold Resistance potions will raise maximum body heat by 30, and give you Cold mitigation, slowing the rate of heat loss. Orcish Thickskin potions will give you +50% maximum body heat.
  • Another potion is the Rage To Heat potion (dropped by Orcs in Kur/Gazluk), which stops you from losing body heat while in combat. Very useful!
  • Leather armor can increase max body heat and slow down the effect of cold. You can barter with Ukorga (with Tuft of Fur, Winterhue Seeds, or Silver Ore) for insulated leather gear with level 40 mods, you can kill Yetis for a chance of leather gear dropping, or players can create their own with Leatherworking.
  • Certain combat skills will offer benefits. Mentalism gives Revitalize, which restores a small amount of body heat. Fire Magic lets you literally light yourself on fire to gain body heat back. Ice Magic can also grant cold resistance.
  • Meditation can have helpful effects, depending on the meditation used.
  • Emergency Warmth Fires can be deployed for 60 seconds of a campfire effect anywhere. They can be purchased from vendors such as Hogan in Eltibule, or the recipe for creating them yourself can be learned from the noticeboard immediately inside Kur when travelling from Eltibule.
  • Dipping into dungeons such as the Wolf Cave, Yeti Cave, and Kur Tower will restore your body heat, as they are shielded from the harsh winds outside.
  • When all else fails, the faster you run, the quicker you can get to safety!

Gazluk shares the cold effects of Kur, but it is even colder and your body heat will fade even faster. Emergency Warmth Fires will become even more useful here.

The non-city portions of Rahu and Ilmari are deserts, causing you to become dehydrated over time. Bottles of water, Cooking-crafted drinks, and even potions can rehydrate you. There is a well in Almuna and even one or two in the desert itself to refill your bottles. With appropriate Foraging level, you can also cut Cacti to obtain their juices. Also, be sure to watch out for sandstorms, they will damage you and slow you down dramatically as well as drain your hydration, with effects building up the longer you are inside the storm. It's also worth noting that sandstorms can roll through Almuna, so when you see NPCs get indoors, you should too!
TIP-02 - Boss Curses
Not all boss curses are necessarily terrifying ailments. Some grant boons or offer utility, if used correctly. That is not to say that they are worth their down-sides, but these are the curses that grant up-sides as well.

Ciervos The Shadow (Goblin Dungeon; Green Annex) -- Turns you into a Deer (and defeating him cures any Deer form)

Claudia (Labyrinth) -- -10% Max Health, +3% Max Power

Doctrine Keeper (Ranalon Den) -- Glorious chat-spam.

Guardian Crystal (Goblin Dungeon; Purple Annex) -- -10% Health, -10%Armor, +10% Nature damage

Lord Sedgewick (Dark Chapel) -- +10% Evasion, +20% Enemy Evasion (of your attacks); Potentially useful for tanking or pet skills

Maronesa (Crystal Cavern) -- Turns you into a Cow (and defeating her cures Cow form)

Sherzat (Carpal Tunnels) -- -50% Out-of-combat Power Regen, +5 Direct damage

Ursula (Serbule Crypts) -- Spawns Ursula as an enemy (very low health), and also rarely as a pet, bartering vendor, or 16 slot storage (though unreliable)
TIP-03 - Miscellanea
For leveling Teleportation, the game keeps track of every unique teleportation platform you have used (either recalling or binding counts as being 'used'), granting extra experience for each. In the skill panel for Teleportation, clicking "Reports" and then "List Used Teleport Locations" will give you a numerical breakdown of how many platforms you have used in each zone, however there is no way to know (other than your memory!) which specific ones you have interacted with. The wiki keeps a list of all teleportation platforms.

Words of Power (from the Lore skill) are one-time-use words you can speak aloud in chat to grant effects. It is worth noting that Words of Power are NOT safe to keep for later. Once a Word of Power is generated, other players can research the same word (even though it is very unlikely), and if they use that word, it will deactivate it for you as well! If you create Word of Power scrolls though, those are permanently safe. Oh, and please don't type them into Global chat. Use Nearby or a private channel.

The phases of the moon affect many in-game elements. These phases roughly correlate to the phases of the moon as observed from Florida, as the server(s) are hosted there. The phase of the moon ticks over at midnight Eastern US time. The Lore recipe to check the moon phase will give you the number of days until the next phase, rounded up (any amount of time between the current time and midnight EST will count as an entire "day" for this recipe's functionality). Examples of things affected by the moon phases (check wiki for details): Lycanthropy forces players into wolf form for the 3 days of the full moon, the Dark Chapel statues in Eltibule for entering the dungeon and treasure hunting, and player-made mushroom growing boxes will affect certain types of mushrooms growing robustly or poorly.

[06/26/2019]: "New to this update, you can also use Transmutation to remove the treasure effect that is making your item Legacy. After you've used Transmutation to change the offending effect into something else, log out and then log back in so that the game re-examines the item and removes the Legacy status. (If it works, the message "THIS IS A LEGACY ITEM" should disappear from the item description after relogging.)"
"Equipment that is in a Vendor-Locked folder is never counted as part of a Quest or Work-Order. (Note this only applies to equipment, not other items. This is so that players can still put regular quest items in vendor-locked folders to prevent accidentally selling them, and the items can still be turned in for the quest.)"

Casino daily quests follow a rotation of Wolf Caves, Dark Chapel, Winter Nexus, Ice Caves (Yeti Caves), and then repeating with Wolf Caves again.

The Casino's daily quests can be completed without turning in the quest items. Currently, the game only checks to see if you did damage to the boss, then grants you the quest condition for its death. If the quest log shows a checkmark, you're good!

You can check your storage from anywhere in the world by typing "/isearch xyz", where xyz is what you want to search for. This can be used to almost completely view your storage: searching for a vowel will cover most items.

Items can be 'inscribed' with Calligraphy, allowing you to write messages on your gear. Take the gear and some ink to a writing table to do so. Inscriptions can be removed with Ink Remover by players with a higher Calligraphy skill than was used during the inscription.

While not an inherent part of the game, it is worth mentioning that the Poetry Appreciation and Oratory skills are best learned during the player-hosted Poetry Jams every Saturday at 2pm server time (Eastern US time, subject to Daylight Savings). Alcohol, music appreciation, dance buffs, and buff statues are included. A helpful note: buffs pause while you are offline, so attend the event even if you will be busy afterwards!

Player tombstones can be removed after enough players 'mourn' the tombstone. If a hardcore player's tombstone disappears or is removed, their broken items can be repaired at the tombstone's former location by double-clicking all broken items.
TIP-04 - Useful Chat Channels
Here I intend to document any helpful chat channels created by other players. If you want to find other channels, try /rooms.

NEWBIE -- similar to the Help channel, this is another place to ask questions about the game that has players devoted to answering the more common or basic questions.

curseremoval -- If you get a boss curse and cannot find someone to help you, the fine folks here will rush to your aid to free you of your infliction.

LFG -- Underutilized as of the moment, but worth joining just in case.

egghuntspoilers, huntspoilers, lemonaid, spideraid and other such channels -- With Admins now being able to dynamically create in-game events without a patch, some events will require searching for hidden things. So far, I have seen two "egg hunt" events, and channels like these will assist players completing the event. These channels may change name with each event, so be sure to ask in Global if there's a spoiler channel whenever an event is running.
TIP-05 - Graphics Settings
Keep in mind that this game is in beta, and as such it has not been optimized for performance yet. Due to this, framerates are volatile, but certain settings can help fix that.

Graphics Quality Level - For some reason, certain animated effects will not work on 'Ultra' setting (ex. teleportation platforms), so use 'Amazing' and manually set settings higher if desired.

Shadow Distance - Generally this is not huge, but in towns it can be a killer. If towns packed with players is a problem, nudge this down.

VSync / Target Framerate - With how volatile framerates are, VSync can cause jitters (as it does not seem to have an adaptive mode), so I recommend setting VSync to 0 and using Target Framerate to specify a framerate cap. Note that (currently) Target Framerate does not take effect until you load into the world, so your game will be running uncapped on the login screens.

Grass Draw Distance / Grass Draw Density - This is a very high-impact option. Despite having a solid mid-range GPU, I still had to crank this down to 65 distance and 0.15 density to have more stable framerates. Note that you can click on the number to specify your own value, since the slider will not give you partial density (which does work).

Camera Far Clip Plane - Oddly enough, this does not seem to make much impact. I have it set to 3000 so that I can see the entire landscape of a zone at any time, without any noticeable change in performance.

Camera Field of View - Does not impact performance, but the default is 50, which is quite zoomed-in. Settings around 70-80 are nicest, but this is preference.

3D Window settings - Do not change these. Messing with this will shrink your view inside the game window or expand it and make your action bars inaccessible. If you have this issue, reset your settings.

Camera Cull-Distance Multiplier - This controls how far away you can see NPCs, players, items, and so on. It can have a fair impact, so I leave it at 3, which is far enough to see most things I want to see.

Entity Animation Distance Multiplier - This is a counterpart to the above, where it instead controls whether or not those NPCs or players are performing animations (instead of T-posing). Setting these two to the same number means everything you see also animates, whereas a lower value on this setting makes it so more distant entities do not animate. This lets you make a trade-off between fidelity and performance. I leave it at 2, since I do not notice it often, except for players.

Tilt Shift - This is usually called Depth of Field. Causes things "out of focus" to become blurry. Moderate performance impact, but also up to preference. Personally, I dislike the effect.

Vignetting - This is the darkening of the edges of your screen. No performance hit, just visual.

Screen Space Ambient Occlusion - Adds small shadows to the corners of objects and where objects meet the ground. Moderate performance impact, but makes everything look more realistic.


Additional special settings can be typed into the Special settings tab. Add one per line, without quotes.

"AbilityTipsX=-1" - Not a performance tweak, but makes it so tool-tips appear next to your cursor instead of elsewhere on the screen.

"MaxActiveLoads=10" - Allows the game to utilize more CPU to load things and more RAM to store data. Can be increased from 10, which is the default.

"SphereCull" - Normally, the game engine only loads what you can see. Turning around means the game has to load in everything you could not see before. This setting makes the engine keep a spherical area around you always loaded in, reducing lag when turning around.

"OptimizeUI" - Lowers the framerate at which enemy selection boxes render, reducing processing load when 5+ selectable objects are on-screen.
TIP-06 - External Resources
http://wiki.projectgorgon.com - The main wiki for Project Gorgon. While it isn't perfect, it's a solid community effort that's growing every day.

https://www.gorgonify.com - An extremely useful resource for determining what gifts to give NPCs for favor. Sadly, it doesn't seem like this website is coming back, as it has been down for months now. :( It's back! Nevermind, down again.

https://github.com/dlebansais/PgJsonParse/releases - A program that reads the JSON database information of the game and allows you to search through it. This is NOT user-friendly, but if you're a technically-inclined person, this is the best way to reliably source game data (short of manually browsing the JSON files). It doesn't cover everything, but it covers most things. It also includes a build-planner and works offline (just in case your internet is out and you have nothing better to do!~).

http://www.gorgonexplorer.com - A website that hosts the JSON database information in a more user-friendly format. Very useful as well.

http://wiki.projectgorgon.com/wiki/Discord - A link to the Gorgon's Head discord server, which is the de facto discord server for the game. I have linked to the wiki page with the invite link just in case it ever changes. Make sure to post your in-game name in the #mod-interface channel to be granted access to the members-only channels, where most of the discussion takes place. This is also a great resource for getting help with in-game events, so check the #event-talk channel for that.

http://www.defenestration.co/pg/surveying/ - A helpful tool for automatically mapping surveys.
TIP-07 - Upcoming Content
A frequent question posed by players is what the server wipe at full release will entail. Currently, the developers have stated that the only things that will be kept are "most" skill levels and purchased storage slots (Hulon; Qatik). The intention is to keep all skill levels, excepting if any skill gets majorly reworked, is bugged, or ends up being problematic to the game and removed entirely -- but these are worst-case options, and the developers intend to keep every skill they can as a 'reward' to players currently beta-testing the game. Currency and items will be wiped to prevent players immediately advancing through the content at an absurd or unfair pace, as well as removing all items that may be over-powered as a result of reworking of gear mods and skills. Beast forms will persist, however since items will be wiped, you will not have the ability to revert your Beast form until you obtain the un-juice(s) again.

Upcoming player races (in speculated order of release) will include Orcs and Dwarves. While the developers intend to allow players to re-customize their gender and appearance at release, race-changes will not be an option. Also, the additional races may need to be unlocked through quest(s) on a different character. These quest completions are permanent account unlocks, even if you delete the character that completed them.

An update likely coming very soon is mounts, with horses being the primary focus. Sprint speed will be nerfed once mounts are live. It is unknown if beasts will be able to use mounts and if beast sprint speed will also be nerfed.

The developers plan to add Vampirism as a new skill, and players have speculated that it may be incompatible with Lycanthropy. The developers have stated that, in the future, some skills may be mutually exclusive, so this possibility remains. Druid may also have a similarly locked skill in the future as well, but that is less certain.

Priests may receive emergencies similar to Druids.

Other planned features include, but are not limited to: dynamic weather, a Weather-Witching combat skill, player housing (not much detail at the moment), more zones (both between the current zone levels and above; the addition of Kur and Ilmari were placed into the game earlier than intended due to testing their hazardous weather effects, and Gazluk was introduced as a stepping-stone to fleshing out the Orc race and a potential home for player Orcs), and much more.

Close to release, a VIP subscription will be added. This is planned to be QoL features only - most possibly including inventory space, storage space, and cosmetics. It has been confirmed that they discarded the idea of a "special currency" earned by VIPs, wanting to stay away from traditional "cash shops". A possible other addition is an Autodidactism skill, which will require materials of some sort to slowly level skill(s) while offline.
Missing Information
If you know anything about things listed here, please leave a comment! :)

Abilities:
  • Giant Bat's Virulent Bite and Hammer's Hurl Lightning & Reverberating Strike: Duration of concussion; Chance (per-tick or per-timeframe) to stun
  • Hammer's Leaping Smash: Duration of knock-down
  • Missing durations for slowed movement caused by Archery's Mangling Shot, Fire Magic's Frostball, Gardening's Spade Assault, Pig's Pig Punt, and Unarmed's Bodyslam & Kick. Missing duration and slowed movement percentage for Battle Chemistry's Freezing Mist.
  • Fear duration for Ice Magic's Blizzard and Sword's Decapitate
  • Probably more durations, idk, note to self: CTRL+F "duration?" :D
  • Druid's Heart Thorn has two significant mods: one adds Nature DoT, one converts the ability to Poison instead of Nature. Confirm: added Nature DoT does not convert?
  • Sigil Scripting -- Repulsion Barrier: counts as knock-back?

Mechanics:
  • 03/20/2020 update included diminishing returns on stuns, but the description is the same as my prior testing, and further testing indicates no change...
  • Investigating diminishing returns on crowd-control effects other than stun. [Obtained preliminary immobilize data, needs expansion/verification]
  • EHP calculations via Armor, Health, Evasion, Dodge, attack frequency, etc.
  • Do concussions stack? Concussions of similar/differing severity and/or sources?
  • Treasure mods can apply multiple percent chances to stun; if both trigger, does it trigger two stuns and affect diminishing returns?
  • Treasure mods can apply multiple instances of slowed movement; does this stack and/or diminish?
  • Modifiers to maximum Rage can be applied once, but if a treasure mod effect is doubled, does it apply once or twice total?
  • Concrete proof on Cow's Graze mod, Necromancer's Deathgaze mod, Rabbit's Hare Dash, Pig's Terror Dash and Squeal's mod affecting flight speed. Spider's Web Trap and Shield's Take The Lead are already confirmed to work.
  • Damage formula. AoE damage fall-off formula.
  • Damage cap? mid-400's attack and mid-300's attack on preserved corpses both did 280 damage. Wut?
  • Confirm Psychology can also crit heal from Phrenology

Items:
  • Armor set drops: mobs that drop, level of treasure mods available
  • List of non-alchemy-craftable potions [e.g. Rage To Heat] and acquisition methods

Skills:
  • Orcish leveling data

Monsters and NPCs:
  • [06/26/019]: "All monsters that were vulnerable or resistant to Sonic have been changed. Most are now resistant/vulnerable to some new type instead." -- Needs investigation.
Changelog
[06/27/2020]:
  • Added sections detailing all of the pros, cons, and notable features of each DPS, tank, and support skill, to help players weigh their choices and decide what to pursue.
  • Edited the guide info blurb (that appears in the guide listings) to be a bit more concise and adapt it to the growing amount of general info and leveling guide contents.
[06/24/2020]:
  • Removed note about Knife Fighting working with stuns. The assumption of stuns working was based on a wiki record of patch notes, which contained a typo that was later corrected on the forums.
[06/22/2020]:
  • Revamped M&M strategy, added a sort-of walkthrough. I've been winning speedruns consistently, so I feel that I can give more specific strategy tips now.
[06/20/2020]:
  • Added a chart for Mushroom Farming. No new info, just making a nicer visual of the wiki data.
[06/20/2020]:
  • Fixed Sushi section... Was missing gathered ingredient totals. This is why you don't stay up until 7am and push guide updates.
[06/18/2020]:
  • Added Sushi Preparation section.
[06/09/2020]:
  • Added even more about the new M&M contents.
  • Added small section on Transmutation.
06/07/2020]:
  • Added more about the new M&M contents. Revised strategy and tips sections slightly.
  • Added minor mechanic note about combat refresh availability.
[06/04/2020]:
  • Updated M&M section for the new rework.
  • Added minor mechanics: NPC favor item enchantments, Fairy Soul Anchor, unroutable enemies, metabolism timer.
  • Added CC notes for Flat-Footed and Elite/Boss stun diminishing returns.
  • Added leatherworking note about recipe level versus level required to acquire.
[03/14/2020]:
  • Updated gaming strategy with note about Mushroom Event hat damage counting for Executes
[03/13/2020]:
  • Added Warden to damage type reference, treasure mod type changes, and cc and cc mods
  • Added Fae Mentalism to damage type reference, treasure mod type changes, and cc mods
  • Added Gardening guide, though with some missing values
  • Added Monsters and Mantids hat list (most likely incomplete)
  • Added misc note about tombstone removal and hardcore-specific interaction with missing tombstones
  • Added a nod to the wonderful nimble shoes versus rage attacks
  • Updated Giant Bat's damage types, updated treasure mod type changes
  • Updated metal armor set bonus, added Fae metal armor set "bonus"
  • Updated enemy armor mechanics
  • Temporarily striked-out mentions of AH pet aggro issues due to patch, testing required
[09/25/2019]:
  • Updated all combat refresh values for armor sets
  • Updated armor/health mechanical considerations with the new set bonuses
  • Added confirmation of Mentalism critical heals
[09/11/2019]:
  • Added a small section on Mushroom Farming for comparing box types.
[09/10/2019]:
  • Added section detailing Phrenology
  • Added first-time experience bonus column to Leatherworking table
  • Completely reworked Tailoring section due to new exp-degradation mechanics. Added a table. Who doesn't love tables?!
[09/08/2019]:
  • Added a minor mechanic note about 'Rage Stalling'
[09/01/2019]:
  • Updated info about burst damage to reflect that AoE abilities do less damage as more and more enemies are hit by a single cast.
[08/30/2019]:
  • Touched up the Gaming section. Made skill selection and skill descriptions more concise and clear. Reworked a few event notes.
[08/27/2019]:
  • Damage typing chart for treasure mods updated to reflect shield's new acid properties
  • Added section on Gaming and gambling!
  • Updated level 80 info for Leatherworking, Tailoring, Fletching (and organized Fletching tables better)
  • Added new Fae armor sets
  • Astounding Cloth Cowl was patched in, updated armor sets
[08/26/2019]:
  • Pain Bubble 5 added to Mentalism section
  • Updated Armor Sets - partial, since only some sets got updated (missing new armors from Fae Realm, if they exist)
[08/24/2019]:
  • Added note to minor mechanics about "sprint" speed buffs that affect flight speed.
[08/16/2019]:
  • Updated beast form section with information on the distinction between "base" forms and "shapeshifted" forms.
  • Updated experience gain section -- Survival Instincts works like FA & AP.
[08/14/2019]:
  • Added a specific section for minor mechanics. Moved relevant info out of Misc section. Added notes about using fire abilities in water, Corrupt Hate, monster evasion, monster 'pet' summons, and food restoration's global timer.
  • Added section on statistical combat skill synergies
  • Updated damage typing treasure mod notes to charts and mod typing section for Fire Magic's Room-Temperature Ball.
  • Updated Urusla's curse to mention her storage slots
[08/05/2019]:
  • Added many crowd-control treasure mods that I missed to list of crowd-control abilities
  • Modified crowd-control list to denote treasure mods that can be on two pieces of gear for additional benefit
[08/02/2019]:
  • Added scorpiclaw set to armor set data (credit to Vanahiem for pointing out that I missed it)
  • Added misc. note about inscribing messages on gear; note about NPCs that play music for you to dance to
[07/28/2019]:
  • Removed advice on survey mapping, added external reference to a survey-helper tool.
[07/18/2019]:
  • Added note about /isearch
[07/17/2019]:
  • Song of Discord triggers an effect that periodically casts an internally coded ability, which does Trauma damage. That mystery is solved.
[07/14/2019]:
  • (Tried) to make some paragraphs more concise. Not my strongest area.
  • Added a pet note about necros and player graveyards
[07/13/2019]:
  • Added a section on graphics settings and performance, plus some useful special settings
  • Flipped the changelog so that the newest changes are on top, because I'm a dumbdumb and didn't think about it beforehand :3
  • Added note about casino daily quest items to misc tips
[06/28/2019]:
  • Moved Surveying tips to a new Surveying section. Added Surveying strategy and tips for surveys in water. Who said being a Druid is necessary to survey in Kur?!
[06/27/2019]:
  • Added (preliminary) data on immobilize diminishing returns
[06/26/2019]:
  • I figure it would be best to record changes to the guide here. Content added before today is not noted in this log.
  • Unarmed abilities and treasure mods reworked; modified skill damage typing charts.
  • Sonic damage type was removed, with all current sonic effects being replaced by Nature typing instead; modified skill damage typing charts; modified dungeon damage typing notes; modified armor sets. Devs state that these abilities may be changed away from Nature in the future.
  • Added additional damage typing chart that also includes treasure mods
  • Added list of treasure mods that add/change damage types
  • Added misc note about Transmutation now being used to fix Legacy items. Note: This will be irrelevant come full-release, most likely.
  • Added misc note about quest item turn-ins and vendor-locked folders interaction
12 Comments
Qrasss May 24, 2021 @ 9:34pm 
Wow, what a comprehensive guide.
Thank you!
Shiny_Smile Jul 28, 2020 @ 7:17pm 
One thing I'd mention that makes necromancy graveyard summon barriers bearable is the fact that you can get the "free-summon archer" ability that lets you instead use skulls to summon them any time. Requires a bit of farming for the skulls but definitely makes it easier to deal with.
☆Telixnth  [author] Jul 25, 2020 @ 1:09pm 
Thanks for the correction! I forgot I had a line about that in there (from before the change).
m19998 Jul 24, 2020 @ 5:03pm 
Good work, but Giant Bats cant fly in dungeons
☆Telixnth  [author] Jun 24, 2020 @ 6:16pm 
Correction: that wiki link contains an old version of those patch notes, where it was actually a typo. Corrected notes here: https://forum.projectgorgon.com/showthread.php?1507-Update-Notes-May-25-2018 -- so, yes, stuns will not work with knife fighting and never will. Sad news. :(
☆Telixnth  [author] Jun 15, 2020 @ 3:40pm 
Sadly, the Knife Fighting & stunned target interaction is currently bugged. I've submitted reports about it, but it is supposed to work, as per this game update log: http://wiki.projectgorgon.com/wiki/Game_updates/2018-05-25 . Thanks for the note on Heart Thorn, as I refuse to become a Druid for the time being. ;)
Kioku Jun 14, 2020 @ 10:45pm 
D-03 Knife Fighting "Abilities that have effects for when your target is not focused on you, having other players or pets is an obvious choice -- however, stuns, fear, and mesmerize also triggers this effect."
Incorrect; fear and mez trigger the effect, but stuns sadly do not.

Also, can confirm that changing Heart Thorn to Poison damage does not change the Nature DoT treasure effect.
☆Telixnth  [author] Mar 13, 2020 @ 1:29pm 
Fae's here and so am I! Big update today, and more to come. Working on Alchemy, Gardening, and Cooking analysis. Expect more ungodly-huge speadsheets. Shield your eyes, lest it blind you.
☆Telixnth  [author] Aug 27, 2019 @ 11:59am 
Got around to updating the level 80 content for the sections already in the guide. Sorta awkward, since some recipes are missing for now. :bandaid:
󠀡󠀡Chudyie Aug 8, 2019 @ 6:28pm 
very nice!! :steamhappy: