Total War: WARHAMMER II

Total War: WARHAMMER II

163 ratings
Quick Tips for Legendary
By alkjash
Tactics, strategy, and hidden mechanics I've not seen anywhere else. Each tip can mean the difference between a disaster campaign and smooth sailing.
3
   
Award
Favorite
Favorited
Unfavorite
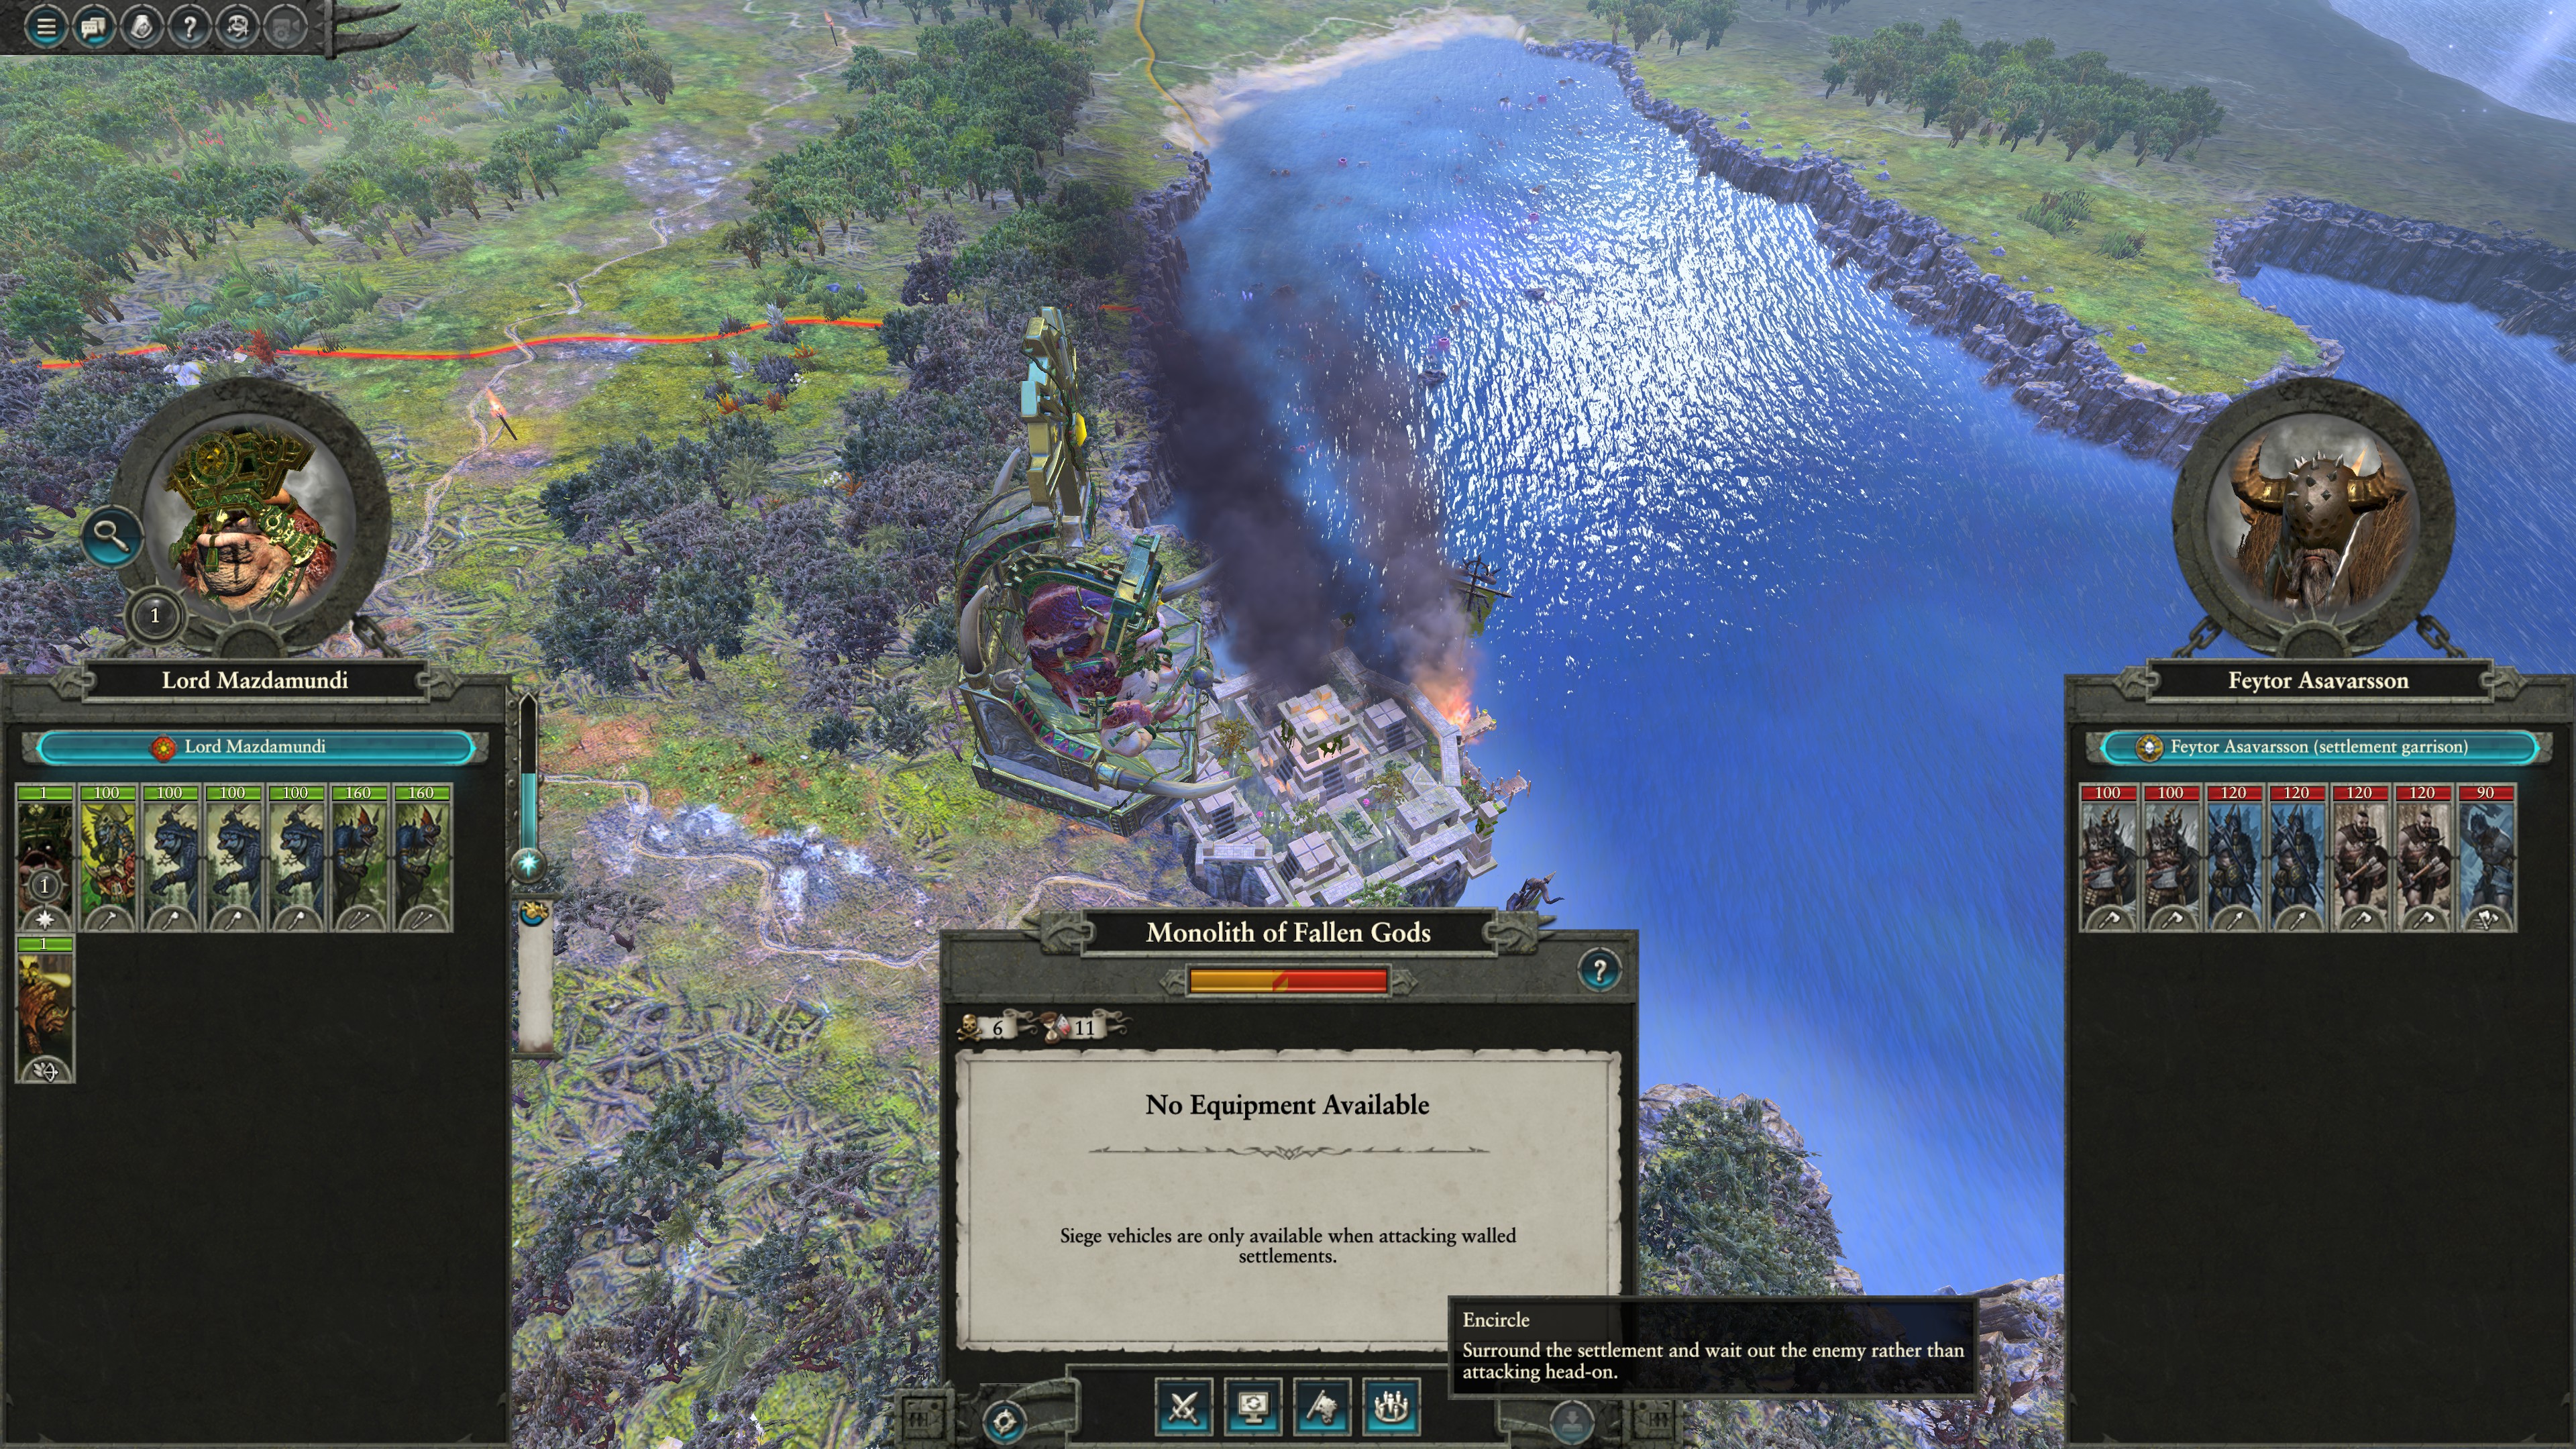
1. Click the Encircle Button.
Just before attacking a settlement, always click on the encircle button (continue siege if the settlement has walls) to look around before you take the fight.


Clicking encircle has no negative consequences: you can click on your lord and continue the fight after looking around. This is ALWAYS a good idea even if you already planned to take the fight, for two reasons. First, you get the most line of sight from your lord after moving to the town, so you can spot approaching dangers that you may have missed in the fog of war. Second, only after getting to the town and setting up the siege can you fully inspect the defender's army composition and the buildings in the settlement.

Decide before you start the fight whether you plan to occupy, sack, raze, or sack then occupy.

Ask yourself three questions before you take the fight:

  1. Is the settlement safe to occupy?
    The easiest way to lose an army is to occupy a settlement within movement range of an enemy army and force-march range of a second. You cannot retreat from a newly-occupied settlement, and it has no garrison to support you. If you're in range of danger you can't beat, either beat the settlement and sack it or just run away directly.
  2. Do you have enough movement to sack and occupy in the same turn?
    Click on your lord after encircling and mouse over the movement bar. You need a bit less than 20% movement left to sack the city and run back and occupy it in the same turn. When you can do this, 80% of the time it is the best option, as you'll get a huge amount of gold for only one deleveling of the settlement buildings (many of which you'll want to demolish anyway).
  3. What buildings/garrison does the settlement have?
    You get the most information after you've walked up to the settlement and encircled it. The garrison will influence whether you're willing to take the fight. The buildings will influence whether you want to sack. Remember that occupying directly reduces all levels of buildings by 1, so (AFAIK) you lose all buildings that are at their lowest tier anyway, while sacking and occupying reduces levels by 2. Important province capitals you want to develop might be worth occupying directly for that extra level, even if sack value is up in the 10k's.


2. Encircled towns lose Zone of Control.
This mechanic is so important that I'm making it a separate tip from #1. When a city is encircled/sieged, it loses its zone of control and CANNOT REINFORCE. Meanwhile, the encircling force CAN still reinforce.

This means that if you have two armies A and B and you park A inside a settlement and B next to it, B is NOT SAFE. If the enemy has two armies C and D in normal movement range, they can run C in to encircle your settlement, run D in to beat up B (this will be a 2v1), then attack garrisoned A with C and D afterwards (another 2v1). I've lost multiple armies in 1v2s to what I thought was a bug before I realized why they weren't getting reinforcements.

Similarly, if you're in the situation where you have two armies A and B within range of a garrisoned army C and an ungarrisoned one D, the correct sequence of moves is:

  1. Run in and encircle C with A.
  2. Attack the outside army D with B. This will be a 2v1 as if you have SUPER LIGHTNING STRIKE where you get reinforcements but they don't.
  3. Once D is beaten, attack C with A. This will be another 2v1 unless D retreated but is still in reinforcement range, which is very rare.

The upshot is that if you're attacking a non-horde faction (who will usually park one army inside and one immediately outside) with multiple armies, you don't need Lightning Strike - this strategy is strictly better.
3. Red > Blue > Yellow.
Everyone knows that the red and blue lines are much better than the yellow line for skilling lords (excluding special points, LL trees, and magic). But most people recommend diving Blue first, while I think dipping into Red for 4-7 points first is usually straight up better.

In Red, you can usually get +5 leadership aura (which can be quite good depending on your race) and +8MA/+8MD on your front line for 4 points, and a ~20% more ranged DPS for 3 additional points. After that, I recommend diving Blue until you start getting gold chevron units, and coming back to the second part of Red for that.

The problem with Blue is that all the amazing points are gated by crap. The first point that makes a noticeable difference after Route Marcher is your 7th point, Lightning Strike. After that, 3 more points for Casualty Replenishment and/or Upkeep reduction, and the last one is usually amazing (Renowned and Feared or its equivalent).

I've heard the argument that UPKEEP REDUCTION IS KING on Legendary. This is ♥♥♥♥♥♥♥♥. For 7 points in Red, I would estimate that your basic tier-1 troops are ~25% more effective (flat MA/MD is that good). Meanwhile, you need 11 points in Blue to get a 23% upkeep reduction even if your faction has Renowned and Feared. If you're really strapped for cash, don't fill up your stack. A 16-stack of tier 1-2 units with a level 9 (1 point for Route Marcher) Red line Lord performs about as well in battle as a 20-stack led by a level 12 Blue line Lord, and costs about the same.

Another reason that Red is better for LL's is that LL special yellow points usually unlock around level 10, and these skills are often so good (e.g. Tyrion's factionwide public order, Malekith's factionwide income or upkeep reduction) that you'll want to bank a few points from the previous levels to get them all ASAP. This means that LL's that run Blue first will usually stop halfway through to put 3-5 points in their special yellow line before getting the juiciest Blue points, further delaying the Blue power spike to something like level 15-18. Meanwhile a LL that runs Red first will be done with it by level 6 or 9, depending on whether you take the missile upgrades.

Caveats:
  1. Always start Route marcher. This point is absurdly valuable.
  2. Certain factions have much better blue lines. If casualty replenishment is in the first block or faction is a horde faction (so there's horde growth), this puts blue over red.
4. Wipe factions out.
Legendary AI receives ridiculous income/upkeep buffs, to the point that an enemy faction with only one minor settlement can usually field 2 full stacks. They also seem to have absurd recruitment caps, so that a Greenskin AI can have a 20-stack of Orc Boyz at your gates 3 turns after you sacked their only settlement. However, the good news is that these buffs seem to be flat instead of scaling: it's not as if an AI with 3 settlements can suddenly field 6 armies.

Thus, wipe your enemies one at a time to minimize the total number of enemies you're at war with at once. One of the biggest mistakes you can make is conquering half of an AI's territory and letting the rest go because it's not a threat any more/ you have other things to worry about/ the remaining settlements are not juicy. The AI's strength and threat level doesn't really depend on how much territory it has: for comparison, at some point in my current Empire campaign I was at strength rank 2 with 3 full armies which I'm supporting on 4 provinces + Marienburg, while Vampire Counts is strength rank 1 even though they're still stuck in a single province.

Go out of your way to wipe out a faction's remaining forces. Spend a couple extra turns razing any remaining settlements that you don't want. Every extra faction you're at war with is one more massive unfair disadvantage to deal with.
5. Spears > Swords.
In general, always take your tier 1 or 2 spear units (empire spearmen, dreadspears) over the equivalent sword unit (empire swordsman, bleakswords), and always take the version with shields. If only one has shields take the one with shields. The purpose of your front line is to hold the line for as long as possible while your missiles and cav do the damage. Usually, the difference between spears and swords is that spears have about -10MA/+10MD and slightly less attack, but a bonus versus large and charge defense against large.

Here's a breakdown of matchups your front line will see, and which to prefer spears over swords.

  • vs. chaff (skavenslaves, goblins, peasant militia, skeleton warriors.) These are the only matchups your tier 1 infantry might win by themselves. In this case, swords win a bit faster, advantage swords.
  • vs. other tier 1 infantry. This will be an even matchup that takes forever to resolve, mostly decided by the presence of missile/lord/artillery/cavalry support. In this case their performance is almost the same - swords do more damage but spears last longer for your DPS to get around to helping them. Even.
  • vs. better infantry (greatswords, chaos/dwarf warriors, grave guard, etc.) Any tier 3+ infantry and some factions tier 1/2 will chew through both swords and spears. In this situation MD is superior to MA, since MD is preventing a percentage of their DPS while MA is adding to yours, and they'll just have way more DPS. Advantage spears.
  • vs. monsters, cavalry. Any low-tier shock cavalry or monster with low armor gets demolished by spears compared to swords. Without their + 30 charge bonus and with the +8 bonus versus large you get on the average spear, your tier 1 spears can have a roughly even fight against units costing double. Massive advantage spears.

The upshot is that swords and spears are approximately the same in every respect except that spears have a huge bonus against large. In the early campaign, those four units of trolls or Bretonnian knights are the scariest units in the enemy army, and picking spears makes your entire front line a good match-up against them without costing you anything.
6. Use allies to fight rebellions.
The diplomacy game (especially for the order factions) is extremely helpful for keeping the number of enemies you have down to a minimum. There is danger of getting into unnecessary wars if you ally with too many AI's, so the simplest choices is to get NAPs, trade agreements, and military access with everyone and stop before alliances. Is there any reason to make allies?

Here's one surprising and extremely useful way of using your allies. Most of the time an AI ally has one or two provinces and parks at least one army at home long term. If you manage to get a province capital nearby their parked army, you never have to worry about public order again (unless you're HE and care about the bonuses). For example:


Louen's got your back.

After I allied with Bretonnia and took Marienburg as Empire, I sacked Grung Zint but left it open, letting Louen take it instead. Now he has a defensive forced parked nearby who spawn-camps the Marienburg rebels - the province has rebelled four or five times and I haven't built a public order building or sent a lord there since I captured it.

Whenever you expand keep an eye out for friendly factions with nearby settlements who have the tendency to sit in place. Any faction with a single town in nearby mountains is a great candidate. These allies will solve your public order problems at least temporarily and free your building slots and lords to expand further faster.
7. Prioritize AP Damage.
On Legendary difficulty, you will have fewer armies than enemies to face. It is of upmost importance that your best army can take on every possible threat even at unfavored odds, and what that means is that you need as much AP damage as you can get.

Non-AP damage is especially dangerous because it lulls you into a false sense of security: you will chew through certain factions using your basic HE archers or Empire Crossbowmen well past the point you need to upgrade them, and then get completely wiped by the first armored doomstack that comes your way.

Here's how armor works: Armor below 100 reduces non-AP damage (including non-AP spells, magic damage, fire damage) by (0.75 * armor)%, while armor above 100 reduces non-AP damage by (50 + 0.25 * armor)%.

Thus, the average light infantry/monster/cav with 30 armor gets 22.5% damage reduction against non-AP damage, while the average heavy infantry/monster/cav with 100 armor gets 75% damage reduction against non-AP damage. This means that the instant you go from fighting lightly armored to heavily armored foes, your non-AP damage does LESS THAN A THIRD of its original damage. Except for the first 20-30 turns, you need to upgrade everything to AP damage as soon as possible to get this massive damage boost. This is why DE darkshards are so strong and will last you through the game.

It's hard to believe, but AP damage is even better than these number suggest. Heavily-armored units have all their other defensive stats lowered, presumably for balance reasons. For example, most heavily-armored elite infantry (greatswords, black orcs, swordsmasters, everything with great weapons) don't have shields, so AP missiles will do an extra 50% to them than against bronze-shielded enemies, and 100% better than against silver-shielded enemies. Also, these elite infantry usually have surprisingly low MD (Swordsmasters of Hoeth have the same 38MD as basic HE spearmen, and the fearsome Black Orcs start with a paltry 20MD), so AP melee attacks will hit a lot more often than you expect.

Aim to phase out non-armor-piercing artillery and missiles ASAP.
8. Build recruitment in every province.
The first building priority in a new province is a basic recruitment building to replenish your front line. Even adding four units of tier 1 trash while combining your beaten-up elites is usually worth it. This is way more important than income/trade buildings (which essentially count for 1-2 unit's upkeep apiece) or walls (which take forever to get up), especially since you need only one recruitment building per province.

There's a little-known mechanic that global recruitment duration decreases by one turn for every ten recruitment buildings for that unit. Ten of the same building may sound like a lot, but getting ten basic infantry buildings in the midgame is extremely realistic, and will practically double your recruitment rate and ability to recover armies far from home.

An all-too-common mistake is to get your front line ground down to 10% health in multiple fights each turn, but keep them around instead of recruiting fresh troops because of Chevron Attachment Syndrome. You cannot win an even fight without a near-full-health front line, and it is almost impossible to get casualty replenishment rate high enough to replenish to full in a single turn.

Infantry recruiting in every province lets you be much more efficient about recruiting new armies. Each time you start a new army, only stay in your specialized recruitment provinces long enough to recruit the core high-tier DPS, then move them out and add filler frontline as you go. This can get a new army to the front line 2 or 3 turns faster than otherwise possible.

9. Play your race/faction.
Many factions/races have some mechanic that's extremely overpowered - I'll give some examples. Depending on the race, exploiting the following mechanics can feel like cheating, so be warned.
  • Dark Elf slavery income is insane. I'm talking 30k extra income at turn 30 insane. If you can fill out your first province, you essentially cannot lose if you know how to handle slavery (build a single province with maxed slave + public order buildlings), because you will literally be able to afford to outnumber a legendary AI.
  • Horde factions don't have to deal with public order and defense. I can't express how easy this makes Chaos compared to say Dwarves, even though they play similarly in battle. It's fairly straightforward to roll through an ME campaign with three full stacks of Chosen and win the short victory in < 100 turns.
  • High Elf influence feels like cheating. Get a Noble to spam Secure Influence and pick the influence options whenever dilemmas come up, and rush for three mages ASAP. As soon as you can hire 3 Administrator mages (40 influence each), every building builds for free in one turn (together with the construction cost commandment). Also, you can still demolish these buildings for ~60% of their original build value. On my recent Teclis fun run, as soon as I unlocked his War Crown of Saphery on turn 20, I was making ~6k extra gold per turn by alternately building and demolishing every building in a province. Later on, buildings get more expensive and you can park your administrators between two provinces and move them back and forth every turn to get the bonus in both. Almost as good as slavery.
  • Bretonnia doesn't have supply lines. This means in the mid-late game, you can field twice as many armies as any other faction (except possibly DE, see first point) on Legendary.
  • Cylostra Direfin can get 90% physical resist syreens (which have great stats and do AP damage). Running around with Cylostra + Bartholomey + 18 syreens makes the game a joke. Even the best mage enemies will only be able to burst down a handful of the 18, and everything else gets slaughtered.

10. Garrison/Ungarrison don't cost movement points.
You can always ungarrison a garrisoned army by clicking outside, even just after occupying. You can always put it back in by clicking in the settlement. Here are the main uses of garrisoning/ungarrisoning.

  1. Setting up for retreat. If you occupy a settlement but immediately ungarrison, your lord can still retreat from an enemy attack (verification needed).
  2. Setting up for reinforcement. See point 2, you DO NOT want to be in a situation in a heated war where one of your armies is garrisoned and another army is parked nearby. You will not get reinforcements if the enemy has two armies. Just ungarrison your army.
  3. Public order control. Only garrisoned lords provide the military PO bonus. If you want the next rebellion to come a turn or two earlier, pull the lord out of the settlement.
  4. Quest battles. It is possible to teleport to a quest battle immediately after occupying a settlement, simply by ungarrisoning your lord. For example, in my Empire starts I usually fight the Bloodpine Woods battle on the same turn as taking Eilhart, after taking Eilhart first. This way the mage will be embedded in your army and ready to go for Marienburg on the next turn. You can even regarrison the army after doing the quest battle.
  5. Special stances. Some factions have 0-movement cost stances that are better than being garrisoned. The most important example is treasure-digging for VC - you can do this on the same turn as occupying a settlement after taking the settlement. The other example I can think of is Norsca, who will occasionally want to get out of a just-occupied settlement and take the 20% upkeep reduction from raiding.

WARNING: DO NOT switch to force march after ungarrisoning! You will not get any movement points but will get stuck in force march mode, and you cannot switch back. This can lose you a defensive battle because of the vigor penalty.
11. Play the leadership game.
This is the only tip about battle tactics. A long time ago, I thought leadership was essentially useless stat to pay attention to on Legendary since the AI gets so many buffs. After losing one too many won battles because Orc Boyz kept coming back, I don't think this way anymore.

Understanding and being able to manage leadership in battle is one of the most important things to do tactically. Here are some specific tips:

  1. Chase routing units off the map. If you have access to dogs, bats or crap cavalry, two units of these fast-movers dedicated to chasing routing units is the single biggest improvement to your army that you can make. Hold them back until enemy units start routing, then fire and forget with guard mode off. I've won many close battles where my archers ran out of ammo and I used them as dogs to chase down slower routing enemies.
  2. Focus fire and overpower single points in the enemy line. If you can break a key unit, you gain a critical advantage for flanking and about a minute where that unit is not doing anything useful.
  3. Snipe lords. The most effective way to do this is guns. The second most effective way is having a superior duelist. The third is Spirit Leech from the Lore of Death. Putting damage on lords before engaging is also the only use of the Fireball spell.
  4. Stack different leadership penalties. In order to break enemies on Legendary before they're almost dead, you will need to stack a bunch of distinct leadership penalties, including: Fear, Being Flanked, Losing current combat, Damage sustained, Being Fired Upon, Artillery, Lord Dead. When you see enemy units low on leadership, redirecting one magic spell, ranged unit, or artillery to attack it can tip them over the edge. Banners and special abilities that reduce enemy leadership are also great, and otherwise weak magic can break a key unit when timed correctly.
  5. Use the edge of the map. As a rule of thumb, if you have weaker leadership than your opponent, stay away from the edge. If you have stronger leadership, get near the edge and try to direct routing units into it. Corner camping is an extreme example of this - you can hold off low-leadership armies 3 times your size with a high-leadership faction like Dwarves, because they will break and disappear off the map much faster than you do.
12. Turn off Research at the start of each turn
The Student follower, which gives +10% Research Rate, only drops from battles if you're not currently researching anything. Get into the habit of turning off research at the start of each turn and turning it back on before ending your turn to farm these guys. Over the course of the game this is easily +50% research rate.

There may be other hidden mechanics for farming other followers, none that I have personally confirmed.
31 Comments
grab these bandages Jul 6, 2022 @ 3:28am 
> legendary guide
> useless melee red skillpoints
kek
Doom Daddy Jun 5, 2022 @ 5:22pm 
Spellcasters. Always have spellcasters.
sebjustseb Sep 8, 2020 @ 11:07am 
Someone's probably already said this, but getting to lightning strike asap (available for most factions) is absolutely imperative, especially on legendary difficulty. This is because the AI can spam armies faster and at higher levels than you, and for every fullstack you can make, the AI can make 3-5 (5-7 if skaven w/ skavenslave spam).

This brings me to the next point: always be the attacker if possible. Lightning strike only works if you attack
FrostyJinx Dec 11, 2019 @ 8:07am 
Great tips, I wish I'd read this sooner and saved myself some trouble.

When it comes to saurus warriors vs. spears that people mention in the comments, I think it really depends on whom you're going to be facing. Against Skaven and TKs you'll be dealing mostly with cheap unarmored chaff that the warriors can quickly chew through. With Chaos the biggest problem are powerful heavy cavalry stacks so you'll definitely want mostly spears and preferably temple guards. Against HE and DE I'd pick spears because of how strong and tanky their heavy infantry is, you'll be depending on dinos, krox and magic to deal the damage.

But for cold one riders, always stick with the spear ones. Dinos are better at bashing infantry around and spears work for harassing arty and most ranged just fine. Regular riders take huge losses against Chaos and Elven heavy cavalry while the spears can hold their own or at least deal significant casualties.
Drunio Nov 5, 2019 @ 6:40am 
Also Easy/Medium/Hard starts don't mean crap. Just finished Maz and he was by far the hardest (or maybe just most annoying) campaign I've finished on Leg. Easy/Medium/Hard starts don't mean crap.

With the new systems in place you pretty much never know how things are gonna go down. I've noticed that if Mors is taken out early it hurts the skaven a ton as pest will start doing rituals and having to deal with being invaded which helps their enemies big time. Giving Itza/Sotek a chance to survive. The Spirit can also come up north to help deal with the orcs, but its fairly random. He may also just be killed.
Drunio Nov 5, 2019 @ 6:35am 
Some additonal tips you could add.

1. Forched march armies do not retreat and die if they lose the battle. Ambushing an enemy or getting ambushed in forced march is usually death.

2. Using a weak army to set up a strong army ambush is very effective for drawing enemies out of their garrisons or for turning an impossible fight against several stacks into an easy win against one.

3. SCOUT. Heroes can easily scout for you and make all the difference. Remember Gi Joe! Knowing is half the battle.

4. Assault Garrison/Army hero ability is one of the most overpowered mechanics in the game. One said heroes pull it off several times they get an additional 15% effect making it absurdly strong. Assaulting armies is usually more difficulty than garrisons. Garrisons can also be almost completely destroyed by 2-3 heroes pulling it off with the full upgrade and trait. Level 5 walls mean nothing.
Elven Supremacist Nov 3, 2019 @ 11:27am 
Wrong, slavery is laughable when it comes to the High Elves' financial power. All one need do is spam as many "Entrepreneur" heroes as possible in a rich settlement and you can make more than 5,000,000 gold per turn. Don't believe me? LegendofTotalWar did a video on it its pretty hilarious.
AnarKey Nov 3, 2019 @ 8:59am 
Awesome guide, this actually made me wanna try a legendary run which I've never done cause I'm addicted to the ultimate power of manual saves.
Daedolon Nov 3, 2019 @ 12:38am 
Got it, thanks!
alkjash  [author] Nov 2, 2019 @ 2:02pm 
@Daedolon The leadership perks on the skill trees usually aren't great, they just improve the individual leadership of that unit (and not the surrounding ones which will be more important). What I meant by playing the leadership game is paying attention in-battle to the leadership bars at least as much as to the health bars.

I think heroes are only worth a slot for these roles (in order of importance):

1. Using magic if your lord doesn't have access.
2. Maxing combat stats to be a lord/hero duelist.
3. Providing passive AOE buffs to key DPS units.