A Hat in Time

A Hat in Time

71 beoordelingen
Midouri's Guide to Death Wish: Chapters 5-7 + Seal the Deal + Secrets
Door Miri Ryllis ミリス
A comprehensive guide to every Death Wish in the game, including the secret ones.

Covering The Finale, Arctic Cruise, Nyakuza Metro, Seal the Deal, and the Secret Death Wishes
2
   
Prijs
Toevoegen aan favorieten
Toegevoegd aan favorieten
Verwijderen uit favorieten
Introductions
Welcome to my guide, thank you for checking it out. It's my first one, so please do not hesitate to comment suggestions or the like below.

I know there's several out there already, but I feel like I could be able to give my own little spin on things (plus I could always use an excuse to ramble about Death Wish). This series of guides will house all 38 + 2 secret Death Wishes.

Each Death Wish will be grouped by chapters (so Mafia Town, Dead Bird Studios, etc) and will feature information of:
  • Alterations from the vanilla game mission
  • The 3 objectives that must be completed
  • General advice of what to keep in mind before you start, and recommended loadout... If a boss mission, then the boss attack patterns, tells, and HP
  • The nitty gritty explanations of how to win each objective
  • A video from my YouTube channel that showcases the mission for the visual learner

Looking for another chapter of Death Wishes?
Note that this guide assumes you are NOT using Peace and Tranquility mode. You are free to if you wish, as it will make the death wish easier.

Without further adieu, let us sign the contract of updooting the guide and BEGIN!
Death Wish #33 - The Mustache Gauntlet
Sleep now in the fire.

Alterations from Vanilla:
  • There are now 99 enemies across the level, and all are mandatory to kill to proceed.
  • There are minor alterations in platforms
Objectives:
  • Don't get burned
  • Dont use projectiles

General Advice:
This level in itself is more tedious than difficult, but still be on your guard as there are many ways you can take damage from fire, be it the firey birds, fire turrets, or even falling into lava. You're not timed, so take your time.

The only enemies you will likely miss are either the thief cats, or the dweller'd sleepy racoons. There are 5 thief cats in the level. 2 at the end of section 2 with the dweller bridge, 1 right after the hammers before the launch pad, and 2 with the patrolling goat.

Note that certain enemies will require using the dweller mask to damage, so be on the lookout for them as they're generally hard to spot.

Objective Guides:
Don't get burned - Other than simply being careful, there are two particular sets of enemies that may give you trouble for this. One is the fire birds of course. If you intend to get both bonuses at once, then hit them with your umbrella as far away as you can, as it will not count as touching fire and taking damage. Using Time Stop hat during this strategy (especially at the end) will make it much easier to time. It should also be noted that Pushy Crows exist, so be cautious.

The other annoyance will be the thief cats. They love going invisible until they rup up into your face and can knock you back into the lava if they hit you right. If you look real hard, you can see faint distortions in the air, which is where the cat is (can you see it in the right corner in the pic?). Focus on it and time an umbrella (or homing attack) to right as it heads toward you so you can surprise attack them! The most annoying time you'll have to deal with them here will be the two where the giant goat is patrolling. I'd suggest standing behind one of the fences on the side and making sure your back is not to the lava, as this will prevent them (mostly) from knocking you into the lava, and it keeps the goat from doing the same since he cannot reach you there. This may sometimes softlock them to not do anything though, so you may have to tiptoe around to either corner while still behind the fence to get them to attack you again.

Don't use projectiles - This means your only methods of attack are the umbrella and homing attack. Thankfully, only the firey crows are actually difficult to hit with the umbrella, and the Time Stop hat will negate this for the most part. The other tricky spot to note though would be the Mafia goons who are on the small metal platforms with a rotating flame turret on it. Time Stop will make this easier, though it is also possible to bait them to fall to their death by standing as close to the platform as you can without actually being on it.

Video:
Death Wish #34 - No More Bad Guys
She's gone way too far, now.

Alterations from Vanilla:
  • Generally faster
  • Moves are much more difficult to avoid due to larger number of hazards spawned or additional patterns.
  • Her final bullet hell phase does not heal frequently (once per 12 seconds), so do not rely on it to win.

Objectives:
  • Do not use any hat abilities
  • Defeat Mustache Girl within 3 minutes of initiating Phase 2

General Advice + Moveset:

Phase 1 (5 HP) -
  • Teleportation Lv.1 - Mustache Girl will occasionally begin to teleport around very fast. Once she does it 5 times, she'll appear in front of you to attack, use this time to wham her with a Homing Attack or Umbrella.

  • Homing Flight - Mustache Girl may begin to spin in place in the air, and will a second later charge at you. Double jump over her and immediately Homing Attack to counter.

  • Underground Surprise - Mustache Girl will go underground and chase your current position, in a ring similar to Snatcher's Exploding Rings. Once the inner pink ring becomes a full circle, she will spew from the ground and land a moment later. I recommend running in a small circle around this, as she will try to Rubber Band to your location so moving too fast can actually be harmful. Keep her pre-occupied with constantly changing her direction and you'll be fine.

  • Time Piece Barrage Lv.1 - She will go into the air and throw 6 dark time pieces at you. To counter this I'd recommend jdouble jumping and theen dashing, which should gete you through all of it. She is vulnerable afterwards.

Intermediate Phase - She will send you to a dark realm and rain time pieces upon you. Simply avoid the yellow circles and you'll be fine

Phase 2A (The Hyper Zone) (5 HP) - The timer starts once you enter this
  • Teleportation Lv.2 - Mustache Girl will start the phase by teleporting 6 times before attempting an attack. All future teleports will happen as many as 10 times before appearing in front of you.

  • Laser Beam EX Lv.1 - The Laser beam will now track your location and follow you, so be sure you're keeping an eye on it and jump over it when need be! The tell is you'll hear a low whrrr sound just before it activates. She will eventually teleport away from you if you get too close to her using this attack, and will attempt to use it again. Keep pursuing her until you land a hit.

  • Time Piece Barrage Lv.2 - The time pieces will now drop in succession, still causing the black line explosion they did in vanilla. Mustache Girl will also immediately drop down after throwing them, so try to rotate around her so that you can land a Homing Attack without the black lines getting in the way

Phase 2B (The Hyper Zone) (6 HP) -
After enough damage, she will begin teleporting away trying to fire her Laser Beam EX, until eventually the Mafia Ball falls down unprompted. It has the same principles as it did before, where if you hit it it will seek her location and stay in that spot until you hit it again.

  • Laser Beam EX Lv.2 - The laser beam will now also be followed by 2 falling time pieces that will make an "X" line once it makes a complete turn in one direction, with the center of the "X" being your location. I recommend jumping the moment she begins charging her attack and jump + dashing once the beam makes a move since that is when the "X" appears

Phase 2C (The Hyper Zone) (5 HP) -
She now surrounds herself with a shield that can only be destroyed via a fruit bomb. She most easily can be hit by a fruit after either her Underground Surprise or Laser Beam EX as she will stay still for a time. You may homing attack her or umbrella her in the first second it breaks. Her Underground Surprise attack returns and is used after every "Time Piece Barrage," but is unchanged. Thankfully she no longer teleports away when you get close to her, so you can use Laser Beam EX Lv.2 as a chance to attack by immediately jumping and dashing toward her the moment she begins the attack. Similarly, if she uses Laser Beam EX Lv.2 while shielded, Homing Attack her and then circle around her until the beam stops because it will track you.
  • Ground Pound Lv.1 - She will teleport to a random location and then begin hopping around 6 times, each hop causing a shockwave as well as spawning Purple Time Pieces in an "X" shape on you, simply keep moving in one direction.

Phase 2-Touhou (The Hyper Zone) (8 HP) -
She is utterly desperate and will wildly use all her moves, though do stay calm as it is not as wild as it may seem. Time Pieces are constantly falling on top of you, but if you keep up a rotation in either direction they generally shouldn't hit you. Homing Attack is the ONLY way you should attack her due to the immense i-frames it offers you, and I recommend you do it by jumping and then SPAMMING the Homing Attack button so you use it as quickly as the game will allow you to (usually being just a tiny bit off the ground).

  • Ground Pound Lv.EX - She will furiously slam on the ground 4 times, with now four time pieces spawning to explode on you instead of 2. Jump while moving in one direction to avoid. Do not directly punish this specific move as she will immediately use another move after she finishes. Try to quickly judge if she uses a Time Piece Barrage (she goes immediately into the air) or a Laser Beam EX (you'll hear a whrrr sound), and adapt accordingly.

  • Time Piece Barrage Lv.EX - She will even more furiously throw 8 time pieces toward you and fall immediately, usually directly following the Ground Pound Lv.EX. You should handle and punish this similar to how you did the attack back in Phase 2A, though dashing toward her after she's thrown a few can help!

  • Laser Beam EX Lv.EX - Her laser beam turns into a frantic 360-degree spin with a little air to it. Double Jump and IMMEDIATELY Homing Attack to get her, but beware she may still fake out and teleport away to use it again before you land. Keep trying until you connect the hit!

If you feel you may still need help, check out Elzquiem's Guide specialized on bosses

Objective Guides:
Don't use any hat abilities - I have done my best to describe way to use her vulnerable states in a way that would only involve the umbrella or homing attack, so following what was said above should do you fine. I recommend learning the fight this way anyway seeing as you will have to have absolute mastery over it to survive Seal the Deal even with a hat.

Defeat Mustache Girl within 3 minutes of initiating Phase 2 - This will require the utmost aggression and abuse of her vulnerability states, as in pretend there's an objective for "Dont miss your cue to attack," with a little wiggle room. She has a total HP of 24 during this phase so you essentially must hit her every 7 seconds to win. If you want to use hat abilities, the brewing hat is your best bet in shaving seconds for punishing her attacks, and can especially be abused during her Time Piece Barrage attacks as you can throw a brew into her to hit her a little early. The Time Stop hat will not slow down the timer this objective tracks, so try not to rely on it too hard besides if you want to squeeze a hit in for her Ground Pound moves. The timer starts the moment you enter the rainbow stage and stops the moment she suffers the final blow.

Video:
Death Wish #35 - Rift Collapse: Deep Sea
I hate this level so much

Alterations from Vanilla:
  • The rift is mirrored
  • You are preciously timed
  • You have 3 lives. If you lose them all, you are locked out for 5 minutes.

Objectives:
  • Escape with 30 seconds remaining
  • Collect all Rift Pons

General Advice:
Due to a nerf from Nyakuza DLC, the Rift Collapse Stopwatch timer is slowed. Now, it takes 1.33 real-time seconds to reduce the stopwatch by 1.00 second, giving much more wiggle room to win.

The most demanding of all the rifts. You must make use of every second you have. The magnet badge is a must, and you will need to utilize Dweller Mask, Sprint Hat, and Ice Hat to make it!!! Learn the layout of the rift and pon positions!
It is tight to do both challenges at once, so unless you want the extra challenge I would recommend going for one at a time, preferably the "All Pons" one first so that you then know what you may be able to cut down on. There are 18 pons in the rift but only 11 are required. .

Pon locations
(the order I list them is the recommended grab order):
If you are to skip out on pons for the 30 seconds remaining objective, I recommend a full clear of Room 2 and 3 (Pons #1-9), then 1 pon from Room 4 (Pon #10), and 1 pon from Room 5 (Pon #15)

  • Room 1 - No pons. Equip Sprint Hat.

  • Room 2 - (3 pons, 2 total to progress)
    • 1. Upon Entering, head up the wall jump part where the castle pieces are. Equip Dwellers Mask, try to only activate its ability the moment ur about to touch the green piece and then disable it the moment you jump for maximum recharge. Pon is at the end
    • 2. Head back and continue upward to the giant green castle. Use dwellers mask to jump on the castle and continue through. A Pon waits at the end. For speed, I'd then advise facing the far low platform and double jump air dashing toward it to make it to the final section with the owls
    • 3. Equip Sprint Hat and rush to the pon at the top of this section, then suicide down

  • Room 3- (6 pons, 2 total to progress)
    • 4. Head straight, continuing straight until you get to the Dweller Bridge, where you then equip that mask and make it to the springboard and use dweller so you may make it to the starfish and disable it on the jump to the pon at the top of the castle
    • 5. Right after the above pon, equip sprint hat and turn behind to jump on the falling platform, and dash-jump to the rightward part of the castle roof which you can then use to jump to the leftward part for the pon
    • 6. Grab the hookshot near you and swing to the left castle, continuing up until you get to the fire spewing section. Instead of moving clockwise around, run counterclockwise, jumping into the fire as high up as you can while still hugging the wall. You should get booped by the roof and ricotche to the right, where you can then steer yourself to the hookshot and grab it before it's too late.
    • 7. From the above pon, Dash jump to the castle to the left of the ice platform and once you're at the rotating 4 platforms, go clockwise and touch the pon
    • 8. Continue the path upwards to find the pon sitting at the top of the rotating 4 platforms castle
    • 9. Continue the path by grappling the hookshot and letting go at the apex of your swing so you may jump and dash into the top of the castle for the pon, then quickly take the ice platform to the portal to the next level.

  • Room 4 - (5 pons, 4 total to progress)
    • 10. Immediately jump on the ropes to the very top of the ship with the pon
    • 11. Using those ropes, get enough height to then dash onto the falling platforms near you, then long jump to your left where you should see a wooden platform sticking out of the wall, the pon is right after it.
    • 12. Continue forward from the above pon so that you may grapple onto the hookshot and swing to the leftward floating island. Wait for the platform to come to you (jump if you feel risky) then jump onto the rope and wallclimb to the top. Then dash to the floating wooden platform to the right. A pon is below you on a falling platform with rotating boxes.
    • 13. Return to the floating wooden platform andn take the upward path for the next pon. Mind the timing of the wooden platform
    • 14. Upon getting the pon, long dash jump over to the very bottom island again where a pon is resting, then zerg to the portal to the next level.

  • Room 5 - (4 pons, 3 total to progress)
    • 15. Upon entering, take the leftward path with the hookshot, at the end is a pon on a starfish
    • 16. Continue forward, ignore the portal to the next level and take the ice platform up, then equip the dwellers mask and go to the leftward path with the rotating staircases. You want to activate the dweller mask before you make contact with the green stairs or else you'll get trapped and fail the rift. Alternatively but more risky, you can use the lavafall to damage boost to the top. After you pass the stairs, continue on and the pon is waiting on the purple castle.
    • 17. Instead of taking the ice platform, use the sprint hat and long dash jump leftward to the starfish down below. Then equip the dwellers mask and continue the path to the pon at the very top, timing your usage of the dweller so you only use it when necessary. There is a falling platform halfway through the green wall, so do not use the dweller mask twice in a row lest you fail.
    • 18. Take the ice platform and go onto the final path. If you can, use the hookshot on this path and release at the apex of the swing to jump and wallclimb to the top of the mountain, ignoring the rotation castle puzzle. Otherwise, watch for the flames that spew from them. After grabbing the pon from the top, use the Ice platform to return to the portal and take it to the time piece.
The Time Piece orb takes 4 hits to break.

Video:
Death Wish #36 - Cruisin' for a Bruisin'
Now it's time to take you to task!

Alterations from Vanilla:
  • The mission will now go on forever until you make him angry

Objectives:
  • Complete 40 tasks
  • Complete 40 tasks without failing any
  • Complete 70 tasks

General Advice:
This level is LONG. It will take you about 18 minutes to clear 70 tasks, so sit tight.

Obviously, learn the layout of the ship and what connects to where (listed below to help). Knowing every entrance will be key to survival. Tasks take ~3 min to fail once they spawn, and another ~3 min to fail once you begin them, with Time Stop slowing their timer down. Take the time to know which task will go where, as many for the most part go to the same spot every time and tasks WILL repeat themselves over time. This foresight will greatly allow you to plan out how you want to traverse the ship, as I would recommend planning at least 2-3 tasks in advance.

The amount of anger he will lose per completed task will gradually decrease as you fail more tasks, capping to about 1/3rd or 1/4th of a bar of anger per completed task. Similarly, try to remain calm the entire mission as panicking will lead to errors in judgement of how you should proceed. Note that it is very possible to DIE in this mission from the environment, though there are several health pons to fix that. I'd recommend not having magnet equipped so you dont waste any.

Should you pick up more than 2 items you will begin to wobble. Try to learn how to work around this, though once you've picked up 5 tasks at once it becomes cumbersome and I would highly recommend simply ignoring certain tasks until you're at a lighter load, unless you do not think you'll be able to wrap back around them in time. A good way around the wobbling for me has been to spam dash cancelling, as you will still go in the direction you want, but without the effects of wobbling, at the cost of slightly poor ability to change directions.

I would advise usage of the Sprint Hat for the majority of the beginning or when you only have a load of 0-2 tasks. Time Stop however will work wonders for you after 30 tasks as it slows down his anger and the task timers, so consider swapping to that for emergency task grabbing that are low on timers. Do note that Time Stop's ability will be pre-maturely cancelled if you either go through a door, bonk into a wall, or initiate a task (red circle), so plan your usage wisely to get the most out of it.

The level will build in complexity/demanding at 10 task, having more and more tasks appear at once, though there is a cap to how many tasks are active at once.

Task Prioritizing:
The ultimate tip for task prioritization is making them work with each other. Consider picking up tasks that will lead you to other tasks either along the way or at the destination of the task. While going for the "do 40 tasks without failing one" bonus, I would prioritize working out to tasks that are 50% decayed, and dropping what you are doing and immediately zipping to a task that is 75% decayed (a tasks icon begins to shake when at this point).
Similar to above, consider ignoring a fresh task that is near you unless you know that it can be completed on the way to your destination (This is where knowing which tasks will go where comes in handy). This will help keep your load small, giving you more movement controls, which means you can get to your destination faster. Additionally, it means the task will stick around longer, giving you time to plan how you wish to use it.

Once you're at the part where you need 70 tasks, while the above is still important, your biggest focus should be on wherever there are the most tasks to pick up, as you're going less for not failing a task and more for just keeping his anger down, which completing 3 tasks at once and failing 1 task is more ideal than failure, yeah?

Some tasks are part of a "family," in that they will eventually lead to another task spawning. Such an example is the tasks in the upper pool area, where sending a drink to a guest will eventually spawn a task to take that drink back to the bartender. Mafia Boss also has a short string of tasks that send him across the ship, and so do the CAW Agents with a letter. This is important to keep in mind so you can guess how you should tackle your next few tasks should one like this spawn to keep the captain happy.

Other than these tips, there's really no sure-fire way to nab the objectives, especially considering all the tasks are RNG on which spawn.. you could get 10 easy tasks in a row, or you could have the entire run tell you to go peck yourself with tasks that are all over the place. Regardless, you can win no matter what RNG pulls if you try hard enough!

Icon Meanings:


Room Connections/Shortcuts:
  • Captains Room: Connects to the leftward+rightward sides of the ship via doors on the side, the diner area on one end, and the top of the casino which also leads to the "hotel" area.

  • Diner Room: Connects to the Captain's Room at the top with the lights, as well as the elevator to the daycare+outdoor pool, and the kitchen.

  • Daycare Room: Connects to the elevator to the diner room, as well as the outdoor pool area

  • Outdoor Pool Area: Connects to the daycare + elevator to diner, the "hotel" room, and the leftward part of the ship via a door where the pool is

  • Leftward "Large" Outdoor Part: Connects to the Outdoor Pool via door at the very top right end of the path, the electricity room at the very middle bottom, the hallway to the kitchen and registry area at the bottom right, the captain's room above the entrance to the hallway, and the "hotel" room at the very top left.

  • "Hotel" Room: Connects to the outdoor pool at the very top, the leftward side of the ship at the bottom, and the top of the Casino to easily get to the captain's room + casino/registry desk room.

  • Casino Room: Connects to the Registry Desk Area, as well climbing up to the top for the captain's room (and doors to the leftward/rightward sides) + "hotel" area

  • Registry Desk Room: Connects to the rightward outdoor side of the ship, the Casino at the top, the electricity room behind the receptionist desk, as well as a vent at the far top right and a door at the bottom left that both lead to the hallway to the kitchen and leftward outdoor side of the ship

  • Electricity Room: Connects to the Registry Desk on one end, the Washer Room on the other end, and the leftward outdoor part of the ship on the top side.

  • Washer Room: Connects to the electricity room via a vent, as well as the Kitchen above

  • Kitchen Room: Connects to the main diner area, the Washer Room below, the rightward outside part of the ship via a door, as well as the hall that will lead you to the leftward outdoor part of the ship and the registery desk area.

  • Rightward "Bathroom" Outdoors: Connects to the Kitchen via door after bathrooms, the Registry Desk room near soda machine, and the captain's room at the top.
Video:
Death Wish #37 - Nyakuza Metro Snatcher Coins
Alterations from Vanilla:
NONE

Objectives:
Aquire 3 Snatcher Coins

General Advice:
The Compass Badge sold by the Mafia Boss inside Chapter 2's shiproom will tell you where the coins are with a purple arrow. Free Roam act will do

Coin Locations:
  • Snatcher Coin 1 of 3: Upon spawning, head to the food stand near The Empress's jewel shop and sit in the catnip to attract the bouncer. Keep going up and up and be on the floating platforms, acting as if you are going toward the Time Piece in that location, but instead of jumping there, ride the train to the end and time a good long jump to land on the 3 floored green tower on the corner of the map, the coin is resting on the lowest one.

  • Snatcher Coin 2 of 3: Head back into bluefin tunnel, and at the part early on where you have to hide in small holes in the wall from a cat-tram, use timestop when you're at the very end to nab the Snatcher Coin.

  • Snatcher Coin 3 of 3: From the starting area, enter the Pink Paw Station and take the 2 cat-trams up as if you were heading for the time piece, but don't actually go beyond the 2nd cat-tram. Instead, use it to hop onto the top of the pink electrical fence, the coin is sitting at the very end of it.

Video:
Death Wish #38 - Seal the Deal!
You're gonna meet your match, your soul belongs to Snatcher.

Alterations from Boss Rush:
  • Toilet of Doom does not exist. Just Mafia Boss, Killing Two Birds, Mustache Girl, and Snatcher in their EX forms fought in their individual DWs
  • Snatcher himself is further buffed with new and altered moves into what is commonly dubbed "Ultra Snatcher"
  • They have reduced HP compared to their standalone EX versions, save for Snatcher who is still at 8
  • You have 3 lives, restarting you at the beginning of whichever boss you died at. Fail and you reset to square 1.

Objectives:
  • Don't use any hat abilities
  • Don't fall to 1 HP

General Advice:
It goes without saying that you need to absolutely master the fights at this point. Lucky for you, they have significantly less health in this mission, so there's less room for error unless you get careless. I recommend playing each boss singularly from their DW missions without hat abilities so you may truly learn them inside and out. The fact Snatcher forces you to not use hats anyway, and him being the hardest boss of this rush, makes this all the more essential. Refer to my previous guides for the breakdown on the attacks of Mafia Boss, Killing Two Birds, and Mustache Girl

Mafia Boss and Killing Two Birds are both fairly generous with health pons, though still be on your guard. Mustache Girl does not let you heal whatsoever until the final phase, at 1 health pon per ~12 sec. Ultra Snatcher will give you 1 health pon every other hit, however.

Boss Health + Important Moves to Watch:

Mafia Boss:
  • Phase 1: 3 HP
  • Phase 2: 3 HP
  • Phase 3: 6 HP
Important Moves to Watch for:
  • Megacharge. Recall that he will send 8-10 shockwaves. Be about 75% away from him, then jump+dashcancel over 2, jump backward over a 3rd, jump+dashcacel over 4-5th, repeat until he's done.
  • For the falling sandbags across the entire fight, simply never stop slightly moving around, and I'd advise jumping so you can more easily see yourself moving and more quickly control yourself, which also lets you more easily adjust to any attacks
Killing Two Birds:
  • Phase 1: 4 HP
  • Phase 2: 3 HP
  • Phase 3: 3 HP
  • Phase 4: 5 HP
  • Phase 5: 4 HP total, 2 HP Each
Important Move to Watch for: The Cars. Double jump and dash to a left or right corner to evade and more easily prepare for another boss attack.

Mustache Girl:
  • Phase 1: 3 HP
  • Phase 2A: 4 HP
  • Phase 2B: 5 HP
  • Phase 2C: 4 HP
  • Phase 2-Touhou: 5 HP
Important Moves to Watch for:
  • Phase 1 Spinning/Flying Attack - Remember to double jump just as she begins to come toward you and homing attack her.
  • Phase 1 + 2C Underground Surprise attack. Remember to not move too fast, but instead focus on moving in a circle so she doesnt slam you.
  • Laser Beam Lv.2, remember to jump in the air when it spawns and to dash away when the time pieces spawn.
  • Phase 2-Touhou, She will always follow up her 4 Ground Poundings with another attack, do not punish.
  • Phase 2-Touhou, Time Piece are constantly falling, but just keep moving in one direction and you should be fine.
Ultra Snatcher:
Health: 8 HP
Drops Health Pons every other hit starting with the 1st hit

Truly the biggest surprise hurdle in this, you think you're done with Mustache Girl's bullet hell madness but the fun's only just begun

For the most part he is the same as Snatcher EX from "Breaching the Contract," but he has a few tweaks, as he will inherit abilities from each boss. As a reminder, to dodge the shockwaves effectively it is good to double jump + air dash. You will need to adjust yourself for any incoming shockwaves, there is always a way you can land safely even if it means jumping immediately when you land

He will now summon Time Pieces for most attacks, which are telegraphed like potions with a yellow wheel in the spot it will land. To best avoid his potion+time piece combo at the start, I'd recommend moving in either direction while mixing jumps and dashes, altering for any yellow circles in your way

Note that you're only able to do ONE jump while holding a potion, which has enough height to dodge his minions and shockwaves. You may also throw the potion while in the middle of the jump and can do a 2nd jump right afterwards. Consider this if you get caught in a bad situation, though try your best to NOT have a potion equipped when he's in the middle of an attack. Similarly, try not to throw a potion during his whack-a-mole attack, seeing as you can damage him with Umbrella for that and then can immediately follow it up with the potion for double damage!

  • Whack-a-mole ULTRA - When he does his whack-a-mole, he no longer spawns shockwaves, and instead will spawn 5 saw blades that will home in on you, so definitely never let yourself get caught offguard by constantly jumping. He will also still spawn potions, but again none of them will stick around to be used. He will do this until he's out of potions (~5 times), then be vulnerable, use the umbrella attack here.

  • Minion Summon ULTRA - During the Hat Kid Shadows and Minion Swarms, it will constantly rain down Theatre Lights like from Killing Two Birds. Their falling locations will be marked with a shadow. This means you need to be more on the move while dodging the minions and the shockwaves that come from the exploding rings. I'd suggest moving counterclockwise, but not too fast, time yourself for the shockwaves.

  • 4-way Explosion ULTRA - The best way to counter his 4-way explosion now thanks to the raining purple time pieces is to constantly be dashing in the same clockwise direction as the rings are moving, making sure not to have a ring under you when he's got 1 or 2 potions left to throw as the rings will detonate when he runs out of potions. A potion will spawn after this, usually just behind you.

  • Clockwise Explosion Barrage ULTRA - When it comes time for his constant delayed explosion ring spamming, move clockwise constantly double jumping in a zigzag to match the explosions relatively well (aka, move diagonally slightly away from snatcher for the first jump then diagonally slightly toward him for the next jump), though dont dash unless a ring spawns right under you. Adjust your movement to fit dodging the shockwaves, and only change your direction when a ring spawns right in front of you.

  • Red Rings of Death ULTRA - The red exploding rings are faster than ever here, and the only reliable way to dodge them AND the purple time pieces that spawn during them is to move in same direction the red rings are moving, while constantly shifting yourself to and away from snatcher as the red rings approach you to avoid getting hit.

All i can say in the end is good luck. You're almost there, you can do it!

Video:
Secret Death Wish #1 - Kick the Cans
This is not a real Death Wish with no actual benefits. This is a just-for-fun easter egg located in Act 2 of Chapter 6 where you must kick 6 cans into the front desk where you start.To kick a can, simply run into it.

You may also check out Ms. Switch's Guide on the matter

There are 2 cans located inside the front desk room, and 4 outside.

  • Can #1 is located on the ground floor near a puddle
  • Can #2 up top near the door to outside that leads to the bathroom
  • Can #3 near the soda machine past the door in the same area
  • Cans #4 and 5 on the place above the bathrooms
  • Can #6 near the door to the Captain's Room in the same area
A depiction of Can #6 and where you want it to be before kicking it off the platfom

I recommend doing Can #6 first, as it is by far the easiest to let fall into a place it wont recover from. As said in the picture, you'll wanna kick it to be as close to the edge as you can get without actually going over, and then finally kicking it square into the next lower section where cans #4 and 5 are.

Then, you'll wanna align yourself like below when you kick cans #4-6 into the lower section with can #3:

Other than that tricky scenario, it is simply a matter of kicking the cans behind the receptionist desk. You'll know you succeeded as you'll hear a "ding" and an applause. Do not stop focusing on one can until you hear that jingle. Do note if you kick two in too fast, one may not register until you kick it again.

You may also watch my video of it here:
Secret Death Wish #2 - Metro Madness
This is a secret death wish located in Nyakuza Metro's Pink Paw Manhole.

You may also check out Lumitic's Guide on the matter.

There are 4 steps to this

Step 1 - Collect the 15 initial electrical pons (and make note of the door with the glowing light you see next to the entrance to the next room)

Stpe 2 - Collect 100 electrical pons, does not matter which

Step 3 - Activate all 4 doors across the level, do note that you have to be sure you press the giant glowing red button next to each door with the interaction button and hear a "click" to have successfully pressed the door. They can be pressed in any order, just be sure you pressed them. Here are some images that show you the relative location of each door (near the glowing red buttons):

After that, you will have a door open up. Walk inside to be greeted by a lovely environment and a manhole. Ice Hat inside and have fun! Your reward is a "Wowza" sticker.

Video:
Conclusions
That is all the death wishes in the game, i hope this helped you. Please leave any feedback below for what I may do to clarify or improve and I will do my best to do better.

Below you can find links to the other guides:


Shoutout to CraftMasteeer707 for originally making the DW guides

As well as Elzquiem for his Boss-Specific DW Guides

As well as Ms. Switch for the Arctic Cruise Secret DW and Lumitic for the Nyakuza Metro Secret DW
Changelog
[Jul.31st 2019] - Tweaked and condensed "Cruisin' for a Bruisin"
6 opmerkingen
GoodGuy7 21 feb 2021 om 9:29 
It seems like "Ship Shape" (and thus, "Cruisin' For A Bruisin'" by extension) only exists to remind me of how bad I am at multitasking. I'm sorry, but there's just too much going on at once, and such a confusing layout, for my simple brain to keep track of it all! I-I simply can't retain all the routes around the ship while knowing which tasks take me where!

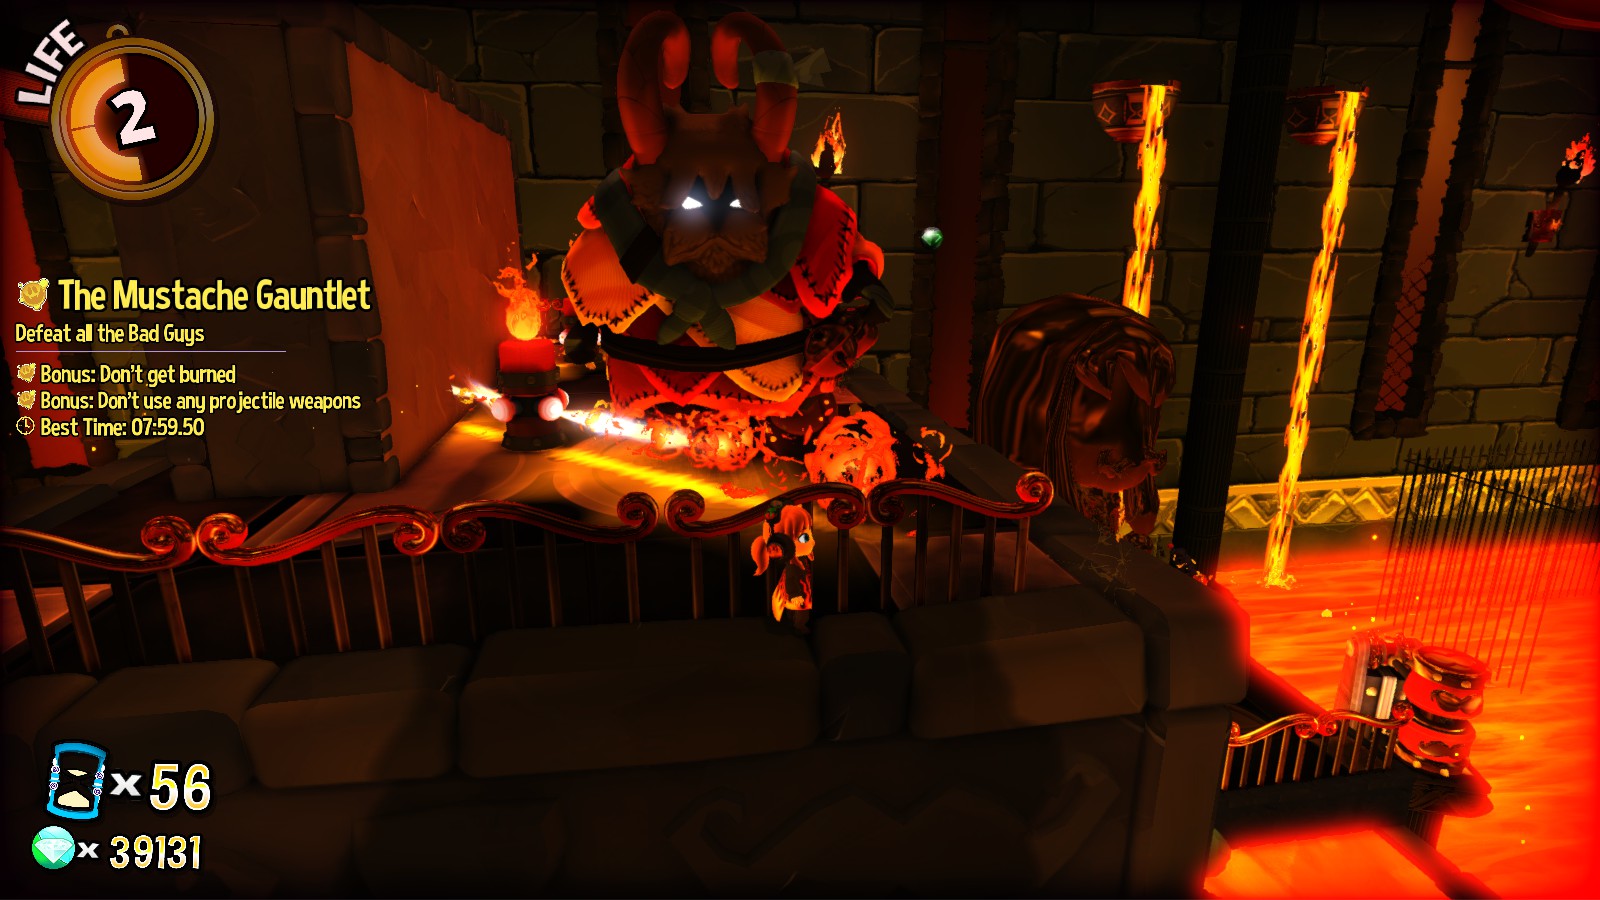
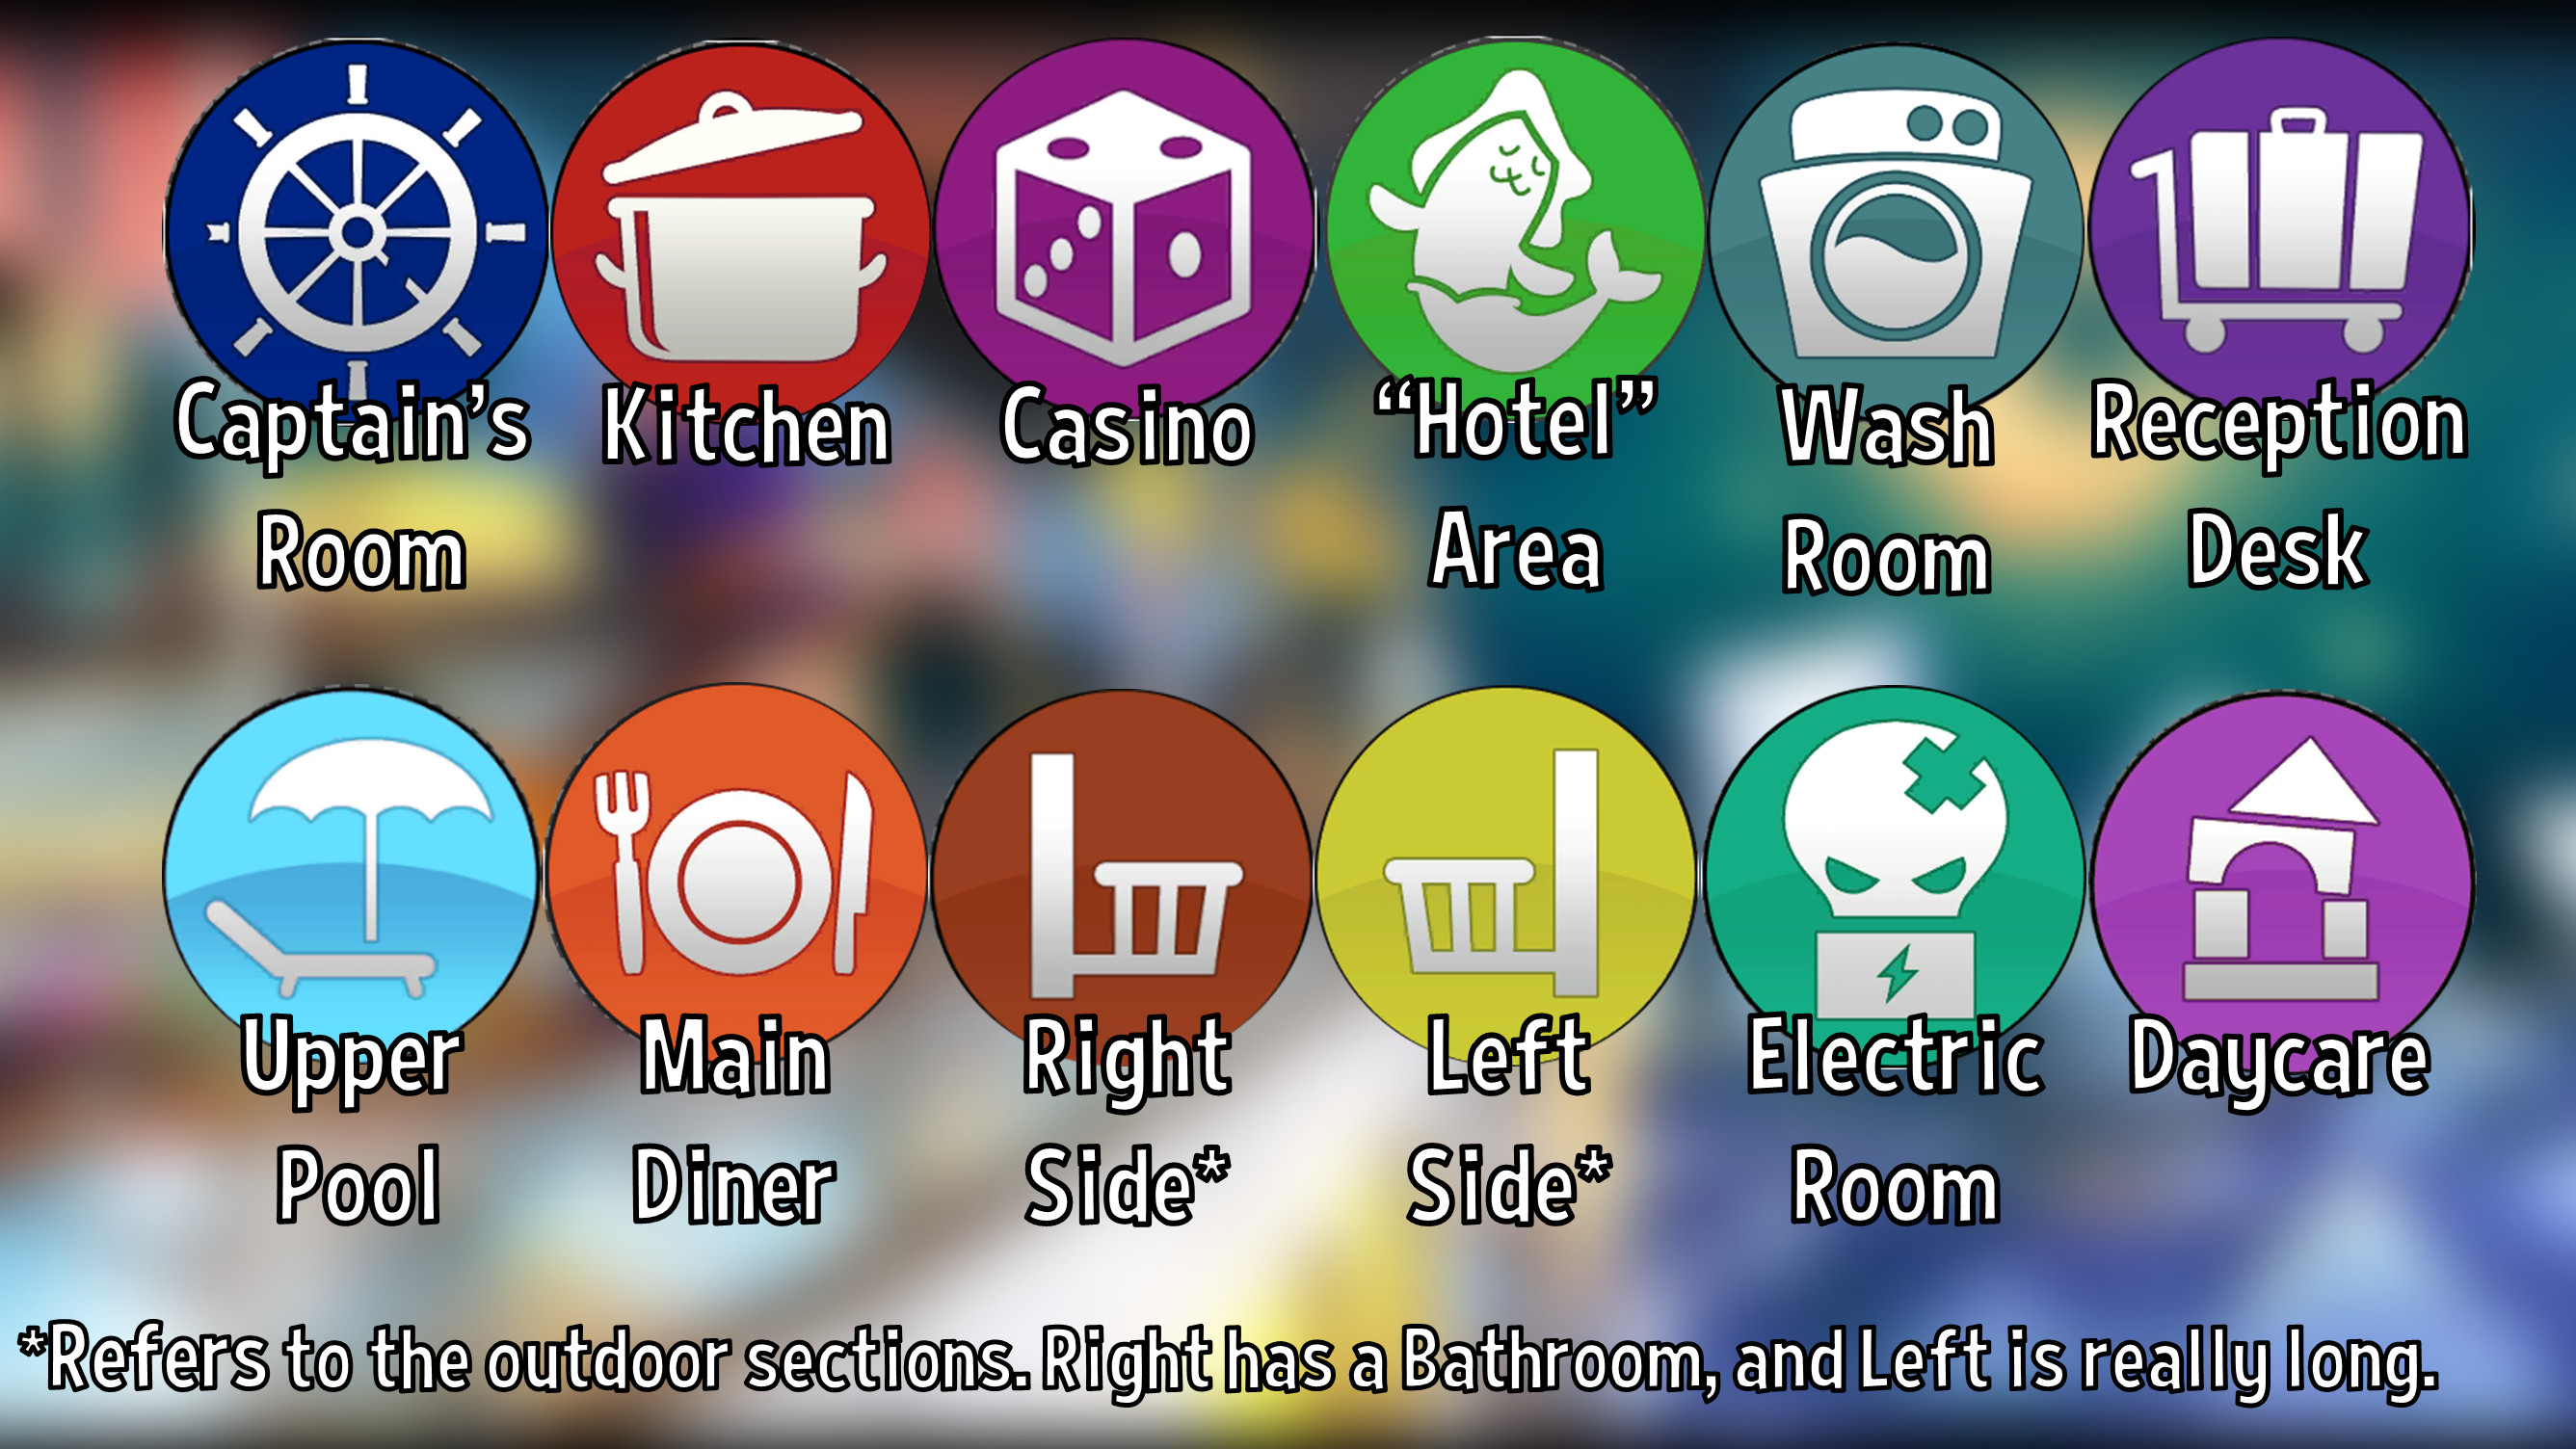
You know what's worse about Death Wish, though? On Steam, you can download extra badges and hats through the Workshop to give yourself a little boost. But on the Switch version (which is the only other version beyond Steam that supports Death Wish at time of writing), you don't have that luxury.You gotta use your skill, focus, and a little bit of luck.

...The latter two of which I usually don't have.

...sigh.

Thanks for the guide anyway.
Miri Ryllis ミリス  [auteur] 20 feb 2020 om 14:33 
@boy_mayo no. they will stay. they will just go back into hiding and will attack you again
PlayerName 20 feb 2020 om 14:09 
Just wondering, do the thief cats despawn if they manage to steal something from you?
Amberstar 30 jan 2020 om 15:08 
"...and I recommend you do it by jumping and then SPAMMING the Homing Attack button so you use it as quickly as the game will allow you to" This is how I almost always do a Homing Attack...
Miri Ryllis ミリス  [auteur] 15 jun 2019 om 22:22 
Haha, yeah i loved his take on the Snatcher lyrics video so I had to hide em around the guide!
And I am very glad you are getting use out of them, you're very welcome! Kick those contract's butts! :nepnep:
ThatOneCloaker 15 jun 2019 om 18:33 
Nice references to Man On The Internet :D
Also thanks for these awesome guides!