The Witcher 3: Wild Hunt

The Witcher 3: Wild Hunt

155 ratings
A Death March And Overall Guide For "The Witcher 3: Wild Hunt" And Both DLCs
By Saiun
A guide all around Death March difficulty from the beginning until the end (with both DLCs). For new players, returning players and for people still playing the game. Even experienced players might learn something new. Core is a High DPS Combat/Alchemy Build. You will meld through everything, while still have enough survivability. I did a lot of research and needed a few days to finish it. I hope you can enjoy it and find it helpful. Thanks!
2
2
   
Award
Favorite
Favorited
Unfavorite
Introduction
Good day everyone and thanks for reading my guide!

It's my first guide here on Steam. My native language is german, but i play most of my games in english. I prefer to write guides and reviews in english as well. That could explain some of the grammatical mistakes, or spelling errors, if you find any. I try to avoid any major spoiler and when there are some, i will use the spoiler tag.

I started to play the game on "Story and Sword!" difficulty and switched to "Blood and Broken Bones!" at the end of the first map, because i found myself way to overpowered and there wasn't a real need to use all my stuff to beat the enemies (Oils, Bombs, Potions). After i have done the first main quest in Velen i finally switched to "Death March!" and never looked back. (Except for a few Archivements, like the "Master Marksman" archivement).

So i didn't get my "Death March" archivement until the end of my second playthrough on New Game+, but later more of that story. I'am a very slow player, exploring every corner of the map, pick up every piece of junk, reading every piece of lore, used every opportunity to play Gwent. I don't wanna tell you how you play the game ofc., but i really recommend to enjoy it fully, go out exploring (you need to do some for all the Alchemy Formulas) and do the side quests.

So i needed about 180 in-game hours for my first full playthrough, where i got all my archivements except two (Blood and Broken Bones and Death March archivements). Then i will make a "quick" run through New Game + to get the final two. But that's enough about me, let's get right into it.

If you have any suggestions, or questions, please add them in the comments. Thanks again for reading!


Basic Overview
Difference between any other difficulty and Death March!:

First of all, if you go for the Death March archivement you have to choose it right as you start the game and NEVER change it, until you finished with the main story.
You can change it when you want to do archivements, but don't play on with the that savegame. Switch back to your Death March-Savegame when you got the desired archivement.
Better wait until you finish the main story on Death March and do any missing archivement after that, because you can play and finish stuff after the game. Don't forget that.

Biggest difference is that meditation does NOT regenerate vitality, but don't worry. There are enough ways to do so. Enemy Health is 80% higher, Enemy Damage Bonus is 230% higher and Experience Gain is 80% lower than normal. You have to use everything the game have to offer, because even the "easiest" enemy hits like a truck and i don't even wanna start with late-game and DLC Bosses.

To get through the game we will use Quen, Dodge/Roll, Decoctions, Potions, Oils, some Bombs and a Light Armor/Combat/Alchemy Build, which i will explain in detail throughout this guide.
We will switch to a Medium Armor/Combat/Alchemy Build for BaW and when we are lvl 40. We will finish the game with that build. At that point we are fully prepared for New Game+.

So make yourself comfortable with Dodge and Roll mechanics as soon as possible, don't get greedy, make use of Quen and buffs, search for healing opportunities and don't be shy to use your potions and bombs, even when it looks like an easy fight.
Make it a custom to upgrade your Oils, Potions and Bombs as soon as you get the Formulars, if you can, because the are your best friends out there.

General Build Info and Combat Tree
There are a few reliable Builds out there, but i found a Light Armor/Combat/Alchemy build the most fun to play with. Using a mix of Fast Attacks (main source of damage), strong attacks, Quen as the main Sign, while buffing ourselfs with Adrenaline Points, Oils, Potions and Decoctions. Bombs usability is very situational, as so is the Crossbow.

If you want to respec all your ability points, you can use a potion called "Potion of Clearance" at anytime, when you finally have access to them. There are a few merchants which sell them for 1000 Gold each. I found myself using them quite often throughout the game. :-)

Let's get to the build and the skills itself. Be sure to get ability points from every Place of Power out there. You also get one for every level up.

Combat Tree:

In the end you want 6 Abilities from the whole combat tree to fill 6 of your slots to get the most out of your Greater Red Mutagens. 7 Abilities when we switch to Medium Armor during the Dlcs. Every point spent in the combat tree increases Adrenaline Point gain by 1%.
It's where most of your direct damage comes from. Fast Attacks, Strong Attacks and the damage boost from Adrenaline Points (Each Adrenaline Point increases weapon damage by 10%). There are some useful abilities for Protection, but Dps over Protection is the motto here. :-)

You need 8 Points to unlock the second Tier, 20 for the third and 30 for the fourth Tier.
Go for "Muscle Memory", "Resolve" and "Precise Blows", then switch to Alchemy.

Marksmanship and Defense:

Avoid every single ability from the Marksmanship Branch, it's just a waste of points and slots if you don't go for the Marksmanship Archivement. Defense Branch have a few interesting Skills, but nothing is really worth it.

Fast Attack:

Muscle Memory 5/5 Points:

Increase of fast attack damage.

No-Brainer. First skill you want to invest in.

Precise Blows 5/5 Points:

Increase critical hit chance and critical hit damage of fast attacks.

No more to say. Get it as soon as possible.

Whirl:

Whirl sounds great, but we will wait until we have enough points and get the Weapon Entchantment from The HoS Dlc. Great for groups of enemies, but there are other ways to deal with them as well and it's just don't worth the points/spot in the early game. We get it later as Ability #7 from the combat tree. Great with the HoS Weapon Entchantment in the late game.

Crippling Strikes:

Crippling Strikes gives a nice DoT, but you don't really need it at that point anymore. Also it is really cheap to bleed your enemies and watch them die. :-)

Strong Attack:

Strength Training 5/5 Points later (see Resolve):

Increase of strong attack damage.

We will mostly use Fast Attacks, but as soon we are comfortable with Dodge/Roll we will switch Strength Training in and Resolve out. Strong Attacks are great against armored enemies.

Crushing Blows 5/5 Points:

Increase critical hit chance and critical hit damage of strong attacks.

Really a no-brainer in that tier.

Rend 5/5 Points:

Deals additional damage in proportion to the Stamina consumed. Ignores enemy Defense and increases critical hit chance. Adrenaline Points increase total damage by 33%.

Oh yes! Great for Bosses and other single target fights. Even greater with the HoS Weapon Entchantment in the late game.

Sunder Armor:

Reduces enemy damage resistance.

I like that one, but i never found a open slot for it. But if you find any get it in late game if you want.

Battle Trance:

Resolve:

Lower Adrenaline Point loss upon taking damage.

That's the Ability we use beside Muscle Memory to get to the next tier. Drop it when you master the art of dodging and get Strength Training instead for armored enemies.

Razor Focus 5/5 Points:

Instantly gain one Adrenaline Point when entering combat. The Adrenaline Points generated by sword blows are increased. Really a no brainer.

So that's the 30 points i spent in the Combat Tree and the 6 abilities i used to fill my slots. Get Muscle Memory, Resolve and Precise Blows as fast as possible and boost them with a red mutagen, while getting enough Alchemy Formulars. Then move to the Alchemy Tree. Drop Resolve later and get Strength Training. Get Whirl as a 7th for late game.


Alchemy Tree
That's where the game really shines. Power up your oils, potions and decoctions. You want 5 Abilities from here and even more when you are in the "Blood and Wine" Area later. Use Green Mutagens to boost your vitality. Every point spent in the alchemy tree increases potion duration time by 5%.

You need 8 Points to unlock the second tier, 20 for the third and 30 for the fourth tier.

When you are done with the most important Abilities from the Combat Tree it's time to boost your buffs as much as you can. A lot of your dps will come from here, but it's a slow process and you need to get Alchemy formulas from all over the world. But it's worth it, believe me. For more of that topic go to the Toxcity explained Section of this Guide.

Start with Poisoned Blades and Heightened Tolerance, then go for Protective Coating. We want to get to Synergy when we have Greater Mutagens and enough slots enabled.

Brewing:

Heightened Tolerance 5/5:

Increases potion overdose threshold.

Potions and decoctions are the core of any good Alchemy build. You want to use a 100% of that Toxicity so you don't get an overdose. And belive me when i say, a Toxicity overdose in the middle of a fight is bad. Really bad.

Refreshment, Delayed Recovery and Side Effects:

I haven't found any use for the other abilities here, at least for our build.

Oil Preparation:

Poisoned Blades 5/5 Points:

Oil applied to blades gives a chance of poisoning the target on each hit. The chance is greater the higher the level of oil used.

Great and very useful DoT, but it is a bit cheap to the enemies. You can and will change it out later, but it's great for the early game.

Protective Coating 5/5:

Adds up to 25% protection against attacks from the monster type the oil targets.

Very, very useful and a no-brainer!

Fixative:

Fixative is the most useless ability out there, because you can go to the inventory every time you want and apply a new oil.

Hunter Instinct:

Hunter Instinct is awesome, but for the endgame, when you have the points and slots available. When Adrenaline Points are at their maximum, critical hit damage against the targeted enemy type is increased. So that's 100% Crit damage on lvl 5 on max Adrenaline Points.

Bomb Creation:

Bombs are just not useful enough to spent any points here. You could make them useful, but you need to spent a lot to do so. Not really worth it yet. Bombs can be the most powerful force in the game, but not until the very end of the BaW Dlc. (see Sections for Bombs and Grandmaster Bonus Sets)

Mutation:

Acquired Tolerance 3/3:

Every known level 1, 2 or 3 alchemy formula increases maximum Toxicity by 1 on Level 3.

Most useful ability in the entire tree, when you have enough alchemy formulars. At late-game you can use up to 3 Decoctions and still use 3-4 Potions. Later even 4 Decoctions and Potions. But even the use of 1, or 2 Decoctions will help you a lot. Wait for it until you have some formulas, to get the most out of it you want to collect all the formulas in the game. (see "Toxicity explained" Section)

Tissue Transmutation 2/5:

When consumed, mutatgen decoction increases maximum Vitality for decoction's effective duration.

Just a filler to get to the next tier, you will have enough Vitality.

Synergy 5/5:

Increases bonus for mutagen placed in mutagen slot.

A must have! No more to say.

Adaptation:

Extends effective duration of all mutagen decoctions.

Thanks, but no thanks.

Trial of the Grasses:

Nothing really useful, except for the third ability. I ignored that ability until "Blood and Wine", but it's actually pretty useful for that build.

Fast Metabolism:

Toxicity drops up to 5 points per second faster.

It's a crazy ability. You drink a potion and seconds later the Toxicity is gone. Very, very useful when you want to drink 4-5 potions between the margin of your toxicity taken up by decoctions and your max Toxicity. You can drop Poisoned Blades for it later. (see "Toxicity explained" Section)

That's the 25 points i used in the alchemy tree for the 5 Skills. At that point you should get into the "Blood and Wine" DLC and unlock even more slots. Save a few attribut points for that, or spent some for "Fast Metabolism".


General Tree and Sign(s)
You have to unterstand that every Ability you want to use from the general tree, takes one of your slots away and you don't get the mutagen bonus. And the aren't that useful. For our build there is only one we absolutely must take. Not too soon (preferable when you have some good light armor, or your first Felline Armor Set).

Cat School Techniques 1/1 Point:

Each piece of light armor increases critical hit damage by 25% and fast attack by 5%.

Strong Back:

Maximum inventory weight is increased by 60. Useful when you find yourself overloaded with junk, especially in Skellige with all these Smuggler's Caches and need to get to a merchant.

Metabolic Control

Increases maximum Toxicity by 30 points. For the end-game, when you get your mutation in BaW.
(see "Toxicity explained" Section)

Signs:

I'am pretty sure there are some good Builds around Signs out there, but i never really looked into it. I just love the combat system, when you finally got used to it. So the only sign i use is Quen and that's pretty inevitable for close combat on Death March. The other Signs get useful again, when you have your Mutation in BaW.

You have to cast Quen everytime, preferable, befor you go into combat, but sometimes it's more or less unavoidable. Don't forget to recast it when it breaks. It's essential to survive out there.

There is a very useful Armor Entchantment later in the HoS Dlc. With that one you get a free Quen at the start of every combat. (more in the Weapon/armor Entchantment Section)

Quen is your best friend, when it comes to protection. On Death March, nearly every single hit will shatter it nonetheless, but you just get that extra protection you need. Dosen't matter how hard the hit is, you wont get damaged, it just breaks and you need to cast a new one.

Light Armor and a "Tawny Owl" potion should give you just enough stamina regen to survive even the toughest opponents. You can use it to rush into your foe, take a hit and just finish him of, when they have low health.

There arent many opportunities to cast anything else, because you just wont have the stamina.

Aard is nice for "BaW", when you have a mutation running and against enemy groups.

Igni can be helpful against larger groups of Gouls or Drowners.

Yrden is great against Wraiths, but you are mostly all over the place and never in your trap anyway. ^^

Axii is useful against some single creatures like humans with shields, or cyclops.

But there just isnt any space to invest in any of them. So the Sign Tree remains empty. The Quen Branch have a few interesting options, but nothing that useful for a spot.

The only exception would be "Delusion" from the Axii Branch, if you want more dialog options. You don't miss anything if you prefer not to (Just less money and more fights :-)

Armor and Weapons of choice
Armor:

Should be obvious by now i guess. We want to use Light Armor, preferable the Feline Witcher Gear Set for that build, so we can make full use of Cat School Techniques Ability from the General Tree. So we changed to the School of the Cat, instead of the Wolf. Nah, just kidding. Cat School People are crazy!

The big problem with Light Armor is the missing damage reduction, but we could change that with an Armor Entchantment from the HoS Dlc and go full Heavy Armor or Medium Armor. Cat School Armor gives a great Attack Boost and what else do you want. Nothing should be too difficult in the base game anyway. ^^

Until you can do the first set of quests to get the diagrams, of the Cat School, you can use anything you like ofc. Light, Medium, Heavy, whatever you prefer. There are some nice diagrams even on the first map by the way. Don't be shy to craft some.

Basic set is lvl 17, enhanced lvl 23, superior lvl 29, mastercrafted lvl 34 and finally the grandmaster is lvl 40. For New Game+ there even legendary versions of them. I played with the Felline Armor until i got the Manticore Set at lvl 40 in the BaW Dlc, just because of the Attack Boost you get, but there are more options when you finally unlocked Entchantments with HoS.

With a certain Entchantment every Armor out there can be treated like a Light Armor. So that you still get the Bonus from Cat School Techniques and the Stamina Regen for Light Armor, while having the damage reduction from a Heavy or Medium Set. So you could switch to the Ursine Gear with heavy damage reduction and heavy Adrenaline Point gain if you like. (More info in the Weapon and Armor Entchentment Section.)

Ursine Gear is craftable and useable at lvl 20, 25, 30, 34 and 40. Make sure to get the diagrams for them as well.

Weapons:

For weapons you can use whatever you like, but as soon as we get the Weapons from the School of the Bear we start to use them. Because Bear = strong!. Or really just use anything that comes in handy on the way, but i really like the Adrenaline Point gain from the Ursine Weapons.

You can craft and use them at lvl 20, 25, 30 and 34 and 40. There also legendary versions in New Game+.

Crossbow:

While the Crossbow can't really be seen as a damage weapon for most parts, you can still use it to shoot down flying creatures and for unterwater combat. Bolts don't really matter. Most of them are in my stash anyway, because you can't even sell them.

Armor and Weapon Enchantments
Runes, Glyphs:

I'am not very creativ with my Runes i have to admit. I use a "Chernobog Runestone" for all my Weapons until HoS. It gives 5% Attack Power for every high lvl rune.

For Armor i just using a "Glyph of Quen" for everything until HoS. It gives 10% Quen Sign Bonus for every high lvl Glyph.

Enchantments (HoS DLC):

With the HoS DLC you can entchant your weapons and your Chest Piece. You have to unlock the Runewright to use them and doing so is very, very expansive. So save some money. You could do the first part of the quest as early as you want i think, but for the second part you have to fight some very tough enemies and you want to have the proper lvl for them. The quest is lvl 32.

Armor Entchantments:

There two very viewable Armor Entchantments for our build . First is called "Protection". It casts a free Quen at the start of combat. Every combat! I think that's just the best if you want to stay in Light Armor until the Manticore Set. You can use a differnt Sign to start combat for instance and then switch back to Quen. I used that along with my Feline Armor until the Manticore Set. Also good for Fist Fights.

Second one is called "Levity". All equipped armor items are treated as Light Armor. That's the Entchantment you want if are going to use Medium or Heavy Armor. Also the one we use when we get our Manticore Set. You still get the Stamina Regen from Light Armor and the bonus from Cat School Techniques, while you benefit from the damage reduction from Medium/Heavy Armor.

Weapon Entchantments:

There are two Entchantments which makes just so much sense. I haven't even looked at anything else here ^^

First one is "Preservation" for the steel sword. With that, Workbench and Grindstone bonuses, never expire. That's 20% more damage and protection permanent and good for lazy people like me. You never will be looking for a Workbench and Grindstone anymore.

Second one is for the the Silver Sword. It's called "Severance". It increases the range of Whirl by 1.1 yards and Rend by 1.9 yards. Rend and Whirl are so much more useful now. Just try it with and without the Entchantment, if you don't believe me.

Mutation(s)
Mutations (BaW DLC):

Mutations are just insane and the next lvl for just everything really. You can spike your dps for a plus of 200-250%. You will need to do a lvl 35 quest, which you will get the first time you enter the main city of the BaW DLC. Do that quest as soon as possiple.

You can just use a single mutation and you need to spent Attribute Points and Greater Mutagens to develope new ones. When you develop 2 Mutations you get an extra Ability Slot, 4 for a second, 8 for a third and 12 for a final fourth Abiliy Slot. But you are only allowed to use one mutation, remember that.

These extra slots you get have to be of the same colour as the mutation you use, so Alchemy (green) in our case. There are some Mutations where you can fill the extra slots with a mix of Combat Abilities, Sign Abilities, or Alchemy Abilities. And even some where you can combine all three of them. You are never allowed to fill the extra slots with Gold Skills from the General Tree.

There are a lot viewable Mutations and every single one can be very, very strong. Overall there are 12 of them. You can make Crossbow your Main-Weapon and play the game as a shooter if you want to. Or boost your Signs beyond insanity. But there really is just one we want to go for. Ignore everything else.^^

"Euphoria" is the one to go for!

Each point of Toxicity increases damage dealt by swords and sign intensity by 0.75%. So the higher your max Toxicity is, the higher the max bonus can get. Highest possible Bonus is 245% of Attack Power and Sign Intensity.

So the more Decoctions you are running the more base bonus you will get. So when you are running 3 decoctions your base Toxicity is 210 already. That's an extra of 157.5% of sign intensity and attack power and then more from your potion Toxicity.

If you run 3 Decoctions and the Basilisk Decoctions you will get 250 Toxcity and a bonus of 187.5.

And finally 280 Toxicity if you get to 4 full Decotions. So that's a base bonus of 210% Attack Power and Sign Intensity. That's just totally insane and Signs are actually useful again. \o/

So It's about to find the fine line, between Decotions, Potions, "Fast Metabolism" and your max Toxicity. (More in the "Toxicity explained" Section.)

That's the build i had near the end of BaW. Still try to unlock the third and fourth slots from the Mutations and going for Hunter's Instinct and Bomb Damage.


Every Grandmaster Set Bonus
Grandmaster Set Bonus:

Together with the Witcher-Set from BaW there are 5 Sets, all of them granding a unique Bonus for 3 and 6 pieces. I played a little bit with each one of them. All of them can be pretty useful with the right build, but there really is just one to go for us.

Every single one of them is only available in the BaW Dlc and you have to be lvl 40 to craft and wear them. Save a lot of money when you want to craft them, they are expansive if you don't have the mats. Just the Grandmaster Version will give the Bonus.

Going through every one of them a little bit. With the possibility to change your Medium/Heavy Armor to a Light Armor with a certain Entchantment from the HoS Dlc, all of them could make sense, but here is just one #1 we want to go for. (see Armor/Weapon Enchantments Section for more info)

Manticore Set:

Bonus for 3/6 pieces: Critical hit chance and critical hit damage also apply to bombs.

Bonus for 6/6 pieces: The maximum number of charges for each alchemy item is increased by one.

My personal favorite. I have to admit. The looks are ok, there are better out there, but the stats are unmatched for our build. It's a Medium Armor Set and first of all you get better damage reduction then Light Armor. Just use the Armor Entchantment and make it a Light Armor Set.

Where it really shines is the 30 Toxcity, so you will get to 327 Toxcity with it. So you can use 4 Decotions, Potions and get a possible 245% damage and Sign Intesity boost with it. You can't get more then that. (See Mutations and Toxcity explained for more info)

Then you get +15% crit chance, +100% crit damage and +250 Armor piercing for each sword + armor.

The 6/6 bonus is nothing special and not really useful. You can meditate anytime you want, but it gives you extra Bombs. so that's helpful for the second Bonus.

The 3/6 is just great and makes Bombs the most devasting weapons of mass destruction in the whole game. You have to push Bombs with certain Abilities to make them really useful ofc, but now is the best time for it. Long Story short, it is by far the best Set for our build.

Manticore Set. Undyed.


Feline Gear Set (School of the Cat(:

Bonus for 3/6 pieces: Strong Attacks increase Fast Attack damage for five seconds by 10% for each piece of the set.

Bonus for 6/6 pieces: Rear attacks deal 50% more damage, and also stun opponents at the cost of one Adrenaline point.

Everything sounds great really and it would be the obvious choice for every combat build, but the Bonus for 6/6 pieces just destroys everything here. You will lose all your Adrenaline Points just by hitting the enemies in the back. It just dosent makes sense, because we want the damage bonus from Rend and the overall damage Bonus from Adrenaline Points and not want to lose them.

Ok, the Attack Power you get from the Armor is great and the 3/6 Bonus is just awesome, but the weapons arent that good and you will look like an Assassin from a certain Ubisoft Game Series with that gear, more than a Witcher.^^

Maybe if you just take 5 pieces and another weapon we can talk about it, but i still like the Manticore way more for our Euphoria bonus.

Ursine Gear Set (School of the Bear):

Bonus for 3/6 pieces: When a Quen shield shatters, there's a chance a new one will be cast at no stamina cost. This chance bonus increases by 5% for each piece of the set.

Bonus for 6/6 pieces: Damage dealt by abilities involving the Quen sign is increased by 200%.

Only Heavy Armor Witcher Set and because of that it gives incredible damage reduction. You won't even blink when an enemy hits you while wearing that piece of plate. That alone makes it worthwhile to mention the Set here.

Every piece have Adrenaline Point gain on them. Overall you will get a +97% of Adrenaline Point gain from the whole set. Adrenaline Points you can spent on special attacks and to boost your overall damage.

But the bonuses makes it a no-go. The 3/6 is still a big game of chance and the second one is just not very useful in my eyes. Maybe to reflect back damage to your opponent with Quen. I don't want to get hit in the first place, so i don't know. But you will look awesome with it, wouln't it be for the hair clipping.

Griffin Gear Set:

Bonus for 3/6 pieces: After using stamina to cast a Sign in standard mode, the next Sign cast within three seconds will be cast without using up Stamina.

Bonus for 6/6 pieces: The size of Yrden traps is increased by 40%. While you are within an Yrden trap, stamina regeneration is increased by five per second and Sign intensity by 100%, and damage is reduced by 20%.

Obvious choice for every Sign Build. You can get a whooping Bonus to Sign Intensity of 103% alone from the Armor/Weapons. Combine that with the bonus from 6/6 pieces and others. There are really no limits in what you can do with your Signs that way. But that's not what we are looking for in our build. Medium Armor by the way. My personal personal favorite when it comes down to the looks.

Wolven Gear Set (School of the Wolf):

Bonus for 3/6 pieces: Up to three different oils can be applied to a sword at a time.

Bonus for 6/6 pieces: Bombs are thrown without any delay.

Last but not least. Welcome to the black sheep of the family. Ok it looks pretty cool, but that's really everything good to say. Stats are a mix of everything. Medium Armor, Sign Intensity, Attack Power, Adrenaline Gain, Bleeding Chance. Nothing bad, but also nothing special.

And the bonuses are just a mess. Whenever you would need three oils on one sword really is beyond me. And the second one just dosent gives any gain to DPS or whatsoever. I just don't unterstand that Set and it's from your own School. That's a bit sad, but we changed to Manticore by now anyway. So all good.

Oils and Potions
Oils:

Oils are one of the main sources of damage and protection (with the right Abilities). You need alchemy formulas and ingredients to create them. You create them once and can use them whenever you want. Even in combat. There 3 Tiers of them. Basic (10% more damge), Enhanced (25%) and Superior (50%). You want to upgrade them as soon as you get the formulas.

There really just two types and it's pretty self self-explanatory how to use them. Go into your inventory and use them on your swords. You can see the oil and how many usages you still have in your buff bar or in the inventory.

"Hanged Man's Venom" for humans and nonhumans. Put it on your steel sword.

One for each monster type and the silver sword. If you don't know the monster type yet, you may have to guess. ^^

Potions:

A main scource for everything. You will need enough toxicity to use them, so don't stack everything with decoctions. Most of them need 20-25 of your Toxcity. I mostly pop 3-4 befor a tough fight and maybe another 1 or 2 for healing if needed. Same as oils, there three Tiers and you need formulas and ingredients to create them. You just have to develop them once. Go for Superior as fast as you can.

These first 3 are pretty essential for the harder parts of the game.

Thunderbolt:

Increases Attack Power. 100% critical hit chance during storms on Tier 3. Pretty straight forward. Nothing esle to say. Must have.

Maribor Forest:

Accelerates the generation of Adrenaline Points. Grants 1 Adrenaline Point upon consumption on Tier 3. I like!

Tawny Owl:

Accelerates Stamina regeneration. Never expires at night on Tier 3. Perfect for Quen, not so without it.

Next ones are situational and/or optional.

Petri's Philter:

Increases Sign intensity. Signs always apply their special effects on Tier 3. Optional.

Killer Whale:

Just one Tier. Increases breath supply while underwater by 50% and improves vision while diving.
You will spent some time unterwater in this game.

Cat:

Grants sight in total darkness. Immunity to hypnosis on higher Tiers. Great for combat inside caves or dark rooms. You have to wait for it to wear off when you get into the light again, otherwhise it's unplayable. I prefer a torch instead of Cat. ^^

Black Blood:

Vampires and necrophages start bleeding when near the witcher. In addition, the witcher's blood injures and knocks them back when they wound him on max Tier. Very useful in some situations.

Blizzard:

Whenever you slay an enemy, time slows for a short period. If 3 Adrenaline Points are available, during this period actions don't deplete Stamina. Sounds great, but for some reason i have never used it.

Golden Oriole:

Poisons now heal instead of doing damage on max Tier. Awesome Potion. You can exploid it for healing as well, but later more of that. (see Healing Section)

White Honey:

Clears Toxicity and cancels all active potion effects. Yeah, you don't wanna use that one, otherwhise say goodbye to your Decoctions as well.

Decoctions and Buffs
Decotions

Decotions are a wee bit different to use. Decoctions does not raise your toxicity level, but rather take up an amount of space on your toxicity bar. Each one takes away 70 Points of toxicity until the run out, the witcher takes a White Honey potion, or the Witcher meditates. Every Decosion, without the proper skills, last 30 Minutes and have one charge each. So more then enough time until you next meditate most of the time. They reset when you meditate, same as potions and bombs, with the use of alcohol.

You want the "Acquired Tolerance" skill to make good use of them and for that Ability you want all the alchemy formulas to max out your max Toxicity. Max possible Toxcity is 327. That's our aim.

Recipes for Decotions are all over the place, you get a lot of them while reading books. Every Decotion is from a certain monster type and you need that monsters mutagen and a few other
ingredients to craft them. You get most of the mutagens from your contracts. Some are missable.

Some of the best are explained in the "Healing" Section of this guide. Here are just the Dps ones, because that's what we wanna use. There are some for protection and other stuff, but i don't want to list all of them here.

Succubus Decoction:

Attack power grows 1% every 2 seconds to a maximum of 30% at 1 minute over the course of a fight. Pretty straight forward, but you need the rare succubus mutagen for it.

Water Hag Decoction:

Damage dealt is increased by 50% when vitality is at its maximum. That' my choice to go, but combine it with one of the healing decoctions for max use.

Archgriffin Decoction:

If any Stamina is available, strong strikes consume all of it and reduce the struck foe’s vitality by 5% after the weapon damage is calculated. Great Decosion, but hard to get the Mutagen. More for the late game and you need stamina for it. But when you get a free Quen shield you can make the first hit count.

Ancient Leshen Decoction:

Each sign cast increases stamina regeneration for the remainder of the fight. Great for a very tough fight in wich you need Quen a lot.

Katakan Decoction:

Increases critical hit chance +5%. Nothing more to say. You can't go wrong with that one.

Doppler Decoction:

Increases critical hit damage when attacking from behind by 50%. If you even need more crit damage. Good alternative and you can get it early.

Basilisk decoction:

Applies a buff increasing the intensity of a randomly selected Sign at dusk and dawn. Pretty useless, but it's the only Decotion with 40 Toxicity instead of 70. You can use that to push your "Euphoria" Damage if you have Toxicity to spare.

Take whatever you like, until you have enough Toxicity for 2, then take Waterhag and Ekimmara (or another healing one). Later take Archgriffin or Katakan as a third and all four when you have your Manticore Set.

Buffs:

Only want to mention the Grindstone buff for 20% Attack Power and the Workbench for 20% damage reduction. Get them whenever you can, until you get it permanet with the Weapon Entchantment. There are some new, very useful, bonus buffs when you get to the BaW DLC later.

There is also the Place of Power Buffs for your Signs, but i never really use them. Only need a Place of Power for the ability point.^^

Toxicity explained and Alchemy Formulas
Toxicity explained:

So your base lvl of Toxicity is 100. The base threshold for getting a overdose is 75%. So you can drink 3 Potions without worrying too much. When you get over the threshold you will start to lose health. The more you over the threshold the more you will lose.

That's where the ability "Heightened Tolerance" comes into play. It raises the threshold for 5% each lvl up to a max of 25% at lvl 5. so you can get to a 100% theshold with that awesome ability.
You will never get a overdose again and won't lose any health because of it. It's impossible to go over your maximum toxicity. When you try to take a potion, but don't have enough toxicity left you simply can't take another until toxicity wears down again.

Toxicity drops at a slow pace. Base rate is very slow. I think it's 1 point per second, but i'am not 100% sure. For your Toxicity to drop faster you need another very useful ability called "Fast Metabolism".
On lvl 5, Toxicity will drop 5 points per second faster. So nearly instantly after you used a potion. Get the Ability later on your playthrough, because there are more important ability to go for at first. To get rit of all your toxicity in an instant you have to use a "White Honey" potion, but it will cancel all your Decoctions as well.

There are only three ways to raise your overall Toxicity. One is a ability called "Acquired Tolerance". With that every known level 1, 2 and 3 alchemy formula (on lvl 3) increases maximum Toxicity by 1. That's why you should get every formula in the game. With all the base game formulas you can get to 247, then 1 from HoS and another 19 from BaW and you can get up to 267 Toxicity just with one lonely Ability. You can get a max "Euphoria Bonus" of 200.5% that way.

Combine all three of those abilities to get the max out of your build in the early game.

Another ability called "Metabolic Control" increases maximum Toxicity by 30 points. The problem here is, the ability is from the General Tree and will take a slot away. A slot we can't simply afford to lose in the early game.
When you have all the recepies and 267 Toxicity already you can get to 297 Toxicity with it. Just drop "Poisoned Blades" if you havent done already and use your 3 favourite Decoctions and the Basilisk Decoctions to get to 250 Toxcity. You can get a max "Euphoria Bonus" of 222.75% that way.

There is one other way, but you need to be lvl 40 and to another quest in the BaW DLC. It's from the Manticore School Gear, only available in the DLC. It raises your Toxicity by another 30 points Overall we can finally get to 327 Toxicity, use 4 full Decotions and still use one Potions after the other. You finally get a max "Euphoria Bonus" of 245.25%.

That's the limit in New Game. I think the legendary Manticore Gear from New Game+ can raise Toxcity by another 5 Points, but i'am not there yet.


Alchemy Formulas:

I don't wanna get too much into it, so i just post a link with all the formulas.

In the base game there are:

https://witcher.fandom.com/wiki/Category:The_Witcher_3_alchemy_formulae

9 Substances
6 Mutagens
3 Alcohol
24 Bombs
28 Decoctions
36 Oils
38 Potions
3 Quest Items

HoS:

1 Quest Item

BaW:

https://witcher.fandom.com/wiki/Category:Blood_and_Wine_alchemy_formulae

18 Mutagens
1 Quest Item

Dye recipies don't count toward max Toxcity anymore, because of a patch, unfortunately.

Bombs and other useful Items
Bombs

Bombs are ok, but most of them are very situational when you didnt invest in any bomb-related abilities. There are 3 Tiers for every bomb and you have to get the recepies to develop them, same es everything else. They reset with meditation, same as everything else. There are 2 bombs which are very helpful in particular.

Dancing Star:

Produces a fiery explosion that ignites the surrounding area. You want the Superior Version because of that. It places a small pool of fire, wherever you throw it. The pool of fire stays there for 13 seconds and it ignites everything near it. While people or monsters are ignited you can get behind them and just finsih them of, without much of a resistance. You can easily cheese powerful enemies, 15 lvls above yourself, with one of those. Like fiends, archgriffins, or groups of humans.

Northern Wind:

Freezes foes. Blows landed on frozen foes deal additional damage. Chance of instant kill on highest Tier. Second bomb here is very effective against bigger groups of humans, nekkers, ghouls and drowners. Not so much against bigger single target ones.

Devil's Puffball:

Releases a cloud of poison when detonated. Never really using that one, but it's great in combination with a "Superior Golden Oriole" Potion for healing. See the "Healing" Section.

Dimeritium bomb:

Releases a cloud of dimeritium slivers that block magic and monsters' magic abilities. Very situational. You can use them against Elements, but they are pretty rare anyway.

Moon Dust:

Contains silver splinters that permanently prevent monsters from transforming. Also situational, but it's extremly useful against monsters with health regen and can make the differnce in those fights. Also great against Vampires and Noonwraiths.

I use Dragon's Dream, Grapeshot or Sanum when i run out of the others, which never really happens.

Other Items:

Just a few tips here. Use torches instead of the Cat Potion when you don't have to fight in the dark. Don't sell any or all of your mutagens like i did, you can thank me later for that. Don't spent any money for useless stuff, because there are some points where you need a lot of it. Try to play Gwent at any opportunity for some fun, money and the archivements involved, because Gwent is just great fun. \o/


A hundred ways to heal yourself
Ok, it's not a hundred ways, but there are still more ways than you might think of. On Death March you can't meditate to get your health back.

Foods and Trinks:

Obvious and pretty straight forward. There are just a few different ones. Either are 50 or 80 vitality a second for 5 or 10 seconds.

Swallow:

Accelerates Vitality regeneration. Taking damage does not interrupt regeneration on max Tier. A Regen Potion. Nothing special, but can be a lifesaver. Uses Toxicity.

White Raffard's Decoction:

Immediately restores a portion of Vitality. Restores Vitality immediately and fully. Grants immunity to damage for a short duration on max Tier. What else do you want? Potion = Toxicity.

Full Moon:

Increases maximum Vitality and heals Vitality by an amount equal to current Toxicity on max Tier.
When you run out of White Raffard's. \o/

Then there are Healing decoctions. While i prefer dps ones i always run one of these.

Ekimmara decoction:

Damage dealt to foes regenerates Vitality. 10% Vitality drain. That's my favorite one.

Ekhidna decoction:

Performing actions that consume Stamina regenerates Vitality. Nothing wrong with this one.

Troll decoction:

Regenerates Vitality during and outside of combat.100 Vitality regeneration outside combat. 20 Vitality regeneration during combat. Good alternativ. You will never have health problems again outside of combat.

Grave hag decoction:

Each foe slain accelerates Vitality regeneration for the duration of the battle. 5 Vitality regeneration during combat. Not really useful.

Nightwraith decoction:

Geralt's maximum Vitality is increased with each foe killed. This increase lasts until he meditates or fast travels. Great Decotion, but never used it, because i had enough Vitality and prefer more Dps. :-)

There are some Abilities that can give you an indirect heal.

Undying (Battle Trance Branch, Combat Tree):

When Vitality reaches 0, it will be restored based on the number of Adrenaline Points used. Requires at least 1 Adrenaline Point, which will be consumed. Well, you should not die in the first place.

Active Shield (Quen Branch, Sign Tree):

Alternate Quen Mode. Creates an active shield. Maintaining it (no Stamina Drain here on max lvl) and blocking attacks drains Stamina. Damage absorbed by the shield restores player Vitality. To maintain your active shield you have to keep keep pressing the Sign Button. When you get hit that way, you will get Vitality. Can be pushed with the Ursine Grandmaster Bonus.

Refreshment (Brewing Branch, Alchemy Tree):

Each potion dose imbibed heals some of your maximum Vitality. You could use all potions as healing potions now, but you should have enough healing options. So no need for this Ability.

Sun and Stars (General Tree):

During the day, Vitality regenerates by an additional 10 points per second when not in combat. At night, Stamina regenerates by an additional 1 points per second during combat.

Gourmet (General Tree):

Eating food regenerates Vitality for 20 minutes.

The Golden Oriole and Devil's Puffball Combo:

Golden Oriole have to be Superior. Pop a Golden Oriole and throw a Devil's Puffball to heal yourself with poison! Any source of poison can heal you with a Superior Golden Oriole.


Honorable mention:

There is a sword with a leech effect even and the very useless out of combat regen (1 health per second).

Monster and Boss fights from the base game
Heavy spoilers incoming. Don't read them if you don't wanna spoil yourself. I would like to explain a few of the harder bosses and monsters of the base game on Death March!

Monsters:

Normal Monsters should not be the big deal, even on Death March if you see to a few ground rules. Don't get surrounded, be mobile. Try to get behind a foe for extra damage. Back up for healing and recasting Quen if you need to. Use Oils for all the fights and everything else you can use, like potions bombs and such. Don't be shy to run away from a fight if you are underleveled. Watch the Boss Mechanics, especially for the Dlcs and don't get greedy. Even the scariest monsters should not be a big threat.


Hardest fights in the base game, on Death March, are the Fist Fight Challenges, especially those in Skellige. At least you can redo them as many times as needed. You can't take more then 2-4 hits from them and the timing is a bit different for every fight. Learn the timing and pattern of the fighters and be prepeared to lose a few times.

Counter strong attacks is easy, you will have enough time, but fast attacks are really, really hard. After a successful counter, you can hit them 3 times, then you have to counter again, or back up, but backing up mostly just messing with your timing. Try to get into a "flow" and don't hit the counter button too soon. So counter, 3 hits, wait a bit, counter, 3 hits, wait a bit and so on. It's weird because the two champions there are easy and the normal fights are so hard.

Oh yeah! And don't even talk about that last fist fight in the BaW DLC. Oh boy, that's just plain unfair. :-)

Main game Bosses:

The Battle of Kaer Morhen:

While it dosen't really count as a boos fight, i can imagine that people might have trouble with it. Try to do the pre-quests for it and you get a "Full Crew" to help you with the task. They should be a good diversion. Use elemental Oil for the hounds AND the Wild Hunt fighters (i think). Nothing special and just a appetizer for things to come

Bald Mountain, here is where the "fun" starts:

Ciri against the Crones:

Hands down, that is the most difficult fight in the whole game. Forget about Oils, Potions and your Build, in which you invested so much points in. You will fight with Ciri and it's three against one and they hit really hard. Only way to survive that, is when you overuse her blink ability. Stay mobile, never stay to long at one place. Use your second ability to charge at them, then blink through and hit them in the back once or twice. Then blink away again.

Go for the smaller ones first, because they have less health and leave the fat/tanky one for last. Focus one at a time and when you killed the two smaller/ranged ones, the last one should be "easy". Just hit her twice, blink trough and repeat until she drops dead. If you need a breather, blink in a wide circle around the arena, you will slowly gain health. Well done if you killed them, but here is no time to breath.


Geralt against Imlerith:

You have some time to prepare befor the fight starts. I'am still not 100% sure, but i think it's Elemental Oil for all of the Wild Hunt. Tha't what the offical Prima Guide says at least.Trink your potions, but save some toxicity for healing potions. And make sure to never go near him whitout Quen, he hits like a truck. I mean he even look like a truck. Fight have two phases. The first one should be pretty easy. He is pretty slow, so get to the side or the back of him, hit him a few times and repeat.

When 2/3 of his health is gone he will enter the second phase and suddenly he is super mobile. Teleports around like a madman, have a huge hitbox and 3-4 hit combos. You may die once or twice befor you get the timing right. The trick is to dodge at the right time. Not too soon and not too late. He will teleport right behind you, then start his combo, roll away every time he teleports to you, then wait for his combo to end and get behind him when he is breathless for a few seconds. Hit him as hard as you can, repeat that until he is finally dead.

You could use bombs like Sanum to blind him, but don't get hit during the animation. Gratz for beating that "guy", really love that fight. \o/


On Thin Ice:

Ciri and Geralt against Caranthir:

The main story coming to an end and so is your Death March Archivement. Soon. I think the next fights are way easier then the one from Bald Mountain, especially this one. I have to admit i can't even remember it that well. Fight have two phases. First one is Ciri against Caranthir. Pretty straight forward and way easier than the three Cones. Charge at him, be mobile, blink through him and hit him in the back. You just need to finish him until he have around 1/3 of his health.

Now is the time Geralt steps in, he can thank Ciri for beating him up already. Be mobile, dodge his magic and roll near him, get a few hits in and he will teleport away. Rinse and repeat. When he have about half health he will summon an ice elemental. Use that as a pillar against Caranthirs magic and finish him.


Geralt against Eredin:

Here he is! The big boss. The leader of the Wild Hunt. The man Geralt and Ciri are hunting down for the entire game. I really love that fight. It's long and demanding, but never unfair. You have to dodge mechanics and holt up your concentration for some time. Doing so and you will see, you wont have much trouble beating him.

Two phases again. First one is a lot like the second phase in the Imlerith fight. He teleports behind you and doing his combo. Dodge/Roll away and go for his back, hit him a few times, rinse and repeat. Use Quen and Igni to destroy his shield. you should know the trick from Imlerith. When he is around 25% of his health, both will be teleported to a special arena.

Here is where the fun starts. Recast Quen when it breaks, stay mobile and never be in front of him. He has two special attacks. One where he teleports to the side of the arena and casting a frontal cone of magic energy towards your direction. Stay to the side, get to his back and hit him until he teleports. Next shockwave splits into three. Same as above. Stay to the side and get to his back until he teleports away.

Second special attack is when he teleports to the side of the arena (surprise) and starts to summon magic mines unter your feet. Get close to him while rolling. Don't stay still. Never. Hit him while dodging the last mine and fight him like in the first phase. You have to do that for a while. When he just have 10% left you will be telported back to the ship. Finish him of for good! Well done! The threat is over! Ooooooor is it?


Monster and Boss fights from HoS
I really love that DLC. Great quests and challenging fights. Either you wait with HoS until you finished the main story of the base game and then play the first DLC afterwards, or you do it befor the end of the base game. Really up to you. I did it after the main story. The first quest is lvl 32 and you don't want to be unterleveled for that one. Believe me. Again. Heavy spoiler incoming.

Monsters:

There arent many new enemies, just two i think. One of them can be pretty nasty. The Arachnomorph. A spider-like enemy with a ranged attack, which can root you. The always come in numbers, so keep Quen up and be mobile. It's hard to close the gap because the keep backing up and you can't really hit them, but when you finally catch up, you can easely stunlock them until they are dead.

Second threat in the "new" areas are large group of Fallen Knights. You always have to fight 5-10 at the same time. They are well armed, have a lot of health and hit pretty hard. Bombs working wonders here.


Bosses:

When you already had trouble with base game bosses you will have a hard time here. Make sure you have a good gear, all Superior Items and a good build. HoS on Death March is no joke.

Evil's Soft First Touches:

The Toad Prince:

First boss sets the tone already. I could had an easier time if i guessed the Oil, but that wasn't the case for me. Use Cursed Oil, Golden Oriole, Quen and don't try to get to it's back or to it's side, but don't stay in front of him either. More in the area of one of it's eye, if you know what i mean. When you do otherwhise he will jump into the air and push you away, breaking your shield. Dancing Star will set him on fire and so does Igni. Make use of them. Try to stay close to him, while still avoiding his front. you will know what i mean when he you shoots his tongue at you. This fight is all about patience. Keep it up and he will go down at some point. But there really isn't much time to breath or celebrate.

Ofieri Mage:

While you don't have to fight him and could run away, you will miss a nice fight if you do so. He looks pretty weak, don't you think. At least that's i've been thinking. First task is to even get to him, second to even get a hit befor he teleports away, third is do avoid all his magic while killing the adds. Adds die like flys at least, but that's the only good thing here. Hard to believe, but he is human, so use the proper oil. So kill the adds, avoid his magic, try to get close to him, keep up Quen, don't get hit by the Sandstorm he summons, hit him when you finally get close, rinse and repeat. He don't have much health at least. Oh, and don't throw bombs at him.

Scenes From a Marriage:

The Caretaker:

Welcome to my most favourite quest in the DLC and second most favourite quest in the whole game. Whole quest remindes me of a SoulsBorne game. Great storytelling, great scenery and you have the "honour" to fight 3 bosses in a single quest. One of them is very, very hard if you do the archivement as well. First boss is "The Caretaker". He looks really frightening and tough, but he is pretty straight forward, slow and predictable. He will swing his monstrous shovel your way, doing 4-5 hits befor he charges a frontal-cone-attack in your direction. So don't stand in front of him. After his cone attack, he will be out of stamina for some time, so get behind him and start hitting, until the ground starts to glow, back up, rinse and repeat.

When he hits you, he will heal himself, so try to avoid that, Quen also works. Don't bother with bombs, he won't even blink when you hit him (man, i'am so funny today). At certain points he will summon dead spirits from the ground and try to kill the adds for health. Kill the adds befor he can get to them. All about patience here. He will drop dead at some point. He is a relic by the way (wink, wink).


The Wraith from the Painting:

Not much trouble her, beside the scare factor. It's your typical Wraith fight. You should know how to beat those by now. When a painting starts to glow, hit the painting. Should be over soon.

Ethereal:

There is an easy way to do this and a hard way. Creature class is Spector, but it's more something from a nightmare coming straight at you. The boss itself consists of 6 copys of the same nightmarish creature. 5 of them standing still and doing nothing, until you hit them. That's the easy way. Just fight the one copy, avoid hitting the others until it's dead. Easy peasy.

For the Archivement involved you have to fight all 6 at the same time and you can't kill any of the copys befor all 6 are awaken. That's the hard way. Circle around, don't get close, hit a copy and back up. When you get to close to them, they charge at you and likely kill you in the process. When all 6 are awaken, try to cluster them and throw either a Northen Wind or a Dancing Star at there feet. I prefer Dancing Star. When the are burning, or some of them are, recast Quen, use all your potions and just finish of as much as you can. If some are still standing just repeat it. Hope that works for you. Otherwhise you could change to easy, get the archivement, then redo the fight on Death March with a single copy and go on, but where is the fun in that? Anyway. Congratulations!


Monster and Boss fights from BaW
Might be the best DLC i have ever played and i have played a lot of games in my life. It also involves my most favourite quest in the whole game and that one is even missable. It does everything right. Serveral new enemies, nice boss fights, a wonderful new questline, a lot of interesting side quests and the most beautiful area you can think of. When you come here from the war-ridden Velen, or the rough islands of Skellige it's just stunning. You will be running around with your mouth open and wondering if it's even the same game anymore. Very well done CD Project! I recommend doing the DLC after the main game and after HoS.


Next good thing about the DLC is the aditionale stuff you can do to boost your DPS. There is nothing else you can wich for. First one is the Mutations you can develop, which are just insane as described already. Just do the main quest line until a kid brings you the massage, then do the related quest. It's a lvl 35 quest called "Turn and Face the Strange". See for yourself what's possiple after doing so. Second one is the Grandmaster Gear plus Bonus. They are lvl 40 quests and you also have to be lvl 40 to wear them. After does two upgrades nothing will stand in your way anymore!

There still some bosses on the way, which i will descripe here. Overall monsters should not be a problem in the DLC after the upgrades anymore and you should not encounter many befor them.

BaW Bosses:

The Beast of Toussaint:

Golyat:

The new DLC throws you right into it. 3 Bosses within the very first quest in the new area. First one is Golyat. Don Quijote sends his regards here. You have to fight a giant, the size of a windmill. There is an easy and a hard way to that, both are really straight forward.

Easy way first. It unlocks a archivement. It's the only way to get it. Bring a crossbow. Aim at his head. Shoot. Gratz, you won the fight and earned the archivement!

Hard way next. Fight him. Man versus Giant. Geralt against Golyat. Ogroid Oil, Quen and Potions. Don't stand in front of him for obvious reason. Keep your distance and watch his movements. He don't have many different attacks. All involve his giant club. It'a all about patience again. Go in after his action, hit him and get out. Rinse and repeat.


The Bruxa of Corvo Bianco:

Second one is a little bit more demanding and mobile. Vampire Oil, Quen and Moondust Bombs work wonders here. So is a Black Blood Potion, for an easier time. With all that in mind, just stay mobile again, keep Quen up and use your Moondust Bomb if you want. She has a lot of health, but it isn't the hardest fight in the world. She is very mobile, so try to catch up with her and make your hits count. She should drop dead soon enough.

Shaelmaar from the Emperor of Nilfgaard:

Last fight in that quest is a Shealmaar. Relict Class. A really anoing fight but there is a simple trick to it. He likes to roll at his foes, so you can take that to your advantage. Lure him to roll at you and get away. He will hit a wall, roll over and expose his belly. Just finish him of. If you are really suicidal you can fight him head on, if you wish (literally). You could use Aard as well, but that's like cheating. After that very long quest there is another one right away and that's the most challenging fight of the DLC coming up.

Blood Run:

The Beast of Toussaint:

Welcome to the most challenging fight in the whole game yet, beside the Crones. There is an very, very easy way and a hard way to do it. For the easy way just let him "kill" you. You can't lose here. A good friend of you will step in and end the whole fight, but you will miss 1000 exp and a great combat.

Let's do it the hard way then. Man versus Higher Vampire. They are the most challenging monsters in the whole world of "The Witcher". They are practical immortal and have all the time in the world to practice there combat skills.

Vampire Oil, Quen, Black Blood and other Potions will make the difference here. He teleports all over the place and mostly use multiple hit combos. He has a charge attack, recognizable when he winds his arms above his head, dodge that. He has a ton of health and can down you with 2-3 hits. You need high concentration and patience for this one. Watch his movements, while always be on the move yourself and look for opportunities to hit him. Don't hit him more then once, wait for his teleport and hit him again. When he is regenerating just hit him and he will stop.

Just take your time and be really careful. There is no easy way to win this fight, only your pure skill. Congratulations if you "killed" him. After that fight you can do the Quest "Turn and Face the Strange" to get your Mutation, if you didn't had done it already. Nothing should stand in your way after that.


After that it's only groups of humans where you can make good use of Oil, Bombs and Whirl. Vampires, including another boss fight against a Bruxa and an optional against an Aplha Garkain. Nothing special by now if you use Moon Dust, Vampire Oil and Black Blood Potions.

Nothing should stand in your way anyway after your Grandmaster Armor and your Mutation. Also some very unique fights if you choose a certain path in the main story. I don't wanna go into detail, but that's actually the best part of the whole Dlc. Why would you choose the other path? ^^
Then there is an ultimate fight against Dettlaff.


Tesham Mutna:

Dettlaff against Geralt. The ultimate Endfight.

Here we are. Here is where the game takes another turn to Dark Souls or Bloodborne Boss Battles. A very mobile an challenging foe, which you have to fight in three phases. The last phase gets you to a very cool Arena to fight in. You have a little time to prepare, the fight starts when you go near Regis and Dettlaff. So get your Vampire Oil and Potions ready:

First phase is very short and not much different then the first fight against him. It get's serious after he did lose some health. Be mobile, use Quen and healing potions. He will try to drop on your head, so get out and hit him while he recovers from the attack. Hew ill leave little traps on the battlefield, so try to avoid them.

Then the third and last phase starts. He will transform to it's final (?) form, he hits very hard and fast. But your goal isn't the add itself, you want to kill the nodes around the Arena. There a three of them. The add is respawning and pretty straight forward to kill if you need a breather. Congratulations, you won an heroic battle!


Honorable mentions:

Hanse Bandit Camps:

There are 3 of those in the entire Dlc. These are practical Bandit Camps, each leaded by a brutal human, who is the main enemy to defeat. When you defeat him, everybody alive will surrender at the base will become a hub for the toussaint knights.

To get to the "boss" is the hard stuff here. He is mostly surrounded by hordes of bandits. If they notice you, one of them will become a "Runner". This "Runner" will try to reach a Signal Fire and he will try to light it. You don't want him to reach it, believe me.

So kill the "Runner" as soon as you see him, then kill the bandits until you get to the boss. He mostly is on higher grounds somewhere. If the "Runner" reaches the Signal Fire you will be swarmed by hordes of bandits. Just use Whirl and Bombs if it's happen.

New Game +
I just decided to add a little Section for New Game +.

You will unlock that mode when you completed the Story of the Main Game and did see the credits.
You still can play after you completed the main game and start a New Game + from any savegame you have after that. Even from the Dlcs at a high lvl. You can unlock the Death March and any other Archivement on New Game + as well.

Min lvl for New Game+ is 30. If you managed somehow to be lower then 30 after the story, your char will be scaled to lvl 30 for New Game+. After the BaW Dlc you should be lvl 53 and New Game + will start with lvl 53 then.

Everything will be scaled to your lvl. So i you start with lvl 30, everything should start around lvl 30. If it's monster lvls and quests. All Crafting diagrams will be scaled as well. There are new legendary version of all the Witcher Sets in New Game+.

You will get a free Potion of Clearence at the start of New Game +, if you want to reset your Ability Points.

Items and stuff you will take over form your old save:

1. Most of the Items, Stuff for Roach (except the Trophy), Weapons and Armor equipped on you, or thats been inside your Stash
2. All Food, Crafting Mats and Alchemy Ingredients
3. All Potions, Oil, Bombs and Decotions already developed
4. All Alchemy Formulars known and developed, except 4 of the Quests Fomulars (you can keep the Shaelmmar bait for some reason)
5. All your Abilities and Abiliy Points
6. Mutagens (beware there is a Mutagen Bug, where you will lose all your Mutagens except one of each sort)
7. Your Mutation and all developed Mutations
8. Your max possible Toxcity lvl should be 323 with the 2 Abilities and the Manticore Gear now.

Items and stuff you wont take over from your old save game:

1. All Glossary Entries including Bestiary, Tutorial Character and Book entries. Also all your Craftin Diagrams.
2. Every Items not on your Character or inside your Stash including all the stuff on Weapon, or Armor Racks, in Corvo Bianco
3. All Trophies, Books and Quest Items (finally)
4. All map exploration, points of interest, fast travel points and such
5. All your Gewnt Cards
6.All the Places of Power will give you another Ability Point again \o/

So, if you took over a BaW savegame like i did, you will need some new Armor and Weapons soon. Because the Grandmaster Gear is lvl 40 and there soon will be better stuff from drops and Crafting Diagrams. So say goodbye to your Grandmaster Bonus until the New Game + Version of it. Toxcity lvl should still be high enough, for three Decotions and the Basilisk one, without the Manticore Gear, so don't be sad.

So you can enjoy the whole game again, with all the Formulars already optained, get New Gear and do all the quests again, or just run trought until the end. Have fun!


Epilogue
Finally! The end! Well, there is new game+ next. ^^

I hope you did enjoy the guide and i really hope i could help you. It took longer than expected and a lot of research and time went into it. If you have any questions or see some wrongdoings on my side, fell free to comment. If i should put anything else into the guide just tell me.
I doubt there ever will be a german version, but you never know. We can talk about it, if there are enough people asking for it. ^^

Most important thing is that you enjoy the game. There is so much hidden stuff and memorable moments in the game i will never really forget and never wanted to miss.


28 Comments
Spaniard Jun 16, 2024 @ 12:14pm 
Thank you!
Saiun  [author] Jun 16, 2024 @ 11:41am 
@ Spaniard: Sure, you can die and probably will die a lot. The only thing you have to do is play the game from start to finish with Death March difficulty on and never change it.
Spaniard Jun 16, 2024 @ 11:08am 
Is it OK to die even once on Death March to get achievement?
Saiun  [author] Dec 15, 2020 @ 4:02am 
@PeferG17: Yeah, there are so many ways to make a great build. With a bit more balance it would be even better.
PeferG17 Dec 14, 2020 @ 4:27pm 
First Deathmarch platythough was a crazy Igni stacking Griffin build, tons of fun, great against mods... total dog shit against bosses except the ones weak to fire like Shrieker... that bitch had a 10K dot on him and he melted...

Second Deathmarch playthrough was just LMAO Quen Build Bear Armor...
Revan579 Aug 13, 2020 @ 12:06am 
@Saiun He basically did just write a small guide, making a hypocrite of himself. Guides don't exist just because the game is difficult or not. I followed this guide because I wanted to be hitting 10,000 damage crits just for the hell of it. Many people also just like reading guides.
Saiun  [author] Aug 12, 2020 @ 7:24am 
Cool story bro! You should write a guide!
MULTIPASS Aug 12, 2020 @ 6:52am 
This game was easy as hell, I don't understand why so many people felt the need to make "guides" for it.

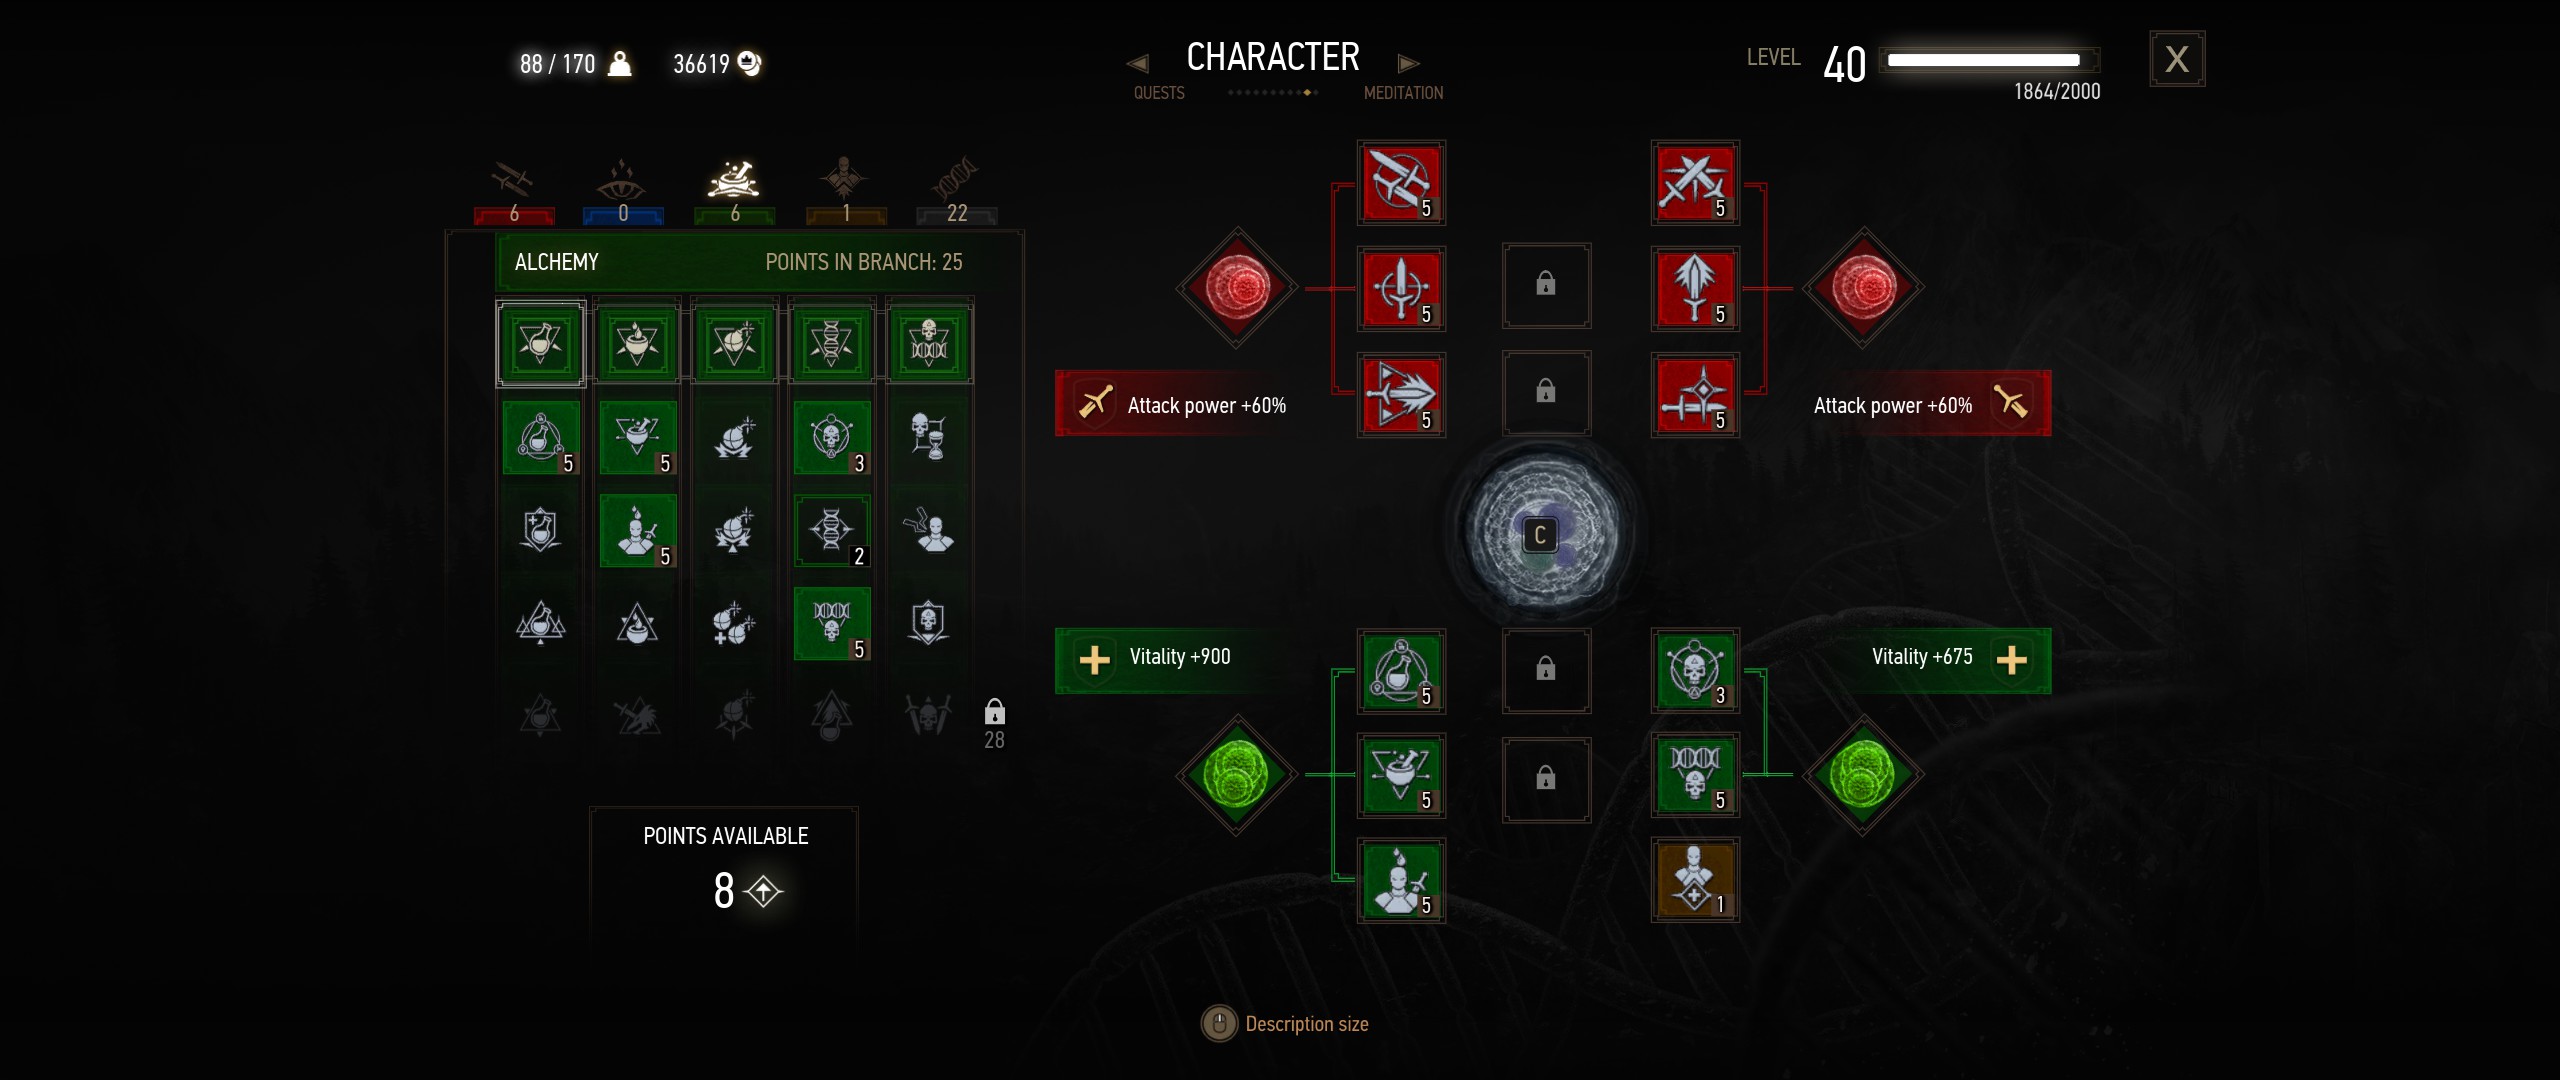
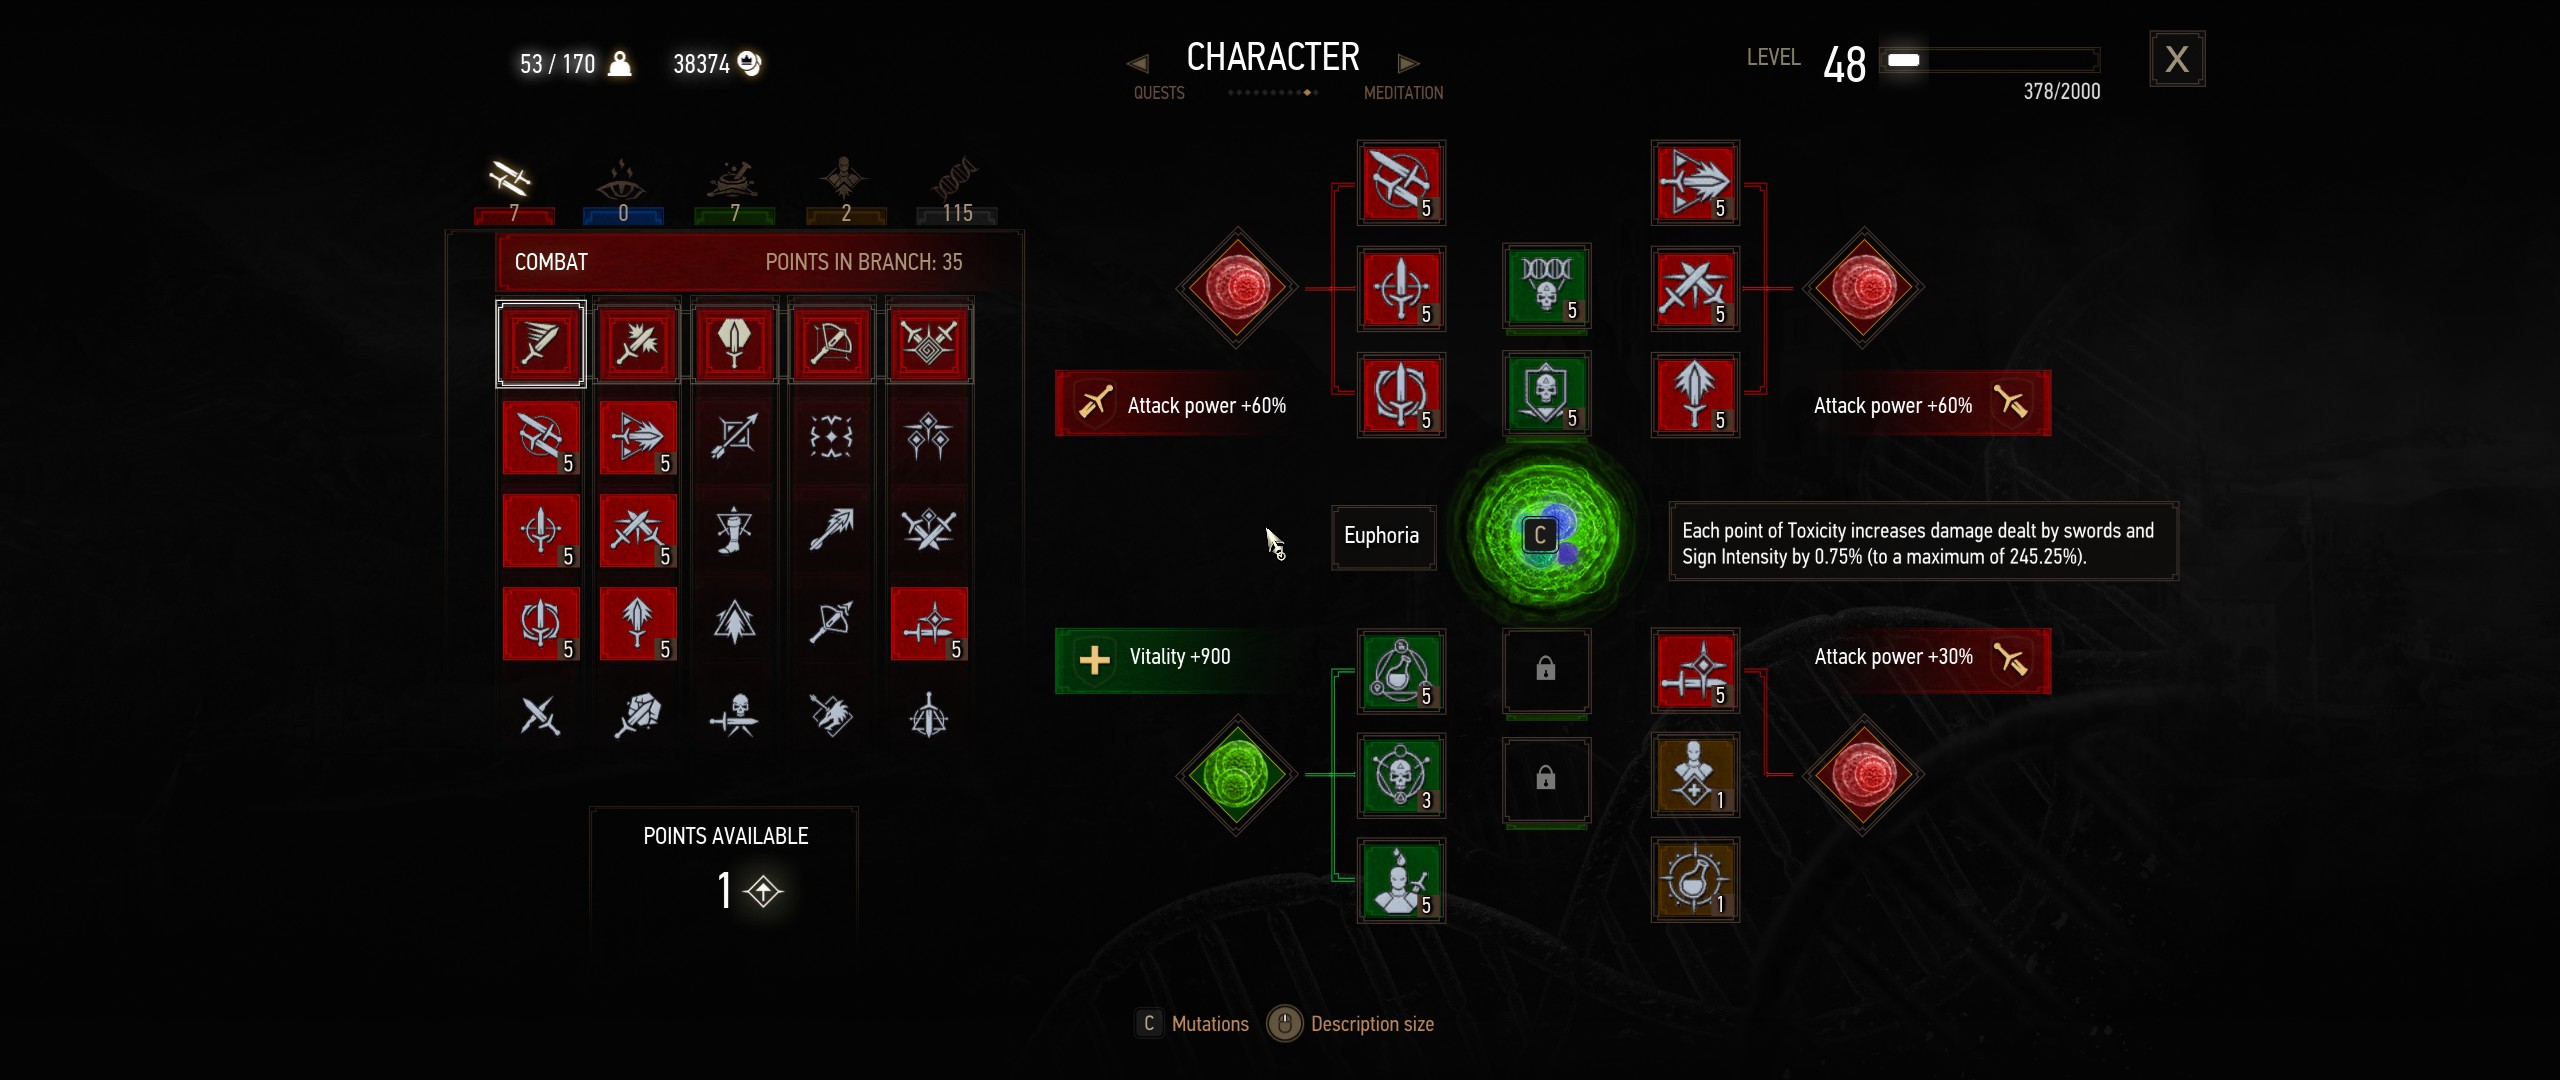
Level 1, first place of power before the the quests even really start: gryphon school techniques. You can now be invincible against normal combat damage every 3.34 seconds.

Dodge everything, because you have no resource limitation and the iframes last the entire animation.

Face-roll fast attacks into enemies, their hit reactions break their attack animations almost every time and your attacks are faster than theirs.

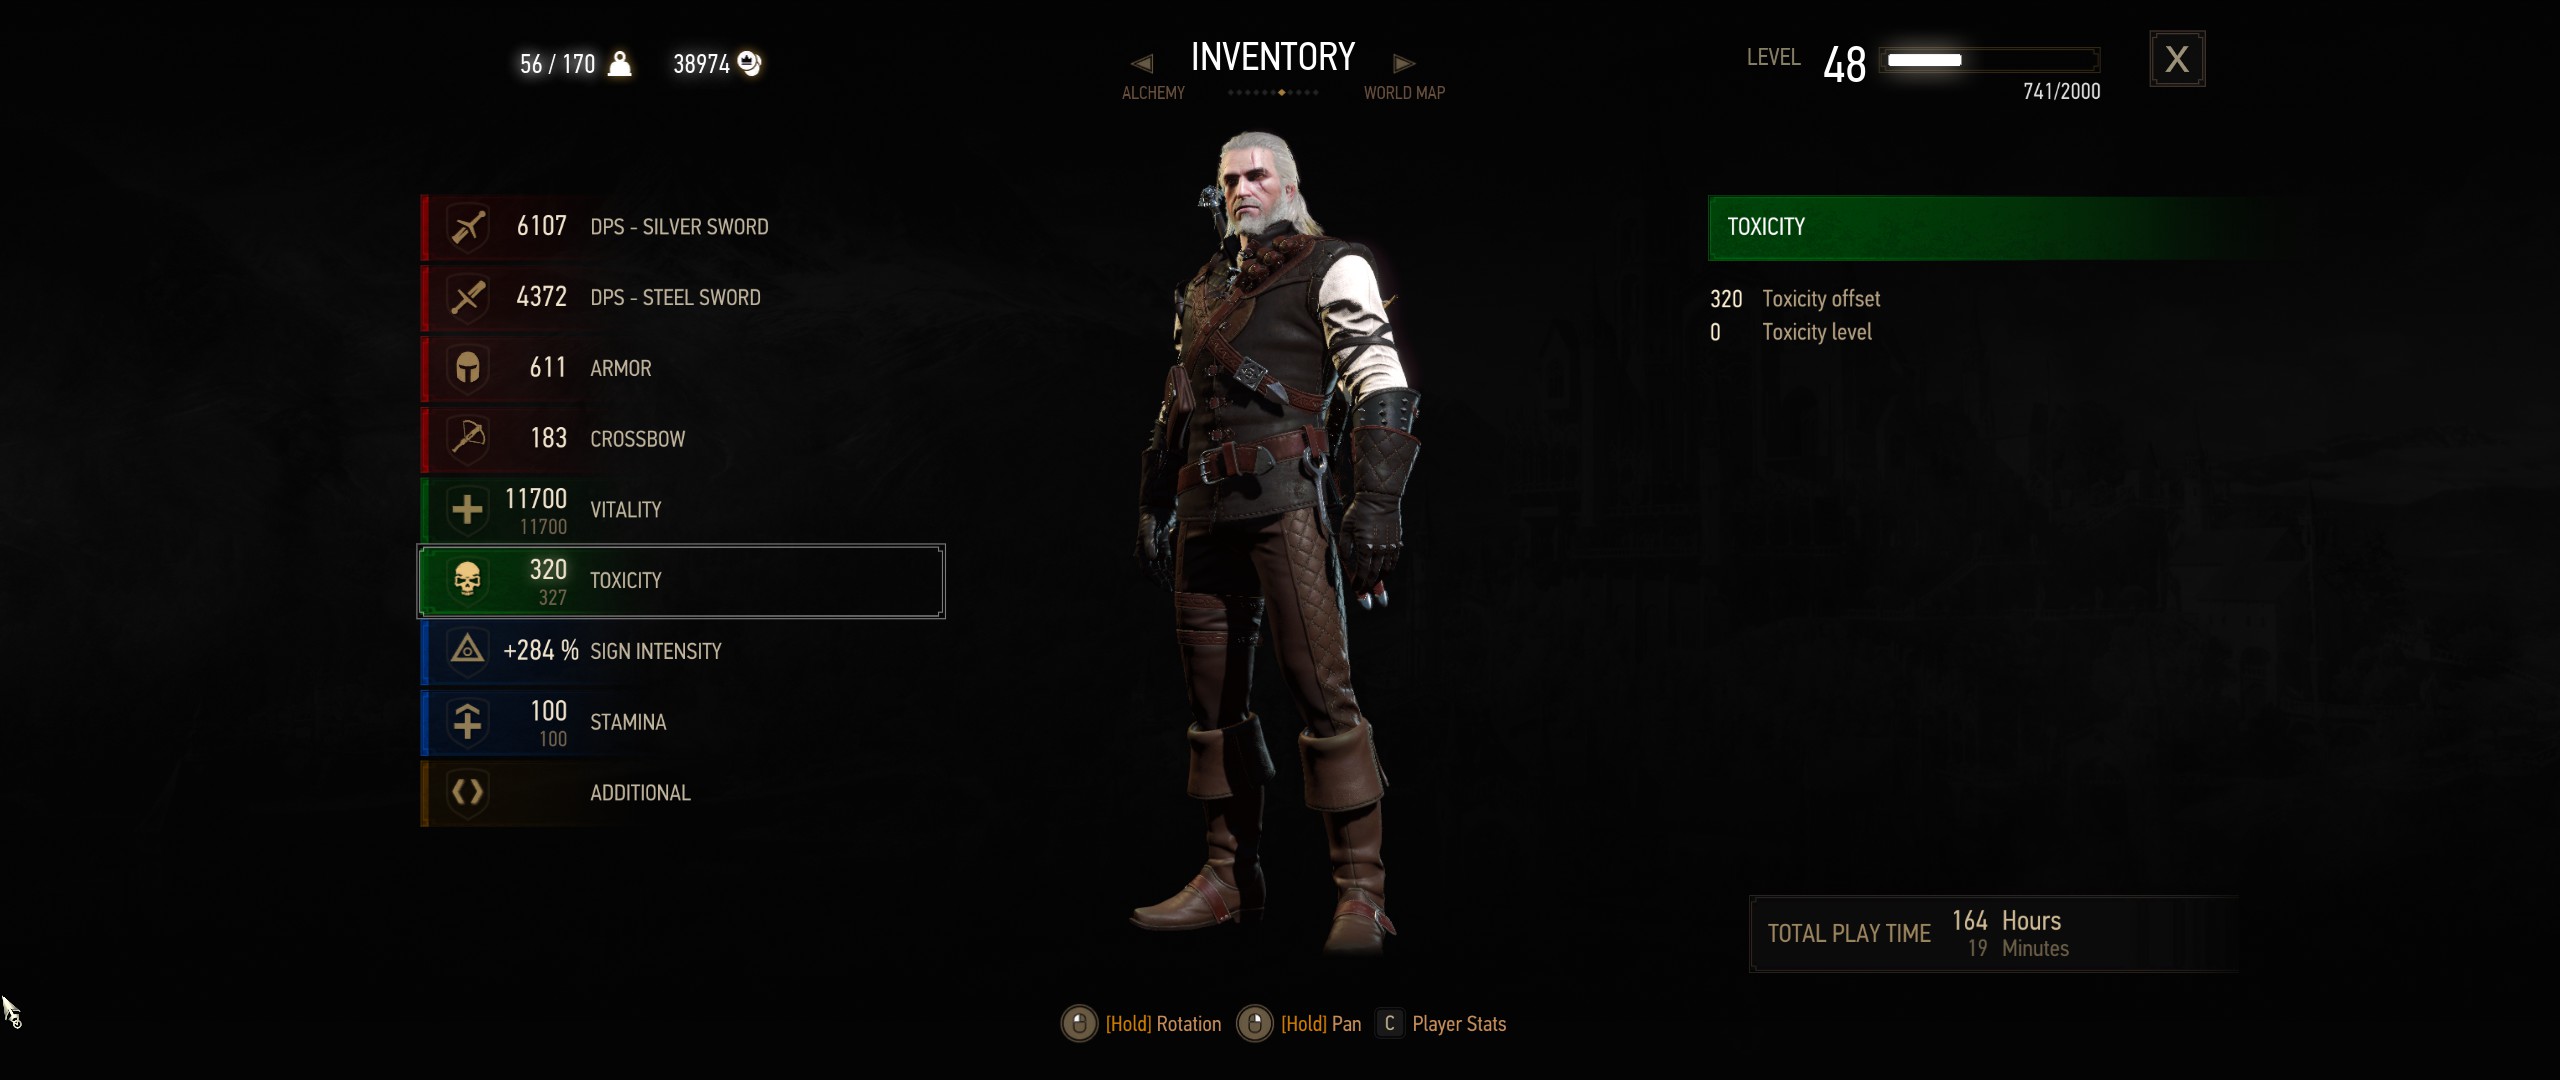
Heal instantly with potions and refreshment - pause the game and drink them in your inventory screen if you want to. Use white honey to clear toxicity if necessary. You should have enough to fully heal yourself (instantly, with combat is paused) 4-5 times over per fight. When you run out, just meditate and get them all back.

The fundamental mechanics are tilted so far in favor of the player it's ridiculous.

Revan579 Jan 14, 2020 @ 11:57am 
The sad thing is that I finally got my build to the point where it pretty much maxed out its potential... and I got bored. Turns out that the journey is the actual fun, not the destination. Still extremely cool to have done all of that. Still wish that Death March was actually hard.
Saiun  [author] Dec 31, 2019 @ 5:30am 
@Companion Cube: I'am glad you enjoy the game. It offers so many details, easter eggs from movies and other games and many special moments. People should not rush through the game with there eyes closed. ^^

I really hope Cyperpunk works out well for CD Projekt, so they can make many more games in the future. My expectations and those from others are already pretty high i guess.