Rabi-Ribi

Rabi-Ribi

138 ratings
100% MAP & 80/80 EGGS WALKTHROUGH!!! [MAIN GAME + DLCS]
By AngryMexicanDog
A guide to get every egg and see every room in v1.99 .. before the dev decides to add even more rooms and eggs

This is a work in progress, that means it is still incomplete and there might be a few errors here and there because English is not my first Language
8
   
Award
Favorite
Favorited
Unfavorite
FIRST WORDS
My name is MISTAR AngryMexicanDog (Already changed my name) and this is the first time I decide to make a full guide for a game actually the second if I count my failed Hyperdimension Neptunia (Latin America Spanish patch) Guide I never finished...I'm sorry for not finishing my guide with you Waifu Bot MK. II

Long story short, I wanna thank AlexSSZ from rabidb for his amazing website and かずねちゃん for his/her amazing guide with the location of every egg (I still had to use google to translate stuff because my Japanese is rubbish. Both of them made it possible for me to achive 80/80 eggs and 100% MAP completion even.

Now I want to help others to achieve the same results in a faster time.

https://steamcommunity.com/sharedfiles/filedetails/?id=1660670393
http://rabidb.com

IMPORTANT STUFF TO MENTION:

  • If you see visual differences that is because I am currently playing with visual mods such as U.I. changing mods, a different starting outfit for Erina and a different texture for the Hammer (it is a sword).
  • I am playing with all the DLCs
  • At some point you will see me playing with a dark dress. You need to buy the BNC DLC to the dress.
  • The dress is naturally unlocked during Chpater 2
  • You can obtain it later in the game but there is a cheat code which allows you to wear that dress after chapter 1. I press L Magic Change + Right Magic Change + DOWN during the [NEW CHAPTER SCREEN]
  • You can only activate that cheatcode if you already have the "Welcome Everyone Achievement" AKA Defeated and Recruited character.

THIS GUIDE WON'T CONTAIN:

  • A complete strategy guide for every boss - I have only finished the game in Normal and Novice mode. If I decided to play in any higher difficulty, this guide would consume even more time.
  • An ultra detailed guide of every room - rabidb already has in detail the information of most rooms in the game.

WHAT THIS GUIDE DOES:

  • Guide a player with no knoledge about secret techniques...that means there are no sequence skips to get everything faster.
  • Try to give the player all the mobility power up as fast as possilbe ASAP.
  • An aproximation on how to obtain every item, obtain each egg and visit every room.
  • Show an approximation on how much progress a player has done (map, items and eggs)
  • An aproximation of the route I took to get every item I could. I am not showing rooms I souldn't access because I was missing a power up nor am I showing them how to use secret techniques to reach an item.
PART 0 - PROLOGUE
Location - Hospital???


ITEMS
EGGS
0/0
0/80

THINGS TO DO
  • Climb the boxes and then go left.
  • Go to the top floor and trigger the cutscene
PART 1 - STARTING FOREST AND SPECTRAL CAVE
STARTING FOREST

THINGS TO DO
  • Get the Hammer
  • Beat Cocoa
  • Get the carrot bombs
  • Beat Ribbon - Get Ribbon

Erina will wake up the the leftmost part of the forest.

  • Just walk to the right until you fing a hammer (a sword in my case because I'm playing with visual mods)


Keep walking to the right until you see a hole you can't jump over. You will be forced to fall down.


Keep walking down to the next screen and you will see a save point and a warp point


  • Walk to the right a little bit more until you see a dead end.
  • Strat jumping the platforms until you see a spring
  • Go the left into a room with 2 enemies and another save point.


BOSS 1 - COCOA


Originally posted by author:

Just attack her. At some point you will unlock another hit for your hammer combo.

Your reward is the Carrot Bomb


  • Return to the save point and use the carrot bomb in the ground block
  • It will reveal a new floor where you can get you first HP UP
  • Use the bombs again and return to the warp point


SPECTRAL CAVE

Just walk to the right until you see a save point. Use you carrots on the enemies to level them up (the carrots will explode faster).

Go a few screen to the right and you will fight your second boss.

BOSS 2 - RIBBON


Originally posted by author:

YOUR DAMAGING COMBO IS:

triple hammer attack followed by a hammer drill (attack + UP) followed by am aerial - hammer drill (attack + DOWN)


After you beat ribbon she will become your ally (long range attack). Proceed to the next room just to be greeted by a wall too high for you. Return to the warp point


Go to the left and fight the Miniboss. After you finish the area you will be sent to the next area


Originally posted by author:

Get used to charge Ribbon while walking and while doing a combo

You can release Ribbon during or after a combo if the opponent is not invincible

END OF THE CHAPTER SUMMARY

TOTAL MAP COMPLETION
EGGS
2.17%
0/80

Originally posted by author:

ITEMS
  • Hammer
  • Ribbon
  • HP UP X1


PART 2 - RABI RABI BEACH AND RAVINE
THINGS TO DO
  • Collect various items
  • Beath Ashuri 1
  • Get the Sunny Beam
  • Reach Rabi Ribi Town

RABI RIBI BEACH


Just walk to your left and you will see a mana potion and a save point. Get it.
Walk ahead and you will activate another miniboss and the BOOST mechanic.
After the battle is over go back (right) but don't jump, you will get another MANA UP


Jump over the piramid but don't go in, there is no need yet. Instead break a block at the bottom of the pyramid to get a PACK UP.
Go forward a few screens and use a bomb above the HP UP to get it
Keep walking left and fall through the hole to get the Health up badge


Get back to the beach and go ahead (left) for a to save your game and fight another boss


BOSS 3 - ASHURI


Once you finish the fight go to the, climb the platforms and go back to the room where you fought Ashuri to get the Sunny Beam (Yellow Shoot).
Keep walking to the left and just before the bridge destroy the blocks.
Drop down and get an ATK UP
Use the spring to go out.
Keep walking left to go to the next area


RABI RIBI RAVINE


Just walk to the right and get activate the cutscene
Go to the next screen and go to the save point
Drop down and then go to the right
jump to the platform and activate a bomb to get access into a new room
Get the PACK UP


Just walk to the left and leave the area.
Reach Rabi Rbi town to end the chapter.


END OF THE CHAPTER SUMMARY

ITEM %
TOTAL MAP COMPLETION
EGGS
6.93%
4.92%
0/80

Originally posted by author:

ITEMS
  • MANA UP X2
  • HP UP X1
  • PACKUP X2
  • HEALTH PLUS BADGE
  • SUNNY BEAM
PART 3 - PARK, BRIDGE AND GRAVEYARD
RABI RIBI TOWN

THINGS TO DO
  • GET CONSUMABLE ITEMS
  • GET THE HEALING STAFF
  • GET THE RABI SLIPPERS
  • GET SPEED BOOST
  • ITEMS FROM THE STORE
  • DEF GROW badge
  • ACTIVE WARP POINTS IN SKY HIGH BRIDGE AND FLOATING GRAVEYARD
  • GEAT AERRINGS


Go outside and meet MIru to obtain some consumable items
Go to the shop as many of the following items as you can:
  • Healing Staff
  • Soul Heart
  • Book of Carrot
  • Max Bracelet


Originally posted by author:
The Healing Staff and the Max Bracelet are the most important items...they could literally save your life in a pinch

After you finish buying, you will get the SPEED BOOST.
Abanadon the town through the left gate and enter rabi ribi park.

RABI RIBI PARK


Walk to the left for a few screens until you reach a save point. Prepare for a boss battle

KOTORI 1
Originally posted by author:
JUMP over her lasers


Once you finish the battle keep going left .
In the next room you will see the DEF GROW BADGE.
Go up and then to the left to activate the warp stone
Go to the right and enter the cave to see the RABI SLIPPERS
Return to the previous room and go up
Keep going up and activate a bomb where you see 3 brown blocks for a HP UP
At the top of that screen activate a bomb to open a secret passage with a hidden egg
Go to the following screen (up) and then right, then up then right.
Walk for a few meters and fall through the hole to enter the URRPC base


In the third floor use a bomb in the left corner to find another egg
At the end of the floor pick up the MANA UP
Go to the last floor and pick up the RABI SLIPPERS (HI-JUMP)


Return to the area where you jumped ...don't go to the base, instead keep walking to the right
Grab the MANA UP


Return to the precious room and then take the left path
Go up
Go to the place of the photo and use a bom to uncover an ATK UP
Keep going up to reach a save point
Keep going up and then to the left to reach SKY-HIGH BRIDGE


SKY-HIGH BRIDGE

Take the path going up.
Reach the room and then go right to find the warp point
go to the next room and activate a bomb in the lower right corner to uncover another egg
Go down 2 screens and activate a bomb in the right to open a new path


Go down another screen and take the left path to return to where you started.
Return to the warp point and then go 1 screen below the room where you got an egg.
Travel all the way to the right to get a HP UP
Drop down 2 screens and walk right.
The next room will contain a save point
Walk another long cprridor and you will reach the next boss


BOSS 4 - VANILLA


Originally posted by author:
She has 3 tactics:

She will spend some of her time flying and shooting bullets to the floor
She will jump around the whole room

After you berat Vanilla, go through another corridor and reach the Floating Graveyard


FLOATING GRAVEYARD - QUICK VISIT


Just walk ahead untill you see a save point
Return a few meters and drop through the hole in the floor
Pick the auto earrings and go to the left
Keep walking to the left untill you see the wall
Jump and get inside. Use a carrot bomb to uncover a MANA UP


END OF THE CHAPTER SUMMARY

ITEM %
TOTAL MAP COMPLETION
EGGS
14.93% OR 16.93%
IF YOU BOUGHT THE ITEMS FROM THE SHOP
19.25%
3/80

Originally posted by author:

ITEMS
  • DEF GROW BADGE
  • HP UP X2
  • MANA UP X3
  • ATK UP X1
  • ITEMS FROM THE STORE
  • EGGS
  • HEALING STAFF - GREEN SHOT
PART 4 - TOWN, CAVE, UNDERGROUND AND RIVER BANK
THINGS TO DO
  • Collect various items
  • Get the Amulet
  • Beat various bosses (Ailus 1, Cicini and Ashuri)
  • Get the ATK GROW Badge
  • Get the Red Shot
  • Get the Bunny Whirl

RABI RIBI TOWN


Finish Buying stuff

SPECTRAL CAVE


WALK RIGHT
USE SPRING TO JUMP TO NEXT SCREEN
GET MANA UP


GO DOWN AGAIN
CROSS THE CORRIDOR

BOSS BATTLE - CICINI

Originally posted by author:
2 PHASE FIGHT


WARP BACK TO TOWN
TALK TO RUMI TO GO BACK TO THE WARP DESTINATION


WARP DESTINATION

Walk a few steps and a boss battle will start. You will also receive the Bunny Amulet (Panic Button)

BOSS - Illusion Alus I


Originally posted by author:
This boss has some skills Erina doesn't have yet


RABI-RIBI TOWN
After defeating the boss, you will be transported back to the town. Don't Accept Cicini´s proposal to be transported to the Gold River Bank, instead travel to starting forest.

STARTING FOREST


RETURN...WALK TO STARTING FOREST
DROP TO THE HOLE
CLIMB UP
WHEN YOU REACH A HEALING AREA GO DOWN
WALK RIGHT
ACTIVATE A BOMB IN THE PLACE OF THE PHOTO FOR ANOTHER EGG
KEEP WALKING RIGHT
DROP DOWN AND GET THE DOUBLE CHARGE
RETURN TO THE HEAL AREA


BOSS: COCOA 2
Originally posted by author:
More of the same.

She will now offer bombs in town for 6k EN

Once you beat her return the forest.
Go to the screen with the Warp point and use a bomb
Go inside to get the DEF TRADE BASGE


Follow the path marked by the map and go to spot 8 to get a MANA UP.
Go up again and leave the forest with the right path.


GOLDEN RIVER BANK


Walk to the right to reach the save point and the warp point
Walk to the right until you see 3 brown blocks which can be destroyed with a bomb, break them and go inside for a MANA UP.
Leave that room and take the path to the right. Go all the way up


Follow the left path to get to the room above the warp point.
You will find in that room the ATK GROW badge.


Return to the previous room and take the upper route.
Walk through the long corridor to reach the save point.
Go up through the next room and reach the BOSS ROOM.


BOSS: ASHURI II


Originally posted by author:
She will fly across the boss room shooting bullets

Once you beat Ahsuri, go the room located to the left to get the Explode Shot (RED).
Go back to the room located after the warp point. Go to the area shown in the picture and fall through the right hole while hugging the right wall.
Get the ATK UP.
Fall down and go to the left


Follow the path until you see a hole. Drop through and go right
When you see a spring jump and go to the next screen
Use the hammer to break the blocks
Get the Bunny Whirl (jump attack) and use it to break the block above.
Return to the previous room and go right
When you see another spring use it to go up.
Walk to the right and use a bomb on the block above the pillar to get a HP UP
Return to the previous room and walk right to leave this area.


**FORZEN AREA FOR SAYA --> GET QUICK BARRETE
** GO TO CICINIS BASE FOR SLIDING DASH

END OF THE CHAPTER SUMMARY

ITEM %
TOTAL MAP COMPLETION
EGGS
23.03%
15.5 %
4/80

Originally posted by author:

ITEMS
  • MANA UP X3
  • BUNNY AMULET
  • DEF TRADE BADGE
  • ATK GROW BADGE
  • GET THE EXPLODE STAFF
  • ATK UP X1
  • HP UP
  • BUNNY WHIRL
PART 5 - LAB, SNOW LAND, PYRAMID AND WARP DESTINATION
THINGS TO DO
  • Get the WEAKEN badge
  • Get the sliding powder
  • Get the Bunny Strike
  • Get the Quick Barrete

EXOTIC LABORATORY


WALK TO THE RIGHT TO GET TO THE SAVE POINT
KEEP WALKING TO THE RIGHT UNTIL YOU REACH THE STARS
GO UP, FOLLOW THE WHOLE PATH (LEFT) TO GET THE WEAKEN BADGE


RETURN TO THE STAIRS AND GO DOWN
GO THROUGH THE CORRIDOR
GO INTO THE SMALL ROOM AND USE A BOMB TO OPEN A SMALL SPACE TO GET AN HP UP

FALL DOWN TWICE TO REACH THE SAVE POINT
GO TO THE RIGHT AND GET THE SLIDING POWDER
Go to the room at the left of the save point.
Go throught the corridor to encounter a miniboss


Climb the platforms with the lacers
go all the way to the top to get an HP UP
Slide through the samll gap and you will fall into another room. Go to the place where you see the egg and slide
Go forward to the healing area (the next room is a warp point and then a miniboss room)


Originally posted by author:
The miniboss will become a disk of energy and is untouchable during a small period of time

Keep walking right untill you see the stairs. Take the bottom path and then go right to reach the save point.
Activate a bomb in the right corner to open a new room.
Inside the room just pick up the PACK UP
Return and take the left path
In the middle of the corridor you will see a block. Use a bomb to destroy it and get the ATK UP
Go to the next room (computer room) and you will be sent back to the town


RABI-RIBI TOWN
Visit quickly the shop. Talk to Mirmiam (the owner) and then leave. She will give give you the Bunny Strike.


Originally posted by author:
I recommend to upgrade the charge ring up to level 3 and the bunny amulet in case you haven't done it

AZURE SNOW LAND


Take the Warp point in the town and go to the Park
Walk left and you will reach the Azure Snow Land
Walk to the left to see a save point and an HP UP. Use a carrot to open a way.


Go throught he whole corridor (go up).
In 2 screens drop through the floor to get the Quick Barrete
Return to the previous romm and go to the room in the left to see a MANA UP
Use a bomb in the wall to break it.


Keep going left untill you see a Save Point.
Get ready for a Boss Battle


BOSS: RITA

Originally posted by author:
She will jump and throw her bullets like shurikens and diagonal angles.

Once you beat her go to the room to the left and then go up to find another Warp Point.
Break the wall in the left and slide. Get the egg in this room.
Go back to the warp point and return to the town


END OF THE CHAPTER SUMMARY

ITEM %
TOTAL MAP COMPLETION
EGGS
29.30%
19.95%
5/80

Originally posted by author:

ITEMS
  • WEAKEN BADGE
  • HP UP x3
  • ATK UP x1
  • MANA UP x1
  • PACK UP
  • Get the sliding powder
  • Get the Bunny Strike
  • Get the Quick Barrete
PART 6 - SYSTEM CORE, LAB AND SPECTRAL CAVE
THINGS TO DO
  • Get the Air Jump
  • Get various items
  • Get the cellphone
  • Get the Tough Skin badge
  • Get the Crystal Flower

RABI-RIBI TOWN


Return to the Town to activate the next EVENT (Talk to Rumi)


WARP DESTINATION


Walk to the right and beat the human enemies. At some point you will trigger a 2 part Boss Battle

ALIUS 2 BOSS BATTLE

Originally posted by author:
The first fight will be against Erina

The second fight will be against Ribbon


SYSTEM INTERIOR


After being forced back to Rabi-Ribi town, use the warp point to reach the beach.
Warp to the beach, walk all the way back to the save point at the middle of the stage and cicini will appear


Warp back to the exotic laboratory and go back to the computer room to reach the System Interior.


Walk to the right to fight a miniboss and then reach the save point. In the save point room go up and then left to find the Air Jump


After getting the air jump return to the save room and go right the big area.
First go to the right to get an egg and then go up for the MANA UP.
Then go left and up to get an ATK UP. Break the wall where you see a red X.


Go to the next room (left) and go all the way up and walk through the wall in the right.
Use a bomb to break the floor in the next room.
Walk to the right and go up.
Pick the HP UP at the top.
Go down and slide in the left wall.


Walk the whole corridor to the left and you will reaach a room with lave in the floor.
The next floor has 2 paths, a hidden path to the left (you need to double jump) with some invisible platforms with a REGEN UP and a path down filled with lasers (The correct path).
First go to the left path, then go down and climb again using the right path to get a PACK UP.
Go down and then right to find the save point.


BOSS: SYARO


Originally posted by author:
Double Jump and quick drop

She is immune to physical damage


Once you beat Syaro go to the right to andfollow the path to get the Crystal Flower and leave return to the computer room.


EXOTIC LABORATORY


Go back to the stairs and go to the upper floor to get the ATK UP. Bomb the right wall.
Return to the left stair area and go to the left. Keep walking to the left and double jump in the platform to get an egg.


Back track to the left and go where you got the hp up...slide again and use the second jump to go to the left while falling to get a MANA UP. Warp back to the Town.


RABI-RIBI TOWN

Talk to syaro - buy her cellphone for 5000 EN.
Use the double jump to get the egg in town.

Originally posted by author:
Might as well upgrade your hammer

CRYSTAL CAVE


Warp back the crystal cave and go to the right. Go to the spring room.
Double jumo to get the Arm Strength badge. Then use the spring and go to the left (slide) to get another egg.


Go to the left of the of the warp room. Double jump to get an HP UP. Go up and then left to reach the next room. In this room go to the top to find a MANA UP.


Go to the left and then drop down to find the WallJump. Go down, then left and up to find the save point.

PART 7 - SPECTRAL CAVE PART 2
THINGS TO DO
  • Finish doing stuff in the cave


EXOTIC CAVE


Return to the room where you got the MANA (NUMBER 4 IN THE MAP) and follow the whole corridor to the left. You will get an HP UP. Go room back and then up to get a PACK UP.
Return another room and go up to get an HP UP.


Go up again and then to the left. Slide to get into another room with a MANA UP.
Return to the previous room and go up. In the next room go the right and use a bomb to break the wall. Go to the new room and double jump to get an egg. Go down and then slide to the left to return to the cave.
Return to the Save point.


To cross the big area use a bunny slide (Slide + attack) and then jump.
Get the egg and go down.
Go to the right and be ready to fight a miniboss.


BOSS: RAINBOW CRYSTAL


Originally posted by author:
When you destroy a crystal, the others will heal

Once you destroy all the crystals go to the room located to the right and get the tough skin badge.
Go to the left and and leave this area to reach the Volcanic Area.

END OF THE CHAPTER SUMMARY
ITEM %
TOTAL MAP COMPLETION
EGGS
29.30%
39.50%
11/80

Originally posted by author:

ITEMS
  • WEAKEN BADGE
  • HP UP x3
  • ATK UP x1
  • MANA UP x1
  • PACK UP
  • Get the sliding powder
  • Get the Bunny Strike
  • Get the Quick Barrete
  • Get the Arm Strength Badge
PART 8 - VOLCANIC AREA, GRAVEYARD, SKY ISLAND AND PYRAMID
To do:
  • Fire Orb
  • Air Dash
  • Some Badges

VOLCANIC AREA


The moment you reach the area youi will see a heal zone. Walk through the whole corride. Be careful of not falling.
The next room will have an egg in a ledge. Use a double jump and a wall jump to get it.
After getting it go down and go to the left.


In the next big room go down through the first whole and take the right path. Bomb the wall and you will get a PACK UP. Then go to the left and go down.


Use a bomb in the left wall at the bottom to open a new route. Use the double jump and the wall jump to reach it. Go down to the next screen.
Use a bomb in the middle to get access to the next room.
Inside this room you will get the Fire Orb (it allows you to melt some blocks).


Take the left path ang go up back to the start of the volcanic red area.
Walk left through the corridor and you will see a Warp Point. Take it and go to the town.


RABI-RIBI TOWN

Originally posted by author:
Recommendation - Upgrade the following items if possible:
  • Wall jump to level 2 - not optional
  • Hammer to level 2 or level 3- optional
  • Fire orb to level 2 or level 3 - optional

Originally posted by author:
Save 13,000EN for a future upgrade for the next power up

FLOATING GRAVEYARD


Go to the right - where you found the Auto Earrings - and take the right path
Use a carrot bomb at the middle of the corridor to get an ATK UP.
keep going to the right and you will reach a save point. Be ready for another BOSS FIGHT


BOSS: Kotori - BLUE-

Originally posted by author:
She create alternating moving pillars of bullets. Double jump and quick fall to survive that section.

Keep going right and you will exit this area


SKY ISLAND


Go to the right and go up to reach the save point.
Go to the left to reach the area where the AIR dash is located.


After you get the air dash, backtrack 2 rooms and use a bomb to find a spirng which will take you to the next area.
Use a bomb on the brick to get an HP UP.


Return to the entrance of the area and use a bomb to create a shortcut to the beach.
After you fall down, go to the right and use the WARP POINT to visit the town


In the town use 13,000 EN to upgrade your air dash to LVL 3.


RABI-RIBI BEACH


Warp to the beach and head to the pyramid and the center of the area.
Jump inside and inmediately take the right path. Follow it and get an HP UP.
Now head to the left path and go for the egg (air dash and then jump)


Return to the middle area and go right to reach the save point.
Slide through the gap and reach a lower floor. Walk to the left and cross many rooms.
Walk to the left and break the wall to find a HP UP.
Go to the bottom of the area and then right. Break the wall and get a PACK UP.


Return to the previous floor and go the floor above
Open the door and get the ATK Boost


Return to the previous room and cross half of it. Jump above the platform and use a bomb to uncover the Armoured badge.
2 rooms later, the second block in the floor has an MP UP, use a bomb to break it.


USE THE SPRING TO GO UP and use the save point. stand on the left wall and use a bomb to open a shortcut. Go to the right and get ready fight another boss.


BOSS:PANDORA

Originally posted by author:
Her rod will chase you around the room

Leave the boss room and return to it to see part of the floor gone. Gone down and grab the Hourglass (makes carrot explosions last longer and deal more damage)


Do down and then left to get a REGEN UP in a room full of falling enemies.
The next room is the warp room. Follow the path and eventually you will reach a room with platoform which lead up. Take that route and you will end up witha door which takes you down. Put a bomb beside the door and you will get an egg and a shortcut to the warp point. Open it.


PART 9 - PYRAMID PT. 2, AND FOREST
Objectives:
  • Chaos Rod
  • Visit the Secret Base
  • Light Orb
  • Mana Wager
  • Get all the items in the Starting Forest

PYRAMID - PART 2


After taking the door you will be in the bottom floor.
Go to the left. Enter and exit that area to trigger another Boss battle

ILLUSION PANDORA

Originally posted by author:
She no longer has her chaos rod, instead she will use homing attacks and barrels.

Once you beat her go left. Inside that room you can only go up, once you get there you can obtain the Chaos Rod (Purple shot).


Originally posted by author:
This thing is great at opening breakable surfaces (a few here and there). We are just missing the Light Orb - needed to walk in dark areas I have evaded - and the Water orb - which allows us to walk normally in underwater areas-

Break the block with a bomb and backtrack to the door. After that bomb the wall and open the shortcut to the warp point.


RABI-RIBI TOWN
Upgrade some stuff
Talk to Rumi to get ready to visit the Warp Destination Again


WARP DESTINATION
Walk through the whole area
Once you reach an ice-cream store go to the right and open the door.
You just entered CRESPIRIT'S base. Get the egg located at the left of the base and then explore everything else inside.
Once you are done leave the area and go right


BOSS BATTLE: NOAH AND ALIUS


Originally posted by author:
Phase 1: If you damage Noah she will heal you. Aftre some time she will some Alius to the battle field


Originally posted by author:
Phase 2: Alius does the same as the last battle.

Once you finish the battle you will return to the town.

STARTING FOREST


Go to the entrance of the starting forest and start spamming the Purple shot, you will open the entrance to a hidden underground room

Originally posted by author:
I swear that damn was the reason why I almost quit doing a 100% run


Go to the end of the corridor and do a double jump and a triple wall jump to rewach an ATK UP.
Go to the area where you obtain the hammer and use a bomb. It will open a whole in the floor. Go all the way down and go to the room in the right.
Jumo through all the platforms and go left (there will be a place for Erina to slide into). Go up and reach that MANA UP
Go all the way back to where you got the hammer from and continue walking to the right.


Get to the hole you were unable to jump over at the beginning of the game follow that route. 2 rooms tro the right you see an open area. DJ+WJ (double jump and wall jump) to get a REGEN UP


Foillow the whole path up. First go to the left for an HP UP and then to the right. Keep going right untill you reach a dark room. Jump to the platofrms and you will get trhe Light Orb. Go one screen up and then right.


Travel varios screens to the right. In this screen put a bomb between the flowers and open a path to a MANA UP. Go all the way to the right and pick up the egg.
Go all the way to the left and double jump to get the Mana Wager badge. Visit the room to the left for completion reasons.


Go to the previous screen and go down to get an egg. Go back up and walk to the right to then fall down.


Go back to the screen where you got the MANA UP and then down. Go for the REGEN UP
Drop all the way down and break the wall with the hammer. Get inside for a PACK UP.


END OF THE CHAPTER SUMMARY

ITEM %
TOTAL MAP COMPLETION
EGGS
53.80%
33.24%
18/80
PART 10 - FOREST AND PLURKWORLD
Objectives:
  • Nature Orb

DARK FOREST


Enter the dark forest and go down. In one of the platforms (almost at the bottom) you will can bomb a platform to find an egg.


Go all the way down and pick up the TOXIC badge. The room to the right you will find a save point.
Go to the left and you will activate a miniboss battle with a lot of URRPC girls.


Follow the whole path and then go up.
In one of the rooms with a giant brown enemies, you can bomb the floor near to the exit and you will find a PACK UP. Go to the room with spikes and the spring to reach the next floor.


At the top floor, in the room where a dialogue triggers, throw a bomb to the floor and you will uncover an egg.
In the next room you will face a boss


ALRAUNE
Originally posted by author:
She will use bullets are form a whip which throws more bullets.

Once you beat Alraune, go to the room in the left to obtain the Nature Orb. After that go to the right and you will see a warp point. Don't use it, instead go to the right and complete the map of the area


PLURKWORLD


You will be warped to an area with a warp point. This WP will take you to the forest.
To the right of this room is the save point.


Just go all the way to the right untill you are allowed to go down on floor. Follow the road to the ledt and you will go through a big fall. Once you reach the floor, go the the left to grab an egg.
Go to the right and start climbing using the springs.


You willl go to an area with a headless dog with a lot HP. The dog will use a bone to break the floor. You have to go down all the way.
Jump through the springs just to go all the way down again.


Walk all the way through this corridor and you will reach a brown wall. Use a bomb to break a part of the wall to get another egg.


Go down untill you reach a heal zone and get ready for a miniboss.

MINIBOSS - BLUE AND PINK DOG

Originally posted by author:
If you kill one, the other will revive the fallen one.


The last egg in thisa area is located in the room next to the miniboss. Use the spring to go up.


Climb all the way up and then go to the right. Walk the long corridor and use a bomb to destroy destroy the wall covering the upper path.
Once you reach the room below the warp point, go right and prepare to fight another boss


KEKE BUNNY

Originally posted by author:
Flying snake-bunnies.

Once you beat the boss, go to the right, climb up and the back track to the entrance. You will receive the P Hairpin.
Use the warp point and leave the forest. .

Originally posted by author:
Go to town to upgrade gear.

I upgraded the P Hairpin and the all orbs

END OF THE CHAPTER SUMMARY

ITEM %
TOTAL MAP COMPLETION
EGGS
53.80%
47.00%
23/80
PART 11 - EVERNIGHT PEAK AND AURORA PALACE 1/2
OBJECTIVES
  • CASHBACK
  • PLUS NECKLACE
  • SPIKE BARRIER


EVERNIGHT PEAK


Originally posted by author:
I am not stopping to pick up stuff from the Golden Ravine, instead I plan to go directly into the Evernight Peaks for some good items.

In the save room just go to the right until you discover the warp point. In that room go down.
Tehn go to thge right to find the PLUS NECKLACE


Return into the area where you dropped from and go to the right (slide) to go to a lower floor.
Go down to the botton floor and walk to the left. At the middle of the stage you will see a U-shape platform. Bomb it and to get a PACK UP. Walk event further until you see a whole, jum through to see the CASHBACK badge. Keep walking down and when you see a cliff, DON'T JUMP DOWN, this will take you to the Exotic Laboratory.


Originally posted by author:
Equip the cashback badge to start getting EN

Go up and take the left to return to the previous floor. Go to the left and jump into the wall to go inside a hidden dark room. Go for the MANA UP.


Go all the way back to the room before the Warp Point and go UP. Go mup and then all the way to the left. Bomb the wall to enter a room with a HP UP. Return to the previous area and now go up.
Jump to the left and use the air dash to reach a new area. Walk the whole corridor and get the SPIKE BARRIER.


Go one room to the right and jump over the spikes. Be ready for a miniboss battle with a lot of enemies


In the next room bomb the block in the middle to get an egg. Jumjp to the whole and go to the eoom below the egg room. You will see a PACK UP over a ledge. JUMP --> AIR DASH --> JUMP to get it. The next room to the right is the Save Point. In this room you can break the wall in the upper left corner to go inside a new room. Inside this room you will get an ATK UP.


Return to the area where you obtained the egg from and go right. Bomb the second stair to uncover a REGEN UP. In the next room you will fight against a BOSS and you will get an egg.


BOSS: SAYA


Originally posted by author:
she will spend her time in the air. Get on top of a pillar and shoot her.

Once you beat her, go to the right and then down.
In this new floor, cross the whole corridor and jump down while hugging THE LEFT WALL for an ATK UP. Go to the right and in a small room you will get the Hammer Roll (can roll over spikes)
Go up and then left to find Saya and clear this area.


Now go all the way down and and go to the right. You will arrive to the Aurora Palace.


AURORA PALACE
Once you reach the area, go to the next screen and use a bomb to get an egg.
In the next room use the pring to go up. Go to the right to get to the save point just a few screens away from Rita's boss batle.


Go up and then use a bomb to breack the brown block, then go down and use another bomb to uncover an ATK UP. Go right and then up to go back to the surface.


Walk left (the whole corridor) to reach the Palace. Inside the palace use the spring to reach the next flloor. Walk through the whole corridor to get a MANA UP.
Backtrack to the middle of the corridor to find some platofrms which lead up. Then go left to see the warp point.


Originally posted by author:
This is a good moment to warp back to the town and upgrade stuff

Go all the way to the right and use the spring to reach a platform at the left. The left wall has a secret dark area. You will get a REGEN UP from this room. Clim up and then hug the wall for another egg hidden in the wall.

In the next floor walk along the corridor and melt the ice block to go back again...walk towards the warp point and double jump to reach the new area. Go to the right and get the ATK UP. Go back and DJWJ again. Then go to the right and return.

OPTIONAL - PREPARATION FOR THE END [PART 11.5]
There are a few items you could get before the following section to make you stronger for the Boss fights coming soon (PART 12 and beyond)

ATK TRADE BADGE: +25% damage dealt but +50% damage received. You get this in the park (follow my guide on part 13)

Originally posted by author:
MORE DAMAGE = FASTER FIGHTS

UNLESS SHE IS A FINAL BOSS AND RELIES ON A LONG FINAL ATTACK PATTERN WITH A COUNTDOWN


PURE LOVE BADGE: Reduce the collision damage with female bosses. Some of them love approaching you to deal extra damage. You get this badge in the Sky Island (follow part 14 of the guide)

Originally posted by author:
DON'T FORGT TO UNEQUIP THIS BADGE DURING THE HALL OF MEMORIES...AFTER FIGHTING A MOVING SMILY FACE

SURVIVAL BADGE: Survive any attack with 1HP left. You get this badge in the upper part of the Graveyard (follow my guide in part 14)
Originally posted by author:
YOU LITERALLY WANT TO KEEP THIS BADGE FOREVER

PART 12 - AURORA PALACE, ICY SUMMIT AND WARP DESTINATION [FINAL]
OBJECTIVES
  • WATER ORB
  • Super Carrot
  • Golden Carrot.

AURORA PALACE PART 2


Go all the way to the left to the room which has a spring at the bottom. Use it to go 1 floor up.
Walk through the corridor and use a bomb at the end to get another egg.


In the next room you will find another spring, use to go up. Walk through the whole corridor and get ready for another Boss battle:


BOSS BATTLE: NIEVE

Originally posted by author:
At some point she will fill the room with water, expect slow mobility.

Once you beat the boss go to the room at the right of the save point and jump from it. You will be sent back to the Azure Snow Land


AZURE SNOW LAND

Go underwater and get the SELF DEFENSE badge.


Quote --> Walk back to the warp point and go to the town to upgrade stuff

ITEMS SO FAR
ITEM %
TOTAL MAP COMPLETION
EGGS
67.73%
54.45%
28/80


ICY SUMMIT


Walk back to the save point in the middle of the Azure Snow Land. In the room beside the save point double jump to reach the Icy Summit. Walk all the way right to find the warp point.


Climb up and bomb behind the ledge to find an egg. Walk throught he corridor and fall down to find an MP UP. Go down twice for completion reasons.


Return to the long corridor you where in and go up. Use the Chaos Rod to break the wall and go down and then right. Pick up the HP UP in the room with ball-shaped enemies. Go to the right to kill more enemies. Go up again and pick the Super Carrot.


Originally posted by author:
From now on try to finish every combo with a Super Carrot. Combine the SC's damage and the fire orb damage to acumulate cheap damage.

You can use the amulet to reset the carrot's count down and use it again.

Walk to the left and get eready for a boss

ILUSION RITA

After defeatig the boss walk to the left and use a bomb to uncover an ATK UP.
Walk through the corridor and and jump to the left to get into a secret area. Double jump and get a Golden Carrot. Jump down and then Air dash + Jump to get a PACK UP.


Originally posted by author:
This carrot will heal 100% of your HP. If you use it, you will need to pick it again in this place.

Now go to the right and up to use the save point. Use the spring to explore a secret room.

NIEVE

Originally posted by author:
Don't forget to grab the egg

Once you beat the boss go right and then down to complete the map. Go to the warp point and return to the town.


RABITOWN


Originally posted by author:
UPGRADE THE SUPER CARROT

WARP DESTINATION


Originally posted by author:
DON'T FPRGET TO GRAB EVERYTHING CAUSE YOU WON'T BE ABLE TO COME BACK UNTILL YOU CLEAR THE WHOLE GAME AFTER CHAPTER 9

Get ready for the final battles in the original campaign. You will be warped to the lowest floor in the hospital. Walk to the right untill you reach the area where the game began.


Go up and use a bomb to uncover an egg. Walk to the left and reach the stairs. Go to the end of the second floor and place a bomb against the wall to get another egg. Go to the highest floor and walk along the corridor to reach Miru's room. Walk to the closet and then back to star the Boss Battle.


BOSS: MIRU
Originally posted by author:
When the cute little sister goes full Yandere. She still scares the F out of me. And her SP version is even creepier.

She will deactivate Ribbon, so be ready to use physical attacks when she is in the ground and the supper carrot while she is floating.

Once she is defeated go back and visit the room to the left for the FINAL BOSS of part 1.

BOSS: NOAH

PHASE 1
Originally posted by author:
Your average Boss fight

PHASE 2
Originally posted by author:
If you fall from the platform you will receive damage. Double Jumping and Air dash will help you a lot

PHASE 3 - ERINA
Originally posted by author:
Survive her final pattern


END OF THE CHAPTER SUMMARY
ITEM %
TOTAL MAP COMPLETION
EGGS
70.70%
57.00%
32/80
PART 13 - PARK AND SKY HIGH BRIDGE 100%
OBJECTIVES
  • ATK TRADE BADGE
  • Get 99% of the rooms in the park (the last room will open for the final boss of the main story)
  • HEX CANCEL BADGE

RABI RIBI PARK

Return to the town and walk left to reach the park
Walk right and double jump to rach a secret egg.


Go up for a few screens and then right to the place where you got a MANA UP. Instead of going right go up. In the next screen go left (through the whole corridor) until you reach adead ead in another screen. Use a bomb to get the ATTACK TRADE badge.


Originally posted by author:
From now on you will use this badge as much as possible for Boss battles.

You seriously don't want to receive +50% DMG while exploring the world


Use bomb to go down and continue walking towards the warp point of Sky High bridge (at the top).
In the vertical corridor towards before the save point, slide to the right to enter a room with a REGEN UP. Save your game before going to SKY HIGH

SKY HIGH BRIDGE


Originally posted by author:
I barely touched this area becaue I had no reason to do so in a Novice run...If I were to replay the game in HARD or above, I would definetely come here and the floating island earlier.

The good item here are the HEX CANCEL badge..which nullifies every 6th hit you receive and the LUCKY 7 badge which gives you a stronger hit very 7 hits during a combo


Go up to the entrance of the Warp room and use the purple shot to destroy part of the ceiling. Go to the next screen and do the same but aim to the left of the room. A spring will Fall
JUMP AND KEEP SHOOTING to break another piece of the wall.
Go inside the newly created passage and grab another egg.


Return to the warp point and then go right and drop for a couple of floors. In the room with the 2 spiky bunnies, use a bomb in the left ledge to create the entrance to a new room.


In this room go to the lower left corner and use a bomb to uncover a spring. You will reach a room with a MANA UP.

Now go to the floor and above the boss room and go right. Follow the dark corridor and get a LUCKY SEVEN badge. Now go the Boss corridor.


No go down and to the left to reach a dark area. Follow the left path and reach a well lighted area. Use a bomb to uncover a spring to go one floor up. Pick the HEALTH WAGER badge.


Return to the dark area and go clockwise for completion reasons. Go up and the right and fall down. Hug the left wall and keep falling until you see a REGEN UP. Use the Chaos Rod (purple shot) to break the wall and enter a new area. Inside you will get the HEX CANCEL badge and a PACK UP.


Return to the big area before the Boss room. Double jump to jump the ledge and then jump to the wall enter the room where the LUCKY 7 badge was located. Go down and get another egg.


Go back the area where you double jumped and now go right. Jump and go over the ceiling. Use a bomb and slide to get inside the boss room to get an ATK UP.

Go once more to the same location and now keep walking right. Reach the graveyard and grab a HP UP.

END OF THE CHAPTER SUMMARY
ITEM %
TOTAL MAP COMPLETION
EGGS
76.00%
59.63%
35/80
PART 14 - GRAVEYARD AND FLYING ISLAND 100%
OBJECTIVES:

  • Survival badge
  • Pure Love badge
  • 100% Upeer graveyard
  • 100% Sky Island

Originally posted by author:
The Halloween DLC will be done way later

UPPER GRAVEYARD


Start by going to mthe save point and double jump. In the next room you will find an egg and and a MANA UP.


Go to the left and keep walking until you see a ledge. Double jump to reach it.Use a bomb to uncover a new path.


Go up and right right. until you find a heal zone. Double jump, wall jump and air dash to the right. You will reach the roof. Keep walking to the right for an egg.

Return to the heal zone and go left. When you see a tombstone use a bomb to uncover an egg.


To jump through the big area you will need:
  • Slide + Attack
  • Jump
  • Air dash
  • Neutral air attack the enemy for a jump boost.

Once you reach the other side, walk to the left wall and use a bomb to open a hole. Go through it. In the next room you will get the SURVIVE BADGE


Originally posted by author:
It allows you to survive any attack with 1HP.

Walk right for a few screens until you see a big hole. Fall through it and you will see a gap.
  • Fall
  • Air dash
  • Jump


Now go to the floating city


FLOATING SKY CITY
Go to the left of the save point and double jump. Go to the right and use a bomb in the entrance to uncover a REGEN UP.


Now return to the left and use a bomb in the middle platoform to uncover an egg.
No go all the way to the left and then up. Go left again to get the TOP FORM badge.


Now go all the way to the left and you will find the Warp point and a spring. Use the spring to go up. In the next screen use a bomb against the right wall for a PACK UP. Go left and use a bomb in the wall . Slide through the hole to get the PURE LOVE badge.


Originally posted by author:
This will decrease the collision damage from bosses.

Get ready to fight another boss:

LILITH
Originally posted by author:
Prepare for a 2 phase battle

After that, you will be sent to the Starting Forest. Go back to the town to upgrade stuff

ITEM %
TOTAL MAP COMPLETION
EGGS
79.73%
61.35%
39/80
PART 15 - RABI RABI RAVINE
OBJECTIVES:
MANA SURGE
HAMMER WAVE

RABI RABI RAVINE


Walk to the lft entrance of the Ravine (you can warp from the beach)
When you reach the save point go one platform down adnt ehn left. In the next screen use a bomb to get a HP UP.


From there go all the way up and then right.
You will get the MANA SURGE badge. Go up and to the right to find the Warp point.


Return to the previous room. Go Up and then left. You will get MANA UP.


Return to the previous room and go left. On the next screen do a short hop and go left. On the next screen use a bomb to oopen a hole with a HP UP. Also break the brown block to get an egg. This will make you go down..Double jump and wall jump to go back again


Go one screen left and then all the way up. Go right to get an ATK UP .


Go all the way up and then left and down. In this room you will get the Hammer Wave.
In the next room you will see an ATK UP on the other side of the room. Use the platform in the middle to reach it. In the same screen go to the bottom right corener and you will get a hidden egg. Fall down.


You rached the save point. You could go right to return to the big vertical corridor if you forgot something. If you go below you will fight another Boss:

CHOCOLATE
Originally posted by author:
Vanilla's sister.

She will fly through the air and shoot bullets to all directions

Beating Chocolate will activate the Halloween DLC ... but I plan to do it after chapter 8 once I obtain every badge.

Go down to complete the map and return to the town to upgrade and buy stuff.

Originally posted by author:
Texto citado

END OF THE CHAPTER SUMMARY
ITEM %
TOTAL MAP COMPLETION
EGGS
83.43%
62.83%
41/80
PART 16 - GOLDEN RIVERBANK AND EXOTIC LABORATORY
OBJECTIVES
  • FRAME CANCEL
  • ??? CARTRIDGE

GOLDEN RIVERBANK
Warp to the riverbank. In the next screen slide to the right and go left. Jump only in the areas with grass and break the walls. When you cross the whole corridor use another bomb to open a path down. You will get a PACK UP. Walk to the left to reach the Starting forest to complete that map


Return (go right) untill yoe sea wall which needs the Double Jump to jump over..Use a bomb and open a secret area. Use another bomb to go even further to the secret area. In the next room (left) go toi the lower left corner and use a bomb to open a new path.


In this new room go to the right and bomb the lower and the upper corners for a MANA UP and yet another room. This room must be navigated COUNTER CLOCKWISE and it is full of spikes. Once you reach the other side of the room use a bomb to get a PACK UP


Walk to the right and then up in the vertical corridor. In the room at the left, double jump towards the wall to find another egg.


Walk along the whole corridor and then go to the upper left corner. Destroy the first pillar to uncover another egg. Walk left and you will find a REGEN UP. Go down and return to the save point.


Backtrack before the area with spikes and go right (to the second save room). In the next room climb a couple of stairs and use a bomb to uncover a small passage. Slide through it and you will get the FRAME CANCEL basge

Originally posted by author:
This badge allows you to cancel the hammer combo to use a carrot bomb or a super carrot


Now go all the way down to the long vertical corridor. Go to the lower right passage and use a bomb besides the ATK UP. Go all the way to the exit of the area and use the Spring to go up. Go to the left and slide to reach that ATK UP from a few rooms ago. You are now free to visit the laboratory.


EXOTIC LABORATORY
Use the Cahos Rod (purple shot) and shoot to the ground. You will open a secret passage. Slide to the left and then to the right. Double Jump to the right wall adn you will get an egg. and


Originally posted by author:
This is one of the few eggs which are so difficult to obtain that they require a guide.

Literally one fo the 2 or 3 items rabidb hasn't added yet.

Go to the lower left corner (the room with horizontal lasers) and use a bomb to uncover a new room- Keep doinf that until you see 2 holographic Enemies. Go to the corner and grab the ??? (cartridge) .


Originally posted by author:
Apparently this item becomes invisible if you obtained it during a different playthrough.

ITEM %
TOTAL MAP COMPLETION
EGGS
86.83%
64.43%
44/80
PART 17 - AZURE SNOWLAND AND NATURAL AQUARIUM
OBJECTIVE
CARROT BOOST
SELF DEFENSE BADGE

AZURE SNOW LAND

Warp to the snow land Go left and explore just a few underwater rooms for quick completion.


Now walk up to the entrance of the area and explore those rooms. Go doiwn adn right to get the Carrot boost badge. Go back and explore to the left to get an egg and a REGEN UP.


Quote: Thius will deal more damage with the Supper carrot and the orange shot (we will get this item later on).

Go left and you have 2 roads..the the Hidden one in the left towards a dark room. Inside you will get another egg (and a room full of spikes). Use the purple shot to break the walls. Now return and go down to reach the Natural Aquarium.


NATURAL AQUARIUM


Go might then up to reach the save point and a REGEN UP. Use the Amulet to navigate this area.
Go down and then right for a PACK UP and then go to the beach.


In the beach grab the egg and go for the ATK UP if you didn't get it a long time ago.
Go back to the aquarium adn go left. You will reach a room with 3 areas to fall through. Go through the middle one to get MANA UP.


QUOTE: For safety reasons return to the save point to heal and save your game.

Go all the way down adn then left (cross the room with energy balls and spikes. Take the upper path if you want to fight the boss now.


SEANA

quote: She will force you to go up and down through the stage

Keep walking to the right. You will see an egg surrounded by brown blocks. Use the pruple shot to destroy some of them and get it.


Keep walking to the left and you will reach a dark room. Use a bomb against the left wall to go to a secret room. Inside you will get a HP UP.


Now go up to get the MANA PLUS basge. Go right to get to the save point.


Go left and then up. For the following 3 vertical rooms you will have to Double Jump and Wll Jump into a narrow space.

Originally posted by author:
Extend your jumps as long as possible by keeping the jump button pressed...even the wall jumps.


Use a bomb to open a new path. Go right and then down to get a HP UP. In the next room navigate the room by dashing and then jumping to get an ATK UP.


Go back ann double jump + wall jump and air dash to leave this room.


Go down and then right to reach a dark room. Exit the dark corridor and go down.
In this corridor there is a big platform. Go to the right and enter inside it to get an ATK UP. Walk the whole corridor to see all the rooms (map completion)

Go up and then left until you see a wap up. Go right and you will find the warp point. Go down and finish exploring this corridor.


Return and go left then up to finish exploring the whole map. Return to the azure snow land and walk to the left to get the Self defense badge.


Return to the town and leave trhough the west gate to fight Seana again

Originally posted by author:
Quote: This time she has a countdown mechanic...you have to survive throught the whole song.

No ATK GROW badge for you.


ITEM %
TOTAL MAP COMPLETION
EGGS
92.53%
70.09%
48/80
PART 18 - VOLCANIC AREA
OBJECTIVES
  • BEAT KOTORI 3
  • EXPLORE THE WHOLE VOLCANIC AREA


VOLCANIC AREA

Originally posted by author:
I can easily say this is my least favorite area in teh game. Between the laser shooting flowers, the lava and how difficult it is to navigate without a map...that was the bane of my existance during my first blind playthrough.


Warp directly into the Volcanic area and go down and left. Get ready for another Boss fight:

KOTORI 3 - RED FLAVOUR


Originally posted by author:
This time around she will summon a lava wave that hurts a lot. At least now you have the double jump and the air dash.


Go left and explore the whole way to the exit. At the end of the first corridor you will have to bomb some block to find an egg. In the next screen use a bomb to go down and get a HP UP. Keep going and you will reach the WESTERN COAST. Map all the rooms and return.

Now go right and then down (reach the place where you got the fire orb from).
Go right and down to to expore the rooms below.


Originally posted by author:
The lower right room will be SUPER IMPORTANT AT THE END OF THE GUIDE...IT LITERALLY TAKES YOU TO THE LAST EGG.

Return to the top right room and hug the right wall to proceed. Walk to the right and at some point you will reach a huge room. you have to explore all of it for map completion reaons.


Originally posted by author:
QUOTE: THIS ROOM IS A NIGHTMARE TO EXPLORE WITH NO POWER UPS..that's the reason why I left this place till the end.

I wasn't kidding when I said I hate this place.


In the save room you will have to break the floor with a bomb and then fall down.
Hug the left wall to get the egg


ITEM %
TOTAL MAP COMPLETION
EGGS
92.93%
72.18%
50/80
PART 19 - HALL OF MEMORIES
OBJECTIVES
  • CARROT SHOOTER
  • BEAT MIRIAM

HALL OF MEMORIES

Get ready for 3 eggs, A loooooooooooong walk, possibly the best shot type if your HP is low ...and a long battle.

EGG 1: Found in the vertical RAVINE room with the moles. Use a bomb in the right lower corner to uncover the egg.


EGG 2: In the system interior room use the bombs to break the blue blocks. You will uncover an egg.


EGG 3: Possibly the most obscure egg to obtain.


  • First go up and use a bomb in the platform. This will break 1 block.
  • Then break the second block with the purple shot. Go inside
  • In this room wait some time until the screen becomes dark and 2 blocks disappear. There will be a sound cue.

In the next room you will see a Warp point and then the Carrot Shooter (Orange shot)

Originally posted by author:
this weapon deals more damage the less HP you have left. Combine it with the carrot badge and another badge we will get in the last area... and this weapon will do obscene ammounts of damage.

Go back to the town to upgrade stuff and buy whatever you need. Get ready to fight another boss:

MIRIAM
Originally posted by author:
The shop owners is capable of copying every single item and skill you have

Originally posted by author:
PLEASE UNEQUIP THE PURE LOVE BADGE OR SHE WILL SURVIVE WITH 1HP AND DRAIN ALL YOUR MONEY

ITEM %
TOTAL MAP COMPLETION
EGGS
93.93%
77.11%
53/80
PART 20 - FORGOTTEN CAVE
OBJECTIVE
  • BLESSED badge


The FORGOTTEN CAVE is your classical Megaman Boss Rush. Instead of showing every boss again, I will show the special things around here.

PIXEL FACE
Originally posted by author:
This guy will inflict Skill Ban if he damages you.


ILLUSION ALIUS 4
Originally posted by author:
More of the same, Miriam was more of ma challenge with her whole copy thing.

BLESSED Badge
Originally posted by author:
Increases the rate of recovery of your amulet.

Useful in most battles..unless the boss has a reflect-damage mechanic


RUMI
Originally posted by author:
Your first multi-lphase boss

She will alternate between normal ARPG and SHMUP mechanics

If she activates revenge 300 - use the Red Shot to inflict small amounts of damage..otherwise that damage will reflected to you as well. Don't even use the Bunny Amulate

Once you beat her, will start a new chapter, return to the Boss room to claim another egg.

ITEM %
TOTAL MAP COMPLETION
EGGS
94.43%
79.82%
54/80
PART 21 - SYSTEM INTERIOR
OBJECTIVE
  • CYBER FLOWER


EXOTIC LABORATORY

Warp to the Exotic Laboratory and go to the computer room
Go all the way up and then left to the place bofore you fought Syaro.


Go to the left to the left to the big room. Double Jump and Wall Jump to and then go left to reach another Save Point.


Go to the left to activate a cutscene where Erina jumps to a new area. Once you take control,

Follow the whole corridor. In the bottom you will see an egg, grab it. Keep going right.

Once you reach a big room with a spring, go to the right to find the save point. Use a bomb near the right exit to uncover a path to the next room. Go for it and go inside the "JUMP MINIGAME" room without being forced to play it. Walk to the end of the room and use a bomb in the last red block to uncover an egg. Now return to the minigame room and double jump + air dash to map the whole room.


Now go to the left to activate the WWWWWW minigame. Follow the path and get the Cyber Flower.

Originally posted by author:
Erina will move up and down continously while bullets go across the screen. You have to survive for a long time.

Go down and teleport back to the lab. The moment you leave the room, a new chapter will begin.


ITEM %
TOTAL MAP COMPLETION
EGGS
95.43%
87.45%
56/80
PART 22 - FLOATING LIBRARY
OBJECTIVES
  • CRISIS BOOST
  • AUTO BADGE
  • ERINA BADGE
  • RIBBON BADGE

FLOATING LIBRARY


You will be transported to the forest. Go right to the base and activate the scene with Irusu. After that, use a warp point and go to the Floating Grayard


Go inside and then left. Go inside the room to get the CRSISI BOOST


Originally posted by author:
Quote: You will deal more damage if your HP is below 20% .. pair it with the Carrot Shooter to deal a lot of damage.

You still need to get a badge at the end of the chapter for this to work

Now go to the right to go inside the FINAL DUNGEON.


Once you are inside the room, go anti-clockwise to the lower left corner to reach an egg.


Then go right to the next room. Walk thorugh all the corridor and reach a room with a spring. Use the spring to go up and then left. Use a bomb to break the huge block to uncover the HITBOX DOWN badge. Go back to the previous room.


Go to the left room and use the spring to go up and then left. Slide to the left and use the spring to go up. Go to the left and you will eventually get the AUTO badge.


Go to the left to the heal zone. Use charged shot to break the wall and reach the next room. Use the spring to go up to a new room.


Return to the area with the spring and go right then up. You can break the right wall to revisit the Floating Sky city but you will lose all your progress.


Originally posted by author:
DONT LEAVE THE AREA UNLESS YOU NEED HEAL ITEMS OR YOU CAN'T PLAY FOR 20 MORE MINUTES

IRISU

Originally posted by author:
Prepare for the final boss in the main game

She will start the fight by casting magic which nullifies everything you have. Use the amulet 3 times to counter her attack.

She has a countdown final attack...so pour your resources on survivability instead of pure damage.

Once the credits roll, you will be in the town. Pick the ERINA BADGE and the RIBBON BADGE


ITEM %
TOTAL MAP COMPLETION
EGGS
98.43%
89.91%
53/80
PART 22.5 - REACHING 100% ITEMS
After finishing the Main game I realized I forgot 2 items:
  • STAMINA PLUS badge
  • REGEN UP

FORGOTTEN REGEN UP
Originally posted by author:
The REGEN UP was on my path to the FORGOTTEN CAVE.

Literally just below the Cocoa fight in the underground.


FORGOTTEN BADGE - STAMINA UP
Originally posted by author:
Another simple I item I forgot to mention in my guide.

This one is in the same corridor as the warp point.

You have to breaK a block to uncover it.


GOLDEN PYRAMID

Originally posted by author:
Visit the last room in the pyramid for a MANA UP.


ITEM %
TOTAL MAP COMPLETION
EGGS
100%
89.91%
53/80
PART 23 - LOWER GRAVEYARD AND HALLOWEEN DLC
OBJECTIVESS
ERINA'S COSTUME
WESTERN COAST 100%
LOTS OF EGGS


FLOATING GRAVEYARD

Warp to the graveyard and go left to enter the DLC area.

Originally posted by author:
prepare all your defensive items cause this is an annoying area.

Follow the path. You will see a vertical green corridor with spikes everywhere. You will return to this area again with a TWIST


Once you go down and up to the vertical area you will return to the entrance...but you will be below. Walk to the right. The next room has some enemies and a heal zone. Breack the blocks and go down


You will be in another green area. If see carefully there is another heal zone below, that means you will return here a lot if you fail in moving through the area. Use the bunny whirl to break the blocks


The next room is SUPER IMPORTANT. It has Red blocks which need the red shot and blue blocks which need bombs. Purple blocks break if you stand over them

Once you break the purple blocks below, you must follow my instructions:
  • Walk to the second (from left to right) purple block
  • Throw a bomb...it must land in the first block
  • After it explodes jump on the first block
  • Slide to the left

If you area successful, you will gain entrance to another room with an egg. This will also break a few blocks in specific locations


For the second egg go up (the place with spikes) and use a bomb against the left wall. It will open a gap small enough to allow Erina to slide.


In the next room break the blocks, pick the gg and go left. You will be back to the vertical corridor.


Go one screen down and you will see purple blocks to help you to go up. Break the red block and then slide.


Go up to the place where you see 2 blocks placed one next to the other. If you go to the next room you will see red blocks stopping you. The way to deal with them is by depleting your Stamina and sliding. The fire orb will trigger and it will destroy the red blocks. Break the blocks and get the egg.


Go back to the area with the purple blocks and go right if you need to use the Heal Point.


In the next area you will have to slide and jump over some purple blocks. At the end you will have to use a carrot bomb and then jump to open a path. If you fail, go up and use the heal zone before attempting this area again.


Go up and then right to continue. Break the block in the right side of the room and go inside the room. If you try to slide, a block will stop you from getting that egg. You will have to go around.


Return to the previous area and you will see 2 pruple blocks to help exploring a new area. Go through it and you will get another egg.


Use the spring to go up and hug the right wall...otherwise you will be forced to leave the area and do everything again.


The next area is a long corridor. You will have to break blocks and avoid enemies. Go right and you will eventually reach a romm filled with enemies and blocks. Use the Green shot paired with the Ribbon badge to deal with them safely and recover HP.


In the next room try killing one oof the block enemies with the green shot. The next room will have a lot of enemies a 2 eggs. Kill the enemies to heal some HP. Use the pruple shot on the upper right corner to open a new path.


The next room is tricky to navigate because it becomes dark the moment you leave the platofrm. Whe you get the egg, jump and do an air attack to open the path.


For the final room you must do the following:
  • Fall down
  • Air dash
  • Jump


Originally posted by author:
OPTIONAL: VISIT THE UPPER GRAVEYARD

ITEM %
TOTAL MAP COMPLETION
EGGS
100%
92.00%
65/80
PART 24 - WINDY RAVINE

This area is full of eggs and items which acan only be ontained at the end because there is a Escape Sequence, new blocks will bring access to different areas or objects.

Talk to the Irisu in the town and you will be warped to the Ravine. Go to the top and then right to access this new area.


Inmediately go right and melt the ice blocks. Go down to reach the save point.


Go up and then left. You will reach a vertical room. Go all the way up and the right. In the next room you will have to go all the way down.


In the next room you can use a bomb to uncover an egg, but you can't grab it. yet.
BREAK THE BOWN BLOCK IN THE FLOOR..THIS WILL LET YOU LOOP TTHIS PLACE
The next room will have a spiky block and some brown blocks. Use the green shot to kill the enemy and step over the brown blocks to break them and go down.


In this room the wind will blow to both directions. You have to run to the opposite direction of the spikes. Once you reach the bottom, bomb the left wall and get an egg.


Go down and then left to loop for the other egg. Now go up and reach the room with the plant shooting bullets. Go up (you broke that block earlier) and get the egg.

Now go down and right. In some places te floor will break if you stan over it. You will reracha heal zone, go right. In the next room go up and then right. You will reach a room with another egg. To leave that room use down+attack to pull yourself down.

iF you go down, you will realize this room is actually bigger than it looks like. Navigate through it and get another egg.


Now go left and then up. You will reach a room with lots of blocks. Use a bomb and escape right. This will take you above the previous room. Go up.


In the next room we will pull out possibly the hardest trick in the guide: EARLY WIND BLESSING

Originally posted by author:
  • SLIDE + DASH
  • JUMP DOWN
  • JUMP UP
  • AIR DASH
  • WALL JUMP


No go to the left to continue the normal route. In the next screen you will see an egg. To get it right now, slide through the gap and use the bunny amulet while you are above it to stop your dash.


Go up and you will reach the first boss of this DLC

PILLAR SAYA
Originally posted by author:
A powered up version of saya. Jump on the pillars to shoot at her easily.

Originally posted by author:
Once you beat her use the warp point just for map completion
Otherwise you won't be able...the Ravine will be untouchable even after finishing the DLC

Go right and up. Then go left through the frotating fire and the wind corridor.

Just follow the path and you will eventually reach a room eith a spring (and next it is the save point.) After saving, return to the room with nthe spring and get ready for another boss fight.


LILY AND PIXIE
Originally posted by author:
You have to beat both opponents to finish the fight.

They will change the gravity of the battle field. Use that time to grab the eggs.


ITEM %
TOTAL MAP COMPLETION
EGGS
100%
95.45%
72/80
PART 24.5 - THE ESCAPE
Once you defeat both Faeries, the whole place is coming down. There is a countdown fo how to escape the place


Go down to floors and use the purple shot to open a new path. Go up and follow the path. Go up again adn you will reach another egg. Slide and it will take you to another screen. Go right and break the bricks.


No go all the way up for the second egg. You will need to slide.


Go left and up. Then all the way to the right and tren down.


Now go left 2 screens, down adn right. When you reach the room with many blocks, use a bomb and go right. Go up to the room where you can get the Wind Blessing


Originally posted by author:
GO FOR THE WIND BLESSING IF YOU DIDN'T OBTAIN IT EARLIER

If you don't want the Blessing, instead go down and then left. You will reach the area with the heal zone. Go up and then right. Go up (besides the flower) and left. Break the floor and keep going left.


Break the ice blocks and go left. Once you reach the save room, go up and then right.

Go all the way down and then left (to break the ice blocks and reach a locked warp point).

Now go up adn right. The down


Go left, f}down and right. In the save point use a bomb.

Go down and right. Then up and left.

ITEM %
TOTAL MAP COMPLETION
EGGS
100%
???%
74/80
PART 25 - HALL OF MEMORIES

OBJECTIVES:
  • Getting the last eggs
  • Getting the Amulet back
  • Exploring every map
Warp to the Voncanic area and go left. Once you reach the gray room, use bombs to go down.


Originally posted by author:
This is the final area of the game, which means you should be ready to be here for a long time to finish mapping and to get the last 6 eggs.

Go to the right and you will see a replica of Rabi town..after the cutscene Erina will realize she lost her Amulet. That means we can't skip certain parts.


The first room is full of spikes. The next 2 rooms has an enemy shooting energy beams. You must explode those beams near the blocks to break them.


Originally posted by author:
Whenever you see spikes, use the Hammer roll to move withour receiving damage


The next floor is a vertical and filled with lasers. You must fall down quickly.


Originally posted by author:
You will need to return to this place to get an egg.

Once you reach the next area you will see 4 different paths corresponding to a diferent color.

  • BLUE
  • GREEN
  • PURPLE
  • EGG
  • RED
  • MORE EGGS

Blue Area
Blue's mechanic is all about rotating blue lasers + avoiding them and underwater rooms.

Follow the path adn evade the lasers with the architecture. In one room you will see an egg. That egg can only be obtained by leaving the area after clearing all 4 colors. That is literally the last egg.


Green Area

Green's mechanic is all about rooms filled with spikes and clocks which summon blocks for a short amount of time.


To get the egg in the green zone you must do the following (in the screen above)

  • Activate the clock
  • DO NOT STEP ON THE LOWER LEFT BLOCK
  • Once time runs out use that block slide to the left


Purple Area

Purple's mechanic is all about rooms filled slow moving energy beams. You must shoot a charged Ribbon shot to erase part of the beam.


You will and egg but it is unreachable until you clear the RED area - and we are taking a detour.


Once you finished Blue, Green and Purple , you must go up and back track to the beggining of the Hall of Memories.


Back to the entrance, you must double jump -> wall jump -> air dash to get an egg. You can only reach it when the red area is the only one you haven't cleared.


Return to the 4 color HUB and be ready to do the Red area.

RedArea

Red's mechanic is all about spikes and energy waves moving up and down


Return to purple and go for the egg. You will have go one screen down and then go up witha double jump.


Return to the central area and go up again. This time you will go to the left to a small room with a miniboss (the same as the crystal cave) and an egg.


Once you clear all 4 areas go down. You will find a warp point, you amulet and finally the entrance to the final boss.


Unfortunately we are still missing 2 eggs. One of them is below us and the other one is outside (in the volcanic area.

Go to the room where you got the amulet and use a bomb in the same place. It will open a way to another room. Inside this room you have to survive before the door opens. In the next room you will get tour 79th egg.


Now go to the warp area and use it to go to the entrance. In this place you will break the floor to go into the first cave of memories (a few rooms before the Miriam boss fight.)


There are 2 things to finish:

  • 100% map in the Ravine
  • Geting the LAST EGG.

To get 100% in the Ravine, now go back to the entrance of the DLC and visit the warp room which takes to the place where you fought PILLAR SAYA


To get the last egg take the warp room and travel to the volcanic area. Go to the place with 9 red rooms with a 3x3 formation. Go to the botom right one adn jump down. It will take you the last egg located in the BLUE AREA.

PART 26 - THE END
THIS SHOULD BE YOUR SCREEN IF YOU FOLLOWED EVERYTHING


Return to the warp point and leave the cavern again and get ready to fight the TRUE FINAL BOSS:

ERINA: THE FORGOTTEN MAIDEN


Originally posted by author:
Erina/Noah in her prime. She is capable of using the same attack paterns as the other girls, that is the proof of her power.

Once you deplete her 3 Life bars the music will stop and a countodwn attack pattern will star. In this case the camera will star to zoom and you will be forced into slow mode (visible hitbox).

You have to survive 100 seconds and then use a finishing blow (The amulet will do).


Originally posted by author:
Erina has IMO the best themes of the game. I love that vocal chorus which happens during minute 1:30.

Once you defeat Erina you will learn more about the past. You will also receive the BUNNY MEMORIES.


13 Comments
SeniorFaces Jul 6, 2022 @ 7:08pm 
Great guide, while a full area maps, along section map are a better idea, it still a good guide for getting almost all eggs,Except Windy Ravine last 2 eggs (if you don't carefully read) and completing the 100% of the main game. (not all achievements)

Now that I officially ended the main game (not all achievements), i feel a "Now what!?" that I really hate, since i'm not skilled enough for completing all achievement due to "speed running" being one of them, and unlike my college years, now i have responsibilities that cap my time to fully master this game.

I guess that I will treat this game as Castlevania Aria of Sorrows, Just play the game normally twice a year and maybe in 2 to 4 years, I 100% complete the main game Again and the cycle repeats.

Sorry for being too dramatic, but this is easily my 2nd (almost 1st) favorite 2D metroidvania.
By the way, I don't know IF you know this or not, after an certain update, the part of your

" Don't Accept Cicini´s proposal to be transported to the Gold River Bank, instead travel to starting forest."

You can not can't accept Cicini's proposal at all, the game forces you to accepts no matter what, so you have to re do you guide from that point out.....
sofiahelena103 Jul 6, 2021 @ 3:35pm 
belo walkthrough amigo
Zincoshine Nov 30, 2020 @ 4:41am 
Amazing walkthrough. Well done!
AngryMexicanDog  [author] Apr 26, 2020 @ 7:52am 
@吉

Hello and thanks for reading this guide.

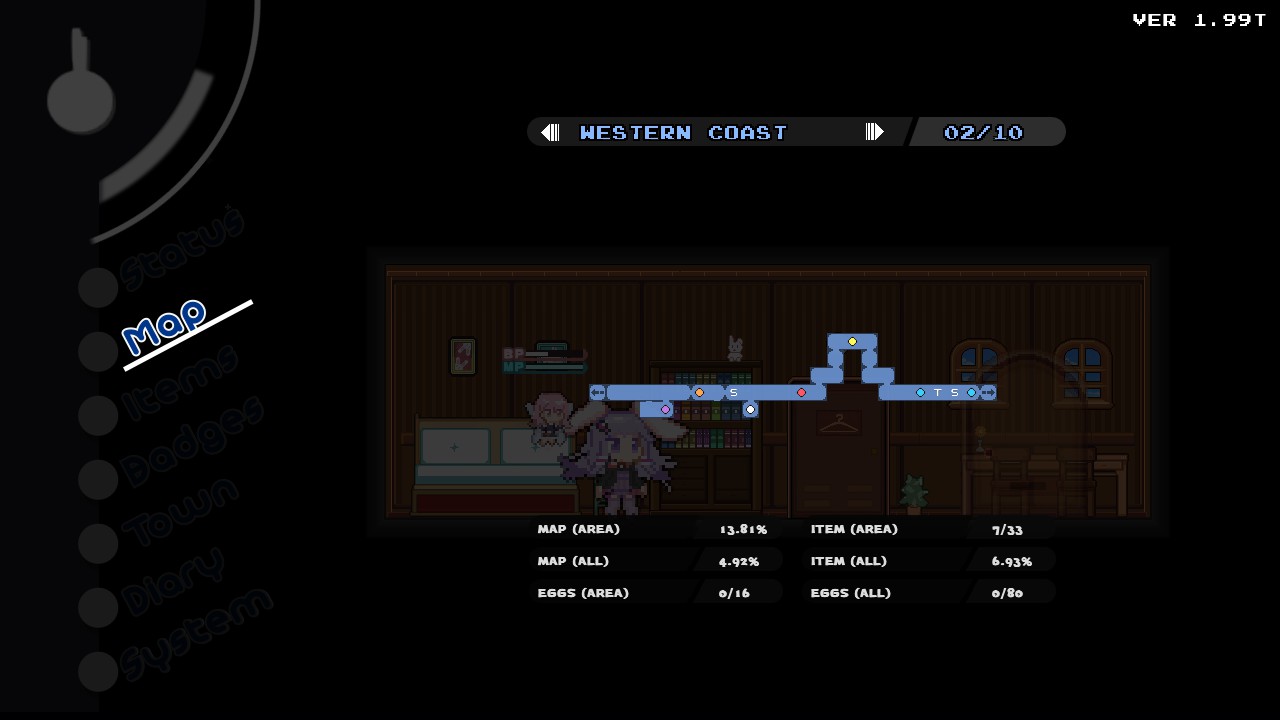
Starting from part 3 each section has multiple maps with numbers to guide the player to get all obtainable items in that area. My original idea was to make a guide to show new players where to go and how to not get lost (pushing the player to a specific direction).

What kind of maps would you add to make this guide better? I know RabiDB has full maps with complete items. Maybe a map with no items could also be helpful.

:rbrb1:
Bobs Apr 25, 2020 @ 9:19am 
I think posting the full maps would be more useful...
AngryMexicanDog  [author] Mar 17, 2020 @ 7:16pm 
@Mashiro

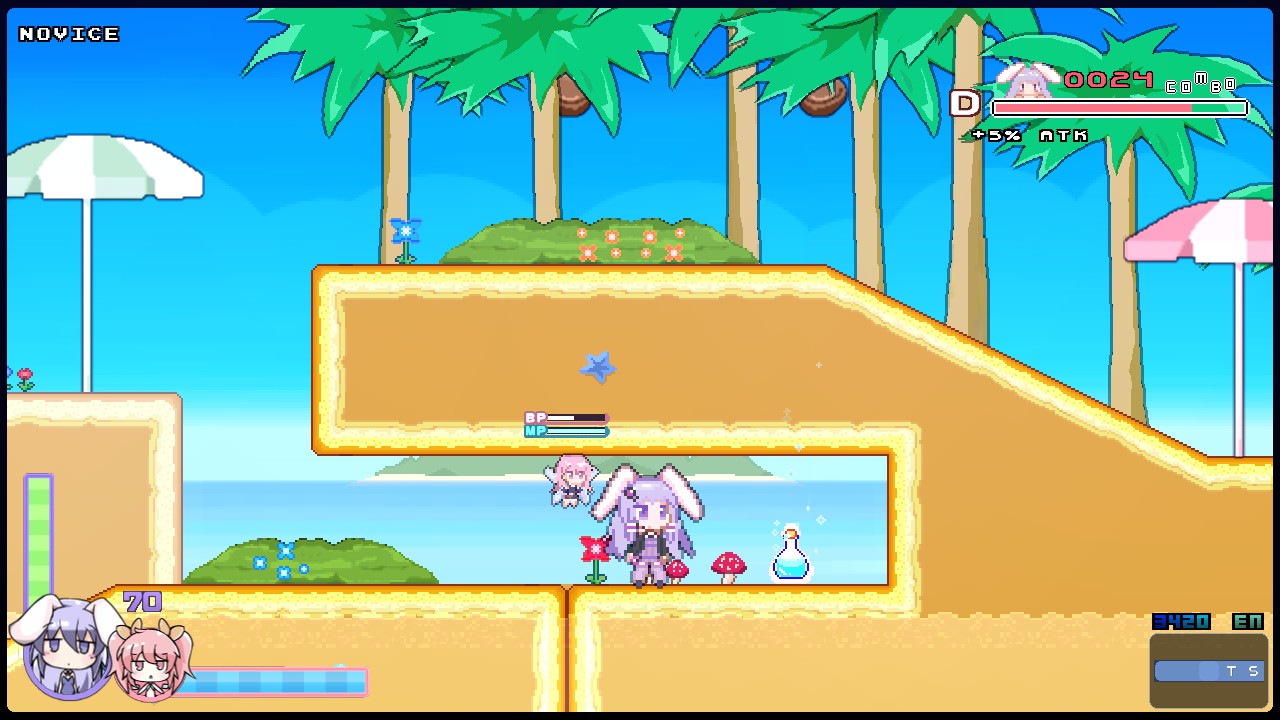
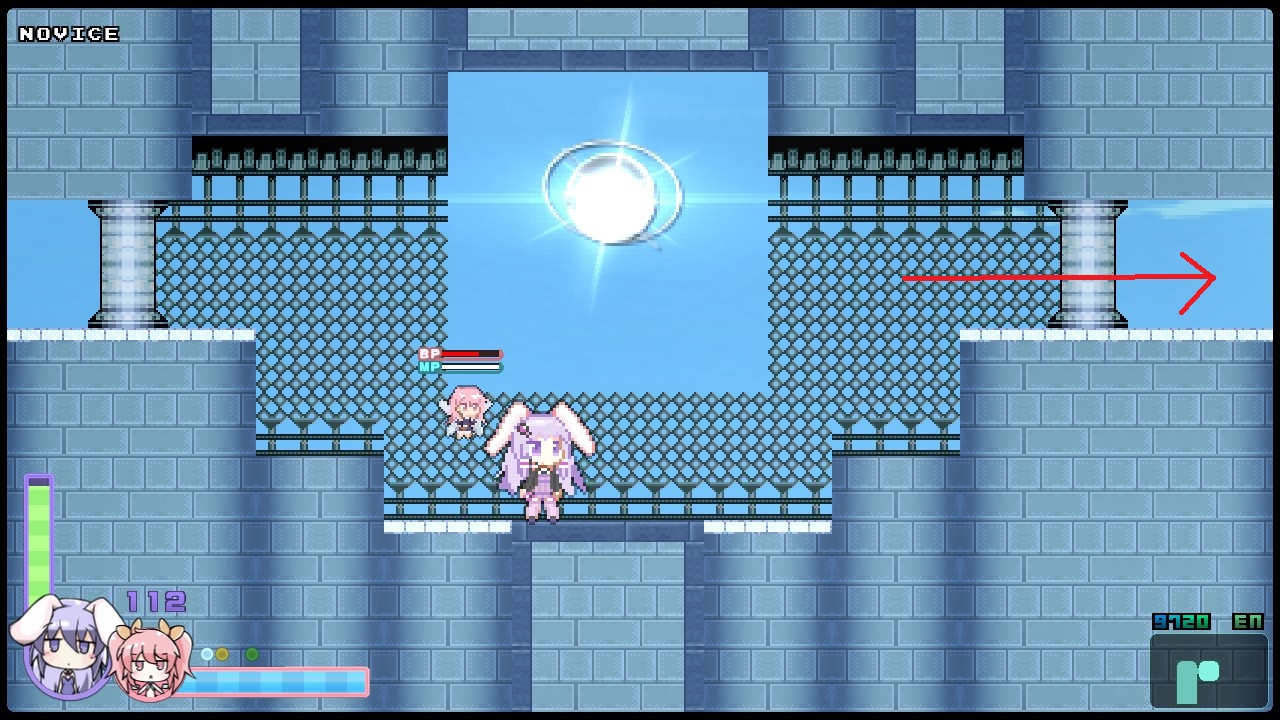
If I'm not mistaken the springs appear in lower difficulties. Guess you have to wall jump and use every other technique :rbrb1:
Maayan Mar 17, 2020 @ 11:01am 
why is there no spring for me in the floating library, I cant get the badges in this level...
AngryMexicanDog  [author] Jun 2, 2019 @ 3:24pm 
Thank you.

If you see any inconsistencies that's because I kept adding/removing ideas while writing the guide. I will revisit this guide later during the year after finishing Bloodstained:ROTN and a few (untouched and unfinished) games in my library,

This is by far the biggest proyect I have done yet.
waylaven Jun 2, 2019 @ 2:17pm 
10/10 guide. I'm at 100% achievements already and looking through this somehow makes me want to do another run just to use it.