ACE COMBAT™ 7: SKIES UNKNOWN

ACE COMBAT™ 7: SKIES UNKNOWN

461 ratings
How to S rank all missions on ACE difficulty - ACE of ACES achievement
By Edon
How to get S rank on all missions on ACE difficulty and what aircraft builds to use.
8
8
30
2
2
2
   
Award
Favorite
Favorited
Unfavorite
Intro
Hi Pilots!

This guide will cover how to get S rank on all missions on ACE difficulty and what aircraft builds I used to do it. It is intended for players who have finished the game on ACE and have access to the top end aircraft, weapons and parts.
To get an S rank you must get a score => the S rank score for that mission, I used the Ace Combat wiki to find out what they are (link below).
Score is your combined destruction score plus time bonus.
You get destruction score for blowing stuff up, you lose points for destroying friendly targets.
Each mission has a time bonus for completing it quickly, if you beat the mission under this time you get the full bonus and the bonus goes down for each second you go over. If your struggling to do the mission quickly you can make up for it by blowing more stuff up.
Damage taken and accuracy do NOT affect your score, they do affect how much MRP you get but that is different to your score, so dont worry about taking a few hits and be liberal with your missiles.
On some missions I had to kill the Named ACE to get S rank for their high value destruction score, see Laika's guide (link below) for how to get them to spawn.
You can get the S ranks in FREE MISSION mode and still get the achievement.
I used a regular X-BoX 360 pad.
I have the flight controls set to expert and the units set to meters.

Thanks to the Ace combat wiki for the S rank scores and mission times.
https://acecombat.fandom.com/wiki/Ace_Combat_7:_Skies_Unknown/Missions

Thanks to Laika's guide for how to kill the Named Aces.
https://steamcommunity.com/sharedfiles/filedetails/?id=1642144158
Mission 01 - Charge Assault - Operation Deer Horn
Aircraft:Su-35S
Weapon:LAAM
Parts:Light Blisk
Variable Cycle Engine
Superior Manoeuvrability
Queen's Custom
Electronic Optical Hybrid Sight (MSL)
Thrust-Adjusting Steering Device (MSL)
Electronic Optical Hybrid Sight (SP)
Thrust-Adjusting Steering Device (SP)
Named ACE kill: Not Required
Score required: 20,500
Time bonus: 10,230 4mins 50 secs

This mission is very easy, you can get away with only using your LAAM's. It takes 1 LAAM for the Tu-95s and escorts, it takes 2 for the Tu-160. Make sure to leave 1 bomber alive until you finish off the escorts so they dont despwn.

Mission 02 - Charge the Enemy - Operation Eastern Wind
Aircraft:F-35C
Weapon:8AGM
Parts:Light Blisk
Variable Cycle Engine
Superior Manoeuvrability
Queen's Custom
Electronic Optical Hybrid Sight (MSL)
Multiple Enemy detection Device (MSL)
Thrust-Adjusting Steering Device (MSL)
Takeoff Weight Augmentation (SP)
Named ACE kill: Not Required
Score required: 33,000
Time bonus: 25,550 6 mins

As you can see from the required score this is a speed focused mission as you can get 25k out of the 33k you need just from the time alone. Taking 8AGM with the take off weight part means you have more missiles than ground targets allowing you to do the first part of the mission in under 3 mins.
This leaves you 3 mins to dogfight the drones in the second part. I did get the Named ACE JESTER to spwn during my run but was still able to S rank without killing him.
Mission 03 - Two-pronged Strategy - Operation Dual Wielder
Aircraft:F-22A
Weapon:8AAM
Parts:Variable Cycle Engine
New Flap Actuators
Superior Manoeuvrability
Queen's Custom
Electronic Optical Hybrid Sight (MSL)
Thrust-Adjusting Steering Device (MSL)
Takeoff weight Augmentation (SP)
Thrust-Adjusting Steering Device (SP)
Named ACE kill: Not Required
Score required: 44,000
Time bonus: 27,640 9 mins

Save your 8AAM for when the arsenal bird shows up. You should fly behind the arsenal bird and use your 8AAM to quickly destroy its components and the drones flying in formation around it. After the arsenal bird raises its shield and the objective switches to taking out the drones and you will face groups of drones spread far apart. Use your 8AAM when closing the distance between the groups and switch to standard missiles when <2200.
Mission 04 - Rescue - Operation Lighthouse Keeper
Aircraft:F-22A
Weapon:QAAM
Parts:Variable Cycle Engine
New Flap Actuators
Superior Manoeuvrability
Queen's Custom
Electronic Optical Hybrid Sight (MSL)
Thrust-Adjusting Steering Device (MSL)
Takeoff weight Augmentation (SP)
Thrust-Adjusting Steering Device (SP)
Named ACE kill: Not Required
Score required: 50,000
Time bonus: 32,440 10 mins 30 secs

Time is tight on this mission so you want to get the first part of dodging the radars out of the way as quickly as possible. I took both shortcuts though the radars, note that on ACE difficultly the gaps are smaller, particularly the second one.
Shortcut 1
Shortcut 2

After the drones launch from the containers use QAAM for any drones in the air to get quick kills and destroy all ground targets on the mainland. You want to leave the drones around the base of the space elevator till last so you dont waste time flying back and forth between the mainland as the ground targets dont all spawn at once. After Mother Goose One (MGO) has taken off you want to be killing as many drones as you can but at the same time taking out the ones that head towards MGO. The drones attacking MGO are easy to spot when they spawn out of nowhere on your radar and make a B-line straight for MGO.

Mission 05 - 444 - Operation High Card
Aircraft:Su-35S
Weapon:LAAM
Parts:Light Blisk
Variable Cycle Engine
Superior Manoeuvrability
Queen's Custom
Electronic Optical Hybrid Sight (MSL)
Thrust-Adjusting Steering Device (MSL)
Electronic Optical Hybrid Sight (SP)
Thrust-Adjusting Steering Device (SP)
Named ACE kill: Not Required
Score required: 35,000
Time bonus: 18,040 8mins

For the first part of the mission I just go up high (10,0000) and circle over the airbase until the targets become available. When your targeting is enabled are take out any escorts near you then dive down and use LAAM on the bombers, kill 1-2 more escorts than use LAAM on the next wave of bombers, rinse and repeat.

Mission 06 - Long Day - Operation One Pair
Aircraft:F-35C
Weapon:8AGM
Parts:Light Blisk
Variable Cycle Engine
Superior Manoeuvrability
Queen's Custom
Electronic Optical Hybrid Sight (MSL)
Multiple Enemy detection Device (MSL)
Thrust-Adjusting Steering Device (MSL)
Takeoff Weight Augmentation (SP)
Named ACE kill: Not Required
Score required: 27,000
Time bonus: None

Their are 3 bases on this mission with a few smaller bases and convoys spread out between them, drones also start spawning in the later half of the mission. Fly straight ahead from the mission start to the first base, focus on taking out the escorts that are taking off in your first strafing run and then move on to the TU-160s that are taxing. Remember to make good use of your machine gun to conserve your missiles. Use 1 full salvo of 8AGM to quickly take out half the base then pick off the remaining 2 escorts and ground targets. I ignore the base in the canyons due to canyon walls blocking line of sight making it require more staffing runs to take out instead head to the north base. Take a route that passes over one of the truck convoys and one of smaller base. At the northern base I destroy ground targets only until I run out of 8AGM and switch to the air targets, you should be able to clear out all ground and air targets in the north base before the drones spawn. The rest of the mission is spent shooting the drones down. I focus on the air targets as they give much higher score than ground targets, a drone is worth 450 but warehouse is only worth 100.

Mission 07 - First Contact - Operation Two Pairs
Aircraft:F-22A
Weapon:QAAM
Parts:Variable Cycle Engine
New Flap Actuators
Superior Manoeuvrability
Queen's Custom
Electronic Optical Hybrid Sight (MSL)
Thrust-Adjusting Steering Device (MSL)
Takeoff weight Augmentation (SP)
Thrust-Adjusting Steering Device (SP)
Named ACE kill: Not Required
Score required: 46,350
Time bonus: 40,550 12 mins 30 secs

Again just by looking at the time bonus this is a speed mission. You only nee to take out a few none TGT in the first part, I would recommend the AH-64Ds and dont use your QAAM yet. Once the drones spawn take them out quick with your QAAM. When Mr X shows up only focus on him and ignore the rest of SOL squadron. You should have around 10 QAAM left over from the drones, only use them when you have a clear shot and just throw your regular missiles at him. The volume of fire will quickly get the 6 or so hits you need to force him to withdraw.

Mission 08 - Pipeline Destruction - Operation Three of a Kind
Aircraft:F-35C
Weapon:8AGM
Parts:Light Blisk
Variable Cycle Engine
Superior Manoeuvrability
Queen's Custom
Electronic Optical Hybrid Sight (MSL)
Multiple Enemy detection Device (MSL)
Thrust-Adjusting Steering Device (MSL)
Takeoff Weight Augmentation (SP)
Named ACE kill: Not Required
Score required: 40,550
Time bonus: 12,050 10 mins

The first part of this mission is by far harder than the second. You have to destroy all the ground targets,the AH-64Ds, 1-2 of the escort fighters and 1-2 of the drones in the second part to get the 28,500 destruction score you need, assuming you complete the mission in 10 mins. In the first part you should focus all your effort on the oil tanks themselves, when they are destroyed they will take out other near by targets as well, including other oil tanks, this can set of a chain reaction taking 5+ targets in 1 shot. In my first strafing run from the mission start I fly straight ahead and dive to around 500, when in range slow down to 300 (or a slow as you dare without stalling) fire 2 missiles to the oil tanks to the left and right and use your machine gun to focus on the oil tanks head. After this first pass over the main base head to the smaller base to the west, you should be able to take it out in one pass if you hit the oil tanks. Now use all your 8AGMs on the main base, switch back to standard missiles when your 8AGM are reloading for precision strikes against oil tanks. I leave the oil tanker ships till last but make sure you get them as their worth 500 each. You should be able to take out all ground targets with 1 min to spare before the start of part 2, use this time to take out 1-2 of the fighters. Once the second part starts take out the convey of 3 trucks ahead of you and the 1 truck just on the edge of the dust storm. Now check your score, are you over 27,000? If yes great, the remaining main TGT trucks will give you the score need, if your not just keep taking out the TGT until the drones spawn, kill the 1-2 you need to push you over 28,500 and then focus on the remaining TGT.

Mission 09 - Faceless Soldier - Operation Flush
Aircraft:Gripen E
Weapon:LACM
Parts:Light Blisk
Variable Cycle Engine
Queen's Custom
Electronic Optical Hybrid Sight (MSL)
Multiple Enemy Detention Device (MSL)
Thrust-Adjusting Steering Device (MSL)
Takeoff weight Augmentation (SP)
Electronic Optical Hybrid Sight (SP)
Named ACE kill: Required
Score required: 43,000
Time bonus: 31,240 11 mins

For me this was the hardest mission to get S rank on. Beating the 11 min time limit for the max time bonus is no problem but getting the kills you need to push your score over 43k is a pain to do. I found the best way to do it was to kill the Named ACE for this mission:SPIDER, to get him to spawn you must destroy 50% of none TGT targets in the first part of the mission he will then spawn around the middle of the map. He will de-spawn at the end of part one so you have to kill him before you take out the last radar or in the brief 30 sec gap you get between parts 1 and 2. Using LACM for their long range, ability to skim over mountains and their blast radius makes taking out the ground targets quicker, easier and safer. The best none TGT targets to kill to hep get SPIDER to spawn are the groups of warehouses, these are in groups of 2-6 that can be taken out with 1 LACM. I found a good opening start to the mission is to fly just under the clouds at full speed towards the first radar, fly out of the clouds when in range of standard missiles, destroy the radar, switch to LACM and fire 1 at the AA guns on the mountain opposite then dive into the clouds on the other side of the mountain where you will be in a good position to hit the 2 AA guns on the valley floor. After this is very much down to finding a route though the map that works for you, taking out the AH-64Ds is good for your score but the clouds mean you have to get close before you can lock on and makes it more likely for them to dodge you missiles, dont waste to much time dog fighting them as the warehouses and SPIDER are you main targets. The higher you launch the LACM from the better the chance it has of skimming over the mountains to its target, popping above the clouds firing off 2 LACM and diving back under will increase your chance to hit. You can take one hit from the missiles that get fired at you for being above the clouds and still have 30% HP left. At the start of part 2 I fly up to 10,000 and fly around the map at full thrust, this will make you immune to any missiles fired at you and you will spawn back near the TGTs after the cutscene.

Mission 10 - Transfer Orders - Operation Full House
Aircraft:F-22A
Weapon:QAAM
Parts:Variable Cycle Engine
New Flap Actuators
Superior Manoeuvrability
Queen's Custom
Electronic Optical Hybrid Sight (MSL)
Thrust-Adjusting Steering Device (MSL)
Takeoff weight Augmentation (SP)
Thrust-Adjusting Steering Device (SP)
Named ACE kill: Not Required
Score required: 27,000
Time bonus: 19,240 12 mins

As you have to kill all targets in this mission to completed it the S rank is about speed. The SAMs spawn in the same place each time so if you learn their locations you can find them fast. For a rough guide to find the SAMs: fly straight from the mission start over the fist SAM group then keep going on that heading until you destroy 2 more SAM groups. Then turn 90 degrees right and go West, destroy 2 more SAM groups. Then turn 90 degrees right and go north, destroy 2 more SAM groups. Around this point the first fighters will spawn, ignore them for the moment. From the position of the last northern SAM turn right 135 degrees and fly south east over the map to get the 2 final SAM groups. Once the SAMs are down kill the fighters. You will know if your time is good as the Named ACE:LOUVETEAU will spawn in the 3rd fighter wave, you dont need his points to get the S rank but he spawns if you kill the SAMs quickly. When the drone arrives switch to your QAAM and fire at will, it will be dead before you run out.

Mission 11 - Fleet Destruction - Operation Siren's Song
Aircraft:Gripen E
Weapon:LACM
Parts:Light Blisk
Variable Cycle Engine
Queen's Custom
Electronic Optical Hybrid Sight (MSL)
Multiple Enemy Detention Device (MSL)
Thrust-Adjusting Steering Device (MSL)
Takeoff weight Augmentation (SP)
Electronic Optical Hybrid Sight (SP)
Named ACE kill: Not Required
Score required: 40,000
Time bonus: None

LACM makes this mission easy to S rank. Focus on killing the ships as a single LACM will one shot all of them apart from the aircraft carrier that will take 2, make sue you target the ship itself and not its weapons. After you take out the main body of the fleet pick which platform you want to attack, I chose the north one in the ocean as theirs more room to maneuver than in the fjord. Keep just out of range of the platforms air defence and focuses on killing the fighters and picking off the single ships around the platform with LACM. To take the platforms out you need to hit their COREs this is best done at slow speed and a low altitude under 250.

Mission 12 - Stonehenge Defensive - Operation Dragon Breath
Aircraft:Su-57
Weapon:PLSL
Parts:Light Blisk
Variable Cycle Engine
Superior Manoeuvrability
Queen's Custom
Electronic Optical Hybrid Sight (MSL)
Multiple Enemy Detention Device (MSL)
Thrust-Adjusting Steering Device (MSL)
Laser Beam Expander
Named ACE kill: Not Required
Score required: 50,000
Time bonus: 15,330 16 mins 30 secs

This is a more destruction focused mission. The target order is: bombers, ground targets, fighters. The range of the PLSL is 5k and it makes quick work of the groups of ground targets and the slow moving bombers. You will want to save around 100 ammo for your PLSL for when the arsenal bird shows up so you can take down its main propellers quickly, leaving you more time to kill drones for points.

Mission 13 - Bunker Buster - Operation Magic Spear
Aircraft:X-02S
Weapon:None
Parts:Light Blisk
Cutting-Edge Airbrakes
Variable Cycle Engine
Superior Manoeuvrability
Queen's Custom
Electronic Optical Hybrid Sight (MSL)
Mutiple Enemy Detention Device (MSL)
Thrust-Adjusting Steering Device (MSL)
Named ACE kill: Not Required
Score required: 38,000
Time bonus: 19,240 7 mins

The second hardest mission to get S rank on due to its random nature. Their are 8 silo TGT on the map but only 5 that are real and its randomised which are the real ones each time you start the mission. Their is only just enough time to hit all the silos so getting the 16k destruction score on top of that is what makes this mission hard. I found the best tactic is to allow yourself one staffing run on each silo to knock as many ground targets as possible around it then turn around for the bombing run on the silo itself. Once you knock out the silo leave any remaining ground targets and move on to the next silo. The Helicopters and AD-Tanks are your best way to boost your score, only attack the AD tanks at close range <300 as they have CWIS and will shoot down your missiles if you fire from long range. Ideally you want to visit all 8 of the silos to pick up the easy kills in the open but you might get "lucky" and kill the 5 real silos in a row causing all the targets to de-spawn, if this happens you most certainly going to get A rank rather than S. You want to make sure you have 16k points before knocking out the final silo in part 1. At the start of part 2 you want to see a single fighter flying away from you to the west, this is the Named ACE:COMET he spawns if you kill the silos quickly, you dont need to kill him but the fact he spawned means your making good time. A good tactic for taking down the IRBMs is to come up from under them, it takes 3 missiles to kill 1.

Mission 14 - Cape Rainy Assault - Operation Werewolf
Aircraft:F-35C
Weapon:8AGM
Parts:Light Blisk
Variable Cycle Engine
Superior Manoeuvrability
Queen's Custom
Electronic Optical Hybrid Sight (MSL)
Multiple Enemy detection Device (MSL)
Thrust-Adjusting Steering Device (MSL)
Takeoff Weight Augmentation (SP)
Named ACE kill: Not Required
Score required: 32,000
Time bonus: 18,040 9 mins

Doing a quick run though the canyon at the start will make or brake your chances of getting an S rank on this mission. You want to aim to keep your average speed >1000 but dont be afraid to slow right down for the tight turns, you can make up for it in the more open parts of the canyon. Stay low as their are less search lights.Once you reach the base slow down and do as much damage as you can in your first few staffing runs before the AA defences come online making your life more difficult. Take out he AC-130U before it gets to far away and try and kill the fighters and helicopters on the ground so you dont have to waste time dog fighting them in the air. You will know if your time though the canyon was good if the Named ACE:GADFLY spawns with the fighter reinforcements. Always prioritise targets attacking the allied ground units and make full use of your 8AGM.

Mission 15 - Battle for Farbanti - Operation Giant's Step
Aircraft:F-22A
Weapon:XSDB/QAMM
Parts:Variable Cycle Engine
New Flap Actuators
Superior Manoeuvrability
Queen's Custom
Electronic Optical Hybrid Sight (MSL)
Thrust-Adjusting Steering Device (MSL)
Takeoff weight Augmentation (SP)
Thrust-Adjusting Steering Device (SP)
Named ACE kill: Not Required
Score required: 57,000
Time bonus: 21,700 21 mins 30 secs

Start the mission loaded with XSDB to take out the ground targets and dont be afraid to use lots of your standard missiles. At the beginning of the mission take out all the aircraft straight in front of you and then either go west to hit the ground targets or east for the AC-10s. I ignore the ships in the ocean so I dont have to waste time flying back and forth between them and the mainland. Once you get 17k points the Named ACE:SERPENT will spawn in the middle of the ocean and head towards you, you dont need to kill him for the S rank but points are points. When their is around 3 mins left the HQs base defences will come online, make sure to use up all your remaining XSDB on them and once you run out or their is 1 min left fly over the return line to the north and swap them out for QAAM. When part 2 starts ignore Mr X and focus on his escorts, my normal tactic of using a QAAM when their is a clear shot and spamming standard missiles will take them out quick. Save your QAAM until after Mr X's dog fight with Cyclops 1 but keep hitting him with regular missiles until then.

Mission 16 - Last Hope - Operation Gorgon
Aircraft:Su-57
Weapon:PLSL
Parts:Light Blisk
Variable Cycle Engine
Superior Manoeuvrability
Queen's Custom
Electronic Optical Hybrid Sight (MSL)
Multiple Enemy Detention Device (MSL)
Thrust-Adjusting Steering Device (MSL)
Laser Beam Expander
Named ACE kill: Not Required
Score required: 39,000
Time bonus: 19,240 18 mins

This is the first mission where you have to ID your targets, hostile and allied targets dont change so if you know a target is hostile you can fire before you ID it will no ill effects however if you hit a friendly target you will lose points. You ID targets faster if their right in the centre of your HUD within <3000 and you can ID them though terrain and buildings. Top priority is to keep the car moving, it will stop if their are unknowns or hostiles near it so prioritise them first. Although you dont need him, if score 10k before the car enters the tunnel the Named ACE:AXMAN will spawn for extra points. This mission is cloudy and your PLSL wont shoot though clouds so choose your weapon appropriately.

Mission 17 - Homeward - Operation Reflux
Aircraft:Su-35S
Weapon:LAAM
Parts:Light Blisk
Variable Cycle Engine
Superior Manoeuvrability
Queen's Custom
Electronic Optical Hybrid Sight (MSL)
Thrust-Adjusting Steering Device (MSL)
Electronic Optical Hybrid Sight (SP)
Thrust-Adjusting Steering Device (SP)
Named ACE kill: Required
Score required: 44,000
Time bonus: 18,930 15 mins 30 secs

This is a destruction focused mission, you have to kill pretty much every single available target to get S rank. Same as the previous mission you can fire on unknown targets if you know what they are to save time. You will want to kill the Named ACE:MANTIS to boost your score, to do this you need to fly along the mass driver a low altitude <100, he will then spawn with the bombers. The hardest part of the mission is making sure you kill all the bomber escorts and MANTIS before the bombers reach the island, you will want to save your LAAM for this, Su-160s take 2 LAAM to shoot down. Keep 6 LAAM in reserve for when the cargo ships launch, each takes 3 to shoot down. You can take out one then finish of the 2 escorts who spawn from behind you.

Mission 18 - Lost Kingdom - Operation Beehive
Aircraft:F-35C
Weapon:8AGM
Parts:Light Blisk
Variable Cycle Engine
Superior Manoeuvrability
Queen's Custom
Electronic Optical Hybrid Sight (MSL)
Multiple Enemy detection Device (MSL)
Thrust-Adjusting Steering Device (MSL)
Takeoff Weight Augmentation (SP)
Named ACE kill: Required
Score required: 37,000
Time bonus: 25,550 12 mins 30 secs

Their are 2 ways to approach this mission; kill the ground targets quickly or kill the air targets quickly. I prefer the ground option as it allows you to spawn the Named ACE:LYNX for more points and once all the ground targets are gone you have more time to focus on the air. If you prefer the air option my F22-A QAAM build will give you a solid aircraft to do it in. In order to get LYNX to spawn you have to destroy all targets before the reaching the castle in 2 mins 30 secs, or 17 mins 30 secs on the mission time limit. The hard part it the dog fight with the 3 fighters but if you make good use of your 8AGM you will have plenty of time to deal with them. You will see LYNX take off and fly vertically up once you reach the castle if you were successful. Once SOL squadron take off you only need to take 2 out as then the other 2 become invincible after the first 2 go down. As you dont have QAAM just throw missiles at Mr X, you should have around 60 so shear numbers means you will get a lucky hits. JAEGER says Mr X weakness is that he flies straight and level after dodging a missile but ive not really seen this.

Mission 19 - Lighthouse - Operation Daredevil
Aircraft:F-22A
Weapon:8AAM
Parts:Variable Cycle Engine
New Flap Actuators
Superior Manoeuvrability
Queen's Custom
Electronic Optical Hybrid Sight (MSL)
Thrust-Adjusting Steering Device (MSL)
Takeoff weight Augmentation (SP)
Thrust-Adjusting Steering Device (SP)
Named ACE kill: Not Required
Score required: 67,500
Time bonus:16,840 20 mins 30 secs

This is a destruction mission. In part 1 you want to save you 8AAM and focus on the lead aircraft (F-22As,Su-57s), as they give more points and the drone aircraft become less manoeuvrable once the leader is down. Once the arsenal bird arrives finish off any none MQ-101 aircraft first then move onto the drones. Save you 8AAM until the shield drops and use them to take out the arsenal birds modules en mass to reduce the number of missiles heading your way. You wan to have 50k points before you take out the arsenal bird so dont kill it until you have destroyed all of its escort drones, you will need all their points. A good tactic for the harder to hit targets on the arsenal birds under side is to; set your target first, to pull back to around 2000, drive down at 45 degrees, do a high G turn just before you hit the water, this will give you a good angle to hit its underside and is fast so you dont get exposed to the laser and pulse cannons.

Mission 20 - Dark Blue - Operation Hush
Aircraft:F-22A
Weapon:QAAM
Parts:Variable Cycle Engine
New Flap Actuators
Superior Manoeuvrability
Queen's Custom
Electronic Optical Hybrid Sight (MSL)
Thrust-Adjusting Steering Device (MSL)
Takeoff weight Augmentation (SP)
Thrust-Adjusting Steering Device (SP)
Named ACE kill: None
Score required: 36,000
Time bonus: 25,550 10 mins

Save your QAAM until you have taken out the 4 WEAPON UAVs or they may get shot down. Keep 2 QAAM in reserve for the AFD-11 under the space elevator, when you exit the tunnel wait till it passes the central pillar and easily take it out. Once you have taken out the repeaters look at the ramps on the ground leading to the central pillar, the ones with flashing lights lead to the gaps allowing you get yourself lined up easier.

45 Comments
//_Pamiat'_Merkuria_<3 Feb 8 @ 4:17pm 
respect
Balls are breaked Dec 2, 2023 @ 8:10pm 
Thank you so much, I was struggling a bit for some of them ! Very good job !
SlyAceZeta Oct 11, 2023 @ 11:05pm 
@Complete Domination: There is no reward for S-ranking the DLC missions.
Complete Domination Oct 11, 2023 @ 10:26pm 
Would it be possible for you to write a guide for 3 SP missions too?
Shinigami Sep 5, 2023 @ 5:21am 
For mission 10 to shoot down the drone just fly AWAY from the drone. When you fly away (5+km) and then turn around to face it, it flies into your face. This is the only time when QAAMs can hit it, it goes down after 3 gun runs or so. I tried to "dogfight" it, it took 5+ minutes and my rank dropped to A. Flying away and into it takes around a minute and I managed to get S. I was planning on trying lasers if this didn't work (they work well in mission 20, better than "dogfighting" at least).
Shinigami Sep 4, 2023 @ 10:19am 
For Mission 19 - Lighthouse I used Raven (I think, DLC plane with PLSL) with QAAM instead since 8AAM didn't hit anything. I reserved my QAAMs for very agile enemies that were dodging every single normal missile - worked like a charm. But I ran out of normal missiles before the mission ended. I had 53k destruction score and around 10 minutes left on the timer (and no drones... and no PLSL ammo... no missiles, 4 QAAMs). My total was 80.8k score, so you can skip some targets, like all the guns on the arsenal bird. Diving underneath to blow up those targets in the middle (bottom) is a good idea, though. Just make sure you don't stall or you'll fall into the water.

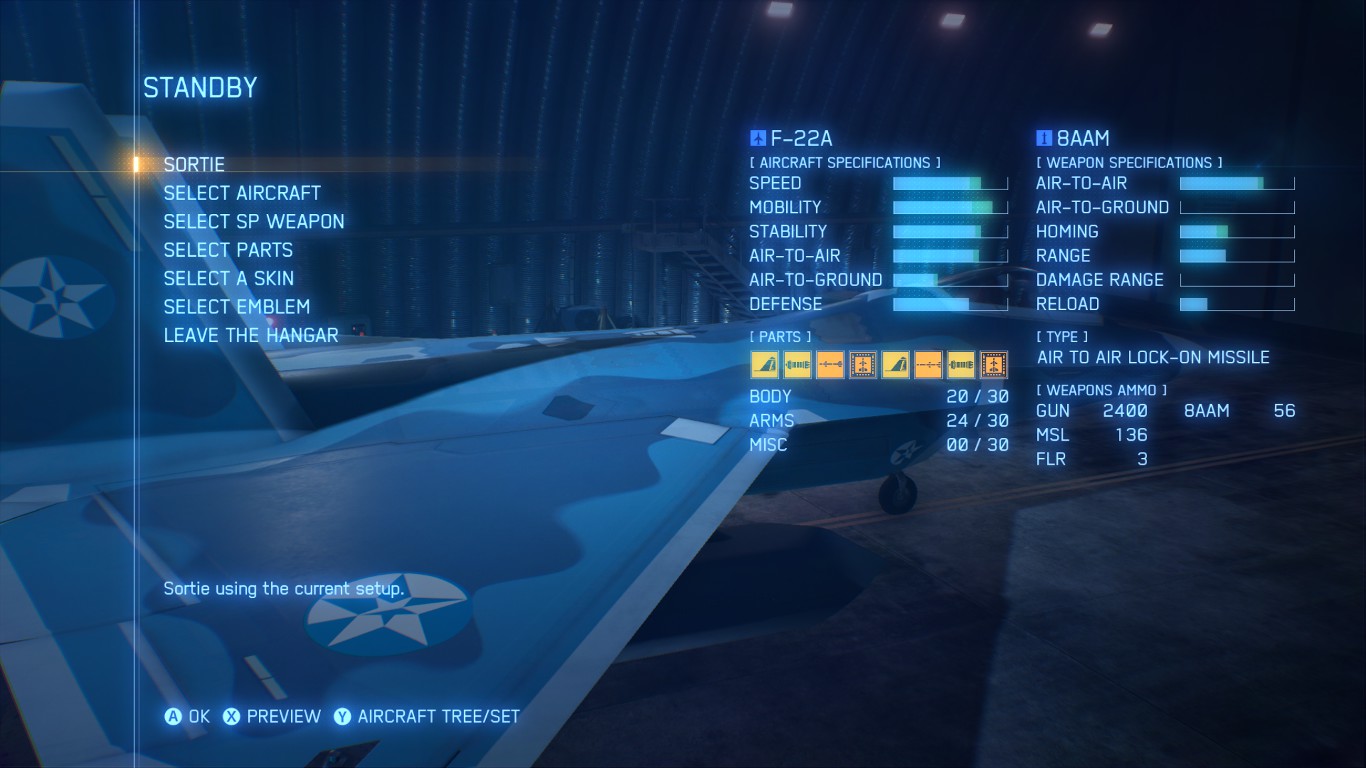
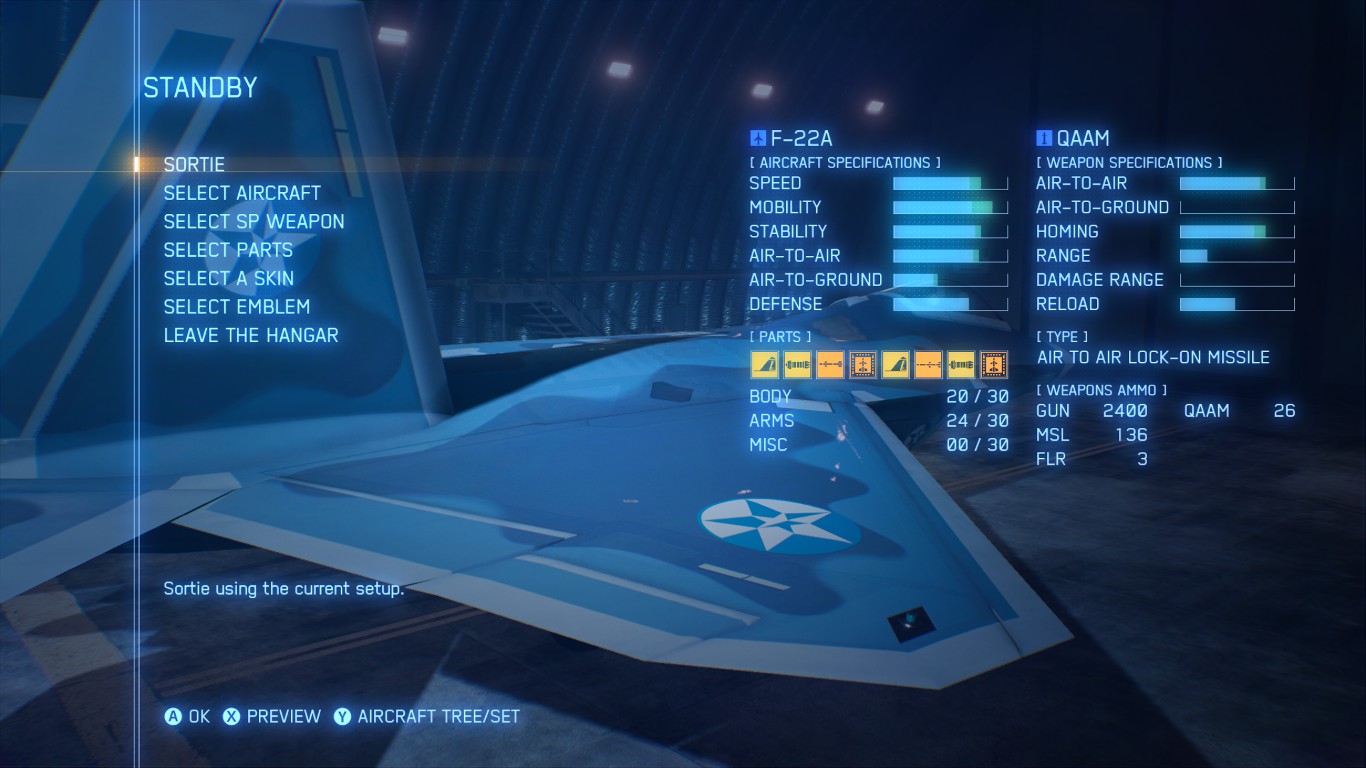
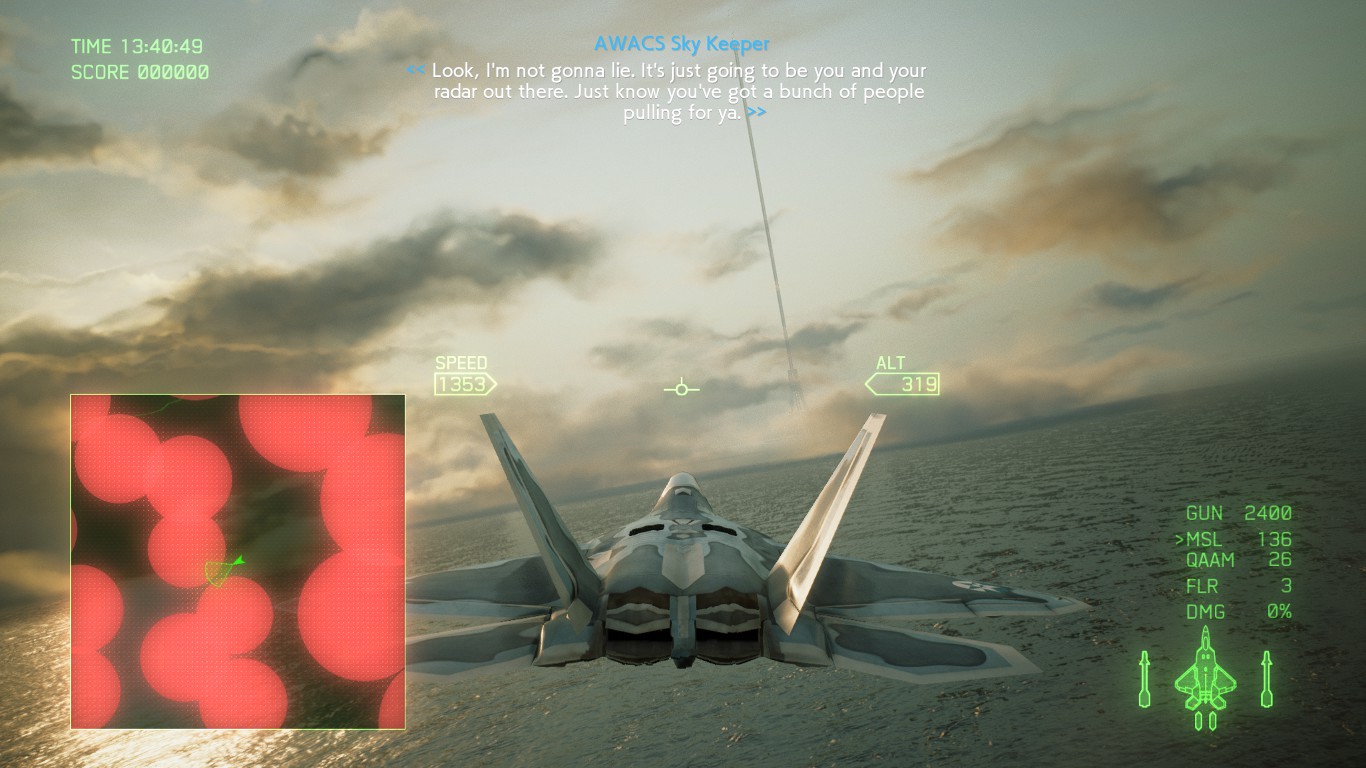
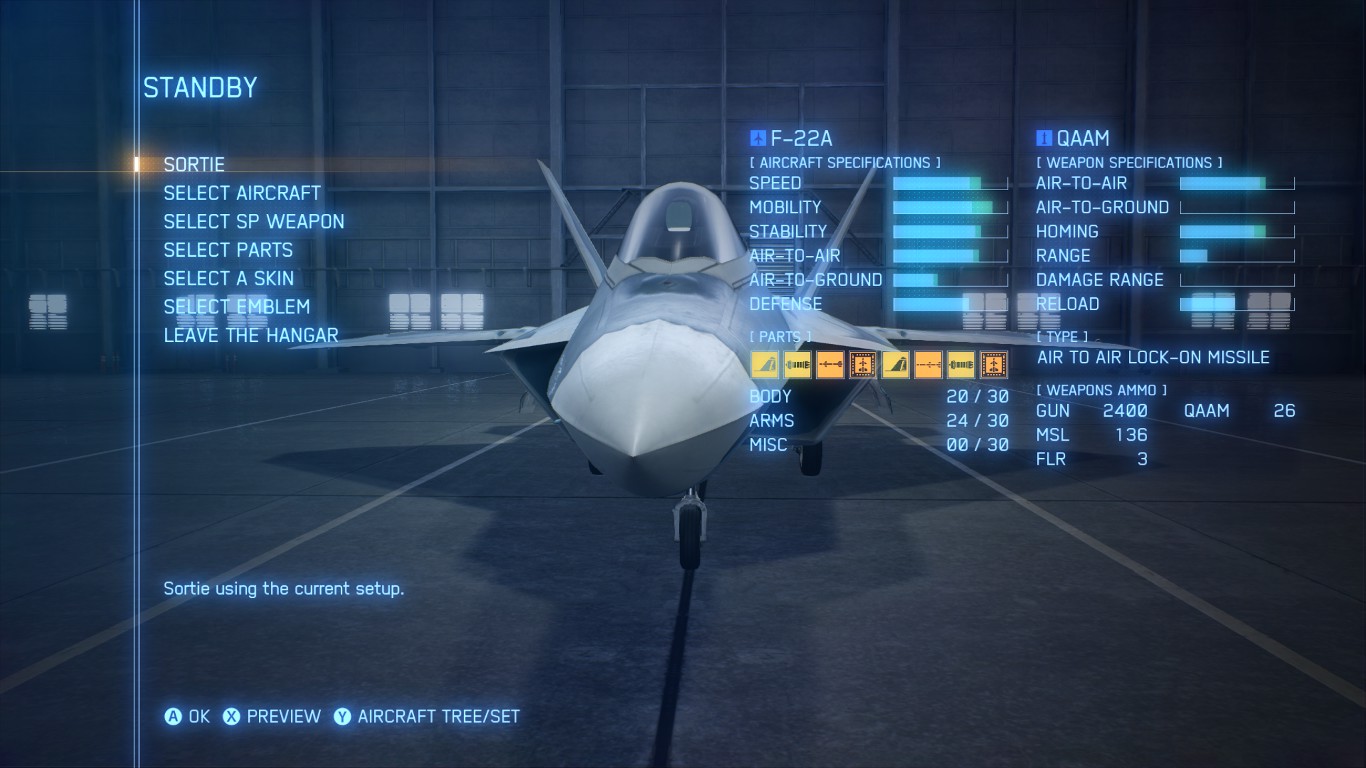
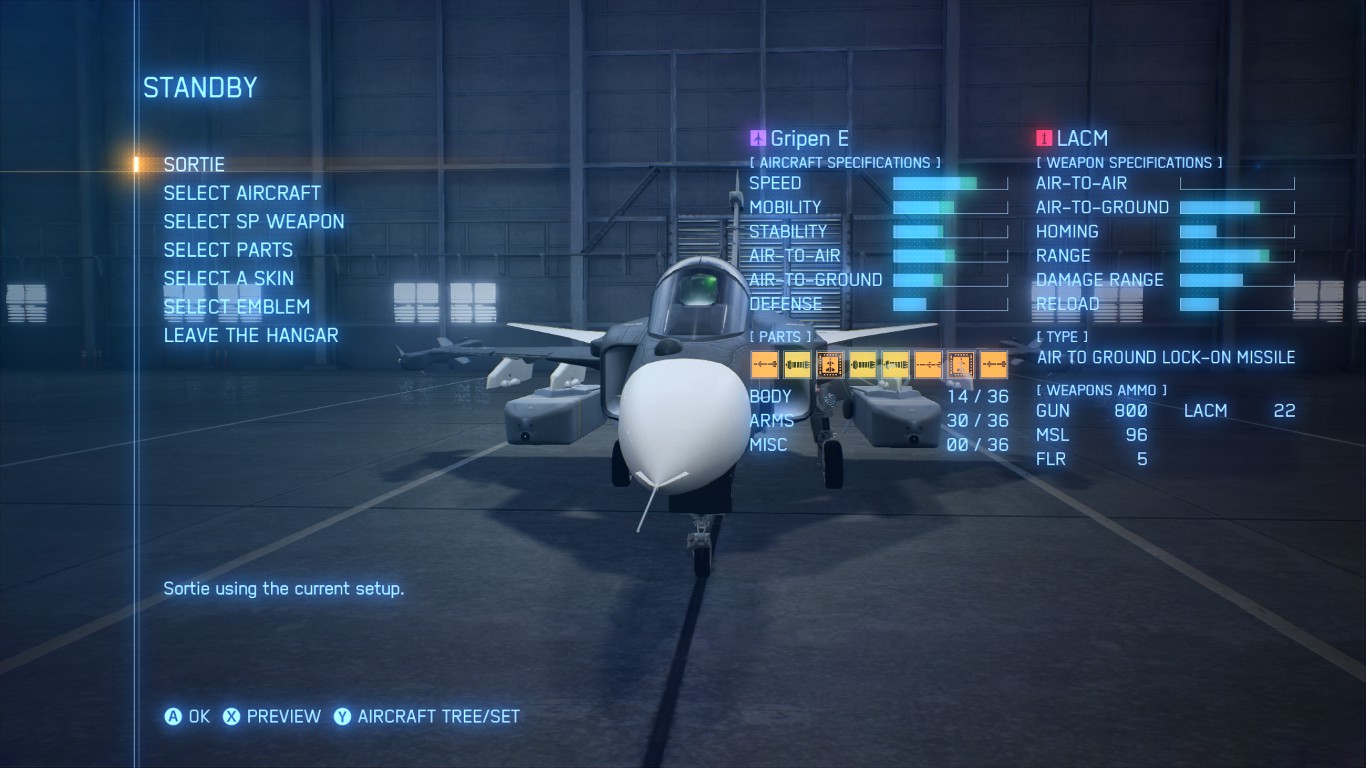
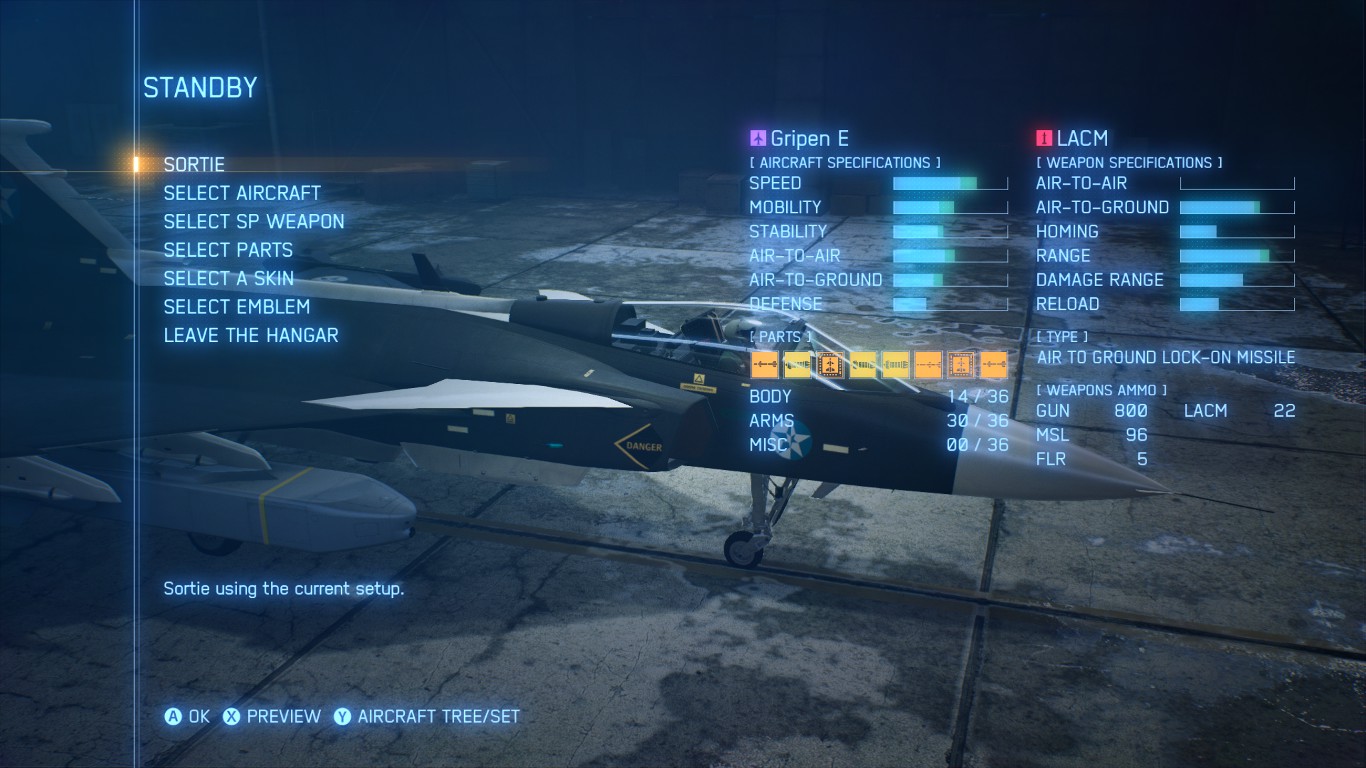
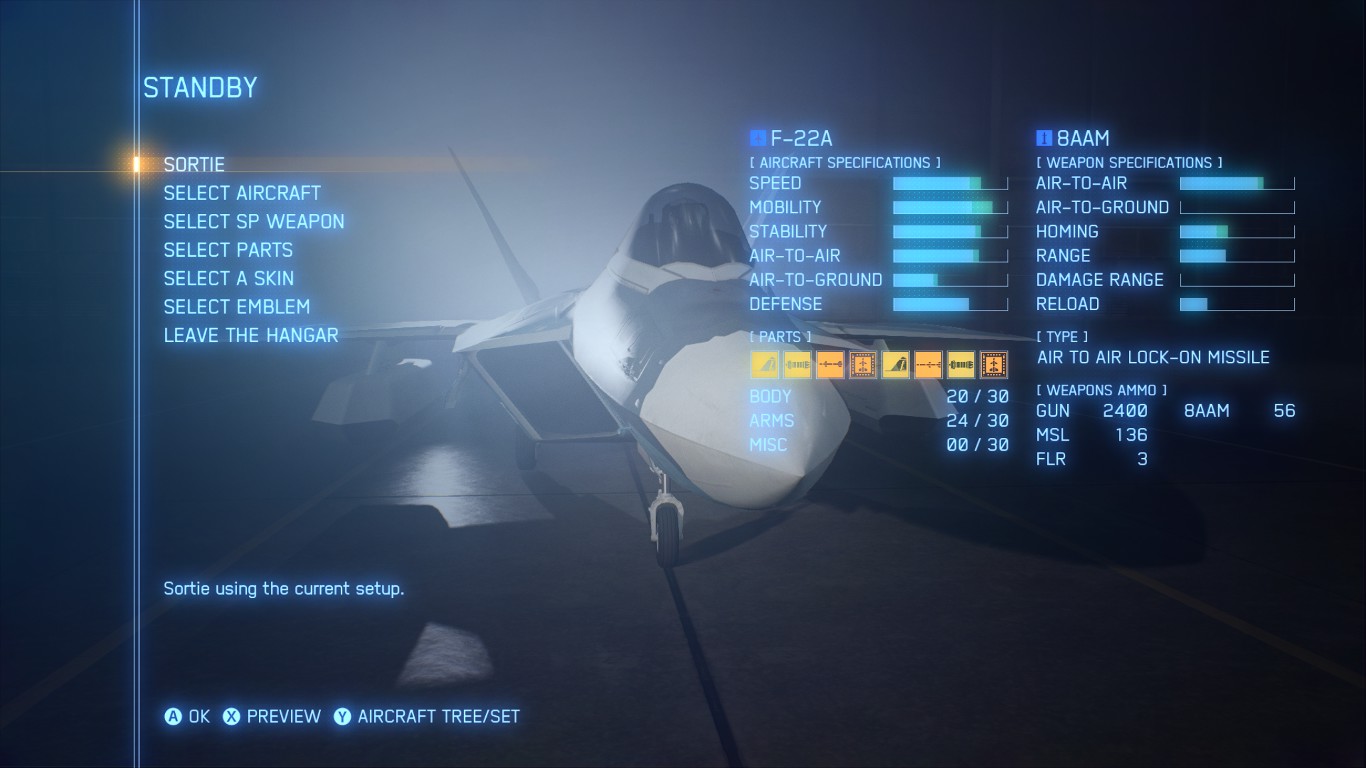
Remember: when you hold down "target" button, camera will turn towards your target so you can see if missile is locked or not. QAAMs lock on target at very large angles, so you can dive under the bird, fly over the water and still shoot QAAMs and hit it (I think it's 1 missile per target but I'm not sure).
Tall Bunyan Jul 18, 2023 @ 10:38am 
"Just use XFA-27 with MSTM, very easily S-rank all of them"
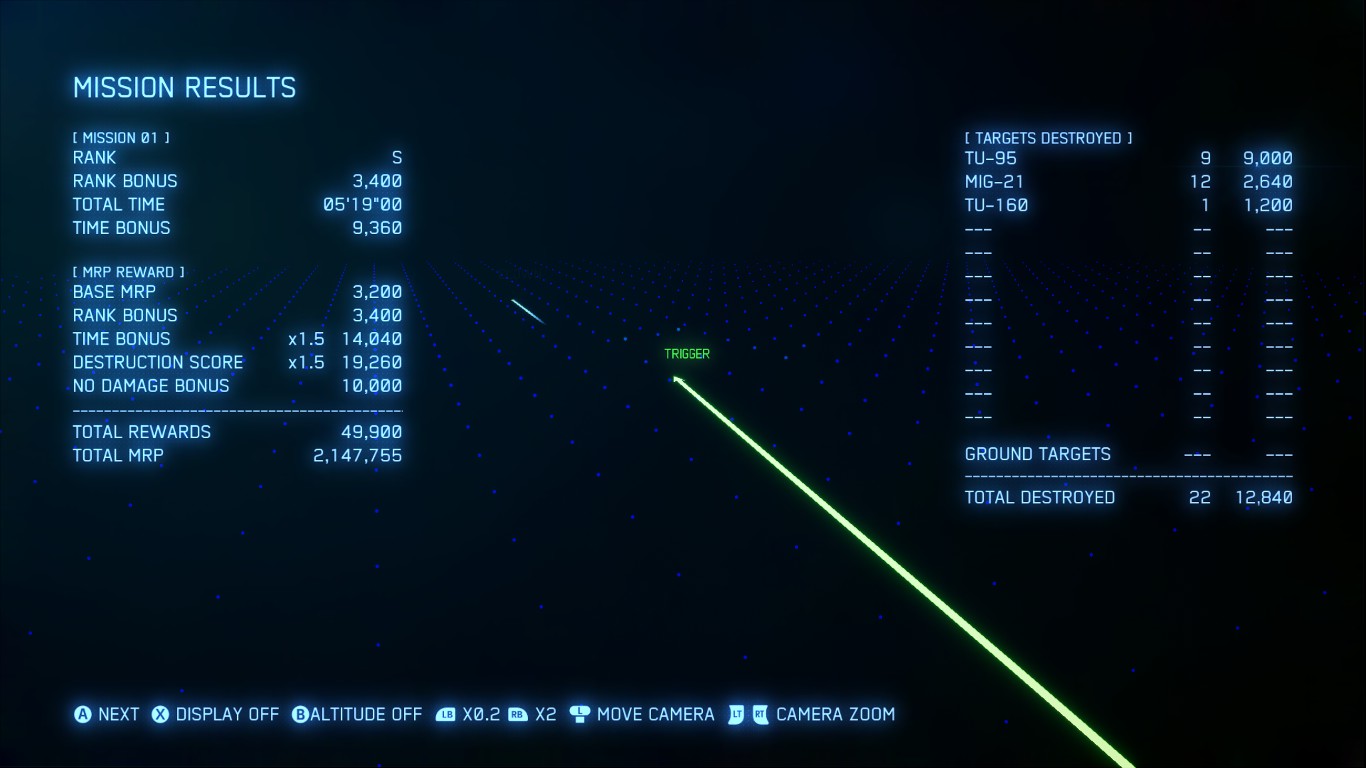
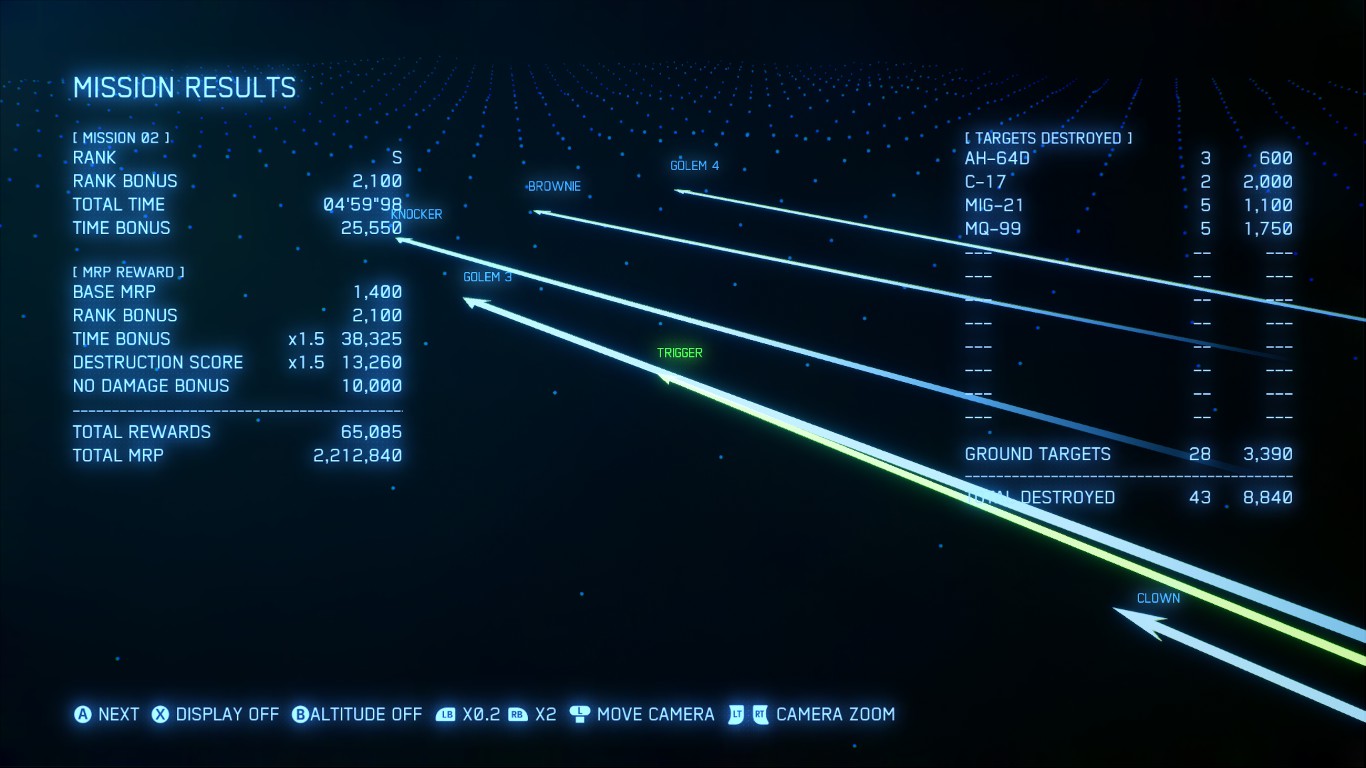
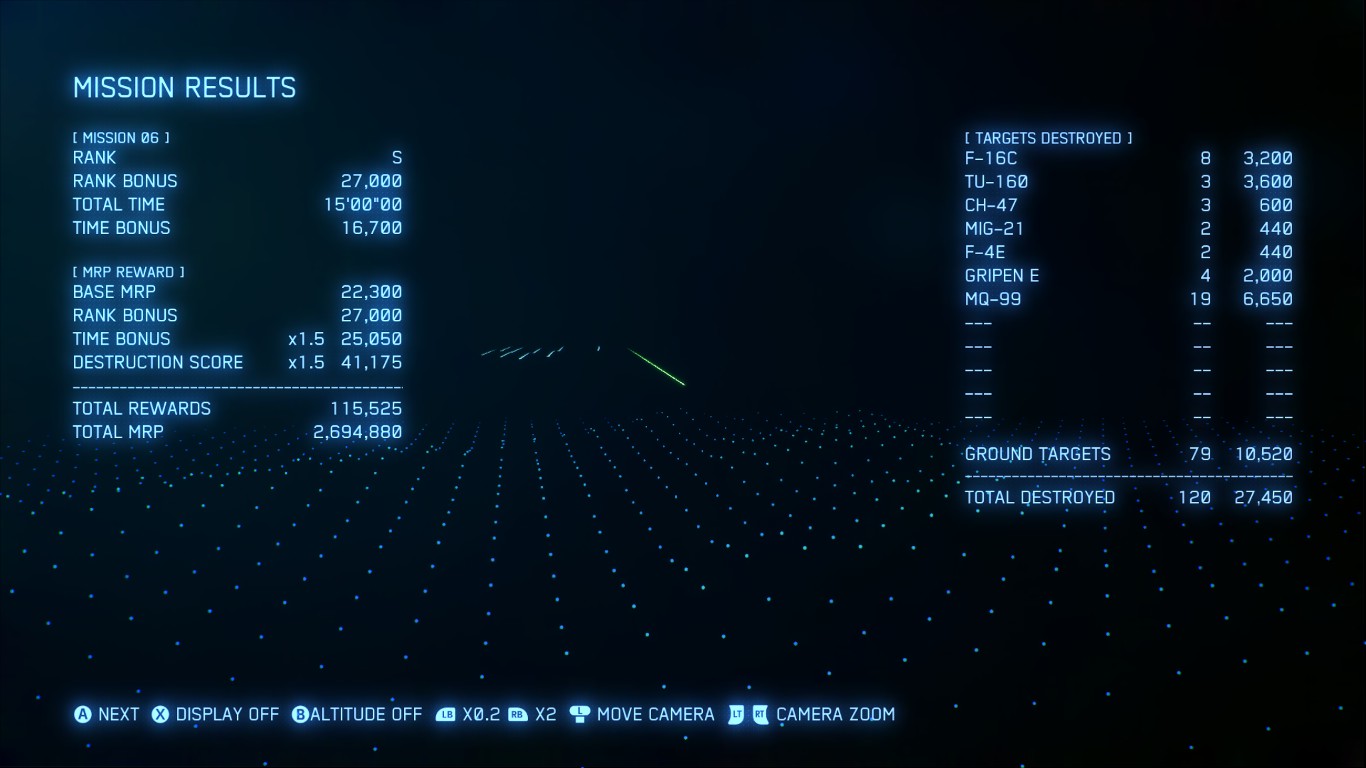
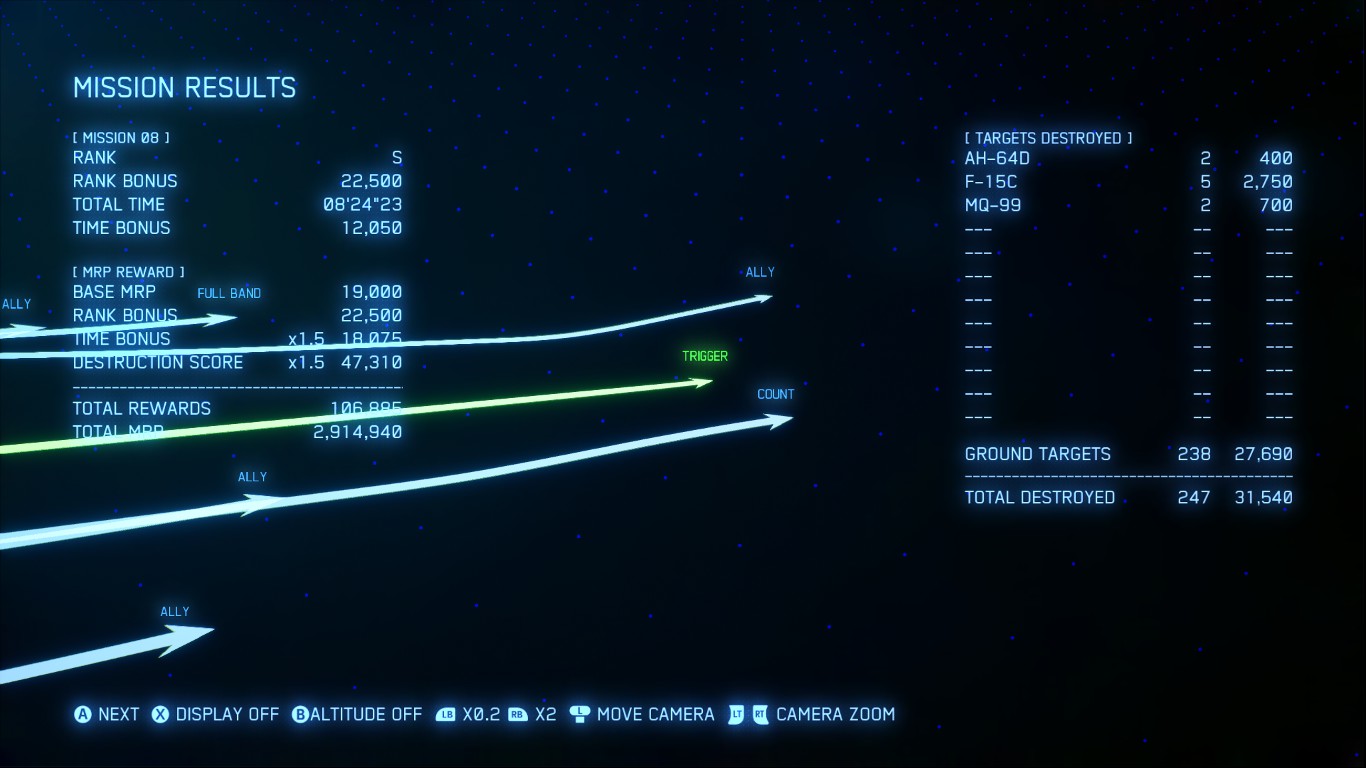
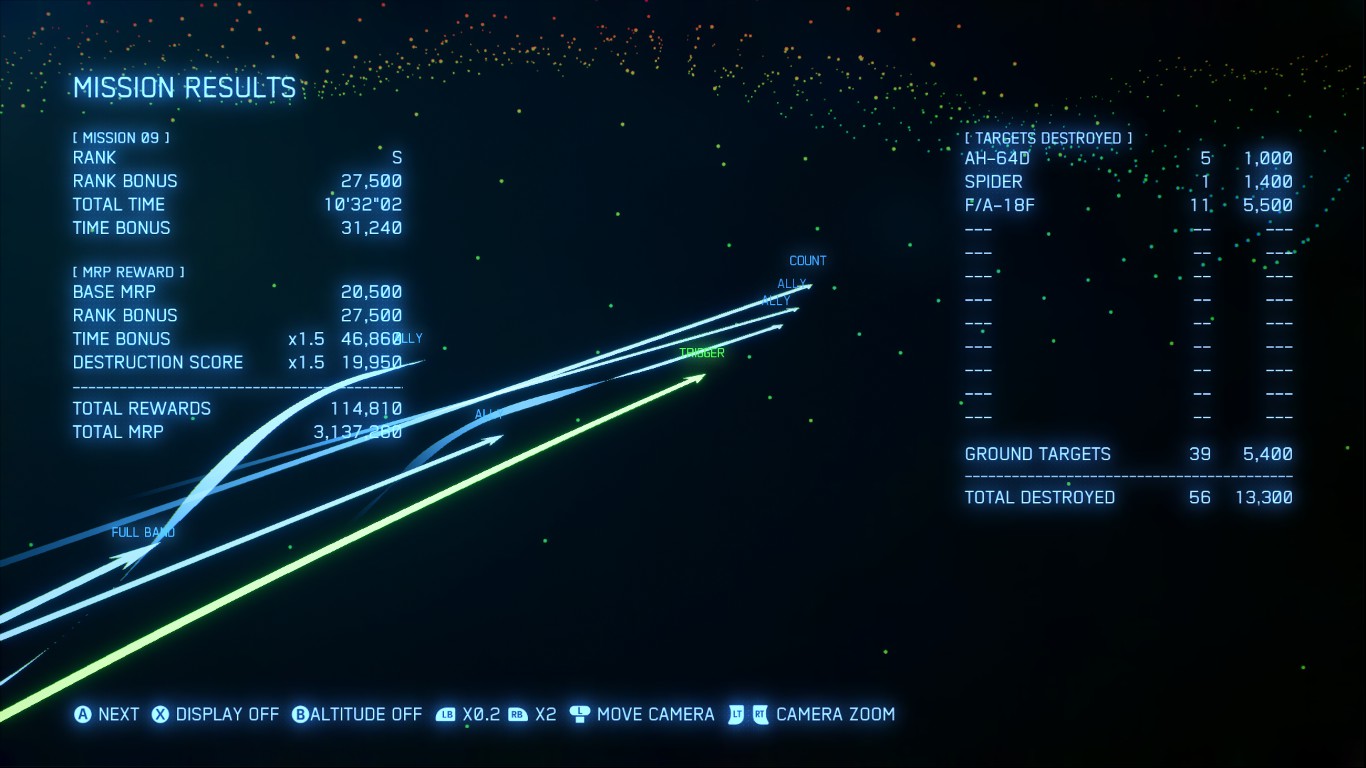
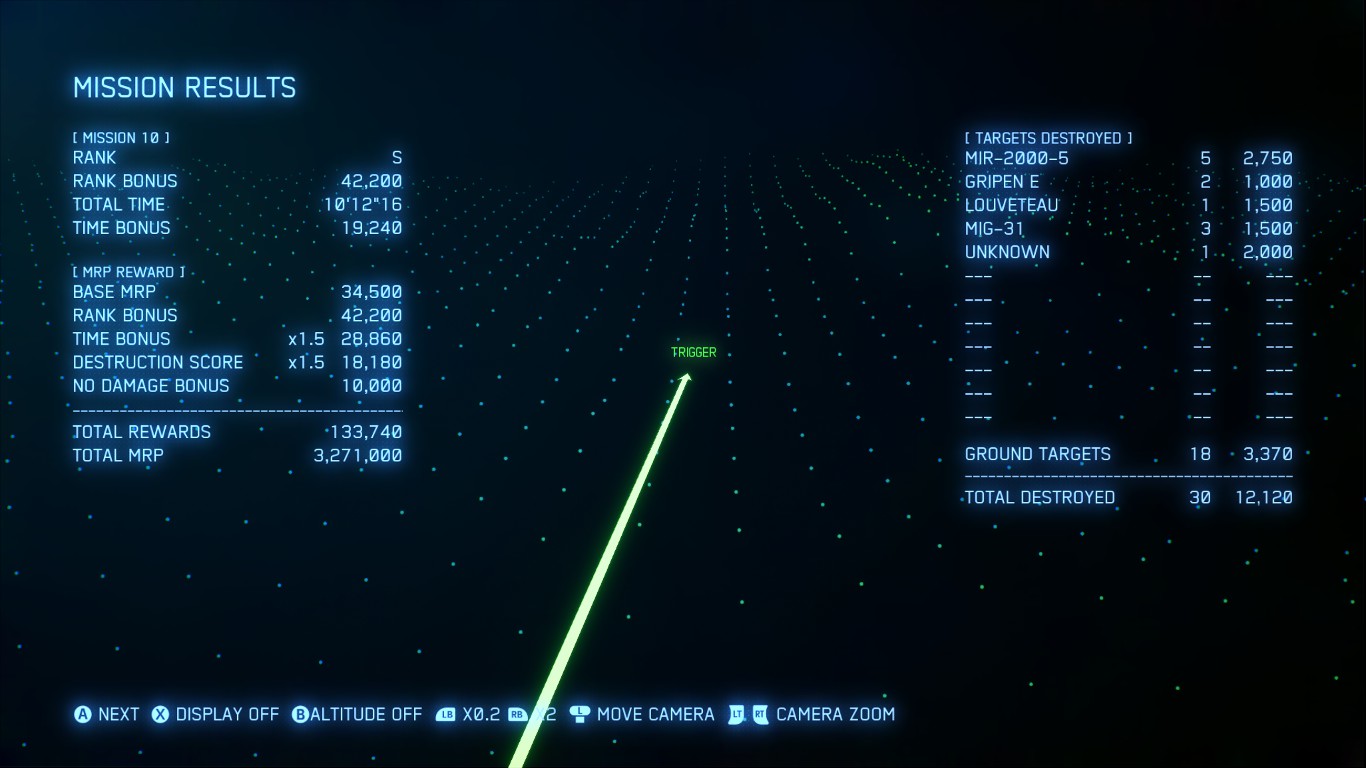
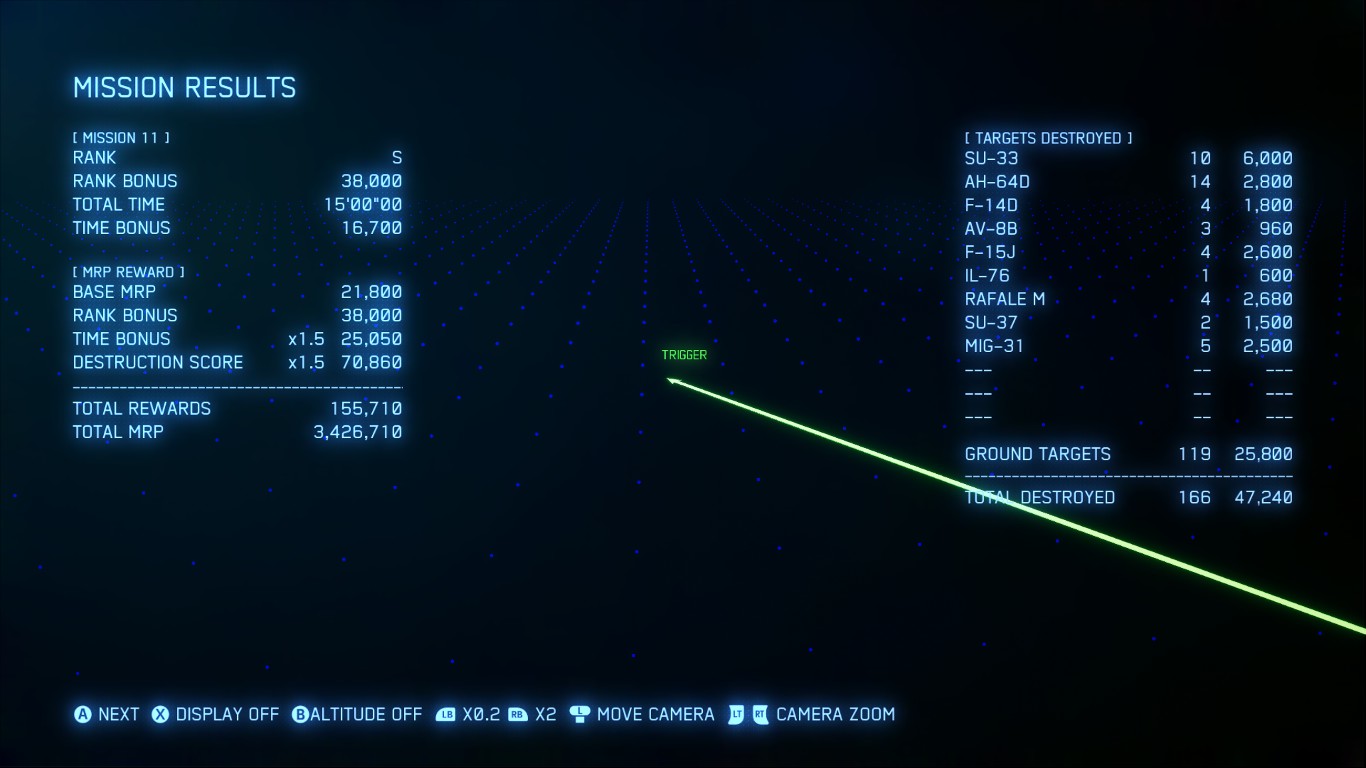
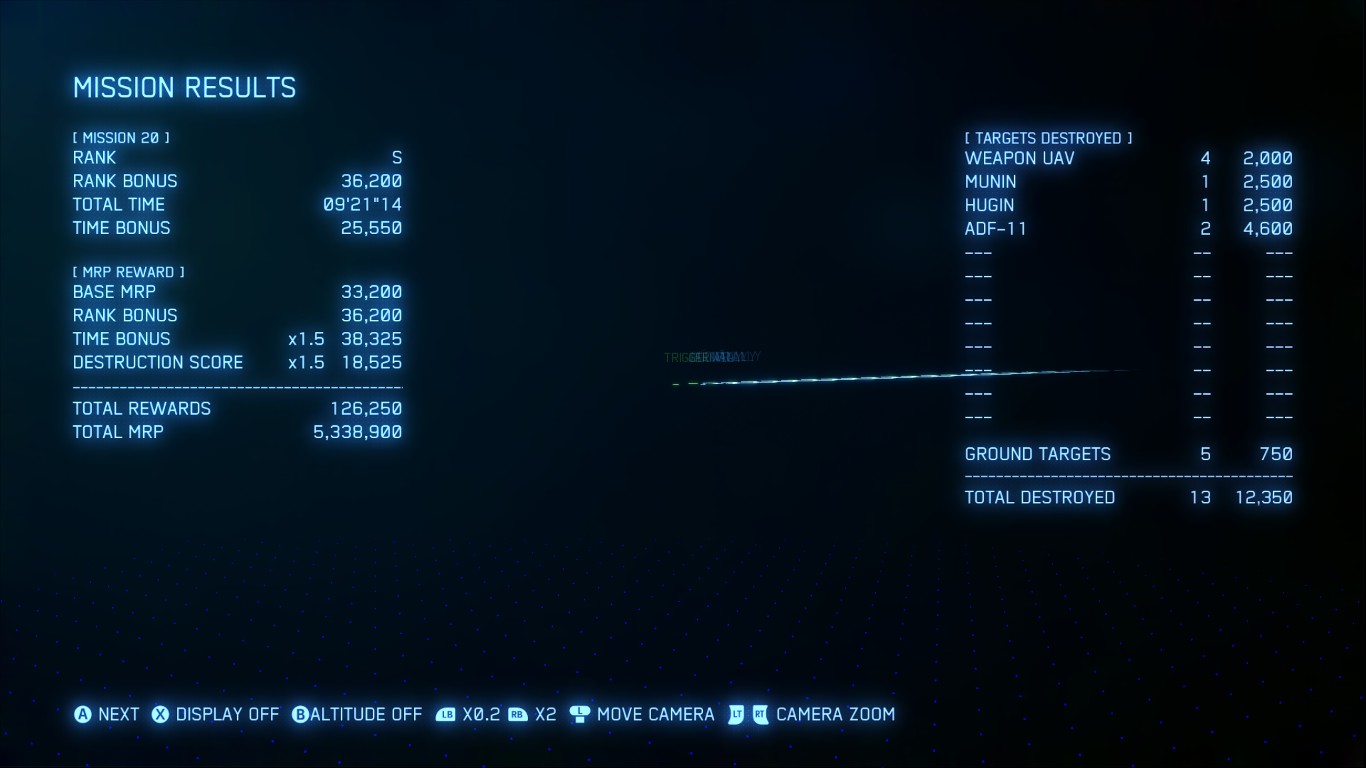
Try that on Bunker Buster and see if you get an easy S rank
a u Jul 11, 2023 @ 9:55pm 
Just use XFA-27 with MSTM, very easily S-rank all of them
Rat With A Gat May 31, 2023 @ 12:23pm 
For Fleet Destruction I got ACE-S rank in one try using the ASF-X Shinden 2 with rocket pods. Rocket explosions can penetrate through the top of the platforms and damage/destroy the core. Theyre also good against the fleet combined with a missile salvo when youre closing in on a ship.
Alter Reich Feb 13, 2023 @ 11:03am 
Somehow I managed to get all of S rank with only F-14A TGM. But still need this guide for required time and score.