Grand Theft Auto V 레거시

Grand Theft Auto V 레거시

81 평점
Don't fill up your Nightclub! - Opportunity Cost vs Fixed Cost Degression
Red Z 님이 작성
This guide aims to give an answer to the question "When should I sell my Nightclub Goods?" in order to maximise profits per hour. The answer is not as trivial as it seems.
WARNING: Math and accounting ahead!
3
   
어워드
즐겨찾기
즐겨찾기됨
즐겨찾기 해제
Introduction to the Problem
The Nightclub has a total of 7 different types of goods that you are able to produce but you can only assign 5 technicians.
Additionally, once your revenue goes above $1,000,000, Tony's cut will stop being 10% of the revenue but instead be fixed at $100,000. So every additional good you produce above that point will activate the effect known as Fixed Cost Degression. The fixed cost of $100,000 will split up over more goods, generating more revenue the more goods you sell.

However, if you assign a technician to one of the other 2 types of goods, you start experiencing a different effect - Opportunity Cost. Once you're producing a good that is not the most profitable you're effectively spending time on something that is "not as worth it", because it is less than optimal. You gain less profit per hour.

So the question is: Should you sell once your 5 goods are full? Should you use the cap of Tony's Cut or are the Opportunity Costs too high?
Time and Revenue
Table 1 below shows the time it takes for each good to be produced to the maximum.
The original source is this Reddit thread: https://www.reddit.com/r/gtaonline/comments/91tyvu/nightclub_earnings_table_and_guide/
The table has been expanded for use for this guide.

Note: My version of Excel is German, so . and , are interchanged.

Table 1: Time and Revenues


It's already common knowledge that you should do everything but Organic and Printing first but Table 1 gives you a good overview again. What immedeatly jumps into sight is the fact that three of the products finish after 20 hours, so when selecting the two other goods, at least one of the technicians will have no work!

What we need now is a Gantt Chart in order to find all possible points at which we could potentially stop the production and sell.
Identifying the Key Points to sell via Gantt Chart
Table 2 shows a Gantt Chart, the x-Axis resembles the time in hours that it takes to produce each product. We can identify a lot of time where a few of the technicians are doing absolutely nothing.
Unfortunetly, the numbers for the hours are pretty small but I will list them after we are done identifying the key points.

Table 2: Gantt Chart


In Table 3, we are now identifying all key points at which we could potentially sell for maximum profit.

Table 3: Relevant Points for sale


Now we need to analyse all of these possible selling points and we will get our answer!
Analysing the Key Points
The analysis is done by calculating the profits at each of these points and dividing it by the time it took to produce the goods in Table 5. Profit = Revenue - Cost.

Table 4 breaks down the revenue to each good.

Table 4: Break Down of the Revenue

Table 5: Calculating the Profit per hour
Conclusion
As shown in Table 5, you are making the most amount of money per hour when selling exactly after 20 hours and never touch Organic and Printing.
You will sell for $825,000 with Tony's Cut being $82,500, yielding you a profit of $742,500 which means $37,125 per hour.
You are not using the Fixed Cost Degression since the Opportunity Cost is higher than what you gain from that.
댓글 21
Metallicat 2020년 8월 30일 오후 7시 08분 
The 20 hour, only five goods system, is simple and clear and anyone can do it. It only has the tiny downside of not reducing Tony's cut. The upside is that you don't need to micromanage your technicians and sale times.

In fact, you can sell any time, and will get the same profit per hour. If you keep the crate size under 90, you'll always get the fast Speedo to deliver with too.

But there are some more tricks, which sometimes can come in handy.

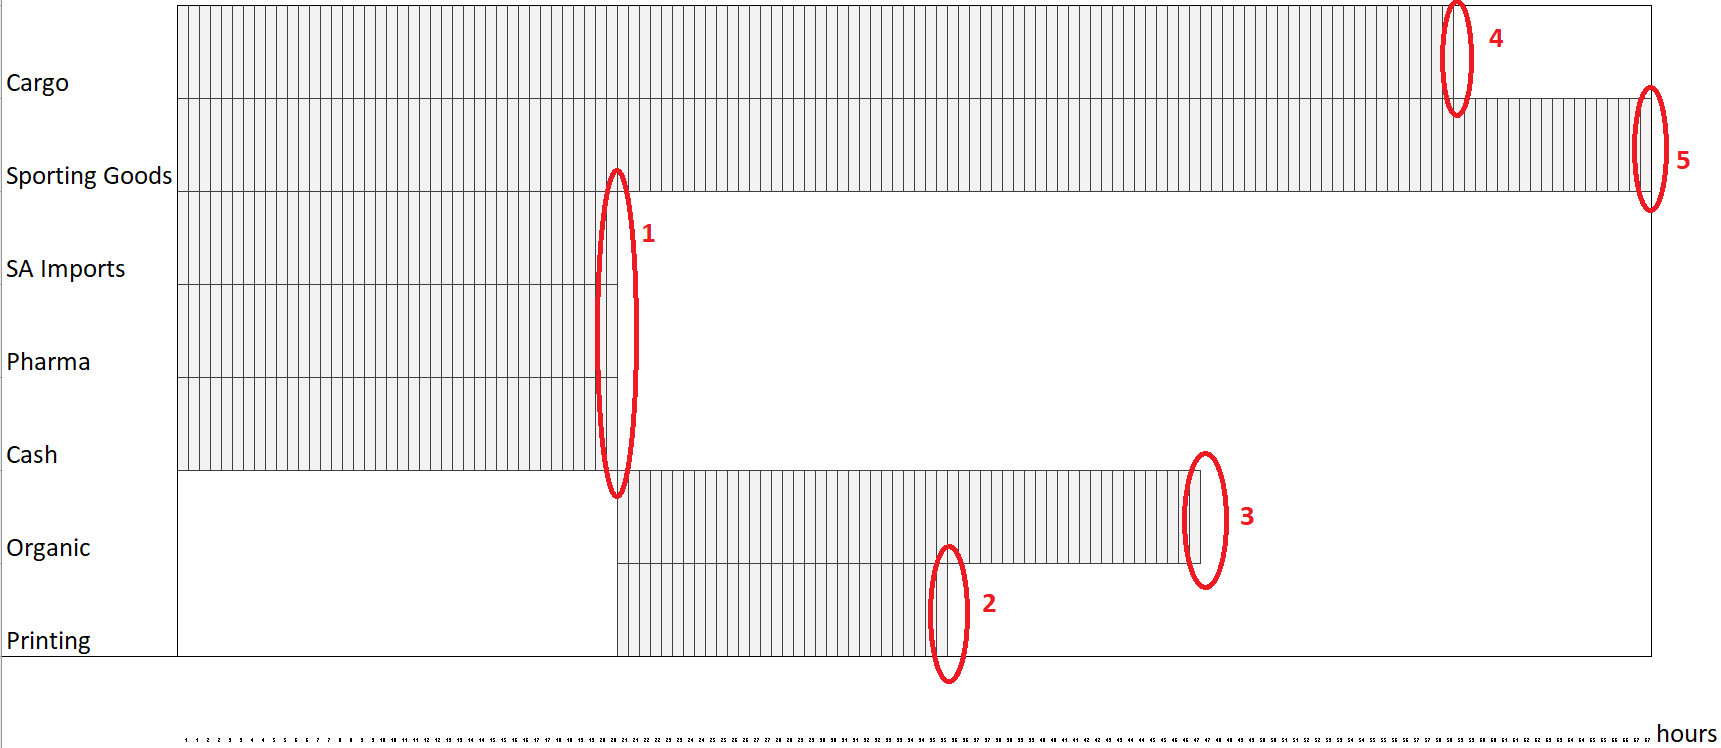
At 20 hours, change to Organic and Printing, and sell Cash. This will be a small sale, but will let Cash resume production.

After selling the Cash at 20 hours, repeat for SA Imports and Pharma. Then, reset the technicians back to those.

Now, that means three sale trips every 20 hours, rather than one. But they'll be small sales, and those can run faster if you're lucky.

If you do this twice, then at 60 hours, you'll have a large stock of Cargo and Sporting Goods, and should be well above a million and get a better cut deal from Tony.
Harris 2019년 12월 30일 오전 7시 47분 
This is very well done, good job.
ulx 2019년 12월 25일 오후 4시 40분 
thx for the mathematical proof of what i assumpted already xD
Anyway, since the larger Delivery Vehicles arent exactly great in handling and speed, i keep recommending ppl to sell around 500k stock already xD
Evil 2019년 6월 23일 오전 9시 33분 
I barely understand anything related to making money in gta and I'm hella confused.
Tjack Morris 2019년 6월 1일 오후 6시 23분 
i dont want to belive this guy has some experience in economy but still well done.
Trobby 2019년 4월 21일 오전 9시 06분 
Fill it up 100% anyways and sell in a populated lobby for that sweet sweet rival players bonus
~𝑂𝑏𝑖𝑡𝑜𝑜𝑜 2019년 4월 17일 오후 8시 17분 
:steamhappy:
Woodlin_Loner 2019년 4월 17일 오전 11시 51분 
Damn, didn't think this would be so in depth. You put a lot of effort into this.

Will show this to my friends, you are an amazing person and thanks for being in this community.

:csgox:
Basio1k 2019년 4월 17일 오전 8시 46분 
i was high reading this

i dont know what the fuck i just read i gave up 75% in
Stakes 2019년 4월 16일 오전 9시 02분 
:steamhappy:Hi. I'm make animations for the steam profile to the order. Read more in my profile.:steamhappy:
:steamhappy:Привет. Я делаю анимации для профиля на заказ. Подробнее в моем профиле:steamhappy: