Terraria

Terraria

Not enough ratings
Terraria Boss Ideas Part 5 [Bosses 21-40]
By Okami Tomato
Part 2 of Boss Ideas 5, this time covering bosses 21-40

[This isn't a guide. But at this point you could probably have assumed that already since it's me :P]

Despite the fact that Ideas 5's 1st part doesn't have all too many views yet, the larger-scale bosses in this one lead to me making it prematurely as to house the ideas somewhere safer.

If you've seen Pages 1, 2, 3, 4 or the 1st part of 5, you may know how this works. If not it's fairly simple

Anyways, Enjoy! :)
   
Award
Favorite
Favorited
Unfavorite
[Intro]
The second part of page 5, detailing the next 20 bosses to be designed.

To be fair, the majority of these bosses fit into the pseudo-lore that seems to have been growing ever since Boss Page 4, which in itself got developed even further in the 5th page's 1st part.

Like with the first part, though, there still isn't an underlying gimmick of the next 20 bosses; it's just that a few of them ended up being useful for lore and world-building and thus got additional roles added to their boss battles.

https://steamcommunity.com/sharedfiles/filedetails/?id=1652869689
[Previous: Part 1, the first 20 bosses of Page 5]
21 - Chaos Doppelganger
"Despite the fact I thought I'd finished with Chaos' rematches at this point, I came to realise that I'd accidentally not made Chaos the final battle, as #1 is only post his battle. Therefore, I made an even harder one to act as a colossal challenge and a proper finale."

Appearance: Despite being the special post-game battle of a foe previously bombarded by attacks, Chaos Doppelganger starts out the fight looking the same way he did during his first ever encounter.

Summon: Use the Paradox anywhere in the world and at any time. The Paradox isn't consumed unless the boss is defeated. Upon summoning the boss the world characteristically becomes more faded and the sky turns black. Both the Nurse and Dryad are inflicted with Phase State and cannot be interacted with. Teleporters stop working and enemy statues don't spawn NPCs anymore.
The Paradox is only obtained by defeating every boss in the game on a single world, put in the player's inventory once they have done so. Only 1 is awarded per world, so don't accidentally discard it.

[Fought: Post-Game]

Stats:
Health: 1,000,000,000 (1,820,000,000)
Attack:
-400-800 (510-1100) (Previous Attacks)
--410 (700) (Chaos Sphere)
-620 (1000) (Grim Scythe, Zeus' Spear)
-394 (680) (Scythe Fire, Zeus' Spark)
-550 (885) (Arrow Rain)
-375 (516) (Arrow Magic)
-420 (719) (Shadowflame)
-600 (930) (Neoradiance's Energy)
-0 (0) (Phase Shift)
Defence: 500

[Bear in mind that Chaos' Doppelganger is no longer as vulnerable to the Lightseal. It now only adds 2.5x (2x) damage per attack. This is half of the damage it used to add.]
[Attempting to deal over 1,000,000 damage to the boss in a single attack will cause you to deal 0 damage instead, acting as an anti-butcher defence.]
[Debuff: Phase Shift: Player cannot move, use items or interact with anything. Player's health and mana regen is also temporarily nullified. NPCs affected by it cannot be interacted with either.]

Attacks:
Phase 1:
Uses the attacks that the original Chaos Doppelganger Reborn used, though with the adjustments described in Chaos Doppelganger Revenge to the Void.
At 90% health Chaos Doppelganger switches into Phase 2. He also says actual dialogue for once, unlike during the previous battles which either had nonsensical sentences or no dialogue at all. His sprite also changes.
Phase 2:
Uses all of the attacks seen in the final (19th) phase of Chaos Doppelganger's Revenge.
At 80% health Chaos Doppelganger becomes immune to damage, though continues his assult for another 30 seconds. Then he inflicts all players with Phase Shift and teleports them below him. He goes to follow this up with a Black Hole Void, but is stopped suddenly by the appearence of Neoradiance, who crashes into him.
Neoradiance is then rather effortlessly crushed in the palm of Chaos' hand, with its energy being used for more attacks. Phase 3 of the fight begins as Chaos Doppelganger becomes vulnerable again.
Phase 3:
Chaos uses all his previous attacks, as well as some new ones.
-Holding a ball of energy, the Doppelganger summons multiple spherical projectiles with varying properties. All of them are one of three types; the ones seen back in Neoradiance's own fight.
-He may hold a ball of energy that begins firing off lasers in random directions. They have tracers seen before the lasers are fired, giving players a little time to dodge.
After being taken down to 65% health he becomes invulnerable again and continues his attack for another 30 seconds. Garagon, much like Neoradiance, flies in from off-screen and crashes into Chaos Doppelganger, though after a powerful energy pulse is repelled. Chaos becomes vulnerable again and enters Phase 4.
Phase 4:
All of the attacks seen prior are used, plus some new ones.
-He may teleport all players into an indestructible box, attacking them while inside. If the player tries to leave they are teleported back inside and debuffed with Webbed, with the timer for the debuff doubling every time they try and escape. When Chaos' attack ends, the box vanishes.
--He may summon several Chaos Spheres that bounce around the box like water bolt projectiles, though slightly larger
--He may summon Chaos Spheres from outside the box, sending them horizontally through the box.
--He may fire a laser from his mouth into part of the box he is looming over.
21 - Chaos Doppelganger [Continued]
After being taken down to 50% health, Chaos Doppelganger's appearance shifts again, gaining after-images that move freely from the boss itself. It becomes invulnerable, like before, but stays this way for 20 seconds instead of 30. Prism Knight, Magia and Frost all attack Chaos, with the latter 2 striking its sides and Prism using a downward strike. They are all repelled by another pulse and Phase 5 begins, with Chaos vulnerable again.
Phase 5:
All the previous attacks return, plus a few new ones that utilise Shadowflame.
-Chaos may cloak his hand in shadowflame and slam it downwards or sideways. If it hits a solid block it creates a massive explosion that travels predominently back up the path of the hand's movement.
-He may summon 2 large shadowflames, 1 either side of himself, and attack with them
--He may send one from right to left horizontally, the other left to right horizontally shortly after, and then being both of them downwards from above.
--He may send them in a '+' shape, followed by an 'x' shape
-He may summon up to 4 shadowflames nearby before causing them all to explode violently. The explosions are quite large and can be hard to dodge for unaware players.
-He may summon a diamond-shaped box, corners hammered-in to make the walls slopes, before summoning a ball of shadowflame inside. The ball will roll along the walls, as well as sometimes travelling from one of the 4 corners to the one parallel. It does this for around 10 seconds before disappearing.
-He may spew large quantities of shadowflames out of his mouth into the sky. These rain down again shortly after slowly, potentially getting in the way during other attacks.
At 35% health, Chaos becomes invulnerable again, his face beginning to melt away. He continues attacking for another 20 seconds before suddenly a barrage of fireballs rain down upon him. The fireballs are distinctly those used by Garagon and Ember. Chaos roars and transitions into Phase 6, becoming vulnerable again.
Phase 6:
The Doppelganger begins to use an assortment of giant weapons, some of which look similar to weapons seen previously from other characters.
-He may summon a giant spear and strike the ground. Two large lightning pillars are formed 50 blocks to the left and right of the spear, as well as 2 more directly either side of the spear itself. Slow-moving, lingering bolts of lightning erupt from the end of the spear, as well as electrical orbs that bounce along the ground in tall arcs.
-He may summon a giant scythe and strike the ground. Two sets of fire pillars erupt; one set directly beside the scythe and the 2nd 50 blocks outwards. Fireballs travel horizontally between the fire pillars, and further fireballs slowly rain down from the sky.
-He may summon giant elemental arrows from the sky, each performing a different function once it lands or travels far enough
--The fire arrows will release fireballs that bounce along the floor, plus a large fiery explosion from the tip
--The lightning arrows drop lightning bolts to the immediate left and right of the arrow, and a lightning orb is summoned from the tip; releasing up to 3 lingering lightning bolts towards the player
--The poison arrows make floors near the arrow go purple and grow small thorns. The thorns inflict Venom on contact. Damaging purple smoke is also released from the arrow, but doesn't travel too far
--The water arrows summon 3 water bolts at either side of the arrow, and a small tornado that forms around the arrow itself
--Finally, the earth arrows summon large thorny brambles on the floors near the arrow, and send out up to 3 Nettle Bursts from the arrow's head.
At 10% health, Chaos will begin abusing his invincibility, remaining as such for another 20 seconds. He teleports all players near to him and briefly inflicts Phase Shift again. He goes to use his Black Hole again but is struck suddenly by Storm who breaks his invincibility, revealing the gimmick of the final part of the fight. Chaos switches into Phase 7, the last phase of the fight, and becomes invulnerable.
Phase 7:
Chaos spends most of his time invulnerable, leaving the player to helplessly dodge his attacks. Storm, roughly every 25 seconds, will break his invincibility for 5 seconds. During his vulnerability time, Chaos does not attack and instead remains immobile, seemingly stunned by the attacks. He doesn't gain any new attacks during this Phase.
At 0.5% health, Chaos falls to the ground, still invulnerable. His signature smile begins to fade into a frown due to his current position. Storm lands a precise blow to his 'head', causing energy to begin erupting out from it. Chaos loses his invulnerability and his ability to attack, leaving players to inflict the final necessary blows in order to finally defeat him for good.
21 - Chaos Doppelganger [Continued Further]
Defeat: Chaos begins to let out a roar, with Storm observing from nearby. Chaos begins to slowly melt away and his remnants disintegrate as he does so. After a bright flash of white, nothing is left of Chaos Doppelganger. Storm also leaves at some point during the flash.
Many other things also happen during this time:
-Paradox, Chaos' summoning item, disappears. Any other chaos-summoning items seen in the game, including the Chaoscaller, also disappear. They vanish even if placed in chests or thrown on the ground.
-All boss summoners (except the Boss Rush's item) stop working once the boss summoned by that item is defeated. Each one gives a message and their treasure bags instead; with the message being either a message from the boss, a message about the boss, or lore.
--A few very specific boss items will still work; mainly the 'Memory' bosses seen far later and a couple of additional oddities.
--The Boss Rush still works and Magia can still show up to 'spar', but that is mainly all for rematches
-The Corruption or Crimson in the player's world can now be overrun by purity, and it does so quite quickly.
-Enemy spawn rates are reduced and any enemies directly relating to Chaos Doppelganger stop spawning.
-Storm, Ember and Frost can show up as NPCs in the player's world if the player has spare housing. They retain their massive health bars, as well as the idea of them 'leaving' upon running out of health instead of being slain.
--Frost isn't obscured in a cloak as an NPC, so you actually get to see what she looks like
-The player receives permanent buffs: 100 more health and mana, +10% damage and crit chance, +10 defence, -20% reduced ammo consumption and mana cost, +15% movement speed, +10% flight speed and flight time and increased health and mana regeneration.

GelTech Info:
-"The End."

Drops: An accessory, a multitude of vanity items, and 4 special weapons. The accessory grants the player further max health, the vanity items are various item sets all dropped at once, and the 4 special weapons are these: A summoner staff that summons small Neoradiance, a variant of Ember's scythe for melee, a variant of Storm's spear for magic and a light bow that shoots elemental arrows. In expert mode there is a final accessory that grants the player doubled max health at the cost of heavily decreased life regeneration; almost like a boss. Also has a few other drops; all of which are accessories which provide unusual, but mostly beneficial, abilities which could change up entire playthroughs of the game. Finally, its last Expert drop gives the player 2 more accessory slots.

Extra Info:
-Okay, this time this is the True final boss. Nothing else comes after this.
-Considering the boss' difficulty, all its drops are dropped with a 100% chance.
-Despite being a boss it lacks a trophy or mask, perhaps corresponding to how Chaos Doppelganger should now have been fully purged and thus parts of his body or his influence wouldn't make sense to be around.
-This boss could easily take the player over an hour to kill, so be ready for the long-haul.
-Unlike other Chaos Doppelganger fights, he doesn't retract certain attacks during phases like he used to, only ever building up with more while never getting rid of previous ones.
--This may be due to desperation, as it is shown that this fight actually destroys him by the end. Perhaps he is also aware of the stakes
-This is the only instance of Chaos actually talking, as he does so several times throughout the fight. This is opposed to the random nonsense seen in previous encounters.
-The boss is impossible, or at the least extremely difficult, to cheese.
--Firstly, the boss has an anti-butcher and anti-godmode function. Players who are detected as using godmode will have their game auto-crash and those using things like overpowered weapons or the butcher command will find themselves dealing 0 damage to Chaos
--Any sort of AFK machine also doesn't work due to enemy statues no longer working, as well as Chaos' frequent use of teleporting the player around the map
--The Nurse cannot be interacted with during the fight at all, meaning she cannot heal you. The Dryad also cannot boost your defence as she, too, is inflicted with Phase Shift.
-Chaos has successfully carried over all his previous attacks from all his previous incarnations except for his summons.
-The additional accessories provided by Chaos Doppelganger upon defeat, mentioned above to be able to change how you play the game, all provide differences to the player specifically:
--For example, one item reduces the player's health to 1 but increases enemy drops significantly, another gives the player a strict and specific 500 health but they will always take 100 damage no matter what attack they are hit by (essentially allowing them to only take 5 hits), another reverses the effects of buffs and debuffs, another provides infinite flight time and slowfall, another randomises the player's stats every time they respawn, and another provides the '!?' debuff from the Lihzahrd Sly's fight; randomly altering the player's stats mildly every second.
[Added: 4/3/19]
22 - Pinky
Appearance: A female counterpart to Slimey, seen back in page 4. Her body is pink as opposed to blue and her suit uses shinier silvers and a use of a pinkish red as opposed to Slimey's matt greys and blues. She appears to have hair which, in reality, is just more slime.

Summon: Use the Enchanted Pink Slimeball anywhere in the world and at any time. The item is made the same way as the Enchanted Slimeball used to fight Slimey back in boss page 4, though uses Pink Gel instead of normal Gel; using a lot less as well. Boss doesn't despawn unless all players die or flee too far.

[Fought: Chaos Mode]
[Secret Boss: Unlisted Craft, unusual recipe]

Stats:
Health: 6,000,000 (7,650,000)
Attack:
-285 (430) (Melee)
-300 (450) (Slime Sword)
-240 (400) (Slimeball)
-230 (387) (Pink Slimethrower) (Inflicts On Fire!)
-400 (635) (Colossal Energy Ball)
-20 (10) (Regenerating Aura) (Healing)
Defence: 100

[All of the boss' attacks, if they deal damage, will heal the boss by 20x (35x) the damage they dealt to the player]

Attacks:
Pinky will spend the entire fight moving around in a similar way to Slimey, even utilising her own pair of Pink Slime Wings. She gains attacks are certain percentages of health and they become more common at lower percentages as well.
-She sometimes will 'taunt' the player, pulling a pose that often has a heart appear above it. This becomes less common at lower health, never really being seen once she's below 30%
-She may swing her Slime Sword, causing a large arcing barrage of slimeballs to spawn from it
-She may lunge upwards with the Slime Sword from beneath the player, causing slimeballs to rain down from the left and right of Pinky
-She may pull out a large chain-gun like weapon and proceed to start firing a rapid barrage of shots at the player. She turns slowly, but will always try to aim it at the player. First used at 85% (90%) health, becomes more common at 60% (65%)
-She may pull out a pink flamethrower and fire large blasts of pink flames at the player, potentially inflicting On Fire! (which still heals Pinky, by the way...). First used at 75% (82.5%), but doesn't become more common at any point.
-She may set up a healing energy barrier on the floor near her and stay in it, regenerating 500 (650) health per second until attacked 3 times. Players can also stand inside the barrier and get healed, but doing so may prolong the fight as the longer it stays active the more health Pinky gets back. First used at 50% (60%) health and becomes more common at 20% (30%)
-Finally, she may may charge up a large energy ball and fire it at the player. The ball has a slight homing effect and passes through blocks. Eventually explodes on its own in a massive explosion. Used first at 40% (50%) health and becomes more common at 25% (40%)

Defeat: Comically launched into the air, leaving her loot as she flies off. Has a slow-down after the finishing attack is dealt for more emphasis.

GelTech Info:
-The status of her and Slimey's relationship is not precisely known, only really ever being stated as 'romantic'. It is believed Slimey built her the suit at some point, roughly around the same time he made his. Despite being somewhat of a 'girly-girl' at first glance she is quite an impressive engineer, working on several large-scale projects either alongside Slimey or all by herself in secret.

Drops: Like Slimey she drops items used in her fight (though unlike his they weren't designed by the FMG discord this time). Drops a Pink Slime Blade, Magenta Slimethrower, Pinkannon (minigun that uses gel as ammo), Pink Slime Wings, and a couple of accessories that grant max health and/or regeneration.

Extra Info:
-Players who are bad at dodging may need to be careful in this fight, especially in expert mode, since she is able to heal back excessive amounts of damage in only a few hits.
--22,225 is the most she is allowed to heal back in a single hit, though only using her strongest attack in expert mode against a player with 0 defence.
-Pinky has the 2nd lowest health of any boss in Chaos Mode, only beating the Necromancer Overlord's ~30k.
--This may be due to her being based off of another of the lowest-health bosses, but also due to her natural ability to heal by dealing damage; which artificially increases her health.
-Pinky has been planned since boss page 4, but has had a couple of re-designs.
-The specific detail of Pinky being an engineer may be a hint that she may have been involved in the creation of some of the robotic bosses the player fights in the game, like the Technicus Juggernaut
-Despite being jokingly referred to as a 'girly-girl' in her GelTech description the only real things to point to this are her pink colouration for both her and her weapons/attacks and hearts in her taunts and for when she heals.
--The use of weapons like swords, flamethrowers and miniguns, the summoning of colossal balls of volatile energy, and specific mention of her engineering capabilities contradict this statement to an extent.
-The slow-down on her defeat being followed by her being launched into the air may be a reference to Super Smash Bros. Ultimate, where a similar thing happens when a player is hit by an attack that should defeat them.
-Despite Pinky's armour also having a similar appearance to Titanium, it is given a pinkish-purplish hue to it that may be hard to notice unless specifically pointed out.
[Added: 5/3/19]
23-26 - Lorekeepers
A sub-set of bosses designed to give the player more insight to the story behind some of the characters seen in Boss Pages 4 and 5, as they share a story. They do still have their own unique fights, but are mainly there for the player to learn more about some of the characters' backgrounds and origins.

Lorekeepers themselves all have similar appearances; large cloaks that obscure their figures, scrolls bound to their backs, and a golden chain with a gemstone hung loosely over their shoulders. Their basic forms look the same, but their colour schemes, attacks and what is visible of their faces vary as to distinguish them all. They all have different names as well, none of which can be directly translated into anything as the names themselves are canonically meant to be from a dead language (though in real terms they were completely made up).

Lorekeepers are designed to be tough challenges for the player to overcome regardless of what difficulty was chosen. They often have exceedingly high stats for their placements in the game and often also carry at least one devastatingly powerful attack. This works from both a lore perspective (powerful entities as to protect the scrolls) and a gameplay perspective (more rewarding when you actually manage to beat one, even if you didn't want lore).

Lorekeepers themselves were apparently chosen by the Dragon King to keep the history of these lands safe. He chose an assortment of beings from various lands with various abilities as for there not to be one overlapping weakness amongst them. However, some of the ones seen were not the original ones chosen.
For example, Dystopius was at one point a Lorekeeper, evidenced by their appearance, but their association with Scourge lead to them losing their role.

They all use the same summoning item, though they only work at certain points in the game. They have to be beaten in order and cannot be rematched once defeated (making items obtained from them one-of-a-kind per world).
23 - Lorekeeper Ryuuk
Appearance: A figure obscured in a cloak, wearing a golden pendant with a red gemstone in the centre. Carries a scroll on their back, wrapped in a brown case. Appearance looks intentionally excessively similar to Dystopius, seen on the previous boss page. Ryuuk's face is entirely hidden by their cloak. Appearances are mostly shared by the other Lorekeepers.

Summon: Use the Lorekeeper's Scrawling anywhere in the world. The boss will spawn and the fight will begin momentarily. Boss only despawns if there are no more players to fight due to either getting too far away or dying.

[Fought: Late Hardmode]
[Special Boss: Uncraftable Summon]

Stats:
Health: 105,000 (145,000)
Attack:
-100 (170) (Melee)
-95 (162) (Shade Ember)
Defence: 45

Attacks:
Ryuuk will spend most of the fight flying near to or circling the player, firing several types of fire-based magic attacks at them. While many use the same types of projectile, their usages are always different.
-Ryuuk may summon a lone stationary fireball that begins firing out more fireballs in a spiral pattern. The main fireball persists for at least 10 seconds while the ones that it in turn summons only persist until travelling about 20 blocks.
-Ryuuk may fire a rapid volley of fireballs at the player. However, instead of them all travelling in a straight line, they will approach in a wave pattern. The wave doesn't lose horizontal mobility, though does begin to become wider as it travels.
-Ryuuk may fire a rapid volley of fireballs that do travel in a straight line. After making contact with a solid block, however, they all disperse in an arc in the player's direction.
-Ryuuk may make a ring of fireballs and have it charge towards the player up to 4 times before disappearing.

Defeat: Ryuuk falls to the ground, proclaims defeat, gives some lore, then disappears.

GelTech Info:
-The weakest of the Lorekeepers, Ryuuk is still a prominent and powerful person to face that will likely be the necessary catalyst to get the attention of the others. However, you aren't yet ready to face the others...

Drops: Drops an accessory that boosts magic-based stats (Mana usage, magic damage, magic crit chance) and a staff that fires rings of shade embers. Also, through dialogue, gives the player some lore.

Extra Info:
-Ryuuk is always the first Lorekeeper the player will face, as they have to be faced in a specific order
--Ryuuk can only be fought once per world so it always drops its items, and those items are one of a kind in the player's world outside of expert-mode multiplayer
-Ryuuk does drop a mask, but never a trophy. This is a detail shared by all the Lorekeepers.
-Ryuuk looks very similar to Dystopius, having an identically-coloured cloak and hidden face. As stated previously, this is because Dystopius was at one point also likely a Lorekeeper.
-Ryuuk is the mage amongst the Lorekeepers. This is quite odd since you would likely expect to be fighting a magic entity as one of the later bosses in a group; but not this time
-Ryuuk has some of the highest stats of any Hardmode enemy, only losing out to foes like the Moon Lord in terms of sheer health and damage.
[Added: 6/3/19]
[Ryuuk's Lore]
After Ryuuk has been defeated, they will begin to 'speak' (Dialogue in chat), telling the player about times before the player's arrival. Ryuuk's own lore relates a Garagon the Dragon King; major boss of Page 5 Part 1 and important figure in many of the other boss' later lore.

"Ah, so I have been bested.
I was not expecting to find such power in one of your... stature.
I take it you have searched me out in order to seek wisdoms of times passed.
So it seems you are in luck, I may read from the scroll what is written.
I shall translate to a more modern tongue, as it is written in a long-dead language.
I must make it brief, for I am exhausted from our battle.

A time ago in these lands there was a king. A king known to all the lands, one who ruled over all.
He had a pet dragon; raised from an egg found abandoned in the deserts decades prior.
The dragon's name was Garagon, and it was the king's special pet;
powerful and intimidating, yet wise and kindhearted.
Yes, the king was a good one, arguably one of the best we have had in this place.
He was a fair king, but a mortal king nonetheless.

One day, he disappeared from his throne.
He told no man nor beast as to where he was headed, except to Garagon.
Garagon was made to swear it to secrecy, and with that...
...the king disappeared forever.

Garagon, the closest living entity to the king, was naturally chosen to take his place.
People were not happy with this, believing that a dragon should not rule over humans.
Revolts happened, the kingdom was in disarray.
Garagon performed his duties, stopping the ranting and raving personally.
He ruled almost as well as his master before him had, following his teachings closely.
Despite this, the fires in the human hearts were not quenched. This would butterfly in time.

That is all I may tell you, eager one.
Seek out the others and they shall tell you more.
But now it is my time to leave."
24 - Lorekeeper Fudon
Appearance: Another of the Lorekeepers, this time donning a greyish-green cloak instead of Ryuuk's brown. 6 blue eyes are visible from underneath its hood and 2 luminescent tentacles as well, suggesting its face looks something like the Moon Lord's.

Summon: Use the Lorekeeper's Scrawlings anywhere in the world once the Moon Lord has been defeated. Ryuuk must have been defeated before doing this, otherwise it will spawn Ryuuk until they are defeated, where then Fudon will finally be spawnable.

[Fought: Post-ML]
[Special Boss: Uncraftable Summoner]

Stats:
Health: 850,000 (1,000,000)
Attack:
-150 (240) (Melee)
-155 (250) (Arrow) (Various debuffs depending on arrows used)
-140 (228) (Arrow Rain)
-170 (283) (Barrage)
Defence: 80

Attacks:
Fudon, much like the previous Lorekeeper, doesn't attempt to directly make contact with the player. They spend as much time as possible staying horizontal to the player, attacking them mainly from the sides. This is also the first of the Lorekeepers that uses teleportation either to re-position themselves for an attack or to close distance with the player if they are moving too far away.
-Fudon will summon an enchanted bow which stays near to them the entire battle. The bow fires various types of arrow: Fudon's main source of damage.
--Flaming arrows are fast and simply inflict On Fire!
--Frost Arrows are slower, but inflict both Frostburn and Chilled on hit
--Explosive arrows are quite fast and inflict Dazed briefly if they hit. They also explode as their name suggests, with the explosion also able to inflict the debuff.
--Electrified Arrows are the fastest arrows, being little more than light blue laser-like projectiles, that inflict Electrified
--Sludge arrows are the slowest types of arrow and inflict both Oozed and Obstructed on hit.
-Occasionally, Fudon will call down a shower of arrows from above. They have thin tracers that reveal their paths, though the arrows only fall down roughly half a second after they appear. More arrows appear per shower when at lower health.
-Finally, Fudon may line up with the player, staying this way for a few seconds. After this, they will become immoble and fire a massive barrage of blue arrows horizontally in the direction the player last was to them. The player needs to be quick to avoid this attack as it does high damage.

Defeat: Similar to Ryuuk's: Falls, speaks, disappears.

GelTech Info:
-Another of the mysterious Lorekeepers, seemingly more experienced with their unusual powers than the previous one. Far from the strongest; Fudon's enchanted bow and seemingly-infinite stockpile of magic arrows means that their secrets are well-guarded. They are believed to have come from the ocean's depths.

Drops: Like Ryuuk before, Fudon drops an accessory, an item and its mask along with its lore. The accessory is for rangers (Ammo consumption, ranged damage, ranged crit chance, ranged velocity) and the weapon is Fudon's bow; a bow that uses mana to make magic arrows instead of using your own supply.

Extra Info:
-Fudon's appearance is said to be most like that of the Moon Lord's; with numerous eyes and bioluminescent tentacles.
--This makes at least some sense as Cthulhu, the creature the Moon Lord was based off, apparently dwelled in the ocean for at least some time.
-Fudon's green and blue colouring, combined with its face, may suggest some sort of relation to the ocean. While this isn't present during its boss battle its GelTech description does say that Fudon likely came from beneath the sea.
-Fudon's lore is the most densely-packed when it comes to characters. It mentions Garagon, as to be expected, but also Scourge, the Blight Dragon, Technicus, Slimey, Pinky, Storm, Ember, Frost, Magia and Prism Knight.
--However, despite this, it only names 2 of them by name including Garagon, with the others only being described in brief sentences.
---Either way, it does link together quite a broad range of seemingly otherwise separate characters as having an inter-connected past at some point.
[Added: 6/3/19]
[Fudon's Lore]
Fudon, much like Ryuuk, speaks rather unusually. Fudon speaks in a way most wise characters are portrayed; using metaphors and verbose language to artificially add to their apparent wisdom. However, unlike with the previous Lorekeeper, Fudon seems more visibly displeased with losing. They seem to say 'ah' quite frequently at the beginning of their sentences, as well as the common use of 'I' as well.

"Ah, so another stranger arrives in anticipation of me revealing well-hidden information, do they?
I see, you summon me here and bring me to nearly face my own mortality, just for knowledge.
Asking would have been far less barbaric; even if I did decline your request.
Ah, I have lost, so woe is me I suppose.
I shall tell you reluctantly the information that I possess.
Ah, the scroll, written by the Dragon King's own followers from times passed.
I shall begin. Quiet yourself.

Garagon's lonesome position as ruler was short-lived as others soon joined him by his side.
Many of these people were outcasts from their homes, taken in by Garagon personally.
Ah, perhaps he had a soft spot for those made lesser, like his master had before.
The first, a blonde girl with abilities most shocking, followed suit by one in red with fire.
Two gelatinous organisms, brought in as to attempt to prove their kind's innocence.
A warrior donning the rainbow, another donning the fiery blade of her own forefathers.
A timid girl with the power to command the cold, and finally us Lorekeepers were taken in.

It wasn't long after this point that an entity only referring to itself as 'Scourge' appeared.
Ah, he had strength and brains, but his nature was cruel and merciless. He and Garagon fought.
Garagon, after a gruelling match of power, claimed rugged victory.
Scourge hid himself away for many moons, a spiteful grudge against the Dragon King inside.
It boiled away, ranting and raving and scheming, readying itself for some twisted vengeance.

Garagon, worried of his return, requested assistance in building a machine to stop him.
The king forged a unique, super-dense metal, using it for the body of his new creation.
Ah, it took the collective many days and nights, but it was complete.
The colossal juggernaut that was Technicus.
It was put to the test swiftly, fending off a beast known as the Blight Dragon as it attacked.
Despite Technicus having only just been finished, Blight's assaults against the cities were stopped.

Scourge, as this happened, continued plotting.

There.
That is all I have to give you.
Now I leave for my own domain."
25 - Lorekeeper Eudeus
Appearance: The third of the Lorekeepers; donning a deep red cloak and with a silvery diamond in the centre of their medallion. 4 eyes are visible beneath the hood, as well as 2 large fangs that also shine in a similar way to its eyes.

Summon: Use the Lorekeeper's Scrawlings, though 3 particular circumstances need to be met. Firstly, both Ryuuk and Fudon must have been defeated prior (or they'll be spawned instead). Secondly, the player must have defeated the Moon Lord and must be in the post-ML game. Thirdly, they need to have defeated at least 1 boss with a health bar consisting of at least 3,000,000 health. All 3 conditions need to be met before Eudeus can be spawned.

[Fought: Post-ML]
[Special Boss: Uncraftable Summon]

Stats:
Health: 6,500,000 (8,000,000)
Attack:
-300 (500) (Melee)
-285 (472) (Enchanted Sword)
-270 (450) (Enchanted Dagger)
Defence: 100

Attacks:
Eudeus will spend most of the fight simply moving towards the player, teleporting to reposition itself frequently. It stops to attack, but otherwise keeps moving towards the player.
-Eudeus will sometimes stop briefly before charging at the player. It teleports again immediately at the end of the charge.
-Eudeus will stop to summon invincible enchanted swords at 85%, 70%, 55%, 40%, 30%, 20% and 10% health. These swords act like the Enchanted Sword enemies, but are immune to knockback and cannot be destroyed.
-Eudeus may throw an arc of 6 daggers at the player. They bounce off of any solid blocks they hit.
-Eudeus may teleport to a position diagonally above the player and begin barraging the player with a volley of daggers. These bounce off of solid blocks they encounter as well.
-Eudeus' last attack summons a long row of daggers below the player before sending them upwards in a wave motion. They disappear after the wave goes all the way across (and back again in expert mode)

Defeat: Like the other Lorekeepers, Eudeus falls to the ground and spouts lore before disappearing.

GelTech Info:
-The third of the Lorekeepers and one of the two elder ones. Eudeus' frightful appearance, while still mostly concealed, is still enough to frighten away unnerved opponents. If not, Eudeus' hyper-aggressive strategy and endless supply of knives will likely leave foes fleeing for the hills.

Drops: Gives some lore, but also a weapon, mask and accessory like the other Lorekeepers. The weapon is a sword like the enchanted ones summoned during the boss and the accessory grants melee boosts (Damage, crit chance, swing speed, knockback).

Extra Info:
-Eudeus probably has the overall strictest of the summoning methods for the Lorekeepers, as it requires the player to not only enter post-ML, but also defeat at least one of the later bosses even in that mode. While this is natural progression, it is still harder than the simple act of entering the next highest difficulty like the other three.
-Eudeus is the only one of the Lorekeepers that actually goes out of their way to attempt to deal contact damage to the player.
-Eudeus is also the only Lorekeeper to not say what is written on their designated scroll as they consider the information boring. Instead, they tell the player about Scourge.
--It is questionable where Eudeus got this information from, as it wouldn't be the sort of thing Garagon would have known since Scourge was in-hiding at the time of performing most of the things Edueus speaks about.
-The player should keep relocating themselves during this fight due to the multitude of enchanted swords summoned by the boss, as well as the ricocheting daggers and lengthy dagger waves being summoned.
[Added: 7/3/19]
[Eudeus' Lore]
Eudeus doesn't tell the player what is written on their scroll, as they personally consider the information incredibly dull and boring. Instead, they talk about what happened to Scourge during his absence; somehow aware of what apparently happened to Scourge during this time.

"Alright, alright, I yield!
I see that Fudon did not jest when he spoke of one with seemingly-limitless strength.
As much as I would like to continue our fight, I grow weary, too much so.
As a reward for besting me, therefore, I shall read from the scroll what is written.

...
...
Nevermind. The information is dull and boring, not something you would find interest in.
Though, to avoid disappointment, I shall find a compromise.
I shall unravel my wisdom of the entity called Scourge.
You know of them, do you not? Perhaps you have even fought them recently.
Yes, but that was long after his primes had passed him; he is only a fragment of his original might.

Scourge, long ago, was a powerful creature. An entity of flesh and blood, almost like yourself.
He conquered worlds single-handed, believing that only the strongest should rule.
His endless conquest proved to have an end as he encountered Garagon, however.
The Dragon King bested him, forcing him to retreat into the caverns; beaten and bruised.
It was here he devised a plan to make himself an army.

He gathered those who owed him, and those who would willingly swear their allegiance as well.
Wisp, a fire elemental whose body was partially composed of a unique type of flame.
Cyclonus, a serpentine creature who boasted almost unparalleled speed.
Sentinel, an otherworldly entity who was unrivalled in his loyalty.
And Dystopius; one who was among our own ranks before their mind became soured.
With his new armies, he set out to again try and usurp control of the lands from the Dragon King...
...and again he failed.

His minions either scattered willingly, or were blasted over the horizon. Scourge failed.
He didn't give up, however, he tried again.
He found something this time; a rift from which unnatural and unstable energy leaked.
He tricked Garagon there, using a combination of the energy of his and Garagon's attacks.
The rift opened further... and from it something most wretched and vile emerged.

And that is all I know for certain, I'm afraid.
As much as I would like to face you again, I am bound by my oath to not do so again... yet.
Maybe someday I can convince my master to let me fight you again.
Until then; try not to die, alright?"
26 - Lorekeeper Geresso
Appearance: The last of the Lorekeepers. Wears purple robes and has a green gemstone inside of their medallion. Its face seems to have a mark on it, whether some strange glowing crack or some strange oozing eye, it is unclear.

Summon: Use the Lorekeeper's Scrawlings anywhere in the world. The player needs to be in Chaos Mode to spawn Geresso, as well as having defeated the other three previously.

[Fought: Chaos Mode]
[Special Boss: Uncraftable Summon]

Stats:
Health:
-13,200,000 (15,400,000) (Geresso)
-750,000 (1,000,000) (Shadows)
Attack:
-340 (563) (Melee)
-350 (576) (Ryuuk's Shadow)
-355 (584) (Fudon's Shadow)
-360 (592) (Eudeus' Shadow)
-365 (600) (Phantom Sphere)
Defence: 145

Attacks:
Geresso is a summoner, and thus doesn't actually do any real attacking themselves for a lot of the fight. They summon small shadowy clones of the 3 previous Lorekeepers, each using their own attacks to fight.
-Geresso's only actual attack is to summon spheres which slowly follow the player before violently exploding. The explosions are very large, even if the spheres themselves are small and easy to dodge.
-Each of the Lorekeeper's Shadows will use their own respective attacks from their own boss fights, though on smaller scales due to their increased numbers and smaller sizes. Each shadows' own set of attacks all deal the same amount of damage, regardless of how hard the attack is to dodge. Up to 4 (5) of these shadows may be active at a time.
-At 50% health (60% and 30% health) Geresso will spawn 3 Shadows that only orbit around them. They only ever attack infrequently, and don't move independently of Geresso; only orbiting them and teleporting when Geresso does.

Defeat: Like the other Lorekeepers, Geresso falls to the ground and begins speaking before vanishing. All the summons disappear once Geresso falls, regardless of their current health.

GelTech Info:
-The eldest and strongest of the Lorekeepers; Geresso has been around for millennia. Many years of existence has brought Geresso unusual wisdom, as well as some rather deep understanding of otherwise-forgotten civilisations and legends.

Drops: Says lore, drops the usual trio of Lorekeeper items with a mask, weapon and accessory. The weapon is a summoner staff that summons small Lorekeepers and the accessory grants minion buffs (Increased damage and knockback, as well as increases to max minions and sentries).

Extra Info:
-Geresso, due to them using small versions of the other Lorekeepers as attacks, technically has the most attacks of any of the Lorekeepers.
-The player has to be careful since many of the Lorekeeper Shadows' attacks can overlap each other, becoming very awkward to dodge.
-Unlike the previous Lorekeepers, Geresso isn't as overpowered in comparison to the other bosses available at the start of Chaos Mode. Some of the earliest bosses found in Chaos Mode can even pose more of a threat than Geresso can. However, this doesn't mean they're an easy fight.
-Geresso is the oldest of the Lorekeepers and apparently holds knowledge of otherwise-lost civilisations. However, they never explicitly tell the player any of this information.
-Geresso, much like Eudeus, seems to hold information about another mysterious entity; though this time it's the first appearance of Chaos Doppelganger.
--Geresso's dialogue is the only one that doesn't end with them addressing the player, instead having them talk to themselves about the fact there's a Doppelganger, but Chaos themselves is never seen.
[Added: 7/3/19]
[Geresso's Lore]
Geresso's lore is, fittingly, about the Chaos Doppelganger. Considering when Geresso may be fought this makes sense as they may only be faced in Chaos Mode, an entire section of the game named after the Doppelganger. Geresso, despite apparently carrying excessive knowledge, seems to know very little about Chaos other than the event that happened after the Doppelganger's appearance, and thus describes that event for most of their lore.

"...I have been bested, after all these long years.
A fight of this magnitude has been eagerly awaited for many passing decades
And I am pleased to see it finally come to pass.
You fight seeking knowledge, do you not?
Then I shall grant you the knowledge that I may share
It is about this... entity...
...A Doppelganger of a chaotic shadow
...The Chaos Doppelganger

We know not of its true origins, as it is not of our dimension.
A powerful buildup of energy forced it to enter our reality, and that was that.
Chaos' Doppelganger, now awoken within the midst of a duel, immediately made its might apparent
It turned its powers towards both sides of the conflict, taking no sides but its own.

The Doppelganger bombarded Garagon with powerful blasts, too much for the Dragon King
He was forced to flee, with some of his allies staying behind briefly to try and retaliate and distract.
Soon, they too had to retreat back as the Doppelganger's power grew more apparent.
Scourge, wanting to contain his newfound weapon, attempted to best it as well.
Scourge... was ripped clean in half in a single blow.
However, Scourge's unwavering determination and refusal to perish persisted
His soul transferred over to the stones beneath his hands as his mortal body perished.

It then went about spreading its own influence, making the Crimson and Corruption
He powered up entities and created some of his own, each with varying powers and abilities.
The Dryad, learning of this, sided with Garagon's forces.
Another attack against it was attempted, Technicus also activated due to the severity of the event
...They failed once more, fleeing.
Soon, Garagon and his allies were mere myths, separated across the lands in hopes of safety.
Some stayed with the Dragon King, others went their own ways to find the being's weakness.
So far... we have little to show for it...
Except you.

So, that is all I know I am afraid.
Though, I must ask myself a frightening and ominous question:
If this being is a Doppelganger to another...
...then what is the original like?
Ha, it is these questions that keep old folk like me up at night."
27 - Dynamo
Appearance:
Dynamo is an entity made of plasma, able to shift into a few forms during her battle.
-Her normal form is the most clearly human of the three. While her head is still relatively large in proportion to the rest of her body, she seems mostly normal outside of her bright yellow colouration.
-Her Magus form has her summon a decorated circlet on her head and a robe that covers her arms and legs fully. Not much else changes about her, though.
-Her Wyvern form has the most drastic changes as her body completely shifts into the form of a Wyvern. It is far longer than shown in the picture, actually being a bit longer than the enemy it was originally based off.

Summon: Use the Plasma Core in the Temple. The temple specification only requires the player to be standing on Lihzahrd bricks whilst in front of a Lihzahrd wall for it to count. The boss doesn't despawn if taken out of her respective biome, nor based on any specific times.

[Fought: Post-ML]

Stats:
Health: 32 (42)
Attack:
-100 (180) (Melee)
-115 (210) (Energy Sphere)
-120 (218) (Explosive Energy Sphere)
-1 (1) (Returning Sphere)
Defence: 0*

[Debuff Immunity: Boss is immune to all debuffs]
[Player Immunity: Direct attacks from the player or player-activated sources deal no damage, includes Traps, NPCs, Player Attacks, Explosives, Minions, etc.]

Attacks:
The boss will cycle between 3 phases, using varying attacks with each different phase. She cannot be hurt by the player using normal methods; instead only being vulnerable to some of her own attacks being deflected back at her. This is done by simply attacking the explosive spheres in a way that will launch them back at her. While they only deal 1 damage, this is offset by the boss' incredibly low health.
She cycles through phases once she is hit 9 times by her own attacks in her current phase, switching back to Phase 1 when this happens in her 3rd phase.
Normal Form:
-Fires an arc of energy spheres at the player. Just before the arc an explosive one is fired, staying just ahead of the centre sphere in the arc.
-Summons a clump of 3 spheres which circle around her once before firing at the player from an angle. Easiest to hit at her when performing the original circle rather than when aimed at the player. One of the 3 spheres has a chance to be an explosive one, but isn't guaranteed.
-Drops a row of evenly-spaced spheres from above or brings them up from below. Each has a chance to be an explosive sphere, though this caps at 2 (1) per row.
Magus Form:
-Summons 3-4 rings of 7 energy spheres in various places nearby. These rings spin around for a while before each sphere disperses in an outwards spiral. Each sphere has a chance to be explosive, though this caps at 3 (2) per use of this attack.
-Makes a multitude of ever-accelerating spheres enter the screen from varying sides and angles. They arrive from the sides, below, and above and all start out slowly before rapidly accelerating after a few seconds. 3 (2) are almost guaranteed to be explosives, though the barrage and weird angles makes it hard to aim them at Dynamo.
-Fires a rapid volley of energy spheres directly at the player. While it is nearly guaranteed one will be explosive due to their sheer number, it is hard to fire them back at Dynamo without getting hit yourself in the process.
Wyvern Form:
-Flies around, like a Wyvern, firing attacks from its head. These range from lone spheres that have a decent chance to be explosive to arcs of 3 or 4 where 1 of them will always be explosive. The simplest form in concept.

Defeat: Lets out a yelp and disappears with an electrified explosion.

GelTech Info:
-Made up of plasma found lingering around the walls of the Lihzahrd Temple, Dynamo is quite literally a being of pure energy. While her body is still barely stable, it is solid enough to be able to hold a humanoid form. However, it is unknown both as to why she didn't take on a Lihzahrd form, and also how she even knows about Wyverns due to living underground.

Drops: Plasma weapons, mainly being magic-based. One of the mage staffs and one of the summoner staffs both summon smaller versions of Dynamo for their attacks.

Extra Info:
-Dynamo has the least health of any damageable segment of any boss in Terraria, having base health comparable to that of things like Zombies.
--However, this is offset by her only taking damage from her own attacks
-The boss' RNG can be a nightmare if the player attempts to speedrun the game, as it isn't always guaranteed her attacks will have explosive spheres and, even if they do, that they'll be useful for the player as they may be out of reach
-This boss always takes a set amount of hits to kill, no matter what weapon the player uses
-The easiest way to fight this boss is to make a small Lihzahrd room at the surface where she can be summoned, then to head outside of the room for the rest of the fight since she doesn't despawn if outside the dungeon.
-It is probably the easiest boss to kill with only the Copper Shortsword since the player has to simply direct attacks back at her as opposed to sitting there chipping away at a health bar with it.
--In fact, any item that deals damage can be used, even a Broken Wooden Hammer's 1 base damage is almost as good as a Meowmere.
---In fact, it might even be better as the lack of a bouncing arcing projectile makes it easier to predict what direction your attack will send the explosive orbs in
[Added: 8/3/19]
28 - Blackrune
Appearance: A shadowy, lanky, vaguely humanoid entity with two small, white eyes. While its body is humanoid its proportions seem off, with its rather round body being supported by 2 skinny legs and with 2 even-skinnier arms at its sides. It wears a brown rag around its neck, though nothing else.

Summon: Use the Chaotic Fragment at night anywhere in the world. The player is debuffed with Obscured throughout the entire fight, making vision very limited. Luckily, many of the boss' attacks are still bright enough to be visible to the player.

[Fought: Post-ML]

Stats:
Health: 8,000,000 (10,000,000)
Attack:
-300 (500) (Melee)
-265 (450) (Red Dagger)
-400 (635) (Assassin Stab)
-320 (542) (Red Energy)
-465 (730) (Nightmare)
-280 (474) (Red Chain Dagger)
Defence:
-100 (Normally)
- -50 (Stunned)

Attacks:
Blackrune spends most of the early fight jumping around frantically, rapidly using an assortment of attacks. These change and he becomes faster as the fight progresses. As soon as the battle begins the player is inflicted with the Obstructed debuff, which persists until the end of the fight.
If Blackrune is ever stunned by a counter-attack from the player they will become immobile and stay on the ground, trying to steady themselves again. During this time, they have -50 defence, 150 less than normal, making them very vulnerable for a time before they recuperate.
Phase 1: (100-70% health)
Blackrune mainly does simultaneous hops when attacking, though uses larger leaps for others.
-He may hop around, throwing red daggers horizontally at the player, up to 2 per hop
-He may jump into the air and fire up to 3 red chain daggers at the player, all returning to him at the same time
-He may disappear for a brief moment before appearing next to the player, dagger in-hand. If hit during this time, he will be stunned.
Phase 2: (70-20% health)
Uses all his previous attacks, with mild changes to one of them. Moves more rapidly, performing greater leaps and sometimes hanging in the air for certain attacks.
-During his 'Assassin Stab', the gap of which to hit him is tighter. He needs to have the blade raised high into the air to stun him now.
-He may summon up to 3 red energy orbs. They move around seemingly-randomly, charging at the player if they ever get too close. They disappear a while later. The attack cannot be used if 3 orbs are, or have been in the last 10 seconds, active. Brief period after summoning the 3rd orb where he can be stunned, though the window of time to do so is rather short.
Phase 3: (20%> health)
Becomes enraged, moving with even more speed. He is now so fast that, in-between attacks, he vanishes completely. Some attacks that have the ability to stun Blackrune have their windows shortened even further.
-To stun the boss during the Assassin Stab, he needs to have his blade raised as high as he can into the air
-The window after summoning the orbs has been reduced by 0.2s
-Sometimes, Blackrune will pull a blade out from behind his back and disappear. A couple of seconds later, he will try and attack the player with a highly-damaging horizontal lunge while obscured by a black misty cloud. If hit when drawing the blade, or from close-range during the attempted slash, he will be stunned.

Defeat: Shudders uncontrollably as black particles are exerted from his body. Then he disintegrates into dust.

GelTech Info:
-Born of a fragment of the Chaos Doppelganger's energy, Blackrune is far from the strongest entity linked to the Doppelganger. However, having inherited some cunning alongside its villainous nature, it has become closest to that of an assassin.

Drops: Mainly melee and throwing weapons, as well as his scarf as an accessory in expert mode. The scarf grants the player increased melee and movement speed as well as increased velocity on melee and throwing projectiles.

Extra Info:
-During the last phase of the fight stuns become very important as the boss begins to spend the majority of his time invincible.
-All of the boss' attacks are melee-based in nature. Daggers and chain knives are usually counted as melee, 2 of his strongest moves are contact-based melee attacks and even the spheres he summons go out of their way to melee the player.
-Blackrune's scarf doesn't count as part of his hitbox, luckily.
-Despite apparently being a fragment of the Chaos Doppelganger's energy (and therefore being directly related to it) it lacks its signature smile, despite having an entirely-black body with white eyes like the Doppelganger still.
--Also, since Blackrune naturally took on a human form, it could be theorised that the Doppelganger's actual body is also humanoid. However, due to him blending in with the background, it is impossible to see for certain.
-Strangely, Blackrune shares some similarities with Ember. Both are characters who wear and drop scarfs as items, both use attacks that heavily utilise a strong red colour, and both get faster as the player reaches later phases of the fight. Both also make use of melee weapons for both close and medium-ranged combat. However, this was seemingly unintentional as it isn't referenced anywhere else in the game.
-The Obstructed debuff given by the boss is somewhat offset by their use of bright-red attacks and the boss' own glowing white eyes that make them stand out.
-Since the boss uses both a sight-reducing debuff and a night-based fight, it is recommended the player build a brightened arena to help make Blackrune stand out from the background more.
-Chaos Doppelganger and Blackrune are the only 2 bosses to have entirely-black bodies that are not given shading. However, Blackrune's scarf and the Doppelganger's summoned weapons and minions still do have shading, even if the bosses themselves don't
-Blackrune has had the shortest development cycle of a boss so far, with a sprite made in only a couple of minutes and the fight designed in roughly 20.
-Blackrune's design and fight was based off of Phantasm, a similarly-humanoid monster that appeared back in the very first boss page.
[Added: 8/3/19]
29 - Lunar
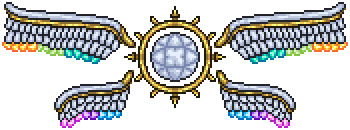
Appearance: Lunar is a large, rounded white object surrounded by a golden, spiked ring. 4 large wings float around it, but are not physically connected to its body. These wings are white and gold and have white feathers in the first 2 rows, with the 3rd row of feathers on each wing using colours similar to the Lunar Event Fragments seen back when fighting the Moon Lord; with Vortex and Solar at the top and Stardust and Nebula at the bottom. Despite the simplistic design, Lunar is still quite large, though mainly due to its wingspan.

Summon: Use the Celestial Caller at the surface at night. The boss will despawn during the day, but will not if taken underground.

[Fought: Post-Game] (One of the only 3 fights that are actually Post-Game as of now)

Stats:
Health:
-200,000,000 (265,000,000) (Lunar)
-10,000,000 (13,650,000) (Summons)
-200,000 (300,000) (Stardust Summons)
Attack:
-350 (530) (Melee)
-365 (560) (Evisceration Laser)
-340 (515) (Spear of Light)
-330 (500) / 350 (530) (Minion Melee)
-327 (495) / 347 (515) (Minion Attacks)
Defence:
-400 (Lunar)
-250 (Minions)

Attacks:
At the start of the fight, Lunar is invulnerable and does not attack the player, instead leaving 4 minions to attack instead. These minions are re-summoned at 50% (66% and 33%) health, with Lunar being invulnerable once again when they are active.
Each of the Spirits has 2 attacks, though they are all able to attack in unison.
-The Solar Spirit will either charge at the player or summon massive pillars of fire to its immediate left or right. Getting hit by it will inflict a long-lasting On Fire! debuf
-The Nebula Spirit summons orbiting energy wisps around itself before launching them at the player, or by summoning slow-moving arcanum projectiles. Getting hit by it will allow it to heal itself and the other spirits by a few thousand health, as well as buff their damage momentarily.
-The Vortex Spirit will either summon a portal to fire lightning from or vanish before charging at the player through a portal. It can teleport at will through portals.
-The Stardust Spirit can either fire an arc of stardust projectiles or summon small copies of itself. If it hits the player a copy will be made at the player's location. The copies can also summon other copies if they hit the player as well.
Once all the Spirits have been defeated, Lunar itself will become vulnerable and begin attacking the player.
-It may passively flip gravity for the player at random intervals
-It may fire a laser directly at the player
-It may fire a sweeping laser that travels 720-degrees around Lunar. However, they are immobile during the duration of the laser
-It may summon a row of light spears far above the player and make them fall down. There are gaps between them for the player to navigate through (The gaps are randomly-spaced in expert mode)
--It may also use this attack from below or to the side of the player, but less often
-It may rapidly summon light spears above the player that fall almost immediately, forcing the player to keep moving
--(In expert mode it can also do a horizontal version of this attack where the player has to keep changing their height to dodge them)
-It may launch a barrage of spears upwards at angles before they all descend again from the direction they were launched. They pass through solid objects in normal mode (but in expert mode they sometimes ricochet off of the ground and back into the air as well)
-It may fire between 3-8 evenly-spaced lasers from its body outwards.
-It may summon several portals in the sky in a row that fire out lasers in rapid succession. These lasers are all fired downwards in the specific order of the closest to Lunar first, often forcing players to distance themselves from the boss.
(In expert mode, once the boss is taken down to 50,000,000 health, it will gain a special new phase. Its wings crumble and fall apart, leaving only its body behind)
-It may summon one of its minions, though does not become invulnerable nor stop attacking while it is alive
-It may perform any of its previous attacks, though summons more light spears and more lasers where possible.
-It may perform a chain of 3 very fast-moving dashes. It stops dead after the 1st and 2nd charges, though only slows down a little after the 3rd. The 3rd charge also fires off light spears at 90-degree angles rapidly.
-It may summon a '+' or 'x' of lasers from portals that fire towards itself, followed by an 'x' or '+' back outwards afterwards.
-It may summon light spears in rapid succession around itself. They are all fired off individually, though with minimal delay. They always ricochet off of blocks and up to 30 can be summoned per volley.

Defeat: Its wings crumble away, feathers breaking off. The golden ring around its body begins to vibrate and shake while its rounded core begins to crack. Its core eventually explodes, shattering the golden ring and causing a bright burst of white light. The light obscures the player's vision for about 5 seconds before they can see again. Once these 5 seconds have passed there is nothing left of the boss except its loot.

GelTech Info:
-"Ancient guardian of a forgotten land, worshipped long ago by unfamiliar people. It is unknown why it answered your call."

Drops: An assortment of weapons and accessories. Drops 'empowered fragments' which provide benefits to certain classes whilst weakening others, a set of wings, a health and defence-boosting core and at least 2 weapons for every major class type.

Extra Info:
-Lunar is one of only a few things considered the 'post-game', with the only others being the Boss Rush (and Magia as an extension) and the true Chaos Doppelganger final boss.
--The statement about Garagon being the '2nd strongest foe' isn't true when factoring in Post-Game bosses, as Lunar and the final Chaos Doppelganger are both stronger (technically making him the 3rd or 4th depending on if you count the Doppelganger fights individually.
-Lunar shares similarities with Galeem (White spherical body, detached wings, use of light) and The Radiance (White, winged entity that heavily utilises lasers and light spears)
-Despite the use of Lunar Fragment-based summons and the name Lunar, the boss isn't related to the Moon Lord in any way
-Each of the Spirit summons are based on their own respective Lunar Fragments, using the same colours and bodies based on the fragments' inventory sprites, as well as having wings based on those of Lunar's own wings.
-Despite being a post-game boss the weapons Lunar drops are still comparable to the Chaos Mode weapons in terms of damage.
[Added: 16/3/19]
30 - Half-Harpy Princess, Skye
Appearance: The re-sprited boss back from the first guide, though she has remained mostly the same in basic design. Her golden 'armour' is more reflective and less yellowed than before and the loincloth is now made of blue harpy feathers instead of sharing the same colour as the rest of it. Her hair is also no longer identical to a stylist's hairstyle and her sprite is larger as to be more distinguishable and to make her hitbox larger. Otherwise, she is mostly the same as before.

Summon: Use the Aetherbound Wing at the surface or in space during the day. The boss will 'enrage' if taken underground, attacking faster. The boss can be taken anywhere, though will despawn when it reaches night.

[Fought: Chaos Mode]

Stats:
Health: 25,000,000 (28,500,000)
Attack:
-300 (450) (Melee)
-330 (498) (Fireball)
-288 (430) (Feather)
-400 (600) (Flame Pillar/ Inferno Blast)
Defence: 120

Attacks:
-Fires an arc of 5 feathers followed rapidly by a faster-moving arc of 6
-Fires a rapid volley of feathers at the player, though they are all at very slight angles.
-Fires a massive burst of feathers at random angles and speeds in the player's general direction
-May create a brief tailwind that pushes the player slightly in a certain direction, somewhat like a weakened desert wind.
-May create an updraft that allows the boss to move more rapidly, but also allows the player to jump and fly higher and fall slower
-May charge in arcs around the player, firing arcs of feathers at the player at the end of every charge
After being taken down to half health Skye will enrage, orangey flames erupt from her hands, eyes and wings and she starts using more fire-based attacks.
Phase 2:
-Uses all of the phase 1 attacks, though the feathers are now ignited and inflict On Fire!
-Summons a ring of flames around the player that move with them. Red feathers appear from the flame ring and move in straight lines towards the player's location. After around 10 feathers the flame ring explodes. (In expert mode it explodes into arcing fireballs that eventually fall back down)
-Teleports around, leaving stationary fireballs with each teleport. After a while they fly at the player one at a time in succession
-Summons a large ball of fire surrounded by a flaming ring that fires between 1-3 giant lasers at the player in succession before exploding (Inferno Blast)
-Flies upwards, summoning a large flaming pillar below where she was. The pillar spits out arcing fireballs until it eventually disappears, where Skye will reappear from within it.

Defeat: Like with her original fight, she will begin to glow before flying upwards and vanishing from sight. However, her glow is now more of an orange-gold as opposed to white like it was originally.

GelTech Info:
-Ruler of the sky and nemesis of the Moon Lord many ages ago. Once considered the physical embodiment of the sun, since nearly forgotten about by mankind. She does not seem to mind too much, though still seems to have some soft spot towards them.

Drops: Fire and sky-themed weapons. Some of her original weapons seen back in the 1st guide would be drops, but would be made stronger due to the later part of the game. Her accessories (the wings and heart) will remain mostly the same, however, except with updated sprites.

Extra Info:
-Along with Garagon, Skye was one of the original bosses seen back in the first guide. Her sprite was, originally, just a player's; though this one has been fully re-made without a pre-existing base for any part of it.
-Skye was, originally, a boss fought around the same time as the Moon Lord, though has been upgraded to a Chaos Mode boss, much like Garagon.
--Also, much like the Dragon King, she was also given a title when re-made.
-Due to her feet pointing downwards, it seems like her feet are just stubs, though there are meant to be feet there still
-Not much has been recycled from her original fight: Only her feather barrages, one fireball attack and projectile rings remain from before (though altered) but everything else is new.
[Added: 16/3/19]
31 - Crystaline Renegade, Nebula Devourer
Appearance: The re-made sprite of the Nebula Devourer; another boss seen back in the first page and therefore one of the first bosses made by me. As opposed to its original design which used a bright pink and multicoloured crystals this one uses darker pinks for the body, blue for the eyes, and an indigo for its spines, teeth, spikes, tail, etc. It looks more menacing than the original.

Summon: Use the Wrath Nebula at night anywhere in the player's world. Boss despawns during the day, but is unaffected by depth or biomes. Its summoning item is a super-rare drop from any Chaos-Mode enemies killed in the space biome, with an increased chance for bosses.

[Fought: Chaos Mode]
[Special Boss: Uncraftable and rare summon]

Stats:
Health:
-100,000,000 (145,000,000) (Nebula)
-5,000,000 (8,450,000) (Crystal Worms)
-2,500,000 (4,000,000) (Crystal Turret)
Attack:
-500 (800) (Head Melee)
-350 (550) (Body Melee)
-320 (500) (Crystal Laser/ Minion Body Melee)
-385 (610) (Crystal Barrage/ Minion Head Melee)
-365 (573) (Crystal Mine)
-300 (472) (Crystal Bullet)
Defence: 250

Attacks:
The Nebula Devourer itself will act predominantly like a Worm AI, burrowing through the ground at high speeds. It is far faster than enemies like the Destroyer and is able to perform massive leaps or race across the map using the speeds it can achieve. It uses a mixture of attacks against the player, based on the player's own actions.
-Segments that aren't attacked will sometimes fire lasers at the player. The laser passes through blocks
-Attacking segments may cause the Devourer to spawn one of two types of minion:
--Crystal Worms act like smaller versions of the Devourer, though lack any ranged attacks outside of lone laser shots from their faces when near the player
--Crystal Turrets are stationary grounded enemies that fire crystal bullets at nearby players.
-If the player 'enrages' the boss it will unleash a massive barrage of pink lasers that deal more damage than the normal lasers, as well as travel faster. They still pass through blocks.
--The boss can be enraged either by dealing lots of damage without any breaks in-between (continuously barraging the boss) or by keeping it off-screen for too long (like if you tried to cheese the boss using sky platforms)
-The boss' final attack is to launch balls of spiky crystals from its head that increase in size and hang in the air for a long, long time. They deal contact damage to the player and cannot be destroyed, despawning on their own after a long timer.
After reaching 5,000,000 (10,000,000) health it transitions into Phase 2. Its body becomes immobile and its head and 2 other segments break free. The now-3-segment Devourer speeds up and no longer uses as many ranged attacks. The stationary body takes no damage.
-The live segments will mostly just try to melee the player with increased speed. Occasionally it will fire laser streams from its head, though these are infrequent. The crystal mines are still used normally, however.
-The 'dead' segments sometimes explode in clusters of around 3 segments at a time. Each cluster that explodes spawns a Crystal Worm. This attack can only be used as long as at least 3 clusters remain.

Defeat: The last 3 live segments of the Devourer slow down, crack, and explode. Any 'dead' segments or boss minions also explode.

GelTech Info:
-Fuelled by a cruel vendetta, the Nebula Devourer has been seeking half the galaxy for the one who wronged it in the past. Perhaps due to previous fights, perhaps even mockery and slander; but either way its passion for revenge carried it this far... only to fail.

Drops: Crystal-based weapons, accessories, and materials to make an armour set. Not only does it drop its own respective mask and trophy, but it also drops an 'Ancient Nebula Mask' which is modelled after the original Nebula Devourer sprite

Extra Info:
-The Nebula Devourer, much like Skye and Garagon before it, was one of the original bosses seen back in the first guide. Personally, I would say that the Devourer has had the most drastic design changes of the 3 as it is nearly unrecognisable in its new, upgraded state.
-The player can actually go the entire fight without it using its barrage attack by simply keeping it on-screen as much as possible and by occasionally taking short breaks from dealing any damage to it as to stop its rage growing enough to use the barrage.
-Almost nothing from the original fight was taken over into its newly-made rematch. The only thing that remained in-part was the head breaking away, though in this fight it brings a couple of extra segments with it as well.
-The 'vendetta' was likely a reference to its original design looking somewhat goofy and far from menacing due to its bright pink colouration and multicoloured crystals.
[Added: 18/3/19]
32 - Tomato Arena
[The return of the Tomato Armies from the very first guide, but instead of just being the over-complicated mess that was the original it is instead now 1v1s against randomised bosses based on game progression, making the ordeal a whole lot simpler.]

There are currently 4 'bosses' that can be fought based on game progression. 1 in early hardmode, 1 in late hardmode, 1 post-ML and 1 in Chaos Mode. They all also have variants based on higher difficulties, meaning that any of them can be fought in Chaos Mode, all with buffed stats.

Summon: Use the Red Flag anywhere. A makeshift arena will be made around the player, with blocks to the sides and below, powerful winds above to limit the player's height, and audiences either side that cannot be interacted with. The arena despawns once the boss (or the player) is defeated.
-In Pre-hardmode nothing happens when the item is used as there is no set boss since the item is normally hardmode-exclusive
-In early hardmode the Big Boy will spawn with a 100% chance
-After Plantera is defeated Tomantha or the Big Boy may spawn, each with a 50% chance
-Post-ML both the previous bosses may spawn, as well as the Bush Goliath, with a 33% chance each
-Finally, in Chaos Mode, Tomathena or the previous 3 may spawn, each with a 25% chance

Defeat: Each one has their own defeat animations, depending on which one is fought.

Drops: Each boss also has its own unique drops, usually upgradable. The upgraded versions will be dropped in higher difficulties instead (so, for example, a weapon Big Boy drops in early hardmode can either be upgraded post-Plantera or dropped in upgraded form if the player fights Big Boy a 2nd time).

Extra Info:
-Despite being based off of the Tomato Armies event, only 1 enemy from it returned
--The returning boss, Tomantha, has still had a complete redesign and looks completely different from the original
---However, the Tomato and Tomato Warrior enemies from the original event can be seen outside of the arena, acting as the audience.
-Each of the bosses has its own signature gimmick or attack that they use during their fights. They are usually either highly-damaging attacks and/or a defence mechanism for the boss.
-Big Boy's sword seems to be a sightly smaller version of the Seedler, with a slightly altered projectile as well
-Tomantha was based off of a character from a game I used to play years ago, brought back during the 1st page due to me still playing it back then. However, she was completely different
-Tomantha and Tomathena both share rather similar head sprites. This is mainly because Tomathena actually only started out as a redesign of Tomantha as opposed to her own character
-Bush Goliath and Big Boy are not given actual names, whilst Tomathena and Tomantha are
--Their 'boss names', Big Boy and Bush Goliath, are types of tomato
---However, both of the named bosses also have tomato fused with their names, so even they haven't escaped the tomato naming
-Bush Goliath was originally based off of a Reddit post in its original design, though changed drastically during the spriting process.
--He also never used to have a loincloth, but this was added to protect some of his modesty.
-Tomathena's wings are similar to a few other bosses, including some from Touhou and even 02 from Kirby with the red disconnected crystals
-Despite having full opportunity to self-insert my profile's character into the roster, I have restrained myself and not done that
[Added: 24/3/19]
32A - Big Boy
Appearance: A giant version of the Tomato Armies' basic Tomato enemies, wielding a slightly-altered version of the Seedler and a shield (despite lacking hands).

Summon: Appears as a boss in the Tomato Arena, being the first one the player is likely to encounter. He has a 100% spawn rate prior to Plantera, a 50% prior to ML, 33% post-ML and 25% in Chaos Mode. He will remain within the arena and only leaves if the player gets out of the arena or he defeats the player.

[Fought: Early Hardmode, Post-Plantera, Post-ML, Chaos Mode]

Stats:
Health: 15,000 (18,550) / 34,000 (37,500) / 785,000 (1,000,000) / 10,000,000 (12,450,000)
Attack:
-40 (75) / 60 (95) / 150 (230) / 285 (470) (Melee)
-55 (95) / 80 (130) / 180 (300) / 320 (650) (Sword Strike)
-40 (70) / 58 (90) / 145 (220) / 282 (465) (Seed Bomb)
-0 (1x) / 0 (1.3x) / 1x (1.65x) / 1.25x (2x) (Shield Deflect)
Defence:
-30 / 45 / 70 / 100 (Normally)
-75 / 145 / 300 / 1000 (Shielding)
[When shielding, Big Boy will take no damage. However, in expert mode, the defence is still used when calculating the damage the deflected projectiles will do to the player]

Attacks:
[Early Hardmode]
-Can 'charge' horizontally at the player by performing a chain of very short hops, holding his sword outwards
-Can jump into the air and slam his sword downwards, getting it stuck in the ground briefly
-Can swing his sword, causing a large seed projectile to be launched from it in an arc. The projectile will explode on contact with the ground or a solid object
-Can guard using his shield. He cannot attack or move when shielding, but is also immune to damage. (In expert mode the shield will deflect projectiles back at the player.)
[Post-Plantera]
-The charge attack is now faster and has a shorter wind-down at the end
-The sword during the downward attack is pointed outwards and no longer gets stuck in the ground
-Now spawns 2 seeds per swing instead of 1
-Can now slowly move when guarding, but cannot if under fire.
-Has a new attack where it bounces around the arena, ending with a sword strike that slams into the ground. Bounces in an arc, though doesn't lose height between bounces like projectiles usually do.
[Post-ML]
-Charge attack is now a single slash with the sword that covers a lot of ground. A lot faster and has a shorter wind-down at the end
-Downward attack ends with a tiny shockwave that travels forwards. Disappears shortly after, though.
-3 seeds are spawned per swing, sometimes followed up by a 2nd swing as well
-Can move when guarding and isn't stopped by attacks. Can now defect projectiles even in normal mode
-Bounce attack is slightly faster
-Has another new attack where he leaps through the air, spinning the sword around him while airborne. Similar to one of the Solar Pillar enemies.
[Chaos Mode]
-Charge attack's dash is faster and covers more ground. Can now be followed up immediately by another attack
-Shockwave from the downward strike is larger. Shockwave deals the sword's base damage and travels to the arena's borders.
-Does 3 simultaneous swings with his sword, moving forwards as he does so. Seeds are launched in groups of 3, meaning a total of 9 seeds are launched.
-Slightly increased movement speed when guarding. Performs a wide slash after dropping his shield in front of him.
-Bounce attack ends with a shockwave, but is otherwise the same.
-Leap attack can happen up to 3 times simultaneously and has reduced wind-down time

Defeat: Is sent rolling by the player, dropping his sword and shield. Crashes into one of the arena walls.

[No GelTech Info for any of the arena bosses]

Drops: His sword and shield. Works as a weaker Seedler pre-Plantera, a slightly stronger one post-Plantera, and stronger ones post-ML and in Chaos Mode. Shield grants knockback immunity, defence, and slightly increased life regen. Defence and regen increased depending on what tier boss is defeated. Items can be upgraded into later variants using materials found in those areas of the game.

Extra Info:
-Big Boy is the only one of the 4 tomato arena bosses to actually be spherical in shape as opposed to the otherwise-humanoid bosses
-Big Boy is the only one to use actual weapons as opposed to either just magic or melee
-Big Boy is one of the more deadly bosses to be fought in expert mode in the earlier stages of the game due to the forced arena and shielding abilities, limiting the players' movement options and attacking intervals. It is also hard earlier on due to having weaker equipment overall. Luckily, though, the player is allowed to use post-mechanical equipment for its first fight as long as they don't kill Plantera, potentially giving the player a slight edge.
--Similarly, using Lunar event items for the 2nd fight is also allowed if the player loses to, or flees from, the Moon Lord as opposed to defeating it.
[Added: 24/3/19]
32B - Tomantha
Appearance: A re-designed version of Tomantha back from the first boss page. As opposed to being a mini-boss like she used to be she is now an actual boss for the arena.

Summon: Appears as a boss in the Tomato Arena, summoned using the Red Flag. Can first be found post-Plantera with a 50% chance, though appears later with boosted stats at slightly lower chances both post-ML and in Chaos Mode. Doesn't leave unless the player somehow escapes the arena or dies.

[Fought: Post-Plantera, Post-ML, Chaos Mode]

Stats:
Health: 65,000 (83,000) / 800,000 (1,000,000) / 10,000,000 (12,450,000)
Attack:
-70 (100) / 130 (250) / 270 (400) (Melee)
-84 (125) / 150 (285) / 300 (445) (Energy Bolt)
-73 (107) / 136 (264) / 280 (416) (Nettle Burst)
-90 (140) / 170 (330) / 340 (500) (Energy Burst)
-1x (1.2x) / 0.8x (1x) / 0.25x (0.5x) (Repulsion Barrier)
Defence: 45 / 80 / 100

Attacks:
[Post-Plantera]
Spends much of the fight on the ground, firing various magic-based attacks at the player. May teleport around if attacked or to reposition herself, but never leaves the arena.
-She may fire 2 energy bolts at the player in succession. They travel quite fast and explode on contact with solid objects
-She may summon 3 large vines from the ground that travel upwards from the ground. The floor from which they sprout from is random, but has a 'tell' by dirt-like particles appearing from them.
-She may summon stationary energy bolts in random places around the arena, then cause them all to explode after a few seconds. Can be triggered manually by attacking them.
-She may generate a barrier around herself that blocks all incoming damage and projectiles, with the projectiles remaining stationary just inside the barrier. After a while the barrier explodes, flinging all the projectiles trapped within it back outwards as hostile projectiles.
[Post-ML]
-Now fires 3-4 energy bolts in succession, with the final one having a very slight homing effect
-3-4 vines are now summoned. There is less time before they erupt from the ground and the vines are both thicker and taller
-More stationary energy bolts are summoned at a time and their explosions are larger. A 2nd, smaller amount is summoned afterwards.
-Her barrier lasts longer and, while the multipliers for damage are smaller, the player's own damage is likely a lot higher, resulting in them still dealing more damage than they used to.
-At 33% health she now summons a hollow clone of herself which also uses her attacks. The clone cannot be destroyed, only despawning if the boss is defeated or despawns, but also attacks slower than Tomantha herself does.
[Chaos Mode]
-4-5 energy bolts are summoned. They travel faster and are fired with increased frequency. Final 2 have slight homing effects
-5-6 vines summoned at a time. Now reach the top of the arena and take less time to erupt from the ground
-More energy bolts summoned in both waves, explosions also larger
-Barrier lasts longer and has a slightly reduced damage multiplier to make up for the player's current damage likely being in the thousands.
-Her clone remains the same, except that it attacks with slightly increased frequency.

Defeat: Releases a powerful burst of energy and teleports away.

[No GelTech Info for the arena bosses sadly]

Drops: 3 magic weapons and an armour set. Armour based on her attire, weapons include a slightly-buffed Nettle Burst, a tome that summons energy bolts, and another tome that summons vines from the ground. Stronger variants dropped in later fights or made via crafting.

Extra Info:
-Despite Tomantha appearing in the very first guide back a few years ago she looks almost completely different in this one; dropping the original mage robes and hat and having brighter-coloured hair.
--Also, despite the original one actually being little more than a reskin of another enemy, this time another enemy was originally a reskin of her.
-Due to the arena's enclosed nature many of her attacks, including the vines and energy bursts, are harder to dodge. However, it also makes the player more likely to be able to see when she uses the barrier attack and thus signals that they should stop attacking.
-In expert mode her barrier can sometimes cause the player to essentially 1-shot themselves due to the damage multipliers granted by the barrier combined with the player's damage. Melee classes need to be especially careful since their weapons naturally carry damage in the hundreds and likely have projectiles, especially in the late-game.
-The barrier she uses is slightly broken and heavily messes with many attacks the player may use. For instance, Spears and Flails technically use projectiles and thus get stuck in the barrier as well, locking players in-place or forcing them to take damage as the weapon returns to them, summons may get confused and continue attempting to attack the boss even in the invulnerable state, summons with projectiles will keep firing and eventually cause the boss to release a mass of projectiles the player would just have to deal with, etc.
[Added: 24/3/19]
32C - Bush Goliath
Appearance: A giant, seemingly-bearded boss with a cloak made of plant life. It seems to have boots and gloves made of twisted wood as well, with more greenery protruding from them.

Summon: The third of the bosses that can appear in the Tomato Arena, appearing only once the player has defeated the Moon Lord and made it into the post-ML game. Appears with a 33% post-ML and with only a 25% chance in Chaos Mode.

[Fought: Post-ML, Chaos Mode]

Stats:
Health: 1,000,000 (1,375,000) / 12,345,000 (16,000,000)
Attack:
-165 (270) / 330 (500) (Melee/ Boulder)
-50 (85) / 80 (100) (Grab/ Bury)
-140 (260) / 300 (470) (Shockwave)
-175 (300) / 350 (537) (Shoulder Charge)
Defence: 80 / 145

Attacks:
[Post-ML]
Bush Goliath will spend rather limited time inactive, usually spending the majority of its fight bombarding players with attacks. Unlike most of the other bosses in the arena, Goliath doesn't actually use weapons, freeing up his hands for his special ability.
-If the player gets within close-range of Goliath while he is not attacking he will proceed to grab the player, dealing some minor damage, before throwing them. The player also takes damage when they land and they cannot move or use items when being thrown, so they cannot fly or teleport to avoid damage. This attack cannot be altered via knockback immunity.
-He may punch his hands into the ground, pulling up large boulders. He then throws them at the player in one of two ways:
--One type of boulder will continuously bounce when thrown until it hits a wall, like a Flower of Fire projectile
--The other will work more like the Staff of Earth boulders, bouncing mildly before rolling to a standstill and despawning
-He may perform a jump and a short midair dash followed by him reaching out to grab the player. If he catches them he will deal grab damage before throwing them into the ground, dealing further damage. The player, for a brief moment, will be affected by a buff similar in function as Frozen: immobilising the player completely for a few seconds.
-He may jump up into the air several times, slamming down into the ground to create shockwaves with each descent. They work like the Ogre's jump attacks, though Goliath performs these jumps in succession.
-His final attack is to do a short jump backwards before landing and immediately performing a swift, horizontal charge. The player, if hit by the charge, will be pulled along with him and eventually slammed into one of the arena's walls, dealing high damage. The player cannot attack or use items until they hit the wall, leaving them at Goliath's mercy if they are caught.
[Chaos Mode]
-Grabbing mechanic has slightly more range, forcing players to keep more of a distance
-Pulls out more boulders per volley of boulders. Bouncing ones remain mostly the same but the rolling ones will keep rolling with the same speed until they hit a wall and break
-Midair dash attack given more horizontal distance, making it harder to dodge
-Shockwaves are taller the closer the player is to Goliath; with the furthest points being the same as they were post-ML and the closest being as tall as Goliath himself
-Charge is even faster, but is otherwise the same

Defeat: Knocked back and falls flat on the ground (think Street Fighter)

[No GelTech Info since he's part of another 'boss', sadly]

Drops: A fist-shaped Flail, a sword, a glove that fires fist-shaped projectiles, a tome that also fires fist-shaped projectiles and a melee weapon that makes shockwaves on the ground nearby. Can also drop his cloak which grants melee, health and defence boosts. Not all guaranteed to drop in 1 fight. All drops have upgraded versions in Chaos Mode.

Extra Info:
-Bush Goliath's page went around a week without being finished due to lack of time to finalise the page. Luckily, I finally got around to finishing the 2nd half.
-Goliath has many attacks that it can use that will temporarily immobilise the player; being his grabs, throws and charges. None of these can have any of their effects blocked except for the debuff of being buried, which is nullified by a single item seen later in the game.
--This, combined with his high health, damage and mobility, makes him by far one of the hardest of the bosses in the arena the player may have to face.
---However, he also has some of the best drops, so a fight may still be recommended if possible.
[Added: 27/3/19]
32D - Tomathena
Appearance: The last of the Tomato Arena's bosses, only being found in Chaos Mode. Her design consists of a darker-green outfit and lighter green hair, like Tomantha's, though with large amounts of gold added. Tomathena also has 4 large, disconnected wings following her; each made of golden spikes connected together by further greenery with small reddish crystals floating nearby.

Summon: Has a 25% chance to appear in the Tomato Arena once the player reaches Chaos Mode. Unlike the other 3 bosses up to this point, she cannot be found in any other difficulties.

[Fought: Chaos Mode]

Stats:
Health: 18,650,000 (22,220,000)
Attack:
-35% (50%) of Player's max health (All Attacks)
Defence: 135

[As opposed to dealing set amounts of damage, Tomathena's attacks are instead based on health percentages, allowing players to only survive a set amount of attacks from the boss. Players, when not accounting for regeneration, can only take 2 hits in Normal Mode and only 1 in Expert.]
[The player cannot use any forms of self-healing during this fight, including (but not limited to) Health Potions, the Nurse, Hearts, heal-on-hit Weapons, etc.]
[The player's regeneration rate is set at 1% of the player's max health per second, no matter what buffs the player may have that would normally cause otherwise]

Attacks:
Phase 1:
-Can summon a large wave of vines that travel along the ground rapidly
-Can summon large volleys of diagonally-falling golden leaves
-Can fire a large sweeping laser across the floor roughly 120-degrees
-Can summon large spheres near the player that slowly accelerate towards the player's location when they first spawned.
-Can summon large golden spikes that travel in large rows or columns horizontally or vertically across the arena. There are gaps between them for the player to pass through
Phase 2:
Triggers at half health, made most obvious when she says "Enough" in golden letters in chat and proceeds to become more aggressive with her attacks, buffing up older ones and adding newer ones as well.
-Vine wave is taller than it was before and is slightly faster
-More leaves spawn at a time and sometimes one set will fall from one angle and the 2nd at another
-Laser sweeps a whole 360-degrees instead of just 120
-Spheres, while slightly smaller, are more numerous and accelerate faster
-More golden spikes are spawned per row/column and can be used up to 3 times in succession
-May sometimes summon a ring of around 12 energy orbs around the player that close in. 1 is always destructable and the player must destroy it and get out before it closes in too much. Orbs disappear once they all meet in the middle. Attack can happen up to 3 times in succession.
-Can rapidly teleport around, summoning orbs wherever she teleports to. These will all converge at the player's location when they started moving, and then all fire at the player again 1-at-a-time afterwards.

Defeat: Tomathena's wings shatter and Tomathena herself glows golden and teleports away, leaving her drops behind.

GelTech Info:
[None since she's part of the Tomato Arena, where none of them have any info]

Drops: Mainly mage items, including staffs, tomes, etc. Also drops a mana-absorbing sword, a sword that uses mana, a bow, and 2 summoning weapons. Can also drop a couple of accessories, plus a mount with infinite flight that looks like her wings that works like a faster UFO without disappearing in water.

Extra Info:
-Tomathena is overall not only the hardest fight in the entire Tomato Arena (quite fittingly), but also one of the hardest to actually engage due to the requirements of being in Chaos Mode and having to beat the other 3 bosses. Plus it is only a 25% chance when it comes to finding her; lower odds than any of the other 3 when it comes to fighting them the 1st time.
-It is recommended that, before triggering her 2nd phase, that the player waits for their health to regenerate back to full. This is because of the player's inability to heal themselves and the added difficulty of this phase.
-Tomathena is one of the most punishing bosses to lose to since the player will have to attempt to re-encounter her again, which is only a 25% chance in her arena.
-Due to being Chaos Mode-exclusive she doesn't have weaker counterparts to her weapons.
--She also has the most drops of any of the Tomato Arena bosses, and drops multiple at a time upon defeat
-Tomathena was originally just going to be a Tomantha rematch, though this was later changed to make Tomathena her own unique boss.
[Added: 21/4/19]
33 - Forest Spirit (Remake)
Appearance: A slightly altered version of the Forest Spirit from the Calamity page, with additional leaves on the wings, a circlet of twisted roots and some additional smaller alterations here-and-there. Mainly remade due to the previous boss being very easy.

Summon: Appears on its own within the post-Golem underground jungle. It will provide the player with some forewarning before appearing, however. Messages will begin appearing, rarer enemies will begin spawning, and eventually the spirit itself will appear. The boss' spawn can be cancelled by leaving the underground jungle before it appears. Boss can be rematched later using a peace candle, which can allow its spawn to trigger again.

[Fought: Post-Golem]

Stats:
Health: 20,000 (x5) (26,450) (x5)
-Total: 100,000 (132,250)
Attack:
-55 (100) (Melee)
-58 (105) (Leaves)
-62 (114) (Leaf Tornado)
-70 (126) (Red Thorn)
-85 (150) (Red Snapper)
Defence: 40

Attacks:
Flies around, keeping its distance throughout most of the fight, flying above, below or to the side of the player. It will use certain attacks depending on what phase it is on, as with most bosses, but the phase triggers are based on taking it to 0 health as opposed to certain health percentages, as the boss regenerates back to full 4 times when taken down to no health.
Life 1:
-May summon a circle of leaves around itself, then fires the ring at the player. The ring stops moving after a few seconds, spinning around in-place for a while before each of the leaves disperses outwards.
-Can summon a large number of leaves to fall diagonally across the screen. Number depends on health, phase and difficulty, though is always over 50. The spirit herself remains stationary during this attack (except in expert mode, where she flies around still)
-Summons between 3-5 (4-6) targeted leaf attacks. These have 4 leaves come in from off-screen and fly directly towards the player's location. They do not home-in after being fired.
Life 2:
Regenerates health by up to 10,000 health per second, taking 2 (~2.6) seconds to reach full health again. Invulnerable during this time. Gains new attacks along with her old ones.
-Can now summon up to 3 'leaf tornadoes'; large projectiles that slowly home-in on the player before eventually disappearing.
-Can summon a leaf tornado alongside one of her phase 1 attacks, making it harder to dodge
-Can summon a slower-moving leaf tornado that eventually becomes a powerful pillar of wind that covers massive amounts of vertical distance.
Life 3:
Regenerates at a rate of 8,000 health per second, taking 2.5 seconds (~3.3) seconds to reach full health and become vulnerable again. Uses new attacks alongside her old ones.
-Summons large thorn trails outwards from herself in random directions. They are long, thick, and persist for a decent amount of time, making them quite hard to dodge
-Sets a trap on nearby ground that, when stepped on, summons a large thorny vine upwards to hit the player. The traps eventually disappear on their own
Life 4:
Regenerates 5,000 health per second, taking 4 (~5.3) seconds to reach full and become vulnerable. Gains her last new attack.
-Can summon large red plants that charge at the player. They disappear on their own after the 3rd charge and deal the most damage of all of her attacks.
Life 5:
Regenerates 2,500 health per second, taking 8 (~10.6) seconds to reach full and become vulnerable. A weaker version of Plantera's 2nd phase is summoned that doesn't drop hearts as well, increasing difficulty. However, she gains no new attacks in her last phase, though uses her previous ones more rapidly and overlaps a few of them.

Defeat: Lets out a light green burst of energy and explodes into leaves

GelTech Info:
-A powerful entity who is said to guard the forest from threats. Rarely shows itself to humans.

Drops: Mostly just powerful plant-based weapons, with the majority being mage weapons. Also drops a sword, summoning staff, an upgrade of the Blowgun, and a couple of accessories that provide defensive buffs.

Extra Info:
-The original Forest Spirit was the last boss put on the Calamity page before that project was sadly abandoned. However, feeling that her design could have used more, I remade it and her entire boss battle.
-She is currently the only boss to be remade who wasn't from the 1st guide, instead being from the more-recent 3rd one.
-The Forest Spirit is overall a very easy boss to accidentally skip as the player would likely leave the jungle prior to encountering it after defeating the Golem.
-The Forest Spirit could be the 3rd jungle boss the player fights in a row, coming directly after the Golem who came directly after Plantera.
-The Forest Spirit is not actually related to the Forest biome, but actually the Jungle instead.
-Her design is very intentionally similar to that of the Dryad, complete with green hair and the use of leaf barriers in their attacks.
[Added: 21/4/19]
34 - Sungazer
Appearance: A large potentially-human entity wearing a larger, modified version of the Solar Cultist robes. They have fiery wings and a 'flame shield' at the front, as well as an orange glow coming from their body. The wings and shield, while using the solar fragment colours, are very different from the Solar wings and shield, respectively.

Summon: Found in the Jungle Temple after the Moon Lord is defeated. Found very close to where the Lihzahrd Altar was naturally, meaning that he should spawn in the largest room in the 'back' of the temple. Appears there with a 25% chance every day. Attacking him will cause the player to be teleported to the surface above the temple along with the Sungazer, and a massive ring of flames will spawn around you both. The ring's radius is around 75 (60) blocks, giving limited moving space. Will despawn if it reaches night.

[Fought: Post-ML]

Stats:
Health:
-1,250,000 (1,850,000) (Sungazer)
-400,000 (500,000) (Shield) (Regenerates 100 (200) health per second)
Attack:
-90 (165) (Melee) (Inflicts Daybroken*)
-100 (180) (Fireball) (Inflicts Daybroken*)
-150 (220) (Giant Fireball) (Inflicts Daybroken*)
-500 (700) (Fusion Flares) (Inflicts Daybroken*)
-850 (1000) (Supernova) (Inflicts Daybroken*)
-1000 (1000) (Flame Ring Border) (Inflicts Daybroken* debuff until you re-enter)
Defence: 65

[The Shield stays broken forever in Normal Mode but respawns at <50% health once in Expert Mode]

Debuff: Daybroken
Slightly different from the one the player inflicts. Deals 25 damage per second in 5-damage chips.
Desc. "The Sun Calls..."

Attacks:
Phase 1:
The Sungazer's shield blocks all damage the player tries to inflict, and regenerates slightly for as long as it is active. The player will need to destroy it to progress the fight.
The Sungazer only uses basic fireballs while the shield is still active, though spams them.
-He may fire 3 single fireballs in rapid succession followed by an arc of 4 (5) followed by another barrage of 3 individual fireballs.
-He may fire a long wavy 'worm' of fireballs at the player
-He may fire an arc of 4, followed by an arc of 5 and then followed by an arc of 6 in rapid succession
-He may fire a slow-moving large fireball and then throw a smaller one at it, where it explodes into 10 smaller fireballs that disperse outwards.
-He may fire an arc of 3 of the large fireballs and then fire smaller fireballs at them which cause all of them to explode into bursts of 4 fireballs each.
Once the shield is destroyed the Sungazer will begin using more damaging attacks in conjunction with his phase 1 ones.
-He may lock-on to the player's location and, after a brief moment, fire a massive barrage of bright orange flares which create violent explosions. The attack can be dodged with quick movement, which is recommended since it deals high damage.
-He may continuously fire a barrage of small fireballs at the player for up to 5 seconds, forcing the player to keep moving
-He may summon a large 'snake' of fireballs that mildly lock onto the player for a few seconds before all exploding.
At half health one of two things will happen. In normal mode he will finally add his last new attack to his arsenal or in expert mode re-summon the shield. With the shield he reverts back to his Phase 1 attacks until it is destroyed, where he gains access to all of his attacks again.
-His final new attack has him build up massive amounts of energy over a few seconds, before staying still and releasing a slow-moving shockwave of fiery energy. This can be used up to 3 times in succession and each wave keeps travelling outwards until it hits the edges of the arena's border (the fire ring). The attack either needs to be interrupted when he is stationary or dodged via the Rod of Discord or other means of teleportation.

Defeat: Vibrates in-place violently before glowing white and exploding into flames. The flames deal damage so take caution. After the flames all fade the arena's ring border will also vanish.

GelTech Info:
-An anonymous figure who has devoted itself entirely to a powerful sun-based entity. Any sense of individuality has been expunged for more selfless devotion. It isn't even clear if the one he follows is even aware of this, however.

Drops:
-A few solar-themed weapons including staffs and swords, as well as an accessory that grants a Daybroken-esque debuff to all of the player's attacks. Also drops the summoner for the Harpy Princess, though it only works in Chaos Mode.

Extra Info:
-The Sungazer is, technically, just a remake of the Solar Cultist boss seen in the 1st guide. Hence its design and connections to the Harpy Princess. The new name is a reference to one of the boss' original drops.
-The Sungazer, much like Garagon, Nebula Devourer, Forest Spirit and Harpy Princess, was made much more difficult when it was re-made to accommodate for the post-ML and Chaos Mode extensions added.
-The Sungazer was originally planned to have its hood be destroyed and face revealed later in the battle, though this idea went unused for a few reasons, one being to drive home the GelTech's specific mention of their 'loss of individuality'.
-While the Sungazer technically only uses modified versions of the Solar Shield, Wings, and Cultist Robes, they look notably different (especially the wings and shield).
-None of the original boss' attacks were directly imported into this fight. Even his signature 'giant laser' attack was changed for the Fusion Flare attack which works in a similar way.
-Some of the boss' more powerful attacks, being the Fusion Flare and Supernova, are fittingly references to stars; being Nuclear Fusion, Solar Flares and Supernovas, respectively.
[Added: 21/4/19]
35 - Phantom
Appearance: A black-clad, black-haired, pale man in a large cloak. A large sword is visible on their back at the beginning of the fight, though this is taken off when the battle begins.

Summon: Use the Riftwalker's Pendant at night. It will begin raining once done so and the boss will appear. Attacking the boss will get it to attack back and thus the fight will begin. Boss despawns once it reaches daytime or if the player dies. Unlike most bosses, if even 1 player is killed in multiplayer the boss will leave, even if everyone else is still alive.

[Fought: Chaos Mode]

Stats:
Health: 7,000,000 (9,650,000)
Attack:
-300 (485) (Melee)
-450 (700) (Charged Slash)
-320 (520) (Shade Energy)
-500 (765) (Execution)
Defence: 0 - 10% Damage Reduction

Attacks:
Will alternate between his physical and negative forms at regular intervals. Each has its own attacks and playstyles.
Physical:
Uses sword strikes and slashes for all of his attacks. Uses a pair of black feathered wings to remain airborne if the player is too far from the ground.
-May perform a series of 3 swift slashes in succession
-May jump into the air and swing the sword 180-degrees in front of him
-May dash forwards, pointing the blade outwards. Travels a decent amount of horizontal distance and works even when airborne
-Can jump upwards, holding the entire blade as for the sharp side to face up
-Can slam the blade downwards into the ground, creating a small shockwave to the immediate left and right
-May hold his sword behind himself before swinging it in a large arc almost instantaneously. A large, red 'slash' is left behind afterwards. (Charged Slash)
Negative:
Levitates around, sword placed back on his back. Uses magic attacks as opposed to melee and keeps a slight distance from the player at all times. Changes between this form and his physical form every 20 seconds.
-Summons energy spheres that slowly move towards the player's location when they first started moving
-Summons 3-4 homing energy spheres that continue to follow the player for a while before disappearing
-Small black clouds may appear which all move towards the player for the entire time Phantom is in his negative state. If the player fails to out-maneuver them, they will all come together and a red 'slash' is seen cutting diagonally through them, hitting the player for a massive amount of damage. More of them appear in multiplayer and they are more likely to appear the lower Phantom's health is.

Defeat: Covers his face and disappears into small, black particles which fall to the ground. Photo-negative particles appear instead if defeated in Negative form.

GelTech Info:
-An otherworldly warrior. Almost no data exists about them in the archives, except for what you have just witnessed. It is possible you may see them again, but that's just a guess.

Drops: A few accessories including his cloak, as well as a few weapons. A gun and staff are dropped as well as his own signature sword.

Extra Info:
-Phantom is likely the easiest boss the player will encounter in Chaos Mode due to his rather restricted movepool and low health for this point in the game. However, he will obviously still pose a decent challenge.
-Phantom had little prior planning when compared to many of the other bosses in this 'wave' of additions. His design was based off of an old concept while his moveset was almost entirely composed of simple sword techniques of homing magic attacks.
-Players who are good at distancing themselves from bosses will likely do very well against Phantom since many of his attacks are close-ranged or homing. Dodging skills will pay off, especially against his negative self.
-Phantom's negative self, despite seeming like it is photo-negative, isn't quite. The skin, blade handle and one of the cloak shading colours were altered slightly for his appearance to appear a little smoother.
[Added: 21/4/19]
36 - Geode Golem
Concept suggested by: Pumpscare
Appearance: A large stone creature covered and partially made of gemstones. His head appears to be a large diamond and its pointed legs an emerald and an amethyst. Its body is rounded, full of smaller gems, with a larger ruby in the centre. Its 'arms' are mounds of gem-filled stone with either topaz or sapphire making up the fists. None of its limbs are connected; instead floating around the main body.

Summon: Use the Geode Cluster in the Underground or Cavern layers in the player's world. Doesn't despawn if taken anywhere else, however. Its summoner is made of stone, every type of gem (except Amber), and some souls of Light.

[Fought: Early Hardmode]

Stats:
Health: 15,000 (22,450)
Attack:
-65 (100) (Melee)
-50 (80) (Gem Spike)
-55 (87) (Gem Light)
Defence: 50

Attacks:
Floats around, usually a little off the ground, though will fly higher if the player travels far from the ground. Uses attacks depending on the player's positioning.
-If the player is on the ground it will tuck in its body and slam into the ground, causing shockwaves of gemstones to travel outwards from the golem.
-If the player is lower-down and close-to it then it will spin its legs around while dropping large gem spikes downwards. It will continue to do this for a few seconds.
-If the player is close to the ground, even if not directly on it, it will tuck in its body and bounce around. Small piles of spiked gems are left on the ground with every bounce, though they disappear shortly after.
-If the player is above it will fire slow-moving white lasers at them from its head while moving upwards
-If the player is to its sides then it will fire arcs of gem spikes at them while moving upwards

Defeat: Explodes into large geode chunks, dropping its loot from where its body was.

GelTech Info:
-A large cluster of stone brought to life by the power of soul energy. Its body consists of a large geode and some large gemstones, now overflowing with energy.

Drops: Mainly drops gemstones upon defeat, excluding Amber. Also drops a few early-hardmode weapons based on various types of gem, including a staff that uses the large diamond that once acted as the boss' head.

Extra Info:
-While its design would at first seem more like that of a mini-boss it has boss-like stats and drops, cementing it as an early-hardmode boss battle
-The boss can actually be very different to face with or without wings due to it likely using different attacks if the player spends lots of time flying around as opposed to being on the ground.
-While it spends most of its time airborne it is still one of the few non-human bosses to still interact with the ground
[Added: 21/4/19]
37 - Spirit King
Appearance: A pinkish-coloured flame-like spirit wrapped inside of bandages whose colours most closely resemble the ones worn by Light Mummies. A golden crown floats above, appearing to rest where the spirit's head should be. In the middle of the crown is a large ruby. A sceptre, seemingly belonging to them, floats alongside them as well. It seems to be made mostly of gold and rubies as well, with a wrapped up handle.

Summon: Use the Pale Rose in the Hallowed Desert at Night. The rose will fall to the floor and suddenly glow white and the Spirit King will rise from where it once was. The fight will begin shortly afterwards. The boss will respawn if taken too far from the Hallowed Desert or if it becomes daytime.

[Fought: Post-Moon Lord]

Stats:
Health:
-200,000 (350,000) (King)
-45,000 (Infinite) (Sceptre)
Attack:
-70 (127) (Melee)
-74 (135) (Pale Sphere)
-68 (123) (Sceptre Melee)
-85 (150) (Red Bolt)
Defence:
-75 (King)
-60 (Sceptre)

Attacks:
Phase 1:
The Spirit King will fly around near the player, occasionally teleporting as well. His sceptre floats alongside him and does nothing yet.
-It may fire up to 5 pale spheres at the player. Once the reach the player's last location they travel back to the King again.
-He may fire up to 4 pairs of spheres, 1 left and 1 right for each pair. After they fly far enough away they both make U-turns and both converge horizontally to the player's last location; exploding when they both collide.
-He may fire up to 3 spheres that, while travelling towards the player, do so in continuous loops as opposed to straight lines
At 50% (65%) health the Spirit King will transition into Phase 2. His sceptre now attacks independently and flies around on its own.
Phase 2:
The King uses all his old attacks, but also gains a new one on top of those
-The King now rapidly fires volleys of 3-4 red projectiles. They all travel out in random directions. Up to 10 volleys can be used per attack, resulting in at most 40 projectiles.
-The Sceptre will move around like an Enchanted Sword would, spinning before charging at the player.
--At the end of every charge it sends out a burst of 5 red projectiles in random directions. It does this after every successful charge until its destruction*.
(At 30% health, exclusive to Expert Mode, the Spirit King will summon a 2nd Sceptre. It acts the same as the first one, charging and firing projectiles, and is also immune to damage)

Defeat: The Spirit King will explode into gibs of mummified wraps and small pale pink particles. Any sceptres alive when he is defeated immediately despawn. His crown will fall down directly below where he was defeated, though it isn't technically a gib.

GelTech Info:
-Restless entity disturbed by a strange lunar force making its way to earth. By defeating it you have once again allowed it to rest undisturbed. It has bestowed its crown to you in return.

Drops: Weapons for every major class, with 3 for mage and 1 or 2 for everyone else. Drops an accessory and materials to make an armour set. Its crown is also dropped, though technically as an interact-able gib as opposed to being alongside the other drops. The crown is worn as a helmet and can complete any armour set bonus; counting as the helmet.

Extra Info:
-The design for the Spirit King was seen on the Terraria Discord a day or so before being uploaded onto the guides page. While it was originally a prototype it eventually stuck.
--The designing for the Spirit King began when someone in said Discord suggested that I made a Hallow-based boss. I used the Light Mummy as a design base as to connect it to something that already exists while making the sprite itself entirely unique.
---This is also the first boss to both be suggested by, and shown in, the Terraria Discord.
-The Spirit King's attacks are rather strange; with the majority being either fired randomly or having some after-effect if it doesn't hit the player the first time around.
-The Spirit King is one of the weaker post-ML bosses as it is meant to be fought not long after the Moon Lord is defeated.
-The armour made using the materials the boss drops lacks a helmet. This is because the crown, also dropped from the boss, is used to complete the set.
--Also due to this the set bonus also includes a defence bonus to work around the crown's otherwise-lacking defensive stat of 2.
-The crown's ability to complete set bonuses has a workaround for armours with multiple helmet types. Right-clicking the crown when equipped will cause it to rotate through the helmets' bonuses, which can be good for any sets that have specifically desired bonuses.
--Sadly, the crown is still less useful than actually completing any of the armour sets. This is due to the loss of defence from wearing the crown instead of the proper helmet for the set. The crown only provides 2 defence whereas the post-ML helmets all provide much, much more, even if they do require further grinding.
[Added: 24/4/19]
38 - Cursed Doom
Appearance: A larger, more menacing version of the Ancient Doom enemies summoned by the Lunatic Cultist. Its face appears more melted and its smile larger, curving all the way back up to its eyes.

Summon: Use the Doomseer's Visage at night after the Moon Lord has been slain. However, it must be used prior to Chaos Mode to fight the Cursed Doom. The screen will immediately darken, but still leaves a bright area localised around the player. Enemies are still visible for the most part, but are obscured by the darkness. The boss disappears if it reaches daytime.

[Fought: Post-ML]

Stats:
Health:
-200,000 (350,000) (Cursed Doom)
-35,000 (55,000) (Binding Chains)
-4,500 (15,000) (Ancient Doom)
Attack:
-500 (1250) (Cursed Doom Melee)
-70 (125) (Ancient Doom Melee/ Projectile)
Defence:
-35 (Cursed Doom)
-20 (Chains/ Ancient Doom)

Attacks:
Phase 1:
The Cursed Doom is invulnerable and will slowly follow the player at all times, attempting to deal its massive contact damage to them. Clusters of Cursed Chains will spawn nearby, usually 3 clusters at a time, that need to be broken. These chains are only partially visible with the rest meant to be obscured in the darkness, though their visible vulnerable sections are shown on the minimap. These chains need to be destroyed to continue the fight, with a 2nd set appearing after the first 3 clusters are destroyed (resulting in 6 'targets' being spawned altogether). The Cursed Doom will use attacks as it follows the player. (In Expert Mode the Cursed Doom isn't at all visible in the darkness, only when near enough to the player to be in their concentrated light. It is also invisible on the minimap.)
-The Cursed Doom will summon Ancient Dooms in random places nearby. They only become active after a second passes, minimising the chances of cheap damage. They act like Ancient Dooms normally do; exploding into a '+' of shots after a few seconds if not destroyed first.
-Sometimes the Cursed Doom will stop briefly and begin summoning Ancient Dooms horizontally in both directions in rapid succession starting from the areas closest to itself. Players will need to either destroy Dooms to make a gap or find other methods of dodging the impending wave of projectiles.
After all 6 chains have been destroyed the Cursed Doom enters Phase 2.
Phase 2:
The Cursed Doom's attacks do not change, though it does become faster and spawn more Ancient Dooms with every attack. The main difference, however, is that the Cursed Doom itself is now finally vulnerable. Bear in mind that contact damage against the Cursed Doom is still almost instant death; so be wary of the speed boost.

Defeat: The Cursed Doom melts away and disappears and the Ancient Dooms will eventually destroy themselves in their own time. The screen brightens again once the fight ends.

GelTech Info:
-A larger, more powerful variant of the Ancient Dooms. Still fuelled by malicious energy; the Cursed Doom will now seek out entities on its own accord; with a vendetta against all life.

Drops: Purple weapons themed around Ancient Dooms, as one would imagine. Also drops versions of many of the Lunatic Cultists' attacks as magic weapons.

Extra Info:
-Like the Spirit King before it, the Cursed Doom was seen in the Terraria Discord. However, this time it was only for a few seconds before being purposefully deleted.
-While it is said to be just a larger Ancient Doom there are still differences between their sprites, even when excluding the obvious scale differences.
-As opposed to being a boss of epic proportions like many others it is more horror-themed with its menacing appearance, reduced lighting, and continuous stalking behaviour.
--This is made even worse when in Expert mode since the boss now does even more damage and cannot be seen unless it is extremely close to the player.
[Added: 24/4/19]
39 - Colossal Bat
Appearance: A derpy-looking, large version of the Giant Bat enemies, actually itself made entirely out of Giant Bats all huddled together, pretending to be a singular entity. Its design itself is actually just a larger Giant Bat, though with the tiny eyes of the original. The ears stand out more, it has actual feet and the wings are smaller in proportion to its body.

Summon: Use the Bat Bait in the underground or cavern layer. Does not despawn if taken anywhere or at any time, only when there are no players nearby.

[Fought: Early Hardmode]

Stats:
Health: 18,500 (24,000)
Attack: 55 (100) (Inflicts Bleeding and Feral Bite)
Defence: 22

Attacks:
Flies around, similar to how bat enemies would, but a little slower due to its size. Collides and bounces off of blocks unless using its charge.
-Its charge attack has it stop briefly before launching itself at the player. The charge goes over quite a long distance and passes through blocks. The charge deals no additional damage.
-Damaging the boss will cause it to spawn Giant Bats from its body. This happens with every 150 (100) damage the boss takes, potentially filling the screen with bats.

Defeat: Explodes into another cloud of bats. Some of them are normal enemies while others are just background entities that fly upwards off-screen.

GelTech Info:
-In order to protect themselves from both humans and other cave-dwelling creatures, these bats have intelligently banded together to make an even larger bat. Anything unwary caught in its path will be reduced to little more than a skeleton in an instant.

Drops: Bat-themed items, including a cosmetic set based off of Batman. Drops include a Boomerang, a Bitey Hook (A grappling hook which has a giant bat tied to the end instead of a hook), and a mount that is a giant bat that works like the Bee Mount, but faster and flies longer.

Extra Info:
-Shockal was accidentally the person who gave me the concept for this boss by spamming Bat emotes in chat. I have no idea why my mind immediately went to making it into a boss, but we got this guy so it's not all bad.
-The Giant Bat mount dropped by the boss actually flies a bit faster than the UFO mount, though has limited flight time that makes the UFO still somewhat of an upgrade
-Since the boss is a giant bat it is only fitting that it has some drops themed around Batman
-The Bitey Hook is not to be confused with the halloween-inspired Bat Hook already found in the vanilla game
-It is one of the few enemies that can inflict Feral Bite even outside of Expert Mode
-Despite being a boss it only has 1 actual attack and only 1 form of damage. However, since it still drops a Treasure Bag, it is still technically a boss
-128 Giant Bats are spawned in Normal Mode, which can very easily clutter the screen and cause lag if not dealt with
--In Expert Mode a total of 240 Giant Bats are spawned, which means it can easily reach the sprite cap and stop spawning them. This also doesn't take into consideration the additional 5 that spawn when it dies.
---Piercing and AoE weapons are highly recommended for this boss due to the sheer amount of Giant Bats that end up spawning throughout it. Despawning the Giant Bats by taking the boss elsewhere can also work if the player makes a few separate spaced-out rooms to fight the boss in.
-The boss deals exactly 10 damage more than Giant Bats do in both Normal and Expert mode. Originally, it dealt the exact same damage as them.
-The 128 bats spawned in normal mode, in addition to the Boss' own health, mean the player has to technically get through 31,300 health in total.
--72,000 health needs to be chipped through in Expert Mode due to 240 bats being spawned instead; a noticeable difference.
---Post-Plantera the Giant Bats receive a buff to their stats, meaning the player would instead need to get through 76,800 health if Plantera is defeated first
-Giant Bat banners, which can be obtained mid-fight very easily, make this fight a lot easier to deal with due to the added benefits it provides
--Also, despite the boss itself only being a massive cluster of Giant Bats, the banner's buffs don't affect the boss itself.
[Added: 25/4/19]
40 - Rogue AI
Appearance:
-The Rogue AI itself is a mechanised version of the Lunatic Cultist. Its robes are now red with copper rims and details instead of blue and gold. It is now slightly taller, its arms wider and its hood flops down more. Grey, metal hands are visible from underneath its sleeves and its mask is a metal circle with a '?' as its only detail. Copper wires hang from its back. It is also seen riding some sort of platform for mobility.
-The Doomcounter is a large, metal circle with flashing lights and a picture of the Moon Lord's face in the centre. While it is much larger than the AI its design is more simple, with most of the added details simply being flashing lights.

Summon: Use the Lunatic Chip at night anywhere in the player's world. The boss will not despawn if taken to any specific biomes, though it will despawn if it reaches daytime.

[Fought: Post-ML]

Stats:
Health:
-550,000 (800,000) (AI)
-95,000 (120,000) (Doomcounter)
Attack:
-105 (175) (AI Melee)
-112 (188) (AI Magic)
-120 (200) (AI Energy Detonator)
-0 (0) (Doomcounter Melee)
-5000 (5000) (Doomcounter Countdown)
Defence:
-70 (AI)
-90 (Doomcounter)

Attacks:
The AI itself works very similarly to the original Lunatic Cultist, teleporting around on its platform while using various magic attacks.
The Doomcounter will float around close to the boss, counting down its timer. If destroyed the timer is stopped until the AI eventually respawns the counter, where it has to begin the countdown anew. The countdown is signalled by beeping and lights turning red on the Doomcounter, as well as the screen slowly fading into red as the countdown gets close to finishing. If the counter successfully finishes all players will take immense damage, with the counter resetting afterwards if any players actually manage to survive the attack.
[AI]
All of the AI's attacks are based off of the Cultists' original attacks, though modified and all given more electrical themes and additional abilities:
-The fireball attack now instead launches balls of plasma instead. When they explode they leave a cloud of damaging plasma wherever they explode for a few seconds.
-The lightning orb now is launched forwards and fires electric bolts more rapidly at the player. Also fires more before vanishing
-The ice attack is now a large plasma orb that fires smaller plasma orbs. The smaller orbs have a slight homing effect when the player is close to them.
-The ancient light attack is now golden and is immune to players' attacks. When they hit solid objects they leave behind damaging plasma
-Finally, instead of summoning ancient dooms, it now summons large clusters of red energy. These explode violently after a few seconds pass and deal large amounts of damage
[Doomcounter]
The Doomcounter does not use any actual attacks other than its countdown when it is alive. If destroyed, however, the AI will eventually spawn another in its place; meaning that there is ever a looming threat of an instant death if the counter isn't prioritised.

Defeat:
-The Rogue AI will cover its face and recoil backwards before eventually exploding, letting out a mechanised version of the original Cultist's death sound.
-The Doomcounter will simply explode and fall off-screen when destroyed.

GelTech Info:
-A machine downloaded with the Lunatic Cultist's personality; an inevitable catastrophe that they still never planned for despite the risks associated with it. Immediately it set to work; creating a machine in the image of its old master... preparing once again for worldwide destruction.

Drops: Mage items that utilise plasma make up most of its drops, the majority being magic weapons. Its platform can also be dropped, as well as its robes which act as a more defensive mage armour set oriented around keeping the player alive as opposed to raw DPS.

Extra Info:
-The Rogue AI was supposed to have begun development back in 2018, though was pushed forwards into early 2019 due to other bosses and a brief hiatus. Due to the wait, I decided to give it the honourable spot as #40, finishing off the 2nd part of the 5th boss page.
-While the player may think it wisest to attack the AI first it is actually a necessity to kill the Doomcounter first whenever it spawns. The counter will likely kill the player before the player kills the AI since it deals damage in the thousands, so focusing it is required.
--The Doomcounter will despawn if the AI is killed, meaning that the player could risk ignoring it if the AI is down to low health when it next spawns
-An infinite amount of Doomcounters will spawn, though there are large gaps inbetween each spawn which give the player some time to actually focus on damaging the main boss.
-Despite its seemingly-low health it isn't recommended to try and kill the AI in the early post-ML game since much of the player's time will actually be dedicated to destroying the counters as opposed to damaging the boss itself.
[Added: 25/4/19]
16 Comments
Okami Tomato  [author] May 15, 2024 @ 7:01am 
Thanks :steamthumbsup:
Lau May 11, 2024 @ 8:55pm 
lunar is peak i love him
Queennoobi101 Dec 31, 2019 @ 9:30pm 
Lunar looks like galeem from smash ultimate
Mythomaniac Gremlin Nov 20, 2019 @ 7:59am 
this is a boomer idea
GLaDOS38 May 18, 2019 @ 5:52pm 
or maybe he could summon past bosses but they are stronger especially the first bosses but i want to see your image of him
GLaDOS38 May 18, 2019 @ 5:50pm 
maybe he could have like arms dripping out hatred (black stuff)
Okami Tomato  [author] May 12, 2019 @ 5:58am 
Chaos himself eh?

...I mean if you want him to appear I might be able to potentially work on that... for something Post-Post-Game :P
GLaDOS38 May 12, 2019 @ 5:37am 
what about chaos himself?
Okami Tomato  [author] Apr 25, 2019 @ 3:11pm 
There we go. 40 bosses have been achieved for the 5th page now. Part 3 comes out when there are at least 8 bosses on it, so there may be a wait

But to the people who stayed along and didn't abandon this during my brief hiatus: Thanks
Okami Tomato  [author] Apr 21, 2019 @ 8:53am 
[Insert comment about actually getting around to finishing the Tomato Arena here]