Deep Rock Galactic

Deep Rock Galactic

2,155 ratings
Lock and Load! A Complete Class, Weapon Build and Perk Guide. V3.
By Muppetshu
Updated with new weapons. This guide will cover all of the perk options available, a complete coverage of your class and the necessary builds you will need to conquer Hoxxes IV!
6
6
47
3
11
5
2
   
Award
Favorite
Favorited
Unfavorite
⠀⠀


Lock and Load is a weapons guide designed for newer players, that provides advice on how to use each weapon and what upgrades to prioritise with your limited minerals. it also provides some quick advice on mastering the fundamentals, perks and class choices. So, turn that greenbeard into a greybeard and get mining!


Changelog 08/04/2022
Hey, hey, this is guide is slightly out of date. (Only the sludgepump has been changed massively). My plan is to update the guide to V4 when the new secondaries are released, and go over the guide once more.
Fundamentals
Kiting
Kiting is the act of running around, while dealing damage. The best way to kite is by sprinting then jumping, before firing your weapons while mid-air. While mid-air, slowdowns applied do not have any effect until you have landed back on the ground, keeping you moving at sprint speed.

By utilising sprint-jumps you can cancel out most slowdowns from things such as: Grappling, Firing and Mining. Another use of sprint-jumps is to increase the range of throwable items, like flares or C4, as the throwing distance is affected by speed.

Positioning
Proper positioning is what wins games. When a swarm is announced, an egg is mined or any event with high action start looking for a good location to hold off in. Flat ground with space to kite free of danger is the first priority, clear sight lines second.


Pace
Keeping up a solid pace in DRG means less swarms, less ammo wasted and less chance of failing. While you'll naturally get faster over time, some tips include making heavy use of bosco and skipping over smaller clusters of minerals.

Basic Build Advice
When making a build, generalist builds with a mix of AoE and single target damage tend to be more flexible. For example, driller with a flamethrower may want to take power attack damage + impact axes, to allow him to deal with large single target enemies if needed.
Gunner
Overview
Gunner provides heavy sustained damage to the fight, though struggles to kite as easily as other classes. His ziplines provide an easy way to navigate through caves, while his shield can provide a window of opportunity to revive fallen players and dish out damage.

Weapons
  • The minigun provides a solid reliable damage output against medium sized creatures and above, but struggles with swarms of smaller enemies.
  • The autocannon has a slow windup, but it's additional splash damage helps it to effectively deal with hordes and enemies of all sizes.
  • The Hurricane allows for rocket guided precision in focusing down key targets, with even more potential splash damage than the autocannon.
  • The bulldog is a pocket sniper capable of one tapping many enemies, and can be used to pick of long ranged threats though has a limited clipsize.
  • The BRT is a solid, generalist gun that can perform any role it is needed to. While slightly shorter range than the bulldog, it's clipsize makes it easier for spamming out damage.

Equipment
  • Zipline is a great tool for getting across large gaps, entering caves and moving gems like aqaurqs back to the minehead.
  • The shield can save entire teams by giving crucial breathing room at key moments, allowing for easy revives and your team to pump out damage from safety.

Grenades
  • The sticky grenade is just solid AOE damage if thrown in front of enemies on the ground. Can be used to scare away praetorians with a direct stick.
  • The fire grenade is niche, doing less damage than the other two gunner grenades.
  • The cluster grenade is a massive explosion and the most damage overall, though hardest to control.

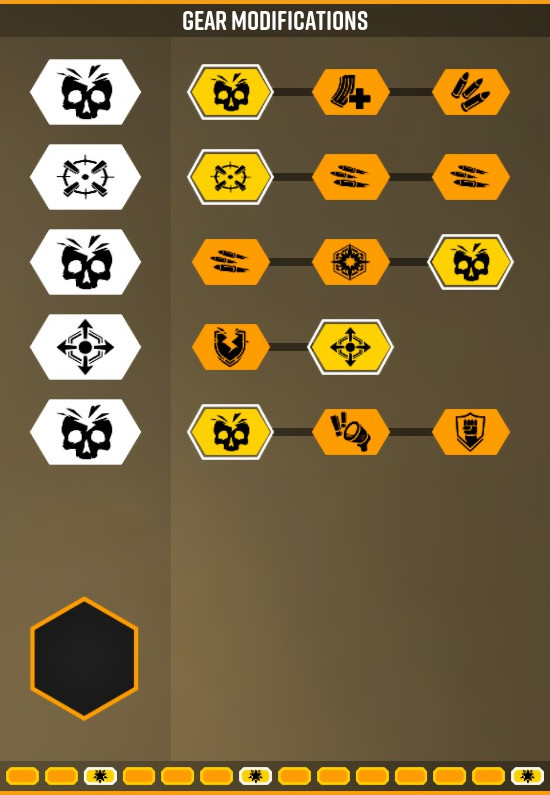
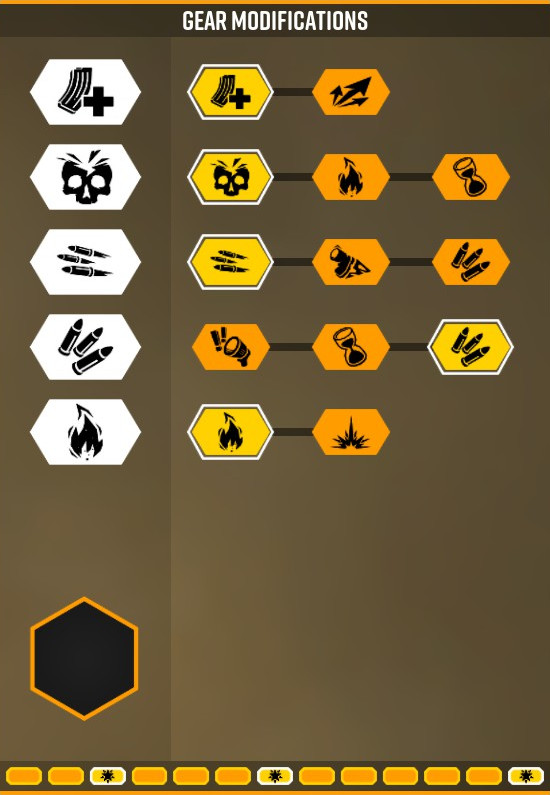
⠀⠀Minigun Build
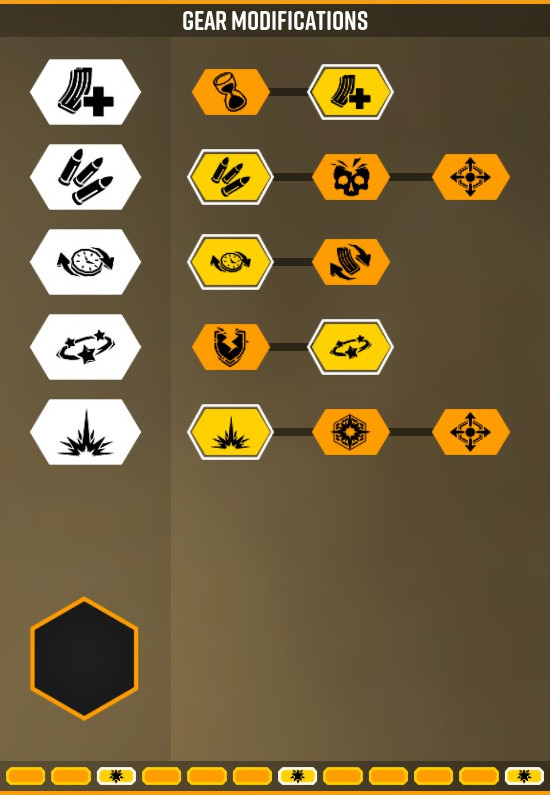
⠀⠀⠀⠀⠀⠀⠀LEADSTORM
  1. ACCURACY allows the minigun to hit weakpoints more reliably increasing damage, effective range and ammo conservation.
  2. DAMAGE is far more useful, as the minigun has good ammo base.
  3. BLOWTHROUGH allows the minigun to shred through hordes of enemies.
  4. DAMAGE ON WINDUP is a good damage multiplier that stacks with the damage mod on row2.
  5. VENTING allows for an emergency AoE fear OR COLD GRAVE allows for long sustained firing.
⠀⠀Autocannon Build
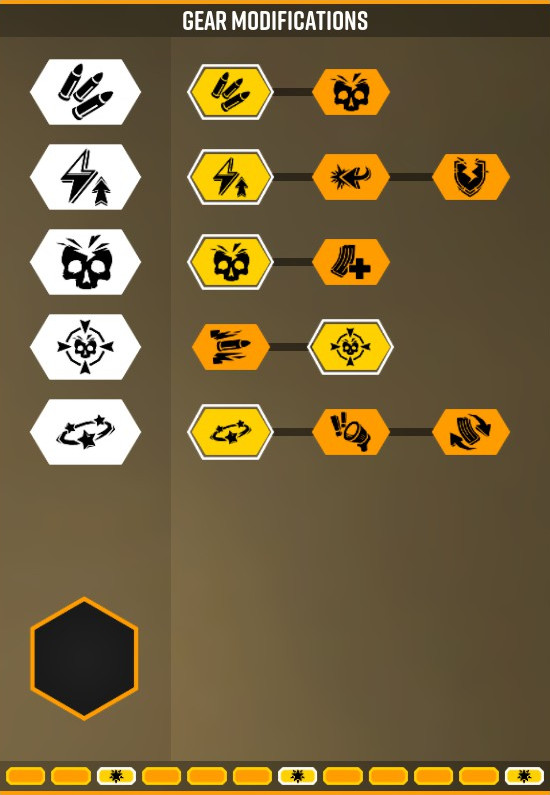
⠀⠀⠀⠀⠀⠀⠀AUTOCANNON
  1. DAMAGE upgrade is most helpful here, as the autocannon has sufficient base ammo.
  2. ACCURACY increase allows the autocannon to hit weakpoints more reliably, increasing damage and range while saving ammo.
  3. DIRECT DAMAGE is a good middle ground between ammo efficiency and DPS OR MAX FIRERATE for more DPS at increased ammo consumption.
  4. SPLASH RADIUS is good at dealing with swamers and clumped grunts OR ARMOUR BREAK for stripping armour when shots miss weakspots.
  5. DAMAGE scales well with previous damage upgrades for more single target output.
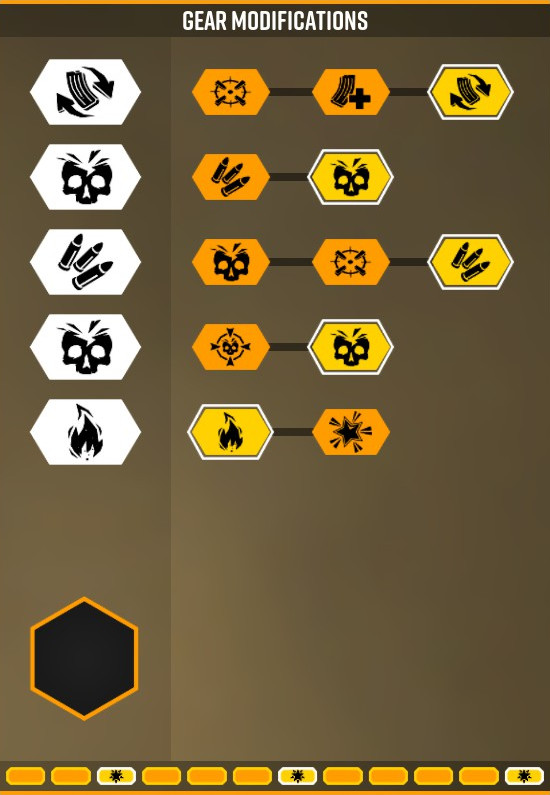
⠀⠀Hurricance Builds
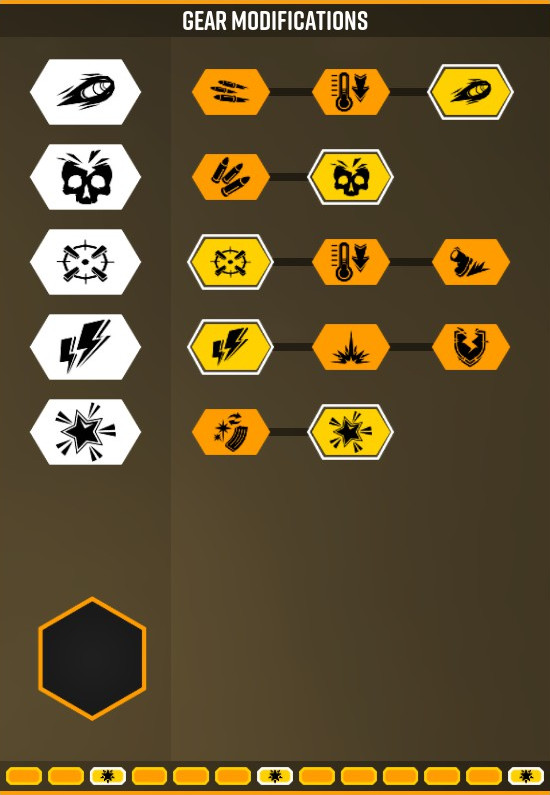
⠀⠀⠀⠀⠀⠀⠀HURRICANE
  1. SPLASH RADIUS will stack well with splash damage upgrades and shred swarmers.
  2. ARMOUR BREAK shreds armour allowing easier hits of future rockets and giving your allies more of an opening to attack.
  3. FASTER FIRERATE to output more DPS OR BIGGER CLIP for sustained firing of the weapon.
  4. SPLASH DAMAGE combos with the splash radius, to make this weapon highly effective against clumped up enemies.
  5. STUN allows for decent crowd control, especially with the splash radius OR FIRE ROCKETS to set enemies on fire for additional DPS.
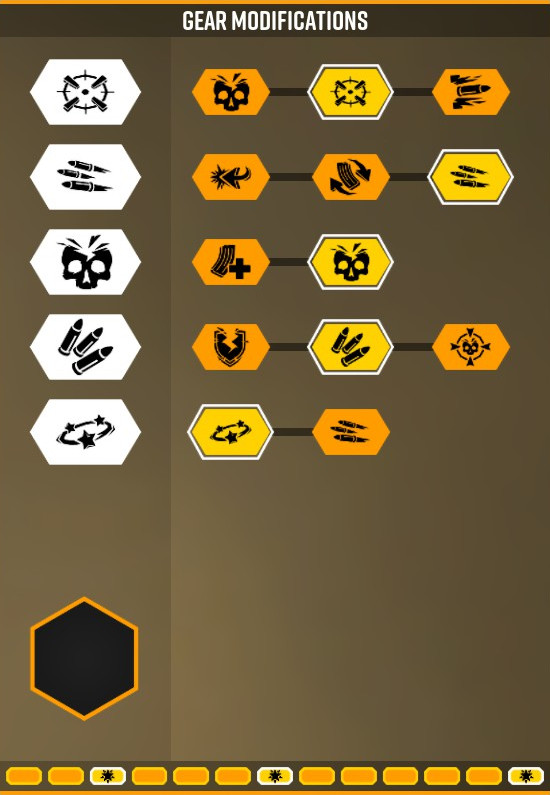
⠀⠀Bulldog Build

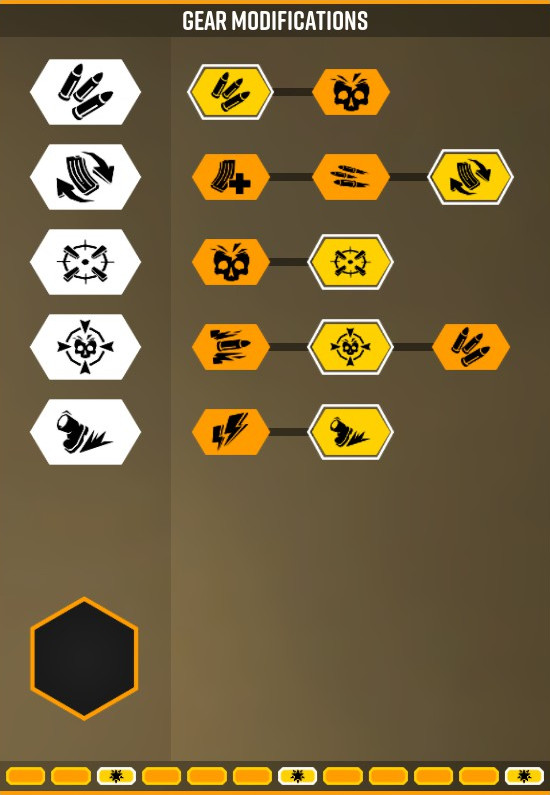
⠀⠀⠀⠀⠀⠀⠀⠀BULLDOG
  1. ACCURACY makes it far easier to reliably shoot weakpoints.
  2. RECOIL REDUCTION allows shots to be chained together far quicker OR AMMO to boost the gun's limited supply of bullets.
  3. HOLLOWPOINT allows the weapon to reach critical one-shot breakpoints.
  4. AMMO to further boost the gun's limited ammo count. Only one ammo upgrade is needed for most situations however.
  5. DEAD EYE allows the user to kite and shoot accurately.
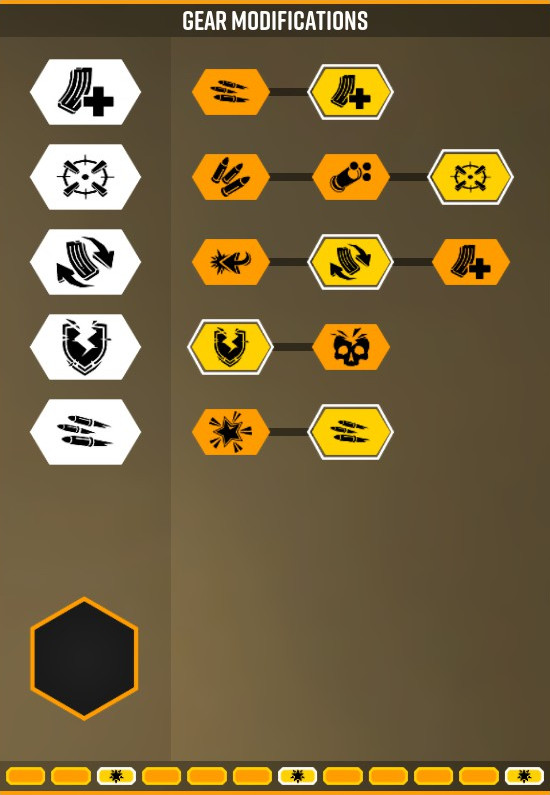
⠀⠀BRT Build
⠀⠀⠀⠀⠀⠀⠀⠀⠀BRT
  1. ACCURACY allows the gun to hit weakpoints, increasing damage and range.
  2. DELAY REDUCTION improves the gun's handling signifcantly.
  3. DAMAGE to make the BRT hit harder.
  4. AMMO massively increases the gun's small ammo pool OR HOLLOW POINT for high burst damage against large targets.
  5. STUN can chain-stun larger targets, allowing the full clip to be fired easily.
Driller
Overview
The driller is a close range powerhouse. Both his primaries are easily capable of dealing with swarms of enemies and crowd controlling larger threats. His secondaries help him do yet more AoE damage or pick off long ranged enemies like spitters. Finally his drills let him get around anywhere with ease.

Weapons
  • The flamethrower can wipe out any medium enemy or smaller in seconds. It leaves a fire effect that can spread between enemies to finish off anything that survives. (Shoot through and underneath enemies for maximum effect)
  • The cyrocannon can freeze anything from grunts to bulks, providing a massive damage boost to any kinetic damage dealt to the target. (Shoot through and underneath enemies for maximum effect)
  • The Sludge Pump lacks the damage output of the flamethrower and the freeze of the cyro-cannon, but can cripple the movement speed of most enemies with it's giant goo puddles.
  • The subata gives the driller a much need long range option, and can do decent damage against large targets due to the stacking damage bonuses.
  • The EPC gives the driller a way to do massive AoE damage at longer ranges, and can eviscerate small enemies before they get close.

Equipment
  • Driller's detpacks can delete entire waves of enemies, especially when combined with crowdcontrol effects like pheromones or LUREs.
  • The drills let driller go anywhere with ease, and be highly independent. Very useful for getting back to the pod as driller can drill straight back.

Grenades
  • The impacts axe gives driller a much needed single target damage source, and is a great pick.
  • HE grenade is remarkably lacklustre, and unfortunately does not provide any large benefit.
  • Neurotoxin is some large DoT but takes a significant time to deploy and blocks line of sight for your team. Use with caution.
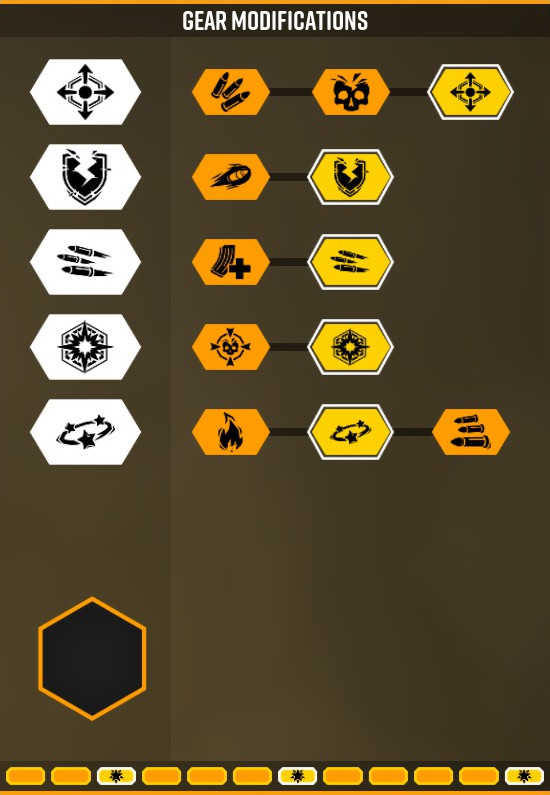
⠀⠀Flamethrower Builds
⠀⠀⠀⠀⠀FLAMETHROWER
  1. INCREASED FUEL TANKS allows for longer damage output OR INCREASED RANGE to hit targets further away.
  2. INCREASED DAMAGE significantly boosts the direct damage of the flamethrower.
  3. FIRERATE stacks with the increased damage for high DPS OR STICKY SLOW for more crowd control at the cost of damage.
  4. AMMO offsets increased fuel usage from faster firerate.
  5. DEATH EXPLOSION combines well with the DPS increase from previous upgrades to destroy enemy crowds easily.
⠀⠀Cryocannon Builds
⠀⠀⠀⠀⠀⠀CYROCANNON
  1. INCREASED TANK allows the cyrocannon to freeze larger targets before running out of pressure.
  2. AMMO to allow for heavier use of the cyrocannon without needing to resupply.
  3. FASTER FLOWRATE to improve the speed of freezing targets.
  4. INCREASED DAMAGE to further increase damage alongside flowrate.
  5. FRAGILE turns the cyrocannon into a weapon capable of shredding targets almost instantly.
⠀⠀Sludge Pump Build
⠀⠀⠀⠀⠀⠀SLUDGE PUMP
  1. INCREASED GOO SIZE to cover even more area and slow more bugs down.
  2. MORE FRAGMENTS combos with bigger goo spread to coat large areas with slowing potential.
  3. INCREASED AMMO to increase the weapons sustain and offset the increased usage from faster charging.
  4. FASTER CHARGE massively boosts how much goo can be outputted, allowing for more DPS and slowdown.
  5. STRONGER SLOW makes this weapon into a crowd control monster OR INCREASED ACID for more DPS.
⠀⠀Subata Builds
⠀⠀⠀⠀⠀⠀⠀⠀SUBATA
  1. FASTER RELOAD improves weapon handling OR PINPOINT to make the weapon accurate at extreme range
  2. DAMAGE will increase the base damage, which will later be multiplied by bonuses.
  3. AMMO to allow more frequent use of the subata without running dry.
  4. DAMAGE will stack with further bonuses.
  5. VOLATILE BULLETS are the best option if using flamethrower, for massive damage values when shooting weakpoints OR MACTERA TOXIN if using cryocannon.
⠀⠀EPC Builds
⠀⠀⠀⠀⠀⠀⠀⠀⠀⠀EPC
  1. AMMO to offset the EPC's limited ammo pool
  2. EITHER OPTION this one is down to personal preference. Faster projectile speed may make it easier to hit containment fields.
  3. FASTER CHARGE leaves less of a window where you are slowed and vulnerable.
  4. LARGER SPLASH will take out more enemies per shot OR AMMO to allow heavier use of the EPC.
  5. UNSTABLE CONTAINMENT can be used to mine out veins from a distance and prevents the weapon from immediately overheating when fired.
Engineer
Overview
The engineer always has a solution, and a weapon for every situation. The PGL and breach cutter provides a massive amount of damage in different ways and the turret adds even more damage. Platforms can be used to secure any area and make walkways between locations.

Weapons
  • Warthog is a close range weapon capable of dealing decent damage to grunts and praetorains but struggles against tiny enemies like swarmers.
  • Stubby has a bit less ammo economy than the warthog but slightly more range and the ability to stun enemies, slowing them down and doing damage.
  • LOK-1 automatic targetting is excellent in poor vision conditions, shooting on the run and never missing a shot. Learn to curve bullets, and the burst damage can be insane.
  • PGL can delete hordes of enemies from large distances, and is effective for anything weaker than a guard.
  • Breach cutter is excellent against bigger foes, and can shred various threats to bring them down quickly.

Equipment
  • The platform gun allows the engineer to secure salvage zones and creates bridges to any places necessary for the mission.
  • The turret adds yet more damage to the engineer's arsenal and is excellent at killing swarmers and shockers.

Grenades
  • The LURE attracts up to 10 enemies, giving you a great window to deal damage. On higher hazards, multiple may have to be thrown at once to be effective however.
  • The plasma burster is a grenade great in tight chokes, but incredibly niche in most situations.
  • Proximity mines are great for locking down an area, making them effective on salvage. If you find yourself kiting often however, their deploy time might be unideal.
⠀⠀Warthog Builds
⠀⠀⠀⠀⠀⠀⠀⠀WARTHOG
  1. CLIPSIZE to increase the weapon's uptime and DPS.
  2. AMMO ensures the weapon will not run dry OR CHOKE to allow precision fire on weakpoints.
  3. RELOAD SPEED combines well with increased clipsize, allowing for a more consistent damage output in hectic situations.
  4. ARMOUR BREAK can be very useful against key enemies.
  5. AUTOMATIC FIRE increases firerate and DPS while providing the ability to hold down the trigger which is a nice quality of life boost.
⠀⠀Stubby Builds
⠀⠀⠀⠀⠀⠀⠀⠀STUBBY
  1. SHOCK CHANCE will stack well with further upgrades and provide crowd control.
  2. LARGER CLIPSIZE allows firing for longer OR RECOIL REDUCTION to hit weakpoints more reliably especially at range.
  3. AMMO to offset the stubby's small ammo pool.
  4. SHOCK BONUS DAMAGE works well with the increased shock chance from before and electric arc.
  5. ELECTRIC ARC gives the stubby massive crowd control potential both on small and large targets while dealing a DoT.
⠀⠀LOK1 Build
⠀⠀⠀⠀⠀⠀⠀⠀⠀LOK-1⠀
  1. INCREASED AMMO prevent you from running out of ammo too quickly and allows for more liberal shooting.
  2. INCREASED RANGE allows you to target enemies further away, without limiting your angle too much.
  3. BLOWTHROUGH can be decent for improving anti-crowd ability, OR ELECTROCHEM ROUNDS for additional damage when working with heat-inflicting weapons.
  4. FASTER LOCK ON combos well with the final row 5 upgrades, allowing you to reach full lock on faster.
  5. FEAR ON FULL LOCK is amazing crowd control, that will constantly keep bugs away OR DAMAGE ON FULL LOCK will boost your damage further against large targets.
⠀⠀PGL Builds
⠀⠀⠀⠀⠀⠀⠀⠀⠀⠀PGL
  1. AMMO to boost the PGL's reserves.
  2. INCREASED DAMAGE means more grunts will be one-shot.
  3. FIRE ROUNDS will finish off enemies that survive with low health.
  4. SPLASH RADIUS will allow the PGL to catch more enemies in the blast radius and set them on fire.
  5. SPIKED GRENADE squeezes and additional bit of damage out from the PGL.
⠀⠀Breach Cutter Builds
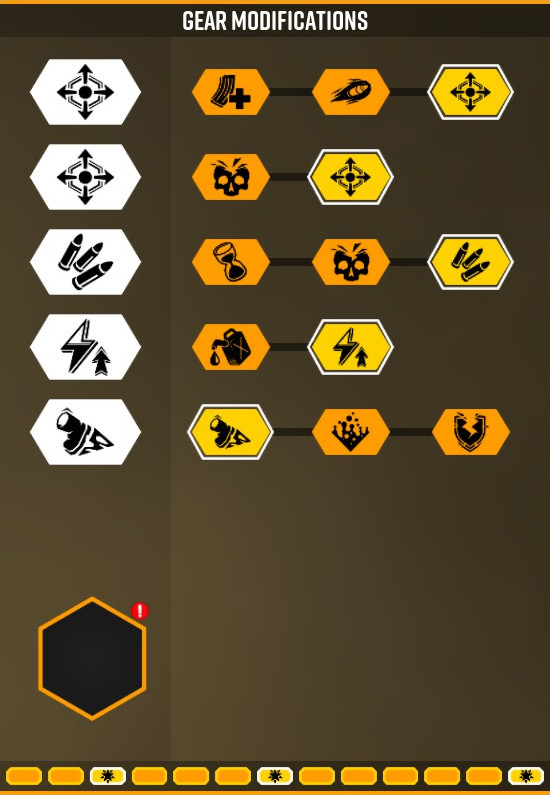
⠀⠀⠀⠀⠀BREACH CUTTER
  1. CLIP SIZE will help avoid the large reload time on the cutter OR PROJECTILE TIME will increase the cutter's range.
  2. AMMO to improve the limited ammo pool of the weapon.
  3. QUICK DEPLOY allows the cutter to be used in chaotic situations.
  4. ARMOUR BREAK makes the cutter more effective and serves as a damage boost, being very strong against guards and praetorians.
  5. EXPLOSIVE END gives the cutter some more splash damage OR PLASMA TRAIL to deal bonus damage that works well with stun on row4.
Scout
Overview
Scout is the quickest class in the game, able to run circles around any enemy. Scout can easily revive other players and has access to some of the strongest grenades in the game. The downside is that the scout lacks significant amounts of AoE damage and ammo relative to other classes.

Weapons
  • The GK2 is an all round solid weapon that has no remarkable features. Able to handle shooting big targets, small targets and everything in between with ease due to solid damage output.
  • The M1000 struggles against tiny enemies against swarmers, but is able to easily bring down larger enemies at long ranges and one tap various bugs.
  • The Drak-25 fires much faster than even the GK2, but deals far less damage per shot. The key feature of the Drak-25 is unlimited clip size, as long as you don't overheat.
  • The boomstick has limited range, but inside that limited range it provides an excessive amount of firepower that will shred anything that's not a praetorain or larger.
  • The zhukovs are a pair of sidearms that will shred through hordes and tiny enemies with a bit more range than the boomstick.

Equipment
  • The grappling hook is the corner stone of scout, letting him easily escape any problem allowing him to survive and rescue the entire team in bad situations.
  • The flare gun provides the entire team with light, especially useful during swarms and stops the team from walking straight into those cave leeches.

Grenades
  • IFGs are a powerful slowdown and damage increase, but have a limited area which can often means enemies bypass the zone.
  • Cyro Grenade is amazing for freezing large groups of enemies, but requires a followup to be fully effective. Especially effective against mactera and mactera plagues.
  • Phermones causes enemies to massively group up, and gives a large window of time to blow them up or revive allies making it an incredibly strong grenade.
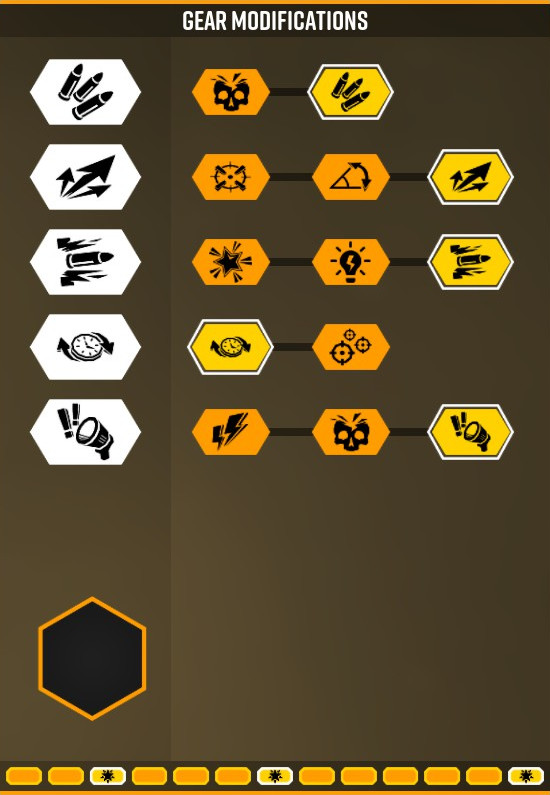
⠀⠀GK2 Builds
⠀⠀⠀⠀⠀⠀⠀⠀⠀⠀GK2
  1. PIN POINT to allow the GK2 to snipe key targets like spitters.
  2. AMMO to offset against scout's limited ammo pool.
  3. DAMAGE makes the most of the increased ammo and increases DPS.
  4. HOLLOW POINT to make hitting weakpoints even more effective, saving ammo and increasing damage.
  5. BATTLE COOL keeps the gun accurate when shooting hordes of enemies making it easy to hit weakpoints.
⠀⠀M1000 Builds
⠀⠀⠀⠀⠀⠀⠀⠀⠀M1000
  1. AMMO to offset scout's limited ammo supply.
  2. FASTER CHARGE to reduce the time spent vulnerable and slowed down while increasing damage output.
  3. DAMAGE to hit critical breakpoints and make the most of each shot.
  4. HOLLOW POINT increases damage against weakpoints increasing damage and saving ammo.
  5. STAGGER makes it easy to dump clips into larger targets OR QUICK RELOAD for more uptime and grunt clearing ability.
⠀⠀Drak-25 Build
⠀⠀⠀⠀⠀⠀⠀DRAK-25
  1. FASTER PROJECTILE SPEED makes it far easier to land shots on weakspots increasing damage and ammo efficiency.
  2. DAMAGE improves the DPS of the weapon and allows it to hit weakspots harder.
  3. DECREASED RECOIL futhermore improves the ease at which weakspots can be hit.
  4. ELECTRO ROUNDS give the gun a light damage over time with a slowing effect, handy for large enemies like bulks and praetorians.
  5. BOOSTED FIRERATE for a little more damage output once the gun reaches a certain heat threshold to boost damage.
⠀⠀Boomstick Builds
⠀⠀⠀⠀⠀⠀⠀BOOMSTICK
  1. AMMO to offset scout's limited ammo supply.
  2. QUICK RELOAD is a massive boost in up-time due to how frequently the gun is reloaded.
  3. MORE PELLETS to make one-shotting enemies such as grunts easier.
  4. BLOW THROUGH grants the boomstick a massive bonus to clumped up enemies.
  5. AUTO RELOAD allows for weapon cycling so damage can constantly be dealt.
⠀⠀Zhukov Builds
⠀⠀⠀⠀⠀⠀ZHUKOVS
  1. AMMO to offset scout's limited ammo supply.
  2. QUICKER RELOAD to improve up-time and combine well with row 5 speed boost.
  3. ACCURACY stops stray bullets makes it easier to focus weakpoints, increasing damage and saving ammo.
  4. HOLLOW POINT for high burst damage against single targets OR BLOW THROUGH to make the weapon effective against clumped grunts.
  5. SPEED BOOST is amazing for kiting and avoiding enemies OR BONUS DAMAGE if running IFG's for more damage output.
Perks
DEEP POCKETS won't win games, but the extra mineral space is nice to have, especially on scout. Consider choosing more combat focused perks.
VETERAN DEPOSITOR has a decent damage resistance, but requires molly on the mission, and isn't effective while kiting. Best suited to gunner, or tight caves.
VAMPIRE has some useful edge cases, though sweet tooth is often better for recovering health. However has combos with beserker, iron will and combat drills, though it can be risky to try and gain health back this way.
UNSTOPPABLE can save your life against earthquakes and storms, and is helpful for transportation on point extract. Solid but boring perk, good on everyone but scout.
SWEET TOOTH allows you to keep health topped up higher. Especially strong on shield-disrupt missions due to more red sugar spawns. Movement speed is a nice but niche bonus.
STRONG ARM is a rather weak perk, making it slightly easier to find leeches and transport gems. Consider choosing more combat focused perks.
SECOND WIND is hard to use effectively. In combat situations, you'll want to shoot, fire, sprint but the firing cancels out second wind reducing it to minor utility.
RESUPPLIER is very useful on salvage and escort missions, since you'll likely rely on resupply pods for the heavy action sequences.
FRIENDLY ideally shouldn't be needed providing your team isn't actively trolling. Consider more combat focused perks instead.
ELEMENTAL RESISTANCE is incredibly useful on the radioactive and magma zones due to elemental damage being a bigger threat in those biomes, but is weak on other biomes.
ITS A BUG THING is a joke perk, so only invest if you have perk points to spare or wanting to have a bit of fun. Or you just really, really hate lootbugs.
BORN READY is only worth considering on flamethrower driller and autocannon gunner. Even then, other perks provide a far larger advantage,
THORNS A solid perk for classes that struggle with swarmers and shockers. Can save your shield from being worn down mid-combat by constant chip damage.
BEAST MASTER is very strong when used on guards, as the large health means the creature stays alive longer to provide a distraction.
BESERKER allows for a quick burst of damage to eliminate key targets, and can be really strong to eliminate tricky targets like oppressors by ignoring their armour.
DASH allows for you to easily avoid bad situations and re-position, it's quick recharge allowing for frequent use and dodges. Strongest on gunner, weakest on scout.
FIELD MEDIC is an excellent tool for confident grey-beards, the faster revive speed and AOE fear allowing for comebacks. However, it requires you to be the carry to be effective.
SEE YOU IN HELL has a massive AOE blast and fear, allowing for you to revived in a pinch. However, this requires your team to be communicating and you to go down.
HEIGHTENED SENSE is a mostly useless perk once you've gotten into the habit of looking up, but can be used to escape the odd trawler or grabber if needed.
HOVER BOOTS is on the weaker side unless if you find yourself dying to fall damage commonly. It's short duration and long cooldown make it lacklustre to keep you away from danger.
IRON WILL can be excellent for clutching a game, dealing damage at a tough moment and reviving an ally or yourself. However, it's one time use and doesn't come with the field medic passives.
SHIELD LINK is a decent perk for salvage or black boxes due to it's passive, but the activate ability is hard to use effectively without communication and close group positioning.
FAQ / Credits
Regarding Overclocks
I appreciate people asking for overclock builds! However, I'm likely not going to cover them in great detail for a few reasons:

1) The guide's focus is on newer players that likely do not have overclocks. Adding builds that include overclocks will bloat the guide for greenbeards. 2) By the time a player has gotten overclocks, they will likely be experienced enough to make their own decisions.

Not to mention, there are a ton of other awesome guides out there that to go into overclocks in more detail! The other greybeards have put a large amount of effort into their guides, so go read them :D

Credits (WIP)
Thanks to FlipFTW and CyRob for advice on how to properly style the guide.

LOK1 Build
The LOK1 build was a hard choice for me to make. I think Electrochem Rounds (Row 3) + Stun on 3 Shots (Row 5) is a better weapon for newer players. However, the fear effect is so powerful and getting people to experience the benefits of fear will hopefully be better in the long run.
135 Comments
Mikagu Apr 30, 2023 @ 4:35pm 
For the perks, all you say is "Eh, its not that good". So what perk should i use? You didnt call ANY Perk worth taking. XD
Big Tiny1234 Jan 30, 2023 @ 3:06pm 
@Mushu any idea for when the next update will be :)
Octavia Rose Jan 28, 2023 @ 4:32am 
For anyone curious: The new Shard Diffractor is an amazing crowd killer, I'm not able to tell if it pierces enemies but if it doesn't then it mows down swarms just from the dmg alone. My current build for it is: Damage, Weakspot Dmg, Magazine Size, Heat, and Slowdown.

I'm hopeful that the electro/burning rounds from LOK1 will give it even better single target dmg against praetorians or oppressors. Been running with Warthog for a bit.
Dante2133 Jan 25, 2023 @ 2:03pm 
thanks for the guide can i know when you could update it?
Saucy Wiggles Nov 9, 2022 @ 5:54pm 
STILL LOVE YOU MUSHU
Sireristof1332 Nov 9, 2022 @ 1:35pm 
Needs an update for Boltshark!
AwesomeSause Sep 13, 2022 @ 2:35am 
cool! you gonna do one for overclocks too?
Muppetshu  [author] Aug 29, 2022 @ 10:14am 
Eh, some builds are outdated unfortunately. Right now, I've been fairly busy and likely will not update for a while.
Saucy Wiggles Aug 29, 2022 @ 5:17am 
it will always be relevant
noq2rne Aug 28, 2022 @ 10:34pm 
is this guide still relevant?