Terraria

Terraria

68 ratings
Terraria Boss Ideas 4
By Okami Tomato
Welcome to another one of these

So to the recurring 8 or so viewers who know the drill go on ahead; but to the newcomers I will simply say that this is not a guide, just a collection of ideas I've had of bosses I have designed and how they'd function in the games, with this one being about the more unusual or different bosses that wouldn't fit with vanilla terraria but would with, say, its own mod...

...though due to lack of skill, experience, knowhow or assistance it shall be stuck in guide form for the time being, but enjoy what exists of it currently :P
   
Award
Favorite
Favorited
Unfavorite
[[Prior Note]]
There is a lot of stuff in this guide to get through due to the sheer amount of bosses covered within it.
Many of the bosses are also designed around unlikely additions to Terraria, more fit for modding, which is why it was separated from the other pages.
For example, a boss may be designed with a gimmick that doesn't fit with Terraria's existing boss roster, it may be designed for a post-Moon Lord battle, it may have some deep lore, custom music*, rematches, unique fight gimmicks, important lore, or might just be too weird for Terraria.

Sorry, this isn't a guide, or a real mod yet. Get in touch if you possess the skills for these sort of mods and would be willing to mod them, since I likely won't be able to do it for a while now.

[Extra Note about the 'GelTech Info' sections:]
It's an tem crafted using the Royal Gel, Gel and Iron Bars. Puts small tablets of lore into the player's inventory upon successfully killing a boss. Only obtainable normally in expert mode, but isn't crucial for the player to ever have it. It just gives extra boss details like the Calamity Mod's lore items.

Anyways, thanks for reading, and enjoy the chaos below.


*Music not made, it's just that if it were to be, the things listed would be involved, maybe
[Pre-Hardmode]
The bosses that are fought prior to defeating the Wall of Flesh and entering hardmode. While they aren't as powerful as, say, attempting to fight the mechanicals pre-hardmode they will still provide the player with a decent challenge at their points in the game.

[7/1/19]: Added Necro Warriors, Sorrow, Torchworm, Granite Burrower, Marble Burrower and Cursebrand. Desert King and Frostmaw being designed, but not yet sprited.
[26/1/19]: Frostmaw and Desert King might not be made anymore and thus have been added to the scrapped list at the bottom of the guide.
Necro Warriors
Appearance:
While they seem to be humans donning Necro Armour a second observation will unveil some other differences. For example, the colours seen through the eye holes in the visor suggest that they are actually skeletons. They also wear shackles around their wrists and pendants around their necks that look like a very small version of Sorrow, a boss fought shortly after.

Summon: Found in the Necro Dungeon entrance (Dungeon that will either be found at the opposite side from the normal Dungeon or will be an alternate world generation maybe) and can be challenged at night. During the day they will mock you, but cannot be battled. Rematches are not possible after their initial defeats.

Stats:
Health: 1,000 (1,650) (x4)
Attack:
-35 (68) (Melee)
-38 (72) (Weapon Attacks)
Defence: 10

Attacks:
All 4 of the Warriors will stand in the background, unable to be interracted with. One at a time they will jump forwards and attack.
-The Flail Warrior will walk towards the player before stopping and flinging his flail before repeating the cycle
-The Bow Warrior will do similar things, though uses a bow and arrows instead of a flail
-The Caster Warrior will also walk towards the player, though fires of magic bolts occasionally
Finally, when the other three are defeated, the Necro Summoner will become active.
-The summoner will use smaller, destructable magic bolts to attack the player, but can also summon Angry Bones from the ground around him occasionally

Defeat: Explode into gibs

GelTech Data:
Former followers of the Watching Shadow, kept alive by their oaths. They retain their skills and thoughts from when they were human, but lack any true free will in fear that breaking the oaths will result in a swift end...

Drops: Each of them will drop their own weapon and special variant of the Necro Helmet. The weapons will be skeleton-themed and the helmets will replace the normal Necro Helmet, each providing special buffs. Each helmet will change the other armour pieces' ranged bonuses to the corresponding weapon type and the set bonuses to either higher health regen, less mana consumpion or more max. minions.

Extra Info:
-The individual enemies that make up the boss technically have the lowest health of any boss in the game, with only 1000 each. However, when all 4 are put together, they beat both King Slime and Eye of Cthulhu in terms of raw health; still excluding the Angry Bones the summoner spawns.
-This boss is the only* boss that can only be encountered once in a playthrough under normal circumstances.
-The boss shares some similarities with the Lunatic Cultist.
--They are small, humanoid enemies that use unnatural powers, both stand outside of their respective dungeons in small groups and both are essentially mini-bosses that are necessary to kill at least once in order to face a stronger, more intimidating foe.
Sorrow
Appearance:
A large, spherical ball of darkness with a single red-pupiled eye. Its body is surrounded by purple, hazy energy.

Summon: Use the Necro Lens dropped by the Necro Warriors after they are defeated. The item will be re-usable. It can be summoned at any time as long as the player is near to the Necro Dungeon.
While the item can be used whenever, it will warn the player that the boss is much harder at night in its tooltip.
It can also be found acting as an invulnerable Dungeon Guardian prior to defeat and, even after being defeated, will act as a much slower Dunegon Guardian in the cavern layer of its dungeon, but will give up the chase when the player leaves its specific area.


Stats:
Health: 4,600 (9,000) // Infinite
Attack:
-50 (80) / 500 (800) / 2000 (Melee)
-45 (72) / 450 (720) (Dark Magic)
Defence: 13 / 130 / 0
-The first set of stats is used for a battle during the daytime
-The second set of stats is used for battles during the nighttime, where the boss is far more powerful and usually too hard-hitting for pre-hardmode characters
-The third and final set is used when acting as a dungeon guardian. It has no dark magic attacks when performing this action

Attacks:
Will fly around above the player, firing two types of magic bolt at them. Firstly, it may fire slower-moving projectiles that act like the ones used by the Water Bolt; bouncing off of walls. The second type are much faster and pass through blocks, but are destructable.
-It will also occasionally let out a roar and attempt to ram the player in a fashion much like Skeletron, but without the spinning. It stops firing magic bolts during this phase.

Defeat: Bursts into a cloud of shadows, dropping its loot.

GelTech Data:
The one who the Necro Warriors had devoted themselves to. While its appearance to you may seem unthreatening it is believed this is not its true form...

Drops: Drops a large assortment of magic books, though only up to 2 per fight. Has 2 additional drops as well; one for killing it when it turns night and another for fighting the entire battle at night. While these drops are stronger they may require far better gear or skill and so, especially in the 2nd case, may need hardmode equipment just to get.

Extra Info:
-The boss is, technically, one of few bosses that cannot be considered 'dead' even after defeating it. While most bosses only appear once naturally or not at all without single-use summons (suggesting that after they are defeated they're technically dead) the boss can still be found in its dungeon's cavern layer as a slow-stalking dungeon guardian even after defeating it.
--This in itself is contrary to the Necro Warriors, the bosses you need to defeat prior, who can only ever be defeated once before being completely lost from the player's world.
-The boss parallels Skeletron, specifically its expert-mode counterpart, in a lot of ways.
--They are both dungeon-based bosses with reusable methods of summoning them that have time-based 'insta-kill' mechanics, both have themes of the undead, both drop at least one spell book, both have some sort of unusually-moving projectile and both have an attack where they stop firing and instead attempt to ram the player by flying into them. They both also act as Dungeon Guardians until defeated.
Granite Burrower
Appearance:
A large worm coated in granite. Its eye and teeth are light blue, as well as the few parts of its body that are still exposed.

Summon: Use the Granite Worm in the Granite Biome.

Stats:
Health:
-5,000 (7,500) (Worm)
-300 (300) (Armour Plates (per)) (Regenerate after being broken in Expert Mode after some time passes)
Attack:
-70 (175) (Head) (Briefly inflicts Electrified)
-45 (80) (Body)
-30 (55) (Tail) (Briefly inflicts Electrified in expert mode)
Defence:
-5 (Head and Tail normally, Body segments once armour is broken)
-15 (Armour Plating)

Attacks:
-Will follow basic Worm AI throughout the battle, though will occasionally summon Granite Elementals to assist it. Will override the enemy type cap for the battle for a maximum of 6 (12).
-The body segments are all protected by armour at first, which stops the worm directly taking any damage from those segments. Once the armour on a segment is destroyed the worm itself can be damaged from that segment. In expert mode they will regenerate back to full health a little while after they are destroyed.
-In expert mode the boss will also gain mild speed buffs for every destroyed piece of armour plating at any given time, meaning that destroying many of them to maximise the effects of piercing weapons will make the boss itself harder to deal with until the segments' armour regenerates.

Defeat: Explodes into pieces of granite, none of the light blue parts appear as gibs.

GelTech Info:
A large worm with a nasty temperment, caused in part by its rival having been accused of stealing its idea to coat itself in rocky armour. Little does it realise, the idea of armouring ones self has been around for longer than it has and, so, it wasn't even its idea to begin with.

Drops: Granite weapons, including a Sword and Flail. Also drops a gun and a staff. Will also drop a lot of granite.

Extra Info:
-This boss is a counterpart to the Marble Burrower mentioned (but not named) in its GelTech data. Both are large armoured worms that use their biomes' resources as armour plating. Even their stats and drops seem to mirror each other somewhat.
--Their armour gimmicks will also swap in expert mode. While normally the Marble Burrower's armour regenerates and the Granite Burrower's armour stays destroyed, in expert mode the Marble armour stays destroyed and the Granite armour regenerates.
-This boss is the only source of the Electrified debuff outside of Hardmode
--When it is inflicted it will always cause additional damage as the player will either have to stand still and be hit by other segments of the boss or move and take damage from the debuff. In expert mode the multiplier for its head's damage can also make this somewhat of a death sentence as players lose over 50% of their health from the initial hit and the damage received from their decision afterwards.
-The boss can actually be killed without having to ever deal with its armour by only aiming for the head and tail, which are not counted as armoured. This can be very useful, especially in expert mode where the broken armour increases the boss' mobility and regenerates itself after it is destroyed.
Marble Burrower
Appearance:
A large, skeletal worm that has been weaponised. Its body is coated in marble and gold plating and its head has had large, bronze spikes attatched to it. Smaller bronze spikes also run down the plating on its body segments. Red fabric can also be seen between these plates for some additional, even if minimal, protection.

Summon: Use the Marble Worm while in the Marble biome.

Stats:
Health:
-5,000 (8,500) (Worm)
-45 (600) (Plating) (Regenerates a few seconds after being destroyed, but only in Normal mode)
Attack:
-60 (190) (Head) (Inflicts Bleeding debuff)
-50 (85) (Body) (Briefly inflicts Bleeding)
-35 (60) (Tail)
Defence:
-8 (Head, tail and unarmoured segments)
-18 (Armour)

Attacks:
-Follows the normal worm AI for its attacks, but will also summon up to 6 (12) hoplites at a time to assist it. The head and tail, when attacked, deal immediate damage to the worm, but the armour on its main body segments will need to be broken before the worm can be damaged. In normal mode these will regenerate after a while, but in expert they don't and instead are given a large boost in health.

Defeat: Bursts into bones and chunks of bronze and marble.

GelTech Info:
-An armoured worm; former champion of the Marble biome. Donning the hoplites' signature red and being armed to the teeth, this beast was quite intimidating. Quarreled with the Granite Burrower due to its use of armour.

Drops: Marble and bronze weapons, including a bow, sword and staff. Will also drop a lot of marble blocks and a piece of the gladiator set.

Extra Info:
-As stated previously, this boss has a lot of parallels to the Granite Burrower; its granite biome counterpart.
-The Marble Burrower's ability to summon ranged enemies may be problematic since they can distract you from getting in hits against the worm itself, or force te player to dodge several targets at once. Due to this, the summons end up being a larger source of damage against the player than the worm often does.
--This in itself is a contrast from the Granite Burrower where its minions were relatively harmless but the boss itself was able to quickly dish out a vast amount of damage.
Cursebrand
Appearance:
A floating sword surrounded by pinkish-coloured energy. The sword is mainly black and red, with a purple gemstone in the hilt. The blade itself is grey with two small red gems close to the blade's base.

Summon: Use the Shadow Dagger in the underground Corruption or Crimson. The boss may be brought to the surface in the corruption or crimson, other underground/cavern biomes or the surface if it is night time. However, if it is daytime at the surface it will despawn shortly after being taken there.

Stats:
Health: 3,000 (4,650) / 18,600 (30,000)
Attack: 65 (140) / 85 (180)
Defence: 14 / 30
-The first set of stats is for a pre-hardmode encounter
-The second set of stats is for a hardmode encounter, where it will drop an abundance of Souls of Night.

Attacks:
Will spend most of the battle performing similar actions to the Enchanted Sword enemies from hardmode, though it will charge more frequently and cannot be interrupted by attacks.
-On occasion it will spin around in-place, firing out sword beams in random directions. In Expert mode these sword beams will target players and will spin around, much like the ones fired from the True Nights Edge.

Defeat: Dies in a similar way to the Enchanted Sword; with a faint whisper and a puff of smoke.

GelTech Data:
A powerful sword that has grown weary of being dormant. It arose from its altar and was naturally drawn to the world's evil. It waited a long time for a powerful foe to emerge; and it seems its wish has been granted.

Drops: Will drop a sword that can be repeatedly upgraded throughout the game. Other drops include a variant of the Enchanted Sword item and a staff that fires swords. Will drop a single (though rather useless) Soul of Night in pre-hardmode and up to 20 at a time in hardmode.

Extra Info:
-It is the only* source of Souls of Night in pre-hardmode. However, it will only ever drop 1 unless its stronger form is fought in hardmode. The souls will also be relatively useless in pre-hardmode anyways, since most crafts that use them require Mythril/Orichalcum anvils, which are hardmode-exclusive.
-The boss receives a powerful buff to its stats in hardmode, and in return will grant additional Souls of Night to make rematches useful. Its main drop, the Broken Cursebrand, can also be upgraded throughout hardmode as well, making it potentially rather useful to fight it again in early-hardmode.
-The boss, despite having its summoning item inexpensive, should be saved until you are later into pre-hardmode. Its damage output rivals the Wall of Flesh and its defence and health can make fights tricky.
--Melee is also not recommended for this fight, ironically, unless the weapon has good range and damage, like the Enchanted Sword (Or the boss' own drops)
Torchworm
Appearance:
A strange, blue worm with a smooth body and no real features. Its head and tail (as well as small bands slightly away from these areas) are luminous, living up to the name.

Summon: Use the Coiled Torch in the cavern layer. From this point until you either win, die or flee the caverns all light sources will stop working. Shine potions will still work, but Campfires and Torches will provide no light. Armour set bonuses or accessories that provide light will also work if worn. Night Vision still works as well.
This, however, works in the player's favour as the worm's head and tail are luminous and let off strong glows, making it stand out in the darkness.
In expert mode the player will also be given the Blackout debuff throughout the battle, further decreating light levels.

Stats:
Health: 7,000 (13,500)
Attack:
-50 (100) (Melee) (Inflicts On Fire!) (Also inflicts Confused in Expert mode)
-35 (60) (Fireball) (Inflicts On Fire!)
Defence: 24

Attacks:
-Will spend most of its time simply trying to charge into the player, like the majority of worm enemies. Successful attempts will inflict the On Fire! debuff to players.
-As its health decreases it will also sometimes shoot fireball projectiles from its head and tail. Ones from the head will bounce like the Flower of Fire ones but ones from the tail travel in a straight line and burst upon contact with blocks or players.
--In expert mode the frequency of these attacks increases drastically at low health

Defeat:
-Explodes in a large, bright explosion. Light sources cancelled by the boss will begin working again and the Blackout debuff inflicted in expert mode is lifted.

GelTech Info:
-A large, rubberised worm. Far from natural, likely mechanical, though still acting as if it were an actual worm of some kind. Its inventor must be rather strange themselves to come up with a design like this.

Drops: Worm and torch-themed items. Will give a staff that summons a smaller version of the Torchworm, a Chain-Knife weapon that inflicts On Fire! and a staff shaped like the worm that shoots fireballs. It doesn't drop any ranger weapons, though; but it does drop a lot of Torches.

Extra Data:
-The boss' design is based off of a real-world item; the double-sided bendy torch. The idea was strange enough to inspire an entire boss.
-Every attack the boss lands will successfully inflict the On Fire! debuff
-Both normal-mode debuffs caused by the boss are not actually blocked by the Ankh Shield, though variants of them are (Poisoned and Darkness). Confused is blocked by the shield and its charm in expert mode, but the items themselves cannot be obtained until Hardmode where the player would have already surpassed this boss' level.
[Hardmode]
Enemies that can be encountered at any point before the player faces the Moon Lord. Hopefully all of them will have some sort of indication as to when they should be fought as hardmode itself covers a lot of the game.

[7/1/19]: Added the Bramblemaw, Cosmic Beetle, Giga Deathworm, Hallow Spirit, Omnicron Doppelganger, Soul Master and Storm. Frost Reaper's design being finalised.
[12/1/19]: Gulper added
[25/1/19]: Storm's sprite updated, Ember and Super Slime have sprites. Frost Reaper has been dropped, sadly, though Ember has risen up to take her place. Sprite for The INVADER has been finished.
[26/1/19]: Ember, INVADER and Super Slime added. Also, upon the realisation that the Moon Lord got away with player-sized hitboxes, Storm, Ember and Omnicron Doppelganger have all been given additional health.
Cosmic Beetle
Appearance:
A large grey-coloured beetle with a purple shell. Atop the shell lies a mark that looks like, and uses the same colours as, a Fallen Star.

Summon: Found rarely in Space at night. Can be made more common by holding up Fallen Stars in space as doing so briefly increases their spawn chance. Can re-appear even after defeated, but only one per night. They can be found at any point after Skeletron or Sorrow is defeated, but it is strongly recommended to wait until Hardmode due to its massive defence making most pre-hardmode weapons deal minimal damage.
[Can be fought pre-hardmode, but it is designed for a fight between the WoF and the mechanicals.]

Stats:
Health: 5,000 (6,850)
Attack:
-50 (80) (Melee)
-65 (120) (Star Shot)
Defence: 60 (45-100)

Attacks:
-Will walk towards the player throughout the fight. It the player is too high for it to catch it will fly to them using wings. It will travel through blocks if unable to reach the player.
-At random intervals it will stop moving, summon a Fallen Star on the tip of its horn, and throw it at the player. The star has very high velocity and cannot pass through blocks.
-In expert mode exclusively its defence will increase as its health decreases, reaching roughly 80 defence at 20% health and 100 at around 5%.

Defeat: Explodes into gibs of solely its shell. None of the beetle's body appears as gibs for whatever reason.

GelTech Info:
-Beetles that are said to soar through space to find suitable planets. Many have flocked to earth but have had to stay as high as possible to avoid conflicts with many of the planets' natural inhabitants.

Drops: Will drop a lot of fallen stars, as well as a Star Cannon. Other drops include a summon, the Star Cloak, and an accessory that increases the player's defence and provides a glow effect.

Extra Info:
-Despite being found in pre-hardmode it is strongly suggested that the player avoids fighting it due to its high damage output and extreme defence. The battle can be fought pre-hardmode, but is designed more for early hardmode where the player would likely have increased mobility, defence and offence.
--In normal mode the player could attempt to use Hellstone weapons (Mainly the Molten Fury and Hellfire Arrows) to deal around 12 damage to it plus afterburn. While this may take a while it will provide the player with useful tools to kill the WoF and ammo for the Star Cannon.
-The boss is unusual in the fact that it cannot be manually summoned by the player. The best the player can do in the ways of summoning it is to repetedly hold up Fallen Stars while in Space at night. Eventually, one is likely to show up.
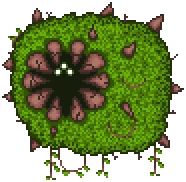
Bramblemaw
Appearance:
Its mostly-round body is cloaked entirely in foliage, with some vines hanging down below it. Its entire body is coated in scattered, mahogany-coloured spikes, with a ring of them pointing inwards around a large hole in the front of its body, resembling a mouth.

Summon: Found originally by staying in the Underground Jungle for an extended period of time. After it is defeated the player can craft or purchase the Jagged Thornbush and summon it manually.
[Fought at some point alongside or before the Mechanical Bosses]

Stats:
Health: 26,500 (44,500)
Attack:
-80 (173) (Melee) (Inflicts Bleeding and Feral Bite in expert mode)
-120 (260) (Enraged Melee) (Inflicts Bleeding and Feral Bite in expert mode)
-65 (120) (Bramble Stream) (Inflicts Slowness briefly and Bleeding for longer. Also inflicts Poisoned in expert mode)
Defence:
-24 (Normally)
-62 (Enraged)

Attacks:
Will slowly float towards the player's location throughout most of the battle, getting faster as its health gets lower. Will frequently disappear, only to appear elsewhere and continue the chase (Similar to the Brain of Cthulhu's 2nd phase)
-When damaged it has a chance to spawn Moss Hornets to assist it
-Will sometimes stop and use one of two other attacks before continuing its pursuit.
--It may spit out a large swarm of bees. These have no additional chances to drop hearts and in expert mode cannot drop hearts at all.
--It may summon large trails of thorns like the Vilethorn that linger for a long time and inflict Bleeding and Slowness on the player. In expert mode it will also inflict the Poisoned debuff as well.
If taken out of the underground Jungle it will enrage in a similar fashion to Plantera, becoming faster and gaining increased melee damage and defence.

Defeat: Bursts into leaves and leaves gibs of its 'teeth' and some branches.

GelTech Lore:
-Despite its unusual appearance and seemingly-limbless body; Bramblemaws are actually powerful hunters that use their bodies as a disguise and a weapon. They will stun prey with their thorny vines before devouring them, most of the time whole.

Drops: Will drop thorn-themed weapons and an accessory that works like the Thorns potion. Will also drop an accessory that increases the player's health by 10% in expert mode.
Will also drop Souls of Smite which are used like the other souls; as crafting materials.

Extra Info:
-The Bramblemaw's fighting style is comparable to the Brain of Cthulhu in the ways of it summoning lots of minions and spending a lot of the fight attempting to fly straight into the player. However, the Bramblemaw is immune to knockback and spawns more powerful minions, though does not have an immune phase 1.
-Due to the debuffs the Bramblemaw can cause, along with the many potential sources of damage in the fight, it is suggested the player craft the Ankh Shield before confronting it. The knockback immunity can prevent the player being stun-locked by the thorns and can help the player keep distance from the boss while the Ankh Charm's immunities can remove the Slowness, Bleeding and Poison effects of the boss' attacks.
-Piercing weapons are also highly recommended for this boss due to its ability to summon large amounts of minions while moving. The Moss Hornets are especially troublesome.
--Since they are spawned when the boss takes damage and not from a direct action from the boss it is likely Bramblemaw will still be moving towards the player while the hornet will start out stationary. The hornet will therefore be guarded by the Bramblemaw and so has the opportunity to attack the player freely.
Hallow Spirit
Appearance:
Appears human, though likely isn't. The colours of her wings and dress are the same ones as used by the Pixie enemies, though inverted (The boss' main body is blue with yellow wings instead of yellow with blue wings). Despite looking non-threatening the boss can be a challenge, especially in early hardmode.

Summon: Use the Fairytale Butterfly in the Hallow at the surface. She can be taken to most other biomes, though. Will only despawn in the Underworld.
[Fought before the Mechanicals]

Stats:
Health: 18,000 (30,000)
Attack:
-40 (75) (Melee) (Inflicts Silenced)
-50 (90) (Magic Orb) (Inflicts Confused)
-35 (60) (Cloud) (Inflicts Slowed)
-15 (26) (Hallowed Surge) (Inflicts Weak)
Defence: 20

Attacks:
Flies back and forth above the player throughout the fight.
-May summon Pixies to assist her at any point in the battle
-May fire a moderately-fast ball of magic that inflicts the Confused debuff
-May summon clouds around herself that travel outwards in a large spiral. These will inflict the Slowed debuff
-When under half health she will also occasionally let out a large, high-velocity burst of energy that deals mild damage and inflicts the Weak debuff. While it can be evaded it is very hard to do so.

Defeat: Defeated with a similar light burst to Pixies, complete with the same sounds.

GelTech Info:
-Guardian of the Hallow. Despite her cutesy appearance she has a lot of power at her disposal. It is likely she mistook you for a threat to the hallow... or maybe she just wanted a good challenge...?

Drops: Hallow-themed weapons, mainly magic ones. Drops an enhanced pair of Fairy Wings and a lot of Pixie Dust upon defeat. Also drops Souls of Light.

Extra Info:
-In some ways she could be seen as a hallow counterpart to the Cursebrand. Both of them are said (or at least hinted at) looking for a tough opponent, both have comparable stats in hardmode, both are fought in hardmode around the same time, both drop their own respective soul, both can be taken to virtually any biome except one and both have a drop that is an alternate version of another item the boss is based off of.
-The Ankh Charm is highly recommended for this boss as well since all of its attacks cause debuffs that are blocked by the Ankh Charm's immunities.
-The Hallowed Surge attack the boss may sometimes perform is a fast-moving, block-ignoring ring that seems nearly unavoidable. However, using teleportation or distancing ones self from the boss will allow the player to escape it if they so wish.
--However, if the player is immune to the Weak debuff due to Vitamins or is mostly unaffected by it due to their class it may just be worth getting hit by it due to its very low damage output being reduced to 1 damage with decent gear.
Giga-Deathworm
Appearance:
A large, brown desert worm, made up of 45 segments. The head has large fangs and 3 orangey-red eyes and the tail has almost vice-like pincers on it, though the rest of the body is relatively plain.

Summon: Use the Desert Worm Bait in the Desert. Will follow the player anywhere in the world afterwards.
[Fought alongside or prior to the mechanicals]

Stats:
Health: 95,000 (140,000)
Attack:
-120 (220) (Head)
-50 (85) (Body, Vile Spit)
-60 (110) (Tail)
Defence: 25

Attacks:
-Will follow the Worm AI. While it will occasionally fire Vile Spit projectiles from its head it does very little else outside of it, making the boss rather predictable.

Defeat: Explodes into gibs

GelTech Info:
-A large desert hunter, armoured with fortified plating and donning large fangs. Not the largest of its species, mind you, but not one to be underestimated.

Drops: Will drop desert and worm-themed weapons, as well as an accessory that boosts defence in exchange for slightly lowered mobility.

Extra Info:
-Part of a sub-set of bosses which are all stated to be part of the same species. The other members are faced at different points in the game with various similar summoning items.
-The Boss lacks immunity to most debuffs and so the Golden Shower combined with the Magical Harp can shred the boss' health very swiftly, sometimes taking only seconds to kill it.
Soul Master
Appearance:
A spherical boss made entirely of souls. It is surrounded by fragments of the 6 types of soul seen normally throughout the game (Fright, Light, Night, Might, Flight and Sight). The central orb resembles an eye and will take on different colours based on what soul it is tapping into to attack using. It will default to purple when first summoned.

Summon: Use the Amalgamated Soul at Night. The Biome and Depth are irrelevant when spawned.
[Fought after the mechanicals due to you needing their respective soul types.]

Stats:
Health: 34,000 (50,000)
Attack:
-60 (110) / 45 (90) / 68 (124) / 65 (122) / 55 (103) / 90 (175) (Melee)
-65 (115) / 70 (123) / 70 (130) / 75 (140) / 50 (92) / 85 (160) (Projectile)
Defence: 30
-The different stats correlate to different soul types being used. They are Night, Light, Fright, Sight, Flight and Might, respectively.

Attacks:
Throughout the fight it will alternate between 1 of 6 possible attack patterns, indicated by the colours the Soul Master takes on. They alternate every 10-15 seconds, but always start on the Night form when it is first summoned.
-In Night form it will fly near to the player, firing arcs of 3 energy orbs every few seconds. It will also charge occasionally.
-In Light form it will not charge, but it will fire more projectiles in an arc (4 at a time). The charge has been replaced with a burst that sends magic bolts outwards in random directions at random speeds.
-In Fright form it will summon cursed skulls that deal projectile damage and have 1,000 health each. It will charge at the player more frequently.
-In Sight form it will stay horizontally to the player, attempting to hit them with high-velocity lasers.
-In Flight form it stays above or diagonally to the player. It charges in an arc, swooping down to hit the player before flying up again. It fires slow-moving bursts of 8-10 feather-like projectiles outwards in all directions.
-In Might form it will charge at the player. At the start of each charge it will leave a large, lingering energy bolt that explodes after some time.

Defeat: Sends its 6 soul fragments towards the player one-by-one, dealing projectile damage if they hit. Once all 6 are gone the Soul Master will charge at the player, exploding once it hits the player, a block, or travels too far. It drops its loot wherever it explodes.

GelTech Info:
-A being made entirely out of the souls gathered to make its summoning item. It taps into fragments of these souls for its attacks, signalled by its colour changes. It is reckless, with each soul-tap being potentially life-threatening, but it seems to either not care or not be aware of this.

Drops: Will drop a decent amount of each type of soul, and an additional 5 of the type that the Soul Master was prior to death. Drops a Bow of Might, Sword of Fright, Wand of Sight, Spear of Night, Staff of Light or Blaster of Flight.

Extra Info:
-One of the rare cases where a boss will intentionally perform a last-ditch attack to kill the player. However, in its case, the very attack will destroy it.
--If players are killed by the soul projectiles the boss can still despawn, but it will always count as being defeated if it finishes its last-ditch charge as it dies immediately after it is finished.
-Certain mods will allow this boss to be fought without defeating the Mechanicals, like the Calamity Mod, which has other bosses that also drop souls.
-The Soul Master can be a great way to farm a lot of souls quickly, since it will drop 1.5x the souls used to make its summoner, and an additional 5 of the type the soul master was when he uses his last-ditch charge attack.
-The Soul master lacks his own soul type, despite being one of the bosses that could have made use of it due to its name and nature.
Gulper
Appearance:
A gigantic eel, a dark, greyish blue body with green fins. Its eyes are lighter greens than the fins and are surrounded by green rings. Its mouth is full of small, but abundant and sharp, teeth.

Summon: Found rarely in the world's ocean biomes after at least 1 of the mechanical bosses has been defeated. Only found near the outskirts of the ocean, not near the shoreline, however. Should never be taken out of the ocean biomes as it will become enraged and gains the ability to insta-kill players if they remain out of the biome for too long. Will become notably rarer once defeated at least once.

Stats:
Health: 115,000 (160,000)
Attack:
-95 (250) (Head Melee)
-55 (100) (Body Melee)
-58 (105) (Bone Spit)
-0 (10) (Bubble) (Inflicts unique Bubbled debuff)
-2,500 (4,500) (Enraged Melee)
Defence:
-10 (Head)
-35 (Body)

Attacks:
Will slowly fly towards the player at the start of the fight. As it takes damage it will begin slowly speeding up.
-It will become enraged if taken out of the ocean biome for too long. It accelerates to the same speed as Lightning Boots and will deal insta-kill damage from its head once it catches the player. After this, even in multiplayer, it will despawn.
-At 75% health it begins spitting fast-moving bubbles at the player that inflict their own, unique debuff.
--'Bubbled' will make the player begin accelerating upwards while trapped in a bubble. Players cannot use items when bubbled and will be dismounted from mounts.
-At 50% health it will begin spitting bones and skulls at the player from inside its mouth.

Defeat: Bursts into gibs

GelTech Info:
-A giant ocean menace that usually dwells in deeper waters, but travelled inland to try to get a taste of people. Their mouths are more then capable of just eating you whole, but they seem to enjoy a struggle.

Drops: Ocean and bubble-themed loot. Will also drop a smaller version of itself that spits bubbles and bones to deal ranged damage.

Extra Info:
-It is suggested that the player fight the boss at least once before dealing with bosses like Duke Fishron, or else they risk it also appearing by itself mid-fight.
-More than one Gulper can be active at a time, though having this happen is rare, as it will have a reduced spawn when still alive.
-The Gulper is, much like the Destroyer, very vulnerable to piercing weapons. Unlike the destroyer, however, this boss is not immune to debuffs.
Super Slime
Appearance:
A Blue Slime wearing a red cape. It has golden broach at the front, holding the cape on. Its appearance is purposely reminiscent to that of Superman.

Summon: Fought using the S-Shaped Insignia at the surface during the day. The boss won't despawn if taken underground, but despawns with a special message if it makes it to nighttime.

Stats:
Health: 15,000 (18,500)
Attack:
-65 (120) (Melee)
-50 (85) (Slime Vision) (Inflicts Slimed 'debuff')
Defence: 5

Attacks:
-Spends a lot of the fight hopping rapidly towards the player, covering ground much like the Slime Staff summons (rapid hops that retain its velocity).
-If below the player it will perform a 'Super Jump' where it leaps upwards and passes through blocks. Deals no additional damage, but due to its very small wind-up it can be hard to predict.
-May stand still and fire a stream of 'Slime Vision' at the player. It is a series of water-bolt projectiles, complete with ricochet, that inflict the Slimed debuff on players.

Defeat: Explodes, much like a normal slime does. Makes a louder 'squelch' than normal, however.

GelTech Info:
-Coming from its home planet of Slypton, the Super Slime is tough... for a slime. The reduced gravity on earth allows it to potentially leap tall buildings in a single bound, though much of the other stuff that a similarly-clad superhero can do is out of this slime's capabilities.

Drops: Slime-themed weapons and its signature cape. Also drops a slime-based accessory that increases jump height and reduces fall damage. Doesn't have a mask, but the cape takes its place as its rare, boss-specific vanity cosmetic. Strangely, it also drops a "Rocket Fist", despite never using one.

Extra Info:
-This boss now wins the award for Smallest Boss, even surpassing many of the human ones seen in this page, as its size is only comparable to that of a purple slime.
-Much of this boss' design is heavily (and often very obviously) based on Superman, one of the most famous comic book heroes.
--Its appearance, in the ways of colour scheme, red cape and golden, diamond-shaped, S-inscripted icon, are all obvious visual references.
--Its "Slime Vision" is a play on Superman's heat vision
--The GelTech's mention of 'Slypton' being the Super Slime's home planet is a reference to Superman's home planet of Krypton.
---The GelTech also mentions its jumping abilities, which also references the line "Able to leap tall buildings in a single bound", another phrase associated with Superman.
--One of the less obvious references include the trophy, which has the boss' cape ripped in a similar way to the one seen on the cover of the comic The Death of Superman.
--Another less-obvious reference is the Rocket Fist, whose design and description are references to the Iron Giant (Look mainly to the last scene, as sad as it was).
-The Slime is, quote obviously, designed to be a joke boss, as the boss itself is rather easy to fight and features no complex attack patterns.
--The message that appears when the boss despawns at night, 'Nap Time', is also in itself not a serious message, though you probably don't need me to tell you that.
-It is arguable that, with the equipment avaliable to the player at this time, that the Super Slime may be the easiest boss in the game. Many of the earlier bosses are harder due to the weaker items provided to the player, but you have everything up to the mechanical boss' items to use for this boss.
I.N.V.A.D.E.R.
Appearance:
A large mechanical worm seemingly made from the Martian Conduit Plating. The connections between every 2nd and 3rd plating seem to be looser, suggesting that they can be disconnected.

Summon: Use the Martian Vengeance Beacon at the surface. Will not work of Martian Madness event or the Martian Probe are active in the players' world. Only craftable after the Martian Madness event has been completed as Martian Conduit Plating is needed.

Stats:
Health: 700,000 (1,000,000)
Attack:
-150 (300) (Head Melee)
-75 (130) (Body Melee)
-80 (145) (Laser)
Defence: 50

Attacks:
-Starts off the fight as a single, giant worm. As it takes damage segments will begin to disconnect from the main body as 2-segment mini-worms, eventually separating the entire 80-segment worm into 40 smaller, 2-segment worms.
-Each head will rarely fire off a strange laser projectile. The dart towards the player about 8 blocks, stop, fire towards the player again for another 8 blocks, stop again, fire at the player again for about 8 blocks, stay still, and then burst.
--However, by the end of the fight, it is likely at least 3 of them will be active at a time due to the sheer number of worms active by that point.

Defeat: All 40 worms explode, with the last one to take damage dropping all of the boss' loot.

GelTech Info:
-The martians' plan B. If their attempts to conquer earth were thwarted the INVADER would be sent down instead to tear the planet apart while the martians observed from space. With their plan B destroyed, the martians have retreated again.

Drops: More martian-themed weapons. Drops a modest amount of conduit blocks, 2 of the Martian Saucer weapons, and a few exclusive weapons like a spear, flail, wand, etc.

Extra Info:
-The boss seems to be a more faithful depiction of a hardmode counterpart to the Eater of Worlds. While the Destroyer managed to encapsulate the ideas of a giant worm and being overwhelmed when not playing ones' cards right, this boss' ability to split up into smaller worms is more accurate to the source material.
-Strangely, despite firing electrical laser projectiles, this boss doesn't inflict the Electrified debuff.
-The reason this boss cannot be faced when there are Martians active despite being a martian boss is explained in the GelTech description found in Expert Mode.
-Despite saying that the boss was designed to 'desrtoy the earth' it both cannot destroy blocks and itself doesn't quite seem large enough to do so (despite appearing enormous when compared to the player).
-It is recommended that the player build a 'sky bridge' to avoid being overrun by the smaller worms. Their melee damage can stack up very quickly while the player is on the ground and, due to the sheer amount of damage the melee attacks do, being hit by them is potentially a death sentence.
--Sadly, trying to despawn some of the worms is not possible as they will remain active for as long as the player is in the world. Even if the player teleported to the other side of the map, all 40 worms would follow you back.
-Due to the boss' separations during the fight it actually becomes slightly harder to deal piercing damage to the boss as the fight goes on as segments will become more scattered and some may hide underground.
-The boss has some of the highest health seen pre-ML, even having multiples of the ML's health and almost 10 times that of the Destroyer, one of the bosses it was based off of.
Ember
Appearance:
A red-haired girl with a red scarf over her face, covering her mouth and nose partially. She has an orange-coloured hairpiece in her hair, sticking up at the back. She also carries a large, red scythe that occasionally has red, flame-like particles eminating from it.
In Phase 1 most of the boss' body is obscured by a large red and orange cloak. The cloak is held on via a yellowy-gold broach at the front.
In Phase 2 she ditches the cloak. Her attire is a mixture of bronze, red, orange and black.

Summon: Use the Flame Wisp at the surface. The time of day is unimportant. She will not despawn if brought underground, though it is recommended that she stays above-ground due to some of her attacks bouncing off of solid walls. She is intended to be fought around the same time you fight Storm; before the Omnicron Doppelganger and Moon Lord, but still Post-Golem.

Stats:
Health: 64,000 (82,000)
Attack:
-75 (140) (Phase 1 Melee)
-80 (150) (Phase 1 Scythe Projection) (Inflicts On Fire!)
-70 (132) (Phase 1 Fireball) (Inflicts On Fire!)
-82 (155) (Phase 2 Melee/Scythe) (Inflicts On Fire!)
-74 (137) (Phase 2 Fireball) (Inflicts On Fire!)
-100 (200) (Phase 2 Fire Tornado) (Inflicts On Fire!)
Defence: 20

Attacks:
Phase 1:
-Will spend most of the fight slowly following the player from the ground, sometimes performing leaps or dashes, though only ever to keep up with the player.
-She may summon a transparent scythe beside her before firing it towards the player. It accelerates constantly, passes through blocks, and has a very mild homing effect.
-She may also summon fireballs from her hands that travel with high velocity towards the player, though don't pass through blocks.
-Finally, she may summon large, stationary fireballs in the sky near to the player, before causing them all to explode.
Upon being taken down to 22,000 (30,000) health, she transitions into Phase 2. She ditches her cloak and begins using the real scythe alongside some of Phase 1's projections.
-She is a lot more mobile in this phase, using a pseudo-teleport, being able to hang in the air, having access to dashes, etc.
-She may throw her scythe towards the player in an arcing motion, like a large, faster-moving boomerang.
-She retains both fireball attacks from Phase 1, though each one uses more fireballs.
-She may also still summon the transparent scythes, though summons up to 5 at a time in singleplayer and at least 2 more in multiplayer. They accelerate even faster than they used to.
-Finally, she may stay still on the ground before bringing down her scythe, creating a large, flaming tornado at her position. It works like Duke Fishron's, though sends out fireballs instead of Sharkrons and lingers slightly longer. (In expert mode, the Fire Tornado also leaves behind 3 blocks of lava that disperse almost immediately after the tornado becomes active, destroying wooden platforms and making solid floors more hazardous. The lava persists even after the fight ends.)

Defeat: Falls to the ground and teleports away. Her scythe, upon being defeated, bursts into flames and shatters.

GelTech Info:
-The younger of rivals whose goals, whilst different, overlapped constantly. She is a keen fire elemental and has started on the path of true mastery, though still has a way to go before then. The scarf she wears was apparently a present and, as evidenced by its well-loved exterior, seems to be one of her most prized possessions.

Drops: Fire-themed weapons, the most prominent of which is a damaged version of her own scythe that can be upgraded several times throughout the game. She also rarely drops the 'red fabric' which is a material used to craft the Red Scarf. The scarf is a vanity item whose tooltip says 'The static clings to you...'.

Extra Info:
-Through several pieces of evidence it is made rather clear that the 'rival' that is referred to by the GelTech description is Storm, and that their rivalry is a friendly one. They are fought essentially at the same time in the game (twice), both share a 5-character name based on their attacks, their fights share similarities in their fast movements, heavy use of an elemental attack and melee weapon, their upgradable weapon drops and even their animations when defeated. The Red Scarf's description is also a more subtle nod due to the mention of static electricity.
-Strangely, despite the scythe having its own special particle effects, the debuff it causes is still just the standard On Fire! debuff.
--These particles are left behind after every movement of the scythe, which can be quite visually appealing when many scythe attacks are used in succession.
-Due to them being fought at roughly the same point in the game, it can be argued whether Storm or Ember is the harder one of the two to fight. While Storm is more mobile at the start of the fight and has a debuff that you need to work around, Ember has additional health and her attacks cause more damage and more consistent DoT.
-Ember's design is actually based off of Frost, a scrapped boss for the mod who would have looked and acted similarly. However, due to the flames making Ember's fight more visually interesting, Ember's design was chosen over Frost's.
Storm
Appearance:
A human, dressed mainly in yellow and black. Wears a beret on her head with a golden band. She wields a spear that seems to have some control over lightning.

Summon: Use the Stormcaller at the surface. The boss can be taken almost anywhere afterwards.
[Fought around the same time as Golem]

Stats:
Health: 60,000 (78,500)
Attack:
-70 (130) (Melee)
-75 (132) (Lightning Orb) (Inflicts Electrified)
-78 (135) (Lightning Strike) (Inflicts Electrified)
-120 (210) (Zeus' Bolt) (Inflicts Electrified, Slowed, On Fire! and Confused)
Defence: 20

Attacks:
Will move around very quickly, virtually teleporting, with small sparks of electricity whenever she does so. Will stop to use attacks:
-Can summon a yellow lightning orb that acts the same as the Lunatic Cultists' orb, though inflicts a debuff if hit by the bolt. The orb does damage as well.
-Can summon a large stormcloud that looms far above players. These clouds will drop between 1 and 3 large lightning bolts before dispersing.
-When under half health she may move diagonally to the player, throw her spear into the ground, and create a massive lightning bolt between her and the spear. An electrified aura also surrounds Storm while the bolt is active. This bolt inflicts massive damage and a lot of debuffs, but leaves her briefly vulnerable afterwards.

Throughout the fight she will also provide dialogue via the chat, warning the player about the consequences of continuing onwards. Later in the battle she will warn the player that their paths will cross again if they continue.

Defeat: Her spear breaks and she falls to the ground. She disappears after a lightning bolt hits her, suggesting some sort of longer-ranged teleport. This bolt can damage the player. She leaves her loot behind.

GelTech Info:
-A powerful lightning elemental who spent many centuries studying an anomaly. Due to your own quest it was almost destiny that your paths would cross in combat.

Drops: Mainly lightning-themed weapons, including a bow that shoots lightning bolts-shaped arrows, a sword that causes damage-over-time, throwing knives that don't arc and a 'Broken Spear'. The spear is as weak as the Spear found in wooden chests, though can be upgraded throughout the entire game.
Despite not dying during the battle she will still drop Souls of Plight, used for the crafting of the Suspicious-Looking Top Hat.

Extra Info:
-Despite not actually dying at the end of her boss fight, she still drops souls. However, she will drop less Souls of Plight than other bosses drop of their respective souls.
-Most of her attacks will inflict the Electrified debuff which, considering her fast-paced fight, can be problematic without things like the Rod of Discord to work around them with.
-Her small hitbox, combined with her fast movements, make Storm a difficult boss to hit reliably without homing attacks.
--When she uses the Zeus' Bolt attack the player can deal a lot of damage while she is immobile, though must be careful of the bolt's deceptively large hitbox, and the lightning aura Storm gains while using it.
Omnicron Doppelganger
Omnicron's design by BBBatMudkip

Appearance:
A skeletal figure who spends most of the fight obscured in a black cloak. They wear a top hat over their face that covers their eyes. From the angle their skulls tilt at they almost seem to be smirking. They also have a cane, though this is under the cloak for most of the fight as well.

Summon: Use the Suspicious Looking Top Hat at night. At this point it the game and tooltip say that the boss is Omnicron, not a doppelganger. Omnicron will bow, tip his hat, and start the fight.

Stats:
Health: 150,000 (200,000)
Attack:
-90 (170) (Melee)
-85 (145) (Magic) (Inflicts Shadowflame, On Fire!, Cursed Flames, Frozen, Poisoned or Ichor depending on the attack used)
Defence: 15

Attacks:
Will float in-place, teleporting occasionally to reposition himself.
-May fire an arc of 3 shadowflame projectiles at the player that pass through blocks. These projectiles inflict the Shadowflame debuff
-May summon a ring of 5-6 fireballs around himself that orbit him for a few seconds. He then takes his arm out of his cloak, which disperses the fireballs. They all act as Flower of Fire fireballs, each with its own arc and direction. The fireballs inflict On Fire!
-May make several Cursed Flame fireballs erupt from his cloak into the air. They fall down slowly, all around Omnicron with a massive area. Most of them are at slight angles which can make dodging harder. They don't pass through blocks. The fireballs inflict Cursed Flames both on the ascent and descent.
-May summon a large ice crystal above himself and point his cane upwards. Then he will sharply bring his cane down, with the ice crystal crashing down into the ground, sending out icy shockwaves both left and right of where the ice crystal hit. The crystal and shockwaves inflict Frozen.
-May summon a green skull above the player that drops large splashes of poison from its mouth. Inflicts Poisoned if the skull of drops hit the player.
-May summon a large ball of Ichor and bat it with his cane. It works like a large water bolt projectile, though also releases small drops of ichor. Both the ball and droplets inflict Ichor.

Defeat: 'Omnicron' recoils and begins to glow white. Eventually he explodes into gibs of bones. The text reads "An Omnicron Doppelganger has been defeated".

GelTech Info:
-Masquerades as Omnicron to strike fear into those who see him. He holds nowhere near the power Omnicron does, but is still far from weak. Was this the one Storm warned you about...?

Drops: Will drop mostly magic weapons based on his attacks, as well as a Cool Top Hat sometimes. In expert mode it also drops a summoner staff that summons a Top Hat.
The Omnicron Doppelganger will also drop Souls of Spite, used to craft other items.

Extra Info:
-Due to the warnings given by Storm prior to his fight it could be that Omnicron was the one that Storm was worried about. Further evidence is given due to the fact Souls of Plight, Storm's unique drop, is a component of the doppelganger's summoning item.
--However, in expert mode, the GelTech will suggest otherwise from its rather ambiguous comment given at the end of the Doppelganger's description.
-Omnicron's design was not originally made by me, but one of my friends. I added it to the guide simply because I like the character and because it fits quite well with the underlying chaotic theme to the bosses.
[Post-Moon Lord]
Bosses that are fought after the Vanilla game's final boss. Many of them will be balanced to the standards of mods to ensure better compatability.

[7/1/19]: Added the Deathworm Colossus, Coleopterra, Geostorm, Marble Champion and Soul Emperor. Queen of the Hallow, Storm's rematch and 'Chaos' have sprites, though haven't had their pages finished yet.
[10/1/19]: Added Queen of the Hallow and Storm's rematch
[11/1/19]: Added the Chaos Doppelganger
[12/1/19]: Added the Prodigous Defenderfly
[25/1/19]: Added the Prismatic Corebuster. Fixed the spelling mistake in the Prodigious Defenderfly's name. A trio based on a new ore type have been designed.
[26/1/19]: Added the Grimstone Trio; Ember, Zight and the Thanoserpent
[31/1/19]: The Eclipser's design has been made; not yet sprited, however.
[2/2/19]: Added the Eclipser
[6/2/19]: Added Atlas and Crescent
Deathworm Colossus
Appearance:
A 90-segment worm enemy that acts as a stronger variant to the Giga-Deathworm fought in Hardmode. It has more fangs and spikes across all its body segments.

Summon: Use the Premium Desert Worm Food in the desert. The boss can be taken anywhere, but is only summoned in the desert.

Stats:
Health: 350,000 (500,000)
Attack:
-300 (470) (Head Melee)
-105 (190) (Body Melee)
-185 (300) (Tail Melee)
-100 (185) (Vile Spit)
Defence: 50

Attacks:
-Works almost identically to the Giga-Deathworm before it, though will fire Vile Spit projectiles from its head far more frequently. The spit projectiles travel through blocks.

Defeat: Explodes into gibs, much like the Deathworm before it.

GelTech Info:
-An older Deathworm, better equipped for combat. Likely the strongest of its kind, the Colossus is likely the reason the desert is as baron as it is: A creature that size would need a lot of food to survive.

Drops: Stronger versions of the weapons the Giga-Deathworm dropped, also including a bow that shoots small sand tornadoes and a staff that summons small Deathworms.

Extra Info:
-The boss is designed to be fought not long after the Moon Lord's defeat due to the lack of preparation needed for it. The boss isn't too threatening and, with a proper platform layout, can be killed within about a minute without much threat to the player.
-The boss is, at this point in the game, likely the largest enemy the player would have encountered. With more segments than the destroyer and with each segment roughly 2 of the destroyers' in width, its total area surpasses even the Moon Lord.
Coleopterra
Appearance:
The 'awoken' form of the Cosmic Beetle. Its shell is darker purple and has several, smaller stars on it below the big one. Its eye has taken on a yellow glow and all the stars on its back have as well. Its shell and eyes are luminous.

Summon: Use the Star Beetle's Lens in Space at Night. The boss can be taken down to the surface, but not underground.

Stats:
Health:
-85,000 (130,000) (Beetle)
-9,999 (19,998) (Clones)
Attack:
-135 (220) (Melee)
-172 (300) (Shooting Star)
Defence:
-150 (Beetle)
-350 (Clones)

Attacks:
Will perform similar attacks to the Cosmic Beetle, but they deal more damage and are performed more frequently.
-Every 25% health lost by the boss will cause it to summon a beetle clone. They are luminous yellow silhouettes of the main boss and perform the same attacks as well, though have less health and higher defence.

Defeat: Bursts into gibs. The shell has no gibs this time, but the beetle does.

GelTech Info:
-The Alpha of the Cosmic Beetles that came to earth. Its luminous shell attracted a large colony of them to the planet. Most live their whole lives in orbit around earth, though those who wander down don't ever seem to return.

Drops: Will drop an upgraded Star Cannon, hundreds of Fallen Stars and a special version of the Beetle Shell that can be used to upgrade both Beetle Armour and Wings. Will drop a Star Pouch in expert mode that provides infinite ammo for Star Cannons.

Extra Info:
-It is recommended that, if the player's gear is strong enough, that they deal with the clones as they are spawned. Otherwise it is likely they will persist until the end of the fight which leaves 4 beetles chasing the player, all able to throw high-damage attacks at any time.
-The name of the boss is a play on words of the group beetles fall under, Coleoptera, and the word Terra
Bramblewrath
Appearance:
An 'awoken' version of the Bramblemaw. It looks more rough, with excess twigs sticking out of its body and cracks showing in its 'teeth'. 3 eyes can also be seen peering at you from inside its 'mouth'.

Summon: Use the Corrosive Concoction in the Underground Jungle. The boss can be taken anywhere else, but will enrage much like Plantera.

Stats:
Health:
-300,000 (420,000) (Bramblewrath)
-100,000 (145,000) (Bane Worms)
Attack:
-160 (230) (Melee) (Inflicts Bleeding, Feral Bite and Venom)
-140 (220) (Worm Melee) (Inflicts Bleeding, Feral Bite and Venom)
-280 (440) (Enraged Melee) (Inflicts Bleeding, Feral Bite and Venom)
-123 (200) (Vilethorn Spear) (Inflicts Bleeding, Slowness and Venom)
-130 (206) (Stinger Barrage) (Inflicts Poisoned and Venom)
Defence:
-60 (Bramblewrath)
-180 (Enraged Bramblewrath)
-80 (Bane Worms)

Attacks:
Follows a similar pattern to the fight against the Bramblemaw, though many of the attacks have been adjusted.
-The Moss Hornet spawn has been replaced by a stronger, faster-firing Bramble Hornet with 800 health that inflicts Venom instead of poison.
-The thorn attack has longer thorn trails with larger spikes, giving it a larger hitbox.
-The bee-spit attack has been replaced by a bee and stinger barrage. Both small bees and large clusters of stingers are fired at the player. The stingers inflict both Poisoned and Venom.
At 80%, 50% and 20% health the Bramblewrath releases a Bramblewrath Bane; a long but thin worm that deals contact damage to the player. While you don't need to kill them doing so can be useful to free up space and to avoid being trapped by it.

Defeat: Bursts into large shrubbery clusters and 'teeth'.

GelTech Lore:
-A Bramblemaw overcome with parasites. Instead of the maw becoming weaker and distressed it seems to have gained power since its hosts joined it and it doesn't seem to mind them being there. Strange.

Drops: Will drop a more powerful variant of the vilethorn, a staff that rapidly shoots stingers, a Flail whose end looks like the Bramblemaw and an accessory that grants the player extra life and attack.

Extra Info:
-The Bramblewrath is very similar to its original counterpart, as you would expect, with the fights playing out very similarly and the counters to the Bramblewrath being similar for the most part. However, the Ankh Shield is slightly less useful now due to the boss inflicting Venom instead of Poison, which the shield does not block.
-The boss has over 800,000 health in expert mode when counting the Bramblewrath Banes it summons, making it a massive leap in comparison to the Moon Lord or Colossus in terms of raw health.
-The boss still enrages when taken out of its biome, though now its speed will quickly accelerate up to 75 mph and it will perfectly follow the player's path.
Soul Emperor
Appearance:
Looks identical to the Soul Master in its base form, complete with colour changes. Its 'awoken' form is seen in Phase 2.

Summon: Use the Lunar Soul at the surface during nighttime. The boss can be taken almost anywhere, as long as it doesn't become daytime.
[Coleopterra needs to be defeated prior due to one of its drops]

Stats:
Health:
-56,000 (60,000) (Phase 1)
-340,000 (500,000) (Phase 2)
Attack:
-110 (185) (All Phase 1 attacks)
-160 (270) / 120 (230) / 160 (270) / 220 (365) / 175 (290) / 135 (250) / 200 (330) (Phase 2 Melee)
-160 (270) / 175 (290) / 170 (282) / 180 (300) / 170 (282) / 180 (300) / 200 (330) (Phase 2 Projectile)
Defence: 80
-The attacking stats go in the order Blight, Sight, Flight, Might, Night, Light, Fright.

Attacks:
Phase 1:
-Identical to the Soul Master fight from hardmode, though all attacks now deal more damage.
Upon Phase 1's defeat it will perform the same last-ditch attack, though after crashing into a block or player with the charge it instead transitions into it's true form in Phase 2.
Phase 2:
-In Phase 2 it gains a new form, the Blight form, that acts as its normal form. It can fire the other souls at you, each dealing a different debuff based on its colour. (Cursed Flames, Frostbite, Broken Armour, Shadowflame, Silenced and Weak in the soul order listed above)
-In Night form it charges more frequently and covers more distance doing so. The charges also leave small trails of orbs that eventually move towards the player's location at the end of the charge.
-In Light form the arc of magic has 5 projectiles instead of 4 and it also has two types of 'rage' attack. Firstly it retains the death-blossom of projectiles from the Soul Master fight, but it also gains one where it fires out shots in + or x shapes while moving slowly towards the player.
-In Fright form it still summons cursed skulls, though they are indestructable and fire magic blasts and also try to ram you. They despawn after the Soul Emperor changes into a different form.
-In Sight form it does the same things, though it fires smaller projectiles more frequently that build up speed as they move.
-In Flight form it is identical to how it originally was, but fires out 14-16 feather projectiles in the burst instead.
-In Might form it will charge at the player constantly. During charges it leaves several immoble projectiles that create large explosions after a few seconds.

Defeat: The souls disperse from the Soul Emperor and it falls to the ground, exploding on impact.

GelTech Info:
-An entity made from a near-perfect fusion of 6 soul types. A 7th seems to have been in creation, but was thwarted before it could be completed. I wonder what it would have become once the transformation was complete...

Drops: Vast amounts of the 6 main soul types, as well as 'True' versions of the weapons it dropped in the Soul Master boss fight. Also drops Soul Essence; a rare crafting material used for many other boss summoners, some weapons, and an armour set.

Extra Info:
-Phase 1 seems to mainly just be some sort of fake-out boss fight. It makes the boss seem identical to its original fight, though after the point where it should have died it comes back as its more powerful form.
-The colour scheme and the info given via the GelTech on the boss suggests some sort of relation to Ocram, with the Emperor's yellow body and apparent incomplete fusion.
Geostorm
Appearance:
A longer version of the Granite Burrower without any armour. The lack of granite plating reveals its entire body is made of the same energy that fuels the other granite enemies. It is the Granite Burrower's 'awoken' form.

Summon: Use the Hyperdense Granite Cluster in the Granite Biome. Geostorm will follow the player outside of the biome in the underground and caverns, but will not go to the surface.
[Soul Emperor is required to have been defeated to craft the summon]

Stats:
Health: 1,400,000 (2,300,000)
Attack:
-400 (685) (Head) (Inflicts Electrified, Withered Armour and Distorted)
-200 (320) (Body) (Inflicts Electrified and Distorted)
-240 (385) (Tail) (Inflicts Electrified and Distorted)
Defence: 20

Attacks:
-Geostorm itself will follow the usual worm AI, much like its pre-hardmode counterpart did. However, instead of summoning Granite Elementals, Geostorm will summon 'Unstable Energy Clusters' that follow the player slowly at varying speeds. It summons one every 10% health lost from its tail. The Unstable Energy Clusters are completely invulnerable and deal the same damage as Geostorm's body, complete with debuffs.

Defeat: Geostorm violently explodes in bursts of blue energy. New ore will spawn in the world, too.

GelTech Info:
-The raw, unfiltered power that lay dormant inside of the Granite Burrower unleashed! Geostorm's very presence is enough to energise the earth it passes, sometimes causing cavern-layer stone to react and change into a new type of energised ore.

Drops: Energy-themed items, mainly weapons. Will drop an accessory that increases the player's critical strike chance and damage. Doesn't drop Granite anymore.

Extra Info:
-Damage taken from its head is extremely deadly. Not only does the head itself deal devastating damage that takes massive chunks of a player's health, but it also inflicts 3 debuffs players cannot gain immunities to. The debuffs affect the player's stats and mobility, making movement not only hard, but also harmful. The drop in defence almost ensures that another attack shortly after will finish off the player.
-Geostorm's switch to sheer offense is designed to mirror the Marble Champion's defensive boosts.
Marble Champion
Appearance:
The Marble Burrower, donning a fully-custom set of armour designed to mirror the Hoplites'. Marble slabs are seen in-between the large metal plates that coat its segments. Each segment of its armour has large spikes sticking out of the sides, with smaller ones behind the larger ones. The Burrower is around 100 segments in length, if not more. It is the Marble Burrowers' 'awoken' form.

Summon: Use the Champion's Challenge in the Marble Biome. The Champion can be taken out of the biome, mainly due to its sheer size, but it will not follow the player to the surface.

Stats:
Health: 3,000,000 (4,750,000)
Attack:
-300 (485) (Head)
-155 (240) (Body/Tail)
Defence: 87

Attacks:
Will alternate between two different attacking styles: Passive and Aggressive. It alternates between the two every 20 seconds.
In Passive it will remain close to the player, though still keeping its distance. It is quite slow, travelling at roughly the speed of Hermes boots. Buffed-up Hoplite enemies spawn during this style; Javelin-Throwers, Archers, Swordsmen, Mages, and Paladins. Each one has health in the thousands and deal large amounts of damage using different types of attacks; though the Paladin also has the ability to perform an invulnerable 'guard' like Granite Golems do. The Champion itself will only attack the player intentionally if they begin fleeing too far away.
In Aggressive it will not spawn any Hopites, but instead resorts to normal worm behaviour. It becomes very fast, easily outspeeding Lightning boots, requiring a lot of dodging from the player.

Defeat: Bursts into skeletal gibs. Armour pieces also drop alongside the sketal ones as well. A new ore begins spawning in the world; Champion's Ore.

GelTech Info:
-The former champion of the marble biome, left dormant for centuries. It commands its own special unit of enhanced Hoplites, tasked with the protection of their master. However, the Champion has now been bested, it seems.

Drops: Drops stronger variants of the weapons dropped by the Marble Burrower. Will also drop an accessory that increases max health and defence. In expert mode it will also drop the Speartongue, a weapon that resembles the Champion and works similarly to the Solar Eruption.

Extra Info:
-The boss is a defensive counterpart to Geostorm, which makes sense considering their normal variants were also essentially counterparts to each other.
-If the player ignores the army of Hoplites spawned by the boss they could, after a while, reach the spawn cap. The boss alone takes up over half by itself, leaving under 100 Hoplites to be spawned (Which can be done in roughly 5 of the boss' passive cycles).
-The boss' defence, when looked at in perspective, is rather high. This is to reduce the effectiveness of piercing weapons which, at this point in the game, most are.
Queen of the Hallow
Appearance:
The Hallow Spirit's 'awoken' form. Her dress has now been given the golden colour the Pixie enemies have, though instead of her wings being made to match them too they are given a brighter coat. The Queen of the Hallow also produces far more light than any other boss does, almost making it appear like daytime, even at night.

Summon: Use the Core of the Hallow in the Hallow. The boss can be taken anywhere, as long as it isn't the Underworld. The time of day is also no longer important.

Stats:
Health: 1,850,000 (2,500,000)
Attack:
-165 (300) / 155 (285) / 140 (260) / 120 (245) / 100 (230) (Melee)
-185 (330) / 170 (310) / 155 (285) / 140 (265) / 125 (250) (Magic Bolt, Fallen Star)
-200 (365) / 180 (340) / 165 (300) / 150 (275) / 135 (260) (Geyser Star)
-000 (000) / 000 (000) / 000 (000) / 185 (330) / 250 (440) (Supernova)
(All attacks will inflict a more powerful On Fire! debuff, as well as a chance to inflict one of either Confused, Silenced, Weak or Slowness)
Defence: 60 (60) / 70 (72) / 80 (85) / 90 (98) / 100 (111)

Attacks:
The Queen will fly around near to the player, usually around 15 blocks above her current target. She fires off attacks quite frequently, with no fixed pattern to them.
-She may fire a large arc of bolts at the nearest player, exploding on contact with solid objects
-She may fire out large magic bolts in all directions, acting the same as her first attack
-She may summon 'Geyser Stars' around herself that are immoble for a short while before accelerating very rapidly towards players. She summons more of them the more players there are or when the world is in expert mode, with at least 1 targeting every player in range of the fight.
At certain health intervals she will flinch and move into a different sub-phase. These will deal lower damage, but the boss will have more defence during these phases.
The phases change with every 300,000 (500,000) health lost.
-Once at her 4th or 5th subphase she will begin using her 'supernova' attack. It sends out large bolts in all directions that home in on players and deal excessive damage. It can only be dodged using solid blocks, teleportation, or sudden bursts of acceleration the bolts cannot accomodate for (like a dash).

Defeat: Flinches once more, then creates a large burst of light in a similar fashion to the Moon Lord before disappearing. She doesn't drop skeletal gibs like the Moon Lord, however. The Hallow stops spreading by itself.

GelTech Info:
-The true power of the Hallow Spirit, awoken by the destruction of powerful entities all around her. After such a defeat it is likely your world's Hallow will be forever weakened...

Drops: Powerful weapons mostly based around Light or Magic. A lot of weapons and accessories that use Souls of Light in their crafting recipies will have upgraded variants as drops from the boss.

Extra Info:
-Despite being a stronger version of a previous boss, she loses all of her original attacks and attack patterns and fight gimmicks, leaving few similarities.
--Her appearance is still similar, her 'special move' is still hard to dodge and her magic bolts look similar, but otherwise the fight is very different.
-The boss can be fought immediately after killing the Moon Lord, though doing so is unwise due to the jump in difficulty.
-Defeating this boss will cause irreversable effects on the player's world, similar to how killing the Wall of Flesh does.
--Due to this it is recommended to allow the Hallow to spread a little before fighting the boss if the player wants Hallow in their world.
-This is one of the few bosses to actually 'weaken' as their fight progresses as opposed to somehow just getting more powerful. Her supernova, however, is contrary to this due to its damage actually getting stronger in subphase 5.
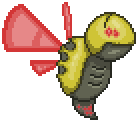
Prodigious Defenderfly
Appearance:
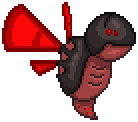
A large, yellow mechanical fly. Its body has a 2-coloured shell; yellow on the outside and grey on the inside. It has two pairs of red wings; a larger pair with a smaller pair underneath.

Summon: First found in a small temple below the surface of the 'Surface Hive' biome (Another new biome like the Necro Dungeon mentioned above). Requires a lunar pickaxe to mine through it. Will appear once the player is inside the temple walls. Can be rematched through a drop from the temple's enemies.

Stats:
Health: 875,000 (1,200,000)
Attack:
-195 (294) (Melee)
-185 (285) (Musical Detonator)
-175 (272) (Invader Missiles)
-165 (250) (Firestarter Flameball) (Inflicts On Fire! debuff)
-200 (385) (Deathwall)
-115 (200) (Poisoned Bullet) (Inflicts Poisoned debuff)
Defence: 100

Attacks:
Flies around near the player, with similar movements to the Queen Bee. Uses a variety of attacks:
-Will charge at the player horizontally, then diagonally, then horizontally again
-Releases a large, 20,000-health homing explosive that chases the player until destroyed. It makes a rhythmic, beeping sound until destroyed that goes with the boss' theme.
-Fires missiles that move vertically to the same level as the player, then begin travelling horizontally at high speeds. Explodes on impact with the player or blocks.
-Fires large fireballs from its stinger that explode into several smaller embers upon hitting the ground or players.
At 400,000 (600,000) health the boss gains 2 new attacks that it will use slightly less frequently than its other ones. There is no distinct 'tell' that the boss has changed phases except its health bar.
-The defenderfly may now also summon large, red walls of energy that move slowly either horizontally or vertically. However, due to its slow speed, it may remain active even when the defenderfly begins performing a new attack.
-It may begin firing high-velocity projectiles from its stinger while the player is below it. They are like the Queen Bee's stingers, though have higher velocity and smaller hitboxes.

Defeat: The defenderfly, since it is a robot, will explode upon being defeated. However, it will leave behind a single Hornetslug and a musical detonator.

GelTech Info:
-A large mechanical wasp created with seemingly-modern technology used to make it. Commanded to defend the temple beneath the hive's mud, the Defenderfly is more than well-enough equipped to keep it safe.

Drops: Various weapons that utilise red, burning energy that inflicts health-draining debuff. Also drops plating used to make armour. Will also rarely drop the Honey Blob, used to summon a pet.

Extra Info:
-The boss has several references to the D&B band Prodigy.
--The boss' name has prodigy in it, the musical detonators are references to Rhythm Bomb, the Invader Missiles to Invaders Must Die, Firestarter Flameballs to Firestarter, Deathwall to Wall of Death, and Poisoned Bullets to both Spitfire and Poison.
-The boss has similarities to Queen Bee in appearance, some attacks, and references to bee-like enemies. It is also summoned without a special object in certain biomes.
Prismatic Corebuster
Appearance: A giant worm, entirely composed of large, colourful crystals. It has no facial features or any real features at all on its rather minimalist body, though still has two 'spikes' at the front. Each crystal that makes up its body has its own unique colour, shifting through the rainbow as you get closer to its tail.

Summon: Use the Rainbow Prism at night whilst near a light source. The item will release several trails of colourful light before the boss appears.

Stats:
Health:
-500,000 (700,000) (Worm/Total)
-50,000 (65,000) (Per Crystal)
Attack:
-300 (500) (Head Melee)
-165 (270) (Body/Crystal Melee)
-185 (300) (Crystaline Blast)
Defence:
-80 (40) (Body)
-50 (65) (Crystals)

Attacks:
-Will fly around near to the player, occasionally trying to ram them. The main boss itself moves rather slowly and, as a worm boss, is naturally a big target. It summons stationary crystals that fire slow-moving rainbow bolts at the player (though only ever 1 at a time), with the main worm's head also occasionally firing these shots as well.
-The worm itself, when attacked, will actually heal the boss' health instead of damaging it. The crystals, therefore, need to be destroyed in order for the boss to be killed. 10 crystals minimum (11 in expert mode) need to be destroyed for the boss to be killed.
-However, it gets worse. For every 80% (55%) health the boss loses, another one of the worms will be spawned. While this means that you will end up with only 2 of the worms if you only attack the crystals, you can end up spawning additional ones if you mess up even a few shots. More worms make it even harder to hit the lone, stationary crystals, making it even more likely you'll heal the boss, repeating the cycle.
-Killing enough crystals to bring the boss to 0 health will, luckily, despawn all active worms and end the fight.

Defeat: Lone crystal explodes in a similar fashion to how pixies do. The worms will do the same, with an explosion for each individual segment for each individual worm.

GelTech Info:
-Compressed to a point where the main body is virtually invulnerable, the Corebuster still continued to lie dormant in the earth's mantle. However, sensing the light of the prism, it was called out of its slumber and to the surface, where it encountered you. Even having shattered its body into powder, it is likely one of those crystals has enough cells in it to eventually reconstruct its whole body, but by that time you'll be long gone, probably.

Drops: Light-themed weapons, as well as crystal-themed ones. Stronger versions of the Last Prism and Crystal Vile Shard are among its drops. A bow that converts normal arrows into crystal ones, a gun that makes musket balls into crystal bullets and even a crystal-firing sword are also amongst its potential drops.

Extra Info:
-The fight can actually become unwinnable if the player manages to spawn 20 of the worms by continuously attacking them after dealing sufficient damage. At this point, the 200 enemy cap has been reached, and thus no more vulnerable crystals (or other NPCs, for that matter) may spawn.
-Piercing weapons, despite being helpful for virtually every other worm enemy, are actually incredibly bad for this battle. It is likely the piercing projectile will hit through the crystal and, potentially, hit the worm, healing it for roughly the same amount of damage as what you just did to the crystal, essentially making the shot worthless. Minions and AoE weapons can also cause similar problems.
-Luring the main worm(s) away from the vulnerable crystal might be helpful to keep them out of the way when firing on it. This minimises the chances of any attacks hitting the worms and healing the boss.
-This is one of the only enemies to actually lose defence when brought to expert mode instead of it either remaining the same or increasing.
-Other than the Lime, Cyan and Magenta crystals, the boss' segments are all different colours of the rainbow
-The crystals spawned by the boss will have colours based on the order they are spawned, matching the main boss' segments and looping around back to red if more than 10 are spawned in the battle.
The Eclipser
Appearance:
A giant, moth-like creature. Its entire body only appears a dark blue colour, aside from bright flames that cover its body and wings, and its eyes.

Summon: Use the Darkened Sun during the day. The sun will change into an immediate Solar Eclipse, though due to the boss few eclipse monsters will actually spawn. The boss can be taken anywhere, but leaves at night.

Stats:
Health: 5,000,000 (7,000,000)
Attack:
-170 (280) (Melee*)
-155 (258) (Fireball)
-185 (300) (Deathray)
(All attacks inflict the On Fire! debuff)
Defence: 100

Attacks:
Will spend the majority of the fight flying above players, usually in a wide figure-of-8 pattern. It will occasionally stop to perform an attack. Only contact with its fire-covered middle segment counts as contact and so only that part causes contact damage with the boss.
-It may fire out 8 fireballs in all directions, then move a bit and fire 10 from its new position. (In expert mode it moves a short distance again and fires out another 12)
-It may send out a flurry of fireballs in all directions and at varying speeds. (In expert mode these fireballs will then turn around and return to the Eclipser)
-It may fire a large, sweeping beam, going roughly 200 degrees. This attack is blocked by solid blocks, however. (It goes a full 360 in expert mode).
At half health it will change up its attacks a little:
-Its 8-fireball attack will replace 4 fireballs with deathrays in the first volley, and 5 in the second. The 2nd fireball is always replaced so that no 2 deathrays are directly next to each other. (It replaces 8 in the 3rd volley in expert mode, with the 2nd and 3rd being deathrays)
-It may also fire 3 deathrays directly at the player that pass through blocks. However, they have a windup time before they are actually fired so that the player can get out of the way. (The windup is shorter in expert mode, giving the player a lot less time to move.)
-(Exclusively in Expert Mode buffed Mothrons will also spawn at this point. They have their usual drops, and additionally drop a single heart each.)

Defeat: Explodes into flames, dropping gibs. The gibs of its main body are darker as the flames have been extinguished. The eclipse

GelTech Info:
-A gigantic, cosmic moth. Its slumber had been prematurely disturbed and thus it had flown into a burning fury, incinerating those who dared to cross its path. Its flame has now been extinguished...

Drops: Fire-themed weapons and 2 accessories, one of which being a pair of wings.

Extra Info:
-The original design of the Eclipser was much smaller and did not resemble its current design: It was originally a sphere with fire around it and small, fire wings. However, due to the boss being rather small and not looking particularly interesting, it was re-designed into its new moth-like form.
--The Eclipser itself most resembles a moth, while its original design was meant to resemble just an eclipse.
-The Eclipser had the overall longest time for development of any single boss in the guide; being continuously re-designed over 2 weeks before the spriting even began. The spriting itself also took a long time, being almost 3 whole hours before being finished.
-The boss is somewhat comparable to Hollow Knight's 'The Radiance', and the Calamity Mod's 'Providence', who were both mild inspirations for its re-worked design.
-The Eclipser's shading is also rather unusual, being inverted from the usual Terraria shading as it has the darker areas at the front and the lightened areas at the edges.
--This is because, unlike most bosses who have light shining at them from the front, the Eclipser's light is shining on it from behind from both the Eclipse and from its own fire.
Crescent and Atlas
Appearance: A girl and her moth.
-Atlas, the moth, has a mostly dark-blue body. It has white fluff around its abdomen and the base of its antennae. Its eyes and wings share a lighter blue colour. Its wings seem to show moon phases and several stars surrounding it.
-Crescent, a similarly-coloured girl, wears blue trousers and dark blue boots and shirt. Her hair is a similar, almost silvery colour, to Atlas' fluffy body. While she seems rather petit, she makes up for this with her agility.

Summon: Use the Lunar Wing Dust at night. The boss can be taken basically anywhere, but will despawn if it reaches daytime.

Stats:
Health:
-3,000,000 (4,200,000) (Atlas)
-400,000 (525,000) (Crescent)
Attack:
-155 (200) (Atlas' Melee)
-170 (230) (Atlas' Diamond Dust)
-200 (350) (Atlas' Lunar Laser)
-188 (313) (Crescent's Melee)
-180 (248) (Crescent's Strike)
Defence:
-65 (Atlas)
-30 (Crescent)

Attacks:
Throughout the fight, Atlas and Crescent will remain invisible and invulnerable when dormant. They will take turns attacking. One will appear, attack, and then disappear again. Afterwards, the other will do the same.
-Atlas can fire an arc of 5 diamond dust projectiles at the player
-Atlas can summon several slower-moving diagonal diamond dust projectiles from the sky nearby
-Atlas can create 3 white lasers that have a lengthier windup, though deal additional damage.
-Crescent can perform a long-range horizontal dash at the player with a sword
-Crescent can also perform a downwards strike with the sword, given only very mild horizontal movement
-Crescent can send a barrage of 4 crescent-shaped sword beams at the player in quick succession
The attack pattern will always alternate between Atlas and Crescent for as long as both are active. If one is defeated, the other will attack twice as often to compensate)
(In expert mode, if one is defeated, the other will speed up drastically, entering a sort of 'frenzy mode')

Defeat: Atlas will back away into the background a little, becoming visibly darker. Crescent will fall to the ground, though will support herself with her sword. After both are defeated, they disappear in to clouds of light blue particles.

GelTech Info:
-Renowned warriors from their homelands due to their efficient teamwork and thorough understanding of each other without even needing words. One has to wonder how someone befriends a giant moth, though...?

Drops: Some weapons, accessories and materials; though they also have special drops depending on which is defeated last. If Crescent is defeated last she drops her sword and, if Atlas, a pair of wings.

Extra Info:
-Despite Atlas' massive size and bright colours, they are somehow still able to blend in with the night sky when not attacking the player.
-It is one of few fights where a non-human entity manages to survive the encounter, with the other examples including Slimey and Omnicron
--However, they still have human resemblances due to their sprites being made to seem human, so their inclusion in this is debatable.
-Their health has been made lower due to them having large segments of the fight where at least one is invulnerable. Plus, combined with Crescent's purposefully tiny hitbox, it makes consistent damage against the duo very hard to maintain.
-Despite Atlas being treated quite humanly with their descriptions, they weren't explicitly given a gender.
--While on the contrary, characters like Omnicron, Slimey, the Super Slime, Chaos Doppelganger, etc. are given genders despite their 'lack of'.
-Atlas is the same height as the Eclipser, though has a slightly shorter wingspan. However, due to Atlas' bulkiness, Atlas still technically takes the award for the largest sprite on the page thus far.
-Atlas and Crescent are one of few bosses where the player must take on several boss-like enemies where the bosses in question are not aesthetically similar.
-The only part of Atlas' sprite that isn't symmetrical is the tuft of fluff at the base of its antennae.
-Crescent shares her name with one of the scrapped bosses listed below, though takes nothing else directly from the scrapped Crescent.
Zight
Appearance:
A large eye, most similar in appearance to Phase 1 Spazmatism, operating a giant red and black mech. Turrets are seen on both sides of the mech's main body and a missile launcher/jetpack on the back, meaning the boss is definately well-armed for the fight.

Summon: Use the Grim Eye at night. The boss will leap to the player's location shortly, potentially dealing melee damage unless the player moves.

Stats:
Health: 2,500,000 (3,200,000)
Attack:
-120 (200) (Melee)
-95 (150) (Shockwave)
-85 (143) (Lasers)
-145 (250) (Targeted Deathray)
-100 (175) (Missiles)
Defence: 70

Attacks:
-Will spend most of the early fight on the ground, walking towards the player in its mech suit.
-It may perform a 'super jump' to close distances with players. It can also pass through blocks when using the jump.
-If the player is close to the ground it may jump up and crash down into the ground, creating a similar shockwave to the Ogre from the OOA event.
-It will frequently use its cannons to fire high-velocity lasers at the player that don't pass through blocks. They look similar to the ones used by the golem, but are thinner.
-At 75%> health (Any time in expert mode) it may fire missiles that home in on the player. They have 1,000 health each and explode either on contact with the player or when destroyed manually.
-At 50%> health (75%> in expert mode) it will occasionally attempt to lock onto the player using a red, spherical symbol that looms near the player's head. Zight then fires a giant laser directly at it that, despite not passing through blocks, is fast enough to almost keep up with the player. It is recommended that the player seek shelter during this attack or it is likely the player will take hundreds of points of damage.

Defeat: The mech suit explodes. Amongst the gibs of the boss is Zight, entirely intact, but inactive.

GelTech Info:
-Despite the obvious lack of any natural body, Zight is believed to be a genius. Records suggest that he was the creator of the 3 mechanical bosses and, potentially, the Defenderfly as well. However, since his body (or lack thereof) hinders him, his inventions are all still rather limited.

Drops: Grimstone bars and Souls of Desire, both used to craft various other items.

Extra Info:
-Zight's name is simply a corruption of Sight and sadly does not contain any sort of wordplay.
-The use of Zight's in-tact body as a gib means that it is likely that Zight survived the Mech's explosion and, therefore, the battle.
--However, the lack of movement may suggest he has merely been stunned and/or injured by the blast, or it may actually suggest (due to the lack of Zight's own movement throughout the entire fight) that Zight's physical body is completely immoble.
-The Grimstone bars that Zight both drops and uses to make the mech are actually simple corruptions of Brimstone, hence the red and black colouration.
-Zight's deathray is suprisingly dangerous when compared to the slow-sweeping or completely immobile ones used by other bosses, as the beam is able to sweep at almost the same speed as the player.
--If they player does not have a wall of solid blocks to hide behind then the best option is to get close to Zight and circle him via wings and dashes, minimising the chances of the ray catching up the the player.
Thanoserpent
Appearance:
A giant worm coated in the same 'Grimstone' armour that Zight used. Each segment is covered in blades that pertrude outwards quite far. Each segment also has a skull for a face, with the front one having larger eyes and teeth. Upon its tail there is another large blade and a small skull at its base.

Summon: Use the Grim Worm at night. The boss can be taken anywhere, but will become enraged during the day and likely kill the player before despawning.

Stats:
Health:
-8,500,000 (11,000,000) (Worm)
-300,000 (450,000) (Thanoseeker)
Attack:
-300 (530) / 9999 (Head Melee)
-200 (385) / 1000 (Body Melee)
-130 (220) / 500 (Skull)
-230 (405) (Seeker Head Melee)
-140 (250) (Seeker Body Melee)
Defence:
-65 (Worm) (+99% Damage Reduction when Enraged)
-75 (Seeker)

Attacks:
-When between 100% and 80% health, Thanoserpent will fly around above the player, sometimes doing lone sweeps downwards for a small chance of a direct hit.
--During this Phase it will summon a Thanoseeker and, every time it is killed, summon a new one 5 seconds later.
--It also fires skull projectiles from its head that home in slightly, much like Skeletron's.
-When between 80% and 60% it switches into Phase 2 and begins acting like a Wyvern. Due to its large size it is effective at trapping players and getting off free damage.
--It doesn't spawn Thanoseekers during this Phase, and the skulls become more infrequent.
-When between 60% and 40% health it begins acting like a worm, burrowing through the ground instead of flying over the player.
--It begins to spawn Thanoseekers again, and fires its skull projectiles more frequently once again.
-When between 40% and 20% health it will begin to shift between Phases 1, 2 and 3 every few seconds.
--The spawning of Thanoseekers and the frequency of the skull projectiles depends on what phase it is currently re-using at that point.
-Finally, when at or below 20% health it just begins chasing the player directly. It is faster than the player but, much like with the Wyvern phase, will only home-in until only a few blocks from the player.
--It spawns 2 Thanoseekers during this phase, and fires skulls somewhat infrequently.
The Thanoseekers will alternate between acting like worms and flying every 20 seconds. They always start out by acting as normal worm enemies.

Defeat: Explodes into gibs. Some of the gibs are pieces of armour and the others the skulls that make up parts of its body. For a split second the player is able to see what is underneath the armour... more skulls.

GelTech Info:
-A being made entirely of restless souls. Each one seems to have been, in life, a warrior or knight. Their determination and devotion seems to have persisted even after death, fuelling the massive worm.

Drops: Grimstone and Souls of Esquire, used to craft other items. Will also drop a lot of Skulls.

Extra Info:
-The boss' name comes from a combination of Thanos (Death) and Serpent (Snake), so its name technically means "Snake of Death".
-The boss has some of the highest health seen prior to the Chaos Doppelganger boss fight, having over 10 million points of health in expert mode. However, this is mainly to compensate for its massive hitbox and lack of 'special resistances' that mean the player is able to dish out a lot of damage through piercing weapons.
--Piercing weapons are a must-have for this boss due to its sheerly obsurred amount of health.
-The single frame shown of its whole, un-armoured body reveals that the entirety of the Thanoserpent is made completely out of human skulls... which is quite disturbing.
--This is also why it drops such a large amount of them when defeated.
-Much like with Zight the reasoning behind the naming of his respective soul is found within the GelTech info as opposed to its appearance or fighting style.
Ember Rekindled
Appearance:
Looks like Ember, as seen previously pre-ML, though there are some changes. Her scythe is larger, now standing far taller than Ember herself stands, her orange hairpiece has been replaced with a red one, her eyes have gone from an orange to a red, and finally her cloak and clothing are now the colours of Grimstone; red and black.

Summon: Use the Rekindled Flame at night. Upon doing so giant eruptions of magma will burst from the ground 150 blocks left and right of the player, acting as arena borders.

Stats:
Health: 5,400,000 (7,000,000)
Attack:
-165 (310) / 180 (330) (Melee)
-155 (285) / 170 (316) (Fireball)
-180 (320) / 200 (375) (Red Flame)
-165 (300) / 180 (330) (Scythe)
-220 (405) (Fire Tornado)
-185 (337) (Meteor Shower)
-750 (1000) (Magma Eruption (Borders))
(All Attacks Inflict On Fire! Debuff)
Defence: 75

Attacks:
Her Phase 1 is much like how it used to be in her original fight, with a cloaked form that mainly uses magic instead of melee. However, instead of walking along the ground in this form, she now levitates, often moving close to the player, before attacking.
-She still creates transparent scythes, though they are launched with much higher velocity and travel a farther distance. They still pass through blocks.
-She may summon several fireballs around herself before sending them all towards the player at varying speeds and at various times. They explode violently on contact.
-She may summon a ring of fireballs and send all of them, still in ring formation, towards you. They eventually stop moving and disperse outwards, exploding on contact.
-She may still summon stationary fireballs in the air, detonating them shortly after. They have large radii for their explosions and the larger fireballs will send out smaller ones upon exploding in a '+' formation.
At half health she will transition into phase 2. Much like with her original fight she becomes faster and her attacks become more frequent.
-She gains the ability to throw her scythe like a high-velocity boomerang again, like the first fight's 2nd phase, though it travels outwards much farther.
-Red fireballs may sometimes take the places of normal ones in her phase 1 fire attacks. These deal additional damage, inflict On Fire! for longer and, if one of the stationary fireballs from her 4th listed attack, will send out fireballs in an 'x' formation instead of the '+' one.
-She can summon small fire tornadoes from her scythe that follow the player, much like Duke Fishron. When the make contact they summon large fire tornadoes on the ground below.
--These fire tornadoes deal contact damage and spit out fireballs that are affected by gravity. The fireballs act like those launched by the Solar Pillar, but are not destructable.
-She may slam her scythe into the ground and create a fire tornado at her location, much like she could do in her original fight.
-Finally, she may also point her scythe skyward and summon flaming meteors from above. They travel straight downwards and deal rather high damage.

Defeat: Same as it was during her first fight, with her scythe breaking and Ember herself 'teleporting' away. The scythe, when broken, releases flames that almost resemble butterflies, though no such detail is present when Ember teleports.

GelTech Info:
-Having pushed herself to her limits to keep up with her rival, she has exhausted herself both physically and mentally. Mustering all her strength to face you, she feared it may have been her final battle. Luckily, for her, it wasn't. Though, one must wonder where she got the Grimstone used for her armour from...

Drops: Souls of Fire and a small amount of Grimstone. Also drops a few accessories and weapons, as well as the same crafting material in-place of a mask. Has another special crafting material only dropped if the player defeats her with a melee weapon, used to make and/or upgrade other melee weapons.

Extra Info:
-Much like with her first battle, Ember's difficulty is once again comparable to that of Storm's. She has more health and damage, but her attacks are easier to avoid and she is less mobile in phase 1.
-Ember has two unique themes for her battle, both complete with lyrics. The first is mainly just a warning to the player of her abilities and that she is more confident than she was during her last encounter due to her training. However, the second song is more melancholy when looking at the lyrics, with it instead being an apology to her rival/friend for 'failing' and the realisation that she may die during this fight.
-Ember's fight, while not entirely intentional, is comparable in-part to that of Yharon's (Calamity Mod, if you couldn't tell). Both of them utilise fireballs, flame tornadoes and highly-damaging fire borders to their fights, have noteworthy changes during their 2nd phases, are fought around the same point in the game, have comparable health, and have more dramatic songs during their 2nd phases that have actual lyrics to them.
Storm (Rematch)
Appearance:
Storm herself looks the same, though the clothes she wears and her weapon have been altered. Her clothes have replaced the original brown colours with reflective gold and the clothes themselves have had mild alterations to them. Her weapon, after the previous one was destroyed, is far larger and more intimidating. The spear has gold points, smaller spikes partway down, and is overall far more detailed than her original one.

Summon: Attempt to use the Chaoscaller at the surface. She appears quickly instead of 'Chaos' (The person the tooltip said would appear) and challenges the player instead. Can be any time of day, though rain will begin and persist throughout the boss battle).

Stats:
Health: 5,000,000 (6,200,000)
Attack:
-150 (285) / 178 (320) (Melee)
-185 (330) / 215 (400) (Lightning Bolt)
-180 (320) / 200 (375) (Lightning Orb, Lightning Orb Bolt)
-165 (300) / 180 (323) (Magnet Pulse)
-220 (405) (Overload)
-300 (520) (Zeus' Bolt)
(All attacks can inflict Electrified)
Defence: 75

Attacks:
Much like her original fight, Storm will move around frantically with quick dashes. This, combined with her small hitbox, leaves her hard to consistently hit. She still has dialogue for this battle, with similar warnings about the player getting close to something potentially deadly.
-She may twirl the spear above her head while stationary, causing a cloud to appear over players' heads. Small clouds will produce a bolt directly above the player, forcing them to be moving to avoid it, while large clouds produce bolts all around the player but not directly above them, preventing them from moving horizontally without taking damage.
-She may summon 2 lightning orbs that each shoot 3 lightning bolts at the player, much like the Lunatic Cultist's orb attack, though the bolts are fired with faster frequency. She moves while they are active, but doesn't attack until both have fired their 3 shots and despawned.
-She may spin the spear around herself, creating a blue circle of light, before sending it after the player. It homes in until it either hits a solid surface or is active for 5 seconds, where it despawns.
Once taken down to 450,000 (750,000) health she will enrage. She gains a damaging electric field around herself which actually increases the size of her hitbox to one slightly smaller than the EoC's, making reliable damage against her easier.
-She retains all her previous attacks from Phase 1, though amplifies their damage and adds a 3rd Lightning Orb to the lightning orb attack.
-She may hold the spear upwards above her, spawning lightning bolts that strike from above, travelling outwards from her. They are evenly spaced with gaps of about 5 blocks between each of them.
-She may increase the size and intensity of her electric field and attempts to ram the player. After 3 charges she appears above them and slams down into the ground, sending a massive lightning bolt down at her location as well. She stops moving briefly after this attack and loses her barrier while immoble. (In expert mode the lightning bolt attack from prior will also prock once she slams into the ground.)
-She may stay still in a location quite high above the player, though almost vertically, before throwing down her spear. She summons a large, heavily-damaging 'Zeus Bolt' between her and the staff. Another will then shortly after drop down from the sky above the player while Storm grabs her spear again.

Defeat: Falls to the floor, spear broken, and flees with a fancy lightning teleport. Same style as before, though with more sparks and smoke. Her final message before she leaves says the player might actually be strong enough to face Chaos. The Chaoscaller becomes the 'Fragmented Chaoscaller', apparently broken during the battle.

GelTech Info:
-She has trained herself relentlessly after your first encounter, aware that you would likely continue on your quest. She fears the worst, though with the power you have, it is now possible you could face the threat...

Drops: More powerful versions of her items. Still drops Souls of Plight. Will also drop the Lightning Heart, an item that increases the player's stats, health, and grants them immunity to the Electrified debuff.

Extra Info:
-Her dialogue during this fight will mention a few things. Firstly that Omnicron wasn't the threat she warned you about, secondly that the threat itself is far greater than the player anticipates and, at the end of the battle, that the player might in fact be ready for the fight, wishing them good luck.
-Much like the other 'awoken' bosses Storm's fight both has similarities to the original, but also has changes.
--She retains some of her old attacks and a similar way of moving, as well as the electrified debuff across all her attacks. However, this new fight gives her attacks new variants and patterns and an entirely new phase.
-The 2nd phase in this fight will increase Storm's hitbox, allowing for the player to hit her more consistently due to her hitbox normally being far smaller.
-Her Zeus' Bolt attack no longer immobilises her like it used to, though one of her new attacks now does instead.
Chaos Doppelganger
Appearance:
Only its eyes and mouth are ever seen due to the background and Chaos' doppelganger sharing a deep black colouration. Its eyes and mouth stand out strongly due to them being white instead. It always has a smile on its face throughout the battle.

Summon: Use the Chaos Beacon at the surface, made using the Broken Chaoscaller and several ingredients gathered from previous bosses. The time of day and/or biome are not important and taking the boss underground afterwards doesn't do anything to alter the fight. The background goes completely black and most blocks will darken and have their colours become washed-out and greyer. The summon message simply says "Nothing has Awoken..." as opposed to naming the boss.

Stats:
Health: 8,000,000 (12,000,000)
Attack:
-450 (650) (Melee)
-300 (430) (Chaos Rain, Chaos Sphere)
-278 (400) (Chaos Breath)
-340 (478) (Chaos Laser)
-326 (460) (Chaos Bomb)
-250 (335) (Chaos Bullet)
-800 (2000) (Black Hole Void)
Defence: 100

Attacks:
In Phase 1 of the battle Chaos will slowly move in towards players, teleporting occasionally to either approach from a new angle or target different players (in multiplayer).
-It may occasionally perform a long-distance charge towards the player, teleporting after the charge is finished.
-It may also roar towards the sky that summons purple, vaguely droplet-shaped projectiles down in random places.
-It may summon large bursts of spherical projectiles, all moving in different directions and different speeds.
At 80% health it will transition to Phase 2, retaining its previous attacks and gaining some new ones as well.
-It can also summon faster-moving sphere projectiles in a burst of 12 shots outwards in all directions
-May accelerate towards the player, breathing out large clouds of reddish smoke before slowing down again and teleporting.
At 65% health it goes into Phase 3, gaining some new attacks
-It may teleport to the left or right of a player and fire rapid, high-velocity 'bullets' in a similar fashion to Retinazer's Phase 2 laser barrage.
-May fly above the player and shoot a laser from its mouth that sweeps across the screen, much like the Moon Lord's central eye.
At 50% health it transitions into Phase 4, only gaining one new attack. However, random messages begin appearing in the chat.
-It may now spit 3 volleys of arcing projectiles upwards, each containing between 8 to 10 'bomb' projectiles. They explode on contact with either players or blocks.
At 35% health it transitions into it's 5th and final phase. The messages will keep appearing, though occasionally have more sinister ones thrown in
-It may perform a reverse version of one of its previous attacks; summoning projectiles far away from it and drawing them into its mouth.
-It may also use its most devastating attack now; the Black Hole Void. It inflicts players with Dazed and then moves towards them, summoning a 'Black Hole' from its mouth. It will teleport up to 2 times while the Black Hole is active. The Black Hole deals massive damage if hit, potentially insta-killing unaware players. Dazed wears off after the attack ends.

Defeat: Chaos' Doppelganger will freak out, shifting its face into various forms, before beginning to melt.
-It explodes into a brilliant white light that lasts for around 3 seconds before the screen reverts back to its normal colours.
--Enemies that are active during Chaos' 'white flash' will often die due to it dealing 5000 damage every frame to hostile NPCs while the flash occurs.
-The Corruption and Crimson stop spreading.
-The game enters an even harder difficulty; Chaos mode.

GelTech Info:
-[Undefinable Entity, does not match databanks.]

Drops: Will drop very powerful weapons based off of the Crimson and Corruption, one for each of the main weapon types: Swords, Projectile-less Swords, Spears, Flails, Yo-yos, Throwing Knives, Bows, Guns, Rockets, Flamethrowers, Summoning Staffs, Sentry Staffs, Magic Staffs and Magic Tomes. Also has a pet and some accessories.

Extra Info:
-Despite being used to progress the game Chaos' Doppelganger is essentially treated as a Superboss. It has massive health and lots of damage, even when compared to other bosses fought around the same time as it.
-The Rod of Discord is so useful for this fight that it's almost a necessity. It can help players evade Chaos' fast-moving projectiles and charges, as well as being extremely useful when inflicted with Dazed during the Black Hole attack, with the chaos state effect dealing far less damage than Chaos itself does.
-Chaos in this fight technically uses the 4 main damage types in Terraria
--It has a charge that covers melee, the Chaos Bullet attack that covers ranged, many magic attacks and the Black Hole counts somewhat as a summon.
-The messages that appear throughout the fight are mostly random nonsense or fake-out boss summons:
--It may sometimes say that Omnicron or another Chaos Doppelganger has spawned, though they never do.
--The random messages include backwards quotes from Storm during her battle and rematch, messages about Chaos' power 'being beyond the player's comprehension' and, strangely enough, a step-by-step guide to making Sponge Cake, always in the correct order, even if segmented by other messages interrupting. Sometimes it puts sentences from the GelTech boss info as well, though only ever single sentences at a time. It may also sometimes mention other things like "-Player- likes Slimes. They are cool" or other messages on a similarly-strange level.
---Finally, death messages may also be put in chat once in its final phase, being a mixture of default messages, Rod of Discord messages, the WoF 'escape' message, or the Companion Cube's death message. It may also use certain quotes from town NPCs, especially ones from when a Blood Moon is active.
[Chaos Mode]
Upon the player successfully killing Chaos' doppelganger in a world, the world will change. All normal enemies become stronger, bosses receive buffs to their stats and new drops are added for existing enemies. Some bosses can also only be fought after Chaos, with all of them being Superbosses.

[11/1/19]: Spritework is completed for a Sorrow rematch, The Elder Deathworm, Necromancer Overlord, Storm and Omnicron
[12/1/19]: Slimey, Necromancer Overlord, and the Deathworm Colossus have been added
[25/1/19]: Necromancer Overlord and Elder Deathworm given titles, Overlord's sprite reworked slightly. Sprites for the rematches for Storm, Chaos Doppelganger, Sorrow and Omnicron finished. Neoradiance's sprite finished, with fight pattern being finalised. 4 special boss variants designed, but sprites are not finished.
[26/1/19]: Sorrow's rematch and Arret has been added
[31/1/19]: Neoradiance has finally been added, with the other planned bosses on their way shortly. Slimey's drops have also been slightly updated. Omnicron and Storm's final rematch have also been added.
[1/2/19]: Made some adjustments to Neoradiance's damage output and fixed Omnicron's drops and extra info. Added absolutely nothing else; trust me.
[7/2/19]: Void Purge has to be added, though once this is done the Boss Rush will be worked on.
[9/2/19]: Void Purge's sprite has been found and has been added. Shockal has been un-scrapped and is being worked on. Once Shockal's boss is finished, production of the Boss Rush begins.
[1/3/19]: Gave a certain someone a buff. A small buff, but a noteworthy one nonetheless.
Slimey
Appearance:
A person in grey and blue armour with a slime for a head. The slime has two beady eyes and, though very hard to see, lightened cheeks as well. He wears a pair of slime-like wings as well that leave behind blue particles as he flies.

Summon: Use the Enchanted Slimeball anywhere at any time. Crafted using a few of the Chaos Mode-exclusive items and a lot of Gel.

Stats:
Health:
-8,500,000 (12,000,000) (Slimey)
-250,000 (400,000) (Slime Worm)
-165,000 (225,000) (Slime Eye)
-145,000 (200,000) (Big Slime)
Attack:
-230 (385) (Slime Melee, Slime Sword, Minion Melee) (Inflicts Slimed debuff)
-185 (310) (Cicerian Bow) (Inflicts On Fire! debuff)
-200 (328) (Inferno-Yo, Pumpking Greatsword) (Inflicts On Fire! debuff)
Defence:
-128 (Slimey)
-20 (Minions)

Attacks:
In Slimey's first phase he will use a mixture of three attacks.
-He will ready his sword and charge at the player, covering a lot of ground very quickly
-He may swing the Slime Blade, sending several arcs of slime to fly through the air and fall down to the ground. They will either be swung upwards, where up to 15 projectiles will be summoned, or above the player where up to 7 would be instead.
-He may draw a Cicerian Bow and fire an explosive flaming arrow at the player with a very mild arc. It explodes on contact with players or blocks.
At phase 2 (6,000,000 (9,000,000) health) Slimey will begin using a Slime King's staff as well, allowing him to summon forth three enemy types. He retains his other attacks, though the Cicerian bow becomes less commonly used.
-A highly-mobile Slime Worm with high acceleration that deals contact damage.
-A Slime Eye that will occasionally charge at the player, like the EoC.
-A Big Slime that performs 2 smaller hops followed by a massive leap that covers a lot of vertical distance.
At Phase 3 (4,000,000 (6,000,000) health) he gains two new attacks, with the summons becoming roughly as common as the Bow.
-He will spin 2 Inferno-Yos around himself with a radius of about 10 blocks that leave flaming trails as he moves towards the player.
-He may rapidly swing the Pumpking Greatsword, summoning several slow-moving flaming pumpkin projectiles that disappear either after travelling too far or hitting the player.
Finally, at phase 4 (2,000,000 (3,750,000) health) he gains one new attack. The attacks added in Phase 3 become roughly as common as the bow and summons.
-He may draw the Starman's Katana and perform a chain-dash of 3 charges towards the closest player.

Defeat: Slimey's armour bursts in a massive ball of slime, leaving behind only a Blue Slime with a Magic Mirror inside of it. The slime uses the mirror and teleports away.

GelTech Info:
"I made this!"

Drops: All of the weapons he uses during his fight, as well as the Time Whale, Wind Rider, and Enchanted Worm food. Also drops Slimy Slime, a crafting material.
The Slime Blade fires slimeballs that don't arc like in the fight, but do inflict debuffs based on the colour of the slime ball launched. All projectiles will inflict a special variant of Slimed that makes fire-based debuffs deal multiplied damage to those affected by it.
The Cicerian Bow fires arrows that increase in firing speed the longer the player goes firing it without taking damage. Each arrow hits foes several times, have high-velocity, and will inflict On Fire! even if flaming arrows aren't used.
The Inferno-Yo, a yoyo that ignites enemies and leaves a damaging fiery trail. Description says that it is inscribed with '"Monkey around" -G'.
The Slime King's Staff, which summons large slime minions. They also inflict the special variant of Slimed.
The Pumpking Greatsword, which summons Pumpkin projectiles every swing and additional ones if the player hits foes with the blade. Inflicts On Fire!
The Starman's Katana, which allows the player to perform up to 3 dashes in quick succession. Dashes recharge faster when less are used in succession.
The Time Whale, which slows down time for 5 seconds (enemies and bosses included) but has a cooldown.
The Wind Rider; a flying surfboard mount that can have its speed increased with mana by using alt-fire. You cannot attack whilst riding the board, but it's great for transportation.
The Enchanted Worm Food, which summons an EoW mount that can pass through blocks, but the player cannot use items and has an air meter when in blocks.

Extra Info:
-The Boss' GelTech description is both a reference to the Self-Made item quality from TF2, another game the creator plays freqently, and a joke about Slimey being the person who usually writes the GelTech data for the bosses.
-The boss is, in a way, a pseudo-love letter to the FMG server, with many of the boss' references being designed around it.
--All of the boss' drops, with the exception of the Enchanted Worm Food (Idea by Shockal), were suggested by members of the FMG discord.
---The Inferno-Yo, Cicerian Bow, Slime Blade and King Slime Staff designed by your's truly, Starman's Katana & Wind Rider suggested by Starman, Pumpking Greatsword suggested by Pumpscare, and the Time Whale made by Sorrow.
--Slimey itself is a character who appears on the FMG server occasionally.
---Slimey (The Boss) has 128 defence, the same as the character it was based off of
--The Inferno-Yo and Cicerian Bow, despite being based on the server's admins, were not designed by them
---The Inferno-Yo's sprite has a large, orange-coloured 'G', relating to the server admin Mr. G, and the description and weapon gimmicks relate to the server 'Flaming (On Fire! effect) Monkey (Description) Gaming'.
-The Starman's Katana appears to be made out of Luminite, due to the colours of the sword.
-The Wave Rider's mana acceleration will continue acclerating forever, though the rate of acceleration slows at an asymptotal rate.
-Many of the weapons dropped by Slimey synergise with each other:
--The Slime Blade and King Slime Staff's effects work with the Cicerian Bow and Inferno-Yo
--The Starman's Katana and Time Whale work well as you can easily reposition yourself majorly at any point in a boss fight rather easily
--The Time Whale and Cicerian Bow work well together as it allows the player to get a lot of easier hits off against bosses, increasing the bow's firing speed almost for free
--The Time Whale and Slime Blade work together as it allows the player to essentially inflict all of its debuffs against a boss rapidly and easily as it is likely you will cycle through all 7 of the blade's projectile colours in those 5 seconds
Arret
Idea by "Someone Who Wishes to Remain Anonymous" (He doesn't want his name disclosed for whatever reason)

Appearance:
Starts out only as a few lines and a large spot in the sky. The boss, at this point, lacks any real features.

Summon: Use the Pink Letter at night. The background will go black at the start of the fight, though the moon is still visible. The boss will remain stationary and the player will be given a debuff that halves their maximum vertical flight.

Stats:
Health:
-2,000 (2,500) (Arret)
-3,500 (5,000) (Leech)
-30,000 (43,200) (Giant Leech)
-800,000 (1,000,000) (Galactic Devourer)
Attack:
-200 (300) (Leech Melee)
Defence:
-70 (Leech)

Attacks:
When the 'boss' is summoned she remains stationary and doesn't attack. She is considered a friendly NPC and thus she cannot damage the player and the player cannot damage her, but other enemies can harm her. Arret regenerates up to 2 health per second and grants the player regeneration based on how close they are to her.
-At the start Energy Leeches will slowly begin spawning. They primarily target Arret, but will go after players if they are too close and/or attack them whilst nearby. The leeches look like Eater of Souls, but are blue and have glowing white eyes.
After 30 seconds her sprite will change slightly, with the outside of the lines getting a slight blue glow and another patch appearing to the right of the other one. It begins looking almost like a face.
-However, more leeches will begin spawning at this point, increasing the boss' difficulty
Another 30 seconds pass and the shapes begin slowly shifting into a face, with a mouth being visible.
-More leeches spawn, as well as larger leeches that act as mini-bosses. They move much slower and are completely immune to knockback. However, their attack and defence is the same.
30 more seconds pass and Arret once again changes. Her face turns a dark purple and what looks like stars can be seen within it. The stars continue scrolling throughout the final phase.
-In the final phase a giant Leech spawns. It flies overhead, summoning smaller leeches until it is destroyed. Killing it ends the fight.

Defeat: There is a burst of light and a human version of Arret takes the place of the face. The background goes back to normal. Speaking to the NPC will cause her to give the player money, special hair dye, and a trophy. The boss cannot be re-fought after this, so you will always get the trophy.

GelTech Info:
-A cosmic entity given physical form. The transformation was risky, as the energy produced naturally draws in energy-hungry beings from across space. After keeping her safe throughout the process, she seems to have taken a shine to you.

Drops: None, though the NPC that appears will give the player items and sells various space-themed weapons and accessories.

Extra Info:
-The boss' fight is quite a unique one, being closer to the Old One's Army event as opposed to an actual boss battle.
-Technically, this boss has some of the lowest health of any boss in the game, with only 2000, though this is because the boss itself is meant to be protected from other enemies.
-The boss can only take 11 hits in normal mode (Due to the regeneration healing her enough to just about survive a 10th hit) and only about 12 in expert. However, longer gaps between damage mean that she may be able to take a 11th (12th) hit.
-Arret's name is Terra (Earth) backwards, and is pronounced in a similar way to 'array', which is slightly ironic when you look at her boss battle's lack of unique enemies. Though, this may be intentional
-The boss, rather unusually, can only ever be fought once in a world. After that point, the summoning item doesn't work. This may be because the boss is now in NPC form and, therefore, doesn't need to go through 'the process' again.
Void Purge
Appearance: A large worm coated in large crystals. Its body is a dark blue colour and its eyes a pink colour like that of the Rod of Discord. Each of the crystals on its body has a pink base that shifts to a blue end as you go up them.

Summon: Use the Unstable Gemstone at night. The boss will despawn during the day, but changes in biome do not affect the boss in any way.

Stats:
Health: 212,000,000 (300,000,000)
Attack:
-400 (645) (Head Melee)
-285 (400) (Body Melee)
-280 (390) (Crystal Orb)
-195 (300) (Crystal Laser)
Defence: 105

Attacks:
The Purge will fly around near the player, attempting to ram into them frequently. It performs one of a few attack types whilst doing so. It will sometimes summon portals and travel through them to approach from a new angle; with segments disappearing into one portal whilst appearing from the other.
-It may fire a volley of lasers at them that deal lower damage, but each laser will split into 2 smaller lasers after travelling for a while. (Any %)
-It may summon slow-moving orbs from each segment that follow the player and persist for a very long time (85%>)
-It may summon portals and send more orbs through them, though they do not home. The portals are aimed at the player so that, when an orb goes through one portal, it will appear from one and be moving towards the player again. (65%>)
-Finally, it may speed up; travelling through lots of portals very quickly. It will disappear through one, then appear from another to the left or right of the player in an attempt to ram them. It will always aim to be roughly horizontal to the player since its turning abilities are limited like this. (50%>)

Defeat: Explodes into several large chunks of crystal. Loot drops from the segment which last took damage.

GelTech Info:
-An otherworldly entity, cloaked in an unstable energy. Some entries report it appearing suddenly, as if from nowhere, and devouring entire civilisations within moments.

Drops: A lot of portal-based weapons and the Rod of Discord. Drops an accessory that increases the player's health at the cost of decreased life regeneration as well.

Extra Info:
-It is recommended that, if the player does not already have a Rod of Discord by the time they enter Chaos Mode, that they seek out this boss first. The Rod of Discord is almost a necessity in the late-game due to the often complex and heavy-hitting attacks from the other bosses.
-The Rod of Discord, despite being one of its drops, is also one of its biggest weaknesses. Use of the rod can make many of its attacks extremely easy to dodge.
-Much like with many other Worm bosses seen prior, contact with its head causes a lot of damage. However, it is much less than the other 2 worm bosses fought in Chaos Mode.
--The main reason it is lower is because the boss is a lot more unpredictable than the others due to its ability to re-position itself whenever and wherever it wants to.
-Luckily, the boss is prevented from summoning portals at the player's current location; attempting to spawn them just off-screen. This minimises the chances of cheap damage from the boss.
Wasteland's Creator, Elder Deathworm
Appearance:
An even more massive version of the Deathworm Colossus, with more teeth and spikes on its body. It has 135 segments; each with the width of the EoC and height of the player, making it the largest boss in Terraria and even surpasses most mods' largest bosses, like the Jumbo Cactuar.

Summon: Use the Chaotic Worm Food in the desert. The boss can be taken anywhere, as it would be almost impossible to win if restructed to only a desert for the fight, and can be fought at any time to make its borderline-stupid amount of health more bearable.

Stats:
Health: 650,000,000 (1,000,000,000)
Attack:
-2,000 (100,000) (Head) (Heals 1% of the boss' health)
-220 (400) (Body, Tail, Spit)
Defence: 0

Attacks:
-Works like the Deathworm Colossus before it, burrowing and sometimes firing spit projectiles from its head. It fires volleys of spit projectiles instead of infrequent, single shots. Contact with its head will instantly kill players, overkilling them in expert mode, and heal back 1% of the boss' health.

Defeat: Bursts into massive gibs that eventually leave behind skeletal blocks once they disappear. These blocks need at least a Picksaw to be mined. Desert Oasis biomes will begin spawning in deserts, each containing pools of special, healing water. New enemies and critters will also spawn in the desert and a lot of enemies become passive.

GelTech Info:
-The true cause of the desert's bleak, sandy wasteland of a landscape. Such a ferocious appetite has lead to the population of the desert being taken down to fractions of what it once was. Perhaps killing it will restore some life to the desert.

Drops: Same drops as the Deathworm Colossus, but far stronger due to being later in the game. The weapons themselves will also be far larger, especially the sword.

Extra Info:
-The Deathworm Colossus' immense size will almost certainly require players to travel across the whole map to evade it well.
-The health gained by the boss from being hit by the boss' head only procks if the player takes damage, not during invincibility frames.
-The health gain from its head is only a problem in multiplayer as in singleplayer the player is likely to be dead from a single hit anyways. This is especially true in expert mode, where boss' health scales with players and the damage is increased to higher than the Destroyer's base health.
-Platforms may be unwise in the fight due to the Deathworm potentially getting onto them and making dodging even harder. Using infinitely-flying mounts is the player's best option as they can stay as far away from the boss as necessary and the boss itself is still restricted to ground-level.
-The Boss is essentially a DPS-fest for the player as it is purposely given no defence and tonnes of health, simply allowing the player to gain rediculous damage-per-second without also slaying the boss almost immediately.
Shapeless Void, Necromancer Overlord

Appearance:
-One of the Necro Warriors seen last in pre-hardmode, having tapped into a strange otherworldly power. It retains its helmet, but now dons a large cloak. Its entire form radiates a strange, black energy, and its body seems to have been replaced by a strange colour-shifting core. Closer inspection to the eyes shows similar colours leaking from the helmet's eye holes.

Summon: Use the Necromanter's Eldrich Beacon near to the Necro Dungeon. The overlord appears, starts to radiate the energy mentioned above, and begins the fight.

Stats:
Health: 30,000 (33,500)
Attack:
-450 (700) (Melee) (Inflicts Shadowflame)
-200 (372) (Magic) (Inflicts Shadowflame)
Defence: 1999 (+99% damage reduction) (Most attacks deal only 1 damage)

Attacks:
Teleports around similar to how the Lunatic Cultist does most of the time, using attacks after every teleport.
-May fire 5 high-velocity projectiles directly at the player in rapid succession.
-May summon several projectiles around the screen in random places before sending them all in the direction of the player closest to each of them.
-May surround itself with 20 of these projectiles around itself and charge at the player. Sends the projectiles outwards with increasing velocity after the charge ends.
-May rapidly teleport around, firing projectiles out in bursts of 3 in random directions.
At half health the boss will add a few more attacks to their arsenal.
-It will begin slamming down into the ground, sending projectiles in bursts of 4 (6) outwards and upwards in two separate groups; one either side of the boss.
-May rapidly-fire streams of projectiles, making a 'beam' of sorts, and make it do a 360-degree sweep back to its starting angle.

Defeat: The boss stays in place, lets out what almost sounds like an aggressive whisper, and begins to discintegrate.

GelTech Info:
-The state many of the Necro Warriors had wanted to achieve in their lives, but most never will. They realise that this form will leave you as nothing but a mildless husk, but they don't care...

Drops: Drops an assortment of Shadowflame weapons upon death, some being references to Necro Warrior drops, and an accessory that increases player's attack at the cost of defence.

Extra Info:
-Most attacks against the boss will end up only dealing 1 damage due to it almost having 1,000 defence; a stat only really rivalled by the Dungeon Guardian.
--However, exclusively in normal mode, weapons that surpass 1000 damage can deal more than 1 damage per hit to the boss. This isn't possible in expert mode due to the additional 99% damage reduction requiring the player to have a 1,000,000 damage weapon, which you cannot get among the ones mentioned.
-Since it only takes 1 damage from most attacks, and this being a main feature of the fight, damage-over-time effects like Poisoned, On Fire!, Venom, etc. are very good at taking health away from the boss.
-The Cicerian Bow combined with one of the Slime weapons dropped by Slimey can rack up suprisingly high damage due to the combination of the modified Slimed debuff's On Fire! changes and the bow's ever-increasing firing speed. Other D.o.T. effects and fast-firing weapons can also provide similar effects.
-The Necromancer Overlord has the least health of a post-Chaos Doppelganger boss, though this is due to its massive defence.
--Also, strangely, despite its defence being one of the most notorious things about the boss, the accessory it drops actually decreases players' defences when equipped.
Awoken Malevolence, Sorrow
Appearance:
Looks like Sorrow, fought previously, though its entire body has darkened in colouration. Its eye has inverted its two colours and purple 'runes' can be seen surrounding the eye.

Summon: Use the Soulcatcher near the Necro Dungeon. The boss can be spawned at any time, though the world's time will immediately be set to 7:30 PM. If the time ever reaches 4:30 AM it gets set back to 7:30 PM again, essentially creating a 'looping nighttime'.
As soon as it is summoned, the player will be inflicted with the Soul Drain debuff.

Soul Drain: The player cannot heal through any means and they take 1 damage per second. This means that, with 500 health, the player will have a maximum of 500 seconds (8 minutes 20 seconds) to kill the boss under normal circumstances. Anything that increases the player's health increases the timer.

Stats:
Health: 7,250,000 (9,250,000)
Attack:
-100 (155) (Melee)
-1 (1) (Echo)
-1 (1) (Shadowflame Fireball) (Briefly inflicts Shadowflame)
Defence: 25

Attacks:
-The boss will fly around near to the player, firing shadowflame fireballs at them occasionally.
-Sometimes it will summon rings of them before sending them all towards the player
-It may sometimes charge at the player, attempting to deal contact damage
-Sometimes it will summon large 'bullet-hells' of fireballs either horizontally or vertically
-Rarely, the boss will teleport somewhere that is slightly off-screen. It will remain stationary for up to 2.5 seconds before releasing powerful echoes. The echoes travel outwards very fast and deal chip damage to the player. It only stops echoing once attacked and, if attacked before the echoes start, it will cancel the attack.
Because the boss is already on a timer most of its attacks are based on dealing chip damage which, therefore, will reduce the amount of time the player has to kill the boss.


Extra Info:
-This boss is rather unusual due to the fact that it instead decides to try and 'chip away' at the player's health instead of trying to deal massive damage in single hits. The inability to heal, its reduced invulnerability frames (caused by it only dealing 1 damage with 2 of its attacks) and its debuff all help to speed up the timer to the player's death.
--However, for Hardcore players, this timer is useful; if they see their health getting low they can leave the game and come back, essentially preventing death.
-The boss' debuff removes healing of any kind from the player. This includes, but isn't limited to, Hearts, The Nurse, Health Potions, Regeneration, and Life Leeching Effects (Vampire Knives, Spectre Armour, etc.)
Gelatinous Lightbearer, Neoradiance
Appearance: A large, golden slime. It has two pairs of wings on its body, a larger pair nearer the top and a smaller pair below them.

Summon: Use the Radiant Slime at any time and anywhere. The boss doesn't despawn if taken anywhere in the world; only if the player manages to get too far away from it.

Stats:
Health: 7,800,000 (10,000,000)
Attack:
-550 (950) (Melee) (Briefly inflicts exclusive 'Discintegrating Light' debuff)
-380 (640) (Slimeball) (Briefly inflicts exclusive 'Discintegrating Light' debuff)
-425 (658) (Piercing Light) (Briefly inflicts exclusive 'Discintegrating Light' debuff)
Defence: 20

Discintegrating Light:
-Deals roughly 50 damage per second to the player in a similar way to other health-draining debuffs.

Attacks:
Phase 1:
-Acts like a glorified King Slime, performing 3 hops before a 4th, larger hop. However, it covers a lot more vertical and horizontal ground with each jump.
Once down to only 6,000,000 (8,000,000) health the boss transitions into Phase 2, becoming more threatening.
Phase 2:
-Continues hopping, though will also now spawn 3 types of slimeball projectile.
--Type 1 is a normal projectile that travels in a straight line and passes through blocks.
--Type 2 will decelerate after being fired before stopping in mid-air. They linger for a while before disappearing.
--Type 3 is like type 1, but slower and it will ricochet off of blocks instead of passing through them.
Once down to 3,000,000 (4,000,000) health it transitions into Phase 3 and changes majorly.
-The boss no longer hops along the ground, instead flying at the player.
-The boss will also charge at the player, covering a large amount of ground rather quickly
-The boss retains its slimeball projectiles and continues using them in this phase
-The boss also gains a new attack. It may stop for a brief moment and fire a thin, white beam at the player. After firing the beam, it continues its normal attack pattern.
Finally, after being taken down to only 1,200 health, the boss will briefly become invulnerable and use a last-ditch barrage of beams to try and kill the player.
-It will sometimes fire barrages of them at or near to the player
-It will also sometimes fire them all around itself in groups of 6 or 8
Once it has finished its 30-second barrage, it drops to the floor and does nothing. Due to its low health, it will likely die instantly after losing its invulnerability.

Defeat: Screen flashes white and it explodes.

GelTech Info:
-The most powerful of the slimes. Its slimy body only makes up its surface layer as within lies a tremendous amount of stored energy. The energy within it is so intense that even slight contact could cause it to partially burst out and discintegrate you, so be careful.

Drops: Slime weapons and 'energy' weapons that inflict the boss' signature debuff. Also drops Elysian Gel, an item used to craft an armour set and accessories.

Extra Info:
-The boss' rather simple design and fight is intentional as to compensate for the boss' massive damage output vs the player.
--The boss' damage is easily able to 1-shot an unprepared player, even in normal mode, or at least deal massive damage to them. Its melee is the worst, dealing over 500 damage in normal and almost 1,000 in expert.
-The boss' name consists of 35 characters (33 excluding spaces), making it one of the longest names of a single boss. However, this is shared among many of the other Chaos Mode bosses due to their titles.
Merciless Deathbringer, Omnicron
Omnicron's design by BBBatMudkip

Appearance: Looks much like their doppelganger, though radiating a distinct, red energy. Its chest also has what seems to be a portal or vortex of some kind, leaking energy.

Summon: Use the Death Revelation at night. Doesn't matter where in the world it is used. The time will be frozen at 12:00 AM, midnight, throughout the entire fight.

Stats:
Health: 11,450,000 (15,000,000)
Attack:
-320 (500) (Melee/ Small Projectile)
-400 (612) (Medium Projectile)
-485 (720) (Large Projectile/ Deathray)
-650 (9999) (Eclipsing Void)
Defence: 100

Attacks:
Will float in-place, teleporting occasionally to reposition himself.
-Will summon small shadowflame blades in an arc and fire them at the player. Usually summons between 3 and 5. Fires additional blades at other closeby targets in multiplayer.
-Summons balls of red energy around himself, dashing at the player. Then hits 3 of them at the player with high velocity before combining the others into a medium projectile and sending it at the player as well. Explodes into 5 smaller energy balls that disperse outwards on contact with a solid object.
-May send a volley of shadowflame blades into the sky that rain down at slight angles above all nearby players. Not stopped by blocks.
-Summons a large, red crystal above himself before slamming it into the ground. It creates 2 large crystal spikes either side of him and 2 medium-sized ones that travel outwards.
At 6,000,000 (8,000,000) health Omnicron seems annoyed and begins using new attacks in conjunction with his old ones.
-May raise his hand to the sky, summoning down a few medium and large-sized meteors. They explode into fireballs once they crash, with the smaller ones leaving fire where they handed and the larger ones sending small fireballs outwards when they crash.
-May use the doppelganger's Ichor Ball attack, though summons 3 Ichor balls at a time and a single, large, red energy ball as well. Bats them all away in rapid succession, with them all bouncing off of solid blocks.
At 2,000,000 (3,500,000) health Omnicron becomes enraged. He attacks faster and throws an additonal, highly-volatile attack into the mix.
-He may summon a portal and begin pouring energy into it. If Omnicron is damaged enough the attack is cancelled but if he isn't the portal will explode and deal massive damage to players, being enough to kill them instantly in expert mode. However, the windup is quite long and thus the player has time to deal with it.

Defeat: Looks suprised for a moment, then bows to the player. Turns completely black before small, black orbs disperse from him, leaving nothing in their place.

GelTech Info:
-A being of chaotic spirit, known for bringing destruction to all those he encounters. Unlike with the doppelganger, this is the real deal. It is likely that, despite the apparent defeat, he will return.

Drops: Malevolent fabric, a crafting material, and a few stronger variants of the Omnicron Doppelganger's drops. Also rarely drops his hat, acting as a mask, or his cloak.

Extra Info:
-It is left relatively ambiguous as to what happened to Omnicron after the battle, though one can assume that he is likely still alive.
-Omnicron's entire attack pattern seems to be almost completely separate from the doppelganger's, except for a single attack involving the ichor balls.
-A lot of Omnicron's attacks are hard to dodge and deal rather high damage to the player, often making the fight take a few tries if players are not used to them.
-Omnicron has an instant-kill attack at the end of his fight, much like the Chaos Doppelganger. They are both designed to create tension due to them potentially undoing the players' process, despite being rather easy to avoid or cancel and are both rather predictable.
--Attacking Omnicron just before he summons the portal can cancel the attack immediately, so in some battles you may never see it at all. This is most common with fast-firing projectile attacks, like bullets.
Lightning Apprentice, Storm
Appearance: Storm, though her attire has been altered slightly. The gold used on her previous outfit has been replaced by a light yellow. The other major difference is her new spear, modified to be even more dangerous.

Summon: Use the Spark of Origin at the surface. It will begin raining almost immediately and Storm will spawn. She doesn't despawn unless the fight ends.

Stats:
Health: 10,000,000 (14,200,000)
Attack:
-220 (330) / 178 (320) (Melee)
-230 (358) / 215 (400) (Lightning Bolt)
-227 (352) / 200 (375) (Lightning Orb, Lightning Orb Bolt)
-200 (320) / 180 (323) (Magnet Pulse)
-410 (580) (Overload)
-500 (700) (Zeus' Bolt/ Lightning Vortex)
-300 (500) (Stormcloud Net)
-80 (120) (Rapid Stab) (No invulnerability frames)
(All attacks can inflict Electrified)
Defence: 80

Attacks:
Phase 1:
-Uses all the attacks seen in her rematch fight from the get-go, all with increased damage.
Once taken down to 5,000,000 (7,000,000) health she will stagger back before a new entity joins the fight, known as the Embodiment of the Lightning Spirit. They perform the same attacks as Storm, but is invulnerable.
Phase 2:
-Storm and the newcomer fight alongside each other, both pulling from Storm's movepool. Their attack speed has been reduced slightly in singleplayer to compensate, though in multiplayer it isn't as it is likely they will have different targets.
-Storm can also summon 3-5 small clouds nearby that remain stationary. After a few seconds they begin sparking and then each one is linked up to each other by giant lightning bolts, making a 'net' of electricity.
-Storm may also now perform a rapid-stab if the player is close-by, followed by an electrical blast that deals standard lightning damage. The rapid-stabs ignore invulnerability frames and thus are suprisingly effective at dealing quick chip damage.
-Her final new attack is that she can summon a large vortex of lightning around herself while stationary. The vortex then becomes a large, thick pillar of electricity. This sends out horizontal lightning bolts until it eventually disperses.

Defeat: The Embodiment of Lightning disappears and Storm staggers back and falls over, like normal. However, instead of immediately teleporting away, the gets up and bows before teleporting.

GelTech Info:
-Through even the toughest trials you have found yourself successfully overcoming even the deadliest of obstacles. Now, seeing your true, unleashed power firsthand, I have found greater respect for you. I wish you luck on your journeys ahead.

Drops: A few lightning-themed weapons and accessories. Drops several crafting materials as well, including 2 used to upgrade the Broken Spear (1 is expert exclusive) and another that it used to craft a vanity set that looks like Storm's original attire.

Extra Info:
-Much like before, the GelTech info seems to be written by Storm herself, addressing the player directly as usual.
-The fight is especially challenging in singleplayer due to the addition of a 2nd foe the player has to face. This, combined with Storm's massive and highly-dangerous movepool, makes the fight exceptionally challenging.
-Storm is one of the only bosses to carry across previous attacks into a new fight, bringing over all her rematch's attacks and implementing them immediately into this fight's Phase 1.
-Despite being a counterpart of sorts to Ember, there is no Ember battle comparable to this fight, unlike her other 2 encounters.
Chaos Doppelganger Reborn
Appearance: The Chaos Doppelganger seen previously, though its face appears to be melting. The face will constantly twist into various different forms throughout the battle, though will still go back to its 'default' face (the one above) often.

Summon: Use the Chaos at night. The background will turn black and the time will be stuck at midnight. Most blocks will have their colours washed out, with most things being filtered into a greyish colour.

Stats:
Health: 15,000,000 (20,000,000)
Attack:
-480 (692) (Melee)
-340 (480) (Chaos Rain, Chaos Sphere)
-310 (470) (Chaos Breath)
-370 (518) (Chaos Laser)
-360 (500) (Chaos Bomb)
-280 (375) (Chaos Bullet)
-2000 (8000) (Black Hole Void)
-Varying (Chaos Burst) (Takes player to 1 health)
Defence: 100

Attacks:
-Retains all of the attacks used by the original Chaos Doppelganger, but can use them all immediately.
At 80% health it gains a new attack, which it will use immediately upon reaching 80% health before integrating itself into its normal movepool:
-It may create several small spheres of energy that send out Chaos Lasers in the direction of the player, though they do not move. After a few seconds they all stop firing lasers and disappear.
At 60% health it gains another new attack, integrating it in the same way as the first new one:
-A Chaos Bomb is dropped into a small vortex before sending 8 lasers out from the vortex in various directions. These lasers pass through blocks.
At 40% it gains a couple of new attacks, using either one of them before they are added to its roster:
-It may rapidly teleport around near the player, leaving energy spheres with every teleport. After it has finished teleporting these spheres will be launched at the player in rapid succession.
-The doppelganger may fire a laser downwards that then continuously re-emerges through portals near the player, usually 4-5 times, before it stops appearing.
At 20% health it gains a final new attack which is used in the same ways as the other new ones:
-A giant silhouette of a hand will appear and attempt to slam into the player from either above or the side, dealing contact damage. If it hits any solid objects it creates chaos spheres that travel outwards in an arc.
At 10% health the doppelganger will let out a powerful burst of energy and disappear. It leaves behind some drops, but it is mainly just money.

Defeat*: When taken down to 10% health it will disappear with a burst of white light. The burst leaves the player on 1 health and, instead of there being a message congratulating the player for defeating the boss, it simply says "Chaos Spreads..."

GelTech Info:
-Chaos: [returnNull]

Drops: Leaves only money and an accessory behind. The accessory grants the player buffs to all their stats, including health.

Extra Info:
-The message 'Chaos Spreads' that appears after defeating the boss actually signifies that certain other bosses now begin dropping special items used to craft new boss summoners, as well as small differences to the bosses. However, there is no warnings as to what the message actually does in-game.
--Omnicron now drops the Vile Core and has +10% damage
--Neoradiance now drops the Pure Heart and has +10% health
--Elder Deathworm now drops the Chaotic Scale and has +20 defence
--Malevolent Sorrow now drops the Pure Grimstone and its Shadowflame debuff lasts 2x longer
---The bosses given special items were the first 4 bosses planned for Chaos Mode, with the others like the Overlord, Constructor, Frost Reaper, Prism Knight, etc. being designed much later.
-Unlike many other bosses who survive their encounters with the player, the doppelganger doesn't flee with 0 health and instead leaves with 1.5 million / 2 million health left.
-Much like with the first Chaos Doppelganger fight the GelTech is unable to register/find information on it, instead returning 'null' when inquired about Chaos.
[Chaos Spreads...]
After fighting against (and failing to kill) the returning Chaos Doppelganger a small amount of extra bosses are unlocked. Each one of them is based off of a previous boss in some way, often being corruptions of the original bosses, carrying slight variations to their original counterparts.
They are all fought by gathering the new, unique drops from the buffed-up Chaos bosses fought prior. However, some of them are not dropped by the bosses they represent due to game progression but instead by the next closest boss to them.

[2/2/19]: Chaoserpent, the Grim Defenderfly, Omnicron and the Corrupt Spirit's sprites have been finished, though not yet added. Corrupt Spirit's page started.
[3/2/19]: Corrupt Spirit's page finished, Chaoserpent, Omnicron and Grim Defenderfly added.
[7/2/19]: Chaos Doppelganger wants his revenge... the final battle awaits...
[1/3/19]: Some bosses have been buffed to make them more difficult
Corrupt Spirit
Appearance: The Hallow Spirit seen back in early hardmode, though her appearance has been adjusted quite noticeably. Her colours are all inspired by the Corruption, her wings now have small wisps of cursed flame burning off of them, and her hair seems a little more unkempt.

Summon: Use the Chaotic Butterfly at any time at the surface Hallow. The boss will not despawn when taken out of the biome, but will be enraged, dealing 20% more damage. A Pure Heart is used in the crafting of the summoner, which is dropped from a buffed Neoradiance.

Stats:
Health: 16,500,000 (20,000,000)
Attack:
-250 (400) (Melee)
-275 (460) (Cursed Fireball) (Inflicts Cursed Flames debuff)
-300 (520) (Cursed Burst) (Inflicts Cursed Flames debuff)
-285 (478) (Vileblade)
Defence: 75

Attacks:
Flies back and forth over the players' head, using one of a few different attacks.
-May summon 4 cursed fireballs to the left and right of herself and send them all at the player at a very high velocity
-May create a ring of 7 cursed fireballs, make it land on the ground, and either roll of bounce in the player's direction. Explodes if the blocks are too tall for it to bounce or roll over.
-May fire a large amount of cursed fireballs upwards, which then all fall to the ground and bounce 4-5 times before exploding
At 50% health it will gain two new attacks, using them roughly as frequently as the others.
-It may stop and release a burst of energy after a short time. The burst has a radius of roughly 30 blocks, making its AoE very large.
-It may also inflict the player with warped gravity (like the Vortex enemies do) before summoning 3-6 large blades that slam into the player from above.

Defeat: Shudders, and explodes into cursed flames. Several bouncing cursed flameballs will also come out of the explosion, potentially catching a player off-guard.

GelTech Info:
-[The doppelganger's influence appears to have corrupted those from your past]
I still sense there is some of the Hallows' own influence over her, so there is a chance, however slight, that she may escape the doppelganger's grasp.

Drops: An accessory that spawns cursed flames when your invulnerability frames are procked and a crafting material called the Hallow Core, used to craft the Lightseal.

Extra Info:
-Being the 3rd and final fight against one of the Hallow Spirits, she too has access to an AoE burst effect. While it does more damage than the other 2 used before her, it has far less range and is therefore easier to avoid.
-The Lightseal, the accessory made of her unique crafting material, will grant the bearer a multitude of powerful buffs including 50 more defence, 30% increased damage and double the players' original base health. However, it can only be made at the very end of the game as you need to defeat all of the 'Chaos Spreads...' bosses in order to get all the necessary materials.
-All 4 of the 'Chaos Spreads...' bosses have an shared theme called the Chaos Chorus, in which there are 3 verses. 1 & 3 are the same for all 4 of them, with the 2nd will be unique for whichever boss it is. They all also appear to be sung by the bosses themselves, with the verses in this fight being sang softer than the others sing theirs.
Chaoserpent
Appearance:
An almost photo-negative version of the Thanoserpent seen earlier in the game. Its original red and black Grimstone armour has become white and blue, and each of the visible skulls has gone black and gained a white aura.

Summon: Use the Chaotic Worm anywhere in your world. The Chaoserpent will only despawn if there at no living players in a world, chasing anyone across the map if needs be. The crafting materials for the summon include the new, unique drop from the Elder Deathworm.

Stats:
Health:
-300,000,000 (420,000,000) (Chaoserpent)
-10,000,000 (13,200,000) (Chaoseeker)
Attack:
-850 (1500) (Head Melee)
-650 (1000) (Tail Melee)
-500 (850) (Body Melee)
-350 (550) (Skull)
Defence: 130

Attacks:
Phase 1: Works like the original Thanserpent's 4th phase; switching between flying above the player, charging at them like a Wyvern, and acting like a worm.
-It spawns Chaoseekers in this phase so that there's always 1 of them active, spawning a new one mere seconds after the previous one's destruction. Chaoseekers are basically Thanoseekers in actions, though are white and blue instead of red and black, like the Chaoserpent itself.
-It uses two types of ranged attack;
--Firstly, it can summon skulls from each of its segments. These fire a single, fast-moving magic blast at the player before charging at the player themselves. They don't have the homing abilities like the original boss' ones have, but they can now be spawned from any of the segments.
--Its other ranged attack is when its head segment fires an even larger skull. It follows the player in a similar manner to the Wandering Eye enemies, though is indestructible. It will eventually stop and explode on its own.
At around 33% health the boss will transition into Phase 2, with its armour breaking off until only the blue parts and the skulls remain. It reveals its entire body is just skulls. All the original skulls from Phase 1 become angrier and the one from the front has its eye-holes join together to make a single, giant eye.
Phase 2: Will become a fast and aggressive grounded worm. It retains both ranged attacks from Phase 1, and now spawns 2 (3) Chaoseekers instead of just 1. It also gains a couple of new features:
-Whenever any of its segments are entirely buried in solid blocks skeletal hands will pop out of the ground above them, dealing the same damage as the skull projectiles.
-If it detects that players are out of its reach it will gain the temporary ability to fly and will gain a lot of speed. These persist until it detects that the player is back within its normal range.

Defeat: Bursts into lots of gibs of skulls, as expected.

GelTech Info:
-[The doppelganger's influence appears to have corrupted those from your past]
The Chaoseeker retains most of the memories of its previous encounter, with emphasis on its defeat. It has since flown into a blind fury and has sworn vengeance, whether in this life or the next.

Drops: An accessory that increases critical strike chance by 15% and strike damage by 25%, as well as a Reinforcing Core, used for the Lightseal.

Extra Info:
-At the end of its GelTech description there is a reference to the line from Gladiator: 'And I will have my vengeance, in this life or the next'.
-Much like with the Corrupt Spirit before it, the reinforcing core is a material for the Lightseal, a powerful end-game accessory.
--And, also like the Corrupt Spirit, it has its own verses in the Chaos Chorus, with a much deeper delivery of its lines.
-Due to the boss' massive defence stat it may be hard to deal consistent damage to it, making it roughly as tanky as the Elder Deathworm despite having over half a billion less health.
-The Chaoserpent's entire 2nd phase is a reference to the end of its original fight, where it would very briefly show its body of skulls before it exploded. (Yes, as hard as it is to see, the Phase 2's body is just 'photo-negative' skulls.)
-The Chaoserpent's body does some extremely high damage to the player on contact, with some hits potentially being able to 1-hit-kill the player. It is advised to be very cautious of its head and tail, especially.
--Unlike the original Thanoserpent the tail actually deals different damage to the body segments, dealing 150 more damage.
Grim Defenderfly
Appearance:
The Prodigious Defenderfly, though it now dons the colours seen most similarly on the Grimstone bosses fought back before the doppelganger. Its eyes and wings are now a bright red.

Summon: Use the Grim Distress Call anywhere in your world. It will not despawn if the player takes it to any biomes nor based on the time of day. However, unlike the Chaoserpent, it will despawn if the player is too far away (though this distance is roughly 1/4 of a medium-sized world, so this is unlikely to happen accidentally.) The rematch with Sorrow is how you get the main material needed for the summoning item.

Stats:
Stats:
Health: 15,500,000 (20,000,000)
Attack:
-320 (560) (Melee)
-400 (720) (Overheated Melee) (Inflicts On Fire! debuff)
-310 (546) (Musical Detonator) (Inflicts On Fire! debuff)
-298 (440) (Invader Missiles) (Inflicts On Fire! debuff)
-285 (420) (Firestarter Flameball) (Inflicts On Fire! debuff)
-350 (580) (Deathwall) (Inflicts On Fire! debuff)
-260 (400) (Poisoned Bullet) (Inflicts Venom debuff)
-300 (535) (Firestorm) (Inflicts On Fire! debuff)
-310 (546) (Kinetic Mine) (Inflicts On Fire! debuff)
Defence: 100

Attacks:
Phase 1:
-Uses all of the attacks seen within the original fight right from the beginning, with the exception of the Deathwall. They all deal increased damage and most will also inflict health-draining debuffs like Venom and On Fire!
At roughly 45% health it will transition into Phase 2. It stops for a brief moment, puts a message into chat about going into overload, and begins attacking again. The background also gains an orange glow.
-It will now use the Overheated melee damage instead of its original damage and will perform charges that cross a greater distance
-It may now summon large groups of stationary mines that explode if the player gets too close to them. If none are triggered they disappear (or explode in expert regardless).
-The Deathwall from the original fight is now used
-It gains a new attack where is fires several fireballs at the ground and platforms, leaving lingering fire over a large area that takes a rather long time to despawn.

Defeat: Begins to explode, though will have a last-ditch attempt to kill the player via 3 charges. After the 3rd charge, it explodes completely.

GelTech Info:
-[The doppelganger's influence appears to have corrupted those from your past]
The Defenderfly was reconstructed from its original, twisted wreckage and reinforced with a thick, durable layer of Grimstone. Its original command to defend seems to have been changed to attack.

Drops: An accessory that increases defence and gives attacks a chance to inflict On Fire!, as well as the Defender Plate; an item used to craft the Lightseal.

Extra Info:
-Its drops another piece of the Lightseal, much like the other 'Chaos Spreads...' bosses.
--And, like the others, it has its own lines in the Chaos Chorus. Its delivery sounds like a recording of someone else, with static heard throughout.
-Much like with the previous fight against the Defenderfly, many of its attacks are based off of Prodigy songs and albums. Many of the previous ones are here, though there is also a reference to 'Baby's got a Temper' (Overheat), 'Mindfields' (Kinetic Mines), and to the album 'World's on Fire' (Firestorm)
--Its verse in the Chaos Chorus also mentions 'Always Outnumbered, Never Outgunned', which is also a Prodigy album. The delivery may also be a reference to parts of 'Invaders must die' as the voice used is similar to that of the person who says the line in the song.
-It is one of the only bosses to use a 'last-ditch' attack, with the others being the Soul Master and Emperor
Omnicron
Appearance: Looks like the previous Omnicron, though the previously-red energy around him has gone to a greyish white. His right eye also takes on a red glow, most visible when he looks upwards.

Summon: Use the Chaotic Revelation at night. Doesn't matter where in the world it is used. The time will be frozen at 12:00 AM, midnight, throughout the entire fight. The main crafting material for the summoning item is dropped from the buffed Omnicron.

Stats:
Health: 15,450,000 (19,000,000)
Attack:
-325 (506) (Melee/ Small Projectile)
-405 (618) (Medium Projectile)
-490 (727) (Large Projectile/ Deathray)
-8000 (19999) (Eclipsing Void)
-500 (800) (Pillars)
Defence: 100

Attacks:
For the most part, it uses the attacks that the previous Omnicron used. It doesn't use its eclipsing vortex from the beginning, but it is free to use all of his other attacks.
At 50% health, however, he will begin to incorporate several new attacks in his movepool.
-He can summon portals that all fire small projectiles at the player before disappearing
-He can summon massive fire pillars to the left and right of himself that inflict On Fire!
-He can summon a large lightning pillar at his position, inflicting Electrified
-He can also summon a large ice pillar at his position that sends out medium-sized sliding ice blocks across the ground. The pillar will always inflict Frozen and the blocks have a 50% chance to.
-He gains access to his more-powerful eclipsing vortex, which is almost certain to kill the player on a successful use.

Defeat: Shudders, lets out roar, then bows to the player. Black particles gather around him and disperse shortly after, with Omnicron missing.

GelTech Info:
-[The doppelganger's influence appears to have corrupted those from your past]
A powerful new energy intertwines with the ones already present in his body. However, it is unsure whether this is the genuine Omnicron, or another mere doppelganger empowered by the Chaos doppelganger's influence.

Drops: An accessory that increases damage and crit chance and the Purified Scroll, one of the materials used for the Lightseal.

Extra Info:
-Much like with the other 3 members of its group, Omnicron has its own material for the Lightseal and its own verse in the Chaos Chorus.
--Its verse is spoken softly, almost whispery in delivery, which is a little unsettling for something that was given the title 'merciless deathbringer' during the earlier half of Chaos Mode.
-It isn't entirely clear whether this Omnicron is the real one or, in fact, one of the doppelgangers. While its name would suggest the former the GelTech info suggests the possibility of it being the latter.
--However, due to their mannerisms, attacks and naming, it is most likely that it is indeed Omnicron and not a mere doppelganger.
Chaos Doppelganger's Revenge
Appearance: Chaos' Doppelganger, back for another attempt at defeating you. The final fight.

Summon: Use the Chaotic Embodiment anywhere and at any time. Time will go to 12:00 PM and freeze throughout the fight. Like before, the screen becomes less saturated and most things become grey or black. The background becomes completely black as well, like with his previous battles.
His craft can only be made after defeating the 4 'Chaos Spreads...' bosses as they all drop materials for the summoning item's crafting recipe.
Single players have 3 lives against the boss. Dying reduces this by 1. As long as you have lives left, you can continue the boss from the phase you died at. If you run out of lives or leave the world, the fight and lives entirely reset. In Multiplayer, all players share a total of 5 lives between them, with players being able to continue from the phase they died at as long as it doesn't reach 0 during the battle. Resets after losing to Chaos or leaving the world.
The Lightseal allows the player to deal 5x damage to this boss and its summons, which is almost a necessity due to its sheer amount of health.

Stats:
Health:
-20,000,000 (34,000,000) (Phase 1)
-30,000,000 (44,000,000) (Phase 2)
-10,000,000 (13,000,000) (Phase 3) (x4)
-25,000,000 (36,000,000) (Phase 4)
-40,000,000 (60,000,000) (Phase 6)
-30,000,000 (47,000,000) (Phase 7)
-32,000,000 (50,000,000) (Phase 8)
-20,000,000 (34,000,000) (Phase 9)
-28,000,000 (50,000,000) (Phase 10)
-40,000,000 (64,000,000) (Phase 11)
-50,000,000 (75,000,000) (Phase 12)
-27,000,000 (50,000,000) (Phase 14)
-20,000,000 (34,000,000) (Phase 15)
-50,000,000 (70,000,000) (Phase 17)
-200,000,000 (300,000,000) (Phase 19)
-5,000,000 (7,200,000) (Chaoseeker Orb)
-8,000,000 (10,000,000) (Chaoseeker Worm)
--652,000,000 (1,000,000,000) (Total phase health)
Attack:
-490 (712) (Melee/ Mega Blades)
-350 (510) (Chaos Rain, Chaos Sphere)
-330 (492) (Chaos Breath, Mini-Seekers)
-378 (534) (Chaos Laser, Dagger Rain)
-390 (590) (Chaos Bomb, Void Blast)
-300 (400) (Chaos Bullet, Bullet Hell, Sword Sparks)
-800 (1100) (Black Hole Void)
Defence: 230

Attacks:
This fight has a massive variety of attacks to use freely, so I will list them all below before I put them into any special order:
1- The attacks used by the original Chaos Doppelganger Reborn fight. Black Hole Void has been made faster, though does not inflict Dazed anymore.
2- Summons large amounts of portals that all vaguely point towards the player. A second or two later, lasers come out of each of them
3- Summons giant swords. The amount depends on players and difficulty. Most of their attacks are normal swings, though it has two other attacks:
--If one is pointed into the air, lightning strikes it. For the next few seconds, slow-moving sparks fly out in random directions from the sword that deal damage on contact.
--If they are slammed into the ground, fire pillars erupt from where they strike. The fire does the same damage as the swords. The size of these flame pillars increases if more than one sword strikes the ground in unison.
4- Summons miniature versions of himself. These charge at the player a total of 4 times, not stopping after the 4th charge until it despawns off-screen
5- Portals appear randomly near the player, firing out lasers after a short delay. Similar to attack 2, though aimed randomly as opposed to at the player
6- A vertical bullet-hell consisting of white fireballs. They pass through blocks.
7- A horizontal version of the bullet-hell attack from attack 6.
8- Chaos slowly moves towards the player, charging up power. Releases an explosion when enough time passes or the player is in range once charged. (Void Blast)
9- Chaos fires a laser from his mouth, then sends it sweeping around him. Circles the laser around 3 times before he stops firing it.
10- Roars, then summons 5 continuous streams of small projectiles from his mouth. These rotate slowly as they are summoned.
--Sometimes performs a reverse version of the attack, with projectiles travelling in from off-screen into Chaos' mouth.
11- Summons rings of 10 small projectiles near to the player. All the projectiles travel inwards after a second, though keep travelling for a long time (and thus end up ultimately travelling outwards)
12- Summons daggers in the air. They stop for a brief moment before darting into the ground even faster than they were moving when originally summoned.

[The fight will be continued below...]
Chaos Doppelganger's Revenge [2]
Attacks:
Phase 1: The same as the original Reborn fight, using only attack 1 listed above.
Fakes-out his death before returning in a new, slightly more disturbing, form.
Phase 2: Uses attacks 1, 2, 3 and 4, allowing the player to get used to his new attacks.
Phase 3: Summons large chains randomly in at the surface across the player's world. Chaos becomes invulnerable. The chains will only sometimes fire small projectiles at the player, but Chaos himself will follow players. When the chains are broken the fight progresses.
Phase 4: Uses attacks 1-4, and now summons the Orb Chaoseekers. They look like giant, black versions of the Dribbler enemies and deal Chaos' contact damage, attacking mainly by flying slowly at the player. They can sometimes fire slow-moving projectiles at the player. Only spawns 1 at a time.
Phase 5: Summons all 4 'Chaos Spreads' bosses back-to-back and temporarily leaves. The 10x damage carries over to them as well and so they can be defeated quite easily. They spawn in a random order each time the boss is fought. They all also get unique defeat animations:
-The Corrupt Spirit is briefly shown uncorrupted and teleports
-The Chaoserpent vanishes into black particles
-Omnicron bows and teleports away
-The Grim Defenderfly explodes into tiny, unsalvageable pieces
These suggest that it is unlikely you'll see the Corrupt Spirit again since she's corruption-free and the Defenderfly is blown to smithereens, though the fates of the other two are ambiguous. After they are all defeated, Chaos returns.
Phase 6: Uses attacks 1-5, though now spawns one of each type of Chaoseeker. The worms deal Chaos' melee damage on all segments and can fly, chasing the player at all times. They are respawned if defeated in this phase.
Phase 7: Attacks 1-7 are now being used and Chaos doesn't spawn any more Chaoseekers
Phase 8: Attacks 6, 7 and 9 are now being used, sometimes even mildly overlapping one another. Chaoseeker worms are also spawned occasionally, with a maximum of 1. Longer respawn time than usual, however.
Phase 9: Chaos becomes invulnerable and summons the Chaotic Heart. Chaos uses attacks 1 and 4, while the heart itself uses attack 10. Up to 2 Chaoseeker orbs can spawn at a time. Killing the heart will make Chaos shift into Phase 10.
Phase 10: Attacks 1-10 are used. Chaoseekers are no longer spawned.
Phase 11: A Black and red version of the Torchworm spawns, blacking out the light as with its own fight. It has increased health and uses Chaos' damage numbers for both its melee and fireball attacks. It is also much faster than the original, but still lacks flight. Chaos is invulnerable until it is defeated.
Phase 12: Uses attacks 2-12 (all of them except its original ones) and summons Chaoseeker orbs, though up to 3 at a time.
Phase 13: Two of the old Chaos Doppelganger Reborn bosses will appear and the 'Revenge' one becomes invulnerable. They use all their attacks except the Black Hole Void and Chaos Burst attacks, preventing cheap damage and deaths as much as possible.
Phase 14: Another Chaos Heart is spawned. Chaos uses attacks 6 and 7 very frequently, and the Heart uses attack 10. Chaos becomes vulnerable again once the heart is defeated.
Phase 15: Attacks 3 and 12 are used. Attack 3 is virtually always active, while 12 happens occasionally. Both type of Chaoseeker are spawned.
Phase 16: The Chaoserpent is spawned again, though with double health. Chaos becomes invulnerable, and Worm Chaoseekers are spawned in-place of the boss' summons. Up to 3 can be active at once, however. Chaos becomes vulnerable again once the Chaoserpent is defeated.
-Chaoserpent will explode into non-photo negative skulls once defeated here, suggesting this time he's actually dead.
Phase 17: Uses attack 1 and summons both type of Chaoseeker. Up to 4 Chaoseekers can be active at once.
Phase 18: Re-summons a double-health Omnicron. Chaoseeker orbs continue spawning and Chaos becomes invulnerable for the last time. Becomes vulnerable for good once Omnicron is defeated.
-Omnicron will shudder and collapse into bones once defeated here, which like Chaoserpent likely means he's dead.
Phase 19: The final phase of the fight. Chaos uses all 12 of its attacks. Up to 3 Chaoseekers can be active at once, and it can be either type.

Defeat: Players are immobilised and teleported below Chaos. Chaos' Doppelganger slowly melts and crumbles away. Screen slowly brightens as this happens. Eventually, the screen will flash white. It remains this way for at least 10 seconds, then the screen begins returning to normal.

GelTech Info:
-Is it... over?
Likely, you say?
Good... good...

Drops: Will drop items based on the attempts needed to defeat it. Drops a lot of money and an accessory or two, but no weapons. Beating it with 1-3 lives left will reward you with a pet based on the mini-Chaos enemies from attack 4. Beating it with 2-3 lives left will reward the player with the Riftstone, used to summon the Boss Rush. Beating it with 3 lives left, however, will net the player an accessory that turns them into a small chaos, called the Chaosoul. (Drops change to 1-5, 3-5 and 5 in multiplayer, respectively).

Extra Info:
-Its health across all its phases reaches over 650 million in normal mode and 1 billion in expert, meaning that it overall matches up with its competitor in health; Elder Deathworm.
--If the player includes all of this boss' summons and mini-bosses, it easily surpasses the Elder Deathworm.
---However, due to the Lightseal's effects, the boss only has an active health of 20% of what is shown, since it allows players to deal 5x damage during this boss fight.
-The Chaosoul, dropped if the player manages to avoid dying even once, grants the player a massive amount of buffs alongside the transformation into a more humanoid Chaos. These buffs are:
--Increases to max life, health regeneration, damage resistance, defence, knockback immunity, immunity to almost every debuff (outside of Potion and Mana sickness), damage, crit chance, crit damage, melee swing speed, 10% lower chance to consume ammo, reduced mana usage, increased minion damage and knockback, increased max minions, increased throwing velocity, increased movement speed, increased flight time and increased flight speed. (Gives the player buffs to virtually every stat in the game)
---However, due to the player blending in with the background, it is not recommended to bring it to a fight against any of the Chaos Doppelgangers. It may increase your stats, but you lose some judgement on your own hitbox to compensate.
-Chaos is, by far, the most gruellingly challenging boss the player will have to face. Its gargantuan health pool, numerous phases, mini-bosses, massive damage output and attack pool make its fight a challenge right from the get-go.
-The boss' attacks are purposely designed to be repeated throughout the fight, as it gives the player a better chance of being able to adapt to them if they are ones used often.
--However, this is countered by Chaos occasionally ditching attacks temporarily during certain phases, meaning that players will constantly have to keep on their guard to see what he's up to.
-There is next to no reason for the player to go out of their way to kill the Chaoseekers because they will likely respawn only a few seconds later.
-Like the previous Chaos Doppelganger fight, Chaos re-uses its previous fight's moves in its first phase.
-It is the only GelTech description for Chaos that isn't some kind of error, instead seeming to be someone's responses to another person's answers.
--However, it isn't ever stated or hinted at as to who it was who said these things, though the most likely person is Storm.
---This is due to her already being known for being aware of Chaos (trying to stop the player unleashing them twice prior), and her ability to alter information on the GelTech (as shown in her Chaos Mode fight).
Chaos Doppelganger's Revenge [3]
Extra Info (Continued):
-The mini-bosses fought in this fight both lead to some ultimate conclusions for some of them, though in one case actually end up posing more questions than answers.
--The Corrupt Spirit gets a happy ending; being un-corrupted after Chaos' Doppelganger loses his grip on her after her 'defeat'.
--The Grim Defenderfly is once again destroyed, though this time is so badly mangled and smashed-up that he is considered unsalvageable.
--The Chaoserpent is finally put to rest after his several rude awakenings and re-awakenings from Chaos.
--Omnicron receives some just-desserts as he is destroyed by the end of the fight.
--However, Torchworm's inclusion in the fight seems rather strange, as Torchworm has had no previous mention alongside Chaos and hasn't been seen since pre-hardmode.
---This, combined with Torchworm's unspecified creator, could mean the Doppelganger had something to do with its creation.
-Due to the final boss of the game still being a mere Doppelganger, the player never actually fights the real Chaos.
--If the proportions between Omnicron's Doppelganger and his actual self are studied, however, it means Chaos would on average have around 10,000,000,000 health and over 1,000 attack. (Perhaps it's good you never fight him then, eh?)
[Special Bosses]
This category is a special one that goes to bosses that, despite fitting into other categories, are given some special things that make them different from a standard boss.

Usually, this will just be the boss being made hidden in the context of the game (usually through a secret item or unusually specific crafts that seem pointless), though may also incorporate other elements like being gamemode specific (e.g. Expert-Mode Exclusive Bosses).

Because they aren't in the other categories, their reasonings for their own special categories will be given with each boss, as well as the point where you would likely face them in the game (if it is ever made).

[31/1/19]: Constructor planned to move here once completed, Added Prism Knight.
[1/2/19]: Frost Reaper has been bought back from the scrapped pile and remade into a new fight. Touch-ups made to both the Prism Knight and Frost Reaper's descriptions.
[3/2/19]: Added the Mega Salamanders
[6/2/19]: Added Cabbage Man
[7/2/19]: Added the World Weaver, Constructor was scrapped sadly.
[10/2/19]: Enough of Shockal has been finished for his boss fight. Production of the Boss Rush will begin...
Prism Knight
Appearance:
A tall, humanoid warrior donning silvery white armour. Certain parts of the armour, usually the trims and edges of the various plates, shine with a full rainbow of colour. Their hair shares the use of rainbows.

[Encountered: Chaos Mode]
[Special Property: Expert-Exclusive Boss]

Summon: Use the Floyd Prism at the surface during the day. The item is crafted using a Last Prism, a Rainbow-tier item (hence the expert exclusive tag), and Luminite, as well as a small amount of Chaos-mode exclusive drops. The boss can be taken anywhere in the world at any time, not despawning even when it gets to night time.

Stats:
Health:
-6,500,000 (Phase 1)
-7,500,000 (Phase 2)
Attack:
-400 (Melee)
-345 (Light Arrow/ Sword Beam)
-300 (Lingering Rainbow)
-650 (Prism Burst)
-320 (Shockwave)
Defence: 75

Attacks:
Phase 1:
-The boss is highly mobile and will constantly be repositioning themselves, sometimes even hanging in the air to attack if the player is too far from the ground.
-The boss may draw a sword and charge at the player, dealing melee damage
-The boss may shoot a light arrow that bounces off of 1 block, though leaves a lingering rainbow trail for a couple of seconds as it travels.
-The boss may sometimes draw their sword and send 2 large, crescent-shaped sword beams at the player. They are quite fast and can pass through blocks.
--When Phase 1 is 3,000,000 health they upgrade 2 of their main attacks; they now fire 2 arrows instead of one (still with the lingering trails) and 3 sword beams instead of 2.
Once taken down to 0 health she falls to the ground and begins glowing. It is designed to appear like a boss defeat, though is in actuality a fake-out as this is actually a transition into Phase 2.
In phase 2 the knight gains a pair of large, multicoloured wings, expressed through a special animation while still glowing that shows them just flapping their wings once. After this, the knight gains a new health bar, and the fight transitions into Phase 2.
-The boss retains all of its attacks from Phase 1, though now charges 3 times during the dash and sends 4 sword beams from the sword slashes.
-The knight may appear above the player and bring their sword suddenly downwards. The attack follows directly above the player until they start travelling downwards, where they will keep going for roughly 100 blocks or when they hit a solid block. Hitting a solid block will cause two giant shockwaves to travel outwards from the strike, decreasing in size the further out they travel.
-The boss may also hold up a prism which reflects light, leaving 3 arcing rainbow trails that linger for a while.
-Finally, the boss' final new attack has them hold the prism in the direction of the player before summoning a large blast of rainbow energy that deals major damage on contact and explodes violently if it hits a solid object.
-At 4,000,000 health the boss upgrades some of their previous attacks. They now charge 4 times in a row, fires 3 arrows instead of two, fires an additional 3 shockwaves in an arc after firing all the others and fires the entire volley faster, the downward thrust will now happen up to 3 times in rapid succession (more in multiplayer), and the boss' prism blast is now faster and has a decreased wind-down time.

Defeat: Glows white and flies off, leaving her items where the was defeated.

GelTech Info:
-Warrior of light, vanquisher of darkness. They have been absent from these lands for many centuries, power sealed within the prism you once held. Free again, her first fight proved to be most exciting, and so it is likely they shall be seen again someday.

Drops: Rainbow-based items. All of them are expert-exclusive due to the nature of the boss and so they are all of rainbow quality. Drops items based off of her attacks, except for her prism blast.

Extra Info:
-The boss' design was mainly inspired by a sudden realisation that many of the Chaos Mode bosses were just re-imaginings of other bosses, or just 'evil entities'. Thus, wanting a more colourful boss, the Prism Knight was born.
-It is the only boss among the guide currently that actually has a fake-out death at 0 health, making the 2nd phase more of a suprise.
--However, in guide format, it is quite hard to have secrets as they are still publically visible, so you'll have to just pretend you were surprised.
-Prism Knight's summoning item, the Floyd Prism, is a reference to the band Pink Floyd
Frost Reaper
Appearance:
-The reaper itself is a hooded figure in a large, dark purple cloak. The cloak covers all of their features apart from a single, glowing eye and what may be a strand of hair.
-The reaper has two variants of scythe; an ice-bladed scythe and one made entirely of ice. Other than the differences to their handles, they looks similar to eachother.
-Finally the reaper's helper, known as the Cryomaw, seems to just be a large face made entirely of ice. Their pupils seem to be made by reflected light, due to their colouration. The mouth is jagged and is lined with small, but likely sharp, teeth.

[Encountered: Chaos Mode]
[Special Property: Summons itself, cannot be manually summoned]

Summon: Encountered very rarely at night in an Ice biome. Needs a relatively large space to be allowed to spawn, so most commonly seen at the surface. The message will appear saying the boss has awoken. Trying to leave the ice biome will inflict a powerful slowing debuff onto the player that only goes if the player re-enters the biome. The boss naturally despawns during the day of it the player manages to escape the snow biome by a few hundred blocks, though this is hard to due to the added slowness.

Stats:
Health:
-3,000,000 (5,000,000) (Reaper, Phase 1)
-800,000 (1,100,000) (Ice Scythes, Phase 2) (x5)
-5,000,000 (7,250,000) (Cryomaw, Phase 3)
--12,000,000 (17,750,000) (Total)
Attack:
-350 (650) (Reaper/Cryomaw Melee)
-275 (465) (Frost Bolt)
-290 (483) (Giant Frost Bolt)
-385 (700) (Scythe Melee)
-1 (1) (Blizzard) (Hits every second) (No invulnerability frames)
Defence:
-20 (Reaper and Cryomaw)
-85 (Scythe)

Attacks:
Phase 1:
The reaper summons a single scythe and begins attacking
-The reaper will either shoot an arc of 5 frost bolts, a ring of 10 in all directions, or create 4-5 giant ones nearby that explode into smaller bolts that travel outwards.
-The scythe will continuously home in on the player, though due to its high movement speed often has to perform a large loop in order to have another attempt to hit the player.
Phase 2:
The reaper staggers back and summons more scythes; a 2nd normal scythe and 2 destructable ice scythes. The Cryomaw also begins attacking.
-The reaper continues using their attacks from Phase 1, though attacks less frequently.
-The unbreakable (normal) scythes can now sometimes stop and spin in-place, sending 4 frost bolts outwards in either a '+' or a 'x' shape.
-The breakable (ice) scythes are slower than the regular scythes, though can occasionally perform a long-range dash towards the player.
-The Cryomaw will frequently appear and disappear where the player was located last, trying to deal contact damage. Sometimes it will also let out a large volley of frost bolts all around itself at varying speeds, though most of them are rather slow.
If the player destroys the two ice scythes, 3 more are spawned. Destroying these 3 will stop the spawning of the ice scythes and the boss will transition into Phase 3.
Phase 3:
The Cryomaw lets out a roar and becomes more aggressive. A blizzard picks up during this phase, dealing 1 damage per second but no invincibility frames, as well as obscuring the screen by a notable margin. The Cryomaw is vulnerable in this phase.
-The reaper and scythes continue using their normal attacks from the previous phases
-The Cryomaw will teleport more frequently and lets out more of the frost bolt bursts from before, as well as rings of 14-15 bolts in all directions that travel outwards very fast.
Defeating the Cryomaw causes the reaper and scythes to vanish, ending the battle.

Defeat: The Cryomaw bursts into chunks of ice and the reaper and scythes vanish. The reaper leaves behind drops wherever they were when the Cryomaw was defeated.

GelTech Info:
-The quiet wanderer of the tundra, having never spoken a word to a living soul. The Cryomaw, seen by their side wherever the Reaper goes, seems to be their only real ally. The Reaper is seen as a bad oman by many, and to everyone else a myth.

Drops: Ice-themed weapons, including a scythe summon and melee weapon. Also drops an accessory that provides resistance to ice attacks and increased defence.

Extra Info:
-The Frost Reaper was originally a prior version of Ember, but was scrapped later in development. However, they were redesigned and remade into a secret boss even later on, as well as losing any original connection to Ember apart from the use of a scythe.
-Alongside the Cosmic Beetle, they are the only bosses to spawn naturally as opposed to directly summoning them.
--However, unlike the beetles who can be summoned faster by 'using' certain items, the Frost Reaper spawns completely randomly as long as the player remains in the snow biome.
Mega Salamanders

Appearance:
Giant, winged versions of the Salamander enemies seen in the underground. Each one shares its colours with one of the normal Salamander enemies, despite them having different attacks.

[Fought: Pre-Hardmode, Hardmode, ML, Chaos]
[Special: Secret fight, Unorthodox and unlisted craft)

Summon: Use the Salamander Stone in the underground. They will leave if the player stays at the surface for too long. The Salamander Stone is made by throwing a Scarred Rock at a Salamander, with the rock being made out of Stone and Silver at a sawmill.

Stats:
Health: 3000 (3650) (x3) / 10000 (12500) (x6) / 500,000 (640,000) (x9) / 1,000,000 (1,450,000) (x9)
Attack:
-30 (45) / 65 (90) / 145 (200) / 265 (400) (Melee)
-32 (48) / 68 (95) / 150 (208) / 300 (455) (Ranged)
Defence: 10 / 25 / 50 / 85

Attacks:
Each of the 9 variants of Salamander have their own attacks, listed in the order of the sprites above:
-The Stone Salamander slams into the ground, making short-ranged shockwaves
-The Metal Salamander has 25% damage resistance and charges at the player (No ranged)
-The Ice Salamander spits large balls of ice that may inflict Frozen
-The Water Salamander spits 3 water bolt projectiles
-The Sludge Salamander spits globules of sludge that linger on the floor and slow players who make contact with them
-The Lightning Salamander shoots out sparks of electricity in a '+' formation
-The Fire Salamander shoots 3 fireballs in an arc that leave short pillars of fire upon hitting a solid block.
-The Kinetic Salamander sends a slow-moving homing attack at the player
-The Venom Salamander spits an arc of 5 purple blobs that inflict Venom
Their fighting patterns and their stats vary depending on when they are fought. However, they will always spawn in a random order, with no real sequence to which colours appear first.
-In pre-hardmode they will spawn 1 at a time until 3 are defeated, at which point the boss is considered defeated.
-In hardmode 2 spawn at the start and each time one is defeated a new one will spawn in its place until 6 have been active. After 6 have become active and been defeated, the boss is defeated.
-Post-ML they spawn in 2 at a time, with new ones spawning for each one defeated. This continues until all 9 are defeated, where the boss is considered defeated.
-Finally, in Chaos mode, they will spawn in 3 at a time instead of just 2. Otherwise, it is similarly structured to the ML fight, with new ones spawning for each defeat until all 9 are defeated.

Defeat: They all explode into gibs, like normal.

GelTech Info:
-Massive salamanders, seemingly transforming into more dragon-like forms. Not quite finished with their transformations, though not too far from it either. I wonder where they've all been hiding...?

Drops: In pre-hardmode they drop money and a Salamander Stick. In Hardmode; Fragmented Scales and a Salamander Mace. Post-ML; Reinforced Scales and a Salamander Staff. Finally, in Chaos Mode; Pristine Scales and a Grand Salamander Staff. The scales are all crafting materials for armour and weapons, and all the 'salamander' items are summoning weapons.

Extra Info:
-Despite being based off of the Salamander enemies, none of them inflict the Poisoned debuff nor use the Salamanders' projectiles.
-Despite being bosses, they have a rather lack-luster amount of moves to use. However, this is compensated for by their sheer numbers and fast movements.
-It is the only boss that can be rematched with stronger stats without having an entirely different summoning item, as the Salamander stone will summon them based on world progression.
-They are considered a secret boss due to the Scarred Rock never suggesting throwing it at a Salamander, and because the Salamander Stone doesn't say that it is a summoning item.
-They can technically be fought on worlds that do not have Salamanders spawning in them naturally, though it will require the player to travel to a different world in order to find the salamander to make the stone.
Cabbage Man
Designed as a collaborative effort from the FMG Discord.
Yes, they chose to invent this.

Appearance: A large, rounded humanoid cabbage monster. Its body seems to be wrapped up in something resembling tape (the silvery colour would suggest something like duct tape). It carries a bag of items on its back which it uses for some attacks.

[Fought: Late Hardmode]
[Special: Secret joke boss invented by friends. Summoning item is an unlisted rare drop from jungle enemies.]

Summon: Use the Leafy Bulb in the jungle. Cabbage man will leap into action shortly after. He will follow players through the forest, crimson, corruption and/or hallow, but not through deserts or snow biomes. Time of day is unimportant.

Stats:
Health: 80,000 (100,000)
Attack:
-75 (130) (Melee)
-60 (110) (Cabbage)
-45 (85) (Duct Tape Ball) (Inflicts Tape!)
-90 (150) (Oversized Sword)
-0 (0) (Sticky Floor) (Inflicts Tape!)
Defence: 35

Tape!: Severely reduces player's horizontal speed and acceleration while affected.

Attacks:
Cabbage Man's large frame is not at all proportional to his speed, as he has rapid acceleration and speed comparable to Lightning Boots.
-Cabbage Man will sometimes throw 2-3 arcing cabbages at the player. They burst into small leaf piles on contact, though these leaves still deal damage (but their range is really small)
-Cabbage Man can throw scrunched-up balls of tape that inflict the Tape! debuff for a couple of seconds.
-Cabbage Man can jump up into the air and bring down a giant sword. The sword has really long range, but has a long wind-down after the swing that leaves Cabbage Man vulnerable.
-Cabbage Man may also throw some tape before charging at the player along the ground with his sword. If the player flies out of his reach or gets too far away he will cancel the attack. If the player remains close-by (likely due to being hit by said tape) Cabbage Man runs up to them and hits them with his sword. Both the wind-up and wind-down of this attack are lengthy.
-The boss has a super-jump that passes through blocks if the player gets too far away or is unreachable due to solid blocks.
-(In expert mode, Cabbage Man can jump and slam into the ground, sending bundles of tape outwards across the ground and platforms nearby. This tape lingers for a really long time and inflicts Tape! for as long as the player makes contact with solid ground until it despawns or the player leaves the afflicted area)

Defeat: Falls over, flails around, then explodes into a mixture of duct tape and cabbage leaves.

GelTech Info:
-A human-like vegetable with a mind of its own. Might want revenge for all the greens the player has eaten in their life, or just because it wants a fight. Either way, it's ridiculous: Who's ever heard of a sentient plant person, anyways?

Drops: [Being Decided in the Discord]

Extra Info:
-Despite Cabbage Man's large and spherical body, he is one of the fastest land-based bosses in the game with speed comparable to (slightly faster than, actually) Lightning Boots.
-Many of the boss' attacks have some sort of major flaw to them. Those using projectiles often can be blocked with solid blocks and his sword strikes have long wind-down times that leave Cabbage Man vulnerable. Despite this, Cabbage Man is still a tough boss.
-Cabbage Man's health is comparable to that of the Destroyer. This, however, is quite worrying due to his lack of vulnerability to piercing that worm bosses often have.
-Cabbage Man's creation mainly consisted of several jokes being but together. Despite continuous questioning as to him being the main representative of FMG on this page, they went through with it regardless.
-The Boss' GelTech data is a joke about this page's creator and the sprite's designer, Okami Tomato, who uses a "sentient plant person" as his online image.
-Some of Cabbage Man's designs were based off of the Hollow Knight boss False Knight. The rounded appearance, lumbering frame, stubby limbs, use of a massive melee weapon and his vulnerable wind-ups were all taken from the False Knight's appearance and/or fight.
--Despite this, Cabbage Man is far from being an early-game boss, being fought not long before the Moon Lord.
The World Weaver
Appearance: Looks like the Clothier, though seems to be wearing new clothes, perhaps as a disguise. His blue jeans and red cloak and hat have been changed to red trousers and the hat and cloak have black on them. His eyes have also gone purple.

[Fought: Early hardmode]
[Special: Weird spawning habit]

Summon: Requires the player to kill the Clothier via the voodoo doll in the day. There is a 20% (28.5% in expert mode) chance the boss will spawn that night if the Clothier hasn't respawned that day. (Cannot be active alongside a live Clother, essentially). Boss despawns when it reaches daytime.

Stats:
Health: 18,500 (21,000)
Attack:
-55 (100) (Melee)
-70 (125) (Magic)
Defence: 24

Attacks:
Will spend the first half of the fight grounded, firing magic bolts of varying types at the player.
-He can summon the standard purple orb that travels at the player in a straight line
-He can summon purple skulls that have slight homing effects, like Skeletron's
-He can summon square-shaped ones that will land as blocks before exploding
-He can summon water-bolt likes ones that are distinguished by their lingering, purple trails
At 9,000 (12,000) health he will become airborne, floating via the use of similar purple energy. He tries to stay relatively close to the player, and attacks more frequently.

Defeat: Purple burst of energy, and the Clothier NPC emerges. He will seem confused as to his whereabouts when first spoken to. Drops vanity armour and accessories when defeated, and the Clothier himself will sell new items.

GelTech Info:
-Lingering remnant of the dungeon's influence over him. Seemingly seeking revenge on you, it has taken over the Clothier's body, suppressing his control and memory. He will likely never have any recollection of this battle, therefore.

Drops: A multitude of different vanity item sets. Drops all 3 parts of a set at a time. Sometimes drops vanity accessories separate of the vanity item drops. Has a massive assortment of items available for drops, though they are all only for cosmetic differences.

Extra Info:
-If the boss is defeated over lava, deep water, or other means of killing NPCs, there is a good chance the Clothier will die again almost immediately.
-The boss is not only hidden, but completely optional as well, since none of its drops affect actual gameplay outside of visual differences to players.
Shockal
Characters designed by Shockal, sprited by me
Anything in italics is directly taken from Shockal's requests or existing ideas

Appearance: Shockal, as taken from his profile. He has his black shirt with grey collar and cuffs, blue jeans, black spiky hair and 'eye-screen' as he usually has.
Spunky, too, is designed straight from Shockal's artworks. She still has her mechanical cat, though her wand isn't visible all the time in the sprite.
Coganule is designed from one of the older artworks. It is a large, wooden, ghostly clock with a strange void within its 'mouth'. Unlike the others, he looks basically the same as his original picture.

Summon: Use the Suspicious-Looking Screen at night. The boss despawns during the day but is unaffected by the biomes the player enters during the fight.

Stats:
Health:
-3,500,000 (3,920,000) (Shockal)
-2,100,000 (2,310,000) (Spunky)
-2,400,000 (2,800,000) (Coganule)
Attack:
-200 (320) (Spunky - Melee, Taser Wand / Shockal - Melee)
-240 (378) (Coganule – Melee, Flail / Spunky - Hand Laser / Shockal - Trapdoor Descent, Hand Summons, Fire Blast)
-285 (500) (Spunky - Short Circuit / Shockal - Eye Laser, Exploding Head)
-175 (290) (Spunky - Bear Trap, Broom Flames / Coganule – Clock Hands / Shockal - Descending Fireballs)
-275 (488) (Shockal - Slap (Inflicts ‘Slap’ debuff, has high knockback)
-185 (300) (Shockal - Mini Army)
-0 (0) (Coganule - Teleport, Time Slow/ Shockal – Laugh (Inflicts ‘Self-Conscious’ debuff))
Defence: 85

[Slap: Decreases movement speed majorly, defence and attack also decreased mildly]
[Self-Conscious: Decreases defence and attack mildly, though the debuff stacks]

Attacks:
An invulnerable Shockal will spawn and present 2 TV screens to the player. After a while, a random mini-boss will spawn from one of them, and Shockal and the screens briefly vanish. When one is defeated, Shockal returns with the screens and one of them will crack. The same mini-boss cannot spawn twice within one fight.
There are currently only 2 options as to whom the mini-boss can be; Spunky or Coganule
Spunky:
-Will fly around, usually above the player. Performs one of five attacks:
--She may fire a laser from her hand, though it will ricochet off any solid blocks it hits.
--She may flick her wand, sending a small barrage of sparkles at the player. If they hit the player, they briefly prevent any horizontal or vertical movement, temporarily stunning them.
--She may charge horizontally, leaving a fiery trail behind.
--She may connect her 2 wires together, building up a lot of excess energy,
before charging at the player. (Short Circuit)
--Her cat may transform into something resembling a bear trap before charging at the player. Also stuns the player briefly if they get hit.
Coganule:
-All his attacks are on a strict timer, meaning they are all used at certain times instead of being completely random.
--He may send arcs of clock hand-shaped projectiles at the player (50% chance every 5 seconds)
--He may swing his flail-like arm around, with surprisingly long reach (50% chance every 5 seconds)
--He may slow down time, slowing the player’s movements greatly, before sending out a large burst of slow clock hand projectiles outwards in all directions. (Every 15 seconds)
--He may slow down time and send bullet hells horizontally and vertically at the player. The bullet hells are also slowed down like before. (Every 30 seconds. Coganule’s time resets to 0 once this happens)
Shockal [2]
Finally, once all of the mini-bosses are defeated, Shockal himself will begin attacking the player.
Shockal:
-His hitbox for receiving damage is larger than he is, though in order to do contact damage his sprite is accurate.
--He may jump up and summon a giant laser from his eye, making it sweep towards the player slowly. The attack also has a wind-down where Shockal is briefly immobile.
--He may jump through a trap-door and disappear. After a second or two, another one opens above the player, with Shockal jumping down momentarily. A large burst of energy occurs if he hits a solid block during his descent.
--He may summon up to 4 hands from his eye-screen. These float up to the player, then lunge forward to grab them. After this attack, they disappear.
--He may release a massive column of fire from his mouth at the player. It is only performed at 90-degree angles, though not downwards.
---If it is fired horizontally, it leaves a lingering trail of fire on the ground
---If it is fired vertically upwards, small fireballs will rain down from the sky shortly after
--If the player remains close to Shockal, he may perform a very over-exaggerated slap. This inflicts the ‘Slap’ debuff and has enough knockback to launch the player some distance.
--He may separate into several, smaller Shockals. These will run around across the floor, jumping up onto any platforms they encounter. Eventually, they re-form into the normal-sized Shockal.
--Shockal will begin to chuckle, then begin laughing. If he successfully manages to perform this laugh, the player is inflicted with the stacking ‘Self-Conscious’ debuff. If hit during the chuckle, this attack is cancelled and one layer of the ‘Self-Conscious’ debuff is removed from all active players if they’ve been inflicted.
--Shockal may also throw his own head, which eventually begins to linger in-place. After a while, it explodes into a cross of flames, being ‘+’ shaped if his head was upright or ‘x’ shaped if the head was looking downwards. Shockal then re-grows his head and continues.

Defeat: When any of the mini-bosses are defeated, they are sent back into the screens they came out of when originally summoned.
When Shockal himself is defeated, he stops in-place for a moment, followed by him exploding into a massive cloud of confetti.

GelTech Info:
-[_/_/_]

Drops:
-A few weapons based off each of the bosses seen. For example, Shockal drops his screen as his mask and a modified version as a laser weapon, he drops Spunky’s wand and cat summon, and Coganule’s magic clock hands and a ‘broken timepiece’ which randomly affects the speed of the player and enemies.

Extra Info:
-All of the mini-bosses seen alongside Shockal are all previous creations Shockal has made in the past.
-Dr. Zak, the character seen animated on his profile, was originally going to be chosen for the fight. However, due to his character not really being a fighter, he was scrapped. His sprite still exists, though it is in the Scrapped area.
-This boss now wins the award for the new winner of ‘longest production period’ for any of the bosses on this guide.
--The Eclipser, therefore, is changed to ‘longest production of a non-collaborative boss’ and/or 'longest production of a non-secret boss'
[Boss Rush]
Nearly every boss in the game, most of which are in the order of which they are fought or depending on their difficulty. To ensure every boss gets their time in the spotlight, they will have stat adjustments as to stop the early-game ones dying so swiftly.

Time is frozen at 12:00 AM (Midnight) and all bosses ignore their spawn conditions; meaning daytime bosses or those isolated to 1 biome will not be affected by this boss.

Bosses with insta-kill attacks have had their insta-kills changed to attacks that simply deal high damage as to avoid infuriating deaths later-on.

There are roughly 60 bosses fought during the entirety of the boss rush, most prior bosses but with one or two special new ones scattered about, meaning the player will have to prepare for one heck of a battle...

Certain Bosses are not included for a few reasons, though boil down to 1 of 4:
-They involve an NPC (Arret, World Weaver)
-They are rematched later (Pre-HM Cursebrand, Pre-HM HM and ML Salamanders, Storm, Ember, Storm (Rematch), Merciless Deathbringer Omnicron, Chaos Doppelganger, Chaos Doppelganger Reborn)
-A superior version is faced later (Giga Deathworm)
-They have some very specific and awkward gimmicks (WoF, Malevolent Sorrow)
A few that fall into these categories, like the Omnicron Doppelganger, are exempt from the blacklist due to major differences in their battles.

Overall, these are the fights the player will go up against:
[Pre-HM] - EoC, EoW, BoC, Queen Bee, King Slime, Skeletron, Torchworm, Granite Burrower, Marble Burrower, Cosmic Beetle, Necro Warriors, Sorrow
[Hardmode] - Skeletron Prime, Destroyer, Twins, Plantera, Golem, Duke Fishron, Lunatic Cultist, Moon Lord, Super Slime, Bramblemaw, Hallow Spirit, Omnicron Doppelganger, Soul Master, Gulper, I.N.V.A.D.E.R., Cabbage Man
[Post-ML] - Coleopterra, Queen of the Hallow, Soul Emperor, Geostorm, Marble Champion, Crescent and Atlas, Eclipser, Deathworm Colossus, Prodigious Defenderfly, Prismatic Corebuster, Zight, Thanoserpent, Ember Rekindled
[Chaos] - Slimey, Shockal, Elder Deathworm, Necromancer Overlord, Neoradiance, Prism Knight, Frost Reaper, Mega Salamanders, Void Purge, Storm
[Chaos Spreads] - Chaoserpent, Omnicron, Corrupt Spirit, Grim Defenderfly, Chaos Doppelganger's Revenge
[Special Bosses] - Torch Wyvern, Reverence, Stormbringers, #1

Extra Notes:
-The player, during the boss fight, will face all 56 of the bosses seen in this page and in vanilla Terraria, as well as 4 exclusive Boss Rush bosses
--The 4 special bosses are, for the most part, based off of previous encounters; this in turn allows for familiar movepools to lower the chances of something totally unprepared for, though also allowing for something new
-The boss rush may take the player well over an hour to complete, meaning the player best be prepared for the long-haul
--In total, the player would likely have to shred through over 2,500,000,000 health in normal mode and over 3,500,000,000 in expert mode. (Elder Deathworm seriously adds to these numbers, by the way)
-Secret or hidden bosses are also included in the boss fight, meaning that it may be the first time some players actually encounter them.
Boss Rush [Part 1]
Bosses 1-15:
"The easiest bosses you'll encounter in the boss rush. None of them are all that threatening."

1. Eye of Cthulhu
+Health and damage buffed, phase change at 60% health
The first boss and overall one of the easiest. In normal mode, the player's mobility almost ensures a damageless battle, though in expert its ability to chain-dash might be a bit harder to dodge

2. Eater of Worlds
+Health and damage buffed, allowed to fire projectiles in normal mode
Even with its projectiles, the player's ability to fly makes it easy to defeat

3. Necro Warriors
+Health buffed, flail's length and speed increased, archer fires shadowflame arrows, magic projectiles indestructible, summoner summons Paladins.
Far tougher than they were originally, but due to their grounded nature they can be very easily out-maneuvered with wings

4. King Slime
+Health, damage and speed increased, major increase to vertical jump height
A more mobile and deadly King Slime. However, it's still King Slime, and therefore suffers from its overall-low mobility

5. Cosmic Beetle
+Health, damage and defence buffed, star projectiles more frequent, increased ground speed
Given buffs to virtually every stat it has outside of its flight speed. However, its projectile is still small and very obvious and its necessity to be grounded to use it causes the simple act of flying a bit to turn the boss into a sitting duck

6. Marble Burrower
+Health and damage buffed, normal mode's armour regeneration timer reduced
Still very easy to kill due to its lack of flight

7. Granite Burrower
+Health and damage buffed, expert mode's armour regeneration timer reduced
Same story as with the Marble Burrower

8. Skeletron
+Health, damage and defence buffed, expert mode's defence boost increased to 2000
Pathetic in normal mode, though deadly in expert mode due to the projectiles and defence boost

9. Sorrow
+Health and damage buffed, attacks more frequently
Lacks its night form's buffs, though still quite dangerous. Skeletron is arguably harder in expert mode due to the homing shots and defence boosts

10. Torchworm
+Health, damage and defence buffed, length increased, movement speed buffed greatly, fires projectiles more often
Buffs all-round for the Torchworm. The debatable beginning of the trickier bosses due to its darkening ability and fireball spam, but piercing weapons still make swift work of it

11. Brain of Cthulhu
+Health and damage buffed, knockback resistance given to brain, creepers receive health and damage buffs also, more creepers spawn
Much harder than its corrupt counterpart. The knockback resistance, while not 100%, is still enough for it to slowly approach the player even during a bombardment

12. Queen Bee
+Health and damage buffed, defence buffed majorly in expert mode, inflicts Venom instead of Poisoned
Ankh Shield doesn't make the boss a joke anymore due to a change in debuff. Gains massive defence buffs in expert mode that mean it is still notably different in expert

13. Super Slime
+Health, damage, defence and movement speed increased, velocity of Slime Vision increased, uses Slime Vision more often
The first, and easiest, of the hardmode bosses. Super Slime still isn't a threat despite being far later in the game, and thus acts as hardmode's flag-carrier

14. Cabbage Man
+Health and damage buffed, acceleration and move speed also buffed. Severely reduced windup and wind-down on attacks
Faster and furious-er, Cabbage Man is surprisingly deadly for sentient vegetation. However, due to the wings available to the player, he can be out-maneuvered quite easily

15. Golem
+Health and damage buffed, fists given massive buffs to health, fireball velocity increased
-Fists' firing speed and velocity slightly reduced
The only boss thus far to actually receive a debuff, though it is quite minor in the long-run. Unremarkably easily for vanilla's late-game
Boss Rush [Part 2]
Bosses 16-30:
"A lot more dangerous than the previous bunch, though still quite a way from the top, I'm afraid."

16. Bramblemaw
+Increased health, damage and defence, inflicts Dazed and Venom instead of Slow and Poisoned, summons given increased stats and knockback resistance
Leading off part 2 of the boss rush is the Bramblemaw. He is a lot more dangerous than his original fight and is no longer completely cheesed by the use of an Ankh Shield

17. Destroyer
+Increased health and damage, given 20 more segments, probes spawned are buffed as well, probes less likely to drop hearts
The Destroyer is a menace in the boss rush due to the major changes he receives, especially to his probes

18. Gulper
+Increased health and damage, given increased mobility
-Cannot become enraged if outside of the ocean biome
Not many changes to this boss outside of some basic stat boosts. Still crippled by piercing weapons, as ever

19. Twins
+Increased health and damage, transition to 2nd phases earlier, gain boosted stats if one of them is killed
Similar to the original, though one of them will become enraged when only one is left. Therefore, it is recommended to try to bring them both down to low health at the same time and to kill them before they deal too much damage

20. Hallow Spirit
+Increased health and damage, uses more projectiles in their attacks, can inflict Withered Weapon instead of Weak with the burst attack
Another small, but dangerous, change. Her hard-to-dodge burst attack can now reduce the player's damage to only 50%, a change most frustrating

21. Skeletron Prime
+Increased health and damage, massive defence boost when spinning, health buffed majorly for all limbs
A pain of a boss to face as it is quite hard to go out of your way to kill specific limbs. Laser should be taken out, but the rest should be ignored to save some time

22. Plantera
+Increased health, damage and defence, fires seeds more frequently, drops spiky balls even in phase 2
-Doesn't enrage outside of the underground jungle
Plantera isn't too much worse, and can actually be partially cheesed by flying high-up whilst away from blocks. Plantera would have nothing to grab and thus cannot follow the player too high into open sky

23. Soul Master
+Increased health and damage, more projectiles per attack, charge distance increased, last-ditch attack given larger explosions
Not too different. Tactics for the original battle will likely work here as well

24. I.N.V.A.D.E.R.
+Increased health and damage, given 50% more segments, mini-worms made of 3 segments instead of 2
Boss is mostly the same, though provides the player with less time on the ground due to its increased length

25. Duke Fishron
+Increased health, damage and defence
-Doesn't enrage outside of the ocean biome
Pretty much a standard Duke Fishron fight

26. Lunatic Cultist
+Increased health and damage, increased stats for all summons, summoning attack cannot be interrupted
The Cultist is freely given opportunities to spawn minions, so it is recommended the player tries to deal with them all first before killing the Cultist and triggering the next boss

27. Omnicron Doppelganger
+Increased health and damage, more projectiles per attack, debuffs last longer
As expected, much of the same. One of the only bosses to actually receive an increased debuff timer, however

28. Coleopterra
+Increased health and damage, minions given additional stat buffs; especially to defence
The only post-Moon Lord boss to be spawned before the Moon Lord itself has spawned

29. Moon Lord
+Increased health and damage, True Eyes of Cthulhu become vulnerable in a newly-added phase 2, phase 3 has 6 invulnerable True Eyes spawn
-Doesn't perform the Moon Bite attack
Quite different from the original battle due to the new phase and more chaotic final phase. Requires a lot of skill to successfully beat

30. Torch Wyvern
One of the 4 special bosses unique to the boss rush. Similar in design and attacks to the Torchworm enemy it was based off of
Boss Rush [Part 3]
Bosses 31-45:
"Nothing from vanilla from here-on out!"

31. Geostorm
+Increased health, damage and defence, Electrified debuff lasts longer, granted flight when under 30% health
Geostorm would be rather pathetic if not for his additional flight granted when low on health. However, this alone can make the end of the battle rather chaotic

32. Marble Champion
+Increased health, damage and defence, cycles between flight and grounded, minions buffed
Granted temporary flight at random intervals. Minions spawn in large numbers and can be hazardous if not dealt with before killing the boss

33. Soul Emperor
+Increased health and damage, more projectiles per attack, summons Soul Masters throughout the battle
The addition of the new Soul Master minions can make it harder to dodge the boss' attacks, though with a little experience the boss can also be out-maneuvered.

34. Queen of the Hallow
+Increased health and damage, defence boosts are more apparent, can also inflict Withered Weapon with its burst now
A harder version of the Hallow Spirit, just as it used to be. Withered Weapon is still a very annoying debuff, so avoiding the bursts if possible is recommended

35. Deathworm Colossus
+Increased health, damage and defence, spawns buffed Giga-Deathworms to accompany it, fires projectiles from head and tail
Easiest boss among the 3rd set, since flying in 1 direction can reliably dodge most of its projectiles.
Deals high damage if it does manage to hit you, however

36. Eclipser
+Increased health and damage, inflicts On Fire! and Ichor whenever it lands attacks, fires more projectiles
Taking a hit from the Eclipser can be a death sentence due to the addition of 2 debuffs. It also fires a lot more projectiles per attack, potentially cluttering up the screen

37. Prodigious Defenderfly
+Increased health and damage, starts out in phase 2 with all its attacks, melee inflicts Broken Armour, deathwall inflicts On Fire!
Not too much more threatening than the original Defenderfly since one of its new debuffs is blocked via the Ankh Shield, though bear in mind it has no attack restrictions at any point in the fight

38. Crescent and Atlas
+Increased health and damage, Crescent's attacks may inflict Chilled and Frozen, Atlas' attacks may inflict Frostburn, Withered Weapon and Withered Armour
A lot more challenging than the original due to the addition of 5 debuffs that cannot be blocked with the Ankh Shield. Bear in mind that one of them becomes faster once the other is defeated

39. Prismatic Corebuster
+Increased health and damage, decreased defence, crystals all have increased health and can fire back additional projectiles at the player
-Additional worms need more damage to be dealt before they can spawn due to the increased health of the boss
Most weapons at this point in the game are piercing, so the player has to be excessively careful to avoid hitting the worm and healing it back tonnes of health

40. Zight
+Increased health and defence, damage increased majorly, attacks inflict On Fire!, Broken Armour, and/or Electrified
While its original fight was somewhat underwhelming due to its lower damage, this fight has his attack skyrocket and gains debuffs on all its attacks

41. Thanoserpent
+Increased health and damage, increased length, spawns more minions, minions buffed slightly
Relatively similar to the original fight, though the serpent itself is lengthier than before

42. Shapeless Void, Necromancer Overlord
+Increased damage and majorly increased defence
-Decreased health slightly
The fight is actually slightly easier than it used to be due to the boss' decreased health bar. The health was dropped to avoid the boss taking too long to kill

43. Ember Rekindled
+Increased health and damage, transitions into phase 2 faster, all attacks inflict On Fire!, debuffs last longer
Any hits from the boss, no matter how mild, will inflict a lengthy debuff on the player. Due to her fast movements, it is likely you will end up making contact with the boss herself at least once and receiving a nasty burn from it

44. Lightning Apprentice, Storm
+Slightly increased health and damage, slightly more mobile, debuff timer lengthened slightly
From now on most bosses begin to receive smaller changes due to them already being closer to the player's level. Storm, despite the suggestion of her being not too much harder from use of the world 'slightly', is still a massive threat

45. Reverence
Another brand-new boss specific to the boss rush. It is a simple fight, but a deadly one, and ends the 3rd part of the boss rush
Boss Rush [Part 4]
Bosses 46-54:
"Shorter than the previous groups, though this is due in-part to the major boost in overall difficulty"

46. Frost Reaper
+Increased health for all enemies in the fight, Reaper and Scythes can inflict Frostbite and Chilled, Cryomaw can inflict both Broken Armour and Withered Armour
Anything to negate the effects of the armour debuffs is strongly recommended as they risk being transferred into the next fight otherwise. Fight is mostly the same other than the boosted stats and debuff, however

47. Void Purge
+Increased health and damage, can make sharper turns when using the portal charge, projectiles faster and more frequent, can sometimes inflict Warped debuff
Similar fight to the original, though it has been granted with the ability to inflict a deadly debuff. Recommended to bring a Rod of Discord, if even just for this fight, just for that one new ability

48. Prism Knight
+Increased health, damage and defence, transitions to Phase 2 faster and with a shorter transition period, attacks can inflict Withered Armour and Withered Weapon
The new debuffs are the main worry for this fight, as to be expected

49. Mega Salamanders
+Increased health and damage, debuff timer increased, each Salamander inflicts their respective buff on contact as well
Not much harder than the used to be, with only minor changes

50. Wasteland's Creator, Elder Deathworm
+Increased health, damage and defence, fires more projectiles, summons buffed Deathworm Colossus to assist it occasionally
The inclusion of the summons and the increases to health mean this boss may still take quite a while. Luckily, the fight itself isn't too hard and the minions despawn after it is killed as well

51. Gelatinous Lightbearer, Neoradiance
+Increased health and damage, debuff lasts longer
Despite the minimal changes this boss is one of the most deadly in the entire boss rush due to its sheer damage output. It is recommended the player exercises extreme caution when facing it

52. Shockal
+Increased health, damage and defence, Spunky's attacks inflict Electrified, Coganule's attacks inflict Shadowflame, Shockal attacks faster
The mini-bosses are granted debuffs and Shockal is swifter at performing attacks. Not anywhere near as deadly as the previous boss was, so not too much to worry about

53. Slimey
+Increased health and damage, uses attacks more frequently, granted additional mobility, health % for activation of certain weapons increased (can use more deadly weapons at higher %)
The changes for Slimey are also relatively minute, mainly just boiling down to it using its later attacks a little earlier. However, the bosses he is between end up stealing most of his (and Shockal's) spotlight

54. Stormbringers
A fight against both Ember and Storm, who proceed to double-team the player in an attempt to defeat them in combat. Uses most of their pre-existing attacks.
Boss Rush [Part 5]
Bosses 55-60:
"The last few bosses in the boss rush, as well as being the most dangerous. So close to the end... yet also so far as well..."

55. Corrupt Spirit
+Mildly increased health and damage, all attacks inflict Cursed Flames, uses more projectiles
The Corrupt Spirit is the same as usual except for the addition of the cursed flames. Most of the other differences are relatively mild, though this is due to her already being an end-game boss

56. Grim Defenderfly
+Mildly increased health and damage, transitions into phase 2 sooner, inflicts Withered Armour with a couple of attacks
No real major changes here outside of the access to a new debuff during its overload charges. Luckily, it doesn't last too long, so with some skill its effects can be minimised

57. Chaoserpent
+Slightly increased health and defence, summons minions more often
Only mild changes to the Chaoserpent, luckily. However, this is also because of its already-troublesome difficulty

58. Omnicron
+Slightly increased health, damage and defence. Attacks may now inflict On Fire!, Withered Armour and/or Withered weapon briefly
Gains a couple of debuffs, all of which are quite dangerous. Luckily, they don't last all that long... though Omnicron is already a very troublesome boss to begin with, so any buffs are bad

59. Chaos Doppelganger's Revenge
+Increased health
-Skips all phases except the first one, the Torchworm summon, and its final phase
Easier than its original battle, mainly just to keep the momentum of the Boss Rush going and to avoid continuous rematches against previously-defeated bosses. Given a lot more health to make up for the 16 skipped phases, so his fight still takes a long time

60. #1
"As the Chaos Doppelganger falls again, a brilliant light fills the screen. However, a silhouette is seen in the light, standing before the player and their victory..."
Boss #30: Torch Wyvern
Appearance: A black, winged variant of the Torchworm boss fought back in pre-hardmode and, closer to this point, the boss rush's 10th boss. It glows more intensely than its burrowing brethren as well.

Summon: Can only be found as the Boss Rush's 30th boss. Nothing despawns it unless the player or the boss dies, and nothing else can summon it either. The screen dims majorly, like the Torchworm's fights before it.

Stats:
Health: 20,000,000 (32,000,000)
Attack:
-300 (465) (Melee) (Inflicts On Fire!)
-250 (400) (Fireball) (Inflicts On Fire!)
Defence: 100

Attacks:
Flies after the player slowly, launching various types of fireball projectiles
-If the player is close to the ground, it will fire a constant flurry of bouncing Flower of Fire fireballs
-If the player is higher-up, it will launch fireballs that travel in a straight line
-Sometimes, regardless of position, it will create a larger fireball from its head. This then begins spitting out fireballs in random directions for a few seconds until it despawns
-If the player is nearest to its tail it will also fire straight-moving fireballs

Defeat: Explodes, and the player may then have their 2nd break in the Boss Rush.

[GelTech Info and Drops do not exist for this boss since it drops nothing]

Extra Info:
-The Torch Wyvern has had the most drastic appearance change of any special bosses. It started out as the original Torchworm with a large pair of wings that functioned as a single sprite (so it wasn't technically a worm) before becoming a multi-winged black-coated worm like it is now.
-Due to its darker colour scheme, it is even less visible than the Torchworm is when the screen darkens. Only the glow from its wings, head and tail are visible.
-The boss is relatively easy to understand, due to it only being halfway through the boss rush, though may still be quite a surprise for players due to it never being seen in the normal game.
[Added: [11/2/19]]
Boss #45: Reverence
Appearance: A mirror version of Omnicron, wearing white robes and donning a cross necklace. He lets off quite a strong glow, much more noticeable due to the boss rush taking place at night.

Summon: Appears as the 45th boss in the boss rush, cannot be summoned via any other means or by himself.

Stats:
Health: 25,000,000 (28,450,000)
Attack:
-385 (570) (Melee)
-320 (450) (Projectile)
Defence: 100

Attacks:
Will teleport around, summoning massive clusters of projectiles, before teleporting again. There are a few variations to his projectile patterns:
-He may summon a horizontal bullet-hell
-He may summon a vertical bullet-hell
-He may summon diagonal bullet-hells that travel at 45-degree angles
-He may send out streams of projectiles from himself
-He may send out slowly-rotating streams of projectiles from himself
-He may summon a cluster of projectiles before they all travel in the direction of the player's location

Defeat: Lets out a powerful beam of light for a brief moment. Following this, he bows and leaves

[No GelTech info or Drops since he doesn't drop anything due to being part of the boss rush]

Extra Info:
-Reverence's main concept was originally to be a sort of 'anti-Omnicron', hence the differences between the designs of Omnicron and Reverence (despite sharing the same base)
-Reverence seems to be somewhat misplaced in the Boss Rush due to him being a lot more difficult than some of the bosses that come after him (Like Elder Deathworm, Neoradiance, and the Frost Reaper)
--His inclusion at this point may be just to have a more solid ending to the 3rd part of the boss rush
-All of the boss' attacks are actually just bullet-hells; allowing for both a new pool of attacks while at the same time not being too unpredictable
[Added: [11/2/19]]
Boss #54: Stormbringers
Appearance: Storm and Ember, fighting alongside each other. They have made modifications to both their weapons and clothing, adopting colours from the other (Storm having used red and Ember using gold). Otherwise, they look mostly the same as their last encounters.

Summon: Appear as the 54th boss in the Boss Rush. Both bosses can be summoned at other points in the game individually, but this is the only time they are spawned together with these stats.

Stats:
Health:
-14,000,000 (16,350,000) (Storm)
-15,200,000 (17,500,000) (Ember)
Attack:
-300 (500) (Storm's Melee, Ember's Melee)
-312 (520) (Storm's Lightning, Ember's Fireball)
-308 (514) (Storm's Lightning Orb, Ember's Scythe)
-278 (468) (Storm's Magnet Pulse, Ember's Meteor Shower)
-410 (580) (Storm's Overload, Ember's Fire Tornado)
-320 (532) (Storm's Stormcloud Net, Ember's Red Flame)
-500 (700) (Storm's Zeus Bolt & Lightning Vortex)
(All of Storm's attacks inflict Electrified while all of Ember's inflict On Fire!)
Defence: 108

Attacks:
Both Storm and Ember retain their previous attacks seen during both of their last-seen encounters. For Storm this would be the Chaos Mode fight and for Ember her 'Rekindled' battle. Storm, however, now lacks her original rapid-stab.
-They will both be active at all times, though will take it in turns to attack most of the time. There are a few cases where they attack simultaneously, though they are rare.

Defeat: Both of them will use the original defeat animations; falling to the ground with a broken weapon. However, they wait until both of them are defeated before they teleport away.

[There is no GelTech Info nor any Drops for this boss since it's part of the Boss Rush]

Extra Info:
-Due to the two bosses being seen alongside each other, one can see quite visibly the height difference between Storm and Ember.
--However, Ember is likely a little shorter than she seems due to her boots, though this only adds roughly an inch to her height at max.
-They share damage numbers for their more similar attacks in all but 1 circumstance.
--The one circumstance is with Storm's Zeus Bolt and Lightning Vortex attacks, as Ember lacks any real counterpart to them
-This fight does two major jobs at once; firstly, it adds a more solid ending to the 4th part of the boss rush via a special boss, and also it exists to finally solidify the idea that Storm and Ember were the two friends/rivals that reference each other (though, to be fair, this was already rather obvious)
-The fight, due to it technically being canonical, means that Ember's worries about dying during her Rekindled battle have been put to rest (...as opposed to Ember herself being put to rest...)
-Storm is overall the more consistently threatening of the duo due to her higher mobility, smaller hitbox, and heavy-hitting special attacks. This mainly just references the fights prior to this; with Storm's final fight being later (and harder) than Ember's.
-The boss' title, 'Stormbringers', is a reference to the boss theme given to them when first encountered; 'A Storm Approaches'.
[Added: [11/2/19]]
Boss #60: #1
Appearance: ...who did you expect... Sportaflop?

Summon: The super-special secret final boss found at the very end of the gruelling Boss Rush. Cannot be summoned outside of the boss rush by any means, meaning that any re-attempts require you to defeat the whole boss rush again...

Stats:
Health: 100,000,000 (111,111,111)
Attack:
-301 (501) (Melee)
-321 (541) (Falling Trap)
-281 (471) (Fake Apple) (Inflicts the useless 'Sugar Rush' debuff)
-261 (441) (Net) (Inflicts 'Tangled' debuff)
-331 (551) (Cannon)
-381 (631) (Disguise)
Defence: 111

Tangled: Slows the player's horizontal and upwards vertical movements in a similar way to 'Dazed'

Attacks:
Moves around with surprisingly fast movements, using a barrage of attacks to defeat the player
-He may summon large, metal cages that fall on the player from above, trapping them if they are caught until it hits the ground, where the player then takes damage
-He may throw a barrage of nets at the player which deal damage and inflict the 'Tangled' debuff
-He may throw a barrage of apple projectiles that are affected by gravity and bounce
-He may throw arcs of apple projectiles at nearby players
-He may pull out a small hand-cannon before firing several high-velocity shots at nearby players
-He may also use a hand-cannon to fire a flurry of shots upwards, causing them all to rain down shortly after
-He may disappear, with several dressed-up disguises placed randomly near to players. One of them will be #1, the others all explosive traps. Right-clicking a trap makes it explode, dealing heavy damage, while right-clicking #1 will cause him to un-disguise and be stunned in place for a while. Waiting long enough will also cause him to un-disguise and have the fakes explode, though he isn't stunned this way

Defeat: Hand-cannon misfires and sends him flying away

GelTech Info:
-"The true #1."

Drops: As he ends the Boss Rush, he does drop items. A lot of money is dropped, as well as the 'Seal of Authenticity'; an item used to upgrade most end-game armour and weapons. Also drops a full set of vanity armour based on his appearance.

Extra Info:
-As is obvious, the boss is based on the character Robbie Rotten
--Along with his appearance, all his attacks are references to the show and especially to We Are Number One, a song sung by Robbie in one of the episodes
---Even his defeat animation is a reference to WANO, with #1 being sent flying by a cannonball
----The boss' theme also contains traces of WANO scattered throughout
-While the boss is arguably easier than the Chaos Doppelganger, this was intentional since the player would have had no prior knowledge and/or experience with the boss up to this point and thus making it super-difficult would likely end in cheap-feeling deaths and rage due to needing to re-do the entire boss rush just for another attempt
-This boss marks the end of Boss Page #4, though not the end of my boss ideas...
[Added: [11/2/19]]
[The Scrapped Content]
"The ones who almost achieved greatness, but got removed last-second for whatever reason rest here"

These are bosses that I either stopped working on due to lack of interest, or had no unique concepts to go along with them... or in some cases any concepts at all. Other times it may be because I cannot make the sprite workable due to its sheer weirdness or size being hard to work with when updating their looks.

[The Entire Concept and Story of the Oof-ageddon joke mode] - Was originally going to be unlocked Post-Slimey via a special Expert drop, the Oof Mask. Equipping it would take up the player's 'head' slot, meaning the player could not helmets of any kind. Bosses would get 10% increases to health and damage and the mask could not be removed during boss fights or the player would die.
-All pre-Chaos Doppelganger bosses killed with the helmet on would drop special items and, if the player collected all of them from every boss, could craft the Oof-ageddon Caller, summoning a joke final boss. The pre-hardmode bosses dropped items to craft OddBod's summoner as well, which would also drop an item for the Oof-ageddon caller.
-The final boss was originally the default Roblox head who would just try to fly into the player and had 50,000,000 health. Touching it would kill you instantly, like a Dungeon Guardian. The boss' sound effects would have also been the 'Oof' sound byte.
-The Oof-ageddon itself has been re-worked into the Constructor, an equally-weird, but more interesting, hidden boss fought around the same time.
-Mask remains a special Slimey drop, just that bosses would not gain the 10% increases nor the special items, meaning the mode isn't entirely gone.

Scrapping Reason: Tedious to work with and many of the bosses contrasted heavily with other ones in the guide. Final boss wasn't an interesting or fun fight and the process of hunting down and attempting to kill EVERY boss from this would likely take days. Too much effort for next to no payoff.
Scrap Date: [25/1/19]

OddBod - A large, blue spherical creature with orange extremities, designed for a special side-story to the 'mod'. Its wings doubled as arms for melee attacks.

Scrapping reason: The story it was for got cancelled and, due to its relatively unthreatening appearance combined with its design being too unusual and contrasting too much, it was scrapped.
Scrap Date: [24/1/19]

[25/1/19]: Someone was scrapped, though was been brought back on [1/2/19]

[No Sprite] Desert King - Was designed as a large skeleton with a crown who could summon unique desert enemies during his fight. Much like the Cursebrand it would have also had a hardmode variant who could summon Mummies and Ghouls.

Scrapping Reason: Never got around to it and, by the time I had a spare moment to make them, I decided that it wasn't an interesting enough boss on its own since it behaves too much like a miniboss or the Dark Mage from the OOA event.
Scrap Date: [26/1/19]

[No Sprite] Frost Maw - Large, bipedal creature covered in ice. Would have had a large mouth with small eyes and two legs for mobility, but no arms or tail. Would have been fought prior to EoC and would have mainly just ran towards the player like the Wolf enemies do.

Scrapping Reason: Boss was rather uninteresting, only following the Wolf AI whilst occasionally summoning ice balls from its mouth. Extremely easy to cheese with a platform a few blocks off the ground and would have been unmemorable at best and laughably bad at worst.
Scrap Date: [26/1/19]

[No Sprites] Crescent and Sonar/ Mecrescent and Sonar - Some of the first Terraria bosses I ever designed back in 2014, which I planned to re-make with better sprites for this page. Crescent and Solar were bosses based on the sun and moon, based off of Kirby's Mr. Shine and Mr. Bright, who would alternate between melee and ranged. Whoever was in the sky would use ranged attacks (Falling stars for C., rays of sunlight for S.) and the other would likely just charge at the player.
Mecrescent and Sonar were a mechanical counterpart with similar abilities and fights. Sonar used sound waves instead of light and Mecrescent used lightning bolts instead of stars, but the fights were still similar.
The Eclipser was meant to be their post-ML counterpart, using enhanced versions of all their abilities before its redesign.

Scrapping Reason: Never got around to making them is the main reason. Eclipser was heavily changed, too, so they lost 1 of their fights. Sprites didn't look good enough, even with a re-make.
Scrap Date: [1/2/19]

The Constructor - Planned originally as the Oof-ageddon final boss, then a chaos mode boss, then a secret boss, and finally scrapped. Would have used LEGO Brick-like projectiles and some structures the player would have to navigate mid-battle. Pickaxe would be a necessity. As it took damage, it would become more and more distorted and damaged, revealing an almost Chaos-like form beneath its yellow exterior.

Scrapping Reason: Never got around to finishing it, and its fight would likely have been an awkward one due to your attacks being continuously blocked by its summoned structures. Rod of Discord and fast movements would break the structures. Most players don't prepare a pickaxe for a boss battle, either.
Scrap Date: [7/2/19]

Dr. Zak - One of the Shockal fight's mini-bosses (and personally the one I think looked best). Had no planned attacks during his design.

Scrapping Reason: Found out that he was one of the least combat-based characters Shockal had, so with that there were no real ideas for attacks.
Scrap Date: [10/2/19]
[Music]
Warning: These themes don't exist yet and I'm not sure if they ever will, sorry
Currently I do not possess the correct skills, experience and equipment to make proper custom music, so most of this page is going to be relatively unimportant to most. It just talks about what sort of music they would have either in mod form or if I, some day, manage to get around to making their themes.
And also with that most of the names put in speech marks are just placeholders at the moment as well.

Necro Warriors, Torchworm, Cursebrand, Granite Burrower, Marble Burrower, Gulper, Mega Salamanders: The usual Boss 1 theme shared by the majority of pre-hardmode bosses.

Sorrow: Would have used the same themes as the WoF and Twins.

Super Slime: Song using motifs from the Forest theme. Not really epic nor intimidating, but that's the point.

Cosmic Beetle, Coleopterra: Theme would use motifs of Terraria's normal Space theme, due to where they are fought.

Bramblemaw: A theme that would have had a 'jungle' vibe to it, perhaps using some segments from the underground jungle or even Plantera's theme.

Giga Deathworm, Deathworm Colossus, Soul Master: Would have all had their own theme, not utilising specific motifs like a lot of other bosses.

Hallow Spirit: Theme uses motifs from the overworld Hallow, though sped up slightly.

Storm, Ember: "A Storm Approaches", uses guitars, but nothing else decided yet.

Omnicron Doppelganger, Chaos Doppelganger: "A Sight Most Disturbing", uses a quior and bells, setting an appropriately 'apocalyptic' feel to their fights.

Bramblewrath, Queen of the Hallow, Geostorm, Marble Champion, Soul Emperor: "--- Awoken!". each one uses motifs of their original themes, but sound more 'epic'. Dashes in title are replaced by the original boss' names (So Bramblemaw, Hallow Spirit, etc.)

Prodigious Defenderfly: "Prodigious", you don't really need an explaination if you read its page, do you?

Prismatic Corebuster: "Colourful Reflections", uses some of the motifs of the Hallow and of the Forest Night themes, quite slow for a boss theme.

Zight, Thanoserpent: Use their own, unique theme. Much like with the post-Chaos Doppelganger bosses the theme uses bells, but no quior like the Doppelganger fights.

Ember Rekindled: "A flame, distinguished", actually has lyrics. A theme which is mainly a warning to the player of her abilities and her knowledge of the player's abilities. Sounds confident. Utilises a motif from the 'Grimstone bosses' as she technically is one.
"A flame, extinguished", also has lyrics. Addresses her 'rival and friend' instead of the player, mainly an apology for her recklessness and a realisation that she may die. More dramatic than the first phase's music.

Storm (Rematch): Uses a motif from "A Storm Approaches". Much like a lot of the later bosses the theme uses bells.

Elder Deathworm, Necromancer Overlord, Neoradiance: "The End Approaches", name has two applicable meanings. Utilises similar bells to the two doppelganger fights mentioned previously, though not the quior. Fast-paced due to the difficulty of the bosses.

Omnicron: "Grim Orchestra", somewhat slow at parts, uses a mixture of bells, a choir and violins, but also things like a guitar at the faster and more tense parts of the song. Uses a motif from the Doppelganger's battle.

Chaos Doppelganger Reborn: "Calamitous Return", sounds similar to the Chaos Chorus in terms of music, though doesn't use the lyrics. Music is faster and louder and there is more use of guitar throughout the song.

"Chaos Spreads..." Bosses: "Chaos Chorus", a track using the bells, choir and guitars like the two doppelganger fights. They also have lyrics, each apparently sung by their respective bosses, with the 1st and 3rd verses being the same for all 4 of them and the 2nd being unique to each. There are motifs of Grim Orchestra and A Sight Most Disturbing.

Chaos Doppelganger's Revenge: "Overshadowing Hopelessness" and "A Dependent Future", The former is a more menacing sounding theme, utilising elements from 'Chaos Chorus' and 'Calamitous Return', though with more emphasis on the choir and bells.
The latter, however, sounds a lot more hopeful. The guitars become more prevalent and begin to override the choir at points. Some areas also slow down, using string instruments and a piano. Uses many motifs of other boss' themes.

Boss Rush: "Sweet Revenge", a multi-part track that begins with a choir and some guitars and drums. When the post-ML bosses begin spawning bells are also added and, once the Chaos Mode bosses also begin to spawn, some piano is added. The track features motifs of a lot of the other boss' themes, including "Chaos Chorus", "Calamitous Return", "The End Approaches" and "A Storm Approaches".
[Thanks]
Well this is the end of the guide (currently), so congrats for making it all the way down here; there's a lot to get through...

Feel free to come back every now and then because it's likely new bosses will be added every now and then when I think of anything interesting (though I still have about 20 in the works while writing this).

If you want to leave any ideas in the comments I'll try and implement them as best I can and credit your name at the top of the boss' section, though if your name changes you may have to tell me since it's hard to keep track, sorry.

WHOA! Boss Page 5 is out now!
https://steamcommunity.com/sharedfiles/filedetails/?id=1652869689


The Trending Tomato award for reaching the top of the Terraria Guides page

Special thanks to anyone who participated in this guide in any ways:
-A large portion of FMG who helped me design Slimey's drops and who designed Cabbage Man; a boss who I genuinely never thought would exist.
-Shockal in helping me make him a boss
-Lv. 35 Boss's ideas and 'Sun God'; leading me to majorly re-design the Eclipser; for the better, naturally :P
-[Everyone in the comments] for the support, the ideas and... sometimes the rather unusual comments here-and-there

-[...and Rerxa] because if I didn't they said they'd explode... I don't want to have to clean that up

So I'll get back to working on my next project now, though as a final note I want to say:
THANK YOU!
109 Comments
spicemaster Jan 21, 2020 @ 4:12pm 
W.U.T D.O.S I.N.V.A.D.E.R. S.T.A.N.D F.O.R.?.
Okami Tomato  [author] Jan 18, 2020 @ 7:07am 
Bendy you could join the Discord if you wanted. It's linked in some of the later ones, but for simplicity's sake I'll link it here, too:
https://discord.gg/Qea4ED
Mr.Who Jan 18, 2020 @ 6:17am 
i will like to make art of bosses but idk how to send it
Okami Tomato  [author] Jan 12, 2020 @ 3:48am 
Thanks Joker

Also twy, I have no idea :P
Twylitefox Jan 11, 2020 @ 8:49pm 
ive a question. how do you... make this idea... seem so insanely awesome? hell, even MY ideas, es MY ideas arent this great
Joker77 Dec 31, 2019 @ 2:53pm 
Now this is some true dedication and passion:summer2019horn:
chimaera. Jun 10, 2019 @ 12:12pm 
Insert random o.o here
Okami Tomato  [author] Apr 24, 2019 @ 2:51pm 
@level 35 boss
...Rogue AI's design may be finished.

...and, to make up for making you wait 10,000,000 years for it, it gets the special placement of #40 when I get there.
Okami Tomato  [author] Mar 21, 2019 @ 2:53pm 
@level 35 boss
Hey level 35 boss if you're still there:

Either you have a doppelganger or I saw you in a match on 2Fort just now :P
Also 2 of your bosses are in part 5, in-case you didn't know
AC Seaweed Mar 3, 2019 @ 9:06am 
u