Foxhole
337 คะแนน
Foxhole Logistics for Beginners
โดย Jimmiefan
Being updated for 1.0 Inferno! An overview and explanation of the role of a Logistics player along with steps to get started and be effective with what you spend your time doing and how you spend your resources to supply the front lines.
14
7
11
2
2
2
   
รางวัล
ชื่นชอบ
ชื่นชอบแล้ว
เลิกชื่นชอบ
Overview
If you're a new player to Foxhole, welcome! This guide is designed to provide a source of reference for everything related to logistics, and to lay out some of the basic tasks you'll need to do when doing logistics.

Feel free to skip through this guide, especially as returning player, to view the portions of the guide which you need. Towards the bottom of this guide, there is a section titled "=== Roles of a Logistics Player and Getting Started ===" (Work in Progress), which you're welcome to skip to in order to get playing. I would highly recommend reading through the individual sections related to other logistics knowledge, structures, and vehicles, as I will go further in depth in those sections about each thing.

As always, leave a comment if there's anything that I'm missing, needs clarified or corrected, or needs to be updated from an older version (I'm still working on updating a few portions of some sections, but if I've missed something smaller, that would still need mentioned).
=== Useful Logistics Knowledge ===
These are things in which aren't necessary for you to play, but primarily are things in which you'll learn through mistakes and experience playing the game over time. I would highly recommend reading and implementing these things sooner rather than later, as it'll help you be safer, more successful, and better off in the long run.
Legend of Abbreviated Structure & Resource Names
Below is a list of the different abbreviations commonly used by players during the game, which will also be abbreviated in this guide. While not mandatory for everyone to use these abbreviations, it does make typing and describing them quicker and easier, so it would be beneficial to know these well enough to tell what others are referring to.

Resources
  • Bmats = Basic Materials (Refined from Salvage at Refinery)
  • Rmats = Refined Materials (Refined from Components at Refinery)
  • Emats = Explosive Materials (Refined from Salvage at Refinery)
  • HEmats = Heavy Explosive Materials (Refined from Sulfur at Refinery)
  • Cmats = Concrete Materials (Made from Components at Concrete Mixer)
For more information on collecting and refining, see the Resource and Refinery sections below.

Production
  • SS or shirts = Soldier Supplies (Produced at Factory)
  • GS or gsupplies = Garrison Supplies (Produced at Factory)
For more information on production, see the Factory section below.

Structures
  • TH = Town Hall
  • FOB = Forward Operating Base
  • VF = Vehicle Factory
  • SH = Safehouse
  • Fort = Relic Base
  • BB or BoB = Bunker Base or Bunker FOB
For more information on a specific structure, see the Structure section below (Only for logistics structures).
Understanding and Utilizing Your Map
Using Your Map
To open and close the world map, press 'M' (default). When viewing the world map, you can click and drag to pan around, and use the mouse scroll wheel to zoom in and out. To the left side of your screen, there's the Map Legend, which has toggles allowing you to turn on and off different groups of features displayed on your map. Down in the bottom left, you're able to see the region that you're in, the day (in-game time), the time of day (1430 == 2:30 pm), and when the map intelligence was last updated (in-game time). For reference, the day begins around 0600, and the night begins around 1800.

On your map, you can see which faction owns which bases, and the locations where structures and resource fields are. Structures such as the watchtower and observation tower can be built to provide map intelligence over their surroundings (Their partially transparent white circle indicates range), which will reveal both friendly and enemy infantry, vehicles, and defenses. Some structures such as Town Halls, Safehouses, FOB's, and forts have an upgrade, which will allow them also to provide map intelligence.

Familiarizing Yourself With The Regions
The best way to learn your way around is by traveling around regularly. There are 37 regions for you to play in, but over time you'll get used to the roads to get from one place to another, the layouts of towns and logistics centers, and the resource fields and mine locations (Resource field/mines positions remain between wars, but the type of resource is randomized for each). Be sure to ask around for help or directions if you're lost or can't find places that are mentioned by others.

Updating Map Intel
All of the intel that displays on your region map that can change position (i.e., infantry, vehicles, new/destroyed structures) will only be changed from what was last seen with a map intelligence update. To get a map update, you can access structures such as the TH, FOB, Fort, or Safehouse, or to get automatic updates every few seconds, you'll have to have a radio or radio backpack equipped. When viewing your map, you can check in the bottom left corner and compare what the current in-game day/time is with the last time it was updated.

Threat Analysis
Always use the map to continually identify the best and safest routes. There's no reason not to if you can. If you don't have a radio, spend a bit of time at a TH, SH, Relic Base, or FOB and keep refreshing your map intel while keeping an eye on friendly and enemy activity to identify where might be vulnerable. I suggest to always have a radio on you, as it's the most effective defense you can have, but it can only be useful if you're using it.

Identify the situations in which you can't identify possible threats, such as along roads without watchtower and defensive coverage, or risky frontlines. It is always better to ask if it is safe first before going, and I might even suggest in some cases where there has been known contact recently to refuse to travel until it has been explicitly stated to you that it is clear. The front line might want supplies, but it is rarely worth the risk of those supplies being lost to the enemy if there is a high probability of enemies being in that area. Both sides can use each others equipment (excluding uniforms), so anything lost can be directly used against you!

Map Markers that can be placed down by players don't require map intelligence updates, so be sure to be reading those if anyone's placed any down near where you're traveling.

Logistics Information For Key Structures
If you hover your mouse over a structure marker, it'll bring up a list of supplies (sorted by quantity, most to least) and base upgrades for that structure. This allows you to observe what Town Halls, FOB's , Relic Bases, and Safehouses have and need supplies without having to drive there yourself. You can also check Refineries and Factories to see what can be refined and produced there, and also see the progress of the base upgrades.

You can also hover your mouse over resource fields and mines to check how many resource nodes are left and how many resources are stored inside, respectively.
Technology (Engineering Center)
You can view the current level of technology in any friendly owned Engineering Center which is found in any major logistics town. The Engineering Center is also where you submit Iron and Aluminum to a technology in order to increase its progress, which will give you prototype kits in return for any successful research attempt. Prototype kits can be taken to any Mass Production Factory (MPF) to produce their respective item when right-clicking on it in the inventory.


Map Icon

The tech tree consists of two categories, Vehicles and Equipment. The vehicle tech tree only progresses by submitting Iron, and the Equipment tree only progresses by submitting Aluminum.

Each tech tree is separated into different tiers, each tier being it's own row, top (Tier 1) to bottom (Top Tier). You have to complete one tech for each tier before being able to start teching the next down. Once you finish the last tier, you'll now repeat this process starting from the top row working your way down again, but getting to tech between one of the remaining options.

Each row is split up into icons on the left of the vertical line separator, and those on the right. As your faction progresses through the tech tree, you get to choose 1 tech out of all of the options on the left. Once it gets finished, everything on the right will be auto unlocked instantly completely free.

After the initial run through all of the tiers in the Vehicle tech tree, the second, and third selections in each row will be veteran leveled, which increases several of their vehicle stats. For example, if you have 3 vehicles on the left side of a row, one of them being a tank. If you choose the tank in the first round through the tech tree, it'll be your normal tank. The second will be the first level up (indicated by 1 yellow chevron on the icon, and a camo paint scheme for the vehicle), and if chosen for the third, it'll be a second level (indicated by 2 yellow chevrons, and a different camo paint scheme)
=== Structures ===
Refinery
The Refinery is where you can refine raw materials like salvage and components into more useful resources such as bmats and rmats, and where you refine Crude Oil into Petrol. You also have to refine Iron and Aluminum into alloys before submitting those to Engineering Centers to increase your technology.


Map Icon


Refinement Options
  • Salvage --------> Basic Materials
  • Salvage --------> Diesel
  • Salvage --------> Explosive Materials
  • Components --> Refined Materials
  • Sulfur -----------> Heavy Explosive Materials
  • Coal -------------> Gravel
  • Crude Oil ------> Petrol
  • Iron -------------> Iron Alloy
  • Copper ---------> Copper Alloy
  • Aluminum -----> Aluminum Alloy

There are several great things with refineries to keep in mind:
  1. Refinery orders can be set as personal or public orders. Personal orders will appear in the Refinement section, while public orders will automatically be added to the Refinery's Stockpile as it finishes.
  2. Personal orders can only be stopped if enemy players destroy the Refinery itself, which gets rid of all orders for everyone (which don't return once the Refinery has been rebuilt).
  3. The Refinery runs constantly even when you're not online. Therefore it can make a huge difference to start large quantities of resources, which would take hours to refine, such as sulfur, started before logging off, which can be retrieved once back online.
  4. Each Refinery has separate orders from one another, so for example, you can get two hours of sulfur refined in one hour by splitting the order evenly between two refineries.
  5. Each players personal or public order can be run simultaneously with other players, which means your order doesn't need to wait on another players order to finish before it can start.

When you interact with the Refinery, it brings up the menu (shown in the image on the right). This is where you can refine each of the resources.

Each Refinery can have a maximum of 10,000 bmats and 5,000 of the rest of the resources stored within your private queue without being retrieved. After approximately 48-50 hours of not adding new resources to the queue, these privately stored resources will automatically be put in the public stockpile.

Getting Squad Store-able Resources for Stockpiles
The only way to get crates of resources which are able to be stored in squad stockpiles in Storage Depots/Seaports, such as bmats, is to refine a private queue of the resources. Once they finish, right click on the finished resources and pull them as crates. These crates will be squad store-able while pulling crates from Refinery's public stockpiles will only be public store-able. There is NO other way to do this, or undo this if you take out resources without crating them then.

Resource Containers
Resource Containers can be unloaded directed into the Refinery's Stockpile by putting it on the ground on the Refinery ramp. This brings up a menu allowing you to submit the resources directly to the Stockpile (Right-click on resources). Alternatively, you can also click the Submit Driveway Equipment button in the Refinery Menu.

Refinery Build Requirements
The Refinery, along with the other logistic structures such as the Factory, can only be built in a town when the Townhall has completed the Industry upgrade. Once built, the Refinery can refine all types of the resources.
Factory
The Factory is where you produce weapons and ammunition, along with other useful tools and equipment such as wrenches, radios, and gasmasks. In busy production locations, these are often the bottleneck for production since each player has to wait for all the orders of other players to finish, which started before.


Map Icon


Categories of Supplies that can be Produced
  • Small Arms (Basic weapons and ammunition)
  • Heavy Arms (Advanced weapons, explosives, and shells)
  • Utility (Tools and equipment)
  • Medical (SS, Bandages, First Aid, and Trauma)
  • Supplies (Garrison and Bunker Supplies)
  • Uniforms

Factory Build Requirements
Just like the Refinery, the Factory requires the town hall to have completed the Industry upgrade allowing the Factory to be built. Once built, you can produce any of the categories of supplies immediately.

Orders and Queues
When you produce something from the Factory, the Queue time is public, meaning if someone has placed an order for something in the same category that you did, you have to wait for their order to finish before yours starts. Only four orders can be queued for each category at a time, which will prevent you from being able to place your desired order.

You can set your orders to be private, squad, or public, to decide who can retrieve your order when it is finished. If you switch tabs for the queue, you can switch between seeing your orders, squad orders, and public orders, which, when completed can be retrieved.

If you are producing something such as SS (Soldier Supplies) or GS (Garrison Supplies), which have more of an importance of just getting created rather than who exactly takes it where it is needed, you probably should set that order public, so if needed, someone can pick it up without either requiring you to get it or having to start their own order. This is more of a common courtesy you should follow if you're not going to immediately pick up your order once it finishes, as too often, front lines have run out of SS while logi has to start a new order of shirts, while not being able to retrieve someone's finished personal order of SS.

Regardless of whether the order is private, squad, or public, it will automatically be put in the public inventory of the Factory after about 45 minutes after it finishes if not picked up. Should there not be space in the public inventory for those crates, they will be lost and not retrievable, so don't keep your Factory's inventory completely full all of the time.

Garrison Supplies
Another crucial resource to produce and supply everywhere is Garrison Supplies. Having these stored in TH's, FOB's, and Relic Bases will prevent the inevitable decay of defensive structures (Damage to structures over time is the way the server gets rid of structures deemed unused by players to reduce server load).

However, they won't prevent decay unless at least the Small Garrison upgrade has been completed for it. Once structures start decaying (varies, but they all take at least several hours), the rate of which the Garrison Supplies get used up automatically for the Small Garrison upgrade is 2 per hour for every decaying defensive structure (including sandbags and walls, i.e. anything that decays) that is within the radius of the TH, FOB, or Relic Base, and 1 per hour for every decaying defensive structure for the Large Garrison Facility.
Mass Production Factory
The Mass Production Factory Factory functions similarly to the Factory but allows you to produce larger orders at a discount over a longer period of time. These are only found in some logistics towns.

Categories of Supplies that can be Produced
  • Small Arms (Basic weapons and ammunition)
  • Heavy Arms (Advanced weapons, explosives, and shells)
  • Uniforms
  • Vehicles
  • Shippables

Mass Production Factory Build Requirements
Just like the other logistics structures, the Mass Production Factory requires the town hall to have completed the Industry upgrade allowing it to be built. Once built, you can produce any of the categories of supplies immediately.

Orders and Queues
The unique thing that makes the Mass Production Factory viable is the orders. Each order can only produce a single type of item but can have up to 9 of that item for Small Arms and Heavy Arms, or 5 for Vehicles and Shippables. Each crate that you add to the order gives a discount of an additional 10% to the final cost of the order, up to 50% for five or more crates. This can make the Mass Production Factory a great deal to get two times as many supplies out of the same cost.

The other thing to keep in mind is the queue times. It takes significantly longer for each order to finish, but each order that someone else adds to the queue decreases the amount of time it takes for the Mass Production Factory to complete orders.

It still functions like the Factory, where you have to wait for the orders before yours to finish for your order to start, but frequently if enough orders are running, your order may end up finishing sooner than it would have otherwise.
Garage (Vehicle Factory)
Production
Garages, still commonly known as Vehicle Factories, are where you can produce every ground-based vehicle except the CV and Cranes, which can be built around TH's and Relic Bases.


Map Icon


The image below shows the inventory of the Vehicle Factory and the list of buildable vehicles. Some vehicles may be unable to be built due to not having completed researching that technology.

Garages are owned by a faction and can only build the respective vehicles which that faction has unlocked. Should you have a prototype kit, or a crate of vehicles, those need to be taken to a Mass Production Factory (Right-click on the item in inventory to add to queue) to be built.

You are also able to perform a Full Repair on any vehicle inside the Garage. This fully heals the vehicle and also replenishes a hidden "armor" value, which increases the chance an armored vehicle can bounce shells which gets reduced due to sustaining damage.
Construction Yard
The Construction Yard is where you produce Shipping Containers, Resource Containers, Concrete Mixers, pallets of sandbags and barbed wire, and emplacement structures. Keep in mind everything made at a Construction Yard are Shippable's, which require a Crane to move.


Map Icon


Once you've finished building your Shippable, you'll need to interact with them to package them to lift them with a Crane. For a Resource/Shipping Container or any other vehicle, there's a Package button when you're interacting with it; if interacting with it while standing nearby doesn't automatically package it.

Storage Depot and Seaport
The Storage Depot and Seaport function almost identically. The main difference is that the Storage Depot stores only land vehicles and has one loading/unloading ramp and crane, while the Seaport stores both land and sea vehicles while having two loading/unloading ramps and two cranes. There are many towns, primarily logistic hubs, in which a Seaport replaces the regular Storage Depot.

Storage Depot/Seaport Inventory and Uses
The Storage Depot/Seaport is an advantageous structure for logistics players. It's inventory works similar to structures like the Town Hall, FOB's, or Safehouses, except that it is only for storage of crates of items or vehicles. When you submit a crate, it is stored in the Storage Depot/Seaport as a crate and can be pulled back out as a crate, rather than individual items. When you store a vehicle, it can be pulled back out as well.


Map Icon (Storage Depot)


The Storage Depot/Seaport's key use are times where a stockpile of resources are rapidly being produced and not always shipped immediately to the fronts, such as for howitzer shells or extra SS. You may have dozens of crates finish before anywhere needs them, which would take up lots of storage crate space.

The Storage Depot/Seaport now allows for much more organized storage of potentially thousands of crates condensed into the space of just one structure. Especially in crucial logistics towns where they are most commonly used, extra crates of ammunition, medical supplies, and shells are produced and locally stored in the Storage Depot to be taken to the front line without waiting for them to be made.
You'll find that some item types once submitted to frontline Town Halls and FOBs, for example, any infantry weapon, does not stack, therefore making transport very impractical after it was submitted to relocate them with a truck. Thus, you should be careful not to overstock individual locations with more of these items, like rifles, then they'd realistically need for the foreseeable future, keeping those crates stored within a Storage Depot/Seaport until they are needed elsewhere. It's rarely worth anyone's time to pull individual weapons back out of bases to move them to the new, active front.

Storage Depot/Seaport Ramp Uses
The two uses of the ramp on the Storage Depot/Seaport are submitting vehicles and filled Shipping Containers. In both cases, you park your vehicle or drop your Shipping Container on the ramp, and select the Submit Driveway Equipment Button in the Storage Depot/Seaport. In the case of the Shipping Container, it is emptied automatically, and the container is left where it was placed on the ramp available for reuse.

Squad Storage
If you're in a squad, the Storage Depot/Seaport stockpile will allow you to store 50 squad storable crates and three vehicles per member of your squad. The contents of the squad will become public after about 48 hours if no additional crates or vehicles have been added.

Reserve Storage
You can also create multiple Reserve Stockpiles. These allow you to store up to 100 crates of most items, with certain things allowing more. You can grant or receive access to other player's Reserve Storages to submit or pull something from them.
Shipyard
Production
Shipyards are where you can produce every naval vehicle except the Motorboat, which can be built on any beach.


Map Icon


The Shipyard is a faction owned structure that can only produce the types of vehicles that have their technology researched.


The image to the right shows the inventory of the Shipyard and the list of naval vehicles that are buildable.

You are also able to perform a Full Repair on any vehicle. This fully heals the vehicle and also replunishes the hidden "armor" value, which increases the chance an armored vehicle can bounce shells, which gets reduced due to sustaining damage.
Salvage Mine
Like the Component Mine, Sulfur Mine, and Oil Well, the Salvage Mine is a structure that can be built to automatically produce Salvage when supplied with fuel. They are extremely useful for logistics players as they can be started and left running for you to do something else. The Salvage Mine has the bonus in which it doesn't run out of Salvage unlike Salvage Fields and needs to be replenished.


Map Icon


Just like any vehicle, you can fuel it in person or with a Fuel Tanker. To fuel it in person, you need to have your Diesel or Petrol equipped in your third inventory slot, then left-click and hold your mouse button anywhere next to the Salvage Mine. To fuel it with a Fuel Tanker, have one parked nearby with Diesel or Petrol in its inventory, then you press the respective button for the fuel you want in the Actions section of the Salvage Mine menu.

All salvage produced will be put in the publicly accessible stockpile. You are able to run the mine off of both Diesel or Petrol. If both have been added, it will use the Petrol before using the Diesel. Salvage Mines are NOT worth it to run off Petrol, as the marginally quicker resource gather speed is not worth the more expensive petrol for a cheap material.

It would be a good idea to keep extra fuel nearby so it can be quickly and easily refueled should it run low.
Component Mine
Like the Salvage Mine, Sulfur Mine, and Oil Well, the Component Mine is a structure that can be built to automatically produce Components when supplied with fuel. They are extremely useful for logistics players as they can be started and left running for you to do something else. The Component Mine has the bonus in which it doesn't run out of Component, unlike Component Fields.


Map Icon


Just like any vehicles, you can fuel it in person or with a Fuel Tanker. To fuel it in person, you need to have your Diesel or Petrol equipped in your third inventory slot, then left-click and hold your mouse button anywhere next to the Component Mine. To fuel it with a Fuel Tanker, have one parked nearby with Diesel or Petrol in its inventory, then you press the respective button for the fuel you want in the Actions section of the Component Mine menu.

All components and tech parts produced will be put in the publicly accessible inventory. You are able to run the mine off of both Diesel or Petrol. If both have been added, it will use the Petrol before using the Diesel.

It would be a good idea to keep extra fuel nearby so it can be quickly and easily refueled should it run low.
Sulfur Mine
Like the Salvage Mine, Component Mine, and Oil Well, the Sulfur Mine is a structure that can be built to automatically produce Sulfur when supplied with fuel. They are extremely useful for logistics players as they can be started and left running for you to do something else. The Sulfur Mine has a bonus in which it doesn't run out of Sulfur, unlike Sulfur Fields.


Map Icon


Just like any vehicles, you can fuel it in person or with a Fuel Tanker. To fuel it in person, you need to have your Diesel or Petrol equipped in your third inventory slot, then left-click and hold your mouse button anywhere next to the Sulfur Mine. To fuel it with a Fuel Tanker, have one parked nearby with Diesel or Petrol in its inventory, then you press the respective button for the fuel you want in the Actions section of the Sulfur Mine menu.

All sulfur produced will be put in the publicly accessible inventory. You are able to run the mine off of both Diesel or Petrol. If both have been added, it will use the Petrol before using the Diesel.

It would be a good idea to keep extra fuel nearby so it can be quickly and easily refueled should it run low.
Oil Well
Like the Salvage Mine, Component Mine, and Sulfur Mine, the Oil Well is a structure that can be built to automatically produce Crude Oil when supplied with fuel. They are extremely useful for logistics players as they can be started and left running for you to do something else. The Oil Well is the only way to obtain Crude Oil, which is then refined into Petrol at a Refinery.


Map Icon


Just like any vehicles, you can fuel it in person or with a Fuel Tanker. To fuel it in person, you need to have your Diesel or Petrol equipped in your third inventory slot, then left-click and hold your mouse button anywhere next to the Oil Well. To fuel it with a Fuel Tanker, have one parked nearby with Diesel or Petrol in its inventory, then you press the respective button for the fuel you want in the Actions section of the Oil Well menu.

All Crude Oil produced will be put in the publicly accessible inventory. You are able to run the mine off of both Diesel or Petrol. If both have been added, it will use the Petrol before using the Diesel.

It would be a good idea to keep extra fuel nearby so it can be quickly and easily refueled should it run low.
=== Vehicles ===
Vehicle List
This guide only contains logistic related vehicles, but for now won't cover each specific modification for each. You can view a more complete list of vehicles on the Foxhole Wiki: https://foxhole.gamepedia.com/Vehicles.

Faction Specific Vehicles
There are now faction specific vehicles which the other faction is not able to research and directly build. For logistics, there are no major differences for the gameplay, though there are a few vehicles which may have worthwhile advantages over others.

Switching Fuels
Every vehicle runs off of Diesel by default, but can be run off Petrol for slightly higher speed and more efficient fuel consumption by accessing the vehicle and pressing the button to siphon fuel out to allow the other to be added.

Transport Truck
Overview
The Transport Truck is your cheap, go-to vehicle when running logistics that can fill many roles. As with every vehicle except the Construction Vehicle, it is built at the Vehicle Factory for 100 bmats. It should be used over the Flatbed Truck with a Shipping Container for any short supply runs, or when there won't be a Crane to unload at your destination.

Stats
Crew Size
Build Cost
Fuel Tank Size
Inventory Slots
6 (1 driver, 5 passengers)
100 bmats
100
15


Vehicle Modifications
There are specific modifications of the Transport Truck, which have advantages and disadvantages but will only briefly be touched on here.

Resource Hauler
  • Stores a larger amount of unrefined resources, ideal for regularly transporting large loads back from Resource Fields.
  • Unable to store regular items, such as bmats, weapons, ammo, etc.

Tracked Truck (Warden Only)
  • Has 13 Inventory slots
  • Does not get slowed down further off-road when carrying a heavy load.

Speartip Truck (Colonial Only)
  • Has a front-mounted machine gun, which requires a second person to use.
  • Still has 15 Inventory slots, but one would need to store the ammunition for the mounted machine gun.
Fuel Tanker
Overview
The Fuel Tanker is the best way to transport large quantities of fuel or refuel allied vehicles. It has two inventory slots, one for both Diesel and Petrol, but can carry two stacks of either instead. If you want to refuel a vehicle, you'll need to have the Fuel Tanker parked nearby, and then press either the Refuel Diesel or Refuel Petrol button when interacting with the vehicle you want to refuel. This will automatically connect a hose that fills the fuel tank from one of the stacks of fuel in the inventory of the Tanker.

You are also able to fuel all four types of Mines (Salvage, Components, etc.) directly from the Fuel Tanker using either the Refuel Diesel or Refuel Petrol buttons from within the Mines inventory.

Stats
Crew Size
Build Cost
Fuel Tank Size
Inventory Slots
2 (1 driver, 1 passenger)
100 bmats
100
2 (1 Stack of Diesel and 1 Stack of Petrol, or 2 Stacks of either Diesel or Petrol)
Light Utility Vehicle (LUV)
Overview
The Light Utility Vehicle, or LUV, is another decent option for logistics player but has its pros and cons compared to the standard Transport Truck.

Pros:
  • Faster off road speed
  • Scouts targets on the map
Cons:
  • Costs more expensive rmats
  • 9 slot inventory compared to 15

The off-road speed is by far the best and most used benefit allowing it to quickly reach off-road resource locations, make supply runs to areas which aren't safe to get to by road, and significantly improve your chances to escape harm or death if ambushed.

Stats
Crew Size
Build Cost
Fuel Tank Size
Inventory Slots
4 (1 driver, 3 passengers)
10 rmats
100
9

Vehicle Modifications
There are specific modifications of the LUV, which have advantages and disadvantages but will not be touched on here, as none of them are suited for logistics over the default.
Flatbed Truck
Overview
The Flatbed Truck is intended for long-distance supply runs or vehicle transport, and likely should not be used as your go-to vehicle when running logistics. While it does have the advantage over the Transport Truck for carrying capacity with a Shipping Container or vehicles on its bed, it does require a Crane to lift them on and off of the flatbed, thus requiring a Crane where you load and then unload your shipment. It would likely be best to supply to logistics based towns near your intended delivery location, unload with a Crane there, and then send supplies to the front via the Transport Truck. If you're transporting using a Shipping Container, you'll need to drop it off at a Storage Depot Ramp to unload it, which is then can be pulled out into a Transport Truck.

Stats
Crew Size
Build Cost
Fuel Tank Size
Inventory Slots
2 (1 driver, 1 passenger)
30 rmats
100
1 Shippable Crate
Crane
Overview
The Crane is essential for several key logistics operations. The primary use is with the Construction Yard, as everything it produces are Shippables, which only a Crane can lift and move them. If you want to load or unload any packaged vehicles or Shipping Containers on a Flatbed Truck, then you'll need a Crane for that too.

Stats
Crew Size
Build Cost
Fuel Tank Size
Inventory Slots
2 (1 driver, 1 passenger)
125 bmats
100
4
Harvester
Overview
The Harvester is ideal for increasing mining efficiency of resource fields and dismantling buildings and defenses without weapons and explosives. It also has the unique ability to split resource nodes at a resource field for an increased spawn rate of the nodes for faster overall resource collection rate.

Left Mouse Button ----> Harvest Resources
Left Mouse Button ----> Dismantle Buildings/Defenses

To harvest resources from fields, hold down the left mouse button while the grinder on the front of the Harvester is over one of the resource nodes. It will automatically start harvesting and put the resources collected inside its inventory. This is ~50% faster than a sledgehammer.

To dismantle buildings/defenses, hold down the left mouse button while the grinder is against the structure you want to dismantle. It will break it down into 1/4 the original cost in Salvage or Components and store those in your inventory. Buildings you're unable to dismantle are Town Halls, Garrison Houses, Watch Towers, and Forward Operating Bases.

Splitting resource nodes happens automatically when harvesting resources from Resource Fields. This will spawn a second node from the number of remaining nodes the resource field can spawn, which does double the amount of nodes that can be collected at once, which is ideal for groups of players harvesting the same field and collecting resources quicker.


Stats
Crew Size
Build Cost
Fuel Tank Size
Inventory Slots
2 (1 driver, 1 passenger)
120 rmats
200
15
Barge
Overview
The Barge is a naval vehicle used for transporting vehicles and supplies across bodies of water. This is your primary means for water logistics early on in the war until other vehicles like the Freighter have been researched. The Barge is often used for supporting naval invasions with support vehicles, resupplying towns which are cut off by land, and ferrying resources and personnel between islands. The 15 inventory slots can be paired well with a truck full of supplies, doubling the potential supply quantity which can be held each load.

Stats
Crew Size
Build Cost
Fuel Tank Size
Inventory Slots
1 + Anyone who fits on deck (1 driver + others)
150 bmats
200
15
Freighter
Overview
The Freighter is the naval version of the Flatbed Truck. It is designed for long-distance, high volume supply runs, or transportation of light or heavy vehicles. It can store up to 5 Shippables (Shipping Containers, Packaged Vehicles, etc.) in its lower decks. You'll need a Crane in order to load and unload the Shippables.

Stats
Crew Size
Build Cost
Fuel Tank Size
Inventory Slots
2 (1 driver, 1 passenger)
300 bmats
300
5 Shippables
=== Resource Fields ===
Salvage Field
The Salvage Field is a location in which large quantities of Salvage nodes are located. A single Salvage Field is limited to many thousands of Salvage, but once harvested, it takes about 3 hours to regenerate those nodes. There is a sense of urgency with harvesting these resources, as it is important to get your hands on them, as you don't want your enemies to get a chance to harvest them, and the sooner you start harvesting it, the sooner it can start to respawn.

You can press the 'E' key next to the center node to be informed how many nodes are left in the field or check the field marker on the map to get a count of how many nodes remain. Each node contains roughly 200 salvage.
Component Field
The Component Field is a location in which large quantities of Component nodes are located. A single Component Field is limited to many thousands of Components, but once harvested, it takes about 6 hours to regenerate those nodes. There is a sense of urgency with harvesting these resources, as it is important to get your hands on them, as you don't want your enemies to get a chance to harvest them, and the sooner you start harvesting it, the sooner it can start to respawn.

Components can only be harvested with a Sledgehammer or a Harvester but can be gathered from Component Mines prior to having Sledgehammers or Harvesters.

You can press the 'E' key next to the center node to be informed how many nodes are left in the field or check the field marker on the map to get a count of how many nodes remain. Each node contains roughly 200 Components.
Sulfur Field
The Sulfur Field is a location in which large quantities of Sulfur nodes are located. A single Sulfur Field is limited to many thousands of Sulfur, but once harvested, it can take many hours to regenerate those nodes. There is a sense of urgency with harvesting these resources, as it is important to get your hands on them, as you don't want your enemies to get a chance to harvest them, and the sooner you start harvesting it, the sooner it can start to respawn.

Sulfur can only be harvested with a Sledgehammer or Harvesters, but can also be gathered from Sulfur Mines prior to having Sledgehammers or Harvesters.

You can press the 'E' key next to the center node to be informed how many nodes are left in the field or check the field marker on the map to get a count of how many nodes remain. Each node contains roughly 200 sulfur.
=== Roles of a Logistics Player and Getting Started ===
These sections below are designed to be a walkthrough to direct and support new players in getting started with logistics and supplying frontlines. There are many ways to play, and many specific roles that you could fill, so this is only a guideline towards how you can play and do these things.

I will only cover what is immediately necessary to know about structures and vehicles as I go through, so please reference back to the above sections as needed for further details.

Here's a quick overview of what you'll be doing over the next few sections.

RED ARROW: You'll need a truck to move around heavy resources, so most likely you'll need to make one by getting 100 Basic Materials and heading over to the Vehicle Factory (Truck icon).

ORANGE ARROWS: With your truck, you'll need to harvest some scrap metal so you'll head to the closest Salvage Field (Screw icon) to mine some with your Hammer. Salvage can be refined into several various resources, but most commonly Basic Materials (bmats) which is done at the Refinery (Hammer icon).

YELLOW ARROW: Basic Materials can be used in many ways but for this section you'll take them over to a Factory (small Factory icon with 2 smokestacks) to turn into basic weapons and ammunition.

From there you're able to drive and deliver wherever needs them!
Choosing a Spawn Location
The role of logistics player requires the use of several buildings in order to harvest, refine, and produce everything you'll need to. The furthest backline regions will almost always contain one of each building, while further mid or frontline regions will only have one or two. When you first start up Foxhole, you'll load into the Home Region which is a hub which includes player driven training courses, war booths which show the map of the current world conquest, and deploy points which will spawn you into the region selected.

Within the home region, head over to the war booth (globe icon on map) to take a look around at the towns, looking specifically for which ones have a Garage (Vehicle Factory), Refinery, and Factory. You will need a Garage (Vehicle Factory) to make a truck if there's no public unused one available, a Refinery to refine the raw materials you harvest, then the Factory to produce various weapons, ammunition, and equipment you'll need.


The further away you spawn from these critical logistics buildings, the harder it is to get started, and of course the longer it takes to run/drive back and forth.

Once you found a town, head over to the deploy point (crossed swords icon on map) to spawn in there.
Building a Truck
Now that you've spawned at the Town Hall (TH), you'll need to obtain 100 Basic Materials (bmats) and 1 can of Diesel so you can build and fuel a truck at a Garage (Vehicle Factory). Some backline logistics towns may have a public parking lot of unused or prebuilt trucks, so you could skip this step if one is available. Just be sure you're not taking someone else's truck that they've stepped away from for just a moment, some people will get very upset about their stuff being stolen and you could potentially get vote kicked.

Most likely you'll either have Basic Materials and Diesel either in the Town Hall, Refinery, or even sometimes the Garage/Vehicle Factory. In my case, I could pull 100 bmats from the Town Hall (5 clicks pulling 20 at a time) and a can of Diesel.

Now you'll have to slowly walk with those heavy materials over to the Garage/Vehicle Factory. Interact with the Vehicle Factory will show you all of the vehicle options you currently have technology unlocked, you'll want to select your Faction's basic truck for transportation which should cost exactly 100 Basic Materials.


Selecting it will automatically place a blueprint of the truck, which can be built by pulling out your hammer and left clicking and holding to swing it. Up to three players can hammer it at the same time, increasing the speed of construction but each player must have Basic Materials in their inventory in order to contribute.


Once the truck has finished being built, you'll need to fuel it. Freshly made vehicles start with a tiny amount of fuel, in this case 5/100 which is enough to drive it out of the factory but not much further. Make sure your can of Diesel is equipped in your third equipment slot, not in your backpack (left click it within the backpack to move it to the equipment slot). Then press '3' by default to pull out the can, left click and hold while next to the truck to fuel it.

Locking your Truck
You should always lock your vehicles to prevent players from both your faction and the enemy one from getting inside or accessing the inventory. You can toggle the lock by pressing 'L'. This will keep your vehicle permanently locked to you, but after a 5 minute timer any friendly player can use a wrench to unlock it (enemies can always wrench any vehicle without delay). If you're in a squad, you can access the inventory of the truck and press one of the buttons which reserves it to your active squad. This allows all squad members to enter the vehicle and access its inventory. Should the vehicle be unlocked by friendlies with a wrench, non-squad players will not be able to pull any items out of the inventory.
Harvesting and Refining Raw Resources
With your truck, you can head over to the nearest Salvage Field to mine some scrap metal. This is the most common and basic resource, and is used to refine into many different resources. The large center piece at the Salvage isn't harvestable, but the small nodes around it are. Hit them with a hammer (or sledge hammer with later technology for more scrap per hit) to harvest the scrap. Make sure to fill up your entire truck inventory, you'll always need more scrap.

If you pick up too much and can't get back in your truck because you're encumbered from your inventory weight, you can drop items by opening your inventory and 'Alt+Click' on the item(s) you'd like to drop. You'll need a weight below 100% to enter vehicles.

Once you've got that truck full of scrap, it's not useful in its current state so you'll need to drive to a Refinery. At the Refinery, you can turn scrap into many different resources but for now you'll want to make Basic Materials. To do that, stay in your truck as the driver and access the Refinery, then click on the Salvage icon left of the arrow for Basic Materials. To automatically submit your entire truck inventory to be refined, 'Shift+Click'.

Right above that, you can choose whether the output of your refinement will go into the public Stockpile on the right hand side, or personal which will output on the right side of the arrow. I'd recommend keeping it personal unless you're okay with those resources being taken by other players for their production/transportation.

You'll need to wait a few minutes for your salvage to refine, you can optionally go harvest some more during that wait or simply wait by the refinery for it to finish. At any time during refinement, you can pull the completed portion of resources back into your truck's inventory.

Iron and Aluminum
You have a chance to obtain Iron and Aluminum from Salvage Fields. When you obtain some, they need taken to a Refinery to be refined prior to being submitted into the Engineering Center's tech tree.

Each Salvage Field can only drop Iron or Aluminum, not both, until it has been fully cleared out. Once it respawns, it could start dropping the other.
Supply Production at the Factory
Basic Materials are used for many different things, even on front and backlines for building. For now you're going to use these materials to build some weapons, ammunition, and other equipment at a Factory.

The same as the Refinery, access the Factory while in the driver seat of your truck. Different goods that can be produced are split up into categories with different tabs in the middle section. Certain things such as basic rifles and ammo only require Basic Materials to produce, while other more advanced things such as artillery shells will need different resources such as explosive or heavy explosive materials.

Select up to 4 items from the same category which only take Basic Materials, such as Rifles and their Ammo (Double check ammo is compatible with the weapon). You can choose that order to be Personal, Squad, or Public which simply means when it's finished, who is able to pick it up. Click the arrow to the right of your items you've chosen to begin production. The Factory does not process different player's orders at the same time like the Refinery does, so your order may have to wait on several other player's orders to produce prior to yours being started.

Once that order has been completed, click the green checkmark to pick it up. Your crates of supplies will be put inside your truck, ready for your delivery to whichever location you want to supply! Once you drive to a Town Hall, Safe House, Relic base, or Bunker Base, interact with that structure to see its inventory, then click the submit items button. You can also right click on specific items within your inventory to submit only certain ones to that location. Crates will be automatically unloaded into separate items upon submitting so that other players can take the individual items back out from that base's stockpile.
Transporting Resources and Supplies
If you don't know where or who you need to supply, ask around if anyone needs certain supplies such as SS or weapons and ammo. Too often does the infantry on the front lines not give fair warning that they are running low on essential supplies until they are out of them. It is wise that even if there aren't requests for deliveries that you make good use of your time and the Storage Depot structures where they can be easily retrieved when they are requested.

Things you can never go wrong stockpiling extra of include some rifles, rifle ammo, HMG's, HMG ammo, frag and HE grenades, gas masks, any howitzer/mortar/arty/tank shells, first aid kits and trauma kits, and SS. Keep in mind ammo is often needed more than the guns themselves, as the ammo is not infinitely reusable like the guns so produce accordingly (i.e., ~1/2-3 gun to ammo ratio)

The key places you'll need to be supplying are Townhalls, FOB's, Safehouses, and Relic Bases, all of which need SS to be spawned at.

When you submit crates of supplies, be aware those supplies can not be re-crated for ease of transport again. This means submitting stuff that doesn't stack, such as weapons, will be very impractical to relocate a few at a time. Because it's not easy to transport supplies after they've been submitted, and because these structures can fall into enemy hands with their supplies still within their inventory, it is best never to overstock any location. Bring what is requested and of enough of a quantity that they will be able to use it all within a few hours. This gives plenty of time to bring another load prior to them running out, yet never overstocking a single location with more resources than they can reasonably use.

It is essential for logistics players to have a radio equipped if possible and to be taking full advantage of map intelligence updates, especially when you are traveling about. Losing a truck full of bmats by unknowingly crossing a dangerous border or a road not covered by watchtowers straight into enemy troops would likely have been prevented by simply asking if it's safe, or even taking a longer route that's properly defended. If you have to get to a new and threatened front line FOB or TH that doesn't have defenses leading up to it, don't be afraid to gather a few infantry to escort you, or even request some to come from that front and escort. Refer to the section Understanding and Utilizing Your Map for more detailed explanations and advantages you can have using the map.

Whenever you're delivering any significant quantities (> 50 which should be ALWAYS) of bmats or rmats, take the extra few seconds and put them in a crate nearby the TH or FOB, and if there is no crate or not enough room, build another. Though you can totally store bmats and rmats in a TH or FOB, you can only take them back out 20 (or 60 by using a truck and right-clicking) at a time with a few second delay in between. If they are in a crate, you can get stacks of 100 with a single click and no assembling delay. There's also the situation where you're trying to repair a TH or FOB being damaged. You have plenty of bmats inside, if it dies, they are now stuck within and not accessible until it's rebuilt. If you have them all outside in crates, then you can keep building defenses, retreat with them to a safer location, or even rebuild the TH or FOB.
=== Conclusion ===
There has been lots of questions regarding how all the numerous things for logistics work just to be able to support front lines, so I've written up this information to be easily accessible and understandable for new players, yet detailed enough to be of use for more experienced players. My goal is to make sure this guide is comprehensive across the variety of tasks and concepts that a logistics player needs to be able to understand and manage, yet still explain it all in a simple and easy enough way that anyone can understand everything necessary without needing to have dozens of hours of in game time in order to fill a crucial and war deciding role.

This guide is not finished, as there's always room for improvement and additions, not including changes made to the game each update, however I'll keep improving it over time and do my best to keep it up to date with the latest updates.

If you have anything you think should be added, changed, or corrected in this guide, along with if you don't understand something or if an explanation should be improved, please leave a comment below. There are many guides on other aspects of Foxhole, but if there are any topics that there is demand for an updated guide, leave a comment as I'd be willing to write one up for that as well.
37 ความเห็น
Jimmiefan  [ผู้สร้าง] 31 ธ.ค. 2024 @ 4: 24pm 
@hiboydd Yes they are infinite. The Salvage, Component, and Sulfur mines mentioned in this guide are the originals which are located in each region (not every region has each type, open your map and uncheck all filters other than "Resources" to help spot them) and are still infinite. There are new stationary mines that can be built as part of facilities that go on salvage, component, and sulfur fields, not mines. Those are "infinite" but will need to wait on the field to replunish once its empty to continue.
hiboydd 31 ธ.ค. 2024 @ 4: 07pm 
Are mines still infinite? Game menu says it consumes resource nodes
Capt_Frank 2 ธ.ค. 2022 @ 10: 32pm 
THANK YOU MAN. THIS IS REALLY HELPFULL
Jimmiefan  [ผู้สร้าง] 30 ต.ค. 2021 @ 9: 53am 
Went through and updated everything in the guide again to be up to date. I've been busy irl, but I will do my best to continue updating and improving this guide further into the future. As always, let me know if anyone has any questions or things I need to fix or improve.
Mikong 25 ก.พ. 2021 @ 5: 34pm 
Great guide.Useful even now.
Jimmiefan  [ผู้สร้าง] 11 ก.ค. 2020 @ 4: 07am 
@GreyGoblin Unfortunately, not really. Vehicles can pull out of the containers quicker, but ~40 crates does simply take some time.

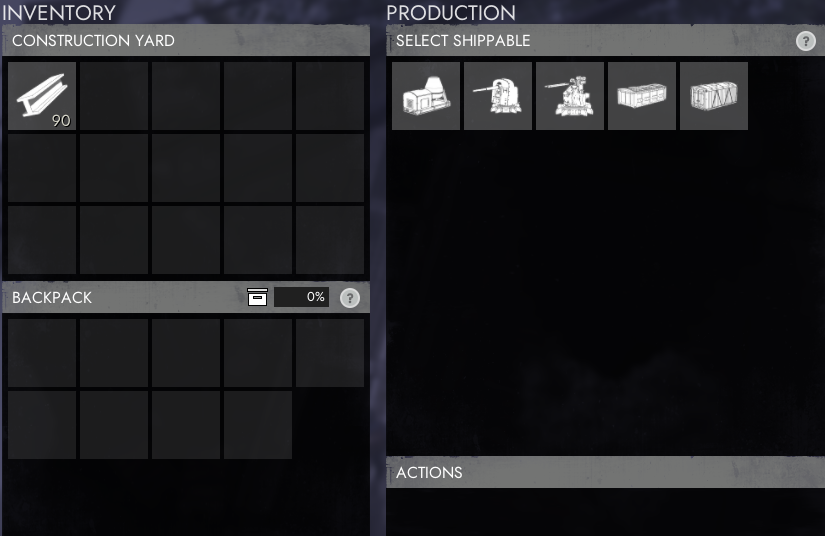
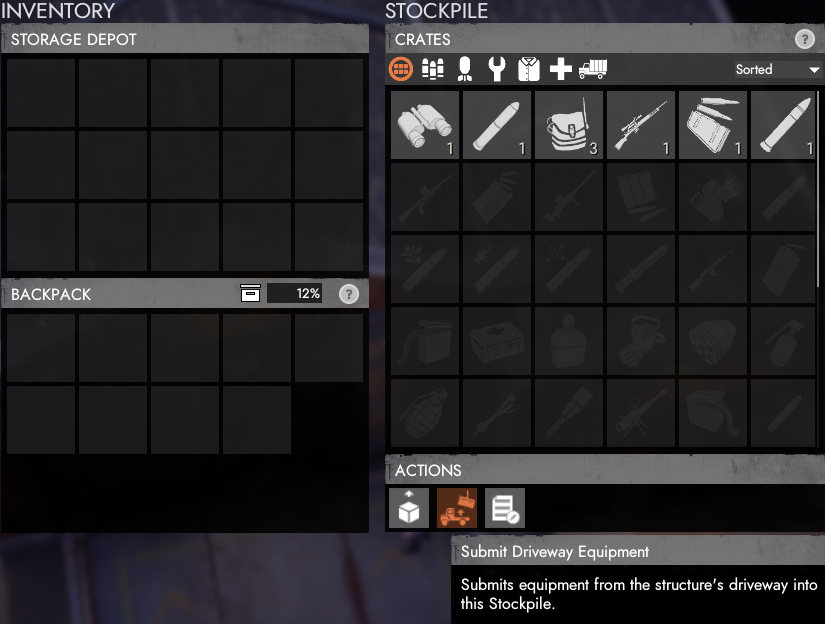
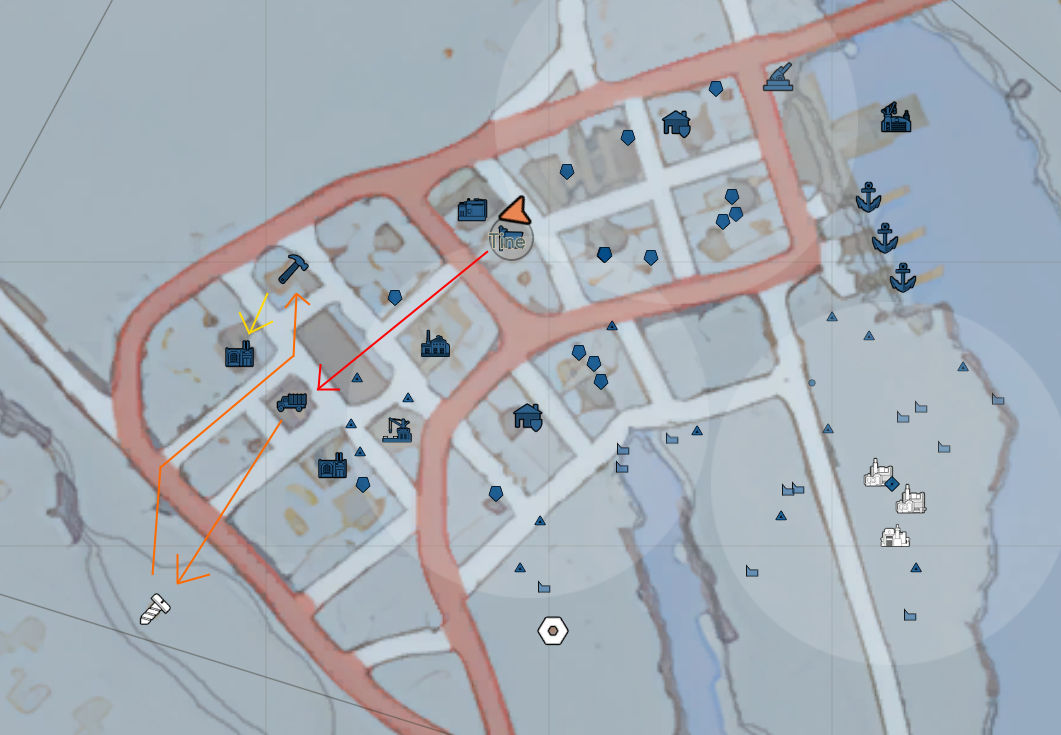
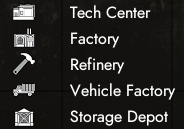
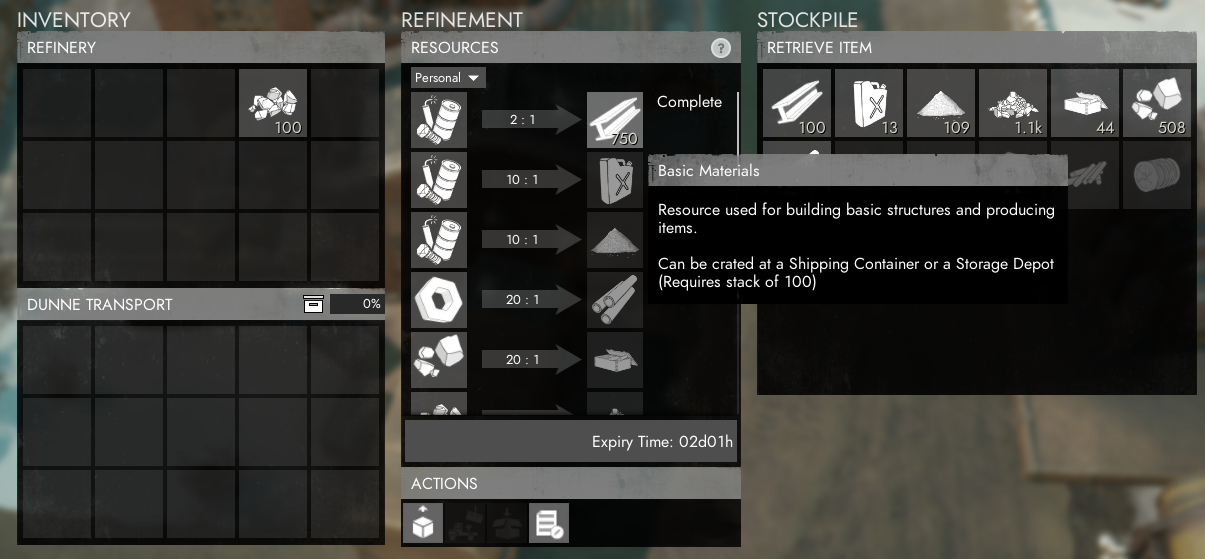
The only other way is to deliver and submit the crates to the nearest town with a Storage Depot, then truck the crates from the storage depot to the FOB. There's obviously going to be additional travel time, but you may be able to take advantage of the nearby depot, and potentially avoid Storage Depot pull times by submitting the crates into the squad storage.
GreyGoblin 11 ก.ค. 2020 @ 12: 54am 
When supplying a FOB by cargo container, is there a more efficient method than dropping the crate beside it and crating and moving items by hand? Assembling crates out of the cargo container seems to take forever.
Punchahontas 8 ก.ค. 2020 @ 10: 58pm 
Thanks for the guide. I haven't played in years and read your guide to get a refresher on what has changed.
Jimmiefan  [ผู้สร้าง] 2 ก.ค. 2020 @ 4: 29pm 
@NCR Trooper I might. I'd probably do a guide specifically focused more towards weapons, how to use them, and then go into tips for how to do better with them. Gun fighting is a bit difficult, as that's mostly learned through experience and practice.

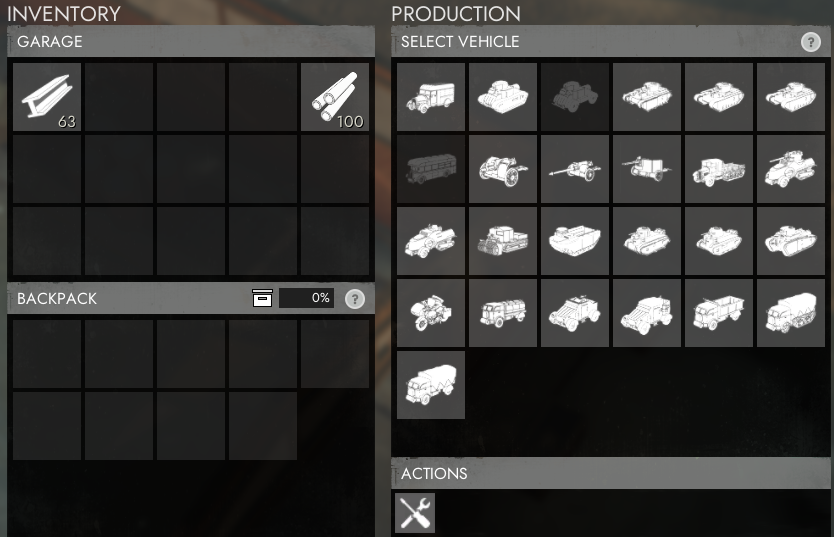
I'll definitely consider it, but probably won't get to it anytime soon. Best thing to do in the mean time is to stick with others and take favorable engagements while working on your accuracy, and always try to ask around to others for help/tips for specific things.
NCR Trooper Scout 2 ก.ค. 2020 @ 4: 24pm 
hey will you make a combat guide? I suck at gunfights in this game.