Portal 2

Portal 2

301 ratings
Map Design Guidelines
By Bisqwit and 1 collaborators
A few guidelines for map designers, from my personal experience.
   
Award
Favorite
Favorited
Unfavorite
Purpose of this guide
This guide collects some guidelines I have come up with for designing Portal 2 puzzles.

It contains my opinions. Things to note:
  • Opinions are not objective truths. What is true for me, may be false for someone else. People like different things. Some people like things that I hate, and vice versa.
  • These guidelines can be called rules, but these rules can be bent. If you do break or bend a rule, be sure to have a good reason for it.
  • Following these guidelines does not guarantee success to your chamber, but it may save you from some nasty feedback.
  • It is impossible to please everyone.
  • My maps do not all follow these guidelines. Many of these are things I have learned the hard way while making them.

Also, since I use a couple of editor mods myself, a few sentences in this guide also refer to those mods. I have identified those sections for clarity. For example, the Pneumatic Diversity Vent is an element introduced by BEEMOD, not available in the standard editor palette, so any mention of the PDV always includes a "(BEEMOD)" tag in the same sentence to avoid confusion.

If you have ideas of things that should be added or changed, feel free to comment on this guide! I will probably also edit it from time to time, adding new things.

Now, I wish this guide will be insightful and useful reading for every aspiring Aperture Science Test Chamber Designer!
Make the Objectives Clear
The sooner the player understands what they are expected to do, the better.

  • The less time the player needs to figure out the layout and structure of your puzzle, the better.
  • If you can, make the exit visible from the very beginning of the chamber, or at least very soon.
  • Always show clearly what activates what. Use the indicator lines (antlines). Ensure the antlines are obvious.
  • Use such architecture that the player's gaze is directed towards important elements soon.
  • Ensure that the player can clearly see everything that they need right now. (See also: lighting.) The worst thing you can do is to have the player stumped, because they can't find a testing element that they need.
  • If a testing element is not needed until much later, try to hide the element. Use a different room, or use a trigger (BEEMOD) or other means to activate/deactivate angled panels.
  • If the testing element will never be needed, do not include the testing element in the first place.
  • If you include a testing element, make sure that the player will need it. If they get to the end of the puzzle without ever using some testing element, they think your puzzle is broken.
There is a limit to how much information a player can store in their memory.
  • Do not have many buttons in your level. It will be difficult to keep track of what does what.
  • If the indicator lights in your level look confusing, with antlines traversing the walls and floors in all directions, your level is confusing.
  • If your map contains a room after a room after a room, there will be fatigue. If earlier rooms contain unsolved items, the player cannot discard them when going to a new one, and there will be memory pressure.
Antline Routing is an Art
The purpose of indicator lights (antlines) is to help the player understand how your test chamber works.

  • Always include an antline, if something that the player does our of their volition is connected to what happens in the level.
    • Using signage instead of an antline is permissible, but it usually means that you have failed to follow other guidelines in this guide (such as placing an element close to their action).
  • Short antlines are better than long antlines.
  • Try to place buttons, laser receivers etc. close to the elements they activate, so that the antline ends up being as short as possible.
  • Use light panels, dummy flip panels, dummy deactivated angled panels and short indents in the ceiling to coerce the antlines to take the most obvious and easiest readable route. This is sometimes a quite painstaking process, as the PeTI editor is known to insist at times on really contrived routes...
  • Remove antlines that come from triggers (BEEMOD). Triggers are invisible elements, and an antline that comes from "nowhere" is just confusing.
  • Related antlines (such as buttons that must be pressed simultaneously to activate a cube dropper) should be routed through same channels. If the PeTI editor is not cooperating with you, use invisible elements or light panels to coerce it into submission.
  • If your testing element activates five angled panels at once, you only need one antline. Hide the antlines for the four other angled panels.
  • (BEEMOD only) If your target element has poor antline attachment points, you can use an AND gate as the alternative target, and put an invisible connection between the AND gate and the target element. Chances are you can place the invisible AND gate in a satisfying position with respect to the antlines.
  • If possible, avoid intersecting antlines. Trying to follow them adds unnecessary difficulty.
Do Not Trap the Player
Ensure that the player cannot trap themselves in your map, even if it is their fault.
Or: Make sure that player does not ever need to suicide and restart the map, even if they make a mistake.

  • If your map contains blue gel, always provide clear gel as well. Eventually, someone will accidentally paint a cube blue, and then they will be quite unhappy, because they can no longer place the cube on a button.
    • If you provide speed gel, you may still need to provide clear gel too. A slippery cube is almost as bad as a jumpy cube (especially if it is a redirector cube that must be pointed accurately).
  • Always provide a mechanism to respawn the cube (such as a pedestal button + dropper). You can never anticipate all the ways the cube can be lost. Even if you think the cube can never be destroyed, someone will still manage to fizzle it against a piston platform or something.
    • Say, you have a button which opens a door. You're supposed to put a cube on the button, and walk through the door. Someone will eventually sit on the button and throw the cube through the door. Bam, chamber unsolvable.
    • Someone doesn't know where the cube is supposed to go, and they carry it everywhere they go. At some point, they lock the cube in a room they cannot return to. Bam, chamber unsolvable.
    • Someone accidentally pushes the cube into an observation room. (See the Playtesting chapter for explanation.) Bam, chamber unsolvable.
  • The player will wander off and not do as you planned. Ensure that there's always a way to return. Do not create one-way streets. And if you do, create another one-way street going the other way.
Lighting Guidelines
  • Always ensure your map has sufficient lighting. Pitch-dark tunnels are annoying.
  • Even if your map is dark, ensure that all testing elements that the player needs are properly highlighted and visible. Never put an important portal surface in a shade.
  • The larger your room is, the more light sources it needs. A very large room may require many small observation rooms to light it.
  • Remember that portalable surfaces reflect light better than non-portalable surfaces. If your chamber contains very few portalable surfaces, you will need more light sources than if your chamber has many portalable surfaces.
  • Play with colors! Use color themes. See what colors different testing elements produce, and use them to alter the color scheme of your room.
    • Laser emitters produce red light. They count as red lights for the purposes for radiosity & lightmap calculations (the color tones on walls), even if they start disabled.
    • High-energy pellet emitters (BEEMOD) produce orange light.
    • Sphere buttons and cube buttons produce warm, orange-pink, light. You can also use warm light panels (BEEMOD) and warm square lights (HWMMOD).
    • Observation rooms and standard light panels produce cold, slightly blue-tinted light. The small observation room produces a brighter light than the large observation room does.
    • While the light bridges are light-blue colored, they do not emit ambient light that would affect the radiosity & lightmaps of the room.
    • Pneumatic diversity vents produce some green light. (BEEMOD)
    • Antlines, cube droppers, buttons and many other elements are visible even in darkness.
  • Do not use testing elements just for the light they produce. Remember that redundant testing elements are bad.
  • The lightmap for angled panels is calculated according to their "undeployed" position. If your panel looks wrong and out-of-place when it is deployed, try adjusting the lighting conditions that face against the panel in its undeployed position to match the condition of its surroundings when deployed. For example, if you have an angled panel that covers a narrow pit in ceiling or in floor, add some light panels facing directly against the angled panel in that pit.
  • Use different colors in different rooms. The more different ways you stimulate the player, the better they remember that place.
Intuitive Architecture
If your map contains many sections or components, try to make it easy to remember.
  • Use different colors in different rooms. The more different ways you stimulate the player, the better they remember that place.
  • While designing your chamber, try to think what names the player might use for different sections of the map. How would someone describe the layout of your map in words? "The room with goo"? "Top-left corner"? "The cube dropper room"? "The dark room"? "The pit"? Design your architecture in a way that lends itself to easy naming. Make something memorable in each place. Easy naming makes it easier for players to communicate information about the map -- to themselves (for remembering), and to others (for helping them / praising the map). Remember White Forest in Half-Life 2 episode 2? They had "the sawmill", "the cranes", and so on; all easily named places. For a good reason.

Minimize the player's confusion.
  • Always make sure there's a line of sight between a trigger and the action.
  • When the player presses a pedestal button or points a redirector cube towards a laser receiver, ensure that whatever happens, is already within their line of sight. The worst thing you can do is a button, that does not appear to do anything (spooky action at a distance). What you would get is a player who repeatedly jumps on the button, desperately looking around to see what changes when he presses it.
  • Never require leaps of faith. If the player must fling/jump/be catapulted somewhere, make sure that the player can judge beforehand whether they have possibility of making that jump or not, and to see where they land and whether they would be trapped in that place or not.
Everything in Moderation
This category is by far the most common beginner mistake!
  • Do not create a maze of Aerial Faith Plates (catapults) just for fun. Or if you do, do not publish your map. Seriously, any time you go to the "newest workshop items" page, you will see probably three of those. Do we need yet another one?
  • Do not create auto-playing puzzles, i.e. puzzles that contain large automatons that do stuff. Elaborate Rube-Goldberg machines: Contraptions that do meaningless stuff to no end. Or if you do, label it clearly as art and do not make it into a puzzle. Make a YouTube video of it and leave it at that.
  • Do not create huge rooms just for the sake of creating huge rooms. Examples:
    • Huge rooms you must simply navigate through.
    • Mazes.
    • Gigantic pools of goo.
  • Do not create rooms with 10 or more turrets. (And have blue paint spray on top of them.)
  • If your room is large, and the player must navigate back and forth many times, please make portal surfaces, catapults or piston platforms that the player can use, to avoid having to spend long time walking.
  • Any time you think, let's crank ____ up to eleven, your map is going to be annoying to play. Do not publish it.
  • Tip: Before publishing your map, review it and analyze each component: Is this item necessary for the puzzle? Remove anything that does not have justification to exist in your map.
    • Do you need the button that turns on the laser? Does the puzzle suffer if the laser is automatically activated in the beginning?
    • Do you need four turrets? Will two not do? Remember that four turrets kill the player twice as fast as two turrets do, giving less reaction time to avoid their line of fire. Is your puzzle about fast reactions rather than about thinking?
    • Do you need all those lighting elements? Will the room look bland and boring without them? Or will it be too dark? Remember that a room without shadows can also look boring. Shadows and contrasts can greatly enhance the look of your chamber. Just make sure everything important is clearly visible.
    • Does the wall need to be that far? Can the puzzle be smaller? Is there a purpose to that long walk?
    • Conversely: Does the puzzle need to be so cramped? Can you add some room for moving and maneuvering? Does it hurt the puzzle if the player can see more of it at once?
Do Not Punish Mistakes
Everyone makes mistakes. Do not punish mistakes.

  • Use autosaves. (BEEMOD/HMWMOD)
  • If the player accidentally fizzles a cube that they have been escorting for the last 10 minutes, do not make them redo the 10 minutes of work.
  • If the player accidentally replaces the wrong portal, do not make them start all over from beginning.
Teach First, Then Require
If your map hinges on some unconventional solution, you best do what the guys at Valve do: First teach the principle in the form of an isolated mini-puzzle, and then include it as the part of a larger puzzle. Even better if you can teach it by showing by example.

  • Never have the player stumped because they did not know that something is possible.
Miscellaneous Gotchas
  • Gratings are highly opaque elements. Especially if the player does not have anti-alias enabled in their visual settings (some graphics cards are unable to use it, and it makes game slower). Avoid using many grating bars. See if you can use glass instead. It is much easier to see through glass than through grating.
  • Remember that a player can grab a cube through a grating. In Coop, the held-item physics are simulated differently than in single-player mode, and the cube can be pulled straight through the grating.

In single player maps, an item, that is held by the player, is simulated by the game as a physics object. In Coop, however, a held object is not really there. It just appears to be there, but it really is not. The object is not e.g. simulated colliding against walls. Practical consequences are:
  • In single-player maps, a player can topple stacks of cubes by waving a held cube around. In coop, this is not possible, because the held cube is not really there.
  • In coop, a button standing vertically on a wall can be triggered through a wall across a corner by a held cube. In single player, it can not, because the cube cannot pass through a wall.
  • When using the noclip cheat, in single player you cannot bring cubes through walls. In coop, no problem.
  • In coop, you can pull cubes through grating bars (but you can't put it back), because once you pick an item up, it is no longer physically there. In single player, you cannot do this.
    • You can also pull cubes through millimeter-wide gaps between glass panels in coop.
  • In coop, attempting to stack cubes precisely is really hard, because the held cube is not really there, and will appear visually in wrong place and in wrong proportions. Do not make cube-stacking puzzles in coop. In single-player it is fine.

Does your water look murky and ugly? Ensure that your level has water only at one height level. If it has water on different height levels, the puzzlemaker will replace it with "cheap" reflectionless water to avoid some problem cases with the rendering engine.
Mind the People with Slow Computers
Try to avoid making maps that are unplayable on non-gaming oriented / low-end computers.
  • Avoid transparent surfaces, such as grating bars, glass barriers and turning glass panels. Some integrated graphics chips (Intel GMA 4500M for example, contained in many laptops) have really trouble rendering those. Use them but do so in moderation. Generally, nesting them is worse than having a larger surface area.
  • Avoid bloom (blur around bright objects). Do not create so much light that the engine will render bloom over it. They are very costly on some integrated graphics chips.
  • Do not create many animated objects (active paint droppers, turrets firing, platforms moving, or crushers (BEEMOD) or pellet emitters firing (BEEMOD)). Each of those requires significant processing resources from the computer; resources which may not be available to everyone.
  • Learn what happens in the "computing visibility" phase of building your test chamber. Use the "mat_leafvis 3" or "mat_wireframe 1" console commands to see what the game really spends effort to render while you play the game (even if it is not visible on the screen). Optimize your level architecture for performance by adding corners to separate different areas. Help the map compiler figure out which areas are visible from each others by adding clear architectural obstacles between them.
  • Do not create huge rooms full of many objects. (Walls, generally are okay, no matter how laid out.)
  • Be aware that people may be playing your puzzle in 640×480 graphics mode with no antialias. Do not require them to aim at or look at tiny details in distance. It will be really, really hard. And they are probably lagging, too.
    • Be aware that the grating bars are much harder to see through without antialias than with it.
    • Do some playtesting in low resolution and without antialias to see if your map remains playable. Ignore the initial shock of how horrible it may look. Just test the usability.
Remember the Audio
  • If you use logic gates, timers, and other contraptions built from lasers, cube droppers, funnels etc., that are not intended to be visible to the player, place them also out of the earshot from the player. I.e. as far as possible.
  • If you have a cube dropper that drops directly into water, or some other element combination that produces persistent noise, and this element is not needed until later in the level, try to start it deactivated and activate it only as the player enters the scene.
  • Place a funnel emitter on the far side wall if possible. Do not put it on a wall right next to another room's wall, or the funnel's noise will be heard loud in the other room.
  • An object that drops into goo is heard almost across the entire level. The most silent way to dispose of an object is to suck it into a Pneumatic Diversity Vent. (BEEMOD) Unless you're using some of the "old" styles (StylesMod), where objects rattling through the PDV cause loud clang noises.
  • If a contraption that causes persistent noise is no longer of importance to the player, try to deactivate the contraption.
Be Aware of the Game Glitches
Be aware of the glitches / programming errors that the game contains. Glitches often allow shortcuts through your map that spoil the fun.
  • If the glitch is too obvious, it can be distracting to the glitch-aware player. It is like a spelling error. It sticks out.
  • Sometimes glitches are even triggered by accident.
  • People who know glitches can sometimes succumb into temptation of trying them when they have been stumped long enough trying to figure out the real solution.
It is therefore recommended to design the chamber so as to avoid inadvertedly exposing the glitches.

It is outside the scope of this article to explain every glitch in detail, so a simple summary is provided here instead. The reader is encouraged to do a search for the glitches on e.g. Google or YouTube.
  • Portal bump. If there is portalable surface on both sides of a thin surface, such as a glass panel, fizzler, or an angled panel, a portal can be "bumped" across the obstacle, bypassing it. Solution: Make sure you have portalable surface at most on one side of the obstacle.
  • Funnel-flying. By ducking and staying still for a couple of seconds at the end of a funnel it is possible to "float" away anywhere from that point, immune to gravity. The exact details depend on the location of the funnel. Basically, any time you have a funnel, be aware that the player may learn to fly. Your job is to make sure they can't benefit from it.
  • Cube duplication. If the player can push a cube back into a dropper when it is attempting to drop a cube (or a sphere), it is possible to manipulate the dropper to drop one or two extra cubes. It is also possible to break the dropper so that it does not drop anything anymore. Solution: Make sure the cube droppers are out of the player's reach.
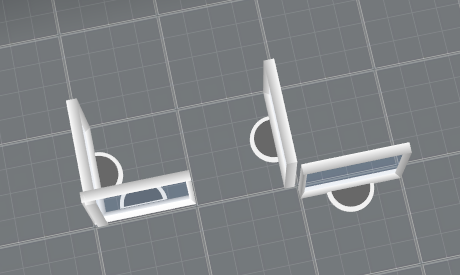
  • Seam glitches. Technically not a glitch. There is a distinct difference between the two placements of glass walls shown on the right. One has a gap between the panel edges, through which portals can be shot. The same goes for fizzlers, turning glass panels, and so on. Always be aware of the seams. In coop mode, you can even pull a whole cube through a miniscule seam.
  • Door glitch (single-player only). Very versatile bug, which may be triggered by accident. See the video that is mentioned in the playtesting chapter. Solution: Avoid placing portalable surfaces right next to thin barrier surfaces, such as observation room windows.
  • Floating reflection cube glitch. A reflection cube can float in air as long as a laser shines through it. See here for a map which requires the use of this glitch: http://steamcommunity.com/sharedfiles/filedetails/?id=143828949
Playtesting is Vital
I cannot stress this enough. Playtesting is of utmost importance!

  • Before publishing your map, play through it, and ensure that you can complete it. If you did not try your map, chances are that the last change you did, accidentally made your map impossible to complete.
    • For example, there is now signage on the wall you're supposed to portal to. You can't put a portal over signage.
  • Be cynical. Think: What's the worst thing the player will do? Try to break your own map while playing it.
  • Assume the player has no idea what to do in your map. Do not underestimate what a frustrated player will do. When they run out of obvious solutions, they will try underhanded tactics.
    • Assume they will try to smuggle testing elements out from rooms they belong to.
    • Assume they will fizzle your cube.
    • Assume they will put a sphere on a weighted button.
    • Assume they will block a laser with a paint blob.*
    • Assume they will funnel-climb, lightbridge-climb or portal-climb.*
    • Assume they will create stairs out of cubes or dead turrets or out of their coop partner.*
    • Assume they will not deal with the turrets in a way you anticipated. They might block their fire with a cube or with a dead turret. They might abuse the turrets' sleep cycle and make a run for it. They might use a laser or a blue gel or a moving panel, or put a portal under them, or throw a cube or a dead turret at them, or suck them into a vacuum tube (BEEMOD).
    • Assume they will put your redirector cube on a slanted angle against a button and point it diagonally towards a portal. Or they throw the redirector cube in air, let it land on their head, and point the cube down or up towards the ceiling.*
    • Assume the player will stand on pedestal buttons, on window sills of observation rooms, and on anything else that protrudes a millimetre from a wall.*
    • Assume the player can throw cubes forward, backwards, and up in air.*
    • Assume the player can fire six portals during a fling when you do not want them to.
    • Assume the player cannot fire portals at all during a fling when you want them to.* Their computer may be too laggy or their reaction times or vision may be bad.
    • Assume they will try shooting through the seams of glass panels or fizzlers.*
    • Assume they will try portal bumping or funnel-flying just out of boredom.*
    • Assume they have no idea how to sit in a chair.
  • Can your cubes be destroyed?
    • Is there a goo pit? Can they drop the cube there? Can they bring the goo pit closer with portals?
    • Is there a piston platform, an angled panel, a crusher (BEEMOD), or some other moving element, that may fizzle your cube by moving while in proximity?
    • Can the player accidentally trigger a bug in the game? Can they push a cube into an observation room, where they can never retrieve it back? Yes, this can happen, quite innocently, by accident. See this video: http://www.youtube.com/watch?v=Y5uHVIV6b44

*) If your map requires the player to do something like this, it is fair to warn of it in your map description.

This only gets you so far though. See, much like programmers, map authors have what is called a tunnel vision. The author is fixated along a certain track. They always assume that things will go just as they planned. Things will NOT go as you planned! You can never anticipate all the crazy things players will try and do in your map.
  • Enlist playtesters. (Politely) ask your friends to playtest your map.
  • Have your friends record a .dem file from their entire blind playthrough of your map, and send them to you. Watch the .dem files. You'll be surprised at the things you discover they do.

Iterate. Fix the problems. Do a new playtesting round. Rinse, repeat. Your map will become better and better.
64 Comments
Derpy Pumpkin Mar 12, 2024 @ 1:27pm 
what is Katzen on
CatsAreCool Oct 2, 2023 @ 11:07am 
this is nice.
but for me its impossible to not add a wheatley cube or something at the end as just "CONGRATS"
and just add a jump plate taking to your death since funi or "BOZO LOL" atleast i dont do that as much only in the bigger ones like vents where it seems nice but then you see a bunch of turrets and a little cage or the pit or the water that just have one that throws you down. those traps are inspired at the part where he kills you but he actually does each time i make those i just imagine the song "the part where he kills you" which is true
and also the only map you can see i posted is NIGHTMARE that is just a wire nightmare and does not give a shit about the player. the meaning of the map is just being a nightmare. literally.
but thanks! i will take this in my next map and try my best to do not the things i always do and try my best i will try this in the next map im gonna make called "flooded test chamber"
Dark Rozen Aug 25, 2023 @ 3:11pm 
Cool guide. Good job!
RosieScienceLabs Jun 18, 2023 @ 4:42am 
No!🤗
jornmann Jun 29, 2020 @ 6:29am 
i read this in your voice, should i be concerned
Bisqwit  [author] May 15, 2020 @ 12:53am 
Thanks TheCompanionCubeGuy!
theCCguy May 14, 2020 @ 9:39am 
Although I basically didn't do anything within this game apart from designing maps the last two years straight, this still helped me out a lot! (And yes, I know that this is seven years old, but I still wanted to write this)
ShadowOfRhonin Jan 9, 2020 @ 9:34am 
*Reads the Do Not Punish Mistakes section* But i made an entire chamber based on that.... XD
Bisqwit  [author] Apr 27, 2019 @ 8:29am 
ieatothecheeto Apr 19, 2019 @ 5:33am 
can there be one of these that explains how to use BEEMOD for starters, and how to get it