Idle Champions of the Forgotten Realms

Idle Champions of the Forgotten Realms

Оценок: 26
Champion Analysis
От Lukas_Poopus
Hello again everybody! It's me again.

Also this is an enormous work in progress.

My formations guide is getting to the point where it's full to bursting, and most of the info is about champions rather than formations! So I thought I'd split the two and maybe be able to go a bit more in depth for both. Cheers!
   
Наградить
В избранное
В избранном
Удалить
Champion Basics
To make things easier I'm going to assume Idle Champions is your first experience with Dungeons and Dragons (it was for me!) So I'll go over some of the important aspects of champions.

If you click on any of your champion portraits (they don't need to be in your formation), a window containing their information will pop up. For example here is Deekin's Information window (don't worry if you don't have him. He's an unlockable event champion, I'll explain events later on)
There are 5 main sections of information, plus two more hidden in tabs.
Let's start at the top right and move counterclockwise.

Name and General Information

In this first section you can see the champion's...
  • Name
  • Current Level
  • Class
  • Race
  • Age
  • Alignment
  • Affiliation
These are all important pieces of information since some characters buff others depending on traits such as alignment or age and so on.

Character Portrait

This section is really quite simple, it contains a small character sprite as well as 2 extra buttons.
  • The first is 2 arrows pointing in different directions. Notice that this is currently blue, when these arrows are blue, it means there is another champion that you can swap into this bench slot. If it's gray, this is the only champion in this slot. 2 champions in the same slot can never be in the formation at the same time, you must choose.
  • The next is a small incognito mask. If you own an alternate character skin, this icon will appear blue, and you may click on it to change skins.
Also underneath these buttons is the current HP of the Champion.

Stats & Attack Information

Each champion has 6 main stats as well as a basic attack and an ultimate attack. It's important to know your champion stats for many reasons, one of them being that some buffs only impact champions with certain stat levels.

Basic attacks are cast passively meaning they happen on their own. You put the champion in the formation and they attack. Take note of the cooldown. Some champions attack very fast, some attack slow. Also pay attention to the icon to the top left of the attack. Notice the small arrowhead. This means this attack is ranged. Their are two other attack types. Melee ~ indicated by a sword and magic ~ indicated by a fireball.

Ultimate attacks are much more powerful, but they must be used actively. (Or in conjunction with familiars, but let's ignore those for now.) Ultimate attacks are not immediately unlocked, you must get your character to a certain level first. Once unlocked they will appear above your champion bar. Simply click one to activate it. Note that they have a much longer cooldown, and may be of a different attack type. For example Deekin's basic attack is Ranged, but his Ultimate is Melee.

Gear

Every champion has 6 gear slots. Typically, but not always they will consist of a 1-2 self buffing items, 1-2 all champion buff items, 1-2 formation ability buff items, an Ultimate Damage buff item, and an Ultimate cooldown item. This will vary between champions. Gear can be found in chests, with event champion gear only appearing in special event chests and weekend chests.

Bio/Upgrades/Buffs

The last section contains 3 tabs. One is a short character bio, another is a list of upgrades that have been purchased, and the last is a list of incoming and outgoing buffs.

With that, you should have all the information you need about a champion!
Champion Types
That that you understand the basics of your champion, let's look at the types of champions that you can have. As I look at it there are 4 main types of champions.
  • The 12 Core Champions
  • Hitch (Pseudo-Core)
  • Campaign Unlockables
  • Event Unlockables
The 12 Core Champions

These champions are all available right when you start the game, assuming you can farm enough gold to purchase them. You don't need to do anything special to unlock/use them. Core champions find their gear in regular silver and gold chests. I'll break down this champions first in the next section.

Hitch

Hitch is essentially a core champion, he's different for 3 small reasons.
  • He was released by signing up for the newsletter. Anyone can get him by signing up.
  • He shares a bench seat with another core champion (Delina)
  • He does NOT reap the benefit of a blessing that the other core champions do. (Focus on the Core)

Campaign Unlockables

Campaign Unlockable Champions are obtained by completing certain variants within their respective campaigns. Currently there are only 2 such champions.
  • A Grand Tour of the Sword Coast
    • Drizzt ~ You can unlock Drizzt by completing the Overdue Rondezvous variant under the Underdeep Cartography main adventure.
  • Tomb of Annihilation
    • Azaka ~ You can unlock Azaka by completing Azaka's Procession Part 2, a variant within the Tomb of the Nine Gods main adventure.
These champions are extremely difficult to unlock. I don't even own Azaka yet, and there are only about 4 total adventures/variants I haven't yet completed.

Event Unlockables

These champions can be obtained in 1 of 2 ways, through an event, or through a Time Gate.
Events are typically on a 3 week rotation and the event is live for a little less than 2 weeks.

If you're in an event you can simply unlock the champion by completing the main adventure which requires you to reach area 50. Do this and reset. The next campaign you enter, this champion can now be swapped in. As I'm writing this, the last Year 1 event has ended and we are waiting on the first Year 2 event. Year 2 champions may or may not be unlocked differently.

Time Gates function as a sort of mini-event. If you choose a champion you don't yet have, all you need to do is reach area 50 in their Time Gate and reset. You now have the champion.
Core Champions
Bruenor ~ Core (Slot 1)
Bruenor is the first champion that you will ever have or use. Until you unlock another slot 1 formation, every adventure will begin with Bruenor already in your formation at level 1 (unless a variant restricts him.)

Here's a look at his details.

Attack Information
  • Basic Attack ~ Slice [Melee] 4 second cooldown.
    • "Bruenor slashes at the closest enemy with his axe."
  • Ultimate Attack ~ Bash [Melee] 60 second cooldown.
    • "Bruenor delivers a devastating blow to the closest enemy."
Notable Buffs/Upgrades
  • Level 10: Inspired ~ Increases the damage of Bruenor by 100% for every adjacent Champion.
  • Level 25: Ultimate Attack is unlocked.
  • Level 50: Rally ~ Increases the damage of all Champions in Bruenor's column by 100%.
  • Level 150: Specialization Choice
Specialization
The Breakdown
  • Champion ~ By choosing this specialization Bruenor immediately recieves a 200% buff and will have many more buffs to Inspired in the future.
  • Battle Master ~ With this specialization Bruenor immediately enhances the power of Rally by 100% and grants many more future upgrades to Rally.
Which to Choose
Apart from the very VERY beginning of the game you'll learn very quickly that Bruenor is best suited to buff rather than be a main damager. For that reason it is always (as in 99.99999999% of the time) best to choose his Battle Master Specialization.

Usage/Affiliations/Synergies
Bruenor is an EXTREMELY powerful buffer and should be in your party in just about every formation. He should be in the same column as your main damage dealer(s). Bruenor is a member of the Companions of the Hall along with Regis, Catti-brie, Drizzt, and Wulfgar. When they are all in a party together they grant some interesting abilites, however they just aren't quite up to snuff. Lastly Bruenor is mostly beaten out by his bench partner Deekin, however there are a few scenarios where he is still better. Without going into too much detail, Deekin causes your party Damage to 'pulse' up and down. Sometimes it's better to have steady damage (in the case of a certain annoying boss in the Tomb of the Nine Gods) and here Bruenor is more useful.

Equipment
  • Slot 1 ~ Axe Increases the damage of Bruenor by (50/125/200/350)%
  • Slot 2 ~ Beard Clips Increase the damage of all champions by (10/65/120/230)%
  • Slot 3 ~ Belt Increases the effect of Inspired by (25/87.5/150/275)%
  • Slot 4 ~ Ring Increases the effect of Rally by (25/87.5/150/275)%
  • Slot 5 ~ Shield Increases the damage of Bash by (25/87.5/150/275)%
  • Slot 6 ~ Helm Reduces the cooldown of Bash by (2/3/6/15) seconds
Important Gear
Bruenor's most important pieces of gear are slots 2 and 4. Those will be his most useful pieces of gear to have at a high level and rarity.

Champion Swaps
  • Deekin: Kobold Bard (Unlocked in Founder's Day)
Upgrade Chart
Honestly not sure if I'll incorporate this section. It's a lot of work and I hate working with spreadsheets.

Final Grade

A-

Bruenor has tremendous buffing power and is an important part of many formations. He misses out an A largely because Deekin is more versatile and manages to buff even more powerfully.

Wooo! First champion analysis done!

I think..


Celeste ~ Core (Slot 2)
Once you gather up some gold using Bruenor and occasional clicking, you should manage to unlock Celeste, she's a powerful buffer as well as healer!

A look at her info...
Attack Information
  • Basic Attack ~ Guiding Bolt [Magic] 6 second cooldown.
    • "A flash of light streaks towards the closest enemy."
  • Ultimate Attack ~ Flame Strike [Magic] 180 second cooldown.
    • "Celeste calls forth a pillar of flame centered on a random enemy." This Ultimate heals all allies to full health!
Notable Buffs/Upgrades
  • Level 20: Crusader's Mantle ~ Increases the damage of all Champions adjacent to Celeste by 100%.
  • Level 40: Mass Cure Wounds ~ Every second, Celeste heals all Champions in the column in front of her for 10HP.
  • Level 50: Ultimate Attack is unlocked.
  • Level 100: Specialization Choice
Specialization
The Breakdown
  • War Domain ~ When choosing this path, Celeste prioritizes buffing the effect of Crusader's Mantle. She will still have some upgrades to Mass Cure Wounds in this path.
  • Life Domain ~ This specialization allows Celeste to focus on increasing the effect of Mass Cure Wounds. She will still have access to some Crusader's Mantle upgrades.
Which to Choose
You'll learn rather quickly in this game (at least in it's current state) that your ability to deal damage far outweighs your ability to heal in respect to importance. The healing is more of a nice bonus. For that reason, unless your front line is getting decimated before you can make any decent favor gains, you should nearly always choose her War Domain specialization.

Usage/Affiliations/Synergies
Celeste is a truly excellent buffer, so first and foremost make sure that she is adjacent to your main damager(s). Secondly, if the formation allows for it, try to also have her placed behind your tanking column so that they can receive her heals. While lacking any affiliations that impact her usage, she does rather uniquely work with Evelyn. Evelyn is an event champion tank who can increase her buffing power while she is receiving heals that actually restore her HP (ie not while she has full HP). By placing Celeste behind her, you can increase her buffing power while she is damaged. However, don't worry your head if you can't manage this in any formation as it is simply a 100% increase.

Equipment
  • Slot 1 ~ Headband Increases the damage of all champions by (10/65/120/230)%
  • Slot 2 ~ Gauntlets Increase the damage of all champions by (10/65/120/230)%
  • Slot 3 ~ Belt Increases the effect of Crusader's Mantle by (25/87.5/150/275)%
  • Slot 4 ~ Amulet Increases the effect of Mass Cure Wounds by (25/87.5/150/275)%
  • Slot 5 ~ Boots Increases the damage of Flame Strike by (25/87.5/150/275)%
  • Slot 6 ~ Symbol Reduces the cooldown of Flame Strike by (5/9/18/45) seconds
Important Gear
Slots 1, 2, and 3 are Celeste's most important pieces of gear, but being a healer and also having a healing ultimate one can argue that slots 4, and 6 are quite important too.

Champion Swaps
  • Regis: Halfling Rogue (Unlocked in Midwinter Event)
Upgrade Chart
Blegh, maybe after this is completed and the task doesn't sound so miserable.

Final Grade

A

Unless it's virtually impossible given a certain formation (I honestly can't think of any since Regis needs to be pretty close as well) I use Celeste in literally EVERY formation I run. That includes speed formation/gold find formation/damage formation, literally everything. Her adjaceny requirement can be a hassle at times, but her buffing power makes the it worth working around. Plus, heals!


Alright so it took more than a day (largely cuz I was lazy, this honestly took maybe 30 minutes) but Celeste is finished!
Nayeli ~ Core (Slot 3)
Unlocking Nayeli begins to give your champions an actual semblance of a formation. She's a powerful tank/buffer hybrid essential to nearly all formations.

Here she is...
Attack Information
  • Basic Attack ~ Swing [Melee] 8 second cooldown.
    • "Nayeli cleaves all targets near the closest enemy."
  • Ultimate Attack ~ Banishing Smite [Melee] 120 second cooldown.
    • "Nayeli deals massive damage to a random enemy and stuns all enemies."
Notable Buffs/Upgrades
  • Level 20: Aura of Courage ~ Increases the damage of champions in the column behind Nayeli by 100%.
  • Level 40: Aura of Protection ~ Increases the damage of all champions by 50% for every enemy attacking Nayeli (stacks additively).
  • Level 50: Ultimate Attack is unlocked.
  • Level 100: Specialization Choice
Specialization
The Breakdown
  • Oath of Vengeance ~ This path allows Nayeli to focus on enhancing her ability to damage buff those behind her.
  • Oath of Devotion ~ This path puts Nayeli on more of a support/survival role. She will gain many future upgrades to her health as well as gaining attack priority from enemies (useful in a formation with more than 1 tank slot) however her damage buff upgrades from her on out will be minimal.
Which to Choose
Oath of Devotion can be useful early game when damage buffs are pretty minimal still or when enemies are doing far too much damage and wrecking your team. That being said the DPS loss largely nullifies any helpful aspect. Oath of Vengeance is the best path unless you're in very specific circumstances where DPS doesn't matter but survival does.

Usage/Affiliations/Synergies
Nayeli is an essential front-line tank/buffer that has a role in every formation. For greatest effect place her frontline with your main damager(s) directly behind her. Alternatively if you have Evelyn, you can tank with her, place Nayeli in C2, with damager(s) in C3. Keep in mind you sacrifice Aura of Protection doing this. You can also dual tank with Nayeli. Nayeli is also the only champion to date with gear that buffs her health. This makes her invaluable as a tank as her health can continue to go higher and higher and higher.

Equipment
  • Slot 1 ~ Figurine Increases the damage of all champions by (10/65/120/230)%
  • Slot 2 ~ Breastplate Increases the health of Nayeli by (25/87.5/150/275)%
  • Slot 3 ~ Mail Increases the effect of Aura of Courage by (25/87.5/150/275)%
  • Slot 4 ~ Gauntlets Increases the effect of Aura of Protection by (25/87.5/150/275)%
  • Slot 5 ~ Holy Symbol Increases the damage of Banishing Smite by (25/87.5/150/275)%
  • Slot 6 ~ Greatsword Reduces the cooldown of Banishing Smite by (3/6/12/30) seconds.
Important Gear
Aside from Slot 5, I would argue that all of Nayeli's gear is very useful. The damage buffs are great, quicker access to a guaranteed stun from the Ultimate can be very helpful and the usefullness of boosted health cannot be overstated.

Champion Swaps
  • Gromma: Tortle Druid (Unlocked in Feast of the Moon Event)
  • Binwin: Mountain Dwarf Fighter (Unlocked in Dragondown Event)
Final Grade

A

I use Nayeli in literally every adventure/variant that she is made available, she's an ultra strong tank with fantastic health, as well as an ultra stong buffer who excels even more while frontline. While Gromma has some niche uses, she can't compare to Nayeli and Binwin only shines with incredible gear. Also, the guaranteed stuns on every enemy from her ultimate is just too good.

Jarlaxle on the way!
Jarlaxle ~ Core (Slot 4)
Jarlaxle is the first pure DPS champion you can unlock, he also behaves as a minor gold buffer. You may not find a ton of use for him once you progress further into the game, but he is very useful at the beginning.

A brief overview...
Attack Information
  • Basic Attack ~ Sneak Attack [Melee] 5 second cooldown.
    • "Jarlaxle disappears into the shadows and attacks the furthest enemy."
  • Ultimate Attack ~ Fan of Knives [Ranged] 300 second cooldown.
    • "Jarlaxle flings hidden knives from below his cloak, hitting several random enemies."
Notable Buffs/Upgrades
  • Level 35: Room to Work ~ Increases the damage of Jarlaxle by 100% if there are no allies directly in front of him.
  • Level 50: Ultimate Attack is unlocked.
  • Level 100: Equal Opportunity ~ Increases the damage of Jarlaxle by 100% if there are at least 3 unique races adjacent to him.
  • Level 150: Specialization Choice
Specialization
The Breakdown
  • Loner ~ This path focuses on enhancing Jarlaxle's "Room to Work" formation ability. Upon choosing this specialization it gains a 300% boost and will have future upgrades to further enhance the ability.
  • Socialite ~ Conversely, this path works on enhancing his "Equal Opportunity" ability. It gets a slightly less immediate boost of 200% and will also gain further enhancements.
Which to Choose
Room to Work can be rather difficult to activate given it's restriction of not having anyone in front of Jarlaxle *ahem* Nayeli *ahem* so it's typically best to grab Equal Opportunity if you are choosing to use Jarlaxle as a DPS, however if the formation does allow for Room to Work, that's likely the better option.

Usage/Affiliations/Synergies
Apart from early game, it's unlikely that Jarlaxle will hold a spot in your formation. He has no upgrades contributing to party DPS, and all of his buffs go to himself. That being said his attack priority is the furthest enemy away. This does have it's uses against bosses. For example, in most boss waves the minions arrives first, and you clear them before the boss. This means as you finally get to attack the boss, the only enemy triggering Nayeli's Aura of Protection is the boss. However with a Jarlaxle DPS, the furthest enemies are targeted first, meaning you will likely have 7-8 enemies stacked on Nayeli as Jarlaxle targets the boss, thus greatly increasing your damage. He also helps against hit-based enemies near the back of the screen, as he ignores the nearby enemies and targets whatever is further away. Overall though you will find many better DPS options.

Equipment
Suggestions/Additions?
If you have any other information you'd like to me include about champions other than their upgrade charts (that's a loooooooot of work) and formations that's my other guide which I'll leave a link for, let me know!

Optimal Formations Guide https://steamcommunity.com/sharedfiles/filedetails/?id=1319319295
Event Champions
Event Champions are special champions that are only available to unlock for an unlimited time. However once you unlock them, they are yours to keep.

Events roll around every third week and last for 10-11 days. During that time you have the chance to unlock event champions by completing certain objectives for them.
Комментариев: 7
intvsystem3 29 окт. 2018 г. в 18:02 
Say something about the familiars in the guide, perhaps?
LogicLover 25 окт. 2018 г. в 15:24 
Still no final grade for Jarlaxe
Commissar Voyon 13 окт. 2018 г. в 15:47 
Awesome! Keep up the good work :)
Tsukiakarise 11 окт. 2018 г. в 16:56 
I know they has use but in my current formation they are useless and i dont have items for them so i want to look for something that is useful even w/o equips
LogicLover 7 окт. 2018 г. в 1:15 
There are no useless champs aside from Krond and Delina, Every othr Champ has a use
Tsukiakarise 5 окт. 2018 г. в 18:44 
Im new and I just found that each champ share slot with some other champs so please add info under every champ which hes swapping
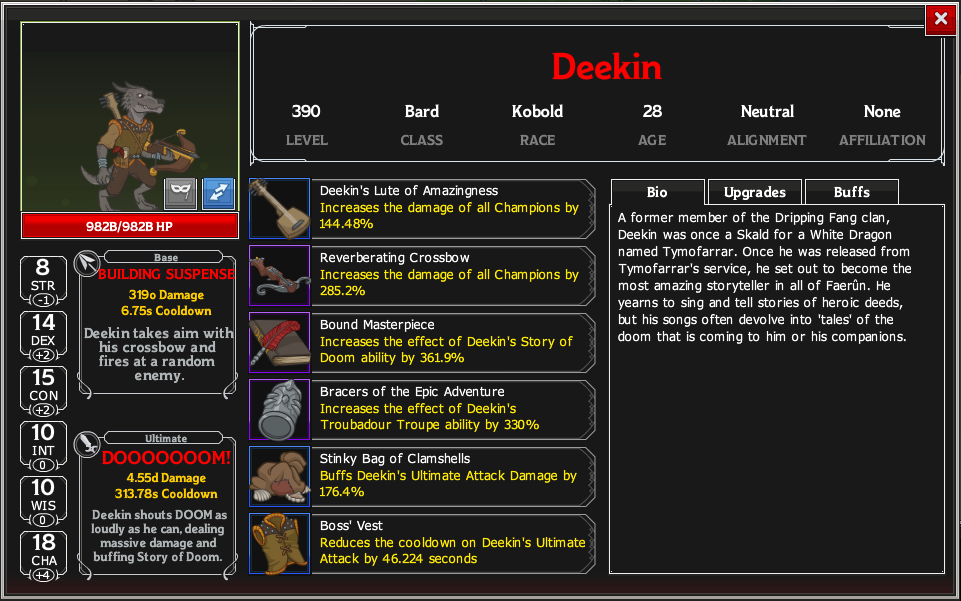
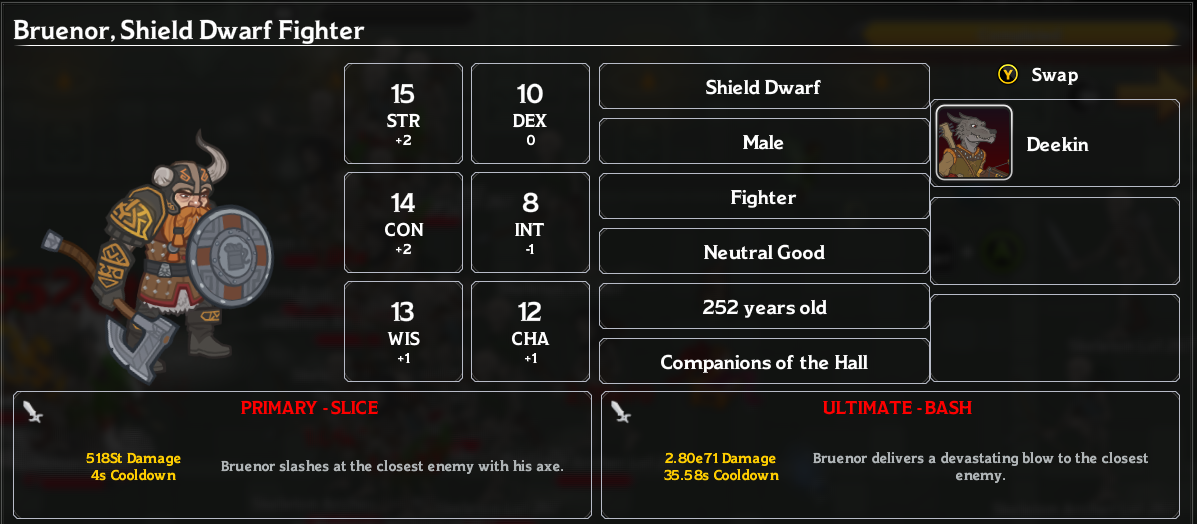
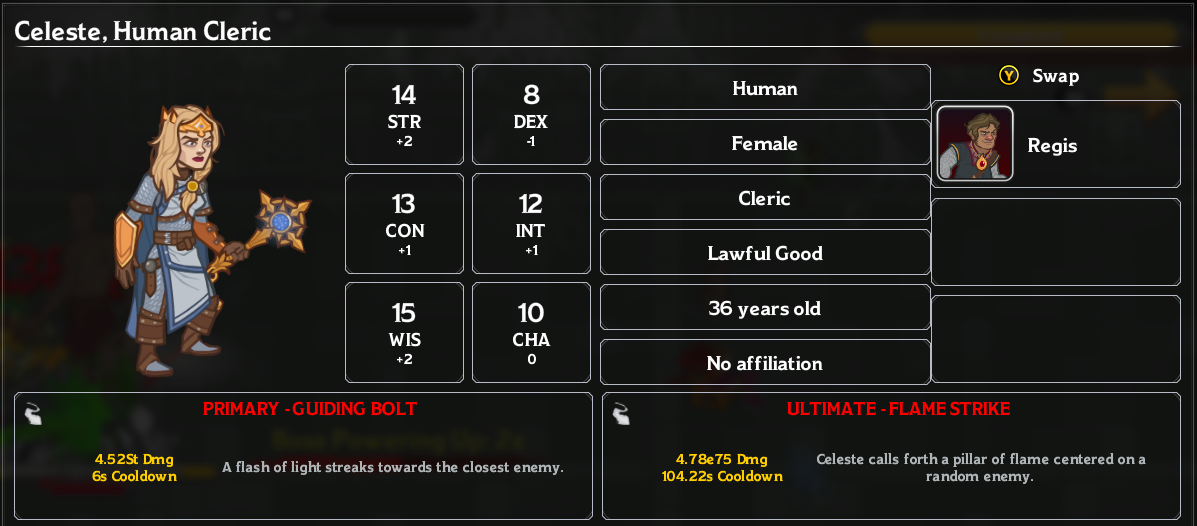
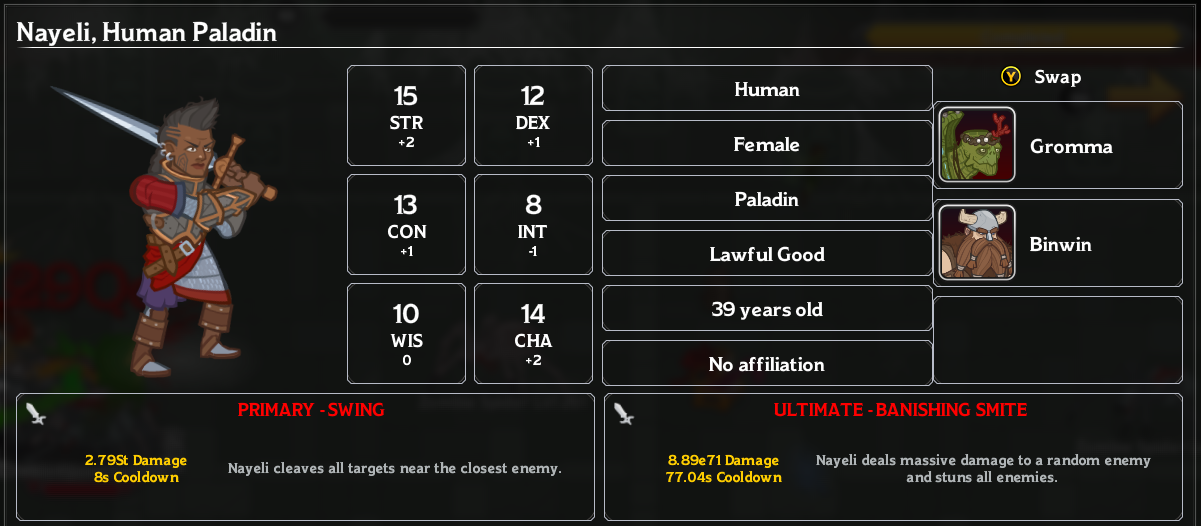
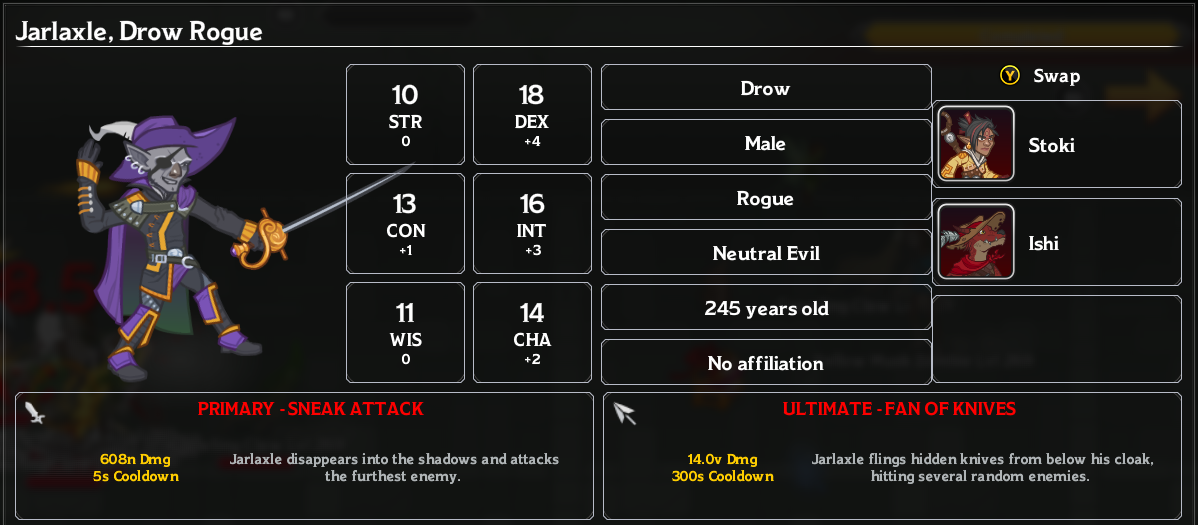
for now I know that Jaralaxle swap with Stoki and Ishi

that will help new players think ahead whitch champ to unlock first... so we can get rid of useless champs in our formation
LogicLover 3 окт. 2018 г. в 12:45 
Adding this to the time gates champion choice guide's other guides section