Two Point Hospital
107 คะแนน
Two Point Hospital Guide [RETIRED]
โดย CreepyCanuck
This is a general guide that will help you to become a successful hospital administrator, and will cover many aspects of the game.

This guide has been retired and will no longer be updated.
   
รางวัล
ชื่นชอบ
ชื่นชอบแล้ว
เลิกชื่นชอบ
Introduction
Welcome to my Two Point Hospital Guide.

This guide will be an evolving work in progress, and will cover every aspect of the game, including unlocks, achievements, best placements, what's required for which rooms, so on and so forth. You'll get an item listing, tips on layouts, breakdown of your staff and their traits, and more.

This is more of a general guide, and not a strategy guide per se, as you can complete each hospital's challenges however you want, since there is no single correct way to do things.

If you have any questions or additions, feel free to jump down to the credits section.
Tips & Tricks
When building the GP's Office, position and angle the desk near the door, with the chair the patient sits in closest to the door. This reduces the time they walk to the desk and when they leave, slightly increasing your productivity.

====================

When you have only a couple of specialists and want to make sure they're always available, make sure to untick every job of theirs, except for their specialty. It's silly to have a surgeon diagnose people.

====================

It's almost always better to build multiple training rooms that are small, so that you can train multiple people in multiple stats without taking up a whole room. I find small'ish rooms of 6 to 9 seats the best, with a couple of bookcases and anatomy dummies.

====================

One of my biggest suggestions is to specialize with the improvement traits as soon as you're able. For example, make sure you're able to get a doctor that comes with a specialist trait (radiologist, surgeon, geneticist, etc.), or comes with no trait, and then train that specialist trait. Once that doctor improves, continue training him with the following: Motivation, Bedside, Stamina, Treatment. This gives you a doctor that's fully qualified in one of the specialty rooms, with boosts to their speed, happiness they bring to their patients, ability to work, and cure chance of success.

I've been doing this since I've been able, and where money permits, and it makes a huge difference. You can then lock that doctor to just perform in that one room, and you'll have the best outcome possible for that cure.

====================

Once you start building training rooms, try to place the training room in the plot of land that's nearest to a helipad, as this is where your guest trainers will come from. This shortens the time required to train, as there's less distance to travel.

====================

When building rooms, you should almost always place in every room, at least:
  • Fire extinguisher
  • One of the garbage bins, then replace as you upgrade
  • Hand sanitizer
  • Plant (any kind; rosebush gives best happiness, but requires more watering)
  • OPTIONAL: Coffee machine
This ensures that if a machine catches fire, the fire extinguisher will be nearby. Garbage bins help prestige and reduce litter. Hand sanitizer helps keep hygiene up, and the plant helps with happiness. The coffee machine is optional, but will give your employees a boost, keeping them going longer.

====================

Epidemics can be a pain in the ass, especially when your hospital is crowded, and there is one hospital where the objective is to vaccinate 25, then 45, then 60 people. I found this one to be the worst because of epidemics.

To help, run the game at slow speed; this gives you the chance to observe. You may also want to remove any energy drink machines, as people who are energized exhibit the same power walking as those who have Jogger's Ripple. Also, you may want to remove all seating, because people who have the disease may be seated, and the animation won't show. Keep in mind that these can affect people currently being treated, which also hides the animation, as well as your own staff. And lastly, the game can annoy you by giving you someone who has Premature Mummification, and having them be victim of the Curse epidemic, which has the same symptoms of that illness, so you may need to waste a few vaccines on those patients in case they have the epidemic as well.
UI & Menus
Two Point Hospital has a fairly compact UI that gives you everything you need at a glance, as well as several sub-menus that tell you everything you'd ever want to know about your hospital, and then some.

UI
The main UI gives you everything you need to know at a glance. Starting from the bottom left we have the main panel.


The green icon with the white mountain will take you back to the region screen, and the three dots will open the menu. Rooms will open the rooms panel and show you everything you've unlocked, as well as what you can build. Items opens the list of all items available to you, and Hire opens the staff hiring screen. All pretty self-explanatory, really.

The first tab with the green person icon will bring up three overview screens: one for all your staff members, which shows their pay, mood, skills, etc. The second one will show you patient info, including their boredom, hunger, thirst, illness, etc. And the last one shows you the illnesses you've researched, how many people have it, how many cures have succeeded (or failed), and where to cure it.


The second set of options under the yellow dollar sign show you finances. Overview shows you where your money is coming from, where it's going, and can help you curb your spending, or figure out where to earn some more. Prices allows you to change how much you charge for every single option available in your hospital. You can let people get their head unscrewed for -20% less than normal, but charge people in the ward an additional 20%. Pricing affects your reputation and happiness; the higher the prices, the more people will hate coming, and your reputation will take a dive. Loans allows you to take out a loan from one of three banks, with various interest rates and payback terms.


The third set of options are visual overlays, that give you a breakdown of your hospital. For example, the first option -- Attractiveness -- will be green around areas that your staff and patients think are nice, and white around areas that aren't. From left to right, top to bottom, the overlays available are:

Attractiveness, Health, Patient Happiness, Staff Happiness, Temperature, Thirst, Hunger, Staff Energy, Hygiene, Toilet, Boredom, Maintenance


The bottom right shows how much money you have available (hover over it to see your income, expenses, and profit). Your reputation and hospital level are under this, as well as your Kudosh, and the game speed controls. The calendar shows the current in-game date, with the awards happening at the end of every December.

The top row above your money are where you receive all your emails, and the blue tray icon lets you view your past messages.


The top right has two tabs. The first tab is your objectives, which list what you need to accomplish to gain a star. At the bottom of the objectives, you'll have any special events, like emergencies or staff requests.


The second tab is the multiplayer challenge, which lets you compete with your friends against set challenges, such as curing the most patients or earning the most income, in a set amount of time. Winning the challenge will give you Kudosh.

====================

Menus
There are five main overview menus available to you (plus the awards, for a total of six). From left to right, they are: Awards, Leaderboards, Finance, Staff, Patients, Log


The Leaderboards menu shows where you stand against friends in six categories: Hospital Value, Cure Rate, Reputation, Yearly Profits, Cures Per Year, Staff Morale. If you don't have many friends, the game throws in some random companies.

Awards
The Two Point County Healthcare Award Ceremony happens at the end of every year, and the awards are given out over eight categories. Winning awards seems to boost your reputation (although I don't know by how much), whereis not winning an award does nothing.

Hospitals - Unlocks & Progression
You'll unlock new items and upgrades by getting one, two and three stars on all hospitals. For each star level, you will get:

1 star: $10,000 and K100
2 star: $20,000 and K150
3 star: $30,000 or $50,000 and K200

These do not scale, and will always be awarded, regardless of which hospital you're in. You'll also unlock special items, new hospitals and more, by getting 3 stars. They are:

Hogsport
1 star: Lower Bullocks (new hospital), Lightheaded Poster (item)
2 star: Salty Snacks Machine (item)
3 star: Newsagent (item)

Lower Bullocks
1 star: Flottering (new hospital), Cardiology (room), De-Lux O-Luxe II (room upgrade)
2 star: Extract-a-Pan II (room upgrade)
3 star: Extract-a-Pan III (room upgrade)

Flottering
1 star: Mitton University (new hospital), Tumble (new hospital), Reception (room), Clown Poster (item)
2 star: Dehumorifer II (room upgrade), Heart Racer II (room upgrade)
3 star: Dehumorifer III (room upgrade), Heart Racer III (room upgrade)

Tumble
1 star: Flemington (new hospital - also requires one star in Mitton University), Small Radiator (item)
2 star: Large Radiator (item)
3 star: Luxury Drinks Machine (item)

Mitton University
1 star: Flemington (new hospital - also requires one star in Tumble), Encyclopedia Bookcase I (item), De-Lux O-Luxe III (room upgrade)
2 star: Encyclopedia Bookcase II (item), EZ-Scan III (room upgrade)
3 star: Server (item), Drug Mixer III (room upgrade)

Flemington
1 star: Smogley (new hospital), Melt Downs (new hospital), Cafe (room)
2 star: No unlocks
3 star: No unlocks

Smogley
1 star: Duckworth-upon-Bilge (new hospital - also requires one star in Melt Downs), Toxic-Waste Bin (item), +100 Research Points
2 star: No unlocks
3 star: No unlocks

Melt Downs
1 star: Duckworth-upon-Bilge (new hospital - also requires one star in Smogley)
2 star: +250 Research Points
3 star: Super Computer, +500 Research Points

Duckworth-upon-Bilge
1 star: Sweaty Palms (new hospital), Grockle Bay (new hospital)
2 star: No unlocks
3 star: No unlocks

Sweaty Palms
1 star: Blighton (new hospital - also requires one star in Grockle Bay)
2 star: No unlocks
3 star: No unlocks

Grockle Bay
1 star: Cubism Poster (item), Blighton (new hospital - also requires one star in Sweaty Palms)
2 star: No unlocks
3 star: Cubism Anatomy Poster

Blighton
1 star: Pelican Wharf (new hospital), Rotting Hill (new hospital)
2 star: No unlocks
3 star: NOT YET THERE

Pelican Wharf
1 star: Croquembouche (new hospital - also requires one star in Rotting Hill), +100 Research Points
2 star: +250 Research Points
3 star: +500 Research Points

Rotting Hill
1 star: Croquembouche (new hospital - also requires one star in Pelican Wharf)
2 star: No unlocks
3 star: No unlocks

Croquembouche
1 star: NOT YET THERE
2 star: NOT YET THERE
3 star: NOT YET THERE
Career Goals
Career Goals are an overarching set of goals for you to accomplish, that aren't tied to one particular hospital, and will eventually be completed as you progress.

There are multiple tiers to the goals, and they will give increasing rewards as you complete each tier. The beginner tiers available are:
  • Cure 100 Patients
  • Earn $1,000,000
  • Promote 500 Staff
  • Promote 100 Doctors
  • Promote 100 Nurses
  • Promote 100 Janitors
  • Promote 100 Assistants
  • Earn K1,000
  • Get 3 stars in Tumble
  • Get 3 stars in Mitton University
  • Get 3 stars in Flemington
  • Get 15 stars
  • Repair 100 Machines
  • Water 100 Plants
  • Unblock 100 Toilets
  • Restock 100 Vending Machines
  • Capture 100 Ghosts
  • Upgrade 5 Machines
  • Launch 10 Marketing Campaigns
  • Get an Organisation Value of $10,000,000
  • Train 20 Staff
  • Train a Staff member in Diagnostics V
  • Train a Staff Member in Psychiatry V
  • Train a Staff Member in Research V
  • Train a Staff Member in Surgery V
  • Complete 10 Research Projects
  • Complete 20 Multiplayer Challenges
  • Train 50 Assistants
  • Train 50 Doctors
  • Train 50 Janitors
  • Train 50 Nurses
Rooms - Part 1
As you progress, you'll unlock more rooms. Some will be unlocked by reaching certain stars, some will be unlocked as part of objectives, like the Clown Clinic. Many rooms have upgradeable machinery as well, which you can unlock. If you choose to have a janitor upgrade your machines, you need to pay, and you can do this twice; upgrade a base machine to level II, then to level III.

Level II adds +25% to its stat and costs $10,000
Level III adds +50% to its stat and costs $20,000

Reception


$1,600
Lets you combine multiple reception desks into one room, basically
Requires: Assistant
Minimum size: 2x3
Required objects:
  • Hatch - $100
  • Reception Pod - $500
Optional objects:
  • Radio - $300
  • Printer - $400
  • Mini Filing Cabinet - $100
  • Charity Pot - $100
The Reception Room is basically the next step up from the Reception Desk. Instead of a single item with a single assistant, you can build a room of any size, and put spots to have many receptionists. This is not only a beneficial item, but a requirement later on, when your hospitals are backlogged.

GP's Office


$5,800
Patients will visit here first, as it's the first line of figuring out what's wrong
Requires: Doctor
Minimum size: 3x3
Required objects:
  • Office Desk - $500
  • Filing Cabinet - $200
Optional objects:
  • Medicine Cabinet - $1,000
As your hospitals advance, you'll need plenty of these rooms, so it becomes a challenge to strike a balance between size and amount. In Smogley, I had 8 offices built, and they all still had 6+ queues.

Pharmacy


$7,600
Distributes cures and medicines
Requires: Nurse
Minimum size: 3x3
Required objects:
  • Drug Mixer - $2,500
Pharmacies will be one of your first places to cure patients, and is staffed by the nurse. They'll produce a variety of cocktails, which the patient will drink, and will then (hopefully) be cured. Plan to build several in later hospitals.

General Diagnosis


$7,100
Second stop on the way to figuring out the disease
Requires: Nurse
Minimum size: 3x3
Required objects:
  • EZ-Scan - $1,500
  • Examination Table - $500
Optional objects:
  • Medicine Cabinet - $1,000
General Diagnosis is staffed by a nurse, and is generally the second place patients will visit after coming from the GP's Office. Depending on the issue, the GD can diagnose it right away and send them off to treatment, otherwise the patient will continue through your diagnostic facilities.

Cardiology


$7,600
Another diagnostic room
Requires: Nurse
Minimum size: 3x3
Required objects:
  • Heart Racer - $2,500
Cardiology will stress your patients and test their heart rate, rhythm, and a variety of other symptoms, which will help the nurse to diagnose what their condition is. It's a fairly quick diagnostic tool, as the treadmill doesn't run for too long.

Ward


$7,500
Acts as both a diagnostic and cure (such as Bed Face)
Requires: Nurse
Minimum size: 3x4
Required objects:
  • Bed - $1,500
  • Nurse Station - $500
  • Screen - $400
Optional objects:
  • Wall Monitor - $500 - +1% Treatment & +1% Diagnosis Power
  • Bedside Table - $250 - Increases room prestige

Once built, click the room to bring up its info panel, and you'll be able to add more nurses to it. Depending on the size of your hospital, and how busy the ward becomes, this becomes a very useful feature.

Psychiatry


$6,100
Cures specific illnesses
Requires: Doctor with Psychiatry Specialization
Minimum size: 3x3
Required objects:
  • Psychiatrist's Armchair - $400
  • Psychiatric Couch - $600
Optional objects:
  • Diagnostic Bookcase - $2,000 - +2% to Diagnosis and increases prestige
  • Treatment Bookcase - $2,000 - +2% to Treatment and increases prestige
Requiring a psychiatrist, the Psychiatry Room cures some of the comical illnesses, such as all those Freddy Mercury wannabes.

Staff Room


$5,500
Lets your staff rest and rebuild their stamina
Minimum size: 2x3
Required objects:
  • Sofa - $400
Optional objects:
  • Locker - $100 - Increases prestige
  • Armchair - $300 - Increases comfort
  • Dart Board - $200 - Reduces boredom
  • Television - $300 - Increases prestige
  • Coffee Table - $400
  • Lamp - $400
  • Bean Bag - $400 - Increases comfort
  • Exercise Frame - $300 - Reduces boredom
Once built, click on the room to access its options, and you can configure who uses it. You can allow just doctors to use that room, or just nurses, and let janitors and assistants share one as well. Or you can create four fairly large ones, one for each type of staff.

Toilets


$5,600
Room for both your staff and patients to relieve themselves
Minimum size: 2x3
Required objects:
  • Toilet Cubicle - $500 OR Golden Toilet - $2,000
Optional objects:
  • Sink - $400 - Increase hygiene
  • Hand Dryer - $200 - Increase hygiene
Once the Toilets are built, you can click on it to configure its settings. You can choose a mixture of allowing male, female, staff and patients. Toggle on and off to mix. For example, you can have a bathroom for both male and female staff, one for female patients, one for male staff, etc.

Training


$7,000
Basically a classroom, allows you to train your staff in various fields
Minimum size: 3x3
Required objects:
  • Lectern - $1,400
  • Trainee Desk - $500
Optional objects:
  • Encyclopedia Bookcase I - $2,000 - Increases room prestige and +2% to training speed
  • Encyclopedia Bookcase II - $4,000 - Increases room prestige and +4% to training speed
The training room is where you'll be able to upgrade your staff abilities as they level up. Each staff member will level up to five times (four times if they come with one trait), and you'll be able to dictate their future by training specific traits you want.

De-Lux Clinic


$21,100
Cures Lightheadedness
Requires: Doctor
Minimum size: 3x3
Required objects:
  • De-Lux-O-Luxe - $15,000
  • Console - $1,000
The De-Lux Clinic is basically Two Point's version of the Inflation room, and instead of popping patients heads and re-inflating them, you unscrew their head and replace it with a new one.

Pans Lab

$20,100
Cures Pandemic
Requires: Doctor
Minimum size: 4x4
Required objects:
  • Extract-A-Pan - $15,000
The Pans Lab cures people of various kitchen related illnesses.

Clown Clinic


$20,100
Cures Jest Infection
Requires: Nurse
Minimum size: 4x4
Main object: Dehumorfier
Required objects:
  • Dehumorifer- $15,000
Optional objects:
  • Cannon - $400
  • Circus Lights - $400
  • Hay - $400
Jest Infection is no laughing matter! Or is it? Depends on your view of clowns, I suppose, but either way, cure them of this disease at the clinic.
Rooms - Part 2
Fracture Ward


$13,600
Cures broken bones and similar injuries
Requires: Nurse
Minimum size: 3x4
Required objects:
  • Traction Bed - $3,000
  • Nurse Station - $500
  • Plaster Caster - $5,000
Optional objects:
  • Wall Monitor - $500 - +1% Treatment & +1% Diagnosis Power
Like the regular Ward, you can increase how many nurses are stationed in the Fracture Ward by opening its panel once you've built it.

Research


$35,100
Allows the research of new cures, rooms and items
Requires: Doctor with Research trait
Minimum size: 3x3
Required objects:
  • Researcher's Desk - $10,000 - +1 to Research Power per desk
  • Research Pod - $20,000
Optional objects:
  • Research Monitors - $8,000 - +1 to Research Power
  • Server - $10,000 - +1 to Research Power
The Research Room is where you'll research all your upgrades, as well as a constant flow of money and Kudosh, if you choose to redo those research paths. It can have up to five researchers, which you choose on the room menu once it's built.

Marketing


$7,100
Run marketing campaigns to boost reputation, attract patients, or get new staff in the door
Minimum size: 3x4
Required objects:
  • Marketeer's Desk - $1,000
  • Marketing table - $1,000
Optional objects:
  • Research Monitors - $8,000 - +1 to Research Power
  • Server - $10,000 - +1 to Research Power
Marketing will give a good time bonus to your objectives if you choose to use it, especially as you get later on and you need to cure 20, 30 and 40 people of a particular disease, as you can use marketing to attract those patients. Like some other rooms of its type, you can increase how many marketers you have up to a maximum of five, by clicking the room once it's built.

Chromatherapy


$21,100
Cures Grey Anatomy
Requires: Nurse
Minimum size: 4x3
Required objectsobjects:
  • Colourizer - $15,000
  • Console - $1,000
Feeling down in the dumps? Blue? Gray? The Colourizer, part of the Chromatherapy cure, will inject life (and color!) back into your patients.

X-Ray


$31,100
Additional diagnosis room
Requires: Doctor
Minimum size: 4x4
Required objects:
  • X-ray Machine - $25,000
  • X-ray Terminal
The X-ray is a high-tech diagnostic room, and will greatly increase the diagnostic progress of your staff. It requires a doctor, and takes a fair bit of time to perform. If you accept an emergency with multiple patients needing x-rays, make sure you have at least two or three rooms.

Injection Room


$15,100
Cures illnesses like Mood Poisoning and Rock Bottom
Requires: Nurse
Minimum size: 3x3
Required objectsobjects:
  • Jab Master - $10,000
In the Injection Room, a nurse will jab patients to fix what ails them. I've personally had this cure fail more than often, so I recommend your Nurse have the Injection Room trait, to give you a better chance at success.

Fluid Analysis


$20,100
Extracts fluids as a diagnostic tool
Requires: Nurse
Minimum size: 3x3
Required objects:
  • Fluid Accelerator - $15,000
Your nurse will jab people and take their fluids as a way to diagnose their issues. I'd like to think they're only extracting blood, but can we really know for certain?

M.E.G.A Scan


$60,100
One of the best diagnostic rooms
Requires: Doctor with Radiology trait
Minimum size: 4x4
Required objectsobjects:
  • M.E.G.A Scanner - $55,000
The M.E.G.A Scanner is one of the best diagnostic rooms you can build, and comes with requirements specific to that: a bigger than normal room, an expensive machine, and a doctor with a Radiology trait. It's also a very slow diagnostic tool, so I'd build multiple if you can afford them, as well as upgrade them, so they go quick.

Cafe


$7,600
Centralized place for food and drink
Requires: Assistant
Minimum size: 5x4
Required objectsobjects:
  • Cafe - $2,000
  • Cafe Table & Chairs - $400
  • Food Bin - $100
The cafe is likely to get crowded, so you'll want to make sure it's fairly large and evenly spread out, so people don't get bunched up between tables and the ordering stand. It'll become very popular, and will quickly dwarf your vending machines, even the luxury ones, so perhaps place it in a fairly empty section of your hospital, so that you can expand upon it in the future.

Surgery


$26,000
Cures many illnesses, at the expense of time and having high end doctors
Requires: Doctor with Surgery, and a Nurse
Minimum size: 3x4
Required objects:
  • Operating Table - $20,000
  • Medical Sink - $500 - Increases hygiene
  • Screen - $400
Optional objects:
  • Operation Monitor - $9,000 - +2% Treatment Power
  • Wall Monitor - $500 - +1% Treatment & +1% Diagnosis Power
Surgery is a very lengthy process, but cures some of the worst illnesses in the game. It's also one of the only rooms that requires at least two staff of different professions (one doctor with the surgery trait, and one nurse). Definitely have at least three of these rooms if you're going to accept any emergencies.

Head Office


$30,1000
Cures Turtle Head
Requires: Doctor
Minimum size: 4x4
Required objects:
  • Turbo-Plunger - $25,000
Turtle, turtle. Turtle! The Head Office is misleading (at least I thought it was some sort of administration room at first), but actually cures people whose head have receded into their body.

DNA Lab


$50,100
Acts as both a diagnostic room and a place to cure certain illnesses
Requires: Doctor with Genetics trait
Minimum size: 3x4
Required objects:
  • Healixir - $45,000
A doctor at the DNA Lab can help to diagnose patients if everything else fails, and will also act as a cure for things like Denim Genes. Therefore, it's best to have at least two, so your patients don't get bored (or die) from the wait, as it's not a short duration.

Shock Clinic


$30,100
Cures Shock Horror
Requires: Doctor
Minimum size: 4x4
Required objects:
  • Discharger - $25,000
Doctors at the Shock Clinic will remove the electricity jumping through your patient, by putting them into a contained unit, and, literally, discharging their body of all electricity.

Resolution Lab


$30,100
Cures 8-bitten
Requires: Doctor
Minimum size: 4x4
Required objects:
  • Debugger - $25,000
This is my probably my favorite disease in the game, the Debugger cures people of 8-bitten, which gives them a pixelated look and stiff movements. It's a neat throwback.

Recurvery Room


$35,100
Cures Cubism
Requires: Doctor
Minimum size: 3x5
Required objects:
  • Recurvery Unit - $30,000
The Recurvery Room helps those who have cubism, and it's a pretty fun room. I thoroughly enjoy how the person is cured of cubism. This is my second fav disease, after 8-bitten.
Rooms - Part 3
Cryptology


$30,100
Cures Premature Mummification
Requires: Nurse
Minimum size: 3x4
Required objects:
  • Decrypter - $25,000
Optional objects:
  • Torch - $300 - Increases prestige
While the patients with this disease are fun to watch, we sadly have to cure them, and this room will do just that.
Kudosh & Items
Kudosh is the sub-currency you earn for various things in the game, such as completing career goals, online challenges, or finishing staff requests and appeasing the VIPs. You use Kudosh to unlock items, which can then be used in any hospital. Once unlocked, you still need to buy the item with cash.

Decorative
Entertainment
Food & Drink
Health & Safety
Temperature
Plants
Seating
Pictures

Cannon - K60
Circus Lights - K40
Hay - K60

Operation Monitor - K300
X-ray Board - K35

Medicine Cabinet - Ks - $1,000

Air Con Unit - K75
Anatomy Model - K200 - $800 - Increases attractiveness, and adds 1% to training speed in training rooms
Anatomy Poster - K80 - $100 - Increases attractiveness and room prestige, and +1 to training speed in training rooms
Arcade Machine - K500
Air Con Unit - K? - $200 - Decreases temperature in a large radius
Beach Painting - K75 - $50 - Increase attractiveness and room prestige
Bedside Table - K50 - $250 - Increases room prestige
Big Bin - K20 - $100 - Reduces litter, and holds more before needing to be emptied
Bin - K? - $50 - Reduces litter
Bookcase - K75 - $500 - Reduces boredom in the hospital, and also increases room prestige in rooms it can go in
Boombox Radio - K20 - $400 - Can be placed in Reception
Brain Anatomy Poster - K80 - $100 - Increases attractiveness and room prestige, and +1 to training speed in training rooms
Bronze Star Award - K100
Cactus - K200 - $90 - Increases attractiveness
Certificate - K? - $50 - Increases attractiveness and room prestige
Chair - K5 - $25 - Increases comfort, but is plain and ugly. Go with benches unless you're struggling
Changing Screen - K50 - $300
Charity Pot - K? - $100 - Increases attractiveness - Can be placed in Reception
Cheesewater Canvas - K75
Clock - K20 - $100 - Increases attractiveness
Clown Poster - K? - $50 - Increases attractiveness and room prestige
Coffee Maker - K200 - $300 - Reduces thirst, gives buzz
Cupboard - K50 - $200
Display Skeleton - K300 - $1,000 - Increases attractiveness, and adds 1% to training speed in training rooms
Dog Painting - K75
Drawings - K15 - $50 - Increase attractiveness and room prestige
Drinking Fountain - K75 - $300 - Reduces thirst, but also reduces hygiene levels; counteract with something like the Sanitiser
Energy Drinks Machine - K200
Exercise Frame - K? - $300 - Reduces boredom
Extinguisher - K? - $50 - Used by janitors to put out fires, and also increases room prestige. An ideal layout has one extinguisher in every room you build
Eye Test Poster - K5 - $50 - Increases attractiveness and room prestige
Filing Cabinet - $200
Fireplace - K300 - $1,000 - Increases prestige
Fitzpocket Canvas - K80
Flowers - K? - $100 - Increases attractiveness - Can be placed in Reception
Food Pyramid Poster - K15 - $50 - Increases attractiveness and room prestige
Gasplank Canvas - K75
Gift Shop - K1,200
Gold Flower Vase - K10 - $100 - Increases attractiveness - Can be placed in Reception
Gold Star Award - K200
Golden Toilet - K40 - $2,000 - Reduces bathroom need
Hand Sanitiser - K150 - $200 - Increases hygiene, place one in areas where hygiene is an issue, and around drinking fountains
Indoor Fountain - K900
Lamp - K? - $300 - Increases room prestige, can be placed in the GP's Office
Lamp - K75 - $300 - Increases prestige, can be placed in Psychiatry
Large Fountain - K1,800 - $12,000 - Increases attractiveness
Large Radiator - K? - $300 - Increases temperature in the largest radius available
Lightheaded Poster - K? - $50 - Increases attractiveness and room prestige
Luxury Snacks Machine - K300
Magazine Rack - K50
Medicine Cabinet - K400 - $1,000 - +1% to Diagnosis and +1% to Treatment
Mini Filing Cabinet - K? - $100 - Can be placed in Reception
Mini Radiator - K? - $200 - Increases temperature, can only be used in Reception as it sits under the desk
More Flowers - K10 - $100 - Increases attractiveness - Can be placed in Reception
Mountains Painting - K100 - $50 - Increase attractiveness and room prestige
Notice Board - K50 - $50 - Increase attractiveness and room prestige
Plant - K? - $90 - Increases attractiveness
Printer - K? - $400 - Can be placed in Reception
Punching Bag - K? - $300 - Increases happiness
Purple Bench - K50
Radiator - K? - $200 - Increases temperature in a standard radius
Radio - K? - $300 - Increases attractiveness - Can be placed in Reception
Rorschach Poster - K15 - $50 - Increases attractiveness and room prestige
Rosebush - K500 - $300 - Increases attractiveness
Rug - K? - $300 - Increases room prestige
Silver Bench - K50
Silver Star Award - K150
Small Air Con Unit - K50 - $100 - Decreases temperature in a smaller than regular radius
Small Radiator - K? - $100 - Increases temperature in a smaller than usual radius due to its small size, but is compact
Sunflower - K400 - $200 - Increases attractiveness
Super Computer $20,000 - +2 Research Power
Sweet Dispenser - K45 - $300 - Reduces hunger, but isn't very efficient
Telephone - K45 - $200 - Reduces boredom
Torch - K35 - $300
Toxic-Waste Bin - $200 - Better than both the bin and big bin, it reduces litter and requires very little maintenance by janitors
Trophy Case - K100 - $1,500 - Increases attractiveness, as well as room prestige when placed in an office
Urn - K30 - ??
Vase - K25 - ??
Wall Monitor - K125 - $500 - +1% to Treatment and +1% to Diagnosis, increases prestige
Weighing Scales - K20 - $300
Whiteboard - K150 - $100 - Increases prestige
Yucca - K50 - $90 - Increases attractiveness, best plant in my opinion, as it's the same price as the regular plant, has the same effect, but requires less watering from the janitors, freeing them up for other things
Illnesses, Incidents, Challenges, Disasters & Epidemics
Illnesses

8-bitten
Cured with: Resolution Lab

Animal Magnetism
Cured with: Pest Control

Bed Face
Cured with: Ward

Boggled Mind
Cured with: Psychiatry

Bogwarts
Cured with: Pharmacy

Broken Face
Cured with: Fracture Ward

Cross Bones
Cured with: Fracture Ward

Cubism
Cured with: Recurvery Room

Decision Rash
Cured with: Decision Rash

Denim Genes
Cured with: DNA Lab

Emperor Complex
Cured with: Psychiatry

Floppy Discs
Cured with: Surgery

Flumps
Cured with: DNA Lab

Freudian Lips
Cured with: Psychiatry

Grey Anatomy
Cured with: Chromatherapy

Gurning Loins
Cured with: Surgery

Heart Throb
Cured with: Surgery

Humerus Injury
Cured with: Fracture Ward

Hurty Leg
Cured with: Fracture Ward

Inflated Ego
Cured with: Psychiatry

Jazz Hands
Cured with: Ward

Jest Infection
Cured with: Clown Clinic

Jumbo DNA
Cured with: DNA Lab

Lazy Bones
Cured with: Ward

Leopard Skin
Cured with: DNA Lab

Litter Bug
Cured with: Injection Room

Lycanthropy
Cured with: Pharmacy

Mime Crisis
Cured with: Psychiatry

Misery Guts
Cured with: Pharmacy

Mock Star
Cured with: Psychiatry

Monobrow
Cured with: Ward

Mood Poisoning
Cured with: Injection Room

Mucky Feet
Cured with: Ward

Night Fever
Cured with: Psychiatry

Pandemic
Cured with: Pans Lab

Pipe Organs
Cured with: Surgery

Portishead
Cured with: Ward

Potty Mouth
Cured with: Pharmacy

Pudding Blood
Cured with: Injection Room

Rock Bottom
Cured with: Injection Room

Shattered
Cured with: Fracture Ward

Shock Horror
Cured with: Shock Clinic

Spinal Bap
Cured with: Surgery

Spontaneous Combustion
Cured with: Injection Room

Touch of Midas
Cured with: DNA Lab

Verbal Diarrhoea
Cured with: Pharmacy

====================

Incidents
Every now and then, you'll receive an email with a blue light on it, and these are incidents. They are major events, like an accident or people running away and needing help, and will test your hospital's services within a set timeframe. You'll have to cure 7 patients with Jest Infection, or 4 people who need surgery, and they all must be completed in the time limit (usually 90 days, I've seen one that is 180).

If you successfully cure the majority of the patients, you'll receive a bonus to your reputation, Kudosh and money. If you do not cure most of them, you'll either get nothing, or you'll get a slight ding to your reputation. Keep in mind that, since some cures take longer than others (such as Jest Infection), having only one room dedicated to that cure may not be enough, especially if the patients get hung up somewhere (bathroom, for example), or the doctor in charge goes on break or has a negative trait like falling asleep, which wastes time.

====================

Challenges

Occasionally, you'll receive an email from a member of your staff with a certain challenge they want you to do. If you accomplish the challenge within the timeframe, you'll earn a bonus to your happiness, and some additional Kudosh. If you fail the challenge, it doesn't seem to have an immediate affect, and as of right now (August 30th, 2018), there's no text telling you of any negative outcome.

Challenges may consist of curing a certain amount of patients, having a Prestige Level 5 room, or going 90 days without any patients dying. These are just a few examples.

====================

Disasters

Some hospitals are located in places that may not be friendly to the building. These issues can be extreme temperatures, earthquakes and lightning storms. Each type of disaster has its own affect. For example, earthquakes can cause rubble to appear in the hospital, as well as damage machines, where a lightning storm will cause scorch marks to appear, can also damage machines, and brings with it a risk of lighting something on fire.

====================

Epidemics


In the later hospitals, once you get to where you need to worry about temperature, you'll be introduced to epidemics. Epidemics are events that occur throughout your hospital, and you need to manually find the people with this issue and cure them, by clicking on them and then choosing the new action on their bar, Vaccine.

In the image example, people who have this disease will walk like if they were mummified, also similar to a zombie walk, and will occasionally sneeze loudly.

Epidemics can affect both staff and patients, so don't just look for patients.

If you succeed in fighting the epidemic without using more than necessary vaccinations, you'll get the most reward. If you fail it, you'll lose rep, and it's a decent amount of rep to lose.

For Jogger's Ripple, look for people that power walk, and randomly stretch or do jumping jacks.
Patients
The patient panel will give you an overview of everything about them. Their current health, happiness and energy, as well as the condition they have, what they're feeling, a breakdown of the illness and its stats (such as difficulty, and whether your staff will be able to handle it), which room they're currently going to, and how long they've been in the hospital.

At the bottom, you'll see a panel of actions you can make on them. They are:

Send Home - send the patient home, useful if the difficulty is high and your skill is low, and you don't want to risk failing a treatment or flat out killing them

Send for Treatment - force them to go for a treatment without being fully diagnosed; useful if you need to hurry them along and believe your skill will cover it, but risky as a forced treatment can kill them
Staff - Overview
The staff panel shows you everything you need to know. You'll see their rating, what they're trained in, their salary (which you can increase if you want), their happiness and energy, where they're currently working, how they're feeling, and a list of actions you can perform on that staff member. Those actions are:

Pick up - Move the staff member somewhere else

Fire - Fire the staff member. The box will show you their stats (how many they've let die, saved, etc.), as well as give you a reason not to fire them. My favorite so far? They threatened to "burn all their swans" if I let them go

Take a break - Send them to the nearest staff room, regardless of energy

Pay review - Opens the financial screen to show you their pay in relation to everyone else

Jobs - Opens the job screen so you can assign or unassign them jobs, such as if you want doctors with the Research trait to only ever work in the research room

Train - Immediately opens the training screen so you can send this staff member to the room

One of my biggest suggestions is to specialize with the improvement traits as soon as you're able. For example, make sure you're able to get a doctor that comes with a specialist trait (radiologist, surgeon, geneticist, etc.), or comes with no trait, and then train that specialist trait. Once that doctor improves, continue training him with the following: Motivation, Bedside, Stamina, Treatment. This gives you a doctor that's fully qualified in one of the specialty rooms, with boosts to their speed, happiness they bring to their patients, ability to work, and cure chance of success.

I've been doing this since I've been able, and where money permits, and it makes a huge difference. You can then lock that doctor to just perform in that one room, and you'll have the best outcome possible for that cure.

Staff Experience
Staff come with various levels. A one star staff member is slower and prone to mistakes, and will only have one slot available for traits. They are also the cheapest to hire. You can hire staff with more experience, or train them to increase their level and title, which then increases how many traits they can have.

1 Star
Student Doctor | Student Nurse | Intern Assistant | Intern Janitor
2 Stars
Junior Doctor | Junior Nurse | Junior Assistant | Junior Janitor
3 Stars
Doctor | Nurse | Assistant | Janitor
4 Stars
Consultant | Senior Nurse | Senior Assistant | Senior Janitor
5 Stars
Senior Consultant | Chief Nurse | sss | Head Janitor

Staff gain experience by doing their job. Staff will start at a minimum of one star. To improve, they need to accumulate:

2 stars:125
3 stars: 250 XP
4 stars: 600 XP
5 stars: 1000 XP
Once at level 5: 2000 XP

DON'T LEAVE ME!

If your staff are unhappy for whatever reason, you'll receive an email with an angry red face stamped on it. This is a letter of resignation, and it gives you a certain amount of time (I've always had 90 days so far) to fix the issues that staff member has, or they'll quit.

Some of the reasons they may quit are:

  • Desperate for the toilet - you have too few toilets for the amount of people, which cause a delay; add more toilets
  • Ugly environment - the hospital's attractiveness is low; improve it by adding plants, posters, etc.
  • Underpaid - fix this by giving them a raise
Staff - Traits and Personalities
Your staff can have up to five traits, which they either come with, or can be trained in the Training room. Generally, the more stars and more traits a staff member has, the more expensive they'll be to hire and keep, and will request higher amounts of money when asking for a promotion.

For traits that come in levels of I to V, you can expect them to be:

I - Default 10% to that skill
II - Enhanced
III - Advanced
IV - Elite
V - World Class

All Staff Traits
Emotional Intelligence: +10% Happiness
Motivation: 10% Speed

Doctor Traits
Bedside Manner: Increases patient happiness when interacting
Diagnostics: +10% Diagnostics Skill
General Practice: +15% Diagnosis Skill in GP's Office
Psychiatry: Allows a doctor to work in the Psychiatry office
Surgery: +10% Treatment Skill in Surgery
Treatment: +10% Treatment Skill

Nurse Traits
Bedside Manner: Increases patient happiness when interacting
Injection Administration: +20% Treatment in Injection Room
Pharmacy Management: +20% Treatment Skill when in the Pharmacy
Training Masterclass: +50% Teaching Speed, +50% Learning Speed
Treatment: +10% Treatment Skill
Ward Management: +20 Diagnosis and +20 Treatment in Ward, +20 Treatment in Fracture Ward

Assistant Traits
Customer Service: +50% Customer Service Skill
Marketing: Allows the assistant to work in the marketing office
Stamina Training: Energy drains slower; works longer before needing a break

Janitor Traits
Ghost Capture: Able to detect and capture ghosts
Maintenance: +30% Maintenance Skill
Mechanics: Ability to upgrade machines

=======================================

Staff come with various personalities, which can be either a positive or a negative to how they'll work, interact with others, and dictate their job satisfaction.

Functional Personalities
Functional personalities are ones that have a plus or minus effect. Some of these are:
  • A natural mentor: +50% Teaching Speed
  • Class clown: Entertains people, increasing happiness
  • Expensive: Will only remain happy when paid a lot, and given a high raise at promotion time
  • Funny: Makes people laugh, which increases happiness
  • Green fingers: Waters plants when not actively working
  • Grumpy: Permanent -10% to happiness
  • Hangry: -10% happiness when hungry
  • Has magic healing hands: Increases the health of their patients
  • Has potential: +50% Learning Speed
  • High energy: Works longer without needing a break
  • Hygienic: Will use things like sinks and disinfectant more often, potentially wasting time
  • Inspiring: Improves the mood of those around him
  • Lazy: Will take breaks more often
  • Motivated: +20% Speed
  • Nasty: Upsets others, lowering their happiness
  • Short Temper: Becomes nasty when angry
  • Suffers from spontaneous bouts of dozing: Randomly falls asleep, wasting time and delaying diagnosis/treatment
  • Terribly dull: Makes people around them bored
  • Thinks their life is a romcom: Falls in and out of love, affecting happiness
  • Unhygienic: Doesn't wash their hands, lowering the treatment/diagnosis success
  • Will work for peanuts: Will take a lower salary and lower raise at promotion time, without affecting happiness too much

Flavor Personalities
Flavor personalities are fun, cute, weird or questionable traits a staff member may have, but they don't actually affect any aspect of the game. Some of these are:
  • A means to an end
  • Assumes all parties are fancy dress
  • Befriends quadrupeds
  • Chases animals at the park
  • Contrary despite their best efforts
  • Doesn't remember that night
  • Has baggage
  • Has some regrets
  • Just like everyone else
  • Level 2 Orbling
  • Loses track of children
  • Loves pudding
  • Not one of a kind
  • Once battled an orchard
  • One-handed backhand
  • Overuses basil
  • Sarcastically frames trivial things
  • Season ticket holder at The Sloop
  • Sleep gallops
  • Their dog has no nose
  • Their handwriting makes them seem boring
  • Thinks clouds probably have feelings
  • Totally moleless

... under construction ...
VIPs & Inspectors
VIPs[/jh1]
You'll occasionally get visits from VIPs. These can be the mayor or a reporter, for example, and they are people who come by to interview your patients and staff, observe, look around, and basically just report on everything that's happening. You do have the option to decline their visit.

If the VIP is pleased, you'll earn a bonus to your reputation and Kudosh. If they have both good and bad things to say, you'll neither gain nor lose anything, but if they have bad things to say, you'll take a hit to your reputation. Reporters are identified by the special icon above their head.


====================

Inspectors
Research, Training & Marketing
Research
Once you get to the fourth and fifth hospitals, you'll be able to build a research room, train a doctor in research, and then research new cures, rooms and items. Each research project will cost you $1,000, and will take some time. The amount of time depends on the quality of your researchers, as well as what items you've added to the research room.

The first research tier of a room unlocks that room. The second unlocks the level II upgrade, and third unlocks the level III upgrade.

Room research: 1000 points
Level II upgrade: 2000 points
Level III: upgrade 3000 points
$3,000 total ($1,000 per tier)

Chromatherapy > Upgraded > Advanced
Unlocks: Chromatherapy Room > Colourizer II > Colourizer III

Fluid Analysis > Upgraded > Advanced
Unlocks: Fluid Analysis Room > Fluid Accelerator II > Fluid Accelerator III

Injection Room > Upgraded > Advanced
Unlocks: injection Room > Jab Master II > Jab Master III

X-Ray > Upgraded > Advanced
Unlocks: X-Ray Room > X-ray Machine II > X-ray Machine III

M.E.G.A Scan > Upgraded > Advanced
Unlocks: M.E.G.A Scan Room > M.E.G.A Scanner II > M.E.G.A Scanner III

Pest Control > Upgraded > Advanced
Unlocks: Pest Control Room > Ultrasonic Cannon II > Ultrasonic Cannon III

Head Office > Upgraded > Advanced
Unlocks: Head Office > Turbo-Plunger II > Turbo-Plunger III

DNA Lab > Upgraded > Advanced
Unlocks: DNA Lab > Healixir II > Healixir III

Shock Clinic > Upgraded > Advanced
Unlocks: Shock Clinic > Discharger II > Discharger III

Resolution Lab > Upgraded > Advanced
Unlocks: Resolution Lab > Debugger II > Debugger III

Recurvery Room > Upgraded > Advanced
Unlocks: Recurvery Room > Recurvery Unit II > Recurvery Unit III

Cryptology > Upgraded > Advanced
Unlocks: Cryptology > Decrypter II > Decrypter III

Training: Research III >Training: Research IV > Training: Research V
Unlocks: Research III > Research IV > Research V

General Research
Unlocks: $20,000 to your bank
Points needed: 1000
This is a repeatable research project that will award $20,000 at the end of every completion. It is not ongoing, and needs to be researched each time you want the $20,000. Unless you have a smooth research operation going, I find this particular project to be useless.

Generate Kudosh
Unlocks: K20
Points needed: 1000
Like the General Research project, spending the time to unlock such a minor amount of Kudosh is largely unnecessary, unless you're a few points away from an item you want to buy, and this will get you it quickly.

====================

Training
A few hospitals in, you'll be able to build a training room, which will allow you to train your staff in various traits. Staff will need to have a free trait spot (out of five), which they earn by being promoted. You can try your staff in any trait, and they are:

  • Bedside Manner
  • Customer Service I
  • Customer Service II
  • Diagnostics
  • Emotional Intelligence
  • General Practice
  • Genetics
  • Injection Admistration
  • Maintenance I
  • Maintenance II
  • Motivation
  • Psychiatry I
  • Psychiatry II
  • Research
  • Stamina Training
  • Training Masterclass
  • Treatment I
  • Treatment II
  • Treatment III

I personally recommend several small rooms as opposed to one or two large rooms. This gives you the best way of training multiple people at once, and you're not forced to wait until one person is trained in a room that can hold 20 people.

====================

Marketing
Further into the game, you'll get the ability to build the Marketing room, which requires an assistant with the marketing trait. From here, you can then launch marketing campaigns to do various things.


The general marketing campaigns are designed to increase your reputation and bring in patients. The larger the campaign, the more expensive, and you can set a duration from one month to one year.

The second tab lets you market for a specific illness, and will be restricted to what rooms you have built in your hospital. If you're struggling to get Animal Magnetism patients to fulfill an objective, for example, you can start a campaign aimed at those patients, and draw them in to your hospital.

The third tab specializes in drawing in staff. As you'll always have a few people waiting to be hired, this is best used to grab the attention of specialists, like a Surgeon or Radiologist.
Achievements
Give a Man a Hospital...
Cure 1 Patient
You should get this pretty quickly in the very first hospital, the tutorial hospital Hogsport.

Double Digits
Have a Level 10 Hospital
If you progress as you unlock 3 stars, and not remain at one, you'll probably get this by the third hospital. Otherwise, just keep playing. Level is based on how many people you've cured, your rep, happiness, and all the factors that make up a hospital.

Low Brow
Shoot 1 Monobeast
For whatever reason, I have only seen one monobeast in my (as of this writing, 14.9 hours), and it was in the second hospital. You can't shoot it while the game is paused, so make sure you have it on default or slow speed to be able to hit it.

Bells & Whistles
Conduct 25 Machine Upgrades
You'll earn this over time, as you upgrade machines. There is also a career goal which will give you kudosh, so you'll want to do it anyway.

Peer-Reviewed
Complete a Multiplayer Challenge
You'll soon be able to do multiplayer challenges, which is the button next to your objectives. They're fairly easy to complete.

Teach a Man to Hospital...
Cure 1000 Patients
You'll get those over time, so just keep playing the game.

I'd Like To Thank My Mother
Win every award in a single hospital
This one will probably take you a while, as the No Deaths award can be difficult to get for those who haven't upgraded a lot of their equipment or staff.

JUMBO
Reach $50,000,000 Organisation Value
You'll achieve this over time, and there's no way to rush it. Keep playing, upgrading, and running successful hospitals that make a lot of money.

Generating Business
Injure someone with an exploding machine
Best way to do this, without purposely trying for it, is to wait until you get to one of the hotter hospitals that's constantly bombarded by volcanic activity, and earthquakes. Your machines will eventually degrade, smoke and blow up, and as long as they injure someone next to them (doctor, janitor, patient, whomever), you'll get this achievement.

I. See. You.
Capture 100 Ghosts
This won't be a 1:1 ration (1 death =/ 1 ghost), but just keep playing, and I guarantee as you get to the later hospitals, many people will die, and many will become ghosts.

Double Double
Have a Level 20 Hospital
Like Double Digits, keep expanding and improving your hospital, while making it attractive, and ensuring that both patient and staff needs are met, while keeping them happy.

County-Wide
Earn 15 Gold Stars
Each hospital has 3 stars for you to get, so assuming you max each one out before progressing, you'll get this once you've completed your fifth hospital.

Two Point Bounty
Earn 10,000 Kudosh
Achieved over time, you can slightly speed this up by winning multiplayer challenges, and having your research rooms constantly generate kudosh, which is $1,000 per 20 Kudosh ($1,000 to initiate the research, with an output of K20).

Pointy Mountain G.O.A.T
Earn 45 Gold Stars
Unlocked over time, just keep chugging away. If you're playing so that you three star every hospital moving on, you'll unlock this on the 15th hospital, the huge and busy one, called Croquembouche.

Always Be Curing
Run 50 Marketing Campaigns
Unlocked over time, just have your marketers constantly running campaigns. You can speed this up by keeping the duration set to 3 months for each campaign.

Well-Informed
Complete 50 Research Projects
Unlocked over time. You can speed it up by constantly doing the revenue and/or kudosh generating projects, but this isn't that efficient.

Cut Above
Train a World-Class Surgeon
Train a doctor so that his five traits are Surgery I through V.

Jung at Heart
Train a World-Class Psychiatrist
Train a doctor so that his five traits are PsychiatryI through V.

Dr Know
Train a World-Class Researcher
Train a doctor so that his five traits are Research I through V.

High Brow
Shoot 10 Monobeasts in a row without missing
More difficult than it should be, this achievement requires you to shoot ten of the little bugs in a row, without missing a single shot.

Inter-Continental
Earn 30 Gold Stars
Unlocked as you play the game.
DLC
This section will be added as DLC is made available (if there's any DLC to begin with, aside from the newsletter bonus).

Golden Toilet
If you signed up for the Two Point Hospital newsletter prior to its release, it gave you a Golden Toilet which you can use in-game. However, it's not given automatically. To get the toilet, go to SEGA'S TPH website here: https://www.twopointhospital.com/register

Once there, sign in with your Steam account, and you'll be prompted to give SEGA access so that it can redeem keys to your account. Agree, and continue, and you'll have the toilet redeemed.


You'll need to restart the game to have it show up in-game, but if you go to Two Point Hospital in your Steam library, you'll see it's been added. You'll still need to unlock it for K40, and they cost $2,000 each to place.
Contact, Connect, Credits
Thanks for reading! Feel free to connect at the following places, or get in touch if there's any issues with this (or any other) guide.


CCG Discord: https://discord.gg/NnzNkXe
CCG YouTube: https://youtube.com/coffeechatgaming
CCG Curator: https://store.steampowered.com/curator/39082514-Coffee-Chat-Gaming/
CCG Group: https://steamcommunity.com/groups/CoffeeChatGaming
CCG on the web: https://coffeechatgaming.com
Other guides: https://steamcommunity.com/id/TheCanuckJ/myworkshopfiles/?section=guides
Reviews: https://steamcommunity.com/id/TheCanuckJ/recommended
22 ความเห็น
Tobey Maguire 13 พ.ย. 2022 @ 8: 46pm 
You get you’re rent if you fix this DAMN DOOR!
Aeon 13 ต.ค. 2018 @ 4: 57pm 
General great overview and a sweet guide. One minor detail though. When talking about Traits, you describe their "qualification" as traits. Functional Personalities is what you should call traits. Just change Traits to Qualifications, and Functional Personalities to Traits, then everything is correct.
jmrathbun 5 ต.ค. 2018 @ 5: 17pm 
Thanks for this very helpful guide. The reason you don't see more monobeasts is because they are reclusive. Try picking up any object that's been in place for a month or more. I guarantee more targets than you can hit.
V8Hilux 20 ก.ย. 2018 @ 7: 20am 
Very extensive guide... great job. Only thing I am not sure about is the values of $ & K you've set for 1*, 2* & 3*.... I don't think they are as universal as that. Pretty sure there's a level I just got $20k for each star with only the Kudosh.

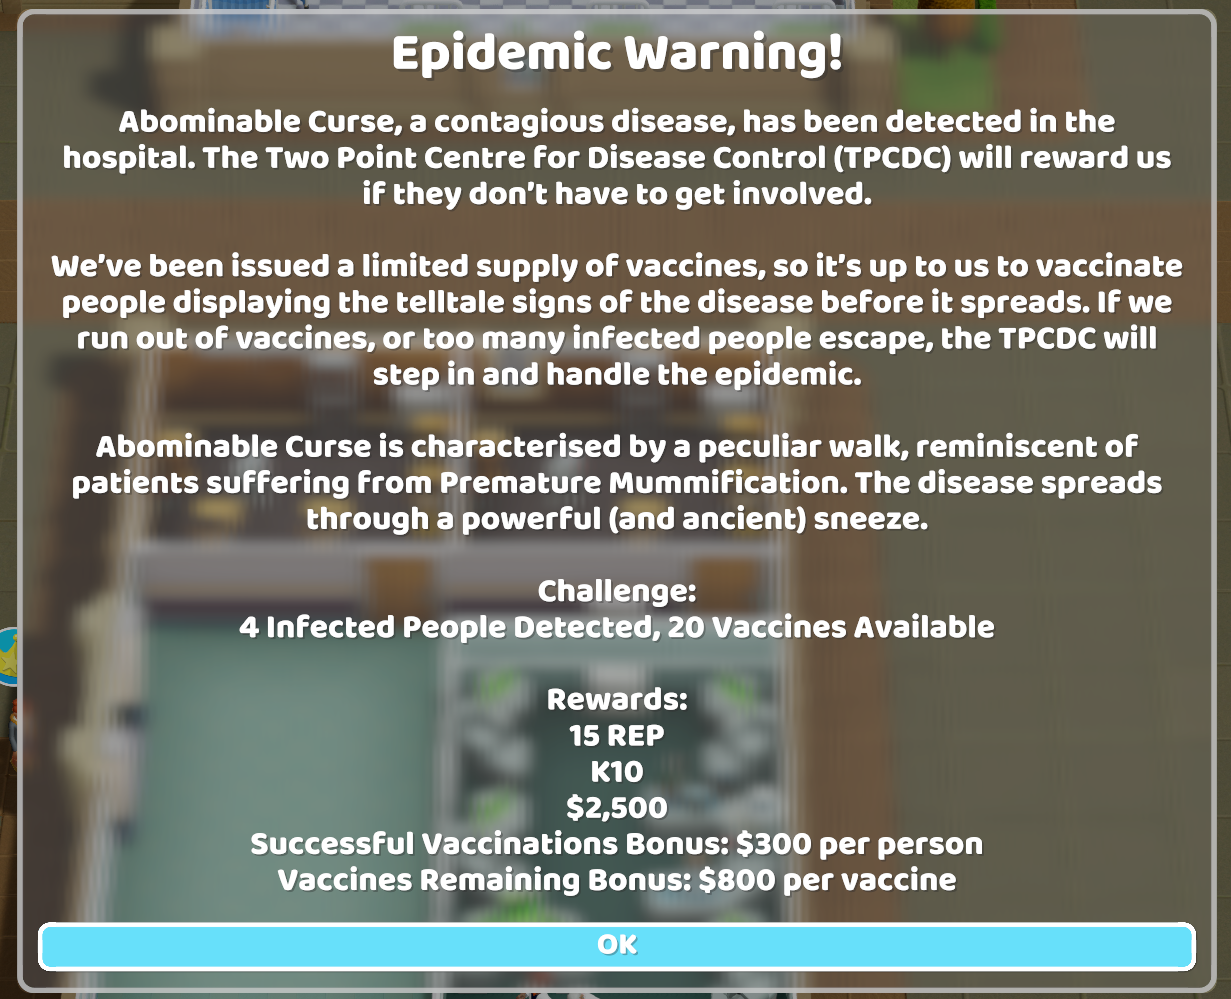
I've tried to verfiy elsewhere and the wiki also has different $/K amounts for some stars as opppsed to the catch all amounts listed.

Defo good to know what you unlock in the game though in order not to waste Kudosh on stuff you can unlock for free.

Thanks again!
Freiya 13 ก.ย. 2018 @ 9: 47am 
Just got my 3rd star at Croquembouche. No reward for 2 stars, no reward for 3 stars. I am not 100% sure about 1 star but I think it gave no reward too.
CreepyCanuck  [ผู้สร้าง] 7 ก.ย. 2018 @ 12: 13pm 
@芽_Abyssnya: Sure, feel free to! Maybe check this one out weekly or so if you want to get any updates.

@Rawrasaur: Thanks, will add that next update!
Rawrasaur 7 ก.ย. 2018 @ 6: 37am 
Just to add to the guide, meltdown 2 star 20,000/150k/+250 research. Nothing else unlocked.
CyberPenguin 6 ก.ย. 2018 @ 11: 53pm 
Usefule guide!! Mind if I translate it into Chinese version? I'll keep this original link to the top corner. Thx!
Nerces 6 ก.ย. 2018 @ 9: 56am 
@Buttfart: There are 15 maps to unlock :)
CreepyCanuck  [ผู้สร้าง] 6 ก.ย. 2018 @ 9: 54am 
@Buttfart Princesspants VIII (that was a fun name to type): No, Bligton's not the last. I just haven't had a chance to get back into the game since I updated, and Blighton is where I left off. Hoping to play more -- and therefore update -- this weekend.