Future Proof

Future Proof

25 ratings
Future Proof - Endings Guide
By Adelion
A comprehensive guide on gettingall endings in Future Proof, effectively serving as an achievements guide.
3
   
Award
Favorite
Favorited
Unfavorite
Introduction
Future Proof is a puzzle game set in a small town on the verge of being hit by a meteor. After missing your chance for evacuation while searching for your parents at home, you now have a 12-minute window to find another way out. Each round represents one loop. At the start of each loop, you will have no equipment, but the Thought Maps - a list of discovered hints for most endings - will carry over. Additionally, the game allows you to trade time for progress on the main ending(s) you have previously completed in earlier loops. I will describe the methods to achieve each ending as clearly as possible, including hints on how to discover them. This may not always be necessary, as you can skip sections if you already know the answers, such as door codes.

One of the fun aspects of the game is that you can find items and information almost everywhere, which really triggers a sense of exploration. With this in mind, I encourage you to explore on your own first and spend a few hours in the game before consulting a guide. Puzzle games tend to be less enjoyable if you don’t figure things out for yourself.

To make the guide easier to understand, I made screenh of all the important steps. I had the option to either use multiple screenshots, which would stretch out the lengthy guide even more, or to present the images in a more condensed manner. Due to the length of some puzzle chains - especially for the main ending(s) - I chose the latter, resulting in rather large, singular images. You may need to open them in a new window or tab to see everything clearly.

By the nature of this guide, it contains many spoilers. So, if you are looking for something specific and don’t want to spoil too much, refer to the Thought Maps or use CTRL+F to search for a specific word or item.

0 - Call to Adventure & Crash and Burn
For completeness, let's start with the beginning of the game and the non-ending. Out of the 17 achievements in the game, 15 are tied to the different endings. This leaves two additional achievements. One of these is "Call for Adventure," which is the beginning achievement. To earn this, simply complete the optional intro and then start the actual game in front of your house. It may also be sufficient to start the game even if you skip the intro, so this achievement is hard to miss. The second additional achievement is what I refer to as the non-ending.


For the non-ending achievement, go two screens to the left from where you start in front of your house, to the city section. Adverse to the red-roofed house, you'll see a key hanging in a tree. Pick it up and return to your house, where you can use the key on the red Sudan. Unlock the car and select the middle option. This will grant you the "Crash and Burn" achievement for the non-ending.

Now, let's move on to the more complex achievements.
1 - Ones left behind (Thought Map - Alpha)
Although this is the first ending numerically in the game, it was not the first one I achieved. The reason is that it essentially serves as the initial segment of the main ending and is consequently much longer than all other routes. The extensive nature of this ending is also reflected in its standalone thought map, in contrast to the thought maps of other endings.

Additionally, significant parts of this puzzle chain act as "prerequisites" for other endings, in form of providing essential items or information that can only be accessed after progressing sufficiently in this path. After this lengthyexplanation, let's now focus on how to obtain this ending.


At the start, you'll need to obtain the dynamite. Begin by entering the red-roofed house. The key can be found inside the blue electrical box nearby. Once inside the house, locate the dynamite in the cabinet. You'll need to guess the code, which you can gather information and ideas for from the community PSA on the city boards, the calendar, and the birthday card. It is 1938, the birth year of the house owner. Additionally, you'll require a lighter, which can be found in the old man's house located at the top left of the city map.


Now, go to the northern area and talk to the scientist. Open the entry of the laboratory with the dynamite and the lighter. Get inside to pick up the rubber gloves and to find out that you need power. Instantly equip the rubber gloves and go to the Power Plant on the same map. The key to open the door can be found hidden beside the sign (if you want to feel more thug-like you can also use the Boltcutter from the housing area to open the gate). Inside the Plant area you have to pick up the metal pole and then enter the building. Use the metal pole to remove the dead animal (don't forget the rubber gloves!) and restart the power plant by pressing the button. Then re-enter the lab to find out that you finally have power but still need the code for the door.


You can skip the whole next section as I will just describe how you get the numbers for the code but if you have the code already from other sources (like this guide) you can use it without all the hassle. The code is 24149.
For the normal way: Talk to Roy to get the key to his house and enter it. In the bookshelf - like described by Roy - you will find the secret note (Pick Book #5, the one with yellow and blue). Go to the foto shack behind your house and switch on the red light. Read the note here again to get the additional information, showing you the order of the numbers.

  • For hint #1 you have to dig out the Tulips in the garden. The shovel you find in the shack which can be opened with the box cutter found nearby. Under the tulips you find a box providing you with the first number you search: 4
  • The second hint I just found out afterwards because I always overlooked the phone in Roy's house. Just dial the number on his phone and a voice will tell you the number: 2.
  • The third hint is for Roy's cat. You get this information by talking with him. You can meet the cat at the cat feeder at one o'clock (2 minutes before asteroid time). Look at the cat and find the next number: 4, once again.
  • The fourth hint refers to the carpet in the house which has the form of a 7. While you are here, pick up the chicken. You ..... need it later.
  • The fifth hint is a nod to the chemical element carbon. Look at the periodic system of elements and you will find out the number you search is 6.
  • The sixth hint refers to Roy's favourite drink. Talk to Roy and find out he likes Rasperry Cola. Sadly the drink is not sold anymore but with the note of the vendor machine in the city and the information on the board you will find out that the number you search is 9.

Now you just have to arrange them in order provided by the additional information:
#2 #3 #4-#5 #1 #6 . Combine the numbers you received for each hint and you get the door code 2 4 1 4 9. To the final part area of this ending: the laboratory!


Go downstairs and to the laser room with the monster and set the switch sequence to 1 and 4 down, and 2 and 3 up. Go to the basket and place down the chicken. Go back to the switches, reactivate number 1 and 4. Now, deactivate shortly switch 2 and immediately reactivate it. After this, you are free to go further down.
Next you are faced with a horde of hairy animals. Your goal here is to get the cute ones to sleep. The note in the room tells you that they need their favourite song and a temperature of 77 °F. Set the thermostat to 25 °C and play the casette player after inserting tape S-189 (it can be found on the table lower right side). Now the animals sleep and can be shoved around. Figure out the puzzle alone or use the image as reference. As final step for this floor you have to find the error in the Sudoku puzzle which is the 2 in the square bottom right side.
Further down to more puzzles. You will now enter the portal room. If you switch off the light and remove the rag on the wall you can - step by step - find the message Up 4 5 1 on the wall. So switch up the switches 4, 5 and 1 and down 2 and 3. And voila, the door has opened.
The next puzzle is more of an action sequence, not to difficult but you may die one or two times. First you have to use the switch on the lower right side and then pick up the gas mask on the top left side. There are four monsters in the room. One which is always moving and three others which move only if the room gets dark which happens all few seconds. Just keep your distance to them and you should be safe. Try to avoid to get cornered. After getting the mask, enter the next room and equip the mask for obvious reason. You can go down to final level of the laboratory where you find the computer. Switch it on and solve the chess puzzle (move the tower to the top). Afterwards, all that is left is entering the password that Roy told you. And now you have finished this ending. Well, there is one final choice. Save yourself (and shooting yourself is NOT another ending, so dont do it). And on your way down you probably got some new ideas and hints for the other endings. As said in the beginning, ending #1 is pretty much a door opener for several other endings.

2 - No going back (Thought Map - Alpha complete)
Here we have it: the main ending, the true conclusion to Thought Map Alpha. And probably the only ending with major lore for the game. As such, the ending picks up directly before you activate the escape pod in ending 1.


If you take your time and look around a bit in the computer room down in the laboratory, you'll find two notes. The first one is a to-do list which tells you of the existence of a secret computer room in Roy's house. The second one is a shopping list with an added telephone number. Similar to before dial this number on the phone in Roy's house and the stairs to the secret room will appear. Go down, switch on the light and use the computer. However, before you can do this you have to overcome two hurdles. The first one is another chess problem. Solve it by moving the queen four squares to the left so it stands diagonally to the white king. The next one is another password. While there are no direct hints, you can ask Roy for the password. However, before he gives you the whole password, he remembers something and stops. At least, you know now that the password starts with glo... . With this new information and a bit looking around, you will find the grave of Roy's dead wife "Alessa Gloria Brown" in the garden which is also the password "Gloria". The importance of her is also solified by a photo in the bed room as well as her name being the password to Roy's most important and private informations.


There are a total of five files on the computer. I will not go into detail as this is the whole lore of the game which in retroperspective tells a rather tragic tale and also gives the teddy bear and the unused bed room a rather sad taste. From importance for going further are two files: the project steiner foto and the passwords. With your new found knowledge go back to the laboratory computer. To open the safe turn the dial 20 to the right, 28 to the left and 05 to the right again, the code which you found on the foto. Inside you'll discover two items. For the moment only the strange device is of interest. After picking it up, you can and have to use it in the item menu as it is a necessity in order to trigger ending 2. You will latest understand if you try entering the password without doing it. With the preparation completed, you can now activate the computer. But instead of activating the escape pod, start Project Planet Destroyer by using the "Phoenix" code, completing the main ending. There is "No going back".

As special note: There is another non-ending hidden here. After using the strange device and losing your "immortality" you can go back to the city and sleep in a bed. Just in contrast to before, you never wake up again.
3 - Vault 8463 (Thought Map - Beta)
This one took a while to figure out. It can be accessed quite fast but the information and hints for the ending are all over the place. And at least one important hint is not directly associated with the Thought Map while another one is really vague. So what are these informations and where can they be found?


The puzzle chain starts in the house of the old man. On the table in the sleeping room, you'll find a foto with the title of 'Project Greek Island'. By talking to Iris and the old man himself, Sean wonders if the old man is calling for his son. However, a quick look at his nearby will clearly states that his son is called Simon. So, who is Jack? The answer to this can be found in Roy's house in a nursery rhyme book and its content: the tale of Jack and Jill. Noteworthy here is the "marked" word vinegar. Also, as you are in Roy's house anyway, take the lubricant with you.
So far so good. But what now? Looking around, you will find the note down in the laboratory as well as the newspaper in the abandoned factory. The final hint however, is something which is not mentioned in the Thought Map and something you may have noticed earlier but not associated with this puzzle chain. Close by to the crazy man in the city you can find a list of conspiracy theories. Of interest is the one about the classified facilities. So, our new goal is the only public phone in the whole city, coincidentally standing in front of the factory.


Before you go there pick up the quarter in the fountain. You need it to make your call. The last real hurdle is the correct phone number. Solving that problem took me quite a while as I originally thought that the classified facility has to do something with the grass mowing note on the city board. But after finally associating the vault with project greek island I came rather fast to the correct conclusion: the phone number is "Vinegar" or in numbers 8463427. A nearby sounds confirms your success. Last task is to get to the inner room of the factory if you haven't been there before. Just use the lubricant on the rusted door, go to the next room and begin your descent to "Vault 8463" and save the town's folk.

4 - S-Warrior (Thought Map - Charlie)
Regarding the puzzle aspect, this is one of the easier achievements. The highest "difficulty" comes from actually finding the two scroll parts which are more a matter of exploration than actual puzzle solving. This is especially true for one of the two parts of the scroll which is locked behind some other puzzles. As they "belong" to another ending though, I will not list them here but refer to where to find the necessary information.


The first part of the scroll can be found in the basement of Roy's House. As the house is not unlocked from the beginning you have to get access first. For this information, please refer to the section concerning "Ending 1 - Ones left behind" as it is a major part of that puzzle chain. The second half of the scroll can be found in the city on a tree upper side utmost left. After you have found both parts, the game will combine them automatically.


Given here is a message and how to decode it. Basically, you just have translate the letter doubles into single letters by drawing a line horizontally for the first and vertically for the second letter. The place they cross is the solution for the corresponding double. If you do this you will get the following message: "Three steps right of Guardian then up". The Guardian is the knight statue in the back of your house. Just go there and follow the instructions. The marked row of trees can be passed, reaching a new place. Actually, you can do this from the beginning and you don't need the scrolls. Still, one should know why he is running through the woods. Before (or also after) going into the void you have one final task left.


Zen will teach you an advanced secret but not for free. He needs .... entertainment. Zen does not give you any hint on what he wants, so you have to explore randomly the city. But if you understand the reference, you will know upon picking the item up that you have the right one. This can be found in the red roofed house in the city (key to the door is in the blue box left of it). Go to the wardrobe and you will find something suitable for bargaining. Afterwards, just go to Zen and start your training. Congratulations, you are now a "S-Warrior".
5 - Man's best friend
Avid readers will have noticed fast that while there are 15 different endings, there exist only 9 Thought Maps. As a consequence, endings exist which are not tied to any of the Thought Maps and are just like this: random. The only "hint" you have here is common sense like the always present question "What to do with this item?".


In the house of the old man (city, top left corner) you will find a plunger under the sink. While some of the items work as equipment this is not the case for this one. So what to do with a plunger? Unsurprisingly, the most basic purpose would be .... to plunge. Doing some random plunging of toilets (or looking up this guide) you will earlier or later end up in the red roofed house earlier or later. In here, you will receive the appropriately named Toilet Key after cleaning the toilet.


Your next job is to find out where to use said key. Luckily enough, it works on the first building to the left of the red roofed house. If you started testing in the opposite direction ... tough luck I guess. Entering there, you will end in a pitch black room. Using your shoe lights you can give yourself some illumination. Other than that, just run to the upper right corner and go down the stairs.


All the information you need to solve this screen is given on the note tucked to the pillar. What you have to do is running down all the multiples of the presented numbers. So you start with 5 10 15 .... 55, then 6 12 .... 66, then 7 14 21 and finally the multiples of 8 and 9. Make sure to hit every field as sequence breaking will be punished with death. At the end, you will reach the other side. Go through the door and cross the next field. You can't do much wrong here as long as you don't step on the obviously evil red field. So cross the field and go through the next door to meet "Man's best friend."
6 - Universe D-321 (Thought Map - Foxtrot)
This is without question the fastest reachable ending in the whole game. As a matter of fact, this ending is only reachable by being fast and there are no items involved at all. Just you being at the correct place at the correct time. And this is where the game brutally exploits our bad habits. Because the chances for stumbling over this ending accidently are close to zero. So how to figure out?


The Thought Map for this ending does not have many informations simply because they are not needed. The first piece of information is a blue map you'll find in Roy's house and which tells you the location of a portal directly behind Roy's house.
The tricky part is that the moment you obtain the map it is already to late and the portal has long been closed. And as Roy's house is part of the main ending, it means that you are in a stage of the game where you usually skip earlier puzzles which - in fact - leads again to you being to late as you have to trade-in the skip for a few minutes of time. While one can assume this and find out the correct time by themselves, the game will actually give you the information for the exact time in one of the lower laboratory level. So yea ..... all you have to do is start a new loop and run as fast as possible to the portal behind Roy's house. The time on the screenshot (11:38) is actually the very last second the portal is open. Just be quick and you will find your way to Universe D-321.
7 - To the Moon VIII (Thought Map - Hotel)
This ending is actually quite easy to solve. Though, the largest problem is finding all the cards needed to crack the first code as they are hidden throughout the city. Especially the last card takes a while to "find" as it is located rather deep in the laboratory. But let us start from the beginning.


Close to the crazy guy in the city you will find an entrance to a basement. In there you will find: a note, a playing card as well as a five digit lockpad. First quest in our new endeavour is to get all five cards. The locations are as follow:
  • Directly beside the note in the basement of the crazy guy
  • In the house of the old man upper left side of the city
  • In Roy's house near the toilet
  • Near the Power Plant
  • First level of the laboratory hidden in the dark
After obtaining all cards, you will notice that they are all of the same tape: Heart. Basic poker knowledge or the note in the southern area adverse to the factory will tell you that this is called a Flush. With the usage of the note from the beginning, this will translate to 16380. Enter it in the lockpad, enter the room and read the note. As you can't interact otherwise, leave the room, go outside and talk again to the crazy guy. Impressed by your deductive abilities, he will tell you that he is called Charlie and will fly you to the Moon in order to stop Hitler. Yes ..... like .... seriously.


One screen transition later, you are now on the Moon. The good thing is that you have no time limit anymore and that you get some basic items from Charlie. The rest of the needed items you find in the room (a green and a yellow light bulb, two large red keys and a small brown key I had no usage for) in addition with a german instruction on how to activate the self-destruction. If you speak german, lucky for you, if not you still have the in-game translator note. Basically, you have to arrange the light bulbs in order: red, white, green, yellow. Then you insert the four red keys into the pad and turn them right, right, left, up. The next step is to enter the password which is a scrambled variant of the one in the manual. The solution is "shutdown". Enter the code and as final step activate the self-destruct button. Congratulations, you just had a trip "To the Moon VIII" and won against Cyborg Hitler!
8 - Final Wars begins! (Thought Map - Delta)
This ending has been changed since the release. Initially the keycard was in the safe and was as such only available rather late on the main story. To ease the access to the ending it has since then been moved.


The keycard to the locked laboratory can be found pretty near in the room with the mutant blob. It is hidden in one of the dark corners in the upper left part of the room. You can use your shoes to light the room a bit. With the card in your posession you can now access the door just one floor further. Going in there you will find a rather small room together with a machine occupying half the space. If you try to activate it, the machine will tell you that it need Uranium to run properly. But where to find Uranium at this time and place? The internet was not widespread 1993 so it is not an option (thanks to Monokoma for the tip to speed this step up). Luckily Roy has - as often - the solution nearby: Specimen 143, your personal mobile nuclear reactor.


But before you can (ab)use it, you need to catch it. For this, use the monster trap which can be found in the laboratory on the lowest level. You just need to have it in your equipment and it will activate itself upon touching the monster. Alternatively, you can equip the Shock Gloves (check Ending 13) in order to avoid fatal skinship. In both cases, all you have to do is remove the formerly protecting laser barrier afterwards. The final step is again rather easy. Pick up the trapped blob - which is the apparent solution to earth's nuclear waste problem - and bring it to the machine. Put in the conveyor belt and then activate Project Z. Sadly it has nothing to do with zombies but nonetheless the "Final Wars begins!" Was it worth? Yes ..... yes it was.
9 - Alt + F4
And another quick ending without a thought map. Well, technically it is probably one of the longest endings although for an inconvenient reason. At least it is easy.


While traversing the park you have probably seen the note tucked on the tree concerning a Yoga course. The very first time I saw the note I already saw the hidden message you get by vertically reading: "Push Finch 102". The only questions have been who is Finch and what is 102? Going to the northern area you see a broken statue which you can push (but nothing happens) with the description Bradley "something". While it seemed obvious at that point, you should always double check in Greensvale. Confirmation can be found on the note for Founder's Day near the abandoned factory: Bradley Finch, Town Founder.


Still, the statue won't budge. At first I thought I need an item or help by someone. But the solution is far easier. The 102 is a time stamp, 1 o'clock and 2 minutes or in in-game time: one minute remaining. And indeed, after the timer ticks down far enough the broken statue can be pushed. Just go down and push the button. What could possibly go wrong, "Alt + F4".
10 - The upside down (Thought Map - Echo)
This has been the first ending I have discovered. The obvious reason for this is that it is reaalllyy easy to obtain. No complicate puzzles, no search for specific items or locations (more or less). Everything accesible from the start and no running around.


You have to make your way to the nothern area (laboratory, power plant). While going there you will pass by the park and the baseball field. As you are here already take the chance and pick up the baseball. Next, visit the abandoned building down left corner in the nothern area.


Inside there, pick up the portrait and place it over that "suspicious" shade on the wall. Doing this will result in a trapdoor being opened which you will go down.


You are now already in the final part of this puzzle chain. If you get here the first time you will most likely die by the slowly fading screen (mixed with some child-like laughter). But as you come prepared you can avoid this tragic destiny. Just follow the advice on the ground and break the mirror by throwing the baseball at it. As a result a portal will open. Just go through it and your world will be "Upside down". As note: There is a sword besides the portal which you can pick up. It will change one line in the ending. Other than that I have not noticed anything.
11 - Unfound (Thought Map - Golf)
Another unique approach on the puzzles in the game. And technically a not to hard to obtain ending. What threw me back the most was that I thought the whole time that there is a connection to the "Gary's mowing" note in the city. And so I tried phoning him and getting the right message. The solution is however far simpler (thanks to Iorewho and Monokoma for helping me find the Hatch).


At first, let us find the more or less sole hint for this whole ending. If you look hard enough in the parc area you will spot a key in the lower left side. Pick it up and inspect it (or do that before picking it up). You will learn that it is the public toilets keys. You can find those in the city near the vending machine. Go inside and read the message on the mirror about the grass field.


Luckily, there are not to many grass fields in Greensvale. You need to look for the largest one which can be found in the northern area. If you pass it field for field you will hear at one point a metallic sound, telling you that you are right. Press the action button and Sean will find a hidden hatch. Go down and you will find a computer device together with 3 numbers of a 4-digit code. Looking around won't help you much. But don't worry it is not that hard. Basically it is a reverse to another puzzle type you encounter more often in the game. Translate the numbers into letters. The most common choice is also the correct one, the alphabet numbers. Using this you will get the letters U N and D. Starting with this there are not much words you can create. So the last letter is O or as number 15. So just enter the code 21 14 4 15 and you are done here. And so the hatch has been "Unfound" again. As special note: You can also find the password hidden in plain sight in the achievement icon :P
12 - Chouginga Sean (Thought Map - India)
And here we have probably one of the hardest endings in the game. Not because it is a complicated puzzle chain but more because it has not this elaborate feeling of logic behind it as the other puzzles. And exploration doesn't help much either. Instead it is some kind of association exercise although it is really hard to link the images and it needs knowledge outside of the game which is .... unusual.


Let's start with the easier part. Go to the abondoned factory and pick up the pencil in the box on the upper right corner. Now go to the southern area adverse to the factory. There is a maze. Looking at it you will probably see nothing. However, the picture changes if you do the "childish" thing. Use your new found pen and solve the maze and you will see a bird (not a chicken >.<). And this is your password. You just have to translate it into numbers (2473) and you can enter the art gallery.


Inside the building you'll find 12 pictures as well as a note, goggles and 4 empty frames. Your goal is to place the correct pictures into the frames. Basic math will tell you quickly that random trying will not work out. So what to do? Looking at the note will give you the information that there are more pictures sprayed around the town. In order to see them, you need to pick up the goggles and equip them. The pictures can be found just by stepping outside of the building as they are all neatly arranged on the roof of the house. Please note that the presented image (by the courtesy of Monokoma) is from an earlier version and triple III has been changed since then. Now to the complicated part: the association exercise:
- the solution to triple I is Salt: It is mined, traded by ship in medieval and used on pretzels
- the solution to triple II is Phone: It needs electricity, it rings and you hear with your ear
- the solution to triple III is Flag: Not sure on this one, colours and stars as common elements of flags, the treasure map as sign for a pirate flag?
Nonetheless, the final step is a tiny bit more logical again. At least in retroperspective. Combine the first letters of every picture and you will get the solution: Sa(lt) + Ph(one) + (Ireland) => Sapphire. Place the final picture and get your new toy to become "Chouginga Sean".
13 - Hydra like this
Another one of the random endings. As you can see in the comment section I got help with this one. Not sure how long it would have taken to take a look outside. If the first step has been noticed the rest of the puzzle chain is actually quite simple.


Have you ever wondered what happens if you switch off the black lever? Yes, me too. So I did it. And nothing happened. At least not in the viewable area. So I switched it back and proceeded elsewhere. However, other people had more curiousity than me, started looking around, left the laboratory and found the answer to another well guarded secret. What is behind the - now opened - door on the right side?


As you can see the black switch opens the door on the outside in the northern area which is something like a specimen prison. The first of this specimen is a Brain Vampire. As he is only interested in your brain and nothing else you can protect yourself easily by equipping the baseball helmet which can be found in the parc. With your new fashionable self you can now deactivate the switch.


The next specimen is a Shape Shifter. Luckily, the specimen fears shock gloves and ever luckier you find a pair of them directly beside the note. Pick them up and equip them immediately. With your new protective gear you can safely deactivate the next switch. As you don't know which plant is the Shape Shifter just run through it without touching anything and open the final door. I am sure "Hydra (will) like this".
14 - Cheating is always the answer
And another random ending. I haven't found any relation to one of the thought maps. As such it is one of the 5 random endings as I call them. Again not very difficult, just a tiny bit of exploration.


Chances are that you have run across the park five times already without ever noticing the hidden key on the lower screen side. If you have: good eyes. If not, this is what a guide is for. Upon inspecting - before picking up or in the item screen - you will get the notice that the key is for the public toilets which can be found in the middle of the city.


Enter it and you will find a not with several cheat codes on the wall advers to the enty. Don't be irritated by the gaping hole on my screenshot. I took the picture after picking up the note and was to lazy to make a new one. Well, the list alone doesn't help you much, you also need a suitable device.


This can be found in the red roofed house (again) on the table upper left side. While all codes are working you only need the WINWIN code to find out that "Cheating is always the answer". If you have the spare minute you can also test out the rest of the codes in order to enhance your gaming experience :P Obviously do the death code last or not all.
15 - Speciman 156
And here we have ending 15. It is another random one without a thought map and has been added to the game only months after release. It was meant to tie up some loose points. Although i dont see much addition to the overall story other than a further use for the monster trap which is probably the most variable item in the game.


The first thing you need is the Monster Trap which can be found in the lowest section of the laboratory (refer to Ending 1 if you want to know how to get there). Pick it up. Outside the lab on the floor you will find a notice about Speciman 156 telling you that Gus (how it is called) can create wormholes, is an omnivore and has been found eating out of the trash. Remember the cow in your backyard?


Well, if you appear at your backyard after a certain in-game time you will notice that the cow has vanished and that the trash can is now open. Your first thought might be that the Cow is Gus. However, if you use the monster trap on it, nothing further will happen, so ..... wrong thought. Instead Gus is sitting in the trash can. If you ignore him long enough he will break out of it and most likely devour the poor cow. So save the cow and the city and use the monster trap on the trash can. And so you caught "Speciman 156" and saved the day again. And Gus has to suffer further under Country Music.
23 Comments
dynastystar Feb 28, 2023 @ 12:55pm 
It worked, thanks. I thought I had to get the cow out of there somehow.
Adelion  [author] Feb 28, 2023 @ 11:20am 
I don't think the note has to be picked up to get the ending. Most information is just there to help figuring out what to do.

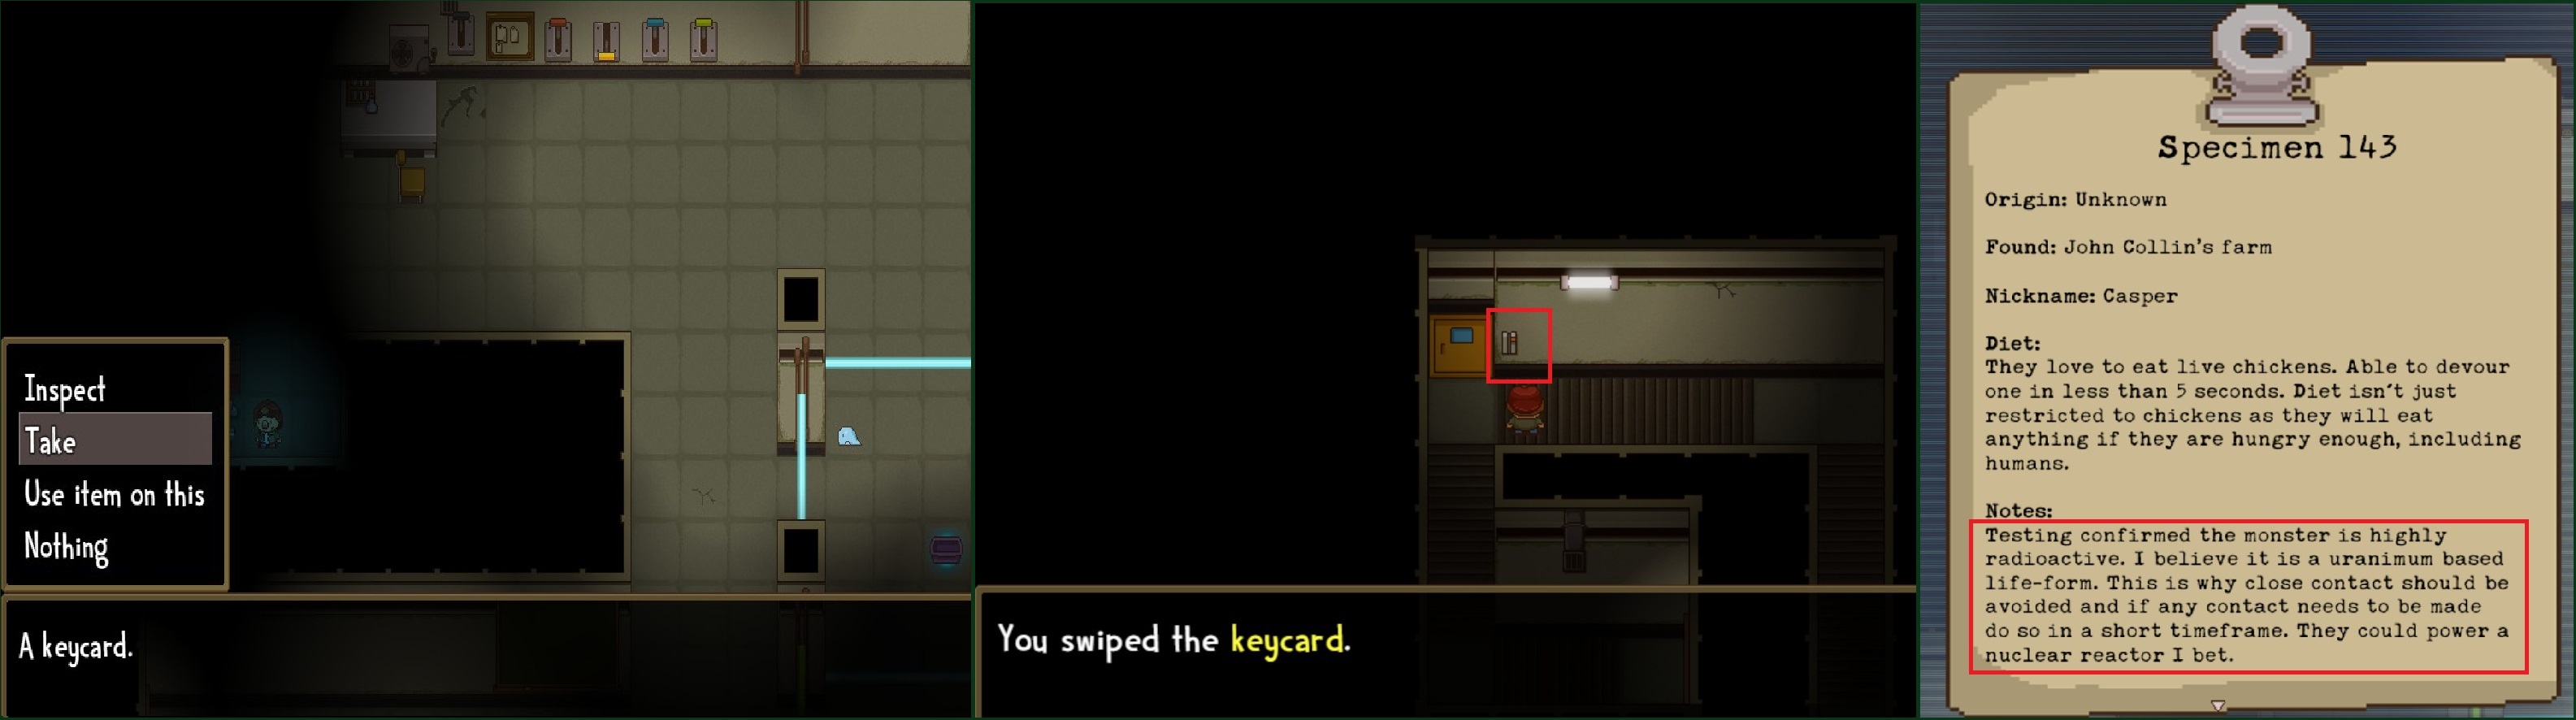
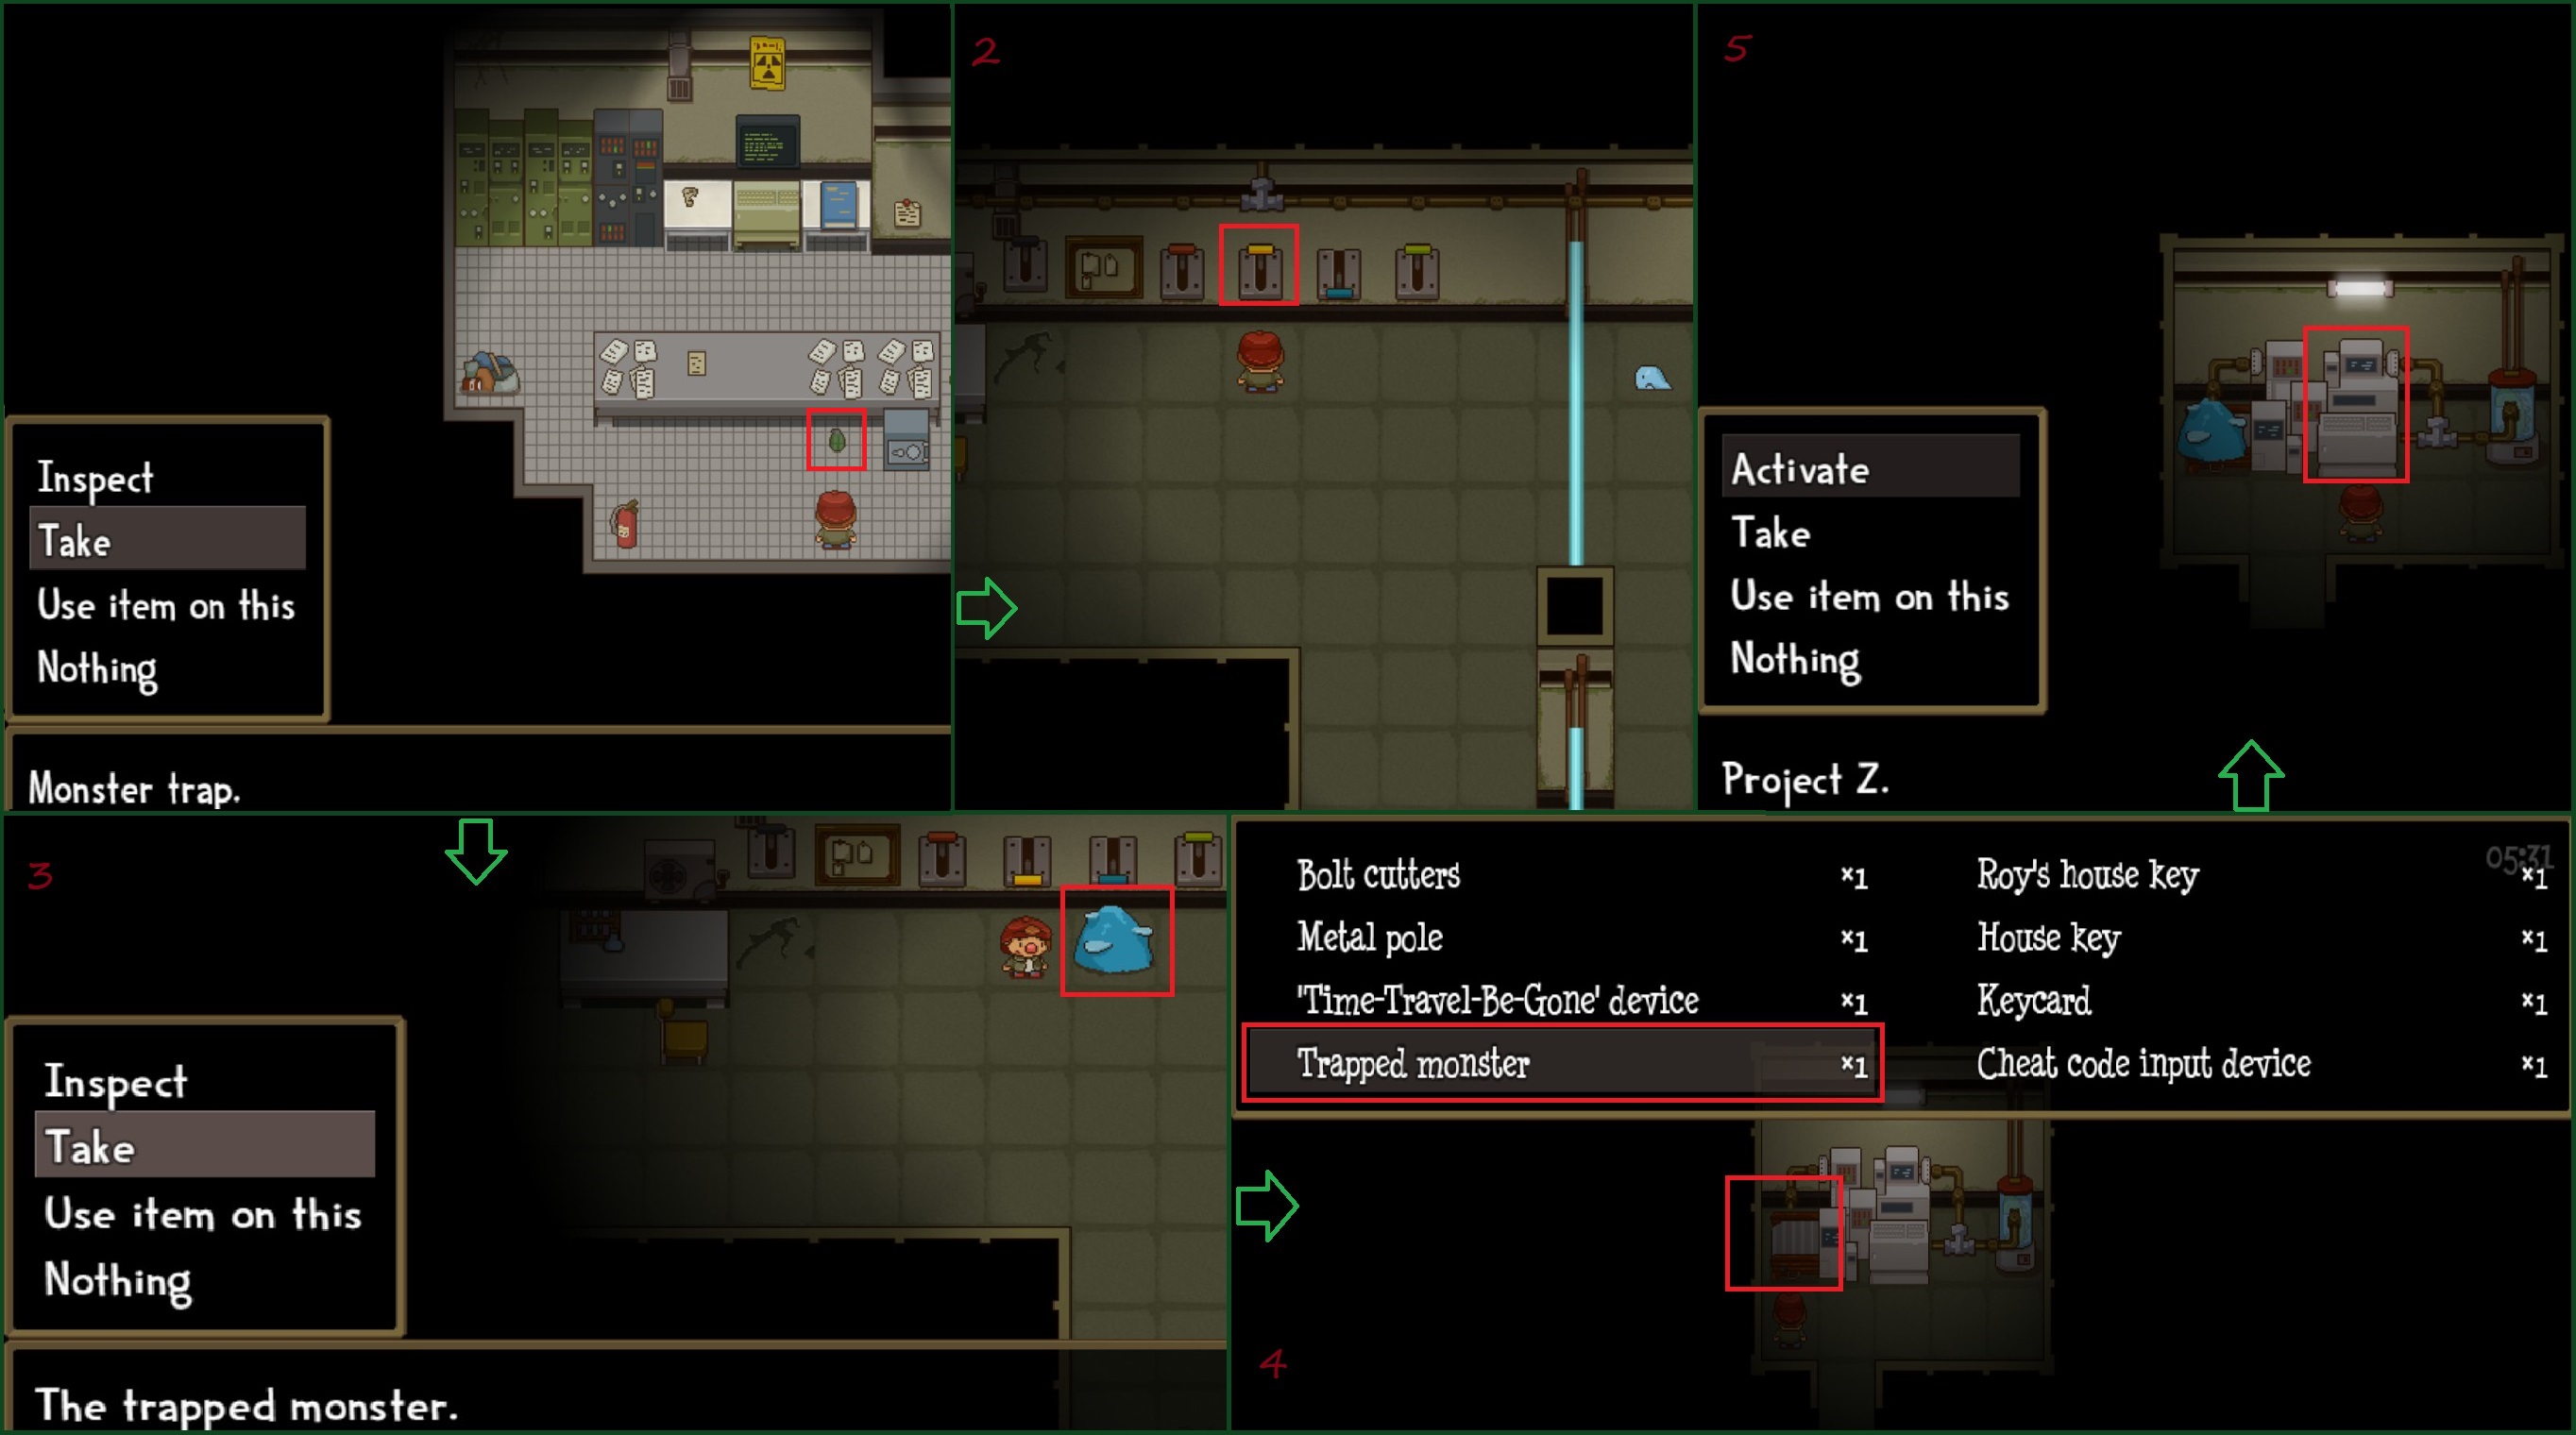
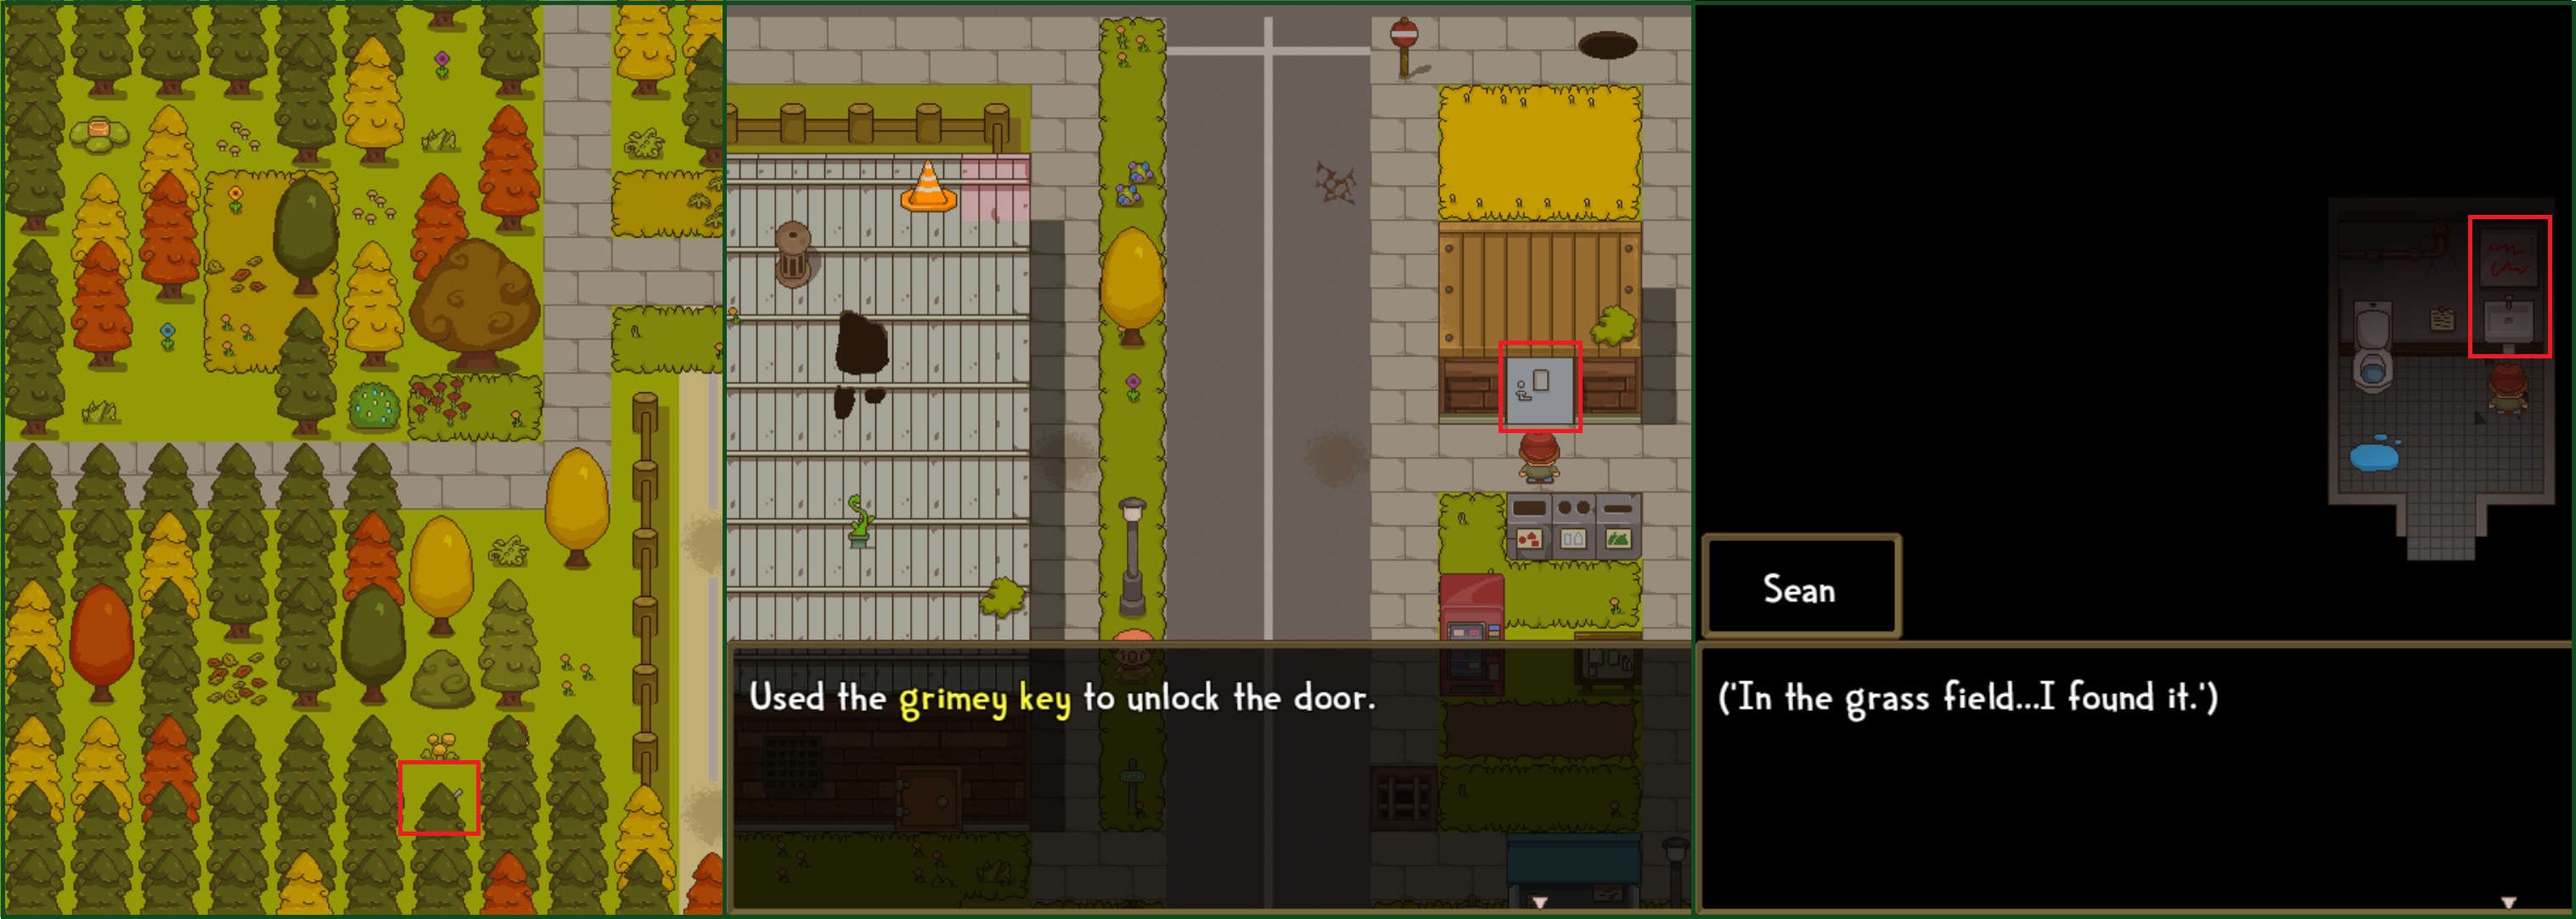
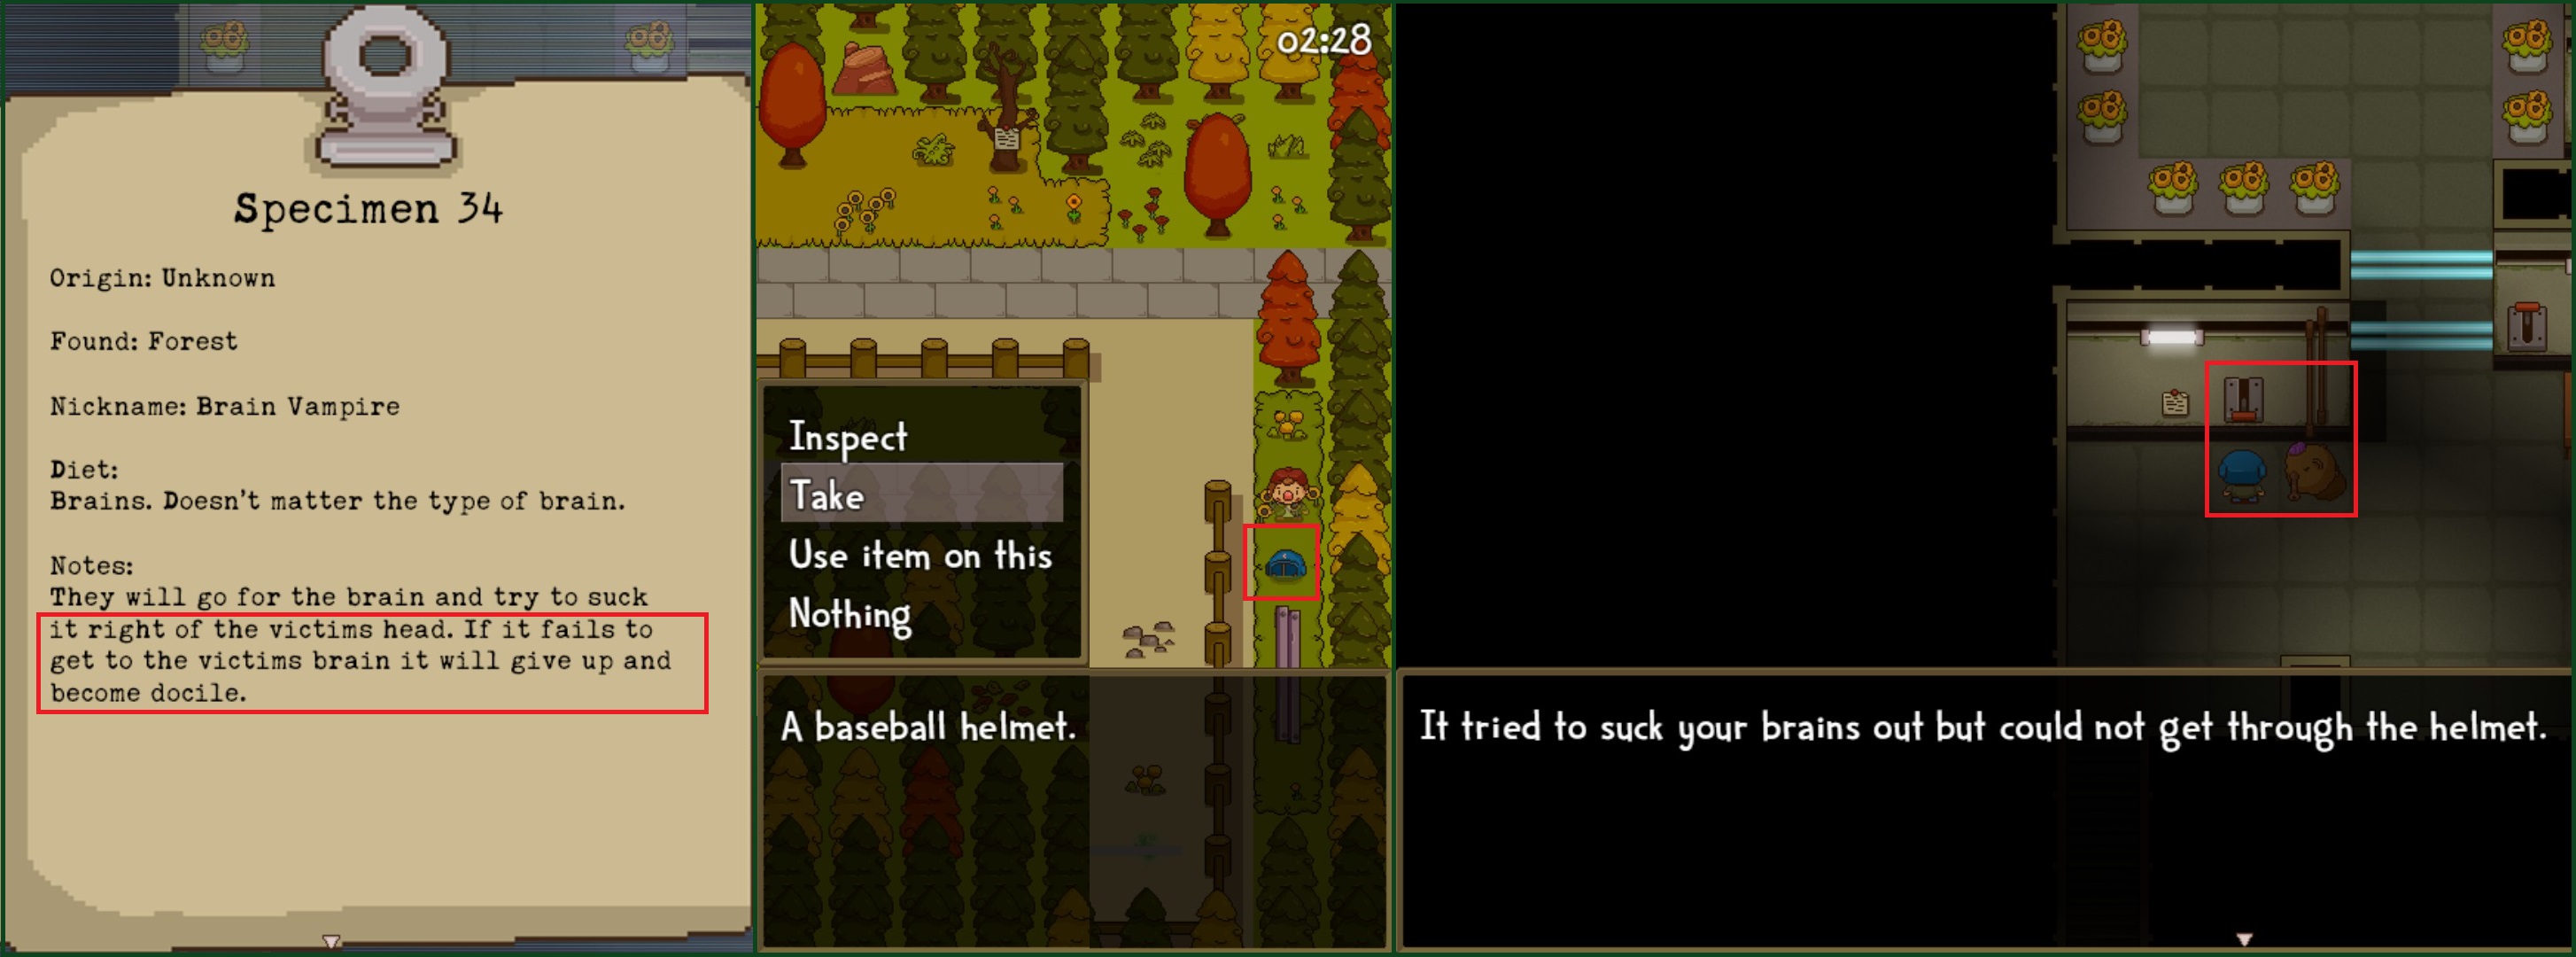
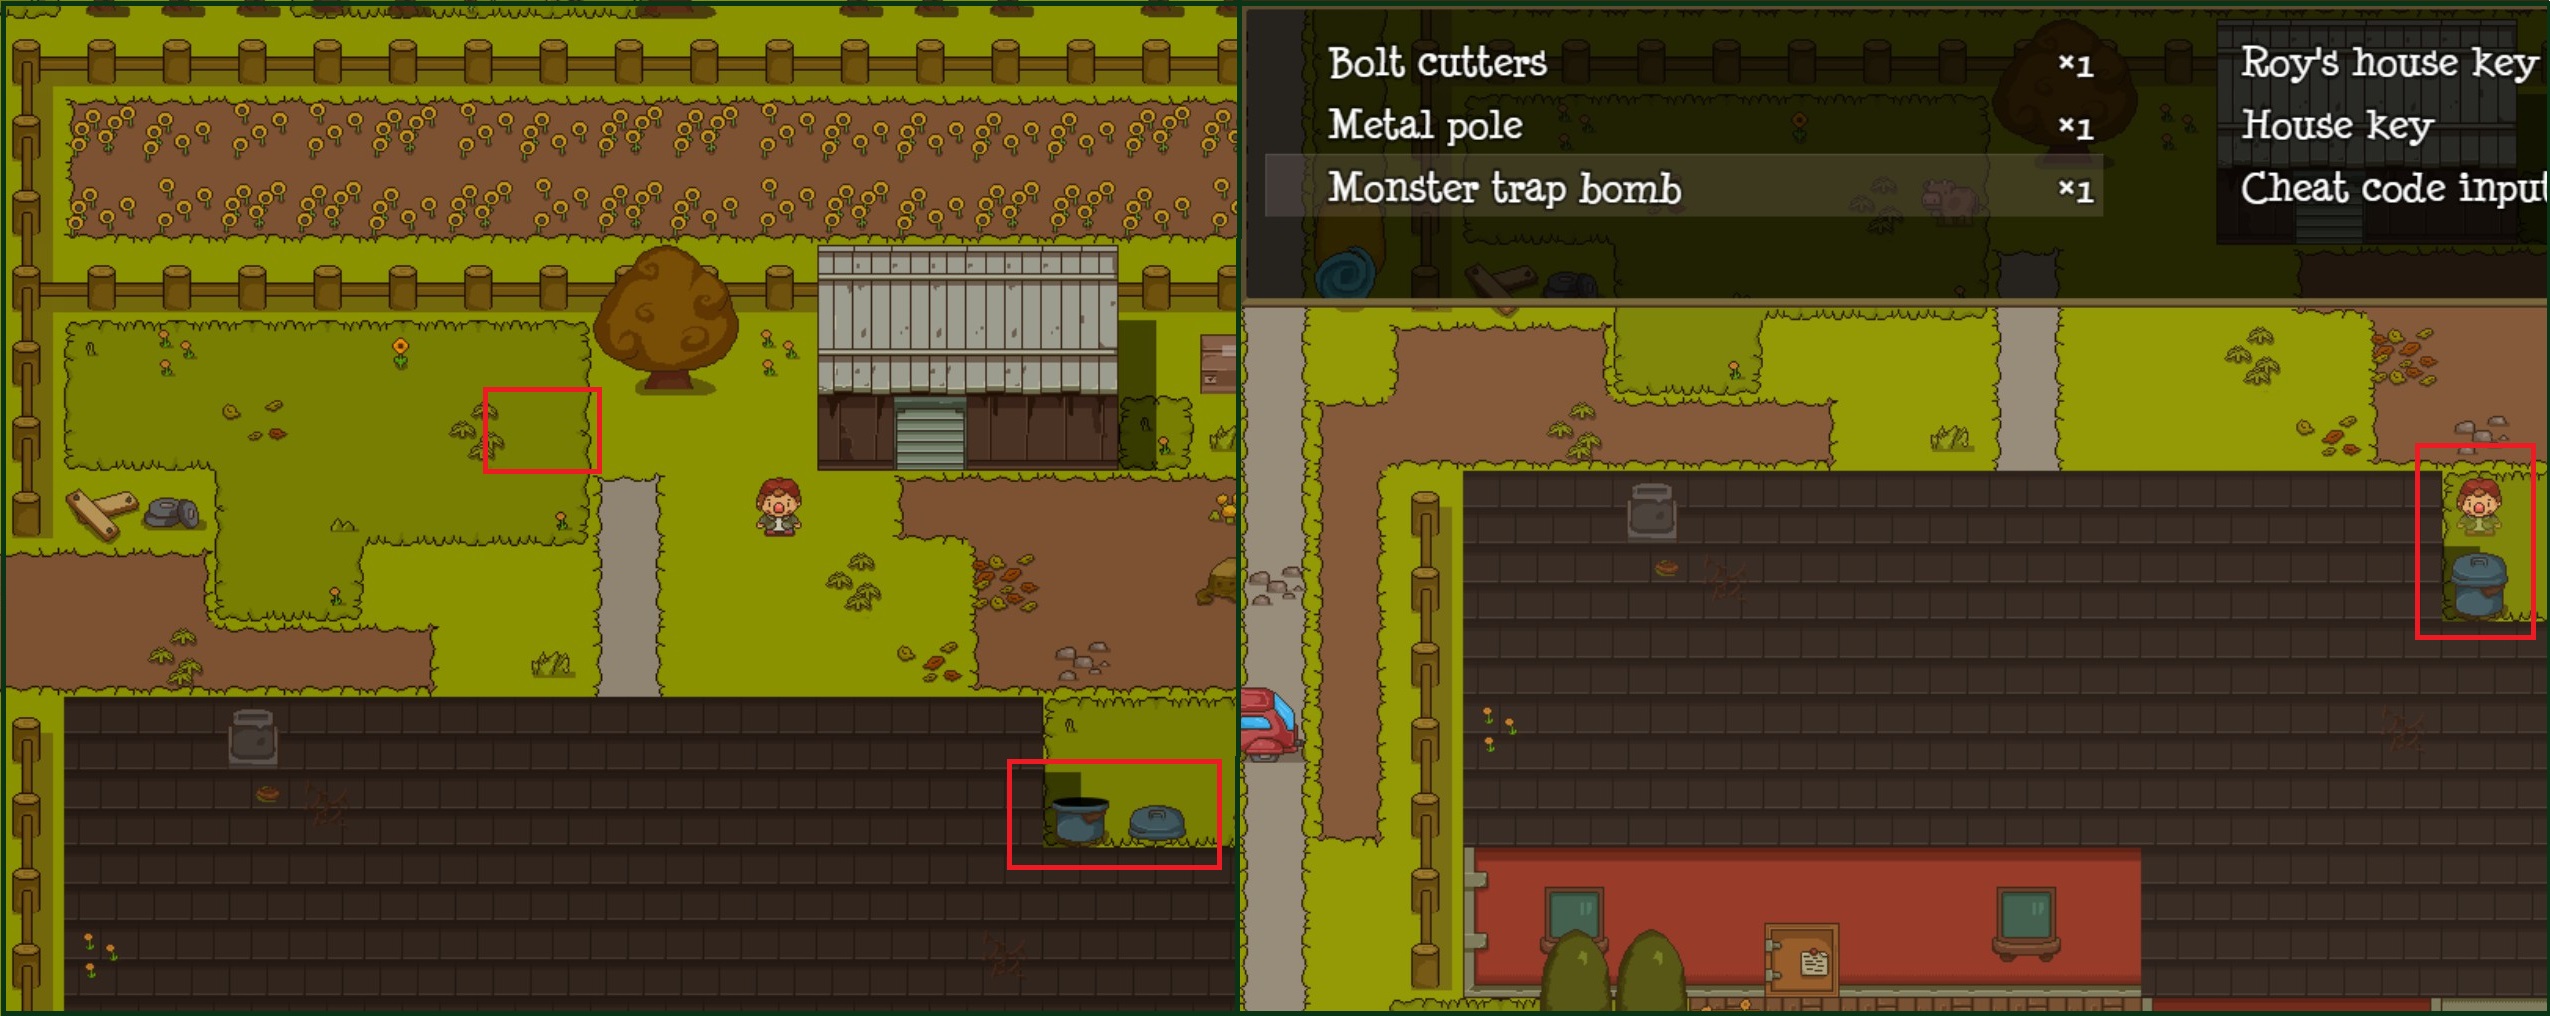
If my memory serves me right, you simply have to use the monster trap on the trash can before a certain point in time passed. So as long as the cow is there, use the monster trap on the can and you should be good. Or does this not work?
dynastystar Feb 28, 2023 @ 9:28am 
How do I "save the cow" in ending 15? I can't seem to pick it up. I'm not seeing the note outside the lab(and I doublechecked my notes to see if I already picked i up)
Adelion  [author] Feb 27, 2023 @ 11:49pm 
Hm, there was a small update at some point, fixing issues with Ending 12 and introducing Ending 15. It is possible that the card changed locations at that point as well. Is it still the same room?

So yea, some minor parts in the guide are probably dated. I hope they don't add to the confusion in the game.
dynastystar Feb 27, 2023 @ 9:42pm 
I dunno why, but it seems that your screenshot of the laboratory Playing Card doesn't match where I found it. I found it in the dark area to the left of the Switches that control the lasers that protect you from the slime.
Adelion  [author] Feb 13, 2021 @ 10:23am 
Well, I tremendously enjoyed playing the game. Especially as I had the "luck" to play while not every ending was yet uncovered and there was some nice team effort to find everything. Also, I really like that everything can be deduced with simple logic and I wanted to showcase this in the guide instead of just telling "do xyz because".

Never thought about it like that. But yea, Greenvale is full of strange people anyway.
Mavelovent Feb 13, 2021 @ 3:07am 
I should mention that I really enjoyed simply reading through this guide, especially when finishing the game myself. Seeing your point of view and experience :) Very well made with plenty of hints and walkthrough of how to get each answer instead of straight up giving it away.

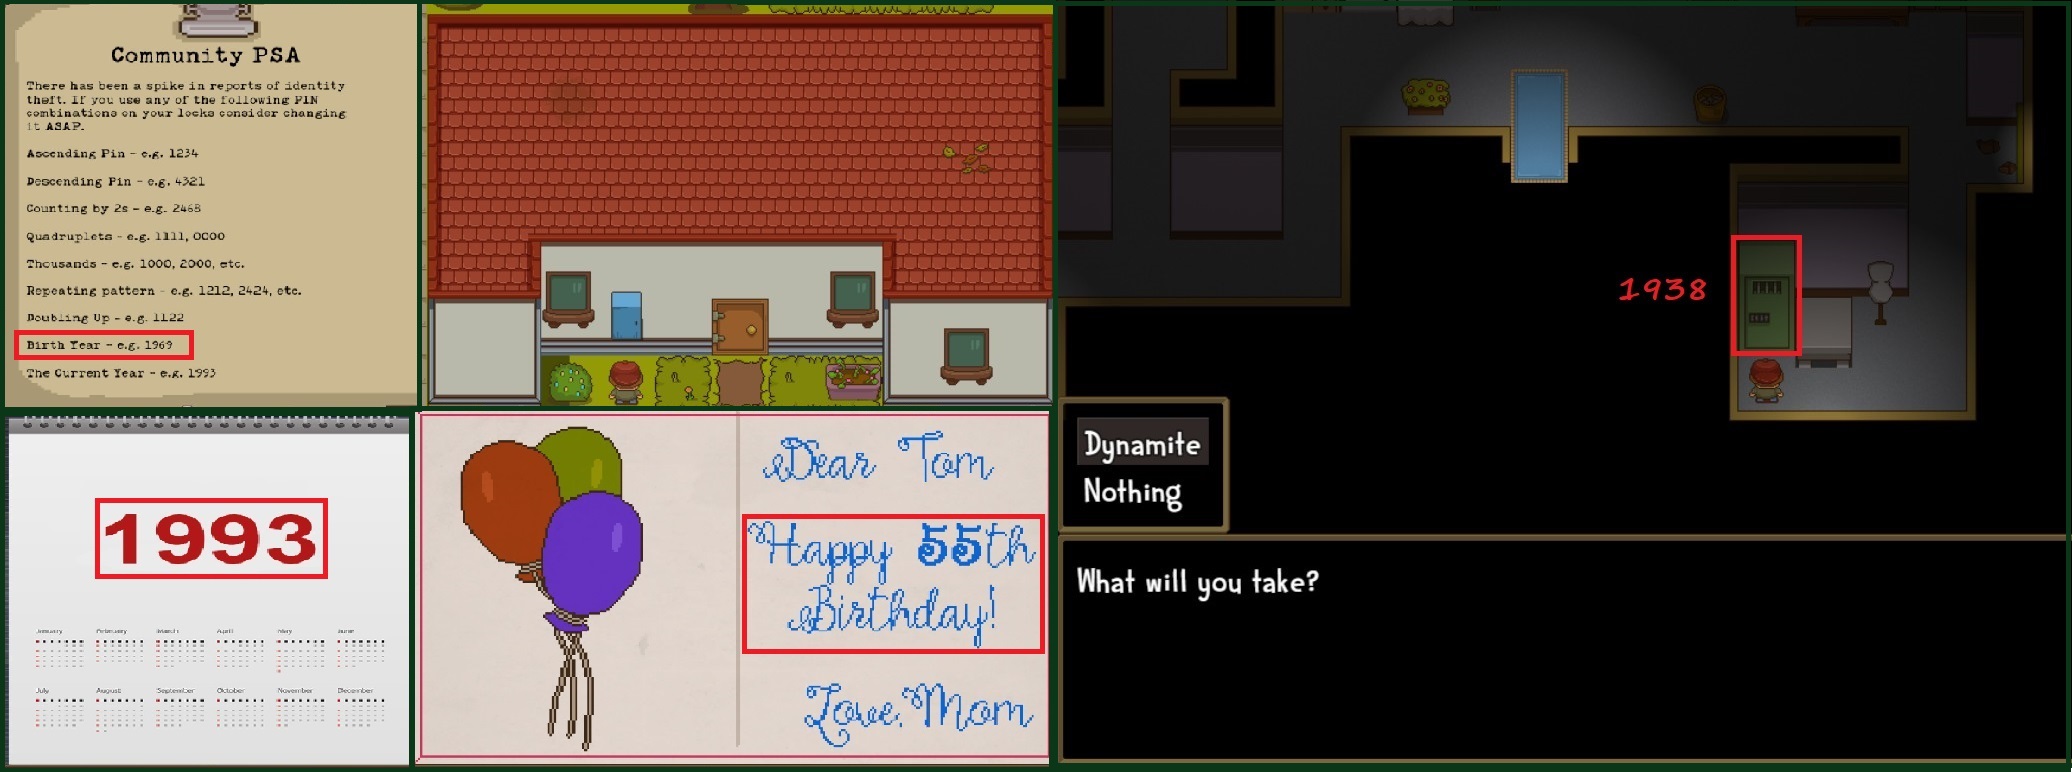
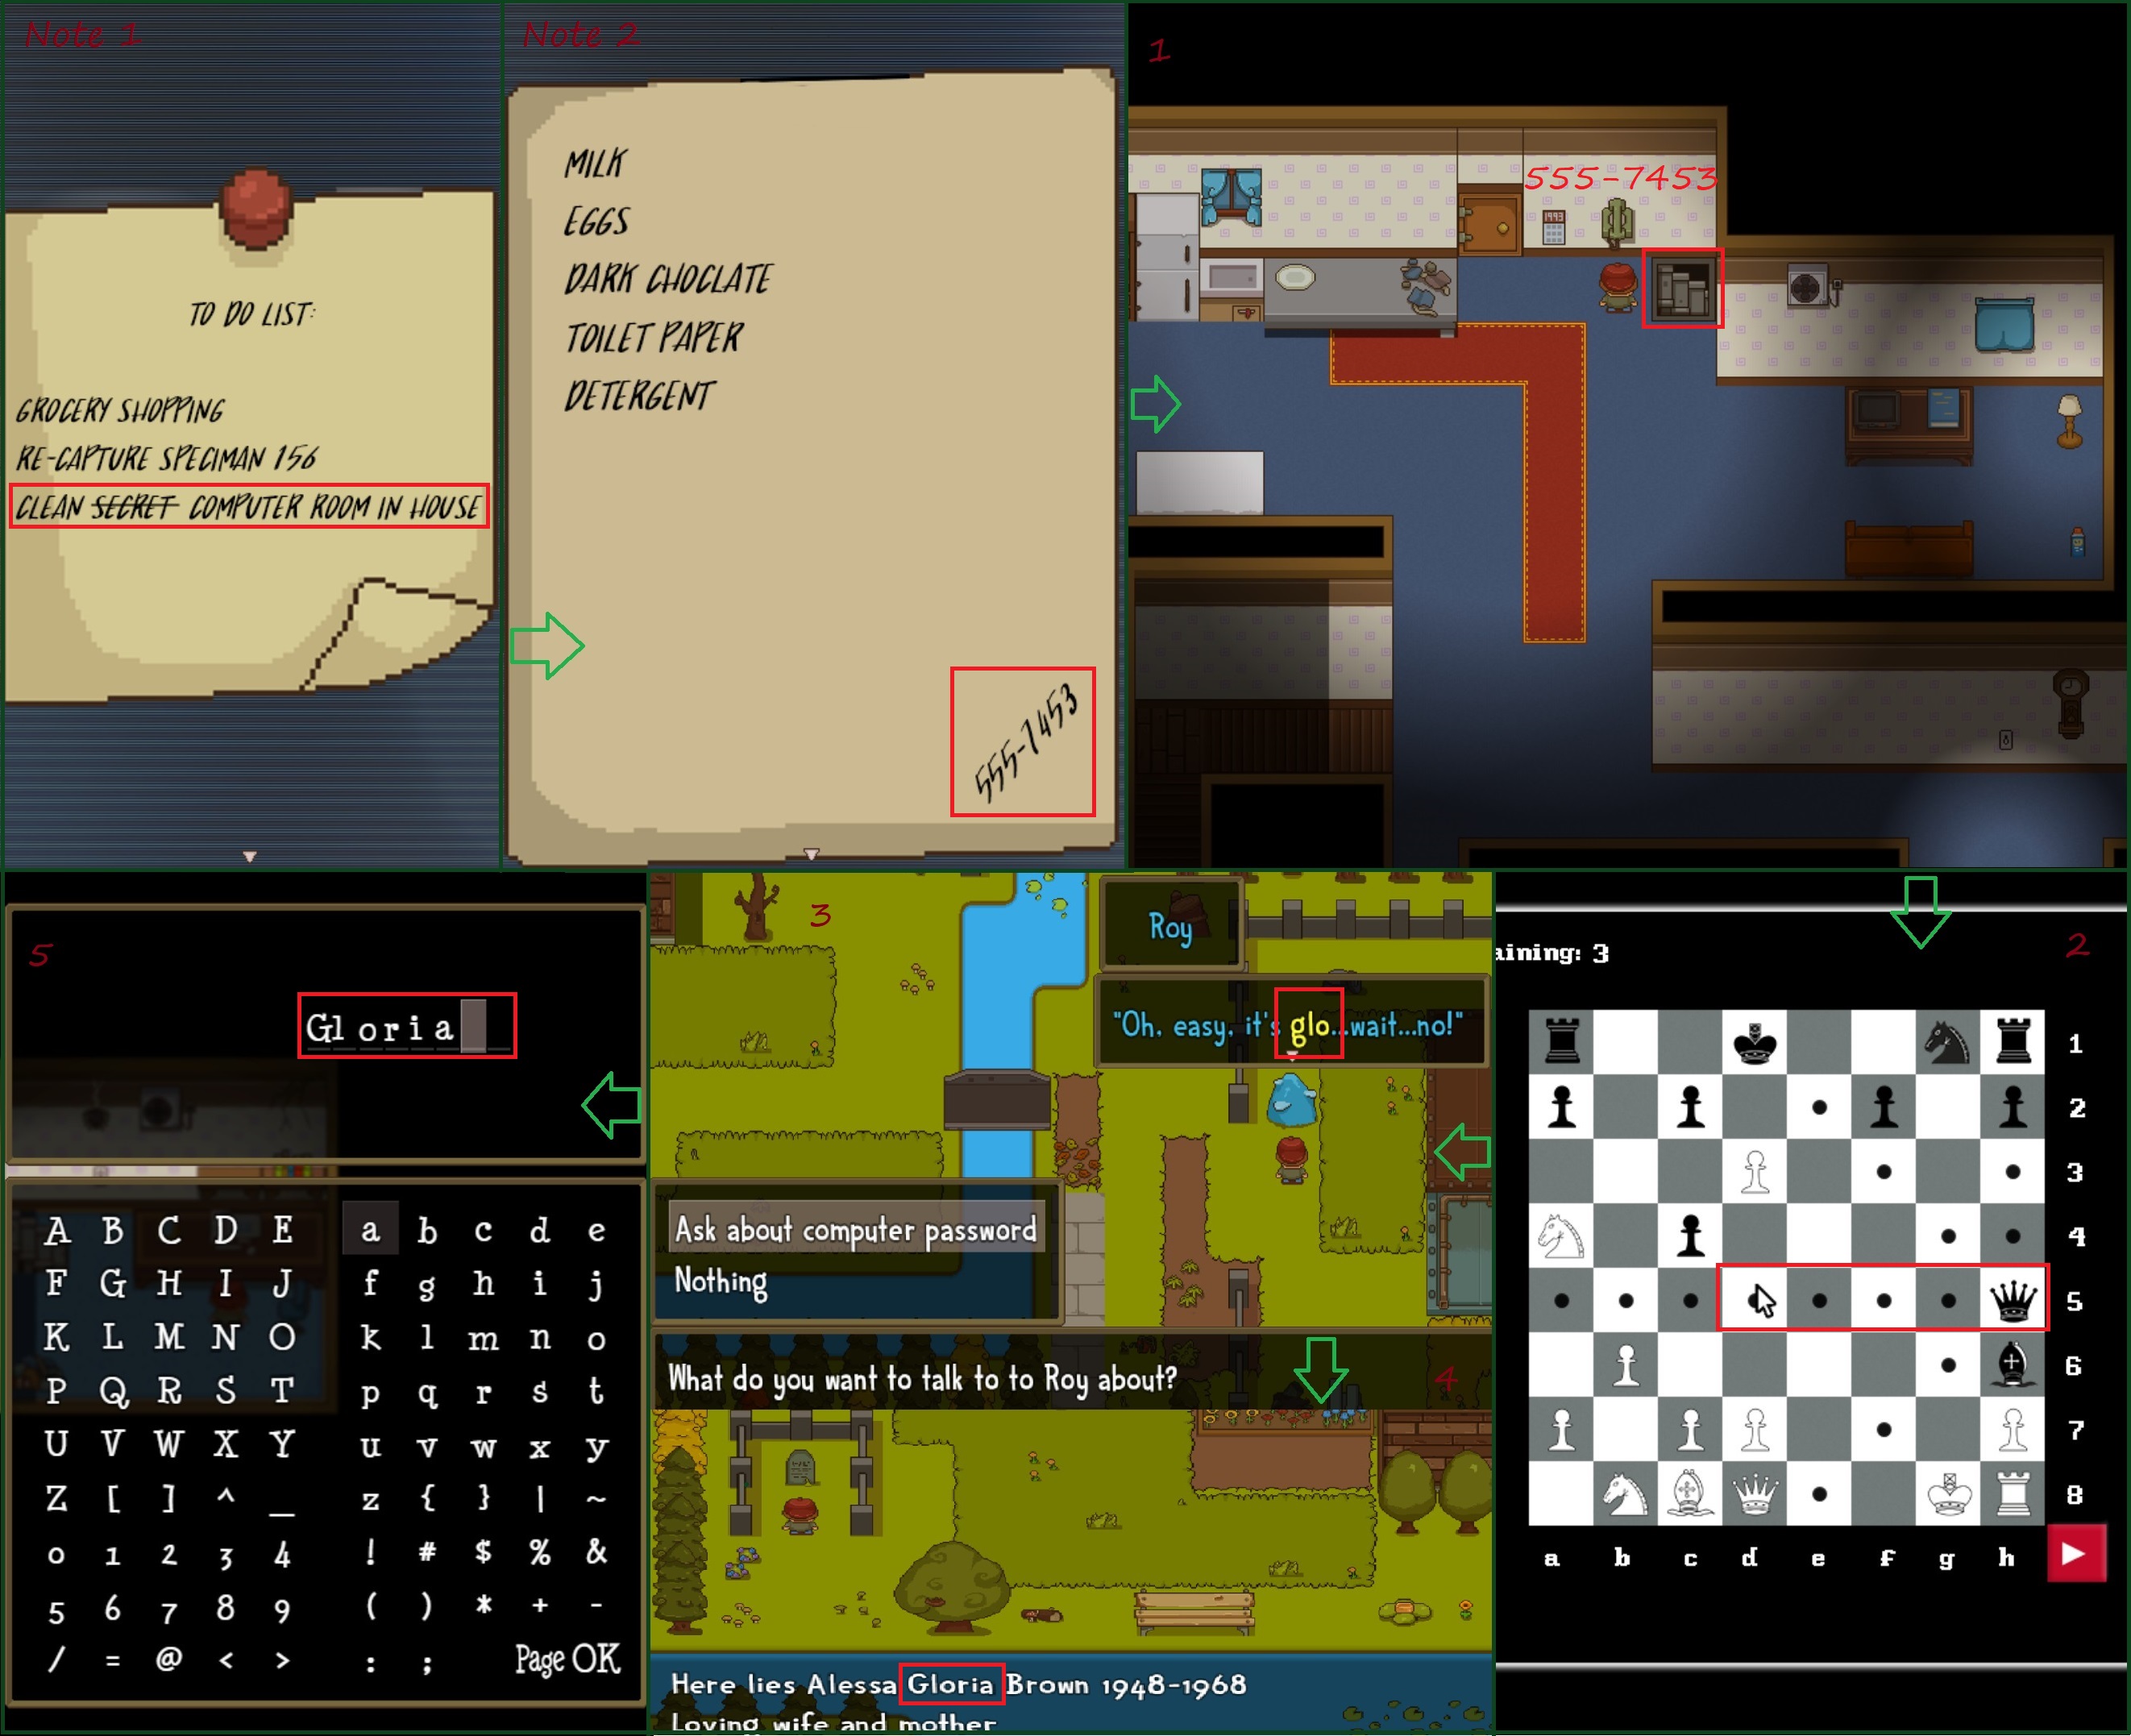
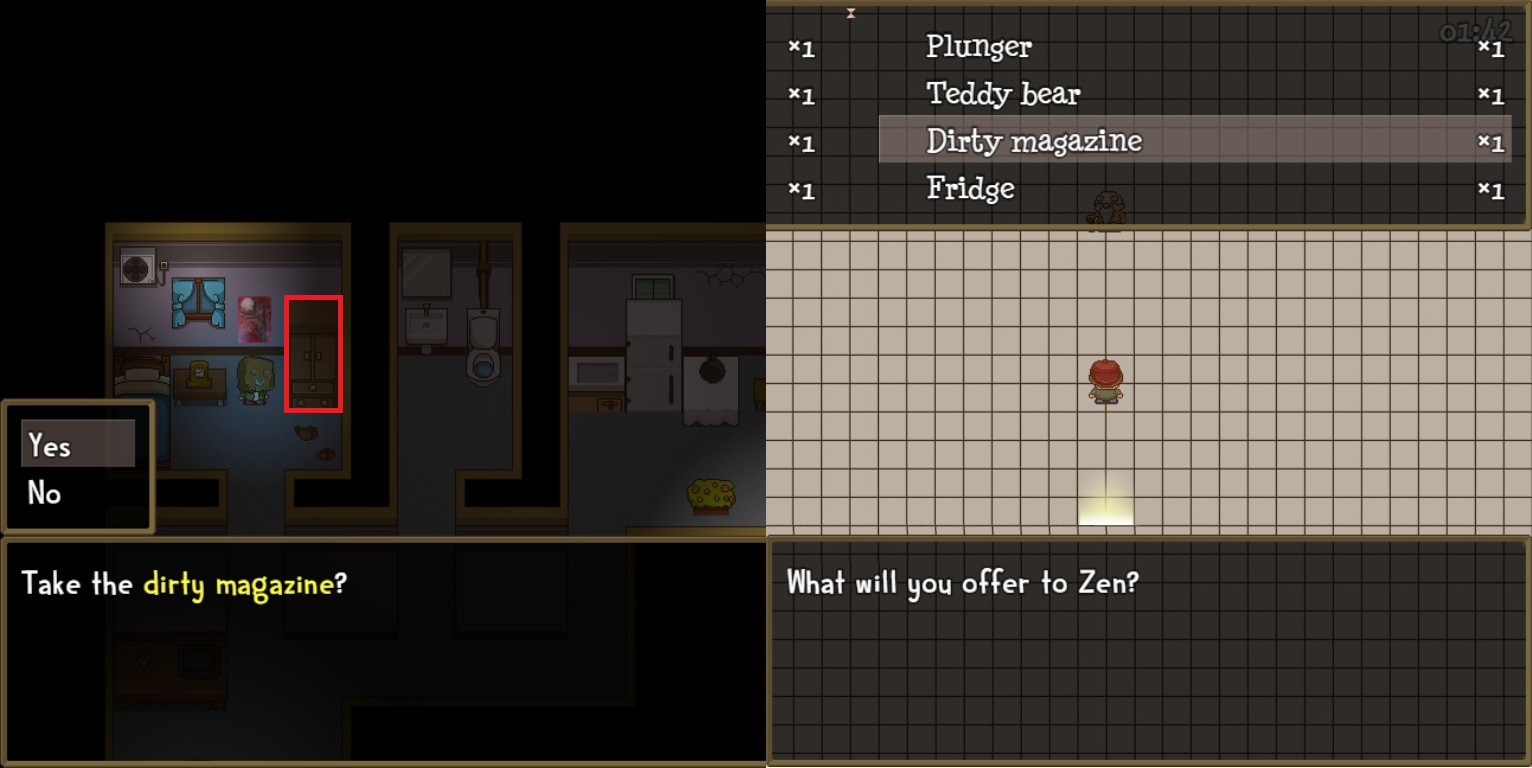
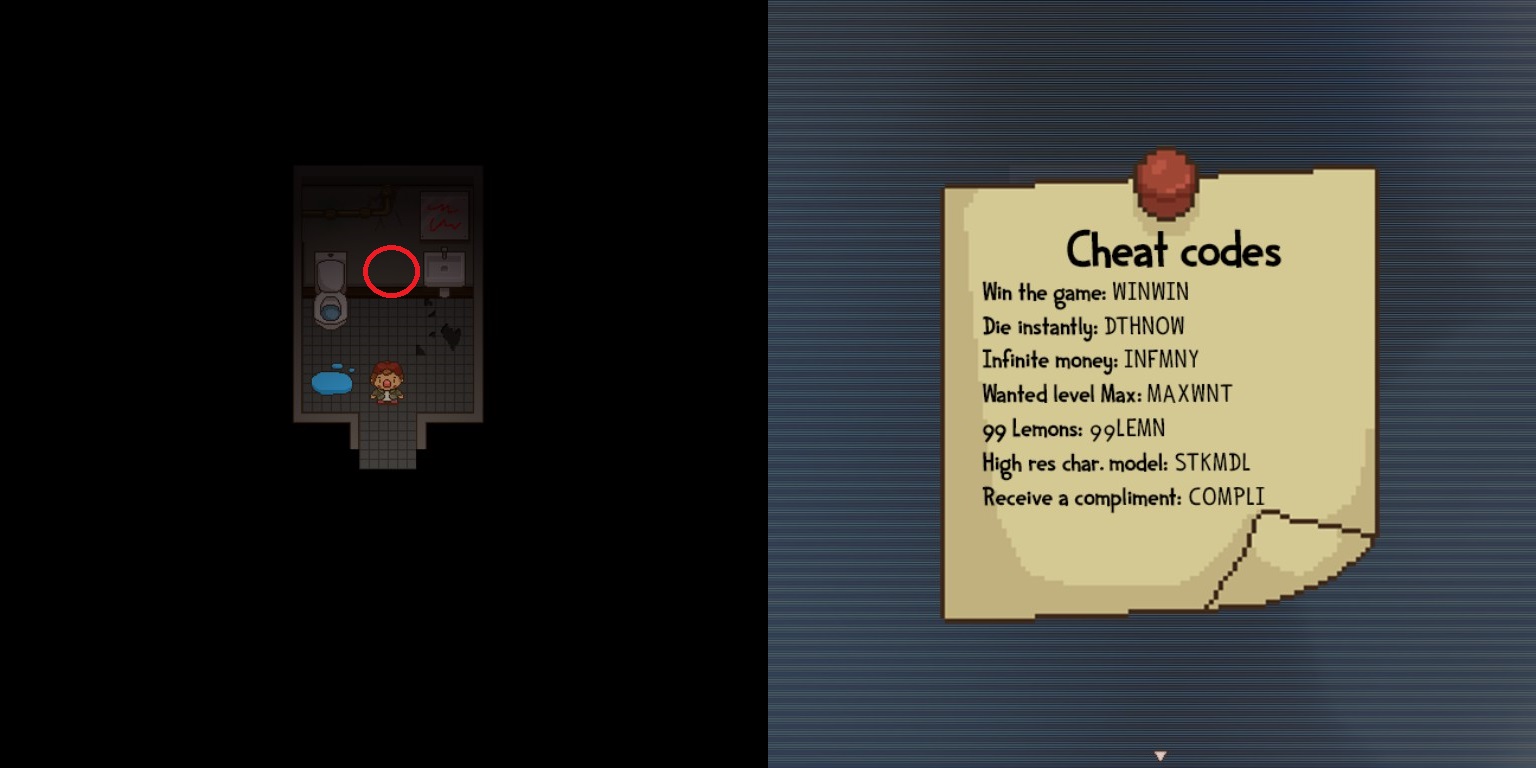
Also thinking about it, the guy living in the red roofed house must be very... interesting. He's 55 years old, getting simple birthday wishes from his mom, has a SINGLE messy, sticky bed, porn mag, weapons, dynamite, cheat machine (?), dying flowers, dirty diapers and a coloring book...
Adelion  [author] Feb 12, 2021 @ 3:40pm 
Hm, there is some information I seem to have missed (or forgotten). The clogging note is interesting.

As for ending 4, I think I mentioned the "obvious" reference which yes, is from Dragon Ball. Not sure if people would normally associate unwholesome with perverted. Wouldnt have crossed my mind.

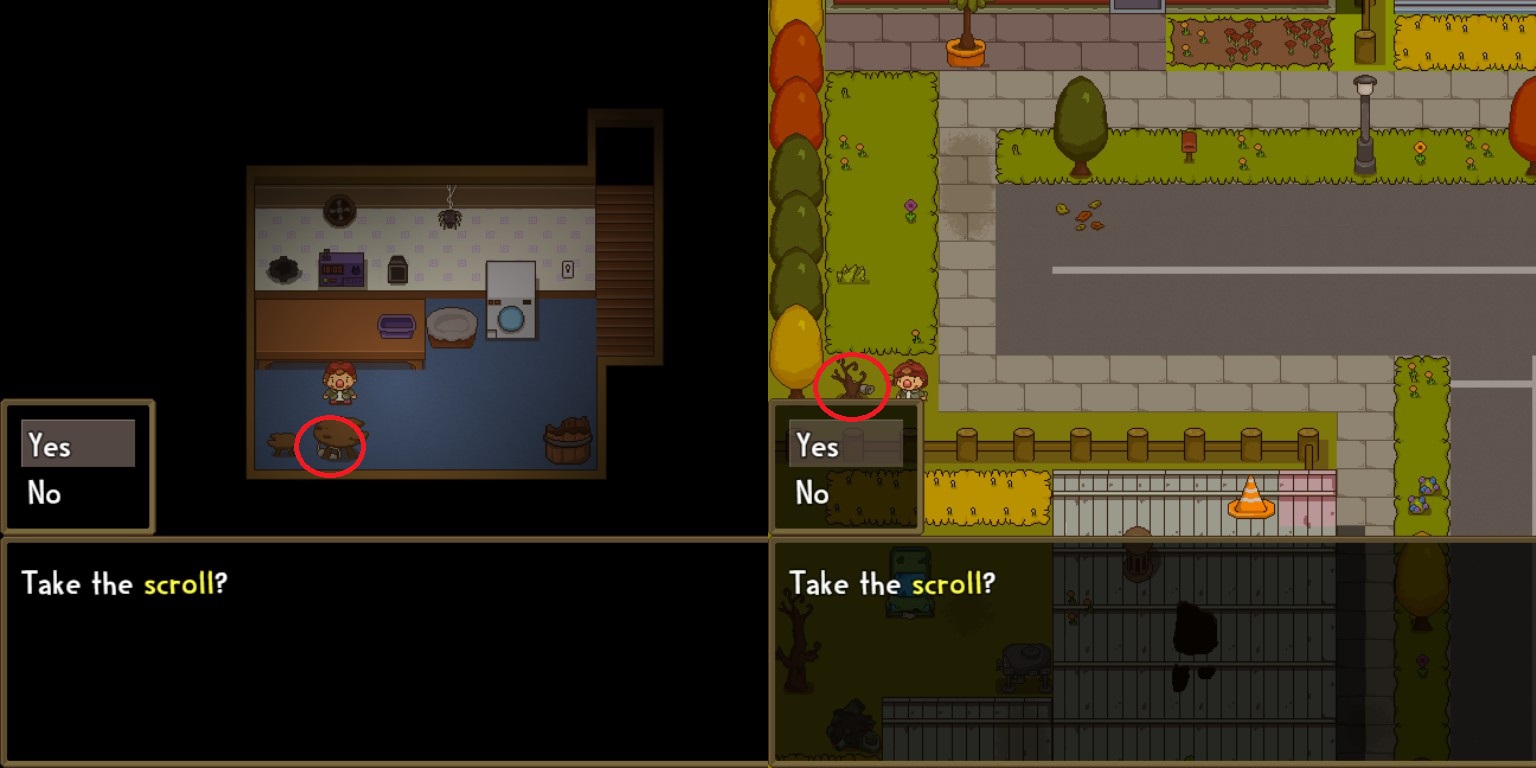
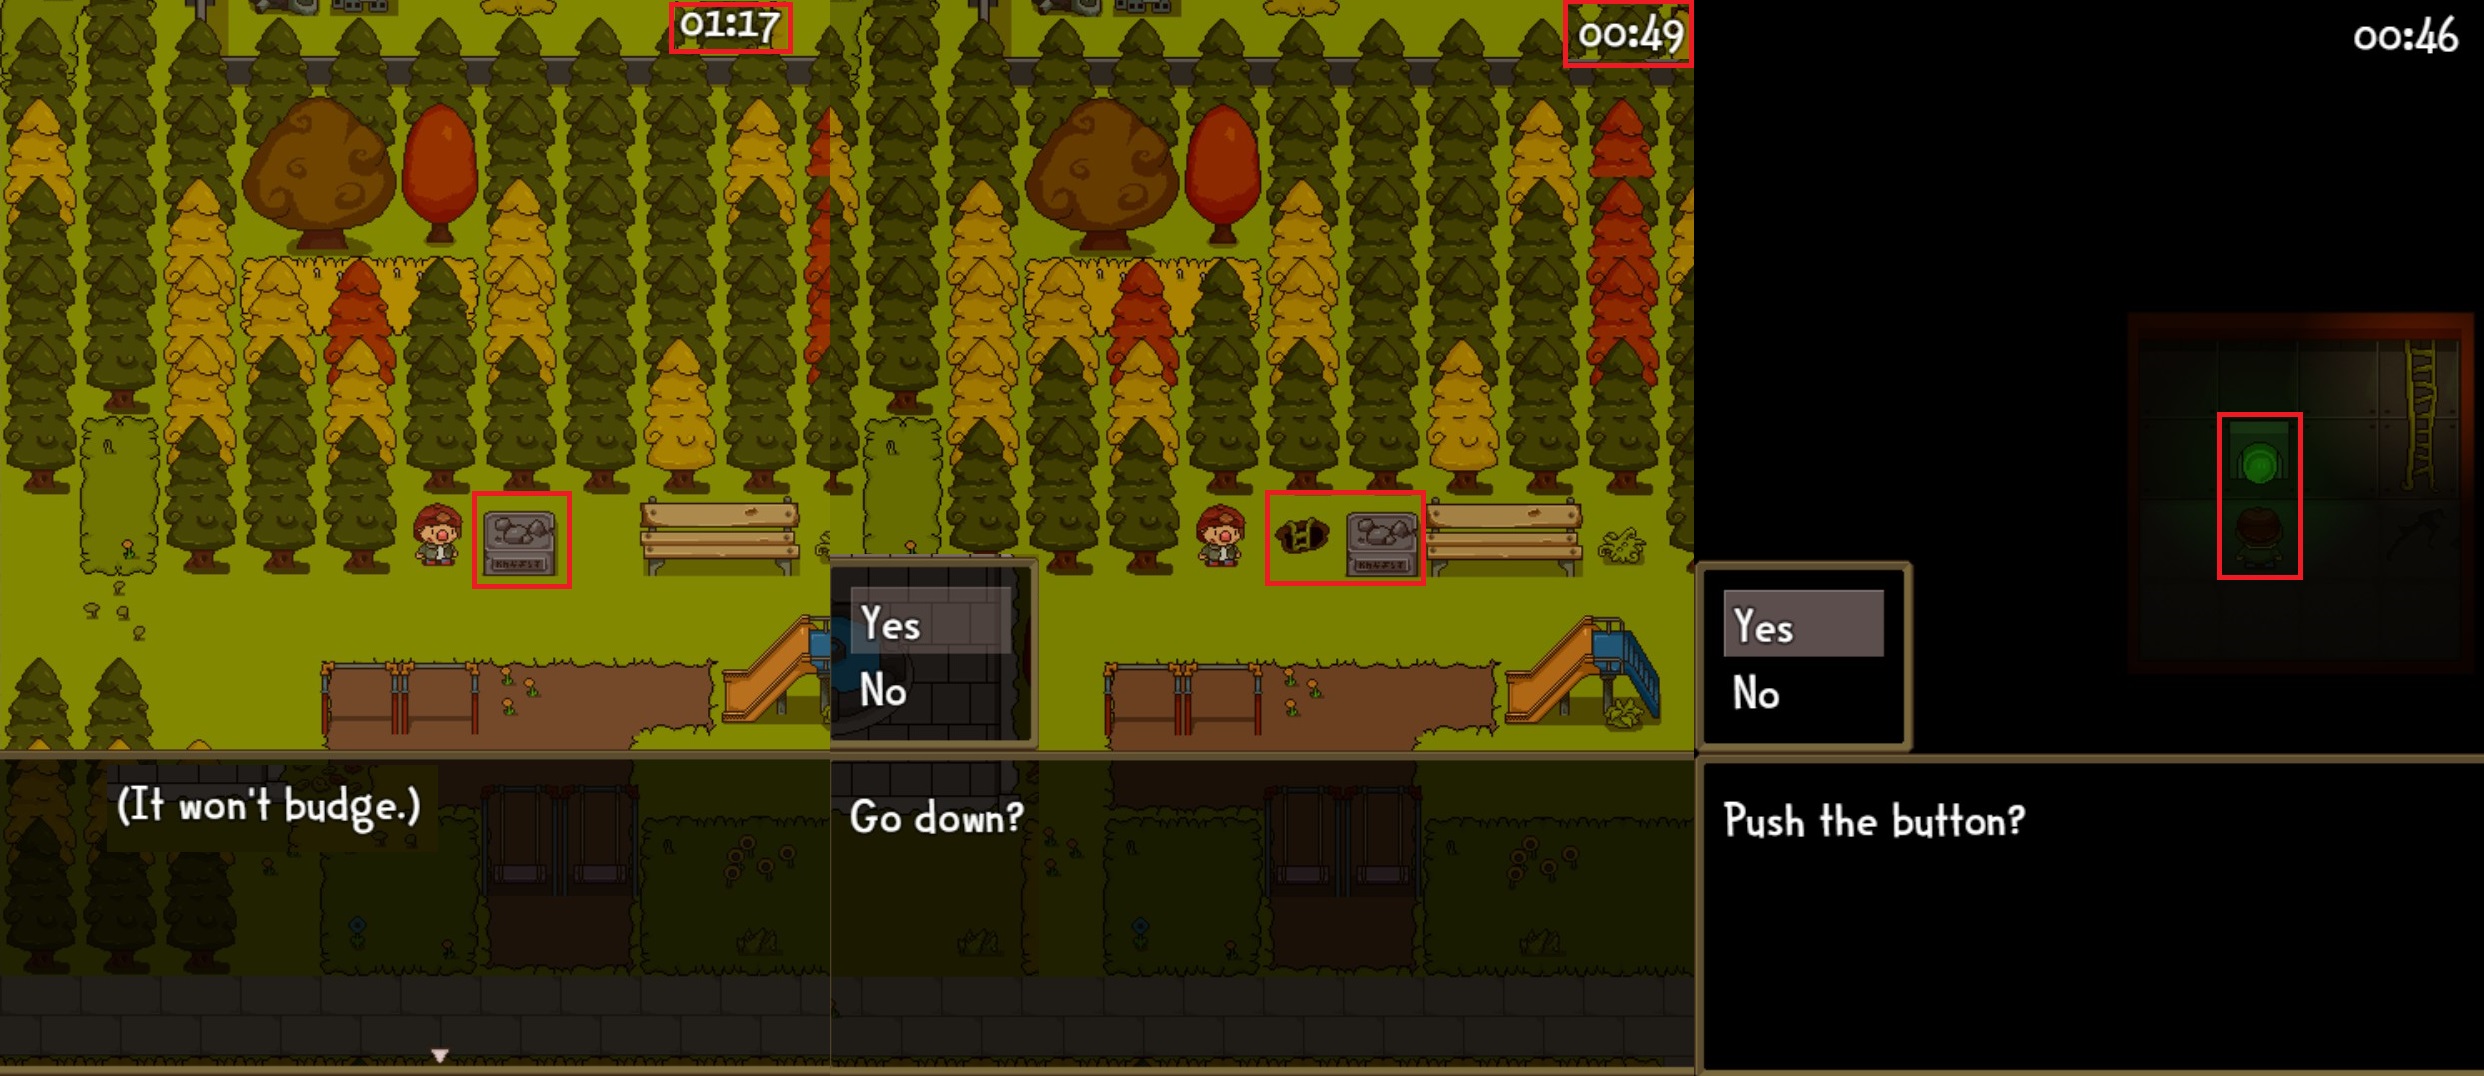
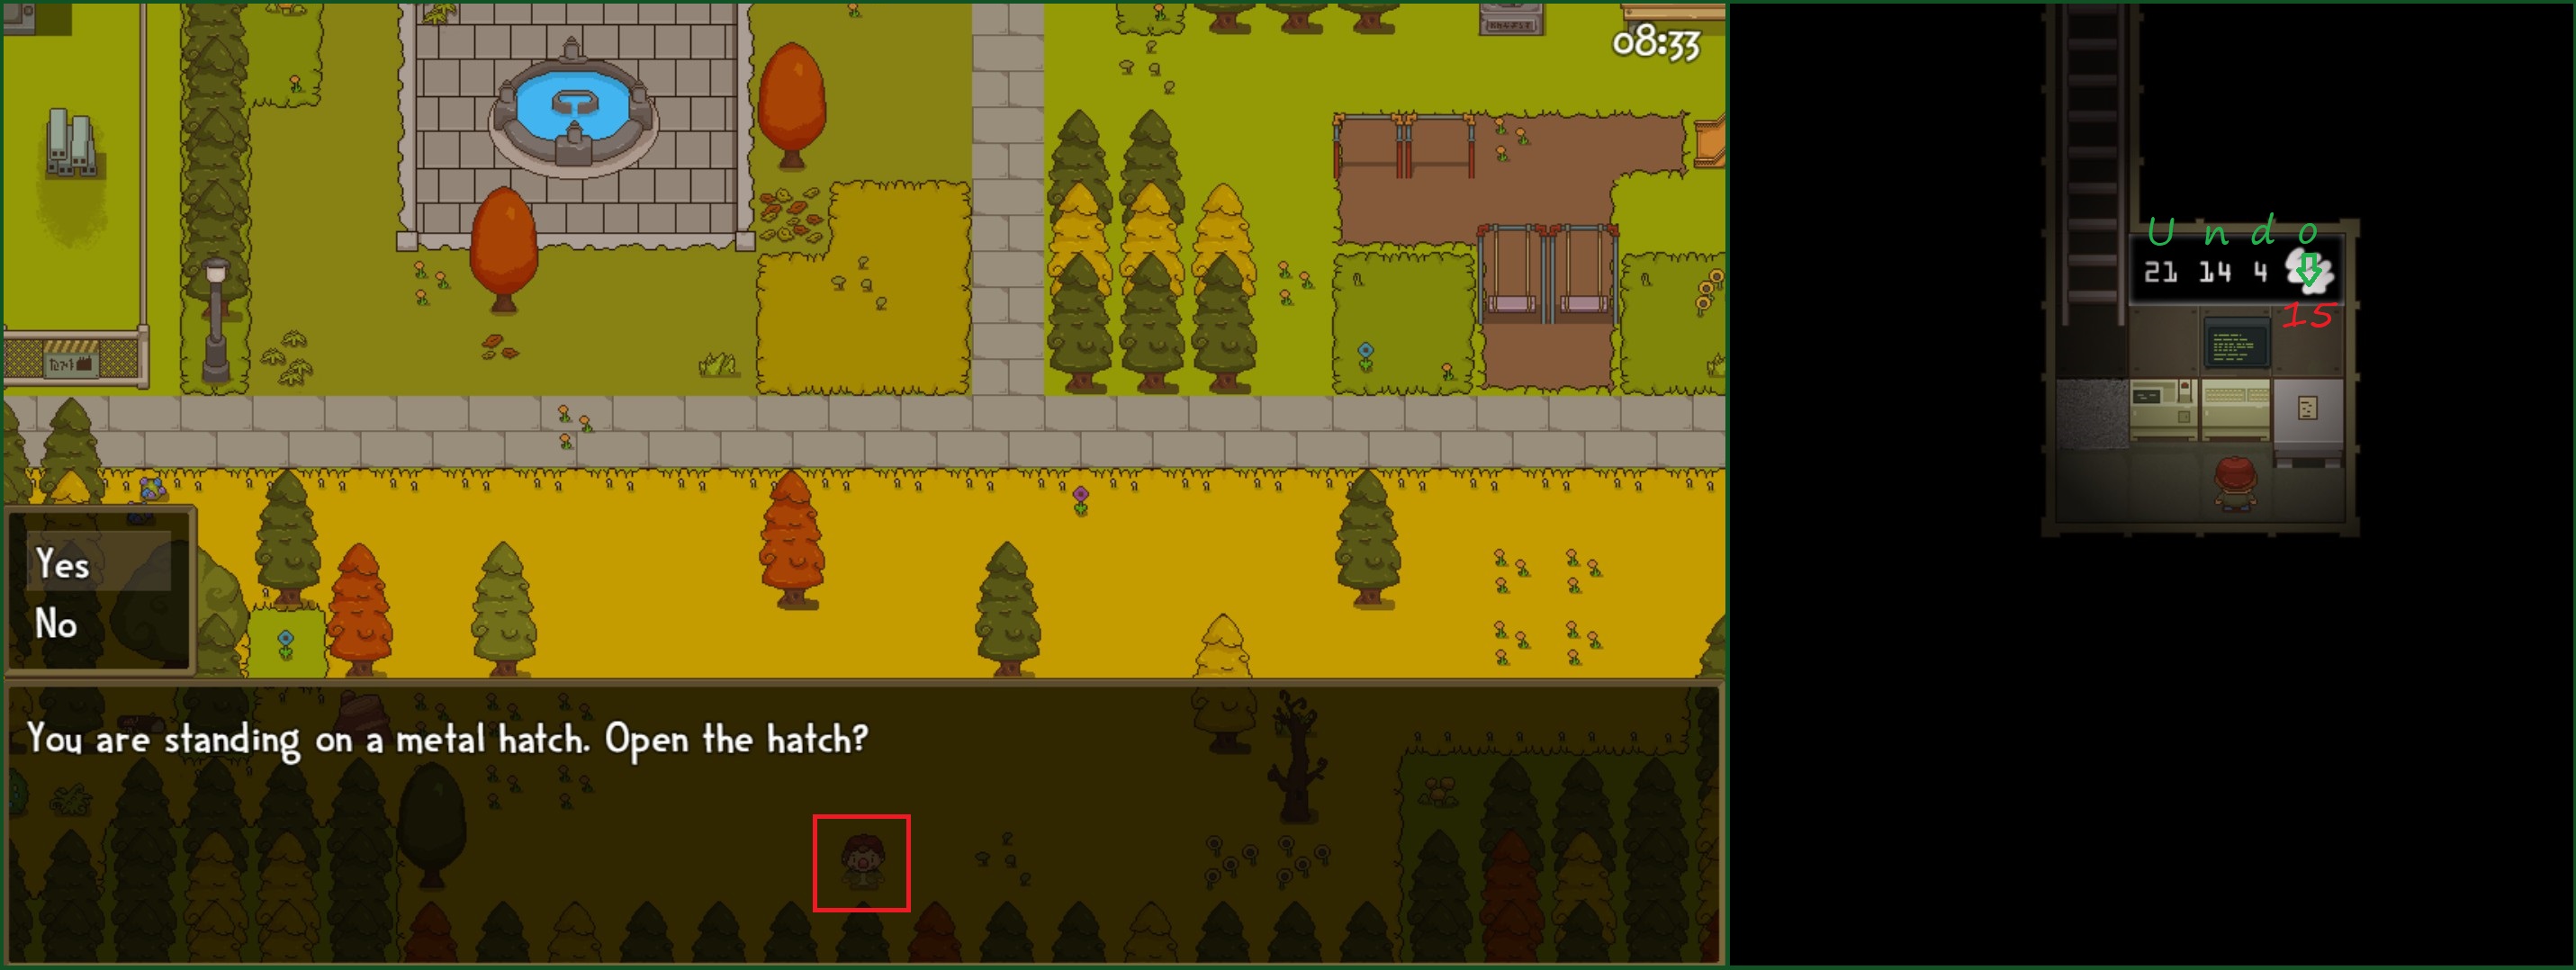
For ending 15, I have to check. Did I really miss the Cow all the time? Well, better that way. Cow life matters :P
Mavelovent Feb 12, 2021 @ 1:14pm 
I'm probably a bit late to the party but I think it's worth mentioning: in ending 5 (Man's best friend) where you have to get the key from the red roofed house, there is a very clear (?) clue that you are supposed to do it: if you check the waste basket in that house you'll find a note saying "sorry for clogging your toilet", hence prompting you to fix it and find the key.

For ending 2 (no going back) you can choose to sit with Laura and calmly watch the end.

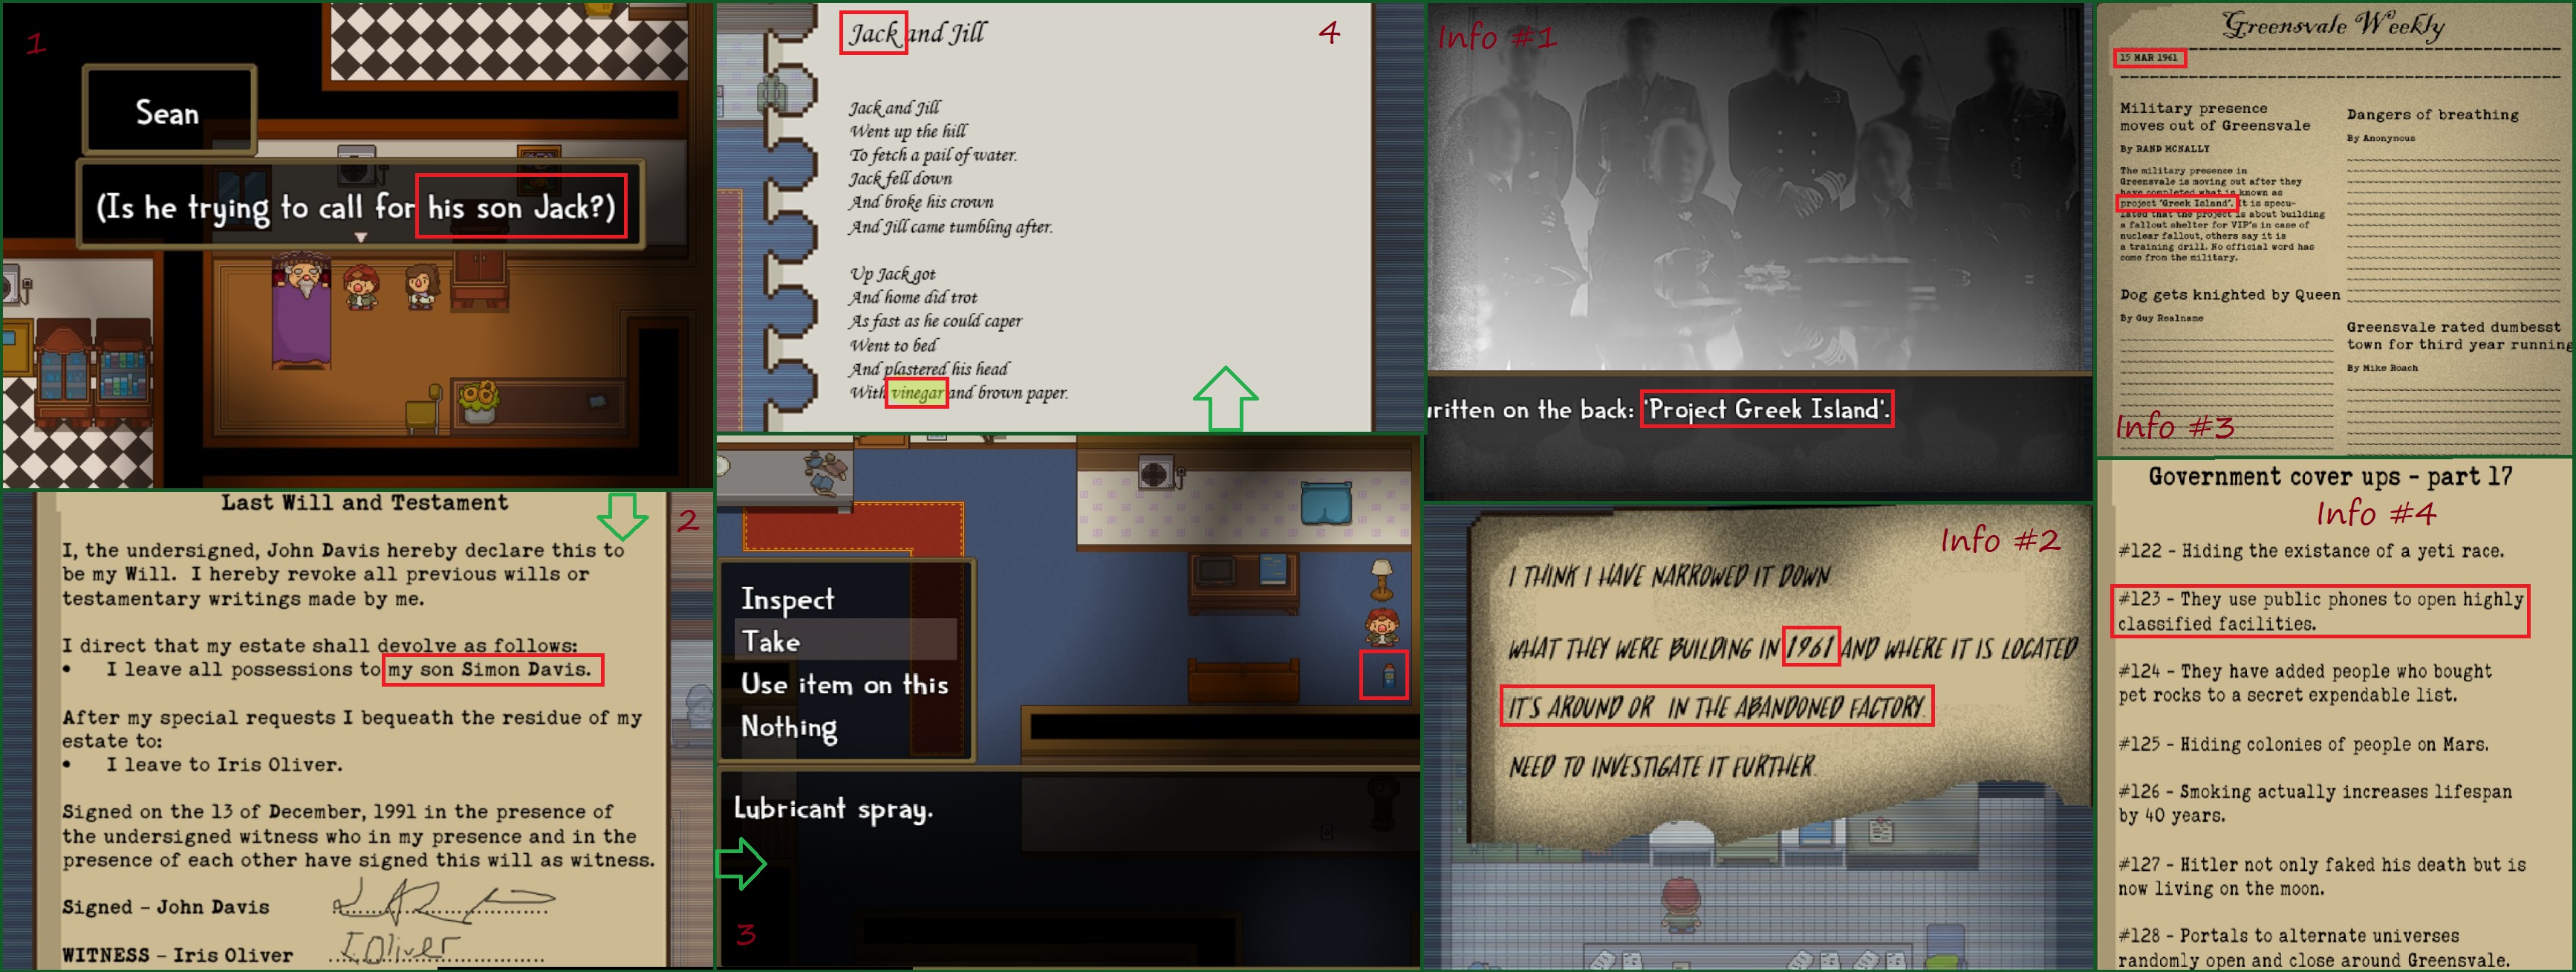
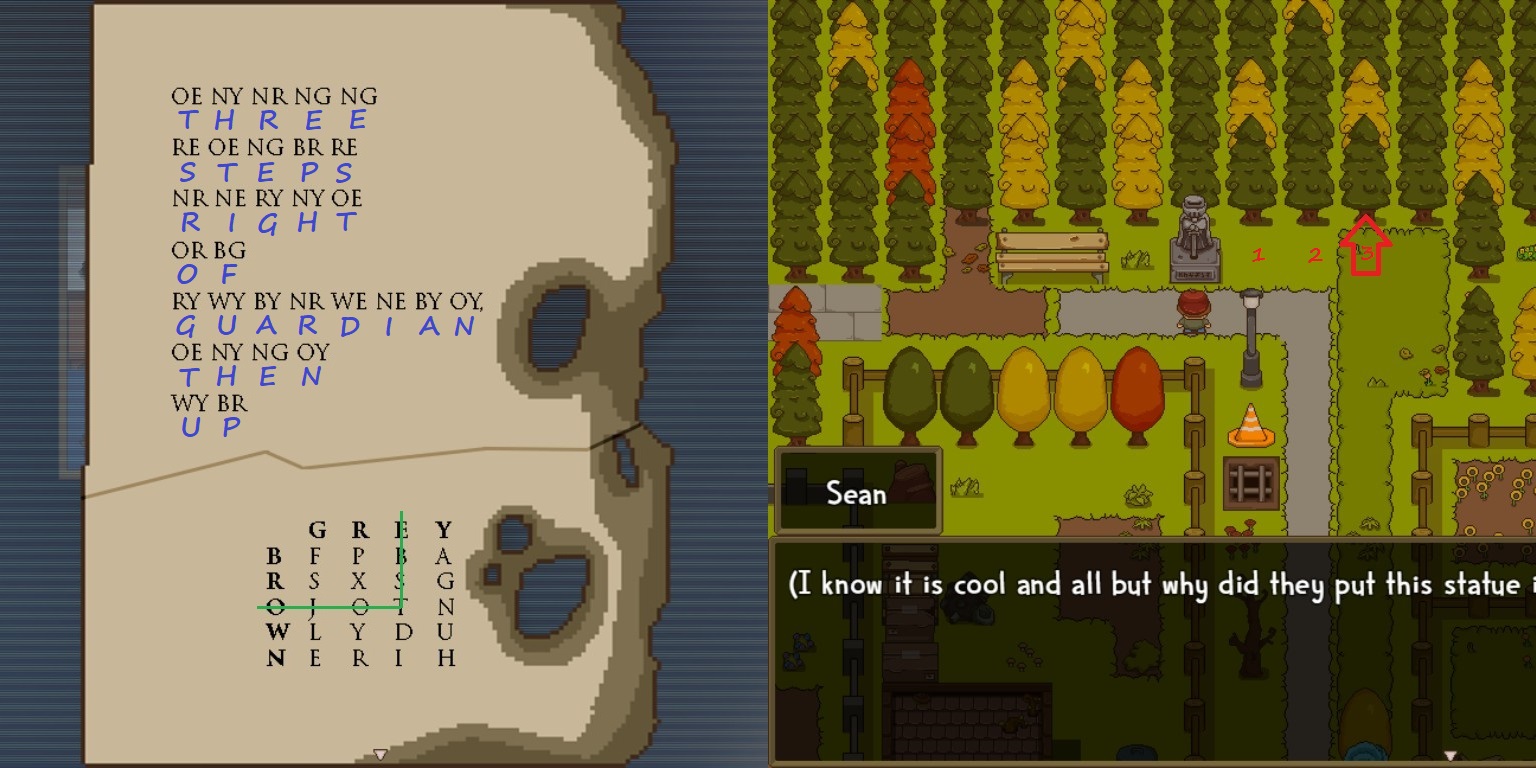
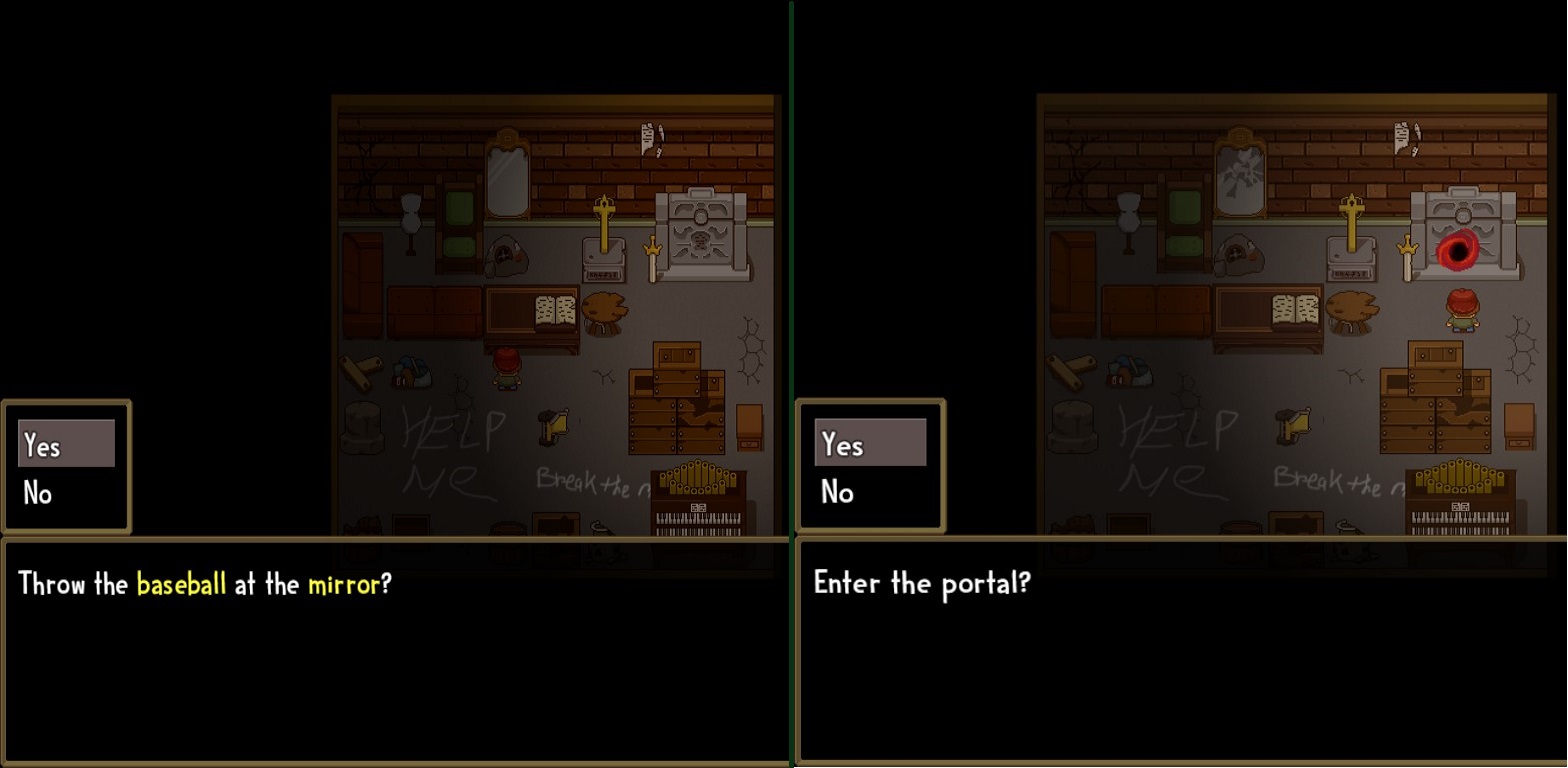
For ending 4 (S-warrior) there is a hint if you check the thought map as to what the old geezer wants (calling him "old and unwholesome" - ergo "perverted"). Also this whole ending is a clear reference to Dragon Ball, which included an old but powerful man teaching kamehameha, whose most characteristic trait was being heavily perverted.

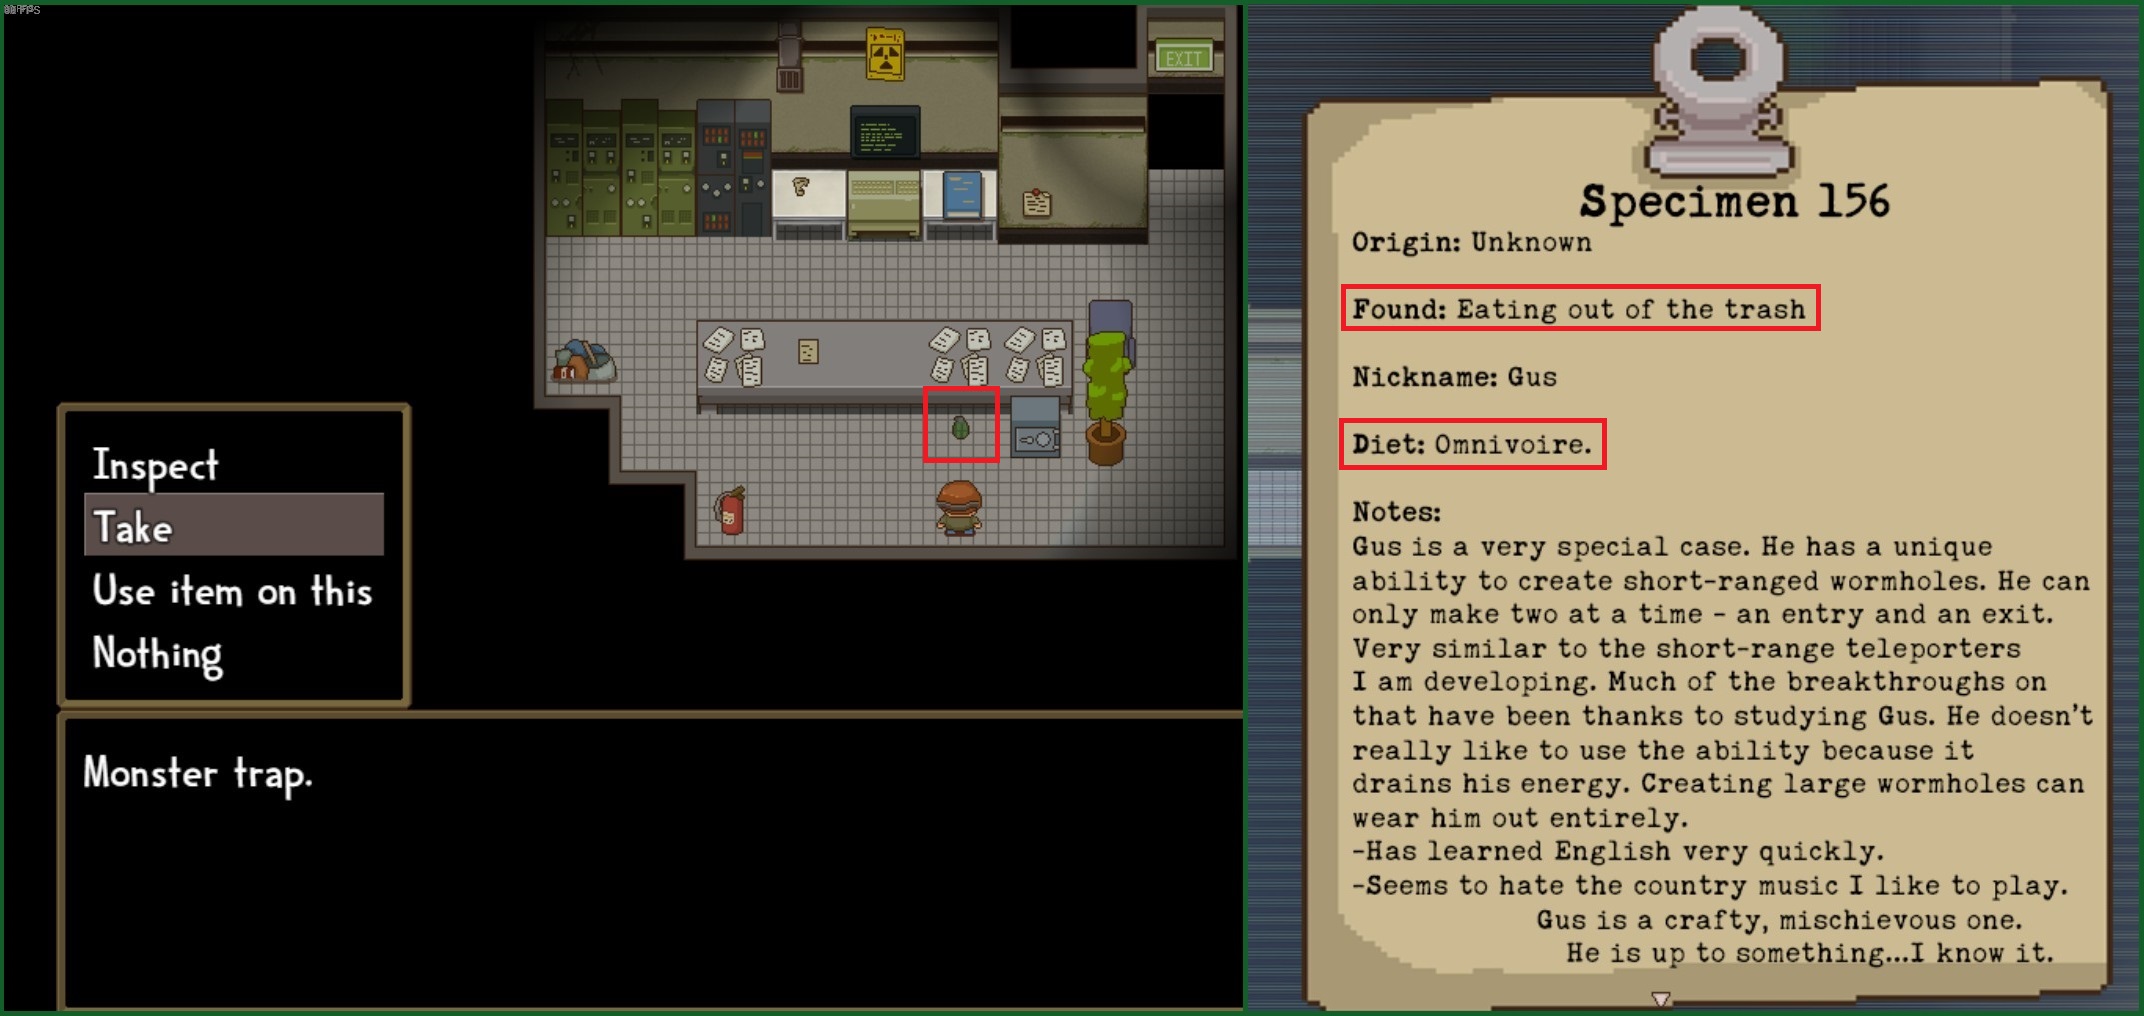
In ending 15, the cow isn't actually eaten, you can find her on the field above your house after Gus has escaped the trash can, meaning he scared the cow, I guess?
Adelion  [author] May 16, 2019 @ 12:55pm 
Well, that explains the existenc of the bolt cutter. I will think about adding the stuff. Not now, but maybe the weekend. Half of it is "only" alternative solutions to some problems. Although it is really cool that there are different solutions, one should help anyone who is struggling. And I didnt know them.

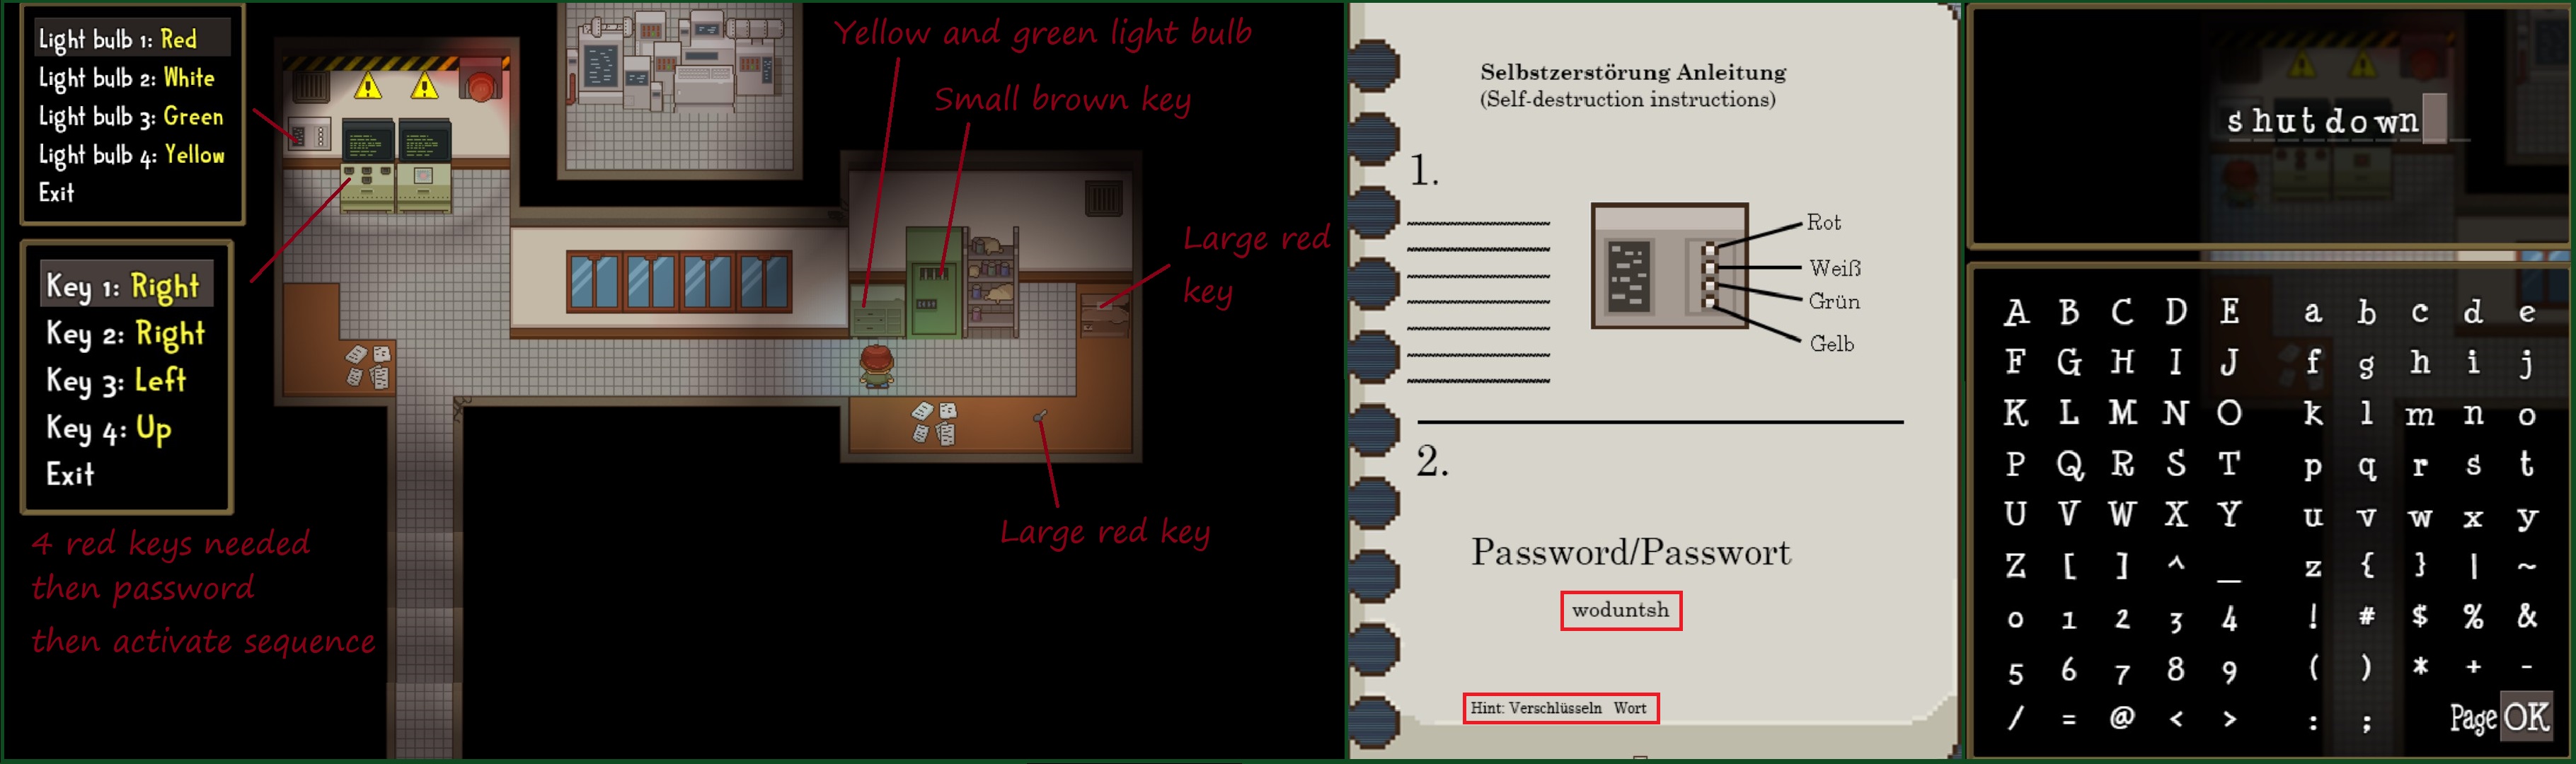
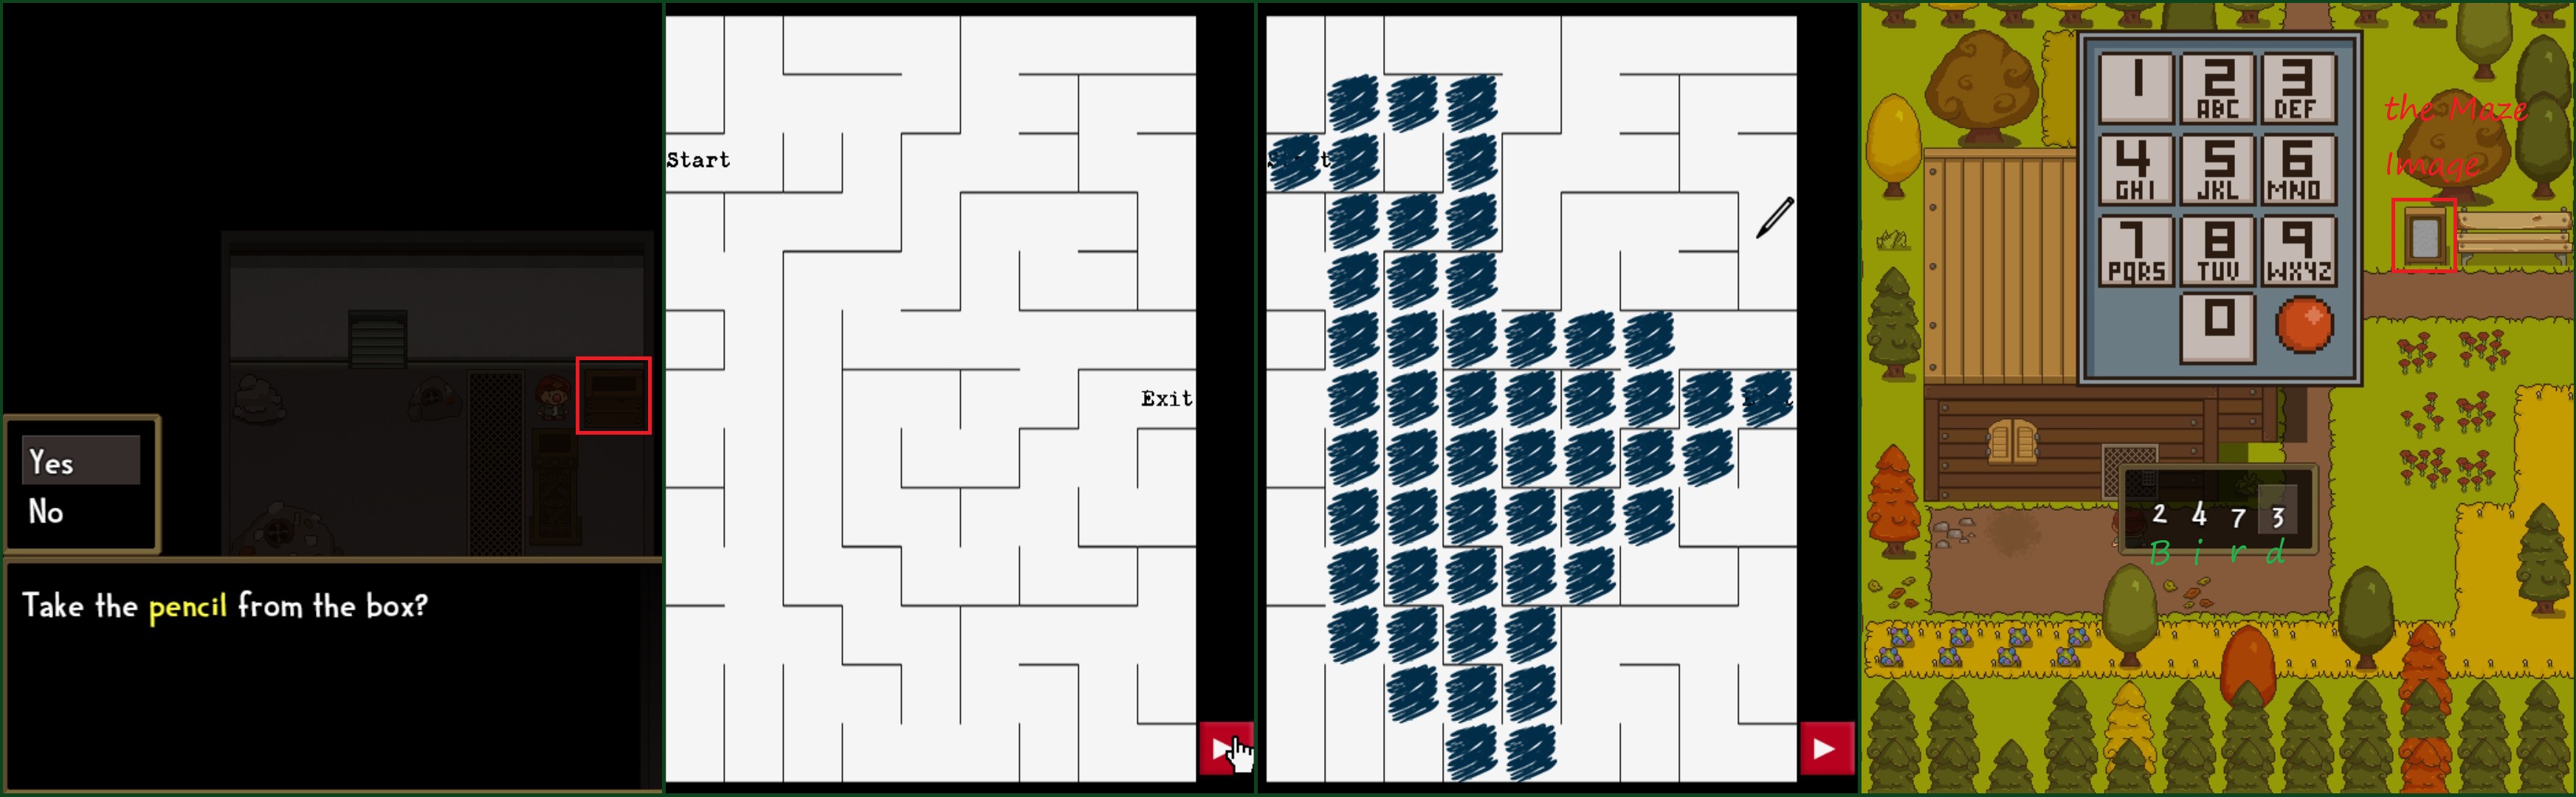
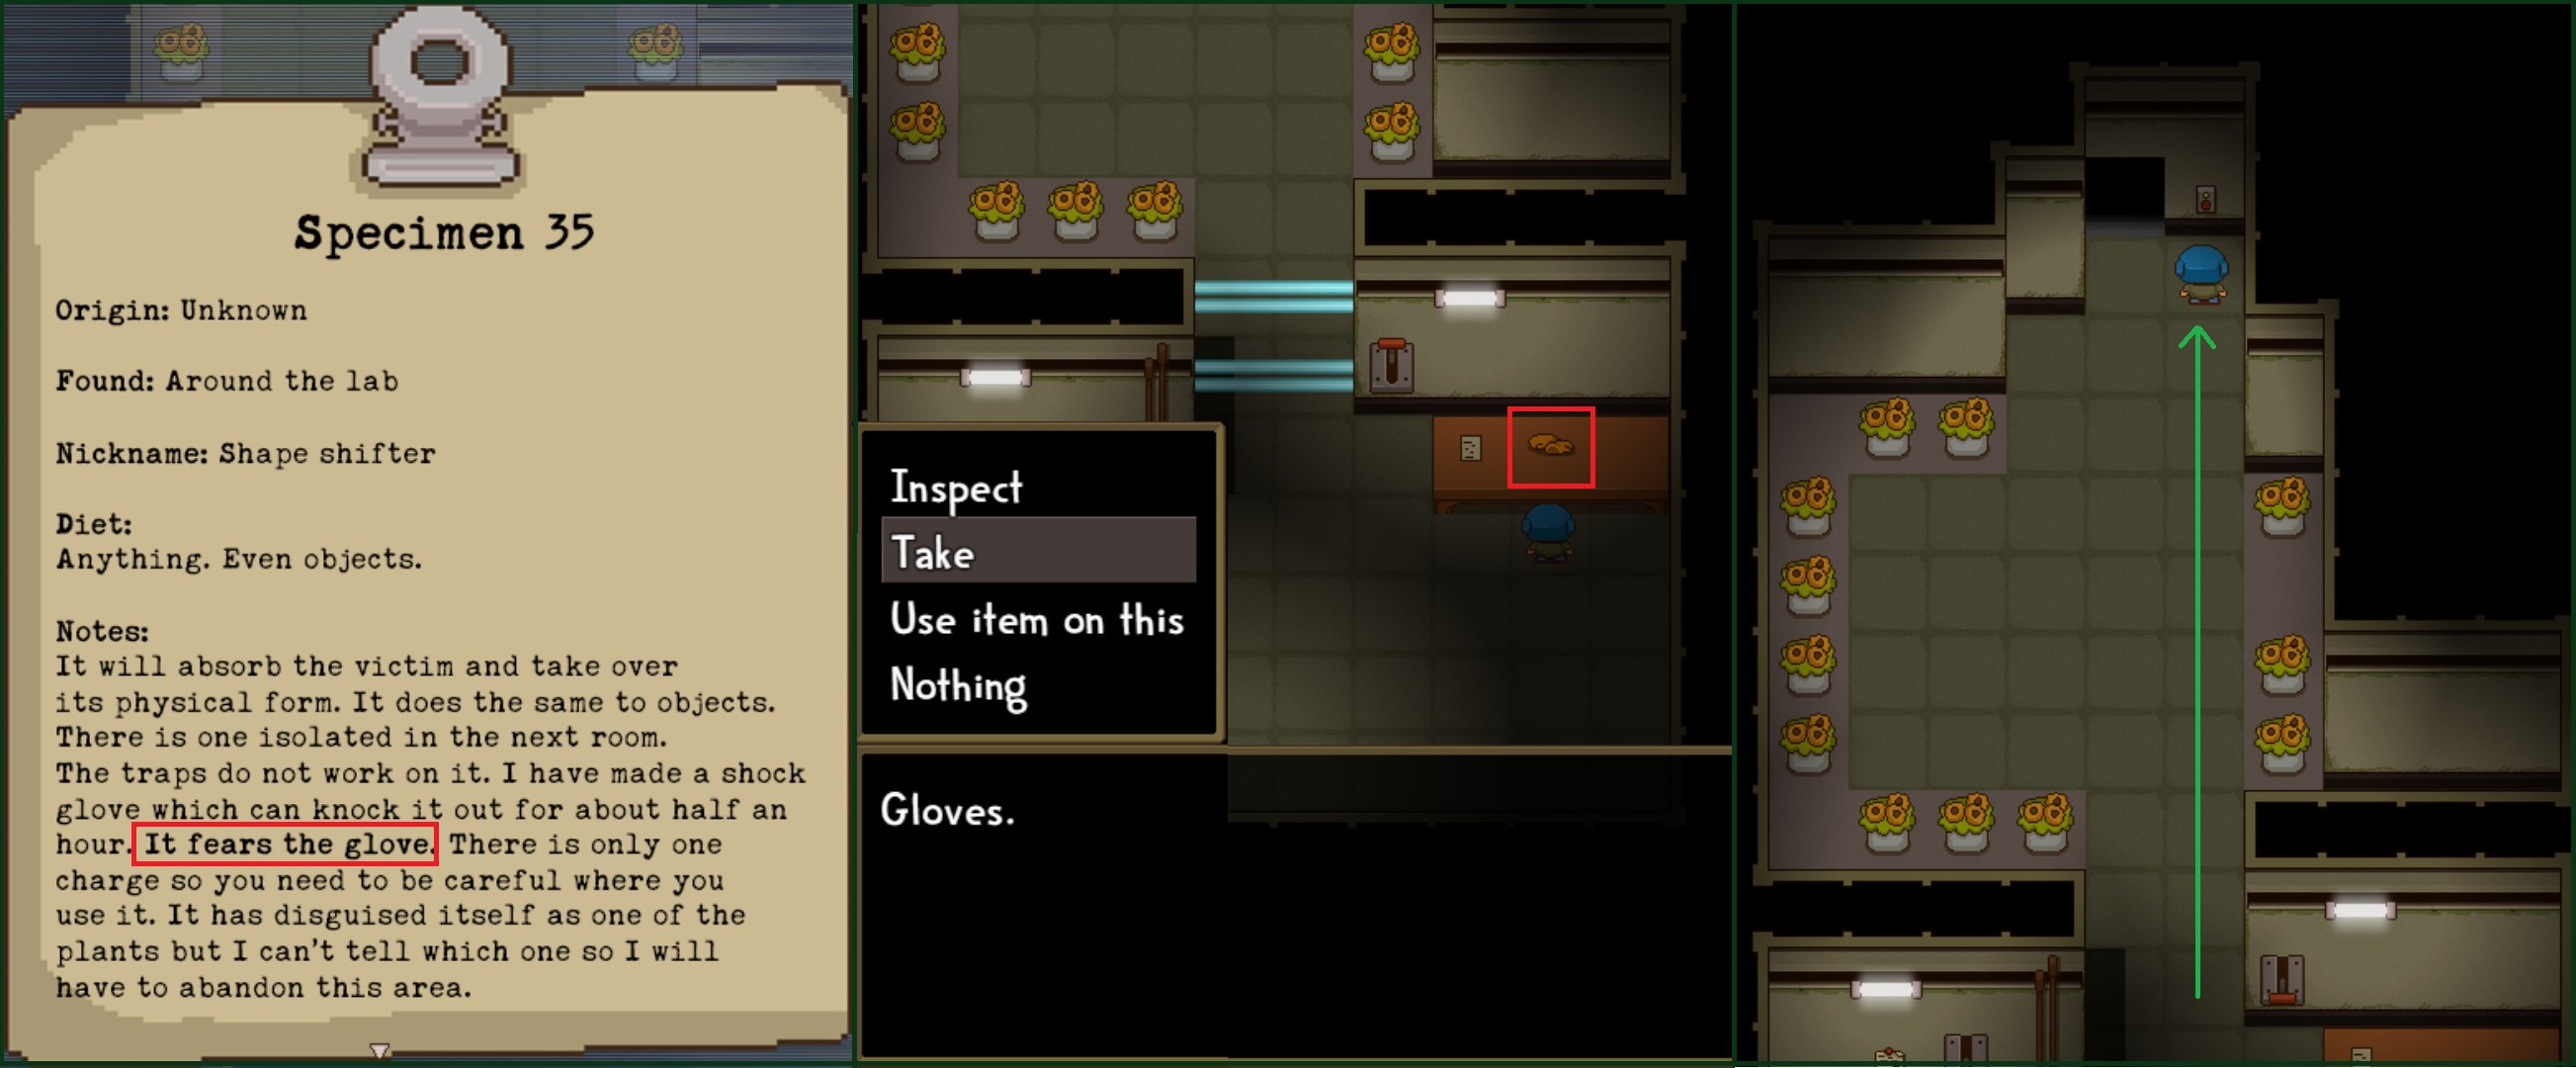
But the guide has some need for revision on Ending 12. Or at least an explanation sentence that it refers to the old ending 12 where the pictures were placed across the city (which I found better actually) and also different. I for one complained about the old ending 12 because it didnt feel as rewarding as the others. Mainly because I think I got lucky instead of coming to the logical solution.

Also the additional non-ending is something really interesting. Also shows that one can still discover stuff. Thankfs for the informations.