Starbound
450 voti
Skittles' Guide to Making your Own Race
Da DrPvtSkittles
I will guide you through the ins and outs of making a custom race in Starbound. W.I.P.
7
2
13
4
4
3
2
   
Premio
Aggiungi ai preferiti
Preferito
Rimuovi dai preferiti
Introduction
So you've decided to make your own race, and you don't know where to start. This guide aims to detail everything you need to know to get your race off the ground.

Currently a W.I.P. Please leave a comment for any topic you wish for me to touch on.


Put your race mod into your 'mods' folder when you are ready to test it.

This guide is current as of March 2025
!Important change to template!
The templates have been updated

objects\protectorate\objects\protectorateship.animation
Not needed. Should be removed.

Fixed the treasurepools.patch file
Removed the items that are found in the starter treasure, and replaced it with the line

{"pool" : "starterTreasure"},

This allows for other mods to tweak the vanilla starter treasure, and have it apply to the custom race.

I am sorry for aaaaaaaaaaaaaaaaaaaall of the race mods that have my error in them >_>

Thank you to RicoWan for pointing out and helping me fix this problem.

Removed some files from Basic
Removed boosterflame.animation and boosterflame.lua

They were removed the advanced template a long time ago but I forgot to remove them from basic.
Cheat Sheet
So you are confused as all hell and want me to give you the gist of it.

First, grab yourself a graphics program and a word editor.

Download the template of your choice and extract it (you can use https://www.7-zip.org/download.html ) into your mods folder.

Read the read me and do as instructed

Choose a name for your race. USE ONLY LOWERCASE (no capital letters) WHEN NAMING YOUR RACE IN THE BAT FILE.

You can find the sprites for your race humanoid\YOURRACENAME
Handy Dandy Programs
Good news! Starbound modding only requires any basic graphics editor (that can create transparent pixels and save in .png) and any text editor.

Free Graphic Programs:
GIMP[www.gimp.org]
paint dot NET[www.getpaint.net]
Libresprite[libresprite.github.io] - Cheers emeraldquark

Great Graphic Editor (if you are willing to spend $15)
Aseprite[www.aseprite.org] - Or you can compile for free from the open source code https://github.com/aseprite/aseprite

https://www.aseprite.org/older-versions/ - Cheers Azure Fang

Free Word Editors
Notepad++[notepad-plus-plus.org]
Atom[atom.io]
Sublime Text[sublimetext.com]

Browser Based Editors
Piskel[www.piskelapp.com]
Editpad[www.editpad.org]
Photopea[photopea.com]

File Compressing
PNGGauntlet[pnggauntlet.com] - Shrinks .png file sizes.
7Zip[www.7-zip.org] - To unpack and pack any file in general.
PAKit[pakit.ibraheemrodrigues.com] - To pak and unpak starbound mods. (Note, do not pak a mod if you are uploading it to steam, it will do it for you).

Free Audio Editor
Audacity[www.audacityteam.org]
Tenacity [tenacityaudio.org]

Making Gifs
ScreenToGif[www.screentogif.com]
The Template
I have currently created 2 templates for race making. One basic and one advanced.

Note objects\protectorate\objects\protectorateship.animation
Not needed. Should be removed.


Basic includes:[github.com]
S.A.I.L.
Respawn Cinematic
Teleport
Codex
Hair and Body parts
Interface
Outfits
Basic Sword
Ship and Ship assets
Recipes
Sfx Hurt sounds
Shiplocker Treasure Pool
Dialog
Npc stuff

Advanced includes[github.com]
All Tier armours - various races
Race Spawner
Custom ship pet - Fennix
Penguin Merchant (craft at inventors table)
A simple particle effect.
Hat with the effect added to it. (purchase at merchant)
Race Spawner (purchase at merchant)
Blank banners (purchase at merchant)
Basic furniture with your race's colony tag (purchase at merchant)
+All what is in the basic version

Stripped Back includes[github.com]
Hair and body parts
Interface
Shiplocker Treasure Pool
Dialog
NPC patches
Uses Glitch ship
Uses human respawn cinematic

Prefer Steam?
Basic
Advanced
Stripped Back

Prefer Chucklefish Forums?
Basic[community.playstarbound.com]
Advanced[community.playstarbound.com]
Stripped Back[community.playstarbound.com]

Prefer nexus mods?
Basic[www.nexusmods.com]
Advanced[www.nexusmods.com]
Stripped Back[www.nexusmods.com]

Sprite Templates
https://github.com/DrPvtSkittles/Skittles-Template-Goodies/releases/tag/starbound

Character Extender
You can't see your custom race without one. I prefer to use Kawa's xbawks-mode character [community.playstarbound.com]
Naming your race
For the purpose of this guide, I will stick to using the advanced template throughout. Once you have downloaded it from the website of your choice you will notice its in .7z format. This format compresses the file to a smaller size than standard .zip which is why I've chosen it. To extract this file you will need 7zip[www.7-zip.org], its free, open source and can open many different compressed files.

After extraction, place the folder in your 'mods' folder, that is located in your 'Starbound' folder.

Chucklefish doesn't like bat files:

To turn the ADVANCED_RACE_TEMPLATE_EASY_SETUP.txt into a bat file open it up in your word editor, go Save As, then Save As Type, change that to All Files. Then change the name to BASIC_RACE_TEMPLATE_EASY_SETUP.bat

Tada!

Now double click to run it.

Now double click on the file called ADVANCED_RACE_TEMPLATE_EASY_SETUP.bat
The .bat file (short for batch) is Windows only, and will not work for Linux and Mac users. You will need to source a program that will allow you to change 'skadvtest' to your race name.

Picking a name
The .bat file will ask you to choose a name longer than 3 characters. Bare in mind this name is NOT visible to the public, its for the use of Starbound, so it MUST be unique. Avoid using names like Mouse or Robot, that might be something someone else may pick. Since this name is not seen, you could pick the name 'asjuajdh', for the 'proper' then in game the race shows up as being called the Teletubbies.
Do NOT use uppercase (capital letters), spaces, or any character either than the standard a-z english alphabet. Not adhering to this standard may make your race not show up in character select.

For this example I will use the name 'myfirstrace'. After picking your name, press enter and wait for the .bat to finish.

Press any key or close the window.
Okay now let's really name the race
Where does my race name actually show?
Navigate to your species folder then myfirstrace.species *Note, when I use 'myfirstrace' in this guide you would go to the name you chose when you used the .bat. Also the text program featured in these
screenshots is Notepad++) .


As you can see, here we can choose what to put as a description, and where to name our race in character select.


Note: Write your name in uppercase as that is what the vanilla races use.

For this race, I will label them Cyclops, however the file name will remain as myfirstrace. This is to illustrate where you can put the "real" name of the race, vs where it needs to be its unique file name.
Dissecting the species file
This is the most important file in your race, and chances are, if your character icon in race select doesn't show, you've mucked up something here. (don't ask me why this happens :P I think its just a coding quirk)

"kind" : "myfirstrace", - this needs to be the name you used in the batch file.

"title" : "myfirstrace", - not sure where this shows, but it can be capitalized unlike "kind"

"subTitle" : "O2", - I think this is unused now

"description" : "Taste the rainbow!" -as shown above, it's the description of your race, in the character creator.

"nameGen" : [ "/species/myfirstracemalenamegen.config:names", "/species/myfirstracefemalenamegen.config:names" ], - the file(s) that will be used to generate your names

"ouchNoises" : [ "/sfx/humanoid/myfirstracehurt_male1.ogg", "/sfx/humanoid/myfirstracehurt_female1.ogg" ], - the location of the file your race uses when it takes damage

"charGenTextLabels" : [ "Eye colour", "Hair style", "Shirt", "Legwear", "Skin Colour", "Hair colour", "Shirt colour", "Legwear colour", "CYCLOPS", "Personality" ], - straight forward. Note that the race is always in UPPERCASE

"skull" : "/humanoid/myfirstrace/dead.png", - used when people play hardcore, its the death icon.

"effectDirectives" : "?replace=FEFFFFFF=FFFFFFFF?replace=9bd4ffFF=ffea63FF?replace=31a6ffFF=f5bc00FF", - the most over looked item here. The start of the beam up, and the end, the colour is defined here. Change the last colour value, the one before the question mark.

"defaultBlueprints" : { - This goes from Anvil to Special. These are the recipes that will be exclusive to your race. No other race can craft them. Unless you patch them into 'player.config.patch'.

Tricky Stuff
They MUST be written as they are, with the capitals where they stand. If included they have either a true or false value.

Back up your mod before tinkering with this, as your mod may not start with the wrong line included.

altColorAsFacialMaskSubColor
Avian. Needs “altOptionAsUndyColor” enabled. Makes the facial mask use the undy colour.

altOptionAsUndyColor
Apex, Floran, Glitch, Humans, Hylotl. The alternate slider changes the colour of the undies (red bits).

altOptionAsHairColor
Floran, Glitch and Hylotl. Needs “headOptionAsHairColor” enabled. The alternate slider changes the 'undy colour', commonly seen as the red colour on the sprites. It allows for the hair sprites to utilise the red/undy colour as an additional colour for the hair.

altOptionAsFacialMask
Avian. Alternate slider changes facial mask image.

bodyColorAsFacialMaskSubColor
Avian. Facial mask will use the colours listed in the body section of the specie file.

hairColorAsBodySubColor
Glitch, Hylotl. The body will use colours listed in the hair section of the specie file.

headOptionAsHairColor
Floran. Glitch. Humans, Hylotl. The head slider will change the hair colour. If this is not included, then the hair colour will use the same colour of the body.

headOptionAsFacialhair
Apex, Avians. The head slider changes 'facial hair'.

Genders
For simplicity I will just talk about the male (as I will just end up repeating myself).
"name" : "male", - I don't know if you can change the name of this, and I've not tried.
"image" : "/interface/title/myfirstracemaleico.png", - the image that represents the male gender in the character creator.
"characterImage" : "/interface/title/myfirstracemale.png", - the neat little portrait of your male race.
"hair" : [ "m0", "m1", "m2", "m3", "m4", "m5" ], - you can name your hairs whatever you want, they are listed here.
"shirt" : [ "myfirstraceoutfit1chest", "myfirstraceoutfit2chest", "myfirstraceoutfit3chest", "myfirstraceoutfit4chest" ], - the tops you can choose from in character select.
"pants" : [ "myfirstraceoutfit1legs", "myfirstraceoutfit2legs", "myfirstraceoutfit3legs", "myfirstraceoutfit4legs" ], - the pants you can choose from in character select.

"facialHairGroup" : "",
"facialHair" : [ ],
"facialMaskGroup" : "",
"facialMask" : [ ]

This is used by Apex and Avians for their beards n facial fluff. If you want to tinker with facial stuff, see the above with the 'Tricky stuff'. I encourage you to unpack the assets (see below) and check out the Avians and Apex to see how they work.

For information about 'bodyColor' hex codes and what not, see below.
Sprite Guide
Where to start?

Skittles' Template Goodies[community.playstarbound.com]

Download the .7z file on the first post. In it are .psd files AND .png files that should cover all of your race making and armour making needs.

Colour mapping

Note, colour highlight effect is not found in notepad++, I have made this in my image editor


I have highlighted what each colour each code is. The first colour is what is on the sprite, and the second colour is what it will be changed to.

Most graphic programs are able to give you the hex code for the colour you wish to use, if not you can use HTML Color Codes[htmlcolorcodes.com]

For this guide I will bring one of the rejected beta races to life.


That big eyed race looks fun!


Here is what the new head looks like after changing the colours to the same as the human's body palette.


In game. How fun!

Now lets unpack some assets before we get too stuck into things.
Unpacking the Assets
It is important as examining the vanilla races will help you learn how to make your race in the way you wish. For example if you wish for your race to glow you can study the Novakid's species file to see how its done.

"statusEffects" : [ "novakidglow" ],
"humanoidOverrides" : {
"bodyFullbright" : true
},

This video details how to unpack the assets.

The gist is that in your starbound folder save a file as a .bat with:

@ECHO OFF
ECHO STUFF
"G:\SteamLibrary\steamapps\common\Starbound\win32\asset_unpacker.exe" "G:\SteamLibrary\steamapps\common\Starbound\assets\packed.pak" "G:\SteamLibrary\steamapps\common\Starbound\assets\unpacked"
PAUSE

Replace the the directory location to where your files are.

The Ship
Sprites for the ship are found in 3 places.

cinematics/story/smallship - This is the ship as it escapes earth in the beginning.
objects\protectorate\objects\protectorateship - The ship you see and the end of the Protectorate Tutorial level.
ships\myfirstrace - Where your Tier 1 to Tier 8 sprites are.

For each Tier, there are 3 images for it.

myfirstraceT3blocks
This dictates the physical space and spawned items of the ship. (I have enlarged it here for clarity).


Each colour represents either a block or an object and this is defined in your blockKey.config. This coloured block map deelie is 1/8th the size of your ship. If we take a gander at the 4th thing in the blockkey that talks about the ship wall n locker and starter treasure.

"value" : [0, 255, 0, 255], that’s the colour, [red, green, blue and opacity].


"foregroundBlock" : false,
“backgroundBlock" : true,

I *think* this is stating whether or not this object or block will sit in the foreground, background or both. Tbh I don't know why both are listed, when I don't recall seeing any that has both as true or both as false.

"backgroundMat" : "apexshipwall", the material that will be in the background.

"flags" : [ "shipLockerPosition" ], Right now, I have no idea. Lol

"level" : 0.5, dunnno… ha.

"unbreakable" : true, can you break it, yay or nay?

"objectResidual" : true, dunno >_>

myfirstraceT3
The sprite of the ship


myfirstraceT3lit
The same sprite, however what ever is opaque will be darker than what is transparent.


For each Tier there is a structure file. This has crewsize, capabilities ("teleport", "planetTravel", "systemTravel") and what images are used.

Some important things to note, if you take a gander at how ships expand they always ADD to the current ship and NEVER replace anything. If you try it any other way you will muck things up.

I don't know why (although I have a theory) moving ship items around, when you think there’s space, will cause them to not show up. My theory is that while an item has a visual space, it has a usable space so if you put your chair too close to your ship fuel indicator, one of those wont show… but that is just a guess.
The Mech - [CREDIT]: Flypotato
"/recipes/mech/body" is the easiest to understand, works exactly like armour
"/items/generic/mechparts/body" is also the same as armours, except there's stuff in the files telling the game it's a mech.
"player.config.patch" decides your default mech
"/quests/outpost" has the quest that gives you the upgraded mech

Each vanilla race has a basic mech and an advanced mech. The quest "Test Drive" gives you the proto mech, and the quest "Advanced Test Drive" gives you a stronger version of the proto one.

"/vehicles" is where it gets a bit interesting, deep inside you'll find 6 images, 3 for each mech.

Each is a different layer:
back - Behind the player
front - In front of the player
fullbright - A neon layer that is visible in the dark

Each of these has 5 frames that forms the startup animation for when you hop in and out of the mech!

For example, in my [Flypotato] mod, the mech is a phone- when you hop in and out the handle hangs up!


Leftmost frame is when you're out of the mech, rightmost frame is when you're in.

You may be wondering, "why the ugly colours?". This is a hue shifting palette that works similar to armour palettes!

In the file "mechparts_body.config.patch" you'll find the variables that determines the default palettes.


Anyways, unlike armours... you don't get to choose each palette :( The game will always change the orange bits


Colour 1 is the orange bits, "defaultPrimaryColors"
Colour 2 is the yellow bits, "defaultSecondaryColors"


What's the best way to test your mech?

Good question!

Turn on admin mode by typing /admin then use the following commands:

/startquest '"mechunlock"'
/completequest mechunlock

This will start and complete unlocking the mech

/startquest '"mechupgrade2"'
/completequest mechupgrade2

This will start and complete unlocking the advanced mech

Then of course spawn these items to craft your mech parts, apply them to and launch your mech!

/spawnitem mechcraftingtable
/spawnitem mechassemblystation
/spawnitem mechplatform

Be sure to type /admin again to turn off admin mode, so you can see if non-admins have access to your mechs.
Adding multiple races to one mod
How you go about this is up to you

I recommend:
  • Make the races separately using their own templates. (Makes it easier to troubleshoot any issues.)
  • Back up all races before merging
  • Merge 1 race, then fix up the files listed below to have the extra race added
  • If merging another race, select 'no' when asked if you wish to overwrite files

Test your mod regularly after each merge, I cannot stress this enough :P

These files need to have all your races in them:

ai.config.patch [ai]
charcreation.config.patch [interface\windowconfig]
player.config.patch [in the main folder]
protectorateship.object.patch [objects\protectorate\objects\protectorateship]
quests.config.patch [quests]
shiplocker.treasurepools.patch [treasure]
universe_server.config.patch [in the main folder]
All .patch files in your dialog folder
What should I have done before my first release?
There are some things you should have in your mod before your first release, as adding/changing them later can be a bit of a pill.

PNGGauntlet[pnggauntlet.com] - A great program for compressing the file size of your .png files. I cannot stress how well this works, and I have had mods been halved in size.

The most important of all of these is the name that you chose in the .bat file. If you change that after your first release, then Starbound will see your update as a separate race to the previous version.

The ship. Changing this later can cause player's ships to muck up and become corrupted, unless its just a simple sprite change, and you aren't changing the physical structure of the ship.
Troubleshooting
Something is wrong! How do I fix it? First step is to check your log. You will find it in your Starbound folder, in 'storage'. There are 6 logs, the ones numbered 1-5 are older logs. The one we want is the non-numbered one on the top.


Open it up and do a word search for the word error, too easy!

Things to keep an eye peeled for

I can't see my race! - Do you have a character extender?[community.playstarbound.com]

My race's icon is missing! - Chances are this is not a problem with your icon or icon folder. Check your log, and try to take a look back at the last thing you have been working on before your icon disappeared. The most common problem is that you have used uppercase letters when naming your race using the bat file. Your file structure needs to look like Starbound\mods\YOURMOD. If you then put your mod into an additional folder, starbound will not be able to find things it needs to find. If this has not worked, it is possibly something you have done in your species file.

[Error] Application: exception thrown, shutting down: - That line is usually found at the bottom of the log, and it tends to be the culprit thats causing your game to crash.

[Error] Could not load recipe /recipes/anvil1/armor/tier1/myfancyclothing: (ItemException) No such item 'wovenfabric' - Oops, looks like your recipe lists an item that doesn't exist. Perhaps you meant 'fabric'.

[Error] Object myfancybed defined twice, second time from /objects/beds/myfancybed .object - Oops, two of your items have the same itemname. One must be changed.

[Error] Exception caught loading asset: /recipes/yummyfood/yumbikkie.recipe, (AssetException) Could not read JSON asset /recipes/yummyfood/yumbikkie.recipe
Caused by: (JsonParsingException) Error parsing json: bad array, should be ',' or ']' at 9:50
- This says in your recipe, at line 9, character 50 you have made a mistake and it should be a comma or bracket.

Check for those pesky commas
Go to objects\myfirstface\myfirstracemerchant\myfirstracemerchant.object
See the item list

"items" : [
{ "item" : ["bomb", 5] },
{ "item" : "myfirstracekittyhead" },
{ "item" : "myfirstracebannerlarge" },
{ "item" : "myfirstracebannersmall" },
{ "item" : "myfirstracewoodchair" },
{ "item" : "myfirstracewooddoor" },
{ "item" : "myfirstracewoodenbed" },
{ "item" : "myfirstracewoodendesk" },
{ "item" : "spawnermyfirstrace" }
]

See how the last item does NOT have a comma. This is important. If you add a comma there, your game will not start. If you remove a comma from one of the items above, your game will not start.

For more information see my guide on troubleshooting HERE
Uploading to Steam
Double click on Starbound in your games list.


Choose 'Launch Mod Uploader Tool'.

Press Select Mod Directory and navigate to where your mod is, and select that folder.

Replace the information seen here with your own. Do not fret if what you have put in your description isn't perfect, because stage 2 is where we will refine the mod listing.


Tick the boxes to the right that make sense for your mod. Select a preview image (icon) for your mod. This is the only place where you can do this.

Write a brief description if your mod. You can change this after you submit this, and before you make the mod public. From there you can:

Edit title & description
Add/edit images & videos
Add/remove Contributors (note, you need to be friends with the person)
Edit Link
Allow Comments

Delete

Add/Remove Required Items (add mods that your mod requires, for species this may be a character extender)
Add/Remove Required DLC (not useful for Starbound)
Change Visibility (this starts off as hidden, you can make this unlisted, friends-only or public)
Uploading Elsewhere
If you choose to upload your mod elsewhere, you will need to edit the metadata file manually.

This file is found in your mod's main folder. It is simply called metadata.

It should have:

{
"tags" : "Species",
"author" : "DrPvtSkittles",
"description" : "Advanced Template to create your own race.",
"friendlyName" : "Skittles Advanced Race Template",
"link" : "",
"name" : "Skittles Advanced Race Template",
"path" : ".",
"steamContentId" : "",
"version" : "1"
}

tags: this shouldn't need to be changed, as your mod should fall under species :P
author: your name
description: a brief description of your mod
friendlyName: name of your mod, it doesn't have to be unique.
link: usually the steam link of your mod. I am unsure if you can put any link there
name: this needs to be unique
path: i... don't know. ha
steamContentId: used by steam, each steam mod has its own unique number
version: you can put anything here, letters or numbers. I like to start mine at 0.1.

Typically you will need to zip or pak your mod before uploading. I prefer to zip, so other people can easily learn from my work (or god forbid I vanish from the modding scene and my mods won't be locked to a certain Starbound release). If you wish to pak your mod, I recommend using PAKit http://pakit.ibraheemrodrigues.com/ . Read their guide for more info.
Screenshots
You will want to take screenshots using .png as the jpeg artifacts really show up on pixel art.


Yuck!

In steam, go to 'Settings', then 'In-Game', then tick '[When a screenshot is taken] Save an uncompressed copy'. You will be prompted to choose a folder for screenshots (it will be different to where the others are kept). In this new folder .png versions will be saved.


Ahh much better!

"But Skittles, how can I insert pictures into my descriptions?" I hear you ask.

Lets grab some mods

Greenscreen Blocks Can make your life a little easier. Read the mod desc on information on how to use them.

Extra Zoom Levels So we can zoom all the way out to 1x.

While in Starbound, in the chat type
/admin (press enter)
/fullbright (press enter)
/spawnitem greenscreenblock 600 (press enter)

Build your green platform and take a screenshot (I prefer to use at x1 and resize later).


Open it up in your graphics editor and select the green colour and remove it.


Bamn!

Upload your image to your mod.

Click on the image in your showcase, then click on the bigger image to bring up the original file, then right click and do 'Copy image address'.


In the description of your mod paste the image link between [img][/img]

It will look similar to:
[img]https://steamuserimages-a.akamaihd.net/ugc/859487850037696280/BB95489682509B6538AD6692C9F41F440941A90B/[/img]

If you have copied the right link, it should show up as a nice little embedded image.

For examples check out
The Advanced Template

How about a gif?
ScreenToGif[www.screentogif.com]

Making a smaller or taller race
The woggles https://community.playstarbound.com/resources/woggles.5193/ https://www.dropbox.com/s/qgw4r3my02n6sp9/Woggles.zip are a smaller race.

In their species folder they have a custom config they use in place of the vanilla humanoid.config. It is enabled by having the line "humanoidConfig" : "/species/woggle.config", in their species file. The humanoid/woggle folder has custom frame files.

I haven't played around with making a smaller race myself so I can't go into detail about exactly what to do. My suggestion to you would be to start adding what I've listed, and tweak it.
Pesky Kitty Hat
There is a fun little kitty hat that I have included in the mod, as an introduction to stats and particles. However if you delete some bits that it uses, but not everything, you may find your mod crashing.

If you want to fully remove this hat and its contents you must remove the following folders:
animations
particles
stats
the kitty hat in the armors folder.

Assuming you haven't added anything into those folders yet, you should be able to just delete the whole folder as is :P
Other useful information
Here I will list resources that may not be about race making, however useful for any aspiring modder.

Racial Description Tool [community.playstarbound.com]

Unofficial Modding Ebook 2.0 SB v1.05 [community.playstarbound.com]

Lists of Block IDs that have been taken[starbounder.org]
Starbound Paint dot net palette. Copy contents into notepad and save as Starbound_Palette.txt [CREDIT] - Nebulox
; paint.net Palette File
; Lines that start with a semicolon are comments
; Colors are written as 8-digit hexadecimal numbers: aarrggbb
; For example, this would specify green: FF00FF00
; The alpha ('aa') value specifies how transparent a color is. FF is fully opaque, 00 is fully transparent.
; A palette must consist of ninety six (96) colors. If there are less than this, the remaining color
; slots will be set to white (FFFFFFFF). If there are more, then the remaining colors will be ignored.
FF151515
FF383838
FF555555
FF838383
FF303030
FF555555
FF808080
FFB5B5B5
FF373737
FF7B7B7B
FFB6B6B6
FFE6E6E6
FF601119
FF932625
FFD93A3A
FFF4988C
FF6E2900
FFAF4E00
FFEA9931
FFFFD495
FF642F00
FFA46E06
FFE2C344
FFFFFFA7
FF144216
FF247824
FF51BD3B
FFB2E89D
FF1A1C51
FF344495
FF5588D4
FF96CBE7
FF320C40
FF6A2284
FFA451C4
FFD29CE7
FF59163F
FF97276D
FFD35EAE
FFEAB3DB
FF472B13
FF754C23
FFA47844
FFCCAE7C
FF383838
FF616161
FF9E9E9E
FFCCCCCC
FF24232F
FF3D3D51
FF676F83
FF9DA8AF
FF1B4C2A
FF48832F
FF9BBA3D
FFD1E160
FF233C43
FF30636C
FF4FACB2
FFA8E6E2
FFDA5302
FFFD8F4D
FFFDD14D
FFFFFFFF
FF251C0B
FF463818
FF6D6330
FF897C4C
FF6F2919
FFA85636
FFE0975C
FFFFCA8A
FF5D4F34
FF8D7B58
FFBCAD80
FFE7DFBD
FF008CD9
FF60B8EA
FFFFFFFF
FFFFFFFF
FF36261E
FF513A2D
FF714F3C
FF976750
FF342804
FF6B5509
FF9B7E14
FFC0AB5E
FF2A2722
FF474239
FF625C4F
FF8B826F
FF6600D8
FFA04BFF
FFFFFFFF
FFFFFFFF

Starbound Swatches
In both .aco (for photoshop) and .ase (for other adobe products)

https://community.playstarbound.com/attachments/starbound-color-swatches-7z.216790/
To do
This guide is very W.I.P. What is here should be enough to get you started. Please comment below and let me know what needs to be added to this mod.


To expand on
mask.png for head items determines what hair/facial bits will be seen or hidden. Full opacity for showing all, zero opacity to hide.
642 commenti
Freian Of Void 6 ore fa 
Update: Nvm, I figured it out
Freian Of Void 13 ore fa 
So I've made great progress on my mod, but I've run into some parts I may need help on. For instance, race specific SAIL dialog (not sure how to replace the text only when playing the race), but most importantly, tiles.

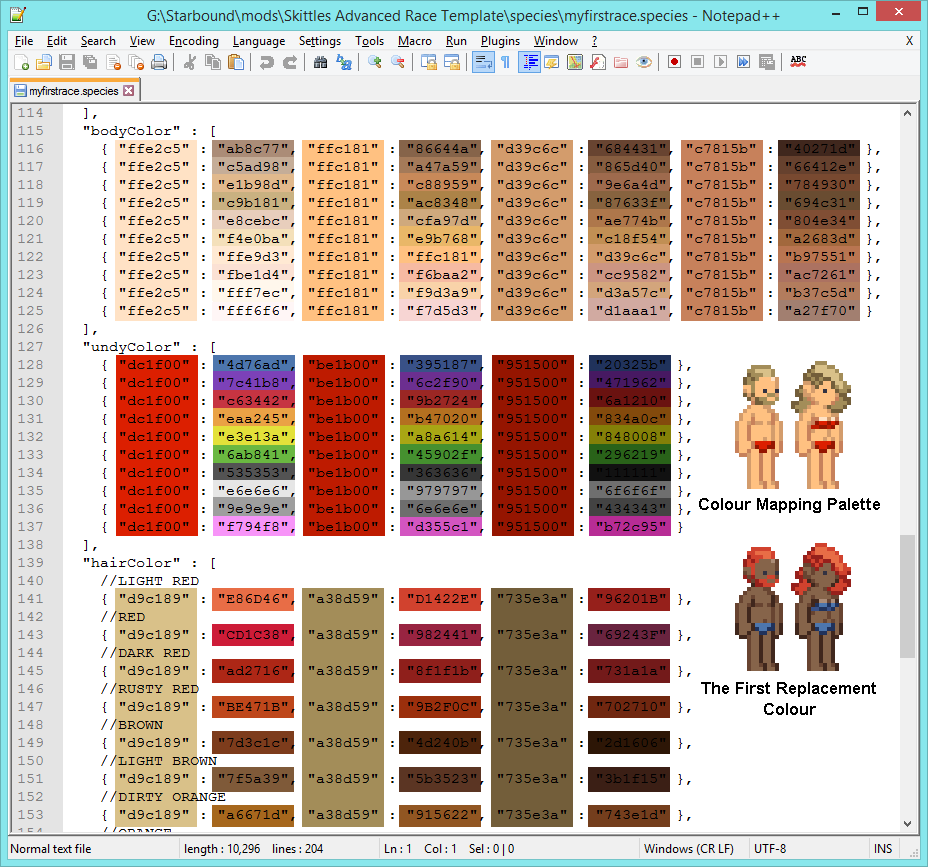
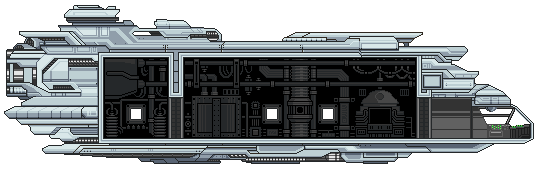
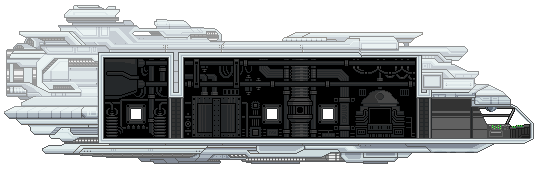
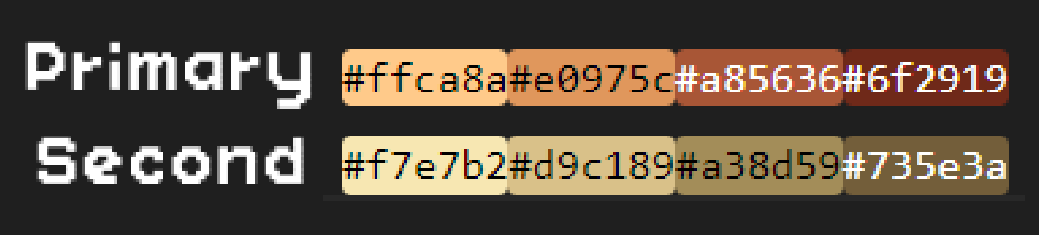
So far tile set up and tilesets are the wall I've hit that I need a bit of help on. Reason I mention this is because I've included a custom tile color in the block PNGs for the ship. May I get some assistance on setting that up? An addition to the guide or maybe an example file with explanations of what some lines do in the tilesets folder? or anything like that really.
DrPvtSkittles  [autore] 20 apr, ore 7:07 
@Croissant man
xD It sure does!
Croissant man 19 apr, ore 13:47 
woha skittle this has alot of stuff in it
DrPvtSkittles  [autore] 27 mar, ore 18:16 
TheGameSquad 27 mar, ore 16:57 
how do you add race stats and mechanics for mods such as Frackin Universe?
DrPvtSkittles  [autore] 25 mar, ore 3:30 
I've released a new race template! Skittles Stripped Back Race Template https://steamcommunity.com/sharedfiles/filedetails/?id=3451708529


This has been designed for people who may wish to implement a non-playable race that doesn't need all the bells n whistles.
DrPvtSkittles  [autore] 11 feb, ore 1:28 
Sweet!
duketired 10 feb, ore 12:20 
nvm i think i got it
duketired 10 feb, ore 12:14 
im trying to make it so that the undycolor actually uses 4 colours instead of just the first 3 because when i added an extra 2 columns it only "read" the first 3 ingame and used the colourmapping colour for the 4th undycolor