XCOM 2
48 ratings
How To Get Great Voice Pack Clips From TV and Movies
By nintendoeats
A collection of tips for using Audacity to remove music, background noise, and other not-voice stuff from audio clips obtained from messy sources.
2
   
Award
Favorite
Favorited
Unfavorite
Introduction
Using samples recorded for use in video games to make a voice pack is easy. Aside from possibly applying a radio effect or cutting out a bit you don’t like, the files come ready to go. Not so with movies and TV shows. The lines you want will frequently contain music or background noise that has to be worked around. Further, TV shows often have very inconsistent recording quality meaning that two clips for the same character will sound like they were spoken into two different microphones...because they were...

When I initially started my Top Gear voice packs I clipped things out and would just work around the noises. I applied vocal isolation with one setting on all files and rejected anything that didn’t come out properly. As I went on, I became frustrated with having to sacrifice good lines and started going through each file individually to remove unacceptable noises and create more consistency in audio quality. After getting used to the key tools for this work in Audacity I can average about 30 seconds per file. Combined with my new faster method of creating voice packs, building the James May voice pack took a fraction of the time required to create the original version of the Jeremy Clarkson voice pack, which was also much lower quality. I wanted to share what I’ve learned in the hopes of accelerating the learning process for others and encouraging high quality clips in voice packs.

For an example of what we are doing here, listen to how well a file can be cleaned up. This unusable clip[www.dropbox.com] was turned into this good one[www.dropbox.com] in a few easy steps.

Since cleaning up files is real audio engineering, I’m starting with a section on audio theory. You don’t absolutely need it, but the rest of this guide will make a lot more sense if you understand how a WAV file is constructed and what all the tools really do. In the rest of the guide I will be assuming that you have read at least the last paragraph of that section. I'm also assuming that you are an intelligent person and don't need detailed instructions for every single little thing. If you have never used Audacity before, there is a detailed Wiki which is a good place to find out about the interface and basic functions.

P.S. This guide is long and in-depth because it is about how to get great clips. If you just want passable ones, all I can suggest is batch applying VRI with strength 5-10.
Understanding Digital Audio
Audio is nothing more than changes in air pressure. The faster the air pressure goes up and down, the higher the pitch we perceive (frequency, measured in Hz [hertz]). The higher and lower the air pressure goes before changing direction, the louder the sound we perceive (amplitude, measured in dB [decibels]). Everything we need to know about audio can be stored in a “waveform”, a wibbly-wobbly line representing air pressure. When a speaker plays a sound, it is merely moving in and out as dictated by an electrical signal along a wire. By moving in and out the speaker moves air, varying air pressure and creating sounds. This is why you need bigger speakers to cleanly create loud sounds: they can physically move more air.

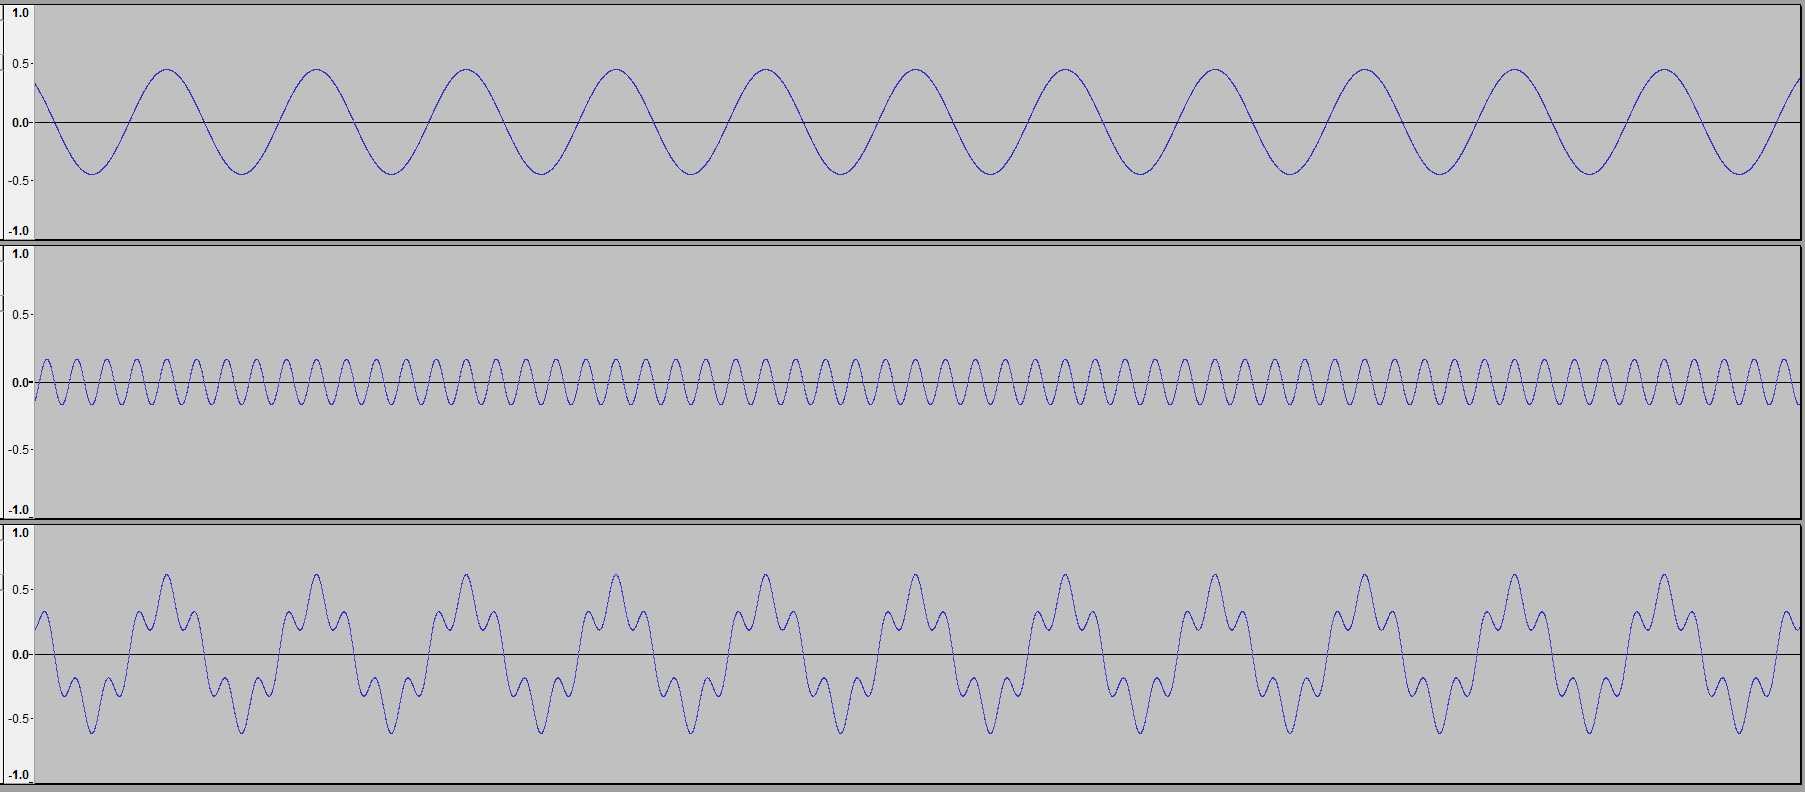
Below are two different pure frequencies with different amplitudes. We know that they are different frequencies because one goes up and down faster than the other. We know that they are different amplitudes because one goes higher and lower than the other. The third track is what happens when you add them together.


Nothing in nature produces only a single frequency. Instead, things produce hundreds of frequencies of different amplitudes, added together as seen above. Using very complicated mathematics we can identify, separate out, and modify the amplitude of different frequencies within a single “sound”.

WAV files are raw audio data, and that’s what you are working on even if you import a FLAC or MP3. If you zoom in on a file in Audacity you will eventually see little dots connected by curves. Each dot is a sample, the level of air pressure that we expect a speaker to create at that moment in time. A WAV file is just a series of samples. Audacity, and any playback software, connects the dots to create a waveform. When you play the file, a Digital-to-Analog Converter (DAC) chip turns the digital waveform created from the samples into an electrical signal which gets sent to the speakers.

Below is 0.001 seconds of audio. Each dot is a sample. The overall shape is a waveform. Remember that each sample represents a level of air pressure. It is only when there is a change in air pressure that a sound is created.


In the uncompressed digital realm, each file has two fundamental attributes:

Sample Rate is how many times a second the computer is storing a data point for the waveform. In order to reliably store a particular frequency, you need to take a sample twice as often. For example, in order to store 10 KHz (the upper limit required to effectively capture human speech), your digital file must have a sample rate of 20 KHz. This is because a frequency of 11KHz can go up and down again before the computer takes another sample, thereby being lost completely. A human being with the absolute best hearing possible can’t hear anything above 22 KHz, and most adults top out around 18 KHz. This is why CD Audio is stored at 44.1 KHz. The important takeaway is that the highest pitched sound you can store is limited by a project’s sample rate.

Bit Depth is how many bits are used to store a single sample. This defines the maximum dynamic range of a file, the difference between the lowest amplitude (quietest) frequency and the highest amplitude (loudest) one. If you only have a bit depth of 1, then you only have a choice between “loud” or “silent” at any particular sample. Every frequency in the file would have the same volume. As you add bits, you can differentiate frequencies more. Humans cannot perceive anything 80dB quieter than the loudest sound that they are hearing. CD Audio has a bit depth of 16, giving a maximum dynamic range of 96dB. Any frequency 96dB quieter than the loudest frequency in the file will be lost. You aren’t storing the file’s overall loudness: that is determined by the end user playing with a volume knob. The important takeaway is that quietest sound you can store is limited by a project’s bit depth.

The thing you need to know is this:
When you try to clean an audio file, what you are really doing is changing the amplitudes of different frequencies. Audacity has several good tools for doing this, but there are limitations. If Minnie Riperton is talking over a bassoon you’ll find it very easy to separate the two things because they have very different frequency ranges. If the bassoon is much louder however, you will start to lose detail in Minnie’s voice because small changes in amplitude weren’t in the file to begin with. The dynamic range capabilities of the file were used up storing the difference between her voice and the bassoon, not the difference between components of her speech. If there is also a flute present then you are in real trouble, because that will be creating many of the same frequencies as Minnie. There is no simple way to determine how much of a given frequency’s amplitude is from the flute and how much is from Riperton’s voice. All of this is compounded by the fact that humans are incredibly sensitive to subtle changes in the 1-6KHz range where we find most of human speech.


The famous Fletcher-Munson curves above show the amplitude that a frequency needs to have in order to sound equally loud to a human. Note that low frequencies need to be quite loud to sound the same as those in the human speech range. Phons are a unit for measuring perceived loudness by humans, dB is a unit for measuring true amplitude.
What Listening Equipment Should I Use?
If you don’t have speakers or headphones that are reasonably clear and neutral (so not Beats headphones or laptop speakers of any kind), you are going to miss stuff or reject clips that are actually fine. If you are committed enough to actually buy headphones for this purpose, AKG K240s are a reasonably priced option, AKG K702s are a pricey option and Etymotic ER4s are a really quite expensive but oh so nice option. On the plus side, those are all great headphones for listening to music. I’m not saying that you can’t do a good job with whatever you have around, unless whatever you have around is laptop speakers. Just know that what you are doing here is full-on audio engineering, and studios buy equipment like the above for a reason.

Conventional wisdom is that you don’t mix with headphones because the shape of your head will alter the sound. Conventional wisdom comes from well-funded professionals who neglect the fact that people need to work with the resources they have. Anyway, we are more interested in catching background details than hearing the subtlties of an overall mix, so headphones make a lot of sense here. They can also make it very obvious that a sound is only in one channel and is therefore a good candidate for removal by VRI. If you have good speakers and rubbish headphones, use the speakers. Headphones are overall better IRL, IMO. YMMV.
Setting Up
When I want to take audio clips out of a video, I first convert it to FLAC using Any Video Converter. Lossy compression formats like MP3 save space by removing frequencies which humans won’t be able to hear over other ones. This works really well for regular listening as long as a modern algorithm was used, but we are actually going to need all of that hidden information because some of it is voice data we want to save. As such, we need to extract the audio to something lossless (you could also do WAV, but that will create a gigantic file for no reason). Of course, the audio you are working with may already have been lossily compressed when the video was published, but there is nothing you can do about that. Compressing it again will only make things worse.

The techniques that I am going to show you assume that you are working in stereo, but 5.1 tracks can potentially create much better results (even if you are working with stereo speakers). Often speech will already be alone in the center channel, and even when it isn’t there will be less extraneous sound that needs removing because most of the music and noise will be in the side and rear channels. Unfortunately Audacity doesn’t want to know about anything above stereo sound, so its up to you to work out which channel is which once the file is imported. The work I’ve done has almost all been from stereo sources, but if I find anything useful about 5.1 in the future I will update this guide. AVC assumes that you want FLAC to be stereo, so you have to manually tell it to do surround under "audio options".

Once you have your audio file, drop it into Audacity. Make the window as wide as possible (I have 3 monitors and I use all of them for this) and stretch the tracks vertically to fill the work space. Assign “export selection as WAV” to a hotkey combination that makes sense to you. I use CTRL+Shift+E.
Building a Radio Effect
NOTE: New versions of Audacity have replaced chains with macros. I do not have time to update this section, this is just an FYI that you now need to use macros to do the same thing.

Some people don’t want a radio effect on their voice packs, but if you are trying to clean audio from a video you don’t really have a choice. Very few of the clips you get are going to sound perfect, but applying a uniform radio effect covers up both imperfections and variations between files. It’s best to set your radio effect up before you start hunting for files, because when you are unsure if a clip is clean enough you can apply your radio chain and tell right away if it is going to work.

To make a new effects chain in Audacity, go to File -> Edit Chains, then click Add.

Your radio chain needs to do 5 things:
  1. Remove the upper and lower frequencies, making the sound tinnier.
  2. Normalize the volume of the file so that it it won’t be louder or quieter than the base voices.
  3. Create clipping, making it sound like somebody is talking into a microphone close to their face. (optional)
  4. Convert the file to mono
  5. Save the file as a WAV


Here is how we achieve those things:

1. Apply a HighPassFilter and LowPassFilter, each with a 48dB rolloff (any frequency being filtered out will have its amplitude dropped by 48dB, which is a whole big bunch). The high pass filter will allow frequencies higher than the threshold through, the low pass filter will allow frequencies lower than the threshold through. I use values of 150Hz and 10KHz respectively.

2. Apply the Normalize effect. This looks at the whole clip and amplifies it until the loudest parts are at the normalization threshold. If you are skipping #3, normalize to -6dB (this seems to be the volume that the base voices are set to). Otherwise, normalize to 0dB because that’s what we need to create clipping.

3. Apply the Equalization effect. Select the draw type EQ and make something that goes above 0dB between 600Hz and 8KHz. The wider the area above 0dB, the more often the file will clip. The higher above 0dB this area is, the more often and aggressively the file will clip. Try to enter the clipping area gradually, since that will sound more natural. You may also wish to add some additional high and low end rolloff.

4. Apply the StereoToMono effect. If you did #3, apply the Amplify effect with a value of -6dB. If not, apply normalization to -6dB again just to be sure. ***

5. Apply the ExportWAV effect. When batch processing, this will save each file in a subfolder called “cleaned”.

*** I have changed my method of doing this. Audacity actually tries to repair the clipping if you do everything in one project. Also, the built in normalization function is the "peak" type, which isn't always the best. I've now switched to the RMS Normalization plugin[forum.audacityteam.org] which more closely models actual perceived volume. Peak normalization is still better for creating clipping because you KNOW that something, but not everything, is at 0.

I created a seperate RMS Normalization chain which I run with a level of -15 on the files after the radio effect is applied. You actually need to apply the final normalization seperately because otherwise Audacity will automatically undo the clipping.

Clipping Theory (If You Are Interested)
Remember that bit about bit depth above? Well, lets say that we have a sample named Susan, which is already at the highest amplitude level possible in 16 bit audio, 32767. That level is called 0dB, and anything quieter is called minus some number of dB. You may have noticed on your stereo that volume is always a negative number which gets closer to 0 as you make things louder. In this context, 0dB means the point above which clipping will occur. Normally you want to avoid turning anything up that high.

Back to Susan. What happens if we increase the amplitude of one of the frequencies she represents by 1 level? We can make the sample to the left louder, and we can make the sample to the right louder, but Susan is already as loud as she can be. What was a smooth peak becomes a plateau since now both she and her friends have the same level, 32767. This is called “digital clipping”. It is essentially the same as somebody talking too loudly into a microphone, “analog clipping”.

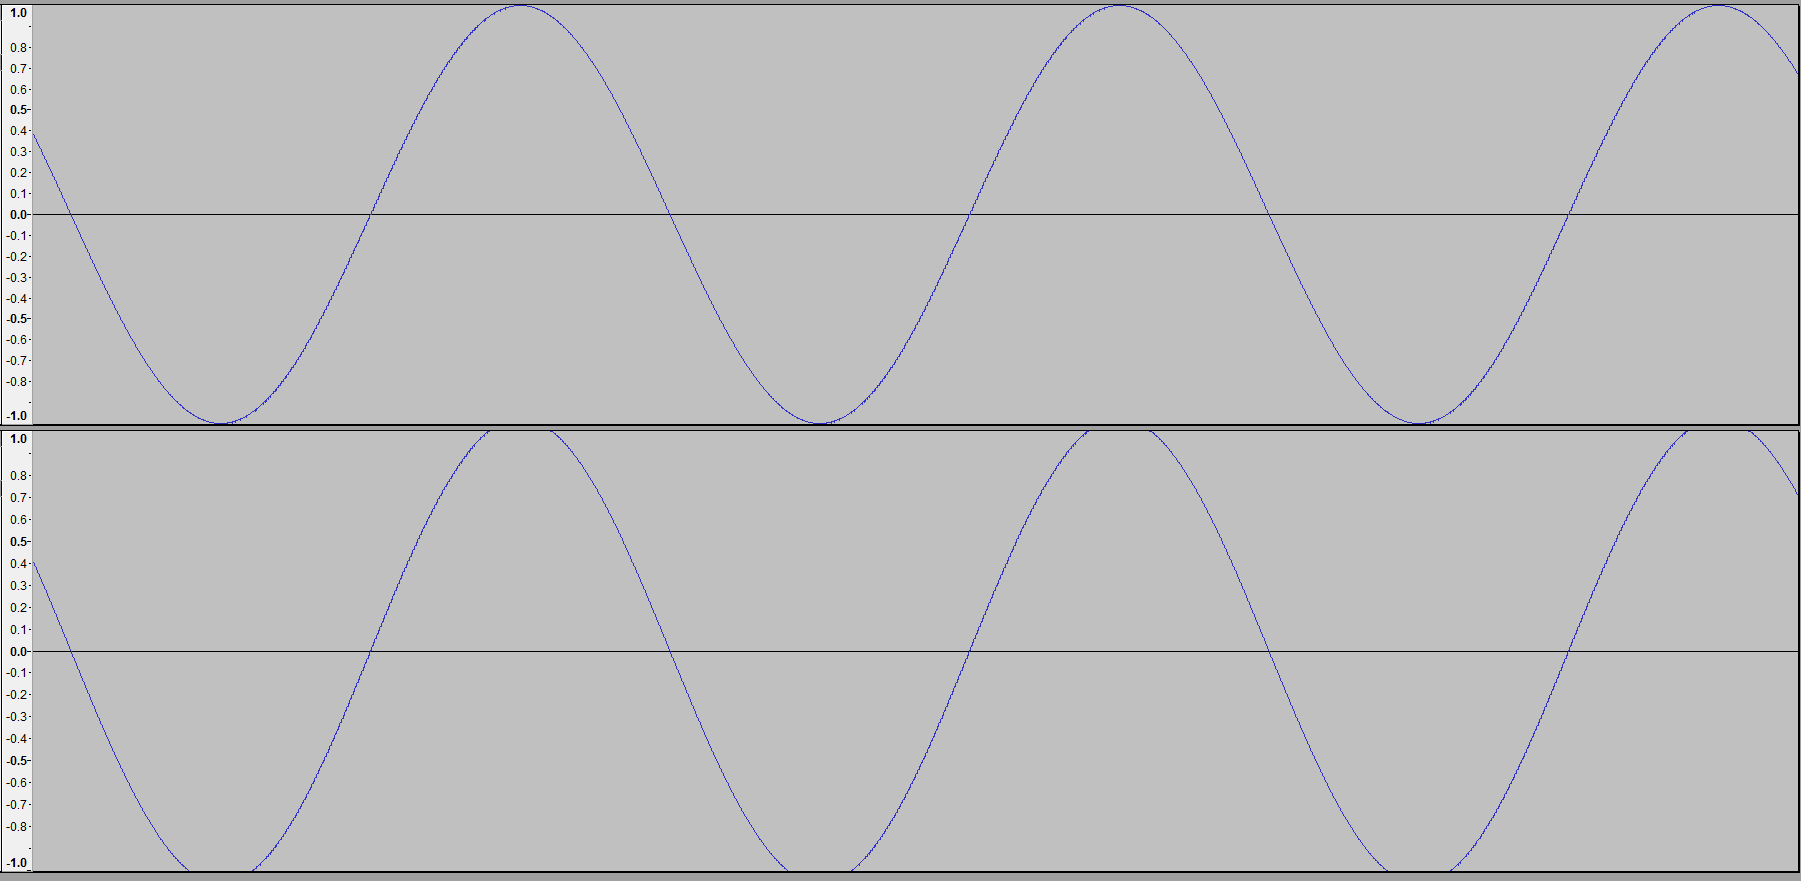
In the image below, the first track is a frequency normalized to 0dB. Susan is at the peak of the waveform. The second track is the same frequency amplified by just 0.5dB. Susan can't go any higher, so the peaks become "clipped". In fact even 0.01dB of amplification would cause this, but the clipping would be so minor that you would have to zoom all the way in to see it. You CERTAINLY wouldn't ever be able to hear it.


With that in mind, lets analyze what we are doing in step #3. We normalize the file to 0dB, guaranteeing that at least one sample is as loud as is posible. Then we apply a EQ curve which says “if a sound is in this frequency range, make it louder”. If any of the frequencies this applies to are already at or near 0dB, the EQ will push them over 0dB and create clipping. A radio mic is very sensitive to the frequencies of human speech but not very sensitive to higher and lower pitched sounds, so it makes sense that we are only forcing clipping on that range of frequencies. This can also draw further attention to the vocals we want people to notice and away from the background noise that we don’t.

The reason we have to add -6dB of amplification in step #4 is that when we normalized to 0dB we made the file too loud to match XCOM’s base voices. -6dB brings the file back to where it should be but leaves the clipping intact. We do this after the downmix to mono because then we are in no doubt that it is at the right level. The only reason we use amplify instead of normalize is that Audacity tends to remove the clipping with normalize, possibly because internally it converts everything to 32 bit.
The Process
Now the fun part: listen to the whole thing and stop every time you hear a line that you like. Apply the techniques below to it and export each selection to a new WAV file when you are happy. Remember not to use any spaces in the file names, UDK won't accept them.

VRI and NR are your big guns, but not every clip needs them. There is also no hard and fast rule on the order to apply things, that decision requires judgment which you will develop as you learn how to use the effects. I will usually use VRI first if it is required, then NR, then one of the EQ curves I have created. That’s only a very general rule, but if you want to start with a consistent process that’s the one.

You want to use as few effects as possible. If something you did doesn't seem to have made a difference, CTRL + Z and try something else. Every time you modify your waveform you remove a little bit more of the original information.

If you aren’t sure if something is clean enough, apply your radio chain to the clip to hear what it will ultimately sound like. Don’t save it with the chain applied though, you will just be making life difficult for yourself later. If you still aren't sure, try playing some music a half volume while you listen to the track. That better represents how the clip will be heard in-game

When you have all of your clips, open a new Audacity window and go to File -> Apply Chain -> Radio Chain -> Apply To Files. Select all of the clips you just made and let Audacity do its thing. It will probably look like it has crashed, but if you open the “cleaned” folder you will see it is still adding files. I’d leave my computer alone while it does this. Do the same thing with your normalization chain as mentioned in the radio effect section.

At this point you should really down-sample your files to 22050KHz. This will cut the RAM and storage requirements of your pack in half. For some reason Audacity doesn’t have a tool to do this, so I use Foobar 2000. Whatever audio management software you use, the internet should tell you how to convert your files to down-sampled WAVs. In the end you should have 3 of each clip: original, radio effect, down-sampled radio effect.

Your done! Drag the down-sampled files into your mod package in the UDK. If you don’t move them you can right click any Sound Wave in UDK and click “Re-Import” to load any changes. If you do move them, you can do the same thing by dragging and dropping the files over the old ones in UDK, clicking OK To All and then holding down the enter key until it finishes.

Now use my other guide to construct voice packs efficiently using tags!
Vocal Reduction and Isolation (VRI)
This effect does two things. For one, it applies high and low pass filters, which you may or may not want to turn off and do separately. The meat of this effect is the stereo sound analysis. In general, vocals in both music and video appear equally in both the left and right speaker so that we will perceive them as being right in front of us. Instruments and background sounds are made less prominent by emphasizing them in the left or right speaker. If you select the “Isolate Vocals” setting, Audacity will look for frequencies which are louder in one channel and take them out. The hope is that what remains will just be voice.

VRI is the most dramatic setting you have access to, and is also the reason you want to work from a stereo source. It can take something totally unusable and in a single click create a fairly clean file. The strength setting is the only thing you need to play with here, and something like 6 will usually remove the sounds you want it to. If it does, but there is still some residue of those sounds left, play with the 2-4 range. If it isn’t getting what you want, you can sometimes get it with settings from 8-15. Always use as little as possible, because this is basically the nuclear option and it can easily start to chip away at your voice data.

In general, you probably want to do VRI before anything else, Every other effect is just going to make the stereo tracks more similar to each other. I would say that when I use VRI, it is my first step 90% of the time.

Since VRI only removes sounds, you will need to use normalize to bring the file back up to usable volumes afterwards. If you use 5 or more there is a good chance that the voice will be virtually inaudible until you normalize it.

As an example of how powerful VRI can be, compare this dirty clip[www.dropbox.com] and this clean clip[www.dropbox.com]. It's not the absolute best clip I've gotten from VRI, but I want to show you how dramatic the effects can be.

Noise Reduction (NR)
This is a two-stage effect. First, it analyses a section of audio which just contains the noise you want to remove. Then, it uses that information to find the same noise in another section and remove it. Basically, it identifies the frequencies and amplitudes of the unwanted sounds, then tries to remove them. “Noise” can mean pretty much anything as long as the sound is consistent. An engine cruising will clean up very well, but if it is accelerating then the pitch will change and you will have trouble removing it.

To use NR, first find the longest section you can which only contains the noise you want to eliminate. 0.05 of a second is enough but more is usually better. If at all possible it should only contain the sound you want to get rid of. If you catch even a tiny bit of the voice in your sample you could wind up taking out all of the bits where the person makes that sound. Below you can see the sort of area you are looking for. I've actually selected far more than I need here.


If you simply don't have enough, you can try duplicating the section you do have (CTRL+D) and then copy-pasting the new track until you get what you need. If the noise really is consistent this works perfectly fine.

Once you have a sample selected, open the Noise Reduction panel and click “Get Noise Profile.”

Select the clip you want to clean up and open the Noise Reduction panel again. I just leave Frequency smoothing on 12, but you will be messing with the other two settings constantly. The Preview button is your friend. I usually start with 25/3 and work from there.

Noise reduction (dB): How much Audacity will reduce the amplitude of anything it detects as noise. Sometimes this needs to be 5, sometimes it needs to be 50. Use as much as you need to, but use as little as possible. If some of the frequencies in the noise are also in the voice of the person speaking you are going to make some parts of their speech very quiet if you aren’t careful with this setting. Note that you will need to use quite a bit more on higher frequencies because humans are more sensitive to them (refer to the Fletcher-Munson curves above).

Sensitivity: How liberal Audacity will be about calling something noise. If the noise varies a little bit from your sample, turn this up. If you hear the noise popping back in when the person is talking, turn this up. If you are starting to remove parts of the person’s speech, turn this down.

NR is the reason that it is better to clean your clips right in the file you got them from. You are much more likely to be able to find a good noise sample if you have the whole scene to play with than if you just have the bit you actually want to use. I know this from painful experience.

Remember, you may have more than one type of noise you want to remove. Nothing stops you from going through this process for each type of noise individually.

Your noise sample doesn't have to come from the file you are working on. If you found similar-ish noise somewhere else, you can try that profile on your clip.

Sometimes after applying NR there will still be some residue in the space you sampled from. This is a component of the noise that Audacity didn't pick up on before, but it can now. If you sample it again you can often get rid of a bit more noise from the rest of the file.

NR can sometimes be used to reduce the echo on somebodies voice by capturing a section of just reverb. The echo will always be slightly lower frequency than the main voice, so the two things can often be seperated.

Listen to this dirty clip[www.dropbox.com] and this clean clip[www.dropbox.com] for an example of background noise which was too similar in frequency to the speaker's voice. Note how the syllables quickly fade in and out as his pitch changes. Compression in the source file adds to this effect, since it discarded information about the speech component which was masked by the much louder jet engines. Eliminating noise without getting this effect is the main reason you have to vary those sliders so much. I'd say this clip is on the edge of usability.

Sometimes the compressor can save a clip like the one above, since it the louder speech components closer to the quiet ones. In this the background noise makes that unlikely to work without a great deal of fiddling and multiple passes.
Equalization (EQ)
The daddy of all effects. Equalization curves allow you to isolate frequencies and make them louder or quieter. If you have ever played with the bass and treble on a stereo, you were adjusting a very basic equalizer.

I like to create and save a few curves for each person I work on. The idea is to identify what range contains most of their speech and roll off everything else. I create more than one because sometimes I need to be more aggressive than others. I apply at least one to evry single file, since that helps improve the consistency of the pack.

EQ can be used to:
  • Make somebody sound less tinny by upping the lower range of their voice slightly.
  • Make somebody sound less boomy by lowering the lower range of their vice slightly.
  • Create a “notch filter”. If there is a nuisance sound in narrow frequency range, create a level curve and then drop just those frequencies by 50dB.
  • Reduce echo effects.
  • If you are prepared to spent a lot of time on customizing a curve, restore voice data lost from using VRI or NR.
  • Many many other things.

To me the equalization panel becomes intuitive very quickly, but here are a few things to consider:
  • I prefer the draw type for most things. It gives you more options and requires less thought.
  • Resist the urge to use the linear frequency scale. The “A-weighting” used by default is modeled on how people actually hear. If you use the linear scale then tiny changes at the low end will have huge impacts because 100Hz is a lot more different from 200Hz than 10KHz is from 10.1KHz.
  • If you lower a frequency by 50 dB twice, it’s not going to be much different than doing it once. If you increase or lower a frequency by 1dB twice it will be hugely different from doing it once. When you are stacking EQs and effects, you need to remember that.
  • Be careful about putting your curve over 0dB. In our radio curve that’s how we create clipping on purpose. You don’t want clipping in your original file. I’m not saying never put it over 0dB, but it’s more dangerous to raise a frequency you want than to lower the frequencies around it. The effect works out the same for our purposes, but you can’t create clipping by lowering frequencies.
De-Essing
There are some parts of human speech that are known as "sibilants" which tend to come out much louder than others. Make a "psst!" noise; that's the sound. While effective for drawing attention, these sounds are usually very annoying. Whomever did the audio mixing for the video you are working with should have toned sibilant syllables down, but they can come back again after you have stripped out other things. Fortunately there is a good de-essing plugin for Audacity, creatively called de-esser.[forum.audacityteam.org]

While you can theoretically use this to analyze a whole clip, that method has a few problems. For one, creating a preview is quite slow. For two, you will often take out speech that you actually want. As such, I usually select the offending section and a few moments on either side.

There are two options with this tool: play the cleaned clip or play the sound to be removed. I strongly advise previewing the latter as that will ensure that you don't remove any non-sibilant speech components. Just don't forget to put it back on "Applied" when you are done! Also, don't remove all of the ess sound unless you want your character to talk with a lithp.

Once you have set the sorts of frequencies you are looking at (I do 800Hz to 11KHz), the only setting you want to alter is "Threshold". The further from zero this number is, the more speech will be removed. I generally use values between 5 and 25.
Plot Spectrum
You may have heard of a "spectrum analyzer", the lights on an old stereo which jump around based on how much bass or treble there is. This tool does the same thing for the selected section: it tells you on average how much amplitude various frequencies have for that period of time. This information can be useful for identifying the typical range of somebodies voice, or for identifying the best frequency to use for a pass or notch filter.

Here is a good example:
This is a pretty clean clip,[www.dropbox.com] but there is an annoying high-pitched noise pervading the second half. There is a blank section with the noise in it, but NR has trouble because the frequency gets louder while Hammond is talking. NR tries to preserve stuff that isn't noise, so it errs on the side of leaving the noise alone. Since the sound is really irritating, we need to get rid of it.


The spectrum analyzer shows a steep valley and then a sudden rise again a little before 3KHz. Using it elsewhere shows that Hammond's voice rarely goes beyond 2000 in this clip, so we know that a notch filter can completely remove the high pitched noise without affecting speech. After applying a notch filter with a Q of 1.0 at 2.8Khz we get this result[www.dropbox.com]. The noise is completely gone but everything else is intact. Note that I applied the notch filter across the entire clip so that anywhere it does remove speech it will at least be consistent.

Plot Spectrum is a hugely important tool, but it does nothing on its own. The more you understand about audio, the more useful it will be.
Compression
(This should not be confused with compression in the sense of shrinking a file size via Mp3 or FLAC. There is no definitional relationship between file compression and frequency compression. Historically this particular term confusion was pretty much guaranteed to occur, so there's no point moaning about it.)

The compressor looks at the amplitudes of all the frequencies in the clip and attenuates (reduces) the higher ones in an attempt to bring the sounds in the file closer together in volume. This often used in pop music recordings to make everything sound very loud. In our case, this can help with clips which vary in volume a bit too much.

Normalization can only raise or lower the whole clip. Compression is smarter because it only works on frequency components that are too loud, and it changes its behaviour at different points in the file depending on what is required. However, it it is a destructive process like VRI and NR so you do need to be careful with it. Not every file should be compressed, but using it intelligently can help to make your voice pack's volume more even. Without compression some clips, and some portions of clips, will sound louder than others.

Short version: Use compression if you feel that the speech in a particular clip varies too much, or find that after normalization it is too loud. If a file has very little unwanted noise, applying compression will make it volume normalize better.

Of all these effects, compression is the one I have the least experience with (as you will sometimes hear in my packs). From what I have found it seems best to leave attack and release times at their shortest values for voice clips. Definitely turn off "compress based on peaks", and "make up gain" is irrelevant because we are going to normalize anyway.

The settings you DO want to change are noise floor, threshold and ratio.

The noise floor is pretty much what it sounds like, the background noise upon which all the important sounds stand. Audacity takes this into account and will try not to make things below that level any louder. This doesn't matter too much for clean voice clips, but it can help to modify this value depending on how much noise remains in the fiel.

Treshold is the point above which the compressor will start to attenuate a frequency, pretty simple. Ratio is how aggresivel you want it to attenutate. These two settings are represented by a handing graph which should make everything fairly clear. The threshold you need will vary depending on how loud the peaks already are: if you have the whole file peak normalized to -20dB, clearly nothing is going to be above a threshold of -10dB. When working on a clip already peak normalized to -6dB think in the -40dB and 3:1 sort of area. There are no blanket settings to apply, you have to fiddle. Don't be afraid do drop the threshold all the way to the bottom sometimes.

Your ultimate goal is to create a file where the frequency components of speech are distinct, but none of them are massively louder than the others. Don't worry about overall volume, that's the job of the normalization algorithm. The more aggresively you compress a clip, the better job the normalizer will be able to do.

You are usually best off applying the compressor after everything else. It's often harder to remove stuff from a clip which has already been compressed, because the effect inherently reduces your signal to noise ratio. It brings the sounds in the file closer together in volume, that's the whole idea. Fades are an exception, since compression might reveal or enhance the noise at the beginning or end of your clip and a fade can bring that back down again.

Your workflow should generally be be:
processing -> compression? -> fade -> radio effect -> RMS normalization -> downsample

If you apply compression and hear noise that you didn't before, undo back to your NR of that noise and add more dB reduction to it. Just because you can't hear a sound anymore doesn't mean that it isn't still lurking somewhere, and compression will often reveal that hiding noise.
Limiting
A limiter is a form of compressor. In fact, the difference between the two is often misunderstood. A general compressor effect can slowly attenuate things as they get louder, but a limiter is basically a hedge trimmer for your audio. It looks for big peaks and cuts them down so that nothing goes over the established threshold; it limits the amplitude of your audio.

Opinion is divided on when each should be used. Some engineers only do one or ther other on most of their files, but it seems that the most common method is to apply compression, then limiting. While I certainly use the limiter for cleaning clips, I more often stick to the compressor. It is more flexible and less prone to making audio sound really weird.

when I do use the limiter I leave it on soft limit and the hold on its minimum setting. Hold is how long the negative gain (attentuation, volume reduction) is applied for after a peak has been trimmed. Since we are working with very short voice clips we don't want any of that. The only setting I modify is "Limit to (dB) which essentially tells it how low your threshold for trimming is. The closer this value is to 0dB, the louder it will allow things to be.

One thing to bear in mind with the limiter, and the compressor to a lesser extent, is that it can make the clipping in our radio effect overbearing. If you trim everything down to one level, normalize it to 0dB and then amplify it then it is guaranteed to clip for every trim that was done. This is fine if there are one or two trims, but not if the whole file looks like it was shoved into a tube.
Minor Tools
Fade In/Fade Out
Sometimes a sound will overlap with the beginning or end of a clip, or the last word will be cut off slightly. A fade can cover that up enough that it isn’t a problem. You may need to apply a fade more than once to achieve the desired effect. Even if there isn’t much left of the last few letters of a word, our brains will often fill in for us. This is especially true when there are other game noises playing and the radio effect has added other imperfections.

Also see adjustable fade. There is a great deal that can be done with that, since you can use it safely in the middle of a track.
_________________________________________________________________________________

Delete
Don’t feel bad about deleting something from the middle of a clip. If there is a click in the middle of the word “room”, there is a good chance that you can delete just that portion of the word and nobody will notice. Your brain wants to hear a complete word whether it’s there or not. It’s a good idea to close your eyes and listen to it a couple times after clipping something out. If you are really paranoid, get somebody else to listen to it and ask if they hear anything wrong.

If you zoom in quite far you might be able to identify one or two waves that are the problem. If you can delete so that the two sample points which now neighbour each other are at a similar level this will reduce the likelihood of an audible clue that you removed something
_________________________________________________________________________________

Normalize/Amplify
If one word is louder or quieter than the others, normalize or amplify it. Amplify is the term for reducing amplitude as well as increasing it!
_________________________________________________________________________________

Notch Filter
I mentioned notch filters under EQ and I'm going to mention them again...NOTCH FILTERS!...

This completely removes a narrow range of frequencies. The smaller the Q factor you use, the more of an area around the selected frequency will be attenuated. A 10Hz difference down low is much more significant than the same difference up high, so we use a factor instead of specifying a frequency range.

Notches are good for removing consistent noises like insects or electrical hums which you can't get a good noise profile of. See the Plot Spectrum section for an example.
_________________________________________________________________________________

Repair
If you hear a very small click, try zooming in to the sample level. if there is a sudden change between samples, that might indicate that a cut was made there ar an effect was applied on one side of the break. If you select that whole "wave" and apply repair the problem will usually go away as it interpolates the two things. Selecting the whole thing gives Audacity a good idea of what the curve should really look like.

_________________________________________________________________________________

Change Pitch
Every now and again somebody will end a perfectly usable sentence with an intonation which is inconsistent with the action you want the line for. If you are very careful you can alter the pitch of the last word so that the person’s voice goes up or down as you need it. I’ve only done this a couple of times, and I think the most I have ever used is 5%. Any more than that is going to sound seriously weird. Don’t use the high quality setting, I think it sounds terrible in this use case.

Here is a good example of a clip where there is clearly more to the sentence[www.dropbox.com] and a version with a 5% pitch change on the last syllable.[www.dropbox.com]
Notes on Selecting and Modifying Sections Without Adding Clicks
If you select a section, especially if it is for amplification or deletion, you can introduce an audible click sound at the edges. This can sometimes be resolved with the repair tool as described under "Minor Tools", but you can also control it by zooming in to individual samples and selecting carefully.

If you are deleting a section, then the idea is to find edges that fit together nicely. This means that they have to be at similar levels and the trajectory of the waveform shouldn't be violated. If you have a waveform that looks like: /\/\/\/\/\/\/\/\/\ you want to clip it so that the two samples are close to each other. For example, /\/\/|\/\|/\/\ would be bad because those clipping points produce /\/\//\/\. You also want to make sure that the the waves are both going in the same direction. If you start with a sample that is part of a rising wave, you can't match that with a sample that is part of a falling wave.

The best thing you can do is find flat spots around zero. If you are applying effects then this is often your only option. Always think about what the waveform will look like afterwards. Of course, there is always the repair tool.
When To Give Up
Every file can be saved given enough time, but that could mean days. When something can't be cleaned in a few steps, you have to start considering the return on investment. A voice pack needs hundreds of files, you can't spend an hour working on every one. The big things that turn me off a clip are:
  • Drums
  • Instruments with frequencies close to the voice
  • Noise for which I cannot get a sample and which doesn't come out with EQ
  • Clipping and clicking in some parts of words
  • Background noise with serious variations in volume

If cranking up VRI or NR doesn't eliminate these things, It's probably not worth the time. You WILL have to give up clips that you like. C'est la vie. Don't let the perfect be the enemy of the good though, clips don't need to be flawless.
Thank You!
I hope that you have found this guide useful and enjoyable. If you have any techniques to share, please do in the comments. Ditto if there is anything in the guide which you feel is unclear or incorrect. Best of luck with your voice packs!
Special Trick For Engine Noise
If you have a clean section of engine to use with NR but it is revving higher than the section you need to remove it from, there is a trick that can work surprisingly well. Copy the engine clip into a new track and use the Change Pitch effect to bring it closer to the RPM that you actually need. If the throttle remains at the same position and the engine doesn't have an active exhaust this can work extremely well.
13 Comments
Gilmore Girls Fanfiction Jul 6, 2021 @ 4:17pm 
8th grade "tech lab" class FTW
Sekondskin Dec 18, 2020 @ 12:28pm 
Beautiful.
nintendoeats  [author] Dec 8, 2020 @ 5:18pm 
Yeah, that's going a while back :p. Whatever works. It's not like single track recording requires high bandwidth. I'm surprised you can still get drivers for some of that stuff though.
ckryan Dec 8, 2020 @ 11:45am 
This is a pretty fantastic guide. Audacity is 214% better today than it was 12 or 13 years ago, but I must be getting old because most of my digital audio gear is FireWire, not USB.
schizophrenia gaming Aug 14, 2020 @ 6:09am 
thank you
nintendoeats  [author] Aug 14, 2020 @ 3:52am 
schizophrenia gaming Aug 13, 2020 @ 9:00pm 
how do we turn it into a mod?
Emigrant [EfC] Mar 11, 2019 @ 1:33am 
Great work Sir! Thank you
nintendoeats  [author] Mar 8, 2019 @ 1:22pm 
@8thFL Co.A] Pvt. Anacletus

Thank you! I think the theory is essential to producing good results. Some of the most powerful techniques (such as notch filters) require an understanding of how the tools work.