Counter-Strike 2

Counter-Strike 2

892 avaliações
CS:GO - The Ultimate Beginner's Tweaking Guide
Por DocCovington
"How come my shots don't connect?", "Why are my FPS too low?" - If you are relatively new to CS:GO and keep asking yourself these or similar questions, look no further. This guide might help you improve your game experience.
   
Premiar
+ favoritos
Nos favoritos
- favoritos
Introduction
Before we get started: If you can't find some specific Windows program or setting I mention in this guide, use the Windows Search Box[www.computerhope.com]to locate it (simply type the name of the program or setting).

If you require further details on a command I mention in the config.cfg or autoexec.cfg sections, please be so kind as to use Google. If I added all the details to every command, this guide would grow out of proportions. Thank you for your understanding.

Now, let's get started!
Tweak your nVidia settings
1. Make sure you have selected the correct GPU (in case you have an Intel in-built as well):


2. Now switch to the game specific tab and set your CS:GO graphics settings:

Some (older) guides recommend to also set your Maximum pre-rendered frames to "1" and to select "On" for your Threaded optimization option instead of the default "Auto". I have tested those settings extensively and find that my game experience is much smoother without them (it feels like my shots hit better). If you wish, of course, you can test them for yourself.

Don't forget to leave Triple buffering (which is only required if you are using V-sync) and Vertical sync off (more on this in the in-game video settings section below).

Note: There should be similar settings available in the AMD Radeon Settings[www.google.com].


3. In case you wish to play with custom width and height, make sure to set these correctly.
Disable desktop composition/Aero
If you don't have a high-end PC and would like to further enhance the performance while playing CS:GO, I suggest you deactivate desktop composition (that handles the Aero effect, among other things).

Don't worry, you don't need to do this globally for your whole system. You can make it CS:GO exclusive (so everything will be back to normal again when you close the game) by adding the respective Compatibility option to the csgo.exe:
  • Go to: <partition>\Steam\SteamApps\common\Counter-Strike Global Offensive\

  • Right-click the csgo.exe and select "Properties". Now go to the "Compatibility" tab and check "Disable desktop composition":

Unpark CPU cores, Hyper-Threading
Unparking the CPU cores

Something I highly recommend is to make sure all CPU cores are up and running.

Use this guide and utility to do so:
http://www.coderbag.com/Programming-C/Disable-CPU-Core-Parking-Utility

Once unparked, type "msconfig" into the Windows Search field and launch it. Select the "Boot" tab, click on "Advanced options..." and select the maximum number of available cores ("processors") for your CPU in the dropdown menu.

Restart your PC.


Hyper-Threading

You can utilize your CPU cores to do twice the workload, if your motherboard and CPU support this specific features. (If you start experiencing FPS loss in some games or any other performance issue after activating hyper-threading, you can safely disable it again.)

There is a video done by 3kliksphilip that you should watch before you proceed. In it, he presents his results of testing how hyper-threading affects performance in CS:GO. Please bear in mind that (as he stated himself) the results are bound to his system and that they might differ on yours.

How do I enable hyper-threading?

If you decide to use this feature, first enter your computer's BIOS and see if your system supports the hyper-threading technology[en.wikipedia.org]. If so, enable it there, then start Windows.

Next, enter "msconfig" into the Windows Search field and launch it as before. This time, however, select twice the number of logical cores (i.e., threads that will be created). Also make sure to check "PCI Lock" for a stable system performance.

Restart your PC.
Set your CS:GO launch options
Right-click Counter-Strike: Global Offensive in your Steam game library, then select "Properties":


Insert these launch options:
-high -novid -noborder +mat_queue_mode 2 +cl_forcepreload 1 +cl_show_team_equipment
Optional:
-nod3d9ex +exec autoexec

Options explained:
  • -high: puts the csgo.exe on high priority in the list of Windows processes while you are playing
    (Note: Read this post, which also addresses the -threads option, to decide whether you want to use this option. Valve's developer recommends you don't. Personally, I haven't encountered any issues with it in all the years, but then again, my system isn't bloated with tons of processes. Thank you, Loki, for the heads-up!)

  • -novid: prevents the intro movie from running everytime you launch the game

  • -noborder: removes the border that Windows creates when the game is run in windowed mode

  • +mat_queue_mode 2: "mat_queue_mode [-1,0,1,2] - This setting determines the threading mode the material system uses. A value of -1 uses the default for your system, a value of 0 uses synchronous single thread, 1 uses queued single threaded mode, and value of 2 uses multi-threaded mode. Many users report performance increases on multi-core systems when setting this variable to a value of 2."

  • +cl_forcepreload 1: increases performance by preloading maps

  • +cl_show_team_equipment: puts team indicator triangles above your teammates' heads, which you can see through walls; helps you avoid accidentally hitting your teammates; also can be expanded by a simple keybind to always display your teammates' names and equipment info (will be explained in a later section)

  • (optional) -nod3d9ex: disables some external effects of DirectX 9, which lets you alt-tab faster and also slightly increases performance on older systems

  • (optional) +exec autoexec: loads your auto-executable (more on this later)

Note: As mentioned before, do not use -threads in your launch options. That command was originally designed as a temporary fix to a multicore issue. However, the game engine was updated long ago to handle multicores properly, so this will only interfere with things and might cause serious issues.
Adjust your in-game settings
´
Game Settings


  • Max Acceptable Matchmaking Ping: Unless you live at the end of the world with no game server nearby, you should set this to 50 (I even have it set as low as 30), as everything higher will result in a bad gaming experience (you will lag and have trouble hitting things while your opponents will also have trouble hitting you).

  • Max Acceptable Game Traffic Bandwidth: Insert the correct value that corresponds with your own internet connection.

  • Enable Developer Console: You will need the console quite often. It's a valuable tool for changing keybinds quickly or looking up the damage details etc. However, "~" will only work on US keyboards, so you will have to change the keybind for this in your config.cfg.

    Example:
    bind "F3" "toggleconsole"

  • Crosshair Style: I recommend a Classic Static T crosshair (more on that in the config section). To find the right style for yourself, use a crosshair generator like this one[crosshairgenerator.com].
You can tweak your HUD also, there are many guides to be found via Google (example). We will get back to the HUD later (when talking about the config.cfg).
______________________________________________________________________________

Video Settings


It is important to keep in mind that Global Shadow Quality, Model/Texture Detail, Effect Detail and Shader Detail all depend on your hardware. However, even on a mid to high range rig, there is no reason to set Global Shadow Quality to highest as this is a waste of resources that only decreases your FPS - mid is sufficient, low if your system is slow (e.g., a low-end laptop). With the other three settings, you best experiment to find the ones that perform well on your system.
  • Multicore Rendering: If your CPU has more than one core, select "Enabled".

  • Multisample Anti-Aliasing Mode: While it might be nice to look at smooth edges, deactivating anti-aliasing in CS:GO makes it easier to spot the pixels of an enemy hiding behind objects in the distance. It also increases performance.

  • Texture Filtering Mode: This setting depends on the capacity of your hardware. Just know that the lower the value you select the blurrier objects in the distance become. Lower settings, however, also increase performance.

  • FXAA Anti-Aliasing: This is a new method to implement anti-aliasing in the game (consumes less resources).

  • Wait for Vertical Sync: I recommend disabling V-sync in this game. It is not required nor necessary with newer monitors and only adds to the already often imprecise hitreg of this game (due to an offset server-client synchronization).
______________________________________________________________________________

Audio Settings


You must select the correct audio device. If your headset is able to play 5.1 surround sound*, you should select that and disable Advance 3D Audio Procession. If your headset is 2-channel stereo only, select the corresponding setting and enable Advance 3D Audio Procession (a.k.a. HRTF, which is a new feature that simulates 3D sound to better pinpoint a sound source's location).

*) Also set this up correctly in the Windows sound settings! (see "Advanced" section below)
Config.cfg: Basic settings
´
The config file has a new location

As of December 2015, your configuration file is stored in the user directory so that different users on the same computer can each have their own configuration.

The new location is: <partition>\Steam\userdata\<userid>\730\local\cfg\config.cfg

You can safely delete the file in your game's <partition>\Steam\SteamApps\common\Counter-Strike Global Offensive\csgo\cfg\ folder, it is redundant. (The file containing your personal video settings, the video.txt, is stored in the userdata folder as well.)

______________________________________________________________________________

I will only discuss the parts that are of interest. Note that all key assignments are exemplary and that you may use any keybinds you prefer.

Be aware, though, that you must always enter the key corresponding with the US keyboard layout, not your local one:

______________________________________________________________________________

Before we get started...

Create a file called autoexec.txt in the same directory as your config.cfg:
  • <partition>\Steam\userdata\<userid>\730\local\cfg\
Change the file extension from txt to cfg --> autoexec.cfg

We will need this later to place some stuff in there that doesn't save in the config.cfg (unless you make it read-only), like toggle command scripts.
______________________________________________________________________________

Adjusting your configuration

Now on to the config.cfg (if you aren't sure about certain commands, please refer to Google). Note that some of these settings can be adjusted in the game's settings menus and don't necessarily require you to do it manually within the config.cfg.

Warning: Refrain from copying any of the commands that already exist in the file. Rather look for them (they are listed alphabetically) and then simply change the value.
______________________________________________________________________________

Let's begin with some basic things (some are, of course, optional and everything after a "//" is merely a comment and not part of the command):
bind "m" "toggle voice_enable" // mutes and unmutes your own team bind "n" "toggle cl_mute_enemy_team" // mutes and unmutes the enemy team, including text chat bind "v" "+voicerecord" // your push-to-talk key for in-game voice chat bind "F3" "toggleconsole" // opens and closes the developer console bind "END" "toggle net_graph" // connection info; script will be placed in autoexec bind "-" "teaminfo" // toggles teammates' info/name tag; script will be placed in autoexec cl_autowepswitch "0" // disables the automatic switch to the weapon you just picked up cl_disablefreezecam "1" // disables the annoying freeze camera cl_disablehtmlmotd "1" // disabled the Message of the Day loading page on custom servers cl_downloadfilter "nosounds" // prevents the download of custom sounds from community servers cl_forcepreload "1" // same as in launch options, doesn't hurt to keep both cl_loadout_colorweaponnames "1" // colors weapons' names in your HUD according to their rarity cl_righthand "1" // if you wish to play left-handed, change the value to 0 cl_show_clan_in_death_notice "0" // displays clan name in addition to player name in death feed cl_showloadout "1" // ensures your loadout is always shown in the HUD, otherwise it fades con_enable "1" // enables the developer console lobby_voice_chat_enabled "0" // disables the lobby voice chat by default tv_nochat "1" // disables GOTV's spectator mode text chat for you
Config.cfg: Advanced settings
´
Note: Again, please google any commands on which you need more details.

Now, make sure to configure your microphone correctly in both, Windows and Steam (i.e., select the correct default recording device, then adjust and self-test the volume):


It is wise to use the same volume level in Steam and in-game that you have selected in the Windows sound settings:


Once done, activate your mic in-game:
voice_enable "1" // enables your mic voice_mixer_volume "0.09" // sets your volume level, 1 = 100%; use the same value as in Windows voice_scale "0.25" // the volume of other players' voices; 1 = 100%
______________________________________________________________________________

Some sound quality enhancements:
dsp_enhance_stereo "0" snd_hrtf_distance_behind "100" // only useful when using advance 3D audio procession snd_mix_async_onetime_reset "1" snd_use_hrtf_onetime_reset "1"
______________________________________________________________________________

If you don't want any in-game tutorial messages meant to help new players, change the following values:
cl_autohelp "0" cl_showhelp "0" gameinstructor_enable "0"
______________________________________________________________________________

To disable mouse acceleration and other Windows mouse settings that might interfere:
m_mouseaccel1 "0" m_mouseaccel2 "0" m_mousespeed "0" m_rawinput "1" sensitivity "2.8" // example
You best start a local server ("Play off-line with bots") and adjust the sensitivity to fit your own comfort level. Since your mouse driver likely comes with a software which allows you to adjust your DPI, you will have to test which DPI-and-in-game-sensitivity combination works best for you. (You need to find the perfect balance for yourself between mouse movement speed and aiming accuracy.)

Example: I play mostly from the wrist and find these settings, in combination with the sensitivity listed above, most comfortable for myself for use with my Razer Taipan:
______________________________________________________________________________

To optimize your connection, use the correct rate value that corresponds with your internet connection speed:
rate "196608"
In order to determine the value for your connection, run an internet speed test[www.google.at]for your upload speed first, then select the correct value according to your results:

0.5 Mbps – rate 62500
0.64 Mbps – rate 80000 (old default)
1.0 Mbps – rate 125000
1.5 Mbps – rate 187500
1.57 Mbps – rate 196608 (new default)
2.0 Mbps – rate 250000
2.5 Mbps – rate 312500
3.0 Mbps – rate 375000
3.5 Mbps – rate 437500
4.0 Mbps – rate 500000
4.5 Mbps – rate 562500
5.0 Mbps – rate 625000
5.5 Mbps – rate 687500
6.0 Mbps – rate 750000
6.2 Mbps – rate 786432 (new max)
______________________________________________________________________________

Valve's servers are 64-tick. The tick rate determines how frequent the client-server information is being exchanged (the higher the value the better). Most community servers (like FaceIt and ESEA) are 128-tick, in which case you want to change the following values:
cl_cmdrate "128" cl_updaterate "128.000000"
If you are curious about tick rates and how they affect gameplay, I recommend you watch this video.
______________________________________________________________________________

If you find it hard to make out your enemy against a bloodied background, assign the removal of decals (blood, bullet holes) to your movement keys:
bind "a" "+moveleft; r_cleardecals 1" bind "d" "+moveright; r_cleardecals 1" bind "s" "+back; r_cleardecals 1" bind "w" "+forward; r_cleardecals 1"
______________________________________________________________________________

To reduce the weapon bobbing effect when you are moving to a minimum, use these settings:
cl_bob_lower_amt "5" cl_bobamt_lat "0.1" cl_bobamt_vert "0.1" cl_bobcycle "0.980000"
______________________________________________________________________________

Learning to throw smoke grenades perfectly requires practice. On 64-tick servers it is especially important to be precise with so-called jump-throws. To make this easier, we can assign the combination of a jump and a throw to one key (its script will be placed in the autoexec):
bind "x" "+jumpthrow"
______________________________________________________________________________

Configuring your net graph (example):
net_graph "0" // disabled by default net_graphheight "55" net_graphholdsvframerate "0" net_graphmsecs "400" net_graphpos "2" net_graphproportionalfont "0" net_graphshowinterp "1" net_graphshowlatency "1" net_graphshowsvframerate "1" net_graphsolid "1" net_graphtext "1"
______________________________________________________________________________

The crosshair (adjust these settings to your liking or, if you have already designed your perfect crosshair via generator, simply use those values instead):
cl_crosshair_drawoutline "1" cl_crosshair_outlinethickness "0.5" cl_crosshair_sniper_show_normal_inaccuracy "0" cl_crosshair_sniper_width "2" cl_crosshair_t "1" // turns your X crosshair into a T crosshair cl_crosshairalpha "255" cl_crosshaircolor "5" cl_crosshaircolor_b "50" cl_crosshaircolor_g "150" cl_crosshaircolor_r "250" cl_crosshairdot "0" cl_crosshairgap "-2" cl_crosshairscale "0" cl_crosshairsize "3" cl_crosshairstyle "4" cl_crosshairthickness "0.8" cl_crosshairusealpha "1" cl_fixedcrosshairgap "-2"
Note that the T crosshair is a relatively new addition to the game and therefore won't be available in most crosshair generator tools.
______________________________________________________________________________

Your HUD (i.e., the user interface) can be tweaked, too. Example:
cl_hud_background_alpha "0.5" cl_hud_bomb_under_radar "0" cl_hud_color "0" cl_hud_healthammo_style "0" cl_hud_playercount_pos "0" cl_hud_playercount_showcount "0"
______________________________________________________________________________

You can even adjust your radar[www.tobyscs.com](a.k.a. mini map). Example:
cl_hud_radar_scale "1.3" cl_radar_always_centered "0" cl_radar_icon_scale_min "1" cl_radar_rotate "1" cl_radar_scale "0.350000" cl_radar_square_with_scoreboard "1"
And if you would like to be able to change the size of the radar during a match, these keybinds can be useful:
bind "KP_MINUS" "incrementvar cl_radar_scale 0.25 1.0 -0.05" bind "KP_PLUS" "incrementvar cl_radar_scale 0.25 1.0 0.05"
Autoexec.cfg: Additional configurations
Open the autoexec. Everything we put in here, including the comments (marked by "//"), can be copied from below one-to-one.

Note: Don't forget to place the +exec autoexec launch command in your launch options to be able to use these scripts (and additional configurations), otherwise the corresponding keybinds we placed in the config.cfg won't work.

First, we add the aforementioned jump-throw script and the one that toggles your team equipment information (which floats above the heads of your teammates and is visible through walls):
// JUMP-THROW: alias "+jumpthrow" "+jump; -attack" alias "-jumpthrow" "-jump" // TOGGLE TEAM-EQUIPMENT-INFO: alias "teaminfo" "info_on" alias "info_on" "+cl_show_team_equipment; alias teaminfo info_off" alias "info_off" "-cl_show_team_equipment; alias teaminfo info_on"

To remove any FPS restrictions (not recommended for insuffiently powerful hardware):
fps_max "0"

Activate the Steam Data Relay protocols to achieve a better connection to Valve's servers:
net_steamcnx_allowrelay "1" // this command is actually located in the config.cfg net_client_steamdatagram_enable_override "1"

Important: If, for some reason, you do not get the autoexec to work, you can copy & paste all these things into the config.cfg. Be aware that you need to make the file read-only afterwards or the game will delete those lines by default. Always keep a copy of your config.cfg somewhere safe in case it gets overwritten.
Windows tweaks and cleanup
1. Adjusting the system settings


Remove unnecessary visual effects that might slow down the system performance:


Optional: Optimize your virtual disk memory (a.k.a. pagefile) size, which is known to improve performance:

Important: The value for min and max must be the same. Furthermore, the value depends on how much RAM your system has. To find out what value is best for your system, read this article[blogs.technet.microsoft.com]. If you are unsure, it is best to not touch this setting.


2. Disk Cleanup

Clean your hard drive of unneeded data like old Windows Update installation files or older system restore points:


The window will close automatically once the cleaning process has finished.

Note: You should do this frequently to assure a smoother system performance!


3. Disk Defragmenter

If you have a hard disk drive (HDD), defragmenting it after the Disk Cleanup is highly recommended:


Note: You should do this frequently to assure a smoother system performance!

Important: Windows 10's defragmentation tool sometimes does not appear to be working. You can try to fix this issue[www.windowspasswordsrecovery.com]or use Piriform's Defraggler[www.ccleaner.com](it's the same company that releases CCleaner and Speccy). However, from my personal experience, Windows' inbuilt defragmentation tool is preferable.
P.S. Training recommendations
Since tweaking your system and settings isn't enough to "git gud", as they say, I am closing up by recommending some excellent Workshop maps created by the community that will help you improve your aim and learn the weapons' recoil patterns:
https://steamcommunity.com/sharedfiles/filedetails/?id=243702660 There are also some fun training maps by Yesber to teach you typical prefire spots and help you improve your timing.

Happy gaming! :)

______________________________________________________________________________
» Don't forget to check out my other guides as well

123 comentário(s)
BlitzSkype 25/jun./2022 às 3:17 
Allright, thanks a lot !
DocCovington  [autor(a)] 16/jun./2022 às 22:05 
> Does this guide is still relevent or not ?

The guide is pretty old (I can't be arsed to update it, really, as most newer system don't require any of those tweaks).

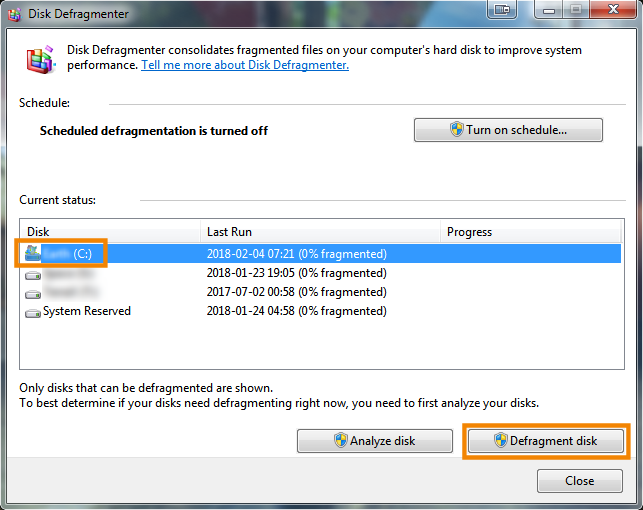
However, some tips in the section on Windows maintenance are still valid. You should always keep your operating system smooth and clean.

> Because i had some issues running the game smoothly with my previous
> laptop, and i hope it won't be the same with my current one.

Most laptops aren't suited for gaming as they tend to overheat, which leads to performance issues and can even damage the hardware. There are laptop cooler pads you could check out, but I have no personal experience with those.
BlitzSkype 14/jun./2022 às 14:18 
I'm planning to install the game on my new laptop.
Does this guide is still relevent or not ? Because i had some issues running the game smoothly with my previous laptop, and i hope it won't be the same with my current one.
DocCovington  [autor(a)] 19/mar./2018 às 7:18 
Hyper-threading is a technology that enhances system performance in general, not for CS:GO specifically. The general rule should be that, the more threads the system is able to handle at a time, the faster everything works.

Now on to your video. I have 4 cores, and as 3kliksphilip states in the results of his testing, hyper-threading yields better results for 4 cores when enabled.

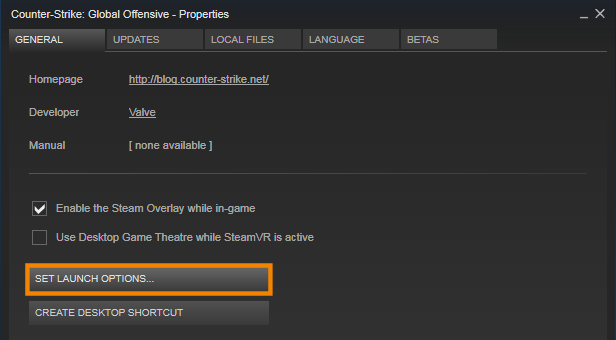
I guess it will be best if I place the video link in my guide so that everyone can decide for themselves whether they want to enable it or not. (Thanks for the heads up, by the way.)
specify_ 18/mar./2018 às 21:55 
Why enable hyper-threading? CS:GO sends different packets of data, so hyper-threading doesn't improve anything but decrease fps. Hyper-threading should be disabled. 3kliksphilip did a video on it.

https://www.youtube.com/watch?v=fj9cuHuTNVU
DocCovington  [autor(a)] 18/mar./2018 às 21:03 
Aaaaand another update. Added CPU tweak regarding hyper-threading.
specify_ 6/mar./2018 às 6:23 
Like I said, all my settings are low as possible but when I play dust2 with my current settings, I get above 120 fps
specify_ 6/mar./2018 às 6:22 
My CPU usage is sometimes 100% but my GPU when playing CS:GO is always above 90%
DocCovington  [autor(a)] 6/mar./2018 às 5:30 
> it's his GT 635 that's botlenecking his i7 hard lol.

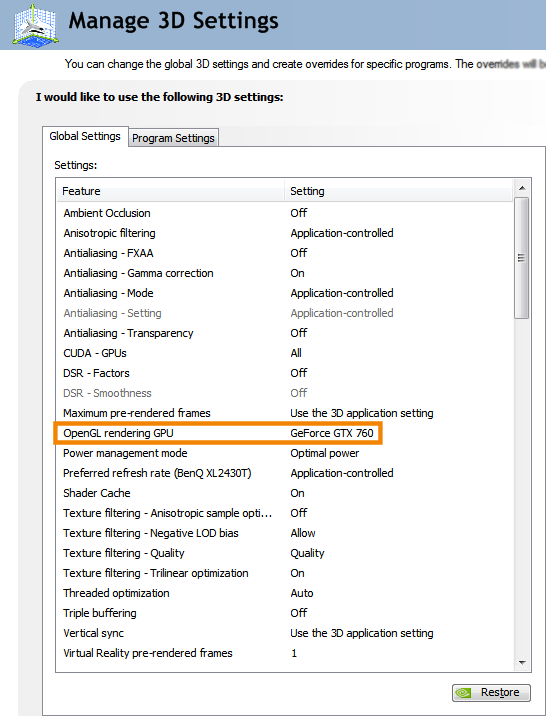
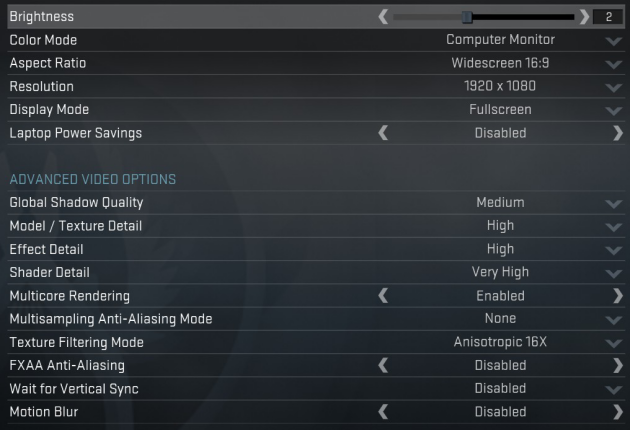
Well, I have a GTX 760 and no issues, so it's possible. Could also be some improper overclocking settings, though.

> The GPU is bottlenecking because it can't sustain very detailed graphics [...]

I recommend lowering the settings and using the tweaks mentioned here rather than lowering the resolution. A native resolution is always preferable IMO.
specify_ 6/mar./2018 às 4:47 
@DocCovington: The GPU is bottlenecking because it can't sustain very detailed graphics like CS:GO I guess. In addition, it is under the minimum system requirements so. Just a little quality drop is just fine, and plus, more fps makes your aim much more smoother. I used to play in a 4:3 resolution when I was young, and using the 4:3 resolution in CS:GO makes it easier to focus on one object.