Oxygen Not Included

Oxygen Not Included

27 ratings
modding Oxygen not included: Customized world generation
By Hanro50
This is not a guide on how to make a language pack, nor will it be one describing how to add a mod to the workshop for Oxygen not included. I don't claim I will touch on everything and this guide might become obsolete as time moves on

What I will showcase in this guide is how to customize the parameters Oxygen not included uses to generate asteroids to your personal preference. Want custom ruins, biomes or map sizes? Do you want a frozen biome that is 1000 degrees Kelvin, Oil fields that are cold enough to skate on or a starting location that is 10 degrees cooler? Then this is the guide for you.

I'll show you everything I know or have been able to puzzle out
   
Award
Favorite
Favorited
Unfavorite
Getting started
First few steps will probably be the easiest. Go to the location where you installed ONI (easiest way to find it is thru steam->Right click ONI ->select properties->local files tab->Browse local files)

Then open the file named “OxygenNotIncluded_Data”

Now select the file named “StreamingAssets” and create a backup of that file.

After that open the file named “StreamingAssets”.
Changing your map/world size
Ok go to your “StreamingAssets” folder mentioned in the “getting started” portion of this guide.
Now browse to “/worldgen/worlds”
Now open the file named “Default.yaml” with a text editor (I recommend Notepad++)
Now check for the heading “worldsize:”
under it you’ll see something like


You can edit those numbers to change your world size, but do keep in mind that larger worlds are more taxing to create. This may also not effect worlds that have already been generated so be weary

Here is an example of how this looks edited

Customizing subworlds
What are subworlds?
Subworlds are basically ONI version of biomes. The “starting area” is a subworld, so are the oil fields you can find at the bottom of the map.

The default location for subworlds is the “worldgen/subworlds” folder in your “StreamingAssets” folder (Which was discussed in the “getting started” portion of this guide)

Basic editing

First I’m going to walk you through how to edit a preexisting “subworld”. First go to your “subworlds” folder (Worldgen/subworlds). For this example open up “Jungle.Yaml”

  • biomeNoise:


    The “BiomNoise:” parameter tells the game how to generate the terrain found within the subworld. Should it look like Swiss cheese or should it be mostly solid with nearly no holes. You can find a full list under the folder named “noise” within your Worldgen folder.

    if you want, you can create your own custom noise map for your custom subworld. You also don’t have to put it in the “noise” folder since most references to other scripts within ONI worldgen scripts use the “worldgen” folder as a root directory. (This is why “noise/” is listed before “subworldJungle” in the example picture)

  • temperatureRange:


    This parameter tells the game the average temperature of the subworld. Do be careful as I have observed that the game will crash if you try and generate a new world if this parameter is set to something invalid

    A full list of temperature names is listed in the “temperatures.yaml” file within your “Worldgen” folder.


    You can potentially add your own custom temperature names by adding them to the “temperatures.yaml” folder in this format

    “ <Insert name here>:”
    min: <Min tempt in Kelvin>
    max: <Max tempt in Kelvin>

  • pointsOfInterest:

    This basically tells the game what ruins, geysers, alian spacecraft and memes should be added to the subworld.

    You can create your own custom stuff by creating a template with debug mode. Name it something like “poi_something” and save it. Then go to your “StreamingAssets” folder (Mentioned in the getting started portion of this guide). Now open your “templates” folder and move the <The name you gave your custom structure>.Yaml file into the “/poi” folder (You can also find a list of templates you can use in the poi folder, although having two or more subworlds reference the same template in the “poi” folder has caused me problems in testing.)


    In the example is an extract from a custom subworld I made. Just reference your template under the appropriate heading. In the example I made two custom templates named poi_Naturem_Geyser_Steam (Custom steam geyser)and poi_Naturem_Geyser_Gas (Custom natural gas geyser) respectively.

    Warning!
    Unlike most other worldgen scripts, the templates have to be stored under “StreamingAssets\templates\poi” for this to work.

Advance editing
I call this advance editing as my knowledge for what these parameters change isn’t spot on as I haven’t had enough time to test them properly

  • CentralFeatures: and Features:


    As far as I can tell these parameters tell the game what random structures to too add to this subworld. In my testing I have found that these two parameters don’t need to be included. Setting them to something invalid doesn’t seem to cause crashes, but do be weary as I have found that pockets of void will generate if they are set to something invalid. Personally I would recommend using the “points of interest” heading if you want to add custom structures. You can find a full list of stuff to add to this under the “features” file located within your “worldgen” folder and like the “noise:” parameter you don’t necessarily have to add files to the “feature” folder if you don’t want to. This is why you see the “features/jungle/<name of feature>” format in the exsample. As long as the file is somewhere in your “Worldgen” folder you should be fine.

    The most recognizable example of a “feature” is an oxilite spiral

  • Biomes:

    I believe this tells the game how to generate the subworld, what it should be made out of and what spawns within it.

    This is also a parameter that contains sub parameters with sub parameters
    (This is why it’s under advance)


    The first set of sub parameters is marked with “- name:”. These sub parameters have their own set of sub parameters, mainly “weight:” and “tags: ”

    • "- name: "

      This defines the location of a biome script. You can find a list of every biome script available under the “biomes” folder within your worldgen folder. This script tells the game what the subworld should be made out of, e.g. gasses, blocks and fluids. Like many other worldgen scripts you can define a custom path to it if you want to make your own custom biome. As long as it’s located somewhere within you worldgen folder. (This is why the name contains "biomes/Jungle/-")

    • "tags:"

      This tells the game what plants and animals to generate within the subworld biome
      (Here is a exsample from the starting area)
Writing your own world gen script
I recommend reading the “Getting started”, “Changing your map/world size” and “Customizing subworlds” portion of this guide before you continue.

The worldgen scripts oxygen not included uses are located within the “worlds” folder within your “worldgen” folder (“StreamingAssets\worldgen\worlds”). By default the game will only allow you to load the script named “Default.yaml”, but if you enter debug mode you will be able to load any script file under the “custom game” tab when you select “New game” from the main menu.

In these guide we’ll use the file name “Default” as an example. I recommend creating a copy of “Default.yaml” and using that as a base in conjunction with debug mode while you’re creating your own custom worldgen script. The game also really doesn’t behave well with an invalid worldgen script. (I'll go into detail about that later on in the guide)

You can comment out lines by using a “#” symbol

  • Name:

    I recommend changing this line to the name of your custom script/mod. Especially if you plan to use the script select within debug mode. This tells the game the name of the script and its used by the script select.

  • description:
    This doesn't do anything currently, but you can change it to what ever you like
    (Here is an example)


  • Worldsize:
    This was covered in the “Changing your map/world size” portion of this guide

  • ZoneFiles:

    This tells the game what subworld scripts to load and where to find them within your worldgen folder. The default location is in you “subworlds” folder, but like many other references to scripts within ONI’s Worldgen folder you can put pretty much put the subworld scripts anywhere you want as long as its somewhere within your worldgen folder.

    (An example of a custom script location)

    Warning!
    The first subworld script under "Zonefiles" needs to be named "StartWorld" or the game will crash upon generating a new world. However you can still put the script in a custom location as shown in the example above. Similarly if the game can't find a set subworld script then it will also crash. Also please add the prefix "- name:" to each entry and don't change the default spacing as that may also cause problems.

  • DefineTagSet:

    ONI uses a tag system to define where to generate subworlds. I’ll cover how they come into play when we get to “UnknownCellsAllowedSubworlds:”, but you can use this space to declare your own custom tags to clear up unnecessary worldgen script later
    Use these format
    <Tag name>:
    - Subtag_A
    - Subtag_B

    The simplist tags are
    - StartFar (Starts far from starter area location)
    - StartMedium (Start at a medium distance from starter area)
    - StartNear (Starts next to starter area)

    You also get tags that don't seem to do anything on their own, but that can be combined with the aforementioned tags
    - NearDepths and - AtDepths (Starts generating subWorld at bottom of map)
    - AtSurface and - NearSurface (Starts generating subWorld near top of map)

  • UnknownCellsAllowedSubworlds:
    Lastly we get to the part of the script that actually generates worlds.


    • "- tagcommand:"
      This is the main command that the game will run when it reads that part of the script
      The possible commands are the following (I’ll also list there supported sub parameters)
      > Default (Generates everywhere)
      -supports:
      [command:]
      [temperatureRanges: OR subworldNames:]

      > ContainsOne (Generates following only one rule permited by its tagset)
      -supports
      [tagset:]
      [command:]
      [temperatureRanges: OR subworldNames:]

      > ContainsAll (Generates strictly following only the rules permited by its tagset)
      -supports
      [tagset:]
      [command:]
      [temperatureRanges: OR subworldNames:]

      > ContainsAny (Generates following any rules permited by its tagset)
      -supports
      [tagset:]
      [command:]
      [temperatureRanges: OR subworldNames:]

      > DistanceFrom (Generates following a strict set of parameters)
      -supports
      [tagset:]
      [distance:]
      [maxDistance:]
      [distCmp:]
      [command:]
      [temperatureRanges: OR subworldNames:]


    • tagset:
      As mentioned in “DefineTagSet:” This tells the game where to apply the tag command within the world of ONI when generating a new world. Basically where do you want this tagcommand to generate the selected subworlds (more on that later)

      You can also use your custom tags you defined earlier if you wanted to.

    • command:
      This parameter has three possible values
      > UnionWith – This will not replace any subworlds that have been generated with a previous tagcommand
      > Replace – This will replace any subworlds generated with a previous tagcommand
      > Clear – I don’t recommend using this as it caused me errors in testing

    • temperatureRanges:

      This tells the tag command what subworlds to place based on their temperature property (More information found in the “Customizing subworlds” portion of this guide)

      Warning: I don’t recommend using this sub parameter with the sub parameter “subworldNames:” as it might cause errors

    • subworldNames:
      This tells the tag command what subworlds to place based on their name e.g - Jungle, - Startworld and etc.

      Warning: I don’t recommend using this sub parameter with the sub parameter “temperatureRanges:” as it might cause errors

    • Advance Parameters:
      My knowledge on what these do is spotty

    • distance:
      Tells the game how many subworld spaces from the area defined by its tagset: property the game should generate a set selection of subworlds(One subworld space is about as big as the starting area roughtly)

    • maxDistance:
      This will let the tag command occasionally generate a piece of subworld past the value defined by the “distance:" parameter to better blend the line between it and other subworlds generated by other tag commands. I recommend having this higher than the “distance:" parameter to avoid errors

    • distCmp:
      This can either be set to 1, 0 or -1

      From testing I found that setting it to 0 or 1 generated a sliver of land in the middle of the map where it was originally supposed to generate that sliver at the bottom of the map. I recommend keeping this set to -1


Debugging, pesky black holes and you
Unsurprisingly poking around with the core world gen scripts used by the game is bound to break something eventually.

You can break your game in two different ways if you’re not careful.

Black Hole/Game crash:


This can be for one of 3 reasons.Either the game couldn't find a certain subworld, a parameter was set incorrectly or you’ve ignored my warnings about keeping the correct spacing. Luckily you can typically find a detailed log in the “output_log.txt” textfile located in your “OxygenNotIncluded_Data” folder within your game’s install directory.

> If the game couldn’t find a select subworld look for text within the “output_log.txt” log file that reads something like:
“System.IO.DirectoryNotFoundException: Could not find a part of the path "C:\Program Files (x86)\Steam\steamapps\common\OxygenNotIncluded\OxygenNotIncluded_Data\StreamingAssets\worldgen\<Subworld name and path here>”

> However if a parameter isn’t set correctly, or you’ve messed up spacing somewhere, you might get something like this:

[WARNING] Exception while loading yaml data: (Line: 4, Col: 21, Idx: 78) - (Line: 4, Col: 30, Idx: 87): Exception during deserialization
[WARNING] Exception while loading yaml file [C:/Program Files (x86)/Steam/steamapps/common/OxygenNotIncluded/OxygenNotIncluded_Data/StreamingAssets\worldgen/BigChill/HotMarsh.yaml]
[WARNING] WorldGen: Attempting to load zone: BigChill/HotMarsh failed
ERROR: Error in: Window.OfflineWorldGen.OnPrefabInit


Generally this is the format to look for

[WARNING] Exception while loading yaml data: (Line: Line error is on)
[WARNING] Exception while loading yaml file { Name and path of bad script }
[WARNING] WorldGen: How did it fail


Invalid worldgen script
If you’re lucky you’ll experience a game crash, if not then you’ll be greeted with a lovely map like this:


This means your worldgen script is broken in such a way that the game can still technically read it, but it can't actually generate something with it. I recommend undoing whatever you tried to do before everything broke or restoring from a backup. If that’s not an option then double check if every parameter within you worldgen script is set to something valid. Do you actually have subworlds that can generate at certain tagcommands? Is the Tagcommands you've used valid? Do all your tagcommands support the sub parameters you've selected for them?

This error has almost no easy fix according to my personal testing and the output log doesn't really produce any valid data to clue you in on what might be wrong.
Closing notes
Unfortunately I’m not an ONI developer. So I have no idea what some of the parameters do. I also have no idea how to create a custom feature script, noise script or biome script.

If you want to see an example of what I’ve been able to make then look up “Mod : Big chill” on the Klei forums (Its under Home> Oxygen Not Included > [Oxygen Not Included] – General Discussion > Mod: Big Chill)

>>Link: https://forums.kleientertainment.com/topic/87094-mod-big-chill/ <<
11 Comments
Hanro50  [author] Dec 19, 2022 @ 9:41am 
This tutorial is out of date now.
I don't have the free time I can sink into creating something like this anymore like I had in 2018. Between work, my own projects and university...I just do not have the 3 to 12 hours of continues free time to test and experiment with various configuration files to see what happens when I change a 1 to a 0.

It is unfortunate, but yea. Perhaps it will be helpful, perhaps it won't.
Hanro50  [author] Mar 19, 2021 @ 10:07am 
Sorry, I don't know how to help you with that. Maybe check the gas contents? Perhaps there's something funky going on there?

Anyhow. Good luck
Hanro50  [author] Mar 19, 2021 @ 8:48am 
Hi Cmdr.
Perhaps that's just lag?
The map gen scripts and the game's physic's engine is not connected.
May I ask if these other games that you have mention also use the unity game engine?

Perhaps it's an engine bug with your particular setup
Hanro50  [author] Mar 19, 2021 @ 6:21am 
I don't know what would spawn the red stuff. Unless a structure was generating up there and that got immediately destroyed once it spawned.
Hanro50  [author] Mar 19, 2021 @ 6:19am 
Hi Cmdr.
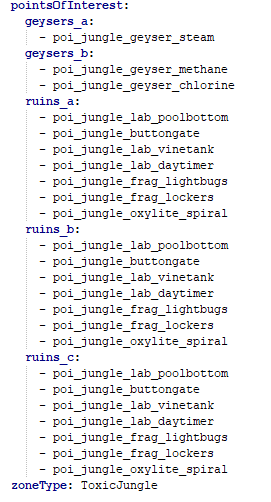
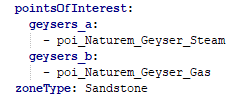
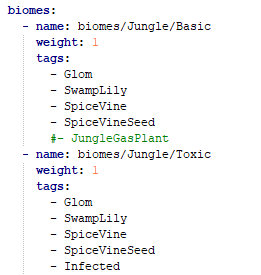
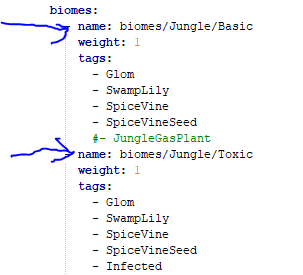
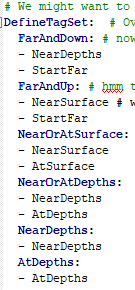
It has been a while since I've delved into the game files myself. However this looks like an error with your main world gen script. Specifically double check what you have written under the DefineTagSet heading. As for the random geyser, perhaps that has more to do with your Point of interest objects?

Never the less just double check those
Proxocasus Nov 26, 2019 @ 9:40am 
Thanks for making this because it wasn't clear to me from looking at the yamls that I didn't need to write additional scripts.

I do however see mods that write C# scripts but I have no idea how they're activating those scripts for the game. If you know, please share. But in the meantime I'll share if I learn something new about it. This guide is the only game in town for figuring out how to mod.
Gemma Oct 4, 2019 @ 10:25pm 
@Mzero the size of any subworld can be increased using the parameter "pdWeight". The default value if no weight is specified is 1.
Hanro50  [author] Apr 24, 2019 @ 6:23am 
Unfortunately I don't actively mod oxygen not included anymore. The way I increased the start area was by creating a duplicate of the start area subworld and telling the scripts to generate it next to the starting area with the "StartNear" tag.

I'd go into more detail but the guide provided above should tell you how to do everything.

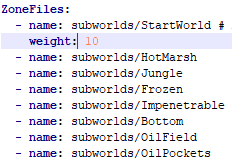
If memory serves correct, the initial way the startworld generates is hardcoded and cannot be changed.
Mzero Apr 24, 2019 @ 12:35am 
How do you set StartArea size ?
TISOD Apr 7, 2018 @ 8:09pm 
Can you help guide me on making the start world larger? I'm looking at startworld.yaml. Is it the density radius settings? I guess I could just make another biome that is similar around the start area but I wanted to know if I can just make a subworld with a larger radius.