Hacker Evolution

Hacker Evolution

215 ratings
Hacker Evolution Tips and Primer
By Comrade St. Nikolai
Whether you're new to Hacker Evolution, or just never figured out how exactly your equipment and bounces stack, I'm here to help.
2
   
Award
Favorite
Favorited
Unfavorite
An Intro to Hacker Evolution
Hacker Evolution is a nifty little hacking game that takes a few cues from Uplink, but plays differently from it on some very fundamental levels. Unlike Uplink, gameplay is performed through a command line prompt with minimal clicking - and unlike Uplink, speed is not critical. Bonus points are awarded for beating a level in under thirty minutes, but it's far from necessary. Feel free to play Hacker Evolution at your own pace.

The objectives change per level, but the basic idea is that you hack into a server, check its files, take its money, and find the hostnames of other servers to hack into. As you do these things, your trace percentage will increase. You must keep this below 100% in order to avoid losing the level. This is Hacker Evolution at its most basic. There's a lot more to it, but that's what the rest of the guide is for.

I'm writing this guide because, while the tutorial gives you a good idea of a few important concepts, it explains far from enough to get a new player going. Once you get past this hump, it's actually a really fun game (and so is the sequel, Hacker Evolution: Untold) which makes you feel like a true Hollywood hacker.

So I hope to fill in some blanks for anyone who's gotten to Level 1 and said, "Oh crap, what now?" I will try not to be confusing about it. Whether I succeed is uncertain, but I'll do my best...ish.

Allowing for laziness and distractions, I'll do my best.
Some Basic Controls
Commands are entered into the command prompt under the log. You never have to click on the prompt to begin typing in it, even if you click outside of it. You can move your cursor left and right using the arrow keys, and Home and End will move your cursor to the beginning or end of the line.

Page Up and Page Down will scroll your log. Entering "clear" into the command prompt will clear the log for you if it becomes too cluttered for your tastes.

If you press the up arrow key, your previously entered command will be copied into the command prompt. You can press up a few more times to see each command before that (up to ten commands back), and use down to scroll to more recent ones if you go too far. This is useful if you need to transfer the same amount of money several times in a row, or killtrace a bunch. It's also helpful if you just mistyped the port number or something. If you have to enter a long or annoying hostname, you can always start typing the hostname and then press Tab to autocomplete it. This also works with command terms.

Personally, I like to type everything in manually. Makes me feel much more hackery.

F1 brings up a small list of helpful keys, including music control. F2 brings up your objectives, and F3 will display the briefing from the beginning of the level. Esc opens a prompt asking if you wish to quit the level. Progress is only saved between levels, so if you quit in the middle of one, you WILL have to start it again. If your keyboard has a pause key, you can use that to pause the game.
Important Commands
If you type "help" into the command prompt, the log will display a list of all commands and their uses. This is especially helpful early on, and it's okay if you have to refer to it a lot. You'll quickly memorize the most useful ones, so don't worry.

I'll go over the most important commands to know, here:

  • scan [hostname] - Type "scan" and then a hostname to view information about that server. This includes port numbers, the length of each port's password, what type of software each port is running, and the server's encryption level (if any). Any port you hack will still be displayed, but will be listed as "unprotected".

    Note: Scanning is VERY important. When you scan a server which is not on your map, it appears there. This is the only way to see new servers and add them to the map. Each time you add a server to the map, you gain 1% extra trace. It's worth it, though. In addition, finding all of the servers in a level through scanning nets you an extra 500 points upon the level's completion.

  • crack [hostname] [port number] - Typing "crack" followed by the hostname and then the number of the port you wish to crack will, as you may imagine, crack that port on that server. If you do not enter a port number, it will default to port 80. Whether you can crack a port depends on a number of things, such as password length, hardware, and number of bounces (covered in "Equipment & Trace").

  • decrypt [hostname] - This will attempt to decrypt the server, plain and simple. This also depends on hardware and bounces, as well as the encryption strength (e.g. 128 bits) of a given server (covered in "Equipment & Trace").

  • connect [hostname] [port number] - This will allow you to connect to a server's port, but only if the server has been decrypted and the port is either hacked, or unprotected from the get-go.

  • logout - Disconnects you from the server. Many commands, such as cracking, decrypting, or adding and removing bounces, cannot be performed while connected to a server.

  • ls - Typing this while connected to a server allows you to see the names and sizes of all of the files stored on that port. Typing this while not connected to any server will show you the names and sizes of all of the files stored locally (i.e. any files you have downloaded).

  • cat [filename] - Typing "cat" followed by a file stored on the port you are connected to (or stored locally if you are not connected to any) will display the data stored on the file. Files often contain clues or hostnames, so be sure to cat all of the ones you find!

  • killtrace - This is your best friend in Hacker Evolution. Typing "killtrace" will immediately drop your trace by 10%, at the cost of $500. As it's the only way to lose trace, you will be using it often. Be careful not to overdo it, however - you don't want to run out of money. Use it when you need to. As a rule, I generally killtrace down to 40-50% whenever my trace rises above 75%.

  • abort - If you find yourself in a process such as a crack or decrypt that will not be able to finish before you are traced, type "abort" to cease the process. There are no penalties for aborting a process, but if you wait until after you've already been traced, it will not be able to remove the trace percentage you pick up from that. If you plan your moves correctly, you should never need to use this option. Accidents happen, however, so remember it just in case.
Semi-Important Commands
These are some other commands you'll want to know, but make sure you've got the previous commands memorized first, and then work on remembering these once you've gotten those down:

  • transfer [amount] - Typing "transfer" and then a number (with no dollar signs) will transfer that amount of money from the server you're currently connected to, and into your account. This can only be done if all ports on the server have been hacked. The amount you can transfer at a time depends upon your modem, firewall, and number of bounces (explained in "Equipment & Trace").

  • download [filename] - Downloads a file from the current server port to your local memory.

  • upload [filename] - Uploads a file from your local memory to the current server port.

  • del [filename] - Deletes a file from the current server port (if connected to one), or your local memory (if not currently connected to any server).

  • exec [filename] [hostname] - This allows you to execute a locally-stored exploit on a server (explained in "Exploits").

  • login [hostname] [password] - If you have a password for a port on a server, type "login", followed by the hostname, and then the password. Do not include the port number. The password will automatically be tried on all ports on the server and unlock any that it works with. Be careful when using passwords - they only give 1% trace, but they give it EVEN IF THEY DON'T WORK. If you misspell the password (which could totally happen because they are usually long and obnoxious), you will not unlock the server, and you will still accrue some trace. They're very helpful, just make certain you've spelled everything correctly before hitting enter.
Trace %
Let's talk about trace. Most major actions give you trace. Trace is the percentage in the upper-right info panel. If this ever reaches 100% or higher, you lose and the level ends, meaning you have to start the level over. You can reduce trace using the "killtrace" command, which lowers it by 10% each time, at the expense of $500. If you've got a high trace and no money, you're probably boned. Thus, it's a good idea to look for money as often as possible. You can tell which servers have money on them by mousing over them on the map. Money is often hidden away on secret servers whose hostnames you must find in files and such.

So what gives you how much trace? Let's see:

15% - Successfully crack a port
5% - Successfully decrypt a server
1% - Successfully execute an exploit
1% - Attempt to login using a password - this trace is given whether the password works or not
1% - Scan a server that isn't on the map and add it to the map
3% - Successfully transfer money
50% - A trace on you is completed - NEVER let this happen; use "abort" if necessary

It's a good idea to plan things out according to trace. If there is a server on your map which you don't need for bounces, which isn't necessary to any objectives, and which shows zero files and money when you mouse over it on the map, there's probably no reason to decrypt and crack it. Leaving it alone will avoid accruing any unnecessary trace and save you money in the long run.

Remember, money and trace % stay with you between levels, so try not to leave yourself in a dire position when you complete that last objective.
Equipment and Tracetime (Part 1)
Next up is BEING traced. By this I mean the active tracetime which appears whenever you try and crack, decrypt, or transfer. Whenever you attempt one of these actions, a timer appears and counts down. This is your enemy. If this timer reaches 0 before your action has completed, you will receive a whopping 50% trace. If this doesn't send you over 100% and end the level immediately, you'll want to end it yourself and start over anyways.

There are ways to avoid this trace, and it's very important you learn how. It's also kind of confusing.


Okay, you have a lot of equipment. Do you see those boxes which say "1 GB", "1 Ghz CPU", "no firewall", and "1mbps.modem"? These are your hardware. Each of them does something helpful.

  • Memory (GB) isn't important early on, though late in the game you will need to increase it. This is how much space you have locally for files. If you want to download files, you need space. You can see how much space you have remaining and how big each file you have is by typing "ls" when not connected to any servers. Don't upgrade this until you absolutely need to. Memory has nothing to do with trace.

  • CPU (Ghz) is the big one. This increases the speed at which you crack and decrypt servers. Double your CPU and you double your speed. Double your speed, and you double the size of the passwords you can crack and encryption you can decrypt.

  • Firewall is the other big one. Your firewall slows the trace, thus increasing the time you have to crack, decrypt, AND transfer money. This will probably be the first thing you'll want to increase. The difference between the firewall and the CPU or modem is that with the firewall, a process still takes the same amount of time to complete; you simply have more time to do it in. Whereas the CPU and modem speed up the action. What I'm getting at is, big passwords and encryptions can take a long time to complete, and it can be boring sitting there waiting for them to go through. If you double your CPU speed, they finish in half the time, which is not only beneficial to you in-game, but beneficial to you IRL as well. With the firewall, they take the same amount of time, but the time they have to work with itself increases.

    Transfers aren't too big of a deal, so don't worry yourself a ton with those. Get a firewall early on and then focus on your CPU.

  • Your modem is what dictates the speed of transfers. With a faster modem, you can move more money with each transfer. As each transfer gives you 3% trace, this can significantly reduce the amount of trace you pull for larger transactions.

  • The box underneath your modem is for the Neural Network Adapter, which costs more money than you will have at any point during the game without cheating. As far as I can tell, it doubles both the time you have before you're traced, AND how fast the action you're performing completes. But I haven't tested it much. If you need it, feel free to cheat it into your life - be warned though, using cheats resets your score to zero.

Memory and CPU both have a special feature in that you can have two of each. See that empty box under each one? Your first upgrade for either will go in that box rather than replacing the 1GB/Ghz box. Upgrades will always replace the box with the least amount in it. So if you have 1GB of memory in the top box, and 2GB in the bottom and upgrade to a 4GB memory box, it will replace the 1GB. Nice feature, really.
Equipment and Tracetime (Part 2)
Now the difficult part to wrap a head around is calculating whether or not you can crack/decrypt/or transfer with your current setup, and how much it will take to be able to.

Your base equipment is 1Ghz CPU, no firewall, and a 1gbps modem. Base trace time is 12 seconds. Base password is 4 characters. Base encryption strength is 128 bits. We'll worry about transfers in a moment, because they're kind of weird. Don't worry, this should hopefully all make sense soon.

Okay, so. Focusing on passwords because they're the easiest to understand: with a 1Ghz CPU, no firewall, and no bounces, you can crack a 4 character password without being traced. It'll crack at the last possible moment, too, so you know you can't go over 4.

If you increase your CPU to 2Ghz (by buying a second 1Ghz box), you will double your speed, allowing you to crack 8 characters without being traced. If you have 1Ghz and a level 1 firewall, you will double your time to crack it in, also allowing you to crack 8 characters without being traced. If you have 2Ghz and a level 1 firewall, however, they multiply each other. You're now working twice as fast with twice as much time, leading to you getting 4x as much done before you're traced. In other words, a 2Ghz CPU with a level 1 firewall will let you crack any password up to 16 characters without fear of a trace.

Decryption works exactly the same way, only instead of multiples of 4, it's multiples of 128. Thus doubled you can do 256, and with the 2Ghz CPU and level 1 firewall example, you can decrypt 512 bit encryptions without being traced.

Bounces multiply this one more time. One bounce doubles the amount of the time you have to work in. Two bounces triple it. Think of it as each computer connected = 1, including your own. So one bounce = 2 computers, two bounces = 3 computers, and so on.

I'm going to tell you a bunch of formulas and stuff, now. If it's too confusing, there's a possibly simpler way to understand it all below, which will be denoted by a bold and underlined title.

So the formula for cracking a password is

(4) * (CPU) * ([firewall level] + 1) * ([bounces] + 1) = maximum password length you can crack OR (4) * (CPU) * (firewall level + 1) * (computers connected) = maximum password length you can crack

Whichever is easiest for you to use. Firewall must add one, as a level zero firewall multiplies by 1, and a level 1 firewall multiplies by 2, and so on.

So if you have a 1Ghz CPU box and a 4Ghz CPU box (for 5Ghz total), a level 2 firewall, and three bounces, for instance, the equation would read as follows:

(4) * (5) * (2 + 1) * (3 + 1) = 240 OR 4 * 5 * 3 * 4 = 240

In this case, with all that equipment, you'd be able to crack a 240-character password. You'll probably never NEED to. But you'd be able to.

The same works with decryption, only instead of the base 4, substitute 128. So with the equipment in the above example, the equation would be:

(128) * (5) * (2 + 1) * (3 + 1) = 7680 OR 128 * 5 * 3 * 4 = 7680

So you would be able to decrypt any server encryption up to 7680 bits with such a set-up.

I hope this makes some sense. It can be tough to work out at first, and the tutorial doesn't teach you ANY of this. But you'll definitely want to know it, or at least be able to refer to the equations as necessary.

As for transfers, they're a little strange just in the amounts. The firewall and bounces affect their time in the same way they do cracks and decrypts, and the modem increases the transfer's speed in the same fashion as CPU does for cracks and decrypts. So for the above equations, substitute modem speed in place of CPU.

What's odd is that transfers aren't exactly base 1000. You can actually transfer up to $1199 with the basic hardware and no bounces. With a level 1 firewall, this doubles to 2398, and then adds one. So you could transfer up to $2399.

Now of course, this is hardly necessary to bother with. I never encountered a part where it was somehow more useful to transfer 1199 than 1000. 2399 could possibly be helpful in specific circumstances, but I've never used it. Your best bet is to keep it as unconfusing as possible and stick to multiples of 500.

So the equation above would be:

(1000) * (modem speed) * ([firewall level] + 1) * ([bounces] + 1) = maximum amount of money you can transfer

Modem also affects download and upload speed I believe - although I've never tested to be sure. You don't have to worry about gaining trace % or BEING traced when uploading or downloading, so the only thing this counts towards is how long you have to sit there waiting for it to finish.


The Possibly Simpler Solution:
A very handy feature to help with this is the config command. Typing "config" will display useful information about your hardware, including your current upgrades, total storage space, and storage space currently in use. But most importantly, it tells you your "tracetime decrease factor", "transfer increase factor", and "speed increase factor", all labeled much more clearly as "firewall", "modem", and "CPU", respectively. These give you a clear idea of the time/speed multiplier each piece of hardware currently gives you.


So really, all you need to do is multiply the "modem" or "CPU" (depending on what you need to know) by the "firewall", and then multiply THAT number by the number of computers you're bouncing through plus your own. Finally, multiply this number by the base of what you're looking up: "4" for passwords, "128" for encryptions, and "1000" (or "1199", as discussed above) for transfers. The resulting number will be the maximum password length/encryption strength/transfer amount you can take on without being traced.


For those interested, I mentioned before that the base time for a trace is 12. So each time you increase the trace time, you're multiplying that. A level 2 firewall and five bounces would give you 216 seconds to work with. Just bear this in mind. If you were decrypting something that required every second of that to work, you'd have to wait for three minutes and thirty-six seconds for it to complete. Now you start to understand the importance of CPU.

One more thing of note is that bounces work slightly different in the sequel, Hacker Evolution: Untold. I'll go into more detail in "Differences Between Hacker Evolution and Hacker Evolution: Untold".
Upgrading and Downgrading
Upgrading's easy, it's knowing when to do it that can be tough. Unfortunately, I can't tell you that - it's for you to figure out over the course of the game. I can, however, tell you how to upgrade your hardware.

At any point, you can type "upgrade" to bring up the upgrade menu in your log. This will display a list of upgrades, their prices, and a three- or four-character code after each upgrade which is used to purchase it. To use the code and purchase the upgrade, type "upgrade" followed by the code. Simple as that. Your money is instantly taken, and your hardware is instantly installed.

When downgrading, you must sell EVERYTHING. Typing "downgrade" will only result in the log telling you as much. In order to actually downgrade, you must type "downgrade all", which downgrades you to the default equipment, and refunds 90% of the money you've spent on any upgrades returned.
The Map


The map is a treasure trove of information. Mousing over a server (you must mouse over the plus that denotes its location, not the hostname) will tell you its encryption level, how many ports it has and how many have been hacked, how much money it has, how many files are stored on it, and how many times you can still use it as a bounce. This is the only way to know if a server has money aside from attempting to transfer some, and the server doesn't even need to be hacked for you to find out. Make sure you mouse over each server on the map at least once to be absolutely positive you're not leaving any money behind.
Bounces


Bounces work by multiplying how much time you have to run a process, as detailed in previous sections. In order to be able to bounce a server, you must have decrypted it and hacked into every port on the server. If you've done this, the hostname will change color on the map. Each server can only be used as a bounce three times. So make sure you unbounce it once you're done with it, so as not to waste any by mistake. In some levels, every single available bounce could be vital. Bounce a server by clicking on it on the map, or typing "bounce [hostname]". Unbounce by clicking on it on the map again. I don't know if you can unbounce through the command prompt. I've read that you can, but it may only be in certain versions, as the commands have never worked for me.

Update: I'm told that you can unbounce a server by typing the normal bounce command ("bounce [hostname]") again, using that server's hostname.
[Thanks to bleed for bringing this to my attention!]

When bouncing, always use the servers with the most bounces left. You can see how many a server has by mousing over the server on the map or scanning it. You may come across something which requires three bounces to get into, and if you have three servers you can bounce but have used up all three bounces on one of them, you'll either have to start the level over or risk upgrading early. If you have a server with one bounce left, and another with three, always use the one with three.

Remember, you can type "bouncehelp" for in-game information about bouncing, and "bounceinfo" for information on all known servers' current bounce capabilities.

Exploits
Exploits can be found on various servers - most prominently, dot-hackers.net. Download these whenever you can, as they can be used to get into ports while gaining only 1% trace, the same as using a password. They're easy to spot, as the filename always ends in ".exploit".

Exploits are always named after the software they break. When you scan a server, you can see which software is being used on each port, and if you have an exploit of the same name as any of them, it's far better to use it than to crack the port.

Each exploit only works on a specific port, however. It's rare, but it's possible to find one which works on one port, and then find a server running the same software, but on a different port. Make sure to cat exploits, as they will tell you which port they work on.

Basic Order of Events for Hacking a Server
So the general order of events is to first decide which server to work with. Use your judgment. Servers with low decryption and password lengths are usually meant to be hacked first. Some servers or ports can be ignored. If a server has no money and two files and both files were on the first port you opened - and you also don't need any bounces - there's no reason to gain trace by cracking the other port.

Once you have a target server, scan it and assess the situation. If it has any decryption, that's your first order of business. You can crack the ports first with no added punishment, but you cannot connect to any of them until you've decrypted the server anyways, so you may as well start with the decryption. If you cannot decrypt it without being traced, you may need to crack other servers first, in order to use them as bounces.

Once the server's decrypted, you need to get into the ports. Look for the easiest ones to get into. One with a low character count on the password, for example, would typically be the best one to crack first. Look at the software and see if you have any exploits that match, and use them if they do. If you have a password, login.

Once you access a port, some information will probably appear. A welcome screen, or what-have-you. Give it a once-over, as there may be a new hostname in there. Next, type "ls" to see the files on the server. If there are some, type "cat" followed by one of the filenames. Check this for clues and hostnames, as well (and if you DO find any hostnames, be sure to scan them). Do this for all files. Download any you need and any which end in ".exploit".

Next, complete any other objectives you have on this port. If you've hacked all of the ports on this server and it contains money, transfer as much of it as you can at a time until you have it all. Now you can logout.

If you ever run too high on trace during this process, make sure to killtrace to prevent hitting 100%.
Final Tips
A few extra things to consider:

  • The tutorial doesn't guide you through all information necessary to understand this game, but it also doesn't guide through all of the tutorial. Your best bet is to run the tutorial once to get acquainted with things, then quit out and play it again while ignoring what the email messages tell you. There's more money out there to be found, which should help you out in the coming levels.

  • Hostnames hide in the darndest of places. Be sure to check login screens, files, email address hosts (including those of anyone who personally sends you a message), and even the objectives for hostnames.

  • dot-hackers.net is a very helpful server, and is usually around even if you're never told it's in the level itself. After you're first introduced to it, you should always scan for it in each level, just in case. It often holds useful exploits which will make life much easier. Make a mental note of which port holds the exploits, though, so you don't go around cracking unnecessary ports each level.

  • Dynamic difficulty is, by default, off. I'm not entirely certain what it does, as I've never used it because I'm an enormous wuss. If you finish the game and want to give it another go with a bigger challenge, however, feel free to flick it on. Each level completed with dynamic difficulty activated grants you bonus points. Go for the high score!

  • I'm told you can also add servers to the map by attempting to decrypt them. If you then abort the decryption attempt before it finishes or is traced, you gain no trace from the action. This means that you can effectively add new servers to the map without gaining the 1% trace that normally comes with it. I haven't personally tried this, but I see no reason why it shouldn't work.
    [Thanks to Gregory Engraf for sharing this tip!]

  • If you wind up with files missing from a server, it has been suggested that this can be fixed by verifying your cache. To do this, go to your Steam Library, right-click on Hacker Evolution, and go to Properties. Click on the Local Files tab and then click "Verify Integrity of Game Cache..." If this doesn't fix your problem, maybe the next tip can help.
    [Thanks to CaptainDishman for pointing out this fix!]

  • I've personally run into a problem where the files on the final server of the final level have failed to appear, and verifying the game cache did not fix it. What I had to do was go into my Hacker Evolution game folder (for me, it's "C:\Program Files (x86)\Steam\steamapps\common\Hacker Evolution"), then navigate to the "hemod-hackerevolution" folder, then to the folders for the level and server the files were missing from ("he-level-9" and "aicore.xenti.com", respectively), and finally to the "files" folder therein. Here were four files which ended in ".b". Changing these extensions to ".bin" fixed the problem. If you happen to have a problem with missing files in another level which is not fixed by verifying the game cache, you may need to do something along these lines to fix it, substituting in the proper level, server, and possibly file extension instead of what I used.
    [Thanks to erpanfi for pointing out this fix!]
Differences Between Hacker Evolution and Hacker Evolution: Untold
If you decide to play Hacker Evolution's sequel, Hacker Evolution: Untold, after finishing HE (and you should), there are a few differences you might want to know, first:

  • In HEU, you have a new "deletelogs" command, which cuts all trace gained from a connected server in half. You must decrypt the server and hack all ports in order to use it, and sometimes this means hacking unnecessary ports which could result in you having a higher trace after deleting the logs than you would if you hadn't hacked those ports at all. Act wisely.

  • Bounces work differently. In HE, each bounce increases your time multiplier. One bounce multiplies it by two, two bounces multiply it by three, etc. In HEU, however, each bounce doubles your time. The first bounce doubles it, the second bounce doubles THAT, and so on. Thus, you can get much more done with less bounces in HEU.

  • Exploits have the port number they work on right in the filename. You no longer have to cat exploits to know which port they're for.

  • You can decline to proceed to the next level right away upon completing a level. You then have ten minutes to complete any unfinished business, such as deleting logs, or transferring money. If at any time you wish to proceed to the next level before the ten minutes are up, you can type "nextlevel" to be taken there.

    Other than that, it's basically more of the same. Personally, I think HE Untold is a tidier game, and the better of the two. If you enjoy Hacker Evolution, you should certainly give Untold a shot.


Thank you for reading my guide! I hope it helped you gain a better understanding of the game mechanics so you're not overwhelmed as soon as you start playing. I hope it wasn't too confusing or too wordy, as I tried my best to make it all make sense. I hope you do not wish to punch me, now.

I mostly just hope that last one.
48 Comments
a.s.barker Mar 12, 2023 @ 1:55pm 
I really appreciate your work on this. You`ve been a great help for me as a newbie to this type of game.
iggy May 29, 2022 @ 8:34pm 
I've created a python script to calculate trace time and how many bounces are needed based in your formulas: https://gist.github.com/iuriguilherme/685fff3da9d2c67216ac74561219bbf5

I would paste the script code here but it's too verbose. Cheers
Bandit Darville May 28, 2019 @ 9:43am 
Great bit of info! And also thanks for blacking out spoiler!
king popo swift Feb 12, 2019 @ 6:06am 
Thanks @comrade St Nikolai I'm on lvl 2 now.
Comrade St. Nikolai  [author] Feb 8, 2019 @ 3:46pm 
@KING POPO DONALD TRUMP - If you mean the first one, you just have to crack it. You should receive a message in the lower right that tells you how. The timer will run out on that one, but it's not game over. You'll just gain a large amount of trace. No worries though, you'll still crack the password, and you'll find out how to remove trace at some point.

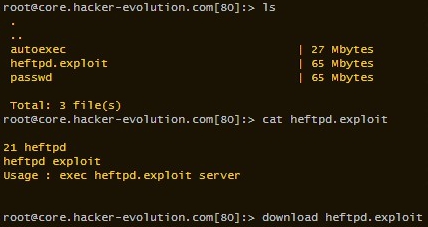
If you mean using the exploit, then you have to first download it. And then run it using the exec command. It will only work on servers with httpd running on the correct port. You can see which port the exploit works on by typing cat followed by the exploit's name.
king popo swift Feb 7, 2019 @ 6:05pm 
I just spent 30 minutes on first level. I know it's httpd but how do I hack the password?
WintersGlade May 4, 2017 @ 7:16pm 
Thanks for this awesome guide! If Prima saw this they would be so jealous xD Great work, I can't imagine how long it must have taken to put all this together, especially with all the formulas and examples!
Stefire Sep 16, 2016 @ 4:54pm 
Thank u
Comrade St. Nikolai  [author] Jul 30, 2016 @ 6:00pm 
@Architector #4 - It's been a while since I last played, but I'm pretty sure they do make you take one 50% trace hit to teach you why doing whatever they have you doing without the right precautions is a bad thing. So that should be fine.

Nice bug find, too. I wonder if speedrunners could utilize that, somehow?
Architector #4 Jul 30, 2016 @ 10:38am 
Okay, once a bug happened while i was trying the tutorial level again: when the level overview of tutorial level appeared, i pressed ENTER then QUICKLY wrote "crack co" and pressed TAB then ENTER right after, to crack the server faster, and when the email/message/whatever appeared, that trace suddenly dissapeared. This happened only once and i couldn't do the bug again, but, good thing to know i guess :D