Borderlands GOTY

Borderlands GOTY

133 Bewertungen
Killing Crawmerax The Invincible & His Drop Stats
Von blk magic
A guide for killing Crawmerax without the glitch spot.
   
Preis verleihen
Favorisieren
Favorisiert
Entfernen
Reasons for Making This Guide
Farming Crawmerax is about all I do in Borderlands 1. I like having other players join me in my pursuit of finding the highest quality of weapons, unique weapons, and of course the elusive Pearlescent weapons. So many times, I see players I play with use the wrong weapon types against the Craw minions to second wind.
Best Classes to Kill/Farm Crawmerax
Generally, there is no debate when it comes to the easiest class to kill Crawmerax. This is strictly my opinion as far as the rest of the list goes:

  1. Lilith
  2. Mordecai
  3. Roland
  4. Brick

Lilith
Lilith's phasewalk action skill makes evading Crawmerax attacks extremely easy. It also makes it easy to destroy Craw's backside. Inner Glow allows you to regen health while phasewalking which makes you very difficult to kill.

Mordecai
Mordecai has great damage output with his pistols and sniper rifles. It is not uncommon for him to blow off Craw's limbs with one shot.

Roland
Roland has his turret which acts as a distraction for the Craw minions and Crawmerax himself. This allows Roland to get safely located around the rock formations for protection to continue his assault. It also gives him time to regen his shield and health.

Brick
Brick needs to quickly get to one of the rock formations for protection against Craw. He has no distraction tactic. The skill Diehard allows the player to stay second winded for longer which is useful if you need more time to kill.
Class SkillTree
Add skills that increase damage, fire rate & magazine size with any weapon. Next would be to add skills that increase your survivability (Health Regen, Shield Regen, Health Capacity, etc.). Craw and his minions can one or two hit you then you are down. So, there is no real way to get around that unless you use a hacked shield that makes you invincible. Where's the fun in that?

All characters are assumed to be at level 69.

Lilith


Mordecai


Roland


Brick
Weapons, COM's & Shield - Oh My!
The great thing about Borderlands 1 is that you can use lots of different weapons reliably without having to build your skills around guns. IE: I can take out Craw with a Sniper Rifle on Lilith with a Mercenary SMG COM and with no skill benefit for sniper rifles. Why? Because the sniper rifle is high quality.

Of course, using weapons that have synergy with your Class Mod and your skills is a lot better than using a weapon that doesn't have synergy.
______________________________________________________________________________
CLASS MODS
¯¯¯¯¯¯¯¯¯¯¯¯¯¯¯¯¯¯¯¯¯¯¯¯¯¯¯¯¯¯¯¯¯¯¯¯¯¯¯¯¯¯¯¯¯¯¯¯¯¯¯¯¯¯¯¯¯¯¯¯¯¯¯¯¯¯¯¯¯¯¯¯¯¯¯¯¯¯¯

Mercenary Class Mod is the best for taking down Craw quickly. It is my personal favorite. Specter is a difficult class mod to get a hold of but if you like using sniper rifles, that is the one for you. It has sniper rifle ammo regeneration. The text pushes it off.


Gunslinger is an ideal candidate for taking down Craw versus the Sniper. Revolvers and repeaters tend to have a higher fire rate which means you can shoot more bullets at Craw & his minions faster. However, it still boils down to preference. Both options will blow off Craw limbs when you pair the Unforgiven with the Gunslinger and the Skullmasher with the Sniper Mod.


Depending on the weapons you prefer for Roland, you can use either the Commando mod for shotguns or the Rifleman & Heavy Gunner mod for Assault Rifles. Both the Commando and the Rifleman mods have ammo regeneration. The Heavy Gunner mod gives you a higher magazine size and a higher fire rate with Rifles. This helps with how much damage you output before you reload.


For Brick, an Ogre class mod is the best option. The extra fire rate for shotguns with ammo regeneration will pair nicely with the Hunter's Striker when fighting Craw. The Centurion class mod, which is a bit easier to find, gives you much needed health regeneration and increase.

______________________________________________________________________________
WEAPONS
¯¯¯¯¯¯¯¯¯¯¯¯¯¯¯¯¯¯¯¯¯¯¯¯¯¯¯¯¯¯¯¯¯¯¯¯¯¯¯¯¯¯¯¯¯¯¯¯¯¯¯¯¯¯¯¯¯¯¯¯¯¯¯¯¯¯¯¯¯¯¯¯¯¯¯¯¯¯¯

These weapons came to mind as good weapons for taking out Craw's limbs and back. There are more in the game that are capable of this. What you look for is high damage weapons with extra critical hit % bonus. Every hit on Craw is critical so the extra bonus is worthwhile.

¯¯¯¯¯¯¯¯¯¯¯¯¯¯¯¯¯¯¯¯¯¯¯¯¯¯¯¯¯¯¯¯¯¯¯¯¯¯¯¯¯¯¯¯¯¯¯¯¯¯¯¯¯¯¯¯¯¯¯¯¯¯¯¯¯¯¯¯¯¯¯¯¯¯¯¯¯¯¯

For Maggots, it is an absolute necessity that you use a shock weapon. No other type of weapon will kill this guy quick enough. The Orion is an excellent choice next to the elusive Pearl weapon Aries. However, I have tested a x1 Surkov legendry shock and it kills the Maggot with a clip. So most likely any x4 shock will do.

¯¯¯¯¯¯¯¯¯¯¯¯¯¯¯¯¯¯¯¯¯¯¯¯¯¯¯¯¯¯¯¯¯¯¯¯¯¯¯¯¯¯¯¯¯¯¯¯¯¯¯¯¯¯¯¯¯¯¯¯¯¯¯¯¯¯¯¯¯¯¯¯¯¯¯¯¯¯¯

For the Green Craw Worms, it is also mandatory that you use an incendiary weapon. So of course, the Hellfire, Firehawk & the Volcano carve through this guy nicely. Like the Maggot, any x4 incendiary weapon would likely take care of this guy.

¯¯¯¯¯¯¯¯¯¯¯¯¯¯¯¯¯¯¯¯¯¯¯¯¯¯¯¯¯¯¯¯¯¯¯¯¯¯¯¯¯¯¯¯¯¯¯¯¯¯¯¯¯¯¯¯¯¯¯¯¯¯¯¯¯¯¯¯¯¯¯¯¯¯¯¯¯¯¯

For the Armored Craw Worms, use corrosive weapons to take this guy down. This slow-moving worm has more health, so he can take a few more shots. I will test other corrosive weapons. However, because this worm is a bit more tanky, these three weapons are highly recommended.

¯¯¯¯¯¯¯¯¯¯¯¯¯¯¯¯¯¯¯¯¯¯¯¯¯¯¯¯¯¯¯¯¯¯¯¯¯¯¯¯¯¯¯¯¯¯¯¯¯¯¯¯¯¯¯¯¯¯¯¯¯¯¯¯¯¯¯¯¯¯¯¯¯¯¯¯¯¯¯
*WILL ADD MORE WEAPON OPTIONS LATER THAT WORK AGAINST ENEMIES*
______________________________________________________________________________
SHIELD
¯¯¯¯¯¯¯¯¯¯¯¯¯¯¯¯¯¯¯¯¯¯¯¯¯¯¯¯¯¯¯¯¯¯¯¯¯¯¯¯¯¯¯¯¯¯¯¯¯¯¯¯¯¯¯¯¯¯¯¯¯¯¯¯¯¯¯¯¯¯¯¯¯¯¯¯¯¯¯
Shield capacity alone will not save you in this fight. It is important to find a shield with high recharge rate and an added benefit such as quick health regeneration. The Rose shield has a special ability where when it is depleted from a full charge, it quickly regenerates a small portion of your health. This keeps you alive throughout the battle.

Enemy Behaviors
______________________________________________________________________________
CRAWMERAX
¯¯¯¯¯¯¯¯¯¯¯¯¯¯¯¯¯¯¯¯¯¯¯¯¯¯¯¯¯¯¯¯¯¯¯¯¯¯¯¯¯¯¯¯¯¯¯¯¯¯¯¯¯¯¯¯¯¯¯¯¯¯¯¯¯¯¯¯¯¯¯¯¯¯¯¯¯¯¯
Craw can damage you in three different ways:

Close Range Attack


Long Range Attack


Area Damage Attack


______________________________________________________________________________
CRAW MAGGOT
¯¯¯¯¯¯¯¯¯¯¯¯¯¯¯¯¯¯¯¯¯¯¯¯¯¯¯¯¯¯¯¯¯¯¯¯¯¯¯¯¯¯¯¯¯¯¯¯¯¯¯¯¯¯¯¯¯¯¯¯¯¯¯¯¯¯¯¯¯¯¯¯¯¯¯¯¯¯¯
Erratic Speed**


Lunge Attack


Close Range Attack


Ranged Attack


______________________________________________________________________________
GREEN CRAW WORM
¯¯¯¯¯¯¯¯¯¯¯¯¯¯¯¯¯¯¯¯¯¯¯¯¯¯¯¯¯¯¯¯¯¯¯¯¯¯¯¯¯¯¯¯¯¯¯¯¯¯¯¯¯¯¯¯¯¯¯¯¯¯¯¯¯¯¯¯¯¯¯¯¯¯¯¯¯¯¯
Lunge Attack


Close Range Attack


Ranged Attack


______________________________________________________________________________
ARMORED CRAW WORM
¯¯¯¯¯¯¯¯¯¯¯¯¯¯¯¯¯¯¯¯¯¯¯¯¯¯¯¯¯¯¯¯¯¯¯¯¯¯¯¯¯¯¯¯¯¯¯¯¯¯¯¯¯¯¯¯¯¯¯¯¯¯¯¯¯¯¯¯¯¯¯¯¯¯¯¯¯¯¯
Close Range Attack


Ranged Attack


______________________________________________________________________________
**Not an attack, however difficult to shoot at distance while moving at top speed
Strategy
______________________________________________________________________________
BEFORE/WHILE YOU ASCEND THE ELEVATOR
¯¯¯¯¯¯¯¯¯¯¯¯¯¯¯¯¯¯¯¯¯¯¯¯¯¯¯¯¯¯¯¯¯¯¯¯¯¯¯¯¯¯¯¯¯¯¯¯¯¯¯¯¯¯¯¯¯¯¯¯¯¯¯¯¯¯¯¯¯¯¯¯¯¯¯¯¯¯¯
Stock up on any ammo.

Make sure you have 1 shock weapon, 1 incendiary weapon, 1 corrosive weapon and 1 high damage/high critical damage weapon.

Tip: Remap keys so that you can quickly switch to a specific elemental gun. That way you are not using the mouse wheel to find the gun you need to take out a crab worm. Remember which key is which. As an example, the '1' key is my Craw weapon, '2' is my shock/maggot weapon, '3' is my incendiary green worm weapon...etc.

Etiquette Tip: Do not jump on players heads in the elevator. You or the person you are jumping on can potentially glitch under the elevator shaft leaving you or the other player stuck there. You can kill yourself with a rocket launcher/nades or wait for someone to use the elevator again.
______________________________________________________________________________
THE FIGHT
¯¯¯¯¯¯¯¯¯¯¯¯¯¯¯¯¯¯¯¯¯¯¯¯¯¯¯¯¯¯¯¯¯¯¯¯¯¯¯¯¯¯¯¯¯¯¯¯¯¯¯¯¯¯¯¯¯¯¯¯¯¯¯¯¯¯¯¯¯¯¯¯¯¯¯¯¯¯¯
The first thing you want to do is run to the rock formations on the map. Regardless of class, these rocks can protect you from Crawmerax's attacks.


Tip: Jump and strafe A LOT. Jumping and strafing throws off the Craw's ranged attack as well as the minions lunges and ranged attacks as well. This has saved me multiple times. I highly recommend that you get used to erratically jumping and strafing.

While you are running towards one of these rocks, look for what crabs are on the playing field. Only three are active at a time. The fast Craw Maggots you will want to kill first, whether they are bothering you or not (they usually are bothering you at this point anyway).

Once at one of the formations, start shooting into Craw. While you are doing so, you will want to start killing the Green Craw worms. Their lunges are fast and annoying.

Keep moving around the formation. Play ring-around-the-rosie with Crawmerax. If Craw starts spitting his venom shots at you, hide behind the rocks. He usually gives you a distinct grumbling warning before he begins shooting them. So, it should be easy to hide. Same with his area damage attack. If you see him dig backwards, he is going to do his area damage attack. If it is getting difficult to avoid the crab minions due to them being on all sides of the rocks, you can run to the other rock formation across the map to start new.

Tip: Try and leave the Armored Purple Crabs on the field. They are slow, and they don't lunge. You can easily out run them. This way you can focus more on Craw himself. Only kill them when you must.

While you are running around the formation, shooting off limbs, make sure to look at your compass. If the red diamond(s) are too large, make sure you check on the minions and adjust your running. Jumping and strafing isn't as fast as you running on the ground so make sure you out run them and continue your assault on Craw once they are at a safer distance.

If you are having trouble shooting out his back, I recommend that you use the rock formation with the archway. This archway is a window to his back. You can usually get some shots off him this way. However, a lot of times you can catch his back exposed when he is trying to go around his crab slaves. He'll start twirling around trying to figure out a way to get to you. This is a good time to shoot out his back.
______________________________________________________________________________
CLASS SPECIFIC TIPS
¯¯¯¯¯¯¯¯¯¯¯¯¯¯¯¯¯¯¯¯¯¯¯¯¯¯¯¯¯¯¯¯¯¯¯¯¯¯¯¯¯¯¯¯¯¯¯¯¯¯¯¯¯¯¯¯¯¯¯¯¯¯¯¯¯¯¯¯¯¯¯¯¯¯¯¯¯¯¯
LILITH
Lilith is simple. If you can't avoid getting hit by a Craw attack or a minion attack, just pop into your phasewalk and run to the other formation and hide behind it. Once you are safely hidden behind it, come out of the phasewalk. The enemies cannot see you through the rocks, so it is safe to wait for your phasewalk to cooldown before you begin your attacks again.

MORDECAI
The rocks are your friend. Since Mordecai doesn't have an action skill that benefits him during this fight it is important that he stays around these rocks. He absolutely shreds off Craw's limbs with the Unforgiven and the Skullmasher. So, try and get your hands on the Gunslinger mod/Unforgiven or the Sniper mod/Skullmasher as quickly as possible. Otherwise the fight will just take a little bit longer.

ROLAND
If the Craw minions come on to you quickly after you ascend the elevator, use your turret so that you can at least make it to one of the formations. All the enemies will start attacking your turret. Once you are close to the formation, start shooting at Craw. Use your turret when you get into trouble. Yes, the cooldown is long so you just have to use it wisely. That is why you still need to hang around formations. Once your turret is ready, you can use it as a distraction again to change positions and/or to regen your health/shields.

BRICK
**WILL BE WRITTEN LATER**
(HAVEN'T PLAYED AS BRICK ENOUGH)
______________________________________________________________________________
THE GLITCH SPOT
¯¯¯¯¯¯¯¯¯¯¯¯¯¯¯¯¯¯¯¯¯¯¯¯¯¯¯¯¯¯¯¯¯¯¯¯¯¯¯¯¯¯¯¯¯¯¯¯¯¯¯¯¯¯¯¯¯¯¯¯¯¯¯¯¯¯¯¯¯¯¯¯¯¯¯¯¯¯¯
I left this part out of the guide mostly since there is a lot of material out already that goes over strategies involving this spot. However, I will quickly go over it anyway.

Once you ascend the elevator, run immediately to your left. The glitch spot is well known. You can find out exactly where on the map it is with a quick Google search. Once you are in it, Craw and his minions will freeze their position, face you, and start screeching into the air.

At this point, you just shoot Craw's limbs off. Pretty simple. Except most people still have trouble because of the back.

Once the limbs are done, hop out and use the strategy I outlined here.

Unfortunately, I do not know the strategies for shooting off his back spot from the glitch spot. As you can tell, I don't use it. ¯\_(ツ)_/¯

Full Run Videos
Lilith

Mordecai

Roland

Brick
**COMING SOON**
After The Kill
Once Crawmerax is dead and you have looked through the loot, you can leave and rejoin the map to spawn him again. You can do this around 4 to 5 times before your game will crash.

Etiquette Tip: Do not ninja the loot. Ninja'ing is when a player rushes to the recently killed Craw loot and pounds on the 'E' pick up button sucking up all the loot to sift through for themselves and dropping the leftovers for the rest of the group. Calmly look through the loot. If you see another player pick up a gun you are looking for, ask if they want to trade or ask if they can dupe the gun for you if you are desperate.

Why does it crash? There is too much loot on the ground for the game to handle. You have a few options to prevent or prolong the game so that you can farm him more without rebooting.

Best Option: Make the loot slowly disappear based on a time you set. Requires editing .INI files. Works with white and green rarities. **WARNING: AMMO, HEALTH VILES, AND MONEY THAT ARE ON THE GROUND/IN CHESTS DISAPPEAR** Navigate to C:\Program Files (x86)\Steam\steamapps\common\Borderlands\WillowGame\Config and open DefaultGame.ini with notepad. Press CTRL+F and type in Short to find the code you will be editing.

[WillowGame.WillowPickup]
ShortLivedDropLifeSpan=20 //This is the white rarity time in seconds. Default was 600 (Affects ammo, money and health viles on the ground)
LongLivedDropLifeSpan=100 //This is the green rarity time in seconds. Default was 1800
PickupShrinkDuration=15

Blue, Purple, Orange, and Pearl will remain on the ground. So you must use the other options outlined here if the loot piles get out of hand.

Option 2: Picking up the loot and holding it. (Sell it later or drop it later)

Option 3: Picking up the loot and selling it at the vendors.

Option 4: Picking up the loot and dropping it on the map outside Craw's Lair. This will allow you to do another set of 5 Craw kills. Game may crash when there is too much loot on the map outside.

I know what you are thinking. How do you pick up all that loot when you can only have a max of 72 backpack spaces? There is a third party program called WillowTree that edits your save game file. You can give yourself up to 1000 backpack spaces. You will need to do this if you want to seriously farm Craw. Rebooting the server every 5 kills will get a bit annoying since you have to make the drive out everytime.

WillowTree Download Link[sourceforge.net]

One question that people ask about this issue with the game crash is if they can throw the loot off the ledge instead of going down to the vendor to sell it or put it on the other map. The answer to that question is that you cannot do this. I have tried it previously and the server still crashed. The loot doesn't disappear off the map.
Overlooked Loot & Tricks
I will go over a few unique weapons that are easily overlooked in Crawmerax's loot pile as well as go over some tricks.
______________________________________________________________________________
EASILY OVERLOOKED LOOT
¯¯¯¯¯¯¯¯¯¯¯¯¯¯¯¯¯¯¯¯¯¯¯¯¯¯¯¯¯¯¯¯¯¯¯¯¯¯¯¯¯¯¯¯¯¯¯¯¯¯¯¯¯¯¯¯¯¯¯¯¯¯¯¯¯¯¯¯¯¯¯¯¯¯¯¯¯¯¯¯¯
The Draco
The Draco is a bugged weapon that is supposed to spawn as a legendary with the red text 'Dragon Fire!'. Instead, it spawns as a purple rarity weapon with either Glorious Machine Gun or Glorious Massascre. It can have x2-x4 incendiary and has a cylinder shaped accessory under the barrel. Draco's have a large magazine size ranging from 79-124.


The Penetrator
The Penetrator can spawn as a green, blue, or purple. Which is why it can be overlooked, just like the Draco. Except the Penetrator atleast has the red text 'Sniper Killer... Qu'est que c'est'.


Anarchy SMG's
Anarchy SMG's are not legendary and have no red text. They can be blue or purple rarity which makes them easily overlooked. They are great Craw killing machines.

Mashers
Masher is a prefix on some revolvers which fire 7 bullets at a time. They will have 7x(DMG) on their item card. The three legendaries that can potentially have this are the Unforgiven, Equalizer, and the Anaconda. Even though they don't have the name Masher, they are all grouped in with eachother. There are non-legendary variants of the Masher that are easily overlooked. All Mashers are great for killing Craw.

Non-Pearl Shields & Class Mods
Players tend to brush over anything that is not a orange legendary or pearl. Shields and Class Mods aren't an exception. I've seen some players walk past some pretty good Impenetrable Panacea's and some really high recharge rate shields (in the 500's).

With Class Mods, even if the mod doesn't belong to your class, pick it up if it's good! You can always transfer it through the locker, through a friend or through WillowTree to the appropriate class.
______________________________________________________________________________
LOOT TRICKS
¯¯¯¯¯¯¯¯¯¯¯¯¯¯¯¯¯¯¯¯¯¯¯¯¯¯¯¯¯¯¯¯¯¯¯¯¯¯¯¯¯¯¯¯¯¯¯¯¯¯¯¯¯¯¯¯¯¯¯¯¯¯¯¯¯¯¯¯¯¯¯¯¯¯¯¯¯¯¯¯¯
Legendary Orange Color
Have you noticed that your legendaries have varying degree's of the orange color? Lower in your backpack, you notice that the oranges get lighter, almost yellow instead of orange. The brighter the orange, the higher the quality. The more yellow, the lower the quality. Sure this trick probably isn't perfect when judging what has perfect parts. The degree's of color tend to get blured so this trick falls apart when you have all bright oranges in your backpack.

Class Mod Sell Amount
If you look at the Class Mods near the top of this guide, you will notice something that they have in common. Many of them have the SAME sell amount; $2,284,580. If you see a Class Mod with this selling amount, it has high quality parts! So pick that bad boy up.
¯¯¯¯¯¯¯¯¯¯¯¯¯¯¯¯¯¯¯¯¯¯¯¯¯¯¯¯¯¯¯¯¯¯¯¯¯¯¯¯¯¯¯¯¯¯¯¯¯¯¯¯¯¯¯¯¯¯¯¯¯¯¯¯¯¯¯¯¯¯¯¯¯¯¯¯¯¯¯¯¯
Loot Statistics
______________________________________________________________________________
LOOT STATISTICS
¯¯¯¯¯¯¯¯¯¯¯¯¯¯¯¯¯¯¯¯¯¯¯¯¯¯¯¯¯¯¯¯¯¯¯¯¯¯¯¯¯¯¯¯¯¯¯¯¯¯¯¯¯¯¯¯¯¯¯¯¯¯¯¯¯¯¯¯¯¯¯¯¯¯¯¯¯¯¯¯¯
I'm not going to re-invent the wheel. Another player already did a large study of ~120,000 item drops from Crawmerax. The user Meltinthesun conducted this study. I will merely transpose the important stuff here. The study is located here[forums.gearboxsoftware.com]. All credit goes to this player.

General
1 in every 10 weapon drops is a orange legendary.
1 in every 5250 weapon drops is a pearl.
1 in every 5175 items drops is a pearl shield.

Translation into the amount of Crawmerax kills needed for a pearl weapon or shield.

1 pearl for every 77 single player kills. (1.29%)
1 pearl for every 42 four player kills. (2.38%)

Specific Legendaries
Note- Total Crawmerax Kills: ~1,200

Weapon
# of Craw Kills Needed
% Chance
Anaconda
8
12.5%
B*stard
17
5.9%
B*tch
100
1%
Bulldog
10
10%
Butcher
150
0.6%
Chimera
19
5.3%
Cobra
34
2.9%
Crux
20
5%
Cyclops
27
3.7%
Defender
10
10%
Defiler
3
33.3%
Destroyer
48
2.1%
Draco
10
10%
Equalizer
2
50%
Executioner
34
2.9%
Firehawk
4
25%
Friendly Fire
15
6.6%
Gasher
71
1.4%
Gemini
16
6.3%
Guardian
15
6.8%
Hammer
13
7.9%
Hellfire
9
12.3%
Hornet
12
8.3%
Hydra
24
4.3%
Invader
50
2%
Mongol
45
2.3%
Nidhogg
134
0.8%
Ogre
19
5.5%
Orion
30
3.4%
Penetrator
29
3.5%
Plague
10
10%
Protector
10
10%
Raven
11
9.8%
Reaper
200
0.5%
Rebel
12
8.8%
Redemption
134
0.8%
Revolution
11
9.8%
Rhino
110
0.9%
Savior
25
4%
Skullmasher
25
4%
Striker
55
1.8%
Surkov
12
9%
Thantos
4
25%
Troll
30
3.4%
Unforgiven
19
5.5%
Vengeance
55
1.8%
Violator
27
3.8%
Volcano
3
33.3%
Wildcat
28
3.6%

Most Common
  1. Equalizer
  2. Defiler
  3. Volcano
  4. Firehawk
  5. Thantos
  6. Anaconda
  7. Hellfire

Most Rare
  1. Reaper
  2. Butcher
  3. Nidhogg
  4. Redemption
  5. Rhino
  6. B*tch
  7. Gasher
FAQ's
**Reserved for Frequently Asked Questions**
Change Log
_______________________________________________________________________________
November 3rd, 2017
¯¯¯¯¯¯¯¯¯¯¯¯¯¯¯¯¯¯¯¯¯¯¯¯¯¯¯¯¯¯¯¯¯¯¯¯¯¯¯¯¯¯¯¯¯¯¯¯¯¯¯¯¯¯¯¯¯¯¯¯¯¯¯¯¯¯¯¯¯¯¯¯¯¯¯¯¯¯¯¯
Loot Statistics
  • Changed the stats to be less confusing.
  • Added the number of Crawmerax Kills needed to obtain the specific legendary with its percentage chance.
________________________________________________________________________________
November 2nd, 2017
¯¯¯¯¯¯¯¯¯¯¯¯¯¯¯¯¯¯¯¯¯¯¯¯¯¯¯¯¯¯¯¯¯¯¯¯¯¯¯¯¯¯¯¯¯¯¯¯¯¯¯¯¯¯¯¯¯¯¯¯¯¯¯¯¯¯¯¯¯¯¯¯¯¯¯¯¯¯¯¯¯
Overlooked Loot & Tricks
  • Added new section with commonly overlooked weapons & items.
  • Added a few tricks on how to determine loot quality.
Loot Statistics
  • Added Loot Statistics section that shows total number of legendaries dropped, number of kills needed for a pearl, etc.
¯¯¯¯¯¯¯¯¯¯¯¯¯¯¯¯¯¯¯¯¯¯¯¯¯¯¯¯¯¯¯¯¯¯¯¯¯¯¯¯¯¯¯¯¯¯¯¯¯¯¯¯¯¯¯¯¯¯¯¯¯¯¯¯¯¯¯¯¯¯¯¯¯¯¯¯¯¯¯¯¯
29 Kommentare
B4ki 3. Juli 2023 um 6:05 
medkits have saved me alot in the battle, so stock up on them
blk magic  [Autor] 8. Okt. 2022 um 20:49 
It is finished in the Borderlands GOTY Enhanced community hub. The only thing missing is a Brick full craw video. Haven't bothered getting a Brick character high enough to kill and record a video. It would look close to the same as the other videos. Strategy doesn't change from character to character.
Gray 1. Okt. 2022 um 19:18 
Will this ever be finished?
>[DEMIG] EFC 1. Aug. 2022 um 5:34 
borderlines
Poatan 15. Juli 2019 um 11:22 
Is it necessary to be level 69 before fighting him or can this be done at 60 and above?
Naga the Confused Undead 16. März 2019 um 13:37 
remember the ledge
rogueKlyntar 14. Dez. 2018 um 13:57 
Continuation of previous comment:

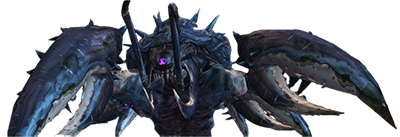
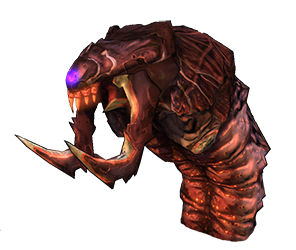
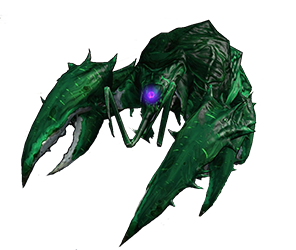
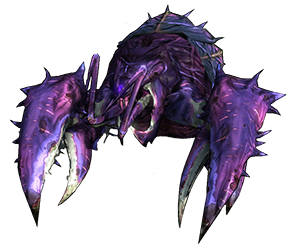
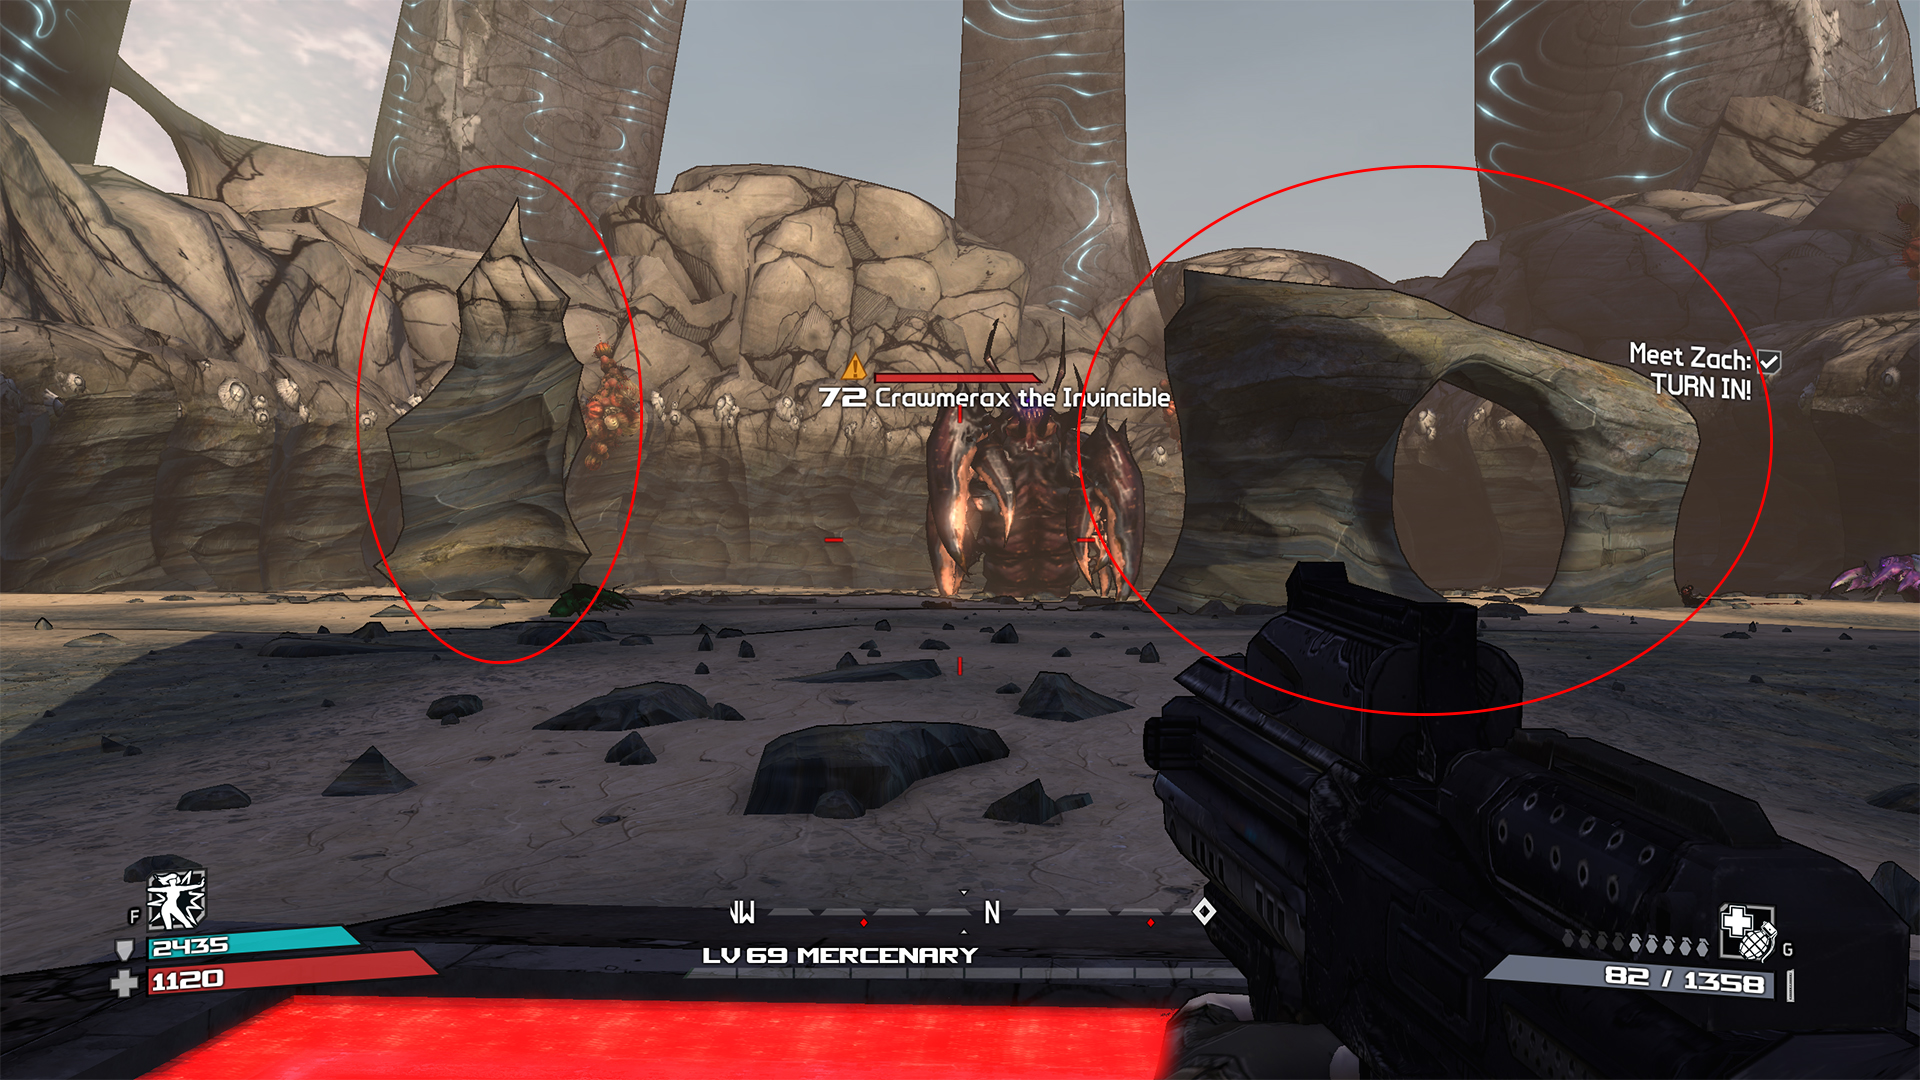
I am not sure if it was just dumb luck or not, but the entire time I was working on the arms he just sat there covering himself up, not even burrowing periodically. I did this from beside/under the small rock with a hole through it.
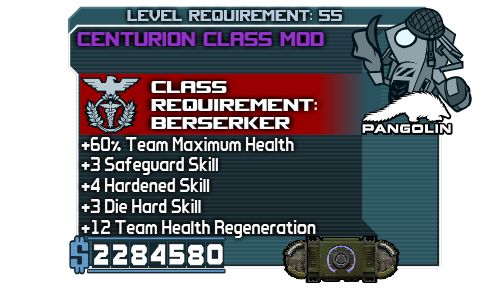
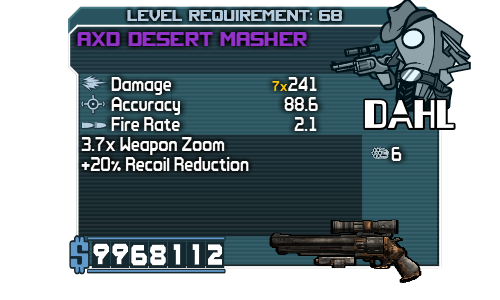
In hindsight, a cluster mod on my grenades might have made the back easier. The first ten minutes on the back were spent running around (didn't work. even with a speed cheat) and waiting for him to burrow so I could shoot at the ground in front of him and hope to hit the crit spot as it passed into the ground.
rogueKlyntar 14. Dez. 2018 um 13:57 
I am just going to repost an edited part of my reddit post here:

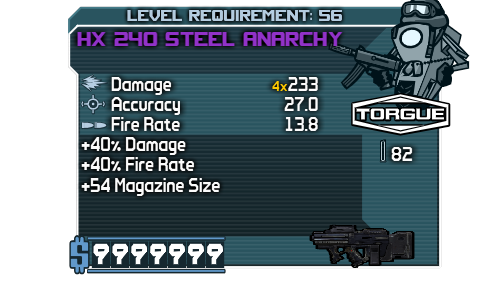
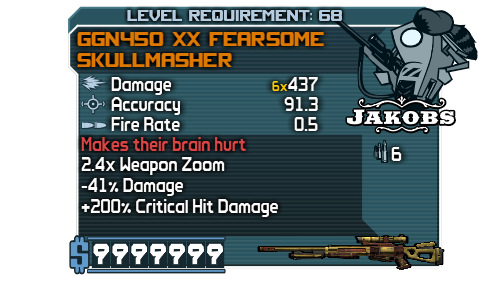
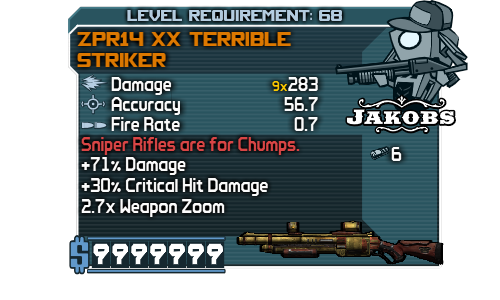
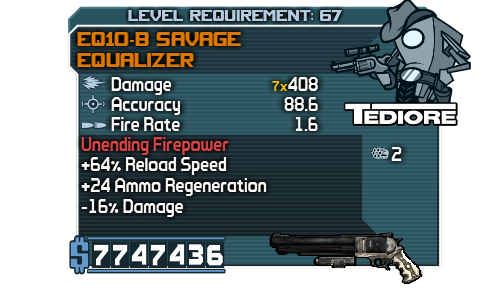
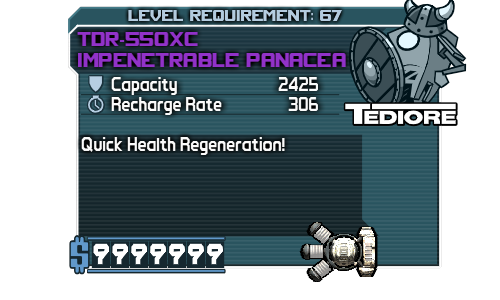
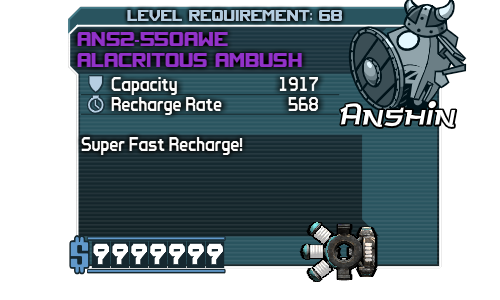
So just know that this was not really a fair fight: I used demigod mode and an infinite ammo cheat. In my defense, though, I did use one of those guns with ammo-(re?)generation (Acid, if it matters) and tried to kill a Craw whenever my HP hit 1 so I could say I didn't cheat on *everything*.
The legs were the easiest because of a glitch that allows you to shoot through the armor while he is covering the purple areas on his sides. You don't even need to be at an angle to his front.
Oersted 8. Nov. 2018 um 18:51 
Yo this guide was amazing. It'll help out when i hit craw at level 69
blk magic  [Autor] 2. Nov. 2018 um 14:45 
Yes, the ranks are about ease. I have noticed people mostly just want to kill him a few times for some legendaries and/or get the achievement. They don't care too much about farming him rapidly.