Transport Fever

Transport Fever

93 voti
The Most Profitable City Bus Routes? (Updated Oct 2017)
Da ajax_post
In this guide I test several different ways of routing buses in towns. Looking at circular and point-to-point systems to work out which, over five years, generates the most profit and enables growth in connected services.
   
Premio
Aggiungi ai preferiti
Preferito
Rimuovi dai preferiti
Intro and Disclaimer
A comparison of different types of urban bus routes to work out which might be the most profitable way to transport passengers between residential (particularly those coming in on a train), commercial, and industrial areas.

All testing is done without any mods but I am using a user created map - the South West England Map created by Painful Agenda: http://steamcommunity.com/sharedfiles/filedetails/?id=860429473

There is only a single train line to connect two towns on the map, Plymouth and Torquay. The secondary town has a single bus route to enable traffic to and from all three zones in that town. I have also created two cargo routes supplying food and construction materials into the main town, Plymouth.

In the main town I test seven route variations to determine how much money they make over a period of (nearly) five years. With the exception of two scenarios all routes go through a bus station adjacent to the intercity train station on the basis that it is inter-city travel that promotes the urban development:

  1. Two separate circuits through all zones, one clockwise and one anti-clockwise
  2. Single bi-directional circuit
  3. Two separate commercial and industrial routes each including a residential stop (there are two variations on this, one with the residential stop before the commercial or industrial stop, and one with the residential stop after the commercial or industrial stop)
  4. Three strictly point-to-point routes (to residential, to commercial, and to industrial) all going through the main bus station
  5. Two strictly point-to-point routes one to commercial and one to industrial with no additional residential services
  6. Two strictly point-to-point routes one to commercial and one to industrial plus an additional route that links the residential area with the commercial and industrial zones but does not go through the bus/train station hub
  7. Variation on the previous scenario, adding a second internal residential route and more bus stops. The residential lines do not go through the bus/train station hub.

Additional Comments
Please read the comments section for some extra insights. There are some good alternative strategies highlighted by several other players and there is discussion of a few other considerations, such as frequency, that aren't mentioned in the body of this guide.

Disclaimer
The results I am presenting are from a five year period with new routes and new towns, results in much larger, busier or more diverse towns may be different although I would expect the same basic rules mentioned in the Conclusions to hold true.

This test was conducted in August 2017 and so makes use of road waypoints and terminal/platform assignment to manage the routes and prevent any changes as a result of the dynamic town development.

I have not looked at or tested any code or scripts, these results are from purely playing the game as shown in the images. :)
The Scenarios Tested (Outline)
The test town, Plymouth, is a good size (RCI numbers are 619, 164, 133) and the three areas (residential, commercial, and industrial) are reasonably well separated and, most importantly, the shopping and working buildings are quite a distance from the railway station. The second town, Torquay, is smaller (RCI: 132, 41, 42) and I have removed the road link so any travellers will have to use my train line!

The railway station in Plymouth only covers a small residential area to start with so, in addition to the nearby bus station, there is a second bus stop for the rest of the residential zone.


NOTE1: One significant change in my test setup for this revised guide is the addition of cargo routes into the main town. There is a line bringing Food Supplies in for Commercial development and a line for Building Materials to promote Industrial growth.

NOTE2: I did adjust the number of cargo trucks and train carriages throughout the test period to meet increasing production/demand and also paid down the loan to a lesser or greater extent in some scenarios. These variations will have had some impact on the map total profit to a different degree in the different test runs.

NOTE3: Purely to aid visibility I changed some of the line colours in the route setup images, despite the difference in colours the setup and results image are from the same test.
Scenario 1: Two Circular Routes
My "traditional" Train Fever setup of one clockwise route: Station - Residential - Commercial - Industrial and another anti-clockwise route: Station - Industrial - Commercial - Residential.


This setup worked OK, both routes became profitable and there was modest growth in the network. Interestingly this setup gave the biggest growth in Plymouth’s population, up 30 to 649. Line usage of 18% in Plymouth was also among the highest.

The combined profit for bus use in Plymouth in the last four years was $211.17, the second highest figure and the total for the whole map was $1616.4.

In summary I classed this route setup as “Good”.
Scenario 2: One Bi-directional Circular Route
I have used this setup a lot in Transport Fever, it keeps the number of routes manageable and is easy to manage: Station - Residential - Commercial - Industrial - Station - Industrial - Commercial - Residential.


This setup also worked OK, but it took longer to generate good profits and the total revenue for the whole map was significantly less than the previous scenario.


In summary I classed this route setup as “OK”.

Scenario 3: Two Direct Routes With Additional Residential (first)
In this setup I had separate routes for commercial and industrial but both went to the additional residential stop before going to their final destination, so one route went : Station - Residential - Commercial and the second route was: Station - Residential - Industrial.


This was a much less successful arrangement. Both routes came into profit but one (in his case Commercial) took much longer than the other so overall revenue was considerably down compared to the other scenarios. Though particularly poor I should say that the map profit figures could have been down to inadequate management of the loan interest.


It is also worth noting that the population of Plymouth declined dramatically and we saw the smallest increase in Commercial property.

In summary I classed this route setup as “Poor/OK”.

Scenario 3a: Two Direct Routes With Additional Residential (last)
This is a variation of the previous setup. In this example the buses go to the Residential zone after their Commercial or Industrial stop, thus two routes: Station – Commercial - Residential and: Station – Industrial - Residential.

This was, relatively speaking, surprisingly successful. By no means the best overall but it did indicate that the sequence of a route through the zones can make a significant difference to revenue. For those who like to micromanage this test helps emphasise that if you examine exactly where your passengers are going, within town or to another town, you can design routes to get them delivered quickly and profitably.

As in the previous example by the time I ran this test I was paying more attention to keeping cargo routes efficient and also paying down the loan as quickly as possible which probably contributed to why this scenario saw the best cumulative map profit figure!

In summary I classed this route setup as “Good”.
Scenario 4: Three Direct Point-to-Point Routes
In this setup I created three zone-specific routes for residential, commercial and industrial, so one route went Station - Residential, one went Station - Commercial and the third Station - Industrial. Note that all three routes went to the main train/bus station hub to accommodate local residents wanting to use a bus to shop or work in Plymouth as well as those travelling to Torquay.

This setup really did not work! I am not at all sure why but while the Commercial and Residential routes were moderately profitable, the Industrial line never came into profit and the overall map figures were the lowest of all tests.


Likewise the population of Plymouth also declined dramatically in this scenario and we saw the smallest increase in Industrial property.

In summary I classed this route setup as “Poor”.
Scenario 5: Two Direct Point-to-Point Routes, No Residential Service
In this test I did not offer any service to the main residential zone in Plymouth, there were just the two separate routes for Commercial and Industrial, Station - Commercial and Station - Industrial.

This was a surprisingly successful setup, although the Industrial line took a time to start making money the Commercial route turned in good profits quite quickly and the overall figures are very respectable.


Interestingly, this very limited service saw the largest increase in both Commercial and Industrial populations and there was certainly no negative impact on the other town, Torquay. I’m thinking that this basic setup really works for inter-city traffic which can be generally good but the lack of a local residential service not only denied me revenue for those journeys but, as the table shows does not encourage local population growth (there was a small loss in Plymouth population). So, this could be a way to encourage a town to focus on purely one type of land use?

In summary I classed this route setup as “OK/Good”.
Scenario 6: Three Zone-Specific Routes, Local Only Residential Service
In this setup, like test 4, I created three zone-specific routes for residential, commercial and industrial but in this scenario the residential route did not visit the main train/bus station hub. So one route went Station - Commercial another Station - Industrial and the Residential line went Residential – Commercial - Industrial so it connected all local zones but residents wanting to travel out of town on the train would need to change buses.

In terms of profit this worked incredibly well! Both the Commercial and Residential lines were making money quite quickly and I could easily have added another bus (or two?) to each line to soak up the demand. The Industrial line took longer and the profits weren’t great but were quite respectable enough.

The ‘trick’ with this setup was that Plymouth residents would use two buses to get to the train station and so generated substantially more revenue. Also with the town at this size, with only one stop in each zone, practically every passenger on every leg of the journey gave me money – there were no buses full of passengers travelling past multiple stops.

The combined revenue across all routes in Plymouth was significantly up on other scenarios and the map overall showed a marked increase in the final year profit. Although town population was only average, we got the best line usage figure for Plymouth and Torquay was also very good.

For the map as a whole, this scenario also gave some of the best total revenue figures.

In summary I classed this route setup as “Second Best”.
Scenario 7: 2 External, 2 Internal & Extra Stops
This particular variant is based on suggestions from SBGaming (see the comments section) who recommended adding many more stops in the town and not rely on just one passenger stop within a catchment area. The idea being that the sims are more likely to use your buses the less distance they have to walk to find one.

It's essentially an enhancement of Scenario 6 in that there are two lines from the train station station to bring external traffic to the industrial and commercial zones. There are also now two internal lines to take the local residents to the industrial and commercial zones as well as link up with the lines that would take them to the station to travel to the other town.


This setup worked rather well. Both the Commercial and Industrial lines came into profit quite quickly but both the local routes struggled for several years. However, the combined totals for the map as whole where better than all the previous tests and local line usage reached a high of 29%, by far the best result.


Watching the routes develop and the changes in passenger numbers I suspect that if I had adjusted the numbers of buses on each route, adding more on the busy 'Direct' routes and only providing enough to meet demand on the 'local' lines the profit figures could have been improved further. I hadn't done that in previous tests so doing so here would have compromised the comparison.

I think one key 'take-away' from this test (for me, at least!) is that more frequent passenger stops are worthwhile and should improve profits by reducing the walking distance the sims consider acceptable.

In summary I class this route setup as "Best"
The Conclusions
As the screenshot below shows the simple zone-specific point-to-point routes tended to work out the most profitable. This may not make sense in the 'real world' but it suits the logic of the game.


So, some observations on the game mechanics:
  • Citizens only travel between home and work or home and shopping
  • There is no travel between residential zones?
  • Citizens going from home to work/shop will not get off in a residential zone unless that stop is the closest to their destination
  • Putting in more stops will give the residents less excuse to walk and so increase rider-ship
  • People will use multiple lines to get where they’re going, if organised well these will get lots of extra revenue from each traveller
  • Using common ‘hub’ stations will work but may not offer the best revenue opportunities
  • Routes will automatically change if the game alters the road layout in the vicinity of a stop - use waypoints and terminal selection to maintain your preferred routing

So, while it means you will have many more routes to manage, to get maximum revenue you will probably want buses going point-to-point for each specific land use type to enable direct travel between homes and work or shop. However, be aware that when the road layout changes as a result of the dynamic town development your routes may also be changed so you should keep an eye on them to ensure the best roads are used. The July 2017 update helps a lot with this, allowing you to set road waypoints and set specific platforms or stops for road vehicles to use.

Stops which cover a mix of commercial and industrial should also work but, like all routes, their success will depend on capacity and demand.

Oh, and with the dynamics of town development in mind it is worth saying that:


Your Mileage Will Probably Vary! :)


Additional Comments
If you've read this far, please also read the comments section for some extra insights. There are some good alternative strategies highlighted by several other players and there is discussion of a few other considerations, such as frequency, that aren't mentioned in the body of the guide.
The Video Presentation
In the first edition of this guide I had a video showing how I got the numbers for each of my test scenarios but when I started work on a video for this new version it came out at about 60 minutes which I think is far too long for most people to listen to me nattering on about revenue streams!

I have added many more images and details to this new edition so, hopefully, a full video version is not necessary. However, if you would like to see and hear me talking about the one route setup that I have classified as 'second best'. This basic design I think offers the best profit opportunities but as I later discovered (in scenario 7) it can be improved by the addition of more stops and, possibly, extra internal routes ...


If you like to see the same commentary on all the other route configuration tests, just let me know and I will try to cobble them together in a moderately entertaining fashion. :)
46 commenti
Whiskers of Sheogorath 28 mar 2019, ore 4:45 
Passengers are quite broken
ajax_post  [autore] 22 gen 2019, ore 12:03 
Hi Evito, thank you for commenting. No, I've not looked at the train station location as a potential issue in this sort of test. That said, I'm not sure it would have that dramatic an impact on revenue. Although the sims are willing to walk great distances there are also a lot of them who will take a very long bus and train route on the assumption that it will be 'fast'.

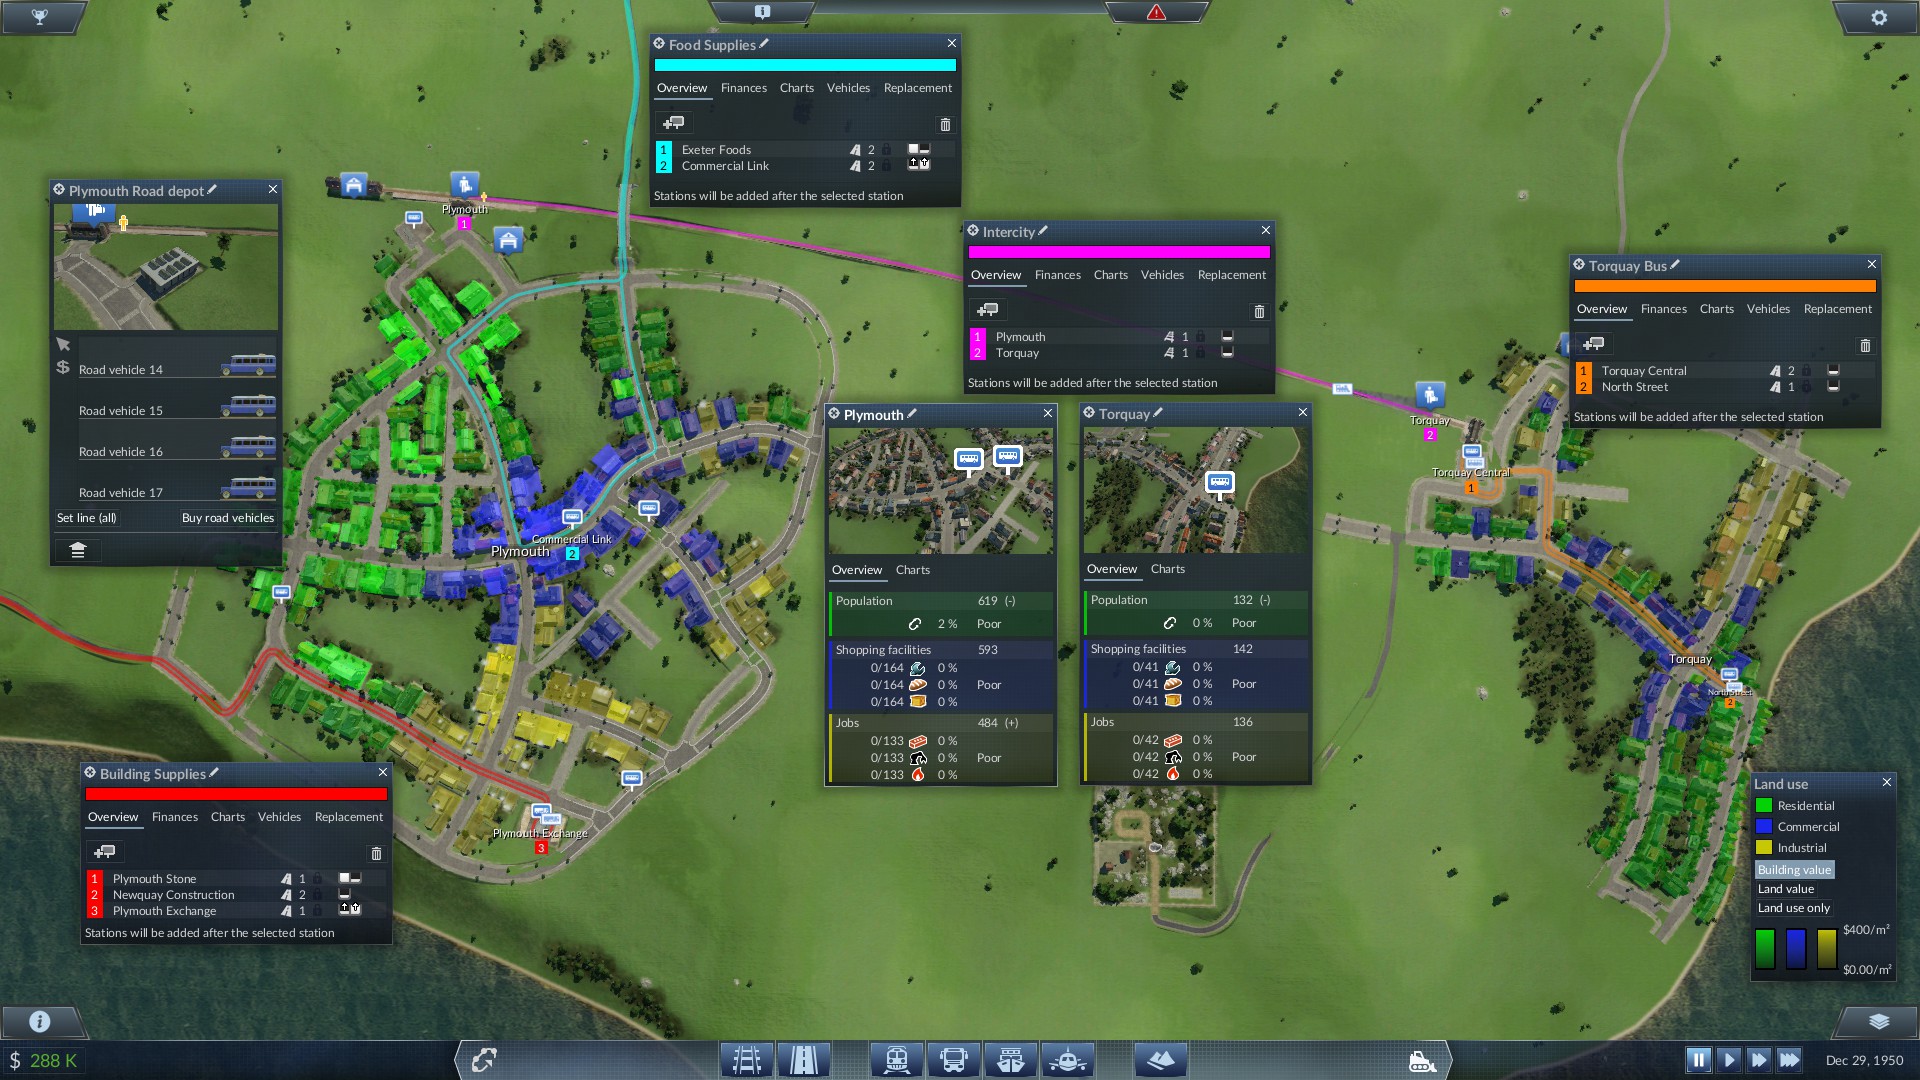
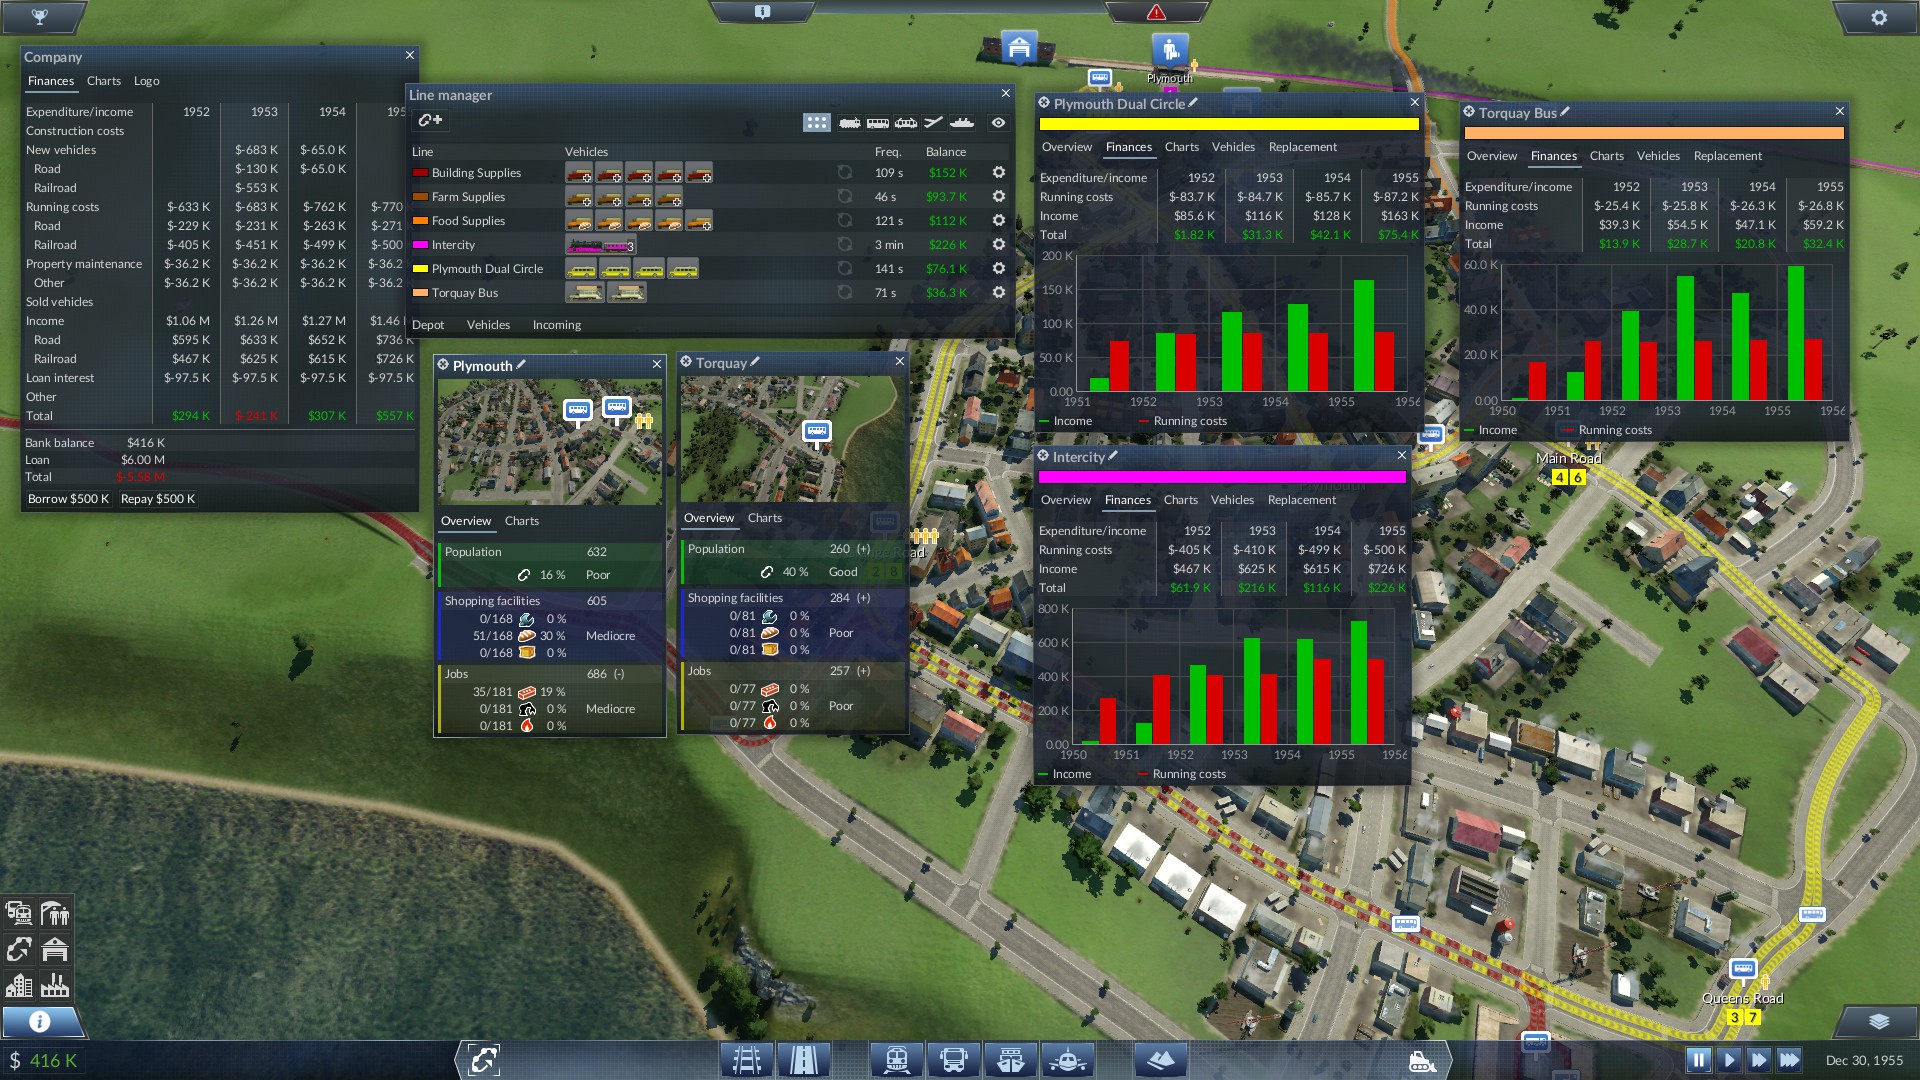
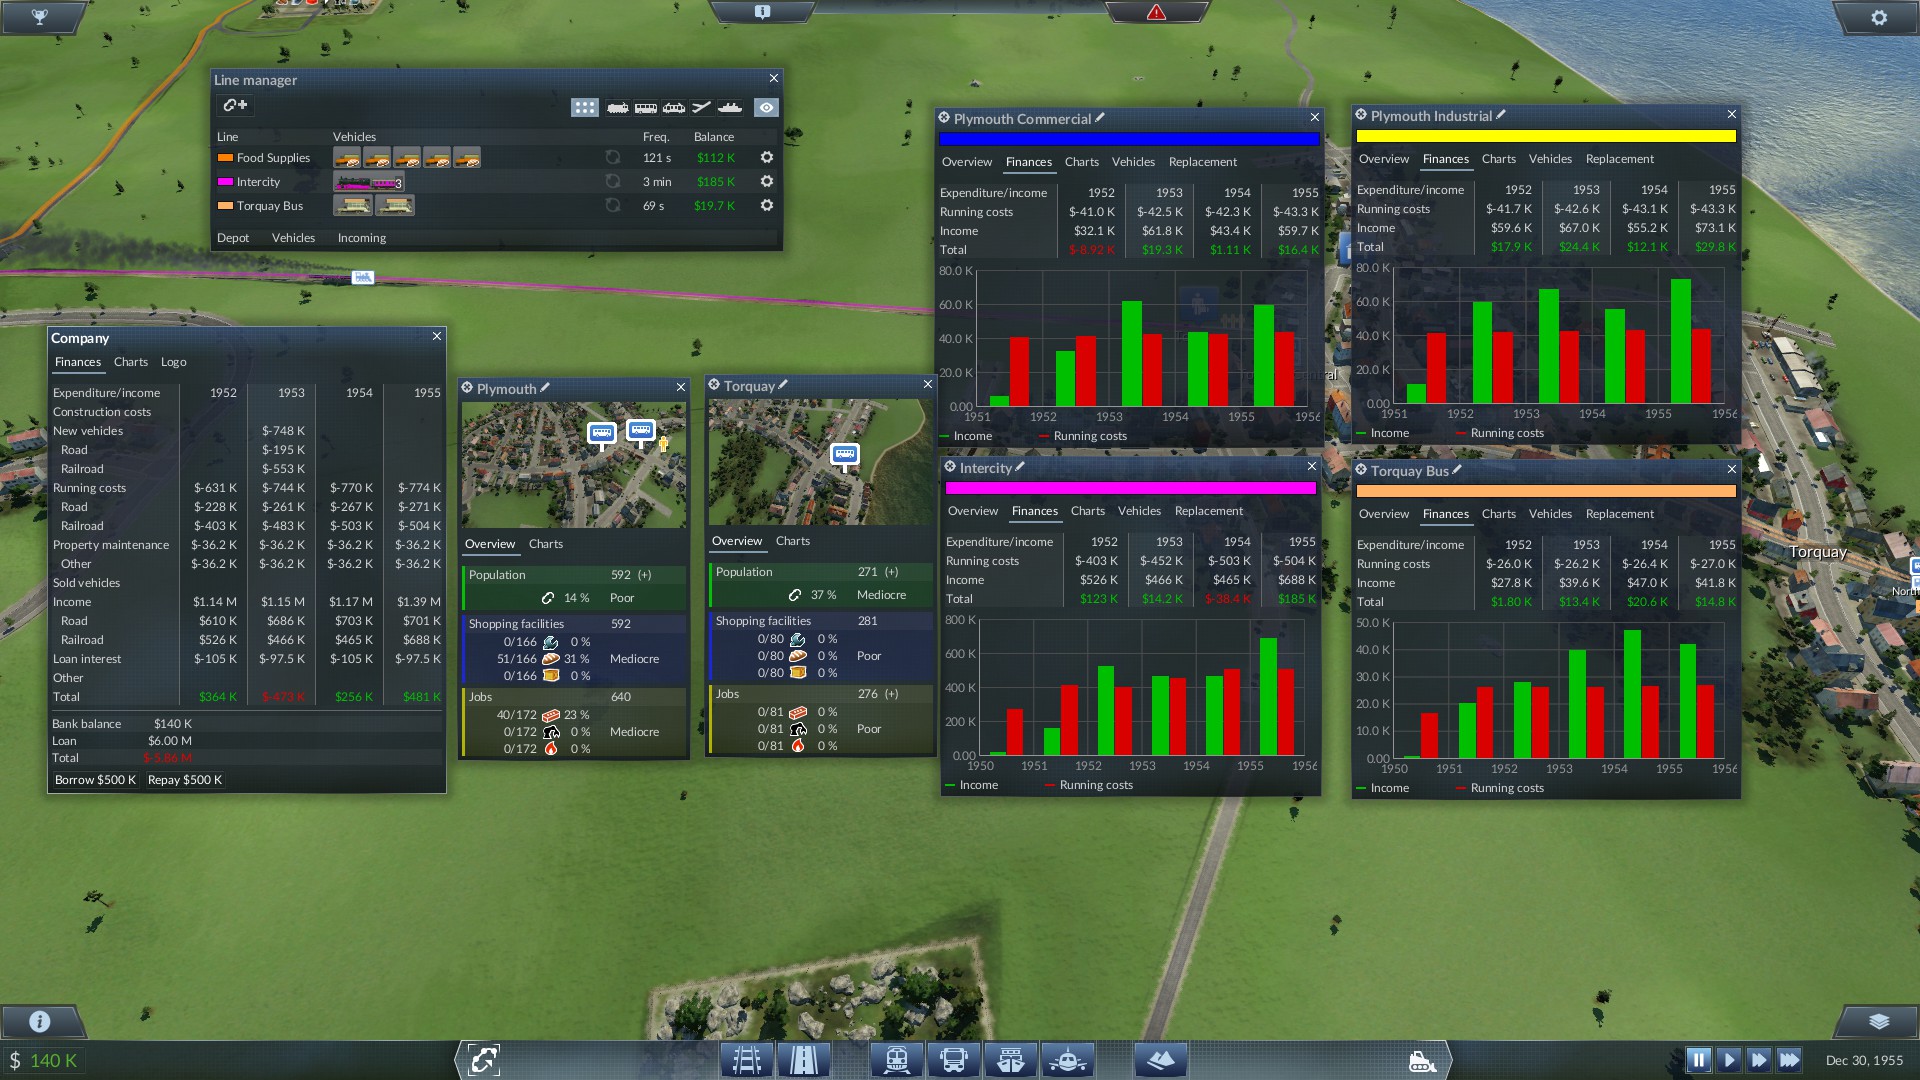
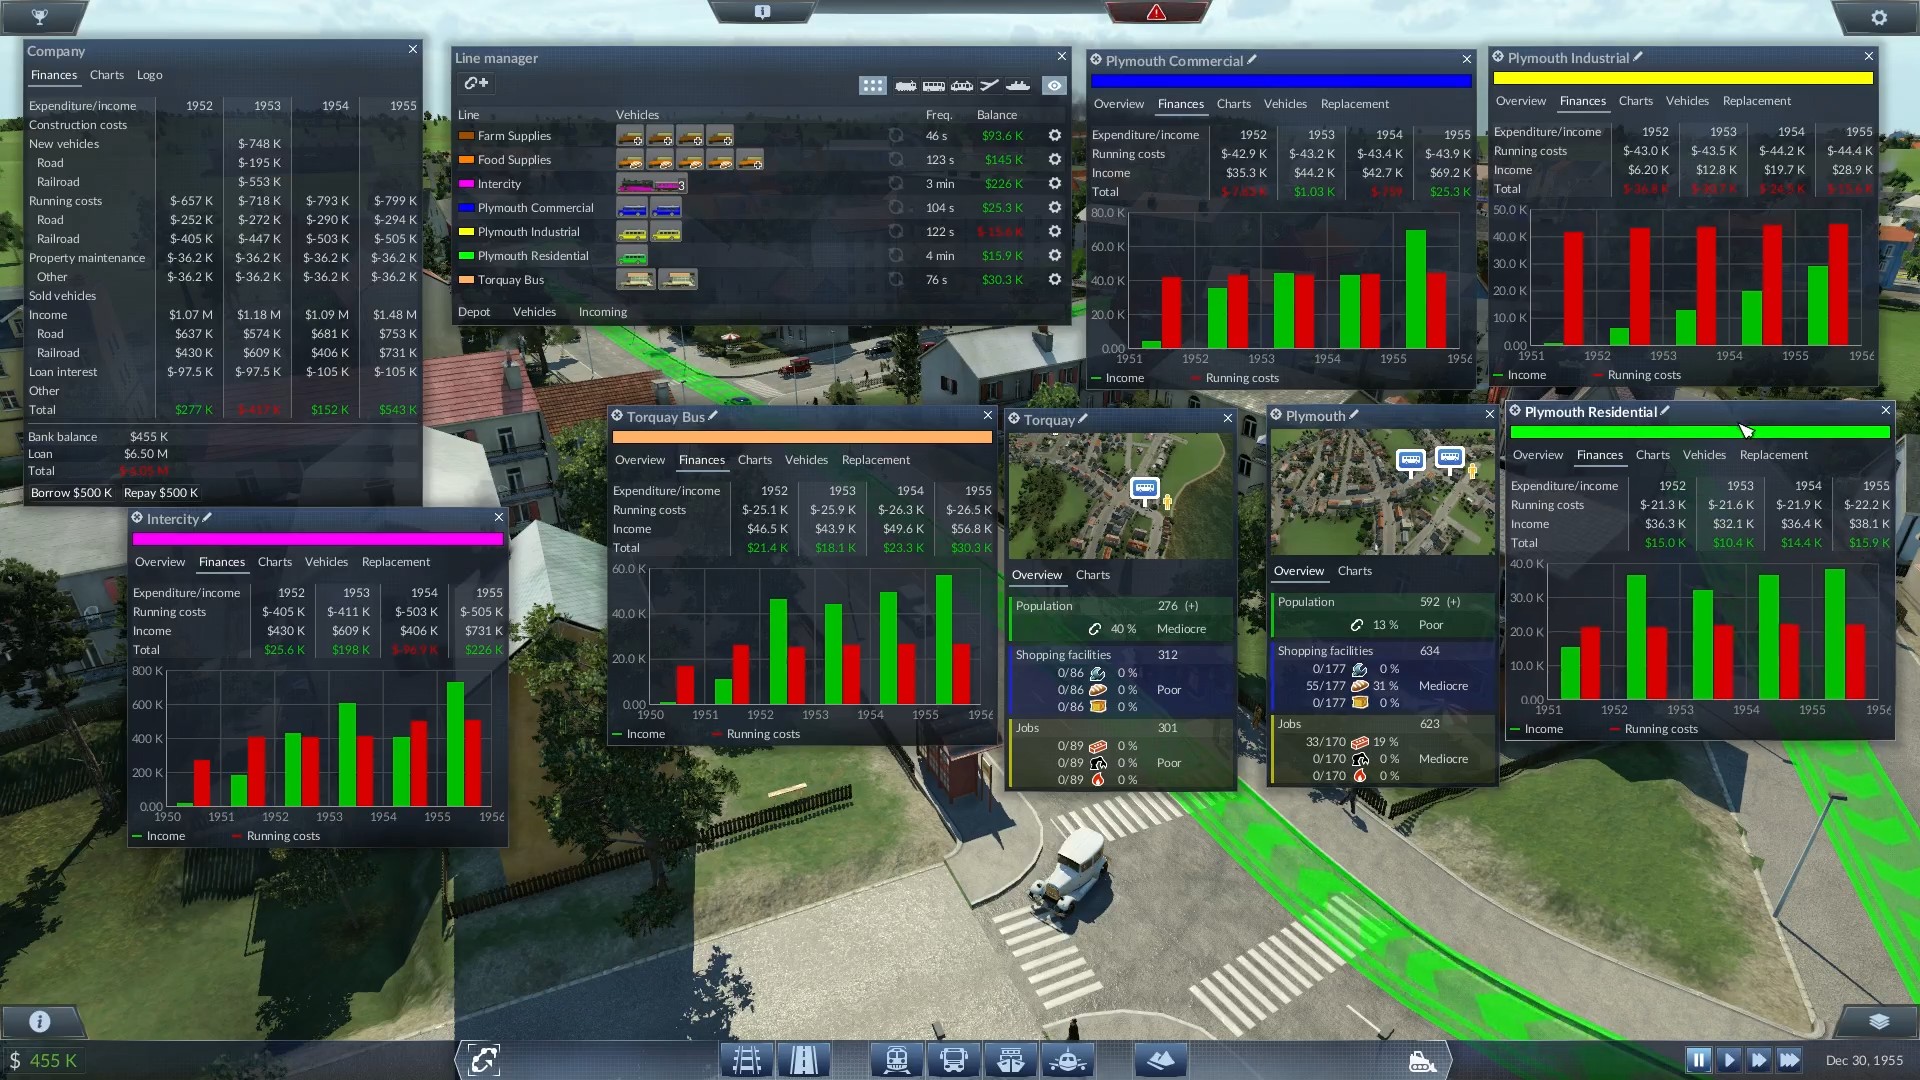
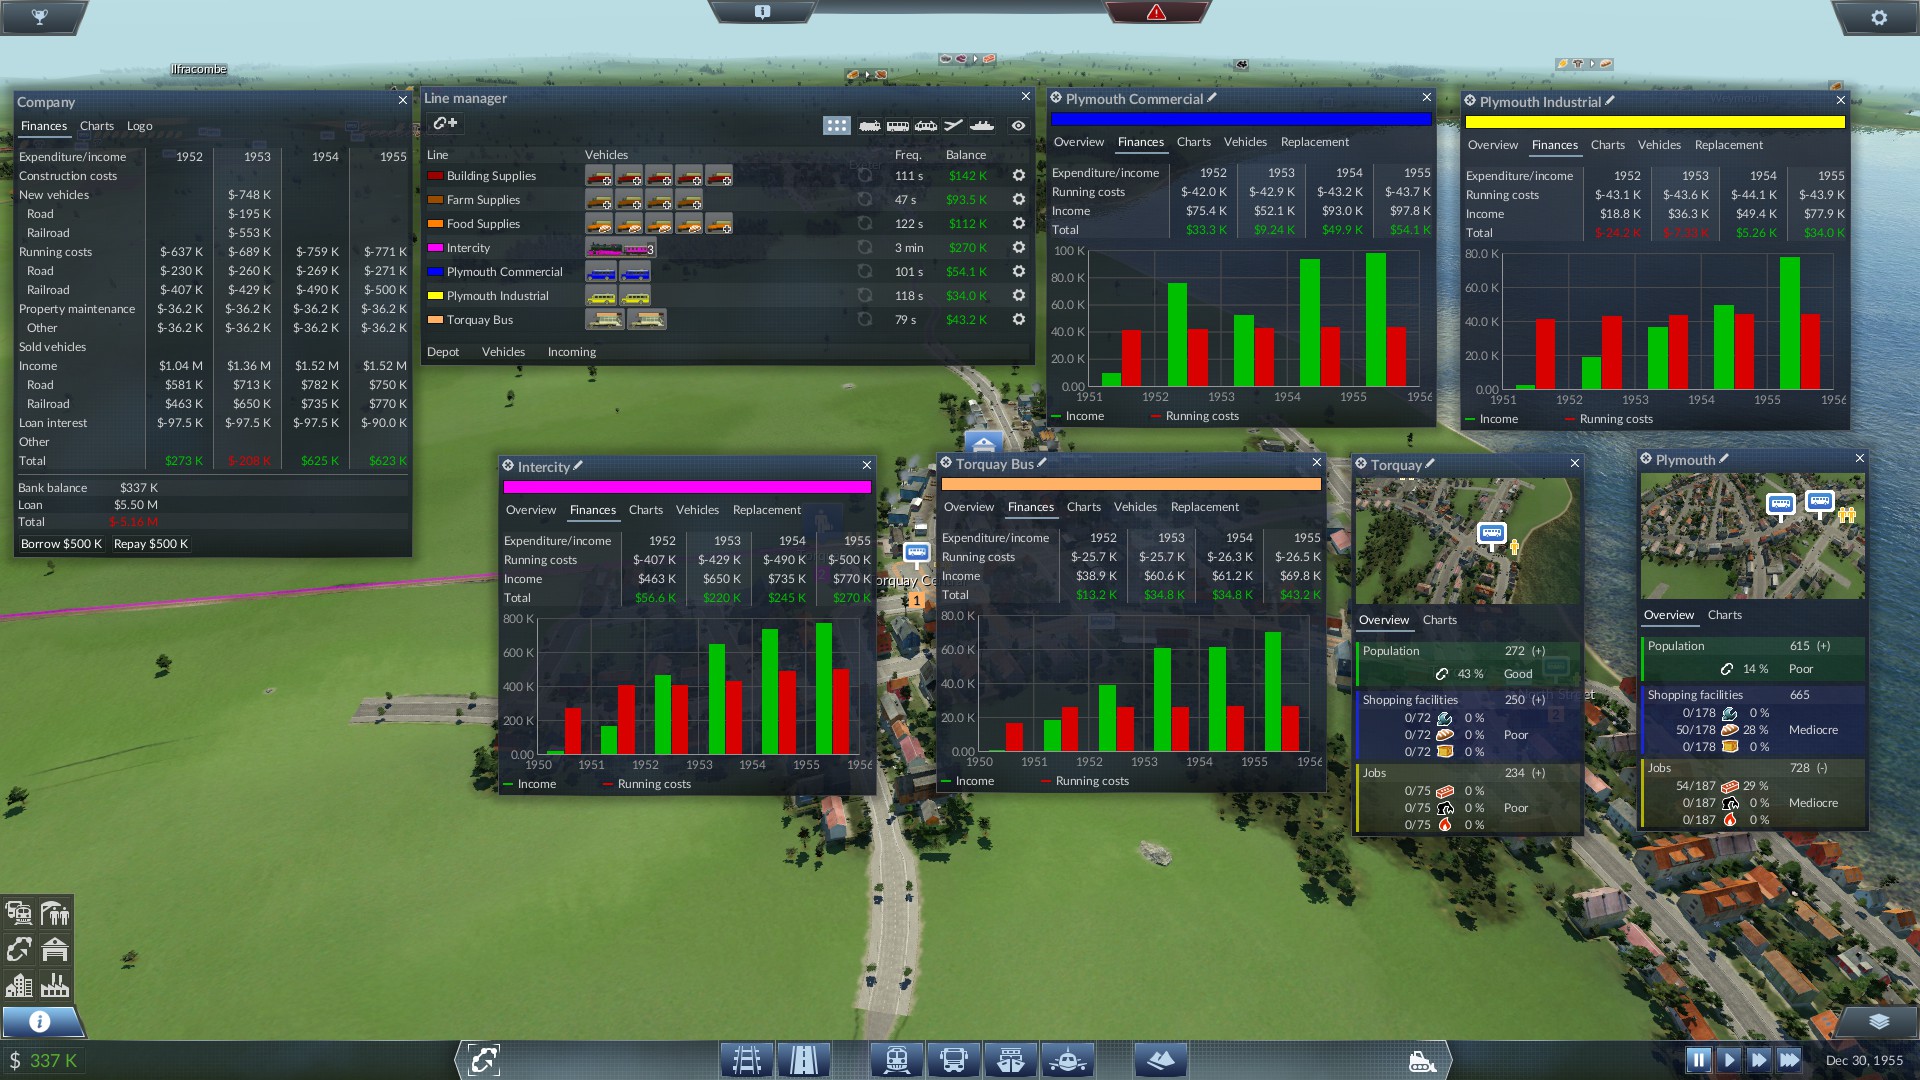
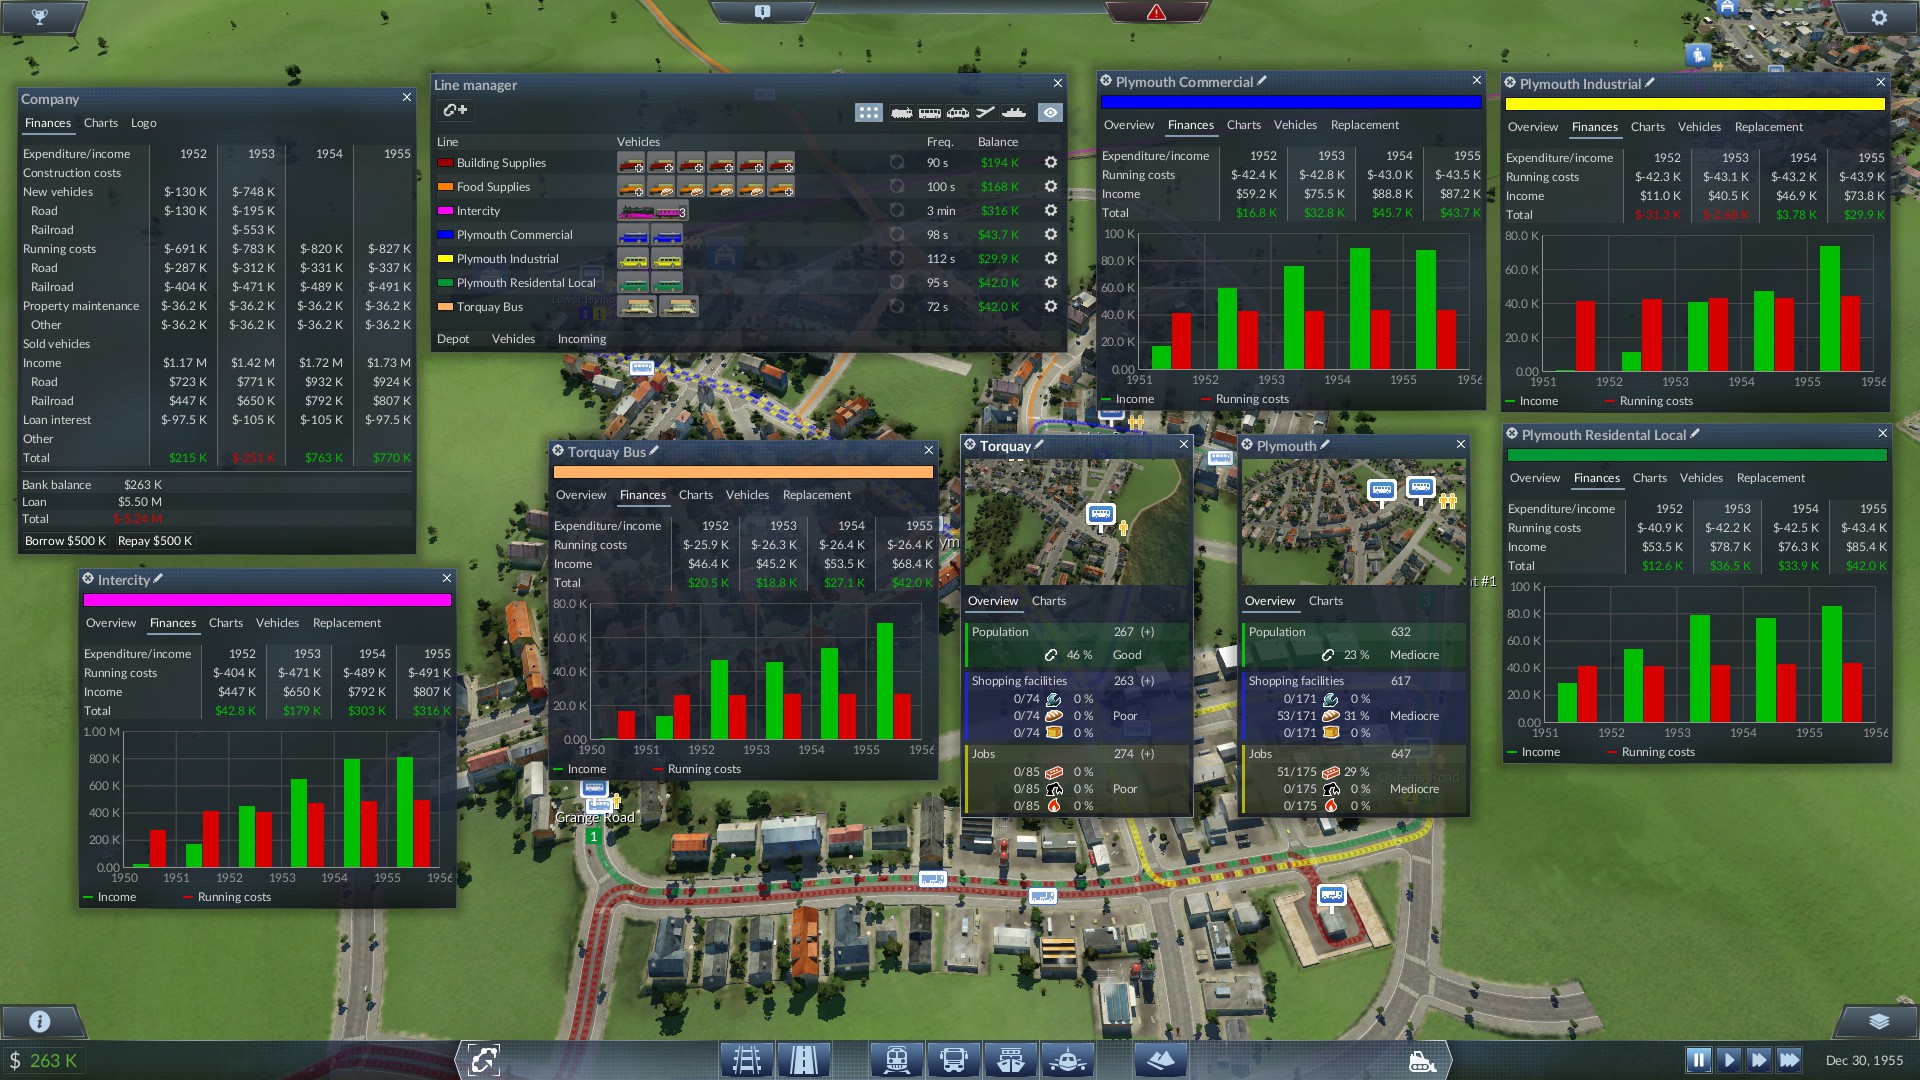
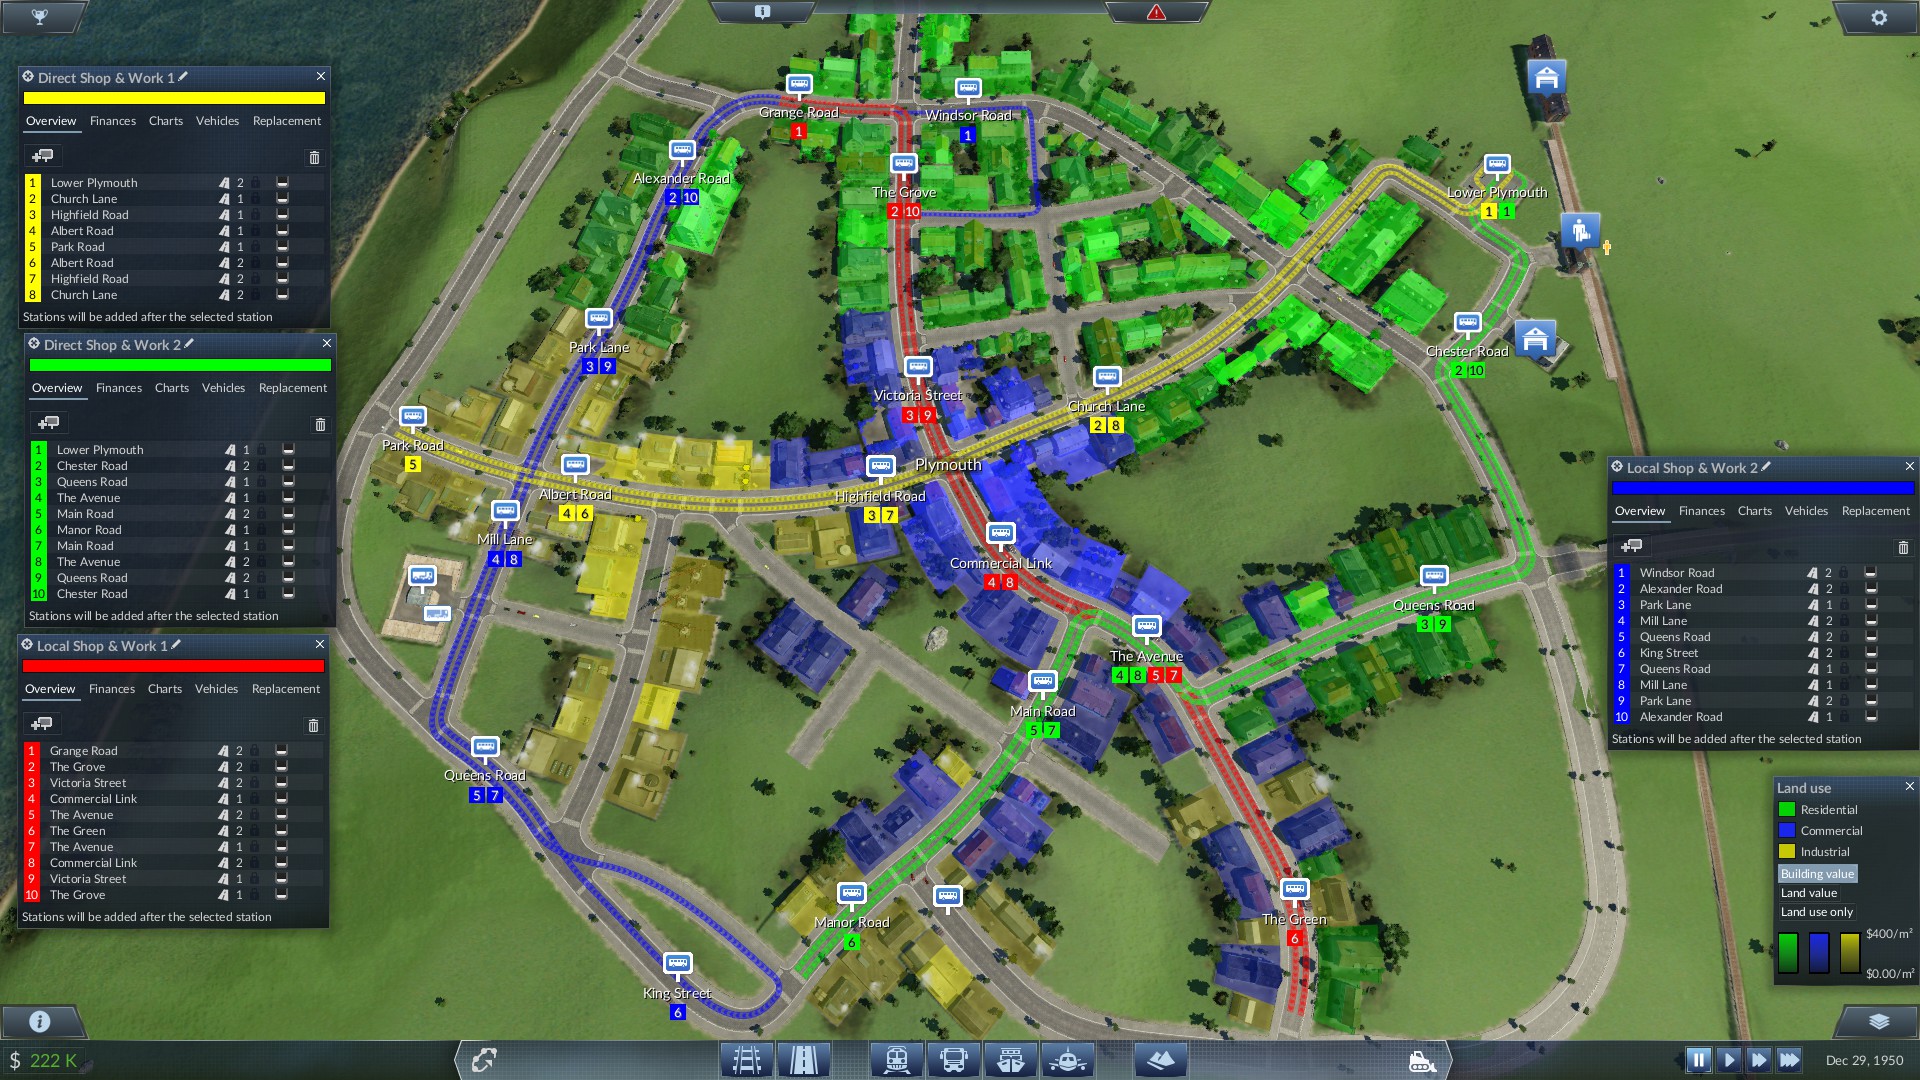
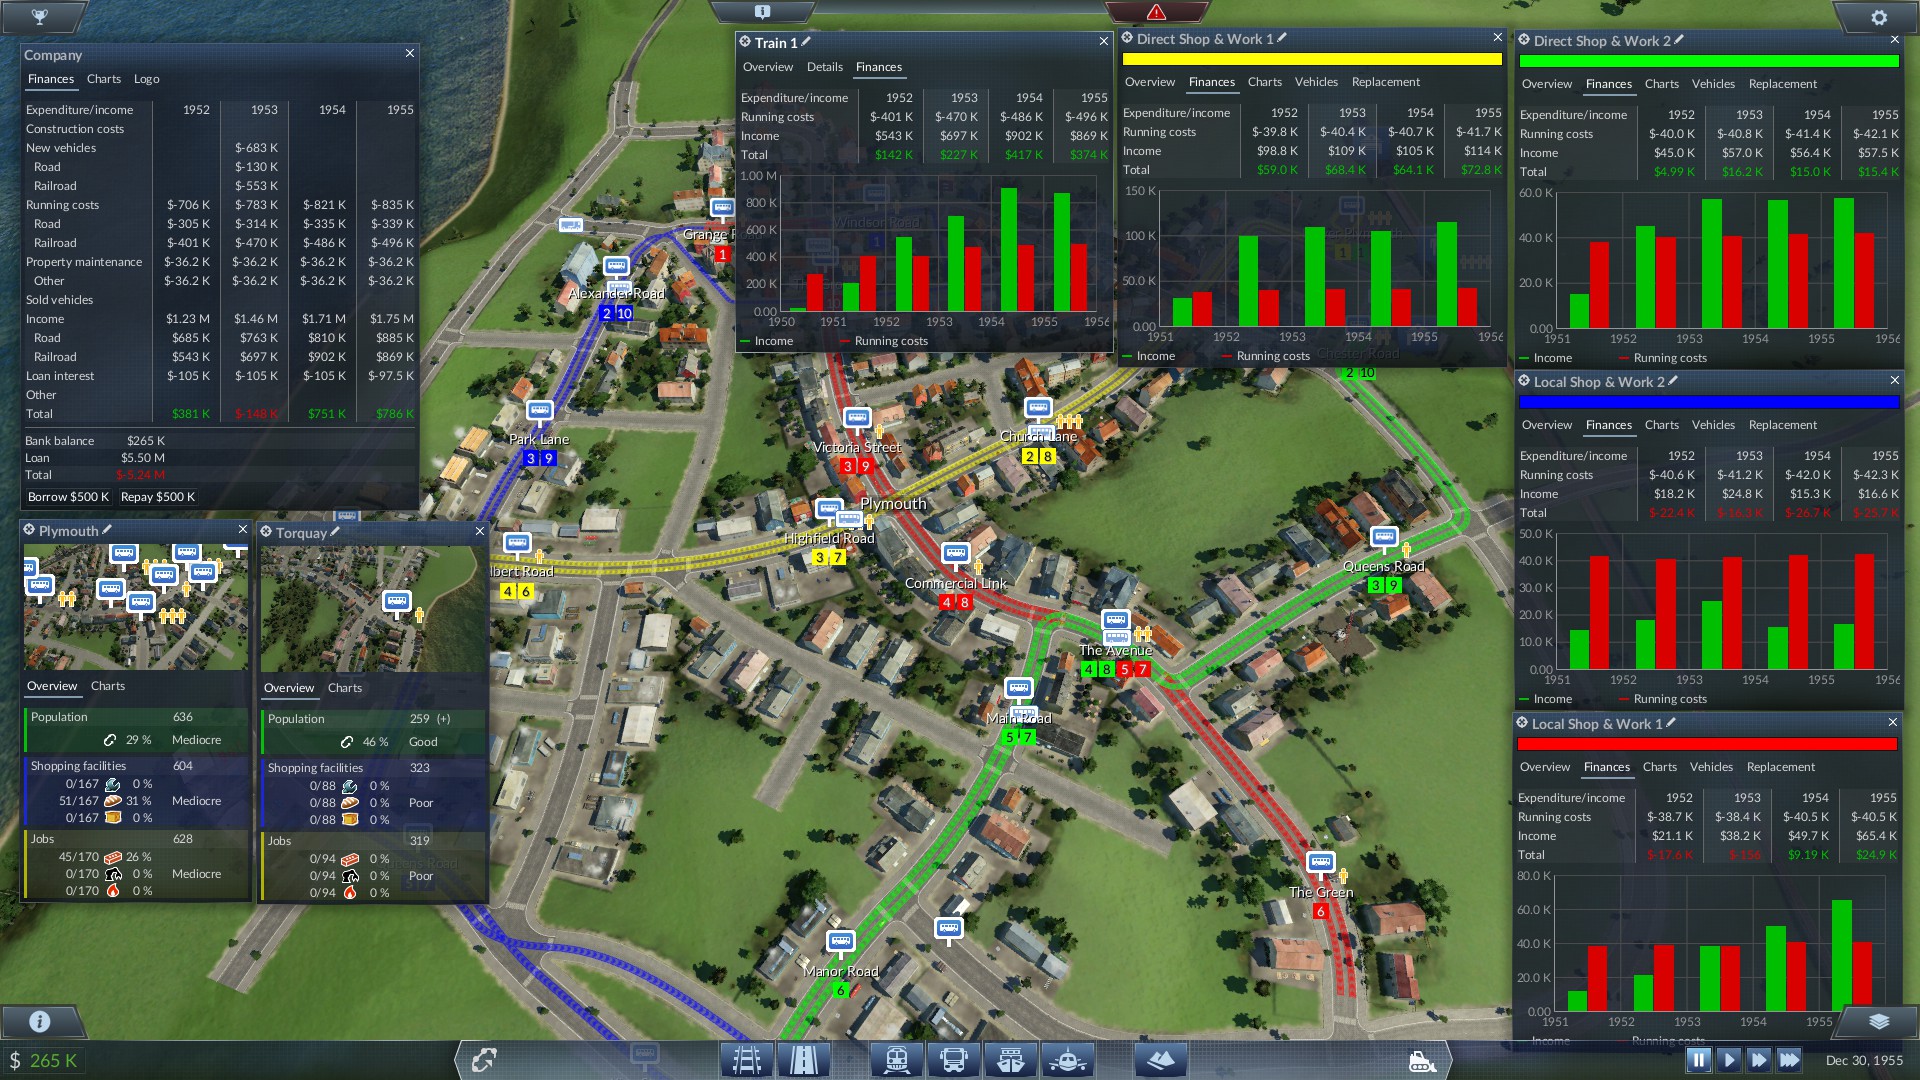
So, yes, I imagine that I did lose some income due to being close to a residential area (and these days I often prefer to place passenger stations near industrial or commercial zones) but I reckon trying to work out how much time or cost sims will spend to get somewhere is going to be a fool's errand but offering several alternatives should promote usage, and profits.
Rivers 22 gen 2019, ore 11:35 
Not sure if this has been asked but have you tried a control test wether the location of the train station itself in the test affected the direct residential test?
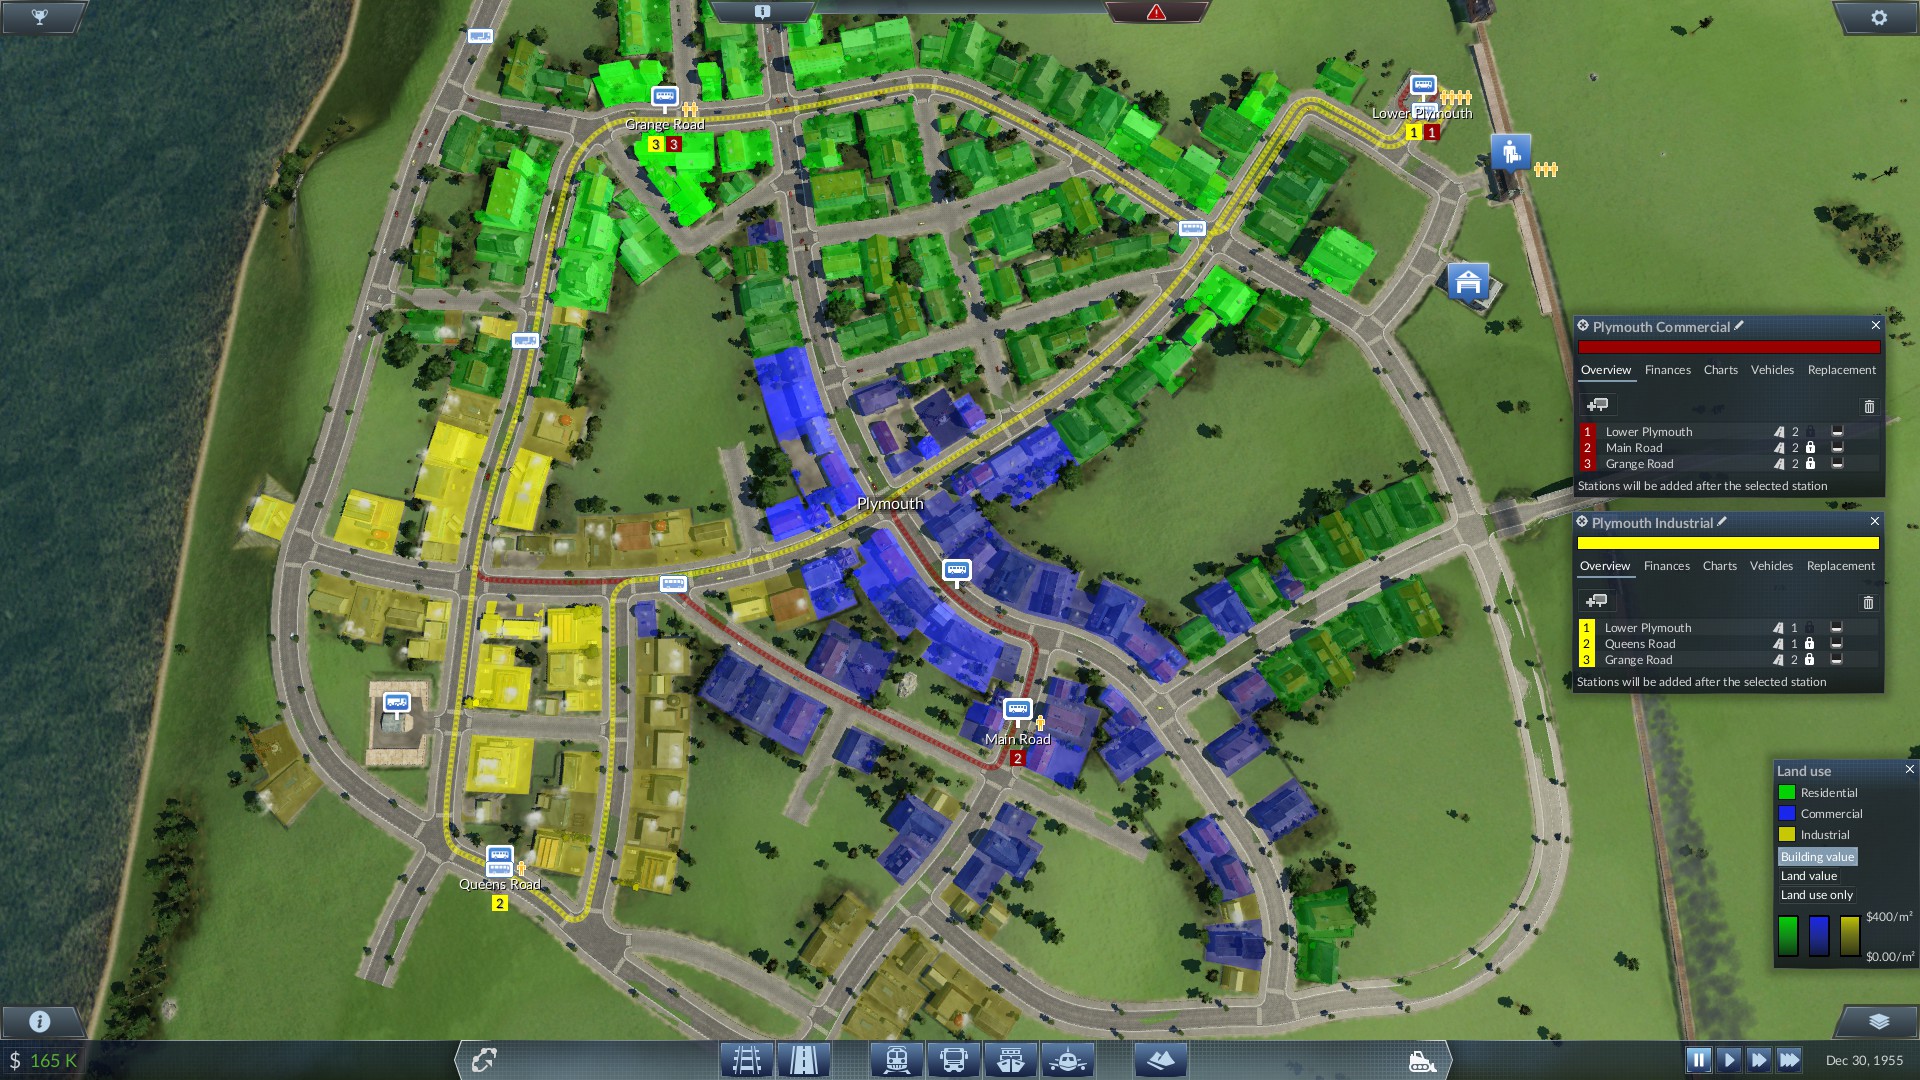
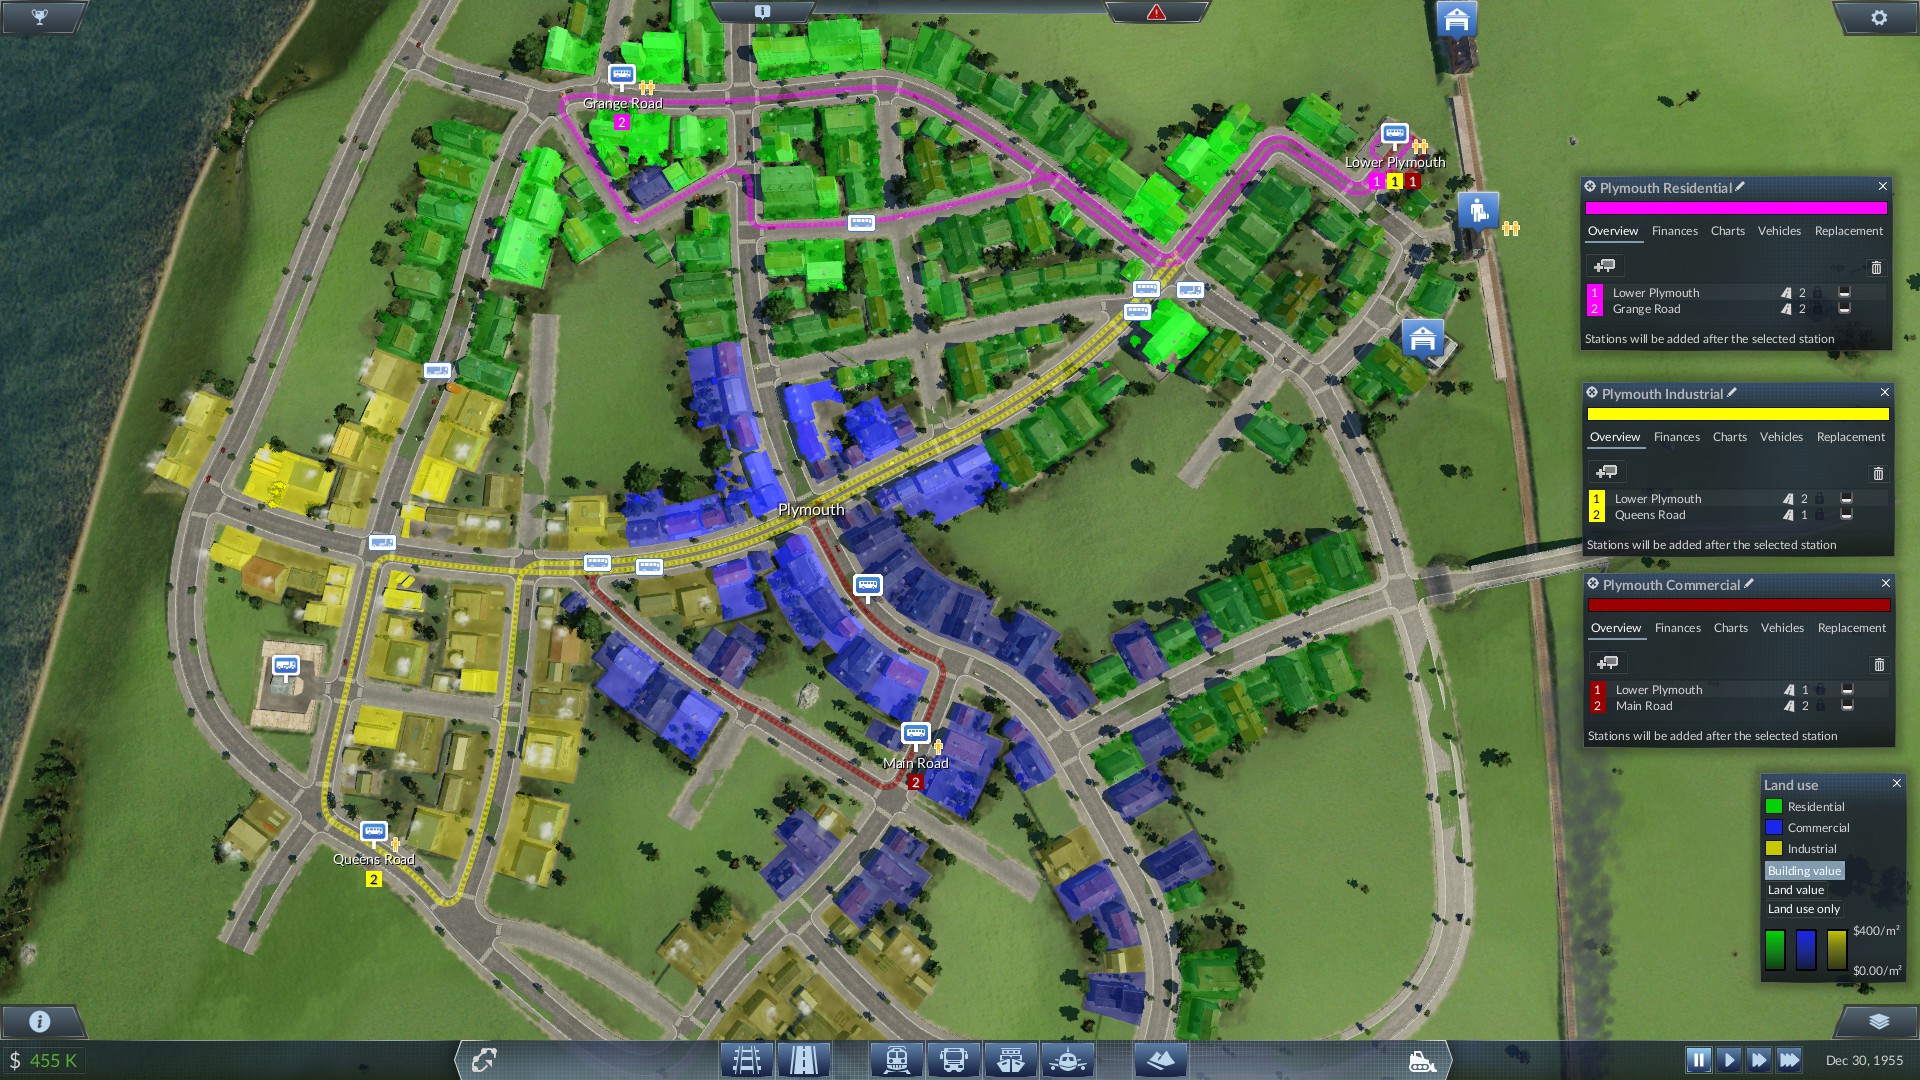
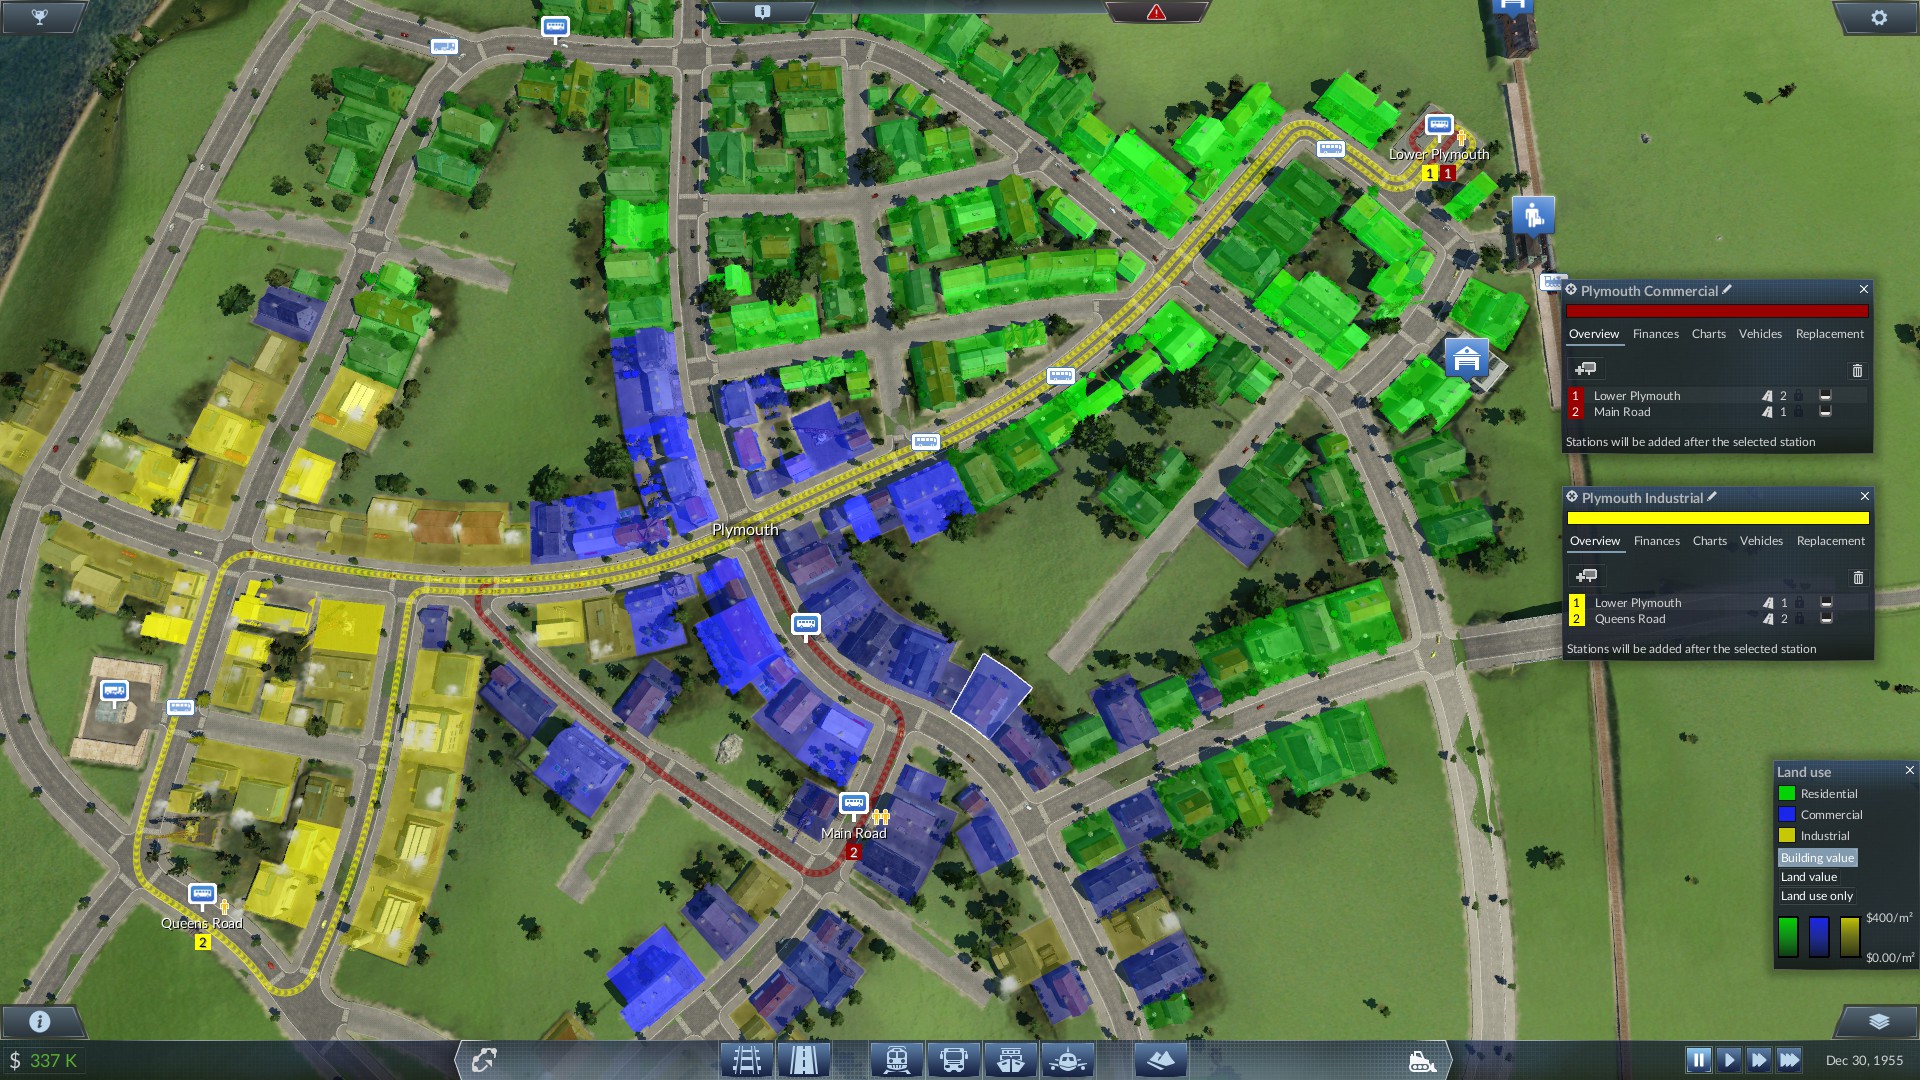
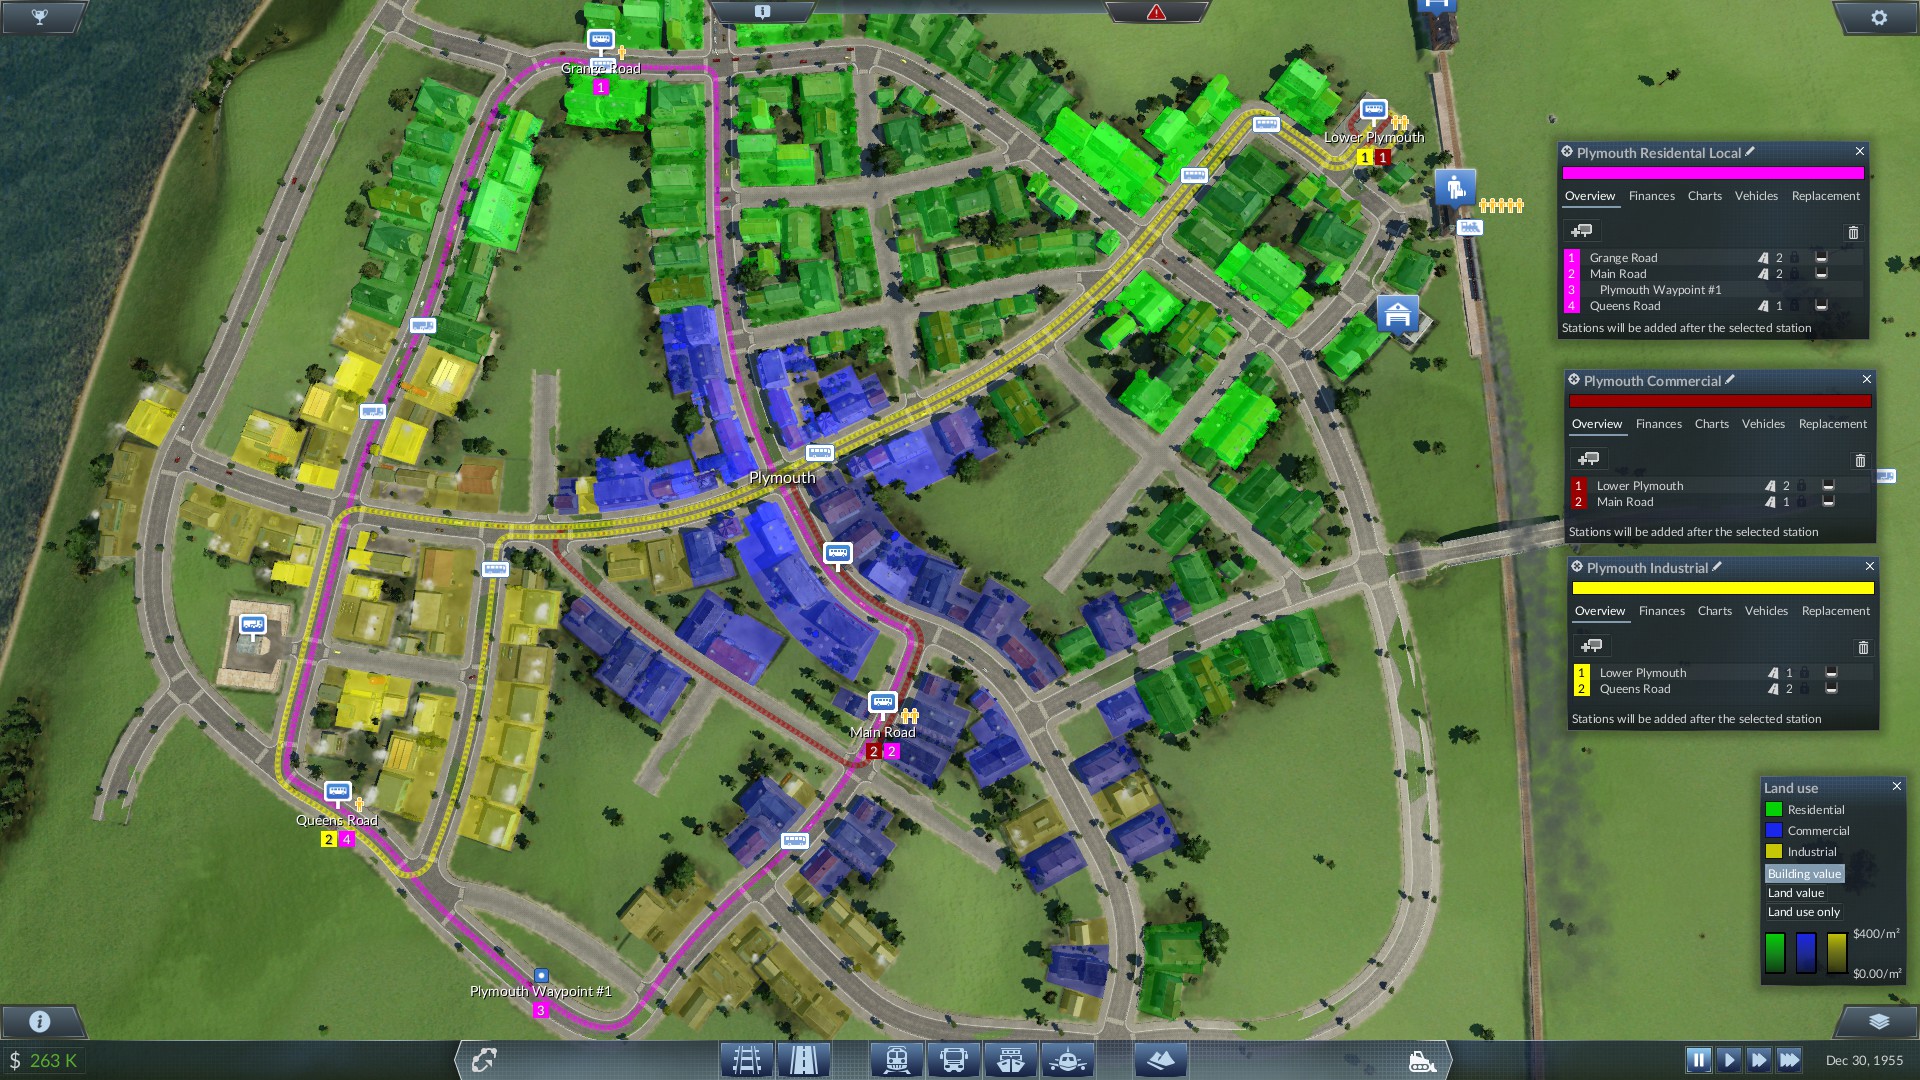
The area shown for coverage by the stations isn't really accurate as the sims will walk quite a bit farther than that, so it could be the residential lines died due to proximity to the station no?
AutoGamerZ 14 dic 2018, ore 16:10 
@ajex_post No problem and I agree, that also goes in real life by the way, I am a public transport fan and I see way too often that companies cut in the local services to pay for longer distance service improvements from the areas which then used to have local servers, Important radials are very often removed or downsized segnificantly.
ajax_post  [autore] 14 dic 2018, ore 14:24 
Wow! Thanks @AutoGamerz for taking the time to look through and critique this guide.

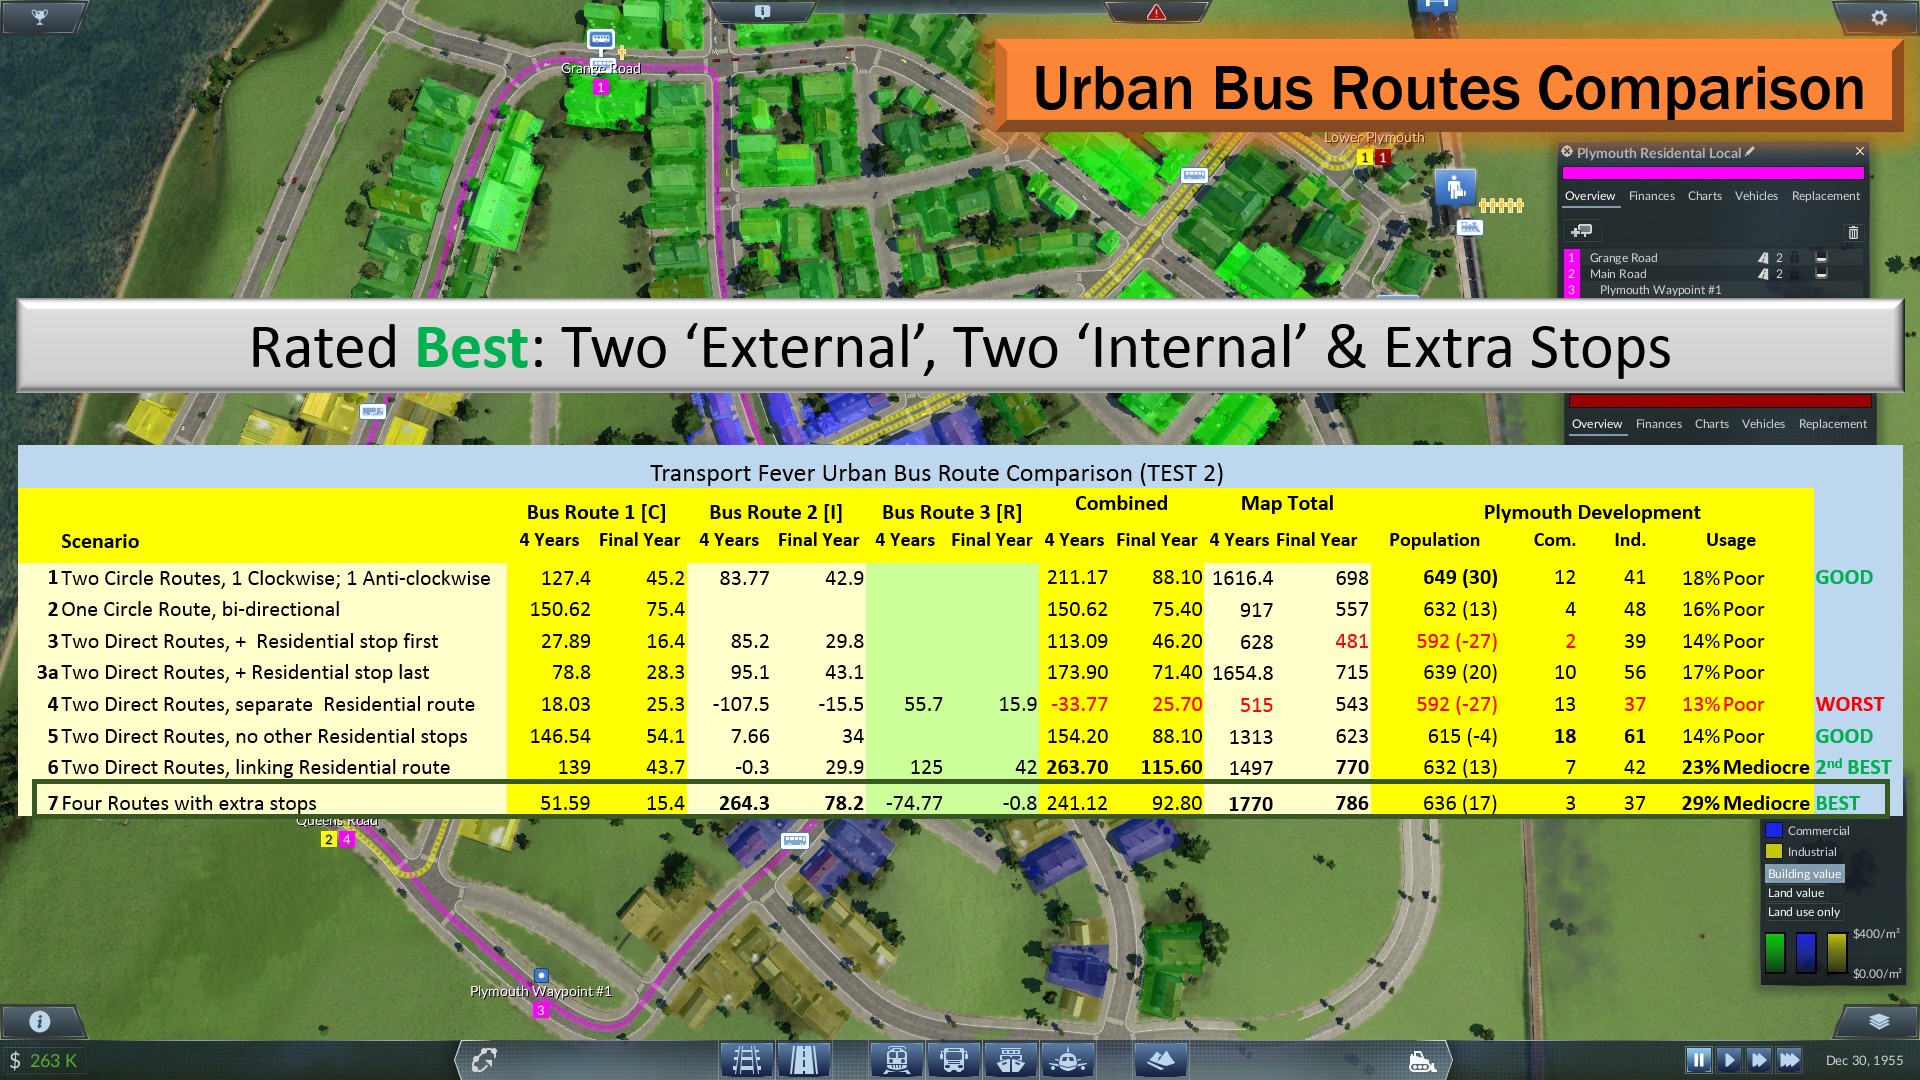
I certainly accept that the timescale and setup of the test was very limited but modelling a more 'realistic' setup was a little beyond my patience & data analysis skills! Even so, I hope I’ve shown that, assuming everything else stays the same (which, of course, it never does) internal bus routes can have a significant impact on profits.

It would indeed be good to see how these various methods work over a longer period and also in larger towns with different RCI zoning. I did consider running a longer test but never summoned up the patience to run through them all again. :(

I think we will probably agree that there is never an "always the best" option and, even if you don't play to transport every last passenger and get every last penny of profit, it is worth paying attention to internal bus routes and I hope that readers of this guide will also read and take your comments into consideration. :)
AutoGamerZ 14 dic 2018, ore 13:18 
Sidenote to people reading this: Read my bottom comment first then go up, steam orders oldest to newest which actually flipped my WAAAAAY too long response. :steamsalty:


AutoGamerZ 14 dic 2018, ore 13:17 
because passengers in the one other direction basically have a choice of trains (assuming they have a similar quality of service), one way loops suffice for traveling into that direction, while the radial with an exchange to the central corridor works fine for the rest, though slightly slower in time (SLIGHTLY).

A final note:

Lines from a station solely to an industry area perform poorly not only because fluctuations and a need for passengers from outside the city, but also because they tend to get a lot of use, but only when a full train just arrived at a station, meaning they can be a great option in very big cities, but in small towns will usually run a loss; but despite that may actually be vital to keeping outside connections profitable in a strange contradiction, adding a bigger net win to outside connections then net loss from their own losses.
AutoGamerZ 14 dic 2018, ore 13:16 
Special tip for a specific special situation:
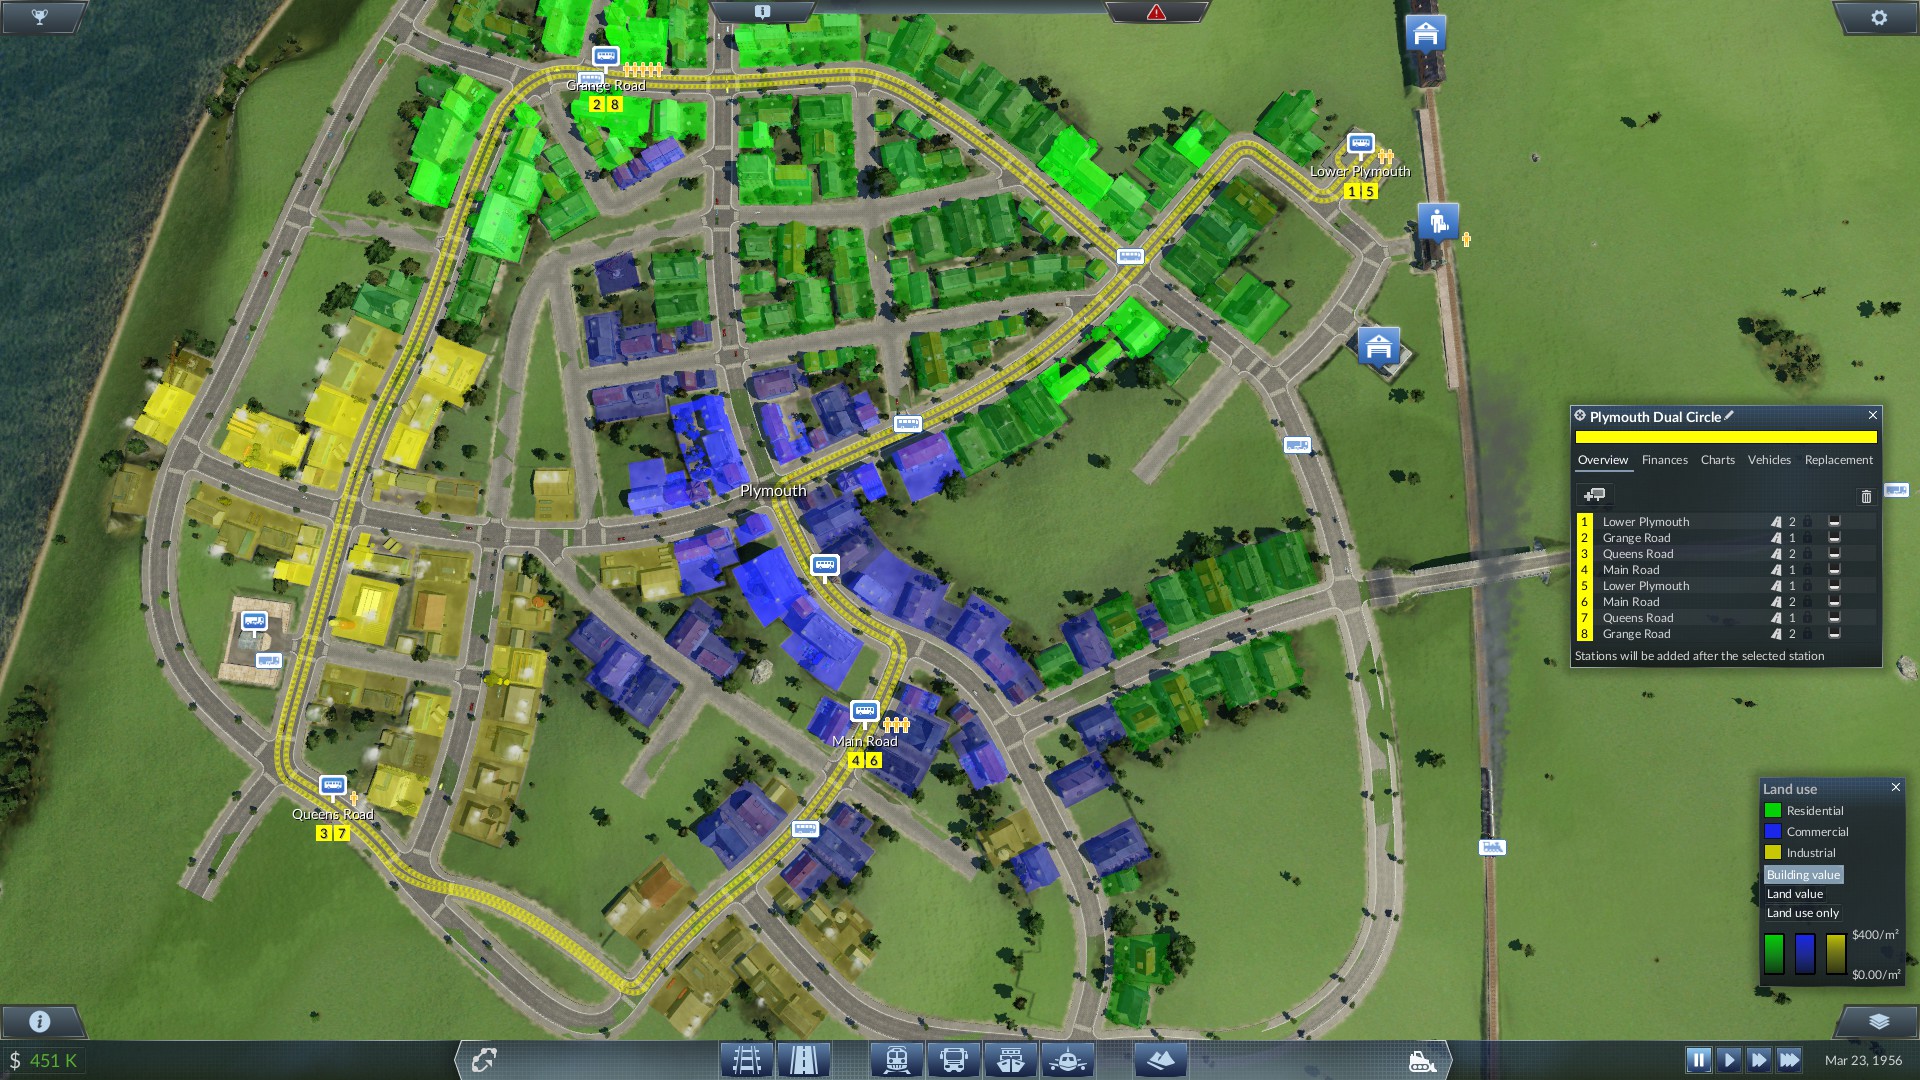
When you have a situation where you have a train station on both sides of a town, for example because a train line merges on right after, you should build a line straight from one station to the other you may actually find something strange to work, build 2 interlocking one way loop lines both taking the opposite way down the center going to both stations and one way around the outsides and then have a cross-connection in the middle, it saves a few buses and with most city layou-outs, would you get this rather specific situation works very well in the long run, because people will use the central corridor to exchange (even if theres a train alternative that's better some will still do this) and for direct journeys, local journeys are always quick with one exchange due to the way the radial and the one way loops work together and,
AutoGamerZ 14 dic 2018, ore 13:15 
Scenario 7:
You actually kind of did what I suggested in Scenario 4, but instead of two loops made the outside lines both end at that same point and added an extra radial, which was good judgement given the cities size, this isn't always the best option, but it certainly can be.

Tdlr; some of these options are very destructive despite seeming very good in this guide, some of these options are better then they seem with a few tweaks or only seem bad because of how the guide used outside connections in combination, and none of these options are a definitive best because it depends very strongly on the internal layout of your town and where the station or station(s) in a town are located.
AutoGamerZ 14 dic 2018, ore 13:14 
Scenario 5:
Don't do this, ever. It'll look good on your bus profit graph but murders your train profit, especially if your suburbs are further from your train station, because people won't use your trains to go out of the city and will walk to work within your own city, giving your city disproportionally much industry and commercial buildings and eventually killing both bus lines which seemed fine earlier because only local people actually work and shop at those locations after a few cycles of recalculating work and commercial places.


Scenario 6:
Never do this, in all scenarios this could be a good idea it's a better idea to run the radial (local only connection) as a circle around the middle line as described in my suggestions for scenario 4.