Arma 3
236 arvostelua
ARMA 3 Sniper/Spotter Guide by Reckoning Gaming
Tekijä Jbvol ja 1 osanottajaa
A detailed guide of hints, tips, regulations and terms to help you be a more tactical sniper or spotter. More tuned to experienced ArmA veterans but will feature parts everybody can use.

Don't let the size of this guide intimidate you, there is something to learn for all types of ArmA players. The less you know the more you could learn in these pages.

Let me know if I missed anything and thank you for reading.

Created by an experienced ARMA recon team going over how to: Use your rifle, Maximize your accuracy, conceal your position, how and when to move and more!
2
2
   
Palkinto
Lisää suosikkeihin
Lisätty suosikkeihin
Poista suosikeista
Table of Contents
ARMA III Sniper/spotter Guide by
[RG] Jbvol and [RG] Lynch
([RG] Mongoose and [RG] Scarecrow)


Table of Contents

Part 1: Introduction - Introduction to the guide and getting to know Reckoning Gaming's Sniper/Spotter team

Part 2: Concealment – The most important of your duties as a sniper or recon

Part 3: Spotters – Why should I consider? - Why having a Spotter leads to an advantage.

Part 4: Terms – Improve communication with your spotter/team

Part 5: Equipment Preferences - Get geared up correctly for your mission, whatever it may be

Part 6: The Rifle and How it Works - Some tips to the sniper rifle you may or may not have known

Part 7: Knowing When to... - Tips on when to stay patient, when to engage, when to move – etc

Part 8: Wrap-up - A look at the important tips from this guide's entirety.
Part 1 - Introduction to the Sniper Role and Reckoning Gaming
Part 1: Introduction to the Sniper Role and Reckoning Gaming

Being a sniper in ARMA III can be challenging – Finding the right cover, being able to judge when to stay patient, when to open fire and the simplicity of knowing how to move is all amplified in this role.

This added together makes it also one of the most rewarding.

Nothing in my opinion beats sitting on a hill, hearing a tank moving about a kilometer away and then scouting out the enemy base

Or helping that all important town capture in a Capture the Island gamemode

Or Suppressing an enemy to the point of him being so scared he tags a teammate trying to save himself in a panic. Then calling a “Send it” on him followed by the occasional rage quit.

Even the little things are 'epic' such as crouching through a forest undetected behind enemy lines.

Hopefully the following guide will help you in your daily gameplay. Whether you be a Spotter or a Sniper. A 'newbie' to ARMA or an ARMAholic there's going to be something in here you can learn and take with you into this great war-sim.

Roles of a Sniper can be chosen by the following

Are you the recon expert who sneaks past the main battle to get deep into enemy territory? If so stay quiet, your senses need to be clear. You'll need to listen carefully for oncoming enemy tanks/vehicles and even aircraft. You generally won't have a set position until you reach the enemy base, find a major town, or find yourself under fire.

Are you a defender? Staying 'at home' at a town that could turn the tide of battle. Use your time to setup and fortify your position - Tripwires, satchels, mines are all things to consider placement of. This isn't the ideal role of a sniper spot but if you're in a losing battle you might not have a choice.

Or finally are you an attacker? Probably you are going to be looking at this role for most games. Heading to the next town (Generally with an infantry squad/ other players) and giving them cover.

(Do any of these cover somebody running into a town like an idiot trying to jump around and no-scope somebody? Didn't think so..)

You aren't limited to choices, you generally will play them all within the length of a match but everybody has a preference. Use your preference to an advantage, it shows what kind of mindset you have.

If you're a recon try to spot Artillery/place map notes for your team while moving. If you're an attacker try to befriend some infantry units. Keep open comms with your team and finally if you're the defender keep in contact with your commander. Know where your MHQ is located and help defend it.


Getting to know Reckoning Gaming

Why make this guide? Reckoning Gaming was created by myself and my friend whom got me into ARMA – We had been a sniper and a spotter throughout many games – Red Orchestra (Ostfront), Battlefield 2 and even Call of Duty. But none of them were realistic which is fine but we thrive on realism. That's when we stepped up to the plate at ARMA.

ARMA brings in a degree of realism unrivaled by any other game and it's sandbox attitude of multiplayer really adds to the immersion and makes each battle unexpected. That draws us in even more.

We have a combined played time in ARMA II/Operation Arrowhead of more than 2,000 hours and take pride in knowing we were one of a kind – People who used snipers for their actual reason outside of clans and tactical groups. I played all of that ARMA II and never once saw a sniper/spotter combo outside of clan play. This is such a disadvantage to the opposing team.


We started a series in ARMA II and labeled them as the “Sniper Diaries” It all started there – the Sniper Diary series became some of my most popular uploads. It featured a variety of tasks we did in our normal games like supporting a town or scouting out enemy bases.

It wasn't always about kill count and never is. It's about how effective you can be with your shots: “Is it just going to be a scoreboard tally kill or am I actually going to help my team?” “Will sniping this opponent lead to a town capture or help us in winning this?” “If I shoot this who else will hear and search for me/us?”

Not every shot will be the amazing headshot on a machine gunner that is pinning down an infantry team but trying to use each and every last round efficiently seperates a strategical player from a reckless one.

So in ARMA III We plan to put a guide out, giving all tactical sim junkies a new perspective. Some of the tips in this guide you will probably have seen before or have already started doing but I'm sure if you read this you will find something you haven't found out about the ARMA universe.
Part 2 - Concealment
Part 2 Concealment

Sometimes you are in danger, sometimes you are on the hunt - It's a fact. You will have to move. This part of the guide will be divided into 2 parts: Movement and of course your 'camping' or set position.


Moving positions seems simple but planning out your path carefully will keep you from making any careless mistakes.

In Capture the Island game modes try to dismount your vehicle around 800 meters from the objective town, this will give you a good amount of space to find a setup point and avoid combat until you are ready.

This isn't a hard set rule. It depends on of course the town's terrain and battle scenario.

When moving, move slow. That doesn't mean you have to walk everywhere or crawl at all times, sprint is used a lot – it's just knowing when to sprint and when to wait. This isn't a race. Generally you will be behind enemy lines so stealth is your ally.

Move with your player looking down slightly to hide your silhouette considerably, this might give you the extra second you need to find a good position.

It is best to make sure you have cover in front of you before you start a sprint across a field or open area. Look for a rock, vehicle, house, tree – Anything that will give you cover if fired upon.

If you are fired on while moving, don't panic! Get to your cover point and return fire if it's a reasonable enemy to face. If it's a tank/aircraft, you don't need me to tell you this.. RUN!! Forests are your friend and provide ample cover.


Position. Your position can mean the ultimate difference in a battle. However setting up a good position will depend on what role you are playing.

One thing however is constant for snipers. Blend in with the environment as much as possible, don't go to the “Obvious area” and always plan an escape route.


Here is a great example – the map setup recreation of Sniper Diaries – Welcome to Stratis and the following is the view of which we had from our concealed position


(The screenshot is a little blurry, taken from our video)

Circled in red is the basecamp we were looking over primarily – our task to help capture this outpost with the aid of an infantry squad.

Circled in green is the known enemy locations that we had spotted during our 3 minute setup as we waited for the assault to commence.

In Yellow was our blind spot, something I kept in check for any patrols, we had just moved in to our position from that direction and had snuck past multiple patrols on the way.

The range is 800 meters away.

Our position was chosen on multiple variables

1. Were we hidden from sight, safe from being spotted?

This is the most obvious goal of selecting a spot. The answer is; Yes we were. The trees in front of us and the brush behind us hid our silhouette allowing us to kneel and prone unnoticed to them before combat commenced. During and after combat it is extremely important to keep motion limited – Always expect reinforcements.

2. Did we have an Escape route?

Escape routes should always be discussed before engaging and are one of the first things to verify with your partner. The answer here is:Yes. The forest to the left of us (see map above) offered us cover and a safe passage back to the shore and friendly towns if need be. Forested areas are great escape routes.

3. Were there any major blind spots

One to the left as mentioned and shown in the picture, a spotter needs to keep any blind spots on his mind and warn his partner of it. If there is motion call it out immediately.

4. Was the area behind us secure

This is crucial when setting up as we were – there was a road about ~100 meters behind us leaving us vulnerable without precaution. We noticed this and set up tripwires and a claymore at the road which had been busily patrolled by an Ifrit only moments before.

5. Were we in any danger?

You always are, never think you're in the clear in ARMA but it is crucial to limit the danger. We were 800 meters away as noted before so the shot on us would have to be setup rather than a suppressive return fire. Our escape route was reliable and the trees in front of us provided even more cover. This I would say was one of the best spots we have gotten for an operation.

It's worth noting that when adding explosive like claymores, mines, tripwires – Make a note in side channel on the map so your teammates will know.


Here are some Positional tips for you.

1. Don't overload yourself.

What this means is an area where you can watch one area effectively is good enough. Don't go for the zones where you'll have to focus on more than one or two good areas to shoot at. The more you can see the more likely you are to be seen.

2. The 'Obvious' cover isn't always best
See Below for more

3. Try to move after each 'fight', this is known as relocating - Try to limit your shots per area for example take one group of infantry out, make sure nobody noticed or that you have time to move and then move positions.

Relocating is a major tactic! !

If you are setup at a position too long, the enemy will inevitibly find a way to flank, supress and eliminate you.

This is easily and best avoided by simply relocating. The enemy will be forced to try and scout and hunt you leaving them at a disadvantage.

Remember however, stay low and move slow. If the enemy is looking for you it only takes one mistake for a counter-sniper team or thermal imaging device to find you.

Picking a spot – The obvious isn't always best.
Here is a spot that a sniper would generally be drawn to
Seems like good cover, the shadow of the bush concealing your position well, right?


Here's a look from the hill across the valley.
You would easily be spotted by the enemy on their first or second sweep.

Here's a spot that may be more uncommon but was only 20 meters away.

Oh no! There are no bushes in front of me. It doesn't matter Again here's a look from across the valley.

What makes this position great is that the trees give you cover and you are limiting your vision while also looking at the target objective. This makes a great spot.
Part 3 - Spotters : Why should I consider?
Part 3 Spotters – Why should I consider?


– I'm generally a spotter and being a spotter I carried (in ARMA II) an M4 for suppression assist and to help if an enemy got danger close (50-85 Meters). It was an odd thing for someone in a ghillie suit to carry.

I constantly was asked in our livestreams/Youtube uploads “Why do you spot in this game?” or “Why do you need a spotter?”


Being a sniper in close quater combat is a very difficult task!

It's not impossible for a sniper to survive or fight through a
situation in which he engages within 150 Meters, however, you must
realize you are most likely engaging (In most cases) 3 or more
targets with weapons much quicker then yours.

You can be the best marksman in the world, but if you are only pulling that trigger every 1.5
(give or take) seconds - suppresion alone will probably be your death
after the first shot. Also remember that AI will be the biggest
problem considering how accurate they are within' close distances.

This is why veteran snipers will usually be seen with a spotter.

[RG] Lynch: "Spotters are hugely under-appreciated in this game.
Pair them up with a sniper and the combo can be extremely effective.
You can have two people able to work together and take on almost anything
that can be thrown at your team."


For the aspect of visionary spotting and judging ranges it's not a necessity although it pains me to admit it. Although spotters are a huge advantage - most servers play on regular difficulty and you can just 'spacebar' or open your menu to find distances in the middle of your screen without switching weapons.

Also you have the argument “There is no wind!” (Well I figure that will be an excuse no more because ARMA III is adding a wind system)

They are all valid arguments but to them I also say – Four eyes are better than two. Spotters help and will always be a major asset to a Sniper team in ARMA

The Range Finder vs the scope of a sniper's rifle. Notice how wider the Range finder is

The range finder (which I find myself staring through for hours) is our greatest tool and it's FoV is wider than the scope of a sniper rifle. That helps tremendously with spotting targets – Your sniper can tunnel his scope and you can spout out Azimuths to him to increase speed, letting him instantaneously switch distances and 'pop' the next target in half the time.

Then you have the Close-Quarter Combat advantage having a Spotter with an assault rifle adds – that should be obvious.

One thing you may not think of is the spotter can be used to suppress. When engaging – say a patrol of 4 – Have your spotter (On single shot preferably) Open fire on the targets while the sniper is free to get some easier shots.

This isn't recommended near an enemy base/town so use this tactic with extreme caution, Stealth is your number one priority.

For example to use suppression you will find a good cover area, kneel or prone down and have the spotter aim from left to right and the spotter right to left. That way if the spotter does hit you won't waste the ammunition from the Sniper's rifle.

I'd also like to add the comradery it adds between Sniper and Spotter. It's great to play ARMA with a friend/friends and being a Sniper and Spotter will require that. You won't be able to perform nearly as well spotting for a random marksman nor will you have that comfort level with a random person playing as a spotter. Plus it makes the game that much more fun.

If you have a friend who plays ARMA with you, ask them to be a sniper/spotter you might enjoy the experience.


A new addition to ARMA III's beta features a new Rangefinder-like optic. This 'weapon' is named the Laser Designator – As seen in the previous ARMA series games it will display the azimuth/distances and also point a laser for designating targets.

Why mention the Laser Designator? It's a helpful spotters tool for calling in air strikes obviously but it also has a great function for lining up shots.


As you see above it lists: Azimuth Range and Visibility settings (Nightvision and Vis)

An addition to the normal rangefinder utilities are the Magnification notice on the right and the elevation.

Elevation will play a role in your shot. If the target is above you or a + you may want to consider aiming slightly above where you normally would.

If the target is below you or a – you will want to compensate by possibly aiming slightly lower.

These are only to be used in extreme conditions and will take some getting used to. Remember practice makes perfect.
Part 4 – Terms
Part 4 – Terms

When in battle or during a stealth operation it generally can get quite fast paced. Using terms like “Contact – Rifleman – Medium” Has been made obvious in several guides but as a Sniper and Spotter there are a few things you can use differently.

The following will help you sound more official/ help immerse you into the realism and simulation which is ARMA. It will help distinct you from others if you are using a teamspeak with a clan and keep confusion to a minimum.


  • As a spotter, for instance, telling your Sniper to fire is known as “Send it.”
If you are using a teamspeak with a tactical group this could be necessary to use. Just yelling “FIRE!” would get everybody's attention.


  • Lead or Leading

Term used when a target is moving, commonly known but figured it was necessary to add considering it will be used in this guide.

When a target is moving you will correct this by aiming forward or leading in the direction he is traveling.

It is recommended to hold your fire until the opponent is stopped to reduce lag's play into the shot as well as obviously decreasing your error rate.

  • If on Teamspeak tell your sniper to “Bar” instead of “Hold”
This isn't an issue with most players, if you aren't in a global channel using 'hold' works just as well. This will just limit confusion and keep rifleman and infantry from holding their fire when you are talking to the Sniper only.

As a sniper you are going to miss – Especially in ARMA's online modes with all the desync and lag. As a spotter you need to keep him patient. Getting frustrated will only get you spotted, wait until the target slows or stops completely. Wait until he's closer or out of cover. Constantly saying “Hold” or “Bar” until you finally yell “Send it!” at the perfect opportunity.

  • Zeroing or Ranging

Setting the rifle to a distance in meters, also very commonly known. To set your zeroing use the <Page up> and <Page Down> Buttons (up and down) The zeroing will show itself on the right side of the screen (Default is generally 300 meters)

  • If you spend a lot of time in a certain town or area – Name objects/buildings.

For example here is a building from ARMA II's town Stary Sobor.
We referred to this building as “Barn” for it's red color and shape. When setting up we always Pre-checked it's distance because it was a hotspot for enemy Marksmen.


If there is a rock formation that could provide a notable position call it simply “The Rock Formation” The names don't have to be special at all – it's even preferable to recycle the names for each major town to reduce confusion.

This system helps you know directly where to go without opening a compass or map.

  • Tree Cancer

Yeah it's been used before but we have used it to describe a newer player playing as a Sniper. We think the term fits as you always find them in front of a tree giving away their silhouette and being easy to spot.

  • Azimuth

The direction of which (in 0-359 degrees) the target is located. True north is 0. South is 180 etc
Part 5 – Equipment – Our Preferences and Hints

When you join a server the first questions you will answer is: What gear will you take to battle today? There are so many constants when it comes to gear: GPS, Map, Compass, Range Finder/Binocs but others depend strictly on mission time of day or what you plan on doing.

NOTICE IF IT IS DAYTIME. Please, please take off the night vision. It is so easy to spot a sniper who wears nightvision goggles during the day. It sticks out like a sore thumb.

  • As A Sniper:

The Rifle
You will want to grab a rifle obviously but the rifle you choose might not be so obvious. In ARMA II Everyone jumped and grabbed the M107 – Stop! Think your mission through. If ARMA III is like the previous they will add a smaller rifle that is more suitable for medium range combat. This might be the better of the two for you.

Think about it. How many times did you engage enemies at 1200(+) meters? The smaller rifle cannot be heard past around 750 meters (In ARMA 2) and could be fired up to 1000 accurately Whilst the M107 could be heard up to 2300 + meters.

There are rare occurrences where you will need a longer ranged rifle or maybe an anti material rifle. For these circumstances go for it – pick up that big rifle and have fun. For most missions though you will want the lighter weight, quieter, Marksman's rifle.

Sidearm
Obviously your sidearm weapon will be a pistol and the silencer is almost necesarry – this is much more important if you're braving the forests of ARMA alone.


Equipment
Once again a topic that has many variables. There are the constants though – ghillie suit, GPS, Map, Compass, Range Finder and take a ♥♥♥ (First Aid Kit) or two just in case. If you have a spotter with you take a medical kit to heal your partner if need be. If you're alone you might want to add a couple of explosives like a satchel or extra claymores just in case you find that perfect ambush spot.

  • As A Spotter:

The Rifle/SMG
As a spotter your rifle is used much differently in most cases – You might not even need to use a single shot but it is extremely important to be prepared for the task at hand.

Spend some time at the shooting range challenge and get comfortable with a weapon and it's sights. Pick an assault rifle and a submachine gun. Unlike the Sniper role, the spotter has more weapon choices and will really depend on personal taste. Some people choose a gun due to accuracy or a good memory whilst using it – others just like the distinct sound certain guns make.

I hardly use the SMG but some people may like it's burst more, I feel it diminishes the effectiveness of Supression – Atleast at the distances a sniper/spotter combo will be engaging from!

But it is still best to become acclimated with the Submachine gun and it's limits. They are a good choice for urban or CQC (Close-quarter combat) operations.

The SMG for ARMA III is the Vermin for Blufor or the Scorpion for Opfor. These were both added in Beta.

Equipment
Just like the sniper you will want the necessities – Ghillie suit, GPS, Map, Compass, Range Finder, FAKs and a Med kit. As the spotter you should carry the explosives and also try and take some of your Sniper's ammunition just in case you spend more time in the fields than you expect.
Part 6 – Your Rifle and How it works

In the last section you read how to choose the rifle for your mission but here are a few hints you may not have known!

1. Use <Left Control> and your ADS button <Right Mouse> To open your secondary sights, another alternative is to press </> on the Numpad to switch them.

This isn't strict to sniper's rifles – Most infantry sights like the ACOG scope have a secondary sight option.

2. ARMA's zeroing system uses a “+/- 49” system meaning if a target is anywhere from 750-849 the zeroing will automatically lock to him at 800.

“also remember that with your scope - range distance is set to be auto-targeted within certain meters by 49+/- of 100. Basically, 800: 751 to 849 ( I never fire at targets at *50)” Quote from [RG] Scarecrow (Lynch)

3. You cannot shatter a vehicle's glass as easily in ARMA III

This is more of a tip, with the year being supposedly 2030 vehicle glass has been reinforced and I want people to be sure to remember it isn't always a sure thing that you will be able to get the driver on the first shot. On a test I spawned a sniper next to an empty Ifrit (On current Beta build) it took 3 shots to shatter the glass at ~30 meters.

4. How to: Zeroing in (For the ones new to ARMA)

Zeroing in is a basic task but is the most important when lining up your shot. Using the <Page up> and <Page down> buttons on your keyboard you will increase or decrease the value of the zeroing on your shot.
Zeroing of the weapon is highlighted in Red in the screenshot above.

5. TWS on a Sniper's Rifle - Not preferred!

I guess this one depends on more of a personal perspective. The TWS sights on the sniper rifle as featured in Operation Arrowhead (And I expect it will soon make it's way into ARMA III) was a major upgrade to solo snipers but it also had a huge downside. You couldn't correct your shots as easily! When using a normal scope you can see the dust and dirt being slung into the air where the bullet hits, with TWS sights you won't see the dust and dirt and have to guess to recalculate.
Part 7 – Knowing When to.....

Knowing when to engage, retreat, move in and take cover is probably one of the major differences you'll notice in an amateur sniper and the veteran sniper.

The amateur may move erratically, sprinting across the field and not stopping even when his character is out of breath. This not only would lead to him being easily spotted but he won't be able to return fire accurately as well.

Another thing an amateur at ARMA may do is not even plan out his every shot.

  • Knowing when to Engage

Let's say there's four enemies around 500 meters out moving away from the target. An amateur in Capture the Island may see this and say “Ooh bonus to my kill count!” then get overexcited and open fire without grabbing the distances of all targets or picking a “Killspot” location.

The veteran ARMA Sniper will take a look at the enemies first, whether he be alone or he will study them with his spotter discussing a strategy.

What role does each enemy play in battle? You need to start prioritizing your targets.

Here is a basic list of priorities for targetted NPCs and Players

1. Marksman - at a distance of 500 or more.

They are the biggest threat to actually hurt you. Extremely accurate so you don't want to leave them up for long.

2. Machine Gunners – They become number one at a distance of less than 500

Less than 500 meters they can be a nightmare – sending tracers all across your covered area. Don't take Gunners lightly

3. Rocket Launchers or AT Soldiers – You need to watch out for your friendlies as well as yourself

These become higher noted if you have an assault force working with you or if you are covering for other players as they move in on a target town. They obviously wreak havoc on vehicles and don't think they won't use that launcher to suppress you!

4. The Commander – Generally will be spotted by his binoculars, if it's a player he moves to 3

The commander can either be the AI in command or a player controlling a group of AI. If it's a player controlling the AI and they DO NOT return fire – save the commander for last. They are probably on 'hold fire' setting and will engage once the commander dies (This is only a rare occasion though). Try and approach the commander (If he's a player) as the most dangerous and least predictable.

5. Regular Riflemen
Not much needs to be noted on the regular rifleman. They will open fire once they spot you generally and try to suppress. Their accuracy is limited to 300m


Once you've planned out your targets you'll want your shots to be quick and accurate. Another thing to help you know when to engage is judge the enemies position and movement. Where are the going? Is there more cover where they are going or is it an open area?

Use their movement to detect a “Killzone” and be patient. If they are moving towards cover or possibly over a hill don't force combat. Hold off until they come back or just take a mental note that they are there then get back to moving up slowly or whatever you were doing.

Some hints for covering a specific zone –

Get the distance, not only of the immediate area but also of cover nearby. They will either bolt for cover or return fire from where you engaged them.

Don't 'hold your breath' until they are there, use the range finder to zoom if necessary. You'll need all of the clean shots you can make.

Don't get too overexcited. This is a major issue with most people playing as the sniper class. You sometimes will need to let an enemy go. If you're in any doubt that you might not succeed, fall back. As a sniper in ARMA I like to end games with 0 deaths rather than a million kills.


  • Knowing When to Move...

[RG] Scarecrow: "I heard this recently, "Movement is Life" and the term couldn't be more correct."

Knowing when to move may sound simpler than it is. Try to stick to hillsides; it's better to be on the slope than in the ditch of the valley.

Remember you don't always need to go directly to the goal, use forests and when out of cover use sprint conservatively.

If there are too many AI nearby you will want to hold position and wait their patrol out.

If there are enemy helicopters flying about hold your position in the trees – if they have thermal sights (Attack Choppers) you may need to run.

As stated above, when you make a camping spot you will make an escape route. Use them for extraction. Even if it's going the opposite direction the first goal of movement is to seperate yourself from combat.

An example would be: Fall back going on your escape route then cut across the road and turn towards to goal objective.


  • Knowing When to Retreat or Hold Fire.

Knowing when to abort your shot or leave your camping spot is another way to tell an amateur sniper from the ARMA veteran.

The game is about patience, and no I can't stress this enough, if there is two packs of eight enemies on the other side of a hill less then 700 away (For instance) – Hold your fire.

Don't start a fight you won't be able to finish, at that point wait for them to break away from each other on patrol so you can engage each one seperately or head to a different location/try to sneak past them.
Part 8 – Wrap Up
Part 8 – Wrap Up

In this guide we have covered: Zeroing, Cover, Patience, Camouflage, Instinct (To a certain extent), Snipers and Spotters relationship and more.

Let's not forget that this is a game though, as realistic as this simulation may get - a mistake here will only cost you a respawn in most cases.

We're all here for fun, some of us get that fun by dressing up like a bush in game and hiding from the enemy all day.

Others by making those epic shots on an infantry team that you (and possibly your sniper) will tell their friends about for months.

But in this wrap up I do want one thing to be clear and it is one thing that bugged me about ARMA 2 towards the end:

If you're going to troll or be a jerk, save it for another game. ARMA has what I believe to be a prestigious community through mature modders and clans that is unrivaled in the FPS category. Towards the end of ARMA 2's campaign the flood of cyber-bullying and hackers began to come in causing a hate towards a certain mod (I'm sure you know which I'm referring to, and no I'm not saying it ruined ARMA, it actually improved ARMA by showing more people this great game) from some ARMA traditionalists.

Play clean and enjoy the game but don't dampen anybody else's gaming experience by being a jerk.

Anyways!

Whatever you do I hope you use the information of this guide to have fun in the game of ARMA 3 – The best military game in my opinion. If I have missed something I'm sure my sniper Lynch/Scarecrow will let me know.

For now this is the Reckoning Gaming Sniper/Spotter guide and much like ARMA 3 this is very much in a beta stage.

Thank you for visiting either on STEAM, through youtube or perhaps you're a follower of Reckoning Gaming's site or livestream.

For [RG] Lynch, this is [RG] Jbvol – Good hunting and enjoy Beta!


Reckoning Gaming has no affiliation with ARMA or the Armed Assault series, ARMA and Armed Assault is owned and created by Bohemia Interactive.

It is also necessary to say that the contents of this guide are to be used strictly in ARMA. Leave the shooting in the games.
41 kommenttia
Covid-19 21.1.2020 klo 16.40 
i always set a marker on the map, zoom in as close to where my target is then use that to get a semi decent range, range my scope in and shoot. i find most servers the range finders suck
Sir. Good-Boi 18.1.2019 klo 0.54 
I built an elevation calculator which should help to get your zeroing down, needs the range to target and the degrees, certain laser designator can provide that, from ACE to 3CB Vectors and probably more.
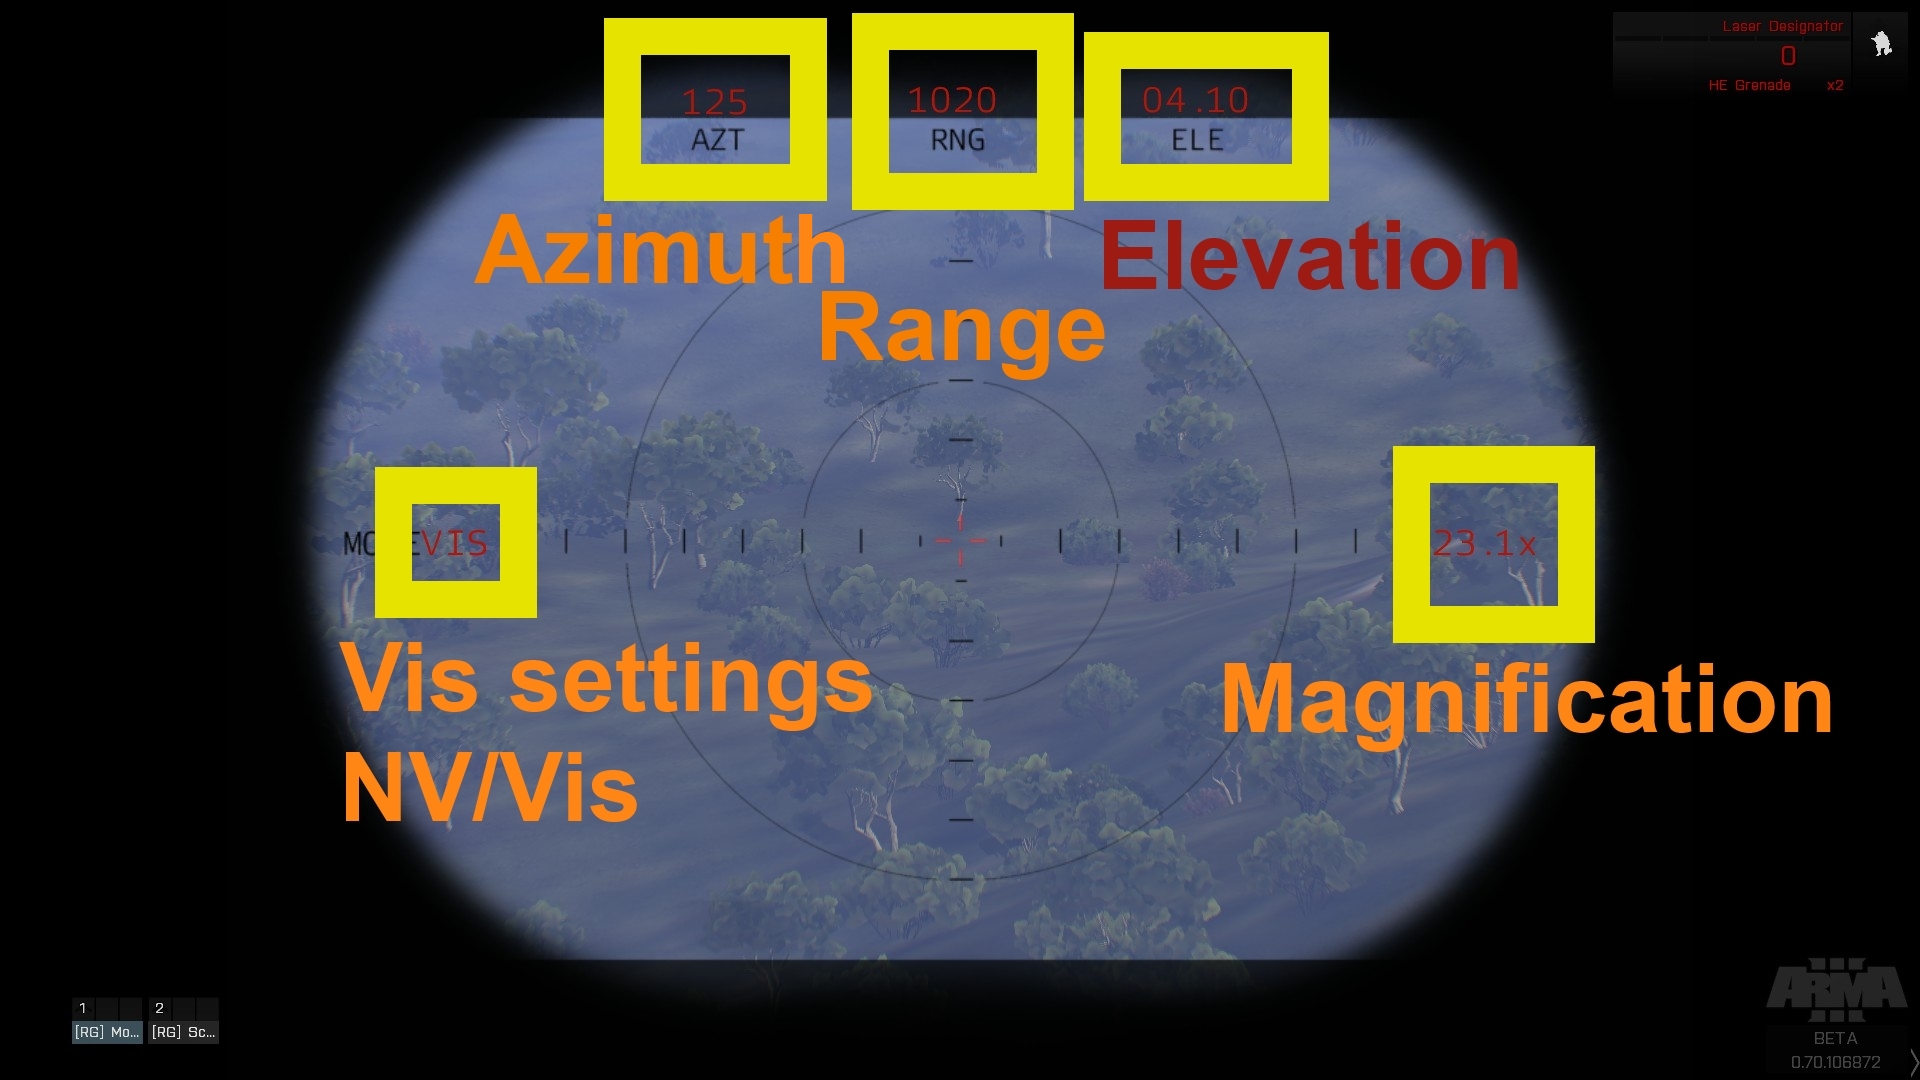
It's a small PowerShell script that can save the session's history so you don't need to write anything down or recalculate. I also included the source code for those curious:
https://drive.google.com/open?id=1voITjlScqDsnk5JiFQdCKl92A-bU5JXo
Defi 6.3.2018 klo 7.19 
spotters are also extremely effective for increasing the speed at which you can deliver shots
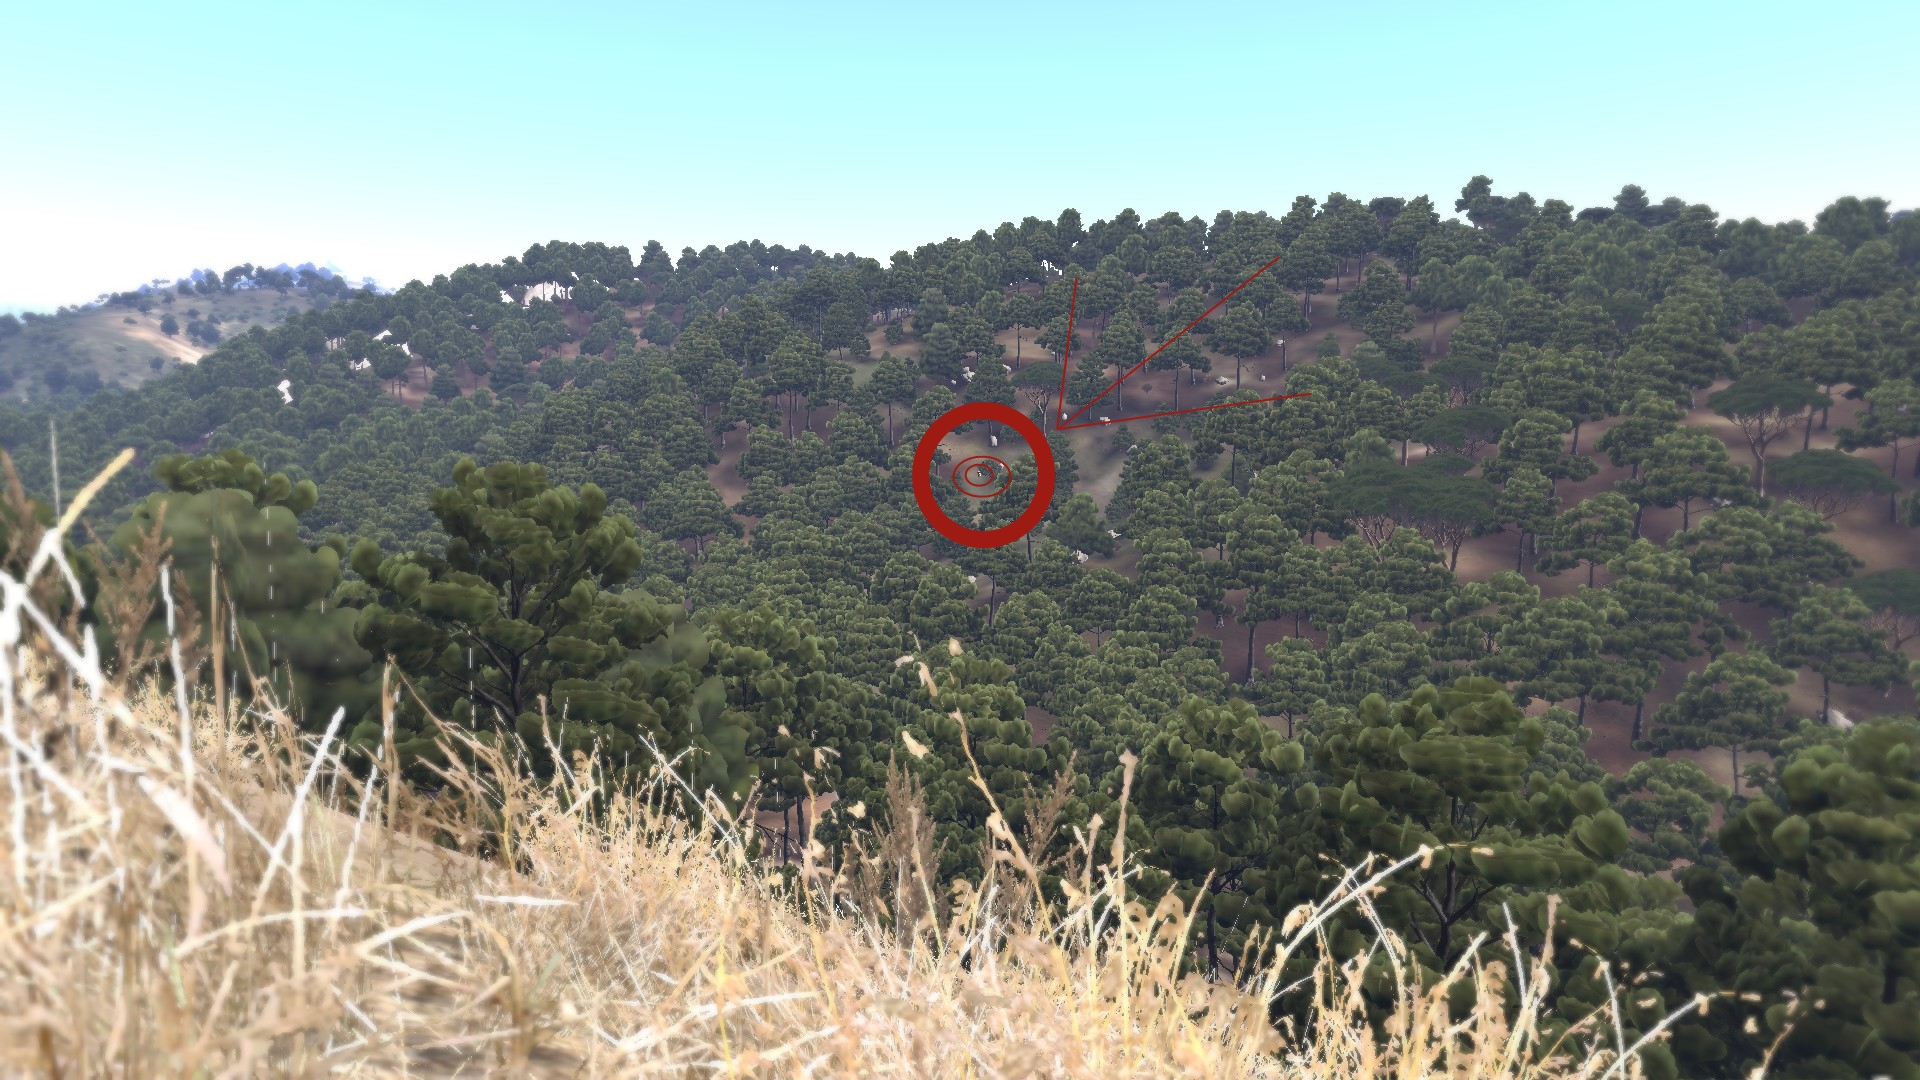
as while you are lining up your shot the spotter has already found another and gauged its distance so you can hoot as soon as you recovered from the recoil
BOT Ujka 20.7.2017 klo 1.22 
thanks mate
Jbvol  [tekijä] 20.7.2017 klo 0.54 
@DamnedSon - You'll likely wish to use the server browser from a different menu. Not the quickfind. A good starting point would be a coop game, public servers where anyone can join and fight the AI in random joint ops across any given map.

I hope this helps : /
BOT Ujka 19.7.2017 klo 23.03 
im still a rookie in this game so i cant find a right server where i can play a "regular" game, i ussualy get in some roleplay or some servers where they just kick me out, i need a team that will train me also
Jbvol  [tekijä] 19.7.2017 klo 16.56 
DamnedSon Not sure what to say to that. What is the problem, exactly?
BOT Ujka 17.7.2017 klo 1.37 
help heeelp,need some help with the servers
Jbvol  [tekijä] 30.12.2016 klo 23.26 
@AzZaMaTr0n, glad to see that! Hope you got a few kills!
O6 Lima 30.12.2016 klo 7.03 
Nice guide mate! Reading it as I sit on a hill with a ghillie scouting out a Rebel Outpost xD