Darkest Dungeon®

Darkest Dungeon®

700 ratings
The Final Dungeon Survival Guide
By mrbunnyban
Maps and strategies for missions in the final location in the game, the Darkest Dungeon itself!
2
3
13
2
2
   
Award
Favorite
Favorited
Unfavorite
Intro & Summary
Welcome to the Darkest Dungeon, and I do mean the Darkest Dungeon itself, not the game. Hopefully you've taken a look at this guide BEFORE you started planning your roster of heroes, as the main purpose of your entire campaign is to develope teams of heroes to conquer the dungeon itself. 4 teams, to be exact, but the last team is pretty flexible. (I'll just call the final dungeon the Darkest Dungeon from now on)

First, there are a few gameplay mechanics unique to the Darkest Dungeon that you should know about that do not exist in other raid locations.

1. Never Again
Every hero who is part of a successful raid in the Darkest Dungeon will not enter the Darkest Dungeon again. They WILL enter other locations (Ruins, Cove, etc.). These heroes will not count towards the roster size, hence you can hire more heroes immediately upon a successful mission.

2. Abandon = Random death
If you choose to abandon a raid in the Darkest dungeon partway, you will suffer a random hero death. Any trinkets equipped by that hero is lost forever but trinkets in your bags are kept: so unequip all your heroes' trinkets before abandoning.

3. No scouting, no surprises, no obstacles, no "Cleansing" curio interactions
-Scouting is meaningless in the final dungeon: when you enter a room, paths which lead to new rooms will be revealed. There are no traps. Also no secret rooms, AFAIK.
-You cannot surpise the enemy. Likewise, the enemy cannot surprise you. Not 100% sure about nighttime ambush after camping, but it seems like it cannot happen.
-There are no obstacles. Do not buy any shovels.
-There are no "cleansing" curio interactions. There are one or two curios per mission (see maps in the respective sections), but these do not require a provision item to make use of.

4. Failure = x2 XP boost
If you fail a raid in the Darkest Dungeon, all heroes gain a x2 XP Boost in the next raid. This next raid does not have to be in the Darkest Dungeon to enjoy the bonus.

5. Victory = Remove all stress
A victorious mission in the Darkest Dungeon will remove all stress from all heroes in the estate. Yes, even the "Never again" heroes. Of course, you also unlock the next raid in sequence.

That's it for unique mechanics.

I'd like to emphasize this advice: Start planning which heroes want to bring to the various raids in the Darkest Dungeon as soon as your roster starts filling out. You need at least 4 full teams. Also train a few replacements in case some of them die along the way.

Personally, I'd send in the my team of fully developed heroes ASAP into the Darkest Dungeon so as to free up the roster space when these heroes get the Never Again status (or die).

There are 4 Raids for the Darkest Dungeon, which must be completed in sequence:
1. We are the Flame
2. Lighting the Way
3. Belly of the Beast
4. Hell is in the Heart
We are the Flame
(This is MY map. I've also uploaded this map to the wiki.)

In a nutshell:
Lots of STRESS
Boss SHUFFLES party like crazy
Lots of BLEED.

Highly Recommended Heroes: Crusader, Jester
Highly Not Recommended Heroes: Leper
I beat it with: Grave Robber/Occultist/Jester/Crusader

Key tip: Stalling out combat when there are few enemies left is crucial to mastery of the game

Basically, when there are few enemies left it is a good idea to stall out the combat (using low damage stun moves) in order to heal/stress heal as much as possible. To prevent players from stalling *too much* there is a reinforcement mechanic in the game. So we want to stall while not incurring reinforcements. The conditions for reinforcements are:
- 2 or fewer enemies remaining
- No 'large' enemy remaining
- Player did not use at least 2 damaging skills in the turn (missing and hitting corpses is okay)

So as long as you use 2 low damage attacks (like stuns) you can keep stalling.

it's a bit more complicated then that and you can read more here[darkestdungeon.fandom.com].

So how does this knowledge help me for this dungeon?
Look at the map. See the encounters which include 2 "Rapture" enemies? Those are Rapturous Cultists which cannot harm your heroes. Keep them for last and you can stall very very safely.
Take note that Rapturous Cultists will GUARD other enemies who CAN hurt you. You should disable the GUARD with a stun or guard breaking skills in order to kill priority targets.

Recommended Provisions
All Food, all Bandages, all Holy Water, all Herbs, 16+ Torches.

Enemies
I won't go into full detail of each individual enemy here (check the wiki page for that), but I will list the enemies to help you search:
Ascended Brawler, Ascended Witch, Rapturous Cultist, Cultist Priest, Defensive Growth (summon of Boss)

Of these enemies, the Cultist Priest and Ascended Witches are your main priorities. Both of these enemies stress out your heroes like *crazy* and do high damage. Take them out ASAP!

Generally, bleed and blight resistance is fair. The BOSS however has high Blight resistance but mediocre bleed resistance.

Boss
The Shuffling Horror has two actions a turn. His moveset includes a party shuffle, strong bleed damage, and slight stress damage/summoning. His direct damage potential is fairly low.
The boss takes up 3 spaces, and is accompanied by a Cultist Priest behind him. If the Priest is killed, the boss will likely summon a Defensive Growth. Repeatedly.
The Defensive Growth will GUARD and heal the boss, & is resistant to stun. IMO, it is much worse than the priest unless you prepped to deal with it (stun or Riposte).

Heroes
Don't forget to consider other raids when you decide which heroes to send this raid! Remember, NEVER AGAIN.

Great: Jester, Crusader
- Jester: This whole raid feels like it is designed for the Jester. Of the four raids, this raid has the most focus on high stress. There is no hero as good as removing stress as the Jester, hands down. The Jester has team anti-stress camp buffs. The boss is vulnerable to bleeds. Dirk stab bypasses guard. The boss shuffles, and the Jester is mobile. Trust me, this is the raid you bring your Jester (if any).
- Crusader: The crusader is the only "tank" who can attack from position 4 with "Holy Lance". The boss is size three, so the Holy Lance skill can always target the boss. He has team anti-stress camp buffs. He has a stun (good for removing guard encounters). He can remove stress. He can heal. Yeah, the crusader really rocks in this fight.
-Shield breaker: Effective from position 1-3, can attack from position 4. Can attack any position she wants. Puncture bypasses then prevents guard, thus sparring the Rapturous Cultist and ignoring the Defensive Growth. Opens up interesting strategies really.

Good: Grave Robber, Highwayman, Man-at-arms, Occultist, Hound Master, Bounty Hunter
- Grave Robber & Highwayman: Effective from any position and good at repositioning to help other heroes. Nuff said.
- Man-at-arms: Effective from position 1-3. Riposte is an important solution if you killed the Priest and got the Guarding mob for the boss. Has good team camp buffs, but I'd favour anti-stress camp buffs for this fight. However, note that the Man-at-arms is VERY highly recommended for the next raid and you may want to save him for that raid.
- Occultist: Not for his heal, but for his damage debuff and extra damage to everything on the raid. If you fully trained an Occultist for the Weald (you should), I believe you should use him in either this raid or the last raid.
- Houndmaster: Effective from positions 2-4, arguably position 1 as well. A source of stun to remove guard. Can remove team stress in combat, and has good team anti-stress camp buff. 2-action boss means debuffs & marks fall off quickly. So don't bother marking the boss.
- Bounty hunter: Interestingly, there are a lot of humans on this particular raid. Since the boss is size 3, the 'anti-large' camp buff may be helpful. Don't bother marking the boss.

Okay: Vestal, Hellion, Abomination
- Vestal: Constant healing is going to be tricky here as you keep getting reshuffled by the boss. Consider hitting the boss with that mace when shuffled to position 1&2. She is still a solid choice overall, but I'd save her for other raids.
-Hellion: Good bleeds and effective from positions 1-3 ... but she REALLY wants position 1 all to herself. I'd use save the Hellion for another raid, but it's up to you. Somewhat useless on position 4. At least she removes Bleed all by herself.
- Abomination: Wants position 1-2, can sort of act in position 3, can't do anything at all in position 4.

Poor: Arbalest, Plague Doctor, Flagellant, Antiquarian
- Arbalest & Plague Doctor: Generally wants to be in position 3 or 4. They can work, but other heroes are generally better.
- Flagellant: Really wants to be in position 1&2.
- Antiquarian: ...why? I mean, really?

Horrible: Leper
Poor movement (1 space at a time), zero effectiveness in positions 3 and 4, and poor bleed resists... this place really really hates the Leper. Please, leave the Leper in the estate.

How did you beat this raid, MrBunnyBan?
Personally, I've used:
a) Grave Robber-Occultist-Jester-Crusader
b) Occultist-Jester-Bounty Hunter-Shield Breaker

Team (a) are very resistant to shuffling. Using finale and lunge to finish off priority targets works well, after which the Jester sits in position 4 stress healing the party.
Team (b) is tricky cos I didn't have a backup healer for when the Occultist rolls 0 heals (damn him).

I'd also try: Occultist-Jester-Shield Breaker-Crusader, with Crusader's position being flexible so he can Holy Lance priority targets depending on the encounter (refer to map)

Trinkets
HP/Dodge trinkets on the low base HP heroes, anti-stress and anti-bleed all work well too. Don't worry too much about damage trinkets: this isn't really a DPS race boss IMO.

Help, I killed the Boss's Priest
And now the boss keeps summoning Defensive Growths that Guard instead? There are only three good solutions: Ultra high stun (need stun trinkets), Riposte and Shield breaker's Puncture.

Wait, what is that chest in the map?
That is a curio which contains an Ancestor's trinket (if you do not already have them all). Don't use a provision to interact with it.
Lighting the Way
(This is MY map. I've also uploaded this map to the wiki)

In a nutshell:
One hero is VERY vulnerable to boss.
Bosses cause Blight, regular enemies cause Bleed.
Bosses have VERY HIGH DAMAGE OUTPUT, especially double-boss pack.

Highly Recommended Heroes: Man-at-arms, Hound master
Not Recommended Heroes: Leper
I beat it with: Arbalest/ Vestal/ Hound master/ Man-at-arms
Even better: Vestal/ Hound master/ Man-at-arms/ Man-at-arms

Key tip 1: Unless you really know what you are doing, bring at least one Man-at-Arms.
Key tip 2: Again, there are encounters with two Rapturous cultists who can be used to fully heal/stress heal

Recommended Provisions
All Food, 6+ Bandages, 6+ Antivenom, 12 Holy Water, 6-12 Herbs, 16+ Torches.
Be sure to equip the three Talisman of the Flame trinkets you got as rewards from the last raid.

Enemies
I won't go into full detail of each individual enemy here (check the wiki page for that), but I will list the enemies to help you search:
Rapturous Cultist, Cultish Priest, Malignant Growth, Defensive Growth, Flesh Hound (accompanies boss), Polyp (accompanies boss)

Again, the Cultish Priest is your main priorities. The Cultish Priests is HIGH damage/high stress/high bleed. You should also watch out for Malignant Growths - though not NEARLY as dangerous, they can still hurt a fair bit.

The Growths are vulnerable to Blight but resist Bleed. The Bosses are the opposite.

Bosses
Yes, bosses. Templar Impaler and Templar Warlord specifically (not Gladiator and Sniper). Both have 2 actions per round, so marking and debuffs aren't effective. They are absolutely deadly to positions 1 & 2, have one/two attacks which also attacks position 3, and do not hurt position 4 nearly as much.

Fortunately, the bosses will usually use one of their two actions to use the Revelation skill, a single-target attack against any position which does nearly nothing to the three heroes wearing the Talisman of the Flame trinket, but humongous damage/stress damage to the hero without it.

Generally, folks consider this raid the hardest because these bosses have extremely high damage output.

Look at the red Boss encounters in the Map. Those are your quest locations btw. The Polyps and Flesh Hounds have knockback and pull skills respectively which disrupt your party line-up: Kill them quickly to stop that nonsense. The Flesh hounds also stun. Both have high dodge and speed.

But the boss fight that really get's everyone's goat is when you fight both a Templar Warlord and Templar Impaler. Yes, both. They both have 2 actions a round. Did I mention high boss damage output?

Heroes
Great: Man-at-arms, Hound master
- Man-at-arms: It isn't just his ability to Guard the vulnerable Talisman-less hero, and that alone is enough to justify why he is practically mandatory for this raid. The Man-at-arms also gains +45% protection when guarding - and that is key to managing the extremely high damage output of the Templars. Riposte is very effective on these double action, high AoE bosses too.
- Hound Master: Take note that the Hound Master's guard only lasts one round, unlike the Man-at-arms. Still, consider using his Guard on the Talisman-less hero if the Man-at-arms is stunned. The boss packs on this raid are eldritch/beast. So the Hound master has good damage as well as fair tanking ability, and dog cookies to help burn 2 out of the 3 bosses. Besides, I need a stress healer.

Good: Vestal, Flagellant, Antiquarian+Highwayman
- Vestal: Out of the available healers, Vestals get my vote for this fight. You need a reliable healer who can top up heroes when needed due to the damage output of the Templars. Since you're going to guard the Vestal, she can equip both healing trinkets.
- Flagellant: A hero that takes advantage of the pain the Templars can dish out! Just be sure to equip Deathblow resistance trinkets (*hint hint*).
- Antiquarian+Highwayman: Yes, really. Because the Antiquarian can force the Highwayman to guard her, then the Templars eat the highwayman's riposte. The Antiquarian has better speed than the Man-at-arms so she's more likely to act before the Templars target the Talisman-less hero. I'd recommend a HP/dodge trinket to help the Highwayman survive the high damage output of the bosses. In this case, the antiquarian should be the Talisman-less hero and equip speed trinkets.

Okay: Bounty Hunter, Crusader, Hellion, Abomination
They are all okay - not much to say here.

Poor: Grave Robber, Occultist, Jester, Plague Doctor, Shield-breaker, Leper
- GR, J, PD: Risky, mostly because their health is too low, and the bosses have high damage output. So they are a crit away from Death's Door. It's okay to bring ONE of these, but then this should be the hero which you Guard with the Man-at-arms. But then you'd be denying the Vestal use of both healing trinkets. Unless you bring two Man-at-arms...
-Shieldbreaker: Too low health, and many of the tools (unstealth, guard break, attack any enemy position) are largely irrelevant here. Sure she can prevent damage to her using Sway, but the Templar,s multiple actions burn through it too fast.
- Occultist: Do you like to gamble? This may not be a good time for it. Rolling zero on heals can really hurt for this raid. Also, his health is pretty low.
- Leper: Not NEARLY as bad as against the Shuffling Horror, as the only monsters which try to move him and party members around are the Polyp and the Flesh Hounds. If you have the Crew's Bell trinket on the Leper, the Leper could work well.

How did you beat this raid?
a) Arbalest/ Vestal/ Hound master/ Man-at-arms.
b) Hound master/ Vestal/ Man-at-arms/ Man-at-arms
c) Artificer/ Vestal/ Highwayman/ Man-at-arms

Of these I think (b) worked best. (a) and (c) had stress issues but I won in spite of afflictions.


Can also try: Artificer/ Highwayman/ Man-at-arms/ Flagellant if you enjoy living on the edge.

Filthy Robot used: Vestal/ Grave Robber/ Crusader/ Crusader
His tactic was to stack dodges on the Grave Robber who doesn't have the Talisman, and used Crusaders to stress heal. He was cursing the whole raid from failed dodges, but generally the tactic worked. Here's a fair example of someone doing it another way from my recommendation. You know there are other ways to do it from my recommendation, right?

Trinkets
Consider an anti-stun trinket on the MaA. Wilbur's flag is ideal.
If you have 2 MaAs... I'm not totally sure what to put on the second. Maybe the Crew's Bell? Cleansing Crystal?
If you have a Hound Master in position 2, do place a HP/Dodge trinket on him. Overture box is ideal.
Double heal trinkets of your choice on the Vestal (Probably okay to reduce her HP since MaA is Guarding her a lot).

Crap, the MaA got Body Slammed into the back positions! I'm doomed!
Yes, this sometimes happens. The MaA shouldn't be stunned if you have the anti-stun trinket on (otherwise, you're doomed). In any case, prioritise Guarding: you can Guard from any position. In between using GUARD, slowly move and Rampart your way forwards back to the front. If you have a Hound Master, Guard with the HoundM until the MaA arrives.

Any other ideas?
Arbalest/ Grave Robber/ HoundM/ HoundM
The Hound masters guard EVERY ROUND. This pretty much renders them immune to any hit that's not a crit. The Arbalest uses her debuff attack (Suppressing Fire), thus rendering all enemies unable to crit. ...yeah, I'm not really sold on this idea either. Just putting options out there.
Belly of the Beast

This is MY map. I've also uploaded this map to the wiki.. Click to enlarge. An even bigger version is available here: http://steamcommunity.com/sharedfiles/filedetails/?id=612528410


In a nutshell:
Lots of Marking and bonus damage vs Marked targets
Lots of Blight
Lots of Knockback and Pull
Lots of Dodge (about 30-40%. Sorry.)
Quite a bit of Stun.

Highly Recommended Heroes: Plague Doctor+Hellion, Hound Master, Grave Robber,
Not Recommended Heroes: Leper
I beat it with: Plague Doctor/ Vestal/ Hound master/ Hellion

Key tip 1: It's possible to permastsun the mini-bosses
Key tip 2: Double Polyp is pretty good replacement for double Rapturous cultists to fully heal/stress heal
Key tip 3: Map awareness is key. Keep referring to the map.

Recommended Provisions
All Food, 6+ Antivenom, 6+ Holy Water, 6+ Herbs, 16+ Torches.

Enemies
I won't go into full detail of each individual enemy here (check the wiki page for that), but I will list the enemies to help you search:
Malignant Growth, Defensive Growth, Flesh Hound, Polyp, Antibody, White Cell Stalk (accompanies mini boss), Templar Sniper/Gladiator (key choke points)

Probably the most dangerous thing in this map are the Hound/Polyp groups. Polyps mark positions 2,3 and 4, then the hounds focus fire the marked hero for +50% damage. Anyone who has lost a hero to puny spiders should know what I'm talking about. Having a Guard skill is the best counter for this.

Blight/Bleed resistances is really mixed. Way too much knockback, pull and stuns for my liking. Focus on blight is easy to counter with antivenom. But the enemy packs are nowhere as dangerous as Cultist Priests; they're meant to wear out players who get lost from all the teleporting. Just be sure to Guard the hero is Marked.

Of big significance is the smaller cousins of earlier bosses, the Templar Gladiators and Templar Sniper. They're about the same as their boss equivalents, except each one is alone, has only 1 action a round, and does not have the Revelation attack. Pretty easy, all told.


Mini-Bosses
Mammoth Cyst

2 actions per round- one action is dedicated to resummoning a White Cell Stalk if the White Cell Stalk is killed.

Not actually all that dangerous, but keeps summoning White Cell Stalks which will eventually teleport you across the map. After being teleported, the Mammoth Cyst retains the damage you dealt too it earlier if you find it again. It can blight as well as debuffs your damage - get rid of the debuff with Herbs.

I recommend a two-fold strategy: (a) semi-perma-stunning the Mammoth Cyst and (b) dedicating one character to kill the White Cell Stalk.

(a) Semi-perma-stunning the Mammoth Cyst
The boss has two actions, but one of those actions is dedicated to summoning the cell stalk. So as long as we keep killing the white cell stalk, the boss will have to spend it's action to summon it. It isn't difficult to heal of the occasional hit you take from the boss if the White Cell is still alive on the boss's turn as long as you keep killing the White Cell Stalk. I find I fully stress heal on the mini-bosses from all the crits I cause. The Plague Doctor (PD) is ideal for a variety of reasons.

(b) Dedicating one White Cell Stalk killer
TL;DR: Use camp buffs, PD's Emboldening Vapours and trinkets to grant the Hellion at least +20 CC and +75% damage to kill the White Cell Stalk semi-consistently.

By leaving only one character the job of consistently killing the White Cell Stalk, we can free up the other characters to handle the Mammoth Cyst. To achieve this, we shall invoke the power of MATH.
-The White Cell Stalk has HP 25 (30 on Stygian/Bloodmoon) and Dodge 38.75%. It is an Eldritch/Beast.
-The Hellion has the best damage for hitting position 4 where the White Cell Stalk is. Maxed out Iron Swan has ACC 105 and damage range of 10 to 19 (average 14.5).
-To hit at least 85% of the time, Hellion needs at least +20 ACC (105+20-38.5= 86.5%).
-To kill consistently, Hellion needs at least 75% damage boost (14.5*1.75=25.375); a bit more than 100% for stygian/bloodmoon (14.5*2=29).

Example: First we give her the Heaven's Hairpin and a Legendary Bracer/Eldritch Slayer's Ring/Beast Slayer's Ring trinkets to increase her damage and accuracy. Use Hellion's Battle Trance and Vestal's Bless camp buffs to improve her damage and accuracy even more. Spend the first two turns of battle buffing the Hellion's damage with the Plague Doctor's Emboldening Vapours. This combo gives a total of +20 ACC and +100% DMG. If my Hellion has the Eldritch slayer or Beast Slayer quirks (+10 ACC each), I can swap out the Heaven's Hairpin for another damage trinket (egs. Legendary Bracer for 20% DMG), or leave the Heaven's Hairpin for a total +30 ACC for 95% hit chance (105+30-38.5=96.5%, but the hit chance is capped at 95%).
For support: The Plague Doctor stuns the Mammoth Cyst with Disorienting Blast (or stun both Mammoth Cyst and White Cell Stalk with Blinding Gas if the Cell Stalk survived the strike from the Hellion). The rest of the team beats down the Mammoth Cyst or help finish the White Cell Stalk as needed.

(On another note, this combo is also ideal for killing the Brigand Pounder. You probably don't have to spend both Emboldening Vapours buffs on the Hellion for her to kill the Matchman who only has HP 16. The rest of the team focuses down the adds and kills the Pounder.)

All in all, this raid isn't too difficult if you have the map I have provided. It's meant to be a test of stamina, but the map and perma-stun tactics circumvents this.

Heroes
Great: Plague Doctor+Hellion, Hound Master
- Plague Doctor+ Hellion: I've already explained why.
- Hound master: EVERYTHING is Eldritch Beast. The Hound master is the only other hero who hits position 4 (enemy side) from position 2 effectively. Also, he can stress heal. Lastly, the Guard skill is VERY useful as a counter to Marking. Marking is very vicious.

Good: Grave Robber
- Grave Robber: High accuracy and buffs her own accuracy is a good counter vs all those Dodgy beasts. Also she is one of the few heroes who hits position 4 (enemy side) from position 2 effectively. Kill that White Cell Stalk!

Fair: Everyone else except...

Bad: Leper
Did I mention this place is full of Knockback and pulls? The Leper hates this place as well.

How did you beat this raid?
Vestal/ Plague Doctor/ Hound master/ Hellion
Switch around the Hound Master's position as needed for stress heals.

But really, once you have the stunning strategy down and a map, the raid becomes quite easy. The encounters are not difficult, but get into too many encounters and you may find your heroes running out of stamina.

Trinkets
- A Blasphemous Vial and some speed for the PD
- DMG and ACC against eldritch beast for Hellion, as mentioned before. See the example above in detail to help you plan out your DMG/ACC bonus in detail. Do the math.
- For others, I'd prioritise at least +10 ACC on this map due to how much dodging is going on. As usual, buff up the HP/Dodge of low HP characters.
Hell is in the heart
No map needed, there is only a single boss fight. There are 4 stages to the boss fight.


In a nutshell:
Balanced Bleed/Blight/Stress. Little bit of stun.
Able to attack any enemy position helps
Easy-peasy The easiest raid of the four, but you don't want to mess up now, right?

Somewhat Recommended Heroes: Hellion, Hound Master, Grave Robber
Not Recommended Heroes: None, it's all good.

(Basically, use whatever heroes you have left over.) I take it back, don't just use whatever you have left over. You still need to have a coherent party composition.

Recommended Provisions
NO FOOD, NO TORCHES, all Holy Water, all Bandages, all anti-venom, all Herbs


Stage 1
Make sure you kill at least one Reflection every round, especially Imperfect Reflections. Ignore the Ancestor himself. That's it to tactics.
In detail: The ancestor himself is impervious to damage, and will either mass heal reflections every round or summon reflections if some are missing. So it's better to kill at least one reflection every round. Each Perfect Reflection killed will be replaced with Imperfect Reflections, and killing the Imperfect Reflections deal damage to the Ancestor.
Do note that Imperfect Reflections will MARK your heroes, and Perfect Reflections do extra damage to marked heroes! Quite dangerous.

Stage 2
Ignore the "Absolute Nothingness", hit the Ancestor. He will shift from position to position every turn. Starting to see why having heroes who can target any position is helpful?
While the Ancestor has some impressive attacks (including a shuffle), he is not immune to most shenanigans like stun (single action only) and has *zero* move resist. So this can be a great chance to stun the boss and recover your party from the last stage. So do have a form of healing/stress heal.

Stage 3
Hitting the Heart heals heroes but inflicts blight. Whatever damage you do carries over to the final form on stage 4. Reducing the Gestating heart to zero HP triggers the final form.
Wait too long however, and it'll move to the final form on its own. So you could consider spending the turns healing and buffing instead of hitting the Heart. Personally I'd hit it anyway with Holy Water activated.
Note that effects inflicted on the Gestating Heart (bleed, blight, etc.) carry over to the final form.

Stage 4
Here is the real bossfight, but it's not too tough.

Come Unto Thy Maker

You've probably heard how the boss insta-kills two heroes with this skill, right? To be more precise, the boss will reduce your party size to 3 once it is down to 2/3rds health. It will then reduce your party size to 2 at 1/3rd life. So it will not activate if your party size is already down due to deathblows.
The good thing is, the game will ask you who to sacrifice. This should probably be the hero at highest stress or closest to death. So to give yourself more flexibility in choosing who to sacrifice, you may want to plan your party/skills such that any combination of 2 heroes left will work.

Interestingly enough, if you have only 1 hero left, the Highwayman becomes a god of Death. (Pointblank shot) A jester also works to a lesser extent (use Herbs).
WilliamDrens shares that TWO Highwaymen left become even more ridiculous, haha.

Other than that, the boss will stress the highest stress hero, use a Bleed attack on heroes with low bleed resist, and use a combination Blight AND Stun attack heroes with lowt Blight/Stun reist. There's actually reason to keep Bleed resist low! (*peers at Leper*)

Heroes

Good: Hellion, Shield Breaker, Hound master, Grave Robber, Highwayman
- Hellion, Shield Breaker: The only heroes who can hit any enemy from position 1.
- Hound master, Grave Robber, Highwayman: The only heroes who can hit any enemy from position 2.

Fair: Everyone else

Bad: None?
- Jimbly notes that if you have an abomination whose stresses out, he'll stay in human form and cannot turn back due to all 4 stages of the boss battle being considered only 1 long fight.

How did you beat this raid?
I used whatever heroes I had left over (*cough* Leper *cough*):
Highwayman/ Occultist/ Leper/ Hellion

What works best?
Houndmaster/ Vestal/ Highwayman/ Hellion... I think

What if I want to use a Crusader and a Highwayman?
Highwayman/ Vestal/ Crusader/ Hellion is good. But you'll probably win whatever you throw in. I take it back, please be a bit wary of the fight's mechanics when choosing your composition.
220 Comments
t1redmonkey Apr 28 @ 5:41am 
Super helpful guide, thanks! Just finished the game, didn't die at all other than the two 'mandatory' deaths at the end. Party compositions I used:

DD1 - Vestal, Highwayman, Highwayman, Hellion
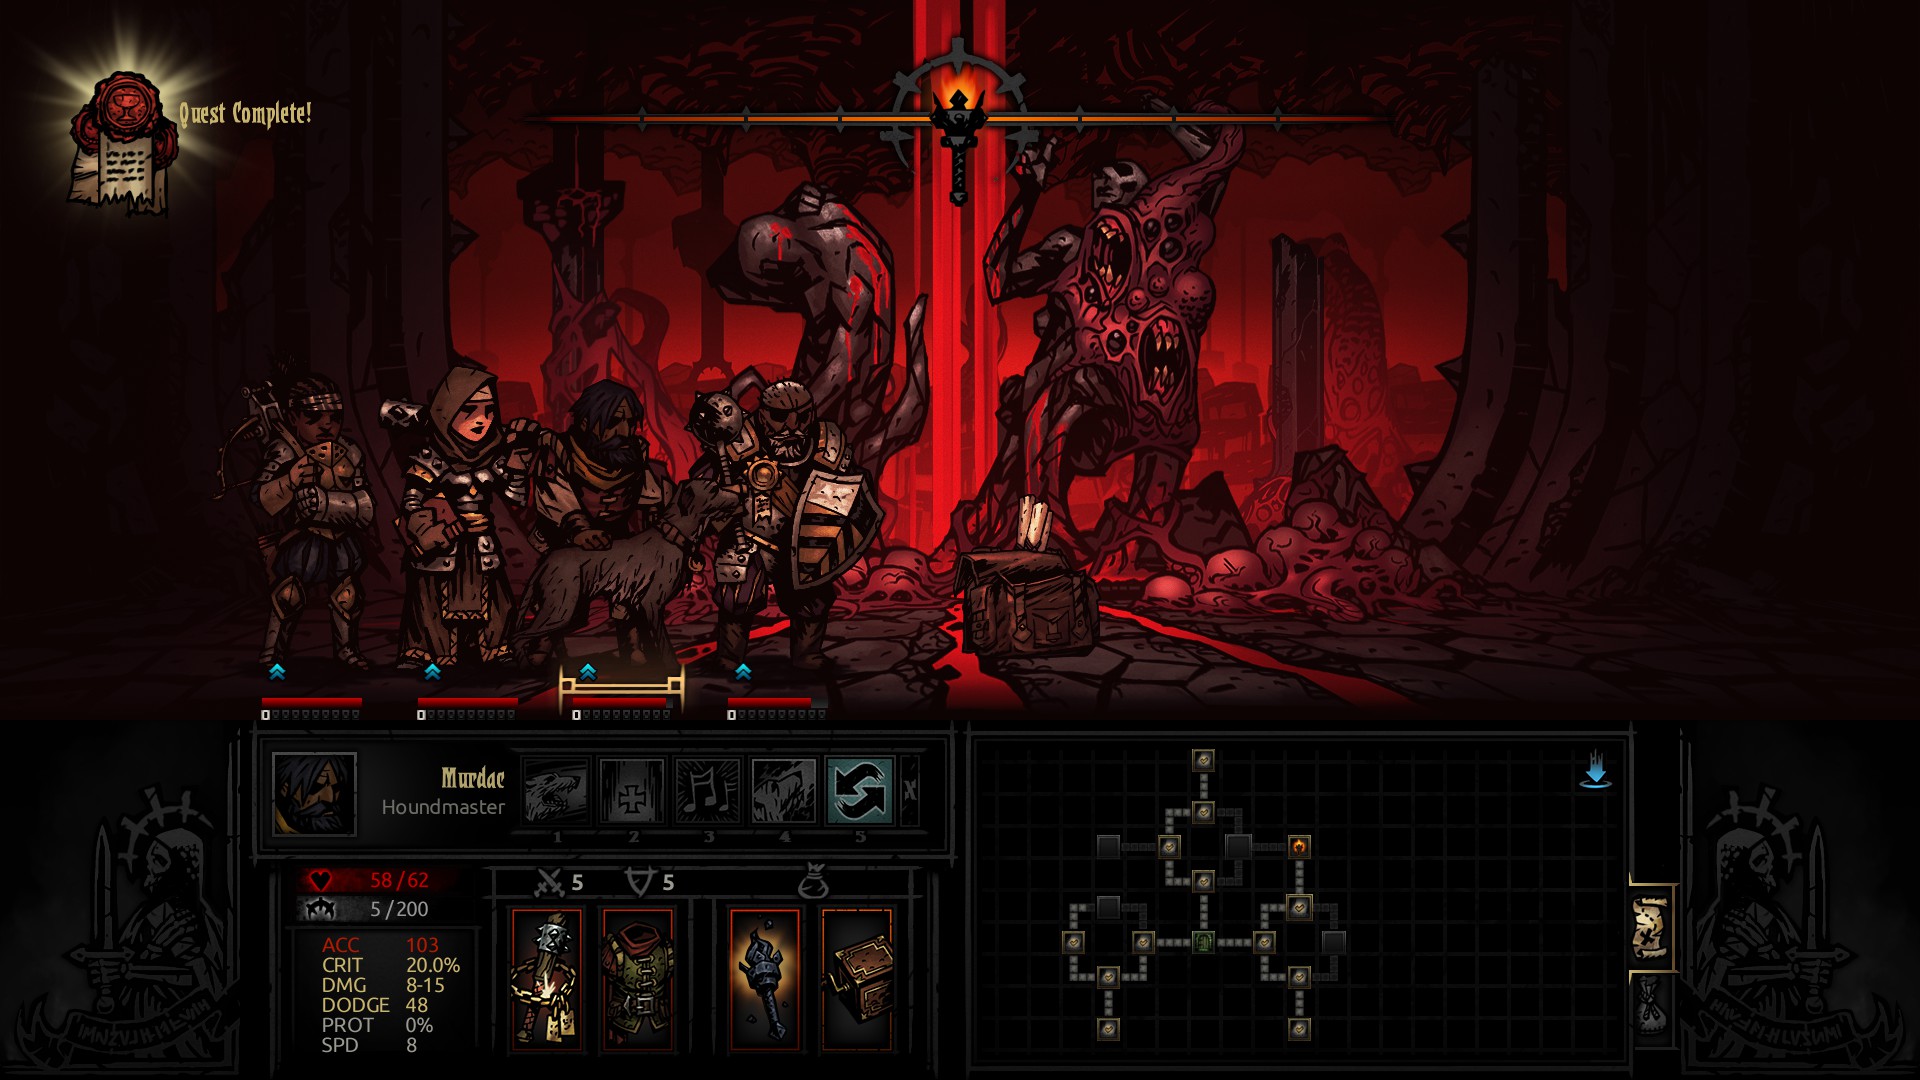
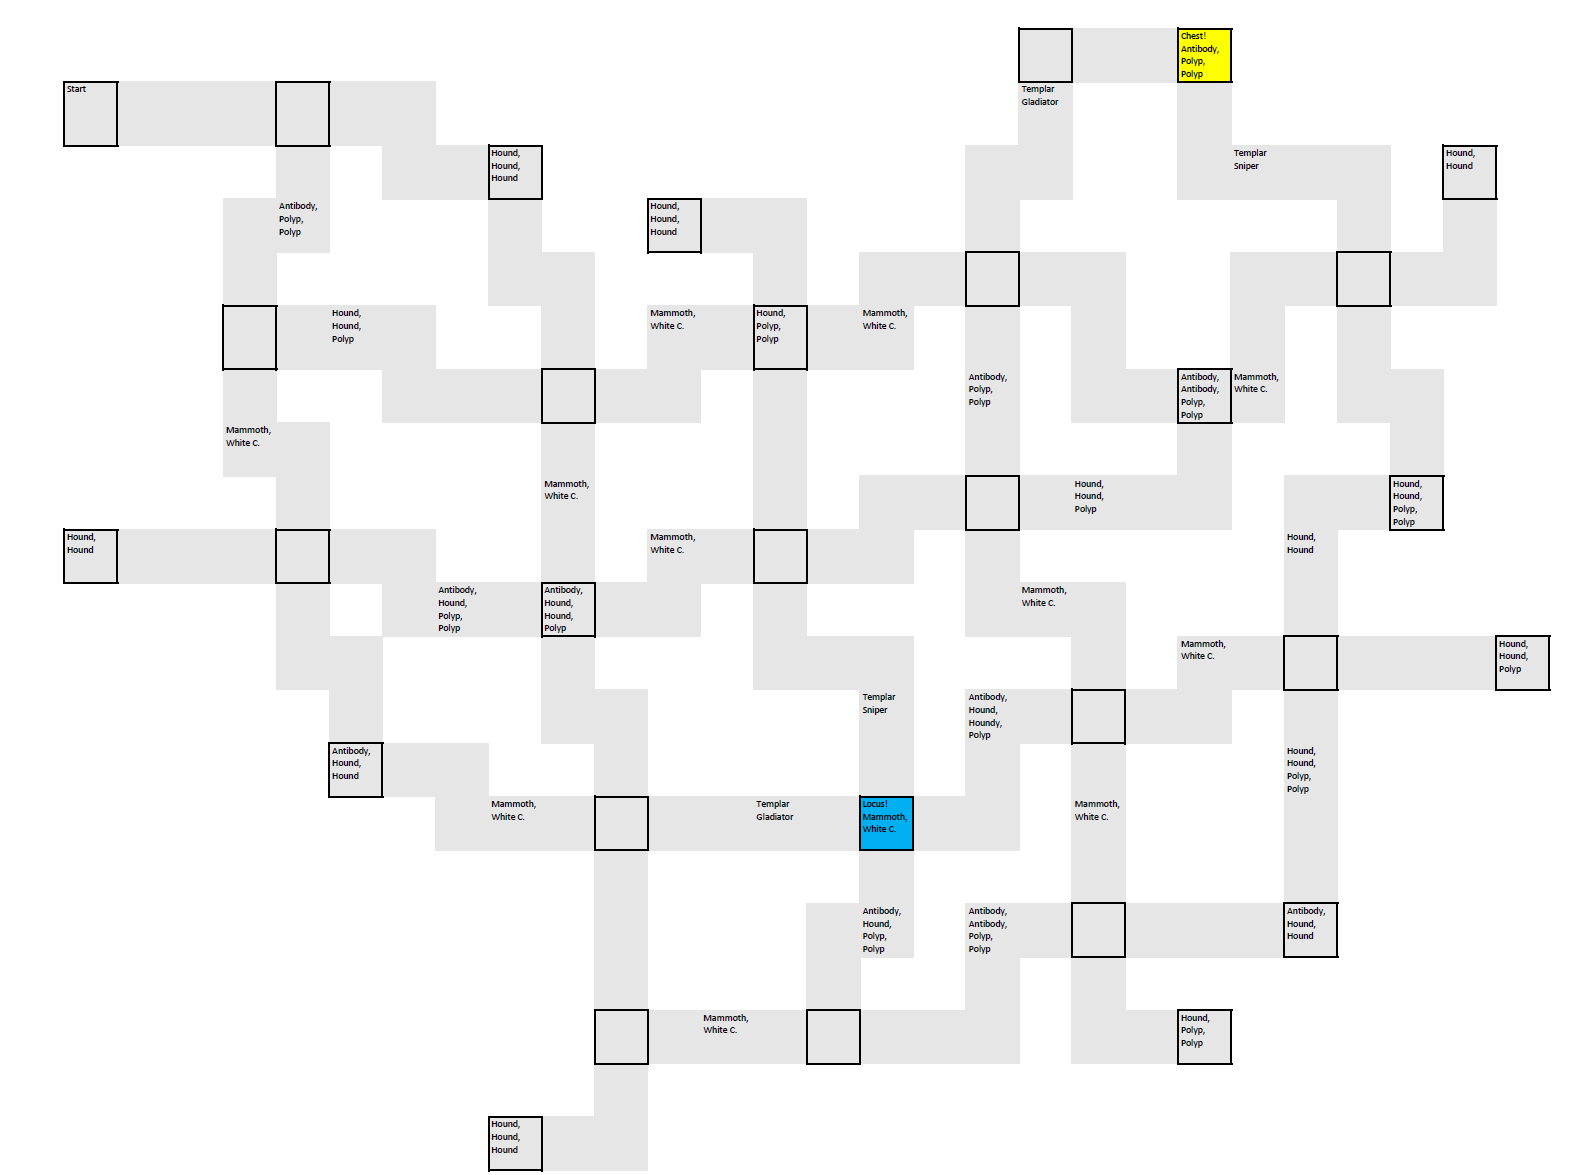
DD2 - Houndmaster, Vestal, Bounty Hunter, Man at Arms
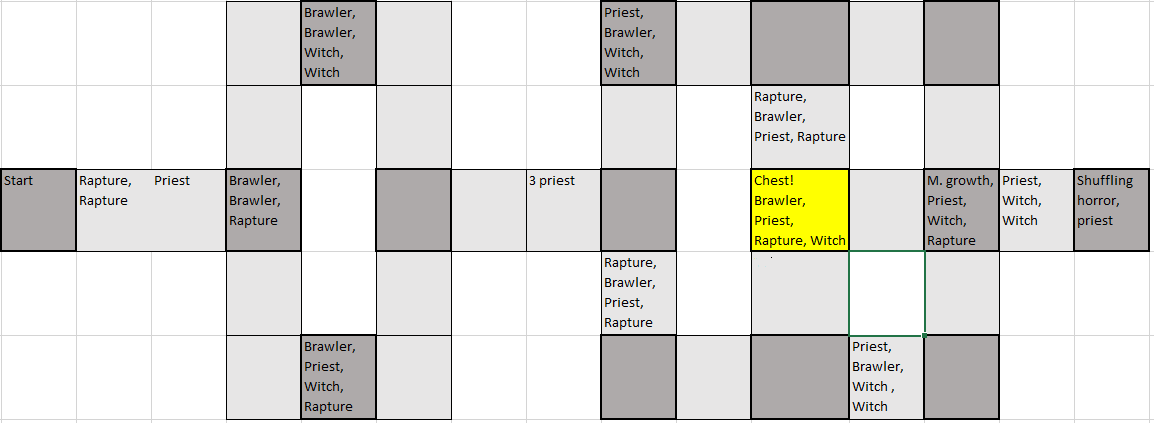
DD3 - Vestal, Plague Doctor, Houndmaster, Hellion
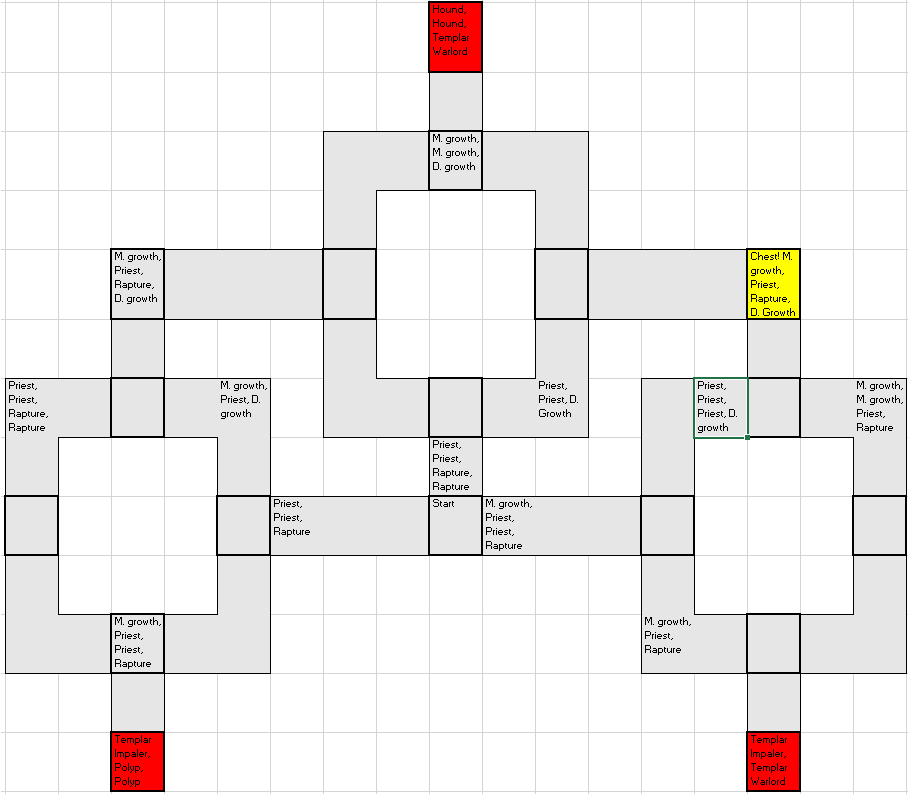
DD4 - Vestal, Grave Robber, Bounty Hunter, Leper

DD3 was super easy, or maybe I got lucky! I didn't even have to camp once, and never got teleported. Having said that, I did dodge a bullet on that quest because my Houndmaster got critted multiple times in a row early on (first or second fight I think), and was on Death's Door, but managed to bring him back.

DD4 was actually very close for me, I probably would've wiped completely if I had taken another turn or two since both my remaining heroes (Grave Robber and BH) were at 10-15hp at the time the fight ended.
ClayThePokèChamp Feb 10 @ 6:47pm 
So in-depth. This helped so much, thank you.
gatodelun1x Nov 11, 2023 @ 3:26pm 
This guide rocks! Just finished the game thanks to it.
Timo Oct 30, 2023 @ 2:07pm 
I'm finding Belly of the beast way harder than lighting the way for some reason, my heroes hit death's door at every other encounter and i'm copying your strats, even the whole +10 acc stuff and everything.
EDIT: Ok i did it on 2nd try, still lost my plague doctor at the final fight, but the remaining 3 clutched through. The mammyth cyst stopped spawning the white cell for some reason after PD died and just spammed attacks on my heroes lol.
Guigui May 29, 2023 @ 1:40am 
Hello there ! Finished the game today. For sure, wouldn't have been able to finish it without your guide. Especially for DD3, it was sooooo handy.

For everyone else out there figuring if last mission is easy or not, it isn't hard at all.
Did it with Musketeer/Occultist/Shielbreaker & Hellion.

Thank you for the time and dedication you put into this guide. Thanks a lot :)
Miissttr Dec 17, 2022 @ 2:17pm 
Thank you man. Your guide finally push me to the end. :steamthumbsup:
Psychonerdy Aug 19, 2022 @ 10:07am 
I read some comment somewhere that they just follow mrbunnyban's guide, and it works well. They were absolutely right!

Amazing tips and guide. There is a joy in trying first run by yourself. And then after I finish mourning the bodies I come here to prepare.
自動販売機 Jul 9, 2022 @ 12:54pm 
thanks for the guide, just beat my very first run on stygian with your help
rook Jun 20, 2022 @ 3:12am 
*My comments refer to the 2nd assault, sorry for not specifying!
rook Jun 20, 2022 @ 3:11am 
(2/2)
When Camping, I did +healing received buffs. (I also have a few Crimson Court buildings that buff these classes a little.)
I barely needed the Jester stress skill but I used it a few times when I felt I was getting a bit too close to 100 stress. Mostly it was stab, stab, stab, finale. For PD, stabbing then poisoning some of the low-health-high-damage enemies worked great - they were losing 10+ health per turn, so after 2 smacks I could just leave them to die the next time they wanted to attack me - works like a charm on that templar with 2 Polyps.

None of the party died, none even got enough stress to become traumatized! MaA was on death's door once. I didn't go for any chambers except the boss ones, but I totally could as I still had food and health left over from the last fight. And this after my three parties lost before even beating two of the chambers :"D

I hope this helps someone who found this guide helpful but still lost with the recommended party compositions!