FINAL FANTASY TYPE-0 HD

FINAL FANTASY TYPE-0 HD

270 ratings
Final Fantasy Type-0 HD Achievement Guide and Walkthrough
By Jedo and 2 collaborators
This guide will take you through Type-0 in a single playthrough carefully outlining what you need to be aware of at each stage of the game while offering various options while not missing any of the achievements within the game.
4
   
Award
Favorite
Favorited
Unfavorite
Missable Achievement Note
The point of no return for is the break right before the second mission of chapter 7. This will be your last chance to get the following achievements.

  1. Teacher's Pet (listen to the lectures every break to get stat/magic rewards)
  2. Moogle Mingler
  3. Total Domination (while overworld is available)
  4. The Hunted Becomes the Hunter (while overworld is available)
  5. Rookie Wrangler (while overworld is available)
  6. The Chocobo Whisperer (while overworld is available)
  7. Eggs-citing Development (breeding earlier is better; can be reloaded)
  8. One Big Happy Flock (breeding earlier is better; can be reloaded)
  9. Hard Work's Reward
  10. The Great Liberator (make sure to visit each town)
  11. The Ark of Agito (small window of opportunity)
  12. Master Marksman (small window of opportunity)
Walkthrough: Chapter 1-3
The walkthrough will only encompass 1 playthrough to get every achievement. It will not cover a second playthrough or every other exploration portions of the game. It will direct you what certain achievement-related tasks become available or unavailable.

The only 6 eidolons that'll be mentioned are:
Ifrit
Shiva
Golem
Rubicante
Vulcan
Odin

Chapter 1

Mission: The Akademeia Liberation

This is the first mission of the game and the first chance to obtain 'Miraculous Mission' which requires you to complete a mission without any casualties. This can be easily obtained in Chapter 2 should you die to the boss fight here. This mission is not replayable.

When you find yourself near a fountain, turn around and you should see a shining red/white sparkle on the ground. Pick it up for your first Knowing tag. You need 25 total.

Boss Fight: Qun'mi/Dainsleif

Stage 1: The first part of this fight uses Odin to weaken Qun'mi. An easy method of doing this is to simply run around dodging her attacks then using Zantetsuken [Triangle/Y/R] to dash in to attack her then follow it up with some quick slashes to deal damage. Repeat until she dies.

Stage 2: The second part will stage Ace, Seven, and Jack against a weakened Qun'mi. Landing breaksight will make the battle short while dodging the beams with whichever character you please.

Enter Class Zero - Complete Chapter 1 "War - Three Hours That Changed the World."


Chapter 2

Make Mother Proud - Completed an SO.


In Akademeia, use the giant red portal to go to the Sorcery area. There, talking to one of the characters will let you enable something called "SO"s. Enable them.

Then, every now and then while you are on a mission, a big red notification will appear on screen that says "Incoming". Hit [Select/Z] to check the SO. You must accept or decline it to make it go away, so you won't be able to pull it up again. Complete the SO for the achievement.

Moogle Mingler - Talked with the moogles from all thirteen classes.

Missable due to the point of no return in Chapter 7. See Moogle section.


Teacher's Pet - Sat in one of Moglin's lectures

Missable due to the point of no return in Chapter 7. See Moogle section.

Mission: The Cadets' First Deployment

This is your first liberation mission where you free the city of McTighe. There are only three things to note here.
1. There is a knowing tag on a corpse on the eastern side of the city that opens the north gate.
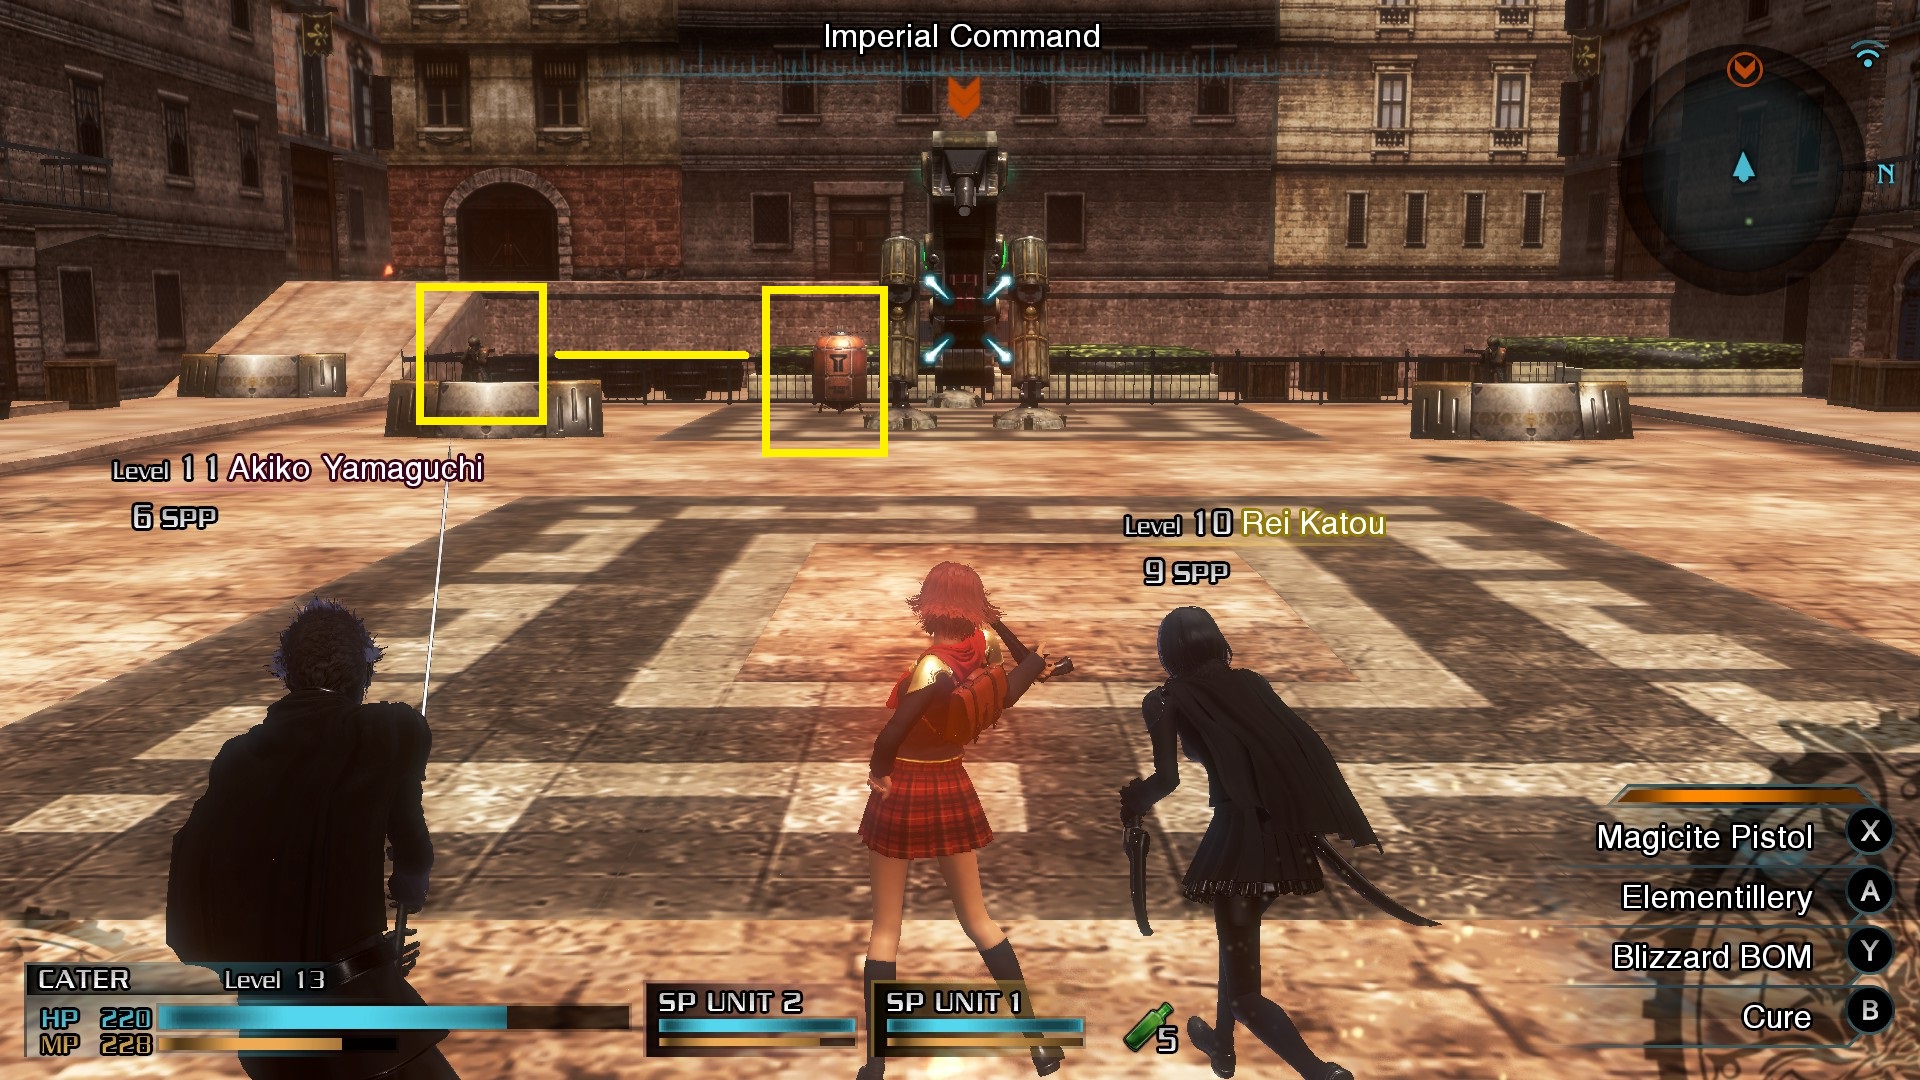
2. The commander for the area will be in a robot with two soldiers as well as a fuel tank which is your first chance at 'Collateral Damage'. See below.
3. After liberating McTighe, be sure to walk back into the city for 'The Great Liberator'.

Collateral Damage - Defeated an enemy with the explosion from a fuel tank.

Shoot the barrel to the left of the boss. It should kill the enemy beside it.


Following this mission, the breeder at the Chocobo Ranch will now allow you to begin breeding. If you talked to him prior, he already gave you 10 of each gendered chocobo as well as some Gysahl Greens.

Things to Do:
- Start breeding chocobos at the ranch; you do not need to hatch 100x, just 100 total chocobos.
- It takes 4 hrs for eggs to hatch, then 2 hrs for chocobos to grow up before starting another
breeding cycle.
- Start catching chocobos in the overworld; need 30 total.

Mission: Operation Reconquista
* Recommended quest for S-Rank; see 'Perfect Marks' under Missions

This is the first real time strategy (RTS) mission that you'll encounter. All RTS missions can be skipped with no losses; however, it is recommended to at least play this one for the S-Rank achievement as well as the no casualty achievement as this mission is ridiculously easy.

Things to Do:
- Revisit Aqvi for 'The Great Liberator'
- Revisit Corsi for 'The Great Liberator'

Mission: The Capture of Togoreth Stronghold

This mission is best used as the means to farm Knowing Tags. See 'Mortal Validation' under miscellaneous for more details in farming Knowing Tags in this mission.

Once you reach the prison section of this level, you'll talk to Koharu who will also die to incoming enemies and a behemoth. Upon the cutscene, you'll receive the Ifrit eidolon as well as the 'Communing with the Gods' achievement.

Boss: General Qator Bashtar's Gabriel magitek armor

While the boss doesn't do that much damage, his speed is hard to deal with. Recommended to fight him using any ranged character. A high speed character such as Queen is also viable.

Upon completing the mission, you'll be awarded with the Shiva eidolon on ANY difficulty.

Shots Fired - Completed Chapter 2 "Raise the Verimllion Banner."


Chapter 3

Following the mission, the Arena will be finished rebuilding from the attack thus giving you access to it. There are three arena related achievements.
- The first arena achievement is listed under miscellaneous.
- The other two arena achievements are listed under combat.

Mission: The Infiltration of Iscah

Very straightforward mission, go to the markers and plant the devices. There are a ton of routes so just stick to the mini-map and its direction.
Note: There are quite a few Knowing Tags in this level, so keep your eyes peeled.

After that, your cadets end up in the town Iscah and the finale of the mission.

Boss: Colossus

Straight foward mini-boss. Weak to lightning and has a weak backside.

Upon completing the mission, you'll be awarded with the Golem eidolon on ANY difficulty.

Things to Do:
- Revisit Keziah for 'The Great Liberator'
- Revisit Mi-Go for 'The Great Liberator'
- Reviist Iscah for 'The Great Liberator'

Mission: Operation MA Demolition

Before starting this mission, make sure that Special Orders are ENABLED. Rubicante can be obtained through a SO during the boss fight. Also bring ranged fighters and make sure they stay alive to the end.

The majority of this mission will be running through the warehouse and sabotaging Brionac in three areas. It's recommended that you do this to severely weaken the boss fight at the end of this mission.

IMPORTANT NOTE: Following the part of the mission where you sabotage Brionac in the labs, it's recommended that you switch characters to a weaker one until you reach Brionac. Be warned.

Boss: Brionac

While the SO shows up for this fight at the very beginning, I would wait til the end when you're almost done killing him to accept the SO since it requires you to defeat him under 5 minutes. But if you have confidence, go for it.

Brionac's attacks will OHKO you and your party so it's best if you don't replace any of your members that die as they'll eventually die again anyways. Dodging his attacks is simply, if he's doing a wide swing, go back to the entrance tunnel. If he's swinging down or thrusting, then go to the sides. Repeat until he dies.

Upon completion of the Special Order, you'll receive Rubicante, an Ifrit-class eidolon.

Expanding the Theater - Completed Chapter 3 "Weapons of Mass Destruction."
Walkthrough: Chapter 4-7
Chapter 4

Unfortunately, you may notice that you don't end up back home and thus are limited to the resources you have. The arena can still be accessed through Aria at the front gate.

Mission: Escaping the Imperial Capital

A Frantic Flight - Completed Chapter 4 "The Last Queen's Return to Oblivion."

In the first part of the mission, the cadets will go underground and be chased by a supersoldier. You can ignore him and run past him. Once you head up top, you'll be confronted by Vajra who occasionally attacks you as you find a way out.

Boss: Vajra

It's recommended to either use a fasting attack character or a ranged character due to Vajra's moveset and ability to climb walls. Your main focus of the fight should be landing breaksights to stun the Vajra and deal massive damage.

Chapter 5

With the cadets back home, you can visit the overworld once more.

Things to Do:
- Revisit Rokol

Mission: The Reclamation of Eibon

Another RTS based mission focused on freeing Toguagh which is technically the last area requried for The Great Liberator if you liberated Meroe in an expert trial. It's up to you whether or not you want to do this mission.

Things to Do:
- Revisit Toguagh

Mission: The Battle of Judecca

It is recommended that you have Special Orders enabled on this mission for an eidolon. Being a fairly high level in the mid 30s is also recommended.

The early part of the mission consists of fighting against wyverns using the ship's guns with a confrontation with a five-star. Continue this until the ship lands and you're on the crystal grounds.

The important part of this mission is the fourth area in the crystal zone. You'll encounter a gigantic monster that appears to be a horse named Mikazuchi. The SO here requires you to defeat Mikazuchi with your leader. The reward is the eidolon Vulcan.

The rest of the mission is straight forward until the boss.

Boss: Shinryu Celestia

There are two stages of this fight depending on how well you fight. If you kill her using just your cadets the mission ends, but if you expend all of your cadets in this fight, you'll end up summoning Bahamut ZERO.

If you finishing her off as Bahamut ZERO, you'll have to stun her long enough that your Megaflare charges up into Gigaflare then ultimately Teraflare. Teraflare is the only attack that Bahamut Zero can beat Celestia.

War of the Wyverns - Completed Chapter 5 "The First Battle of Judecca."


Chapter 6

Mission: The Clash of Big Bridge

Change difficulty at a save crystal to Officer or higher. Otherwise you will not get the Odin eidolon as well as your final eidolon required for 'The Beastmaster'.

Boss 1: Major Ernst

Like the first crystal jammer boss, it's best to not stand in one spot while fighting the magitek armor. Continually attack him from the side or behind and whittle his health down until he dies.

Boss 2: Gilgamesh

A very difficult boss fight, but you do not have to win in order to progress the story. You'll get your revenge later on.

Note: You can revisit this area to pick up Caetuna's L'cie crystal following this mission.

The Forbidden Savior - Completed Chapter 6 "Terra Mortis - Khalia's Decision."


Chapter 7

Mission: The Kingdom's Final Hours

Another RTS mission that isn't required and may be skipped. The city that is liberated is not required for 'The Great Liberator'.

Things to Do:
- Everything missable: Overworld, chocobo, arena, moogle... see missable notes then correspond them to their areas on how to do them.
- Revisit Meroe should you not have to finish 'The Great Liberator'
- See Airship section, now is the only time you can do it.

THIS IS THE POINT OF NO RETURN. MAKE SURE YOU COMPLETE ANY MISSABLE ACHIEVEMENTS OR TASKS BEFORE STARTING THE NEXT MISSION.

Mission: Capturing the Imperial Capital

A very short battle on the side of the cadets.

Boss: General Qator Bashtar's Gabriel Omega

It's best to use a ranged character because Bashtar's new magitek armor is extremely fast making it very difficult to land hits. He only has two breaksight points, when he lands momentarily and when he charges. Figuring out the timing will make the fight extremely easy.

Conclusion to Combat - Completed Chapter 7 "Fate of the Crystal - The Endless Battle."
Walkthrough: Chapter 8
Chapter 8

Mission: Invasion of the Rursus

Bring ranged and magic attacks.

This mission requires the cadets to split up very often so make notes of where you should send each type of cadet. Failing these trials results in death, so if the game gives you a chance to save, do it. Also there are a ton of Knowing Tags on the ground.

The main enemy in this fight is the Rursan Reavers which can only be killed by a killsight then by harvesting the phantoma. If this is not done, then they come back. Left and Right will always be split until they are moved back to a central area where you can split the teams again.

Splitting up your team:
Send Ace to the left with 1 strong character if Ace is not leveled.
Send 1 strong character to the right with magic support.

Hall of Transgression: Left Side
All you have to do here is kill the Rursan Reaver here within 10 minutes.

Hall of Transgression: Right Side
This stage is slightly different from the left side as you have to survive a period of time: 2 minutes 13 seconds. It's best to kill all three at the same time then lock onto them as if you're harvesting their phantoma. That way they can't despawn to spawn more. Max limit is 3 reavers at one time.

Cloister of Adumbration: Left Side
Break room, item on the ground.

Cloister of Revelation: Left Side
Goal of this room is to make it to the exit without being hit. Ace is the best character for this job. You can turn on super speed with [F9] if needed.

Cloister of Adumbration: Right Side
Break room, item on the ground.

Cloister of Revelation: Right Side
A ranged or magic user is required here to attack the candles that are situated on both sides of the hallway here. Upon hitting all 6 candles, the Reaver can now be killed. Eliminate all enemies within 10 minutes to pass through.

Chamber of All
The cadets are joined once more and are given two choices:
1. Become l'Cie (Bad Ending)
2. Remain mortal (Good/Actual Ending)

If you want to see what becoming l'cie is like, be my guest. If you want to progress the story, choose remain mortal.

Cloister of Premonition
While progressing in this area, make sure you harvest at least 7x phantoma otherwise the exit is inaccessible.

At the end, you'll have to split up again.
Send Ace or Trey with magic support to the left.
Send 1 strong character to the right, magic or ranged preferred.

Cloister of Manifestation: Left Side
Physical attacks do no damage in this room, so use magic.

Cloister of Exhibition: Right Side
Simply defeat all enemies within the room. The floor lights up red dealing 200 damage to the active cadet. The Reavers should be easily dispatched. The flans should be baited into attacking thus revealing their breaksight to easily dispatch.

Amphitheater: Left Side
While it's nice to have a ranged character, if your ranged character isn't your strongest, then simply use your strongest character here. Enemies are immune to magic. Be wary of the bomb's self-destruct.

You'll enter the Chamber of Fate giving you a view of Lorica, the portal leads to the Cloister of Inspiration.

Cloister of Revelation: Right Side
Break room, item on the ground.

Amphitheater: Right Side
Destroy 3 of the pillars while defeating the enemies. Now, you should see the flames move to each of the four pathways. You want to destroy the last pillar when the flames are lined up with the golden symbol which is the exit.

The Chamber of Fate on the right will provide a visual of Concordia. The Cloister of Inspiration will spawn a Behemoth that will be simply dispatched.

Cloister of Instruction
With the team back together for good, take the elevator that spawns a Rursan Reaver. Be wary of it powering up with a new wide swing that requires the player to dodge away from the swing instead of to the side.

Portal of Destruction
Includes a save spot here, you should definitely save.

Red Door: Kill all enemies without the two soldiers dying.

Purple Door: Boss Fight against Gilgamesh. Similar to your meeting during the Clash of Big Bridge, you'll have to rely on the breaksights. Luckily in this fight, landing a breaksight will give way to 5-6 consecutive breaksights taking out his health immensely.

Blue Door: Defeat all 4 strengthened Rursan Reavers. The player is poisoned; cannot be cured.
Once the Reavers are dead, the next zone will consist of fighting Dracobaltians that you met at the end of the Battle of Judecca.

White Door: Defeat the two imitations of Bashtar's magitek armor, Gabriel. While they're still fast, they possess a lot less health than Bashtar's version.

Upon beating all four doors, a portal rises in the middle allowing progression to the next area.

Spiral of Rebirth
It's recommended to use Ace as your main character here as his dodging ability and speed will make this part go a bit faster. You can skip everything and keep going up. Party dies at the top.

Sanctuary of Discension
Cutscene + Tears.

Boss: The Rursan Arbiter
Stage 1: Have every cadet die to the boss.
Stage 2: Land a breaksight with every cadet on the boss.

Tips on Stage 2:
1. Save your best ranged character for last as you'll have to land MULTIPLE breaksights.
2. There's three separate parts on Stage 2. The first requires landing breaksights while the boss is following you making it difficult. The second requires landing breaksights when the boss can no longer rotate. The third is a continuation of the second, but you only have 1 character left.
3. It's recommended to save Deuce, Eight, and Cinque for the 2nd part where the boss is no longer moving due to Deuce's attack cast, Eight's weapon range, and Cinque's attack speed.

What Lies Beyond - Completed Chapter 8 "Verdict: Finis."
Airship
There is a very small window to obtain the Airship. You must be in Chapter 7, and you must have either completed the first mission (The Kingdom's Final Hours) or skipped it. Once you've done that, head to the Expert Trials at the Main Gate and pick Operation Homecoming.

From here, head to the Airship Landing and travel to Cetme. Leave the town, then head towards the mountains to your southwest. You should see a cave, enter the cave to pass through the mountain range. From here, head to Bazz. Once you're there, you just need to liberate one area in order to gain access to Bazz.


Now that Bazz is a dominion city, head to the very back of it and talk to the dominion lady and she has a task for you. You have to head South, up a hill, through a forest, down a hill and onto a peninsula to enter Silent Key. Here is a crashed ship. The task itself will not reward the airship though the task will reward you with a Growth Egg for 2x EXP.


In Silent Key, you need to gain access to the bridge. There are 4 switches you must access and can only access if you defeat the all the Iron Giants, 7 total. Each switch is guarded by an Iron Giant. Then there are three Iron Giants in two central rooms. The room before the bridge has two giants in the same room. Once you've flipped all switches, head to the bridge and activate the air ship.


The Ark of Agito - Acquired the airship "Setzer."

Congrats!

Master Marksman - Shot down 50 enemies with the Setzer.

After obtaining the Setzer, you can enter it in the overworld by hitting . Simply kill 50 enemies while onboard the Setzer. The overworld is littered with them. Simply lockon and hold onto that button then shoot with the action button. The lockon will turn red and the orbs will seek towards them. Hold until they hit then move on.

Chocobos
Rookie Wrangler - Captured a chocobo.

See The Chocobo Whisperer.

The Chocobo Whisperer - Captured 30 chocobos.

The only chocobos that can be captured appear on the overworld. To capture them, simply go up to one and hit the action key. If you use the Super Speed function [F9], you can catch them on foot. Else, simply call up a chocobo and catch them that way. In the overworld, you can bring up the chocobo menu by hitting [V] or [Square + X] or [A + X]. The first region where chocobos are available is the Togoreth region. Also available in the Iscah region.

Eggs-citing Development - Hatched 5 chocobos at the chocobo ranch.

See One Big Happy Flock

One Big Happy Flock - Hatched 100 chocobos at the chocobo ranch.

Once you're in Chapter 2, you'll have access to the Chocobo Ranch. Talking to the attendant here will grant you 10 male and female chocobos and some gysahl greens. However, you'll need to complete the second mission, Operation Reconquista, in order for the breeder next to the stables on the right to allow you to breed.

Eggs take 4 free-time hours to hatch, then 2 free-time hours to grow up for a total of 6 hours per breeding cycle. You do not have to breed 100x, but obtain 100 hatchlings. If you obtain the hatchlings, return to the menu and keep accepting hatchlings, it'll count towards the total of 100. If you want to intentionally do this, wait until you end up getting a Gyzahl green when your active character hits 200 kills. (200 kills per cadet will each net a Gyzahl green). If you don't want to do the loading method, it's best to start breeding early.
Combat
Kills
A Simple Skirmish - Defeated 100 enemies.

Self-explanatory.

A Full-Scale War - Defeated 300 enemies.

Self-explanatory.

The White Tiger Roars - Took down 20 imperial soldiers.

Self-explanatory.

Taming the White Tiger - Took down 100 imperial soldiers.

Self-explanatory.

Skilled Slayer - Landed Killsight strikes on 20 enemies.

See The Executioner.

The Executioner - Landed Killsight strikes on 100 enemies.

Killsight and breaksight are the exact same functions except killsight will instantly kill enemies where breaksight will stagger enemies momentarily. If you can deal enough damage, then a breaksight becomes a killsight with the red crosshair instead of the yellow. The timing for these differ based on enemies but generally occur right before an enemy attacks or after they attack when they have an opening. Another opening is when enemies charge forward leaving them momentarily vulnerable. Simply hit them with any attack while the killsight is up to add to the counter.

Collateral Damage - Defeated an enemy with the explosion from a fuel tank.

In chapter 2, fuel tanks begin showing up especially next to leader-type mecha bosses inside towns. They continue to appear throughout the game. Simply target a fuel tank with an enemy near it and it'll deal massive damage and kill the soldiers stationed near the tank. Preferred to attack with a ranged attack.


Overworld
Roaming Terror - Won an encounter in the overworld.

Self-explanatory.

The Hunted Becomes the Hunter - Won 50 encounters in the overworld.

Self-explanatory.

Total Domination - Won a 5-battle chain encounter in the overworld.

Occasionally, you'll finish a battle in the overworld and the game prompts you that another group of units is available for battle in which you can pick either 'Battle' or 'Retreat'. You'll want to keep picking Battle until you get to 5 should there be enough enemies.

Arena
The arena is unlocked following the mission: The Capture of Togoreth Stronghold. The arena is accessible in person at Akademeia or by talking to Moglin in parts of the story where you're away from your hometown.

Practice Makes Perfect - Defeated a total of 20 enemies in combat simulation sessions.

See Practice Pays Off.

Practice Pays Off - Defeated a total of 100 enemies in combat simulation sessions.

At the arena, talk to the woman on the left to practice against imperial soldiers. This session will infinitely spawn soldiers until you die with a maximum of 3 alive at a time. Repeat until you get to 100 kills. These kills count towards the total kill achievement.

Drops
Mystery of Magic - Harvested 100 phantoma.

See Secret of Souls.

Secret of Souls - Harvested 500 phantoma.

Whenever you kill an enemy, their body lingers allowing you to harvest phantoma from the body. To harvest, simply lock onto the dead body and hit your attack key to harvest. Any other bodies in the area will be harvested simultaneously. If you remove your lock on a dead body and there are alive enemies, the lock-on will only recognize the alive enemies. Dead bodies will disappear after some time. If you harvest every enemy you kill, you should get this around Chapter 3-4.

Forced Charity - Searched 3 surrendered imperial soldiers.

See Imperial Investigation.

Imperial Investigation - Searched 15 surrendered imperial soldiers.

In order to have enemies surrender, there needs to be a leader unit within the area for you to take down. A leader is denoted by an orange rank icon on the mini-map as well as the colored name. Killing the leader will cause all surviving units in the area to run away and surrender. Run up to them and hit the action key to search the enemy and receive items.
Eidolons
Communing with the Gods - Forged a covenant with an Eidolon.

Not missable.

The Beastmaster - Forged covenants with 6 Eidolons.

Due to the access to missions in the main menu, this achievement is not missable. You are guaranteed to get Ifrit, Golem, and Shiva on Cadet difficulty. Rubicante and Vulcan can be obtained by replaying missions and doing the SO in their respective missions. Finally, Odin can be obtained by playing the Clash at Big Bridge main mission on Officer difficulty. While some eidolons are completely missable, this achievement is not. See below for Eidolon list and how to obtain each Eidolon.

As Ifrit, Golem and Shiva are unmissable, you need to get 3 more eidolons. We recommend picking up Rubicante, Vulcan, and Odin. If you're leveling up a lot, then you can probably take down some of the expert trials. Expert trials that you miss cannot be played in the main menu. Expert trials are specific to their chapter as well, so if you don't do it and you move to a different chapter, it's missed. Finally, the Finis Difficult is only given during New Game Plus (NG+) which requires beating the game at least once on that save and Code Crimson missions are available in NG+ as well giving you alternate missions to the main storyline that you already experienced.

Ifrit-Class
Ifrit - Mission Reward: The Capture of Togoreth Stronghold (Chapter 2)
Firebrand - Expert Trial: United Front on Officer Difficulty (Chapter 3)
Rubicante - SO Reward: Operation MA Demoltion "Destroy Brionac as quickly as possible with your active leader" (Boss SO/Chapter 3)
Vulcan - SO Reward: The Battle of Judecca "Take down Mikazuchi using your active leader" (Mini-boss SO, looks like a horse/nightmare/Chapter 5)
Calamity - Expert Trial: A Charge on the Border on Officer Difficulty (Chapter 5)
Ignis - Mission Reward: The Clash on Big Bridge on Agito Difficulty (Chapter 6)

Golem-Class
Golem - Mission Reward: The Infiltration of Iscah (Chapter 3)
Gigas - Expert Trial: Expelling the Empire on Officer Difficulty (Chapter 3)
Troll - Expert Trial: Colonel Faith's Revolt on Officer Difficulty (Chapter 3)
Ogre - Code Crimson Mission Reward: A Fog-Laden Foray on Officer Difficulty (Chapter 3)
Titan - SO Reward: Code Crimson Machina's Struggle "The Crystal wills you to take down the Golem" (Chapter 7)
Dwarf Golem - Expert Trial: The Climactic Clash at Azurr on Officer Difficulty (Chapter 7)

Shiva-Class
Shiva - Mission Reward: The Capture of Togoreth Stronghold (Chapter 2)
Shankara - Code Crimson Mission Reward: Operation Breakthrough on Officer Difficulty (Chapter 2)
Petite Shiva - Expert Trial: Covering the Cadets on Agito Difficulty (Chapter 5)

Odin-Class
Odin - Mission Reward: The Clash of Big Bridge on Officer Difficulty (Chapter 6)
Grimnir - Code Crimson Mission Reward: Mission Under Ceasefire on Agito Difficulty (Chapter 4)

Diabolos-Class
Diabolos - Expert Trial: Operation Dragon Slayer on Officer Difficulty (Chapter 7)
Balberith - SO Reward: Code Crimson Operation Vulturnus "Combat Trial: Deal at least 3500 damage to the Diepvern" (Chapter 5)
Astaroth - Expert Trial: Dominating the Dragon's Nest on Officer Difficulty (Chapter 7)

Bahamut-Class
Bahamut - Code Crimson Mission Reward: Operation Vulturnus on Officer Difficulty (Chapter 5)
Neo Bahamut - Expert Trial: Colonel Faith's Revolt on Agito Difficulty (Chapter 3)
Bahamut ZERO - Restricted use during The Battle of Judecca against Shinryu Celestia.
Moogle
Moogle Mingler - Talked with the moogles from all thirteen classes.

Missable due to the point of no return in Chapter 7.

There are 13 Moogles scattered around Akademeia that you must speak with in order to unlock this achievement. Their locations are as follows:

0th: (Moglin): Classroom Zero (Unmissable) & 1st: Fountain Courtyard


2nd: Central Command & 3rd: Terrace


4th: Airship Landing & 5th: Entrance


6th: Main Gate & 7th Lounge


8th: Entrance & 9th: Crystarium


10th: Airship Landing & 11th: Armory


12th: Ready Room


Teacher's Pet - Sat in one of Moglin's lectures

Missable due to the point of no return in Chapter 7. See Moogle section.

Once you have access to cadets in the classroom, talking to Moglin will provide you one of several lectures. Simply select a lecture and listen in. Lectures provide permanent stat bonuses to characters as well as occasionally experience points
Missions
Counters
New Recruit - Cleared 3 missions.

Not missable.

Mission Master - Clear 15 missions.

Depending how many missions you skip throughout the game, you may have to farm up to 15. You can farm missions through the main menu should you need more.

Special Orders
Special Orders, or SO, can be activated in the Sorcery branch of Akademeia. Special Orders are sub-objectives given in essentially every area of a mission. Complete them for bonus items. SOs show up as a red envelope at the top left accessed with [Select/Z]

Make Mother Proud - Completed an SO.

Self-explanatory.

Above the Law - Avoided the penalty for failing an SO.

When you fail an SO, 3 magic circles on the ground will appear right under your active leader. If you stay inside the circle, it'll instantly kill you. Dodge all 3 to get the achievement. It's best to use someone really fast such as Ace with maxed dodge for infinite rolls in succession.

Performance
Perfect Marks - Earned an S-Rank on a mission.

The easiest mission to get S-Rank on is the first real-time simulation mission, Operation Reconquista. The requirements for S-Rank is to simply beat the mission in under 20 minutes while completing all 9 objectives.

1. Occupy Domain 1
2. Destroy the Autoturret
3. Order Domain 1 to Attack Aqvi
4. Break Aqvi's Magic Shield
5. Liberate Aqvi
6. Defend against Warrior troops from Corsi
7. Occupy Domain 2
8. Break Corsi's Magic Shield
9. Liberate Corsi

You can revisit this or other missions you played during the game, excluding the chapter 1 mission, through the main menu using your save. All items, gil, exp gained will be saved onto the save file.

Miraculous Mission - Completed a mission without allowing any casualties.

Best done on the early chapters, but if you somehow don't end up getting it, you can always return to it later on through the main menu mission mode.

Bonus
A Select Few - Earned the "A Select Few" bonus.

See An Army of One. Use 3 people instead of 1.

A Lonely Battle - Earned the "A Lonely Battle" bonus.

See An Army of One. Use 2 people instead of 1.

An Army of One - Earned the "An Army of One" bonus.

The bonus to do these require you to refuse any assistance during the mission while only using a specific number of cadets in a mission. An Army of One can only use 1, Lonely Battle can only use 2, and A Select Few can only use 3. The Active Leader cannot die during this either. They do not stack.

Other
Top Form in the Field - Completed a mission using only Primed cadets.

When selecting your cadets for your mission, you should notice that some names have a gold background. It means these cadets are 'Primed' as well as recommended for the mission. Simply complete a mission with only primed cadets to get the achievement.
Miscellaneous
Knowing Tags
Collector of Memories - Collected 5 Knowing Tags.

See Mortal Validation.

Mortal Validation - Collected 25 Knowing Tags.

Like all items that can be picked up, they glow like a red-white shining star. However Knowing Tags are commonly placed near dead cadets considering they're the ones who carry Knowing Tags. You do not have to finish the mission for the tags to count.

You can farm knowing tags outside of the main storyline. I'd wait until you unlock The Capture of Togoreth Stronghold before attempting this as well as further progressed into the story so you can easily breeze through this mission.

1. Go to the main menu: go to missions and load your MAIN save.
2. Pick Capture of Togoreth Stronghold
3. Run in, go to the first gate, take out the leader to open the gate.
4. Run through the gate, then straight until you meet two mechas on the wall. Ignore them, run left.
5. This area has a gate and a golem. In order to leave this area, you need to take out the gate. Destroy the gate.
6. Do not go up the stairs, instead go straight to the next area.
7. This area has a giant wooden door. Take out the leader and go into the doorway. (2nd Laboratory)
8. This area has 3 knowing tags on the ground. The next room has 1 knowing tag on the ground.
9. Finish Mission

There was suppose to be 3 more knowing tags located in the 1st Laboratory, but I never had them spawn for a total of 7 in the level. But only 4/run this way, but most likely the fastest one to do.

Chapter 1 has 1 knowing tag near the fountain, but can't be replayed.
Post-Chapter 5: Bethnel Caverns houses 7 tags if you can defeat Behemoth/BH Kings (Level 50).


Chapter 8 has several knowing tags as well.

Arena
Hard Work's Reward - Completed a secret training session.

Missable due to the point of no return in Chapter 7.

The arena is available from Chapter 3 to Chapter 7. Once you complete the second mission of Chapter 7, you will no longer have access to the special training NPC; however, you will retain the ability to use the combat simulation through Moglin.

The Special Training is an idle way of training when you're not playing. Now if you know you're about to get off for more than 2 hours, you should always leave a character here.

Now if you want to get this achievement as early as possible while playing, simply save at the crystal in the arena. Then talk to the special training NPC and save in a different slot. Then load the previous save. After 2+ hours, you can load the mid-training one but you won't be able to keep the progress.

Miscellaneous
Emergency Evasion - Dodged 500 enemy attacks.

This achievement is obtained simply for using the dodge function 500 times. You don't need to actually dodge attacks.
The Great Liberator
The Great Liberator - Liberated and visited all cities in the Dominion of Rubrum.

Missable due to the point of no return in Chapter 7.

The objective of this achievement is to visit specific cities after liberating them. Below is listed what cities you need to visit and when you can visit them (do it after you liberate them). All you need to do is walk into the city and nothing more.

1. McTighe (Liberated after Ch 2: The Cadets' First Deployment)
2. Aqvi (Liberated after Ch 2: Operation Reconquista)
3. Corsi (Liberated after Ch 2: Operation Reconquista)
4. Keziah (Liberated after Expert Trial: The Keziah Diversion but not required; visit after Mission Day of Ch 3: Infiltration of Iscah)
5. Mi-Go (Liberated after Expert Trial: The United Front but not required; visit after Mission Day of Ch 3: Infiltration of Iscah)
6. Iscah (Liberated after Ch 3: The Infiltration of Iscah)
7. Rokol (Liberated after Ch 3: Operation MA Demolition)
8. Meroë (Liberated after Expert Trial: Covering the Cadets but not required; visit after Mission Day of Ch 6: The Clash of Big Bridge)
9. Toguagh (Liberated after Ch 5: The Reclamation of Eibon)

14 Comments
ponkberry  [author] Nov 8, 2019 @ 8:14am 
Possible since I havent gone through either game yet
Brachragon Nov 5, 2019 @ 2:24am 
Hey Guys, is there any chance you'll also do a guide for FF XII or FF XIII-3 on the same level of quality as for this one?
Staldart Jan 21, 2018 @ 11:38am 
Great guide!!
ponkberry  [author] Aug 20, 2017 @ 11:55am 
Updated that knowing tags increase count even without completion of the mission. Counter most likely applies to profile.

Corrected an error in the Chocobo section. Breeding can only occur after the second mission.
Helevorn May 27, 2017 @ 5:31am 
I'm gonna play and follow your guide, thank you so much
Fidgitt Jan 16, 2016 @ 9:35am 
Thanks for the guide, a few of these are just what I was looking for!:fhappy:
RVX Dec 26, 2015 @ 6:55am 
Thank you for this guide!
dunmarvinc Sep 27, 2015 @ 1:08pm 
Thank you for this guide! To confirm, you do not have to complete the mission for the knowing tags to count towards the "Mortal Validation" achievement.
Jedo  [author] Sep 18, 2015 @ 2:59am 
tyvm :steamhappy:
PunkSteve Sep 18, 2015 @ 2:53am 
Ok m8, consider urself Followed, lol. :ss13ok::cybereye::sgsmile:
PS: u r my 1st, lol. :steamhappy::rufussmile: