Team Fortress 2

Team Fortress 2

Not enough ratings
Importing Source Models into 3DS Max
By BLADE
A beginner's guide to importing Source models (TF2, HL2, L4D, etc) into 3DS Max.
   
Award
Favorite
Favorited
Unfavorite
Introduction
Have you ever wanted to do 3D modeling? Have you ever wanted to submit items to the Steam Workshop for Team Fortress 2? Well, you're in luck!

This guide will go through all of the details needed to import a Source model into 3DS Max. All of the software links are provided below and the downloads are free. The only registration needed is for the Autodesk website, so you can download a one year student trial for 3DS Max.

If you need a visual guide, please watch my YouTube tutorial I made specifically for this. I included chapters as well for this video so you can skip the unecessary parts if need be.

This tutorial DOES NOT cover modeling techniques or shortcuts. These subjects will be covered in the next tutorial.
Video Tutorial

Chapters are located in the description of the video.
Links to Software
You must have this software downloaded and installed to complete this tutorial.

(3D Modeling Program)
Autodesk 3DS Max: http://students.autodesk.com/?nd=download_center

(Notepad with Advanced Features & Editing the .MDL File)
http://notepad-plus-plus.org/

(Accesses Source Models & Materials)
GCFScape: http://nemesis.thewavelength.net/index.php?p=26

(Imports .SMD Files into 3DS Max)
.SMD Importer: http://www.wunderboy.org/apps/smdimport.php

(Converts Valve Textures to Regular Images)
.VTF to .TGA Converter: http://www.moddb.com/games/vampire-the-masquerade-bloodlines/downloads/tool-quick-and-dirty-bloodlines-tools-v39a
Accessing Source Models & Textures
Once you've installed all of the software for this tutorial correctly, open up My Comuter and see which hard drive holds your Steam software. This is where we will navigate to the steamapps folder. For me, this is how I navigate to it:

E: \ Program Files (x86) \ Steam \ steamapps

Here is where you will find the team fortress 2 materials.gcf folder, which stores all of the TF2 models and textures. All .gcf folders can be easily recognized with a blue / purplish icon to the left of the folder name. Double click this folder and we will be gettting the demoman models and textures from two separate locations. All of these files will be dropped in a new folder for storage, preferably on your Desktop for ease of access.

Folder Navigation for Model:
tf \ models \ player

Files for Demoman Model:
demo.dtx80.vtx
demo.dtx90.vtx
demo.mdl
demo.phy
demo.sw.vtx
demo.vvd


Folder Navigation for Textures
tf \ materials \ models \ player \ demo

Files for Demoman Textures:
demoman_blue.vtf
demoman_head.vtf

Decompiling the Model
Since all of the model and texture files are ready to be used, we are now going to access a Source Model Decompiler in your Source SDK folder. Please follow this order of folders. Mine is:

E: \ Program Files (x86) \ Steam \ steamapps \ (your username) \ sourcesdk \ bin \ ep1 \ bin

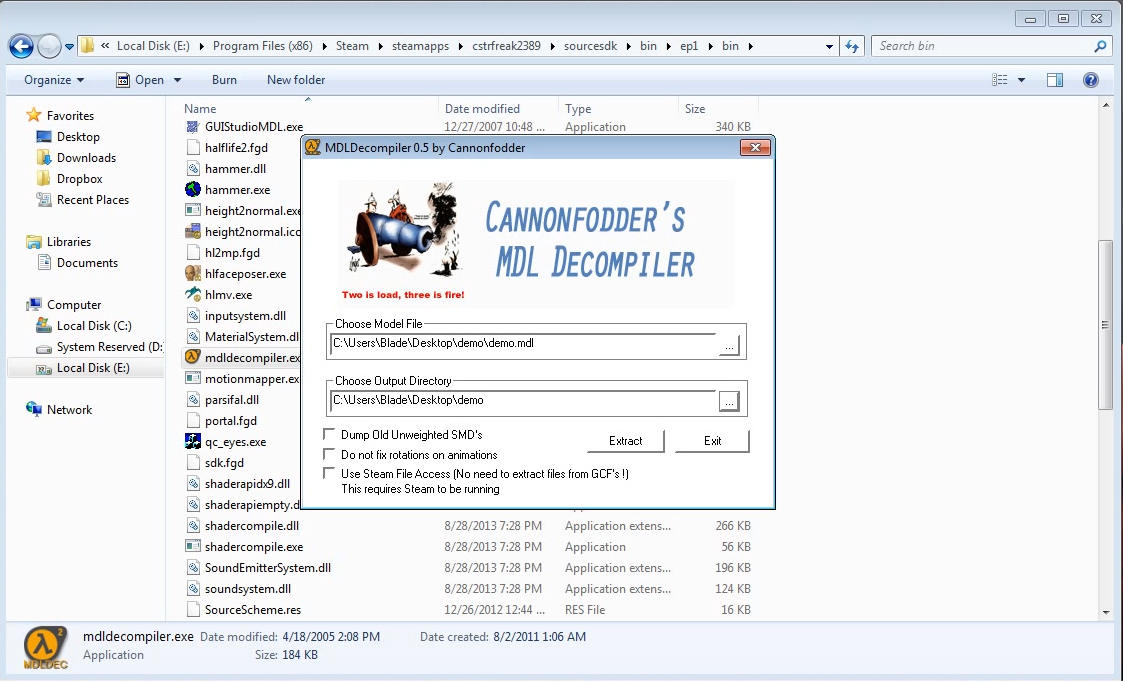
Scroll down a little bit and you will find a Half Life 2 logo with the name of mdldecompiler.exe. Double click this and a small window should pop up. For Choose Model File, navigate to your desktop and open the folder containing all of the files from the previous section. Double click the demoman.mdl file and then make sure the Choose Output Directory is the same as your storage folder.


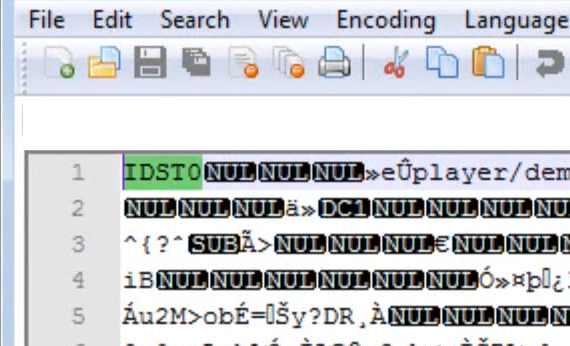
At the bottom of the Model Decompiler, there should be 3 tick boxes. All of these should be unchecked. Before clicking the Extract button, we need to edit the demoman.mdl file with notepad or notepad++ first. In the very first line of code (top left), you will see:

IDST0

Remove the "0" (Zero) after the "T" and replace it with a "," (comma). This will confuse the decompiler so the model can be converted to .SMD format. Make sure to save this to the original file and go back to the decompiler once more. Now, you can stop chewing on your fingernails with anxiety and click the Extract button.

A small notifcation window should pop up saying:
Loaded model: C: \ Users \ (account) \ Desktop \ (folder) \ demo.mdl

Click Ok and a second notification should pop up:
Completed Dumping Model!

If you go to your storage folder, you should now see a whole bunch of files ending with .SMD. We'll get there in just a second after we close the Model Decompiler window and move on to the next section.
Importing to 3DS Max
Now. The moment you have been waiting for....

Let's open up 3DS Max and explore the new world of 3D modeling. Once the program is fully loaded, you should see a main screen with 4 different viewports. Each viewport serves its purpose for viewing models / scenes at different angles and also the main perspective. Remember, I will NOT be going over modeling techniques or shortcuts for this tutorial. It will be gone over thoroughly in the next one I publish soon.

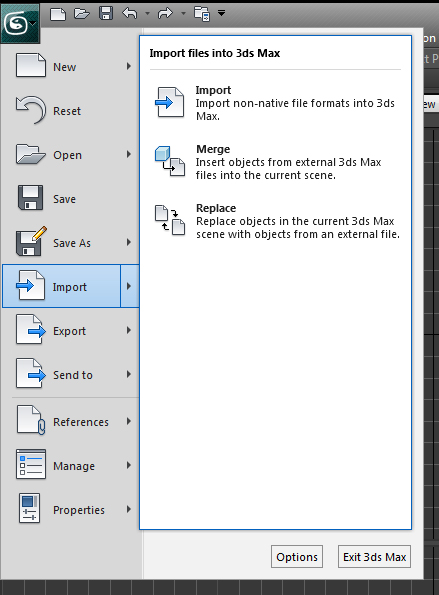
Go to the very top left corner of your screen, click the 3DS Max logo, and move down the list to click on Import. Here, you will navigate to your Desktop and go to the folder that stores the demoman .SMD's. Once there, you should see a whole bunch of files ending with the .SMD suffix. If not, please double check the installation of the .SMD Importer or that you are navigating to the correct folder.

We will be using this file for importing the Demoman:

demo_morphs_low.dmx.smd

After double clicking this file, a small Half Life 2 SMD Importer window should pop up. All of the checkboxes should be marked and then click OK. More windows should pop up, asking for the location of the textures. Click Cancel for all of these for right now and we will discuss textures in the next section.

For right now, enjoy admiring your first TF2 model imported into 3DS Max. Watch the Demoman stand there ecstatically in his T-Pose, while he is secretly recovering from last night's hangover of Scotch.
Converting and Importing Textures
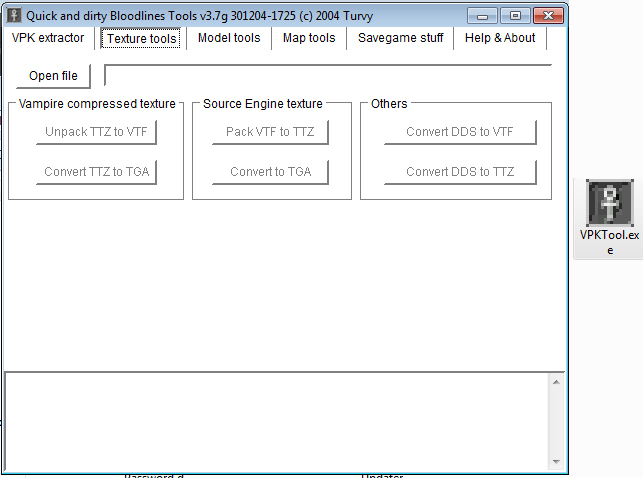
Open up your VPKtool.exe (Quick and DIrty Bloodlines Tools v3.9) and click on the Texture Tools tab. Here we will be converting all of the .VTF textures to .TGA so 3DS Max will be able to read them correctly.

Click on the Open File button and navigate to the folder that holds all of the textures. Next, open one of the .VTF's and then click on the Convert to TGA button. This will finalize the process and place the .TGA into the same storage folder. Repeat this for the next .VTF as well. Unfortunately, this tool doesn't do multiple files at once, so please be patient if you have to convert multiple .VTF's.

Once you are done converting, double check your folder that the .TGA's are there with the correct names. Now, we can get back to 3DS Max and apply some very key detail to our Demoman model. To make our work a lot easier, left click on a blank area in the Perspective Viewport. Typically, this viewport is in the bottom right of your screen. You should now see a gold border highlight this viewport.

Hold down the Alt key and tap the W key on you keyboard to maximize the Perspective Viewport. You can do this with any other viewport you desire, which will make your life easier for modeling and texturing.


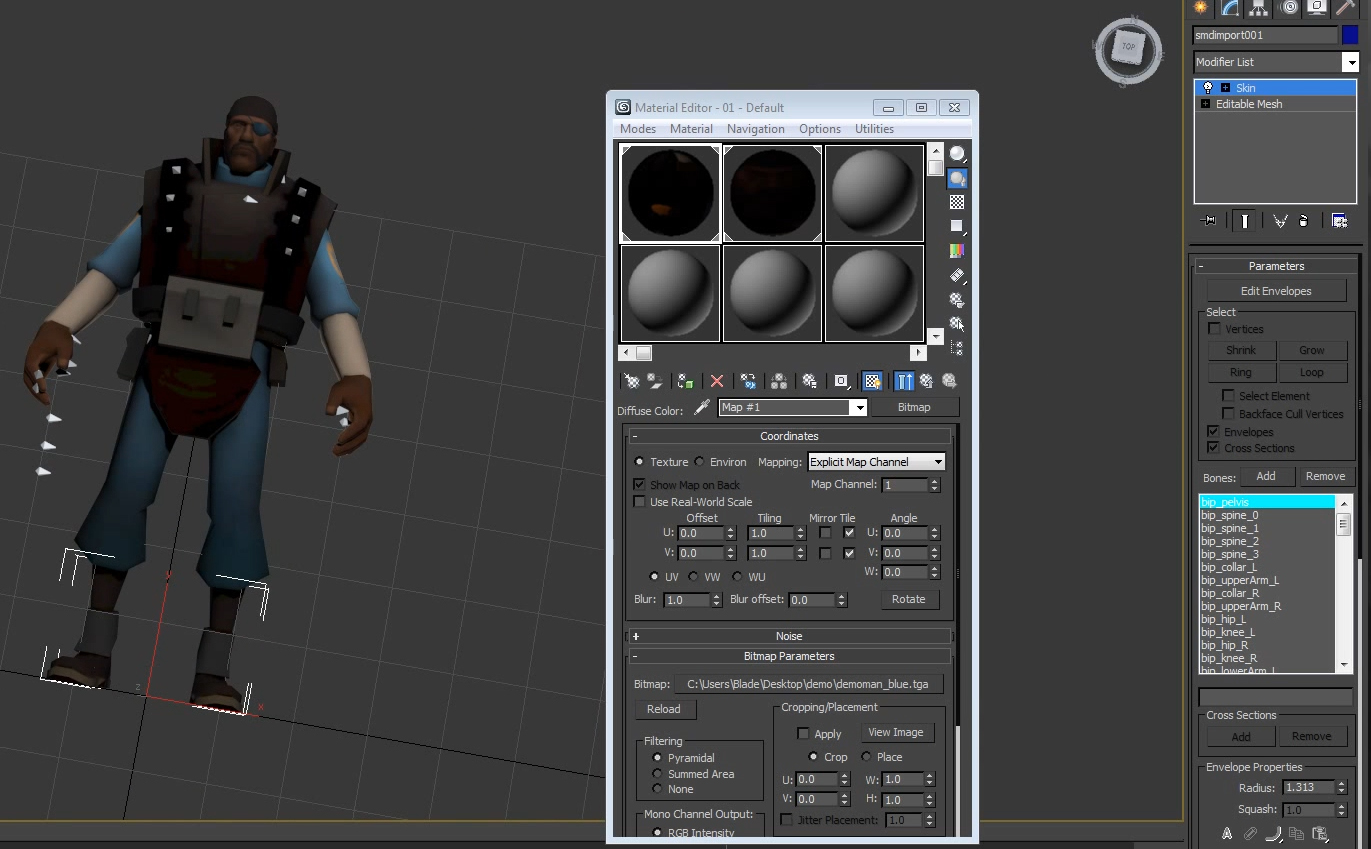
For applying the textures we recently converted to .TGA, tap the M key and a small concise menu should pop up on your screen. This window will consist of multiple gray spheres for applying textures to. If you do not see the spheres, go to the top left of this window and click on Modes. In the drop down list, click on Compact Material Editor.

To keep things organized, left click the top left sphere in the Material Editor window and move your mouse down to the Blinn Basic Paramters section. Here, we will go to the right of the Diffuse color box and left click on the small square box. This square box matches the background color of the Material Editor window.

After clicking this small square box, a Material / Map Browswer window should appear. Double click on Bitmap button, which is the very first option at the top, under the Standard section. Navigate to the same folder where the textures are stored and click on the demoman_blue.tga file. The top left sphere in the materials should now have a texture applied to it in the preview. This means 3DS Max has successfully found and applied this specific texture to this specific material slot.

Now, let's click and HOLD the left mouse button while hovering over the first sphere we applied the texture to. Drag this to the Demoman model and let go of the left mouse button. The model will still look the same because we have to enable textures to be seen in the viewports. In the Material Editor, there is a horizontal row of icons right below the spheres. The fourth icon from the right will be a checkerboard with a lightbulb in the bottom right corner. Click this once and you will see your demoman with the blue team colored skin.

Repeat this same process for the demoman_head.tga texture.

To correct the texture for the head on the Demoman, we must do a very shallow dive into accessing 3D modeling tools. Left click the Demoman model once and go to the right side of the screen. Left click Editable Mesh and look under the Selection menu near the top. You should see 5 different red icons, which all have their very specific purpose in modeling.

To keep this simple, select the very far right red cube. Finally, left click the head of the Demoman model and the entire head should be selected in red. Re-open the Material Editor, go to the second sphere with the head texture, and drag and drop onto the head selection.

Before we celebrate yet, let's add in the feet.
Adding the Feet
If you didn't notice already when the Demoman was imported, he did not come with any feet. To add the feet, simply click on the 3DS Max logo in the top left of your screen and click on Import. Scroll down and look for this file:

lod1_shoes_bodygroup.dmx.smd

The SMD Importer window will appear after selecting this file. Please make sure all the checkboxes are checked before clicking Okay. The next window that pops up will prompt you to select a texture. This is where you will select the demoman_blue.tga texture. Finally, if you didn't change the name of the Demoman model from smdimport to something else, 3DS Max will inform you about a name conflict.

You can either leave the name for the shoes as smdimport001 (suggested by 3DS Max) or change it to something else of your liking.

So, there you have it. A TF2 character imported into 3DS Max that is fully textured and ready to be used for adjustments, animation, or aiding in a workshop item. I hope this guide helped you in your first step of 3D modeling and I look forward to posting my next guide soon for Episode 2.

Thank you for taking the time to read this and please message / comment on Steam or YouTube if you have any problems or questions.

Sincerely,

BLADE
7 Comments
Zogged the Hog Wrangler Jul 16, 2018 @ 2:28pm 
@Chiruliru

If you want to animate, then why not just learn Blender as opposed to using SFM? If you made movies in Blender they would look 100 times more visually pleasing and it would give you infinitely more control over your movies. I'm saying this because I used to use SFM and then realized it was massively unproductive - "Why am I wasting my time, effort and potential making animations in the universe of a video game?" and then I just stopped bothering and took up Blender full time.

I'm now - after 2 years - at the stage where I could make my own animated movies or become a 3D modeller for indie gaming. I love TF2, but seriously don't waste your life pouring over it. Be better.
BlueBlur62391 May 17, 2015 @ 12:19pm 
Can you import models into blender this way?
Alex Fox Mar 22, 2015 @ 1:28am 
Hi! If you are using a modern version of 3Ds Max and plugins that mentioned in this article are deprecated, I recommend Wall Worm Model Tools . It free, powerful and always updated plugin. :commandervideo:
0% Angel Nov 17, 2014 @ 9:24pm 
I have 3ds max 2013, but the plugin is updated only to 2012. what do I do?
Kal Apr 15, 2014 @ 8:08pm 
I don't have a mdldecompiler.exe in my bin folder.
BLADE  [author] Mar 31, 2014 @ 7:10pm 
The opposite way would either be going through the Itemtest in game or using GUIStudioMDL to convert from an .SMD to .MDL. Good luck!
Chiruliru Mar 31, 2014 @ 4:40pm 
Is there a way to do the opposite of this? I actually need to export a 3ds model to a .mdl file
Or at least to make it properly work with source filmmaker