RimWorld

RimWorld

137 ratings
(A17) Outfit Creation Kit
By Chicken Plucker
This badly written guide will help you create outfit textures the chicken way!

Note: This guide gets updated now and then
4
4
2
   
Award
Favorite
Favorited
Unfavorite
Outfit Creation Kit - Updates
This guide may be updated now and then with new file attachments and new methods whenever I develop stuff overtime.

The following below are changes to the file I attached originally in the requirements section:


DOWNLOAD LINK FOR NEW TEMPLATES:
https://drive.google.com/open?id=1son3nyEpg1RTN0NYBrJXvWAXCfvaPiWI

Updated 09/06/2018 Brand new files, new sorting system, lots of other used textures from recent mods. Goodluck!


Updated 10/09/2017 I added most of the clothing assets from vanilla, courtesy of my friend Odstriman who provided them to me from an older version of Rimworld, this should make it a lot easier to modify things to Vanilla standards for everyone!

Removed some clutter from the 3.0 version of this file.


Updated 25/08/2017 - Updated the .psd again, this time with Power Armor line work for EVERY body type. Included is some layer work from my recent DOOM mod, I thought having the body lines for the power armor bodies are important since its completely different from jacket and armor making.

I also included templates of power armor courtesy of Skullywag so you know where to place your power armor textures when you finish it. Happy hunting!


Updated 24/08/2017 - I have updated the attached file and have included a base for coat making.

To explain why I only have the HULK body base for armor and coats, this is because the Hulk is what I start with all the time, after this I add or remove details using the copied and pasted Hulk texture I have finished. Example is shown in the guide.
Introduction
Hello. I am Chicken.

I have made a few outfit mods for Rimworld and my good friend super famous mega movie star Skullywag wanted to know how I make my outfits quickly.


This guide unfortunately will not teach you how to code for mods or how to make mods since I do not have the time to make a lengthy guide on modding.

This guide is also not a guide on how to make pretty drawings since I am not Leonardo Di Caprio, famous painter of Mona the Vampire.

Unfortunately, this is one of those guides that cater to someone who already knows what they're doing but I hope you learn something out of it too if you are curious about modding for Rimworld.

Requirements


Here's the main thing that will prevent a lot of people from creating digital art:
Equipment, Software and Money.

In order to follow this guide you need:
- Adobe Photoshop (Or similar programs like SAI paint tool, GIMP, Krita etc.)
- A pen tablet (Not mandatory if you can draw with a mouse)
- Attached modding file I made for batch production of outfits (You can make your own too)
- Armored Rubber Chicken (Not mandatory)
- The will to live
- Money or your parent's money WITH their permission (don't steal your mums money fam)


How to get these:
- Adobe Photoshop

If you do not have the money to dish out over $400 for a software, I will refer to Cpt. Robbie Rotten's philosophy:

"Yar harr fiddle dee-dee, do what you want, 'cause a pirate is free, you are a pirate!"


Disclaimer: This guide cannot endorse piracy nor should it, I'm just saying, do what you want cause a pirate is free, you are a pirate.

Update: Spacedorf recommends Gimp or OpenSource Tool since they are free compared to Photoshop if you want an image editing software.

- Pen tablet

The one I use is a Bamboo Pen Tablet, if you are good with using mouse for artwork then you do not need this.


- Attached modding file I made for batch production of outfits

Here is the Google Drive link:
DOWNLOAD DEFAULT COLOR KIT (Google Drive)[drive.google.com]

- Contains outfit mod sample with coding explanations inside
- Contains head templates from the game (Forgot who gave it to me, it was from Ludeon sry)
- Contains pawn body textures by TRP
- Contains .PSD file of my default color kit


- Armored Rubber Chicken


If you want the best possible performance with this guide, you need this. Get a normal Rubber Chicken and purchase a 1/6 scale body armor in order to protect the chicken for combat. You don't have to have this to make Rimworld mods, but I highly recommend it.

- The will to live
Please consult a different guide for this, I recommend the Bible. (NIV or KJV)


- Money or your parent's money WITH their permission
Either work for a living, spend your College debt money or ask your mum.


If you are a good son/daughter then you should have no problems if they say either yes or no since rent and food is more important, respect what your parents have to say.

Otherwise, if they don't love you and your parents beat you and let you starve, then please go to the will to live bullet point.

With all of these requirements fulfilled, it's time for the next part!
More unecessary things to say before getting on with it
Just a philosophy you need to keep in mind before we finally start with the work, unless you like skipping things because you hate to read:


1. Never plagiarize work and take all the credit, give credit where it's due

2. .PNG images have transparency

3. Always export the final product in .PNG

4. Always have a backup file and save very often

5. Mistakes are normal, it's all about how fast you can adapt and correct them, not being perfect

6. Undo button and the History tab is like time travelling, do not panic if you make mistakes

7. The bigger it is, the more details it can have

8. The smaller it is, the less details it can have

9. Someone will always notice a mistake and complain

10. Constructive criticism is better than complements

With all this things in mind, it's time for the actual work
Hulk body type
Open up the .psd I attached on the requirements page.
(Unless you wish to make your own default preset.)

Personally, I start with the Hulk body type. I recommend either starting with the Hulk or the Fat body types since you can put the most details in these and the rest of the smaller body types will only require removing details after.


First step, zoom in the image file and make sure the Hulk body outline is turned on to visible while the other outlines are not.

The measurements for these outlines are exactly what Rimworld asks for, if you were to make your own, make sure your dimensions are correct.


Second, make sure you have your layers arranged properly.

You will notice on the attached image that under CF_HULK_Lines are different layers for color and detailing.

In this case we are doing the Hulk body outline first, so we have to make a layer below the outline for colors, above the color layer is a detail layer and extra detail layers depending on how much you want to do.

I do not like to do all the details and all colors in one layer since this makes it very difficult to do these outfits in batches.

Coming from a flash animation environment, this is a very important technique to produce your work as quickly as possible.


It's time to color your outfit, in this case I was creating a Deadpool outfit and the color will be red so bad guys can't see him bleed.

I took a reference image online for details, make sure you credit other artists if they have helped you in any way to produce your work.

As you may notice we can't use the fill tool since we are doing the colors on a separate layer.

All your training as a little child coloring books with crayons are now put to the test since you have to try and avoid coloring outside the Body line layer.


Over here I use my reference image to do my details since Im not able to draw from the top of my head.

If you are special and you can do detailing off the top of your head then please by all means give yourself a pat on the back, I will also send you some biscuits and medals for this achievement, although you will have to email me your address.

Note: Make sure you are not accidentally drawing the details on any other layer or else you will suffer for it later when we start doing the other body types


After finishing your second layer of details, either decide if you are finished or if you want more details. In this case I wanted to add a utility belt for Deadpool.

I also added another layer for body lines since his suit is supposed to be tight.


If you are satisfied with all your work, hold shift and click all the layers you've worked with to merge them.

After this process, try to avoid as many changes as possible so that you can go back to the History tab and undo this later.


Use the rectangle tool to highlight all the image once you are done merging all layers connected to it.

On your keyboard, Ctrl + C for copy and Ctrl + V is pasting. For now, copy what you have after highlighting it with the rectangle tool.

We are going to paste these in a new document soon.


Minimize photoshop, then from my attached file, there are pawn textures courtesy of TRP that has the exact Dimensions and position Rimworld pawns need for everything to look correct.

We are to drag the three body types we need into photoshop in their own new documents, so we can align our finished textures in their respective positions.


In this instance I am dragging over the front view hulk to the Hulk_front template.


Once I'm done aligning everything properly, I can turn off the template layer or leave it as is and erase any extra stuff I don't want to be seen on the final product.

Make sure you name your file properly and you do not replace anything by accident and make sure you save as .PNG since .PNG files have transparency.


Once you are done, repeat the process for other body directions and paste what you have for the other body types.

The Hulk body type is done, good job!

Now we have to do the other body types, if we followed all the steps correctly this will be a cake walk.


(Note: Do not actually walk on cakes, they are for eating not for walking)
Fat body type


So we are done with this Hulk body type, it is time to undo the merge we did to get all the layers back for the other body types.


Make sure you have your History window available (if you are using something besides photoshop, its possible you do not need this since you can only undo once in photoshop.)

Undo the merge you did for the layers.


Now turn off the Hulk body line layer since we don't need this anymore.


Now we are to duplicate all highlighted hulk detail and color layers.


Turn off the visibility of the original hulk layers, we only need to see the duplicates now.

Move the layers accordingly, make sure the Fat body lines are above the color layer and any details you want to be seen under the body line.


It should now look something like this.

Remember the rule "The bigger it is, the more details it can have"


To avoid confusion, we start from the beginning again. Turn off the visibility of the duplicate Hulk layers for now. We are going to erase anything that is going over the fat body line and repaint missing parts.


Bam, when we are done, the body line coloring should be properly filled.

Now to turn on the visibility of the next detail layer.


For this first layer of detail, we move the details where they belong and repeat the process from the colors. We erase things outside the body line and add any extra detail that is missing.


We do this again for the belt layer after turning on it's visibility, now I have to draw extra details for the belt quickly just to fill the fat body type.


Now that I am finished, we merge all the visible layers that we have done for the fat body type and do what we did for the Hulk body type.

Highlight the merged image with the rectangle tool and copy with Ctrl+C


Minimize Photoshop, open up the TRP Textures for the fat pawn


Align the positions where they belong and erase any extra visible textures, repeat this process for the other fat body directions.

Save as .PNG and make sure you name everything properly.

Off to the Male body type.
Male Body Type
I hope you are a fast learner, you should know the drill by now.

Close all saved and extra documents you don't need open. Go back to the default color kit .psd file


Turn off all fat layers or erase them EXCEPT for the body line, duplicate the hulk layers again and move them over to the Male body type.

Turn off visibility for the detail layers and sort out the color layer first.

Erase extra textures going outside of the male body line.

Remember "the smaller it is, the less details it can have" so all we have to do is erase details for these smaller body types compared to having to add them to the Fat body type.


Now we turn on the first layer of detailing and erase excess stuff going outside of the male body line.


For the belt, since it is a little bigger coming from the Hulk body type, we use the rectangle tool, right click and free transform this to fit the Male body type.

When you are finished, merged all layers that come with the Male body type and highlight with the rectangle tool, Ctrl+C.


Minimize photoshop, drag the TRP Male body textures to open their own new documents.

Ctrl+V to paste your textures to the opened documents, Move each position to their respective direction.


Save as .PNG, make sure the naming of files are correct to avoid issues.

It is time for the other remaining body types.
Female and Thin Body
After finishing the Male body type, you repeat the process from the fat body type.

- Undo merging of layers
- Move your layers to the Female body type lines
- Turn off visibility for other Male lines you don't need to see


This is what it should look like now, we are going to erase anything outside of the body lines and add details that are missing.


Once you are done repeating the process you have done for the other body types, perhaps consider having a unique detail for the female body type. (I get lots of complaints for having butt lines and etc on the female pawns.)

Now you merge all the textures as you have with the other body types and copy it using the rectangle tool.


After minimizing photoshop, we open the female TRP pawn textures. Paste the textures you have made.


Save and make sure everything is named correctly for each body type.


Go back to the default color kit .psd and undo the merged layers.

-Move the layers towards the Thin body line
- Turn on Thin body line visibility
- Erase excess colors or details


Once you are done. Take the TRP thin textures and open them in their own new documents.


Arrange the positions and save, yadda yadda you should get this by now.

It's all a repetition.
Finishing statement


You can apply this principle for other types of outfits, when you are done it should look something like this in the folder you have been saving everything in.

I did extra accessories such as headgear and armor for my Deadpool outfit mod, but I am not going to bother adding it in this walkthrough since you can apply this technique to anything.

In my attached file there is a badly drawn armor vest template and a badly drawn jacket template. Feel free to do your own if you think you are better than me and you spit at my work.

If you want to know how coding for outfit works, I have left some notes in my attached file, it is not a proper tutorial but I hope it helps someone understand how coding an outfit mod works.

I hope this guide has helped you, Happy batch production!
45 Comments
Chicken Plucker  [author] Feb 7 @ 12:22pm 
@overcastoys - Join the Discord, plenty of people in mod-development ready to give a helping hand!

https://discord.gg/rimworld

@Saul Goodman Gaming - Sorry mate, I'm aware I'm two years late replying now but as said above, any questions and more up to date support from the community, hop on over to the discord

@Robotic Wizard - I'm three years late for your comment, apologies mate. As said above, any reliable new, up to date help, you can find on the discord.
overcastous Feb 6 @ 4:47am 
any help would be greatly appreciated
overcastous Feb 6 @ 4:46am 
I have all the Textures ready and The base code for the mod ready and over with, but I can't seem to find something to help me code a custom apparel mod
Saul Goodman Gaming #savetf2 Apr 13, 2022 @ 10:52pm 
Can I use my mouse instead of the tablet? And how to make hats?
chasicles Dec 15, 2021 @ 4:57pm 
Butt cheeks on his back XD
Robotic Wizard Mar 26, 2021 @ 3:16pm 
okay but how to use this with XML?
Chicken Plucker  [author] Feb 18, 2021 @ 1:24pm 
@Higgs_The_God_Particle - Replaced the old deadpool body templates for a long time ago but the same templates are there.

@Chicknecht - Cheers!

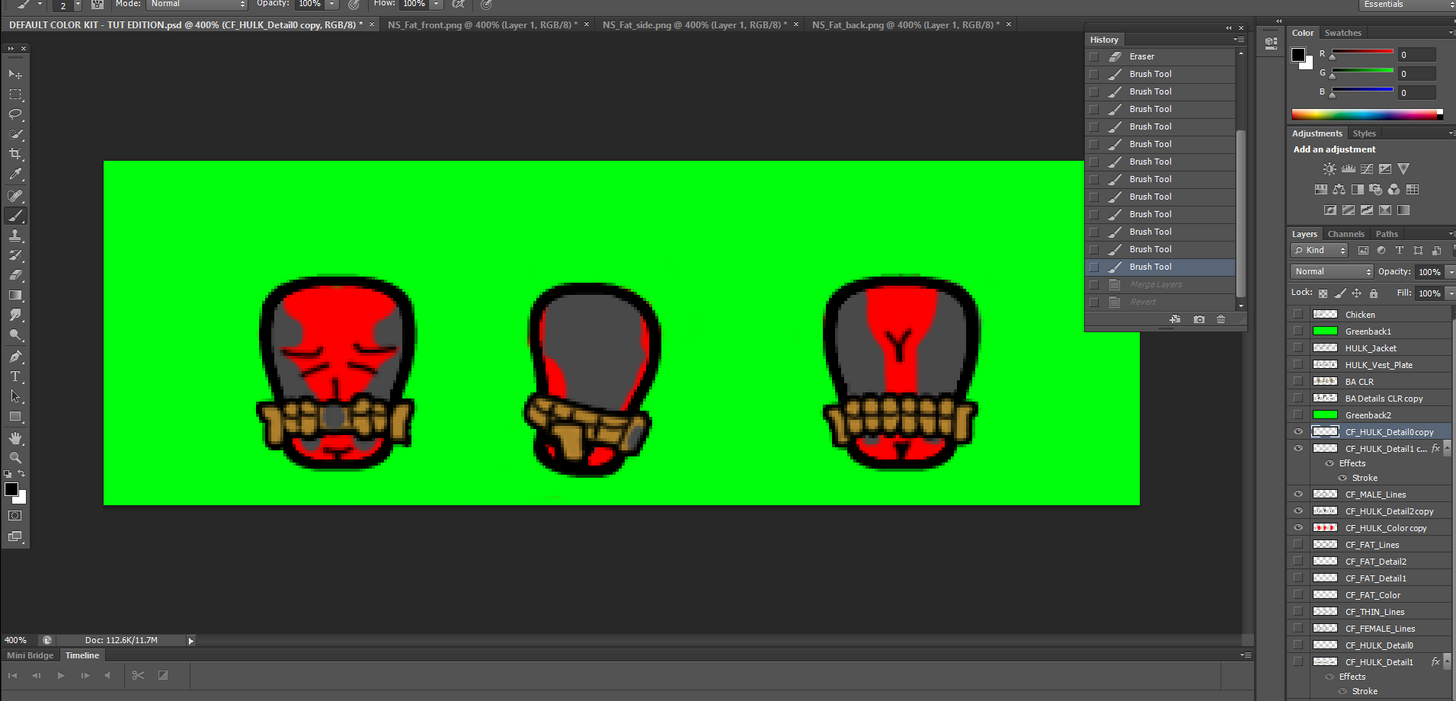
@Tox - No but its an art guide not a coding guide so that shouldn't be an issue

@Xynthinel - Cheers!
Jeager1127 Feb 18, 2021 @ 10:52am 
does anyone know the exact file that has the body templates I was looking through them and found nothing
Katzbalger Jan 2, 2021 @ 1:44pm 
This has been immensely helpful
Tox Nov 29, 2020 @ 4:28am 
Has an updated guide been made for 1.2?