Audiosurf 2

Audiosurf 2

223 oy
Making an Audiosurf 2 skin
Dylan ve 1 yapıt ortağı tarafından hazırlandı
Whether editing an existing skin (no programming needed) or writing your own from scratch, this guide is the place to start.
2
   
Ödül
Favorilere Ekle
Favorilere Eklendi
Favorilerden Çıkar
Basics
Each skin in Audiosurf 2 is it's own folder found in your Steam installation folder/steamapps/common/Audiosurf 2/skins. You can see the default skins there with their given names. Some folders have a name that consists solely of digits - those numbers are the steamIDs of the authors of any custom skins you downloaded from the STEAM workshop.

Inside each folder there's a variety of different files. Many files are image (.jpg or .png) files, 3d models (.obj) or sounds (.wav). We call these the "content files".

There's also a single .LUA file, who's name has to match the folder's name. This file is the script that determines when, where and how the content files are to be displayed, placed and used within your skin.

Making Content
To make your first skin, make a copy of the folder of one of the existing skins. Change the name of the folder, then make sure to rename the .LUA file inside to the same name. Congratulations - you just made a new skin!

Now you can simply edit the content files (images, models and sounds) of that skin and see how things change. For freeware tools, we recommend Blender or Wings3D for models, GIMP or KritaStudio for textures and Audacity for sounds.

Editing only the content files already gives you a lot of freedom, but if you want to create a truly unique skin you will have to edit the LUA script.

Editing Scripts
To get started editing the script you should first get a good text editor first. We recommend the free NotePad++ for this.

Also be aware that editing the LUA script is advanced and requires some coding skills. If you want to get started on that, read on as the majority of this documentation explains the many features of the LUA script.

If you're new to coding, we recommend that you start with an existing skin and edit it to find out how the different things work.

As a note: The script itself is executed while the track is being loaded. During that time the track is built using the LUA file. In most cases once the track is loaded the LUA file is no longer accessed. However there's the option to use an Update function which continuosly changes the track, even as it runs.

If you're familiar with coding, there are some particulars to LUA that are good to know:

Comments
In Lua code, comments start with "--". Any code after two dashes is ignored by the game. You might also see block comments that start with "--[[" and end with "--]]".

Function Calls
Most skins often call functions using {} instead of (). This is shorthand in Lua. A function that takes a single table as a parameter can be called like this "MyFunction{}" and it is equivalent to "MyFunction({})"

Arrays and Tables
In Lua, array indices start at 1! If you're most used to programming in pretty much any other language, you'll have to be careful of this.

Actually, that last tip sort of lied. There are no arrays in Lua. Everything is a table which is sort of like an array and a dictionary rolled into one. Tables are created with curly braces {}. (see here: http://www.lua.org/pil/2.5.html )

Table Length
The length/count of table can be found out by prefacing the table with a # sign. For example:

track = GetTrack()

if (#track > 500) then ... end

Table Field Acess
To access the fields in a table you can use the following syntax: table.key or table["key"].

For example:

skinvars = GetSkinProperties()

if ( skinvars.colorcount > 3 ) then
...
end

is the same as:

skinvars = GetSkinProperties()

if ( skinvars["colorcount"] > 3 ) then
...
end
Skin Workflow
This section gives you a quick overview over the different elements that go into making a skin. Even if you don't plan to make a skin from scratch it's a good starting point to understand how content files and lua script are put together.

Concept
The best way to start with a skin is to come up with a good concept. It helps if you have a strong idea of what you want to create. It's especially valuable if your skin is different than the other existing skins.

Also it makes sense to play around with existing skins a bit to understand how the system works. Put simply, you have a number of ways and options to create visuals:

  • Skybox
    This is the background of the skin, visible where nothing else is. It can make up a large part of the screen at times, so it's good if that fits to the rest of your skin. This also makes it important in establishing the right atmosphere
  • Vehicle
    This is the representation of the player. There's a default vehicle but you can override that for your skin to create something more fitting. This also includes the wakeboard in the appropriate modes. It also allows you to configure the camera
  • TrackColors
    The colors of the track can be changed by the skin, or taken from the current song's album art.
  • Blocks, Rings & PuzzleGrid
    The appearance of the blocks, spike blocks, powerups and the puzzle grid can be changed
  • Rail
    This is a simple, generated mesh that is usually used to shape the track the player drives on. It can be customized in shape and texture and there can even be multiple. For example, one to form the floor, one on each side to form walls.
  • MeshRails
    This is a more complex variant of the Rail that loads a 3d models (.obj) and repeats it along the track. This can be used to form the ground, walls or other decoration that follows along the track. You can adjust it's material and have multiple of those as well.
  • BatchObjects
    These are loaded 3d models that don't conform to the track but rather appear alongside it. They can be placed anywhere in the world, but also easily attached to certain track nodes.
  • Lights
    You can place lights throughout the track or attach them to the player. These will dynamically light the objects in the scene and even cast shadows.
Skin Workflow - The Track
We start the work by taking a closer look at the track: the path generated by the game based on the selected song and mode.

Understanding the track
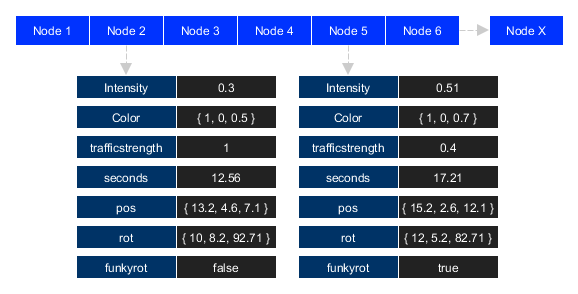
The track is a data representation of the racetrack created by Audiosurf based on the current song and mode. The track consists of a number of track nodes, each of which has a set of useful data you can access to create your skin. Along these nodes any rails you build with CreateRail are extruded.

Track Data
Iterating the track
The best way to use the track data is to get it via GetTrack and then to iterate over the track nodes and then fill new tables based on the properties of the individual nodes.

This is especially useful for decorative objects created with as CreateRepeatedMeshRail or BatchRenderEveryFrame. These take tables as parameters, that tell them where to create objects, or how to scale the mesh based on the node position.

-- Get track data
track = GetTrack()

-- New data to use elsewhere
onlyFunkyNodes = {}
everyFifthIntenseNode = {}
scaleIntensity = {}

-- Iterate over track data
for i = 1, #track do

-- A table of node numbers that have funkyrot
if track[i].funkyrot then
onlyFunkyNodes[#onlyFunkyNodes+1] = i
end

-- A table of every firth node number, if it has an intensity over 0.6
if i%5 == 0 and track[i].intensity > 0.6 then
everyFifthIntenseNode[#everyFifthIntenseNode+1] = i
end

-- Create a table of scales based on the intensity of the track
scaleIntensity[#scaleIntensity+1] = {
x = track[i].intensity,
y = track[i].intensity,
z = track[i].intensity
}
end
Skin Workflow - Creating Objects
To make your skin look like something, you need to create some objects.

Creating the Track
Rails are the quickest and best way to build shapes, that follow along with the track. This is useful to build a floor, sides and/or a roof for the track itself. All it needs is a material and a cross section. See BuildMaterial() and CreateRail() for more information.


Creating Decoration Objects

Creating more complex objects than just simple rails requires a few extra steps. First you need to create the 3d model (meshes). Then the script needs to be written to loaded the mesh, to build the material and then to both need to be put together in a GameObject. That GameObject is then used to create the MeshRail or the BarchRenderedObject.


Creating the right meshes
The first step is to create a 3d model in an external software. There are few things you should keep in mind. Make sure you have read the section no Modelling.

Building the Mesh
To import the mesh into the skin you need to build a mesh. You can either do this using BuildMesh(), which gives you many options. You can also skip this step and simple load the mesh inline in the CreateObject step.

Building the Material
Importing the texture, assigning a shader and configuring it's properties is done in BuildMaterial(). You can also skip this step and create the material directly in the CreateObject step. If want more control over the material, or plan to use it multiple times it is suggested to create it with BuildMaterial.

Building the Object
The GameObject combines mesh and material to create an object that can be used to make the rail. This is done with CreateObject(). Note that the object created in this way is visible by itself. In most cases where you plan to use the object as a prefab, this is not desired. To hide the prototype object you can simply turn the visibility of this object off. The copies created for the mesh rail will be normally visible.

Building the MeshRail
Once you have a GameObject, you need to build the MeshRail in the LUA script. This is done with CreateRepeatedMeshRail(). Simply give the name of the GameObject as the prefab to use.

Wait for extension of MeshRail function

Building BatchRenderedObjects
Creating batch rendered objects is a bit more involved. Rails position themselves, but with objects you need to define their locations yourself. This gives you more freedom but also requires bit more work.

Placing Objects based on the Track
In most cases you will want to place your batch rendered objects alongside the track to provide variation and detail as the player travels. Here are a few ways to go about this, all of which require iterating over the track to generate a table of node numbers. These are then fed into the locations field in BatchRenderEveryFrame.

Here are a few handy ways to generate such a table: Using the Modulo Division[en.wikipedia.org] you can place objects at regular intervals, say every 7th node. If this generates too regular or predictable an output you do the following: Either check against some track data every 7th node to determine if you want an object placed there. Alternatively you can use math.random on each 7th node to randomly determine if an object should be placed.

Example
-- Set up tables
every7thNode = {}
every7thNodeIntense = {}
every7thNodeRandom ={}

-- Iterate over track
for i=1,#track do

if i%7==0 then
every7thNode[#every7thNode+1] = i

-- if Intensity at node is over 0.5
if track[i].intensity > 0.5 then
every7thNodeIntense[#every7thNodeIntense+1] = i
end

-- 20% chance to add this node
if math.random() < 0.2 then
every7thNodeRandom[#every7thNodeRandom+1] = i
end
end
end

Creating Variation
You can affect the color, scale, rotation and offset of batch rendered objects. Unless you want a very regular and repetetive look, we recommend you do this, as the strength of batch rendered objects (as opposed to meshrails) is that they can be modified this way for increased visual variety.

To create variation you can often use math.random to randomly determine the offset or rotation of an object. It might also be useful to use the intensity of the track node at which the object is placed to scale the object.

Example
-- Set up tables
objectLocations = {}
objectOffsets = {}
objectRotations = {}
objectScales = {}

-- Iterate over track
for i=1,#track do

if i%50==0 and not track[i].funkyrot then

objectLocations[#objectLocations+1] = i

-- Determine random position beyond the track width
local xOffset = trackWidth + 20 + 5*math.random()

-- Randomly put this to the left or right of track
if math.random() < 0.5 then
xOffset = xOffset * -1
end

objectOffsets[#objectOffsets+1] = {xOffset,-4,0}

-- Create random rotation
objectRotations[#objectRotations+1] = { 0,math.random()*360, 0 }

-- Create scale based on track intensity
objectScales[#objectScales+1] = {1, 1+track[i].intensity, 1}

end
end
Skin Workflow - Modelling
If you want to create more complex skin, importing externally created models is important. If you want to create your own mode, here's some guidelines:

General
  • The mesh's origin will be the point at which it will be positioned
  • The mesh's origin will be the point around which it will be rotated
  • MTL files exported will be ignored. Materials are created in the LUA script
  • Animation is not supported. If you need animation, look into Morph Targets. See BuildMesh for more information.
  • Using Blender?
    In Blender the Z and -Y axis are replaced. That is if you look at your scene from the top, your object will have to start at the origin and extend towards the bottom (from 0 to -Y) to work properly. Import a mesh from a skin to have a look.

BatchRenderedObjecs with ShapeToTrack
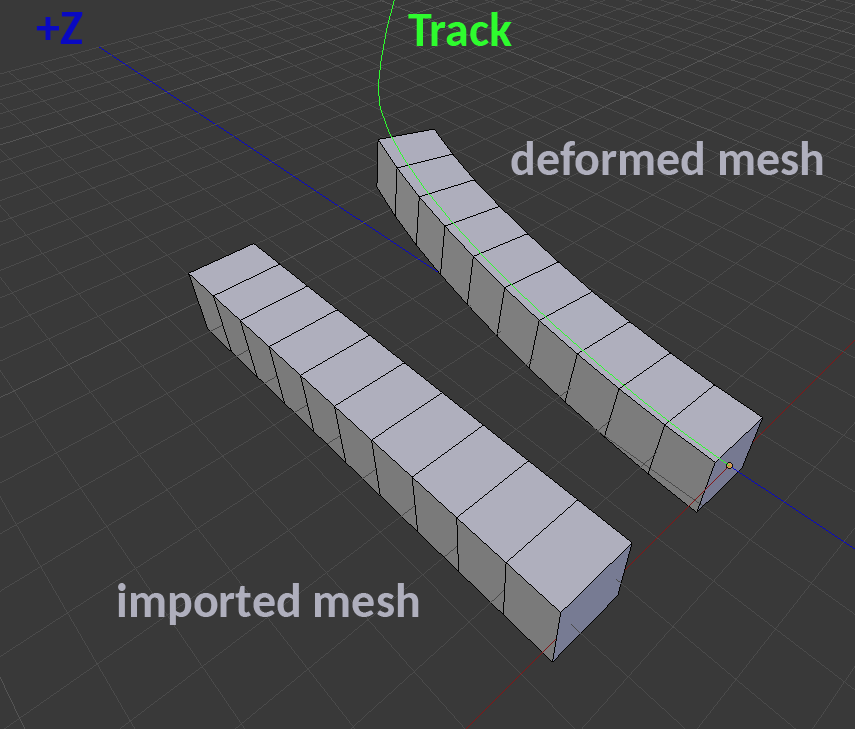
  • The mesh will be distorted to flow along with the track
  • The z-axis is bent to follow the track
  • Every 3 units in the positive z direction will correspond to one track node covered

Mesh Rails
  • The mesh will be distorted to flow along with the track
  • The z-axis is bent to follow the track
  • Every 3 units in the positive z direction will correspond to one track node covered
  • The largest positive z value (the furthest vertex) will be the point that the next mesh will be placed
  • If you want some spacing between your meshes on the rail, you can have your mesh start not at the origin but further down the positive Z axis.

Skin Workflow - Finishing Touches
Once you've built your skin, you might want to make sure that it runs on a wide range of systems and that it's available in the STEAM workshop.

Making Screenshots
You can hide the hud with the "+hidegameplayui" (without the quotes) launch option. You should also uncheck "live gameplay scoreboards" in the game options to get rid of those. Then press F12 within Steam

Performance Improvements
Once you have built your skin, you need to make sure that it runs well on a variety of machines. To help with that your skin should adapt based on the quality level set by the player. To that end it is required to use GetQualityLevel4() to get the player's quality setting and then to use that to adjust your skin.

The performance goals for the different quality settings are:

  • Quality 1
    This is the lowest Setting. As a baseline, your skin should run at around 30 fps on a HD3000 GPU at 720p. It's OK to entirely remove some visuals to make that possible when quality is set to 1.
  • Quality 2
    Targets 30-60fps on a HD4000 GPU at 1080p.
  • Quality 3
    Targets 30-60fps on nvidia 760 at 1080p.
  • Quality 4
    Targets 30-60fps on nvidia 980 at 2160p (4k).

If your skin does not run well on the targeted machines (or something comparable), you need to make some improvements.

Quality Settings
An easy way is to change the various rendering options of your skin based on the player's quality. To that aned the function fif() is very useful. It allows you to get the player's quality and then decide between a high quality and low quality setting. This can be used for rendering distances or the amount of decoration objects created. It can also be used to decide what kind of sky to set or how many lights to spawn.

quality = GetQualityLevel4()

function ifhifi(if_true, if_false)
if (quality > 2) then
return if_true
else
return if_false
end
end

SetBlocks{
maxvisiblecount = ifhifi(100, 70),
...
}

Morph Targets
If your are using morph targets to animate your objects, make sure to keep your vertex count as low as possible. Because this requires every vertex position to be recalculated in the CPU every frame this can have a strong impact, if you have many objects visible at the same time.

MeshRail
If you're running into loading or performance issues it might come down to the vertex count of your rails. The fact that the loaded mesh is repeated very often can create a performance drain. One option is to try scaling your mesh in the positive z direction so that the vertices are less dense along the length of the track.

Uploading to the STEAM Workshop
To upload your finished skin first open the game. Notice that in the skin selection screen, your skin has a small up arrow icon on it. Click that icon to upload and share your skin on Workshop.

Before uploading, make sure your skin folder has a "workshop_image_640x360.jpg" file in it. That image will be used by STEAM to display your skin. Also make sure you have appropriate uigraphic.jpg and uigraphic_big.jpg images too.
Advanced Editing
Here's some advanced tips on editing skins. These can be quite handy and help improve your workflow.

Developer Mode
When you press CTRL+F during the game you can toggle developer mode. This is visible by the grey square in the upper left corner during the loading screen.

In developer mode you can read any print() functions your script calls directly ingame and you can rotate the camera by pressing and holding right mouse button.

Testing
As you build a skin you will find yourself frequently loading a map. Here are a few tips to save you some time:

Start Audiosurf in windowed mode and keep it running. This makes it easier to switch between editing your skin and testing it. It also saves you time as you don't have to load the game all the time

Start a short song. This will decrease loading times. If you don't have one, find a free song online, that's only 1 or 2 minutes. That will allow you to see your skin much quicker.

Once you have your skin loaded, edit it and then press ESC and restart the track. The skin will be loaded again, at a much faster pace. This is because mesh and texture assets are cached and not loaded again.

If you are in developer mode, you can change an OBJ file while the track is loaded and the model will be reloaded and replaced. That way you can quickly see, if the change had the desired effect. Note that this does not work for BatchRenderedObject that are shaped to the track. These will be reloaded but not reshaped.

Colors
Colors in the LUA script are always saved as tables. Each color table has three fields with the names "r", "g" and "b" resembling the red, green and blue channels. The field names can be removed, as the fields will be accessed in that order. A color can have values from 0-1 or 0-255. The game will interpret the colors accordingly.

color = { r= 1, g = 0, b = 0 }

is equal to

color = { 255, 0, 0 }

This means that colors can be modified mathematically. For example to change the hue or intensity.

A useful example is, after taking the colors from the Album art, to check if they are in greyscale. In that case the colors of the mono blocks can be overwritten to avoid them looking too much like grey spike blocks.

Example Greyscale Check
trackPalette = GetAlbumArtPalette{mincount=3, maxcount=5}
maxGreyDeviation = 0

for i=1,#trackPalette do
local c = trackPalette[i]
local avg = (c.r + c.g + c.b) / 3.0
local biggestGreyDev = math.max(math.abs(c.b-avg), math.max(math.abs(c.r-avg), math.abs(c.g-avg)))
maxGreyDeviation = math.max(maxGreyDeviation, biggestGreyDev)
end

overrideHighwayColor = {240, 0, 0}

if maxGreyDeviation < .075 then
OverrideTrackColorForDynamicBlockColors(overrideHighwayColor)
end

Rendering Layers
When creating any Material in the script, you can specify a layer as an integer. This determines the order in which it will be rendered. This also determines, which camera the object will be rendered through.

The Cameras
Audiosurf uses 3 cameras, which selectively render a few layers. This allows the game to better sort the different objects to be rendered. The three cameras used are:

  • Background: To render the far background like the skybox
  • Foreground: To render the track and it's objects
  • Close: Renders last and is used for the vehicle, and grid

The Layers
The following layers and corresponding numbers are available:

  • 18: Renders to background layer only
  • 19: Renders to background layer only
  • 11: Renders the material to the background, and also in the foreground. Rendering foreground objects to the background can be useful for getting a glow halo that doesn't obscure gameplay.
  • 12: Same as 11, but lights are ignored
  • 13: foreground only.
  • 14: close foreground only. covers foreground and background layer objects
  • 15: background, foreground, and close foreground (rendered 3 times)
  • 27: renders after eveything else (even close foreground). can be used for post-effects

Layer to Camera Mapping
This table shows which camera renders which layer

Camera
18
19
11
12
13
14
15
27
Background
Yes
Yes
Yes
Yes
Yes
Foreground
Yes
Yes
Yes
Yes
Close
Yes
Yes
Advanced Editing - Shaders
Shaders are required when creating a material. They have a lot of impact on the way the object is displayed.

Default Shaders
There are a lot of shaders included in Audiosurf 2. The following are the most useful:

  • Diffuse
  • AlphaBumpDiffuse
  • AlphaBumpDiffuseAdd
  • AlphaBumpDiffuseMult
  • RimLight
  • RimLightAdd
  • UnlitTex
  • UnlitTintedTex
  • VertexColorLitTinted
  • VertexColorUnlitTinted
  • VertexColorUnlitTintedAdd
  • VertexColorUnlitTintedAlpha
  • Reflective/Diffuse
  • Reflective/Specular
  • Reflective/VertexLit
  • Reflective/Bumped Diffuse
  • Reflective/Bumped Specular
  • Reflective/Bumped VertexLit

Custom Shaders
Custom shaders can be used in your skin. You simply need to save the file with the .shader file extension in the skin folder. To create a shader you need a copy of Unity 3D (freely available). Read up on the Unity documentation on how to write a shader.

After having written your shader, you need to compile it. To do so, select ypir shader in Unity's Project pane and then click "Show all" in the shader file's Inspector pane. Save the compiled text file in your skin folder with a .shader extension. Make sure your compiled Shader text file has been compiled for all platforms (Windows, OSX, Linux).

Skybox skyscrens and objects that set a "skyScreen_FixedTrackOffset" field automatically have several shader parameters set and others updated every frame, if they are present:

The following parameters are set at the start:
  • iTrackColors
    A large texture representing the color used at every track node.
  • iTrackNodes
    A large texture representing the transform at every track node
  • iTrackIntensities
    A large texture representing the song intensity at every track node.

The following shader parameters are updated every frame
  • iPrimaryColor
    The color of the track at the player's current location
  • iIntensity
    The current song intensity
  • iFloorHeight
    The lowest world Y position of the track
  • iCeilingHeight
    highest world Y position of the track
  • iIntensityTime
    A running value that increases each frame by an amount based on the current song intensity

Full Shaderlist
  • Diffuse
  • DiffuseSelectiveColoredHatched
  • DiffuseSelectiveColoredHatchedNeon
  • DiffuseVertexColored
  • DiffuseVertexColored2
  • DiffuseVertexColored3
  • DiffuseVertexColoredAlphaTint
  • DiffuseVertexColoredOpaque
  • AlphaBumpDiffuse
  • AlphaBumpDiffuseAdd
  • AlphaBumpDiffuseMult
  • AlphaBumpDiffuseNoZWrite
  • Rim Light
  • Rim Light Pixelate
  • RimLight
  • RimLightAdd
  • RimLightHatched
  • RimLightHatchedDark
  • RimLightHatchedDriver
  • RimLightHatchedSurfer
  • RimLightHatchedSurferExternal
  • RimLightHatchedSurferRight
  • TheGrid
  • TheGridSky
  • TheGridSky_min
  • TheGridSkyBlue
  • TheGridSkyBlue_min
  • TheGridSkyMono
  • TheGridSkyUI
  • TheGridSkyUILight
  • TheGridSkyUIMinimal
  • TheGridSkyUIUltra
  • UnlitTex
  • UnlitTintedTex
  • UnlitTintedTexGlow
  • UnlitTintedTexGlowWire
  • VertexColoredLit
  • VertexColoredLitHatched
  • VertexColorLitTinted
  • VertexColorUnlitSkysphere
  • VertexColorUnlitTinted
  • VertexColorUnlitTintedAdd
  • VertexColorUnlitTintedAddDepthWrite
  • VertexColorUnlitTintedAddDouble
  • VertexColorUnlitTintedAddFlyup
  • VertexColorUnlitTintedAddSmooth
  • VertexColorUnlitTintedAddSmoothNoCull
  • VertexColorUnlitTintedAddSmoothNoDepth
  • VertexColorUnlitTintedAddSmoothNoDepthRead
  • VertexColorUnlitTintedAddSmoothNoVertColors
  • VertexColorUnlitTintedAddSmoothPixelate
  • VertexColorUnlitTintedAddSmoothQuarter
  • VertexColorUnlitTintedAlpha
  • Reflective/Diffuse
  • Reflective/Specular
  • Reflective/Bumped Diffuse
  • Reflective/Bumped VertexLit
  • Reflective/VertexLit
  • Reflective/Bumped Specular
  • Reflective/Bumped Unlit
  • MatCap_Lit
  • MatCap_LitDouble
  • MatCap_LitDoubleMult
  • MatCap_Plain
  • MatCap_Plain_Additive
  • MatCap_Plain_AdditiveZ
  • MatCap_Plain_Bumped
  • MatCap_PlainBright
  • MatCap_PlainBrightGlow
  • MatCap_PlainBrightWire
  • MatCap_PlainBrightWireGrey
  • MatCap_PlainBrightWireWhite
  • MatCap_TextureAdd
  • MatCap_TextureAdd_Bumped
  • MatCap_TextureMult
  • MatCap_TextureMult_Bumped
  • PostBleachBypass
  • PostCrosshatch
  • PostDoubleVision
  • PostLed
  • PostLedAlpha
  • PostPixelate
  • PostPixelateAlphaBlack
  • PostRadialBlur
  • PostThreshold
  • PostThresholdColor
  • BarycentricWireframe
  • Cliff
  • CliffAdd
  • CliffNew
  • CliffRail
  • CustomTranslucentShader
  • GpuOffsetCubes
  • GpuOffsetCubesLit
  • GpuOffsetCubesNoLines
  • GpuOffsetCubesNoLinesAdd
  • IlluminDiffuse
  • LitHatched
  • OrderIndependent
  • PsychoBuilding
  • PsychoBuilding2
  • radialBlur
  • Self-Illum/VertexLit
  • SelfGlowBumpSpec
  • SelfGlowBumpSpec2
  • shagga
  • shaggafold
  • TransparentShadowCaster
Functions - Getters
These functions are used to access a variety of game data to help configure your skin.

GetQualityLevel4()
This return the game's current quality setting, from 1-4, with 4 being the highest setting. Note that your skin is responsible for performance scaling: That means you need to make sure that your skin features are scaled or toggled based on the user's quality setting.

  • Quality 1
    This is the lowest Setting. As a baseline, your skin should run at around 30 fps on a HD3000 GPU at 720p. It's OK to entirely remove some visuals to make that possible when quality is set to 1.
  • Quality 2
    Targets 30-60fps on a HD4000 GPU at 1080p.
  • Quality 3
    Targets 30-60fps on nvidia 760 at 1080p.
  • Quality 4
    Targets 30-60fps on nvidia 980 at 2160p (4k).

For many skins, quality 3 and 4 will likely use the same settings since only very taxing visuals (like GPU raymarching shaders) need to distinguish between the two.

GetSkinProperties()
This returns a table of all the values the current gamemode wants the skin to know about. You can use these variables to construct your skin. You can change them if you want to, but this will have no effect on the gameplay itself.

  • colorcount
    The amount of colors in the current mode. For example Mono has only one color, while puzzle modes generally have more than one.
  • trackwidth
    The width of the track. Your skin should support widths from (at least) 5 to 12. So, any objects the track passes through need to be large enough, or be conditionally scaled large enough for a track of width 12.
  • lanedividers
    This returns a table with the different lines between the different lanes. You can use the contents of that table as the x position of Rails if you want to draw lane-divider lines.
  • shoulderlines
    These work like the Lanedividers but return the two lines for the left and right shoulder.

Example: Creating Rail as Lane Divider
skinvars = GetSkinProperties()
lanedividers = skinvars["lanedividers"]

CreateRail{
positionOffset = {
x = laneDividers[0],
y = 0.02
},
crossSectionShape = {
{
x = -.04,
y = 0
},
{
x = .04,
y = 0
}
}
}

PlayerCanJump()
This reurns true if the game is in a wakeboard mode. Skins shouldn't have roofs or tunnels overhead in wakeboard modes.

GetAlbumArtPalette()
This returns a table of the most prominant colors from the album art of the current song. You can optionally pass a table to determine the number of colors you want. The amount of colors is based on the source art, so a very monochrome image will want to return less colors than a very lively one. Forcing a low-range source image to produce a high number of colors will create very similar colors, so a mincount of 2 or 3 is recommended.

  • mincount
    The minium number of colors to return. Set to 3 by default
  • maxcount
    The maximum number of colors to return. Set to 5 by default.

Example with limits
albumcolors = GetAlbumArtPalettte{
mincount = 2,
maxcount = 4
}

GetTrack()
GetTrack() returns a table of all the track's nodes. This is a very important function and will be used throughout your skin. The length of this table gives you the total number of nodes.

The track information is the primary means to figure out where to to place objects on or along the track. It can be used for objects created by BatchRenderEveryFrame() or to influence Rails or MeshRails.

Each track node has the following fields:

  • intensity (number)
    0-1 song intensity at this node
  • color (Color)
    The color of this node, based on intensity.
  • trafficstrength (number)
    The block strength at this node. Blocks are on the track at track nodes where this value > 0
  • seconds (number)
    The song time (in seconds) represented by this node
  • pos (vector3)
    The world position of this node
  • pan (number)
    Y rotation
  • tilt (number)
    X rotation
  • roll (number)
    Z rotation
  • rot (Vector 3)
    Rotation, duplicated from duplicated from pan, tilt, and roll
  • funkyrot (bool)
    Is true if this track node is part of a strange/extreme rotation, such as a loop or corkscrew. experimental and unreliable.
Functions - Setters
These functions allow you to configure some aspect of the skin

SetScene()
This method configures various built-in display and post-effect options.

  • glowpasses (number)
    Sets the passes for the glow effect. If this is greater 0, then a standard glow effect will be applied to background objects. See Render Layers for more information.
  • glowspread (number)
    Detrmines the spread of the glow effect mentioned above.
  • radialblur_strength (number)
    The strength of the radial blur. If set to 0, then no effect is used. If it is used, it is applied to background obejcts only. See Render Layers for more information.
  • dynamicFOV (bool)
    Dynamically adjusts the field of view. If set to false the default FOV of 90 will be used. If set to true, the field of view will adjust based on the intensity of the song and range from between 70 and 120.
  • minimap_colormode (string)
    Determines how the minimap is colored. Possible values:
    • "track": colors the minimap the normal way
    • "white": displays the minimap in white
    • "black": displays the minimap in black
    • "greyscale" displays the minimap in greyscale
  • towropes (bool)
    Are there the towropes to the ships. Primarily for the wakeboard mode
  • airdebris_count (number)
    The amount of decorative air particles. Disabled if set to 0
  • airdebris_texture (string)
    The path to the texture used for the particles.
  • airdebris_density (number)
  • airdebris_particlesize (number)
    The size of the individual particles
  • airdebris_fieldsize (number)
  • airdebris_layer (number)
    The rendering layer for the particles.
  • water (bool)
    Is the track covered with water? Primarily for the wakeboard mode
  • widewater (bool)
    If set to true, the water is wider than the track
  • watertint (Color)
    If there is water, this defines it's color
  • minwaterrandomdarkness (number)
    Sets the darkness of the water
  • watertype (number)
    Sets the type of water.
  • watertexture (string)
    A path to the texture used to color the dynamic "digital water" surface
  • numvisiblewaterchunks (number)
    The amount of water chunks (larger sections of water grouped together) visible

SetSkybox()
This function is used to set a static skysphere, a skyscreen shader, or to configure a pocedural simulated sky with clouds. It is recommended to only use one type of sky for each skin. Combinations are possible but might create graphical issues.

See the Stadium skin or the Audiosprint Mode's skins for examples on skyscreen and procedural skies.

  • skysphere
    This parameter can be either the name of a texture in the skin's folder or a material. The texture and material are wrapped on a sphere that surrounds the skin.
  • skyscreen
    Uses a complicated shader that automatically gets some of it's variables set by the game. Not document, and it's use is not suggested.
  • skyscreenlayer (number)
    Defines the rendering layer of the skyScreen, if one is present.
  • color (Color)
    Colors the sky by accessing the "_Tint" parameter of the sky shader on either skysphere or highway. Can also be set to "highway" to use the color of the current node. Using "highwayinverted" sets it to the opposite color.
  • sky
    This takes a table of parameters to configure a procedural sky using real world data.
    • month (number)
      The month (from 1 January to 12 December) to use
    • hour (number)
      The hour (from 0 to 23) to use
    • minute (number)
      The minute (from 0 to 59) to use
    • longitude (number)
      The longitude to determine the world position
    • latitude (number)
      The latitude to determine the world position
    • cloudmaxheight (number)
      Set's the maximum height at which clouds can form, with 1.0 being the track's highest and -1.0 it's lowest position.
    • cloudminheight (number)
      Set's the minimum height at which clouds can form, with 1.0 being the track's highest and -1.0 it's lowest position.
    • clouddensity (number)
      Represents the number of cloud particles. Default to 0.6
    • useProceduralAmbientLight (bool)
      Using a procedural sky automatically generates an ambient light. Setting this to false supresses that light.
    • useProceduralSunLight (bool)
      Using a procedural sky automatically generates a directional light representing the sun. Setting this to false supresses that light.

SetRings()
This function is used to set the size and material of the 2D rings Audiosurf 2 places at intense track locations. It is also used to configure the jump rings used in Wakeboard modes.

  • texture (string)
    Enter the name of a texture in the skin's folder. This is for the rings.
  • shader (string)
    The shader used in conjunction with the texture. For most cases "VertexColorUnlitTintedAlpha" is recommended.
  • layer (number)
    Defines the rendering layer of the rings
  • size (number)
    Defines the size of the rings. If set to 0, then there are no rings. Default is 0.
  • airtexture (string)
    The texture used for rings that do not surround the track (jumping mode only)
  • airshader (string)
    The shader used for rings that do not surround the track (jumping mode only)
  • airsize (number)
    The size used for rings that do not surround the track (jumping mode only). Default is 0.

Example
SetRings{
texture="simpleRing.png",
shader="VertexColorUnlitTintedAlpha",
layer=13,
airtexture="simpleRing.png",
airshader="VertexColorUnlitTintedAlpha",
airsize=16
}

SetWake()
This is used to configure the wake from the pulling boats in wakeboard mode. Non-wakeboard modes may use this effect also. This effect does not require water to be activated in the scene.

  • height (number)
    Defines how high the wake splashes. If it is set to 0, then no wake is shown.
  • fallrate (number)
    Determines how quickly the Wake falls off.
  • shader (string)
    The shader used for the effect. No textures are used.
  • layer (number)
    The rendering layer four the effect
  • bottomcolor (Color)
    The vertex color at the bottom of the wake.
  • topcolor (Color)
    The vertex color at the top of the wake.

Example
SetWake{
height = 2,
fallrate = .999,
shader = "VertexColorUnlitTintedAddSmooth",
layer = 13,
bottomcolor = {r = 15, g = 115, b = 199},
topcolor = {r = 0, g = 0, b = 0}
}

SetTrackColors()
Set the spectrum of colors used to color the track's nodes. The first color is used for the calmest regions and the last one for the most intense sections. The remaining colors are used inbetween. You may use as many colors as you want.

Example 1: Set Fixed Track Colors
SetTrackColors{
{r=250, g=150, b=0},
{r=250, g=70, b=0},
{r=250, g=0, b=10}
}

Example 2: Use Album Art for Track Colors
trackPalette = GetAlbumArtPalette{}
SetTrackColors(trackPalette)
Functions - Setters - The Player Vehicle
SetPlayer()
This function is optional and can be used to add a custom vehicle model to the skin. All the vehicle's attributes (model, texture, hover height, vehicle thruster positions, camera position...) can be changed here.

SetPlayer() is also used to set the wakeboarder's attributes (model, texture, hover height, vehicle thruster positions, camera follow settings...) in wakeboarding modes. Note that It's not possible to change the wakeboarder's model only it's material. The board itself however can be changed in both material and model.

Since this function does a lot of different things it's different features are subdivided below. It is recommended that you look at a few example skins to find out more about how this function is used.

The Camera
  • cameramode
    Defines the mode of the camera. Possible settings are:
    • first: Uses the first person camera
    • first_jumpthird: Uses the first person camera but goes to third-person for jumps and tricks (mainly for wakeboard modes)
    • third: Uses the third person camera
  • camfirst
    Defines the camera for the first person setting. Only needed when the cameramode makes use of this setting.
    • pos (Vector3)
      The camera has a position, which is where the camera sits. This is relative to the player.
    • rot (Vector3)
      The camera also has a rotation, which uses the local coordinates of the camera.
  • camthird
    This is used to define two camera settings. The camera interpolates between them, moving towards the first position in more intense sections and trending towards the second position in calmer areas.
    • pos (Vector3)
      Position of the first camera setting, relative to the player origin.
    • rot (Vector3)
      Rotation of the first camera setting, using the camera's local coordinates.
    • strafeFactor (number)
      This determines how much the camera moves with the left/right movement of the vehicle, when it's at the first setting. At 0, the camera stays centered and at 1 it stays right behind the player. Numbers in between will affect the movement accordingly.
    • puzzleoffset (number)
      This moves the puzzle grid underneath the vehicle. A positive number pushes it further along the track. A negative pulls it back.
    • pos2 (Vector3)
      Position of the second camera setting, relative to the player origin.
    • rot2 (Vector3)
      Rotation of the second camera setting, using the camera's local coordinates.
    • strafefactorFar (number)
      This determines how much the camera moves with the left/right movement of the vehicle, when it's at the second setting. See strafeFactor.
    • puzzleoffset2 (number)
      Offset of the puzzle grid underneath the vehicle for the second setting.
    • transitionspeed (number)
      This influences the speed of transition between the first and second setting.

Vehicle
  • min_hover_height (number)
  • max_hover_height (number)
    These provide the min and max y coordinates (upwards from the plane of the track), between which the vehicle will bob during the drive.
  • use_water_rooster (bool)
  • smooth_tilting (bool)
  • smooth_tilting_speed (number)
  • smooth_tilting_max_offset (number)
    Smooth tilting tilts the vehicle with the track, but with an offset. The way a boat's front doesn't exactly follow the water surface. It is useful with a water track.
  • pos (Vector3)
    The position of the vehicle relative to the player's position on the track. Note that the y position is controlled by the hover height
  • mesh (Mesh)
    The mesh used for the vehicle.
  • colorMode (string)
    The colormode used on the vehicle's material. It affects the _Tint value of the shader used.
  • material (Material)
    The material used by the vehicle
  • layer (number)
    The rendering layer of the vehicle. Should generally be set to 15 to render on the right layer.
  • thrusters
    Thrusters are the colored blasts coming from the back of most vehicles. These can be configured here.
    • crossSectionShape (Vector3{})
      This table of points determines a cross section similar to CreateRail: The points are connected to form a cross-section, which is then extruded to form the thruster.
    • perShapeNodeColorScalers (numver{})
      This influences the color change on the different defined vertices. It allows some vertices to be less "highway" colored than others. It scales the vertex color by this number.
    • material (Material)
      The material used by the thruster
    • layer (number)
      The rendering layer ouf the booster. Should generally be set to 15.
    • colorscaler
      • close (number)
      • far (number)
        Like perShepeNodeColorScales but instead of using the cross-shape, this works along the length of the extruded thruster.
    • sizefalloff (number)
      Controls how quickly (how many nodes it takes) for the thruster to scale down and taper to a point.
    • extrusions (number)
      The amount of segments created for the thruster.
    • stretch (number)
      Determines the spacing between thruster nodes. Bigger values for longer thrusters
    • instances
      Here multiple instances of the thrusters can be generated. These all have the following properties:
      • pos (vector3)
        Position of the thruster relative to the vehicle
      • rot (vector3)
        Rotation of the thruster
      • scale (vector3)
        Scale of the thruster

Surfer
  • use_water_rooster (bool)
    This turns on the spray of water behind the board.
  • roostercolor (Color)
    This applies a color to the spray
  • arms
    • material (Material)
    • shadowcaster (bool)
    • shadowreceiver (bool)
    • recalculateNormals (bool)
  • board
    • mesh (Mesh)
    • material (Material)
    • shadowcaster (bool)
    • shadowreceiver (bool)
    • recalculateNormals (bool)
  • body
    • material (Material)
    • shadowcaster (bool)
    • shadowreceiver (bool)
    • recalculateNormals (bool)
Functions - Setters - Puzzle Graphics
Functions that set the graphics for blocks and other puzzle-related graphics

SetBlocks()
This function is used configure the shape mesh and material used for blocks, spikes, and powerups. It can also configure the chainspans, the lines which extend under blocks to represent held tones in the music.

  • maxvisiblecount (number)
    The maximum number of blocks visible at one time. Excess is not rendered.
  • colorblocks
    This takes a table with a number of parameters to define the basic collectible blocks
    • gameobject
      this field can be used to just like BuildObject() to create a gameobject within the SetBlocks function. It takes the same parameters as BuildObject(). The object created is then used as prefab for the color blocks.
    • childobjects
      this field can be given a table of tables, each of which is suitable for BuildObject. It works to generate multiple gameobjects, each children of the primary game object. This can be used to create more complex objects with multiple materials.
    • mesh
      Takes the path to the .OBJ in the same folder as the skin. See BuildObject()
    • material
      Set's the material of the block. See BuildMaterial()
    • shader
      Instead of setting the material this can be used to set the shader for inline material creation. See BuildMaterial()
    • texture
      Instead of setting the material this can be used to set the texture for inline material creation. See BuildMaterial()
    • shadersettings
      Instead of setting the material this can be used to set the shader settings for inline material creation. See BuildMaterial()
    • scale (vector3)
      Scales each block around the meshes origin by the given amount.
    • float_on_water (bool)
      If true, then the block floats on water and bobs with the water's movement. Defaults to true.
    • reflect (bool)
      If true, then the block has a visual reflection
  • greyblocks
    This takes a table just like colorblocks but defines the spike blocks
  • powerups
    This defines special blocks
    • powerpellet
      The power block found in corkscrew loops on mono mode. see colorblocks for parameters.
    • whiteblock
      The white blocks found in puzzle modes. See colorblocks for parameters
    • ghost
      See colorblocks for parameters.
    • x2
      See colorblocks for parameters.
    • x3
      See colorblocks for parameters.
    • x4
      See colorblocks for parameters.
    • x5
      See colorblocks for parameters.
  • chainspans
    This defines the lines underneath color blocks, that symbolize held notes. See colorblocks for parameters

Example

SetBlocks{
maxvisiblecount = 100,
colorblocks = {
mesh = "bevelblock.obj",
shader = "UnlitTintedTex",
texture = "bevelblock.png"
},
greyblocks = {
mesh = "bevelblockSpikes.obj",
shader = "UnlitTintedTex",
texture = "bevelblock.png"
},
powerups = {
powerpellet = {
mesh = "clusterBlock.obj",
shader = "UnlitTintedTex",
texture = "clusterBlock.png"
},
whiteblock = {
mesh = "bevelblock.obj",
shader = "UnlitTintedTex",
texture = "bevelblock.png"
}
}
}

SetBlockColors()
Set the colors used for the collectible blocks on the track. This only needed for puzzle modes. In mono modes, the blocks are not recolored and have their default color given to them in SetBlocks();

The function simply takes an array of Colors as parameter. There should be at least as many colors provided as the colorcount of game mode (see GetSkinProperties)

Example

SetBlockColors{
{r=126, g=0, b=255},
{r=0, g=66, b=240},
{r=0, g=184, b=0},
{r=255, g=189, b=15},
{r=227, g=38, b=0}
}

SetBlockFlashes()
Change the texture that flashes briefly each time a block is collected or passed.

  • texture (string)
    This is the texture used for the block flash. If none is given the default texture is used.
  • sizescaler (number)
    The size of a flash when a block is hit. Set to 0 to show no flash.
  • sizescaler_missed (number)
    The size of a flash when a block is missed. Set to 0 to show no flash.

Example

SetBlockFlashes{
texture = "blockFlash.png"
sizescaler = 5,
sizescaler_missed = 0
}

SetPuzzleGraphics()
Configures the textures and look of the in-game puzzle grid that is shown beneath the player's vehicle.

  • usesublayer (bool)
    If true, then a duplicate of the grid will be display under the main grid. Can be used for reflection effects and similar things. Default is false.
  • puzzlematerial (Material)
    The material used for grid. It is an atlas divided into four squares, with the empy grid field in the upper left quadrant and the filled block in the upper right. The rest of the quadrant isn't being used.
  • puzzlematchmaterial (Material)
    The material used to indicate a match in the puzzle grid
  • puzzleflyupmaterial (Material)
    The material used for the blocks flying up towards the score.

Example

SetPuzzleGraphics{
usesublayerclone = false,
puzzlematerial = {
shader="VertexColorUnlitTintedAlpha",
texture="tilesSquare.png",
texturewrap="clamp",
aniso=9,
usemipmaps="false",
},
puzzlematchmaterial = {
shader="Unlit/Transparent",
texture="tileMatchingBars.png",
aniso=9
},
puzzleflyupmaterial = {
shader="VertexColorUnlitTintedAddFlyup",
texture="blockPickup.png"
}
}

OverrideTrackColorForDynamicBlockColors(Color)
In some modes (such as mono) blocks will use a dynamic color, based on the track node they are currently on. If this color needs to be overriden, this function can be called with that color.

This is useful for when the track colors (see SetTrackColors) are greyscale and would cause the dynamic colored blocks to be grey as well, which would make them hard to differentiate from spike blocks.

To find out how to detect for greyscale album art, see the section on Colors.
Functions - Setters - Sounds
If you want to change your scene's sounds, use this:

LoadSounds()
Loads a new mp3 or wav sound file to override the default built-in sound effects. Not usually used. The following parameters are possible:

  • hit
    The sound used when hitting a color block
  • hitgrey
    The sound used when hitting a spiked/grey block
  • trickfail
    The sound used when a trick fails (Wakeboard mode)
  • matchsmall
    The sound used for a small match on the puzzle grid
  • matchmedium
    The sound used for a medium match on the puzzle grid
  • matchlarge
    The sound used for a large match on the puzzle grid
  • matchhuge
    The sound used for a huge match on the puzzle grid
  • overfillwarning
    The sound used when the grid is overfilled

Example
LoadSounds {
hit="hit.wav",
hitgrey="hitgrey.wav"
}
Functions - Creation - Rail
Creation functions are at the heart of the skin. These are used to create the different objects, that make up the skin's track. If you want to display models and textures, this is what you need.

CreateRail()
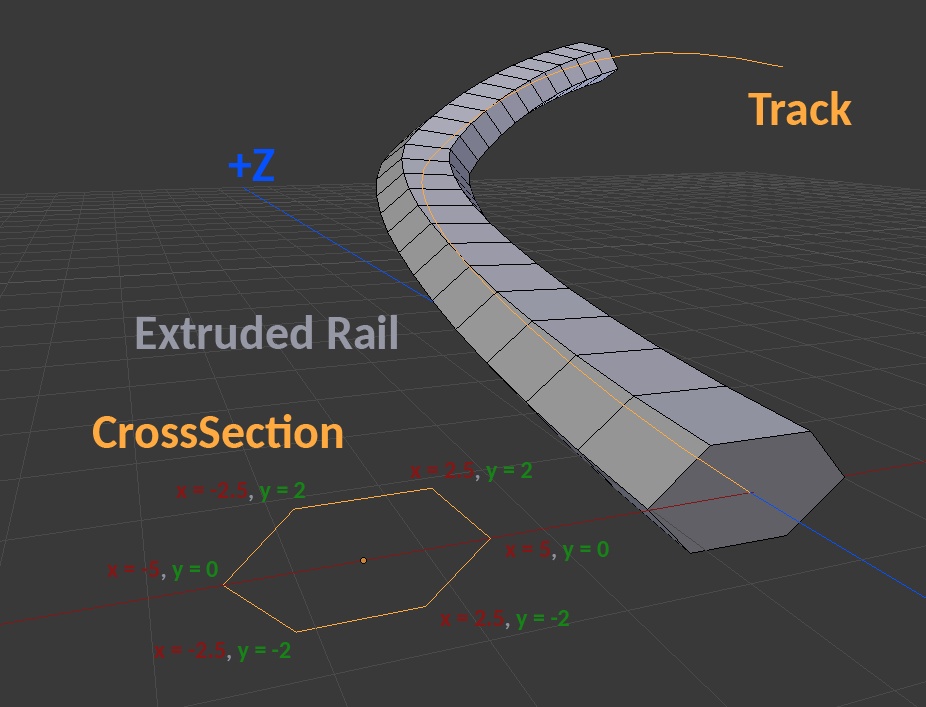
CreateRail is used to create a simple extruded shape that runs the length of the track. In most cases this can be used to create the road surface of the track itself, as well as a number of other objects, such as side-rails or lane lines.

The cross section shape to extrude along the track is given as an array of 2D positions in the "crossSectionShape" table. A "positionOffset" table can be used to move the entire extruded shape and "scales" can be used to scale the cross section towards it's origin point.

The shape can then be given a material, the texture mapping can be generated and a few other miscellaneous options can be set.


The Node Shape
  • crossSectionShape (Vector2{})
    This is a table of Vector2 positions, which represent the individual points of the crossSectionShape. Use -trackwidth and +trackwidth from GetSkinProperties() to create a rail with the width appropriate to the current mode.
  • crossSectionShapeList
    Instead of defining a single crossSectionShape this allows you to supply a list of shapes, which will be used in sequence and repeated once all shapes have been used once. All Shapes need to have the same amount of defined points.
  • wrapnodeshape (bool)
    If set to true, then the last crossSectionShape 2D position will connect to the first crossSectionShape 2D position to close the shape. Otherwise the shape remains open there
  • positionOffset (Vector2)
    Offsets the created rail by this value, relative to each track position.
  • scales (Vector3{})
    This table of scales for each track node is used to scale the entire shape of the rail. The rail will blend softly between the different scales to create a transition. The center of the scaling is the origin of the shape - if it was moved with positionOffset, so is it's origin.

Shape Options
  • stretch (number)
    Determines the number of track nodes to progress before creating another rail segment. Defaults to 1: One segment for each track node.
  • nodeskip (number)
    Determines the number of track nodes to skip after each rail segment. Can be used to create a dashed rail for things like painted lane lines. Defaults to 1, which means no nodes will be skipped. This should never be set below 1.
  • flatten (bool)
    When enabled, the rail tries to minimize bumps in the y direction. This is useful to create contrast with water waves in wakeboard modes. Defaults to false
  • fullfuture (bool)
    If true, the game will try to extend this rail the entire length of the track so it can be seen all the way to the end. Defaults to false.

Material
  • material (Material)
    Defiens the Material to use. See BuildMaterial.
  • texture (string)
    If not material is given this points towards a texture in the skin folder. See BuildMaterial for more information.
  • shader (string)
    If no material is given, use this to point towards a shader. See BuildMaterial for more information.
  • colorMode (string)
    Defines how the meshes along the track will be colored, by adjusting the vertex color. The options are:
    • "static": The mesh will not be colored (default)
    • "highway": The mesh will have the color of it's highway node
    • "highwayinverted": The mesh will have the inverted color of it's highway node.
  • color (Color)
    Sets the color of the rail. The color is applied to all vertices of the rail. Any shader used needs to support vertex colors for this to show. This color setting also only works with colorMode static as other settings override the vertex colors. If this is not set some shaders don't show at all.
  • layer (number)
    Sets the layer on which this object is being rendered. See Rendering Layers for more information.
  • allowfullmaterialoptions (bool)
    When using inline materials (via the texture & shader properties instead of via material) you can set this to true to get all the features expected from a normal call to CreateMaterial. Skins should always set this to true.

UV Mapping
  • textureMode (string)
    This defines how the uv-map of the rail is created, which in turn determines how the texture is applied. It has the following options:
    • "repeataround": Visualize the rail as a cardboard box. In repeataround the texture is applied to the top, to the left, to the bottom and to the right separately.
    • "repeataroundreverse": As repeataround but with reversed directions.
    • "wraparound" Here the texture is folded around the entire box like a piece of gift wrapping.
    • "wraparoundreverse": As wraparound but with reversed directions
  • texturemirroreddowntrack (bool)
    If true, the texture is flipped back and forth down the length of the rail to make it seamless. Defaults to true.
  • texturetracklength (number)
    The number of rail nodes to proceed down the track before the texture is repeated. Defaults to 1.

Light Options
  • calculatenormals (bool)
    If true, then the normals of the rail are calculated. These are only used when the object receives shadows. Default?
  • shadowreceiver (bool)
    If true, then the object receives shadows from light sources. Defaults to true.
  • shadowcaster (bool)
    If true, then the object casts shadows. Defaults to true.

Example: Simple Rail with inline material
skinvars = GetSkinProperties()
trackWidth = skinvars["trackwidth"]

CreateRail{
crossSectionShape = {
{ x = trackWidth, y = 0},
{ x = trackWidth, y = -2},
{ x = -trackWidth, y = -2},
{ x = -trackWidth, y = 0}
},
wrapnodeshape = true,
colorMode = "highway",
shader = "Diffuse",
texture = "rail.png",

shadowreceiver = true,
shadowcaster = false,
calculatenormals = true
}

Common Problems
If your rail is very complex and exceeds it's vertex count limit, then consider turning off fullfuture or to increase the rail's stretch to something larger than 1.
Functions - Creation - Mesh & Material
As soon as you want to create more than just a simple rail you need to be familiar with meshes and materials. Meshes are 3d models loaded from .OBJ files, materials are textures and shaders combined to determine how these meshes are displayed: metallic, wooden, transparent etc.

Mesh BuildMesh()
BuildMesh is the function to generate 3d meshes for your skin. It returns the generated Mesh so you can save it in a variable and access it.

In most cases BuildMehs is used to load a single mesh from a single .OBJ file. This mesh can then be used in CreateRepeatedMeshRail or BatchRenderEveryFrame.

However you can also load multiple mesh files to generate one mesh with multiple morph-targets. This allows you to distort and animate the mesh as desired. For morph targets, all .OBJ files loaded into the mesh need to have the exact same number of vertices. To morph the mesh itself you need to use the UpdateMeshMorphWeights function.

Lastly you can also build and update a procedural mesh from a table of vertices and indices. However this is very complex and not recommended. Morphing is generally a better idea.

  • mesh (string)
    Enter the filename of an .OBJ file in the same folder as your skin. This file is loaded and used as the mesh.
  • meshes (string{})
    Enter a table of .OBJ files in the same folder as your skin. The first file generates the base mesh, all further files generate morph targets for that mesh.
  • calculateTangents (bool)
    Calculates the tangents of the mesh. Neccessary for some shaders. Default is false
  • calculateNormals (bool)
    Calculates and overwrites the normals of the mesh. This is used Used when the object receives lighting and shadows, otherwise it can be turned off. Default is false
  • recalculateNormalsEveryFrame (bool)
    In case the mesh is modified every frame (see Update), then if this is turned on, the normals will be recalculated every frame to ensure proper lighting. Default is false
  • shapetotrack_at (number)
    Enter the number of the node at which the mesh is to be positioned and shaped. The mesh is then deformed and distorted to follow the track.

Example 1: Simple Mesh
bridgeMesh = BuildMesh{
mesh = "bridge.obj",
}

Example 2: Base Meshes with 5 Morph Targets
spikeMesh = BuildMesh{
recalculateNormalsEveryFrame = true,
meshes = {
"spike_base.obj",
"spike_morph0.obj",
"spike_morph1.obj",
"spike_morph1.obj",
"spike_morph3.obj",
"spike_morph4.obj"
}
}

Material BuildMaterial()
A material is what is applied to a mesh to determine how to render it. It usually consists of a texture and a shader, and depending on the shader of some settings.

BuildMaterial lets you create a material and later assign it to visible objects. You can even update the material's settings every frame as the game runs using the Update function.

Materials can be created within object declarations without explicitly calling BuildMaterial. See Inline Material Creation for details.

Shaders are a relatively complex topic. See Shaders for an overview of existing shaders and how you can add your own custom shaders to your skin.

  • shader (string)
    This points towards a shader. Use the name of a default shader to use that. If you want to use your own shader add ".shader" to the end of the shadername to load the file from your skin folder instead.
  • textures
    This is used to assign textures to the different texture inputs of the shader used
    • _MainTex (string)
      In most shaders _MainTex is the default diffuse texture used for the object.
    • Others
      Depending on the shader there may be slots for more textures, such as normal, specular or emission maps.
  • shadercolors
    This is used to assign colors to the different color inputs of the shader used
    • _Color (Color)
      In most shaders _Color is the default color used to tint the diffuse texture.
      • colorsource
        Instead of supplying a color you can also use colorsource to feed a color from the current track into the shader. Possible options are "highway" and "highwayinverted". "highway" uses the color of the current track node, and highwayinverted uses the inverted color.
  • shadersettings
    Here the different settings of the shader can be adjusted. These are highly dependent on the shader used
  • renderqueue (number)
    Sets the material's position within the rendering queue. Lower values are rendered first, higher values later. See documentation on the Unity Render Queue for more information.
  • texturewrap (string)
    Determines how the texture is wrapped. Values are:
    • "repeat": The texture is repeated if the UV values >1 and <0. Default.
    • "clamp": The texture is clamped and UV values >1 and <0 show nothing. Use this for 2d images such as PuzzleGraphics or Rings.
  • aniso (number)
    This defines the level of anisotropic filtering. See Unity documentation[docs.unity3d.com].
  • usemipmaps (bool)
    If false then the material will use no mipmaps (lower-resultion versions of the texture at a distance). useful for 2d textures such as PuzzleGraphics or Rings.

Inline Material Creation
Instead of creating a material and then referencing it when creating an object, you can also create the material directly when creating the object. Many functions (CreateObject(), CreateRail(), SetPlayer()...) have settings for shader, texture, and shadersettings for this purpose.

This is a convenient and supported shorthand. However it is preferred to use CreateMaterial(), store the returned material in a variable and later use it as part of objects. When an object is given a "material" property, inline material creation properties are ignored.

Example 1: Simple Material
wallMaterial = BuildMaterial {
shader = "Diffuse",
textures = {
_MainTex = "wall.png"
}
}

Example 2: Material with custom shader, -color and -settings
floorMaterial = BuildMaterial {
shader = "UnlitTintedTexEmissionDistanceDarken.shader",
shadercolors = {
_Color = {
colorsource = "highway"
},
_SpecularColor = {
r = 255,
g = 255,
b = 255
}
},
textures = {
_MainTex = "floor.png",
_EmissionTex = "floor_emission.png"
},
shadersettings = {
_StartDistance = 85,
_FullDistance = 850,
_MaxDarkness = 0.15
}
}
Functions - Creation - GameObjects
Game Objects are need to bring meshes into the game. They can then be used by themselves to display a single object or used as prototypes in functions to be displayed more often.

CreateObject()
CreateObject creates a GameObject. By default it is simply rendered by itself (a "solo object"). In this case it can have a static world position, or it can be be attached to the player's current track location so it follows them around.

However it is much more powerful when the GameObject used as a prototype (prefab) for other functions. It can for example be rendered many times with BatchRenderEveryFrame(). The Object can also be used as a prototype to create custom rails with CreateRepeatedMeshRail(). Lastly it can be used to override the look of objects createdby the mode (for example the vehicle, blocks or powerups).

  • name (string)
    The name of the GameObject to be created.
  • tracknode (number)
    If this field is given a number, then the object is attached to that tracknode. position and rotation are relative to that tracknode then. Can also take the following strings:
    • "start" representing the first track node
    • "end" representing the last track node.
  • railoffset (number)
    If this is set, then the object is attached to the player. The number given is the offset along the track: 0 means the object is at the player's position. A positive number puts the object in front of the player, a negative one behind him.
  • floatonwaterwaves (bool)
    If the object is attached to the player and this is set to true, then the object will bob on top of the water.
  • gameobject
    This is a table that defines the details fo the object
    • mesh (string or Mesh)
      either supply a string to a Mesh you have created with BuildMesh() or enter the path to a .OBJ file in the same folder as your skin. In the latter case that file will then be loaded and used to create a simple mesh for the current GameObject
    • visible (bool)
      Defines whether the created GameObject is visible or not. If your object is only to be used as a prototype for another function, set this to false.
    • transform
      The transform properties of the game object. These are not inherited, when the object is used as a prefab.
      • pos (vector3)
        The position of the object relative to it's attachment or the world origin, if there's none.
      • rot (vector3)
        The rotation of the object relative to it's own origin.
      • scale (vector3)
        The scale of the object relative to it's origin.
    • material (Material)
      Supply the Material to be used on the object.
    • texture (string)
      If no material is given texture can be used to give a path to a .png or .jpg file in the same folder as the skin. This texture will be loaded and used as the _MainTex in the shader supplied.
    • shader
      See BuildMaterial for more information.
    • shadercolors
      See BuildMaterial for more information.
    • renderqueue
      See BuildMaterial for more information.
    • layer
      Sets the layer on which this object is being rendered. See Rendering Layers for more information.
    • lookat (string)
      If set, the object rotates so that it's positive Z axis faces the given position every frame. If this gameobject is used to create BatchRendered objects, these inherit this property. Lookat can take the following strings:
      • "start" representing the first track node
      • "end" representing the last track node.
      • "camera" the position of the player's camera. Can be used to create billboards

Example 1: Simple Object with Inline Mesh and Material for use as Prefab
CreateObject{
name = "Building",
gameobject = {
visible = false,
mesh = "building.obj",
shader = "Diffuse",
texture = "building.png"
}
}

Example 2: Solo Object with separate Mesh and Material
bridgeMesh = BuildMesh{
mesh="bridge.obj",
}

bridgeMaterial = BuildMaterial {
shader = "UnlitTintedTex",
textures={
_MainTex = "bridge.png"
}
}

CreateObject{
name = "Bridge",
gameobject = {
visible = true,
pos = {
x = 5,
y = 5,
z = 0
},
mesh = bridgeMesh,
material = bridgeMaterial
}
}
Functions - Creation - MeshRail
If you want to create more complex and involved track structures, the MeshRail is a very powerful function.

CreateRepeatedMeshRail()
CreateRepeatedMeshRail takes a mesh and seamlessly repeats it down the length of the entire track, shaping it to the song's twists and turns. The mesh could be textured with baked in lighting and/or shaped into a tunnel for example.

The mesh must have vertices at positive z values. The largest positive z value in the mesh is the track distance each copy of the mesh will cover. If you're running into loading or running speed issues, try scaling your mesh in the positive z direction so the vertices are less dense along the length of the track. If the mesh has vertices in negative z, those will overlap. The resistance skin on workshop does that with its hexagon tube though and no geometry actually overlaps due to the shape of it.

Typically your geometry should start at the origin and move along positive Z only. Every 3 units in the positive z direction will correspond to one track node.

Get the Resistance skin on Steam Workshop for an example.

Keep vertex counts as low as possible when using CreateRepeatedMeshRail() to mimimize loading times

  • prefabName (string)
    The name of the Object to use as prefab
  • ahead_renderdist (number)
    The distance ahead to which the repeated mesh should be rendered. Defaults to 500.
  • behind_renderdist (number)
    The distance behind the player to which the repeated mesh should be rendered. Defaults to 25.
  • spacing (number)
    The distance between different meshes. Defaults to 0: no distance
  • colorMode (string)
    Defines how the meshes along the track will be colored by setting their vertex colors. The options are:
    • "static": The mesh will not be colored (default)
    • "highway": The mesh will have the color of it's highway node
    • "highwayinverted": The mesh will have the inverted color of it's highway node.
  • track_tilt_factor (number between 0-1)
    Determines if the mesh used will tilt with the track. Default is 1. If set to zero the mesh always sticks straight up, making ascents and descents more noticeable
  • offsets (pos{})
    A table of offsets for each node of the track. Will be used to position the mesh relative to the track.
  • scales (scale{})
    A table of scales for each node of the track. Will be used to scale the mesh based on it's origin
  • calculatenormals (bool)
    This calculates the normals of the object. It is required to be set to true if the object is using lighting.

Example: Simple MeshRail
CreateObject{
name = "RailSide",
gameobject = {
visible = false,
mesh = "railSide.obj",
shader = "Diffuse",
texture = "railSide.png"
}
}

CreateRepeatedMeshRail{
prefabName = "RailSide",
colorMode = "highway",
buildlive = false,
calculatenormals = false
}
Functions - Creation - Batch Rendered Objects
These objects can be placed independent of the track and can be used to add a lot of visual variation.

BatchRenderEveryFrame()
This is used to render many copies of a single object prefab in various locations throughout the track.

  • prefabName (string)
    This is set to the name of the object created with CreateObject that should be rendered. Required.
  • locations (trackNodes{})
    This array of track nodes will each render an object based on that node's local transform. The length of this array determines the total number of object copies to render. Required.
  • offsets (vector3{})
    This array offsets each instance relative to the track node indicated in "locations". Required.
  • scales (vector3{})
    Each object is scaled based on it's mesh origin according to the values given here. Since this is an array, each object can have a different scale.
  • rotations (vector3{})
    An array of rotations. Each object will be rotated by the corresponding value. The object will rotate around the mesh's origin usign it's local coordinate system.
  • rotateWithTrack (bool)
    Determines whether every instance should inherit rotation from its track node. If set to true, then the batch rendered object will align itself based on the rotation of the track node. Any rotation done with rotations is done after aligning to the track. Default is true.
  • colors (Color{})
    An array of colors for each instance. When used, each instance will have their shader's "_Color" property set to the value from this array when rendered.
  • maxShown (number)
    maximum number of objects to render each frame
  • maxDistanceShown (number)
    maximum track node difference from the player's current track node to consider an instance for rendering.
  • collisionLayer (number)
    If this is set to a number equal to or higher than 0 each object will collision test with other batch-rendered objects on the same collisionLayer. Objects that collide with other objects on the same layer are not rendered.
  • testAndHideIfCollideWithTrack (bool)
    If set true, the object checks if its bounding box intersects with the track. Objects that collide with the track will not be rendered. Note that his uses the trackwidth determined by the mod and is independent from your visual representation of the track.
  • songspeedratio (number)
    This setting translates an object along the track over time. Using a negative value makes them object move towards the player, while a positive one makes the move with the player (like color blocks). Regardless of speed, the object will always reach it's assigned track node at the same time as the player.
  • songspeedratios (number{})
    Instead of setting a songspeedratio for all objects, a table can be given with an entry for each object, setting individual sognspeedratios.

Example
BatchRenderEveryFrame needs many tables that need to be in sync with one another. Because of this it's a good idea to interate through the track, find out at which nodes you want to render objects and then to define offset/scale/rotation/color as well, if needed.

CreateObject{
name = "Building",
gameobject = {
visible = false,
mesh = "building.obj",
material = objectMaterial
}
}

track = GetTrack()

for i = 1, #track do
if i%5 == 0 then
buildingNodes[#buildingNodes+1] = i

local xOffset = trackWidth + 20 + 5 * math.random()
if i%2 == 0 then
xOffset = xOffset * -1
end
buildingOffsets[#buildingOffsets+1] = {xOffset, -4, 0}

buildingScales[#buildingScales+1] = {
0.8 + math.random() * 0.5,
1.0 + math.random() * 0.2,
0.8 + math.random() * 0.5
}

end
end

BatchRenderEveryFrame{
prefabName = "Building",
locations = buildingNodes,
offsets = buildingOffsets,
rotateWithTrack = true,
scales = buildingScales,
collisionLayer = 1,
testAndHideIfCollideWithTrack=false
}
Functions - Creation - Light & Post-Effects
You can add more life to your skin by adding lights (and shadows) or by adding more complex post-processign effects. However be aware that these things can be serious performance drains.

CreateLight()
This adds a light to the track. It is often used with the "railoffset" parameter to make the light follow along with the player.

  • type (string)
    Defines the type of light. Can be:
    • "point": a simple point-light from which light emanates in all directions
    • "directional": a light that only casts light in one direction, like a sun
  • intensity (number)
    Determines the intensity of the light. Higher values create brighter lights. Default 1.
  • range (number)
    Defines how wide the light reaches.
  • color (Color)
    Defines the light's color. Default is white.
  • railOffset (number)
    If this is set, the light is attached to the player's position, at a node offset relative to the player's current node. A positive value pushes the light ahead of the player, a negative one behind.
  • transform
    The transform properties of the game object.
    • pos (Vector3)
      If the object is attached to the player via railOffset, then the position is relative to that. Otherwise it's based on the world origin. Position is not required for directional lights, since these emit light in one direction, regardless of position.
    • rot (Vector3)
      Rotation is not required for point lights, since these emit light in all directions.
  • shadows
    Is set using a table with the following parameters:
    • type
      Determines the type of shadows cast. The following parameters are possible:
      • "hard": hard shadows, with well defined edges.
      • "soft": shadows with softer edges, but a higher performance cost
      • "none": no shadows
    • intensity
      Defines the darkness of the shadow. Ranges from 0 (invisible) to 1 (solid black). Default is 0.5
    • bias
      Customize the shadow. See Unity documentation[docs.unity3d.com].
    • softness
      Customize the shadow. See Unity documentation[docs.unity3d.com].
    • softnessfade
      Customize the shadow. See Unity documentation[docs.unity3d.com].

Example: Directional light with shadows
sunlight = CreateLight{
railoffset = 0,
type = "directional",
transform = {
pos = {0, 0, 0},
rot = {39, 244, 0}
},
shadows = {
type = "hard",
strength = 0.3
}
}

AddPostEffect()
Used to add screenspace post-effects to the skin. This is done by creating a material with the appropriate shader and then applying that using AddPostEffect().

  • depth
    This determines which rendering layers are affected by the post effect. Read the section on Rendering Layers for more information. The following options are available:
    • "background": The post effect will be applied before the main camera renders anything.
    • "middle": The post effect applies to all pixels after the main camera has rendered to the uffer
    • "topmost_exclusive": The post effect will be applied on the "close" camera which renders after the main camera. That means only rendering layers 14 and 15 will be included in this effect
    • "foreground": The post effect applies to all pixels rendered after the close (post-main) camera is done rendering
  • material
    This specifies the material (and thus shader) used
Functions - Updating Every Frame
If you want your skin to change it's look as it's being played, then the Update function can help you. It can become very complex and add to the performance drain of your skin, but if used cleverly it can make a lot of interesting effects possible.

Update(dt, trackLocation, playerStrafe, playerJumpHeight, currentSongIntensity)
If you want to adjust your skin as it plays (to change morph targets, adjust colors or other things), you need this function. If Update() exists, then it will be called every frame while the track is running. It is the only skin script function the game will call.

The following variables are accessible from within Update:

  • dt (number)
    frame time in seconds
  • trackLocation (number)
    what track node the player is currently at
  • playerStrafe (number)
    player's current x position on the track
  • playerJumpHeight (number)
    The current height of the player during a jump. Use only in jumping/wakeboard modes
  • currentSongIntensity (number)
    A value from 0-1 that indicating the current intensity of the music, with 1 being intense and 0 being calm.

Example: Updating Morph targets and a Material
function Update(dt, trackLocation, playerStrafe, playerJumpHeight, intensity)
local fft = GetSpectrum();
local morphweights = {
3.5 * (fft[1]+fft[2]+fft[3]),
1.5 * (fft[4]+fft[5]+fft[6]),
1.5 * (fft[7]+fft[8]+fft[9]),
1.5 * (fft[10]+fft[11]+fft[12]),
1.5 * (fft[13]+fft[14]+fft[15]+fft[16])
}

UpdateMeshMorphWeights{
mesh = spikeMesh,
weights = morphweights
}

if shipMaterial then
local enginePower = 0 + 99*intensity
UpdateShaderSettings{
material = shipMaterial,
shadersettings = {
_GlowScaler = enginePower
}
}
end

end

GetSongCompletionPercentage()
convenient 0-1 value showing how far along the song currently is, with 0 being the start and 1 being the end of the song.

GetSpectrum()
Get a table of 16 values representing 16 frequency bands for the currently audible music. Imagine and equalizer with 16 bands, each mapped to a differerent frequency band. See the Audiosurf2 logo animation for an idea how this works. Often used with mesh morphing.

GetLogSpectrum()
See GetSpectrum. The difference is that, these values are biased towards high frequencies more than GetSpectrum.

UpdateMaterial()
Change a material's properties: Shader and texture. This is only useful if called from within the Update function.

  • material (Material)
    The material to be updated
  • shadersettings
    The shadersettings to be updated. See BuildMaterial for information.
  • shadercolors
    The shadercolors to be updated. See BuildMaterial for information.
  • texturesettings
    The texture details to change. These can be used to animate a texture.
    • offset (Vector2)
      The UV offset of the texture.
    • tiling (Vector2)
      The UV tiling of the texture. {4, 1} equals a UV scaling of 0.25, 1.
    • scale (Vector2)
      Can be used instead of tiling: The UV texture is scaled accordingly.

Example 1: Dynamic Shader
function Update(dt, trackLocation, playerStrafe, playerJumpHeight, intensity)

UpdateShaderSettings{
material = shipMaterial,
shadersettings = {
_GlowScaler = trackLocation
},
shadercolors = {
_Color = {playerStrafe, 0, 0}
}
}
end

Example 2: Animated Texture
frames = { x = 2, y = 2 }
currentFrame = 1
currentTime = 0
numFrames = frames .x * frames .y
timePerFrame = 0.2

function Update(dt, trackLocation, playerStrafe, playerJumpHeight, intensity)

if animMaterial then

currentTime = currentTime + dt
if (currentTime > timePerFrame) then
currentTime = currentTime - timePerFrame
currentFrame = currentFrame + 1

if (currentFrame > numFrames) then
currentFrame = 1
end

local offsetX
local offsetY

offsetX = ( (currentFrame-1) % frames.x ) / frames.x
offsetY = math.floor ( (currentFrame-1) / frames.x ) / frames.y

UpdateShaderSettings {
material = animMaterial,
texturesettings = {
scale = {1 / frames.x, 1 / frames.y},
offset = {offsetX, offsetY}
}
}
end
end
end

UpdateLight()
This can update the properties of a light as the game runs. This function is only useful if called from within the Update function.

  • light
    The light which is to be updated
  • Others
    See CreateLight for the applicable Light parameters.

Example
function Update(dt, trackLocation, playerStrafe, playerJumpHeight, intensity)

UpdateLight{
light = sunlight,
transform = {
rot = { 39 + (1.0 - playerStrafe) * 51, 244, 0}
},
intensity = corridorFactor * .2,
shadows = {
strength = GetSongCompletionPercentage()
}
}
end

UpdateMeshMorphWeights()
When using BuildMesh to create a mesh with morph targets, this function allows you to control the blending between the different morph targets. Often GetSpectrum is used to access the current music values in the 16 different bands, using those to deform meshes.

To update the morph targets contiuosly during play, UpdateMeshMorphWeights needs to be in the Update function.

  • mesh (Mesh)
    Enter the mesh who's morph weights you want to change
  • weights (float{})
    Enter a table of weights, on for each morph target beyond the base mesh

Example
function Update(dt, trackLocation, playerStrafe, playerJumpHeight, intensity)

local fft = GetSpectrum();
local morphweights = {
3.5 * (fft[1]+fft[2]+fft[3]),
1.5 * (fft[4]+fft[5]+fft[6]),
1.5 * (fft[7]+fft[8]+fft[9]),
1.5 * (fft[10]+fft[11]+fft[12]),
1.5 * (fft[13]+fft[14]+fft[15]+fft[16])
}
UpdateMeshMorphWeights {
mesh=spikeMesh,
weights=morphweights
}
end

UpdateProceduralSky()
This function is used to change the time of day used in the procedural sky. See the Audiosprint mode's skin for an example.

  • See SetSkybox for information on the procedural sky parameters.

Example
function Update(dt, trackLocation, playerStrafe, playerJumpHeight, intensity)
UpdateProceduralSky{
latitude = (-70 + GetSongCompletionPercentage() * 180)
}
end
Functions - Other
print(string)
This function prints a line to the game's output_log file. If developer mode is activated, these lines can also be seen directly in the game

Example
track = GetTrack()

print("Number of track nodes " .. #track)

fif(test, if_true, if_false)
Useful to be used similiar to a ternary expression. Comes especially handy when doing performance optimization.

SetBackgroundColor(Color)
A simple plain alternative to SetSkybox that sets a single color as the background.

GetHighwayColor()
The color of the player's current track node.

Profile(string)
This function is useful to test the loading performance of your skin. It writes the given string to the game's output_log.txt file with a timestamp showing how long it's been since the last call to Profile(). By inserting calls to profile at different sections of your skin you can find out how long the different sections of your skin take to load.

This is useful to troubleshoot a skin with a long loading time. Noe that if you restart a skin that is currently loaded, it's loading time is drastically reduced as images and meshes are kept cached.

AutomagicTable()
Creates an automagic lua table. See here[lua-users.org].

deepcopy(orig)
Copies a lua table fully, not only it's references.
20 Yorum
Toxijuice 6 Eki 2022 @ 17:01 
I totally forgot I made those comments on this thread last year. If anyone else ends up here, note that you can make custom shaders again through AssetBundles. DBN's site has some information on how to use them: https://as2-doc.deathbynukes.com/skins.html#AssetBundles
WeldonWen 8 Haz 2022 @ 15:51 
If your Batch Rendered objects doesn't appear in the latest version of the game, change your collisionLayer in BatchRenderEveryFrame to a negative value.
Toxijuice 18 Haz 2021 @ 2:28 
An amendment to my previous message: this only matters if you are running an older version of the game, it seems. As far as I can tell, custom shaders are not possible any longer.
Toxijuice 17 Haz 2021 @ 23:11 
To those of you, like me, who are visiting this guide from the future where there's global pandemics and cars in space:

Unity has changed quite a bit, and compiled shaders appear to work differently now. This means you will have to use an older version of Unity if you want to compile shaders. The latest I found works was 4.7.2.

What's even more fun is this version of Unity requires that you activate your Unity before using it, and it would seem that the activation service has also changed, and therefore cannot connect. I was able to get around this by disconnecting my internet and then trying to start Unity. After which it allowed me to do an offline activation, which, thankfully, still works.

However, if you are from an even more distant future and that doesn't work, I came across this thread that talks about CgBatch that may also work with Unity versions 4.5 and below, without activation. https://forum.unity.com/threads/runtime-shader-compilation.87085/
swiftsuber 8 Haz 2021 @ 0:04 
is there one for demo2d?
Sergalicious 23 Kas 2016 @ 23:16 
someone halp, why wont my arouras show up when there are cliff rails behind them?
Asi 1 Kas 2016 @ 21:58 
Whoa, this is sick. Thank you!
SpiritKitty 23 Tem 2016 @ 12:18 
Changing Sound Does Not Work. :sad_creep:
M444CE 21 May 2016 @ 15:49 
I want to know. is there a way to change the colour palette in a skin?
Nixel 7 May 2016 @ 19:19 
So, what does airdebrisdensity do?