Duck Game
174 évaluations
Duck Game Official Modding Guide
Par Paril et 2 collaborateur(s)
Looking to modify Duck Game? Look no further! This serves as the official guide to modding Duck Game, how to add new content and the best procedures to follow when creating and uploading your mods.
   
Récompenser
Ajouter aux favoris
Favoris
Retirer des favoris
Introduction
Duck Game Modding!

Hi there, my name is Paril and I am in charge of the mod API for Duck Game. I'm putting this little guide together to help budding mod developers set up and create some super duper awesome mods for Duck Game.

Now, I should warn people off the bat that while the game was developed with modding in mind, it's not the most documented system in history, and it may be fairly confusing as there is a lot of twists, turns, name issues, and other quirks to deal with.

While we will do our best to ensure that mods will always work between versions, we can't guarantee that APIs won't change, disappear, or be replaced by something better - especially given that this is just the first version of the game with modding capabilities, it is worth keeping in mind that things will change.

With that being said, let's mod!
Creating the mod
So you want to make a mod, eh? Well, firstly, we have to set up your mod's home! Head to your My Documents folder (on most systems, browsing to "%userprofile%/My Documents/" should bring you there) and go into DuckGame/Mods. This folder will be referred to from here-on as the "Mods folder".

Make a new folder here, and name it whatever you want your mod to be named. Be careful with this! Be sure to make the folder name unique. This name is used to uniquely identify your mod, and picking a simple name such as "Guns" is not a good idea. If two mods share the same folder name, it can cause big issues! For demonstration purposes, I've named my folder "Paril_Mod".

Mods for Duck Game can be loaded one of two days; firstly, the game can compile a collection of .cs source files at run-time and use that result. This method is recommended, as it keeps the code open for everybody and allows small breaking API changes to potentially be resolved without an update. Secondly, the game can load a pre-compiled .NET DLL located in the root of your mod folder. This will let you use any .NET-compatible language to produce a Duck Game mod, and allows you to keep your actual source files to yourself, if you so desire.

So then, let's create the folder layout for your mod! Here are the recommended layouts, based on the above:

(option #1, don't redistribute source files)
  • Mods
    • <your mod folder>
      • content
      • build
        • src

(option #2, loose source files)
  • Mods
    • <your mod folder>
      • content
      • src

NOTE: the "build" folder will NOT be distributed with your mods! It is a special folder which will not be copied over to Workshop distributions. You can use this to your advantage to keep certain files out of your build.


Now, while I can't produce templates and support every build system in the world, I will be providing templates for #1 and #2 below which you can use to get started quickly. You will still need to see the "Set up environment" step for the rest of the instructions however.

These templates require Visual Studio 2015 Community Edition, which is a completely free environment for developing programs, as well as .NET modules! You can get that here: https://www.visualstudio.com/en-us/downloads/visual-studio-2015-downloads-vs.aspx

These templates require some version of Visual Studio, luckily the community versions are free and they can do everything you'll need to mod DG! You can get the latest version of Visual Studio Community from here: https://visualstudio.microsoft.com/vs/community/ -edited by CORPTRON

Templates: (updated to .NET 4.5.2 by CORPTRON)
#1: https://www.wonthelp.info/DuckGameModTemplate1.zip
#2: https://www.wonthelp.info/DuckGameModTemplate2.zip

Paril's old .NET 4.0 versions of the templates, if you still need them:
#1: http://paril.ca/DuckGame/ModTemplate1.zip
#2: http://paril.ca/DuckGame/ModTemplate2.zip


To use these templates, simply extract them into your brand new mod folder, and open up the .sln with Visual Studio. Most of the environment steps will be completed, however you must still set the Assembly Name and be sure that the Duck Game reference is good. If, under the Solution Explorer < References section, you see an orange triangle next to Duck Game such as this:


then you should right-click it, press Delete, and then follow the steps in "Set up environment" under the "Adding Duck Game reference" section. After that, you may skip ahead to the next section.
Set up environment
This section is mainly if you are setting up an environment with another C# development program, and just contains general information as to how mods are loaded.

Assembly Name

The name of your assembly must match the name of the folder you've created. In Visual Studio 2015, to access these settings, right-click your project, and go to Properties.


You'll instantly be hovered over "Assembly name" under the Application tab, which you should set to the exact same as your folder name. You may also want to modify the Build < Output Dir to your mod directory, in the case that you are using a new project and want it to automatically build to your Mod folder. If you are using the provided templates, this will automatically be set for you.

Duck Game reference

The only reference you need to add in order to make a mod for Duck Game is Duck Game itself. Adding it as a reference in Visual Studio 2015 is simple; in your Solution Explorer, right-click References and click "Add Reference..."


In this dialog, click "Browse..." on the bottom, browse to your Duck Game folder, and double-click on DuckGame.exe


Then, click OK. Now, we just have to be sure it won't try to copy the EXE automatically into your mod directory, which is the default behavior of Visual Studio; right-click on the new reference in the Solution Explorer and press Properties. In the Properties window, be sure that "Copy Local" is "False". If it is not, set it to "False".


Mod information

Four standard .NET assembly attributes are used to provide more information to users who see the mod in-game - Title, Company, Description, and Version. You can set these in most IDE's Project Properties, but if not, you can also set them right in your mod's code. The template uses this in Mod.cs, but for the benefit of everybody, this is how to use them:

// At the top of your file, after other usings: using System.Reflection; // The title of your mod, as displayed in menus [assembly: AssemblyTitle("My Custom Mod")] // The author of the mod [assembly: AssemblyCompany("Me, The Creator")] // The description of the mod [assembly: AssemblyDescription("This Mod Does All The Things!")] // The mod's version [assembly: AssemblyVersion("1.0.0.0")]
Configuration File
A special file in the root of your mod folder, named "mod.conf", can be created (and will be created automatically by Duck Game if it does not exist) to provide some advanced configuration to your mod.

It is a simple XML file with one root element (Mod) and has child elements for configuration. Supported child elements are as follows:

  • SoftDependencies - A list of mod names, separated by |, that should be loaded before yours, but are not required for your mod to load.
  • HardDependencies - A list of mod names, separated by |, that must be loaded before yours. If that dependency is not found, your mod will not load.
  • NoCompilation - True or False, default is False. If this is true, the mod will not attempt to automatically compile .cs files into a DLL if a standard <mod>.dll is not found. The idea is that this will support special mods that don't require any code.
  • PreloadContent - True or False, default is True. If this is true, the mod will preload all of the content located inside its content directory. This will increase load times, but will prevent stuttering when loading custom content in game.
  • PinkTransparency - True or False, default is True. When this is set to true, the color (255, 0, 255) will be replaced with transparency in any textures. This will affect performance when loading, turn it off for better performance.
Basics
Creating a mod for Duck Game will require experience with basic math and a lot of fiddling. Documentation is fairly limited at the moment, but hopefully as things move forward we will have more samples and documentation to provide.

The base class for everything in Duck Game is "Thing" - if you wish to add a new object to the game, that is the class you must inherit.

Adding an EditorGroup attribute to your custom class will allow it to appear in the Editor. The format for this attribute is a token followed by |, for instance:

[EditorGroup("guns|explosives")]

will place your Thing in guns -> explosives.

The static function Thing::GetPath should be used when you wish to query for content in your mod. Thing::GetPath(string), the non-static function, will give you a path directly to your mod (more specifically, to the path of the mod that owns the Thing - which in this case is yours). Thing::GetPath<TMod>(string), the static version, will allow you to call it from anywhere. Pass it your Mod type, or the Mod type you wish you get a path to, and it will give you it.

The Content class is used to load and fetch loaded sounds, textures and songs.
The Sprite and SpriteMap classes are used for creating and maintaining a sprite.
The Graphics class provides direct access to the drawing procedures, if you need more advanced drawing access.

Every Type instance can be given a property bag - a list of keys and values that can be modified during initialization. Inside your Mod, you can check the protected "_properties" member, and you may modify your Mod's property bag during initialization but not at run-time. Things can be given simple properties via the BaggedProperty attribute, for instance:

[BaggedProperty("isGrenade", false)]

You can fetch a property bag for a Type via the ContentProperties.GetBag functions. These are read-only. You can use these as a way to communicate special constant values between mods.
Important types
The following types will be loaded from your mod and registered for use in the game:

  • Thing - the base class for anything that can appear in the game.
  • AmmoType - a special class used for specifying ammo fired from guns. This allows you to specify special data to be passed along with your ammo, and is an important piece of how bullets are transferred over the network.
  • DeathCrateSetting - a class for specifying a potential outcome for a Death Crate. Not currently synced in multiplayer at the time of writing this guide.
  • DestroyType - a class for specifying the type of destruction against a prop. These are mostly used as tags and will likely change in the future.

The following are built-in bagged properties for Things that you may modify on your Things:

  • canSpawn - boolean, default true. Whether or not this Thing can be spawned from a random box. Note that this only applies to Things that inherit from PhysicsObject.
  • isOnlineCapable - boolean, default true. Whether or not this Thing will be spawnable in online play.
  • isFatal - boolean, default true. Whether or not this Thing can implicitly kill other ducks (for instance, the Net Gun does not implicitly kill other ducks, whereas a pistol does). This is used as a hint for the random level generator.
  • isSuperWeapon - boolean, default false. Whether or not this Thing is classed as a 'super weapon' and will have lower chances of spawning in randomly generated maps.
Uploading and updating
When you're ready to upload, you can perform a Workshop upload in-game via the Manage Mods menu in Settings. The initial upload is quick and automated. If you wish to have a small preview image in the Manage Mods menu, add a texture named "preview.png" inside your content/ folder, and it will be used by the Menu to provide a preview.

To update a mod, select the UPDATE option in Manage Mods. You'll be prompted to add a few lines for update notes; when ready, click Update and it will submit the content through Steam Workshop.
47 commentaires
꧁Kritzy꧂ 7 janv. 2022 à 14h03 
@PatitoFake Can't you temporatily unsubscribe from a few mods, launch the game, disable a few mods, and then resubscribe to them when the game is started again? Might be worth a try
0XxBluexX0 7 janv. 2022 à 10h37 
HI, how I can disble mods without running duck game? I instaled to many mods and now I can't run the game becuase it crash. Some help pls :,(
☂P De Pepito☂ 28 déc. 2021 à 8h05 
duck game new update pls
Smokiestsea535 10 mai 2019 à 11h36 
how can I replace an actual weapon? because I am looking to mod cars into the game by replacing the chainsaw first to see how it work I already got the sprites made and everything and start it doing the programing but being honest i got no clue how to program so I am just trying and the most I made was to make the weapon appear but with no sprite no animation only the option that the weapon is there
Nyarlathotep Jano 2 mars 2019 à 13h34 
in case I want to make a hat pack and then want to update it and add hats, where do I add them and in what format? I add them in the folder documents / duck game / mods / "name of the mod"? or where? and in what format should the hats be, in .hat in png, should I export a new modpack and add the folder? what should I do?!? please help: c
toast - tscoct 5 déc. 2018 à 10h31 
hello!

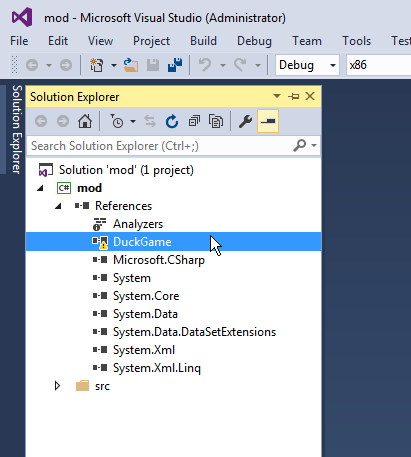
i'm having a little(or maybe not) problem with setting up enviroment,

after i've created duck game reference, my code, that is from duck game, is covered in red lines and after lauching duck game the mod is'nt showing up

i'm going to include a screenshot here:
https://i.imgur.com/qaqN1aH.png

(also, exsuse me for my english)
sau 15 nov. 2017 à 18h15 
"Mods for Duck Game can be loaded one of two days"
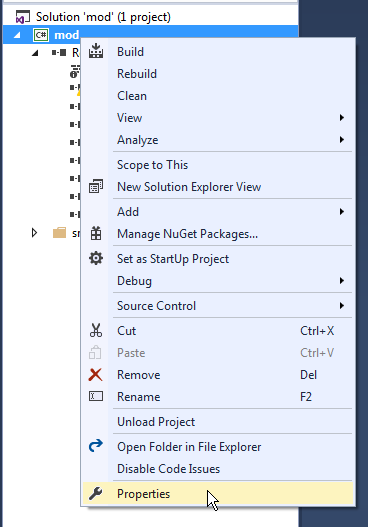
Do you mean one of two ways?
Neko 18 aout 2017 à 13h30 
It seems that the link in the line "<Project ToolsVersion="14.0" DefaultTargets="Build" xmlns="http://schemas.microsoft.com/developer/msbuild/2003">" is not working anymore and making me unable to load the project, anyone know what to do or if i am wrong?
stolve 25 juin 2017 à 19h05 
Is there a deltatime available for the update function?
Zloty_Diament (Golden_Diamond) 19 févr. 2017 à 10h34 
I guess the "Delete Duck Game reference" step can be skipped.
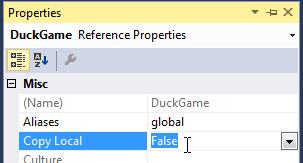
When I had the "!" triangle, I just choosed "add new reference", selected DuckGame.exe, and it covered the previous one, leaving the "copy to mod folder automaticaly" as "false"