Sheltered

Sheltered

28 ratings
Sheltered Hardcore Guide (Update 1.8)
By Pawnstar
(ONLY VALID FOR STEAM VERSION) My detailed strategy for Hardcore difficulty. Effective since Patch 1.6, strategy does not require beating any Scenarios for the unlockable items.
   
Award
Favorite
Favorited
Unfavorite
Introduction
It's no secret: There is more than one strategy to beat Hardcore.
However, if you are reading this, you are very likely to be struggling or simply wondering if you could have done your game any better than what you did.

You require good grasp of the game's mechanics, nerves of steel, a strong will and... time. Lots of time. At the same time, you need to know the difference between Hardcore's settings and your previous game's settings.

It is interesting to note that all methods you employ for Hardcore CAN be used on lower difficulties.

This guide is written based on my own experiences in the game. In fact, I have an infinity game on Hardcore going on, so you can be sure this strategy worked.

The below guides are also written by me and should be referenced to if you have any game-basics questions.

Sheltered General Guide
http://steamcommunity.com/sharedfiles/filedetails/?id=615542015

Sheltered Quest Guide
http://steamcommunity.com/sharedfiles/filedetails/?id=622301332
Hardcore Settings
Chance of Rain
Drought
Map Resource
Scarce
Breach Frequency (Raids)
Relentless
Faction Density
Dense
Populace Mood
Violent
Map Size
Very Large

Chance of Rain: Drought
Rain only occurs after 10+ days, with each rain lasting only 1-3 game hours. With the default Water Filter, you get a minimum of 6 or 7 water per rain. When maxed out, the minimum becomes 9-10 (by mathematical addition rounded down). In case you are not aware, water is measured in float/double variables, meaning that you may have 22.999 water and it will still show 22.

This is perhaps the limiting factor of Hardcore games. Water is required for expeditions, drinking and other basics in the shelter. Having insufficient water means you prioritize certain actions over others, and that means expeditions are of low priority. Without expeditions, your inflow of resources is diminished.

IMPORTANT NOTE
Short rains means less exposure to contamination from Black Rain. It is so short that you can pretend Black Rain never existed.

Map Resource: Scarce
This game regenerate items after a few days. Contrary to popular belief, you do NOT have to empty out a location before they replenish on their own. I have personally tested this and can verify so.

Scarce reduces the number of items that can spawn during a regeneration. This also seems to affect bonus loots from equipping Lockpick, Prospector's Kit and Metal Detector.

Breach Frequency: Relentless
Relentless reduces the number of days between each raid to about 8+ days, but does not increase the difficulty of each raid in any way; you are still subjected to the same raid mechanics as the rest of the game. All strategies you apply for raids can still be used in Hardcore, subject to your resource availability.

Raids cannot occur from Day 1 to Day 50, so you have that amount of time to prepare. This 50-days grace is constant throughout all difficulties and the 50-day grace will be given to you again when you move shelters.

IMPORTANT NOTE
From Shelter 4 onwards, you are no longer given the 50-day grace, but your first raid will still follow the regular raid mechanics.

Faction Density: Dense
Simply put, each faction has more territories in terms of locations and territory size. All faction NPCs still behave the same way as other difficulties (i.e. one faction, usually the Corps, being the strongest and always have a minimum encounter of 3), but their reactions during encounters are still dependent on another setting.

Populace Mood: Violent
Every encounter where you bump into somebody (as opposed to approaching strangers) now have a high chance of the stranger challenging you to a fight. This can be a good or bad thing.

Good: NPCs asking you to trade or recruit in the early game are rather pointless and just waste your time in general. I personally would rather beat them for all their loots.

Bad: In the early game, you might not be prepared against the stronger faction members and will be forced to fight, gamble with "You Handle It" to skip encounters (but be able to loot the location) or outright flee (skip the location).

Note that this is a chance-based mechanic and you will still meet people who want to trade with you or be recruited. Also, "Violent" mood does not increase the difficulty of random encounters; the stats of random NPCs are still the same as other difficulties.

Pre 1.8 Note
If you bump into someone, that someone challenges you to a fight but one of your party members does a successful taunt, the enemy will flee. Depending on your luck, the enemy may flee successfully, but you will not be able to search the location. This is a bug that was reported and hence fixed in 1.8.

Map Size: Very Large
As the name implies, a very large map.

There is a fixed number of locations per map on all difficulties: a larger map simply means the possibility of a larger walking distance between each set of locations. For example, that lone Petrol Station could be further away than it should on Normal, but clustered buildings, denoting a town or city, will still retain the close proximity they had on Normal.

Fog of War: On
Simply covers the map in fog when you first start. Compared to the Off setting, you won't know where the buildings are. Once fog is uncovered, it remains uncovered for a very long time, probably taking a few hundred days before the fog slowly recovers, which will not happen as long as you visit that location once in a while. This affects shelter moving and while it can be a hassle to find where the towns/cities are, you can still spot quests, faction territories (useful for spotting buildings on the map) and terrain, which is useful if you are rushing for Crash Sites.
Starting Inventory
Difficulty does not affect your starting inventory. You start with the same materials as you did in Normal.

However, while the variation of items remain the same, most items will have varied starting amounts, except Rations, Water and Fuel. There's a slight chance that you will gain a small amount of Hinges, Ropes and Motors.

Here's an image of your starting items, which can be found in your Storage. Feel free to restart until you get your desired RNG-decided stash.

Phase 1: The Family
If you have been reading my other guides, you will find the settings below rather familiar. I swear by this setup and never really changed it across all the patches and difficulties. I have played Sheltered since Danger update (there was only one difficulty, which is now known as Normal) and this setup has worked throughout the ages, even on my recent Hardcore foray.

Assuming you want to follow my strategy for Hardcore, this is my setup for your reference.

Pet
The Cat, and only the Cat. Meow.

Adults
Both adults Courageous trait with Violent preset stats.

Violent over troubled due to Dexterity. Violent's starting Dexterity lets you get the first move right in the beginning. Wood (Troubled) may deal more damage than Pipe (Violent), but it is unlikely to kill anyone on both members' first turn, not to mention that the NPC may have their turns first.

Kiddos
The below setups are for one child. I will be listing three setups, of which I would recommend picking two instead of giving both children the same specialty. Regarding stats, choose anything you like, but always remember that you can max them all during the game. Perception is the only one for children that cannot be maxed without going on expeditions.
  1. The Crafter: This kid focuses on building and repairing in the shelter. Hands-on trait with any preset stat. Do remember that while Crafter kids are obsoleted in the end-game phase once you have all 10 tools on your workbench and are leaving your lights in your shelter on, it is highly likely that you will be spending a very long time in your shelter without any tools and light due to lack of resources, depending on your luck with resources and other conditions.
  2. The Salvager: For abusing game mechanics. Highly recommended for one of your child. Bonus if your other child has Wasteful as a negative trait, which can always be turned into Resourceful. Resourceful trait with any preset stat.
  3. The John/Jean Rambo: For defending your shelter during raids while the adults are out partyingon expeditions. Courageous trait with either Bully or Rough and Tumble. Do note that dexterity or strength difference is not an issue, as you will be training in your shelter instead of going out.
In all of the above cases, any kid can arm traps efficiently during raids and wear hazmat suits to repair on the surface.

You can avoid needing a John/Jean Rambo kid by waiting for a shelter raid before going on an expedition with your adults or building effective traps (or play by chance with the lower-tier traps and keep reloading the game until you get the desired outcome for raids). Whatever you do, try to avoid the Worst Case Scenario as described in my Sheltered General Guide.

It is possible to have both kids having the same specialty and keep restarting until you get the combination of negative traits that can turn them into hybrids. For example, in one of my old savegames, I had a kid that was Courageous and Hands-off, which turned into Hands-on very quickly.

My advice on negative traits
For Hardcore, since I will not recommend recruiting anyone, it is in your best interest to find a set of negative traits that you can either ignore or easily work into a positive one by saving Family Preset when you create a new game, deleting your current savegame and creating a new one.

Cowardice: Adults should not be getting this since you are getting Courageous to begin with. Cowardice on kids simply makes you lose control of that kid once your doors are busted. If you have a John/Jean Rambo kid, this is not an issue. If you have time, you can bring this Cowardice kid out on expeditions and win fights to turn it into Courageous, giving you another John/Jean Rambo if you don't have one.

Wasteful: Useful if you get this on the Crafter kid. In the early game, the only Tier 1 item that uses resources that you don't need for survival is the Sleeping Bag (3 Nylon, 3 Wool). Yes, these are used in upgrades and certain items, but these are still low priority. Get the Wasteful kid to spam deconstruct on 20 Sleeping Bags when you have the time and resources and soon the kid will be a Resourceful kid.

PRE 1.7 PATCH BUG NOTE
Wasteful does not turn into Resourceful as the code does not count the number of times you have deconstructed. This has been fixed in Patch 1.7

Big Eater: Not a big deal. Having Big Eaters in your family won't starve your family as fast as you think. Can be worked into Small Eaters if you are daring and have time.

Lazy: Simply affects movement speed in shelter and expeditions, and does not increase the amount of water you need on expeditions. Lazy turns into Proactive after a few expeditions. Useful on adults. For kids, not really a big issue, except that the kid walks slower. Can be countered by effective rearranging of your shelter.

Light Sleeper: Annoying. Tiredness affects training, so you have to wait longer before the you can continue training. You can turn this into Deep Sleeper though, but it takes at least three in-game days of no-sleep. Your choice to reroll or keep; I kept mine.

Pessimistic: Worthless trait. Unless you are not alert to your survivor's stats, you never need to worry about stress and trauma. Even working this into Optimistic isn't really worth it. I would suggest a reroll, but you can ignore it if you don't really care. Beats getting something you don't like, yeah?

Unhygienic: In my strategy, this is a worthless trait as you will permanently be dirty. Another trait that you can go "whew, at least it isn't the other negative trait that I don't want".

Hands-off: Useful on kids. You can convert any kid type into a hybrid with Crafter kid if you get this turned into Hands-on. Not so much use with the adults, since they are just helping out instead of being the core shelter workers. However, do note that with 0 work efficiency (aka no tools on your workbench) and without light (or working at night on the surface), repairing takes a really long time.
Phase 2: Game starts now!
So you have decided on a (or followed my) family setup, got the negative traits that you liked and the starting stash (I mentioned this earlier in case you forgot: starting stash is slightly random apart from water, food and fuel). Time to save and exit your game!

WHAT? ARE YOU KIDDING?
I'm totally serious. You will know (or remember from lessons learnt) that a game-over means a deleted savegame, which can be brought back if you made backup copies of your savegame.

So do that now, backup your game. You wouldn't want to make a new savegame and try getting your desired starting setup again, would you?

The Game Only Starts After Backup.
Here comes the "easy" part, one which you will be familiar with. The order is not important, but just happens to be my clockwork steps I perform in every new game.

  • One kid to upgrade Workbench to Level 2: To unlock Freezer, which will be the main survival structure in your shelter. Other items in Tier 2 are subjected to your needs
  • Equip the other kid with the Hazmat suit (or do it for both, your choice) and send him to repair the filters on the surface. Preferably let the Salvager kid be the one wearing the suit if you only want one kid. Having two kids with Hazmat suits can be confusing if you have different specialties for them.
  • One adult to build a new room
  • Other adult repair generator

Once Workbench is level 2, build an extra Water Butt for rain and a Bed. Some people have decided to use Sleeping Bags, but you will be training on Punchbag once you can, so a Bed will be better. However, building a Bed usually means you do not have enough Nails to build a Crate. Right at the beginning, you don't really need more storage, so you are still capable of making-do with good inventory management. Lastly, build the Mop and Bucket. You will only need this for a short while though, and can be totally avoided or deconstructed as I will note later.

While doing the above, send someone to disable all the Lights, including the two on the left side of the screen. You don't really need the faster crafting speed and you will need to save fuel. Now that I mention fuel, keep an eye on the Generator and make sure there's fuel in it, and keep both the Generators and the two filters in good repair.

You will note that I did not mention to build any Toilet or Showers. If you are sharp, you will already guess what I did. If you are less-sharp, but still knowledgeable of the game mechanics, you will note that Toilet and Showers use water. My strategy ensures that you don't need Water for anything apart from drinking, hence at this point, YOUR WATER PROBLEM IS ALREADY SOLVED.

Yes, that means NO EXPEDITIONS. Not even the first maiden trip out for the first three locations.

Solving Food Problem
You will know that, right off the bat, you don't have any Hinges or Ropes. Hinges are needed for Freezers and Ropes for Snare Traps, and that both just happen to be the missing required items to get to Level 3 Workbench. How coincident.

Without expeditions and only 10 Rations, your food supply won't last long for a family of four. No expeditions also mean no raw materials to build and no scrap materials for that inefficient Makeshift Recycler, so don't build that junk.

A reliable solution to the food problem, one that I personally can attest to, is through the use of your Cat to catch rats. As noted in my other guide, Rats only come when the shelter is rather dirty. Rats will also steal rations. If your idiot Cat actually catches a Rat, you will gain one meat, but only if you have a Freezer.

In other words, between the start of the game and you running out of food, you have that much time left to find the required materials for the Freezer you will undoubtedly need. For starters, you are already missing 1 Hinge and 1 Motor, and will still require 3 Pipe, 2 Metal and 1 Rubber.

So what do you do without expeditions? Call in traders! But what can you trade for the stuff you need? Your starting (sort-of) useless Soap, Gas Masks (leave one for emergencies) and Anti-rads (leave one for emergencies), of course! Bandages too if you are confident in your fights. For those really worried about surviving and are unsure, your Wool is also safe for trading in the early game, but keep 8 for the Punchbag.

What should you prioritize in trading? It is really up to your current situation. If you are confident and are satisfied with the way things are, priortize raw materials for the next upgrade. In the occasions that traders bring water, buy them too. If you are desperate for a survival item (such as a Hinge and Motor that you still haven't gotten but you are running out of Rations), backup your game and keep trying till you get it.

Now, regarding eating. It is likely that your Dirtiness bar is still not full when your survivors need to eat, so for the first meal, they are unlikely to get Food Poisoning. As far as Hardcore goes, I recommend only eating when you are Malnutritioned and drink water only when you are Dehydrated to maximize the time you have with these supplies. Braver players can wait till the HP bar drops till near death before eating or drinking.

On your second meal, it is likely that your hunger dirtiness bar is already full. At this point, you will either have a Freezer or is still waiting for the last materials to build one. If it's the former case, you can deconstruct the Mop and Bucket, preferably with the Salvager kid to hopefully recover all materials (or, minimally, almost all. You can try reloading a backup game to try getting it all back) and let the shelter get dirty from this point on. If it's the latter, keep the Mop and Bucket till you build the Freezer.

In summary, your Phase 2 goals are as follows, in this order

  1. Doing the initial four steps
  2. Turn off all Lights
  3. Getting materials for building a Freezer
  4. Keep an eye on Generator remaining fuel
  5. Keep things repaired
  6. Micro-manage your supplies
  7. Plan for Phase 3
Phase 3: The Food Problem Solved
How do I know if I'm in Phase 3?
  1. Your first Freezer is up

At this point, you should go read up on the Rat Strategy I use, which can be found in the Sheltered General Guide. The basic idea is to keep your shelter dirty, let the rats roam around and let them steal your rations, which you will no longer need, while your lazy Cat catches rats for meat with your Freezer.

Do note that the garbage accumulating in your shelter may lag low-spec computers. As long as you have sufficient garbage (7 to 10 to be safe) on the floor, rats will come. It is rather impossible to count unless you are keeping track. For low-spec computers, keep the Mop and Bucket to control the lag by removing garbage. For better computers, deconstruct it for resources or keep it anyway, up to you. We won't be using it for a long time.

Right before the rats come, fill your Cat's bowl FIRST (important! This ensures your cat doesn't happen to get hungry once you run out of food, which is where you lose), then have all survivors, regardless of hunger, to eat the rations to empty out their hunger bars as much as you can. Any remaining rations can be ignored, used in trades if you can get Traders before the rats come, or simply eaten to totally empty out hunger bars, especially with Big Eaters.

Typically, if you don't fill your Cat's bowl until it meows for food, you will get about 5-7 meat between feeding. Always save one meat for your Cat's food, and feed according to the hunger bar on your survivors. You should rarely hit the maximum of 10 Meat that your Freezer can hold. If you do hit 10, you can either quickly feed the Cat or your survivor, or in the instance where a Trader comes, use it as a trade item of 15 value (30 if you gain the upper hand). As long as your cat always has its meal, you will never miss yours. Building a Poor Stove at this point helps a little if you can get the resources, which should be fairly easy since Traders that bring Hinges usually bring quite a number of those, and Hinges are worth only 1 value.

Rats will never steal anything apart from Rations, so your Meat and other items are safe. However, even if you keep the Freezer powered, there is decomposition and you will lose Meat over time.

This is a game basic and game mechanic: Food poisoning does not reduce HP or kill you, so that is why you don't need a Shower -at all-. Vomiting also keeps the place dirty so that rats can come. Toilet bar will add to the Stress counter, but once you poop on the floor, it goes back all the way to empty, hence no longer generating stress should you be in the red for Hunger and Thirst at the same time. Note that Dirtiness bar does NOT count towards Stress counter.

Fuel Problems
Since power is mentioned, you may realize that Traders rarely bring in Fuel, and you only had 8 to begin with! Assuming all Lights turned off and no other appliances apart from Freezers and Filters (you should never disable these to be honest) are being used (such as Stove), you will be using 0.4 fuel per day. One Fuel item restores 1.0, so you can do the maths; you won't last long!

This is where Incinerator Fuel comes into play. Incinerators are optional if you are lucky with Traders bringing Fuel and you having the stuff to pay them with, but more often than not, you don't. Despite being a Tier 1 item, you will require a massive amount of materials (massive at this point of the game) for one.

Incinerator Required Materials
Metal
Hinge
Pipe
Valve
10
2
4
2

Chances are, by the time you get the Incinerator, assuming you are good with trading (meaning you know when to use your Anti-rads and when to use other materials you don't need for trading), you will be low on things that you can afford to trade out for anymore items.

Currently, your water and food problems are solved in terms of being able to survive in your shelter, and you should be looking to make your life less "on-the-edge" and more humane. Fuel problems will soon catch up if you don't do anything about it. You can delay using the Incinerator, but I'm pretty sure you will eventually need it. I have games where I lost due to running out of fuel and I didn't have the incinerator.

I recommend only burning Animal Fat, Coals and Limestone, which have low trade value and no other uses, for fuel in your Incinerator. Note that if you had upgraded your Generator for efficiency, it does NOT get carried over to the Incinerator. Animal Fat can be obtained from Snare Traps.

IMPORTANT NOTE
Save and backup your game if you have forgotten to do so.

I will just end this section by saying that in no point of the game will fuel problems ever be solved, especially on Hardcore, and will continue to be an issue as long as you don't have sufficient water to mount frequent expeditions.

Preparing for the Second Raid after Day 50
Yes, you will be stuck at Phase 3 for a long time, but you will survive unless you run out of fuel or accidentally forget to feed your Cat.

By now you should be aiming to move up to Level 3 Workbench. As noted earlier, you will need Hinges and Ropes, but chances are that the other materials that you used to have in sufficient numbers are now diminished. Make going to Level 3 Workbench a high priority, as it unlocks the fuel efficient Medium Freezer (holds 20 Meat, cost less power than two 10-slot Freezers) and the most efficient Advanced Snare Trap.

Level 3 Workbench Required Materials
Metal
Pipe
Hinge
Rope
5
10
7
7

While working towards the Level 3 Workbench, maybe build another Storage Box and don't forget to train up your survivors! Between nothing to do and the second raid (safe to assume Day 59 onwards), you should be aiming to get 20 Strength and 20 Dexterity, at least for the adults! Build a Punchbag when you have the materials and get training (make sure you have a Bed). Always remember that Tiredness does not affect Stress, so feel free to reserve that bed for training adults! You have enough time to train until the second raid comes, which may have a chance of breaking through the second door to require a shelter defence.

Along the way, and usually by now, you would have your first rainfall. If you have been managing your water well, you can start to accumulate more by making more Water Butts (I leave the Water Butt tier to you to decide), but 50 or even 70 is sufficient. Aim to be able to make a short expedition that allows you to have 10-15 water remaining for shelter use. Due to Hardcore's short rainfalls, you will never have problems with Water Contamination due to Black Rain.

During trading, keep an eye out for weapons they might bring along. You start with Wood and Pipe, and if those run out due to using them for construction, you have no other weapons! On my game, I got REALLY lucky and one Trader brought a Sledgehammer during Phase 2 itself, the best melee weapon in the game! However, with Courageous parents, you can do fine with any weapon on your current Strength that lets you deal -at least- 34 damage per hit. As you will know, Courageous means that your first two hits NEVER misses on Melee strikes, so you can chance it and score a one-turn KO. A guaranteed one-turn-kill is, of course, a minimum of 50 damage per hit.
Phase 3 Continued: Working for a Better Life
Rant: Damn word count... even for guides? REALLY?

Continued from before
Also, aim for four of the highest grade melee weapon you can find: Two for expedition members, two for shelter defence.

Once you are Level 3 Workbench, build that Medium Freezer work on getting your first Advanced Snare Trap and put it as close to the hatch as possible. Have your kid to harvest each time an animal gets trapped for extra Meat to trade, Animal Fat to burn in the Incinerator for fuel and Animal Skins for future upgrading, trading or save it for the Great Bulletproof Vest (Level 4 Workbench). Building a second Medium Freezer is never a bad idea; you get more storage for food!

If you need more room space, get some Concrete from trades, but remember that building new rooms also require Wood and Metal Pieces.

As for the Advanced Snare Traps, keep an eye on its uses. Once the number of uses shows "1", deconstruct it immediately with your Salvager kid; you will get back almost (if not) all the materials used to make one! With this method (and the occasional savegame reload if you run out of wood and deconstructing didn't give you back everything), your Advanced Snare Trap operation will never cease. Hardcore doesn't seem to affect the frequency and loots of the animals, so you are guaranteed a windfall of Meat if the deer-that-doesn't-sound-like-a-deer comes. Don't fret if the rabbit comes, it's still Meat for food.

Keep up with your Rat Operation until you can manage three or more Advanced Snare Traps. Optionally, keep the operation going as it gives your Cat something to do instead of simply eating and pooping. However, do remember that with more Freezers, you will use more Fuel. Keep that in mind when deciding to build more Freezers. However, if you decide to end the Rat Operation, you will need the Mop and Bucket, and remember that you can start keeping Rations again.

At anytime you feel that you have sufficient water to spare, mount a short expedition. It never hurts to bring home more stuff. It is perfectly to send just one person if he's well trained and you have the equipment and if you plan to only explore the areas around your shelter, but don't forget about Gas Masks or Anti-rads, or you can just simply pray that they don't come home with Radiation Poisoning.

Scanning Frequencies
Whenever your adults have nothing to do and when you don't have anything left to trade with, start Scanning Frequencies. This will reveal the faction territories, which you can opt to avoid. They will always start with the weakest, pause for a few days or so, then a stronger faction will start to appear and so on until the strongest faction shows up.

For some reasons, if you are still in Phase 3 by the time the strongest factions have arrived, you know you are really behind schedule. Don't let this fact pressure you though, just keep going.
Bonus if the strongest faction has a territory near you!


As you can see in the above image, The Corps was the strongest faction (typically, they will be) in my game and they have a territory very near my shelter. I only needed 39 water with two survivors in my party to reach them. Assuming I get into a combat with them, all I need to do is to toss two Good Pipe Bombs over to them and I will have a windfall of LOOTS.

Patch 1.8 Note
Effective 1.8, killing only award BROKEN weapons, so if you just toss explosives to kill them all, you will not gain any useable firearms or weapons, but you will still gain the other loots and ammunitions. If you want the weapons, you have to SUBDUE the target. This can be difficult if you are not strong enough. I recommend leaving one guy alive and alternate between Disarm and Subdue.

Advancing to Phase 4... YES!!!
First of all, if you can maintain your Fuel at this point and have done all the stuff I have written, breathe a sigh of relief and pat yourself on your back: you have crossed the hardest part of Hardcore.

Phase 4 is simply life after the basic necessities have been assured. You will be generating your own water with Water Condensers (Level 4 Workbench, consumes a lot of power, be careful with your Fuel) and in addition to rain, securing enough water to start expeditions to alleviate your other problems. You will start to find tools to craft/repair faster, components for your van, more materials to build the Recycling Plant, better weapons and even firearms for traps, luxury Blueprints and so on and forth.

Basically, once you are in Phase 4, your life is almost back to Normal difficulty. Continue training up, don't forget about shelter raids and you will reach Phase 5 aka end-game, where the Auto Pantry and Auto Water Butts keep you supplied infinitely and that you have found sufficient fuel for your Incinerator (max 99.0 fuel) with plenty of backup Coals and/or Animal Fat. At this point, you can opt to move shelters for the fifth floor and even then you will still be in Phase 5 with all the technologies and supplies you bring over, or simply stay and begin the Infinite Phase, where you no longer need to leave the shelter and can automate your survivors (except repairing).

Unfortunately, if you have been following my guide, you cannot access the Mystery Hatch legitimately. Here, I've said my piece, it is up to you to "get creative" to access the Hatch if you are really desperate.

Anyway, before you start drifting off to imagination of your Hardcore Infinite Phase, here are the goals, in summary, that you should consider to get yourself out of Phase 3, in this order:

  • Begin and maintain the Rat Operation
  • Build an Incinerator
  • Train up survivors (especially Adults)
  • Balance shelter needs and upgrades with fuel stock
  • Work towards Level 3 Workbench
  • Begin Advanced Snare Trap Operation
  • Expand Storage Boxes and Room Space as needed
  • Secure weapons from Traders
  • Craft armor and Bag items (Rucksacks)
  • Reserve enough water for a short expedition (requires more Water Butts)
  • Depending on distance and available water and other resources, mount expeditions to the nearest and strongest faction territory available on the map for easy loot
  • Work towards Level 4 Workbench
  • Balance Water Condensers for faster water income with available fuel
  • Explore map for more materials, supplies, workbench tools and van parts
  • Defend shelter as necessary
  • Find Blueprints and build the Luxury-grade stuff
  • (Optional) End the Rat Operation if you haven't and start switching over to a normal life in shelter
Phase 4 and Beyond
How do I know if I am in Phase 4?
  1. Level 4 Workbench
  2. Able to mount longer expeditions (through getting enough water from Water Condensers or simply waiting for rain)
  3. Fully upgraded Radio
  4. No longer dependent on Rat Operation (you can end it if you want)
  5. Replaced 2 Medium Freezers with a Large Freezer (don't forget that Meat does not get carried over to other Freezers, preferably do it when a certain Freezer has 0 meat)
  6. Food Problem solved with Advanced Snare Trap Operation
  7. Sufficient fuel (you can fall back on Generator fuel or continue to use Incinerator fuel)
  8. Upgraded Water Filter for Efficiency
  9. (For those who went back to Generator fuel)Fully upgraded Generator
  10. Upgraded Durability for all filters and Generators
  11. Recycling Plant built
  12. (Optional) Traps are of Tier 3 and/or Tier 4 with sufficient ammo and Tripwires (for Tier 3 trap)
  13. One survivor can defend a shelter raid on his or her own
  14. Able to trade comfortably with Traders

How do I know if I am in Phase 5?
You are on your own at this point, I believe you are already ignoring any of my advice by the time you reached Phase 4 since you can solve any problems by yourself.
Questions and Answers
Why not rush to Level 4 Workbench for Water Condenser and Solar Panel?
Fuel issues. Your water income from Water Condensers is proportionate to the amount of fuel you have to support them. If you have better ways of securing enough fuel in the early game, do let me know. Also, Water Condensers require quite a large number of materials, which you are unlikely to have when you first step into Tier 4 Workbench.

As I said before, my strategy is not the only way to beat Hardcore. In fact, any methods herein are subjected to nerfs or changes in future patches... who knows?

I sent a party out with my pet Dog and it never came back...
Not my problem, tell that to the developers in the forums. I only recommend the Cat.

How do I get Mystery Hatch if I followed your guide?
Google for it. Just remember that you cannot access the hatch without a fish legitimately.

How many tries did you take for Hardcore before being successful?
4. First game was a modified savegame, so I decided to start over a fresh game once I know how Hardcore worked. Second game, I ran out of fuel, something I did not foresee back then. Third game due to a bad decision, ran out of Meat right before my Cat was hungry.

I'm running out of fuel on my Incinerator!
Fall back on your Generator. I have been using the Incinerator the moment I could get my hands on one, and after close to 300 days, I have accumulated enough fuel to fall back on Generator, and so should you.

At Level 4 Workbench, you can start building Solar Panels on the surface to cut back on power usage on your Generator. This obviously doesn't work with the Incinerator, and you will still need to use Fuel at night.

Why trade Gas Masks and Anti-rads at the start of the game?
If you are not going out, why hang on to those?

I'm using XYZ strategy and it is better than yours!
Good for you. Now, why aren't you helping others? I would love to hear what you did too.

Your guide is rather barbaric! Talk about eating rats and living among poop and vomit, on top of not being able to shower or poop in a proper toilet!
Only the strongest survive, and as long as Food Poisoning does nothing to impede my survival, so be it.
Conclusion
Any questions?
Write in the comments section below. English only, please.

Credits?
Myself, Google, the community and Team17 of course.

My shelter on Hardcore


Note for players on all other platforms
Due to the difference in versions being maintained across the platforms, I regret to inform that I will not be able to help if you encounter something different from what is in this guide, as this is mainly written solely for the Steam version.
21 Comments
Pawnstar  [author] May 18 @ 3:48am 
I can't comment since there is no proof for or against, but pinning recipes was brought up by the community to make tracking desired resources easier. I dont think the devs would have thought that far ahead.

If only pinning up wishlist for money works IRL.
Minh May 18 @ 1:12am 
I don't want to lose in early game because I don't get needed items fast enough. I think maybe pinning recipe make the game give them to you faster.

In 1st few tries, I pin all early to late game recipes & get many needed items but they're for late game recipes.

Later, I pin only early game recipes. If they're done, I unpin them & pin next recipes. I make progress much faster, getting needed items at the moment.

I ask for confirmation whether pinning recipe make those needed items appear faster or it's bad luck & good luck that these cases occur.
Pawnstar  [author] May 17 @ 6:12pm 
And where did you get that idea from?
Minh May 17 @ 5:15pm 
Do I get items needed for recipe faster if I pin recipe? Seems like yes but I want to ensure.
Pawnstar  [author] May 13 @ 7:34pm 
Auto Schematics: let's not put the cart before the horse. You will need water to be looking for these and schematics are set to only appear after a certain number of days and with no guarantee that they will spawn near you. In fact, on my current successful run, it was located at the furthest location on the map, and one of the last places I visited.

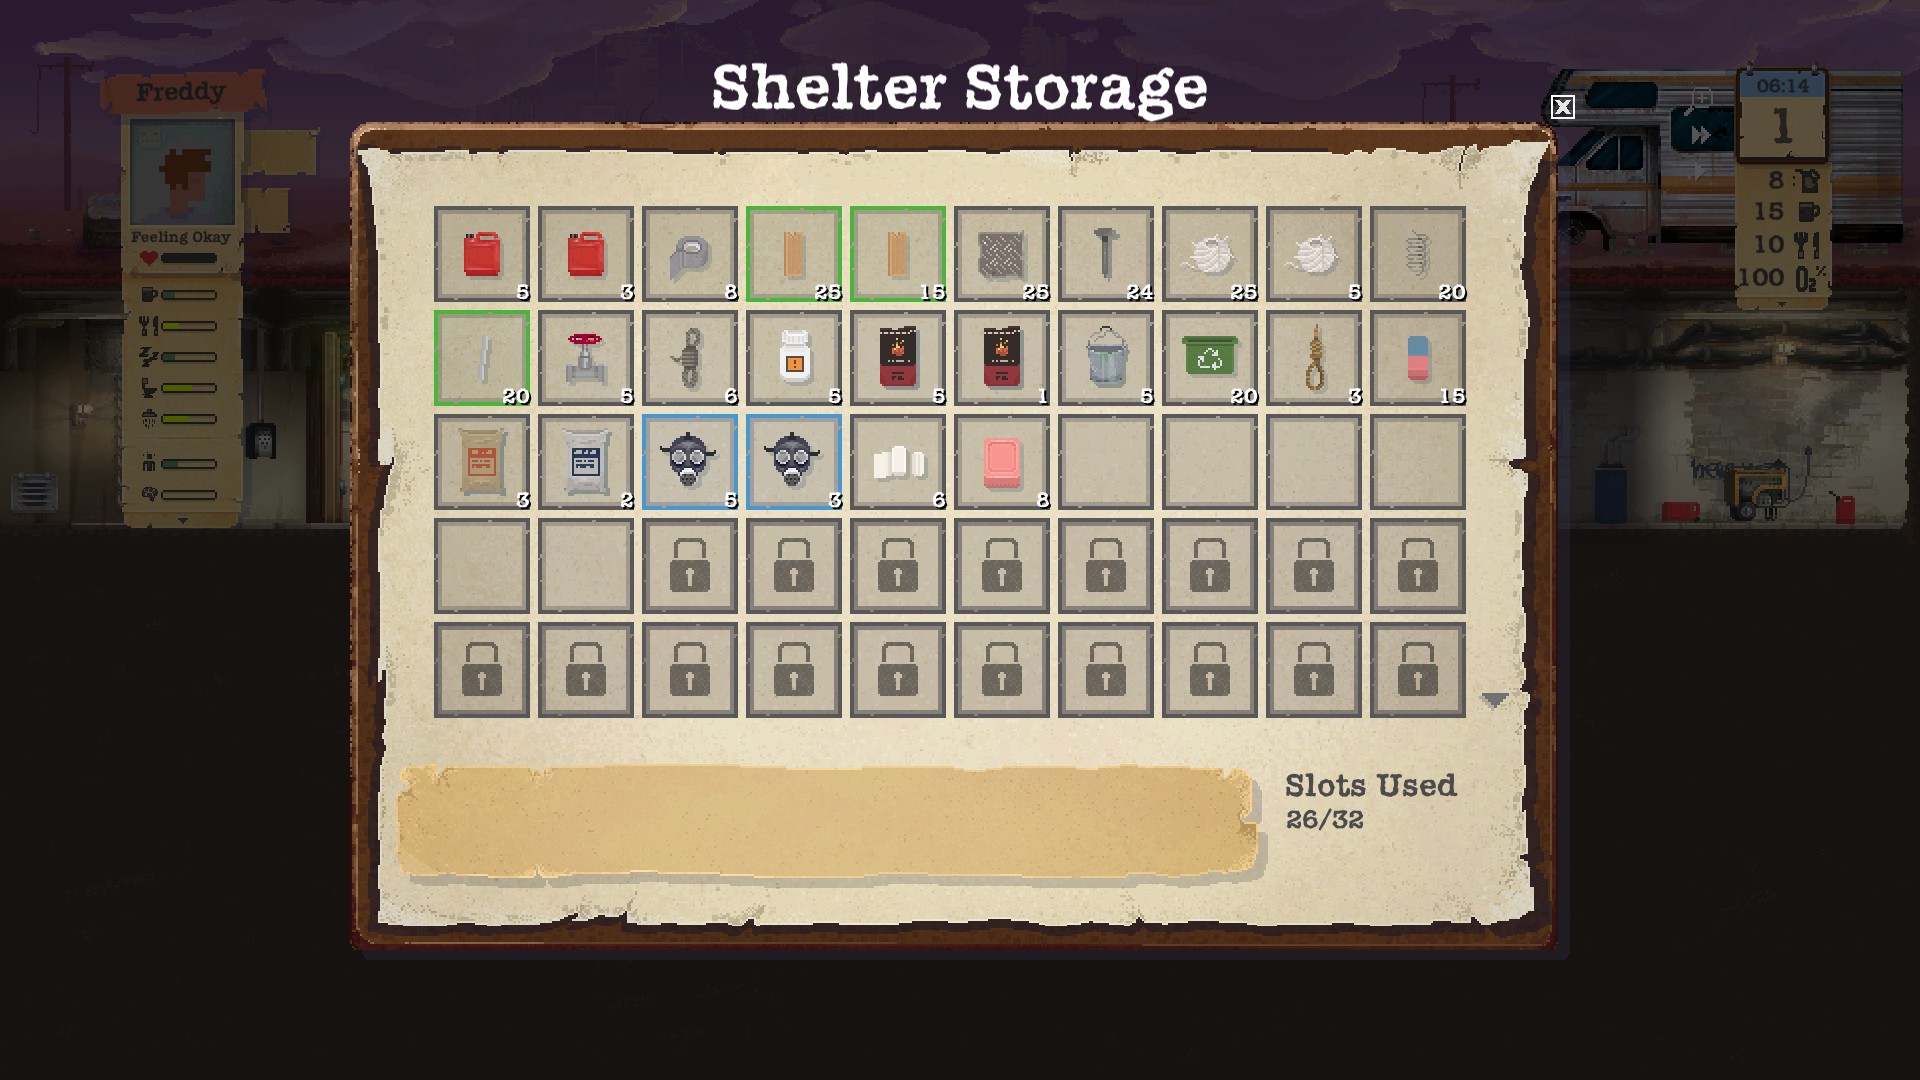
Trash Bin: Trash bin just adds on to item micro, as now you also gotta keep an eye on the surface to make sure people don't steal the stuff you really need. If you aren't going out at all, you will not need that much storage to begin with, as you will be burning the Animal Fat in the incinerator for fuel from the Advanced Snare Traps. Personally I have never touched the Trash Bin and never had to use it, so I didn't include that in the guide.
Pawnstar  [author] May 13 @ 7:34pm 
Small space for rats to roam around: Good point, but do remember that the space needs to increase over time to accomodate extra stuff.

Freezer: Isn't this mentioned?

Meat transfers: Not necessary, but I guess you can do that too.

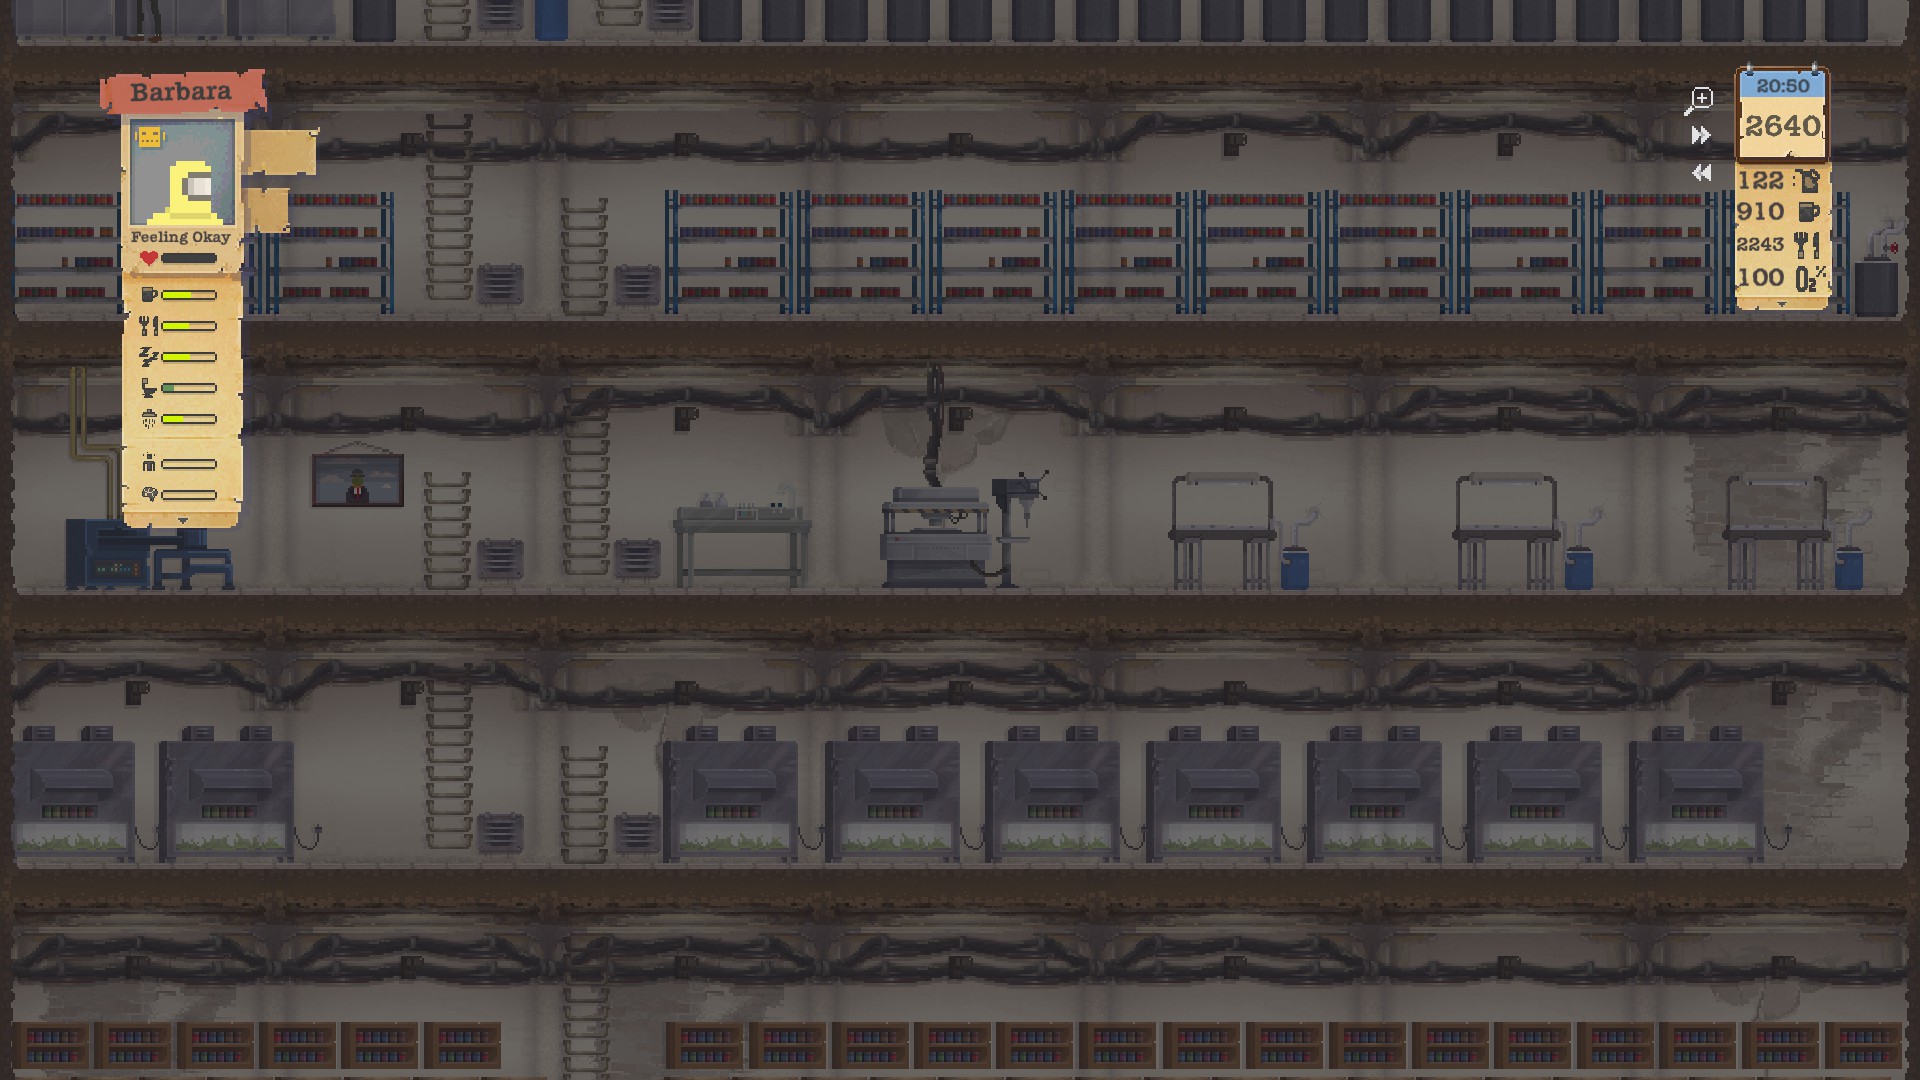
Rat trap: this guide focuses on using the cat and while Rat Trap can be manually controlled to catch rats, that will add on to the micro. This is a valid strategy though, so if the player chooses to do this, he is free to pick another pet. The cat has the lowest feed rate though, so it's easier to maintain in the early game phase. I know of people who use Horse but that goes for a totally different strategy of going out more often. The cat lets you stay indoors to save water
Minh May 13 @ 8:47am 
If there's item that doesn't go from Expedition to Shelter Storage, that item goes to Trash Bin. Trash Bin is temporary place to put many items. Some people go through to get items in Trash Bin. If there's 1 item, no one gets it. Trash Bin is inaccessible if there's 0 item.
Minh May 13 @ 8:40am 
Construct enough Shelter Room for necessities. Rat has small space to escape Cat. Cat has small space to get Rat. Construct more Shelter Room if Rat Trap replaces Cat.

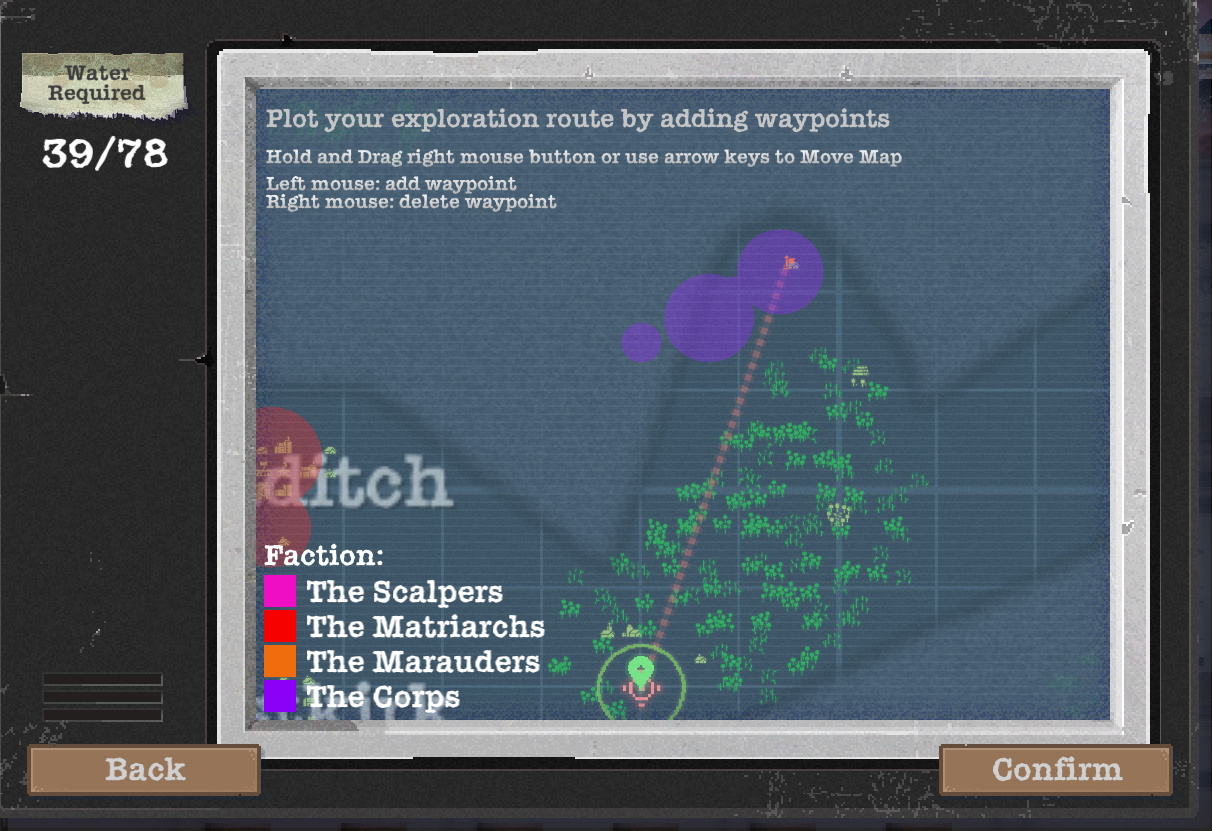
Construct new Freezer. Deconstruct old Freezer. If it's almost done, Setup an Expedition that Required 0 Water. 1 person has all Meat. Expedition is so short that the person exits screen left side to enter screen right side. No Gas Mask needed.

You say this in another Guide but not here. Use Rat Trap instead of Cat if you can. Deconstruct if it's almost gone.

Avoid Water Condenser & try to get Auto Water Butt Schematic. Deconstruct Large Water Butt if there's Auto Water Butt. It collects automatically, doesn't need Fix, doesn't use Fuel, & takes less space than Water Condenser & Large Water Butt.

Rat Trap gives Food at fastest rate & takes less space but Auto Pantry collects Food automatically.
Pawnstar  [author] May 31, 2019 @ 3:22am 
Do watch out for your fuel when doing that too. Someone suggested to use water condensers only in the day because you can use solar panels instead for fuel generation.
brady May 30, 2019 @ 3:19pm 
I made it up to 200 days Hardcore and only ever found six buildings. Until I read your guide I did not think of building multiple water condensers! Now I can do that and get the water I need to explore. Thanks :)