ESCAPE Room: Reality

ESCAPE Room: Reality

Not enough ratings
ESCAPE Room: Reality [100% Guide] [Eng]
By LastNonak and 1 collaborators
You`re stuck and you know of no way out? Well, i`ve stored all puzzle solutions in this guide here. It includes descriptions for all achievements chapter-wise. The puzzle solutions are in spoiler brackets, so that those who do not want to be spoiled, have the possibility to just check where the hidden rooms are located.

Hope i can help!
   
Award
Favorite
Favorited
Unfavorite
Chapter 1: Classroom
Puzzle Solutions


----------------------------------------------------Classroom-------------------------------------------------

🔑 Search for the box-key
The top right flower vase holds the key to the mysterious box


🔑 Note Puzzle
The first number indicates the vertical line from the left and the second number indicates the horizontal line from the bottom.
Move from above the box in these directions: Right, Right, Right, Up, Up (=Click), Down, Right, Right (=Click), Right, Right, Down (=Click), Right, Right, Up, Up, Up, Up, Up, Up, Up (=Click)


🔑 Corner-Chest Puzzle
54363 {The number of items on the desks in the front row from left to right}


🔑 Next Clue
Examine the blackboard (especially the place where Alastor blocked the way earlier to find a clue about the bookshelf)


🔑 Bookshelf Puzzle:
00000 {The number of items on the desks in the back row from left to right}


Hidden Puzzles

CLASSROOM: Examine the wall directly left to the blackboard: "Books Lock. Y = 4032064. White Flowers". This hidden puzzle can only be solved after you have activated the bookshelf lock in the normal storyline. Another chalk mark on the blackboard states that we have to take the square root of Y, which is 2008. Enter the code 02008 into the bookshelf and eventually examine the white flowers in the top left of the Classroom.


Bloodhound Secrets

CLASSROOM: Examine the wall behind the center chair at the bottom of the room. There`s something scribbled on the wall.


Chapter 2: Lights Room - Game Room
Puzzle Solutions


------------------------------------------Lights Room - First Visit--------------------------------------------------

🔑 Lights Puzzle No.1:
Off, On, Off, On, On, On, Off, On {In the lower half of the Lights Room, this exact pattern is displayed by the oil lamps}


-------------------------------------------------Game Room--------------------------------------------------------

🔑 Next Clue:
Grab a box from the right side of the lower billard table


🔑 Mysterious Note Puzzle:
Use the paper with the bottom left oil lamp in the Lights Room. It`s an invisible hidden message after all. After reading it, investigate the darts board in the game room


🔑 Statue Code Puzzle:
AKJQKA {The chairs on the left give you the numbers 441 from top to bottom. The chairs on the right give you the numbers 243 from top to bottom. Examine the three round tables on the left.
Each displays four cards. Relate the them to the numbers from earlier and we got Q (Green),
, A (Red), K (Purple) on the left and K (Brown), J (Blue) and A (Yellow) on the right side. Let`s look at the billard board once again to see the balls from left to ride in this order: Red, Purple, Blue, Green, Brown, Yellow. Associating them with the letters from earlier we get AKJQKA}


-----------------------------------------Lights Room - Second Visit----------------------------------------------

🔑 Lights Puzzle No.2:
On, Off, On, Off, Off, On, Off, On {Turn all the lights off. After that look at the oil lamps at the bottom again to find this exact pattern displayed there again}


Hidden Puzzles

GAME ROOM: After you have entered the game room, examine the wall directly left to it to find another hidden message. The message tells you to turn all lights on in the Lights Room. Return to the Lights Room and do as the note says. Now you`ll just have to examine the leftmost oil lamp at the bottom of the Lights Room to trigger the achievement! This must be done before you have to solve the Lights Puzzle No.2.


Bloodhound Secrets

LIGHTS ROOM:


a) Examine the wall directly next to the entrance into the Lights Room. There`s something scribbled on the wall
b) Look at the left wall in the smaller passage in the Lights Room. A piece of paper is hidden in the wall
c) Between the sixth and seventh light that you can activate, walk three steps down and examine the wall to get an easter egg
d) At the top wall of the game room, 9 steps to the right of the darts board is another message scribbled on the wall


Chapter 3: Water Room
Puzzle Solutions


-----------------------------------------------Water Room---------------------------------------------------

🔑 Next Clue:
You can find a letter in the top left pool in the water


🔑 Activating the pedestals:
Use the button on the barrel at the top left {we know there´s a button due to the letter we found}


🔑 Book Puzzle:
Pick up the book at the top left (you can only pick it up after you have looked at the bookshelf at least once) and use it at the bookshelf at the bottom left. Afterwards, return to the cupboard where you picked up the book and open the drawers. Use the key for opening the chest on the bottom right


🔑 Pressure Plate Puzzle:
The note in the chest states that the box is located in the South and the bed in the North. It also gives you the correct order of where to go: North, South, East and then West.
After activating the switch move to the following directions: First below the vase at the top left (North), then above the vase in the bottom right (South), then below the vase at the top right (East), and eventually above the vase at the bottom left (West). You have to pick up the vase from the bookshelf again to activate the last one, otherwise you would be too light


🔑 Orb Puzzle:
Place the orbs from top to bottom: 1, 2, 2, Empty, 1 {The leftmost table has some items on it from top to bottom: 12210. That would be the code, but the maintenance report stated that the bottom ones were accidentally swapped. That means the correct code therefore is 12201}


🔑 Lower Code Puzzle:
2431 {For the lower code puzzle we have to turn the room upside down (cause the touch screen is looking downwards). On the left side of the room there`s a big number "2" in a dark pattern on the floor. The flower petals right next to it display the number 4. The flower petals right next to it display the number 3. On the right side of the room is a big number "1". The code therefore is 2431}


🔑 Upper Code Puzzle:
iEhZ {Now let`s only use letters for this one. The left side of the room shows the letter "i" in a dark pattern on the floor. The flower petals in the middle of the room display the letters E and h.
On the right there`s a big "Z" in a pattern on the floor. The code therefore is iEhZ}


🔑 Path Decision:
Use the top left sensor to proceed to the "Locked" Path. Use any other sensor to reach the "3 Doors" Path


Hidden Puzzles

WATER ROOM: Visit the bathroom several times. It depends on your luck, but after some tries you should read a message: "new news". When you reach the Pressure Plate Puzzle, do not enter the correct solution yet, but the "new news" solution --> N, E, W, N, E, W, S --> Top left, top right, bottom left, top left, top right, bottom left, bottom right


Bloodhound Secrets

No bloodhound secrets in this chapter


Chapter 4 (I): 3 Doors - Dark Room - Control Room
Puzzle Solutions


--------------------------------------------------3 Doors-------------------------------------------------------------

🔑 Flower Pot Puzzle:
Move the three flower pots to cracked stone bricks in the top right. The not-coloured one should be positioned in the corner. If you have positioned something wrong, talk with Alastor. He should place the flower pots back


🔑 3-digit Chest Code Puzzle:
484 {We`ll have to keep in mind that we moved the blue and the red flower vase 4 spots.
The not-coloured one was moved 8 spots to the corner. The not-coloured one is additionally also positioned between the red and blue one thus making 484 the solution}


🔑 Door Decision:
The door decision matters not directly, but it`s important later on. If you choose the left or right door, you can continue with this path which will lead over to the Classroom II Path. That means it`s the normal main story path. If you choose the middle door though, you also continue wih this Dark Room path, but after that you swap to the Hallway Path. You`ll need to make both decisions at least once to get all achievements


--------------------------------------------------Dark Room---------------------------------------------------------

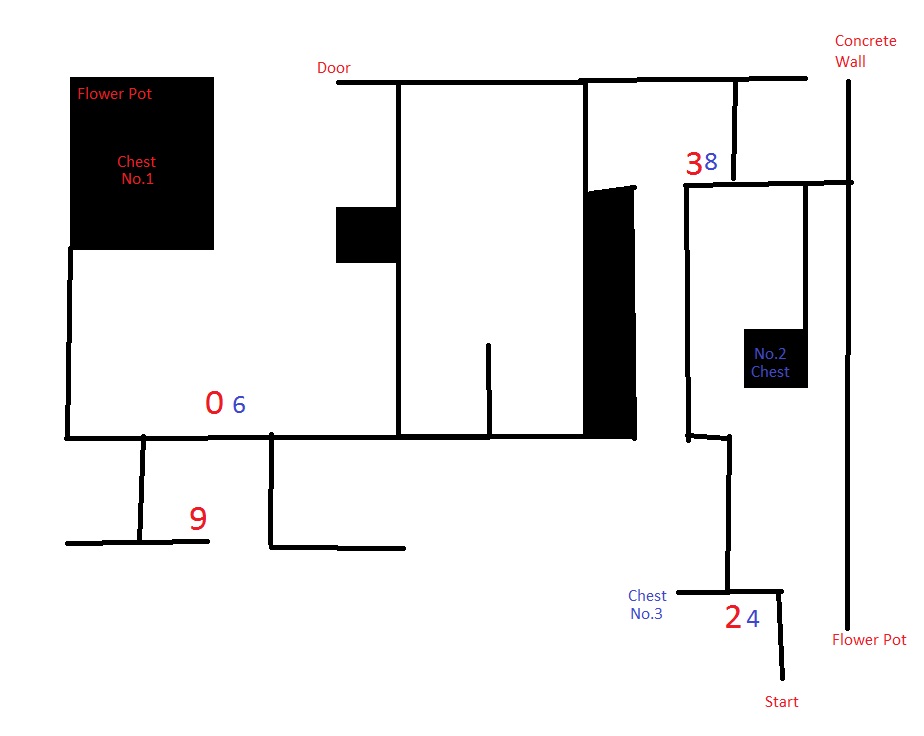
🔑 Maze:


🔑 Maze Chest No.1 Puzzle:
2309 {As you can see in the image above, the Chest No.1 is located at the top left. From the start of the maze to the end we find certain numbers (in red in the image) in a certain order}


🔑 Opening Maze Chest No.2:
Use the key you found in Box No.1 to unlock this one


🔑 Maze Chest No.3 Puzzle:
6CAT84 {The chest No.3 (blue in the image) is at the beginning of the maze. The numbers that are displayed beginning at the one farthest away from the chest are 684. Between the 6 and the 8 is a big letter created by the walls of the maze (it`s an "A" in the middle of the labyrinth near the door). Left of it is a "C" and right of it is a "T". It`s pretty easy to miss. These letters are located in the maze between the 6 and the 8. The Chest Code therefore is 6CAT84}


--------------------------------------------------Control Room-------------------------------------------------

🔑 Guide Puzzle:
Guide her towards the door at the upper side of the room. Shouldn`t be that big of a deal. It`s a bit annoying though


Hidden Puzzles

3 DOORS: Grab the key from the vase to the right of the 3 Doors. In the first dark room where you are guided by Linda, examine the locked drawer which is positioned near the table. It`s pretty dark, so it`s not easy to find. You can take your time though. Open the drawer with the key.


DARK MAZE: The note behind the brick wall stated: 'Second Luck 4213'. We have to rearrange our first Chest Code in the maze that way and we get the code 9320 {2309 --> 9320}. Now enter this code into Maze Chest No.1 and then you`ll have it.


CONTROL ROOM: Examine the left console (not the right console!!!). Everything is written in Latin, but one of the lower remarks states that there is something below the table. Examine the table in this room (the one at the bottom right) about 3 times.


Bloodhound Secrets

No bloodhound secrets in this chapter


Chapter 4 (II): Locked - Warden Office - Leisure Room
Puzzle Solutions


-------------------------------------------------------Locked------------------------------------------------------

🔑 Escape Puzzle:
327 {Look at the markings on the floor of your cell. They more or less spell out the solution.
Just add a bit... creativity}


------------------------------------------------Warden Office----------------------------------------------------

🔑 Drawer Puzzle:
230269 {There`s a note on the board in the top right. We just have to figure out the birth date of that man. In 2015 he got 46, that means he was born in `69}


------------------------------------------------Leisure Room-----------------------------------------------------

🔑 Left Safe Puzzle:
658487 {This corresponds to the note we found in the warden`s office earlier. Yeah, about the colours. (R+B): You`ll have to mix those colours at the left brewing stands in the warden office to receive a brown colour = 6. You`ll figure out the code eventually if you transfer the colour code into the numbers}


🔑 Next clue:
The strange item from the safe is a keycard. Examine the button at the top wall one more time


🔑 Encryption Puzzle:
This puzzle is random-generated. First write down the 5 numbers you get after activating the puzzle. You also should be given an item name (f.e. -A/Cs). There are five A/Cs in this room and in the previous one (yeah, don`t forget the warden office); from every number of the 5-digit code, the number 5 must be subtracted then. Afterwards, change the code into the colour code to solve the puzzle accordingly
Number of items: 6 flower pots, 5 A/Cs


🔑 Unlocking the wooden chest:
After investigating the lockers and then the couch in the leisure room, examine the couch in the warden office to receive a key with which you can open the wooden chest


🔑 Right Safe Puzzle:
You can find the key for the right safe behind the sketch in the warden`s office {The note told you to look behind that, so that`s what you`ll have to do}


Hidden Puzzles

LEISURE ROOM: In the chemistry set, mix the green and red chemicals to create a yellow chemical. Take it with you. Afterwards, move to the bottom right flower pot and pour the yellow chemical into it. You should receive a key afterwards. Examine the bookshelf next to the chemical sets and open the secret diary with that key you got


Bloodhound Secrets

LOCKED: At the bottom left corner of the cell, something is scratched on the wall: 'Fell... down... trap... door"


LEISURE ROOM: This one was tricky to discover. You are only able to reach this secret after the encryption puzzle. After solving the encryption puzzle Vanessa will stand right next to you. Quickly move to the spot where she stood some seconds ago before she returns there. Read the letters there. BE WARNED. The Right Safe Puzzle must be solved AFTER the encryption puzzle to make it possible for you to get this secret.


Chapter 5 (I): Classroom II - Twin Rooms - ENDING
Puzzle Solutions


------------------------------------------------------Classroom II--------------------------------------------------

🔑 Repetition Puzzles:
Those puzzles are the same as in the first classroom. Just look it up in Chapter 1. Then use the silver key on the exit door


🔑 Bookshelf Puzzle:
20020 {Number of horizontal books from the bottom to the top row of the bookshelf}


-------------------------------------------------------Twin Rooms------------------------------------------------

🔑 Unlock the red chest:
After talking to Alastor one more time, you can find the hidden rusty key at the rop right corner of the left room. Open the red chest with that rusty key


🔑 Unlock the yellow chest:
Alastor will give you a dusty key which you will have to use on the yellow chest


🔑 Word-Search Puzzle:
274 {Look at the word search puzzle. The green word "order" is connected to "Hello", "Gamer", "Given" and "Norse" building the digit 2 on the puzzle. The blue word "Water" is connected to "Reference" creating a 7. The red "Yahoo" is connected with "Lucky" and "Golden" building the digit 4 on the word search paper. The code therefore is 274}


🔑 4-digit Box Puzzle:
4827 {We already have the colour codes for green, blue and red from the previous puzzle.
On the bottom of the word-search puzzle "Y NO 8" is written indicating that Yellow corresponds to the number 8. Let`s look at the chests from left to right: Red (4), Yellow (8), Green (2), Blue (7) --> 4527}


🔑 Unlock the green chest:
Left, Right, Right, Left {The note from the yellow chest stated: "First going back to the past" --> Left; "One-eighty flowing with the time" --> Right, Right; "Return home at long last" --> back to the beginning --> left}


🔑 Unlock the blue chest:
Use the magnet on the hole in the floor at the bottom of the left room to receive a key with which you can unlock the blue chest


🔑 Directional Tile puzzle:
Right, Down, Left, Down, Right - Right, Down, Left, Up - Left, Down, Right, Down, Left - Left, Down, Down, Right, Up, Left {Just reproduce the same sequences as you can see on the walls at the left and right side of the twins room}


🔑 Password Puzzle:
2056 {Try to remember the codes you entered into the directional puzzle just now. Right, Down, Left, Down, Right seems to be awfully familiar to a "2" if you try to walk like that. The other 3 directional codes also have a number they correspond to}


------------------------------------------------Display Room------------------------------------------------------

🔑 Display Room Puzzle:
Grab the exit key from the top left flower pot


------------------------------------------------Escape Room-----------------------------------------------------

🔑 Final Password Puzzle:
FLOWERS {The tips around the room form a sentence: "What`s missing in this room?". Actually,
my beloved flowers are missing}


Hidden Puzzles

TWIN ROOMS: At the bottom of the display room (which you enter later) there`s a code engraved in the walls. Enter this code into the directional tile puzzle: Up, Up, Down, Down, Left, Right. You are only able to unlock this chest if you have solved the 3-doors hidden puzzle of Chapter 4 before.


Bloodhound Secrets

No bloodhound secrets in this chapter


Chapter 5 (II): Hallway - Office - Lobby - ENDING
Puzzle Solutions


----------------------------------------------------Office Hallway----------------------------------------------

🔑 Next Clue:
You can find a key in the top left flower vase in the top right room


🔑 Opening the brown box:
You can find the brown box in the top right room. Open it with the key you just received


🔑 4-digit Drawer Puzzle:
6126 {The drawer can be opened by looking at the note from the brown box. Just hold the note into a mirror to receive the numbers 6126}


🔑 Wooden Chest Puzzle: 3561 {The note from the box stated that the code to the wooden chest is the usual code with an Karen`s number as an extra digit. The code we found in the trash in the bottom right stated "356". We know from several notes that the paiting in the top left room belongs to Karen. On that painting is a "1". This one is the extra digit}

🔑 Red Chest Puzzle:
According to the notes one person has been staying in the bottom left room for a long time. Examine the portrait in that room and look through the hole behind it. Afterwards. find the key behind the picture frame #1 and open the red chest with it


🔑 Silver Chest Puzzle:
999 {The painting in the top right room was drawn on the 09.09.99. According to the notes it actually belongs to the person of the bottom right room. The code for the silver chest therefore is 999}


🔑 Blue Chest Puzzle:
2902 {In the top left room was a letter. That letter described a puzzle by the warden. He sees most dates again, but there is one date that he does not see that often. The trick is that he is not talking about dates with other people, but days. Which is the one day that is not occuring every year? The leap year of course}


🔑 Pedestal Puzzle:
Top left: Blue, Bottom Left: Black, Top Right: Pink, Bottom Right: Brown {Examine the carpets in each of the four rooms. Each carpet has a different structure. Try to create a square by using those four structures. The pink carpet would be at the top right. the brown one at the bottom right, the blue one at the top left and the black one at the bottom left}


--------------------------------------------The final stretch--------------------------------------------------

🔑 Next clue:
Examine the telephone at the top left and the drawers beneath it


🔑 Laser-Passcode Puzzle:
1151200 {Examine the plague on the middle of the hallway. The 0 in Authorized and in Personnel is crossed out. The 0 in Only is not crossed out. Correspond thiese hints with the price taggs of the food. The first meal costs $10.00. In Authorized the 0`s were crossed out. Associating that with the price tag, only the "1" is left standing. The second price tag states $15.00. Associating that with the crossed out 0`s of Personnel, only the "15" is left standing.The last price tag is $12.00. In the "Only" nothing was crossed out, everything is left standing. The final code therefore is 1151200}


🔑 Final 10-digit Box Puzzle:
94632 - 92263 {That`s one tough puzzle. The first line of the chairs of the bottom left states "VXZYW" and the second line states "25341". We have to solve these two lines separately

First line: Examine all the flower pots in the lobby. At the end you should have this math equation as a result: V>Z>X>Y>W. Next up, there are 5 different sorts of flower pots in the lobby.
Count the number how often each type appears: Type A (4 times), Type B (3 times), Type C (2 times), Type D (9 times), Type E (6 times). V (Type D) >Z (Type E) >X (Type A) >Y (Type B) >W (Type C). The correct oder according to the chairs is: "VXZYW": Type D, Type A, Type E, Type B, Type C. Associating every Type with their respective number, the correct code is 94632.

Second line: The second line of chairs states 25341. Examine the numbers below the telephone. 09251 00502 98200 47362 31458. The first 5-digit code belongs to the first number of the chair 5-digit code (25341), etc. The second number of the first code is a 9. The fifth number of the second code is 2. The third number of the third code is a 2. The fourth number of the fourth code is a 6. The first number of the fifth code is a 3. The code therefore is 92263.
Thus this makes the code to the box 94632 - 92263}


Hidden Puzzles

HALLWAY: This secret requires a pre-requisite from chapter 3. I hope you weren`t too hungry in the water room. If you did not eat too much, it is now possible to examine the leftmost shelf in the bottom left room. You will find a USB stick there. Afterwards, move to the upper right room and examine the upper right box. Vanessa should really take a look at this. Talk with her and afterwards, examine the computer she was standing at.


LOBBY: After you have completed the Laser Password Puzzle examine the last flower pot in the hallway (to the left of Roland) and take a coin. Go to the vending machine and buy a drink (you get a key though). Afterwards take a look at the drawer of the receptionist (below the telephone) and open it with the key you just got.


Bloodhound Secrets

No bloodhound secrets in this chapter


Additional Remarks
MAIN ROUTE: This achievement is awarded for completing the main route in this game which is described in this guide as Chapter 4 (I) and Chapter 5 (I)


V ROUTE: This achievement is awarded for completing the V route in this game which is described in this guide as Chapter 4 (II) and Chapter 5 (II)


MIXED ROUTE: This achievement is awarded for completing the Mixed route in this game. First choose the Chapter 4 (I) Path, and then decide to enter the central door in the 3-doors path. You will then be able to continue with the Chapter 5 (II) Path afterwards. You can look that up under the 3-Doors section in this guide (see "Door Decision")


MASTER SLEUTH: This achievement is awarded when you`ve completed all the hidden puzzles


BLOODHOUND: This achievement is awarded when you`ve completed all hidden puzzles and all bloodhound secrets


I hope i was able to help you guys. Thanks for reading!


43 Comments
Zero no Saito  [author] Oct 23, 2022 @ 6:10am 
@iZaYh at the end of Chapter 3: Water Room, make sure to pick any button EXCEPT the top left option .

That decision will lead you to Chapter 4: 3 Doors. During this chapter, choose either the left or right door . This will bring you on to the main route :D
iZaYh Oct 23, 2022 @ 2:08am 
How do I choose the Main Route?
Played twice and not sure how I chose the V Route
Zero no Saito  [author] Sep 9, 2022 @ 5:42am 
@Kanaishi after turning on all the switches on the wall in the upper room, you should be able to check right under the left most lamp to get the hidden puzzle. this has to be done after entering the game room, but before you clear the statue code puzzle. hope this helps!
Kan Sep 3, 2022 @ 4:44pm 
How do you solve the Hidden puzzle in Chapter 2? I've tried both of your suggestions (the one in the guide and the one in the comments) but I can't seem to trigger the achievement. I did it after the reading the note and solving the first light puzzle too but still couldn't get it to work.
Zero no Saito  [author] Sep 27, 2020 @ 10:21pm 
@Kitami, do you mean, if you solve the laser puzzle and then try to solve the last 10 digit chest puzzle, the box won't open?

Could you also post this in the main discussion forum so it's easier for me to keep track on any replies and so we don't end up clogging the guide's comment section:

https://steamcommunity.com/app/652510/discussions/
Kitami Sep 27, 2020 @ 8:04am 
i think i found a bug on chapter 5 (ii) you see i open chest soon without laser puzzle it's fine then i load again because need to find last hidden puzzle after laser puzzle then i put same code but chest not opening.........
Zero no Saito  [author] May 30, 2020 @ 9:50am 
I just noticed the latest comment here. The trick here is that the word itself is "missing" and the conversations hints to all clues being found and yet there is still something "missing". . I hope that explains it :D
Madam Fussy Britches Mar 26, 2020 @ 6:58pm 
For the Final Password in route "Chapter 5 (I)", can you tell me where you found the word "missing"? I must have checked every inch of that room 8 times now...
LastNonak  [author] Aug 11, 2017 @ 7:47am 
To to the hidden puzzle in Chapter 2 you have to have access to the game room. You must have solved the Lights Puzzle before, otherwise you can`t enter the game room. For the hidden puzzle just turn off the same lights as you did to enter the game room. Turn off all the lights and then move to the bottom of the Lights Room and examine the leftmost lamp. (You need to have seen the note in the game room before this though!)
TrueFortune Aug 11, 2017 @ 6:53am 
I don't get the Hidden Puzzle in Chapter 2...
How do I turn the lights on in the Lights Room?
No matter what I do, the lights won't change.