DARK SOULS™: Prepare To Die Edition

DARK SOULS™: Prepare To Die Edition

122 ratings
A Guide To Mastering Dark Souls ::
By Shard of Manus
This guide will help you to understand and eventually master Dark Souls while doing it's best not to spoil anything (as little as possible). Perfect for all the scrubby noobs that suck at this game, but don't want all the awesome surprises spoiled for them.
   
Award
Favorite
Favorited
Unfavorite
Introduction ::

Now, any experienced Souls player will tell you that Dark Souls has a steep learning curve. However, for any new player, you need to overcome the first and largest hurdle in order to begin on your path to mastering the Souls franchise... and that is your own determination (or lack thereof).

These games are not easy, not at first, and any new player will (to put it politely) get their a.rse handed to them many, many times over. That is not to say the games are unfair but rather, as stated, have a steep learning curve. Once you learn the basics, you'll see a massive shift in difficulty, and once you become proficient enough, you'll soon be kicking butt left, right and centre.

If you are willing to push on despite seemingly overwhelming odds, then here's to you. If you're not... well don't worry, because this guide will help you regardless and if you follow it then you're bound to git gud anyway.

Before we begin however, for anyone afraid of spoilers... I've done my utmost to keep this almost entirely spoiler free, with only the most insignificant spoilers slipping through.

The guide shall cover the following ::

- The 'Important Basics'.
- Getting lost, or trying not to.
- The Combat of Dark Souls.
- The Magic of Dark Souls.
- The Importance of your Equipment.
- The Importance of your Stats.

Some points overlap, and so will be repeated in some of the sections. If anything this serves to remind you, but please excuse any repetition.
Character Creation ::
Before you start your journey through Lordran, you will first need to create a character, and this involves more than just making your own Shrek. Fret not, picking a class has very little impact on the overall game experience, and only truly affects your experience at the beginning of the game.

If you feel a class doesn't suit you, no harm in starting over, or simply progressing with that character and working towards your own most suitable build. You're free to become what you wish.

The Classes ::
  • The Warrior - The Warrior begins with a decent balance of Strength, Dexterity and Endurance, allowing for varied melee capabilities early game. It starts with a Heater Shield and a Longsword.

  • The Knight - The Knight begins with high Vitality, and decent Strength. It starts with a Tower Kite Shield and a Broadsword. It's a more defensive Warrior. Second most recommended.

  • The Wanderer - High Dexterity, begins with the Scimitar and Leather Shield.

  • The Thief - Highest Dexterity, begins with the Bandit's Dagger and Target Shield. Most importantly is that it begins with the Master Key.

  • The Bandit - Highest Strength and Endurance of the classes. A very offensive class. Begins with the Battle Axe and Spider Shield.

  • The Hunter - Balanced Stats, begins with a Shortsword and Large Leather Sheld. Also has access to the Shortbow and a small number of arrows.

  • The Sorcerer - High Intelligence, begins with a Dagger and Small Leather Shield. Also has access to the Sorcerer's Catalyst and the Sorcery "Soul Arrow".

  • The Pyromancer - Begins at level 1. Has the Hand Axe, Cracked Round Shield, and the Pyromancy Flame; as well as the Pyromancy "Fireball". - Most recommended for new players.

  • The Cleric - High Faith, somewhat balanced stats. Begins with the Mace, East-West Shield, Canvas Talisman and the Heal Miracle.

  • The Deprived - 11 in all stats. Has no armour. Starts with only a Club and Plank Shield.

Choosing a Starting Gift ::
  • Goddess's Blessing. Divine Blessing - Consume to restore to full health, has only one use.

  • Black Firebomb. Gives 10 Black Firebombs which deal high Fire damage.

  • Twin Humanities. Gives one Twin Humanity item, which provides 2 soft humanity.

  • Binoculars. Can be used to zoom in. Not recommended, can be found very early on.

  • Pendant. No use.

  • Master Key. Can be used to unlock various shortcuts and other doors in the game. Highly recommended (comes automatically with Thief Class, so don't pick this if you're a Thief).

  • Tiny Being's Ring. Provides a very small boost to your maximum health. (DOES NOT regenerate health, despite the description).

  • Old Witch's Ring. Allows communication with a later NPC. Not required and can be acquired by other means.
The User Interface ::
The Combat Hud ::
As with any game, understanding what the hell you're looking at is quite important, so this will be a quick and basic introduction to the Dark Souls UI and HUD.

First is the Player HUD, or the Combat HUD. This is displayed at all times when the player is outside of the menu (though can be switched off in the settings). It displays all the important information about the character.

The Soul Count indicates the number of 'liquid' Souls currently in the character's possession. This count can be increased by various means.

The Humanity Counter indicated the number of 'soft' Humanity currently in the character's possession. This too can be increased by various means.

Weapon Slots indicate your currently equipped weapon in each hand (your left and right hands), in which the player can switch between two separate weapons per hand (four in total).

Attunement Slots indicate your currently equipped Spell, and the remaining number of uses. In Dark Souls 1, Magic is limited by Spell Uses specific to each spell, rather than an FP bar like in Demon's Souls and Dark Souls 3.

The Quickbar Item Slot indicates your currently equipped Quickbar Item. Five items can be equipped at a time to allow quick access to them, and can be cycled through on the fly.

Inventory Menu ::


This is the Player's Inventory Menu Page. It allows the player to see which items they have at their disposal, how many of them and to read item descriptions or change the ordering of the menu.

On the right had side is provided basic character information such as their Name, Covenant and Attributes / Statistics (explained later).

The inventory is split into 8 tabs :
  • Consumables, which is the page displayed.
  • Ore - Upgrade Materials.
  • Key Items.
  • Spells.
  • Weapons.
  • Ammunition.
  • Armour.
  • Rings.

Equipment Menu ::


Next is the Equipment Page. This allows the Player to actively equip or unequip the various items they wish in their 'loadout'. These items can be changed at any time, including during Combat, however it is worth noting that Dark Souls CANNOT be paused; and in doing so leaves you vulnerable.

It is best to only navigate menus when there is nothing around, or once you've become so accustomed to it that you can do so rapidly.

As you can see, there are four weapon equip slots. Two for the Right Hand, and two for the Left Hand. As has been indicated, it is recommended that Melee weapons be equipped in the Right-Hand slots. Many Melee weapons equipped in the Left-Hand have a reduced moveset, and it is only recommended for parrying tools such as the Parrying Dagger, and a select few other weapons.

The Left-Hand is best suited for Shields, Catalysts (which allow Spells to be cast) and Bows. In the image I have placed a Bow in the right hand to showcase them, but one can also equip a backup melee weapon. Depending on your character's build (explained later) different types of weapons are suited to different slots.

There is no restriction on what weapons go in which slots, however as aforementioned, some are more effective depending on them being in the Left or Right Hand.

Status Menu ::


Lastly is the Status Page. This contains more detailed information about the Character, including Level, Covenant, Attributes, Current and Maximum Health, Stamina, Equip Load, Defences, Resistances and Item Discovery.

These will all be explained in more detail.
Important Details - Souls ::
Souls ::
One of the most important aspects of Dark Souls is your souls. In Dark Souls, the number of souls a player accrues directly relates to EVERYTHING else they can achieve in the game. It allows the player to level up, to upgrade and repair their equipment, and to buy items from merchants.

Obtaining Souls ::
Souls are received through various means. Primarily, souls can be gained by killing enemies. Basic mobs will give a measly number, tougher enemies will provide more, minibosses will give yet more, and bosses will typically provide the player with a small fortune.

The further you progress into the game, the more souls enemies tend to drop, as the player requires more to increasingly strengthen their character.

Souls can also be attained by defeating Invaders or Hosts in Online PvP (as well as some NPC interactions), and the higher level enemy defeated, the more souls attained. When an Invader defeats a Host or a White or Gold Phantom, they shall receive 10% of the Souls required for that player's next level up.

When an Invader defeats another Invader they receive 25%, and when a Host defeats an Invader they receive 50%.

The last method of obtaining Souls is via items. Throughout Lordran are placed small soul items that, when consumed, provide the player with a small (or large) portion of Souls.

Said items come in various forms, ranging from a Soul of a Lost Undead (200 souls) up to Soul of a Great Hero (20 000 souls). The former of which can be found aplenty, and the latter which is extremely rare.

Soul gain can be increased by equipping certain items.

Boss Souls ::
Among these 'solid' Souls are included Boss Souls. Boss Souls are typically received after defeating a boss, however not every boss provides one. Like above, these can be consumed to receive a large portion of Souls, or alternatively can be used to receive certain weapons or spells associated with that boss.

Boss Weapons and Spells can only be acquired by bringing both a suitable weapon and the Boss Soul to a specific NPC later in the game and transposing them. It is recommended to keep Boss Souls in your inventory until you reach this point of the game, and not to consume them.

Firekeeper Souls ::
The most unique of the souls.

Firekeeper Souls can be found in various locations throughout Lordran, and can also be acquired by killing and looting a Firekeeper (not recommended until the end of the game). Each Firekeeper Soul has a unique description, and only one of each can be held in the inventory.

Bring a Firekeeper Soul to a Firekeeper to upgrade the strength of the Estus Flask. Upgraded Estus Flasks replenish more Health per use. They can be upgraded a maximum of 7 times.
Important Details - Humanity ::
Humanity ::
Much like Souls, Humanity is an extremely important item that affects a very large portion of the game. Also like Souls, Humanity comes in two forms 'Liquid' and 'Solid' or 'Soft' and 'Hard'.

Liquid Humanity is indicated in the Humanity Counter of the HUD. It acts as another form of currency, as well as having other somewhat unique effects.

Soft Humanity can be used to increase various things, including natural Defence, Curse Resistance, the damage of certain weapon types and Item Discovery.

Humanity can also be offered to certain NPCs for unique effects, such as increasing Covenant Standing and Removing Curse (both explained).

Lastly, Humanity can be used at the bonfire to Reverse Hollowing and to Kindle the bonfire. Reversing Hollowing returns the Player to Human Form and allows the player to initiate Online play to more effect, such as summoning Phantoms in certain areas and invading other Players. However, it also allows the Player to be invaded themselves.

It is worth noting that a Player cannot Kindle a Bonfire unless they are in Human Form.

How to get Humanity ::
Soft Humanity can be acquired by consuming a Humanity item, a Twin Humanity, or a unique Fire Keeper Soul (not recommended).

They are also acquired by defeating Red Invaders as a Host, by defeating a Host as an invader or defeating a Boss as a Phantom in a Host's world.

Those are the guaranteed methods of receiving Humanity, however at times (in certain areas where the boss is still alive) it is possible for some enemies to 'drop' a Soft Humanity upon death which is automatically added to the Humanity Counter.

Humanity Items can be found throughout the world, can be dropped by various enemies, and can be bought (in limited amounts) from some merchants.
Important Details - Death and Bonfires ::
Death is the core mechanic of Dark Souls, and doesn't work like most games. Think of Borderlands, it's similar to that. When you die in Dark Souls, you don't revert to an older save, but rather you return to the last checkpoint (bonfire) at a cost, however all items you accrued remain on your character.

What happens when the player dies ::
  • Lose all liquid Souls and Soft Humanity.
  • Respawns all respawnable enemies.
  • Returns the player to Hollow form.
  • Banishes all Invaders or Phantoms currently present to their own worlds.

A player can avoid the loss of Souls, Humanity and their Human form by equipping a Ring of Sacrifice. The ring will break upon death, and be removed from the player's inventory, but the player will return to the bonfire with all their Souls and Humanity intact. Enemies will still respawn.

Upon death, the player will leave a Bloodstain at the location of their demise (or shortly before). Similar to the bloodstains a player can interact with to witness another's death, however this bloodstain will have a green aura above it. Interacting with this Bloodstain will re-acquire your lost Souls and Humanity (but does not return you to Human form).
The player will have only one chance to retrieve their lost Souls and Humanity, and dying again before reaching your Bloodstain will mean they are lost forever. This is a good incentive to spend souls on the fly, but also to pressure the player if they're saving up for something costly.

Not all enemies respawn upon death. Throughout the world are some enemies, typically more difficult, such as minibosses, that do not respawn upon death. Bosses also do not respawn under any circumstance other than reaching New Game+ (your next playthrough after defeating the game).

It is also worth noting that should the player accidentally (or purposefull) kill an NPC, they will not respawn either.

Bonfires are found throughout the game world, and provide the player with various options. Most notably, a bonfire will ::
  • Refills Health and Stamina.
  • Cures all Status Effects such as Poison or Toxin.
  • Replenishes Estus Flask uses.
  • Replenishes Spell uses.
  • Respawns all respawnable enemies.

Death will restore the player at the last bonfire rested at, which can be both a blessing and a curse.

Bonfires also have various other uses that can be unlocked by progressing through the game.

The Levelling Up, Attune Magic, Reverse Hollowing and Kindle options are unlocked as soon as the player leaves the tutorial, and can be accessed at any bonfire.

Levelling Up allows the player to increase their statistics at the cost of souls. Reverse Hollowing allows the player to revert to Human form at the cost of 1 Soft Humanity.

Kindling the bonfire is unique to each bonfire however. As aforementioned, the player can rest at a bonfire to replenish their Estus Flasks (health potions). Normal bonfires will restore them to 5 uses, and bonfires with a Firekeeper will restore them to 10.

At the cost of 1 Soft Humanity, a player can kindle the Bonfire, which upgrades it. For each level of Kindling, the bonfire provides 5 additional Estus up to a maximum of 20. However, Bonfires cannot be Kindled past 10 Estus without the Rite of Kindling found by progressing through the game.

Kindling must be performed at each individual bonfire, and carries through to New Game+.

Repair Equipment, Upgrade Equipment, Access Bottomless Box and Warp can be accessed by acquiring certain items as you progress.

Repairing and Upgrading Equipment costs Souls, just as they would if visiting a Blacksmith, but means the player can do so whilst not near any Blacksmiths. The player cannot Ascend weapons at a bonfire however.

The Bottomless Box acts as storage for any items you don't wish to be carrying around. Its main use is to allow easier navigation of your Equipment menu for the items you use.

Warp allows the player to Fast Travel between certain previously activate bonfires. It is acquired about 1/3 into the game. Not all bonfires can be warped to, but all bonfires can be warped from (excluding one).

Bonfires can also be returned to by other means. Using the Darksign, which the player begins the game with, the player can return to the previously rested at bonfire... though at the cost of their souls.

Throughout the game can also be found Homeward Bones, which provide the same use, but do not result in the loss of souls.
Important Details - Covenants ::
Covenants in Dark Souls are pacts the Player can make with certain NPCs to affect their game in some way.

Typically, Covenants allow for various changes to Online Elements of the game, such as Invasions or Co-Op. They can increase your chances of being Summoned as a Phantom, change the colour of your Phantom, allow for unique Invasion types... but most importantly, is that most Covenants have a reward system.

By performing Covenant specific actions, the player can receive Covenant Items, which when turned in to the specific NPC or Interactable Object for that Covenant can grant the player unique rewards. These can be Spells, Items or even Weapons.

Not all Covenants have a Ranking and Reward System. A couple simply provide unique effects such as increased Online Play, and the ability to cast specific Spells.

Aside from that, not all Covenants are Online focused. Some primarily focus on the PvE aspect of the game, and can even have an impact on certain questlines.

Covenants will be discovered as you progress through the game, and can be joined as soon as you meet and interact with the associated NPC. However, the player can only be in ONE Covenant at a time, and abandoning your current Covenant has negative impacts. Abandoning a Covenant will reduce the Player's standing within that Covenant by half.

Rewards cannot be revoked, but if a Player is close to receiving a reward, and abandons their Covenant before achieving it, their progress will be considerably reduced, and will have to work towards it again. Abandoning some Covenants even turns them hostile, so be cautious.

Requesting Absolution after abandoning a Covenant will ensure a Covenant does not become hostile, but is a costly process. It's best to remain in a Covenant until you are done with it entirely, or if you do not intend to return to it.
Important Details - NPCs ::
NPCs (Non-Playable Characters) are not as abundant in Dark Souls as with many other Fantasy RPGs, however each has a considerable and unique purpose in the world; and can usually lead to great or devastating things.

NPCs can be found right from the beginning of the game, and throughout the game world, each with their own unique and compelling story. But if lore and emotion aren't enough to get you interested, then almost every NPC questline also comes with fantastic rewards.

Firstly, there are different kinds of NPCs :
  • Covenant NPCs (as described above). These allow the player to join and rank up in Covenants, and are typically stationary throughout the game. Progressing past certain points or committing certain actions can 'lock' some Covenants.

  • Merchants. VERY important NPCs. These will provide you with weapons, armours, consumables and materials to help you survive Dark Souls gritty world... at a cost.

  • Blacksmiths. These allow the player to upgrade, repair and 'ascend' their weapons.

  • Mobile NPCs. These NPCs will journey through the game world as the character does, and can be met and interacted with at various junctures throughout the game. Committing certain acts and aiding them on their journey will allow their quest to progress, and will lead to greater rewards and more of their story.

    Sometimes these NPCs can be hard to find, or the criteria for progress difficult to achieve or understand. It's best to thoroughly listen to their dialogue for hints at what to do and where to go next. Also, try to search areas thoroughly.

  • Non-Interactable NPCs. Some NPCs don't have active quests, and can be summoned in various locations for certain bosses. Following their story is a little more difficult, so they can be treated as simple 'hired help'. However, if you put the effort in to piece together their stories... you'll find them just as compelling as the active NPCs.

Killing an NPC will remove them from the game until the next playthrough, and will also add to the Player's Sin. This is not to be confused with the Sin mentioned in the Online section.

Harming an NPC will also accrue Sin, and turn that NPC hostile (and potentially any associated NPCs). A Player can remove Sin by Requesting Absolution at a particular NPC found early on in the game. Doing so is very costly, but will return NPCs to a Non-Hostile state, and allow continued communication with said NPC.

This is especially useful when concerning Merchants, Blacksmiths and Covenant Leaders that the player may have accidentally harmed. A Hostile NPC doesn't force the player to kill them; simply flee and Request Absolution.
Important Details - Online Multiplayer ::
Dark Souls has a very unique Online system, unlike any game I've ever played before. It's fantastic, but can be confusing for new players also. There is no dedicated matchmaking in Dark Souls, but rather the game combines the Singleplayer and Multiplayer experience into one fluid system.

As we mentioned earlier in the Humanity section, Online play is mostly limited when in Hollow form; so if you've no desire to interact with other players, simply remain Hollow. There is no other negative impact of this.

For those that do wish to take part in Online, then remaining human is important.

Dark Souls Multiplayer consists of ::
  • Summoning Phantoms for Co-Op.
  • Being summoned as a Phantom for Co-Op.
  • Invading a Host for PvP.
  • Being invaded as a Host for PvP.

To Host a session, the player MUST be in Human form by reviving at a bonfire. This allows the player to summon Phantoms (up to a maximum of 2), but also allows them to be invaded.

The notable Online Items are ::
  • White Sign Soapstone. Places a Sign on the ground that is visible to other players, when interacted with the Player will be summoned as a Phantom in the Host's world. Can be used when Hollow.

  • Red Sign Soapstone. Places a Sign on the ground that is visible to other players, when interacted with the Player will be summoned as a Dark Spirit in the Host's world.

  • (Cracked) Red Eye Orb. When used, the player will invade a random Host's world. Cracked orbs are limited, the Red Eye Orb has unlimited uses, but is Covenant specific.

  • Blue Eye Orb. When used, the player will invade a random Host's world whom has sinned. Unlimited uses, but is Covenant specific.

  • Eye of Death. Infect three other online players' world with the Gravelord Curse and put your own Gravelord Soul Sign on their worlds to lure them into your world.

Invasions ::
The purpose of the Invasion is to defeat the Host (or the invader). Doing so will send the Invader home with Souls, Humanity, and potentially a Covenant reward depending on the invasion type. Invasions can only occur when both players are Human (Invaders and Hosts alike).

When an Invader defeats a Host, a Host can opt to Indict the Invader if they have the appropriate item. Doing so adds 1 Sin to that Player's Sin Counter. Any Player with Sin can be invaded by Spirits of Vengeance. A Host defeated by a Spirit of Vengeance will have their Sin Counter lowered by 1.

One can also accrue Sin by being kicked out of certain Covenants. However, while a Player may Request Absolution to avoid Covenant Hostility; requesting Absolution has no impact on Online Sin, and so they may still be invaded by Spirits of Vengeance until their Sin Counter reaches 0.

A Host cannot opt out of invasions, and thus when becoming Human will automatically put themselves at risk of invasion, even should they not summon any phantoms. However, there are certain safeguards called 'Invasion Timers'.

There are three kinds of Invasion Timer, I will refer to them simply as :
- Red (specific to Dark Spirits)
- Blue (specific to Spirits of Vengeance)
- Black (specific to Gravelords)

The most common invader will be Dark Spirits. Invasion Timers start whenever the related invader leaves the Hosts world. This can be via Black Seperation Crystal, defeating the Invader or being defeated by the Invader and respawning. Invasion Timers last for 15 minutes, and stop the Host being invaded during that period by the related Spirit.

This is to stop back to back invasions 'pestering' the Host. Certain area specific Covenant invasions do not have a timer, and so can continuously invade a Host that is Human in that area.

The Invasion Timer can be reset by using the following items ::
  • Dried Finger.
  • (Cracked) Red Eye Orb.
  • Red Sign Soapstone.
  • Eye of Death.

Hosts CANNOT be invaded when the boss of the area is dead. Invaders cannot interact with NPCs, items specific to the Host's world, or leave the area they were summoned in. Invaders can pick up items dropped by other players however.

Co-Operative Play ::
The purpose of Co-Op is for Phantoms to aid the Host through an area, defeating enemies and eventually the boss. If the Host or Phantom died during this time, the Phantom will be returned to their world.

Phantoms cannot interact with NPCs, items specific to the Host's world, or leave the area they were summoned in. Phantoms can pick up items dropped by other players however.

Upon defeating the Boss, the Phantom will receive Souls, Humanity and potentially a Covenant reward and be returned to their world. Phantoms receive 50% of Souls enemies and bosses would normally drop, though this can be increased with items.

Bloodstains and Messages ::
Bloodstains appear close to where another player has died. When a player interacts with bloodstains, they may see the death of the player who left the stain. They can be helpful by warning the player of dangerous areas that may be ahead.

Also, players who have died by Curse are turned into statues and are sent to other player's world as breakable props.

Players are able to write messages on the ground, so that other players may read them in their own worlds. Many of these messages will inform you of nearby dangers and items, while others may be deceiving or irrelevant. An Orange Guidance Soapstone is required to write messages.

The miracle Seek Guidance reveals certain developer messages that may hint towards secrets. Developer messages are present even when playing Offline.

Additional Edit - Black Separation Crystal ::
Thanks to NightmareGats for this suggestion. The Black Seperation Crystal has a few uses.

- When used by a Host, the Host can return any summoned White or Gold Phantoms to their homeworld. A Host cannot return invaders.

- When used by a Phantom, it returns the Player to their homeworld.

- When used by an Invader, it returns the Invader to their homeworld.

The Black Seperation Crystal is available from the beginning of the game, and has unlimited uses.
Important Details - Illusory Walls and Secrets ::
Dark Souls is filled with secrets, and these are always worth finding. Some are easy, and some are near impossible without a keen eye.

Illusory walls can be found all throughout the world, in various locations, and behind are some of the best things in the game. Illusory Walls can hide bonfires, treasure, NPCs, bosses and even paths to whole new areas or large sections of a current area.

The simplest way to remove an Illusory Wall is to just strike it with your weapon. Any attack will do, and the Illusory Wall will fade into nothing. However, some are a little more unique in that they require a special item to reveal them.

Some Illusory Walls are quite obvious, others you can hardly believe weren't the real thing. The best way to check is to just smack walls as you go... but be careful, hitting walls might also alert nearby enemies, so keep your eyes and ears open.
Heading In The Right Direction ::
World Design ::
Dark Souls 1 has, undeniably, the BEST world design of all the Souls games. Some may argue that the area and level design of Demon's Souls, Bloodborne and even Dark Souls 3 was and is better than Dark Souls 1, and I won't lie - they all have their strong points and weak points. However, the overall geography and world of Dark Souls 1 is unbeatable.

The world intertwines and twists around and in on itself in the most imaginative ways, and you'll find yourself pleasantly surprised when you recognise where you are after hours of trekking onwards, without a thought of where you'd started.

However, the intricate and at times complicated world design can be the bane of new players. Straight out from the Dark Souls tutorial area, the player has access to several areas... and any inexperienced player will find only one of these a suitable route. I've known a great many players to head in the 'wrong' direction, and give up on the game because they found it too difficult.

Fast Travel ::
Unlike the other Souls games, Dark Souls 1 does not allow the player to warp (fast travel) straight from the beginning of the game. Instead, one has to reach roughly a third of the way through before being granted the ability to warp. This means the further you go, the further you have to come back; which makes heading in the right direction all the more important.

The Wrong Way vs The Right Way ::
Fromsoft provide one very simple indication in this regard. Enemy difficulty. The 'correct' path at the beginning of the game is littered with well placed enemies, that can very well prove a challenge to new players, however they are not overpowered in the slightest.

No player is limited to where they can go in this game, but new players will have extreme difficulty taking routes meant for higher level characters with better gear, and so it is very much suggested that players stick to the easiest route.

If you can survive several hits, and the enemies are dying in just a few, then you're headed in the right direction. If an enemy swallows your hits like they're nothing, and kills you in just one or two... try a different direction.

Minibosses and Bosses ::
Though enemy difficulty is usually a fairly clear indication of whether a player should be tackling an area, throughout the game, the player will come across certain enemies that will provide a much larger challenge. These are minibosses. You'll know them when you see them. Fromsoft does not force the player to fight minibosses however, but rather, the player whom does defeat it is typically rewarded with a unique item or a good chunk of Souls.

Aside from that, each area contains at least one boss, typically at the end of the area, and the defeat of said boss allows further progression along that path.

Having said that, many areas are separated into smaller parts, all indicated by the white text at the centre of the screen, so not everywhere will have a boss.

Shortcuts ::
The Dark Souls map is huge, and navigating your way around it can be troublesome and exhausting for new players. However, the game provides shortcuts throughout the game and in various places, so keep your eyes open and always check every corner. Shortcuts can be doors or gates, ladders, elevators and even simple drops. The vast majority can only be initially unlocked from one side, and thus the player must progress through the area to unlock a shortcut that they may use on subsequent run throughs. However, some shortcuts allow players to skip parts of an area straight off the bat.

A quick tip however... make sure you kick the ladder before you try to go down it.

For those not overly worried about spoilers, below is a map of the world.
Combat of Dark Souls, Part 1 ::
Dark Souls has a very complex and intriguing combat system, with many intricate and at times confusing aspects. Hopefully this section will help you to better understand that system, and even master it.

Managing Your Character ::
Health and Stamina are the crux of combat. If you run out of either one, you risk death. Dark Souls combat is very punishing if you fail to manage yourself.

Health ::
Health is simple, as indicated by the HP bar in the top left of the HUD. When your character is struck by an enemy, falls from too great a height or uses certain items, they will be dealt damage. This directly subtracts from your character's health pool.

Once the character's health reaches 0, they will die. Health does not regenerate by itself, however can be restored by the following ::
  • Drinking an Estus Flask.
  • Consuming a Humanity Item.
  • Consuming a Divine Blessing.
  • Casting a Healing Miracle.

Suggestion by NightmareGats ::
It is worth noting that a Player cannot use an Estus Flask when under the effects of a Lloyd's Talisman. The Estus icon will be greyed out, and a grey misty aura will be present on the character. Using Estus under such circumstances does not heal the Player, and leaves them vulnerable during the animation.

Stamina ::
Stamina is just as simple, but acts very differently from health. Whenever your character performs a combat action, such as Rolling, Sprinting, Jumping, Attacking, Parrying or Backstepping, they will consume a portion of stamina.

Once the character's stamina reaches 0, they will no longer be able to perform these actions, which leaves them vulnerable to attacks. Stamina, however, regenerates automatically, and at a quick rate.

If they Character's stamina is brought below 0 due to a blocked attack, the character will be stunned, leaving them vulnerable to attack. Blocked attacks that significantly reduce the character's stamina below 0 will deal damage in relation to the negative stamina consumed.

Stamina regeneration can be increased by the following :
  • Consuming a Green Blossom.
  • Equipping the Grass Crest Shield in an active slot.
  • Wearing the Mask of the Child.
  • Equipping the Chloranthy Ring.
  • Casting Power Within.

Stamina regeneration is also affected by ::
  • Certain armour pieces.
  • Being above 50% Equip Load and 100% Equip Load.
  • Blocking (heavily reduced regeneration while blocking).
  • Being intoxicated (status effect).

Stamina is extremely important in combat, so always ensure it remains at a reasonable level.

Rolling ::
Rolling is one of the most important combat actions in Dark Souls. Rolling is dodging. Every roll has i-frames (invincibility frames) which allows the player to dodge enemy's attacks at the cost of stamina.

The recovery speed of a roll depends on the player's Equip Load. There are A LOT of recovery speed increments affected by Equip Load, but the most significant speeds are::

  • Fastest Roll (at 0% Equip Load).
  • Fast Fast Roll (Below 8.33333% Equip Load).
  • Fast Roll (Below 25%)
  • Medium Roll (Below 50%)
  • Heavy (Fat) Roll (Below 100%)

Being above 100% Equip Load will stop the player from rolling, and instead will result in a staggered shuffle forwards leaving the player extremely vulnerable.

Players cannot roll when out of stamina.

Blocking ::
Blocking is a simpler and (at first) more reliable method of protecting the character from attacks, though typically leaves the more vulnerable than rolling.

Holding the Block key will raise any Left Hand Shield and many Left Hand Weapons. Weapons are not recommend for blocking however, as they have reduced Damage Reduction and Stability than Shields.

Shields have varying Defences and Stability, with Small Shields being best used for parrying, Medium Shields a decent middle ground, and Great Shields typically have the highest Defences and Stability at the cost of their extreme weight.

Stability determines how much stamina is consumed when your shield is struck.

Be sure to pay attention to a Shields Defences, and not the Attack Ratings when determining which to use.

Backstepping ::
The Backstep is a very useful move (in PvE at least). A Backstep can be executed by tapping the Roll key whilst stationary.

Backsteps, unlike rolls, do not have i-frames; however can be followed up by a faster attack (exactly the same as the Running Attack), by pressing the Light Attack key. It is very good for Counter-Attacking an enemy.

Jumping ::
An obvious and simple mechanic, but different to most RPGs you may have played. Jumping can only be done while in motion, and not stationary.

To execute a Jump, hold down the Sprint/Roll key, then rapidly release and tap it when you want to jump. The Jump will vault the player forwards a small distance, and land in a roll. It leaves you extremely vulnerable in combat, so should only be used when trying to jump across small gaps.

It's worth noting that the player cannot jump up things, but rather across them. It's a horizontal vault, rather than a vertical leap. Also, if you use DSFix, unlocking your FPS or setting it above 30FPS can lead to issues with jumping distances. Be warned.
Combat of Dark Souls, Part 2 ::
Attack Types ::
One important factor of the combat system in Dark Souls is the various ways in which the character can attack their enemy. It might seem simple at first, but you'd be pleasantly surprised otherwise.

Light Attack ::
Melee ::
The Light Attack is a quick and easily executable move with any melee weapon. Faster than the Heavy Attack, with a swifter recovery and allows the player to more capably react in combat. The downside is that the Light Attack deals less damage than the Heavy Attack.

The Light Attack also consumes less stamina, and thus can be used multiple times in succession (depending on the weapon type). Most weapons have a two-swing combo from the Light Attack, which will cycle if the chain of attacks persists.

Casting ::
Staves, Talismans and Pyromancy Flames will not do a normal attack with the Light Attack key. Instead, it will cast the spell in the current attunement slot as seen on the HUD, provided that the appropriate Catalyst is equipped.

Ranged Weapons ::
The Light Attack key will allow the character to shoot bolts/arrows at the target. One cannot perform a melee attack with bows, greatbows, or crossbows.

Depending on which hand a crossbow is equipped in, the Light Attack key or the 'Block' key (as would be used for shields in the Left Hand) will fire a bolt. Bows will always be two-handed, regardless of which hand they are in, and thus the Right Hand Light Attack key will allow the player to fire arrows.

Heavy Attack ::
They Heavy Attack is a slower, more damaging attack, which consequently requires more stamina than the Light Attack. Depending on the weapon, Strong Attacks can have a slow recovery time, which leave the player vulnerable to attack if missed.

Some Heavy Attacks are best used in conjunction with Light Attacks for particular combos, however not all weapons have these, and a Heavy Attack will simply reset the character to initiate the animation.

Some weapons have unique and very powerful Strong Attacks, usually at the cost of weapon durability. Though these are powerful, they can quickly lead to your weapon becoming broken, so use these attacks sparingly.

Jumping Attack ::
A Jumping Attack is a very situational attack. It can be executed by doing a Heavy Attack whilst simultaneously tapping the Forward key. It may take a few times to get used to it, so it's worth practicing until you can do it reliably.

The Jump Attack is the most damaging of the basic attacks (in most cases), but also consumes the most stamina (in most cases). It also has the slowest recovery, so should not be executed when an enemy is in a position to dodge or block this attack, and should only be used when they are vulnerable.

I would recommend it's use against slow enemies.

Running Attack ::
The Running Attack is similar to the Light Attack. It costs less stamina than most attacks, deals less damage, but is usually a very rapid attack and the character is mobile during the animation.

To perform the running attack, simply use the Light Attack key while sprinting in a direction.

Rolling Attack ::
Pressing the Light Attack key shortly after or during a Roll will cause the character to perform a Rolling Attack. Whilst this attack deals decent damage, is often quite rapid, and can be very good at catching an enemy off-guard, it must be noted that it consumes stamina in conjunction with the stamina consumed from the roll.

This means that a large portion of stamina can be consumed from rolling attacks, especially with Heavy Weapons. It's is possibly only worth attempting Rolling Attacks after a fast roll, as medium and fat rolls leave the player vulnerable, and remaining still for an attack only exacerbates that.

Rolling Attacks are best executed when rolling forwards at an enemy through their attack.

Plunging Attack ::
A Plunging Attack can only be performed when falling from a height. However, as a very situational attack, it can also deal massive damage to enemies.

To perform a Plunging Attack, use a Jumping Attack off of a ledge (for additional damage), or simply press the Light Attack key when already falling. Do keep in mind that falling from too high can kill your character, and Plunging Attacks do not reduce or halt fall damage in any way.

Performing a Plunge Attack on certain bosses and minibosses can result in an automatic Critical Attack which deals massive damage. It's worth experimenting to see which bosses can be Plunge Attacked effectively.

Plunging Attacks should not be missed, as they leave the character vulnerable to attack, so only perform them in suitable situations.

Kick and Retreat ::
A Kick is a very effective way of breaking an enemy's guard, leaving them vulnerable to attack. To perform a Kick, simply press the Light Attack whilst simultaneously tapping Forward. Like Jumping Attacks, it may be worth practicing so you're used to the timing.

Kicking an enemy which is blocking will significantly reduce their stamina, which means you can break their guard and get a couple free strikes in afterwards. Alternatively, a Kick can be used to stagger an enemy whom isn't guarding. A stagger knocks an enemy back slightly, leaving them open to an attack, or potentially to be knocked from a ledge.

Large enemies will most likely not be staggered... be smart about this. Enemies around the same size of the player will almost always be staggered by a kick.

The Retreat can be performed the same way as the Kick, as it replaces the Kick for some weapons - most Curved Swords and Piercing Swords. The Retreat deals small damage, while perfoming a unique backstep animation.

Shield Jab ::
Some weapons have a unique attack when combined with the use of a shield. Pressing the Light Attack key with a Spear or Piercing Sword, whilst holding your shield up will perform a Shield Jab.

This attack deals little damage, and consumes a lot stamina, however can protect your character from receiving damage. It is worth noting however, that being attacked by anything that would normally deal a significant amount of stamina damage could result in the player's guard being broken, and thus leaving them vulnerable to attack.
Combat of Dark Souls, Part 3 ::
Critical Attacks ::
Parrying and Riposting ::
Parrying is a difficult, but very rewarding combat action. A Parry can be executed by pressing the Left Hand Heavy Attack key whilst holding a Medium or Small Shield or Parrying Tool in the Left Hand.

To Parry an enemy, one must perform the Parry action just as the opponent strikes, leaving them open to a Critical Attack called a Riposte.

A Riposte can be performed by pressing the Light Attack key when in melee range of your enemy after having Parried them. A Riposte has a unique animation, and can deal massive damage to an enemy.

Only Melee Weapons in the Right Hand can Riposte and enemy.

It is worth noting that not all enemies can be parried, most notably some bosses and larger enemies. Also, Parry Timing can be difficult, and takes a lot of practice. It's best not to attempt Parries on your first run through an area, but rather when returning to an area with no particular downsides or loss to progress by dying, so you can practice Parries without worry.

Backstabs ::
Backstabs are a much easier form of Critical Attack to execute, though typically do slightly less damage than a Riposte (however still deal huge damage to most enemies).

To perform a Backstab, you must simply be behind your enemy, and press the Light Attack button. Much like the Ripose, a unique animation will occur.

Not all enemies can be backstabbed, particularly many bosses and larger enemies. Backstabs can only be performed by Right Hand Melee Weapons.

Counter Attack ::
Counter Attacks are very unique, as they are entirely situational, and can only be performed by Thrusting Attacks.

A great many weapons can deal Thrusting Attacks with certain moves, and so many can make use of this mechanic, but most notably is Spears and Piercing Swords which deal Thrusting Damage with almost every attack.

Counter Attacks occur when attacking an enemy that is in the middle of an attack, and a succesfully landed Counter Attack will deal approximately 20% more damage.

Counter Attacks only affect Physical Damage, not Elemental Damage.

Notable Mechanics ::
Two-Handing and One-Handing ::
The player can Two-Hand any Right Handed Melee Weapon for multiple effects. Two-Handing a weapon slightly increases its Attack Rating (the damage it deals), changes the moveset (attack animations), and also boosts your Strength stat by 50% (1.5x Strength) which rounds down.

i.e 31 Strength becomes 45. This allows the player to wield weapons they may lack the Strength for One-Handed, but reach the required Strength when Two-Handed. However, this limits the use of Left Hand weapons of course.

Lock-On ::
A very simple but very useful mechanic. Simply Lock-On to an enemy and the camera will lock onto that enemy, allowing the player to move around freely whilst remaining faced towards the particular foe and directing all attacks towards it.

However, the Player can only dodge in 4 directions when locked onto an enemy (Left, Right, Forward, Backward). Being too close to an enemy can cause the roll to skew and the player to end up somewhere they didn't want to.

Zooming ::
Zooming can only be performed by Two-Handing a Bow and pressing (or holding) the Left Hand Light Attack key (Block key). The player cannot Lock-On when Zooming, however it allows them to perform a Headshot. Headshots deal superior damage, and stagger most enemies.

Ammunition Swapping ::
The player can equip two types of Arrows and two types of Bolts at a time. When holding a Bow or Crossbow, simply pressing the Strong Attack key to switch between Ammunition types.
Combat of Dark Souls - Damage Types ::
As complex as the combat may already seem... there's more to it. We've already made mention of Thrust Attacks when talking about Counter damage. This is just one of many damage types.


Firstly, there is Physical, Elemental and Status Effect damages.

Physical Damage ::
Phsyical Damage has four variations ::
- Regular
- Slash
- Strike
- Thrust

Each damage type is effective against certain enemies and armours. Most weapons have a Primary damage type, which is the type dealt with most or all of its attacks, typically basic attacks; and then Secondary and potentially even Tertiary attack types.

Weapons with the Regular Primary are ::
  • Straight Swords
  • Great Swords
  • Ultra Greatswords
  • Axes
  • Great Axes
  • Halberds
  • Whips
Many of these, such as Swords, have Thrust as their Secondary attack type.

Weapons with the Slash Primary are ::
  • Curved Swords.
  • Curved Greatswords.
  • Daggers.
  • Great Scythe.
  • Katanas.
Daggers and Katanas have Thrust as their Secondary attack type.

Weapons with the Strike Primary are ::
  • Hammers.
  • Great Hammers.
  • Fist Weapons.
  • Heavy Attack of Catalsysts.

Weapons with the Thrust Primary are ::
  • Spears.
  • Piercing Swords.

Elemental Damage ::
Elemental Damage has three variations ::
- Magic
- Lightning
- Fire

Again, each Element is effective against certain enemies and armours. Typically an enemy with an affinity for an Element will have a high resistance to it.

Some weapons deal innate Elemental Damage, and many weapons can be Infused to deal a certain type of Elemental Damage... but the most common and obvious sources are Spells.

Auxilary Effects ::
Status Effects ::
Status Effects are more unique than the other damage types, as they require a 'build-up' before they deal damage. Also, Status Effects are affected by resistances rather than defences.

Status Effects have four variations ::
- Poison
- Toxin
- Bleed
- Curse

These can be applied from various sources.

Poison ::
The Player can inflict Poison on enemies with the use of certain spells, or by using a Rotten Pine Resin on a buffable weapon.

Poison is a slow Damage Over Time effect, that deals consistent damage to the player or enemy. The Poison Effect remains for 3 minutes, though Players can remove the Poison Effect by consuming a Purple Moss Clump, a Divine Blessing, resting at a Bonfire or casting a certain spell.

Poison Resistances do not affect the damage received from Poison, nor do they reduce the duration of the effect. Instead, resistances simply increase the duration a player can be affected by a Poison source before becoming inflicted.

Different Poison sources can inflict a more potent, or a weaker Poison Effect. Some enemies are immune to Poison, and cannot be inflicted.

Toxin ::
Toxin is a more potent version of Poison, dealing more damage and also slowing stamina regeneration. Toxin will typically last for 10 minutes, and unless removed will usually kill the player.

Toxin can be removed by consuming a Blooming Purple Moss Clump, a Divine Blessing, resting at a Bonfire or casting a certain spell.

Toxin Resistances do not affect the damage received from Toxin, nor do they reduce the duration of the effect. Instead, resistances simply increase the duration a player can be affected by a Toxin source before becoming inflicted.

Bleed ::
Bleed is different to Poison and Toxin, as it does not deal Damage Over Time, but rather when inflicted, causes a large amount of instant damage to the player or enemy.

The damage inflicted is a percentage of the target's max HP. The bleed rating stat on a weapon indicates the percentage of health that the enemy will lose (0.1 times the value indicated on the item). Most weapons have a bleed rating of 300 (30% HP loss), though there are unique weapons that deal more damage.

Bleed build-up, much like Poison or Toxin build-up, is an over time process. However, unlike Poison or Toxin, consuming a Bloodred Moss Clump has no effect AFTER being inflicted by Bleed. While Poison and Toxin's DoT effects can be removed, the Blood Loss effect is instant.

Bloodred Moss Clumps are instead used to reduce Bleed build-up, to avoid the Blood Loss infliction altogether. Resting at a bonfire, consuming a Divine Blessing and casting a certain spell also reduce the Bleed build-up.

Some enemies are immune to Bleed.

Curse ::
Curse is the most potent of the four, but also has the fewest sources. Players cannot inflict Curse on enemies (without hacking), and only certain enemies can inflict Curse on the player.

Once Curse build-up reaches the maximum, the Player will die. Upon respawning, their Health bar will be halved, and they will be unable to Reverse Hollowing.

To remove Curse, one must consume a Purging Stone or speak to a certain NPC and offer 1 Soft Humanity.

Cursed Players are able to attack certain enemies that would otherwise be immune to attacks without resorting to special means.

Divine and Occult ::
Divine and Occult are very unique Auxilary Effects. Unlike all other Damage Types, Divine and Occult have no Defence or Resistance counter-parts in the armour system, and that is because they have no impact on the player. Rather, Divine and Occult damage only applies to very particular enemies, and only adds a Damage Multiplier to existing damage types, rather than dealing their own specific Damage Type.

Divine and Occult weapons deal base Magic Damage, though this scales with Faith rather than Intelligence as most do. Weapons granted Divine and Occult via the Ascension path will receive a 110 Modifier, where as certain unique weapons with innate Divine or Occult may have a higher modifier. These modifiers can cause Divine or Occult Weapons to deal very high damage against certain opponents affected by them.

Divine Weapons typically deal more Magic Damage than Occult, whereas Occult Weapons typically deal more Physical Damage than Divine.
Magic of Dark Souls - Basics ::
Swords and Boards aren't the only way to play in Dark Souls. As with many Fantasy RPGs, Magic is a large part of the game, but an entirely optional one. Magic has many uses in Dark Souls, from Utility, to Defence, to Offence.

Magic can be split into three disctinct categories ::
- Sorcery
- Miracles
- Pyromancy

Each is governed by an overarching aspect.

Sorcery by Intelligence.
Miracles by Faith.
Pyromancy by your Pyromancy Flame.

And each has their own Strengths and Weaknesses. Something all three classes share however, is the core mechanics of the Magic System. To use a Spell in Dark Souls, the character must first Attune the Spell they wish to cast, and also have the appropriate Catalyst and necessary Statistics to cast it.

We have already established that a player can equip Spells by resting at a Bonfire and entering the Attune Spell section. Most spells require only 1 Attunement Slot, though some more powerful Spells require 2 Attunement Slots.

Each type of Magic has a unique Catalyst.

Sorcery has Staves.
Miracles have Talismans.
Pyromancies have the Pyromancy Flame.

All Spells have a limited number of casts, which can be replenished by resting at a Bonfire. The number of casts can also be increased be equipping multiple of the same Spell, or by equipping certain items that boost maximum casts.

The Player remains immobile throughout the duration of casting a Spell, so be sure not to attempt casting when enemies are attacking the player, for they can be interrupted.
Magic of Dark Souls - Sorceries ::
Before using any form of Magic, the Player must ensure they meet the requirements to cast a Spell. All Sorceries and Sorcery Catalysts require Intelligence to use. The more powerful they are, the more intelligence they require. One unique Catalyst requires Faith, and scales as such, but is not suitable for a Sorcery build.

Intelligence also directly governs the damage Offensive Sorceries deal.

Sorceries can be split into two categories ::
  • Utility.
  • Offensive.

Utility Sorcery ::
Utility Sorceries have many uses, from turning the Player almost invisible, nullifying fall damage to creating light to see as well as many others. Utility Sorceries typically have a low Intelligence requirement to cast, but are also very situational.

They also usually have a high number of casts. Utility Sorceries tend to have a fixed effect, and Sorcery Effectiveness boosting items have no effect. However, the duration of many Utility Sorceries can be increased by equipping the Lingering Dragoncrest Ring, which can be found by progressing through the game.

Offensive Sorcery ::
Offensive Sorceries, likely the more popular of the two, also have a great many uses. Offensive Sorceries come in various forms, such as direct attacks, weapon buffs and damage over time effects.

The damage of almost all Offensive Sorceries is directly affected by Intelligence. All Sorcery Catalysts have a Magic Adjustment stat shown in the equipment menu. The higher the player's Intelligence, the higher the Magic Adjustment will be. Some Catalysts have very high Magic Adjustment, but will reduce the maximum number of available casts. This allows for more limited, but more powerful Sorceries.

Typically, weaker Sorceries have many casts, but deal little damage. These are best for picking off weak enemies and mobs. However, more powerful Sorceries have limited casts, but can deal very significant damage against powerful enemies and bosses.

Offensive Sorceries can be boosted by equipping certain items, which allow them to deal more damage to enemies.
Magic of Dark Souls - Miracles ::
Before using any form of Magic, the Player must ensure they meet the requirements to cast a Spell. All Miracles and Talismans require Faith to use. The more powerful they are, the more Faith they require. One unique Talisman requires Intelligence to wield, though is not suitable for a Faith build.

Faith also directly governs the damage Offensive Miracles deal, and the health Healing Miracles restore.

Miracles can be split into three categories ::
  • Healing.
  • Utility.
  • Offensive.

Healing ::
Healing Miracles are obvious. They restore the Player's HP. This can be extremely useful if the Player uses a lot of Estus, for the can use Miracles between fights, and Estus during fights.

There are two kinds of Healing Miracles ::
- Instant.
- Over time.

Instant Healing Miracles restore anywhere from a small amount of HP, to an entire Health Bar, at once. Though they have a somewhat slow cast time, and aren't suitable for use during battle except against really slow enemies.

Over time Healing Miracles restore a large amount of HP of a moderate to long period of time. This allows for consistent and reliable healing even during battle. If a player gets low on Health, they can just play defensively until their HP reaches a comfortable level.

Healing is the Primary focus of Miracles, and can be a very powerful asset to new players whom struggle to manage their Estus. However, as ever, the most powerful Healing Miracles have limited casts, where as weaker ones have numerous.

The most powerful Healing Miracles are locked behind a covenant, but the Player can acquire powerful Miracles regardless.

Utility ::
Utility Miracles are also very useful, just as sorceries. They have various uses, such as returning the Player to the previous Bonfire, increasing Defences, showing Developer Messages and even slowing enemy movement.

Utility Miracles tend to have quite limited casts however, but their uses more than make up for that. As ever, equipping more of the same Spell increases the total casts.

Offensive Miracles ::
Offensive Miracles can be very powerful, however they are extremely limited. Some can only be acquired once per character, and even then have limited casts.

Offensive Miracles come in various forms, such as direct attacks, weapon buffs, knockback effects, AoE attacks and even Auto-Triggered attacks.

The damage of almost all Offensive Miracles is directly affected by Faith. All Talismans also have a Magic Adjustment stat shown in the equipment menu. The higher the player's Faith, the higher the Magic Adjustment will be.

Offensive Miracles and Healing Miracles can be boosted by equipping certain items, which allow them to deal more damage to enemies or restore more Health to the player.
Magic of Dark Souls - Pyromancies ::
Unlike Sorceries and Miracles, Pyromancies do NOT require any stats to use, nor is the effectiveness governed by any of the stats. Instead, Pyromancy damage is directly related to the Enhancement Level of the Pyromancy Flame.

A Pyromancy Flame can be upgraded by three specific NPCs at the cost of souls. The higher the upgrade level, the more souls it costs to upgrade further. However, the lack of stat requirements make Pyromancies an extremely powerful backup for Melee focused characters with little Intelligence or Faith.

Pyromancies can be split into two categories ::
  • Utility.
  • Offensive.

Utility Pyromancy ::
Utility Pyromancies have limited uses, but can have devastating effects. They can turn force enemies to temporarily be allied with the player, they can increase defences, and even boost damage at the cost of HP.

These Pyromancies have quite limited casts however, and have a fixed effect, unaffected by boosting equipment. However, the duration of Utility Pyromancies can be increased by equipping the Lingering Dragoncrest Ring, which can be found by progressing through the game.

Offensive Pyromancy ::
Offensive Pyromancies also have a great many uses, however unlike Miracles and Sorceries, have drastically reduced range, and often a slow cast time. Offensive Pyromancies come in various forms, such as direct attacks, AoE attacks and damage over time effects.

As always, weaker Pyromancies have many casts, but deal little damage. These are best for picking off weak enemies and mobs. However, more powerful Pyromancies have limited casts, but can deal very significant damage against powerful enemies and bosses, just like Sorceries and Miracles.

Offensive Pyromancies can be boosted by equipping certain items, which allow them to deal more damage to enemies.
Your Equipment - Weapons ::
We've already established the various damage types, so now we'll look at specific weapon types. Throughout this guide all weapon types have been mentioned, but in no particular detail.

The Weapon Types Are ::
  • Daggers
  • Straight Swords
  • Greatswords
  • Ultra Greatswords
  • Curved Swords
  • Curved Greatswords
  • Katanas
  • Piercing Swords
  • Axes
  • Greataxes
  • Hammers
  • Greathammers
  • Fist and Claws
  • Spears
  • Halberds
  • Whips
  • Bows
  • Greatbows
  • Crossbows
  • Catalysts
A lot right? Dark Souls has no shortage of weapons, and every single weapon class has its own moveset, and certain weapons within those even have their own movesets.
Which you prefer is entirely up to you, and there is no 'best' option when it comes to choosing your weapon in Dark Souls. Pick what you like, and make it godly. Every player has a lot of free reign when it comes to choosing their build.

However, to help you narrow that down, we'll take a look at the positives and negatives of each class.

Daggers ::
Daggers, as you can guess, are a very light weapon, with rapid attacks and low damage. Perhaps not most suitable for new players, but daggers can be exceptionally deadly when applied correctly.

As a small weapon, Daggers naturally scale best with Dexterity, but don't expect that to make them deal decent damage; their true power lies in their Critical Modifier. Every weapon has a Critical Modifier that determines how much damage they deal with Critical Hits such as Ripostes and Backstabs, and Daggers have the highest among all the weapons.

The Critical Modifier multiplies a weapon's AR, so that does not mean a Dagger will deal more damage than a fully upgraded Crystal Demon's Greataxe, but it is still very potent. Aside from that, the attacks all cost very little stamina, which is perfect for any build that consumes a lot of stamina from dodging or parrying.

Straight Swords ::
Straight Swords are a very reliable weapon type. Fast, decent damage, low stamina consumption and a varied moveset. However, the moderate damage and low Critical Modifier makes them unsuitable for Crit focused builds, and they deal very little stagger damage as well as having low range.

Straight Swords are best used to strike quickly, and dodge or block before striking again. A good mix between defence and offence.

Greatswords ::
Greatswords are the Straight Swords big brother. They can deal very good damage, they have moderate stamina consumption and a versatile moveset. However, they also boast great range than the Straight Sword, though at a slower attack speed.

This is a very good weapon class for new players and experienced players alike.

Ultra Greatswords ::
The largest of the Sword types, the Ultra Greatsword is all about pummeling foes into the ground. They deal huge damage, consume a lot of stamina, can stagger and outright flatten enemies, have very good range, though all at the cost of slow swing speed.

This leaves the player vulnerable against enemies not staggered by your attacks, and so Heavy Armour with good poise and defences is recommended.

Ultra Greatswords can be extremely powerful with Strength focused characters.

Curved Swords ::
Faster than Straight Swords, decent damage, low stamina consumption, and often innate Bleed build-up. Curved Swords are very decent weapons, but should primarily be used with Dexterity builds.

Curved Swords are also very weak against shielded opponents, as the Kick is replaced by Retreat, which deals very insignificant stamina damage to shielded opponents.

Curved Greatswords ::
Much like their Western cousins, the Curved Greatswords are quite slow, have moderate stamina consumption, but can deal very good damage, have decent range, and have wide arced attacks.

Katanas ::
As can be expected of a game developed by a Japanese company, Katanas are a very good class of weapon. They are fast, damaging, cost low stamina, have decent range (sometimes longer than greatswords), and can deal surprisingly decent stagger damage.

Their speed is fantastic for interrupting opponents, and some of the attacks have exceptional range.

Piercing Swords ::
Piercing Swords are another weapon that may or may not be suitable for new players. Their Thrusting Attacks have narrow windows, which may prove troublesome for a new player against numerous opponents; but it attacks rapidly in succession, costs low stamina, and can deal very good damage, especially with Counter Attacks.

Another tidbit is that some Piercing Swords have a high Critical Modifier, and their decent Attack Rating means they can deal very good Critical Damage.

Axes ::
Axes are heavy hitters, even the normal ones. Slower than Straight Swords and Curved Swords, but typically hit a little harder, and deal more stagger damage.

Their arcing attacks can be good for players struggling to aim at enemies, but I can't see that happening. :/

Greataxes ::
Much like Ultra Greatswords, these beastly things can hit like a truck, but darn well feel like you're swinging a truck too. High damage, high stamina consumption and slow swings.

Hammers ::
Very similar to Axes, but deal Strike damage, which is particularly effective against armoured foes.

Greathammers ::
Again, very similar to Greataxes, but deal Strike damage. Greathammers also tend to deal more stagger damage. Greathammers also have very wide swings, which allows for decent crowd control against multiple lesser mobs.

Fist and Claws ::
These weapons are not recommended for new players. Though they can have quick strikes which are good for interrupting enemies, they have extremely limited range and relatively low damage.

Spears ::
Spears are another of the very reliable weapon types. Relatively quick thrusts, decent damage, moderate to low stamina consumption, but most importantly exceptional range and the Shield Jab.

Spears are a fantastic defensive weapon for new players.

Halberds ::
Halberds are another weapon class with fantastic range, and distancing is very important when using them. Halberds can deal considerable damage, but tend to consume slightly more stamina than spears, and cannot perform the Shield Jab.

Scythes are included among the Halberd class, but are slightly different. With a limited moveset, but high damage, it could be one's cup of tea or it may not.

Whips ::
Whips are unique. Though they have mediocre damage and range, they cannot be parried. This has little to no effect on PvE gameplay however, as the vast majority of enemies can't parry anway.

Bows, Greatbows and Crossbows ::
I crammed these in the same section because they all have the same use. Ranged Combat. Bows are easy to use, cost little stamina, and are good for picking off enemies at a distance. However, the player is immobile whilst drawing and loosing the bow, so use with caution.

The Greatbow is just a larger version, however deals considerably more damage, has longer range and can even knockdown smaller enemies.

The Crossbow is best suited only as an off-hand weapon in close combat to interrupt enemies or chip at their health from a somewhat safe distance. Crossbows cannot be zoomed in, which can make aiming them very difficult at range.

Equipping certain items can boost the range of arrows and bolts.

Catalysts ::
Already covered. These are required to cast spells.

Shields ::

Shields come in three categories. Small Shields, Medium Shields and Greatshields. The former are best for parrying, the latter for blocking, and Medium Shields are a decent middle ground between the two, offering moderate stability and defences whilst often retaining the ability to parry.
Your Equipment - Armours ::
Armour is another very important aspect of Dark Souls. Armours can essentially be split into three seperate categories ::
  • Heavy
  • Medium
  • Light
As one can imagine, Heavy Armour tends to offer the highest defences, whilst at the cost of increased equip load. Medium Armour offers decent Physical defences, at moderate equip load. Light Armour tends to offer decent Elemental defences at low equip load.

Some exceptions from each tier exist.

The best way to treat armour is to value Defence / Weight ratio, and determine which is the best for you and your build. For example, equipping Heavy Armour because it allows you to get hit a few more times before dying may not be worth it, as it might put your over 50% Equip Load which leads to Fat Rolling, causing you to get significantly more and overall reducing the effectiveness of the armour.

If building a Tank, Heavy Armour would be worth the investment. However, often finding a decent middle ground between agility and defences is important; meaning that the Player can reliably dodge, but when hit still has decent defences.

When determining Equip Load, one must also pay mind to their Weapon weight as well. Of course, mixing and matching armours for the best Defence / Weight ratio is possible, and any armour combination can be made.

What the hell are you paying attention to Defences for? It's all about the fashion.

Defences and Resistances::

All armour pieces have Defences and Resistances related to the various Damage Types we covered. As a reminder, these are ::
  • Regular.
  • Slash.
  • Strike.
  • Thrust.

  • Magic.
  • Fire.
  • Lightning.

  • Poison.
  • Toxin.
  • Bleed.
  • Curse.
Of course, certain Armours have stronger Defences and Resistances, and as mentioned, usually at the cost of increased Equip Load, or lower Defences in other areas. Some Armour pieces will have exceptionally high Defence for one particular value. Mixing and matching these Armours can lead to extremely high Defences against an Element, Status Effect or Physical Damage type.

Poise ::
All Armour has a Poise Value, though at times that value is 0. The Heavier the armour, typically the more Poise it provides.

If you recall I made mention of Stagger Damage in the Weapons section, well this is where that comes into play. When hit by an attack, players can be staggered. Being staggered briefly stops the player from committing any actions, such as rolling, blocking, or attacking. Naturally, being staggered usually leads to the player being hit a second time, sometimes more.

Poise affects how much 'Stagger Damage' (which is a hidden value) the player can sustain before being staggered. Having high poise means the player can sustain several hits without being interrupted, and can even reduce some knockdown effects to simple staggers.
Your Equipment - Scaling, and Comparing Weapons and Armours ::
This is a seperate section because I couldn't fit any more characters in, so it'll be short.

Scaling ::

Almost all weapons receive scaling bonuses which are attributed to certain stats. As all weapons require stats to wield, as do they become stronger the higher these stats are.

As above, you can see two main values provided ::
  • Base Damage.
  • Scaled Damage.

Base Damage is a mostly stagnant figure, and is only affected by a weapon's upgrade level. As you can see, a Black Knight Sword +5 has 330 Base Damage; and it will have 330 Base Damage on any character at any stats so long as it is +5.

However, Scaled Damage acts differently. Scaled Damage is directly affected by the Parameter Bonus shown, and these are the stats that affect Scaled Damage.

As you can see, as Black Knight Sword +5 has a "C" Scaling in Strength and an "E" Scaling in Dexterity. The Scaling Modifiers from best to worst are ::
  • S
  • A
  • B
  • C
  • D
  • E
Parameter Bonuses only apply to the Strength, Dexterity, Intelligence and Faith stats. Heavier weapons typically have higher Strength PBs, lighter weapons typically have higher Dexterity PBs. Some unique weapons, usually those with innate Elemental Damage, can benefit from Intelligence and or Faith bonuses.

Infusions, as will be discussed, will alter the Parameter Bonuses of a weapon.

Making Comparisons ::

Using the same image as the Armour section, though one can also refer to the Black Knight Sword above, we can see certain values are highlighted in Red and in Blue. When looking at the Defences, Resistances, Poise and Attack Ratings of any Weapon or Armour; they are automatically compared to the equipped Weapon or Armour in that slot.

Values that are higher than those of the equipped item will be highlighted Blue. Values that are lower are highlighted Red. And equal values remain White.

The highlighted Armour Piece is upgraded to +5, whereas the equipped Armour has not been upgraded, thus almost all values are higher. However, when comparing most Armours or Weapons, the player will have to make compromises for certain Defences or Damage.
Your Equipment - Rings ::
Rings, unlike Weapons and Armour have no burden on the player's Equip Load.

Every Ring has a unique effect specific to that Ring, and despite their being two ring slots, players cannot equip more than one of the same type.

Rings can have various, and exceptionally powerful effects, such as silencing the player's footsteps, boosting damage, increasing stamina regeneration and a great many others. Throughout the game are a select few rings that are required to progress, or may aid in that regard at least. Be sure to always regard dialogue, item descriptions and the environment. If progress seems impossible, it may be that you simply need to put on a certain ring.

Also unlike Weapons and Armours, Rings cannot be upgraded and thus can be swapped on the fly to suit the scenario or area without any negative impacts.

Rings can be found throughout the world, purchased from some Merchants or dropped by bosses.

Lastly, though Rings have no durability bar (like Armour and Weapons), a very select few are still breakable; though only under specific conditions. Always read the item description before equipping a Ring.
Your Equipment - Consumables ::
Consumables, as the name suggests, are consumable items found throughout the world. Of varying use, and from being exceptionally plentiful to extremely rare.

The vast majority of consumable items can be held in stacks of 99, and can be acquired from enemy drops, found in various locations or purchased from merchants. Consumables can have a profound impact on gameplay with their innumerable uses, such as buffing weapons, increasing resistances, curing ailments, restoring health, damaging enemies and much more.

Most consumables can be farmed or purchased indefinitely from particular places, and thus a stock can be consistently maintained to ensure the player has constant access to them.

Amongst consumables are certain unique ones however, that are extemely limited. Certain Multiplayer Items may be only acquired once, or a few times per playthrough, or per character, and may have limited or infinite uses.

To understand the effects of each consumable, it is highly recommended to read their item descriptions before using them.
Your Equipment - Upgrading, Ascending and Transposing ::
Upgrading ::
Weapons and Armours in Dark Souls 1 can be upgraded, and there are only a select few which cannot.

Weapons and Armours can all be upgraded at any Blacksmith, to a certain degree. To upgrade any weapon, they player will require Titanite, which comes in various forms ::
  • Titanite Shards.
  • Large Titanite Shards.
  • Titanite Chunks.
  • Titanite Slabs.
  • Coloured Titanite (which all come in Chunks and Slabs, though Blue, Red and White).
  • Green Titanite Shards.
  • Twinkling Titanite.
  • Demon Titanite.
Some weapons are also upgraded by a unique and rare material ::
  • Dragon Scales.
Titanite Shards are the most abundant and easy to acquire, and each becomes increasingly difficult to obtain, such as Slabs, which can only be acquired a few times per playthrough. All upgrade materials can technically be acquired infinitely in a single playthrough, as certain enemies have a chance to drop them, however items like Slabs are an extremely rare drop, and would require a lot of dedicated farming to receive them.

The various forms of Titanite are used to upgrade different types of weapons, which is also linked to Ascension.
  • Titanite - Upgrades Normal, Raw, Crystal and Lightning weapons, and normal armour.
  • Green Titanite - Upgrades Fire, Divine and Magic weapons to +5.
  • Red Titanite - Upgrades Fire and Chaos weapons to the maximum.
  • Blue Titanite - Upgrades Magic and Enchanted weapons to the maximum.
  • White Titanite - Upgrades Divine and Occult weapons to the maximum.
  • Twinkling Titanite - Upgrades Unique weapons and armour.
  • Demon Titanite - Upgrades Boss weapons.
  • Dragon Scales - Upgrades Draconic weapons.

Ascension (Infusion) :: Ascension is the process of making weapons stronger, or infusing them with an Element. Armours cannot be ascended. To Ascend any weapon, the player first would need to provide the appropriate Blacksmith with the appropriate item, called an Ember. There are various Embers to be found in Lordran, and they are each associated with a particular Blacksmith.

There are several paths of Ascension, as mentioned above ::
  • Magic.
  • Enchanted.
  • Fire.
  • Chaos.
  • Lightning.
  • Raw.
  • Normal.
  • Divine.
  • Occult.
  • Crystal.

They each have unique properties. All Ascension paths require a Weapon to first reach +5 in the Normal Path.

Magic and Enchanted ::
The Magic Ascension path provides a weapon with split damage, between Physical and Magic Damage Types. The same goes for the Enchanted path, though there are minor differences.

Magic provides higher Base Damage, slightly higher Strength and/or Dexterity Scaling, but lower Intelligence Scaling when compared to the Enchanted Path.

Fire and Chaos ::
The Fire Ascension path also provides split damage, between Physical and Fire Damage Types. However, it entirely removes the Strength and/or Dexterity Scaling, but with high Base Damage in both Physical and Fire.

Chaos is similar, however, both the Physical and Fire damage receive a Scaling Bonus from the Humanity Stat. The more Soft Humanity in the player's counter, the better the Scaling, up to a maximum of 10 Humanity.

The Base Damage of the Chaos Path is lower than that of Fire, due to Humanity Scaling.

Lightning ::
Just like Fire, the Lightning Path removes Scaling, but has high Base Damage in both Physical and Lightning Damage Types.

Raw ::
Raw Ascension removes all Scaling, but increases the Base Damage of a weapon. It is entirely Physical Damage.

Normal ::
The simplest upgrade path. Increases Base Damage and Scaling, provides no additional benefits such as Elemental Damage.

Divine and Occult ::
Already covered. Adds Magic Damage, with and Occult or Divine Damage Modifier. The Magic Damage scaled with Faith, and the Physical Damage Scales with Strength and Dexterity, though is reduced when compared to the Normal Path.

Crystal ::
Increases Base Damage and Scaling for Strength and Dexterity by more than the Normal Path. Crystal Weapons and Shields cannot be repaired, and suffer a 90% reduction in Durability.

High damage at the cost of vastly reduced durability.


Transposition ::
Lastly comes Transposition. This is the process of turning normal weapons into Boss weapons. To transpose a weapon, first the Player needs the associated Boss Soul, access to a particular NPC and a weapon of similar or the same type at +10 Normal Path.

For example, creating a Bow Boss Weapon, the player would need any +10 Bow.

Unique Weapons and other Boss Weapons cannot be transposed into other Boss Weapons.
Understanding Your Statistics ::
And at last we've come to the last section. Throughout the guide there have been several mentions to Stats, and now we can at last explain what in hell I'm actually talking about.

Firstly, let's cover what the stats are, and what they do ::
  • Vitality.
  • Attunement.
  • Endurance.
  • Strength.
  • Dexterity.
  • Resistance.
  • Intelligence.
  • Faith.

Vitality ::
Increases the Maximum Health of the Player. At 30 Vitality, the increase per level is reduced by approximately 10, and past 50 Vitality the Health increase is minimal.

Attunement ::
Increases the number of Attunement Slots every few levels. The maximum number of slots is 10, and caps at 50 Attunement.

Endurance ::
Increases Maximum Stamina, Equipment Burden, and innate Bleed Resistance. Stamina caps at 160, at 40 Endurance.

Strength ::
Increases the Bonus Damage from weapons that scale with Strength. Allows the player to effectively wield weapons that require a minimum Strength Requirement.

Damage Scaling increases are considerably reduced after 40 Strength.

Dexterity ::
Increases the Bonus Damage from weapons that scale with Dexterity. Allows the player to effectively wield weapons that require a minimum Dexterity requirement. Increases the Cast Speed of Spells.

Damage Scaling increases are considerably reduced after 40 Dexterity, and the maximum Cast Speed is reached at 45.

Resistance ::
Increases Physical, Fire and Poison Defences/Resistance. Considerably reduced bonuses after 30 Resistance.

Intelligence ::
Increases the Bonus Damage from weapons that scale with Intelligence. Allows the player to effectively wield weapons that require a minimum Intelligence Requirement and to cast Sorceries with a minimum Intelligence Requirement.

Damage Scaling increases are considerably reduced after 40 Intelligence. Magic Adjustment increases are considerably reduced after 50 Intelligence.

Faith ::
Increases the Bonus Damage from weapons that scale with Faith. Allows the player to effectively wield weapons that require a minimum Faith Requirement and to cast Miracles with a minimum Faith Requirement. Increases Magic Defence.

Damage Scaling increases are considerably reduced after 40 Faith. Magic Adjustment increases are considerably reduced after 50 Intelligence.

Levelling Up ::

Levelling up any stat automatically raises Natural Defences by a small amount. Levelling up costs Souls, and the number required to increase by one level is always shown in the Levelling Up Menu.

This cost increases exponentially each time the player levels up. A single stat increase equals a single level.

The Levelling Up Menu also displays the Attack Ratings of currently equipped weapons. As can be seen, raising Dexterity from 20 to 21 would boost the AR of the Zweihander by 3 damage. It may seem a tiny amount, but at lower levels the increase is more significant due to diminishing returns.

Dexterity Weapons also benefit more from this stat than the Zweihander, which has decent Strength Scaling instead.
Afterword ::
So at last we come to the end of the guide. Yep, it's finished. It may be updated with more information in time, in the case that something pops into my head or someone reminds me of something.

For now, enjoy Dark Souls. This guide is specific to the first game, but certain aspects can be attributed to the entire series.

Ciao for now.
36 Comments
Ac3 Apr 2, 2022 @ 7:32pm 
In Summary: Git Gud
Jack The Stripper Jun 13, 2021 @ 2:53pm 
Thanks for the guide mate. Just getting ready to dive into the game for the first time and was looking for basically an old-school inside-the-game-case manual ('cause that stuff just doesn't exist anymore).
Mikko Sep 8, 2020 @ 3:32am 
Nice guide.
Shard of Manus  [author] Apr 29, 2020 @ 6:40am 
If a player is struggling with going the 'wrong' way, yes.
Karma Apr 29, 2020 @ 6:34am 
It doesn't save them buying the Residence Key. If you want to free Griggs, you still need it.
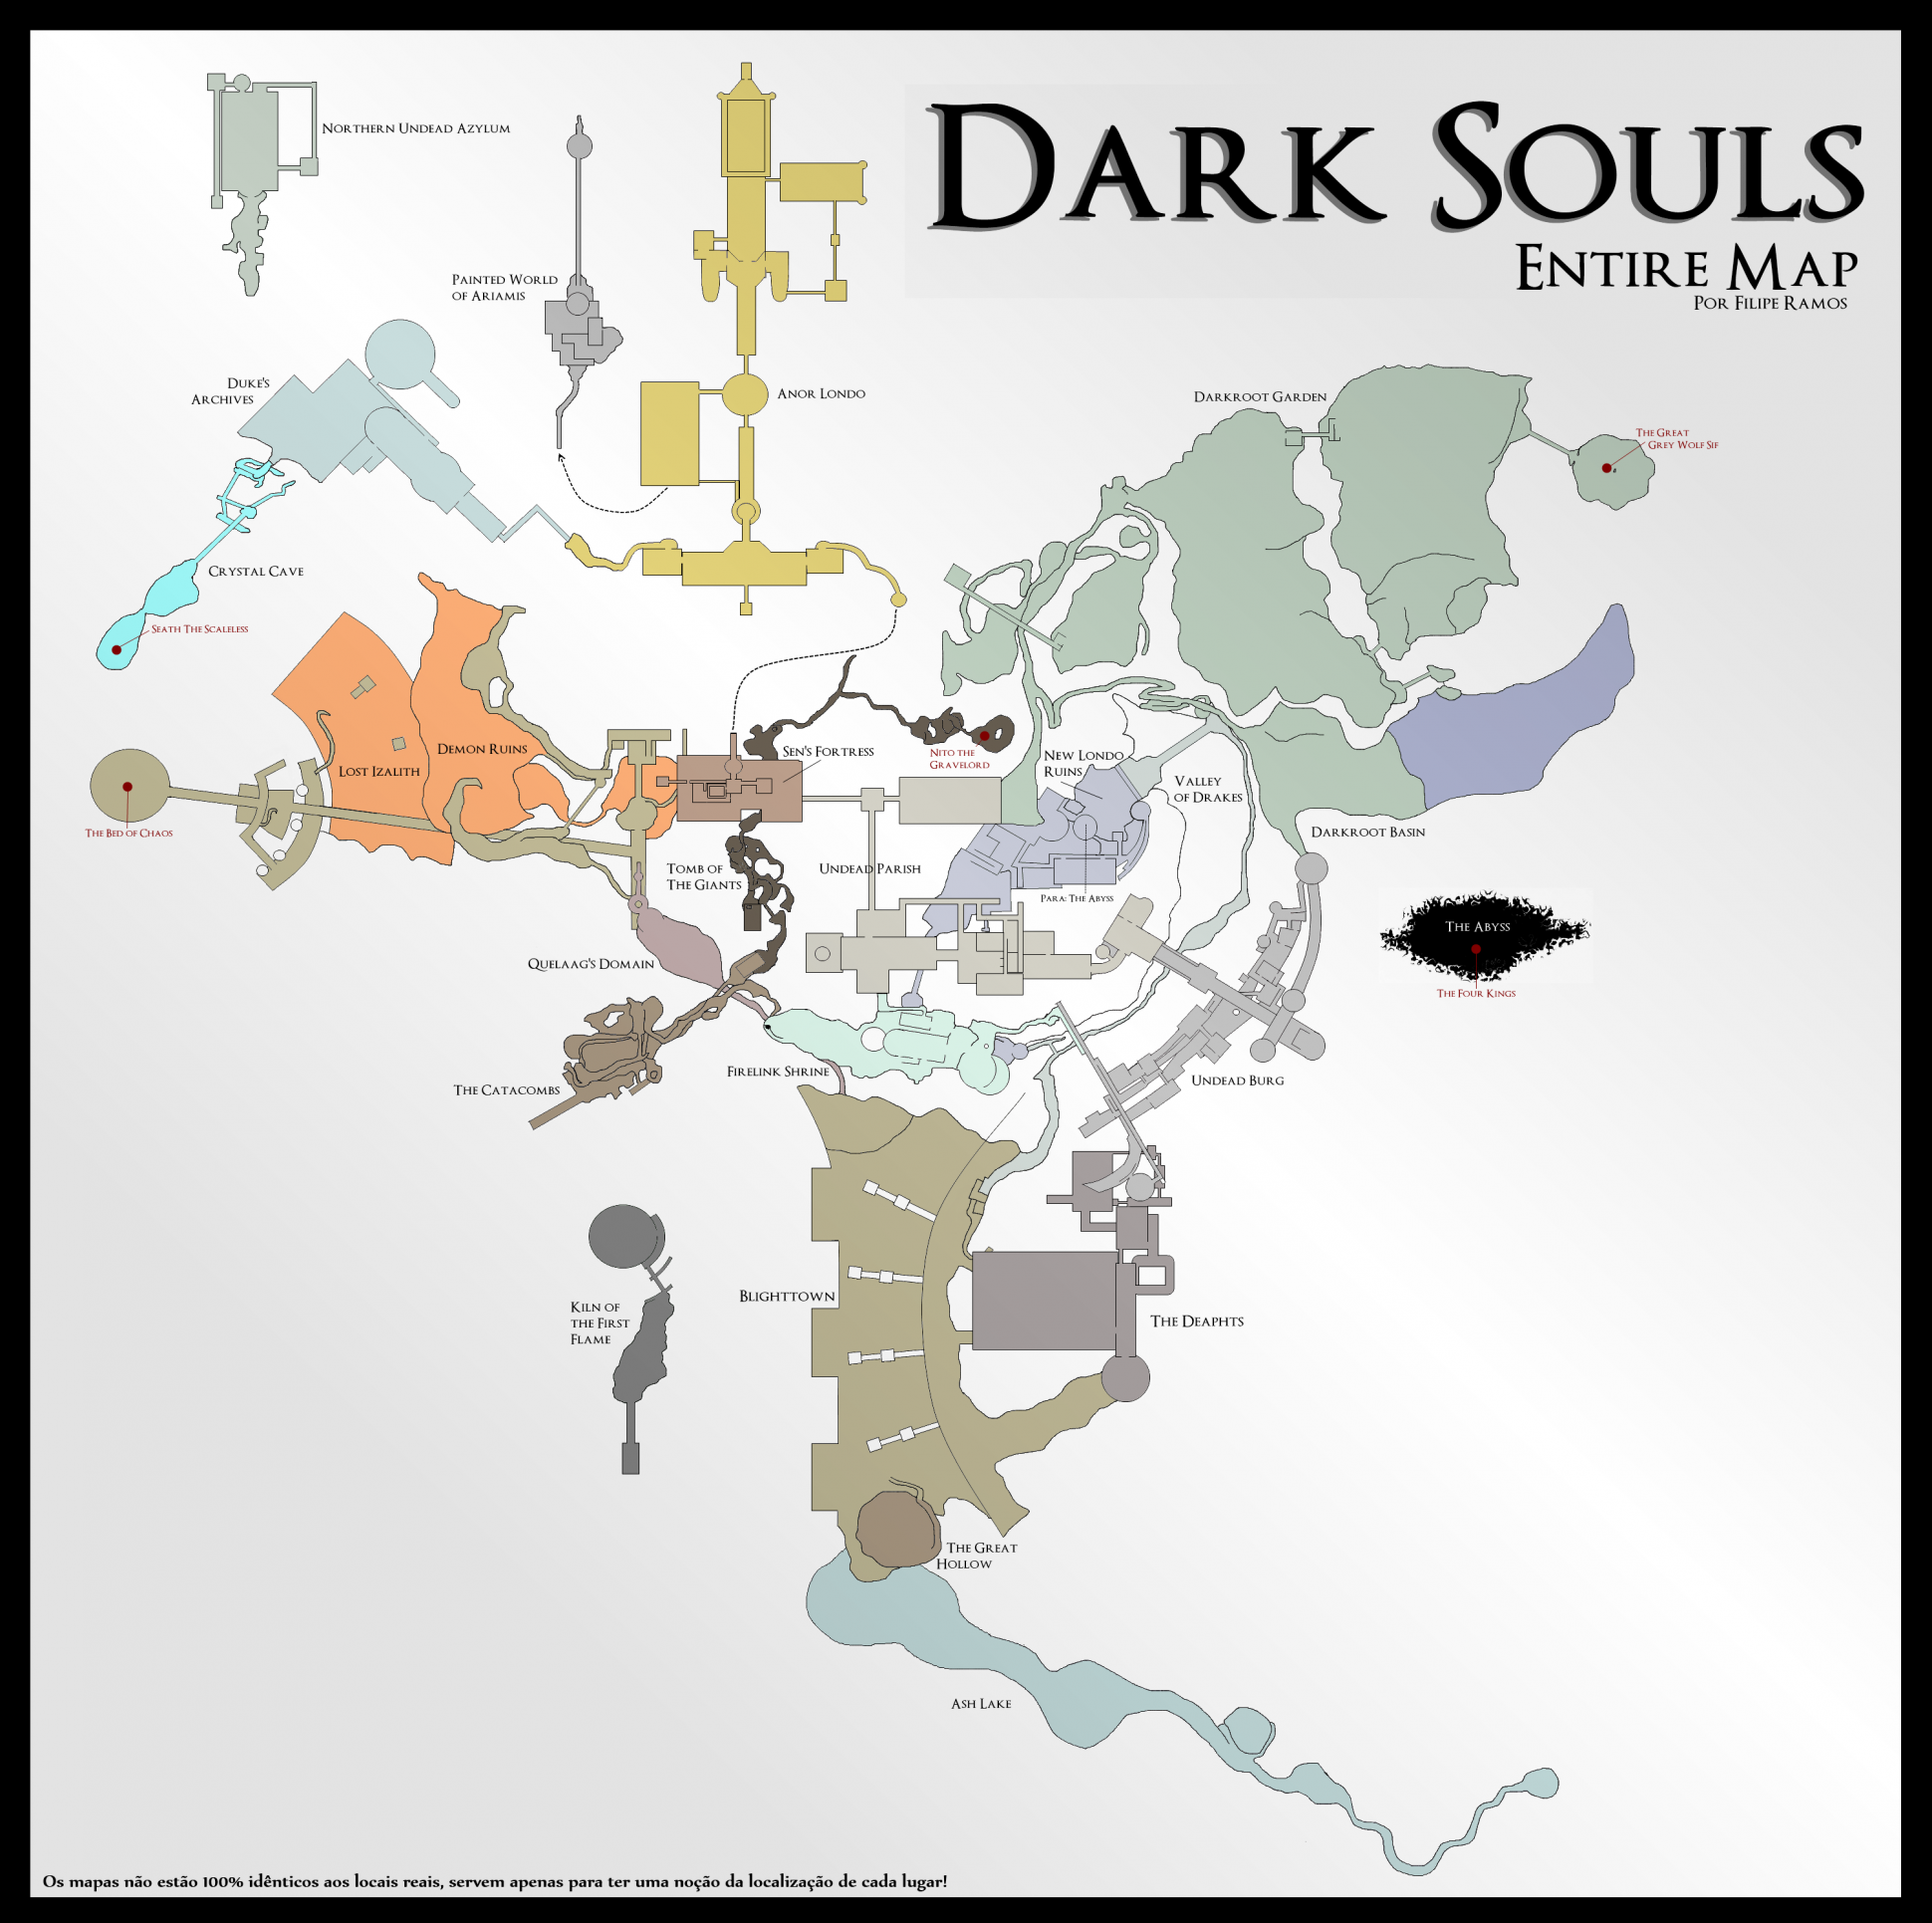
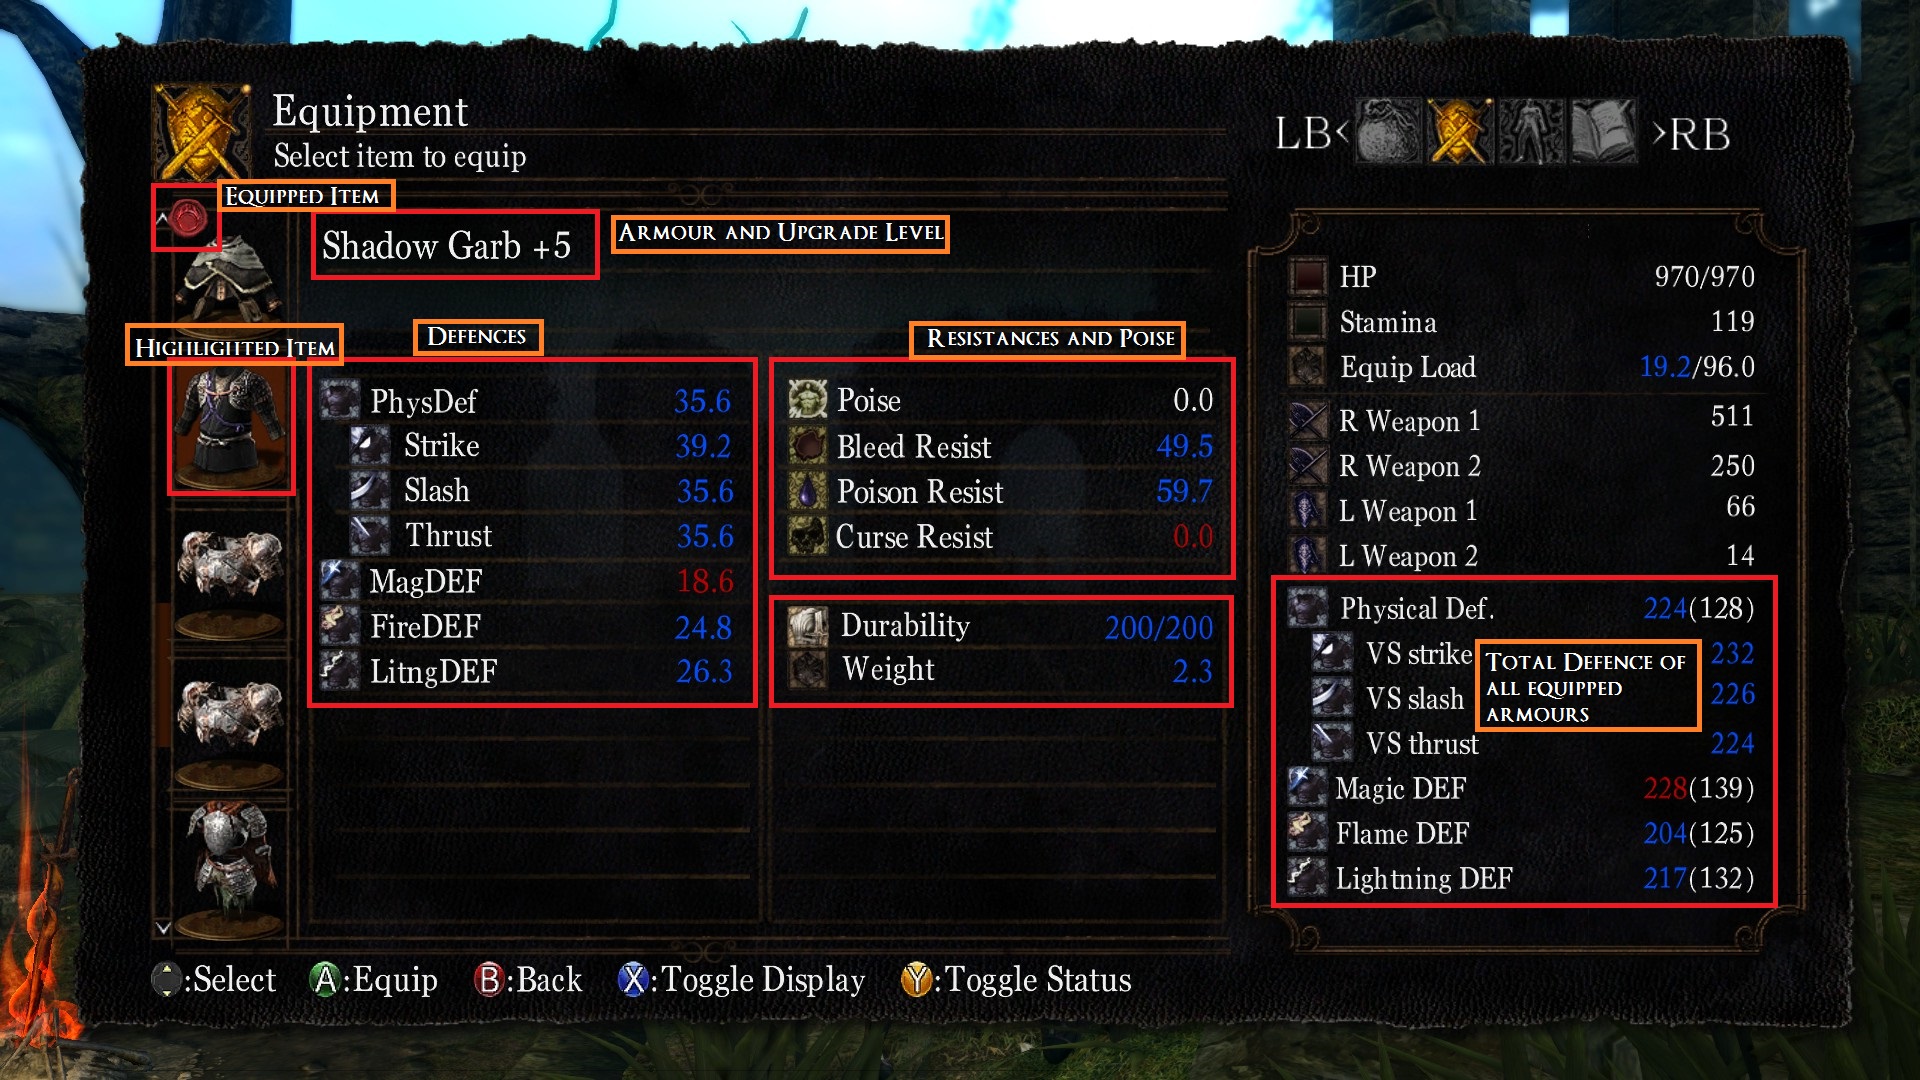
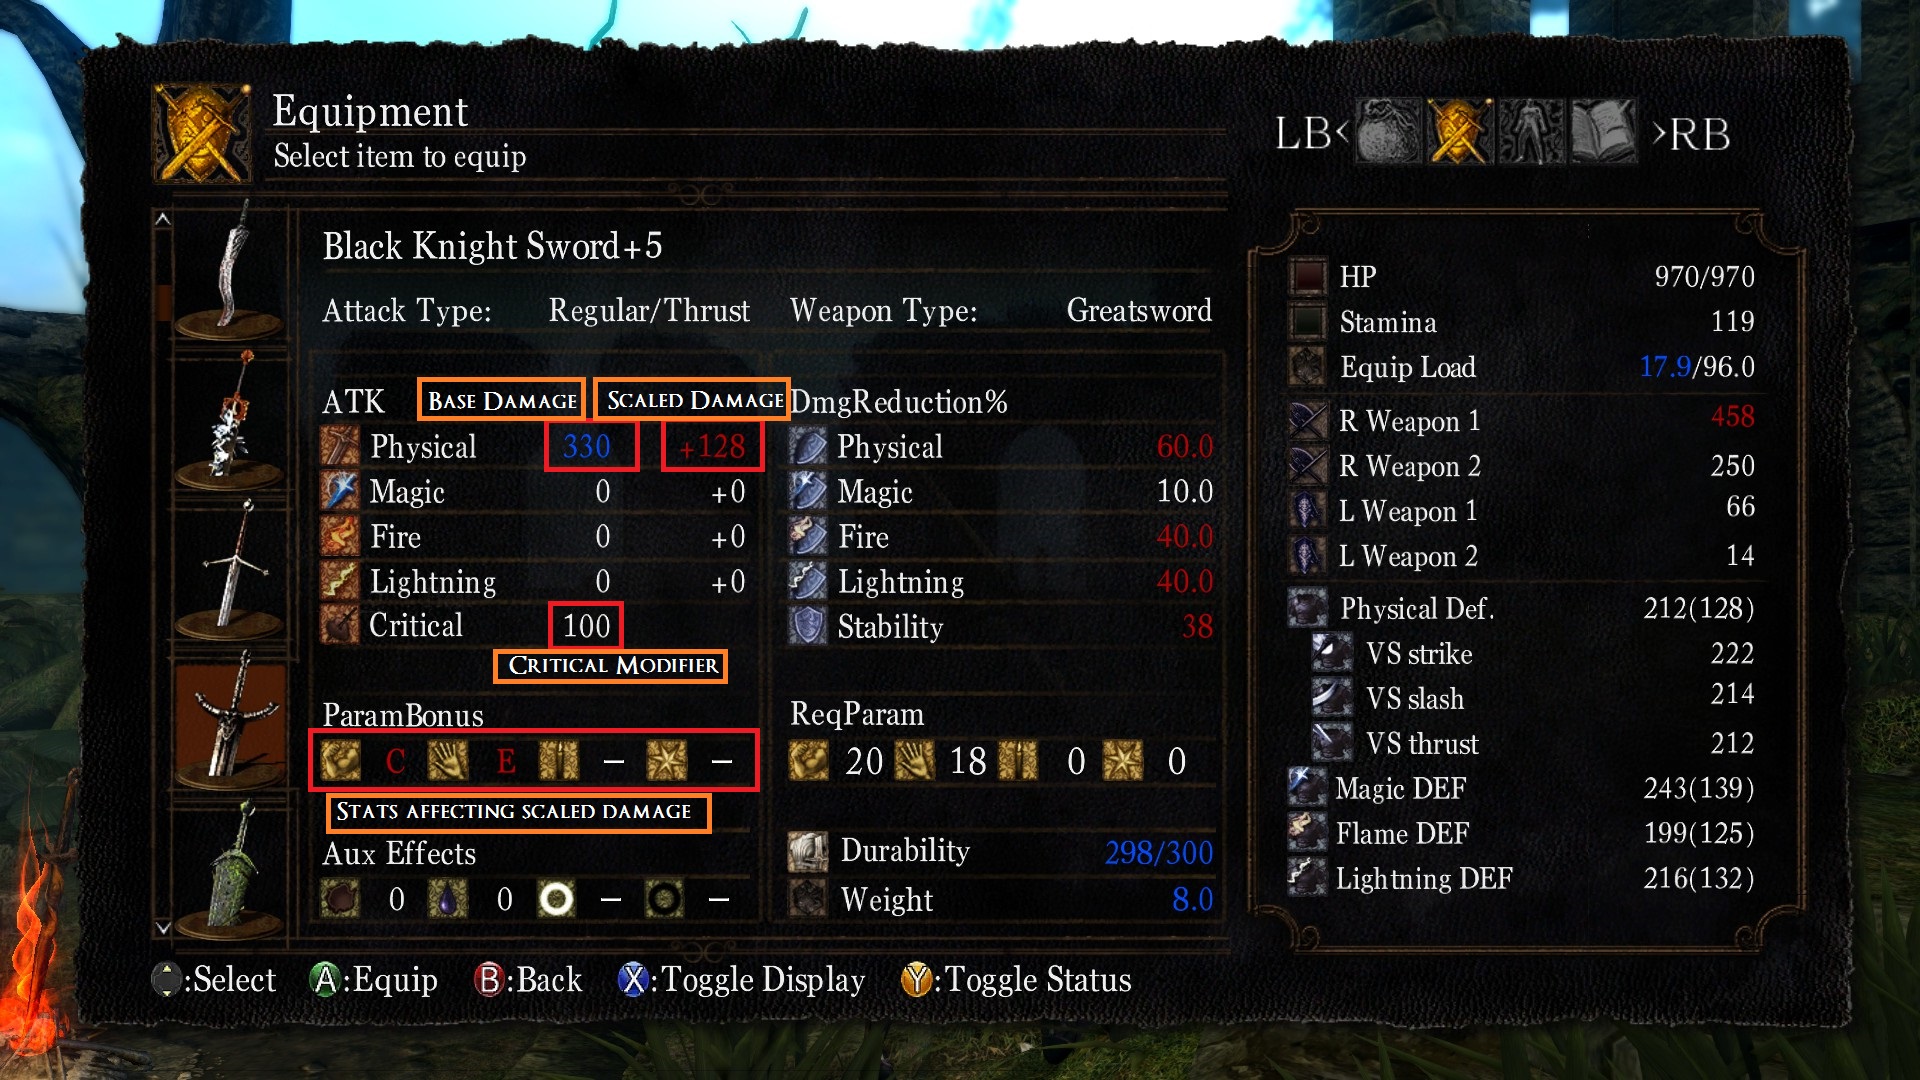
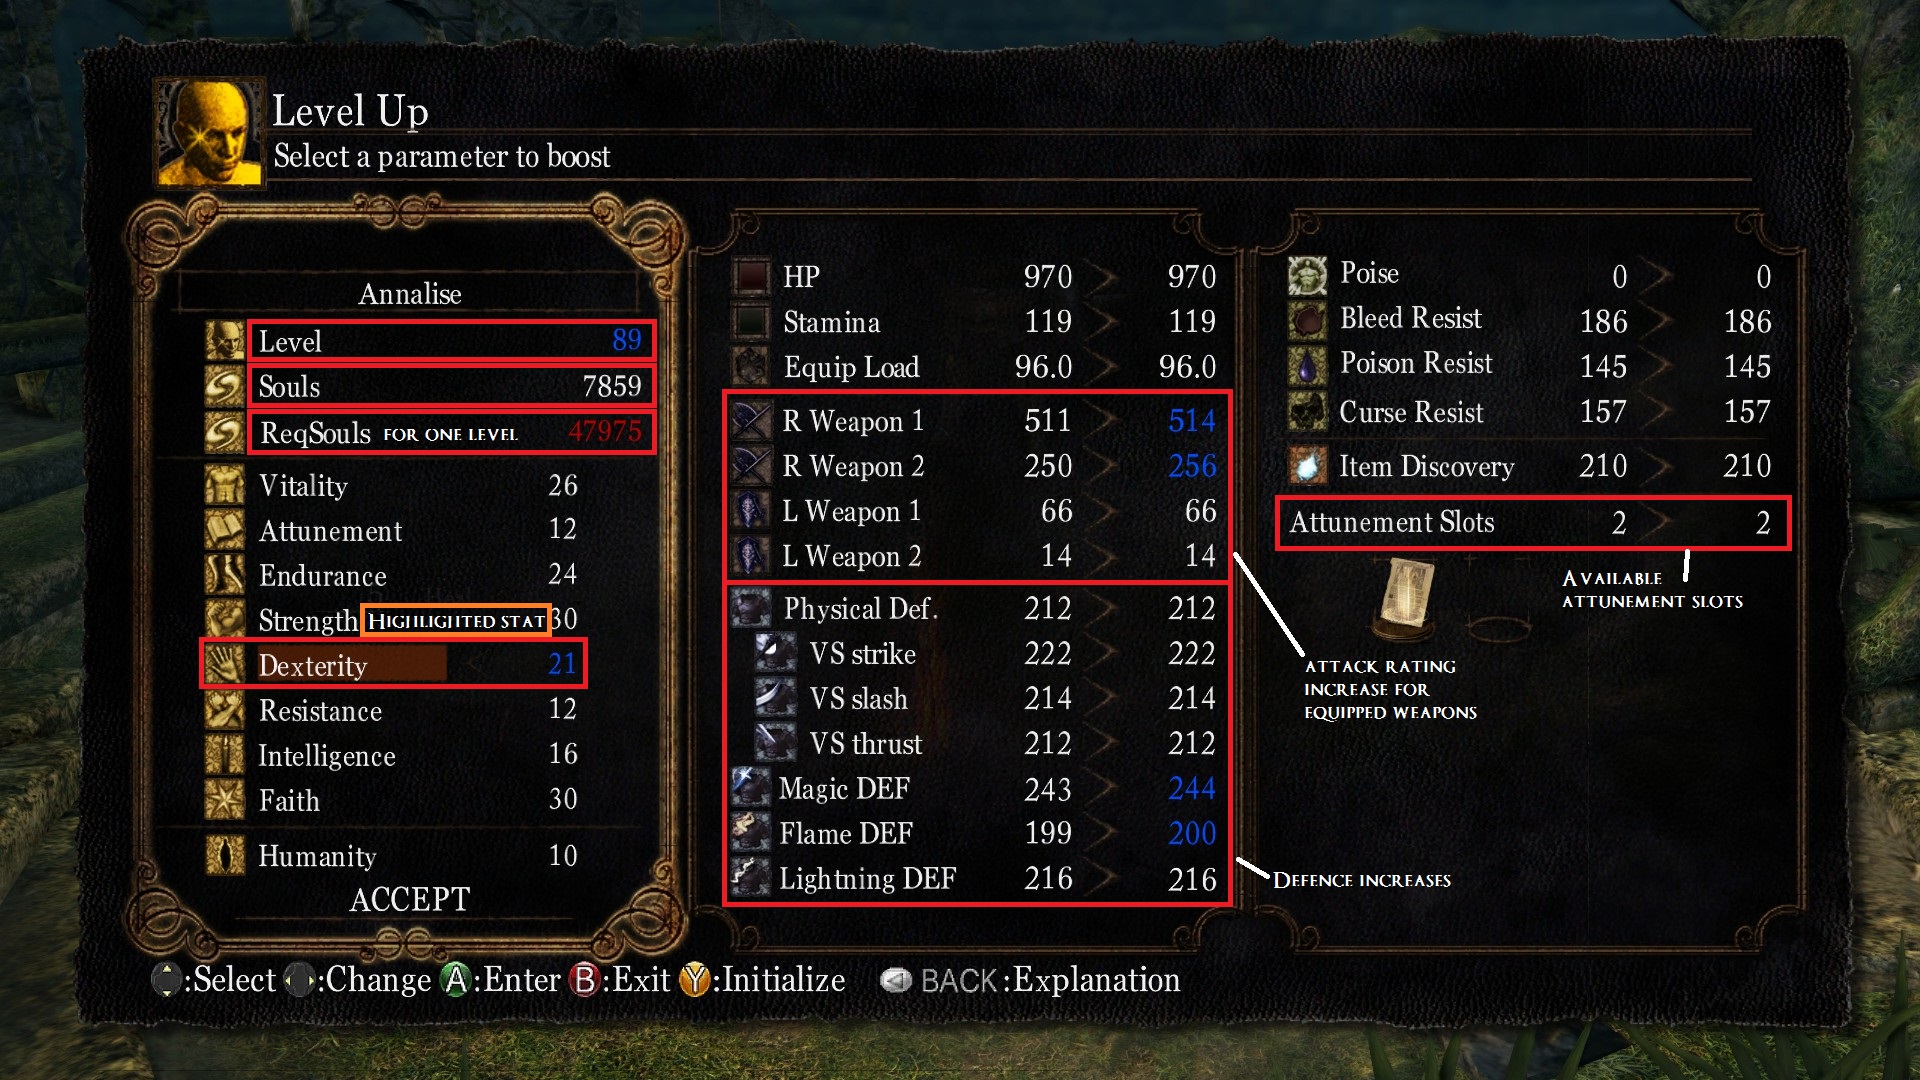
Also, you yourself recommend going in a particular direction in your "right way" section.
Shard of Manus  [author] Apr 29, 2020 @ 2:16am 
The main reason for new players to take the Master Key is because it saves them buying the Residence Key for Undead Burg, allows them to unlock Lautrec if they somehow manage to miss the Mystery Key, unlocks the cages in Sen's Fortress so they don't have to backtrack all the way to Logan after picking up that key, and most importantly - unlocks the door to the Depths bonfire, which would be really useful for a new player instead of having to go and get the key and then make it all the way back (or all the way through the Depths to the shortcut back) just to get the bonfire in that area.
Shard of Manus  [author] Apr 29, 2020 @ 2:16am 
Because it's a very useful gift. The early portion of DS1 is completely non-linear, and the more options you have with regards to direction the better - it encourages a bit more exploration, rather than just following the beaten path.

There's no downside to accessing Valley of the Drakes early, or Darkroot Basin. However, this isn't even remotely the main use of the item (because if someone finds those areas too difficult they can just turn back and take the normal route).
Karma Apr 28, 2020 @ 2:43pm 
Why do Dark Souls guides always recommend the master key? If I knew someone was playing for the first time, I would steer them AWAY from that gift since its main purpose is to get early access to a mid-game area.
Artorias_Knight Jul 10, 2019 @ 9:34am 
BAD . made me scroll this far
Shard of Manus  [author] Mar 24, 2019 @ 3:56am 
Yes, that works.