The Way

The Way

113 Bewertungen
The Way, The Guide
Von Dissectus
A complete walkthrough and speedrun guide for The Way.

This walkthrough features solutions to all puzzles, with images.
It also contains tips and tricks for speedrunners and non-speedrunners alike.

If you have any remarks or suggestions concerning this guide, feel free to leave them in the comments.

Note:
This guide was made for the PC version, but seems to work for the Switch version as well.
One difference is the MABEC puzzle in the West Generator, for which I have included a solution for the Switch.


Guide v. 1.04, February 2020
The Way v. 1.07b
2
   
Preis verleihen
Favorisieren
Favorisiert
Entfernen
Preface
This is a walkthrough for the game 'The Way' by Puzzling Dream.

Note
As with all walkthroughs, this one contains major spoilers about the plot, puzzles and locations of The Way.
If this is your first time playing I would suggest to take your time and discover the game on your own. In my opinion this game is better for it.


This guide also contains notes to help you speedrun[en.wikipedia.org] the game. This is why you'll see terms like 'split' and the timer indications after each major segment. It also means that this walkthrough focuses on the shortest route from start to finish.

Once in a while you'll also see the abbreviation 'CS'. This is used to denote an (unskippable) cutscene.

With that out of the way, I hope this guide will help in adding some more (re)play value to an already great game. Have fun with The Way!
Preparation
Before you begin, on the starting menu go to Settings > Controls and make sure that Auto-Run is set to 'On'. This setting will be remembered after restarting the game, so you'll only have to do this once.

For speedrunners; time starts when selecting 'New Game'.
Act I - Escape
Till death do us part
Press 'e' to pay respects. Sort of.

Carry your wife home to put both her and your marriage in stasis.
Your first task will be to read three notes lying around your apartment. The ability to run will be enabled after reading the first note, so make sure it is the one next to the ladder. After reading it, go up the ladder for the second note. The third note is near the entrance.

As a general remark; you can use the escape key to quickly close screens throughout the game.

After reading the three notes, go back to your wife. You'll enter a short cutscene and arrive at the spaceport.

Entering the spaceport
Take the ladder on your left, hop onto the lorry and over the gate. Try to land near the button and push it to open the gate for later.
Go on and enter the first door on your right to the security room. Enter it and make your way to the top. Not much to tell here. Just be patient and avoid the security cameras. Remember to activate the console after taking out the guard.

Step into the elevator and leave the security room. Go back to the lorry and enter it to drive it onto the lift.

Run back a little and open the emergency hatch to the left. Fall down the ladder by pressing space. Press up to grab the ladder and halt your fall at the last moment. The drop is slightly more than 2 seconds.

High voltage
Operate the terminal and choose:
1. Unlock air ducts

Enter the bottom airduct (hold shift just before entering the hatch to walk and prevent overshooting it).
Crawl to the panel on the right and select:
1. Change Maintenance
to switch the generator operation to manual.

Go back to the room with the terminal, but this time select:
2. Unlock Generators

Go up the long ladder and operate the buttons in both rooms to manually overload the generators.
It is usually fastest to start with the button on the left, jump up the ladder and hit the buttons up top. You can avoid the roving bot by standing directly on it and waiting until it turns. Wait for the flying drone to clear and hit the bottom right button. Rinse and repeat for the next room.

Go back down to the terminal room and again select:
1. Unlock air ducts

Go back inside the bottom air duct. Crawl all the way to the end and select:
2. Discharge

Go ahead, pick up the gun
Exit the air duct, climb up the ladder for a bit to avoid the droid and drop off after it passes under you. Continue right.
Climb up the next ladder you encounter and look at the yellow note to get the password for the authorisation server.

Go back down the ladder, back left and all the way up the first ladder to the second floor.
Enter the air duct to the right, operate the console and keep pressing enter to create a new user with the password you found.

Exit the air duct to the left and take the laser pistol from the rack.
From now on shoot all the droids.

Preparation for takeoff
Go back down and to the left, past the room with terminal.
Go down the ladder and operate the console.
Select the following:
3. Fuse
1. Elliptic
2. Yellow

Pick up the fuse.

Go back up the ladder and run all the way to the right past the space ship.
Shoot the droid and climb all the way up the ladder. Operate the broken fuse to replace it.

On the console to your left select:
1. Crane
2. Chain
3. Lift


Climb down and go to the top of the ladder on the left (where the yellow sticky note is).
Take the lift up into the traffic control tower and operate the console.

Enter the takeoff codes
1. Enter code
5. 8E
3. 5T
2. 5H
1. 0W


Go down and all the way to the right across the bridge to reach the emergency hatch button.
Push it and fall down the cable that is attached to the crane. The drop is slightly less than two seconds. Press up again to grab the cable just before you hit the ground.

Run back all the way to the large lift and push the button. Get out of the way of the descending lift to avoid being vertically challenged.
When the lift has arrived, step onto the lift and press the button to go up.

Exit to the right, climb up the ladder and push the battery on the left onto the cargo lift through the door on the right.

To align the charge levels and make them all four bars of charge:
  1. Discharge 03
  2. Charge 02
  3. Charge 03
  4. Discharge 02
  5. Charge 03

Go back to the main elevator and press the button to go down.

Enter the lorry to drive it to the spaceship.
Climb the ladder on the right to the first platform.
Use the console and select:
1. Charge

Exit the console to trigger the accumulator charge
Enter the spaceship and take off!

Split
Split on entering the pilot seat.
Time: ~15 minutes
Act II - On an alien world
Watch the landing and exit the ship.
After a short cutscene walk to the right and press down+jump to fall onto the platform below.
Navigate down by falling off the platforms and shooting wasps and flesh eating plants.

Follow the rest of the path to the right and you will arrive at the Temple of Life.

The Temple of Life
1. Click on tile 3 to move it to the middle
2. Click on tile 4 to swap with position 3
3. Click the other (outer) tiles clockwise, starting with tile 5, then 6, etc.
4. Keep clicking on the tiles in a clockwise order. After three rounds, the tiles should line up to form a pyramid image
5. Click on the middle tile to move it into the top position (1)


Enter the temple and prepare the water spout sequence:
press the 3rd, 2nd, 4th, 1st buttons.

Go down and activate the button on the left to start the sequence. Follow the sequence to the right as the water spouts shut down.
Go further down, shooting the crawlers coming out of the holes along the way.

Go left and climb the blocks jutting out from the wall.
At the first level, go left and jump across the poles until the 4th pole.
Fall down into the water (on the left side of the pole), grab the first cube and push the button.
Go up and continue left.

Go down, insert the first cube into the first strange column you encounter.
Continue down and to the right. Press the switch to make another set of blocks appear from the wall.

Go back the way you came; climb the ladder back up and jump back to the right across the spike pits.
Now climb the new set of blocks to the second level.
Shoot the crawler coming out of the hole at the top.

Fall down the ladder and take the second cube.
Fall down the ladder again and press the switch.
Shoot the rubble down on the left side and fall down.

After getting the second cube, go toward the right edge of the platform. At the edge, hold shift to walk and fall down. If you did it right, you'll fall down on top of the ladder on the lower platform. Grab the bit of ladder sticking out (by pressing up) to prevent sudden decelaration syndrome. Continue down the ladder to the laser fence.

Navigate the lasers, shoot the crawlers coming from the holes and take the third cube.

Go back through the laser fence, up the ladder to the first level and return to the strange columns.
Insert the second and third cubes into the strange columns and go through the newly opened hatch.

When the monster chases you, try to shoot as many bits of rubble from the ceiling as you can while running left.
Climb all the way to the top and shoot the rubble to dispatch the creature.
Climb through the newly created hole and flip the switch to lower the platform.

Continue right, take the big triangular artifact and exit the temple.

To the village
Climb up the vines to find yourself back at the starting area.
Continue right to return to the triangular cavity. Shoot the wasp and insert the triangular artifact into the cavity to open the way.
Walk up the stairs through the portal into the next area. If you use the middle stairs, the transition will immediately trigger when you start to walk up.

Follow the path to reach the village.

To pass the row of 9 plants below the irrigation system, shoot the first plant and wait for your gun to recharge 1 block before shooting the second. After that, just shoot-move-shoot through the other plants with about 3/4 of a second between each shot.

Next, you'll get to a timing puzzle involving bugs you have to shoot to fall into the carnivorous plants. Just follow the platforms and be patient. This puzzle can be quite a pain if you try and rush it.

On reaching the village you will get a short cutscene.

CS: Disarmed by natives.

Run from the tigerbull into the cave on the left.

Follow the platforms until you come to a door. Watch a short sequence, run into the chamber and climb the stairs to the platform.

Examine the pile of rubble to find the Access sphere.
Use Access on the left panel to open the drains in the floor.
Wait for the tigerbull to walk away. Go down through the hole underneath the left ladder.

Alien console puzzles
Annotated numbers show the number of clicks it takes to rotate the piece into the right position
Left Console
Right Console

Wait until the tigerbull tries a grab with its back to you, then climb up to the floor, jump up the ladder and climb up.
Close the drains (left button), pour water (middle button) and electrocute the beast (right button).
You can fall down into the water without dying.

Exit the cave and enter the village.
Go to the left, climb the ladders and enter the cave.

Split
Split on Accessing the big alien console in the cave.
Time: ~20 minutes.
- Mind Force Temple
To the right of the village is a strange mural. It is below where you exited first when running from the tigerbull.

Interact with it and enter the first temple.

Upgrade your sphere with Telekinesis

Pick up the first block using Telekinesis, hop on it to cross the shaft and insert it into the slot on the left. The other two blocks will activate.
Descend into the shaft by using Telekinesis on these blocks and hopping onto them while going down.
At the bottom, insert the blocks into the two slots.
Go right.

Block puzzle
(Blocks align with their bottom to the horizontal rails).
  1. Move the top block right and down into the middle gap
  2. Move the second block to the right, but reachable
  3. Move the large block all the way up
  4. Move the slim block up and to the right
  5. Move the large block down
  6. Move the slim block left and up
  7. Move the second block left and down so it sits on top of the large block
  8. Move the slim block to the right and into the slot

Jump right onto the block in the middle.
Move one of the blocks under the ladder, climb up and use Access on the panel to turn on the first light.

Go all the way left and down the ladder.

Projector puzzle
65
65

Solve the first image by using Telekinesis on the blocks.
Drop the other two blocks next to the door.
Climb the ladder and go down the next ladder on the right.
Access the panel to project the second image.
Solve the second image while standing next to the door and using Telekinesis to move the blocks.

Walk left and Access the panel to turn on the second light.

Go down the first ladder on the right to get to the next puzzle.

Door lock puzzle
Using Telekinesis, move the blocks like so:


Go left and Access the panel to turn on the third light. Grab the 'Mind Force' crystal, use the lift and exit the temple.

Go all the way back, past the village and up the stairs near the irrigation system to reach the next temple.
- Mind Barrier Temple
Grab the Shield upgrade near the entrance
Go down the elevator by using Shield to reflect the light onto the left pole.

Lens Puzzle
Each lens to be hit with a beam is highlighted.
The lenses in setup 1 and 2 can be reached directly.
To reach the lenses in setup 3, you will have to reflect the beam.
Setup 4 uses a mixture of direct and reflected beams.

1
2

Access left panel to confirm

Access right panel to confirm
3
4

Access right panel to confirm

Access left panel to confirm

Go left and Access the panel to turn on the first light.

Simon puzzle
Go right and down the elevator to get to a Simon-like puzzle. You have to use Shield on the beam to hit certain squares in order. The sequence is random. Just keep using Access on the panel until the red tile lights up. These seem to have the sequences in which you don't have to move around as much to hit the tiles.

After solving the puzzle go right and Access the panel to turn on the second light.

Go back to the lift and further down.

Use Shield to get through the laser bots.
At the start, die once to get the droids in the right pattern.
Then, with the first two droids, keep running until they have fired their first two lasers. Then stand still and use Shield to deflect them.
Just stand on the left of the raised floor and wait for the third droid to come around and shoot.

For the fourth and fifth droids, stand on the ledge and deflect to kill both.
Then fall down on the second platform from above, wait for the sixth droid to shoot, deflect that and drop down.
Take out the seventh droid and climb up the platform.

Wait until the eighth droid just starts moving away before jumping onto the ledge. Keep your Shield ready, because it will fire soon after you have climbed up the ledge.
Same with the ninth droid.
Kill the tenth droid by waiting on the second cube platform and deflecting its shot when it comes above you.
At the end, Access the panel to turn on the third light.

Go back and take the lift down. Grab 'Mind Barrier' crystal, go up and exit the temple.

Go up the stairs, back through the portal (use the middle of the stairs) and return to the landing zone area for the final temple.
- Mind Travel Temple
Grab the Teleportation upgrade near the entrance.
Open the door by hitting the button and set your teleport shadow on the other side of the door.
Go back and hit the button again to close the door and unlock the platform.
Teleport past the door and use Access on the platform panel to move it.

Set a teleport shadow on the platform. Hit the leftmost switch and Teleport back.

Climb the ladder, trigger the switch and run onto the bridge just past the second light. Set a teleport shadow and run back.
Trigger the switch again, Teleport immediately and jump to the right.

Cubepusher puzzle
Set the teleport shadow at the top of the ladder and go down.
Move the cube to the middle slot.
Teleport back, go down on the platform and set the teleport shadow on the platform.
Fall down, move the cube to the right slot. Teleport and Access the switch.

Go back up the ladder, all the way to the top.
To cross the crush trap, first create a teleport shadow on the right side. Fall into the pit and Teleport back. Cross the pit and Access the panel to turn on the first light. Set the teleport shadow again, fall down and Teleport back up.

Go back to the platform and use Access on the panel to return to the central area.

Set the teleport shadow on the platform again.
Hit the middle button and Teleport.

Bird beast
Set the teleport shadow on the top platform on the right side.
Walk down right, stand in front of the wall and wait for the bird beast to come running.
Teleport back at the last moment and have the beast destroy the wall.
Repeat for the left side.
Now that the walls are destroyed, you can flip the switches on both sides to power on the laser.
Once powered up, have the middle laser between you and the bird. Once it sees you, it will run towards you.
After the high powered laser and the bird beast have settled their differences, you can go down and Access the panel for the second light.
Go back to the central area.

Create a teleport shadow on the platform again. Hit the rightmost button and Teleport.

After arriving in the final area, walk right and set the teleport shadow in front of the left ladder.
Climb up the rightmost ladder, walk through the lasers and hit the button.
Teleport back and go up the ladder.

Tile bridge puzzle
Start out by placing the teleport shadow on the left and then walking and jumping back to the ladder all the way to the right. Wait for the tiles to respawn and follow the numbered sequence as noted in the image.
Keep in mind that after step 5 (the leftmost tile) you need to jump over the second tile on the left to continue the sequence.

Pipe puzzle
First, go up the ladder and set the teleport shadow next to the button.
Fall back down the ladder.

Hit the third from the right (middle) button once.
The second from the right button once.
Hit the rightmost button twice.

Hit the left button to start the timer.
Teleport immediately and Access the panel to release the light.
Walk right to Access the panel and turn on the third light.

Go back to central switch platform. Set the teleport shadow on the platform.
Get the 'Mind Travel' crystal, Teleport back and Access the switch on the platform to get back to the temple entrance.

Go back to the village and insert the crystals into the pedestal inside your cave.

Split
Split on pressing 'e' to insert the crystals.
Time: ~25 minutes

CS: Take off and crash landing.
- Desert crash site
Exit the spacecraft.
CS: 4 droids activating.

Go right. Keep a bit of a distance from the droid so it can shoot two pulses. Deflect both pulses on the two droids with Shield.
Go further right and call Tincan to get into the hole in the cliff face.
Further to the right, use Shield again on the droid and Telekinesis the small platform up.

Climb the ladder.
CS: 3 droids activating.

Use Shield on the right droid, then on the left droid. Walk left and use Shield to reflect the sniper droid shots to the rocks above its head. Climb the ladder.
CS: droid activating.

Use the duck trick* on the grenadier droid and move right. Press down twice in quick succession when dropping of the small ledge to stay ducked.

If the duck trick does not work, create a Teleport shadow behind the droid as it walks away from you. Wait for it to turn and walk towards you. Then Teleport behind it and continue to the right.

Use Telekinesis on the rightmost platform and move it down so Tincan can climb up.
Walk left, get Tincan in the hole in the cliff face and let him kill the droid.

Go right to the beginning of the ledge on the right side and call Tincan to help you get up there.
Run left and jump off the ledge onto the ladder structures, right in front of the second hole.
Finish the rest of this timing puzzle and go all the way up onto the cliffs.
CS: 3 droids activating.

Walk left to the ledge and let Tincan take care of the sniper bot. Go back down the ladders onto the small platform and jump left.
Walk further left, jump onto the water spout and use Shield to reflect the laser bolt from the droid.

* The duck trick is performed by running through the grenadier droid from behind. Duck just as you are passing it; i.e. press down just when your sprite starts to overtake the droid. The droid will fire a grenade. Now keep pressing down and crawl forward. The droid follows you, but keeps firing over your head.
If you have trouble pulling this off, I've found this trick is slightly easier when the droid is moving.

Spout puzzle
Click the middle triangle twice, then click each of the four corner triangles twice.

Use Access on the panel to take the lift down. Run right and go down the chasm.

Water wheels puzzle
Use Telekinesis to turn the wheels with a star into position as shown.
Starting position
Step 1
Step 2
Step 3
Step 4

Go back to the lift, go up. Go left over the spout and down the ladder.

CS: 4 droids activate.

Use Shield and use the shots of the first droid to disable both.
Walk behind the grenadier droid as it walks to the left and use the hole to put Tincan in ambush.
Quickly go down the ladder.

CS: Main droid activation

Water pipe puzzle
As soon as you can, do the puzzle to move the cargo container in place:
Jump left and use Telekinesis to move the second to left junction down one slot.
Move the leftmost junction up one slot and wait ~5 seconds for the container to arrive.

Break the flow by moving the left junction up by one when the container is in place:


The flow should look like this:


Adjust junctions again to puke out the rock:
Move the second to left junction up by two.
The second from the right down by two:


After the short cutscene, move the leftmost junction down by one.
Climb up the closest ladder and cross the gap by jumping onto the cargo container.
Push the rock into the container and fall off the cargo container to the right, landing on the small platform. You can press down to look down a bit.

Use Telekinesis to move the second to left junction down by two slots.
Make your way to the second junction from the right and move it up by two slots:


The container starts moving back again. Wait until the rock is positioned above the panel (which is where the giant droid is) and break the flow to stop the container.
Access the panel to have the rock be intimate with the droid.

Take the power core from the battle droid.
Move the unstable core to the left and dump it into the chasm by pressing 'e'.
Run right, get down the chasm to where the core landed and push it all the way to the left.

Split
Split on putting the core in place and starting the cutscene.
Time: ~15 minutes.

CS: Hunter be hunted
Act III - The Hidden City
Access the panel to bring up the three generator panels.

Walk back to the bike and go to the first generator
- East Generator
Go down the platforms:
Jump on the second one from the left, then walk off and land on the platform just below the one attached to the right wall. From there fall onto the hand of the statue. Jump off on the left and land on the third platform from the bottom. From there, walk off on the one to the right and on the ground.

Go right and create a teleport shadow on top of the hatch.
Go down, activate console and select 1. Ore dispenser
Teleport back, create another shadow in the same spot.
Go right, up the ladder, jump via the dispenser and activate the console.

Select 1. Fill and teleport back.
Create a teleport shadow on top of the hatch.
Go down the hatch again to the console and select 2. Ore crusher.
Teleport back up.

Walk onto the elevator and create a teleport shadow.
Push the elevator button to go down. Once at the bottom, wait for the turrets to fire before teleporting in place and leave the turrets feeling stupid.

Walk left.

Rails puzzle
Use Telekinesis to insert the pieces from right to left in the order as numbered below:


After you've fixed the rails, walk over to the elevator and create a teleport shadow.
Then continue to the right, duck under the ore crusher and activate the panel.
After you've activated the panel, just teleport back.

Walk all the way to the left past the trap door and create a teleport shadow.
Ride the elevator back up, go to the console and select 3. Ore smelter.
Teleport back and push the switch there to dump the ore and open the trap door.

Create a teleport shadow where you are standing, fall down into the smelter, run left and turn the valve.
Teleport back up and immediately create another teleport shadow. Go right and call the elevator while you wait for the smelter fires to die down. Use Teleport to get back from the elevator quickly. After the fires die down, create another teleport shadow. Fall down into the furnace again and this time turn the valve on the right. Teleport back.
Now you can go across the elevator to the right and down the ladder.

Use Shield to get past the laser droids and go down the ladder at the bottom.

Slider puzzle
Use Telekinesis to move the power blocks into their slots. Moving the power blocks along the bottom seems to require the least amount of moves.

Go right, activate the lift, follow the corridor and shut down the generator.
- West Generator
Run and jump across the sand to the rightmost platform and create a teleport shadow.
When making your way across, do not jump off a platform onto the sand; it is slower. Instead just walk off and run.
Also, it seems to help to wait for the sandworm to come to your position and dive under the sand (become invisible). The worms needs a fraction of a second longer to start moving again when you hit the sand.

Run and jump back to the second platform at the start.
Teleport back and immediately run all the way right. Use the sand pillar in the background at the end as a marker as to where to stand. Use Tincan to climb up the ledge.

Go right and activate the console.

Move Action Block and Execute Command (MABEC) puzzle
Enter the following sequence and press Exit:


Note for Switch users:
As noted in the comments by frosty840, the puzzle on the Switch requires a different input:
D, R, U, R, D, L, A

Use Access on the panel to start the sequence.

CS: droid moving.

Go right, down the ramp and let yourself be shot to reset the sequence.

You can make the alien mobs shoot themselves by standing on them as they fire. Move in at the last moment when they bring up their gun (and start to fire) or else they will slam you down.

You can take out the first mob this way (jump over his first shot) and immediately run up the stairs to avoid the fire from the second one. Hold right and up as you climb the stairs; it seems to help with a miss.
From the top of the stairs just hold right and fall down on top of the next mob. If the timing is right, he will shoot himself as well.

Wait for the third mob to turn right before climbing up and jump over his shot.
Immediately run past him and climb up.

Wait for the fourth mob to walk right, climb up and immediately jump up left and climb up the rebar.

Spike slide
Jump and hold back while jumping, except for the fourth jump where you hold forward during the jump. You can make it if you jump just before the spikes.

Wait for the sandworm to settle on the left side, jump off the platform onto the sand and run right.

Jump down the shaft. You can go down the first three platforms by holding right.
Shut down the generator.
- South Generator
Run through the village to the right and use Access on the door.
Take the first ladder down after getting off the elevator.

Filter No. 2 puzzle
Go past the grues, down another ladder and use Shield to reflect the yellow laser on the pyramid-shaped crystal. Activate filter No.2 by creating this sequence:


First steam vent puzzle
Go up and navigate the steam vents. Step up to the series of 4 vents, right before the button.
Wait for the first vent to stop for the second time.
The second and third vents should go down soon after. Follow and stand on the third vent.
The second vent will activate and deactivate again. Step back on the second vent.
The third will activate and deactivate. Step on the third vent.
The fourth vent should go down as well. Step out, wait for the last vent and activate the button to turn off the vents

So the basic step sequence is: 1,2,3,wait,2,wait,3,4,5

Second steam vent puzzle
Take the lift up to the steam vents. Walk off the lift and wait for half a second to trigger the savepoint. Walk into the nearest vent to die and reset the sequence.
Have Teleport ready and follow the sequence of vents shutting down until you're on top of the 6th vent. The sixth vent takes about 3 seconds to go out afther the fifth.
Quickly create a teleport shadow and follow the vents back until you are on top of the 2nd.

The 6th vent should be free again. Hit Teleport and do the same trick again.
This time going forward 4 vents, creating a shadow, going back 4 before hitting Teleport.
Now just follow the vents until you get to the button and press it.

Filter No. 1 puzzle
Go right to get to filter No. 1.
The goal is to make the pistons pump in sequence in pairs, with one in between them.
Use Telekinesis and quickly move the power block up and down the bottom two slots twice to get the timing right. Do not put the power block above the second bottom piston or the timing is off. Just die to reset when that happens.

Continue right and fall down. Deflect the shots from the first guard bot to both bots.
Call the lift and deflect shots.

Go right, deflect shots and use Telekinesis to move the spotlight to the right of the leftmost Grue.
Use Mind Force on the battery (hover it over the ledge and release) and move it onto the elevator.
Stand to the right and use Access to move the elevator. Select Teleportation and create a shadow on the left when dodging the second steam vent. Move right to dodge the third vent and activate Teleportation to dodge the fourth steam vent.
Use Telekinesis to charge the battery in the left charger and get back to the elevator.
Stand to the left and repeat the sequence in reverse order.

Put the battery back in filter No. 3 and go through the bottom corridor with the grues.

Navigate the platforms and stand on the elevator.

Furnace puzzle
Lower the elevator until the lift is just beneath the second wall light.
Stand near the beam to the right and use Shield to deflect the fireball from the first launcher into the first furnace.
Then go all the way down until you can't go further. Stand in the middle under the laser beam.
From that position use Shield to deflect the fireballs from the second launcher to the bottom furnace by aiming on the wall above the furnace.
After that, deflect the fireball from the second launcher to the middle furnace by aiming slightly to the left.

Go down and activate the water pump.
Observe the happy locals and enter the guarded house.
CS: Deactivate generator.

Back at the cloaking device, push all three buttons.

Split
Split on hitting the last button.
Time: ~25 minutes
The Pyramid of Life
CS: Not so Hidden City.

Scooter puzzle
Move a little bit to the right and dodge the rocks by moving up and down.
You'll probably need to do this a couple of times to get a good feeling for where the middle gap is.

CS: Tincan vs. alien beast. Round 1. Fight!

Laser tower puzzle
When numbering the switches from top left to bottom right as 1-9, press the following switches:
8, 6, 9, 5,1


CS: Entering the Hidden City

Run right.

CS: Destruction of the sphere

Go further right to the next screen.
Continue right to the center of the bridge; a wild guardian appears.
Run all the way back to the left, look at something in the sand and use it to atomize the guardian.

Shoot two more guardians, then reload by shooting the last charge.
Shoot two more guardians, empty the gun and go down the stairs.

Wait for the two rightmost guardians to spawn an shoot them with one shot.
Shoot the left guardian, empty the gun and move right.

Shoot four more guardians, move right and shoot four more.

Bridge guardian puzzle
On the bridge, move to the right of center and shoot the two rightmost guardians with one shot.
Start moving left, hitting one guardian with a shot, and then the two behind it with one shot.

Immediately empty the last shot to reload while still moving left. Stand with your back to the red barrier and shoot the oncoming guardians. Conserve your ammo by waiting as long as possible before shooting.

CS: Entering the Pyramid of Life.
CS: Foiled yet again.
CS: Entering the mainframe.

Mainframe
You'll probably need to practice this sequence a lot to get the hang of it.

It can be beneficial to die outright when first entering an area in order to reset the pattern. Mostly you can just walk off the platform you start on.

You can single-kill the bomb-spawning blue enemies with a rapid dual shot.

Regarding the zombie pirate LeChuck: it always teleports to your position, also after you shoot it. You can take advantage of that by shooting while running towards it, having it spawn behind you.

Mainframe Guardian
The 'trick' to staying alive is picking a spot and moving as little as possible, only to avoid immediate hits.
Also, your hitbox is quite small, encompassing a small square in the centre.


First round: Stay in the middle
On the very first volley you don't even have to move.
Use this to get a feeling for the size of your hitbox.

Second round: Stay in the middle during the first volley, only moving to avoid the projectiles that come later.
For the 2nd and 3rd volley, stay mostly in the middle, but a bit over to the right.

Third round: Move right and up to about the bottom of the lower black square on the side. Always avoid the initial circle first, then the rest of the projectiles.

Split
Split on making the final choice.
Time: ~20 minutes

Total time: ~120 minutes

28 Kommentare
Rudimaentaer 13. Dez. 2024 um 11:37 
It is great to have the solution. But what i am missing is the explanation how you came to the solution. I try to figure things out myself. But some puzzels are bad in communicating what they want me to do.
S0W_S1 8. Sep. 2024 um 14:54 
for the switch the south generator M.A.B.E.C code is D,R,U,R,D,L,D,A
RunningDroid 6. Sep. 2023 um 22:46 
I kept missing the center "lane" in the scooter puzzle so I hacked together a Linux script that avoids the rocks for me:
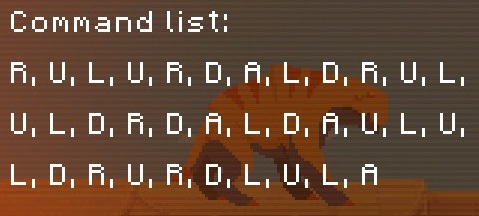
https://gist.github.com/RunningDroid/1e00fea3fe608693e0a4ff1ac809c28d

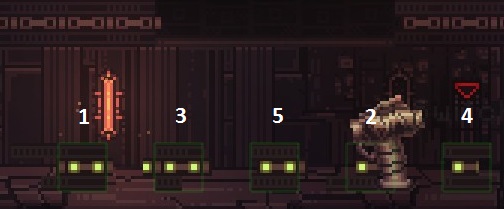
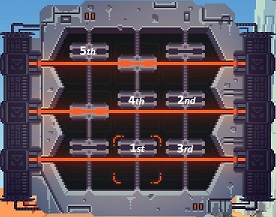
It will only work on Linux and it might not work at all if the game runs at a different speed on someone else's machine, but I figured I'd post it in case someone else is stuck at that part and they'd rather write/debug a script instead of crashing into a rock for the 20th time.
JuGGernaWt 9. Okt. 2022 um 7:44 
Great
FoxDie 4. Nov. 2020 um 3:33 
I got it thanks!
Dissectus  [Autor] 3. Nov. 2020 um 11:23 
@FoxDie: Just manipulate the pipes to make the container move. When it reaches all the way to the right, it will move back to the left and so on.
FoxDie 3. Nov. 2020 um 10:53 
I did it and it spit the rock out but the container is all the way to the right, I can't figure out how to get it to the left to hold the rock that you have to put into it.
Dissectus  [Autor] 2. Nov. 2020 um 9:20 
@FoxDie: If you mean moving the container in the 'Water pipe puzzle'; have you turned on the water flow yet? You do that by completing the 'Spout puzzle' and the 'Water wheels puzzle'.
FoxDie 1. Nov. 2020 um 23:17 
I'm at the desert crash site, and I think I have a bug or something, because the cargo container isn't moved and I can't figure out a way to move it all the way to the left like this guide and other video's I have seen they don't do anything it's just there, any help would be appreciated, Thanks!
Dissectus  [Autor] 7. Aug. 2020 um 9:39 
In the Telekinesis Door lock puzzle how were you suppose to find the code? Was it a brute force thing?

I think so. I may even have looked up the solution. It was a while ago.