Cities: Skylines

Cities: Skylines

98 ratings
Map Themes: In-Depth Guide Terrain
By hadece
For creators: How to make high quality map themes. Focus on texture blending and scaling.
   
Award
Favorite
Favorited
Unfavorite
Introduction
C:S's Map Theme Editor gives you alot of freedom to create your own map theme. I will focus on terrain, how it's build up, what the textures are used for and how you can get the most out of each texture.

What you'll need:
  • References are always a good start. How much water supply is there? Is it a sandy area? what surfaces do you find? What rock colors and structures are usual?
  • Some kind of knowledge in photo editing and software like GIMP [www.gimp.org]or Photoshop.
  • ShaderMap[shadermap.com] or Crazybump for creating Normals out of nothing.
  • Time and alot of patience

Useful for testing
Scripts[gist.github.com] for changing textures in save games by Ronyx69 (ModTools required)
Theme Editor Maps by TPB for loading your map into the Map Theme Editor.
Understanding terrain: Basic buildup
The terrain textures are divided into 8 types, with 6 nature based textures and 2 city based.


The nature based textures are visible on a blank map.
Cliff, ruined and grass are triggered automatically by terraforming. The point from which they become visible depends on the information given within the image file (see part "Blending").
Oil, ore and sand can be placed manually by painting them later in the Map Editor.


The city based textures will become visible on streets and assets. They can be painted in the asset maker or by using mods within the game, but can't blend into each other.

All nature based textures lay on top of each other and show up in a specific order. Top most is the cliff texture, which can not be overpainted by any other texture.
Ruined triggers directly below cliffs.*
Sand is the most versatile texture, since it can be placed manually and has an own normal map.
Below Cliff, Ruined and Sand - on top of the grass texture - oil or ore texture can be placed. In contrast to the sand texture, their appeareance is mixed with grass texture, which means if the grass is very light, the textures can't become black and vice versa.
Finally, grass is the bottom most layer.

*Appart from this standard order, some areas affect the layering by triggering the ruined texture on even grounds: trees, buildings, water shore and river/sea grounds, highway and railway track borders and below sand. Therefore it's essential to have a very flexible ruined texture.
Scaling, layering and planning textures
Scaling is crucial for a believable environment. Since there aren't any people on the Map Theme Editor map, scaling can be hard sometimes. Best is to relay on the 3D grass, since the trees do vary alot in size and are usually far bigger than you might think.

Measuring the map: test texture scaled to 1 km² and 10 m².

The maps in Cities: Skylines are 18 km². A texture (square) scaled to 0.00104175 is 1 km² big. A texture scaled to 0.10475 is 10 m² big.

(the input field will round to the nearest number, but the game will use the exact ones)

Since textures are scaled proportionally, you can easily use this coefficient to get textures true to scale in size.

Automatic scaling
Pavement on highways and Gravel on Railways (both bridge mode) are scaled automatically to 0.0600 (17,45 m²). For a seamless optic I recommend not to use any different scaling than this. The size of your texture should solely be determined by the image file and the resolution should be between 512² and 1024² pixels.

Find the right size of your texture
Not every texture will have the same resolution or size. For example Paving Stones will be very big even at the smallest scaling, so the texture has to have alot of bricks to display a realistic size. With the coefficient and a little math you can instantly make them true to scale.

In contrast, if you want to build a lively cliff texture, you'll have to scale it very big, what leads to huge texture sizes. Don't plan below 2048². Best design it on around double the size, resizing in Photoshop/Gimp is always easier than enlarging.

You can say that a texture set to 0.010475 (100 m² ingame) needs a resolution of 2048² pixels to be perfectly sharp, while a 10 m² sized texture just needs 256² pixels. Don't use exotic resolutions and keep your textures square, otherwise the game will crop it down.

Be aware that most photographs of stone or rock textures are shot from a few (centi)meters, so either you'll stitch together quite a few of them or use shots from far away (mountain-scapes, big solitair rocks for example).

Maximum size of your textures
For normal maps, 2048² pixels is the maximum you can import into the game. Higher resolutions will automatically be cropped by the game.

Let your textures collaborate
All terrain textures are placed in one direction. So designing a texture with a top and bottom isn't a good idea. On the pro side, textures can be designed to fit perfectly above each other if their scaling match exactly or are a multiple of each other.

For example you can use a 0.007 Cliff texture with a 0.007 Normal map. Since your Sand Normal map has to have the same scaling, you'll have to plan it on the same scaling. To avoid unnessary MBs, you can make the Sand texture only 1/4 of the size (and scale it to 0.028) while generating the normal map out of a 4-piece sand texture.
Blending
Every nature based texture except grass can be blended by using the alpha channel of the image. The alpha channel is the transparency in PNGs that comes with an image. Through blending, textures can be used in different situations and blend smoothly together.

Animated comparison of Vanilla European and Rheingold Theme[www.patreon.com]: Cliff, Sand, Ruined and Ore, all with alpha masks for a natural blending of textures. (shot with custom LUT)

That's where picture editing software comes in. In Photoshop the alpha channel can be kept seperate by using a mask.

Black areas of the alpha channel are always invisible, white areas always visible. Grey tones are triggered in terrain depending on slope (or brush strength for oil / ore / sand). I suggest not using too much grey tones to keep the edges sharp. (However, if you like to have soft edges, a little blurring will do the job).

Example
Ruined special cases (sea ground, road edges and so on, trigger 100% of the texture and start smoothing out then depending on your alpha channel. Using a very dark alpha channel on ruined is perfect for getting control over too much dirt in your city.
In my example, I wanted to let the grassy elements of the texture be invisible most times, so that the ingame grass texture can shine through. Therefore they are very dark. In nearly flat areas, only single stones should still be visible, to make the landscape more interesting. So the stones were selected and made almost white.


After setting your alpha mask save the image as .png and start testing the result ingame. To keep your mask editable, you can save selections in layers or as paths. This way you can edit all stages of the alpha mask without influencing the neighbouring.

Hi-res PNGs, however, will make your file size explode imediately, so keep an eye on resolution and scaling.
Blending: Step by Step
Preparations
Open your texture in Photoshop. If you haven't made a custom texture by yourself the image will be locked. 01 To unlock it, go to your Layers window and double click on the background layer. 02 Make a group by clicking on the icon in the footer bar. Drag your layer(s) into the new group.

Content based selection
Select your group in the Layers window. 03 Create a mask by clicking on the Mask icon in the footer. To fill the mask with information based on the texture, you can manually paint it, use the magic wand tool in the tool bar or use Selection >Color Range 04. (If you have seperate layers, you can also select everthing on a layer by clicking on the layer preview image while holding ctrl.) My example shows the Color Range[helpx.adobe.com] window, where you simply click on the color/element and it selects similar areas in the image.

Filling the Mask
If you're done with your selection, click on your mask in the Layer window 05. Make sure that your background color is black and hit delete. Looks good? Deselect your selection. Inverted but otherwise good? Deselect your selection, click on your mask and hit ctrl+i to invert the mask.

Optional: Adjustments
Click on your Mask while holding Alt. You will now see a black and white image of your mask that you can edit like an image. I use different filters like blur filters and noise removal filters to smoothen the selection. Depending on your texture and your wanted result, I suggest testing the mask ingame, and adjusting step by step.

Optional: Random Selection
In case you want a little more random fading in your texture, you can generate a seamless random mask by creating a new layer 06 and select it, assuring that your front and back color are black and white and clicking Filter > render filter > cloud 07.
You can now again use Selection > Color Range to select one of the colors (black or white) in the "cloud" and put the tolerance bar to max. Switch back into your mask (click on mask while holding alt). With your selection active, use a big(!) basic brush 08 and set the opacity of the brush to around 30% 09. Paint with the brush over the complete image. Depending on your brush color, it will either make the selected area more visible or less.
-

Final adjustments and saving
10 To adjust the texture's brightness for the game, create a black color layer. 11 Set the layer's opacity to 50%-70%. Drag the color layer into your group.

Save the image as PNG into your ThemeTextures folder (C:\Users\YOURNAME\AppData\Local\Colossal Order\Cities_Skylines\Addons\ThemeEditor\ThemeTextures). Start the game and load the texture.

Result
Where's north? Set lighting for texture alignment.
Most textures have a natural light source which casts a shadow to one side of an object. To achieve a slight 3D effect, this shadow should head to the north (or south if you create southern hemisphere themes). But where on the theme editor map is north?

If we can agree that on a heightmap or texture "north" is "top" and "south" is "bottom", and textures and height maps are not flipped but displayed regularly, I highly assume that the highway crosses the northern map border.

What means the Vanilla Themes are wrong.

Set the sun's position:
Don't be fooled by the Longitude bar: To make the sun heading from east to west, your Longitude bar in the atmosphere tab should always look like this.


The Latitude works like you might assume: It sets the maximum angle of the sun. But it's flipped, the South pole (90 S) is far on the left, Northpole (90 N) on the right, equator (0) is in the center.

Now you can check your textures ingame if their shadows cast away from the high noon sun and align with the trees' shadows. If not you'll have to rotate your original texture file.

If you disagree with me and believe the Vanilla themes are correct then you will have to rotate all height maps in map editor later and probably your cliff texture, if it casts stong shadows.

The latitude bar is flipped either way.

Editing Structures
Custom Building Base Texture with Normal / Bump Map
The building base normal map behaves a little different compared to the terrain textures' normal maps. When you insert a classic normal map, the light messes up in every possible way. Ronyx69 found a solution:

Correct settings for Building Base Normal / Bump Map[community.simtropolis.com]

Closing Words
I hope I could give you a few tips of how to plan and design textures for terrain. I still haven't found out everything, so I will update this guide as soon as I can.

If you have questions in the meantime, please feel free to ask.

If you found this guide helpful, give it a thumbs up or leave me some nice words :)

69 Comments
hadece  [author] Apr 5, 2023 @ 8:39am 
Hi Vadicus,

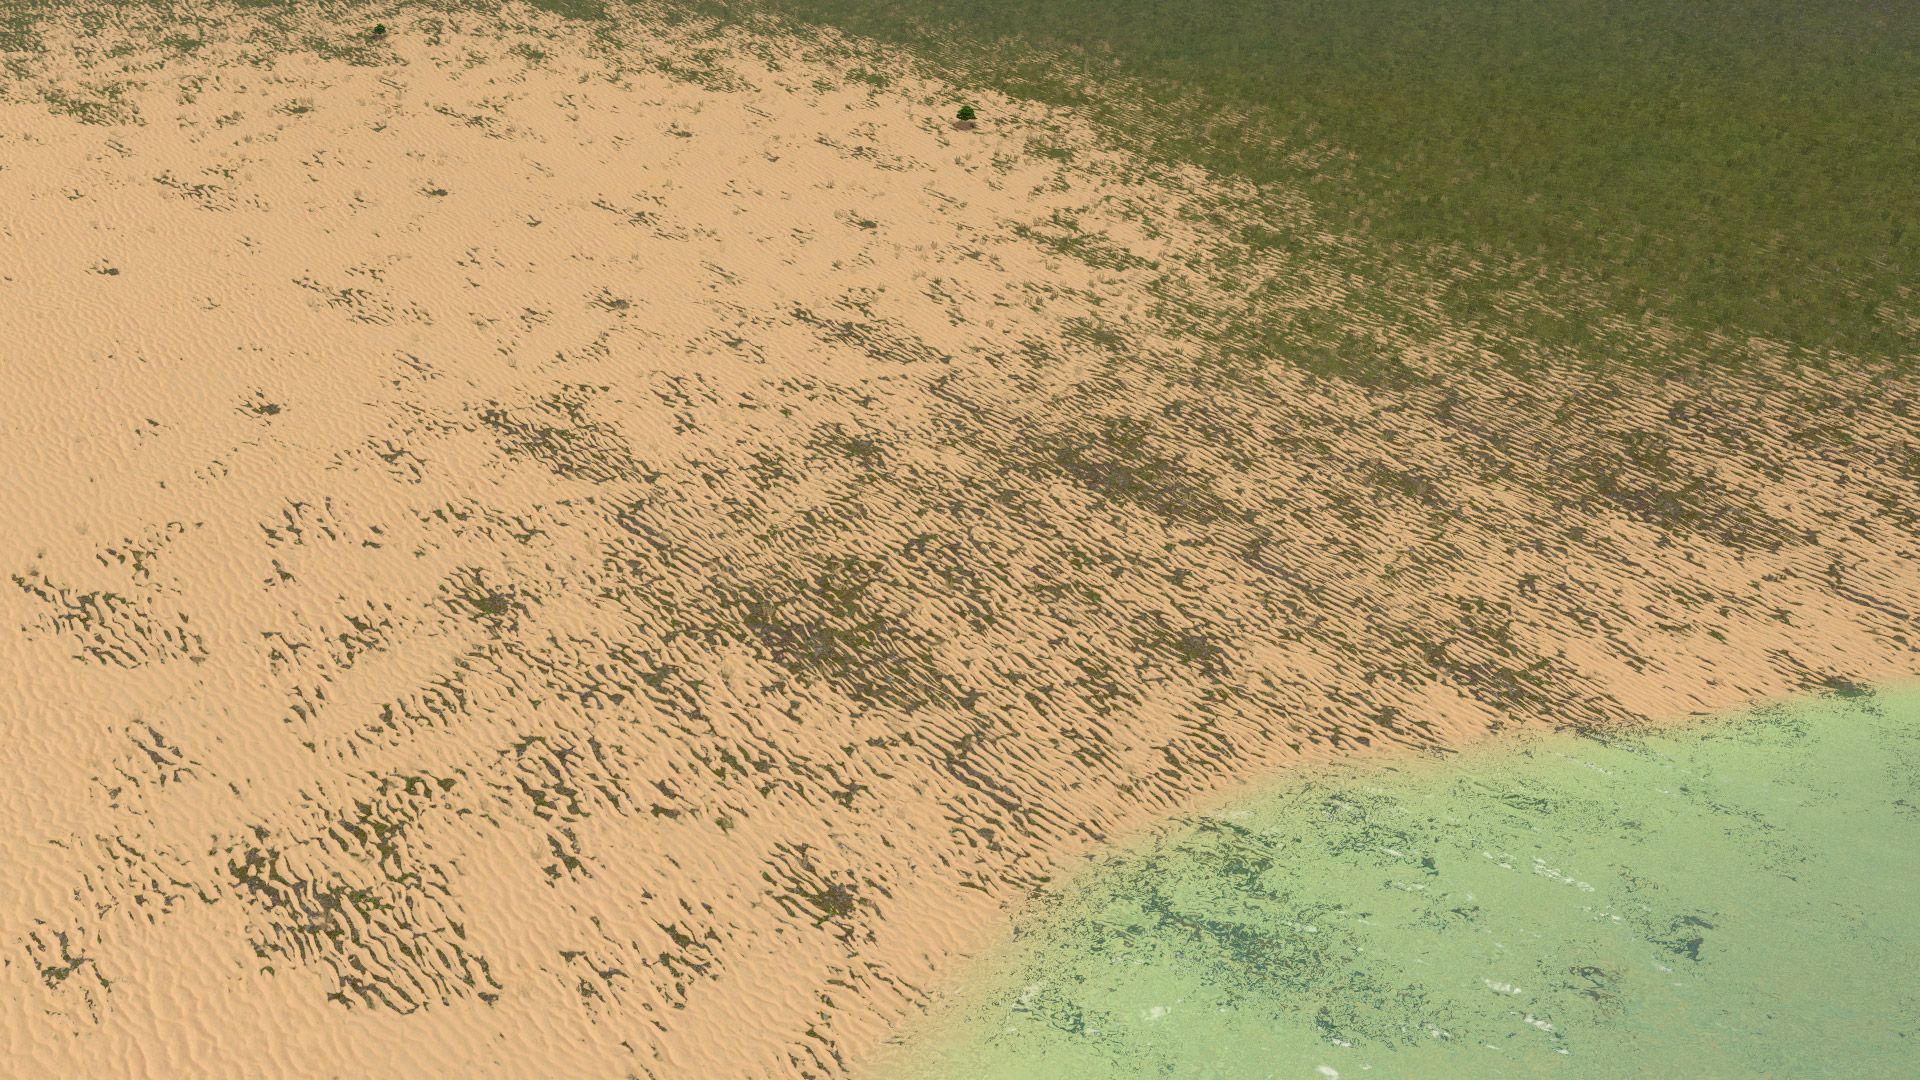
Oil and Ore can not blend with each other, as Sand and Fertile can not blend.
Oil and Ore additionally blend differently with Grass than all other textures. That is what I meant by "blending".

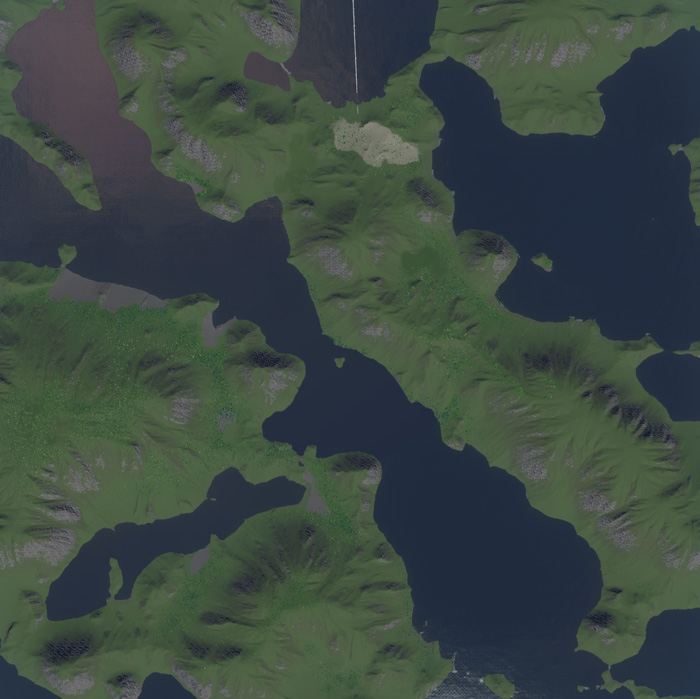
Sadly there is no magic trick to make a cliff blend well with the other textures. It depends much on the mask itself: The smaller the details in the mask are and the more contrast it has, the sharper will be the result, but not neccessarily more realistic it will be looking. Taking days or even weeks to modify and finetune is usually the way to go. ^_^;
Vadicus Feb 24, 2023 @ 1:22pm 
If Hadece could make a quick video showing how to get the mask set right to have sharp blending on the cliffs like his Themes, that would be great. I've tried for hours and can't get it to work. The cliff texture spills across the whole map. I can get it to be somewhat crisp at the edge but no where near like his video above. No way near. Wow, Hadece, great work!
Vadicus Feb 24, 2023 @ 8:41am 
Hi Hadece, thanks for the great guide. I'm just curious about Ore and Oil blending. They do not seem to overlap each other at all. I always get a decent size grass gap in between the two when painting them side by side over grass. I think I understand that they do not layer, but is there a way to make the texture edges not blend into the grass so that the oil/ore can be placed super close together without a grass gap? I'd like to upload an image to show the gap but don't currently have one sadly. Thank you for any advice.
TwoCflyer Feb 15, 2022 @ 10:57am 
thank you so much :) that really helps. every little bit.
hadece  [author] Feb 15, 2022 @ 5:33am 
@TwoCflyer
Its a matter of contrast to get the edges sharp. Its alot of try and error tbh, very time consuming sadly. And yes when I talk about opacity or transparency I mean the mask :)

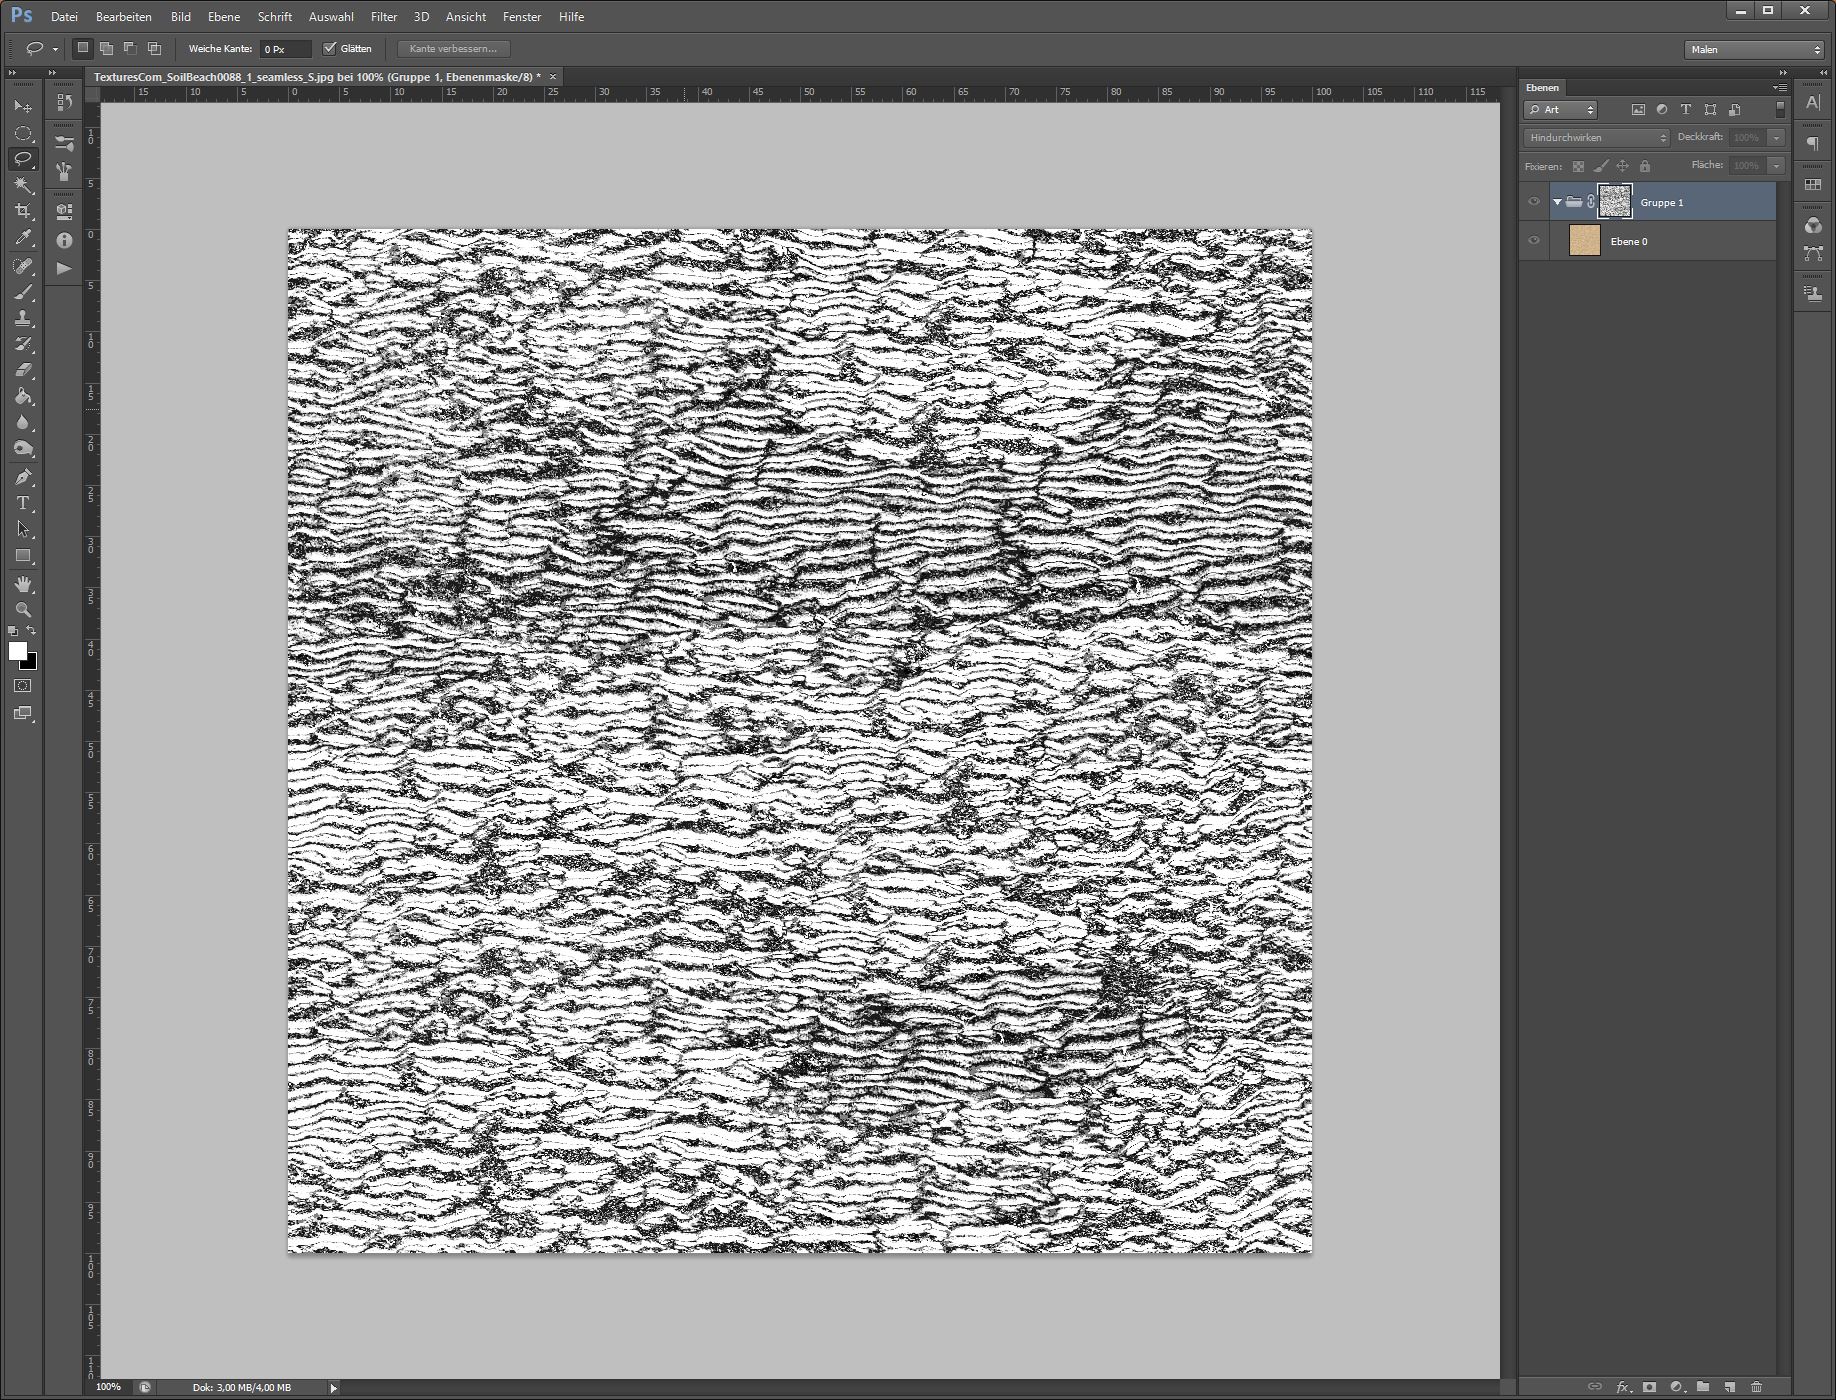
Here you can see a very soft mask (snow) vs. a mask that has very high contrast, more like cell shaded (stones) https://c10.patreonusercontent.com/4/patreon-media/p/post/29726145/e9daf098d862494394c4aed8e35c09c8/eyJxIjoxMDAsIndlYnAiOjB9/1.jpg?token-time=1646179200&token-hash=oDdvrDZj5YQnsYANTfR9-BkEnvD_yWPTBUqrO8R2sRM%3D
TwoCflyer Jan 31, 2022 @ 8:44pm 
Follow up questions, when you talk about opacity/transparency are you talking about masks? And when you say the opacity map fits the image, does that mean like the sand mask above? And how exactly did you get the cliffs/ruined/grass fade to be so crisp? not fuzzy, blend so well together. Im trying to get my cliffs to blend and I cannot seem to get it to work. and there is a super fuzzy layer either between my grass/cliff, or ruined/cliff. I see how you did the sand masking, but i don't understand how you masked the cliffs to get such clean lines where the cliffs stop.
TwoCflyer Jan 31, 2022 @ 3:16pm 
it did!, thanks so much
hadece  [author] Jan 31, 2022 @ 5:28am 
@TwoCflyer
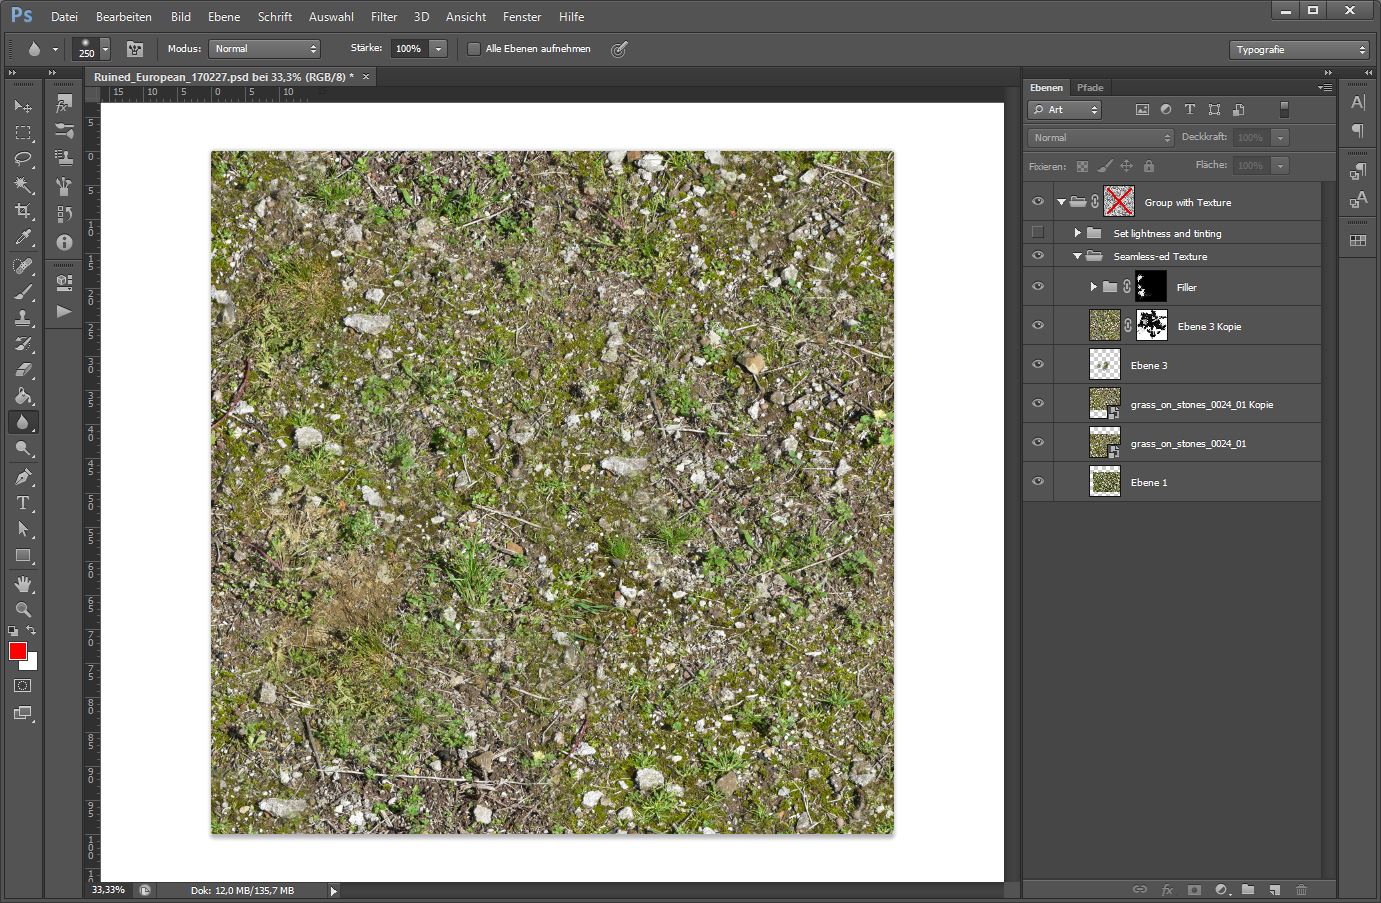
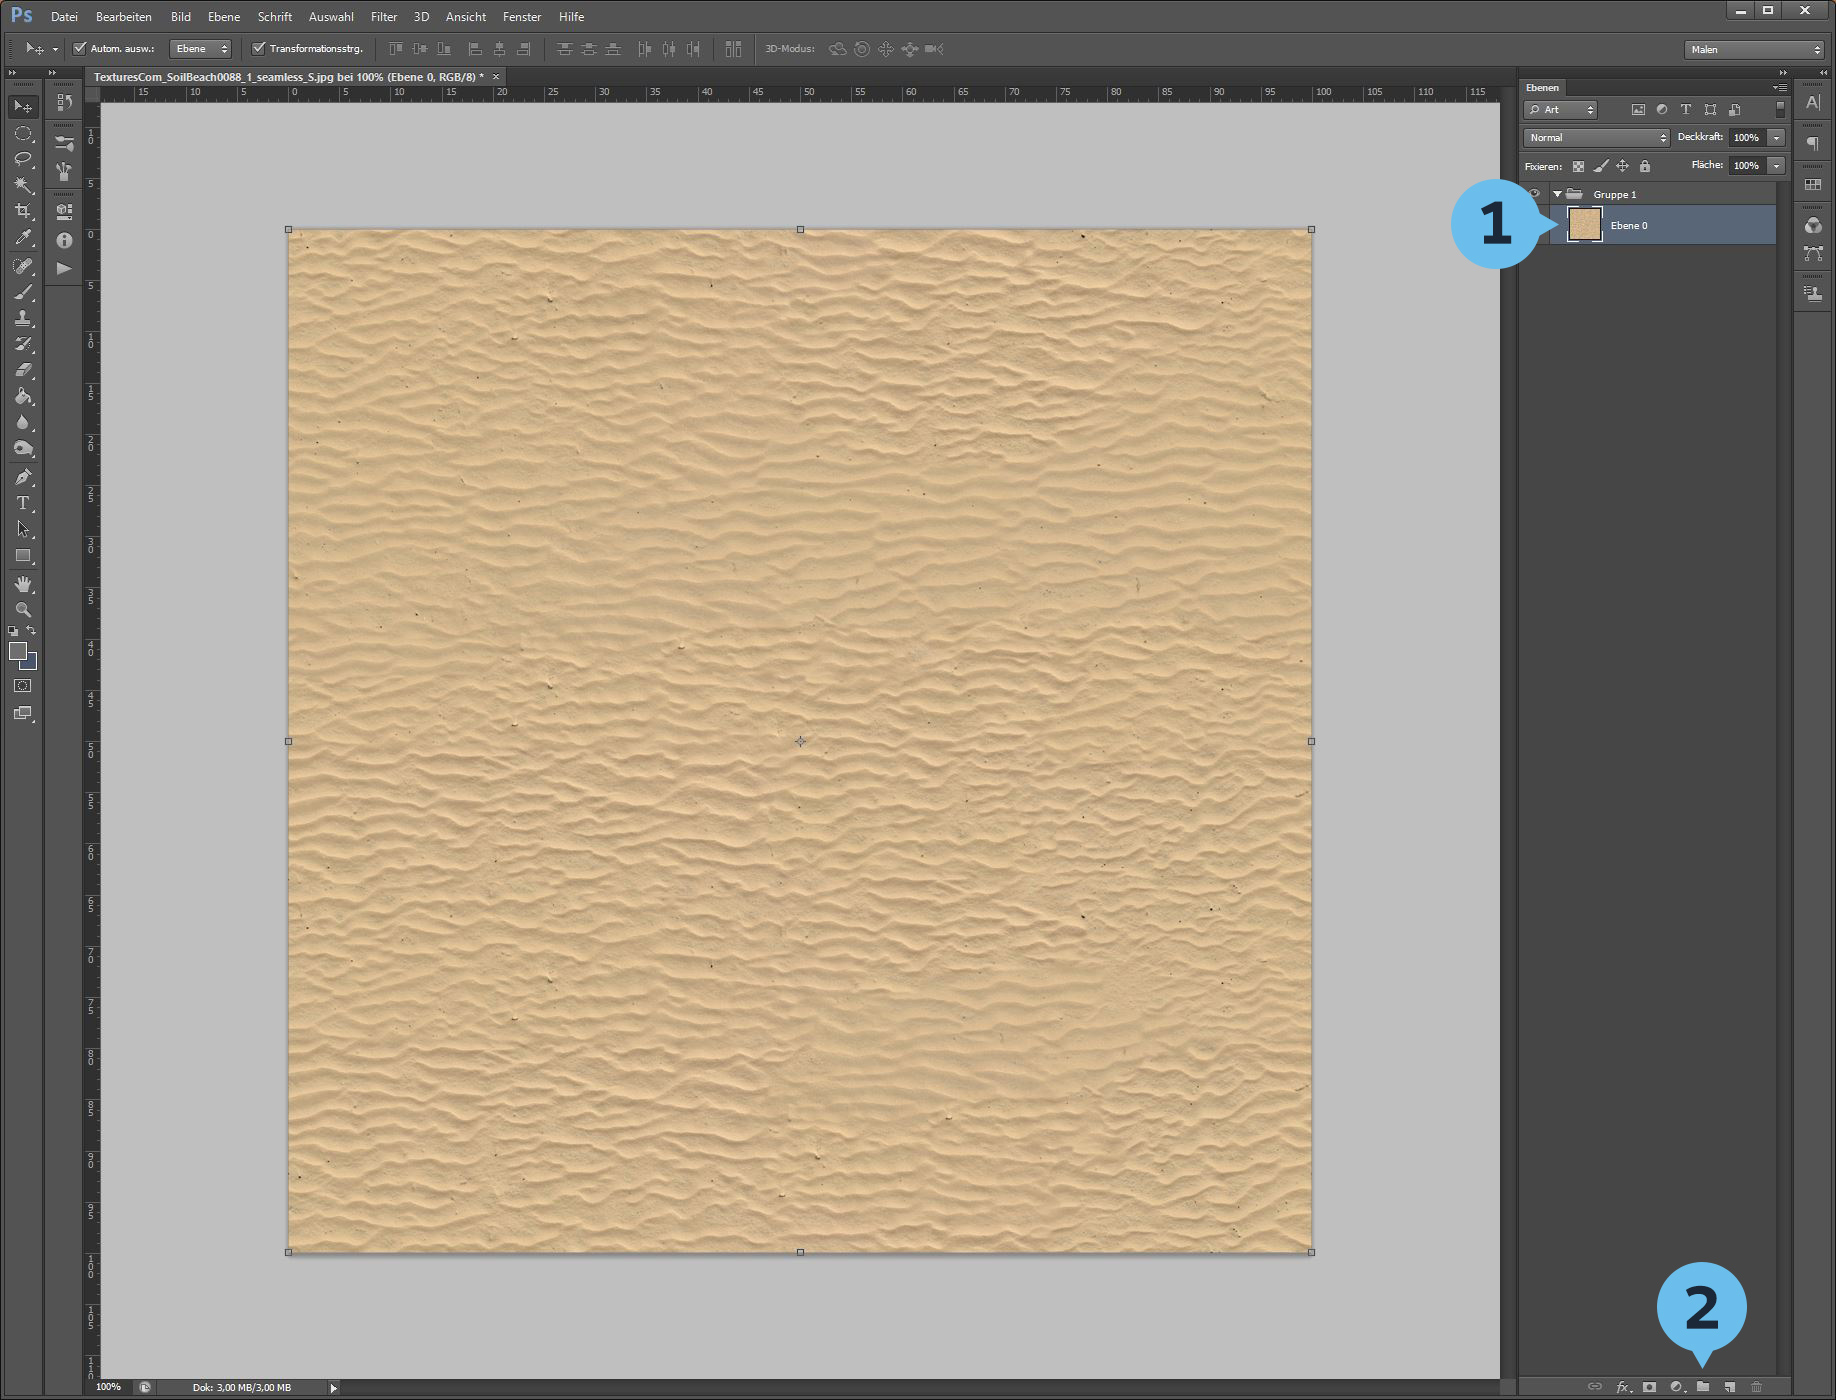
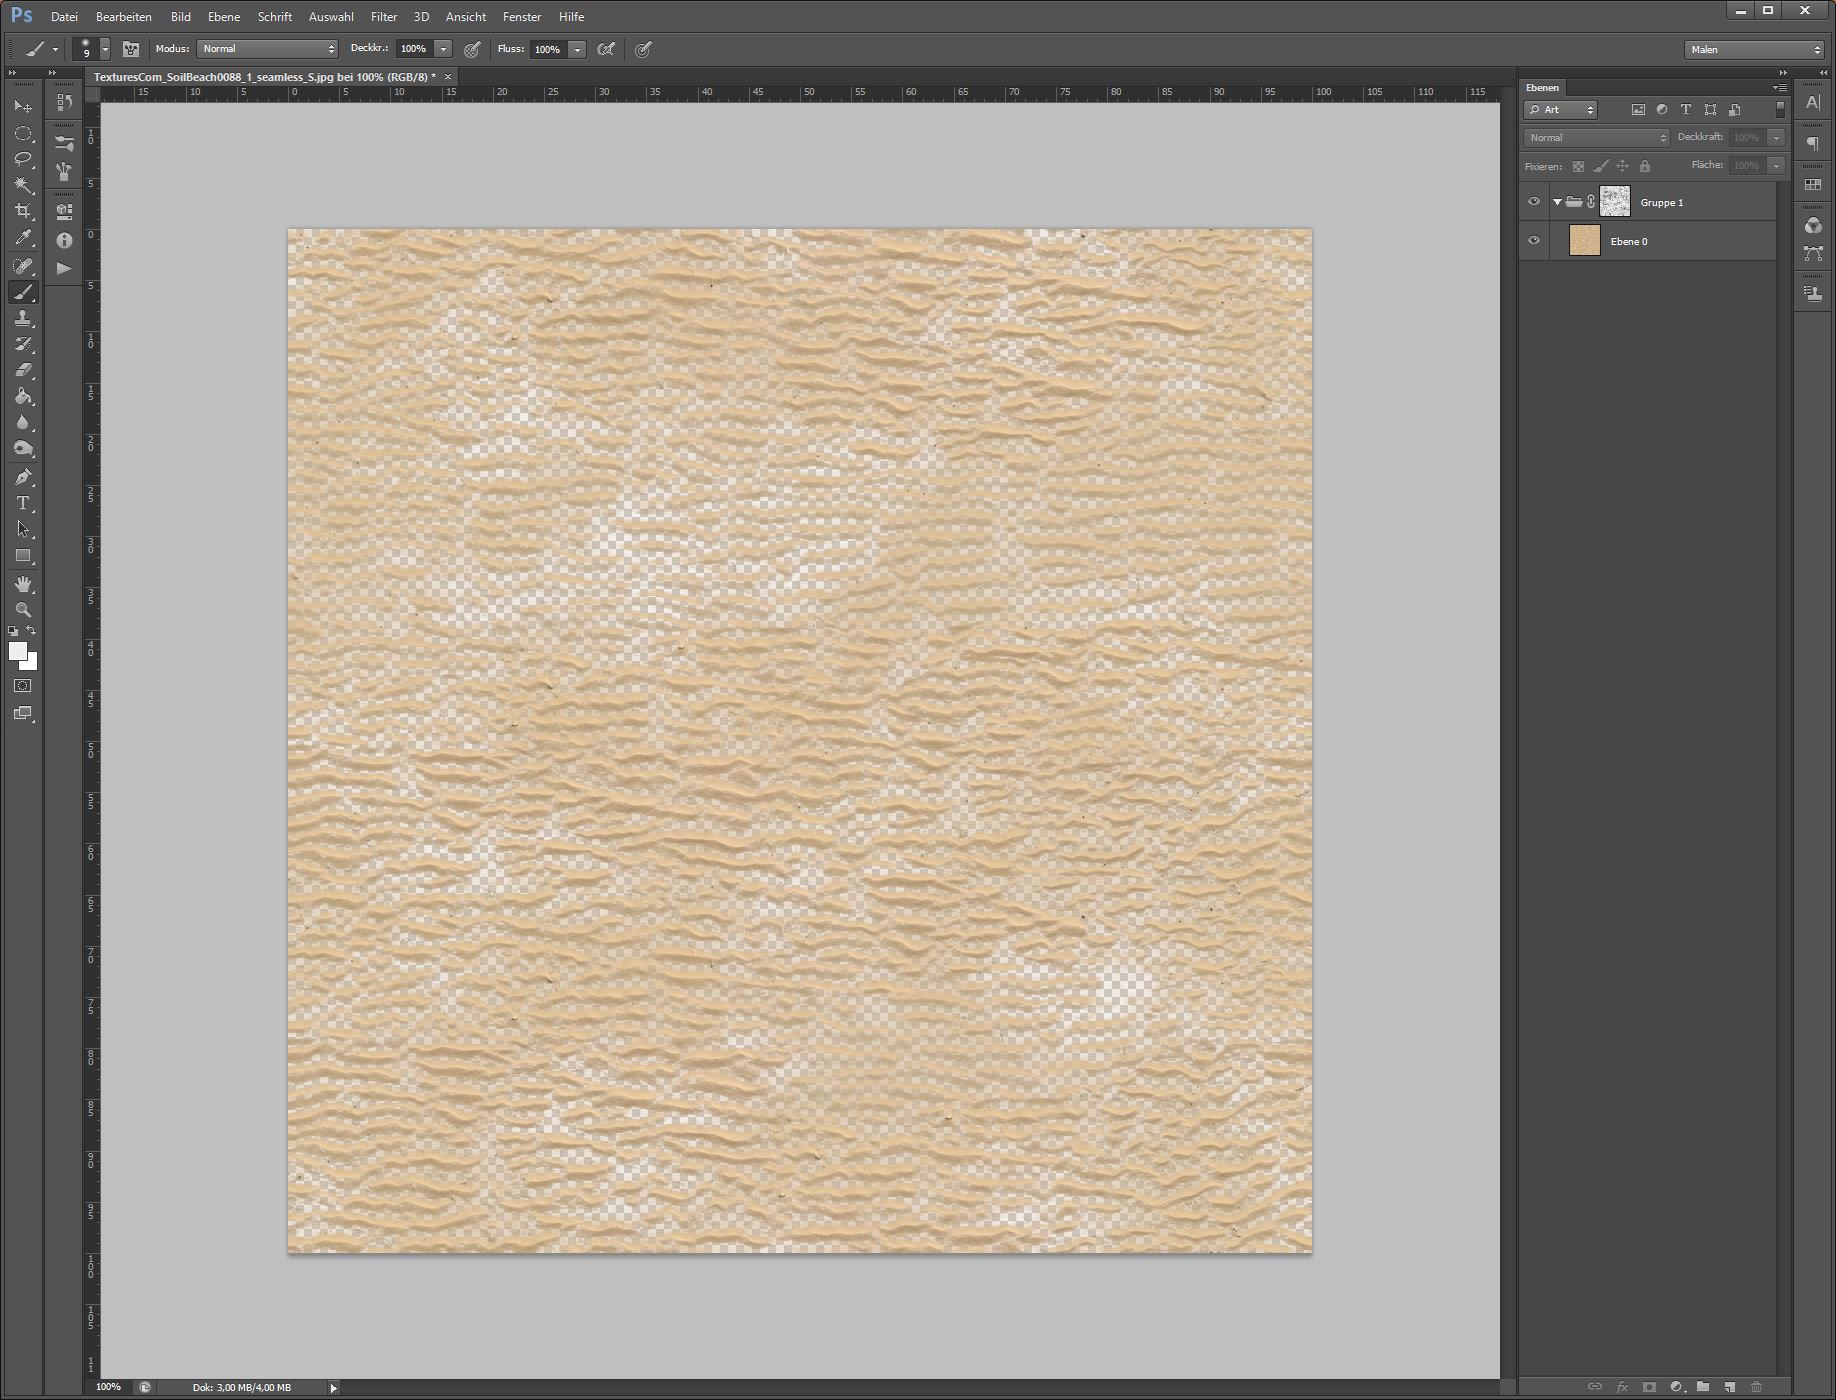
All textures of Rheingold have an opacity map aka transparency, beside "Grass", which has none.
The opacity map itself fits the image and it is set very dark, which means it is very transparent. That causes the texture to trigger late. Hope that helped!
TwoCflyer Jan 16, 2022 @ 12:43pm 
Thank you for any info you can help me on if you remember. I'm working on learning how to do this with GIMP and would love any assistance to help speed up my skills. I don't need help on using gimp, Im pretty sure ive got that covered. My biggest thing is understanding the ratios of those opacity and masking you used between each of the Nature based Layers to get that seamless look between each. Thats the only thing im kinda stuck on. finding that balance. Thank you so much for this guide. It Is extremely helpful to learning how to manipulate the textures! I hope I can get good enough to make a Theme worthy of the workshop!
TwoCflyer Jan 16, 2022 @ 12:39pm 
Question on the Blending using Masks for the different Nature based textures for the Vanilla European and Rheingold Theme Animated example above... Specifically for Cliff, Ruined, Grass, Ore, Oil
1. Do you remember about how much Opacity changes you used for each? which ones you used decreased opacity on?
2. Which ones did you use Alpha Masking, Specifically do you remember using Alpha Masking on the Cliffs (the upper most layer)? or did you only use masking on Ruined, Ore and Oil.

im just curious how much opacity changes and alpha masked ratios or so you used for each of those natured based layers.

I am assuming you used 100% Opacity and no Alpha Mask on Grass as thats the lowest of the layers.