The Elder Scrolls IV: Oblivion Game of the Year Edition (2009)

The Elder Scrolls IV: Oblivion Game of the Year Edition (2009)

371 oy
Optimised Max-Difficulty Oblivion Character Build + Strategy Guide
The Flying Rodent tarafından
An information-rich guide to creating an exceptionally strong character and kicking ar*se on Difficulty 100.
5
4
3
6
3
2
2
   
Ödül
Favorilere Ekle
Favorilere Eklendi
Favorilerden Çıkar
Introduction


A few months back, I had a big nostalgia trip and decided to go back and steam purchase/play some Bethesda RPG’s I’d spent countless hours on as a pimpled teenager, starting with Morrowind. Many years of playing Neverwinter Nights [a Dungeons and Dragons game of the same era as Morrowind] has influenced by approach to playing RPG's, and I decided that upon revisiting the Elder Scrolls universe that I should craft a well-oiled Character Build.

After a bit of research, I managed to throw together a Character Build for an Argonian-Type, similar to something I’d played in the past and had fun with. It was designed to excel at playing on the Highest DIfficulty Setting. After playing through Morrowind, I set sights on Oblivion, with the same Max-Difficulty Character Build idea in mind.

Compared to Morrowind, creating a Max-Difficulty build in Oblivion seemed a little trickier. Aside from all the enemies hitting very hard and having lots of health, it is generally harder to gain access to powerful items without first levelling up. There’s a limit on the amount of training one can purchase to 5 skills per level [as opposed to limitless training per level in Morrowind]. There’s also less Focused skills to increase [7 instead of 10], meaning there’s a smaller level cap [in the 50’s instead of in the 70’s], so there’s less stat increases available to increase all the attributes to 100. With all this in mind, I decided to make an Oblivion Character Build that was more optimised than I did with my Morrowind build.

The following build is designed to excel on Maximum Difficulty. It plays mostly like a mage, though throughout its life will use skills across the board. I did a fair bit of research on UESP, particularly here[www.uesp.net] and here[www.uesp.net]. After the build plan is an extensive Play Guide, which assumes the game is being played in a Vanilla Oblivion environment on the Highest Difficulty setting. If this is your very first time playing Oblivion and you’d like to try this character out, I would very much suggest not playing it at Maximum Difficulty just yet.

The guide aims for the Character to reach ‘Optimsation’, which I define as:
  • The highest base Health it can possibly achieve. I prioritise Health over Magicka, as High Health is helpful early on to survive, and High Level [17+] Fortify Magicka Sigil stones can provide the character with more than enough Magicka,
  • 100 of every Attribute.
  • 100 in every Major Skill [as well as a few Minor ones]. There is also theoretically nothing stopping the Character from reaching 100 in every skill if desired.

To try and help achieve all this, as well as keep it playable, I have written a play guide along with the build. It is rather linear to start [up until about level 6], favouring certain skills above others, in an attempt mainly to maximise Health and remain as strong as possible. After level 12 or so, the guide outlines several playing strategies available to the Character as it gains experience, items and skills.

A forewarning that this guide contains quite a few spoilers. The Character does not necessarily need to be played the way the guide suggests, but I highly recommend following it [or at least taking points from it] to keep play as smooth as possible. The guide on the whole is text heavy, with a lot of subheadings and sections to break it up, and is split as follows:

  • Build Schematics and Skill Rundown
  • Level 1: Starting Out and the Tutorial
  • Levels 2-3 : Summons Training, Guild Supplies and a Spot of 'Light' Farming
  • Levels 4-12 : Conjuration Mastery, First Maxed Attributes and Guild Recommendations
  • Levels 12-16 : Illusion Mastery, Homemade Concoctions and Weakness Stacking
  • Levels 17-22 : Attribute Increases, Kvatch and the Oblivion Invasion
  • Levels 22-51 : Enchanted Items, Master Training and High-Level Custom Spells
  • Levels 51- 54: Oghma Infinium, Final Gear Set and Final Character Statistics

There should hopefully be a few bits of helpful information scattered about [which are outlined in the Chapter Headings], and maybe even some new things for the veterans. During the Gameplaying sections of the guide, there are a lot of images included, and it might be helpful to zoom in 150-200% with your tablet/phone/broswer during these sections.

There's also a bit of mathematics, as I find it extraordinarily helpful. I hopefully do a good job of explaining it when necessary. 😊


Onto the build!

Build Schematics


Race: Male Breton. 50 Magicka Boost, 50% Magic Resistance, and a once/day 50% Physical damage resistance shield for 60 seconds: All rather neat. Males get extra strength, Females get Extra Speed. I prefer Male as the extra strength is more help early on for carrying equipment, and having Athletics as a Major skill provides a decent enough running-speed boost.

Birth Sign: The Warrior. 10 Strength helps for carrying equipment [helpful early on], and 10 Endurance helps to achieve the Maximum Health allowed for the character. The guide is written assuming that the Warrior sign is taken. The Lady ( 10 willpower 10 endurance) is a good sign for the Max Health concept, though I personally prefer the extra strength for hauling equipment. The Mage [50 Magicka Boost] is also a pretty good choice for this type of character, albiet at the expense of a small amount of health and more time training Endurance-based skills. I highly recommend NOT taking the Atronach or the Apprentice: The Atronach makes levelling and playing very tedious, and the Apprentice's 50% magic vulnerability is quite crippling to this character.

Favoured Attributes: Endurance and Luck. Endurance = the more Health the merrier, and with less levelling opportunities to increase attributes, Favoured Luck is pretty much mandatory if one wishes to get it to 100 by the end comfortably.

Class: Custom, Combat Specialisation. Combat Focus helps to train combat skills more quickly, particularly Armorer, Block, and Heavy Armour, which all increase Endurance and thus Health.

Major Skills: Athletics [30], Conjuration [35], Destruction [25], Restoration [35], Marksman [25], Mercantile [25], Sneak [25]. To control the level up of the character’s attributes and keep it playable on Max-Difficulty, it is advised to level certain skills [e.g. Conjuration] in favour of others [e.g. Marksman] to start with. There are also several minor skills that should receive attention throughout playing. More on that later in the guide.

Starting Stats: Str 50, Int 50, Will 50, Ag 30, Sp 30, End 45, Per 40, Luck 55. 2x Endurance = Character’s starting Health = 90 Starting Health.

Total Major Skillpoint Gains: 70 + 65 + 75 + 65 + 75 + 75 + 75 = 500 skill points total, 50 possible levelups.

Maximum Level = Level 51. With Hermaeus Mora’s Oghma Infinium: Path of Spirit: Level 54.
Play Guide Intro and Major Skill Rundown


This guide is split into Chapters, based both on the limit imposed by the Steam forum [only a certain number of symbols/characters per chapter], and where I feel the Character reaches certain milestones. It contains a play guide for the Character, which is both a walkthrough and a series of Character play tips intertwined. From here on out there’s lots of spoilers, so if that’s not your thing then stop reading here.

On the Highest Difficulty, NPC’s are treated as dealing 6x the damage to the player, and the player deals only 1/6 damage to them. This turns Rats into tanky vicious killing machines, and skews combat away from traditional methods such as using Melee Weapons. At the same time, however, NPC’s/Creatures deal the same damage and have the same health vs each other. Conjuration is the Character’s primary weapon to start with, with Illusion and Destruction entering the mix at later levels. Poison Damage is also unaffected by the Difficulty slider, so Alchemy is a great skill to have.

This build guide assumes that the game is being played Vanilla, without any mods aside from perhaps the two Expansions [Knights of the Nine/Shivering Isles] for some items, and Patches to remove bugs such as Unofficial Oblivion Patch[www.uesp.net]. Some of the official DLC would help, particularly the Wizard’s Tower plugin [which comes with the GOTY Edition], but they are not required. I personally don’t use any mods that effect gameplay [only cosmetic ones like the Chase Camera Fix Mod], and the guide assumes that nothing is installed except for the basic game.

I do not like using glitches or exploits, such as permanent Bound Weaponry or infinite-anything glitches. That said, the guide does make use of a few quirks of the game.

  • First: To make Money early on [mainly for spells] requires joining the Mages Guild and selling publicly accessible books and Alchemy supplies from the Mages Guild Halls to the local traders, and grinding lots of food into Potions.

  • Second: To achieve Maximum Health requires first starting with Highest Endurance available to the Character [45], and then after that increasing Endurance to 100 as quickly as possible. On High-Difficulty, this is safest to do via special training sessions with a Summon. See Health calculation here[www.uesp.net].

  • Third: To achieve the Maximum Magicka possible requires the use of several Sigil stones [up to 8] from Oblivion Gates. To keep the countryside relatively safe, Kvatch and therefore Oblivion gates themselves are not attempted until level 17. As well as this: Sigil Stones only have a 2/30 chance of being spawned as a Fortify Magicka variant. To attain the right stones consistently requires saving and reloading in front of the stone until it randomly spawns the right type, and this is the closest the guide comes to exploiting. More on Sigil Stones here[www.uesp.net].

  • Fourth: To achieve 100 in every Attribute requires levelling of various skills in certain amounts and orders, as well as regularly taking Luck points on level up.

  • Finally: To Kill Stuff on the Highest Difficulty late game requires some craftiness. The guide here[www.uesp.net] suggests the use of lots of temporary followers that follow you around and hit stuff, as well as Custom Poisons. Poisons are terrific, but given that this character will be very mobile by the end and outrun their followers, I mainly prefer to use weakness spells stacked on top of each other, and kill things myself.

Major Skill Rundown


Athletics [Major]: Useful for running quickly, which is handy for a squishy mage on Max Difficulty. Athletics is a skill that typically increases slowly. However, as both a Combat Skill and a Major Skill, this character’s Athletics will only require 60% of 75% = 45% of the experience points for each level, meaning it naturally increases at more than double the rate [1/0.45 = 2.22x] than if it were a non-focused Minor skill! It is 1 of 2 skills that can be boosted beyond 100 using spells or enchantments. Purchased Training is recommended once Conjuration and Destruction are maxed. More on Skill experience and levelling can be found here.[www.uesp.net]

Conjuration [Major]: The character’s main weapon to begin with, and the first skill that the Character should aim to get to 100. It can be extraordinarily powerful early on, but loses its potency into the teen levels, once monster spawns catch up to the level of Summons. It is one of three skills that benefit from taking the Path of Spirit from the Hermaeus Mora quest.

Destruction [Major]: Damage early on from this school is very limited due to the 1/6 damage penalty imposed by the Difficulty setting, and it is very easy to run out of Magicka from repeatedly casting Destruction spells. Transcendent Fortify Magicka Sigil Stones[www.uesp.net] [Available from Level 17 onwards] and Custom Weakness to Magic Spells[www.uesp.net] [which are available from 50 Destruction onwards], allows the Character to deal the amounts of damage necessary to kill enemies on the Highest Difficulty, without running out of Magicka mid-fight. It is one of three skills that benefit from taking the Path of Spirit from the Hermaeus Mora quest.

Restoration [Major]: For Self-Healing and Buffing. Waiting for an hour restores all the player’s Health and Magicka in Oblivion, so Healing is less important out of combat than in Morrowind [though casting small healing spells out of combat is a good way to practice this skill]. As for in-combat: As the Character will have quite high total Health, gets hurt a lot by opponents, and has limited Magicka reserves, it is not advised to rely on Healing Spells unless it’s absolutely necessary. It is better to avoid damage entirely, or rely on Restore Health potions. Fortification Buffs are the main benefit provided by this school, in the form of Custom Fortify Attribute, Skill and Magicka spells that stack with each other. Purchased training is recommended after visiting Kvatch [level 17+]. It is one of three skills that benefit from taking the Path of Spirit from the Hermaeus Mora quest.

Marksman [Major]: Given the 1/6 damage handicap on High Difficulty, this may seem like an odd choice as a Major skill. However: Poison Damage is unaffected by Difficulty, and Marksman provides an excellent Poison delivery system. A skilled Marksman can zoom in to shoot, and occasionally knock down and paralyse opponents, in addition to delivering a ton of Poison Damage. The guide recommends only focusing on this skill once Conjuration and Destruction are maxed.

Mercantile [Major]: The character’s ability to make money from selling stuff, and money is a nice thing to have! A character skilled in Mercantile can sell anything to anyone, and merchants will have more gold in reserve to buy their stuff. It is generally a slow skill to increase [aside from perhaps selling of large stacks of items such as arrows one by one, which is tedious]. Purchased Training is recommended once Conjuration and Destruction are maxed.

Sneak [Major]: Because stealth is fun in any Bethesda game, especially combined with Marksman. The guide recommends only focusing on this skill once Conjuration and Destruction are maxed.


Minor Skill Rundown


A list of the 5 minor skills that are recommended to be increased to 100.

Alchemy [Minor]: There’s a lot of room for creativity with this complex skill[www.uesp.net]. The Character can boost themselves in all manner of ways, as well as concoct strong Restore Health and Magicka potions as get-out-of-jail free cards. Additionally: Poison Damage is unaffected by Difficulty, and Custom Poisons can deal a heck of a lot of damage. These can then be applied to bows and shot at enemies in Stealth mode. Damage Poisons deal similar damage effects as spells [e.g. Fire Damage Poisons], however they operate under Poison Weakness/Resistance rather than Magic Weakness/Resistance. Several foes [namely Argonians, Atronachs and Undead] are 100% Resistant to Poison[www.uesp.net], requiring Custom Weakness to Poison spells to make them vulnerable. Despite being very potent, Alchemy is left as a Minor skill so that it can be extensively trained early on without increasing the Character’s Level.

Illusion [Minor]: Arguably the most powerful skill in the game on High Difficulty. Aside from providing several Crowd Control measures such as Calm and Paralyse, Illusion allows for Invisibility [giving the player the option to run past a horde of Daedra in an Oblivion gate and claim the Sigil Stone from under their nose] and Chameleon [which if 100% grants the Character the ability to do whatever the hell they want, completely undetected]. Despite being very potent, Illusion is left as a Minor skill so that it can be extensively trained early on without increasing the Character’s Level.

Alteration [Minor]: A useful school full of Support and Buff type spells, which can compensate for other skills and abilities [e.g. Feather instead of Strength, Shield instead of Armour, Open lock instead of Security, etc]. The Character Guide recommends holding off practicing this skill until the teens, when it can be used to increase Willpower.

Mysticism [Minor]: Another Support Magic school. Telekinesis and Detect Life are useful aids to stealthy play. Other than this, Reflect Spell and Spell Absorption are too Magicka-costly to be consistently practical, Sigil Stones beat Grand Soul Gems for Enchanting power, and often Soul Gems can be found with Souls already in them [reducing the need to Soultrap gems yourself for item-recharging purposes]. As such, Mysticism is probably the least useful of the Magic skills, though it doesn’t hurt to practice it to increase Intelligence, nor to increase it at 100 at some stage. It’s easy enough to train: just cast Detect Life a lot.

Acrobatics [Minor]: Not quite as ridiculous as in Morrowind, but none the less fun. It is 1 of 2 skills that can be boosted beyond 100 using spells or enchantments. The Character Guide recommends not focusing on this skill until the late teens, when it can be used to increase Speed.


The remaining 9 Minor skills do not provide much benefit if maxed to 100 on Max Difficulty. However, they are useful to train to a certain degree for Attribute-Increasing purposes.


Armorer, Block and Heavy Armour [Minor]: All Endurance-based. Block and Heavy Armour don’t block enough damage on Max Difficulty to be worth heavily investing in. A bit of Armorer is useful to have for repairing items. That said: With the availability of Bound Weapons [which don't need to be repaired], the fact that a weapon’s physical damage is next to negligible on Max Difficulty, and the fact that as a mage the Character will pretty much never wear Armour, increasing Armourer to 75+ for 125%-Weapon/Armour-Condition purposes is not a priority. Practicing these 3 skills is necessary to achieve the highest Health possible for the character, so the guide recommends special training with a Summon. More on that later.

Blade/Blunt/Hand to Hand [Minor]: All Strength-based. Melee on Max Difficulty is a suicidal endeavour most of the time, so it is not recommended to regularly train these unless they player has Maxed Illusion + Paralysis spells, Reflect Damage equipment, Maxed Alteration + an 85% Shield Spell, or a 100% Chameleon spell.


Light Armour [Minor]: Even more useless than Heavy Armour on High Difficulty, though it can be worn and trained to increase Speed.

Security [Minor]: If one is skilled enough at the lockpicking mini-game, this skill is almost useless. If one owns the Skeleton Key, it’s completely useless beyond Agility practice.

Speechcraft [Minor]: The character’s ability to talk to people and to get them to like you, which can be handy, even if for just increasing Personality. It can be practiced at any time by randomly talking to strangers and playing the circle-wedge mini game, though this is harder to do as the game goes on and the Character becomes more famous. It can be compensated for with Fortify Personality or Charm, making it overall less useful than Mercantile.
Level 1 [Part 1]: Starting Out and the Tutorial


This is IMO the hardest section of the game on the Highest Difficulty, as the player has limited skills, spells and equipment available. Even rats can effortlessly slaughter you.

Here’s a rundown of how I approach the Tutorial. It is the most linear and thorough part of the guide, and I recommend following it as closely as possible. To try and make things as clear as possible, I've included a lot of images. Maybe open it up on a phone or tablet as you play, and zoom in if things are a bit hard to see. 😊

First off: QUICKSAVE OFTEN. Set your Autosave on rest/wait/travel. Wait for an hour after each fight to replenish your Health and Magicka.


Make your Male Breton as handsome/silly as you like. After this, MAKE A PROPER SAVE, in case you level throughout the tutorial. If you do, you will most likely not be able to max your attributes effectively, and you’ll have to run through it from the start again. If you follow this guide, you shouldn’t level before leaving the sewer.


After the first fight with Assassins, Captain Renault dies and drops her Katana. Pick it up: This will be your main weapon throughout the Tutorial. Your very first fight is against two rats that burst out of the wall. All you have is a Katana, Heal Minor Wounds, Flare, and the once/day Dragon Skin power. 4 flares kill a rat, and 1v1 in a fight with full fatigue, the Character can beat up a rat with the Katana. This is 1v2 however, and you can be easily overpowered.


Try shooting them with flare as much as you can, perhaps from the relative safety of a ledge, though they are tricky to hit as they jump around. The easiest way I found to deal with them is to first use Dragon Skin, snipe them a couple of times each with Flare, then try to beat them to death with your sword. After this, heal up using Minor Wounds, and Flare/bash a third rat in the next room whilst Dragon Skin is still active.


You’re hopefully not dead! Yay! Wait for an hour to replensish everything, and it's time to start looting. Pick up everything, including meat off rat corpses and mushrooms growing on the cavern floor. Soon enough you’ll be encumbered. In general, until you get your Warrior Sign, I recommend dropping anything that is worth 0 gold [EXCEPT WRIST IRONS, KEEP THESE FOR LATER!!!], and ANY weaponry aside from: the Rusty Iron Bow off the skeleton corpse, Iron Daggers, Iron Arrows, and Renault’s Katana [at least not initially]. They weigh your character down too much, and don’t sell too well either.


Through the door to the next area, on the right-hand side as you enter, is another rat [Flare/Sword] and a chest full of Rusty Iron Armour. Equip it along with your Katana. It will now take 6 flares to kill a rat whilst wearing Heavy Armour, as your spells are less effective, but that shouldn’t matter. Flare is tricky to hit rats with at close range: Sword is more efficient. You should now try and use flares simply to tag Rats and lure them into attacking you 1v1, then rely on your Katana and Armour/Health to tank them. It is also a good idea to practice Blade for your first level over Destruction [more on that later]. Keep your Fatigue high, and wait an hour after every battle.


Down the ramp, 3 scared rats run towards you followed by a Zombie. Melee the scared rats to death if they stand still. If you manage to hit some of the rats with Flare from a distance, occasionally they’ll come to their senses and turn around and hit the Zombie. Failing this: The zombie is too powerful to defeat using your sword, but it is slow, so it can be defeated by running backwards around the cavern and shooting flare at it.


A few more rats [Tag with Flare + Bash with Sword tactic], and amongst some remains on the ground are a Rusty Iron Helmet and Shield. Equip them, and leave the Warhammer. Pick up all the food/loot.


More rats, and then through the door to another area to fight your first unarmed Goblin. If you try to fight the Goblin head on it is quite tough, with the hitting power of a Zombie and the speed of a rat. Luckily in this scenario, you can use stealth. There is a Poison of Illness located on a crate. Grab it, apply it to your Katana, and sneak attack him with it.


With one strike, the Goblin should go down. Notice how powerful that Poison was? Unlike normal weapon damage, Poison damage is not affected by the Difficulty slider! This will come in very handy later. Loot the surroundings and move on.


Level 1 [Part 2]: Starting Out and the Tutorial


The next Goblin uses a weapon. Counterintuitively, Goblins that use weapons deal less damage than those that fight unarmed. Tank it with your sword, and again wait. Leave their weapons [unless they're Iron Daggers, pick those up], but pick up their shields/arrows/lockpicks. The log trap can be used to kill the two goblins beneath it.


The final room consists of 4 goblins [one a mage] and a few rats. Save. Lure the 3 melee goblins out one by one using flare, and defeat them with your katana if you can, waiting for an hour in between each fight. The rats can be flared, shot with your bow, or simply left alone, as they are not hostile.


For the Goblin Mage: strip naked, and it’s time for a mage duel! Stand still shooting flare at it from a medium distance [say 20 metres or 60ft], and lightly strafe from side to side to dodge its magic attacks. If you run out of magicka, shoot it with a bow, then start shooting flare again. Once its dead: Loot everything in the cavern that isn’t a weapon.


Drop the katana: you have no further use for it. Equip an Iron Dagger instead. A little further through the cave, and you’re back with the Emperor and his guards. Relief! You should pat yourself on the back for your crafty defeat of the mighty rat and goblin hordes. It’s time to finally get some frickin’ useful abilities.


Take the Warrior Sign. Let the Emperor’s guards deal with the assassins. Loot any potions you find off their bodies. After the Emperor is stabbed, his attacker will head for you. Run away and let the guards deal with him. After that, pick your Custom Class [Combat Specialisation] and Skills [Athletics/Conjuration/Destruction/Marksman/Mercantile/Restoration/Sneak].


You should hopefully NOT be able to level up at this stage. For Optimisation purposes, it is crucial that you do NOT level before exiting the tutorial, as this will most likely result in non-maxed stats for the first level. Hence the use of Blade and Heavy Armour for most of it: Increasing both results in Strength and Endurance increases on the first level up, and doesn’t level Major Skills.


Luckily, by taking Conjuration as a Major skill you can now Summon a Skeletal Minion, which is your most useful spell in the early game. Unlike you, it can kill a rat in one swipe. Use it to kill the remaining Goblins and Rats, and exit the sewer and Tutorial.


SUNLIGHT! FREEDOM! And lots of scary things that can kill you. You’re going to need some items and spells. Fast travel into the Market District in the Imperial City, then head straight ahead of where you're standing to the Copious Coinpurse [wait until 8am if it isn’t open]. Save: It’s time for the Speechcraft mini-game! Place your cursor over the 4 options and judge his facial expressions for each. Try to line up and click the small slices with his angry faces, and big slices with his happy faces. Do this until you can no more and he likes you, and refrain from bribing him.


Given that you have 25 Mercantile, you can bump up the Haggle bar about 1/3rd of the way. Sell everything [Bow, Arrows and Mortar/Pestle included] EXCEPT FOR:

  • An Iron Dagger,
  • The Rusty Iron Heavy Armour Set [helmet/cuirass/greaves/gauntlets/shield],
  • Any Restore Health or Magicka Potions,
  • Any potions ingredients,
  • Your WRIST IRONS [VERY IMPORTANT NOT TO SELL THESE, THEY ARE THE ONLY ENCHANTABLE NON-ARMOUR GLOVES IN THE GAME],
  • Any plot items you’re currently carrying,
  • Lockpicks,
  • Repair Hammers.


After this: Buy his 20 Repair Hammers. With regards to the Armour Set: You do not necessarily have to wear it, as it slows you down whilst running around town . Just carry it for now, it will be used later.
Level 1 [Part 3]: Starting Out and the Tutorial


Next, head back down the road and left to visit Calindil in the Mystic Emporium. Make him like you, bump up the Haggle bar a bit, then buy the following spells: Starlight [Illusion], Minor Life Detection [Mysticism], and Protect [Alteration]. These serve as practice spells for their respective magic skills until a Spellmaking Altar is reached.


After this: It’s time to head to Chorrol, where you can begin training. Fast travel to Weynon Priory, talk to Jauffre about the Amulet of Kings, ask him for assistance and take the supplies from his chest. Leave behind the Iron Cuirass and Steel Weapons if you’re overencumbered. If you so wish, you can return to pick these after and sell in the next trip. Talk to Prior Maborel outside if you would like a horse. I personally never used horses, as I ran faster than them for most of the game, but the option is there. Kvatch is mentioned as the next destination for the main quest: For the moment it is way too dangerous, and shall be avoided.


Head inside the town through the south gate, visit Fire and Steel [right hand path in image above], and sell everything you just picked up from Jauffre’s chest EXCEPT for the Iron Boots: They are needed to complete your Heavy Armour Set, which should now be:
Iron Boots, Rusty Iron Helmet/Cuirass/Gauntlets/Greaves/Shield, along with your Iron Dagger and Repair Hammers.


After this: Find Dar-Ma the Argonian wandering around the south gate. Talk to her about her mother, Seed Nedus, who runs the Northern Goods and Trade Shop. Go visit her [she now likes you a bit more], and sell her everything EXCEPT for your WRIST IRONS, Restore Health and Magicka Potions, Potion Ingredients, Plot Items, Lockpicks and Repair Hammers.


Walk to the Northern End of Chorrol, find the Mages Guild, talk to Teekeeus and join it.


It’s been a tough journey so far for your character, and it’s time for a little self-reflection. You should still be level 1. Your equipment should consist of Wrist Irons, a Heavy Armour set, a Dagger, Restore Health/Magicka Potions, various ingredients, random Plot items [if patches/etc installed], Lockpicks and Repair Hammers. You’ve just joined the Mages Guild, which has beds for resting on the 3rd floor. It also contains a large supply of publicly accessible books and Alchemy Equipment, which can be used as well as sold to Seed Nedus at the southern end of town.

Life is good, though the world is still very scary. Time to begin your next Chapter: Training!

Levels 2-3 [Part 1]: Summons Training, Guild Supplies and a Spot of 'Light' Farming


You’re on your way to level 2, and it’s time to start preparing for the difficult road ahead. To attain the character’s Maximum Health, they will need to increase their Endurance by 5 points every level until they reach level 12 [for 11 level ups, from 45-100]. To do this, Endurance dependent skills [Armourer, Heavy Armour, and Block] need to be levelled at least 10 ranks between each level up, for 11 levels and a total of at least 110 skill increases before level 12. The only way to do this…. is to get hit. And on Max Difficulty, getting hit hurts a lot. Thankfully, you can train these using a Summoned Skeleton, which gives you some control over being hit.

In addition, the Character will need to gain access to the Arcane University to make use of the Custom Spellmaking Altar. To do this requires completing all the Mages Guilds Recommendations for 7 of the 9 major cities [excluding Kvatch and the Imperial City as neither have Mages Guilds]. 3 out of the 7 Recommendation quests [Leyawinn, Skingrad and Anvil] involve fighting, and your little Skeleton won’t cut it.

So: You’re going to need better Summons, which requires Conjuration Skill and money to buy the relevant spells. You’re also going to need the Magicka to cast these spells, which requires Intelligence. It helps to have some sort of Crowd Control for when a Summon is unable to help, which requires Illusion. Also, as Poison Damage is unaffected by Difficulty, it is a good idea to start practicing Alchemy for when decent equipment becomes available.

By level 12, the Character should aim to accomplish the following 5 things:

  • Endurance 100, which requires Summons Training,
  • Intelligence 100, which requires practicing Conjuration and Alchemy,
  • Conjuration 100, along with various Summoning Spells,
  • Alchemy at least 50, if not higher, which is practiced by grinding food crops into potions,
  • Illusion 90, along with Calm, Frenzy, Paralysis and Invisibility Spells,
  • Complete all 7 Mages Guild Recommendations and gain access to the Arcane University.

This part of the guide is again quite linear up until about level 5, and after that allows for a bit of freedom for adventuring alongside skills training. Back to the game!

Summons Training and Level 2:


Your dagger, Heavy Armour set and Repair Hammers are all necessary for Summons Training. Frequent waiting is required, and waiting outside of town can occasionally result in your Character being ambushed by wildlife or Conjurers, so it is best to conduct your initial training within the safety of Chorrol. To stop the guards from attacking your Summon or the friendly NPC’s from flipping out, it’s best to do it somewhere quiet. The Chorrol Graveyard, on the Northwestern edge of town, is a great training spot.

The aim of the training is to have increased a set of skills by 10, allowing for their governing attribute to be increased by 5 when you level up. This all requires a little arithmetic, so if that’s not your strong point then grab a calculator. 😊

A combination of 10 Heavy Armour, Armourer, and Block skill-gains result in 5 Endurance points on Level up. A combination of 10 Blade, Blunt and Hand to Hand results in 5 Strength on Level up. A combination of 10 Conjuration, Alchemy and Mysticism result in 5 Intelligence on level up. Etc Etc Etc. General information on skills can be found here.[www.uesp.net]

It can be hard to keep track of how many skill gains have been made once they all start increasing. Given that you’re a Combat-Focused Breton, all your combat skills will start at 10. Combined at the start of level 1, Heavy Armour, Block and Armourer should theoretically equal 30. For a Max Endurance gain at level 1, combined they’ll need to be equal to 40.

By this stage, the Character should be close to levelling and have skill increases across the board. They should already have some Heavy Armour and Blade points, so for the first level, aim to get 10 Heavy Armour/Armourer/Block levels, and just for the first level up, 10 Blade Levels.

The procedure for Summons Training is as follows:


1. Find a quiet place [e.g. Chorrol Graveyard], and equip your Armour Set and Dagger. Save.
2. Summon your Skeleton.
3. Hit it 3 times with your Dagger. This’ll cause it to attack you.
4. Endure its hits, either by standing still or by blocking, until you’re close to death. Blocking is safer early on.
5. Just before you’re about to die, step away from your Skeleton [run backwards] and summon it again. Your new Skeleton is not hostile.
6. Wait an hour. This will Autosave the game.
7. Every 5 or so attempts, repair everything with your Hammers.
8. Repeat steps 2-7 until you’ve gained enough skills for the particular level, and reload the Autosave if you die.

You may have to hit your Skeleton a significant number of times with your Dagger to get Blade skill up for the first level. Additionally, your equipment should already be a bit damaged from the Tutorial, so immediately repairing it should result in at least 1 point of Armourer. An example of combat skills sufficient for Max Increases [the Total is important rather than the skill increases of each]: 18 Heavy Armour [Endurance, 8 increases], 11 Armourer [Endurance, 1 increase], 11 Block [Endurance, 1 increase], 20 Blade [Strength, 10 increases]. 18 +11+11 = 40 total Endurance-skill points at level 1.


After your first training session and 10 strength/endurance-skill increases, head back to the Chorrol Mages Guild and find a bed. Repeatedly cast Summon Skeleton until you run out of Magicka [you’ll probably manage about 4 skeletons before Magicka runs out, but as you increase Conjuration skill and Magicka this will increase]. Wait an hour, then start casting again. Do this until you have sufficient skills to level, then take 5 Strength, 5 Endurance and 1 Luck on level up.

Congratulations: You’re level 2! For your next two levels, it’s safest to level exclusively through this type of training. But before that, it’s good to have some money.
Levels 2-3 [Part 2]: Summons Training, Guild Supplies and a Spot of 'Light' Farming
Selling Guild Equipment


Find a container in the Chorrol Mages Guild [Cupboards containing clothes should be fine], and dump your Practice Armour set, Hammers and Dagger inside. Next, search the guild top to bottom for any alchemy ingredients such as food, and then any items over 5gp that are publicly available [NOT stolen, as you can't sell stolen items yet, stolen items have a red hand symbol]. This includes Alchemy Equipment, Books, soul gems, clothing, etc. Keep a Novice Mortar and Pestle, Calcinator, Alembic and Retort for yourself, and store it in the container along with your Armour/Hammers.


Once you’ve hit your carry limit [which should be 275 lbs, not bad for a low-level mage!], head down the road to see Seed Nedus, sell the equipment, then head back to the Guild for the next load. This should increase your Athletics/Mercantile a bit from running back and forth selling things.


*In the event that the shop is closed after loading up, wait until 8am when the shop reopens. After a couple of selling runs, grab your Armour/Hammers/Alchemy Set. If you’ve stored your equipment in a container that respawns its contents [e.g. one of the Alchemy equipment-containing desks] things you’ve stored in it won’t load. Wait an hour in front of them and check again if this happens.

Beginnings of Alchemy and Illusion


After liberating Chorrol Mages guild of its public equipment, your character should have at least a thousand gp, if not several thousand. Fast travel to Weynon Priory again. A short walk South East of the Priory is Odiil Farm, which contains a lot of crop food plants that can be harvested for Alchemy purposes, and regrow their contents every 3 in-game days. I recommend keeping track of the day/time you visit the farm by hitting the Wait/Rest key.


There are over 100 plants here, and 2 ingredients at a time [so about 50 potions worth] can be combined to create Restore Fatigue Potions for extra coin and a lot of Alchemy skill. Convert ALL the food you can into potions: Don’t be too conservative about trying to get exactly 10 Alchemy increases for levelling purposes, going over 10 isn’t a problem. Intelligence based skills are easy enough to increase, and for the moment you just want money and practice.

In addition to Odiil Farm, there are several Settlements all around Oblivion that contain crops for potion making. A list can be found here[www.uesp.net]. Several are close to town, including the Vineyards near the western stables at Skingrad, and Whitmond Farm + Brina Cross Inn north of Anvil. I would suggest only visiting these 4 [Odiil + Vineyards + Whitmond + Inn], and not heading too far out of town, until the Character is at least level 4. It is safer to have a better summon than a Skeleton first.


For now: sell all your Odiil Farm-made Restore Fatigue Potions to Seed Nedus, then head over to the Graveyard, and do another bout of Summons Training. From now on, don’t worry about increasing Blade skill: Focus only on getting Heavy Armour, Block and Armourer skill up by another 10 points. Use your Dagger to provoke the Skeleton. Blade skill will naturally increase a bit, but this shouldn’t matter.


To get 5 Endurance on the next level up, you’ll need to gain another 10 points of Heavy Armour, Armourer and/or Block, and in total they will need to add to 50 whilst the character is still level 2 [in the above image, 15 + 14 + 21 = 50]. For level 3, they’ll need to add to 60. For all the other levels that will require training: 4-70, 5-80, 6-90, 7-100, 8-110, 9-120, 10-130, 11-140! For those mathematically inclined, the formula is: Total Skill points required for Max Endurance on the next level is = [Current Level + 3] x10.


After gaining another 10 Endurance-skill points, it’s time to practice Illusion. Starlight is your Illusion practice spell. Select Starlight, unequip your armour, and fast travel to Skingrad.

Levels 2-3 [Part 3]: Summons Training, Guild Supplies and a Spot of 'Light' Farming


Find the Mages Guild, and dump your practice armour/dagger/hammers into a container. Whilst you're casting Starlight, begin taking and selling the Mages Guild equipment to the Colovian Traders across the road from the Mages Guild [which'll again gives you a bit of athletics and mercantile]. Illusion starts at 10: Cast Starlight until it reaches 20. There is a Welkynd Stone inside a display case: DO NOT SELL IT, it can be useful for the Chorrol recommendation.


After clearing the guild hall, head out out of the West gate to the Grateful Pass stables, and pick all the grapes north and south of the stable [there’s about 100 grape plants here!]. Don’t convert them into potions just yet. For now, head back to Skingrad Mages guild.


Once Illusion is 20, cast Summon Skeleton until your Conjuration increases to the point where you can level up. On this level, up, and for the next 7 levels after that [so levels 3, 4, 5, 6, 7, 8, 9, 10], your character will aim to take 5 Endurance, 5 Intelligence and 5 Personality.

Level 3


Conjuration skill should be almost 50, and it’s time for one more town-bound level before setting off on an adventure. Once again: grab your practice equipment, fast travel back to Chorrol, head to the Graveyard, and begin Summons training until your Endurance-skills have levelled up another 10 points, up to 60 total [e.g. 18 Armourer + 18 Block + 24 Heavy Armour = 60]. If you need more Repair Hammers, Seed Nedus sells 20.


Next, get Illusion to 30. Cast Starlight until you run out of Magicka, then fast travel to Anvil, and run around casting Starlight whilst taking their Guild's Alchemy equipment only [NOT books, as there's no book merchant in Anvil], and then selling it BACK to Felen Relas, a Dark Elven alchemist inside the guild. DON'T TAKE THE EQUIPMENT SITTING IN FRONT OF HIM: It's treated as Stolen [red hand!], and taking it results in a swift booting from the Mages Guild and a lot of faffing around to get back in.


Just north of Anvil is Whitmond Farm, and north of that up a hill is Brina Cross Inn, both of which contain crops. The Inn is also the location you’ll visit for the Anvil Recommendation, but don’t try that just yet. Loot all the crops, and whip up a big batch of Grape-flavoured Restore Fatigue Potions.


After this, sell the Grape potions to Felen Relas, fast travel to the North Chorrol gate, then head to the Chorrol Mages Guild and find Athragar. He is the primary Conjuration spell merchant in Oblivion. For the moment, buy both Summon Headless Zombie, and Summon Flame Atronach.


Once Illusion skill is 30, focus on practicing Conjuration using Summon Skeleton, until you reach level up. By the time you level up to 4: Your Conjuration should be at least 50, your Illusion 30, and with all the Endurance-skills and Alchemy/Illusion/Conjuration skill increases, you should again be able to take 5 Endurance, Intelligence and Personality on level up.
Levels 4-12 [Part 1]: Conjuration Mastery, First Maxed Attributes and Guild Recommendations
Level 4 and Leyawinn Guild Recommendation


You’re now level 4, and can now cast 2 decent summoning spells. Flame Atronachs shoot firebolts, and are moderately competent at melee. Headless Zombies have no ranged attack, but have higher Health and can pimp slap people. I prefer Zombies personally, they hit harder and are funnier to watch. Time to finally do a quest!


But first, just after each level up from now on and until you hit level 12, you should head somewhere quiet [The Graveyard again for now] and do Endurance Skill training with your Skeleton to get another 10 skill gains for each level [so a total of 70 combined endurance-skill points for level 4, then 5-80 6-90 7-100 8-110 9-120 10-130 11-140]. After this, fast travel to Odiil Farm, pick the crops again [they should have regrown by now] and whip up another batch of Restore Fatigue Potions.


After Summons training, fast travel to Bravil and start practicing Illusion [Starlight] until it hits 40. You probably have enough gp from guild equipment now to buy all the spells that you need, so taking and selling equipment is not a priority. For the moment, just sell your Restore Fatigue potions to Ardaline the Alchemist. After that, buy some Illusion spells.

From Delphine Jend [on the ground floor during daytime]: Calming Touch [Needs 50 Illusion], Mesmerising Grasp [Charm], Rage [Ranged Frenzy] and Serenity [Ranged Calm]. She also sells some other useful spells if you wish to grab those too, though you may need to increase other magic skills before you can cast them.

From Ita Rienus [in the Basement during daytime]: Chameleon [Needs 50 Illusion], Debilitate [Paralyse, Needs 50 Illusion], Eyes of Midnight [Night Eye, needs 50 Illusion], Hush [Silence, Needs 50 Illusion] and Shadow Shape [Invisibility, Needs 50 Illusion]. She sells some other useful high-end Illusion spells, but I would personally not worry about getting them until you character has some more skill and Magicka.


Onto Leyawinn, and your first Mages Guild Recommendation. After talking to a few people within the mages guild, you are sent southeast to clear a fort of Marauders and recover an amulet. At level 4 [but NOT at level 5, hence why this one is done first], only basic Marauders should spawn, and your new Summons should be able to flatten them.


Using an Atronach or Zombie, and the spells Rage [Ranged Frenzy, handy for getting groups of Humanoid/NPC enemies to fight each other], and Serenity [for pacifying enemies that charge at you], clear the fort and grab the amulet. Most of the loot inside the fort will be chunky Heavy Armour: I'd loot Repair Hammers, Boots and Gauntlets first, then loot as many Cuirasses as you can carry. If you’re finding a fight too difficult, don’t forget your Restore Health/Magicka Potions and Dragon Skin power!


After watching your Summon flatten Kalthar, head back to Leyawinn and sell all your weapons/armour at the Dividing Line. After than, return to the guild and receive your Recommendation, and grab your equipment inside the container. Fast travel to Skingrad, cast Starlight until Illusion is 40 [if you haven't already] and then Summon Skeleton until you level Conjuration enough to hit level up. Take 5 Intelligence, Endurance and Personality.

Level 5 and Skingrad Recommendation


You're now level 5. Skingrad’s recommendation involves fighting enemies which increase in strength/health as you level, so it’s best to do it early. As you're busy completing everything, cast Starlight until Illusion reaches 50. Talk to the various members of the Guild to determine the wherabouts of Bleak Flats Cave. Then head out of the West gate, pick another big batch of grapes from the surrounding vineyards, and set off for the cave. Keep a Summon in tow at all times, in case something decides to run at you.


Just before heading into the cave: Do another session of Endurance skill training [Total Armourer/Block/Heavy Armour skills to 80] with your Skeleton. If you happen to be ambushed by wildlife or a Conjurer in the middle of waiting, your Zombie should swiftly reprimand them.


At level 5, your Headless Zombie should be able defeat a Deranged Zombie in a 1v1 fight. After a series of intense Zombie slap fights, take Erthor back to town and complete the recommendation.
Levels 4-12 [Part 2]: Conjuration Mastery, First Maxed Attributes and Guild Recommendations
Anvil Recommendation


You should still be level 5 after completing the Skingrad recommendation, with lots of Grapes waiting to be ground up. Head to Anvil once more, talk to the Guild members about the recommendation, then set off North to the Brina Cross Inn via the Whitmond Farm, picking the crops along the way. Once at the Inn, make another batch of Grape-Flavoured potions.


The Anvil recommendation involves walking along the main road and then fighting a fairly powerful mage, with some Battlemages as backup. She should easily be overpowered by the Battlemages and your Summon: Just be careful not to be hit with her spells, they hurt. Once she's dead, head back to Anvil and complete the Recommendation. Then, increase Illusion to 50 [if you haven't already], followed by Summon Skeleton until Conjuration is increased enough to level up. Once again take 5 Intelligence, Endurance and Personality.

Levels 6-12: 100 Endurance/Intelligence/Conjuration, 50+ Alchemy, 60 Illusion, All Recommendations


From here on out, the guide becomes a bit more open ended. I’d continue completing the Mages Guild recommendations, and then once they’re done start on the Mages Guild questline [Paralysis Staff ftw]. Maybe even visit a dungeon or two, using Conjuration and Illusion magic to clear them.


Endurance-skills sadly take longer to increase as they level, so training sessions get longer per level. By level 6, you have a bit more health to survive the Skeleton’s attacks. Try casting Heal Major Wounds (which you can buy from a number of Spell vendors, see here[www.uesp.net] ) whilst being hit by the Skeleton. You'll run out of Magicka after a few casts, but you'll also stay alive for longer as it hits you, often long enough for Summon Skeleton to wear off, and thus gain skills a little faster. Between each level up until you hit level 12, train Endurance skills 10 points each level, so that by level 12 Health is Maximum and Endurance is 100.


As well as training, find some crops to convert into potions every level, and try to level up Conjuration above other major skills until it reaches 100. On top of the 4 locations already visited, a list of farms can be found here[www.uesp.net]. Of particular note are Shardrock [West of Skingrad] and also Shetcombe Farm [southwest of Shardrock], which contains more crop plants than any other farm. They should be easy enough to get to: Just watch out for bears [see below for the Summon used in this picture =) ].


At Illusion 50, you’ll be able to cast a lot more Illusion spells, the main ones being Shadow Shape [Invisibility for 30 seconds] and Debilitate [Paralyse for 3 seconds on Touch]. Summon + Shadow Shape + Debilitate is an extremely effective way to begin a fight, albiet a bit expensive on Magicka to begin with. For level 6, 7, 8 and 9, train Illusion up to 60/70/80/90, then leave it at 90 for the time being. Illusion can take a while to level at higher levels, though this is at least helped by being able to practice whilst running around questing. A practice Illusion spell is recommended ASAP, and more information on spellmaking is provided below [Levels 4-12 section].

More info on High Level Illusion spells is found in the next chapter [Levels 12-16].

Level 10 should be the final level that the character takes 5 Intelligence, Endurance and Personality on Level up. For level 11 and thereafter, aim to take a 5/5/1 Attribute split on level ups: You’ll need to start increasing Luck regularly on level ups now, to attain 100 Luck by level 54, which is your Character’s last level up. This starts with 5 Endurance/5 Intelligence/1 Luck until Endurance and Intelligence are 100 at level 12. More info about Efficient Levelling can be found here.[www.uesp.net] After level 12, you can start focusing on increasing other attributes in addition to Luck.

High Level Summons

Once Conjuration hits 75, head back to Athragar, and buy Bound Bow, Summon Clannfear and Summon Frost Atronach. Bound Bow is not of too much use yet, as the duration is short and the Character lacks the skill and equipment to make decent Poisons. On top of this, it’s better to focus on increasing Conjuration than Marksman, so I’d refrain from doing much with this spell [or bows in general] until the Character is level 12. After that, they can create a Custom ‘Bound Bow for 120 seconds’ spell at the Spellmaking Altar in the Arcane University if they wish, and can start making some decent Poisons to attach to bows. More on these later.


Both the new Expert-level Summons are hard hitting. Frost Atronach has the higher HP of the two [280 HP] , as well as ranged frost spell and a heal. But despite this: the Clannfear takes the cake as my favourite Summon in Oblivion. On top of reflecting 20% physical damage, it does just about everything that you want a Summon to do: Runs really quickly to the players side or into any fight, hits really hard which often draws attention away from the player, and chases down and pulverises creatures that you currently are not looking at [listen out for its' cute little chirp =) ]. It doesn’t muck around with prissy spellcasting: it just gets in there and does sh*t. My kind of worker.

It doesn’t have much Health however [180 HP] , and is prone to being swarmed, particularly by Spider Daedra whose Spiderlings use Paralyse. At 100 Conjuration, the standard Summon Clannfear for 45 Seconds spell costs only 68 Magicka, so it's easy enough to recruit another to your side in the event that one dies mid-fight or runs off into the distance to do something silly [like say, charging at an enemy who is miles away and behind a series of obstacles, instead of the one currently swinging at your face].
Levels 4-12 [Part 3]: Conjuration Mastery, First Maxed Attributes and Guild Recommendations


Next, find Vigge the Cautious in the Skingrad Mages Guild, and purchase Summon Storm Atronach. Storm Atronachs [Master level, requires 100 Conjuration] are the best Daedra summon IMO for dealing with packs of other Daedra, as it is Paralysis Immune and has more Health than any other Daedra summon [350 HP]. The base spell also has a decent duration for a Master level Summon compared to the other options available.

That said: Storm Atronachs have quite slow movement speed, and don't hit as hard as a Clannfear. Even after reaching Conjuration 100, Clannfear remained my default Summon. Sadly, Summoned versions of monsters cannot summon underlings like their counterparts, so for e.g. a Summoned Spider Daedra cannot themselves summon Spiderlings, like a normal Spider Daedra could. =( General information on Daedra and their Summoned counterparts can be found here[www.uesp.net].


Once Conjuration is 100, you’ll need to start increasing other Major skills to level. Begin to focus on Destruction and Restoration, but not Willpower just yet. Heal Minor Wounds works well as a Restoration practice spell, and can be cast whilst running around the countryside. Destruction is a little trickier, as it requires spells to hit opponents to increase. Flare is a good Destruction practice spell. It does next to no damage on Max Difficulty, which if anything plays to your advantage. Shoot it repeatedly at enemies such as Bandits whilst running backwards [which you should be able to outrun thanks to your Athletics skill and no Armour slowing you down], occasionally shooting them with Calm or Summoning your Clannfear if they come too close.

Spellmaking


Once you’ve completed all the recommendations for the Mages Guilds, you can access the Spellmaking Altar in the Arcane University. It’s in the Praxographical room [most north-eastern room in the courtyard]. Here you can make all manner of Custom Spells to suit your needs, which is extremely handy! To start, I would suggest making:


Custom Practice Spells for various magic skills: Summon Skeleton for 1s, Shield 3% for 1s, Light 3ft for 1s, Detect Life 100ft for 1 second. The Detect Life 100ft Practice spell can be used to spot enemies behind corners from afar, and costs very little magicka.


Calm Level 25 spell for 2 seconds on Target. A nifty spell that should work against most opponents. As well as being very handy for shaking off melee attackers, it works against Paralysis immune opponents [such as Spider Daedra] and costs siginificantly less than Paralysis [10 Magicka at Illusion 100, an equivalent 2 Second on Target Paralysis Spell costs 30 Magicka at Illusion 100]. As such, it can be shot at a target over and over again, resulting in a stun-lock. See High Level Illusion spells [Levels 12-16] for a nice tactic. :)


*It is worth visiting some of the Mages Guilds again and buying some Apprentice level spells from spell vendors. It is also worth visiting one of the 7 Chapels and purchasing Cure Disease/Paralysis/Poison, and a Restore Attribute spell, from one of the priests there. After this, it is possible to make a cheap Custom Restore Attribute spell for any attribute, which can come in handy in the event an enemy uses a Damage Attribute spell or poison.


*In the event Conjuration reaches 100 before intelligence is 100, you'll still need to raise Intelligence-based skills to increase this. On top of making potions each level, start casting Minor Life Detection [or a cheap custom detect life 100ft for 1 s spell] toraise your Mysticism on top of making Restore Fatigue Potions. 10 Intelligence-based skills = 5 intelligence on level up.


By level 11, your Endurance skills should all add up to 140. For reference, by the end of my Endurance-skill training, I had 34 Armorer, 50 Block and 56 Heavy Armour. 34 + 50 + 56 = 140. After all this is done, you can retire your Armour set and Dagger, and the most contrived part of the Character’s life is finally over! Woohoo!


By Level 12, your character should have the following stats [assuming no buffs]:

  • 280 Health [Not bad for a level 12 mage eh?]
  • 250 Magicka
  • 235 Fatigue

  • 55 Strength
  • 100 Intelligence
  • 50 Willpower
  • 30 Agility
  • 30 Speed
  • 100 Endurance
  • 80 Personality
  • 58 Luck [the screenshot was taken before a big edit, if it is currently 61 don't worry, just take 3 less Luck later on :) ]

And as well as these: 100 Conjuration, 50+ Alchemy , 90 Illusion [changed after a big edit, if it's currently 60 just practice it 10 points/level for the next 4 levels instead of 1], and access to Spellmaking Altars. Once Conjuration is Maxed, it’s time to start focusing on your primary weapons in later life: Destruction, Illusion and Alchemy.
Levels 12-16 [Part 1]: Illusion Mastery, Homemade Concoctions and Weakness Stacking


Conjuration is by far the most effective magic skill early game, as it allows to Character to summon monsters well above the power and level of those that spawn. However, as the player levels, the spawns catch up, so Conjuration diminishes in power and other skills must fill the void.

Recap: You’re level 12, with 100 Intelligence/Endurance and access to a Spellmaking Altar. Your Summoned Daedra kick everyone’s ar*e, but sadly they won’t forever. You’ve got a moderate amount of Alchemy, Destruction, and Illusion, and it’s time to start giving them focus. You might have even got your hands on a few enchanted items or artefacts, such as the Robe of the Conjurer from the Mages Guild, or the Skull of Corruption from Vaermina's shrine [which requires a Black soul gem to begin, also found during the Mages Guild questline outside Dark Fissure].

You haven’t visited Kvatch yet, in an effort to stall the Oblivion invasion and keep the countryside generally safer. At level 17, the most powerful Sigil stones become available [Transcendent], and the guide recommends heading to Kvatch at level 17 [which is covered in the next Chapter]. After that, with the advent of Fortify Magicka Sigil Enchantments, your Character can start casting some very nasty Custom spells. More on them later.

From here on out, the guide provides less rigid playing instructions, and is more like an outline of potential abilities and combat strategies, which can be obtained by certain levels. The Mages guild questline should be priority, but there’s plenty of room for other quest lines and adventuring [Thieves Guild, Fighters Guild, Dark Brotherhood etc. are all up for grabs!]. Aside from Kvatch at level 17, the only other highly-recommended instructions left in the guide are: that the Main Quest is NOT advanced further than taking Martin to Cloud Ruler temple before level 22, and that the player does not read the Oghma Infinium before level 51 [more on that later]. Do NOT start the Path of Dawn quest until your character is level 22, as there is a VERY nice level-dependent ring [The Mundane Ring] that can be looted from level 22 onwards.

By level 22, given the above, the Character should aim to have:
  • 100 Willpower
  • 100 Alchemy [or at least close to 100], and an Expert or above Alchemy set from vendors or loot,
  • 100 Illusion,
  • At least 60 Destruction,
  • At least 70 Restoration,
  • At least 50 Alteration,
  • Begun visiting Oblivion gates and obtaining Fortify Magicka Transcendent [17+] Sigil stones,
  • Advanced the Main Quest to the beginning of Path of Dawn quest [I.e. meeting Baurus in the Imperial City], but not further.

Striving for 100 Willpower, Alchemy and Illusion


Willpower is governed by Destruction, Restoration and Alteration, and for the next 10 levels these should be practiced at least 10 ranks/level to get Willpower from 50-100 by level 22. An easy way to ensure that this happens is to practice Alteration for at least 5 skills/level [using Protect or a shield practice spell], on top of focusing on Destruction and Restoration.


Alchemy should be steadily increased to 100 via routine visits to Settlements and making Restore Fatigue potions. Now that Endurance is 100, one should increase Illusion from 90-100, and for level 13 take 5 Intelligence 5 Personality and 1 Luck [and if you have 100 Illusion at this stage, Personality should be 85, not 70 as in the screenshot: The screenshot was taken before a big edit and I cant be bothered to change it lol].

Once Illusion is 100, other attributes in conjunction to Willpower and Luck can be increased. More info is provided on Attribute increases in the next Chapter [17-22].

High Level Illusion Spells


*Ita Reinus [Bravil] and Borrisean [Praxographical Centre, near the Spellmaking Altars] both have several Expert and Master Illusion spells for sale. Buy all of these, and quickslot the 10 second Paralyse spell. Paralysis spell duration is effected by Magic Resistance [so it is half duration vs the 50% magic resistant Dremoras] and Weakness to Magicka stacking [see below]. Paralysis [Debilitate for 3s early on, Paralyse for 10s once Illusion is 100], in combination with your Custom Calm spell, should be sufficient for pacifying all types of enemies, and pacified enemies are ripe game for a hungry Clannfear. Against a lone enemy: Invisibility [to sneak up on an enemy] + Debilitate/Paralyse + Summon + Paralysis/Calm spam is a very powerful and hilarious combination [see top right :) ].


*It may be worth making a Frenzy level 25 for 120 seconds on target spell too, which will require 75 Illusion to cast. It will not work against creatures, including Undead and Daedra. However, it does work against people and Dremora [and the summons that they control, see above], and using it + Shadow Shape against a group of multiple human opponents can be very nasty indeed.


Levels 12-16 [Part 2]: Illusion Mastery, Homemade Concoctions and Weakness Stacking
Homemade Brew


Your Alchemy skill should be creeping up, and by level 12 Alchemy vendors and dungeon loot starts to offer higher quality Alchemy equipment. Time to start giving this skill some attention beyond mashing food-stuffs together.


Alchemy opens the possibility for the character to make all manner of weird and wonderful concoctions. I highly recommend spending some time ingredient gathering and experimenting with this skill: It is a lot of fun. Unlike looted/bought potions, Custom potions do not work instantly. They tend to heal/damage at a progressive rate, amounting to a large magnitude over time. Keep this in mind, especially with Poisons, which typically will not kill opponents quickly in the heat of a battle.


Stealth Archery is the best poison delivery system. Apply the poison to your bow [not arrow], Quicksave [in case you miss] then stealthily slay the target from afar in Sneak mode. As physical damage is negligible on High Difficulty, any bow will do. Iron Bows and Arrows can be bought cheaply from weapon merchants/smiths, and Bound Bow can be used if the character doesn’t mind trading some extra carrying capacity for a temporary weapon [though they will still have to have arrows equipped]. A custom Bound Bow for 120 Seconds spell costs about 220 Magicka; I’d recommend using the standard spell [which lasts 15 seconds and only costs about 30 magicka] if you only want to shoot once.

Your Marksman skill will NOT effect the accuracy of a particular shot, only its physical damage [which is negligable], and any perks available with practice [which help but are not mandatory]. Similarly: the character should have enough Sneak skill at present to sneak up close enough to an enemy to make a decent shot, and can use Invisibility thereafter to hide [see below]. For the moment, it is highly recommend to focus on Destruction and Restoration over Marksman and Sneak.


A useful tactic to compensate for a Poison's kill delay in the middle of a fight: After shooting Poisoned arrows, Use Shadow Shape [Invisibility], run away from the fight and keep distant until all poisoned targets have been neutralised. This tactic is extremely handy in big fights [e.g. inside Kvatch], as it stops the Character from being mobbed whilst poisons take effect.

Argonians, Atronachs, and Undead are immune to Poison, and Redguards are 75% resistant to poison. To damage these creatures/races with poisons requires a Custom Weakness to Poison 100% spell. Sadly, casting such a spell breaks stealth, making it impossible to kill the above without them noticing [unless the character is 100% Chameleon, then you can basically do anything to anyone, whilst they stare blankly into the middle distance, and at this point Poisons don’t even matter much anymore 😝 ].

[chest]
Once you become Arch-Mage of the Mages Guild, you have access to the Enchanted Chest[www.uesp.net]. Placing one portion of an ingredient inside the Chest results in 10 being generated within 24 hours, and then a full week after the one portion was placed within the chest, it can be used again. It can multiply most ingredients, and is particularly useful for increasing stocks of Rare ingredients such as Ectoplasm.


Here’s a small list of useful mass-producible concoctions, available from 75 Alchemy onwards. There are plenty of others, and I highly recommend experimenting with mixtures and wandering around to see what you can find. Remember that you name your Custom potions and poisons different things, which makes them easier to find in your inventory.

Alchemy merchants should sell all these ingredients. There are also several new ingredients available with the Shivering Isles expansion; this list does not contain any Shivering Isles-dependent ingredients. Once again: An exhaustive list of Alchemy ingredients and effects can be found here[www.uesp.net], and a list of noteworthy potions can be found here[www.uesp.net]. If you wish to know the possible magnitude attainable for a particular effect, have a look here[www.uesp.net].

I'm not providing images for all these ingredients: Just look for them [or click the links] and read. :P

Potions

  • Restore Health: Fly Amanita[www.uesp.net] , Lavender Spring[www.uesp.net]. Green Emperor Way and the Arcane University gardens contain Fly Amanita in abundance. Lavender is found around the road surrounding the Imperial City Lake, as well as around Cheydinhaal and Bravil.

  • Restore Magicka + Shield: Flax Seeds[www.uesp.net] , Bog Beacon Asco Cap[www.uesp.net]. Flax Seeds are found mainly around Skingrad, Bog Beacon around Leyawinn . Steel Blue Entoloma Cap also has Restore Magicka as an effect, though it is best to save these for poisons [see below].

  • Restore Magicka + Fortify Magicka: Columbine Root Pulp[www.uesp.net], Flax Seeds, Water Hyacinth Nectar[www.uesp.net]. Water Hyacinth typically grows near water, particularly in the estuaries north of Neywond Tyill, an Aylied ruin between Skingrad and Bravil that visited for a Mages Guild quest. Columbine Pulp Root is also found between Skingrad and Bravil.

  • Feather: Sacred Lotus Seeds[www.uesp.net], Lady’s Mantles Leaves[www.uesp.net] OR Solminius Frond[www.uesp.net]. Feather is a potion effect best created on its own, as its duration vastly exceeds any other potion effect. Flax Seeds also contain Feather, though it is best to save them for Restore Magicka potions [which you’re most likely going to drink a lot of ]. Lotus seeds are typically found in water, and there is a concentration in a pool east of Skingrad. Lady’s Mantle is found near Anvil, and Solminious is found mostly between Chorrol and Skingrad. It is recommended that Mantles Leaves and Solminius Frond are NOT mixed together, as this results in a Damage Endurance side effect.
Levels 12-16 [Part 3]: Illusion Mastery, Homemade Concoctions and Weakness Stacking
Poisons

These two poisons require ingredients found within Oblivion gates, and so are not available until the player visits Kvatch [which is recommended to be done at level 17] unless the player gets lucky from a visit to an Alchemy vendor.

  • Health/Fire Double Poison: Spiddal Stick[www.uesp.net], Wisp Stalk Cap[www.uesp.net], Steel Blue Entoloma Cap[www.uesp.net]. Spiddal Stick is common within Oblivion gates. Wisp Stalk Caps are found in many caves. Steel Blue Entoloma Cap is found in the Arcane University Gardens, near Weynon Priory, and in the forests around Chorrol.

  • Damage Health + Paralyse Poison: Harrada[www.uesp.net], Milk Thistle Seeds[www.uesp.net], Wisp Stalk Cap. Harrada is commonly found in Oblivion gates, Milk Thistle Seeds on the Northern and Western edges of Cyrodiil. With the addition of Frost Salts, Vampire Dust or Dryad Saddle Polyphore Cap, this potion can also deal Frost Damage [i.e Damage Health + Frost Damage + Paralyse], though all these ingredients are quite rare. The Paralysis effect only lasts a few seconds, which is shorter than a high-level Paralysis spell.

This last poison does not require visits to Oblivion gates, but does require some rare ingredients found on dead monsters or Alchemy vendors.

Health/Fire/Shock Triple Poison: The double poison’s big brother. There are several triple damage combo poison possibilities, outlined here[www.uesp.net]. This one requires the least number of rare ingredients [nor does it require the Shivering Isles Expansion], and with maxed Alchemy and Master equipment, it can deal a whopping 900 damage. It requires:

  • Cairn Bolete Cap[www.uesp.net]: A common mushroom found in abundance in caves, particularly Serpent Hollow Cave, which is south of Chorrol and south-east of Hackdirt. It also can be used to make Restore Health potions.
  • Ectoplasm[www.uesp.net]: Found on Ethereal undead [ghosts and wraiths], which are found in Ayleid Ruins. Vahcaten, the ruin containing the Puzzle Pillar that is visited for a Mages guild quest, contains quite a few ethereal undead that respawn every 3 days.
  • Imp Gall[www.uesp.net]: Found on Imps. Though these mainly spawn at low level, Robber’s Glen Cave, northwest of Bravil, has 12 consistently spawning Imps that respawn every 3 days.
  • Steel-Blue Entoloma Cap: See Health/Fire Double Poison.

Once Alchemy is 100: Any lone ingredient can be used to make a potion/poison of its' first effect. So for e.g. Flax Seeds have Restore Magicka as their first effect, so at 100 Alchemy, 1 Flax Seed is sufficient to make a Restore Magicka Potion. Not all available effects come as 'first effects' of ingredients. For e.g. Feather is never the 1st effect of any potion ingredient.

Destruction 50 and Weakness Stacking

Once Destruction has hit 50, head to Skingrad and purchase the following spells:


From Sulinus Vassinus : Weakness to Fire, Frost, Poison and Shock.
From Vigge the Cautious: Blazing Spear [35 pts Fire on Target], Searing Grasp [45 pts Fire on Touch], Weakness to Magicka.

Next, find a Spellmaking Altar and create the following 3 spells:

  • Target Mark 1: Weakness to Fire 100% for 5 seconds on Target, Weakness to Magicka 100% for 5 seconds on Target.
  • Target Mark 2: Weakness to Fire 100% for 5 seconds on Target, Weakness to Magicka 100% for 5 seconds on Target.


  • Custom: Fire Damage 6 pts for 10 seconds on Target [total 60 damage]. If one completes A Plot Revealed for the Mages Guild after level 20, Wizard's Fury[www.uesp.net] works well as a substitute for this spell.


Weakness to Frost/Shock + Magicka and Frost/Shock damage spells work too, and cost about the same: I only used one type [Fire] for easier explanation. An overview of the effect can be found here[www.uesp.net].

In Oblivion, the standard spells bought from merchants generally cost the same Magicka as a custom-made variant that does the same thing [e.g. a Custom Fire damage 35pts on Target spell will cost exactly the same Magicka as Blazing Spear]. As well as this: Increasing Spell magnitude increases the spell cost exponentially [to the power of 1.28] whereas increasing spell duration increases it linearly [to the power of 1].

Hence, it is more cost effective to cast a low-damage long-duration spell, than a high-damage short-duration spell. That said, it is handy to have both available, as high-damage spells can kill opponents more quickly, leaving less things around to tear your face off. An explanation of the Spell Cost formula in Oblivion can be found here.[www.gamefaqs.com]

As you may have noticed: Mark 1 and Mark 2 do the same thing, but are different spells. An active Weakness to Magicka spell effects the magnitude of further weakness to magic spells. Casting Mark 1 and Mark 2 one after the other on the same target results in the target’s Weakness to both Fire and Magicka to increase exponentially. The result is a rapidly increasing damage multiplier for Fire Damage spells that hit the target.

Using the table provided in the above link, the damage multiplier for Fire Damage is:

1. No Weakness spells: 1x
2. Mark 1: 4x
3. Mark 1 + Mark 2: 16x
4. Mark 1 + Mark 2 + Mark 1: 49x
5. Mark 1 + Mark 2 + Mark 1 + Mark 2: 144x

For those mathematically inclined: Assuming we call the Damage Multiplier for 0 weakness spells active n=1, and assuming that 1 is the 3rd term in the Fibonacci sequence [0,1,1,2,3,5,8,13 etc], the Damage Multiplier Formula becomes:

N Multiplier = [[Sqrt of n-1 Multipler] + [n+1 Fibonacci term]], All Squared.

So, for N=2, i.e. M1 Cast: [Sqrt n-1 or the First multipler with no Weakness Spells i.e. sqrt1=1] + [the n+1 or 3rd fib. Term, i.e. 1] = [1 + 1] Squared = 2 Squared Fire-Damage Multiplier, or 4x.

N=3, i.e. M1+M2: [[sqrt4= 2] + 2] Sqaured = 4 Squared = 16x.
N=4 i.e. M1+M2+M1=[[sqrt16= 4] + 3] Squared = 7 Squared = 49x.
N= 5 i.e. M1+M2+M1+M2=[[sqrt 49=7] + 5] Squared = 12 Squared = 144x.
N= 6 i.e. M1+M2+M1+M2+M1=[[sqrt 144=12] + 8] Squared = 20 Squared = 400x.
N=7 i.e. M1+M2+M1+M2+M1+M2=[[sqrt 400=20] + 13] Squared = 33 Squared = 1089x.

Etc etc etc.

With regards to long-duration spells: Damage will remain the same for the entirety of the spell, so long as it hits when Weaknesses are active.. So for e.g. if a Fire Damage spell that deals 10 points for 10 seconds hits a target with 3 marks [49x] that are active for only 5 seconds, the fire damage will remain the same for the whole 10 seconds [so 49 x 10 = 490 damage for 10 seconds].
Levels 12-16 [Part 4]: Illusion Mastery, Homemade Concoctions and Weakness Stacking
Extreme Firepower (pun intended)


So that's the math! For practical purposes: 3 Marks + Spear should kill mid-level enemies, 3+Grasp should kill most high-level enemies, 3+Custom should kill just about anything that does not have a levelled Health bar. Blazing Spear [35 pts target], Searing Grasp [45 pts touch], and the Custom Fire Spell [6pts for 10 secs on Target. 60 pts total] all cost around the same magicka as a Target Mark spell.

There is basically no benefit using anything beyond “M1 + M2 + M1 + M2, or 4 Marks, + Fire-Damage Spell”, other than perhaps killing a high-health target more quickly with a progressive fire damage spell. The highest Health Monster in the game that the Player will encounter is a level 54 Ogre, which has 26 x [level-3] = 25 x 51 = 1326 Health.

Assuming the player is playing on Max Difficulty, spells deal 1/6 damage. So a Custom Fire-damage spell that deals 6pts for 10 seconds [total 60 fire damage] effectively deals 1pt for 10 seconds [total 10 fire damage].
144 [4 stacked Mark Spells] x 10 [Custom Fire Damage Spell] = 1,440 Fire Damage vs 1,326 Health.
Dead Ogre.

Weakness to Magicka stacking will also effect the Magnitude [or in the cases of spells with a fixed magnitude e.g. paralysis, the Duration] or any other spell, though only linearly rather than exponentially.

So for e.g. using the above:

  • M1= 2x
  • M1+M2= 4x
  • M1+M2+M1= 7x
  • M1+M2+M1+M2= 12x

Etc etc.

This is particularly potent for Paralysis, which typically costs a lot of Magicka for a long duration. 4 marks + 10 second Paralysis spell = 120 Second Paralysis!!

So: Weakness stacking is extraordinarily powerful, however, it has its caveats.

First: At Destruction 50, a Target Mark spell costs about 65 Magicka, so the player can only realistically fire one set of ‘3 Marks + Elemental Damage’ before running out of magicka.

Second: All the mark spells must hit the target in quick succession, followed by an Elemental Damage spell, and all without the Character dying in the process. If any miss, or is there's a long period between marks and they wear off, the mark procedure most likely has to be started from scratch. It can be hard to hit fast moving enemies with marks, so it is recommended to fire marks at enemies from near point-blank range.

Third: Marks can be dispelled. Vs enemies that use dispel [e.g. Dremora], try to land a 10 second paralysis first, then line the Marks whilst once they're on the ground.

With all this in mind: to be able to use this killing tactic effectively multiple times during the same fight requires:

  • High level Destruction [at 100 Destruction they will cost around 20 each],
  • High Level Illusion and Conjuration for Calm/Paralysis/Invisibility/Summons, to distract other attackers from killing the player whilst the marks are lined up,
  • High Athletics/Speed to run quickly around a battlefield of multiple opponents,
  • Most importantly: High Magicka, so that multiple opponents can be killed within the same fight [which will later come in the form of Fortify Magicka Sigil stones].


The level 16 Character has access to only a few of these things, so for now I’d recommend whipping up lots of homemade Restore Magicka and Health potions, hanging onto any Welkynd Stones[www.uesp.net] that you find, and keeping Shadow Shape quickbar’d in case a pouncing monster decides to tear your face off. 😊
Levels 17-22 [Part 1]: Attribute Increases, Kvatch and the Oblivion Invasion


Now that you're level 16, it's time for a bit of arithmetic for attribute-increase perspective purposes. [yay!]

The Character’s starting attributes were:
Str 50, Int 50, Will 50, Ag 30, Sp 30, End 45, Per 40, Luck 55.

To get all these to 100, requires 50 + 50 + 50 + 70 + 70 + 55 + 60 + 45 = 450 Attribute Point gains.

By level 16, the Attributes should now be a minimum of:

Str 55, Int 100, Will 70, Ag 30, Sp 30 End 100, Per 85, Luck 62, and 3-15 distributed elsewhere from the previous 3 levels. That’s 45 + 0 + 30 + 70 + 70 + 0 + 15 + 35 = 265 Attribute Point gains maximum to get everything to 100.

For the next 38 Level ups [including the Hermaeus Mora quest], the Character will take 1 Luck point every level.

On the 3 Hermaeus Mora level ups, it is only possible to take 1 point for each attribute on level up, so its best to have all attributes that are NOT Luck to 100 by level 51, and Luck 97 at Level 51 to take the final 3 levels.

That leaves a maximum of 227 points to be taken over 35 levels, or 227/35 = about 6.5 non-Luck points per level. A well trained character can earn 10 non-luck points per level.

Long story short: You have lots of points to spare, and apart from getting Willpower to 100, you don’t have to be so anal retentive about training every level anymore. Yay! 😃 That said, you still have to be relatively diligent in steadily increasing some attributes every level [average 6.5 a level]. If you wish to continue the 5/5/1 Attribute increase streak, here are some ways to practice the others:

Strength: Hit stuff. This was tough to do before you had Max Illusion skill. Now you can use Mark Stacking + Paralyse [and later the most ridiculous effect in the game, Chameleon] to completely remove an enemy’s offense for an extended period of time, and sit there hacking away.

Agility: You have Marksman and Sneak as Major skills, but so far most likely haven’t used them too much. Once Destruction’s out of the way, I’d focus on these skills. Shoot and sneak things a lot. Security is a bit tough to increase, can be practiced by intentionally failing to open the last pin of a hard lock over and over.

Speed: Jump a lot. Then equip some Light Armour and get hit a lot. I like getting Master Athletics training, so that helps too.

Personality: At 85, this is almost max already. I like to get Master Mercantile training with my character later on, which in combination with walking up to strangers and playing the Speechcraft mini game [and intentionally failing at it to keep the conversation going] is sufficient to level up Personality-based skills by 10 per level. If it's impossible to conduct the Speechcraft mini-game because everyone likes you too much: there is a novel solution! Grab your best Alchemy equipment, then head to Shetcombe Farm[www.uesp.net], which is West of Skingrad and North-east of Kvatch. Pick all the Leeks and Pumpkins, DROP YOUR ALEMBIC, then proceed to make Restore Fatigue potions with them. They will come with a Damage Personality side effect. Drink a succession of these potions until you have the Personality of a Door Knob, then find someone to talk to. Once you're done 'training', use a Custom Restore Attribute spell to get back to normal.

One more level, then its Oblivion gate time. Don’t forget 5 Willpower and 1 Luck on level up.

By level 17, the Character should now have an assortment of offensive and defensive capabilities:

From Conjuration: Summon Clannfear and Summon Storm Atronach spells.
From Destruction: Two custom ranged weakness spells, and Instant Touch, Instant Target and Progressive Target Fire-Damage spells.
From Illusion: Invisibility and Paralysis spells, and a custom Calm spell.
From Alchemy: Homemade Restore Health and Magicka Potions, and ‘maybe’ even the odd triple-damage poison.

It’s time for your first big brawl. Good luck!

Kvatch


It is highly recommended that both Kvatch’s Oblivion Gate and the Town are visited at level 17. Transcendent Sigil stones [the best ones] begin appearing at level 17. Both total Magicka and Magicka regeneration benefit most from taking Fortify Magicka [50 pts] over Fortify Attribute [12 pt] stones. A calculation for magicka regeneration can be found here[www.uesp.net].

At level 17, many tough high level Daedra will not spawn yet, aside from Boss level Daedra spawns. Spider Daedra [which are very annoying] spawn at level 18, Storm Atronachs [which are very hardy] at level 19, and Xivilai [which both summon Clannfears and have with 50% permanent spell absorption; both of which suck for mages] spawn at level 22. Thus: Level 17 is IMO the golden level to attempt the Kvatch quests.

The Daedra that are encountered inside the gate and especially inside the town will spawn in packs, and most of them will kill you in 2 hits. So it helps to prepare. Before you head to Kvatch: Make a ton of Restore Health and Magicka potions, and make sure you're carrying your Wrist Irons.

Summon + Shadow Shape is the best way to start a fight, and Clannfear + Paralysis is a cost effective and relatively safe way to fight 1v1. A chain of 3 Marks + Fire Spell will kill just about any monster provided they all hit, which is very handy for quickly evening the odds of a large fight. Poisons + Arrows + Bow can also be handy, just be aware that Atronachs are immune to Poison, so if you wish to poison these, they must be tagged with a Weakness to Poison spell first.

The First Oblivion Gate


*If you’ve never been inside an Oblivion gate before: There is a Sigil Stone located at the top of a tower[www.uesp.net], which will close the gate if picked up, and can be used to enchant equipment. You can either fight your way to the Sigil stone, or run there under the cover of Invisibility [just remember to recast it every time you go through a door].


Fighting is the longer and IMO the more fun/loot heavy option [though it can sometimes be a slog], and it’s easier to loot ‘The Punished’ containers [which contain Boss loot] when everything is dead. Without spoiling too much: If there are any gates or doors within an Oblivion gate that cannot be opened, chances are you’ll need to find a key, a switch, or another way around.


Most likely you’ll be fighting Clannfear, Daedroth and Atronachs. Dremora can be irritating as they have Magic Resistance and a tendency to dispel your Weakness spells, so I recommend Paralysis before dealing with them. The Sigil stone is located at the top of the Sigillum Sangius, suspended in a beam of light.
Levels 17-22 [Part 2]: Attribute Increases, Kvatch and the Oblivion Invasion
The Sigil Stone


Before you take the stone, make a proper save. Then: Go to the miscellaneous items page in your inventory, collect the stone [it takes a bit of time], wait a couple of seconds, and then hit Quicksave ‘just’ before you pick the stone up. Once the stone is in your inventory, check it! [down the bottom of the miscellaneous items page] Only 2 out of the 30 possible Sigil stone types have a Fortify Magicka enchantment, and that’s what you’re interested in. If it’s not that, quickload, wait a second for the stone to appear in your inventory, then check again.

This is a bit tedious, but at least ensures that you pick up a Sigil stone that is useful. If you stuff up the timing of the quicksave, you can reload the proper save. It is possible to time the quicksave for just fractions of a second before the stone is picked up, making it easy to check and reload if it’s the wrong one.

After you have picked up a Fortify Magicka Sigil stone and exited the gate, you can put it to use: ON YOUR TRUSTY WRIST IRONS! :D


The Town of Kvatch


Now things get interesting. The town is riddled with Daedra, most of which can kill you in 2 hits, and all you’ll have to protect you most of the time is your Summon and the Guard Captain [unless he’s unconscious, which is going to happen a lot]. Occasionally you’ll receive reinforcements, but they're usually short-lived and tend to accidently shoot each other and your Summon. There are Spider Daedra in the town, which are super quick and immune to Paralysis [but not Calm!], that summon Spiderlings that themselves use Paralysis [so Storm Atronach is a better summon for dealing with these].

It’s going to be a doozy. Save.


The trick with fighting any large pack of enemies is to make sure that you are not their focus. If the fight is busily happening between enemies and allies, it is not too difficult to pick off enemies and comfortably replenish Magicka using potions and Welkynd stones. As soon as you become the focus of attention however, you're most likely toast. If you feel like you are being set upon by multiple opponents, Shadow Shape and disengage. Let your allies be the meatshields.

In future, you’ll hopefully have more Destruction skill and Magicka at your disposal, which will make large fights a lot easier. For now, however: you realistically only have enough Magicka to use about 4-5 High-Level Destruction, Conjuration, or Illusion spells in the middle of a fight before running out of magicka. Summons, Shadow Shape, Paralyse, Mark/Fire chains and plenty of custom restore health/magicka potions [and maybe the odd Welkynd stone] will most likely all be required inside Kvatch.


There are three big fights that you’ll encounter in the town: First at the front gate as you enter, second as you emerge from the Chapel Underground, and third as you open the gate to the castle's courtyard. For the first big fight as you enter town, Dragon Skin power + Summon Storm Atronach + Restore Magicka/Shield potion + Invisibility is a good opener. The Storm Atronach should last a while, and the Shield buffs will allow the character to survive 7-10 hits as opposed to 2. For the second and third big fights, you should have more allies, and so less attention will be paid to you. I'd switch back to Clannfear as a primary summon after the first fight too: They're a lot more useful inside tight spaces than a bulky Atronach.


*If you have plenty of allies at your disposal, switch your focus from Destruction Magic to Paralysing opponents for your allies to hit. If you are set upon by a few monsters from the pack, draw them away from the main fight and use Mark/Fire chains to pick them off. If you happen to be carrying any Triple Poisons, save them for Spider Daedra. They’re a f***ing pain.


Martin is inside the Chapel: If you talk to him now [as opposed to later in the campsite outside the city] and ask you to follow you, then head to Weynon Priory before heading further into the town of Kvatch, you can have both Martin AND Jauffre follow you around until you visit Cloud Ruler Temple. These two are quite helpful for clearing the Kvatch town, and are a nice distraction during the big fight outside the castle courtyard.


Once the courtyard is cleared, the rest should be fairly straight forward. The Guard Captain will remain in the Castle once the quest is complete, leaving you, Martin and Jauffre to continue on with the grand adventure.
Levels 17-22 [Part 3]: Attribute Increases, Kvatch and the Oblivion Invasion
Oblivion Gates, Sigil Stones and Restoration Training


Once Martin has been taken to Weynon Priory, Oblivion gates have a 25% chance of spawning at various sites across Cyrodiil. Whenever running or fast travelling somewhere, take a second every so often to look around and check your Compass for Oblivion gate symbols.

The following item slots can be enchanted with Sigil stones. For the clothing and Jewelry, several styles are available. A list can be found here[www.uesp.net].

  • Hood,
  • Shirt,
  • Pants,
  • Shoes,
  • Gloves [Wrist Irons ftw],
  • Shield [Fur Shield is the lightest, will still provide enchantment when unarmed or using a bow],
  • Amulet,
  • Ring 1,
  • Ring 2, which is saved for the Mundane Ring.

By this point: You still may be level 17. Tougher Daedra are going to spawn inside Oblivion gates as you level up higher. You’ll need 8 Sigil stones total to enchant all the equipment that you’re going to need, and you already have 1 piece of equipment enchanted [your trusty Wrist Irons! Woo!] It is easier to kill things when you have more Magicka, and right now the Gates contain relatively tame enemies.


So, my suggestion is: shift all your focus right now towards clearing 7 more Oblivion gates and grabbing their Sigil stones [using the Proper-save/Misc-inventory/Pick-up/Quicksave/Check/Quickload-Til-Success technique used inside the Kvatch gate]. You don’t necessarily have to kill everything inside a Gate, and Invisibility can technically get you through a whole Gate without fighting anything [though again it’s harder to loot if you do this]. If you wish to fight your way through the gates, maybe even hold onto Martin and Jauffre for the time being. If you need to, make some more Restore Potions.

Restoration Training

In addition to seeking out Oblivion gates, it is recommended that the Character begin purchasing regular Restoration training [Max of 5 per level]. Once this skill is 100, a large array of Custom Buff spells become available, which will significantly enhance the Character. In addition to this, training this skill also counts toward increasing Willpower, which should now be approaching 100. In short: Get Restoration to 100 ASAP for fun times.


Marz [Bravil Chapel of Mara] and Ohtesse [Cheydinhal Chapel of Arkay] both train Restoration up to 70. Once it has hit 70, ask either of them about further 'Training', and they shall point you in the direction of the Master Trainer.


The Master Restoration Trainer is Oleta: a Redguard priest who was trappled inside Kvatch and, after being freed from the town, should now be in the camp south of the city. She offers training all the way to 100.

More information on other Master trainers is provided in the next Chapter [Levels 22-51].

Cloud Ruler Temple and Willpower 100


Once you have visited Cloud Ruler temple, do NOT start the Path of Dawn quest until the character is level 22. The Mundane Ring is too nice to pass up, and it only appears as loot during the quest from level 22 onwards. Don’t forget to visit the farms every few days also to keep increasing Alchemy skill.

By Level 22, your character should have:

  • Endurance 100,
  • Intelligence 100,
  • Willpower 100,
  • Conjuration 100,
  • Illusion 100,
  • Alchemy 100 [or at least close to 100], and Expert or higher Alchemy equipment from vendors or loot,
  • Luck EXACTLY 68 [if it is more than this, refrain from taking luck on some levels],
  • Destruction at least 60,
  • Restoration at least 70,
  • Alteration at least 50,
  • 1-8 pieces of equipment enchanted with Fortify Magicka Sigil stones.

The Character should be able to Summon monsters, Paralyse or Calm just about everything [or run past everybody Invisible], brew strong Restore Potions and Poisons that can slay most opponents in one shot [eventually], and cast chains of devastating Destruction spells.

Plenty of offense and defense. But we’re not done just yet!
Levels 22-51 [Part 1]: Enchanted Items, Master Training and High-Level Custom Spells
Enchanted Equipment


With 100 Intelligence and no buffs, a Breton has 250 Magicka. By level 22 your character should have anywhere up to 8 of their 9 pieces of equipment enchanted with Fortify Magicka Sigil stones. Each Sigil stone grants 50 Extra points of Magicka, for a total of 400 Bonus Magicka with 8 stones, and a grand total of 650 magicka.

The 9th item slot is reserved for one rather special ring, and it can be looted during the Path of Dawn quest but ONLY from level 22 onwards: The Mundane Ring.

The ring is carried by Raven Camoran[www.uesp.net], and provides both 35% spell reflect and 50% magic resistance. Thus: Raven will have 35% reflect spell and 50% magic resistance when you fight him, making it a little dangerous to try and use spells such as Paralysis on him [as they can reflect back on you]. He is, however, not immune to Poison, and his cronies do not have any resistances. The easiest way to deal with him is to have Baurus arrange the meet him, then from the ledge above the meeting point, sneak attack him with a poison arrow mid conversation [thus killing Raven], then Summon + Paralyse his followers.

Combined with a Breton’s innate 50% magic resistance, wearing a mundane ring amounts to 35% of spells reflected … and 100% Magic Resistance after that. So once your Character has a Mundane Ring: Congratulations, they’re immune to magic! 😊

With the Knights of the Nine Expansion and the Unofficial Oblivion Patch come two other useful items: The Escutcheon of Chorrol[www.uesp.net] Shield [Reflect Damage 35% if the quest is completed after level 25] and the Necromancer’s Amulet[www.uesp.net] [available in the Arch Mage’s quarters after becoming Arch Mage]. Two looted jewellery items, the Amulet of Axes/Swords and the Ring of the Iron Fist, also contain a Reflect damage enchantment. Wearing 3 Reflect Damage[www.uesp.net] items at the same time results in the character becoming completely immune to Melee Damage!!!!

Given that these 4 items are either Random Loot, are generally harder to attain than Sigil stones, or may require content that you don’t have, it is still recommended that the Character seeks out 8 Fortify Magicka Sigil stones and creates a full 8-item set of Fortify Magicka items, even if some get replaced later. The calculations outlined in the High-Level Custom Spells section assume that the Character has done this.

Aside from steadily increasing certain skills tied to attributes as you level, and taking Luck every level, there’s a small list of things left to think about between now and level 51.

Master Training

Firstly: Restoration, Athletics and Mercantile naturally increase slowly, and it is worth spending money to buy training for these three skills. You should already have received some Restoration training, and by now should be able to receive Master Level Restoration training from Oleta at the Kvatch camp. Get this skill to 100 as quickly as you can: Custom spells await.

You’ll most likely need to increase your Speed in order to receive Athletics training [you cannot train a skill above its governing attribute], so it might be a good idea to practice Acrobatics and Light Armour a little bit in between levels until this is possible. See the previous Attribute Increase chapter for more info.

Given that Personality is quite high, Mercantile training can be purchased right away; from your good old friend Seed Nedus in Chorrol! She’s an advanced Mercantile trainer, meaning she’ll increase it all the way to 70. Once Restoration training is complete, I recommend focusing on this.

In addition: Seed Nedus' quest to head to Hackdirt and rescue her daughter will give you 5 Mercantile skill as a reward. I advise not handing in this reward until later, when your Mercantile is 95. After it hits 70, head to Paloniyra at Divine Elegance in the Imperial City Market district for Master Training up to 95. Then, head back to Hackdirt/Seed Nedus to get the final 5 points of Mercantile.

Once Speed is sufficiently high to start training Athletics: Honditar, an elf found near the Oak Tree outside the Chorrol Mages Guild during daytime, is an Advanced Athletics trainer. Rusia Brandis is the Master Athletics trainer, and lives in Anvil near the Abandoned house.

If you wish to train other skills, a list of trainers can be found here[www.uesp.net]. Remember that only 5 skill ranks maximum can be trained per level.

High-Level Custom Spells

Secondly: 100 [or near 100] in lots of Magic Skills, and a buttload of Magicka, means that it’s time to get serious at the Spellmaking Altar.


Up until now, Restoration has had little impact on the character's life, other than small top-ups of health, and maybe the odd Restore Attribute spell. Once Restoration is 75, this skill begins to shine. Very brightly.

Custom Spells of the same effect stack with each other if given different names, and there is No Stack limit on Magicka or Attributes. As a mage, the greatest benefit that Restoration provides comes in the form of Total Magicka and, most importantly, Magicka Regeneration buffs. In an attempt to understand how this all works: It’s time for some more mathematics! :D


Levels 22-51 [Part 2]: Enchanted Items, Master Training and High-Level Custom Spells
Magicka Renegeration Overview

The Magicka Regeneration formula, with standard toolset settings[en.uesp.net], is: {0.01 x [Total Magicka]} x {[0.75 + (0.02xWillpower)]}.

Let’s call the first set of Bracers {} A, and the second set {} B. Total Magicka affects A, Willpower affects B.

With 650 Magicka [8 Sigil Stones] and 100 Willpower, this amounts to: A>>>{0.01 x 650} x B>>>{[0.75 + [0.02x100]} = A{6.5} x B{2.75} = 17.875 Magicka/second., or 2.75% of Total Magicka/Second.

For every 100 Magicka A increases by 1, and for every 100 Willpower B increases by 2. To calculate Magicka regen, multiply A x B. Easy!

Regarding optimum Magicka Regeneration, from the wiki:

"The exact crossover point occurs when your total Magicka (including both Intelligence and racial/birthsign bonuses) becomes 75 points larger than two times your Willpower."

In summary: Both Total Magicka and Willpower score contribute to the rate at which a Character regenerates Magicka. The optimum Regeneration point occurs when Total Magicka = 75 + [Willpowerx2]. So at 650 Magicka, the optimum crossover point occurs at [650 - 75]/2, or 287 Willpower.

This can roughly be achieved at present by buffing Willpower 200 points.

Expert-Level Magicka Buffs

Regarding Spell Cost:[en.uesp.net] Spells with a base cost of less than 150 can be cast at Journeyman level. Spell with a base cost of less than 400 can be cast at Expert level, which is a big improvement, and enough IMO to start considering the possibility of creating and casting Fortify Skill and Attribute spells of a decent magnitude and Duration.

An overview of spell cost [see link above for more details]: {Base Effect Cost/10} x {Magnitude^1.28} x {Duration in seconds} x {Area if applicable x 0.15, Area = 1 if no area} x {1.5 if a Target spell} = Total Spell cost.

So, for e.g. A Fortify Willpower [Base cost 0.6 for this effect] 50 Points for 44 Seconds Spell, costs:

{0.6/10 = 0.06} x {50^1.28=149.5} x {44} x {1} = ~395 base cost, which is less than 400, and thus can be cast at Expert Level.

At 75 Restoration, the caster will cast at 1.4 - [0.012x75] = 0.5 x the base cost, so the above spell will cost about ~198 Magicka to cast. If Restoration is boosted to 100, it'll cost 0.2 x the base cost, or about ~79 magicka.

So! For the time being: I would recommend making a Custom Fortify Restoration 25 pts spell, followed by a series of Custom Fortify Willpower Spells, similar to above. To make the Fortify Willpower spells stack, requires giving them all different names.

Now: Spells cannot be deleted from your spellbook once they've been created, and there will most likely to be too many to worry about quickbar'ing them onto your 8 slots. So: My suggestion would be: Prefix them all with 'AA + Spell Title + Number or Letter', so that they appear at the top of the list.


*E.g.

  • AA Expert Buff Prep: Fort Restoration 25 Pts for 108 seconds. Base cost => {0.06} x {61.57} x {108} = 399, or ~199 at Restoration 75. After casting this, all subsequent Fort Will Spells will cost ~79 instead of ~199.
  • AA Will 1: Fort Will 50 Points for 44 Seconds.
  • AA Will 2: Same as above.
  • AA Will 3: Same as above.
  • AA Will 4: Same as above.

Casting BuffPrep then the 4 Will spells, one after the other, results in the character having ~100 effective Restoration for 108 seconds, and 300 Willpower [approximately the crossover point for 650 Magicka from 8 Sigil Stones] for about 35 Seconds. After the 4 Willpower buffs run out, they can all be cast once more at low cost, as the Buff Prep spell should still be active.

A{6.5} x B{6.75} = 43.875 Magicka/second., or 6.75% of Total Magicka/Second.

To put this into perspective: This is enough to regenerate a 10 Second Paralysis Spell, every 2 seconds.

And Restoration isn't Master level yet.
Levels 22-51 [Part 3]: Enchanted Items, Master Training and High-Level Custom Spells
Master-Level Magicka Buffs


Once Restoration hits 100, Master-Level spells can replace the Expert level ones, and the aforementioned effect is kicked into Overdrive.

Now: There is about a 2 second delay between each cast, and Magicka Regenerates for ~1.25 seconds between each 2 second cast.

As a fun exercise: It is possible to continuously buff with Master Level Fortify Attribute + Fortify Magicka Spells, without stopping.

Here is one such way to accomplish this.

Near-Infinite Magicka Procedure

The following Calculations assume the stats that the Character will achieve with their FINAL gearset in the next Chapter, for which they'll have 524 Magicka and 110 Willpower. This is LESS than what the Character should currently have [650 Magicka 100 Willpower] in terms of Magicka Regeneration, so these steps should leave the character with even more Magicka at this stage.

An overview of how to achieve the following procedure with potentially ANY character [i.e. 100 Intelligence/Willpower/Restoration and any race/starsign/gear] can be found here.

http://steamcommunity.com/sharedfiles/filedetails/?id=888102371

Custom spells are only allowed to have one of each category of effect on each spell. So for e.g. it is not possible to create a custom spell that fortifies both Intelligence AND Willpower. However! It is possible to create custom spells that both Fortify Attribute 100points and Fortify Magicka 100 points at the same time. These are what spells will be used, aiming to keep as close to the Optimum Magicka Regeneration point as possible {Magicka = 75 + (2xWillpower)}.

An explanation of terms:

'A Spell Label', Spell Type > This places the spells above the 'AA Expert Spell' List in alphabetical order, so they should now appear at the top of the spell list.
WillMagic > Fort Willpower/Magicka 100pts.
IntMagic > Fort Intelligence/Magicka 100pts. 100 Intelligence = 200 Magicka + 100 Magicka = 300 Net Magicka.
BuffPrep > 25 Second Duration.
Master > 120 Second Duration.


First up: 7 Prep Spells, in order of casting. These are cast in preparation for the Master Magicka Buffs.

100 Attribute for 25 sec = 109 magicka.
100 Magicka for 25 sec = 27 magicka.
Total 100/100 spell = 136 Magicka/Prep Spell.

  • A BuffPrep1, WillMagic: Fortify Willpower 100 pts for 25 Seconds, Fortify Magicka 100pts for 25 seconds.
    624 total Magicka/210 Willpower, 524 initial magicka-[136- {6.24x4.95x1.25sec regen=~38 magicka regenerated + 100 Magicka from fortify effect] = 624 - [136-38].
    524 + 100 - [136-98] = 624 - 98 = 526 magicka remaining at time of the next spell being cast.

  • A BuffPrep2, WillMagic > 724 M/310 W, [526 + 100] -[136-62] = 552 remaining.
  • A BuffPrep3, WillMagic > 824/410, 652-[136-92] = 608 remaining.
  • A BuffPrep4, IntMagic > 1124/410, 600 + 300 - [136-125] = 899 remaining.
  • A BuffPrep5, WillMagic > 1224/510, 999 + [167-136, Regen Overtakes Spell Cost] = 1030 remaining.
  • A BuffPrep6, WillMagic > 1324/610, 1130 + [214-136] = 1208 remaining.
  • A BuffPrep7, WillMagic > 1424/710, 1308 + [266-136] = 1424. FULL MAGICKA, 11 sec remaining [5 buffs til preps expire].


After CASTING all the prep spells, head to an altar and proceed to make Master Magicka buffs. There are 12 total, and after the 5th is cast, prep spells begin to run out, Master spells replace prep spells, and Magicka/Willpower stay the same.

100 Attribute for 120 sec = 522 Magicka.
100 Magicka for 120 sec = 131 Magicka.
Timer: Fire Shield 3% for 120 sec = 46 Magicka Base Cost. At Alteration 50, this spell will cost 37 Magicka. This effect is used as a Timer to indicate when the first master buff is about to expire.
Total 100/100 = 653 magicka [690 with Timer effect at Alteration 50].

  • A Master A, WillMagicTimer > 1524/810, 1524 - [690-322] = 1156 remaining.
  • A Master B, IntMagic > 1824/810, 1456 - [653-386] = 1189 remaining.
  • A Master C, WillMagic > 1924/910, 1289 - [653-455] = 1091 remaining.
  • A Master D, WillMagic > 2024/1010, 1191 - [653-530] = 1068 remaining.
  • A Master E, WillMagic > 2124/1110, 1168 - [653-609] = 1124 remaining.
    Prep spells run out here, Master spells mimic prep spells.
  • A Master F, WillMagic > 2124/1110, 1124 - 44 = 1080 remaining.
  • A Master G, WillMagic > 2124/1110, 1080 - 44 = 1036 remaining.
  • A Master H, WillMagic > 2124/1110, 1036 - 44 = 996 remaining.
  • A Master I, IntMagic > 2124/1110, 996 - 44 = 952 remaining.
  • A Master J, WillMagic > 2124/1110, 952 - 44 = 908 remaining.
  • A Master K, WillMagic > 2124/1110, 908 - 44 = 864 remaining.
  • A Master L, WillMagic > 2124/1110, 864 - 44 = 820 remaining.

In a nutshell:

Cast BuffPrep's 1-7, then cast Master's A-L.

If you wish to keep up the high Magicka: 'Just' as the Timer Effect [Fire Shield] is wearing off, cast all the Master Buffs again from A-L [shouldn't need prep this time!].

Whilst all the master's are active: For ~95 Seconds: The Character will have: 2124 Magicka, 1110 Willpower and regenerate {21.24}x{22.95} = 487 Magicka/Second (0-100% Magicka in 4.35 seconds).

It's time to get freaky.
Levels 22-51 [Part 4]: Enchanted Items, Master Training and High-Level Custom Spells
Once an arrangement of the aforementioned Magicka Spells are cast, just about any other high-level Custom spell can be used on the fly. Once again, the Spell Cost Formula can be found here[www.uesp.net].

The following spell costs assume 100 in each particular skill. Here's a list of some example high-level custom spells:

Restoration (other)

  • Restore Health 100pts for 2 seconds. Cost: 145 Magicka.
  • Fortify Strength/Agility/Endurance/Personality/Luck 100 Points for 120 Seconds. Cost: 522 Magicka. These provide the benefits of their retrospective attribute boosts. HOWEVER: Weapon Damage is capped at 100 Strength and Agility [not that that is very relevant for this character]. In general: Boosting these 5 Attributes is less useful to the character than boosting Intelligence, Willpower or Speed.
  • Fortify Speed 100 Points for 120 Seconds. Cost: 522 Magicka. Run fast and jump high.
  • Fortify Athletics 100 Points for 120 Seconds. Cost: 522 Magicka. Run really fast.
  • Fortify Acrobatics 100 Points for 120 Seconds. Cost: 522 Magicka. Jump really high.

Like with the Magicka Buffs: These effects can all stack if their spells are given different names. All skills bar Athletics and Acrobatics are capped at 100. Athletics and Acrobatics are capped at 255. There is no cap on Attribute buffing.

Alteration

  • Shield 85% for 120 seconds. Cost: 318 Magicka. Who needs Armour.
  • Feather 100 pts for 120 Seconds. Cost: 9 Magicka, though Feather spells from merchants typically provide higher magnitude and duration than this. All Feather spells stack with each other.

Conjuration

The standard Summon Clannfear for 45 Seconds spell costs only 68 Magicka, and often I just end up using this spell sporadically if an ally is required in combat. There are several other summons to choose from that can be crafted into Custom spells, ranging from straight up tanky creatures [e.g. Daedroth], Spellcasters [e.g. Lich], and hybrids of the two [Dremora Lord]. That said:

  • Summon Gloom Wraith for 120 Seconds. Cost: 624 Magicka. 500 Health, a ton of immunities, a 120pt Absorb Health Spell, lots of Frost Damage, and a 15 Second Silence Curse. What a tanky annoying b*stard.

Destruction

Expanding on the Mark + Damage Spell concept:

  • A Target Mark Spell [100% Weakness to Magicka and Fire] costs about 4 Magicka/second of spell duration [so a 15 second Target Mark = about 60 Magicka]. A longer Target Mark spell may be a good idea for targets that Reflect or Absorb, such as Xivilai.
  • A Target Mark that provides Weakness to ALL elements [Magicka/Fire/Frost/Shock], and a new custom spell, may be fun to experiment with. The damage markers would remain the same [4x 16x 49x etc.], but they would now apply to 3 elements.
  • A Target Mark Spell can include a 1 Second Paralysis Effect, and an Area Effect, to stop the enemy in their tracks as they are lined up and hit them easier.
  • A Target Mark could instead be a Touch Mark! Given that the character should now have increased magicka and therefore can fortify their speed/athletics, using touch spells becomes less dangerous. A 100% Weakess to Magic/Fire/Frost/Shock for 15 seconds spell, and 16 points Fire/Frost/Shock for 5 secs on Touch, can both be cast at Expert Level Destruction.

Illusion

Mehehehehe....

  • Command Creature 25 Levels for 120 Seconds on Touch. Cost: 522 Magicka. Works against Spider Daedra and Xivilai, which themselves both Summon Daedra. There is theoretically no limit to the amount of creatures that you can control. Go have fun.
  • Command Humanoid 25 Levels for 120 seconds on Touch. Cost: 653 Magicka. See above.
  • Chameleon 100% for 120 seconds. Cost: 548 Magicka. Mmmmm.

Mysticism

  • Telekinesis 100ft for 120 Seconds. Cost: 428 Magicka. For stealing all the shiny things. A shorter duration and lower cost 100ft Telekinesis spell may also be a good idea.

And for the hell of it:

  • Reflect Spell 65% [adds to 35% from Mundane Ring for total Spell Reflection] = 14.65 Magicka/ Second of duration. 65% Spell Reflect for 120 Seconds = 1758 Magicka.
  • Spell Absorption 100% = 21.78 Magicka/Second of duration. Spell Absorption 100% for 60 seconds = 1308 Magicka. Of course, if you cast some BuffPrep spells AFTER all the Master spells are active, Magicka can be boosted up to 2624, which is enough to cast this spell for 120 seconds...

Lastly: There are 15 Daedric Shrine quests to complete, the last of which, Hermaeus Mora’s quest, cannot be completed until all the other 14 are complete. The reward is the Oghma Infinium - A Book, which if read, boosts a number of the character’s Attributes and skills depending on the path taken.

DO NOT READ THIS BOOK UNTIL LEVEL 51, IT WILL GIVE YOU 3 EXTRA LEVELS!!!
Levels 51- 54: Oghma Infinium, Final Gear Set and Final Character Statistics
Once the Character hits level 51, they should have every attribute at 100 except for Luck, and Luck at 97. Seek out the Oghma Infinium, and choose the Path of Spirit. This will increase Intelligence, Willpower, Conjuration, Destruction and Restoration by 10 permanently. The 3 skills will not provide any tangible benefit, but levelling 3 major skills by 30 points WILL give you 3 levels, which you can use to take the final 3 luck points!

And with that, the Character should be level 54, which is their Maximum Level.

Here is a final Summary of what they should aim to have, gear and stat wise.

Final Gearset

Depending on whether or not Knights of the Nine is installed, the final 9 items of gear can very between 5-6 Fortify Magicka-type items and 2-3 Reflect Damage items.

The final set [assuming Knights of the Nine installed]:

  • Mundane Ring [35% Reflect, 50% Magic Resist]
  • Ring of Ironfist [33% Reflect Damage, Fortify Unarmed 25 pts]
  • Escutcheon of Chorrol [35% Reflect Damage, Fortify Endurance 10 pts], and if no Knights of the Nine, Mana Fur Shield [50 Magicka].
  • Amulet of Axes/Swords [33% Reflect Damage, Fortify Blade/Axe 25 pts]
  • Mana Wrist Irons [50 Magicka]
  • Mana Hood [50 Magicka]
  • Mana Shirt [50 Magicka]
  • Mana Pants [50 Magicka]
  • Mana Shoes [50 Magicka]
  • Fine Iron Bow, Silver Bow or Bound Bow
  • Iron Arrows
  • Custom Potions and Poisons

Miscellaneous Items: Scales of Pitiless Justice [2 Intelligence/Strength/Agility, -2 Personality], Skeleton Key [Unbreakable Lockpick].

Final Statistics

This is based on the format presented here[www.uesp.net], and assumes the Character is using the recommended final gear set [above]. I did not include skills boosted beyond 100, as I felt they had little influence. A list of 100+ skill values is provided in the above link.

Core Stats:

  • 720 Health [700 Base, 20 from equipment]
  • 524 Magicka [250 Base, 20 from Oghma, 254 from equipment]
  • 414 Fatigue [400 base, 10 from Oghma, 4 from equipment]

Attributes

  • 102 Strength [100 base, 2 from equipment]
  • 112 Intelligence [100 Base, 10 from Oghma, 2 from equipment]
  • 110 Willpower [100 Base, 10 from Oghma]
  • 102 Agility [100 Base, 2 from equipment]
  • 100 Speed
  • 100 Endurance
  • 98 Personality [100 Base, -2 from equipment]
  • 100 Luck

Major Skills:

  • 100 Athletics [Zooooom]
  • 100 Conjuration [Summons]
  • 100 Destruction [Weakness Stacking + Fire Damage Obliteration Manoeuvre]
  • 100 Restoration [Fortified Stats and Magicka Regeneration]
  • 100 Marksman [Ranged Weapon with Zoom Function, the occasional Stun, and Poison Capabilities]
  • 100 Mercantile [Bill Gates-level Wealth]
  • 100 Sneak [Stealth is awesome]

Minor Skills

  • 100 Acrobatics [Boing]
  • 100 Alchemy [Concoctions for any occasion]
  • 100 Alteration [Support Magic of all flavours]
  • 100 Illusion [Loads of overpowered stuff]
  • 100 Mysticism
  • 30-100 Armourer
  • 50-100 Heavy Armour [So did I!]
  • 50-100 Block [Me too!]
  • 25-100 Blade, Blunt, Hand to Hand, Light Armour, Security, Speechcraft. [/list]

    Notable Permanent Magical Effects [from Gear/Race]

    • Reflect Spell 35% [from Mundane Ring].
    • Resist Magic 100% [50% from Breton + 50% from Mundane Ring]. Immune to Magic.
    • Reflect Damage 101% [35% from Escutcheon Shield + 33% from Amulet of Axes/Sword + 33% from Ring of Iron Fist]. Immune to Melee Damage.
    • Base Magicka and Regen: 524 Magicka, 110 Willpower, {5.24}x{2.95} = 15.46 M/s.

    List of Possible and Notable Temporary Magical Effects [from spellcasting]

    • 7 BuffPrep + 12 Master Buffs: 2124 Magicka, 1110 Willpower, 487 Magicka/Second, ~95 Second Duration. Recast the 12 Master Spells after the Timer effect has run out to maintain high Magicka/Willpower and avoid the Prep procedure again.

    • Cure Disease/Poison, Instant. [Restoration]
    • Restore Attribute, Instant. [Restoration]
    • Restore Health, 100pts/second. [Restoration]
    • Up to 255 Athletics/Acrobatics for Insane manoeuvrability, 120 Second Duration. [Restoration]
    • Potentially 1000+ of any attribute given enough buffing, 120 Second Duration. [Restoration]
    • 85% Shield for Max Armour Rating vs Ranged Weapons, 120 Second Duration. [Alteration]
    • 625 Feather [All Base Feather Spells + 100pt Custom Spell], 120 Second Duration. [Alteration]
    • Water Breathing and Walking, 120 Second Duration. [Alteration]
    • Night Eye, 120 Second Duration. [Illusion]
    • Invisibility, 120 Second Duration.[Illusion]
    • 100% Chameleon, 120 Duration. [Illusion]
    • 100 ft Telekinesis, 120 Second Duration. [Mysticism]
    • 120 ft Detect Life, 120 Second Duration. [Mysticism]
    • 65% Spell Reflect, for total of 100% Spell Reflect with equipment, 120 Second Duration. [Mysticism]
    • After all Master Spells are active, cast 2 WillMagic and 1 IntMagic Prep Spells: 2624 Magicka for ~20 seconds, 100% Spell Absorption, 120 Second Duration. [Mysticism]

    Given all of these: Aside from Ranged Weapons [bows] and environmental damage [e.g. Falling and Lava], the only threat to the final Character comes from Knockback and Paralysis power attacks, which ignore Resist Paralysis [and thus Resist Magic]. Paralysis spells are blocked by the 100% Magic Resistance granted by the Breton Race + Mundane Ring.


    The 4 Primary Weapons


    1. Summoned Allies [Conjuration]: There are several to choose from, and for my particular playstyle, I find Clannfear, Storm Atronach or Gloom Wraith most useful depending on the situation.

    2. Crowd Control [Illusion]: Calm, Frenzy, Paralysis, Command.

    3. Ranged Sneak Attack with Poisoned Arrows [Marksman, Sneak, Alchemy]: 8x30 [240] Health, 9x37 [333] Fire, 9x37 [333] Shock. Total 906 Poison Damage over 37s [Physical Damage negligable].

    4. 4x Weakness to Magic Stacking [Destruction] + Generic Offensive Spell [any school] or Fire Damage Spell [Destruction]: 12x Magnitude or Duration for all touch/target Offensive Spells [except fire], 144x Fire Damage. 5 Successive and Active Destruction Spells = Guaranteed Kill.


    Aaaaaand that’s it! Ask questions if you don’t get bits of it and I’ll happily answer to the best of my ability. Enjoy! 😃
88 Yorum
SirNewbzAlot 10 Oca @ 12:31 
You are gonna struggle with this guide.
Ajentkae 17 Kas 2024 @ 0:00 
How did you get the rusty iron gloves? as far as i know there is no full set of the rusty iron armor in the game.
piersol3 6 Şub 2023 @ 9:19 
This guide is excellent in terms of gameplay and character building. I would have taken a lot longer to find the perfect character in Oblivion without all the work of the author of this article. However after reviewing the game, I found 55 to be the maximum level for a Breton. By taking as a major characteristic acrobatics or any characteristic having as a starting base 25 instead of the 30 of athletics and waiting to have 100 in haggling before doing the quest "A shadow over Hackdirt" given by Seed-Neeus to Chorrol, a Breton can reach level 55 by distributing his hundredth and last Luck point at this same level.
Kirby202 22 Oca 2023 @ 16:18 
@sirchaunce. I would wager that if you are following the guide you are probably running into one problem. You are probably leveling the major skills before you have finished leveling your minor skills for that level.
That would explain why your levels inconsistently give +5.
Kirby202 22 Oca 2023 @ 16:12 
@sirchaunce. You will get an option to level 3 ATTRIBUTES by +5 whenever you level the skills associated with the attribute 10 times.
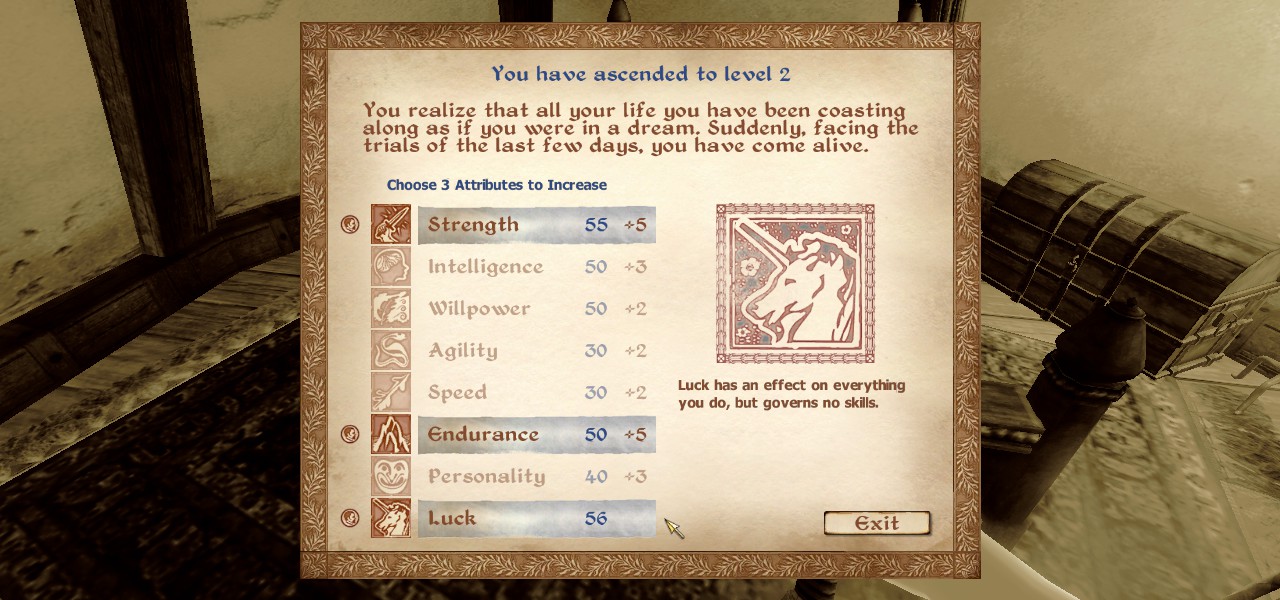
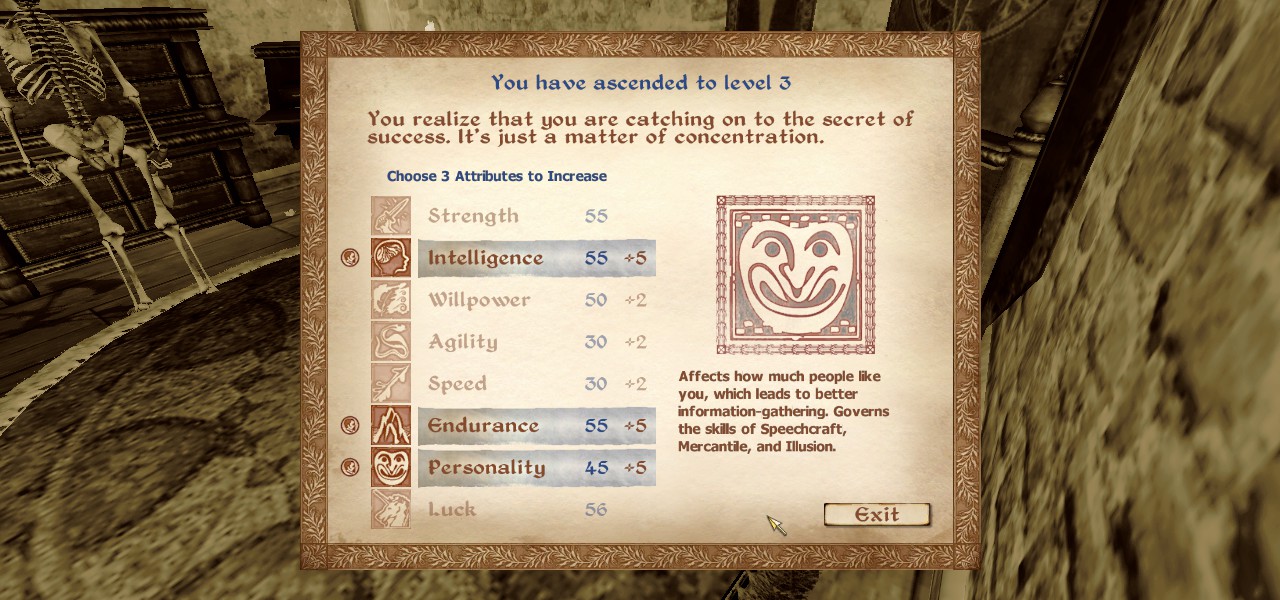
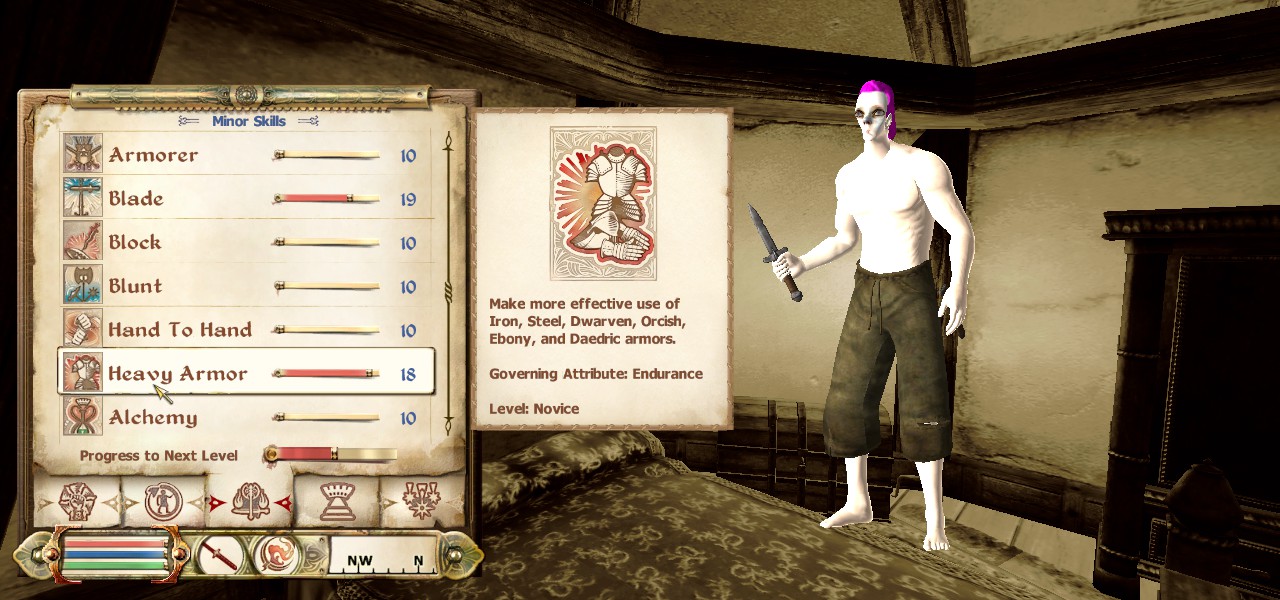
IE: you need to level blunt, block, or hand to hand a combined total of 10 times to get a +5 option for strength on level up.

So for 3 attributes to reach +5 you need at least 30 skill ups BEFORE you get the level up icon.
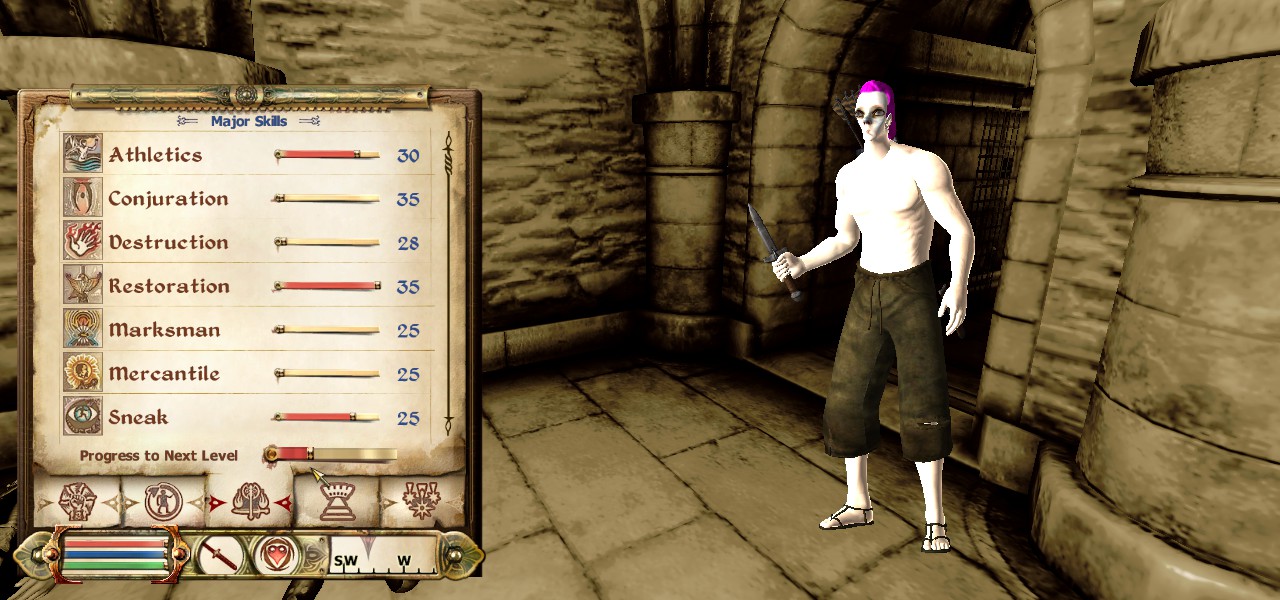
Major skills should ALWAYS be leveled LAST for optimal leveling otherwise the attribute progress will carry over to the NEXT level. Level any combination of major skills 10 times, and you will level up.
(you can get +9 in major skills and still work on minor skills for attributes, but as soon as the icon shows at +10 you can't do more to increase a level's attributes.)

For 2 +5 attributes you will need 20 skill ups. Luck will NEVER increase by more than 1 per level, so that is what you'll be doing most of this.
Do not feel too bad. The leveling is somewhat complex in this game.
sirchaunce 1 Oca 2023 @ 20:30 
I'm now playing this game for the first time, following this guide religiously. Not sure if it's because when the guide was made, or what updates occurred since.. Apparently I am overleveling or something's just not working right.
By Level 12, your character should have the following stats
280 Health
250 Magicka
235 Fatigue
55 Strength
100 Intelligence
50 Willpower
30 Agility
30 Speed
100 Endurance
80 Personality
58 Luck
At level 12, my character has:
225 Health
228 Magicka
219 Fatigue
55 Str
89 Int
55 Willpower
30 Agility
33 Speed
79 Indurance
70 Personality
60 Luck
I can not get END to level at 5 every level at all, let alone 3x 5s at leveling. Now if I put 10 points into endurance stats exactly, perhaps because I have put massive practice elsewhere.. I cannot get 1-5 in END, no matter what. I guess the numbers don't look that bad, but I'll be missing the HP mark by a factor. I have just been going with the highest numbers I can get and hope that it's good enough to complete.
Heimdall313 20 Eki 2022 @ 21:42 
Have you tried Drain Speed?
Aside from Liches and Xivali (Spell Absorb/Reflect), there's basically nothing immune to it, Difficulty has no effect. Draining Speed to 0 prevents a target from moving, searching for a target, entering combat, or attacking - its a total improvement over Paralyze. If you haven't tried it, 50 points of Drain Speed stops almost everything much cheaper than Paralyze, with no issues against Skeleton and such.

Atronach birthsign is only bad because it takes two vital equip slots (Neck and Ring, Spelldrinker + Sorceror Ring) compared to Breton + Mundane, but if you're going Altmer for max magicka its less equip slots overall. Restore Magicka potions are very plentiful (Flax Seeds, Steel Blue Entoloma, Bog Beacon Asco), Welkynd for emergencies, Telekinesis for generally topping off.

Personality is rendered useless by Charm, Luck is also kinda useless. Just stop levelling at 30.

Otherwise, this is quite solid work man, I have no negative criticism.
somerville 23 Eyl 2022 @ 6:43 
cringe guide
malcontex 15 Eyl 2022 @ 7:29 
You can get rich quick at level one by obtaining all 7 goblin totems and selling them to Varel Morvayn for 1200 each, without any haggling whatsoever. Swim out to get Fin Gleam. Varel's disposition is now 100 after those totem sales. Move the slider until Fin Gleam sells for 1200, and bang you have 9600 gold and you just barely started the game. In the goblin caves, you only need to kill the shaman and then the rest of the goblins in that tribe become non-hostile and you can take whatever you want from that cave. Wear heavy armor to get a little banged up on the way and level up endurance skills (again, more organically than fighting your own skeleton in a graveyard). Use the money for training sessions (to avoid grinding) and paying for grand soul custom enchantments, which are 1000 gp each.
malcontex 15 Eyl 2022 @ 7:19 
For making powerful enchanted equipment early on via the arcane university enchanting altar, there are easily enough fixed-location grand soul gems obtainable at level 1 to do 9 wearables and and weapon, two of them are already filled (in the arch-mage tower's lobby). You can turn the rest to black soul gems at a necromancer's altar. The one at Wendelbek is a good choice because inside the ruin are 58 welkynd stones, 3 varla stones, an ayleid statue, and plenty of necromancers to fill the black soul gems you just created.