Red Haze

Red Haze

51 ratings
[07.2024 Update] Map Walkthrough | Upper Floors | Trafficking Dungeon and onwards
By Kaede
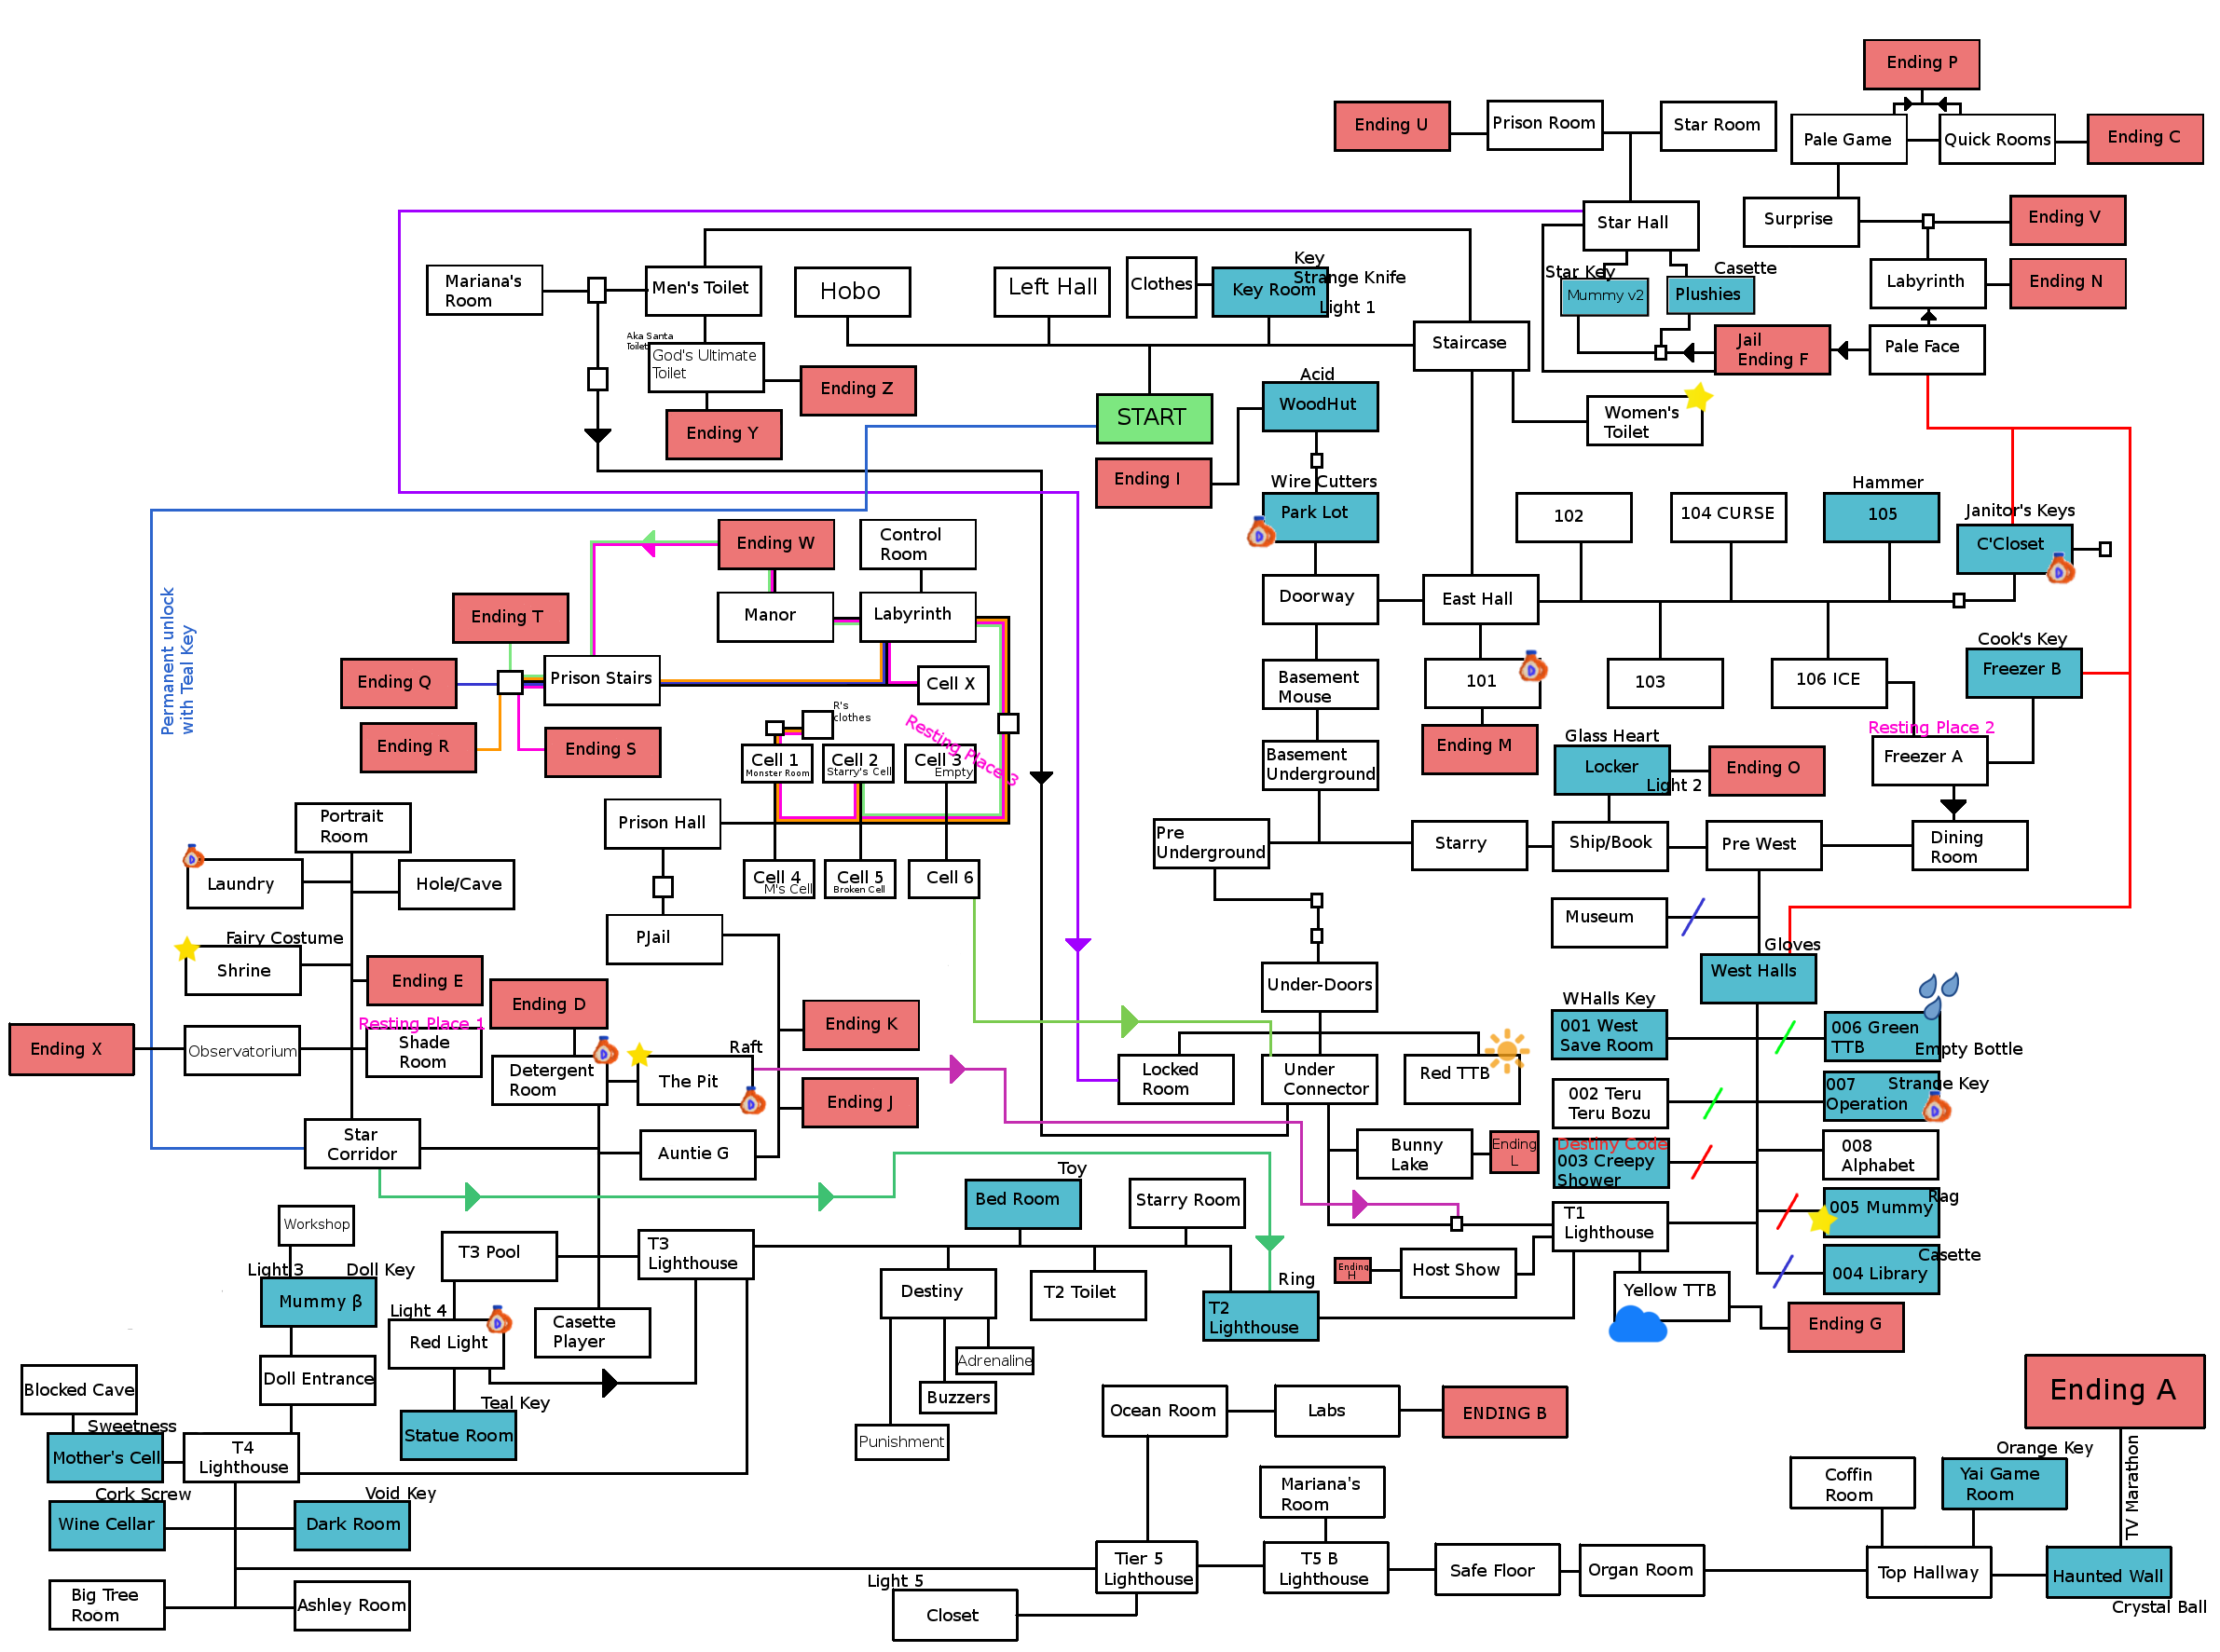
Map with rooms, paths and item locations. Includes step-by-step directions to some endings.
   
Award
Favorite
Favorited
Unfavorite
Introduction
I am playing Red Haze for quite a long time and I was finally allowed to upload something that might help you! I am making the map since early builds of the game, it doesn't include many details or secrets, but it's extremely helpful in reaching the items or planning your next runs. In current build of the game, there are 25 out of 26 endings available.

There were a lot of changes and I probably didn't catch all of them, so there might be some things missing. Please write if something is missing, I will make an update.

This guide is for players that ran around for a little bit already, launched the generator and could access Trafficking Dungeon. ( Which is early to mid game!)
Map and small explaination

  • Green means start position.
  • Red means ending.
  • Blue-ish means item.

The weather icons are for Teru Teru Bozu room.


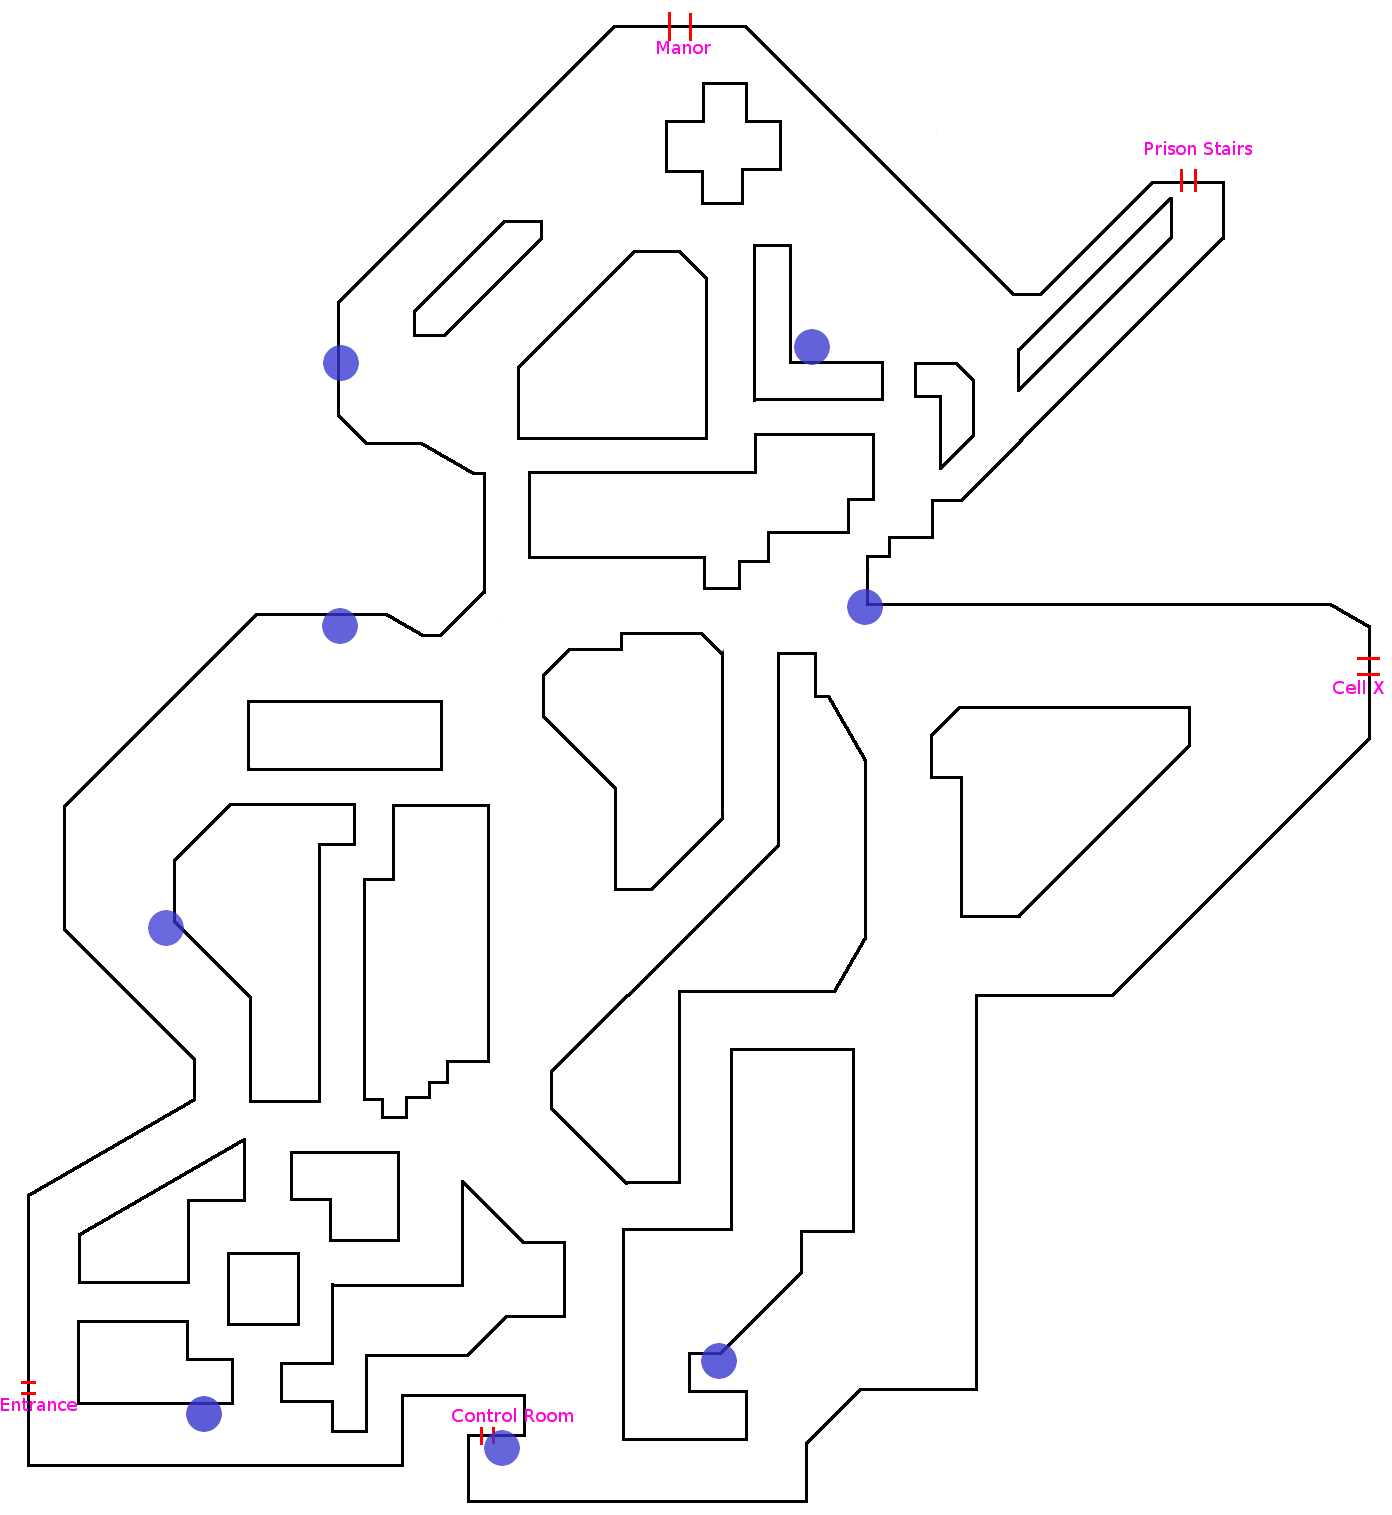
The Great Labyrinth
A crazy chaser in diver suit is trying to kill me and I am in disadvantage!

No worries, here comes hand-written map that more or less reveals terrain you are sneaking through, raising your morale a little bit! Blue circles are most needed hideouts.


Ending Q
In trafficking dungeon it's blue path. It's easiest ending in here.


Completely skip the cells.
Go to the Labyrinth.
Head to the Prison Stairs.
Go up the stairs.


Ending R

Orange color on the map.


Interact with Starry in the basement and let her join you.
Go back and get Mousie :mousie: scene.
Head to the left and get Fairy Tails scene and tell her about your sister.
Proceed to Trafficking Dungeon
Interact with Cell 2 ( 'crying one') and comfort/ask about her.
Move to the Labyrinth and enter Control Room.
Open Cell 2 and Cell 1.
Go back to the Cells and enter Cell 2.
Together with Starry, go to the Cell 1.
Proceed to mini room and put your clothes on.
Go back to Starry.
Go to the Labirynth and head to the Prison Stairs.
Go up Stairs and leave.

Ending W

Map is not showing it.


Interact with Starry in the basement and let her join you.
Go back and get Mousie :mousie: scene.
Head to the left and get Fairy Tails scene and tell her about your sister.
Proceed to Trafficking Dungeon
Interact with Cell 2 ( 'crying one') and comfort/ask about her.
Move to the Labyrinth and enter Control Room.
Open Cell 2.
Go back to the Cells and enter Cell 2.
Go to the Labyrinth and head to the Manor.
When you are appear near the lamp, just charge in any direction ( leave the lamp).
Ending T

Green one the map.


Interact with Starry in the basement and let her join you.
Go back and get Mousie :mousie: scene.
Head to the left and get Fairy Tails scene and tell her about your sister.
Proceed to Trafficking Dungeon
Interact with Cell 2 ( 'crying one') and comfort/ask about her.
Move to the Labyrinth and enter Control Room.
Open Cell 1.
Go back to the Cells and enter Cell 2.
Together with Starry, go to the Cell 1.
Go to the Labyrinth.
Go to the Manor.
Don't move and stay near the lamp on 'event'.
Proceed through Manor and you will land in Prison Stairs.
Go upstairs.
Ending S

Pink on the map.


Interact with Starry in the basement and let her join you.
Go back and get Mousie :mousie: scene.
Head to the left and get Fairy Tails scene and tell her about your sister.
Proceed to Trafficking Dungeon
Interact with Cell 2 ( 'crying one') and comfort/ask about her.
Move to the Labyrinth and enter Control Room.
Open Cell 2 and Cell 1.
Go back to the Cells and enter Cell 2.
Together with Starry, go to the Cell 1.
Proceed to mini room and put your clothes on.
Go back to Starry.
Go the Labyrinth.
Go to the Cell X.
Interact with note, then with Starry's clothes.
Go to the manor.
Don't move at lamp 'event'.
Proceed through manor and you will end up in Prison Stairs.
Go upstairs.
Ending Y [Out of nowhere!]
Doesn't matter whether you are already 'Regretting it' or not, steps are exact the same. It's all about raising hidden counter that is counting our 'good actions and deeds.' Basically you need to raise hidden counter and make sure to get Cross Key in West Halls - it's all about planning! While doing steps above, make sure to interact with some notes and objects on the way.

Start the game and go to the Hobo hole.
Go back to Key Room and interact with Key, but choose to NOT pick it up. [Ding +1]
Proceed to Staircase, then East Hall.
Get Custodian Keys and move to room 104 ( Don't ENTER it).
Read the note on the door and don't enter. [Ding +1]
Go the room 105 and get the Hammer.
Go back to Staircase and enter Men's Bathroom.
Go back to East Hall and enter room 106.
Go to the Park Lot and interact with the Cradle ( doesn't matter if you have... Someone running for your life). [Ding +1]
Head back to the East Halls.
Interact with the Fridge, but choose to NOT open it. [Ding +1]
Get transported to the Freezer and proceed to get the Cook's Key. ( hint: move by the down wall, then go up for the key, then keep moving to the left and when you see many bags, just keep moving down-left to the doors.)
Leave Freezer and put your clothes on. [Ding +1]
~~~~~~~~~~~~~~
Go to the west hall and pick up Cross Key.
Pick up the Gloves in West Halls.
Move to the room 005 ( called Mummy Room).
Proceed through the room and get the Rag, then go back.
Move to the Room 103 ( Shower Room).
Use Gloves on the bath tub.
Use Rag on the bath tub.[Ding +1]
Pick up Destiny Code.
Move back all the way through Basement and East Hall to the Men's Bathroom and enter God's Ultimate Toilet! [ also called Santa Toilet]
Answer that you've been good.


Ending U
For now, it's last ending that will require entering Trafficking Dungeon.


Take Janitor Keys.
Pick up the Hammer from room 105.
Go to the basement.
Interact with Starry, but don't let her join.
Interact with the well, then decline to play the game.
Push the stool and break the wall ( if you haven't done it before).
Take bottom path and enter the room with Mummy v2.
Pick up the Star Key and leave the room.
Go up the Underground, then to Auntie G and enter Trafficking Dungeon.
Talk to Starry and comfort her.
Go to the right and into Room Unlocking screen.
Unlock Cell 2 ( with Starry, left side in the middle) and Cell 6 ( right side at the top).
Go back to Starry and take her with you.
Go again to the right ( Starry will disappear) and proceed to Cell X.
Interact with the note, then with Starry's dress and choose to wear it.
Go back to cells and enter the Cell 6, then interact with the vent.
Proceed to Star Hall and enter the Prison Room.
While avoiding the Driller, enter the crack in the wall, then interact with the mirror.
Ending L
It has nothing to do with the achievement icon, as far it's known till now.


Go straight towards T3 Lighthouse and enter Detergent Room.
Jump down the pit.
While avoiding Slime Abomination, move towards top right corner of the map.
Interact with screen, Then continue pushing the Raft towards south east of the map.
Push the Raft into the water.
Continue moving to the left while keeping the south wall till you reach exit.
In the connector ( with the lamp), move to the left, then into West Halls.
Enter the Operation room (007), then pick up the Strange Key.
Go back to the Connector and go downstairs.
Open the door with Strange Key.
Enter the room, then interact with the raft.
( If it's not there, might need to die or get random ending to start another playthrough).
Ending E
The curse continues.


If at any point of time you opened room 104 in East Hall, after recent update it's going to haunt you for a bit.
After some runs the dolls will appear in various places, blocking access to certain rooms.
Interact with them, then go for some random ending or just die and start new game.
Continue looking for them and finishing the runs.
At some run, they will block your way from Underground.
Follow the directions of the dolls, then find exit from the darkness.
Finish the run via ending or die.
Continue looking for them.
The very last spawn is Star Key hallway ( unlocking the boarded door).
Accept the invitation and step to the darkness.
Abomination
Slimey-boi lurking around the pit.


Most simple way:
Zap it once.
Die.
Adrenaline.
Zap it second time.
Die.
Adrenaline.
Zappy zap.
[2024] Unlocking Upper Floors of the Lighthouse
Before getting into new endings, first it's necessary to unlock Upper Floors of the Lighthouse ( aka fully unlocking Tier 4 and accessing Tier 5).

Reminder: The names of places used will be done according with the map at the very beginning of the map.

Unlocking T4/T5 will require 2 runs.


Run 1
First run will require a Crescent Key. It's obtainable in West Save Room ( in a hallway with Edmund) after reading unique 14~ notes. Hint: You can read notes again after entering Hobo hole when it gets dark.

After obtaining the key, go to T2 Lighthouse
Enter the Bed Room and grab Toy Plane from the drawer by the door.

Go back through Edmund's West Halls and enter Museum by using Crescent Key.
Talk to the ghost boy on the left and REFUSE to give the toy plane.
Go all the way up to Tier 4 Lighthouse and enter Mother's Cell ( crying monster behind bars).
Give it the toy.
Finish your run - get any death scene / get any ending


Run 2
Get Spade Key in West Save Room ( obtained by default!) - You can use Star Hall shortcut from the Starting room
Leave the room and immediately go up to Teru Teru Bozu room
Turn GREEN TTB towards North
Leave and go east in the hallway into 006 and use Spade Key
Pick up the bottle from flooded room
Go to T4 Lighthouse, then Mother's Cell
Use the bottle on her remains
Leave room and go to the right and interact with broken planks


Congrats, T4 + T5 Unlocked
Continue exploring till the very end of the given path and grab special circular item. It stays forever with you!


Ending B

The man, the sea, and the bottle


After unlocking the upper floors you surely saw new room locked by Star Key.

Go to the Basement and jump into The Well
Refuse to play the game
Escape the prison through wall
Jump to the hole in south path in the tunnel
Grab Star Key and leave
Go to T4 Lighthouse
Enter the Dark Room
Grab Void Key
Go to T5 Lighthouse and then into Yai Game Room
Interact with the bell to get Orange Key
Go back to T4 Lighthouse and enter Wine Cellar
Get Cork Screw
Go to T5 Lighthouse and enter door to the left with Star key
Open the bottle and go through it
Good luck!


Let Bottom Wall navigate you, it's the path you should follow.
Whenever it passes you, move to the next hideout.
Ending X

It's all connected now!


You need to find 5 special lights behind specific windows.
Fret not, as soon you interact with any, the progression gets permanently saved, so focus on interacting with it!


Light 1
Go to Hobo hole and make everything dark
Enter the darkened 201 and interact with left glowing window


Light 2
Grab Janitor's Keys
Open 106 ICE, grab Cook's Key
Leave Freezer, go south into Ship/Book room, then enter the Locker with Cook's Key
Interact with glowing window in bottom left


Light 3
Go to T4 Lighthouse then go to Workshop.
In the room with mummy interact with glowing window in the top right of the room


Light 4
Go to T3 Lighthouse and enter door on the left ( T3 Pool) then into Red Light room.
Interact with glowing window near top left side of the room


Light 5
Go to T5 Lighthouse and enter the Closet.
Only one window here!


Ending steps after getting all lights:

Go to Star Corridor via shortcut in starting room
Go to Observatorium
Interact with Telescope


Ending D

Oldest mystery finally put to rest... Or is it?


Need to get all Detergents in one run. Prepare for the marathon and the chasers along the way. Here is my proposed path for them.


Start new run and get Janitor Keys
Enter the C'Closet and get FIRST detergent
Open room 105 ( 1st use of keys) and get the hammer
Open room 101 ( 2nd use of keys) and break the wall, then pick up SECOND detergent
Open parking lot ( Last use of keys) and grab THIRD
( hint: rush west for detergent, then run north past three parking bumps, rush till around the center, then all the way up and run left alongside the net. Enter the hole, change the map up north, return and immediately go through hole and speed all the way down then right to the door)
Go to the basement and hop inside The Well, then REFUSE the game
Escape prison, jump to the hole from south pathway of the tunnel
Grab Star Key and leave the room

Go to West Halls and enter room 007 with Operation table to grab FOURTH detergent
Go to T3 Lighthouse and into Red Light Room
Grab the FIFTH detergent in top left of the room
Go to T4 Lighthouse, grab the Void Key from Dark Room
Go to T5 Lighthouse and get Orange Key from Yai Game Room
Backtrack to T3 Lighthouse and open Staircase with Star Key to enter Star Corridor
Use Orange Key to unlock Laundry and grab SIXTH detergent
Go back to T3 Lighthouse and into Detergent Room, grab SEVENTH detergent
Read the note then jump down the pit
Grab EIGHT detergent from bottom right of the map
Get back to Detergent Room and drop all you have into the pit, then enter the door


Was it worth it?


Ending A

Peak of lighthouse still a mystery


Although not accessible yet, it can be prepared for when the next patch arrives.

Need to find 3 resting places, that are possible to reach only after reading 3 Mariana's notes ( They should have been found already by doing other endings, but will list them anyway).
The resting places are permanent once you unlock any of them and Rockette should react to them in counting manner


Notes:

First note:
Get Janitor Keys, open door 105 and get Hammer
Go up the staircase and open Men's Restroom
Go through the door that was blocked by entity before
Hop down the hole then in the tunnel enter the room to the right


Second note:
Go to The Well and refuse the game
Escape the prison and jump through hole in south pathway
Get Star Key and leave the room
Open the room on the right with Star Key


Third note:
Go to West Halls then into Operation room
Grab Strange Key from the drawer
Go to T1 Lighthouse then to the Basement via stairs on the side
Open the door to the lake with Strange Key and read the note


Resting Places:

(You need Crystal Ball in inventory!)
First:
Go to Star Corridor ( shortcut from Starting room)
Go to Shade Room and interact with top right corner of the room


Second:
Get Janitor Keys, open 106 Ice Room and go to Freezer
Interact with the wall up north at around middle of the room behind a bunch of trash bags
Note: Can do it before picking up the key


Third:
Go to T3 Lighthouse then into Auntie G
Get transported to the Prison Hall
Run directly to the labyrinth
Keep by south wall to reach control room
Unlock the top left cell
Go back and enter that cell then interact with chains on the wall


Start new run and go all the way through T5 Lighthouse and organ room, then forward through TV Marathon into Crystal Ball room. Onwards!
Additional notes
1. You can use drift towards Ending L, pick up the green lamp, then use Fairy Suit to teleport back to the Lighthouse to wander around with some light.
2. There is a trick with most chasers ( most notably mummies) that if you are in one line with them and there is furniture between you, as long you stay in the line they won't move for a bit.
3. You can close the monster in Dark Room from T4 Lighthouse with the lantern and there is very consistent way of doing that.
Manual hyperlink to the video in case preview is down

4. Remaining things to do seem to be Ending A, Alphabet doors and further content regarding Big Secret
Few words


After years the patch finally arrived. Be it good, be it bad, at this point we all just want to conclude the story! It was difficult to look into the map again after so many years, but thankfully there weren't too many rooms added this time around. Hopefully this guide helped out at least one soul out there.
28 Comments
Kaede  [author] Nov 11, 2020 @ 1:43am 
@stephytrash Sadly the game is not updated yet. Remaining content was supposed to be released within 3 bigger updates and so far only one was there from what I recall.
It's also the reason why bottom left of the map is so empty.

When next update lands I will update both the map and the guide. :bloodygirl:
Ramona Nov 4, 2020 @ 5:28am 
hasn't everything been released now? are you planning to update this guide with more help? also thank you for making it! it's helped a lot :winter2019happydog:
The Wandering Tradesman May 8, 2020 @ 4:54pm 
How do I get the hole in the wall?
𓆩☆𓆪 Apr 14, 2020 @ 12:46pm 
tyvm!! i never actually got the janitor's keys before this (too afraid to go in and get chased aha) so it was an oversight on my end.
Kaede  [author] Apr 14, 2020 @ 12:26pm 
The whole East Hell operates on Janitor Keys, that includes Ice Room - as far I recall. There wasn't anything more specific than that.
𓆩☆𓆪 Apr 14, 2020 @ 12:22pm 
maybe its because im so early into the game (i only have a couple endings unlocked. the last time i played this game was in 2017, so ive lost my old save file.) but ive been unable to unlock room 106/ice room. is there something i have to do? an ending to unlock? an item to get?
Skurpe Jun 18, 2018 @ 8:04am 
thx for this guide helped a bit
E L E C T R I C E Y E Jul 28, 2017 @ 7:52pm 
Well it just looks like he isnt working on it. As long as he is I don't mind. but maybe keep the game in early access until it is done?
Kaede  [author] Jul 28, 2017 @ 2:09pm 
It's a little complicated, I won't answer in the name of developer obviously, but just from player perspective.

Dev is working on many projects in general. Let's say he is making game A, in 70% of the game, he starts making game B, then C... And then back into finishing A. As far I don't mind ( the games are really nice and as a fan of RPG Maker I really love them), I understand some kind of frustration from others :skybornannoyed:
E L E C T R I C E Y E Jul 28, 2017 @ 10:58am 
why isn't this game still in early access then? Also I see the creator plugging a bunch of other games, is he even still working on this?