Hegemony III: Clash of the Ancients

Hegemony III: Clash of the Ancients

No hay suficientes valoraciones
Modding Tutorial: Scaling Heightmaps for use in custom maps
Por Fristi61
In this tutorial, I will show you how to manipulate the heightmap files prior to importing them into the editor, so that the game will render them to the scale you desire.
   
Premio
Favoritos
Favorito
Quitar
NEW, MUCH EASIER METHOD!
A lot of this guide is now redundant as the devs have been kind enough to add scaling functionality to the editor itself.

The only thing that the editor does not support which my old method does is Z scaling aka vertical scaling, which can either amplify or smooth the height differences on the entire map at once. As such the old guide can still be found further down below, but is not really recommended.

THE NEW METHOD IS THE FOLLOWING:

-Go ahead and open the editor.

-Go to the file menu (top left button) and enable advanced mode.

-In terrain mode, click on the new "advanced properties" text.

-Adjust the "samples per lat" and "samples per long" lines any way you want (default values are 1200 and 900 respectively) and press ok.

As examples, multiplying both numbers by 2 will make the map twice as zoomed in (for a 4x larger map as its 2x bigger along each axis) and dividing them by two will make the map twice as zoomed out (making the map a 4th of the size as each axis is halved).
Obviously, you can use any values you like.
Note that, if you do not keep the 'samples per long' value at 75% of the 'samples per lat' value, then the map will stretch itself unrealistically. Not recommended unless you're going for a more absurdist mod.
-Now simply hit "import height field", navigate to your height fields and select all of them just as you usually would. The editor will scale them for you.
Introduction
OLD METHOD STARTS HERE

Welcome to this tutorial, where I will attempt to explain how to scale heightmaps that you can then import into the editor and base your custom maps off of.


The Hegemony editor allows you to import professional elevation data from sources such as NASA, giving you an accurate terrain mesh of a real-life geographical area without having to do any actual sculpting work.

However, it will not allow you to change the scale at which the editor imports this data. You will always end up with the same scale as Hegemony’s vanilla Italy map.
There might be instances in which you would want to use a different scale, such as making a very detailed, scaled up map of a small geographical area, or a scaled down map representing a much larger landmass.

In this tutorial, I will show you how to manipulate the heightmap files prior to importing them into the editor, so that the game will render them to the scale you desire.


As an example, we will be upscaling a map of Malta to be roughly the same size as Hegemony’s “Vanilla” Italy map, as well as downscaling a map of the entire Roman Empire to be roughly the same size as well. I will leave a link to both maps at the end of the tutorial, if anyone wants to use them.
WORD OF CAUTION
This process is somewhat advanced. Read very carefully. Make sure you have adequate hard drive space available, as there will be quite a bit of heightmap data to handle.

The coordinates that show up in the Hegemony editor will not be accurate. If you’re trying to pinpoint the location of, say, a city, then you will need to look for geographical landmarks on the terrain mesh instead.

Also, this process is lengthy, tedious and somewhat complicated. You have been warned.

I am by no means an expert with this kind of software and data, and it is quite possible that someone more experienced could come up with a much more efficient way to do this.
Required software
The Hegemony III Editor

A text editor capable of opening very large files, such as Editpad Lite. Available for free for personal use here: https://www.editpadlite.com/

MicroDEM, a rather intimidating (but small) piece of software that allows us to change some elevation values we need. Available for free here: https://www.usna.edu/Users/oceano/pguth/website/microdem/microdemdown.htm
IMPORTANT: Do not change the paths to which MicroDEM attempts to install by default (c:\microdem and c:\mapdata), MicroDEM can run into problems if it’s installed elsewhere, such as the program files folder.
ALSO IMPORTANT: In some operating systems, you will need to change your region and language format to 'English (United States)' as in this link: http://halcyondirective.co.za/blog/2016/03/25/how-to-fix-the-microdem-read-only-error/

OSGeo4W, contains some files needed by some features of MicroDEM. Available for free here: https://trac.osgeo.org/osgeo4w/ (I’m not sure if this is necessary for the features of MicroDEM we’ll be using, you might not need it.)

BILxSRTM, a convertor program we need because MicroDEM isn’t capable of exporting .hgt files. It’s very obscure and very hard to find on the web, so I uploaded it for your convenience here: https://mega.nz/#!H4BgmZxB!xmoSgznxQsm7DZ5anE8eHsJhTl4K8fBJnaZyFzVkC9s


Getting the heightfield files
Unfortunately, the heightfield files from the source the developers list in their tutorial won’t work well with this method.
Those heightfield files contain “gaps” where there’s no data. Normally, this is not a problem but as a side effect of the way we’ll be converting between different heightfield file formats, those “gaps” are going to be end up being “filled” with a very, very tall height value. The result being that when you import those files into the editor after being done editing them, you’re going to see random spikes in the terrain that shoot up to the sky, as seen below.


Why we’re not using the same .hgt files as the developers.

So, we’re going to use this: http://srtm.csi.cgiar.org/SELECTION/inputCoord.asp website instead. (Unfortunately, the website lacks some of the northernmost areas of the world)
They are .asc files instead of .hgt files, but we’ll end up converting them back to .hgt files anyway. They are also a bit larger, each file being a tile of 5 coordinates wide and 5 coordinates long.

Anyway, here’s how to get them.
-Set ‘3. Select File Format’ to ‘ArcInfo ASCII’. Also set ‘2. Data selection method’ to ‘Enable Mouse Drag’
-Click and drag the mouse across the interactive map to select a rectangular area you wish to make a map of.
IMPORTANT: you WILL need to get every tile within that rectangle you selected, including ones not relevant to the area you intend to work on. This is because BILxSRTM seems to require a rectangular area to function correctly.
ALSO IMPORTANT: Make sure to get an additional row or column of tiles along each edge of the map for cutting room. This is because BILxSRTM will sometimes cut out a little bit of the map along the edges.
-Press ‘Click here to Begin Search’. You will get a new page, containing all the files that you will need to download. Download every single one of them using one of the ‘Data Download’ options underneath the file description. (Fair warning, it is not a very fast website to download from.)


Malta actually fits within just the Northwest corner of this map, but we’re taking the other 3 tiles for cutting room anyway.

For the Roman Empire, you can see we’ve taken an additional row in the south and column in the east as well, and yes we will need to get the entire rectangle, including the tiles along the northeast corner that aren’t really relevant. That’s 91 tiles. It takes a while to download, as the website doesn’t seem to let me download more than 6 files at a time.


Notice how, for the Roman Empire example, there’s so many files to download that it’s split into multiple pages, be sure to grab every file from every page!

We then make folders for the maps, and extract the .asc files from the .zip archives we downloaded into those (those files are a LOT larger when unzipped). We don’t need the .prj files.


For Malta, we’re using about 750mb of heightmap data in total.
For the entire Roman Empire, it’s quite a bit more at 13gb of data.

IMPORTANT
It might, on some operating systems, be necessary to put these files in the C:/mapdata/DEMS folder as MICROdem can in some cases have errors otherwise.

Knowing your scale
We’re going to want to know exactly by how much we are scaling our map prior to doing anything else. For the purposes of this tutorial, we’re making both Malta and the entire Roman Empire roughly the same size as the vanilla Hegemony map. That map is representative of I’d say roughly 225,000 km² of land surface area.

Malta is 316 km². Meaning we want 225,000/316=~712 times the surface area.

The Roman Empire at its greatest extent was about 5,000,000 km². Meaning we want 225,000/5,000,000=0.045 times the surface area.

Don’t forget! Doubling the scale will give you a map with 4x the surface area. Halving the scale will give you a map with a quarter of the surface area. This is because when changing the scale you are changing both the length and width of the map. This is why, if we want x times the landmass, we need to take the square root of x as the number by which we multiply the scale.


So, for Malta, the square root of 712 is ~26.68. Let’s just pick a nice, round number for convenience. For Malta, we’ll use a 25 times larger scale than normal.

For the Roman Empire, the square root of 0.045 is ~0.21. Again, let’s just round that number a bit to 0.2. So we’ll use a scale a fifth of the normal size for Rome.
Decimating data for larger geographical areas
NOTE: Depending on how powerful your computer is and how large the geographical area that you are scaling is, this step may not be necessary. This step should only be necessary when scaling very large areas of land down. I recommend you read this bit regardless because it contains some basic information regarding MicroDEM.


Now, in the step after this one, we need to open all the heightmap data that we downloaded for our map all at once. However, this can pose a problem if you’re scaling a very large landmass. You’ll have more data than your computer can handle at once.
For Malta, with less than a gigabyte of data, it’s obviously no problem and we can skip this entire step. Since we’re going to be increasing Malta’s size by a lot, we wouldn’t want to sacrifice detail anyway.
However, for our map of the entire Roman Empire we have 13 gigabytes of data, and we definitely can’t handle all that at once.


However, MicroDEM offers a way to reduce the level of detail in the heightfield files, making the amount of data we need to work with much smaller. Since we’re going to project the Roman Empire map at a much smaller scale anyway, reducing the detail should not be a problem.

Unfortunately, it does mean having to open, edit, save and close all 91 of our Roman Empire tiles one by one, so it’s a tedious process.

So, let’s go ahead and open MicroDEM.

When opening MicroDEM for the first time, you will likely get a bunch of pop-up screens asking to download some additional files needed by the program. Just click yes to all of them and you should be ready to start using MicroDEM.

We go to File-Open-Open DEM and load up one of our tiles. (Loading the file should take a few seconds).

Next, we go to Raster GIS - Thin DEM (decimate).
Here, MicroDEM lets us put in how much we want to remove detail by. A thin factor of 2 would get you a file that’s a quarter of the previous size, this would cut our data down to about 3.25 gb, which might be small enough to work.
But you could put the same number as the amount of times by which you’re scaling down the map, as you would end up with the same detail-size proportion as normal. So we’ll put a thin factor of 5, as we’re using a scale that’s 5 times smaller. We end up with files a 25th of their previous size this way, cutting our data down to just ~500mb.

MicroDEM will open the decimated file alongside the old one, you should be able to tell which is which because the decimated file will have a different colour gradient, as well as by the file name displayed at the top of its window (it should have the word ‘thin’ in it).

Now we need to save our new, decimated file. Make sure it is selected by clicking on it.
Go to File-Save DEM-ASCII-ASCII Arc Grid. Let’s make a new folder containing all our decimated heightfiles.

Okay, now we close the windows of the tile that we just finished, as we don’t want it to stay loaded (the whole reason we’re doing this is because the data is too much to load all at once), and we repeat the process for each of the 90 remaining tiles. It’ll take a while, put on some music or something.

In this image, you can see the difference decimating made. Notice how much smaller the decimated files are.
Merging heightmaps
Assuming you have a manageable amount of data that your computer can handle all at once, we can proceed to this step.

In MicroDEM, go to File-Open-Open and merge DEMS, select ALL of the heightfield files that you got for your map. If you decimated your heightfields, be sure to select the decimated ones and not the old ones.

MicroDEM will now merge all these smaller heightfields into one large heightfield. This process can easily take a minute.

For Malta we didn’t need to decimate any of them so we just select the 4 tiles we downloaded originally.

For Rome, since we did do decimation, we select the decimated tiles and NOT the original ones, all 91 of them at once.

Height scaling
Now that we have our merged heightmap, one first thing we could do is scale the height of the terrain to match the way that we’ll be scaling the size of the terrain later on. If we don’t do this, then it’ll end up changing the steepness of geographical features.


First thing is to decide exactly by how much you want to scale the height of the terrain.

For Rome, if we were to not scale the height values down in the same way that we’re scaling down the overall terrain, then the mountains would be far too tall and steep. If we want to keep them in the right proportion, we should scale them down to a 5th of their current height as well.
If you’ve watched the Hegemony editor video’s, though, you’ll know the devs like to scale their mountain ranges disproportionately tall to make them suitably impressive.
So instead what we could do is scale the terrain height down to a 3rd instead of to a 5th, which would get us the same disproportionately tall mountains the developers like to make, without having to do any actual editor work.
In this example, I’m going to opt to scale it down to a 3rd, but it’s a matter of style and preference if and how much you like your height values exaggerated.


For Malta, since we’re increasing its size so much, if we wouldn’t scale the height values to match, it would smooth the geographical features out far too much, and Malta would end up being very flat without much definition. Ideally, we would multiply the height values by 25 to keep it in the same proportion, or maybe even more if we want to exaggerate the height values.
Unfortunately, that would result in height values that are too tall to work with the game well.
The strategy map in the editor displays any height value above 5000 feet as white, making it impossible to spot geographical features from the strategy map for an area that has been set to a height higher than that. Also, you could end up with terrain that is actually higher than the point at which the camera changes from strategy map view to regular view. There might also just be a hard limit on how tall terrain can be that we would risk breaking.

For these reasons, we’re going to have to limit by how much we scale up Malta’s height values. We’ll be multiplying the height values by just 10 instead, and the only reason we can scale it up that much is because Malta’s highest point is less than 1000 feet. Unfortunately, this means Malta will end up being smoother and flatter than it should be. This is the compromise you have to make when scaling a tiny landmass up by this much, and perhaps a reason to avoid doing so.


To recap: in general you want to scale the height values the same way as you’ll be scaling the length and width of the terrain, but there’s benefits to exaggerating the heights a little and limits with how tall you can go.
We’ll be multiplying the height values of the Malta map by 10, and dividing that of the whole Roman Empire map by 3.


Now, to scale our height values we go to Edit-Single grid arithmetic and then ‘Multiply z values’ or ‘Divide z values’ depending on which you want to do. Input the number you want to multiply or divide the z values by and press ok.

Fixing the sea
The next thing we want to do is set the height of our seafloor. Currently, the sea actually has no height data, and if we were to leave it like this then the game would interpret it as a very, very tall height value, you’d have the seafloor towering far above the highest mountains on the map!


Fortunately, MicroDEM lets us set a height value for all the missing data.

Go to Edit-DEM Holes-Missing data to specified value, putting in a value of -600 should do fine. Press ok.


The heightfields of the black and caspian seas actually have some areas filled with a height of 0 rather than missing data. The Hegemony editor will change any value at 0 or below to -600 when first importing it, so it’ll work out fine.
Saving as .asc file
Now we’re ready to save our merged heightmap to one giant .asc file. Go to File-Save DEM-ASCII-ASCII Arc Grid. It will likely take several minutes to save, as the files can easily be over 500 mb.


We’re done with MicroDEM for now, feel free to close it.
Changing the scale!
For the next part, we need to open the .asc file that we just saved in a text editor. Unfortunately, at close to 700 mb, the files are far too large for your basic text editors like notepad or wordpad to handle. This is where editpad lite comes in to the rescue.

Note that, if the .asc file is larger than 2 gb, even editpad lite might not be able to handle it and you should have decimated the heightmaps (more).

Editpad lite works pretty much just like notepad so it shouldn’t need much explanation. Go ahead and open the .asc file in editpad, it might need a few seconds to load it.


In the 5th row, you will see ‘cellsize’ and then a number. All we need to do to scale our map is to change this number.

For our Malta map, this number is 0.00083333335351. We want to increase the scale 25-fold, so we multiply this number by 25, which is ~0.02. We’ll just round it to 0.02 for convenience.

For the Roman Empire map, this number is 0.00416666688398 (it’s a higher because we decimated the height files). We want to divide this number by 5, which is ~0.0008. Again, let’s just round it to 0.0008. Be sure not to miss any zeroes.


Now simply go to File-Save or hit Ctrl+S like you would any other text editor, and we’re done with editpad lite, which you can now close.
Cutting out excessive areas
IMPORTANT: IF YOU ARE SCALING UP A SMALL LANDMASS BY A LOT, LIKE WE’RE DOING WITH MALTA, FAILING TO EXECUTE THIS STEP CAN RESULT IN YOUR HARD DRIVE BEING FILLED WITH OVER 100GB OF DATA WHEN WE CONVERT LATER!

This step should only be necessary when greatly expanding the size of a small landmass, such as what we’re doing with Malta. This step can be skipped if the map you’re working with hasn’t been greatly scaled up or scaled down instead of scaled up, like our map of the Roman Empire. The following information might still be useful as it tells you how to crop the map in MicroDEM, but remember that BILxSRTM needs some cutting room!


For Malta, only a very small part of the map that we’ve been working so far is actually relevant. Remember that Malta is now the size of vanilla Italy, and it’s only that small island in the middle of its current map! If we were to run this through BILxSRTM, we’d end up with over 100gb of data!

Open up MicroDEM again, go to File-Open-Open DEM and load up the .asc file of Malta we edited in editpad lite. It will probably take a minute to fully load.

Right click the map and select grid/graticule. Click on the Graticule button and change the number to 1. We might also want to use ‘ticks’ instead of ‘lines’ since MicroDEM doesn’t always seem to draw all the lines. Press ok and then close the grid/graticule window. This should have created a sort of guideline/overlay system that divides the map into rectangular tiles.
At the end of our process, each of those tiles is going to be a 3mb .hgt file that we can then import into the editor.


For our map of Malta, we can clearly see there’s a many thousands of tiles because of how much we scaled the map. So let’s crop out everything that’s not Malta.
If you, in your map, are getting thousands of tiles, then you'll definitely want to crop out stuff too.


Click the magnifying glass icon at the top of the map window to zoom in on Malta first. It will ask for a “zoom in factor” which is basically just how much we’re zooming in on the map (this doesn’t scale up the map, it just zooms in the display).


Go to the 8th button from the left at the top of the map window. It should say ‘subset & zoom’ when hovering over it. We click it, and then click and drag a square around just Malta. We want to take a few extra tiles around the edges as well for cutting room.
We should now get an image of only the area we just selected.


Next, we go to File-Save DEM-Current Subset, MD DEM which will create a file containing only the area in the current image.
MicroDEM should offer to immediately open the file you just saved, which you could do (you will need to set the grid/graticule to 1 degree again). You can now close the original .asc file.


Great! in the new .DEM file we created, all the excessive data should be cropped out.
You can use the graticulation method again to see how many tiles you're left with now. 100-200 tiles is fine, you will end up with 300-600mb of data. Much more than that is probably not wise.


Optional: seeing how much BILxSRTM is going to cut out
In MicroDEM, go to file-open-open DEM and open the .asc file we edited with editpad lite, or, if you had to crop down the map like we did with Malta in the previous step, open the .dem we saved at the end of that instead.

Right click the map and select grid/graticule. Click on the Graticule button and change the number to 1. We might also want to use ‘ticks’ instead of ‘lines’ since MicroDEM doesn’t always seem to draw all the lines. Press ok and then close the grid/graticule window. This should have created a sort of guideline/overlay system that divides the map into rectangular tiles.
At the end of our process, each of those tiles is going to be a 3mb .hgt file that we can then import into the editor.

BILxSRTM will cut out ‘incomplete’ coordinate tiles along the edges. Basically, anything beyond the outermost ticks that you can see will be cut out.
If any of those tiles were important to the map you were planning to make, then you did not take enough cutting room and have to start over.

In the below images, I’ve attempted to mark the area that will be cut out with red diagonal lines (hand-drawn by yours truly).


You can see here that, for our Roman Empire map, I actually failed to get enough cutting room along the North. Meaning most of Britannia will be cut off, as well as Rome’s northernmost possessions in continental Europe.
Mea culpa. I thought it would cut off tiles along the South instead, it’s hard to predict which way the cookie will crumble sometimes.

You can see that, on the West side if you look closely the ticks are right at the edge of the map, so nothing gets cut at that side. The same actually happens in the South, but it’s not scrolled down far enough to see in this image.


This step serves no actual purpose and doesn’t modify the map or affect the end result, it just allows you to see what areas will be ignored by BILxSRTM.
Saving as .bil file
Now, the Hegemony editor does have a rudimentary function that lets you import .asc files directly, unfortunately, it won’t work with our edited .asc files. So we’re going to convert our file to the more supported .hgt files the editor wants. We can’t save as .hgt in MicroDEM, so we’re going to save as .bil instead, then convert that .bil to .hgt files using BILxSRTM.

We go to File-Save DEM-BIL and save the map as a bil file in a folder all by itself Again, saving might take a few seconds.


We’re done with MicroDEM now and we can close it.
Converting to .hgt files
Okay, now that we have a .bil file of our map in a folder by itself, let’s also create an empty folder that will hold our .hgt files.

Now, it’s time to open BILxSRTM.exe.
Set the ‘BIL directory’ to the folder containing our .bil file.
Set the ‘SRTM’ directory to the empty folder we created to hold our .hgt files.
Make sure that the ‘3 arcsecond’ option is the one selected.
Press Start.
Wait until it says done at the bottom.


Your previously empty SRTM directory should now be filled with .hgt files.

We can now import these new .hgt files into the Hegemony editor as normal.
Final result


If you’re missing areas, remember that BILxSRTM cuts out incomplete tiles along the edges, and that BILxSRTM doesn’t seem to work well with maps that are not rectangular.


Well, that should be it! I hope you were able to follow me through this process. If anyone has any questions, or suggestions on how to improve this tutorial, let me know.
Download links to maps
I’m not going to use these maps, so I’m sharing them here.
If anyone wants to make these into a proper map mod, feel free. I look forward to seeing what you’ll do with them. Some credit would be nice, but whatever.

Malta: https://mega.nz/#!7lpCQSRJ!91yOMNHNSVSCG7bqc7hDFssoPMog86M6QrXUWfPs0oc
(Again, the terrain is smoother than it should be. You might want to do some manual sculpting to add definition.)

Rome: https://mega.nz/#!654GibIZ!IxJ31KUfWMY50EXub8N6RxGcQCGKhnUJbl-EPNFD4YY
(I went back and redid this one, grabbing another row of tiles along the North so it properly includes Britain and the Netherlands)
16 comentarios
MAN-Of-WAR 29 DIC 2021 a las 2:31 p. m. 
That makes more sense, sorry for just saying map. Understandable though, thanks for letting me know.
Fristi61  [autor] 29 DIC 2021 a las 2:25 p. m. 
Those links weren't actually playable maps, just editor files with raw scaled heightfield data that a modder could then use as a basis to build a map on.
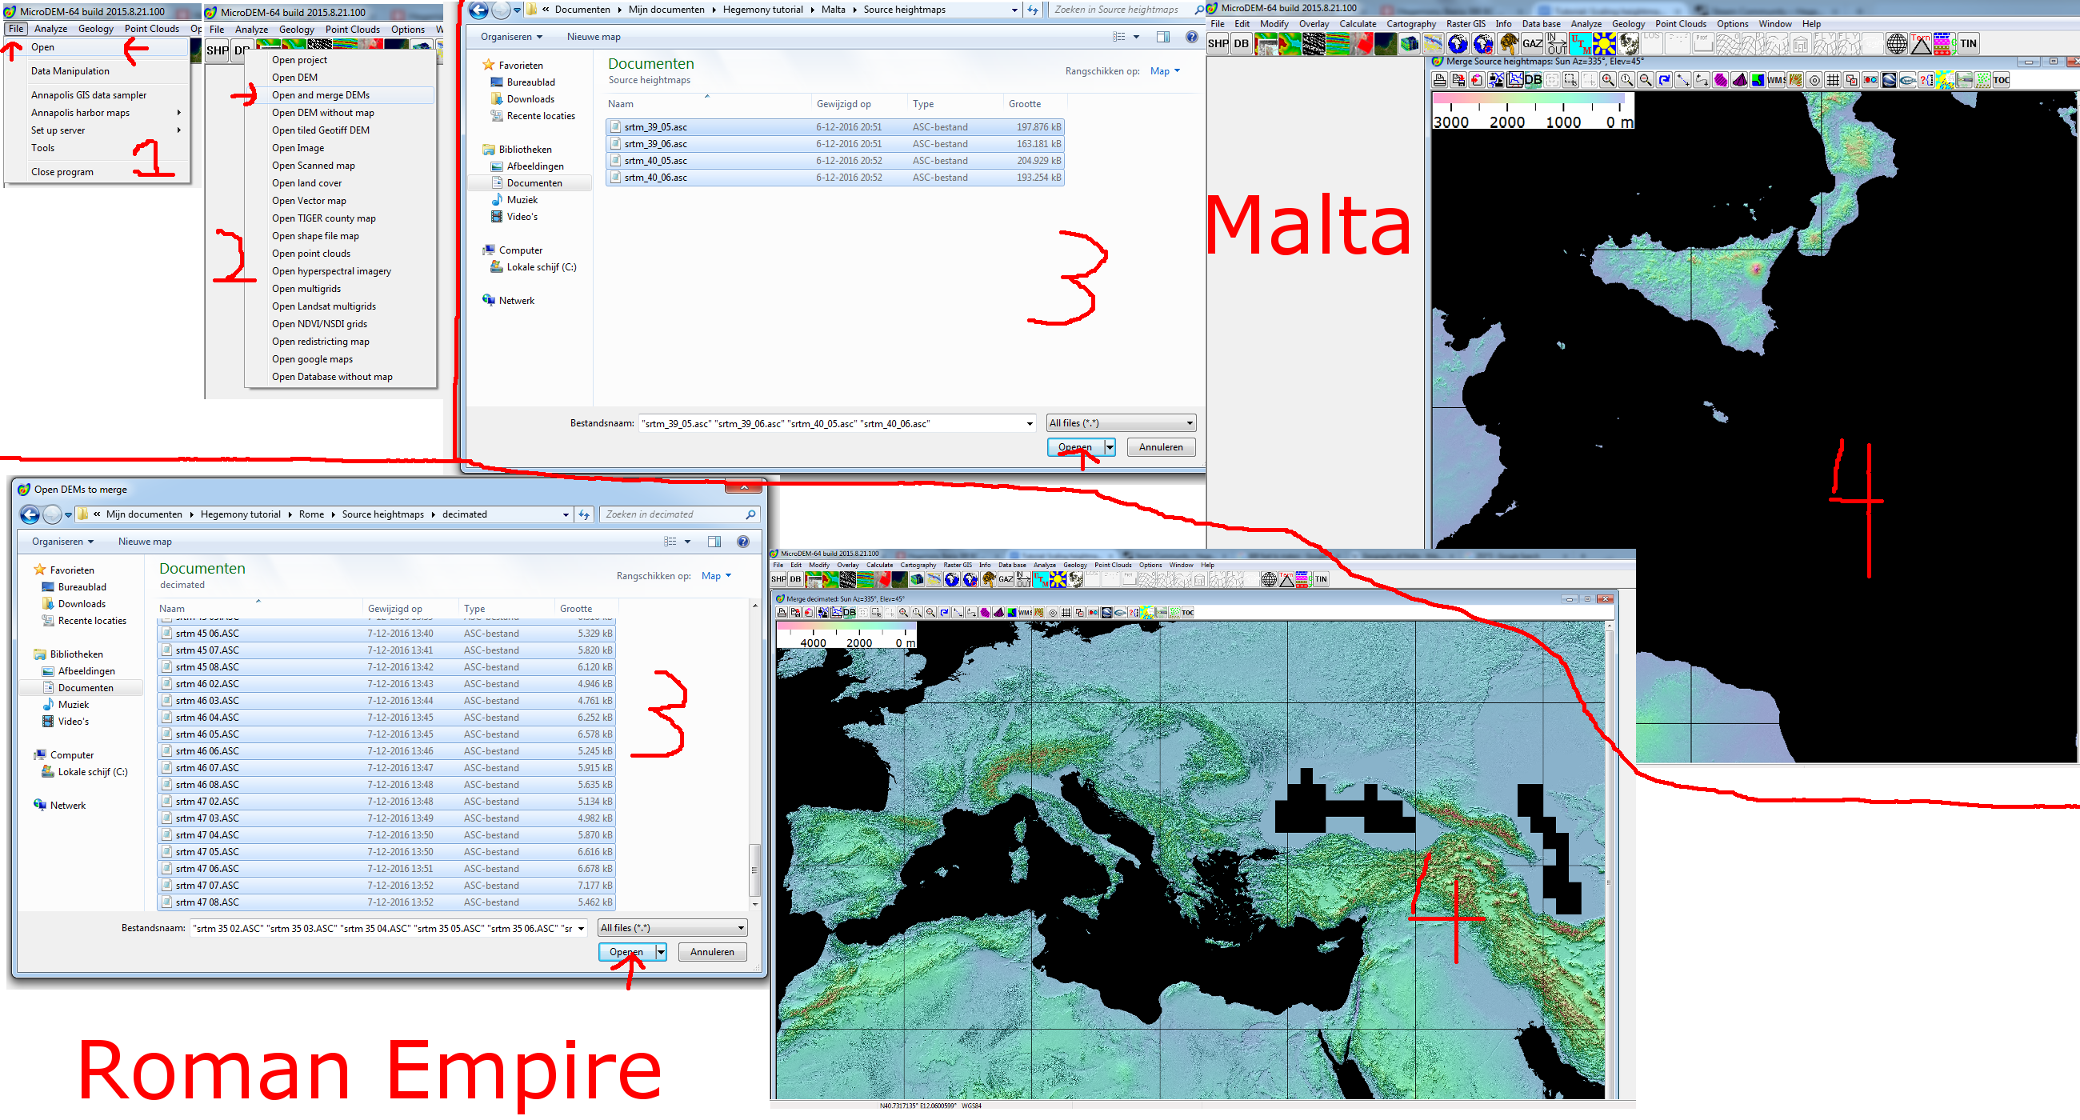
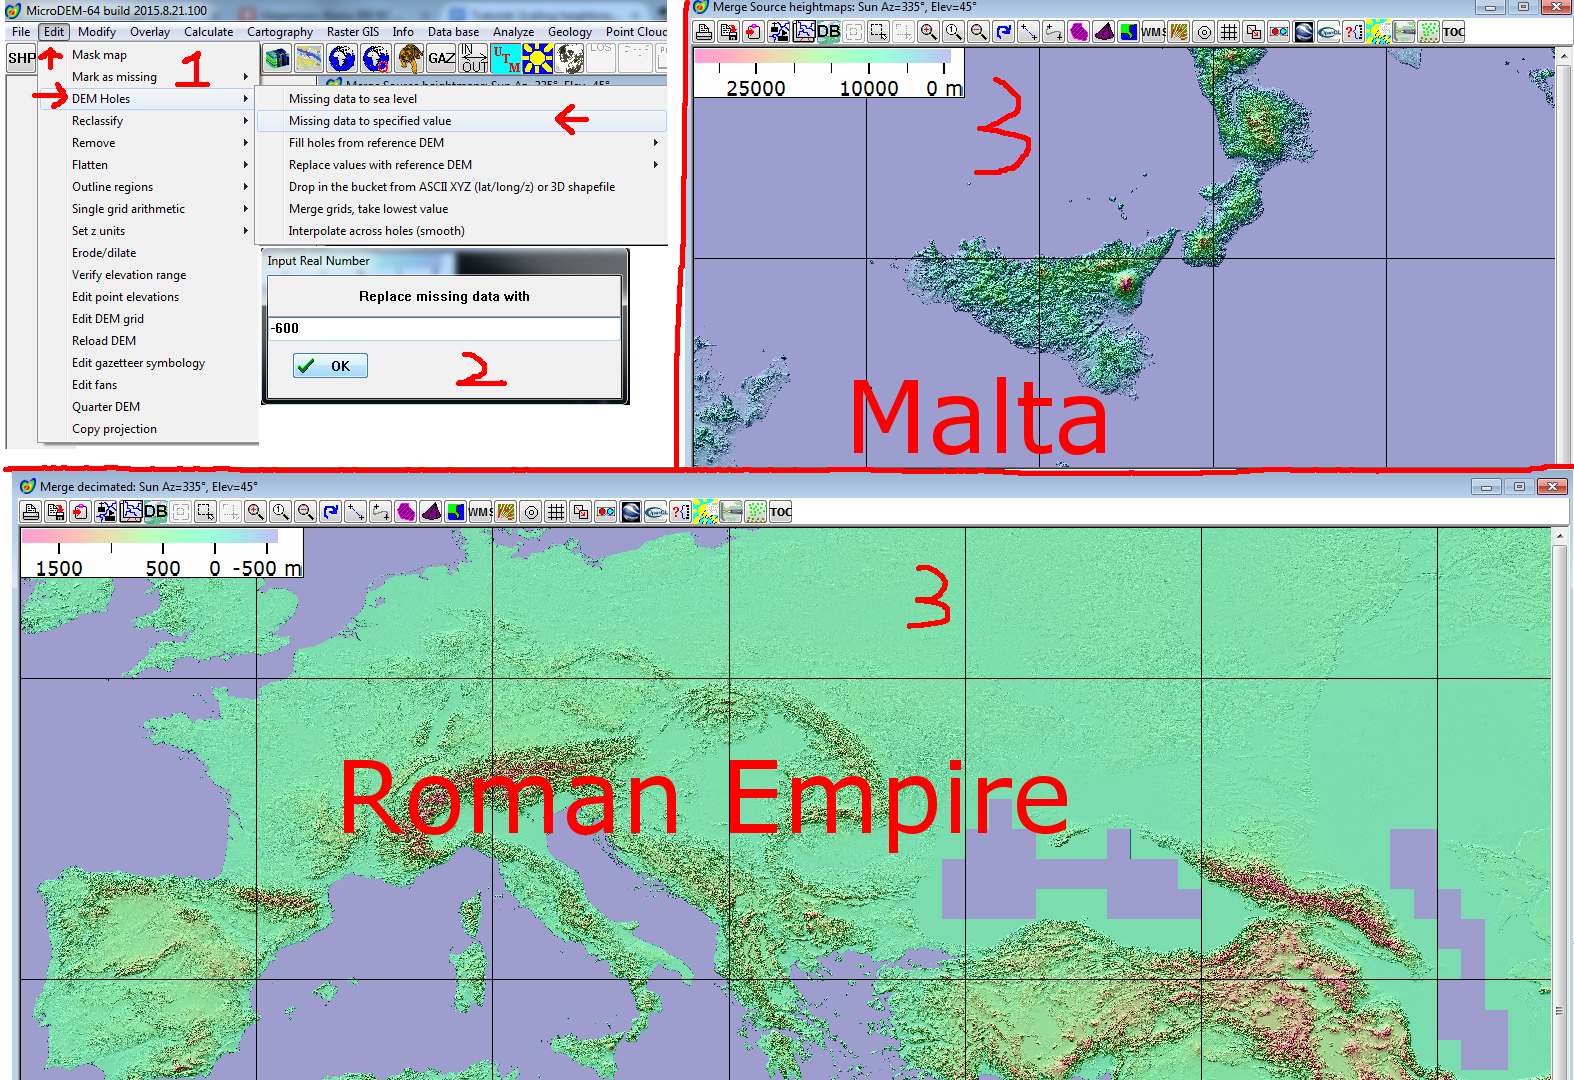
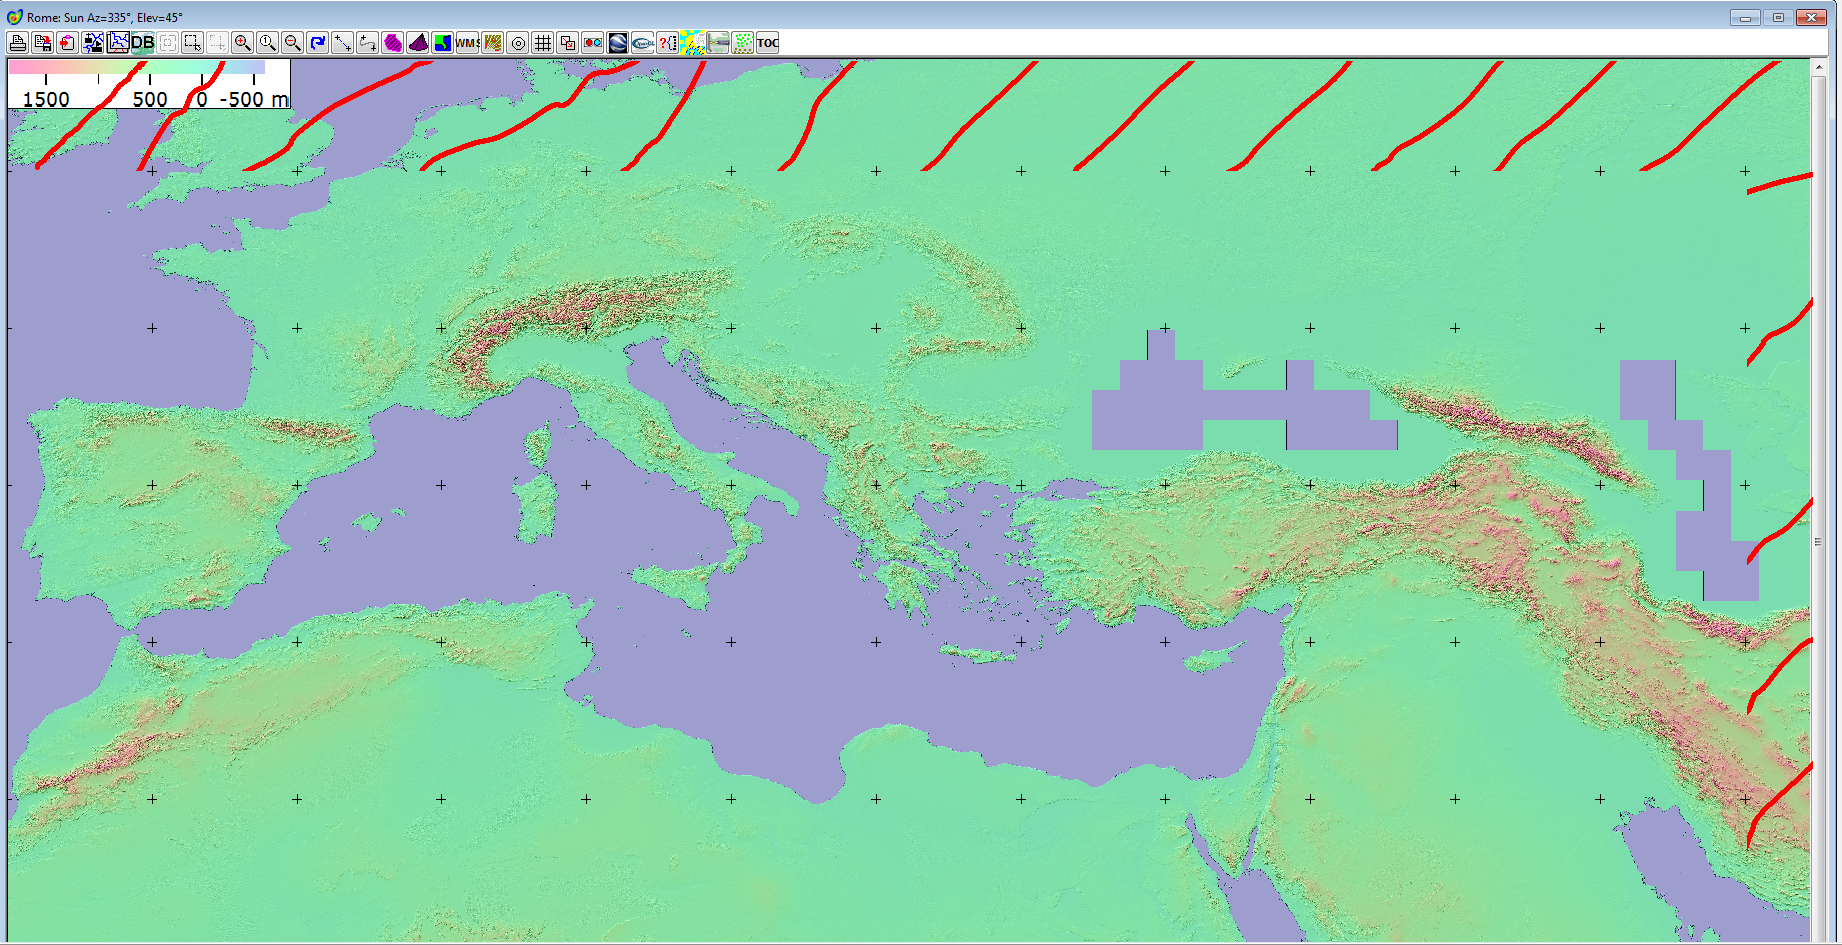
The Rome map in fact became the basis for SGZ's Classical World map.

There are no other sites with ready made maps. Creating playable maps takes many hundreds of hours, and this is a very small community.
The only available map mods out there are the ones made by myself (Iberia, Latium, Skirmish Maps), SGZ***71 (Classical World, Silk Road, Punic War, Conquest Britannia) and the Kingdom of Macedon mod by the game devs.
MAN-Of-WAR 29 DIC 2021 a las 10:57 a. m. 
The links for the maps have been removed. Do you or anyone else know of a site that has ready made maps? I thought the workshop would have more maps.
Fristi61  [autor] 12 SEP 2017 a las 1:55 a. m. 
Updated with the new method.
Fristi61  [autor] 1 JUL 2017 a las 3:22 a. m. 
Well didn't you see the patch notes? The editor just supports map scaling now, so this whole tutorial is pretty much outdated.
Wenchbane 30 JUN 2017 a las 8:44 p. m. 
Fristi, just posting this here for your guide.

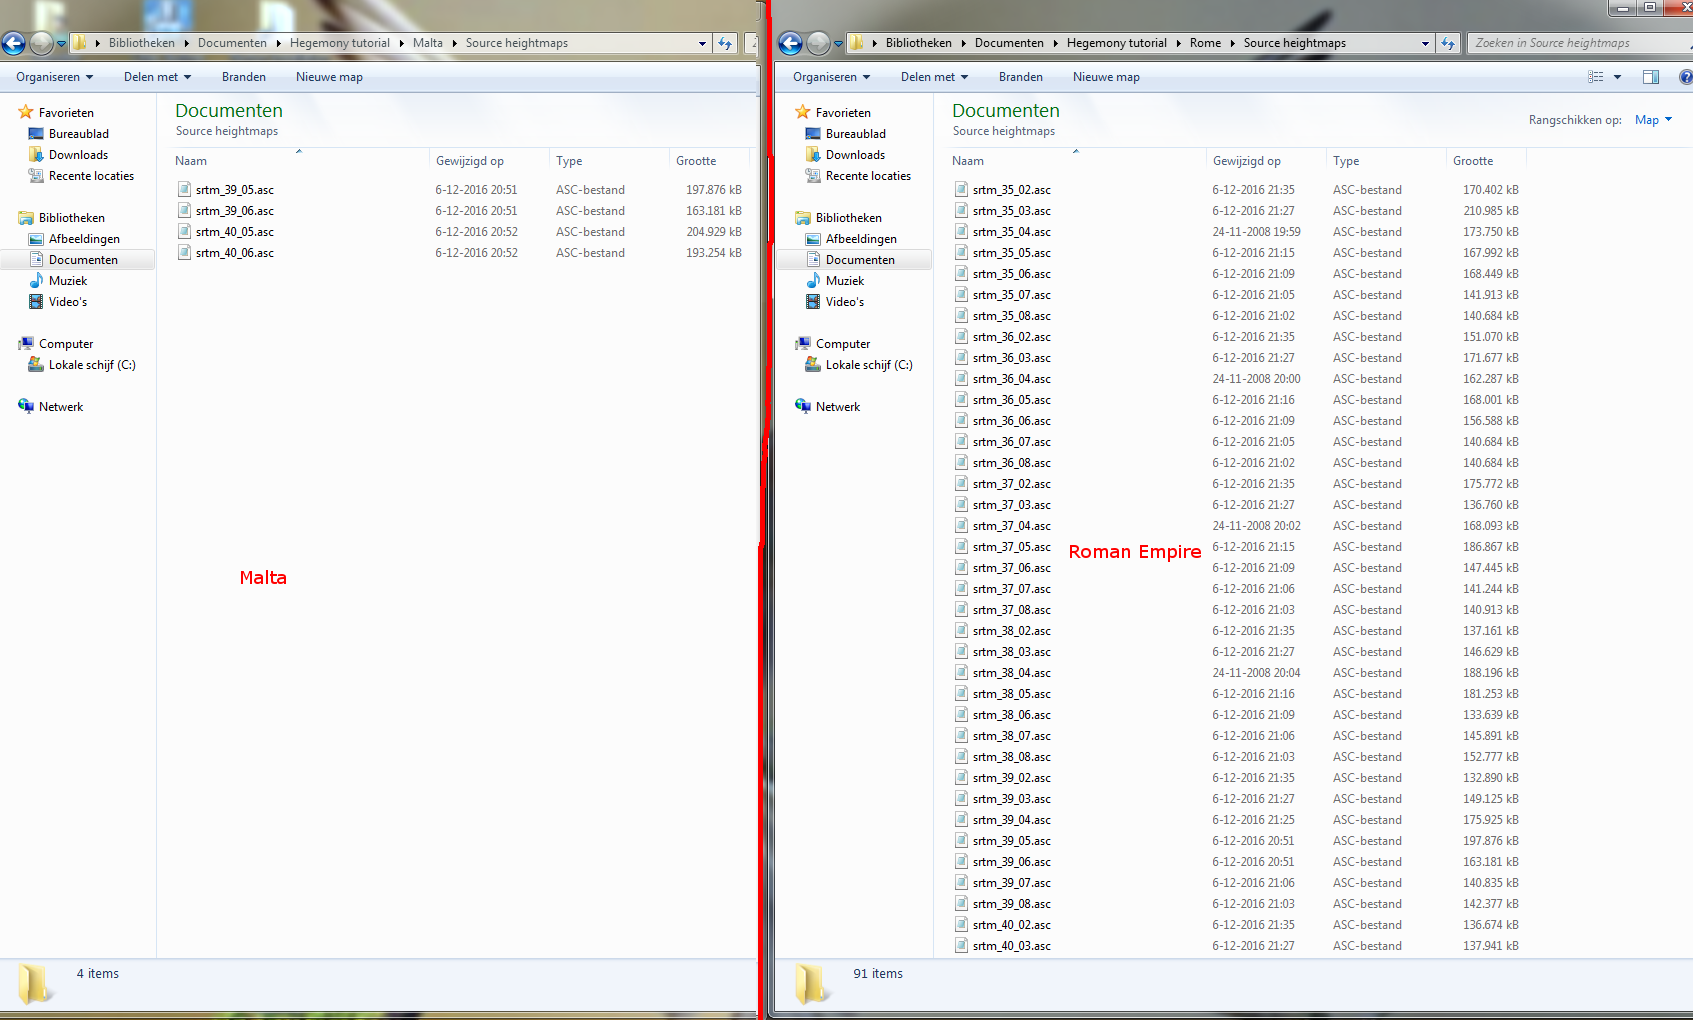
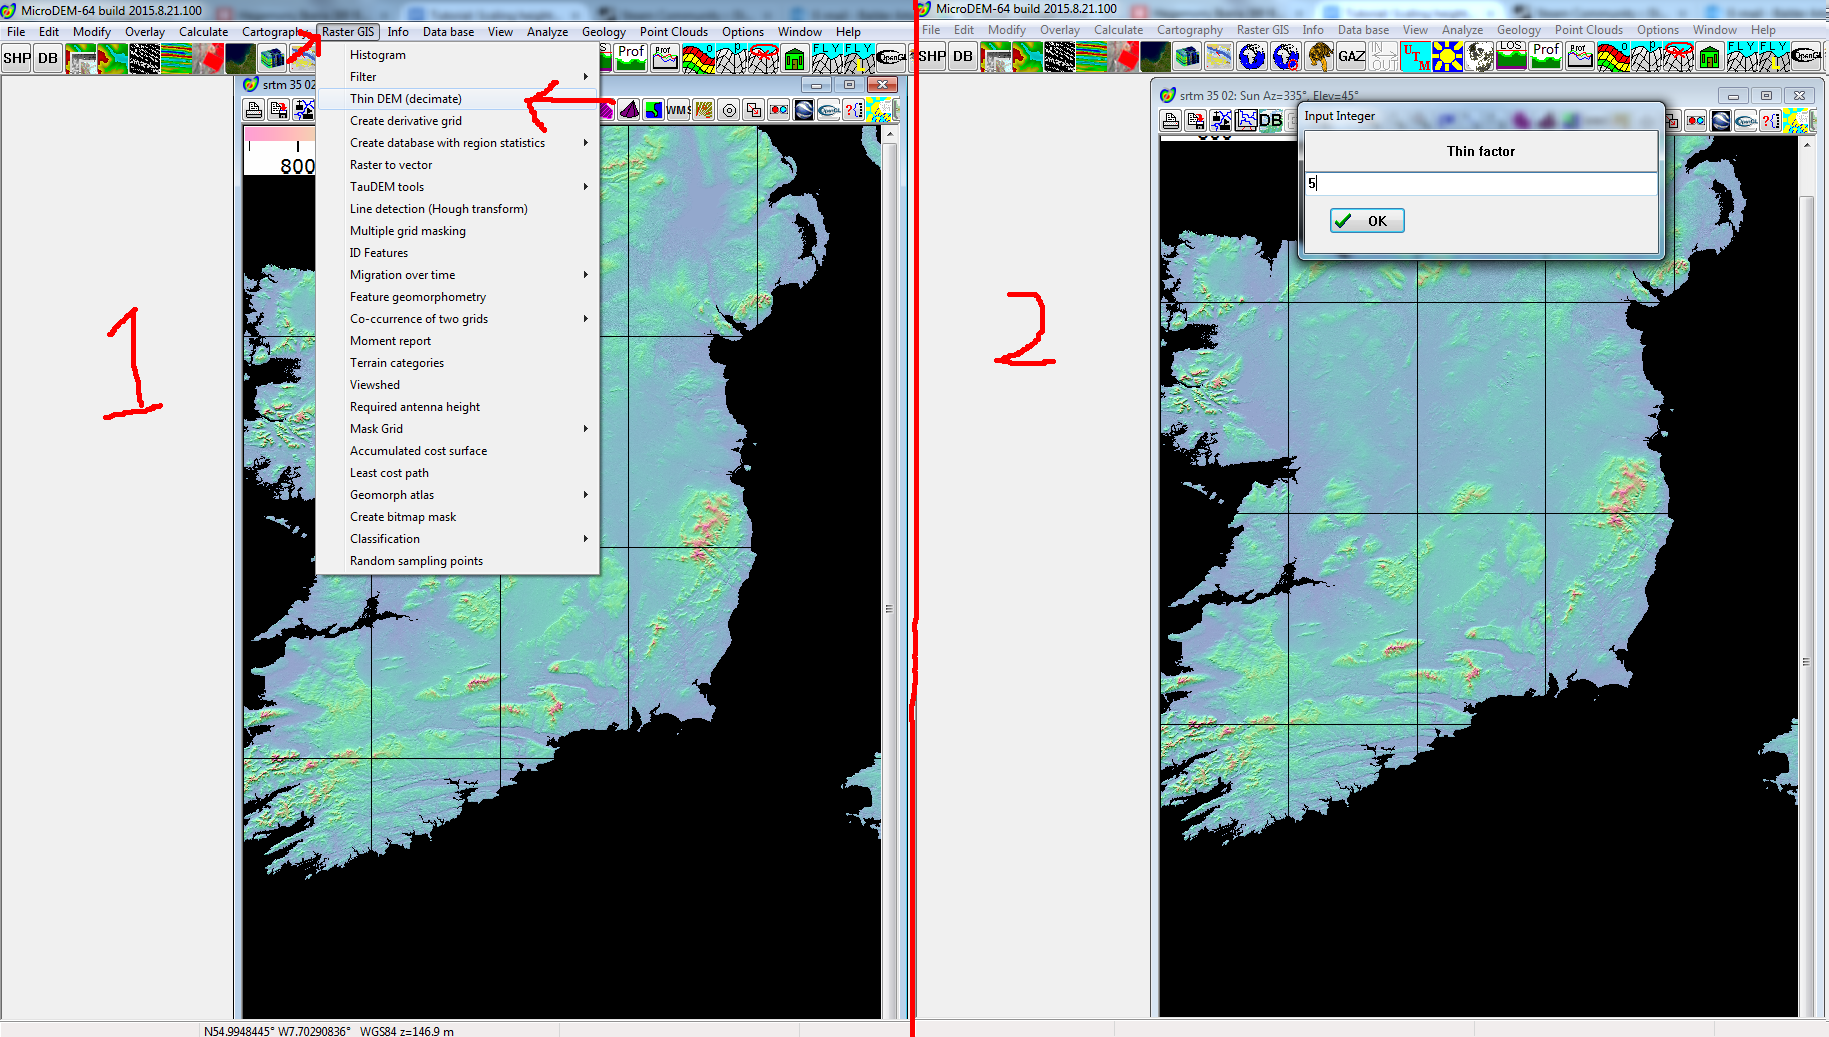
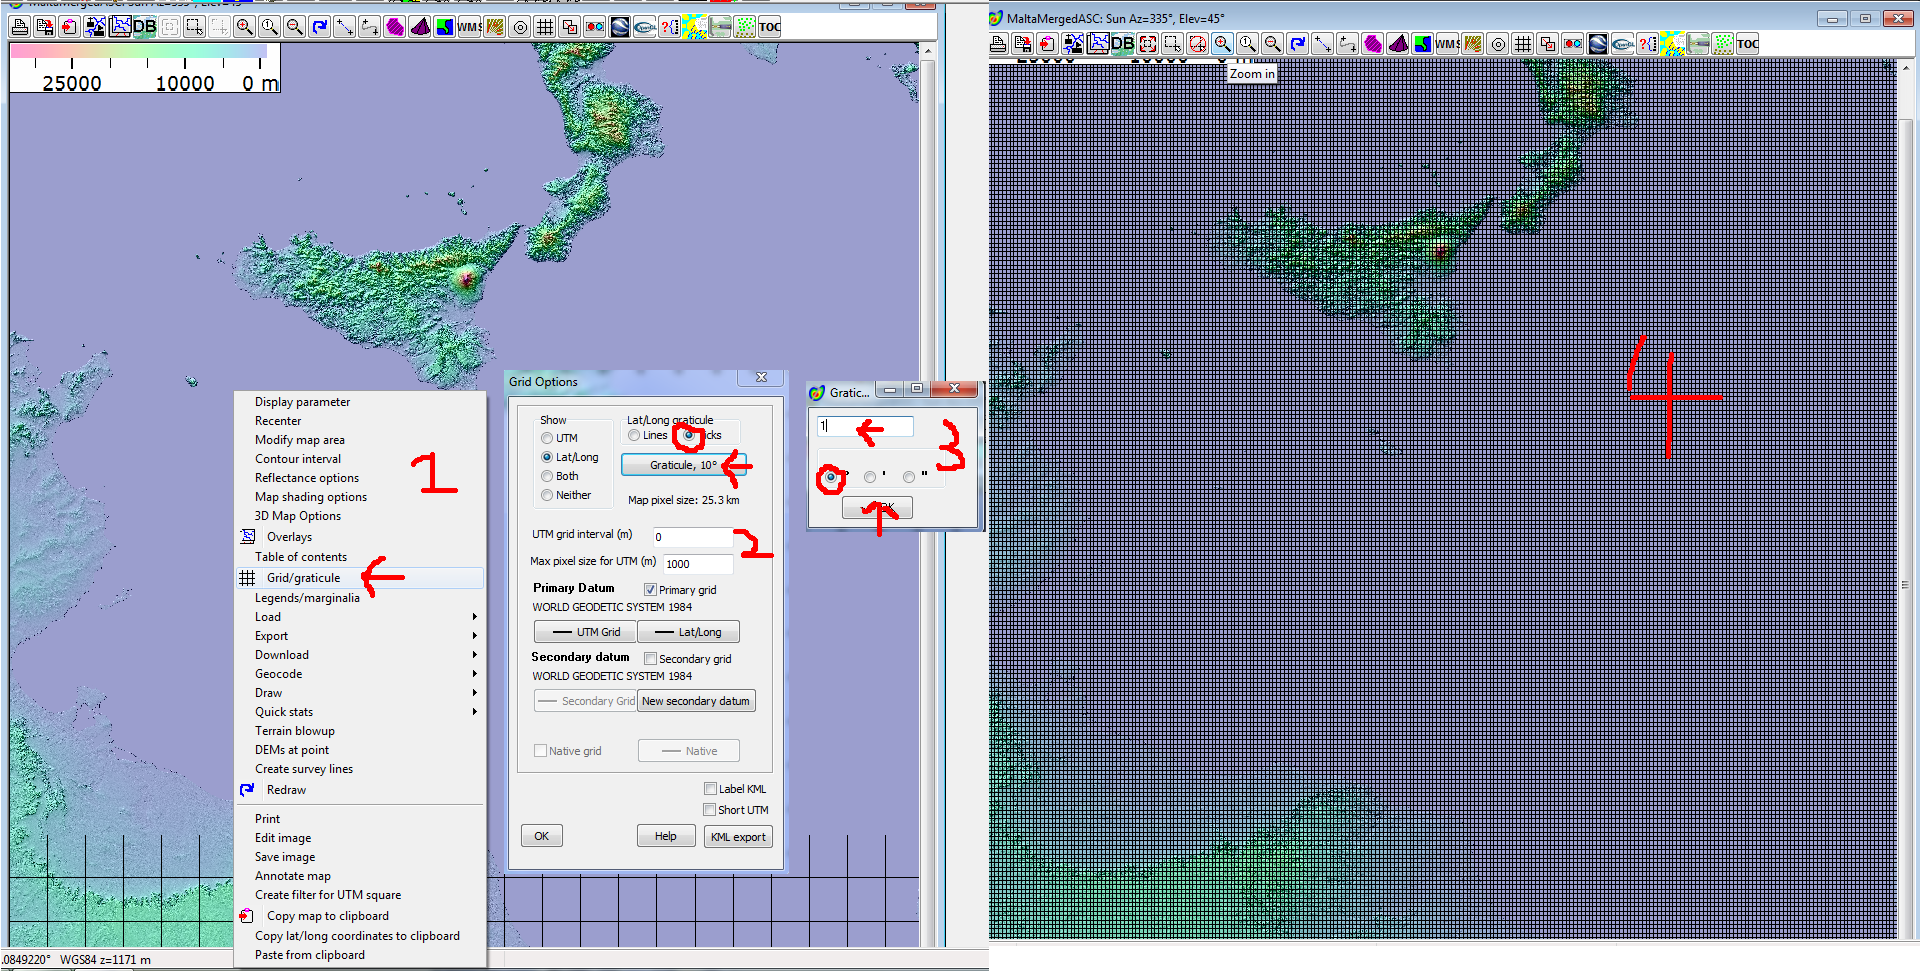
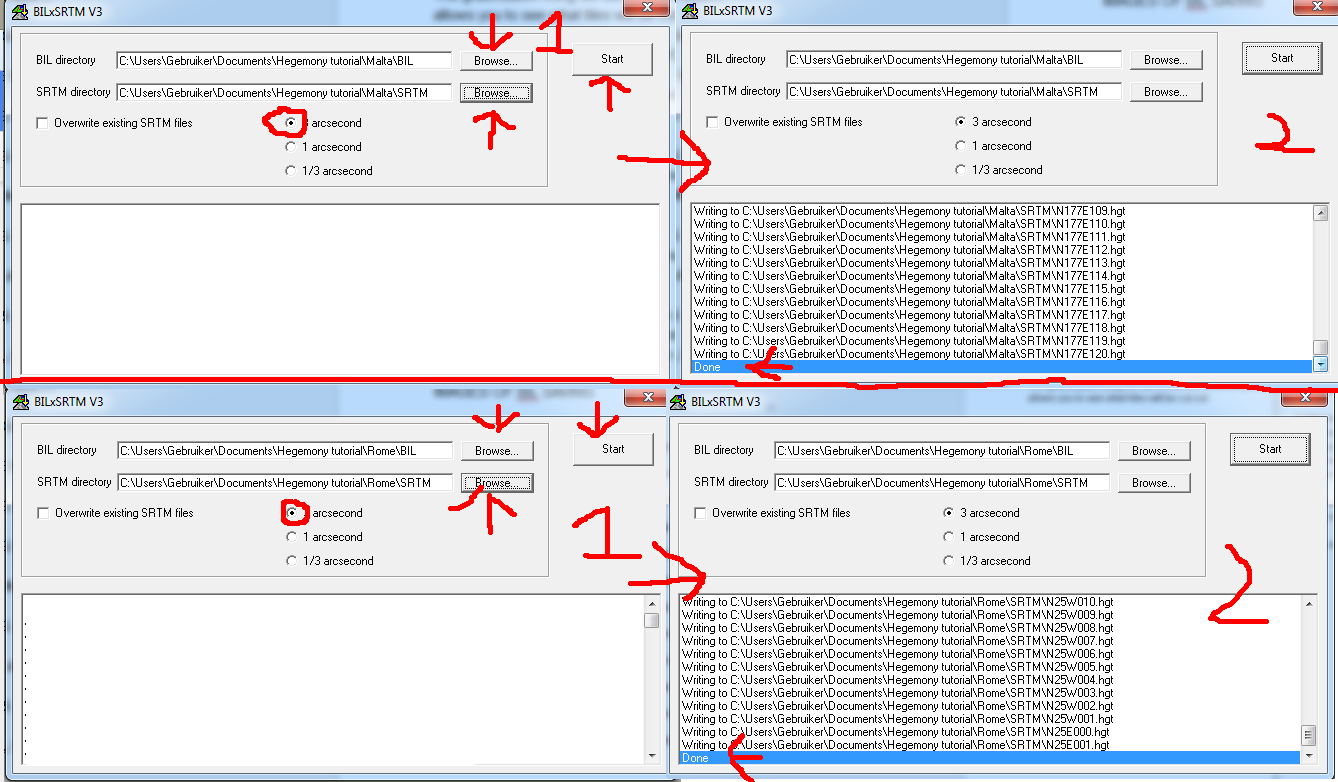
It seems the import limit in the editor of the files once converted by BILxSRTM is around the range of 1600 files at once. If the amount of files the modder has is larger than this number doing it this way doesn't get a nice result.
Wenchbane 9 MAY 2017 a las 2:16 a. m. 
Woah that's pretty complex, kudos to adding the converted maps at the end!

I appreciate the work that's gone into this, solid foundation =P

SGZ***71 17 MAR 2017 a las 4:04 p. m. 
Wow. Complex process. Having read this I appreciate your base Roman Empire map much more.
Fristi61  [autor] 10 ENE 2017 a las 9:23 a. m. 
If you could, send me a screenshot and maybe I can figure out what's happening (of the bumpiness I mean, the website just acts up like that sometimes).
Fristi61  [autor] 10 ENE 2017 a las 9:21 a. m. 
Hmm. The terrain will be really bumpy if you don't do the vertical scaling to match the way you scale down the surface area of the terrain.

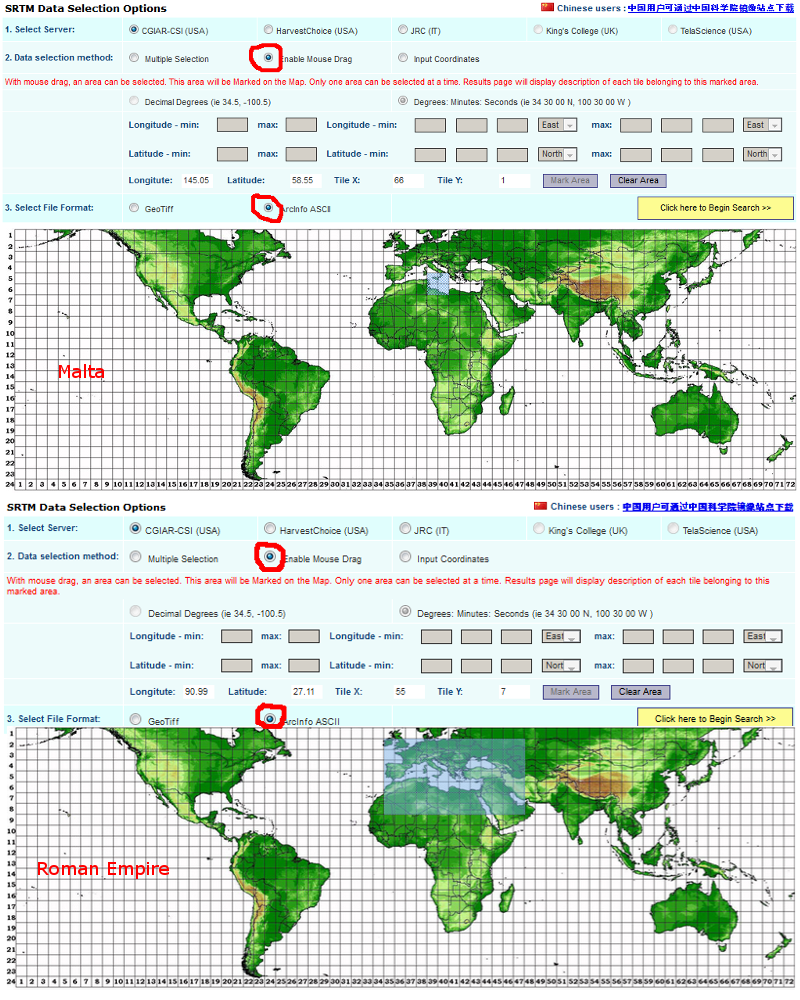
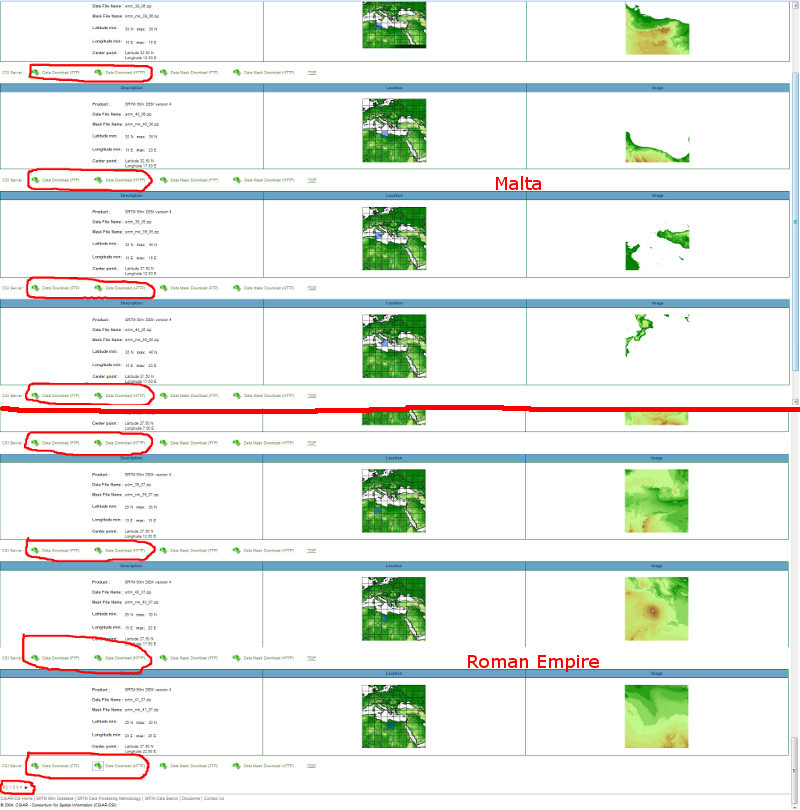
The site IS indeed a little crappy. I've also had it sometimes overwrite one of the tiles that should be in the download page with a different tile that was already linked earlier. Usually it's fixed by trying again, or selecting only one tile at a time.