Camp Sunshine

Camp Sunshine

48 ratings
Camp Sunshine Guide - Item Locations, Puzzle Solutions, and Maps
By Jay T Maximus
Trying to survive the wrath of Sunshine Bear, but need a little guidance? After all, it's hard to go on scavenger hunts and solve devious puzzles all with a maniacal mascot on your tail. Well this guide is here to help! With this guide you'll have access to important item locations, puzzle solutions, maps, bonus material, and even a little guidance for surviving the ending. Life's too short--especially with a killer bear mascot breathing down your neck--to spend it all looking for little white flowers that some paranoid jerk asked you to get. Let this guide help you, and maybe you'll be able to spend more of your time on the important stuff, like running for your life.
   
Award
Favorite
Favorited
Unfavorite
Guide Updates
In addition to a "Basic Mechanics" section, with the release of the Version 1.2 Winter Update to the game itself there have been several changes; only a couple of them have a significant effect on this guide.

1. There is an extra Bonus Quest (See "Beware the Snowman" in the Bonus Quests section)
2. The map has been altered, not only to account for the extra Bonus Quest's details, but also to reflect the fact that certain cabins that were formerly separate have been combined now.
0. Basic Mechanics
Being Chased: The game's main stalker, Sunshine Bear, can appear at any time. He's a supernatural stalker, so he literally appears out of thin air. He will only rarely appear right beside you, if ever, outdoors, but when you're inside he has a much worse habit of this, so it's helpful to reserve some stamina so you can sprint away from him (See "Sprinting").

Flashlight: Press the E Key to turn the flashlight on, to better light your surroundings. Beware, though, because if Sunshine Bear gives chase while your flashlight is on, he will sprint after you instead of his usual walking pace; unlike you, he doesn't run out of stamina, so it's best to click off your flashlight the moment you realize Sunshine Bear is around. Also, the flashlight runs on batteries, which die fairly quickly. You can keep your eye on the amount of battery charge left in the upper left corner of the screen. You can use batteries found throughout the camp to recharge your light.

Sprinting: Hold the SHIFT Key to sprint, but be warned that you can only sprint until the blue stamina bar in the upper left corner of the screen reaches empty. It will recharge naturally after a bit of rest, or else you can refill your stamina instantly by drinking an energy drink, which not only restores stamina, but as of Updtate 1.2 can also give Jez a higher speed at sprinting than he would normally have. When in doubt, it's best to save your sprinting in case Sunshine Bear spawns right next to you, or until you find yourself in close quarters with him and absolutely need your sprint to get by him without being harmed.

Health: Jez can only withstand one slash from Sunshine Bear's blade without dying. On the second slash, it's game over, unless you restore his health by having him eat Food, which can be found throughout the camp.

Map: Press "M" on the keyboard at any time to bring up the map of Camp Sunshine, as long as you're outside in the main camp area. Be warned, however, that just as you can still move around while looking at the map, Sunshine Bear can appear and stalk you too while you're on the map screen.
1. Diary Page Locations
After the 1st, you can find them in any order. Consult the maps at the very bottom of this guide if you need to know where any of the locations in this list are found:

  • 1. Found right in front of you in the first room where you gain control of Jez.
  • 2. In the TV Cabin. You must exit the cabin and cut the wires, then re-enter and talk to the occupant.
  • 3. In the building south of the Warehouse. Follow the winding halls on both floors to the end, then check the cupboard to the right.
  • 4. In the Bunk beside the Arcade, you'll meet a camper named Theo. He'll give you a key to the Warehouse. Go there, find his glasses, and give them back to him.
  • 5. In the West Woods, find the Ranger by the shack in the western part of the map. At his request, put out all five fires in the West Woods (See "West Woods Map")
  • 6. Solve the crate moving puzzle in the Meat Locker, to get to the Diary Page beyond the puzzle (See "Meat Locker Maze").
  • 7. Find 8 White Flowers for the guy in the Dining Hall, then check the cupboard in the upper left corner of the Hall (See "Main Camp Map" for White Flower locations; there are more White Flowers than you'll need)
  • 8. In front of the western door of the building beside the Health Center, there's a dog (see on "Main Camp Map"). Give the dog a Dog Treat, and it will let you take the Diary Page from its collar. You'll have to have done the White Flower quest first to have gained access to the Dog Treat.
  • 9. Bring the tools from the shack in the West Woods to the guy trapped in a trapdoor in the building directly north of the Health Center.
  • 10. Talk to the girl in the Luxury Cabin, then go to the Boiler Room building and talk to the guy there. Solve the Boiler Room Puzzle, then return to the girl in the Luxury Cabin (See "Boiler Room Puzzle")
2. Memento Item Locations
These are the locations of the special items mentioned in each Diary Page. You can find them out of order, but here they are listed in order of their being mentioned (The Diary Pages will always be in the same order, and so will always mention these items in the same order, no matter which order you choose to find the pages location-wise):

  • 1. Camp Sunshine Teddy: In the Warehouse, after you obtain the key from Theo (see # 4 under Diary Page locations), go straight back to the wall from the entrance.
  • 2. Wendy's Hospital Bracelet: In the Health Center, check the bloody bed to the left.
  • 3. Big Bear History Book: Go into the Cat Lodge once you find the key, and go into the lamp lit room with the gruesome scene (you'll see it immediately) to get the book from the table.
  • 4. Chu'Mana's Beads: In the Swamp (accessible from the eastern side of the main map, and becomes available after you've collected enough entries and first see a vision of a Shaman), go directly south from the entrance until you cross a bridge. After this, there is a fork where you can go south or southeast. Go southeast, and you'll come upon a demon statue with the beads around its neck (See "Swamp Map").
  • 5. Resident Reports: In the Camp Offices, upstairs and all the way to the right, you'll find these on the desk with a dead body slumped over it. Just push the body away, and take the reports.
  • 6. Alphabet Block: You'll find it in the Storeroom building, in the upper right corner.
  • 7. Chu'Mana Effigy: In the West Woods, in the northwester corner, you'll find the effigy on a strange tree (See "West Woods Map").
  • 8. Photo of Wendy: In the Ladybug Lodge, you'll find the photo on the wall attached to a bulletin board covered with research.
  • 9. Crucifix: In the Welcome Hall, find the hall leading off to the left from the main room. Follow the hall until it turns northward, then go all the way to the north wall to find the Crucifix, which has been used in a particularly gruesome way.
  • 10. Suicide Note: After having found all 10 Diary Pages, the electric fence in the southwest corner of the main camp area will unlock. Go there to find a house. In the basement of the house you'll find the Suicide Note.

Note: Even after finding all 10 Items, you'll have to take them to the Shaman who first appears to you in a vision. If you have any trouble locating him, see the "Swamp Map".
3. Locations of Building Keyrings
  • Storeroom Key: In the Counselor Hangout building in the drawers off to the left of the TV near the bottom of the screen.
  • Ladybug Key: In the Frog Lodge, in a cupboard/drawers against the back wall.
  • Snowlake Key: If you go into the western door of the building beside the Health Center, go explore the first cupboard up and to the right after you enter.
  • Cat Key: In the dorm left of the Archery Range, just go to the cupboard on the back wall opposite the door.
4. Miscellaneous Plot-Relevant Item Locations
  • Broken Amulet: When you collect enough Diary Pages, Jez will have a vision, or rather be teleported to a Shaman's tent. The Shaman will give you the amulet.
  • Theo's Glasses: In the Warehouse where Theo sends you, all the way to the right, lying on the floor right in front of the doorway to the room with lots of Sunshine Bear costumes.
  • Tool Box: In the shack in the westernmost part of the West Woods (See "West Woods Map")
  • Dog Treat: You'll have to gain access to the Dining Hall by doing the hunt for the White Flowers first. Once inside, go into the kitchen and check the bag in the lower right corner.
5. Puzzle Guides
MEAT LOCKER MAZE
  • 1. As soon as you enter the maze, go up, and push the crate up.
  • 2. Step left, turn up, and push the crate up.
  • 3. Step up, then step left; turn down, and push the crate down.
  • 4. Step down, then step left; turn up, and push the crate up.
  • 5. Step up, then step left, then push the crate left.
  • 6. Step down, then push the crate down.
  • 7. Step left, turn down, then push the crate down.
  • 8. Step left, then push the crate left.
  • 9. Step up, and push the crate twice.

BOILER ROOM PUZZLE
Once you go down into the basement of the Boiler Room building, go to the right and navigate the maze of pipes and steam until you reach some of the valves. If you turn the valves in the following order, you should always be able to navigate your way to the next one on the list:
  • 1. Turn the BROWN valve.
  • 2. Turn the DARK BLUE valve.
  • 3. Turn the LIGHT BLUE valve.
  • 4. Turn the BROWN valve again.
  • 5. Turn the GREEN valve.
  • 6. Turn the RED valve.
  • 7. Turn the BROWN valve again.
  • 8. Make your way out of the maze and to the left, then go up through the now clear path to the boiler, and reset it. Now you're ready to go back to the girl in the Luxury cabin!
6. Bonus Quests
  • Toilet Trek: Go into both of the buildings marked "Rest Room" on the Main Camp map, and close all the toilet seats. In return for your courtesy, you'll see a bizarre science fiction scene and be rewarded with a lot of batteries.
  • Big Socks to Fill: Once you have access to the Swamp, find "The Thing in the Swamp" either on your own or using the "Swamp Map" below. You'll be sent to look for a huge pair of socks, which you can find under a big rock to the right of the Ladybug Lodge (See "Main Camp Map"); you can find them even before talking to the thing in the swamp if you prefer. Bring these to the thing, and get rewarded with lots of food.
  • Snack Man: Find quarters throughout the camp, a couple of which I have marked on the "Main Camp Map," for a chance to play Snack Man, the only working game in the Arcade. Your soft and plushy reward for eating all the cupcakes without dying may not have any practical use in Camp Sunshine, but Jez surely won't mind having a new collectible to show off his bragging rights to his non-murdered friends back home.
  • Beware the Snowman: In the 1.2 Update of the game, the first time you go outside after gaining control of Jez you'll find that, mysteriously, there is snow everywhere. Eventually you'll notice that there are five Snowmen scattered throughout the camp. Find all five of these snowmen (their locations have been added to the camp map), and knock their heads off. Then you'll be on your merry way to increasing your Blue Rat Energy Drink collection as a reward.

7. Last Puzzles
CRYPT PUZZLE:

After finding all 10 Memento Items and taking them to the Shaman, you'll find yourself trapped in an elaborate underground crypt of sorts. The puzzle here is so straightforward you probably won't need a guide, but just in case, here you go.
  • 1. From the start, go directly south, and in the room there go to the left and get the Yellow Jewel from the skeleton there. Insert it into the sarcophagus on the right, and then take the Red Jewel.
  • 2. Exit the room through the North, and go to the right until you see another sarcophagus missing a Red Jewel. Insert the Red Jewel and you'll get the Blue Jewel.
  • 3. Continue to the right, around and up until you see another sarcophagus to the north. Insert the Blue Jewel, and then you'll receive the other half of the Broken Amulet, making the Restored Amulet and opening your way out of the crypt.
  • 4. After exiting the Crypt, you'll come into a hall with robed figures lining the walls. If you try to go into the middle area, Jez will say he needs a disguise. But even after taking robes from one of the figures, you'll need to get the robes with the red mask in order to leave and proceed to the next puzzle.

COLORED BRIDGES PUZZLE

After the Crypt, you'll come into a room with five statues, each with a different colored jewel in its chest, as well as many bridges with colors corresponding to the jewels. The object of the puzzle is to turn the statues in the right order and the right number of times to open up a path, along the maze of bridges, so that you can get out the door to the north. Follow these directions, and you should always be able to navigate your way to where you need to go.

  • 1. Make your way to the statue with the YELLOW Jewel, and turn it 3 times.
  • 2. Make your way to the statue with the GREEN Jewel, and turn it 3 times.
  • 3. Make your way to the statue with the PURPLE Jewel, and turn it 1 time.
  • 4. Make your way to the statue with the RED Jewel, and turn it 2 times.
  • 5. Go to the statue with the YELLOW Jewel, and turn it 3 times.
  • 6. Navigate your way to the northern door and exit through it.
8. Final Battle
When you enter the house of "Sunshine Bear" for the final time, he shows you how he has raised the stakes, and makes off for the basement. Save your game, and follow him down the hole in the basement room. First you'll navigate through some tunnels infested with rats. The path here looks like a maze, but is pretty simple: Just always try to stick to moving southeast, only going north when you have to until you find an opening to get back to going south and east. Then when you reach the easternmost side of the screen, go north until you reach the hole in the wall leading to the Final Battle.

The object of the Final Battle is to find the ten Sacred Fires located through the area (see the "Final Battle Map" below), and into each one cast one of the ten Sacred Items (the mementos). Be warned, though, that if you try to activate the Fire near the starting point before having used up all the rest , the final boss will deal you a supernatural blow that will deal damage. During this battle, the boss will summon the statues located throughout the map to life, and they will give chase, dealing damage if they touch you. At least as of Easy and Normal modes, at first there are only two statues chasing you, but be on the lookout: Anytime that you toss an item into one of the fires near an unawakened statue (all statues, including the first two in their initial location, are marked "S" on the map), the boss will summon that statue to life. A good strategy here is to run to the right, getting a head start on the statues chasing you, and then starting with the Sacred Fire in the upper right corner, hit all the sacred fires roughly clockwise, until only the Sacred Fire near the start point remains. Be warned that, once you have approached 8 fires, spiked bars will begin to pop up for a few seconds at a time in those places marked on the map with four dots up and down. It's a minor thing, but something to keep in mind. Once you approach the last Sacred Fire and activate it, you have officially survived Camp Sunshine! For now...
9. Maps
Click Map Image to Enlarge.

MAIN CAMP MAP (With Items and Location Labels)

WEST WOODS MAP

SWAMP MAP

FINAL BATTLE MAP
10 Comments
saint23thomas Sep 11, 2022 @ 6:31am 
I didn't find any snowmen, either. Maybe it's a seasonal thing; like it's a joke about you being at a summer camp in the middle of winter.
Revenger23 Jul 19, 2021 @ 3:13pm 
Nice Guide, really helped me out :cupup:
有猫的尾巴 Nov 1, 2019 @ 10:59pm 
Hi thanks for the guide, I have some questions. 1.I don't see any snowman through the game from beginning till the end. 2.What is the purpose of collecting white flowers? 3.I remember big foot tell me the sock can help me cross water? 4.Can you go to the center island of the lake?
Jay T Maximus  [author] Oct 26, 2018 @ 11:00am 
Glad to hear all the positive feedback over the years! I stay busy, as I'm a married guy with several young kids, so I often fall behind on keeping up with stuff. But thanks!

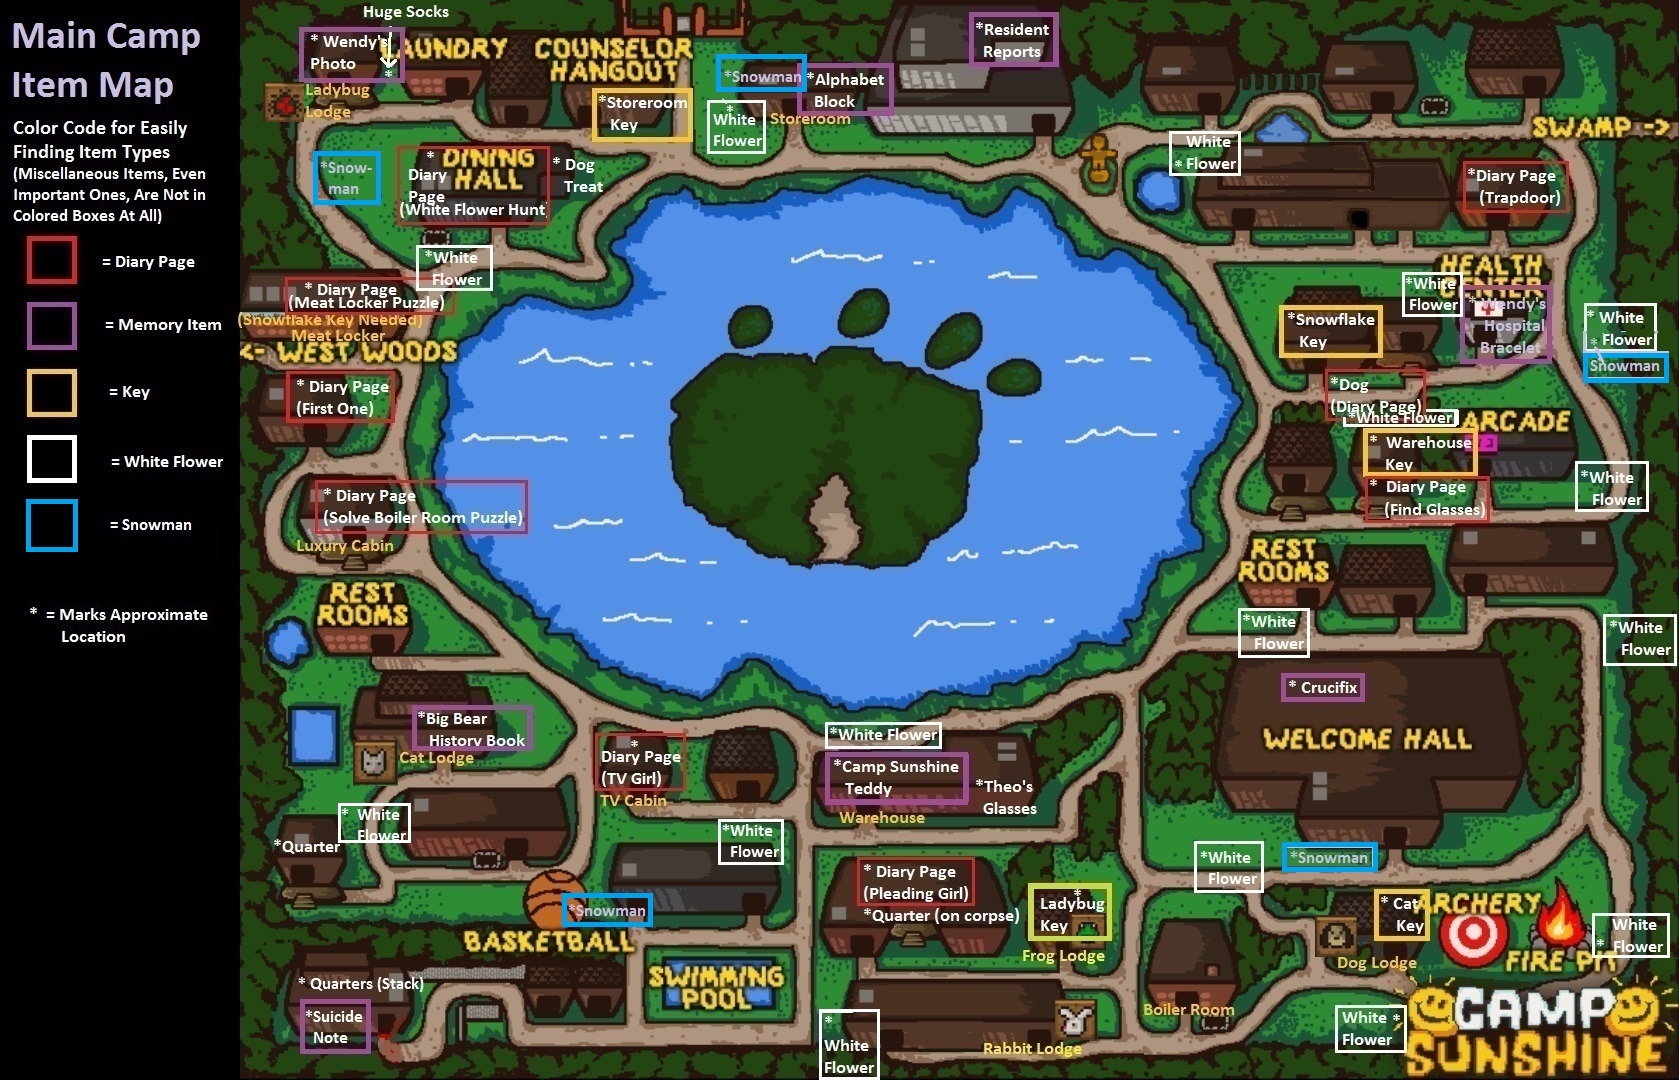
@Nomie, I know I'm really late getting back to you, but I'd certainly be honored if you want to adapt my guide. Just credit me, is all, but as long as you do, I'm just flattered and more than happy to say yes.
chicken chow mein Jul 16, 2018 @ 3:33pm 
great guide thank you!
Nomie Apr 28, 2018 @ 7:17am 
Hello, can I adapt your game guide for a Russian-speaking audience? :CW_Chicka:
可丽 Dec 5, 2017 @ 1:21am 
:steamhappy::steamhappy:Thank you!!!!!!! I' ve searched for the socks forever(T-T)
UppityBlock Jan 15, 2017 @ 3:44am 
Thank you very helpful
AlphaCommander42 Nov 29, 2016 @ 12:30pm 
Good job!
Rabid Urko Nov 6, 2016 @ 12:57pm 
Great stuff