Hardware Engineers

Hardware Engineers

Not enough ratings
[HowTo] Use Models Builder
By Green127.Studio
A guide about how to use Model Builder
   
Award
Favorite
Favorited
Unfavorite
Introduction

To be able to use your custom assets in Hardware Engineers you need to build them with Monogame.

What is Monogame?
Monogame is a free framework under Microsoft Public License (Ms-PL).

What is a XNB?
XNB is the format of asset builded by Monogame, you can build all asset in this format, but you can't reverse it, take care of your original file a XNB can't be edited.

What is a FBX?
FBX is an exchange file format, that can contain mesh and animation. Monogame use this format to import 3D models

Can I import an OBJ file in Hardware Engineers ?
Yes. You need to open your obj with a 3D modeling software like blender and export it as FBX. (see the Export section of this guide)
Prerequisite

To compile new assets you need:
  • Hardware Engineers up to date
  • Monogame Framework 3.7.1
    Download (33MB)[github.com]
    Website[www.monogame.net]
  • A 3D modeling software that supports fbx export

Check on steam if you have the latest Hardware Engineers version.
Then download and install Monogame Framework.The official compatible version is 3.7.1.189
In this tutorial I will use blender 2.79b Website[www.blender.org] Download Page[www.blender.org].
Settings

If you have installed Monogame on the default path you can skip this step.

Step.1 : Check if Hardware Engineers can locate monogame content builder itself
  • Start the game
  • Open workshop menu
  • Open Models Builder

If you have "MGCB:NotFound" blinking in red on the bottom of the window, that means the game cannot locate the builder itself.

Step.2 : Locate monogame content builder
Go to the directory where you have installed Monogame and search for MGCB.exe.
default path (32bits): "C:/Program Files/MSBuild/MonoGame/v3.0/Tools/MGCB.exe"
default path (64bits) : "C:/Program Files (x86)/MSBuild/MonoGame/v3.0/Tools/MGCB.exe"

Step.3 : Edit config file
  • Go to the game directory
    default path (32bits): C:/Program Files/Steam/steamapps/common/Hardware Engineers
    default path (64bits): C:/Program Files (x86)/Steam/steamapps/common/Hardware Engineers
  • Open WorkshopConfig.ini with a text editor
    # Emplacement of MonoGame Content Builder MGCBPath=C:/Program Files (x86)/MSBuild/MonoGame/v3.0/Tools/MGCB.exe # Source folder that contains your FBX files (.fbx) FbxFolder=Mod/Models/FBX/ # Source folder that contains your IMG files (.png) ImgFolder=Mod/Models/IMG/ # Target folder for XNB files XnbFolder=Mod/Models/XNB/ # Temporary folder TmpFolder=Mod/Models/TMP/
  • Edit MGCBPath and enter your new path found in Step.2

You can also change the other path if you want custom folder to export your FBX/XNB/IMG.

Now retry Step.1 you should see "MGCB:v3.7.1.189" on the bottom of the Models Builder window.

Note: if you do not have WorkshopConfig.ini in your game directory, start the game and go in Models Builder the file will be rewrite automatically.
3D : Component's Models

To create your own models you can use this template: Download[drive.google.com]

Slot are already configured, all you need to do :
  • Import your 3d model
  • Scale your model to fit the bounding box
  • Apply Transformation (Location/Scale/Rotation) for all objects except slots and rotating part(like fan) (Blender : CTRL+A in object mode)
  • Adjust slots location (if needed)
  • Edit the UV map
  • Configure objects (next part of this guide)
  • Export as FBX in "FBX" folder (see WorkshopConfig.ini in previous part of this guide)
3D : Configuring Mesh

To work correctly in game your model need to have a particular configuration.

All mesh need to be in separate object.

In this example I will use the model of the Scorpio Antares case.


You can see here all object have different name with tag in it.
The tags are in bracket [], they contain one letter and one number.
The game engine need this tag to know how to render the model correctly

How Tag Works:
The letter identifies the nature of the tag
Example:
C: Color R: Removable P: Properties V: Variation
The number is for identify each tag for example Inside [C2] correspond with this mesh:

and C2 correspond with this color:
3D : Tags

Color Tags [C ]

You can set new channel as much as you want.
Example:
[C1] for color channel 1
[C999] for color channel 999

Only one color tag per mesh are allowed.

Materials Tags [M ]
This tag works exactly like color tag but with materials.
if you tag a mesh [M1] you will see "channel 1" in the editor, and you will be able to set a material to this channel (example brushed aluminum or copper).

Particularity 1 :
if you set [M60] this channel will be aluminum by default because Aluminum material have the ID 60 in the game.

anyway all channel can be assigned to any material with the editor but if you know all the ID of hardware engineers's materials you can set them directly in blender by correlating each channel with a material ID.

ID of common materials :
  • Aluminum = 60
  • Copper = 61
  • Acrylic = 62
  • Mesh = 63
  • Steel = 64
  • PCB = 80 (circuit)
  • HddSticker = 140
  • PsuSticker = 141
  • Port = 142

the materials 142 use this texture :link
Use UV mapping to put this on desired face.

Particularity 2 :
the material tag can be mixed with color tag.
Example you can set [M80][C1].
that means the mesh will have (by default) the PCB materials with the color set in color channel 1.

Properties Tags [P ]

In Hardware Engineers you can set a property for a mesh that determinate specific comportment.

[P1] : The mesh will be considered as the bounding box [P2] : Same as P1 but the mesh will be drawed [P3] : No Outline (use this for small object) [P4] : RotateX when computer is ON (use this with fan) [P5] : RotateY when computer is ON (use this with fan) [P6] : RotateZ when computer is ON (use this with fan)

Bounding box are use to make the component grabable by the mouse.

Warning: Make the bounding box simplest as possible (8 points).
At runtime all point's coordinates are in graphic card memory.
That means it will hugely impact the performance to read them each frame to check if the mouse is over the mesh.

Removable Tags [R ]

In certain case you need to remove some mesh for example when opening a case the door of the case shall not appear.
[R1] : The mesh disappear when the object is on workspace (on the desk) [R2] : The mesh disappear when assembling components (In assembly window) [R21] : The mesh disappear when the 1st optical drive slot are used [R22] : The mesh disappear when the 2nd optical drive slot are used [R23] : The mesh disappear when the 3rd optical drive slot are used etc.

For example the left door of the Scorpio Antares and the transparent window are tagged : [R1]
the right door is tagged [R2] and the first front cover for optical drive is tagged [R21].
Like this the door can be removed when mounting and the plastic cover of the front panel will disappear if you put an optical drive in the bay.

Variation Tags [V ]

This tags are use to make variation of models among components for example you can have the two version of a door case in the same file one with a window and another without window but, on workshop every mod contain their model, that tags are useless for you.
3D : Export to Hardware Engineers

When you finish your model you need to export it in FBX format.
In blender you can find this option in File menu:


In export option remove all unused things like animation/bones/Camera/Lamp/etc. to reduce the file size


Armature, Empty and Mesh are required. Be sure to export in FBX7.4 binary.
I recommend you to create a preset by clicking on the "+" next to "Operator Preset"

Export your fbx in : Steam/steamapps/common/Hardware Engineers/Mod/Models/FBX
(You can customize this path in the WorkshopConfig.ini)
Build your Asset

When your FBX or PNG are in the correct folder it will appear on the left of the Models builder.

Default FBX: \Steam\steamapps\common\Hardware Engineers\Mod\Models\FBX
Default PNG: \Steam\steamapps\common\Hardware Engineers\Mod\Models\IMG

In this example I have a 3d model named "model1.fbx" (it will work exactly the same with png file)


you can see two little icon next to the name "fbx" (or "png") and "xnb" to be able to use your model in the content editor you need to have the little icon XNB light up, to do this select your file by clicking on it and chose "Build Selection" or simply click on "Build all"

Note: If you edit the source (FBX or PNG) file after a build, the XNB icon will be lighted in orange that means you need to update the xnb file by rebuilding it.

Now your new model will be available in component editor :


Enjoy!

Feel free to let me know what you think about this guide in the comment section below.
16 Comments
Tim Jan 8, 2019 @ 1:27pm 
you should do a youtube video tutorial
Green127.Studio  [author] Apr 9, 2018 @ 3:40am 
@Meecube: sended!
Meecube Apr 9, 2018 @ 3:20am 
thanks! Your guide focuses too heavily on case creation however, most information can be applied however!

Could you send me a friend request? I'd like to ask a few questions!
Green127.Studio  [author] Dec 10, 2017 @ 10:22am 
This is due to the lack of UV Map. you need a UV map for all mesh to be able to import them.
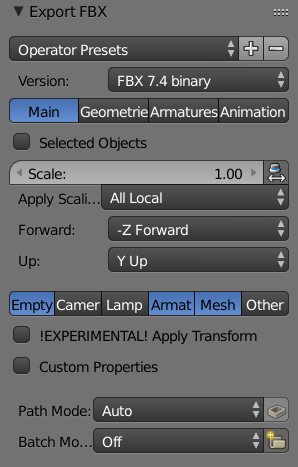
you can set a default UV Map pretty easily with blender by following my last commentary.
DrKleiner Dec 10, 2017 @ 10:07am 
that is the error i become is there maybe a video to see how it works fine

name.fbx: error Processor ´ModelProcessor´ had unexpected failure!
Green127.Studio  [author] Dec 10, 2017 @ 9:11am 
The template haven't UV map.
This is required to import assets.

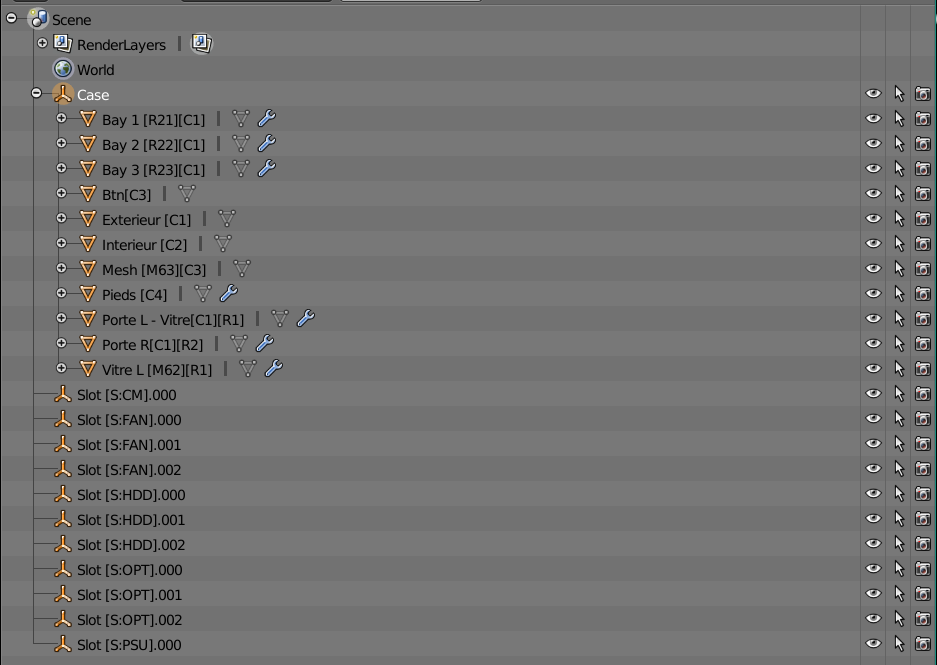
On blender, for each mesh:
Go in Edit mode
Select all face
Press U
Choose Reset

it will set au default UV for the mesh.

For more advanced use of UVMapping you can follow this guide: https://en.wikibooks.org/wiki/Blender_3D:_Noob_to_Pro/UV_Map_Basics
DrKleiner Dec 9, 2017 @ 6:54am 
i dont need to send i tryed the template case
Green127.Studio  [author] Dec 9, 2017 @ 5:57am 
Can you send to me the file you try to build ? I will make some test.
My email: green127.studio@gmail.com
DrKleiner Dec 9, 2017 @ 5:55am 
Yeah wen i begin to build the case i become in the log an error that say anything with Processor is failed argument.
Green127.Studio  [author] Dec 9, 2017 @ 5:46am 
@DrKleiner Frontier Hi, Can you give me more information about this error ?