Warhammer 40,000: Dawn of War - Soulstorm

Warhammer 40,000: Dawn of War - Soulstorm

111 oy
Sisters of Battle guide (WIP)
damascus_fr tarafından
A long and detailed guide on Sisters of Battle race, covering both basic and advanced mechanics and data.

Work in Progress, 80% (as of February 2021 ; started in June 05 2016 ; needs some WIP in some units/squads datas, the strategies and BO (currently working on it) and, in future, a short guide for campaign mode and corrections as english isn't my native language.
3
3
3
3
2
   
Ödül
Favorilere Ekle
Favorilere Eklendi
Favorilerden Çıkar
Introduction
Dawn of War : Soulstorm is the 4th and last installment of the first Dawn of War series. Released in 2008, it brings airborne units to existing factions, and two other factions to the 7 existing ones (Space Marines, Chaos, Orks, Eldars, Imperial Guard, Tau and Necrons) : Dark Eldar and Sisters of Battle.

Sisters of Battle are personnally my favorite race. And i admit it, this is purely for the "nuns with guns" and angelic imagery ! But you, why should you play Sisters of Battle ? Well...
  • An army of women !
  • And fanatical ones ! Just listen Lightning pilot or Immolator pilot !
  • Classy angelic / christian imagery. Sisters build cathedral-looking buildings, have halos over their heads (for faithful units) and even have a giant angel to fight at their side.
  • Lots of pyrotechnical effects, laser beams, golden beams, flaming beams, gold sparks...
  • Soulstorm is the only videogame in which you can play Sisters of Battle (excluding mods).
  • Sisters are IMO one of the weakest races (NO, they are NOT Space Marines in female skins), due to :
    • Their overall weakness
    • No melee units until Tiers 3
    • No walker until Tiers 4
    • Average damages, range and durability
    • No knockback weapons until Tiers 3
    • Their anti-machines weapons never spawn with their two anti-machines units (Celestians and Immolators), they must buy them one after another. Think about Tankbustas who would have to start with Gunz and buy Rokkit Launchers...
    • And a Faith system which makes the race more dependant of Listening Posts than other races.
  • All of this means you'll fight uphill battles, and this is much more rewarding than playing OP races.

The last point explain why i spend some free time doing this guide : as Sisters are weak, they need careful playing and strategy to win with them, but there are only quick guides about them. So, i'll try to give the most informations and data about this faction.

I started this guide soon before Dawn of War 3 release... I continue it now, now plastic models of Sisters will soon be released for the tabletop game. Which i hope will give more visibility to my favorite WarHammer 40.000 race (if it was of any interest, my other favorite races are Orks for their humorous side, then Chaos for many reasons [brute power, cool-looking Defiler, i discovered the WarHammer 40.000 franchise by seeing cousins playing Chaos on original Dawn of War, and Chaos has Slaanesh, then Daemonettes !], then Tau for their OPness).
MECHANISMS -------------------------------------------------------------
DPS mechanisms
DPS stands for Damages Per Second, so how much damages an unit deals within a second. This is an elaborate calculation which takes numerous points in consideration.

Armor types
Each unit have one of the 15 armor types that exist within the game. They are :
  • Infantry
    • Non-armored infantry
      • Infantry Low : Ecclesiarchal servitor and generally all builders.
      • Infantry Medium : Missionary and generally all starting troops.
      • Infantry High : Death-Cult Assassin and generally non-armored higher units.
    • Armored infantry, called Heavy Infantry
      • Heavy Infantry Medium : Sisters of Battle and generally all basic "bulky" troops.
      • Heavy Infantry High : Celestian and generally endgame troops.
    • Commander : As the name suggest, all commanders have this armor type.
  • Vehicles and Buildings
    • Vehicles
      • Vehicle Low : Sisters of Battle don't have vehicle-low-armor units. Space Marine's Landspeeder or Dark Eldar's Reaver Jetbike fall into this category.
      • Vehicle Medium : almost all vehicles have this armor type.
      • Vehicle High : Sisters of Battle don't have vehicle-high-armor units. These are relic (ultimate) units vehicles, like Baneblade or Restored Monolith.
      • Air : Lightning Fighter, and typically all flying-high vehicles (one per faction).
    • Buildings
      • Building Low : Listening Post, Plasma Generator, Inferno Turret (and all turrets) and Purgatus Mine Field (and all mine fields).
      • Building Medium : almost all buildings except Listening Posts, simple Plasma Generators, turrets, mine fields and HQ have this armor type.
      • Building High : Ecclesiarchal Chapel, its evolutions, and generally all HQ buildings.
  • Daemons
    • Daemon Medium : only Daemon-medium units are Krootox and Essence of the Deceiver (though he's invincible).
    • Daemon High : Living Saint, Avenging Angel and typically all non-mechanical relic unit.

    In-game tooltips only refer to 7 types : Infantry, Heavy Infantry, Commander, Building, Vehicle, Aircraft, Daemon. But you can get even simpler, and having only 3 armor classes in mind : troops (include Infantry, Heavy Infantry and Commander), Machines (Vehicle, Aircraft and Building) and Daemons. If a weapon works well on an armor type within a category, it will also work well on other armor types of the same category.

    Weapons base damages
    In Dawn of War, almost every unit have several weapons. Each weapon is determined by a lot of characteristics : Minimal damage value, Maximal damage value, Guaranteed (or hardcaped minimal) damage value, Accuracy, Reload time, Setup time, Accuracy on the move, Area of Effect, Disruption... All of these concurr to determine weapon's basic DPS. Then, the anti-armor type kicks in. For example, the Celestians have standard Bolters or Melta Weaponry. Though Melta Weaponry have higher basic DPS, they deals less damages than Bolters to all infantry units.

    Ingame, the types of units the selected unit damages the most are displayed in the unit's window, on the left side. But it doesn't take in account weapons and is only a general view of the unit. For example, Celestians are described as good VS :
    • Infantry when they are built, with almost same melee and ranged damages.
    • Vehicle, Air vehicle and Buildings with only one Melta Gun. However, with only this gun, Celestians are still better VS Infantry than VS machines, and, whatever their Melta weaponry, they still remain better VS Infantry than VS machines at melee.
    On another note, new basic DPS provided by new weapon isn't displayed on unit's HUD. You have to hover the mouse on the weapon's icon to have this information.

    DPS calculation
    Value
    Explanation
    Minimal damage
    Each weapon has a minimal damage value
    Maximal damage
    Each weapon has a maximal damage value
    Average damage
    Is "maximal damage" + "minimum damage" / 2
    Armor rating
    Percentage based on ennemy's armor type. The higher the better.
    Guaranteed damage
    Each weapon has a guaranteed damage value. If this value is higher than "Average damage * Armor rating", so depending on ennemy's armor type, then this value apply.
    Accuracy
    Differs if attacker is still or on the move
    Reload
    Time between two shots, more in damaging terms than in animation terms. The lower the better

    If "Average damage * Armor rating" is higher than Guaranteed damage, the base DPS formula is
    Average damage * Armor rating * Accuracy / Reload
    If "Average damage * Armor rating" is lower than Guaranteed damage, the base DPS formula is
    Guaranteed damage * Accuracy / Reload
    This is purely for information ; DPS informations automatically takes in account "standard" or "guaranteed" base for damages calculation.

    Remember : DPS stands for average damages per second. Some units have a "one shot" type of fire, meaning they deal their full damages in 0.1 second, and take some time before firing again. For example, against Heavy Infantry Medium armor :
    • A single Battle Sister deals 6.2 DPS, and her damage is spread on a whole second. So she deals 0.62 DPS in 0.1 second.
    • A single Necron Warrior deals 9.9 DPS, and he deals all of his damages right on the shot, and then wait 0.99 seconds to fire again ; so he deals 9.9 DPS in 0.1 second.
    • This is even more prominent with XV88 Broadside armor : it has 150 DPS, but "one shot" type of fire, and a refire rate of 3 seconds, meaning he deals 300 DPS in 0.1 seconds, and will again in next 2.99 seconds !

    On a side note, Sisters haven't any "one shot" weapon, except Exorcist which deals not damages (but is meant to disrupt infantry).

Morale
Morale is a mechanic unique to Dawn of War 1. In short, each squad has a Morale gauge, in addition to Health gauge, which, when it is totally depleted, severly decrease squad's DPS until some Morale is recovered.

For more details, Morale is displayed by the blue bar on each squad (and blue number on squad's avatar on HUD). Like Health, unit or squad always spawn at full gauge.

A single common meter

Unlike Health, Morale is fixed by a set amount, independantly of number of squad members, and is common for the whole squad. It is visible as there is only one blue gauge for a squad (or lone unit) while each member of a squad has a green Health gauge. For example, a Missionary's Morale is set to 300, same goes for a Battle Sisters Squad, while a Seraphim Squad's Morale is set to 450. For either Battle Sisters or Seraphims squads, the Morale stays at 300 or 450 regardless of number of soldiers in the squad. So a 1-soldier Battle Sister Squad will have 300 Morale, and a 10-soldiers Battle Sister Squad will also have 300 Morale.

What is Morale's utility ?

It is simple : when it reaches 0, the squad, thus all its members, is "broken". A broken squad loses 80% accuracy, then sees its DPS decreased. For example, Tactical Space Marine's standard Bolter's accuracy drops from 60% to 12%, then its DPS with standard Bolter against Heavy Infantry Medium armor drops from 11.3 to 2.3. In another hand, broken squad gains 20% movement speed, intended for making it easier for it to run away. When squad is broken, a red target-like aura is displayed under member's feet. The effect lasts until squad rallies.

There are some exceptions :
  • Horrors don't have the standard effects, but receive 50% more damages.
  • Warp Beast Packs, in addition to the standard effects, will turn against they own allies.
  • Artillery weapons (like Grenade Launchers) just never miss, even when user is broken.
  • Imperial Guard's buildings and Chimera ignore if their weapons are operated by broken squads or not.

Morale regeneration and rally

Each squad regenerates a fixed amount of Morale points each second. When squad is broken and a certain Morale amount is reached, squad rallies and is not longer broken (until, of course, its Morale reaches 0 again). For examples :
  • Battle Sister and tactical Space Marines squad have 300 maximum Morale points, generate 10 points per second and rally when they reach 50 points ; they logically rally after 5 seconds, assuming they take no Morale damage.
  • Chaos Space Marines squad has 300 maximum Morale points and generate 10 points per second too, but rallies at 150 points ; meaning it takes longer to rally (15 seconds) after being broken.
  • Celestians have 400 maximum Morale points, generate 14 points per second and rally when they reach 50 points ; they have more Morale than Battle Sisters (and Tacs) and regenerates faster than other units, meaning they are harder to break and rally faster than usual.

Morale damage

Morale is depleted by each attack. More precisely, each weapon of the game deals Morale damage, in addition to standard (Health) damages. Majority of attacks/weapons deal minimal Morale damages, when some weapons, such as Flamers or Eldar Ranger's Long Rifle, deal high Morale damages. Thus, some weapons are specifically designed to quickly deplete Morale. When whatever member of a squad takes Morale damages, it depletes the common Morale gauge ; thus, if a Morale weapon hits several ennemies at once due to its area of effect (such as Flamers or artillery), Morale drops as quickly. For example, a Battle Sister Flamer deals 6 Morale DPS (on almost 80% of units of the game) ; if a flamer hits one ennemy, the squad loses 6 Morale points per second ; if a flamer hits 2 ennemies, the squad loses 12 Morale points per second ; if 2 Flamers hit a same ennemy, the squad loses 12 Morale points per second ; and if 2 Flamers hit 2 ennemies (either same ennemies or different ennemies) each, the squad loses 24 Morale points per second. This is especially important to understand as Sisters sadly have to rely on Flamers.

Morale DPS is simpler than normal DPS :
Base Morale Damage * Morale Resistance * Accuracy / Reload

Base Morale damage and Reload time depends on the weapon itself ; Accuracy depends, like with standard DPS, on the weapon, on whatever you are moving or standing still, and eventually on buffs (like Fleet of Foot) or debuffs (like Blinding Light) ; Morale resistance depends on unit. There are 4 amounts of Morale resistance :
  • Terminators and Assault Terminators : takes only 25% base Morale damage.
  • Scouts, Pathfinders, XV15 Stealths and Missionaries : takes 70% base Morale damage.
  • Ecclesiarchal Servitors : takes 100% base Morale damage.
  • All other units (then the default rate) : takes 50% base Morale damage.

In addition, when a member dies, it depletes his squad' Morale by a fixed amount (known as death penalty), independant from any resistance.

Thus, there is 2 ways to break an ennemy :
  • Using a morale-based weapon.
  • Using Morale penalty by killing ennemies within a same squad in quick succession.

Influence of squad's size

All these facts lead to a singulary conclusion : big squads are actually easier to break than small squads, as big squads have more targets for Morale-based weapons, and more targets to kill, so more death penalties, while Morale gauge remains the same. Of course, big squads deal more Health and Morale damage in first place. On another hand, small squads are harder to break, then are harder to decrease their DPS, but have less DPS in first place... There is no really better option here, it depends on situation, so one should bear this tricky effect in mind.

Morale immunity

Some units, squads or heroes don't have Morale, as well as all vehicles, buildings and ultimate (or relic) units. This mean they are totally immune to Morale damage ; they simply never break, so don't bother to try.

Attachment and Morale

If a hero or an attachable unit is attached to a squad, the squad's Morale is unaffected. In other words, unit's Morale has no influence on squad's Morale.

Some "joiners" give Morale-related bonus to the squad. For Sisters, a Missionary gives no bonus, the Canoness (700 Morale) gives 200 Morale points and 2 Morale regeneration points , and the Confessor gives his Morale immunity to the squad. Thus, attaching an unit can boost the squad, but also make the unit weaker to Morale damage (both by potentially lower Morale, and by the "more targets to demoralize and kill" effect).

Sisters are a Morale-based race... sadly !

This is universally admitted. Problem is, once again, that is because Sisters have no Plasma Guns, or Fire Warrior's range, or Grenades Launchers, or even melee squad until Tier 3 ! And they have lower damages and durability than average races ! So they just NEED to rely on Flamers, at least in early game. Don't get wrong : breaking Morale is powerful... but while you are breaking Morale with your Flamers, other races have better Morale weapons, or tie your Flamer-Sisters so they can't use them again, or pound you from distance, etc...

Then yeah, you'll have to rely on Morale breaking, as ennemy will always be stronger than you.

On defensive side, Sisters are stronger than other races : heroes boost attached squad's Morale, and several abilities restore (Laud Hailers) or give Morale immunity (Angelic Visage) to nearby infantry. Of course, several abilities from other races are more powerful, like Ork's hidden mob bonus at full power, Imperial Guard's Execute or Space Marine's Sergeants' Rally, but Sisters are generally well armed in Morale defense department.
Covers and damage modifiers
In addition to previous mechanisms about health and morale damages per second, some conditions affect, positively or negatively, these values. The most prominent one is the cover : when you move your troops throughout the map, you'll cross or station at specific locations, like craters, forest borders, water bodies and so on. These terrains affects how much damages you receive. But being engaged on close combat also modify these damages. Lastly, SoB have some skills that brings buffs or debuffs.

Cover

Cover is actually portions of the map which determines if you take more or less damages, just by being there.

General informations about covers are :
  • Air units are unaffected by cover.
  • Tau and Imperial Guard vehicles are affected by cover in the same way as infantry (minus the morale bonus of course). This includes everything from Chimeras to the Baneblade, Drone Squads to the Greater Knarloc, both positive and negative cover.
  • No Necron units are affected in any way by cover, positive or negative.
  • Eldar Shuriken Grav Platforms and Brightlance Grav Platforms receive no movement penalties from cover and take 80% ranged damage in heavy cover.
  • Melee jump troops and all jumping vehicles do not receive movement penalties in cover. This includes Raptor Squads, Assault Marine Squads, Stormboyz, Seraphim Squads, Land Speeders, Falcon Grav Tanks, Vypers, and Fire Prisms.
  • The Living Saint is affected by cover like a normal infantry unit, not a jump unit.
  • The Daemon Prince and Bloodthirster are immune to movement speed penalties, and the Bloodthirster also takes 80% ranged damage in light cover and 60% ranged damage in heavy cover.
  • Scout Marine Squads are immune to movement penalties in positive cover only, they are slowed as normal in negative cover.
  • Chaos Rhinos and Chaos Predators take 80% ranged damage in heavy cover.
  • All Dark Eldar units do not receive movement speed penalties in cover.
  • All Dark Eldar vehicles receive 90% ranged damage in light cover, 75% ranged damage in heavy cover, and 105% ranged damage in negative cover.

There are 3 types of cover : light, heavy and negative.

Close combat

When infantry units fight at melee, they benefit from additional protection. To be effective, the targeted ennemy must also be on melee fighting ; then, vehicles and building can't receive these bonuses. In addition, fleeing infantry won't receive damages reduction. If a stealth attacker fights infantry at melee without being detected, attacker technically earns damage reduction ; but being undiscovered, nobody attacks him. His prey, however, receives no damage reduction, as he is not fighting against the stealth unit.

The units answering to these conditions receive only 77,4% ranged health damages, and 10% ranged morale damages, making ranged morale weapons albeit useless.

However, some units behave differently even if they fullfill the requirements :
  • Necron Attack Scarabs, Destroyers, Heavy Destroyers, and Lord Destroyers (but not Tomb Spyders) receive melee combat bonuses like infantry.
  • The Tau Krootox and Greater Knarloc and Dark Eldar Talos likewise receive melee combat bonuses.
  • The Avatar of Khaine, Bloodthirster, Squiggoth, and Living Saint do not receive melee combat bonuses like the Greater Knarloc, although the Bloodthirster and Daemon Prince gain 5 HP per second while in melee combat (the Daemon Prince has both bonuses).
  • Tau clones generated by the Ethereal do not receive melee modifiers even if they can engage in melee combat.

Combination

Here is the covers and melee effects table :

Received Ranged Health damages for infantry
Received Morale damages
Morale regeneration
Move speed
Received Ranged Health damages for vehicles
Outside melee, without cover
100%
100%
100%
100%
100%
Outside melee, Light Cover
75%
100%
150%
90%
100%
Outside melee, Heavy Cover
50%
100%
200%
75%
75%
Outside melee, Negative Cover
110%
100%
100%
80%
110%
Melee without cover
77.4%
10%
100%
100%
100%
Melee in Light Cover
58%
10%
150%
90%
100%
Melee in Heavy Cover
38.7%
10%
200%
75%
75%
Melee in Negative Cover
85%
10%
100%
80%
110%


Combining cover with melee units is especially effective, resulting in just 58.05% ranged damage in light cover and 38.7% ranged damage in heavy cover. The morale effects also synergize very well, doubling the morale regeneration of the units while simultaneously causing them to take only 10% ranged morale damage.

For this reason, engaging melee troops in heavy cover using a ranged focused army is a recipe for disaster. The ranged troops will be unable to cause any significant physical or morale damage to the melee units. This is particularly true if the melee troops can get into melee with a unit of yours that can likewise engage in melee, allowing them to get their melee cover bonuses. Constructing buildings in or adjacent to positive cover should also be avoided for the same reason. Any melee units attacking those buildings will be provided with strong defenses against your army while they rip apart your structures.


Setting traps


Cover can also be used to set traps for your enemy. Heavy cover offers a very appealing prize for attacking units to take advantage of. Knowing this, placing mines in heavy cover can present an unexpected surprise for any attackers, especially since mines count as ability attacks rather than physical damage, allowing them to hit for full damage despite the heavy cover. Meanwhile your opponents can only slowly move out of the heavy cover due to the movement speed penalty.

This tactic can be further enhanced with turrets when negative cover is involved. While the enemy troops are forced to move slowly through the negative cover, they are prime targets for turrets as well as mines. The turrets will also do 10% extra damage to the enemy while they are stuck in the negative cover for an extra edge against them.
Stances
These commands dictate your units' behaviour, both in battle and for engaging (or not battle). It can be easily overlooked as one can simply think to right-click on a location to move the troop there, or on an ennemy to fight him ; but using wisely these functions will optimize your chances, especially with SoB who are generally weaker than other races.

Battle stances

Almost each unit or squad can switch between 2 main stances : melee and range. It simply determinates which range the unit will prefer to use when they'll fight. Some units have only ranged weapons (like vehicles) or melee weapons (like Repentias) and then don't have this choice. The unit/squad adopts the displayed stance ; clicking on its icon will toggle with the other one.
Stance
Hotkey
Perks
Melee
F6
The squad/unit come at melee, but indeed using its ranged weapons in the process.
Ranged
F7
The squad/unit engages targeted ennemy, with its ranged weapons. It usually doesn't go melee, but of course does if ennemy comes at melee.

Idle stances

These ones dictates how the unit/squad will move towards the ennemy when left alone (and ONLY when left alone, i.e. you didn't and still don't give order to the squad). It is some sort of AI behaviour. It is independant from the "Ranged/Melee" stances, but works same way with toggles and display.
Stance
Hotkey
Perks
Attack
F5
The squad/unit engages nearby ennemy, and follow it until ennemy is destroyed, or out of sight, or if you interrupt the action. Good on Flamer wielders, Inferno Pistol wielders and Seraphims, who all have good accuracy on the move, but beware as you can easily lose control and end up in a dire situation.
Hold Ground
F1
Same as above, but follows ennemy only on a short distance from unit/squad's starting position (usually, 25 units). If ennemy goes too far from the starting position, unit/squad quit the pursuit and comes back to this point. Useful to prevents your units to get too far from chokepoints, it is a sort of stamp between Attack stance and Stand Ground stance. It is default stance for most if not all units and squads in the game.
Stand Ground
F2
The squad/unit engages nearby ennemy only with its ranged weapon, without moving from its starting position. It prevents the fire on the move accuracy penalty, and prevents the heavy weapons units to have to resetup (then, is a must for Heavy Bolter Sisters). But in another hand, the melee units/squads will just do nothing, and let ennemies unharmed. This stance can also be used to lure ennemies into traps, like Purgatus Mine Fields : as your units won't move, the ennemy will be forced to walk towards them to attack them.
Burn
F3
Similar to Attack stance, but if there is an ennemy structure around, your squad/unit will automatically target it instead of troopers or vehicles. Dangerous and somewhat useless IMO.
Cease Fire stance
F4
It is only a leftover from precedent versions of the game, back when stealth units were uncovered when they attacked : this stance then prevented then to attack, then to remain stealthed. In Soulstorm, stealth units remain stealthed even if they attack, so this stance is useless. Eventually, Tau players can use this on Stealth teams to provide vision for their long-ranged Fire Warriors, without being noticed. But for Sisters, since t


Usage

Battle stances are generally adapted to the squads. The exceptions are Battle Sisters carrying Heavy Bolters and heroes. But they are other applications.

Battle Sisters are "Hold Ground" by default, then they'll chase ennemies on short distance, preventing them to use their Heavy Bolters during the movement, and for 1.5 s. when they stop. Putting them on "Stand Ground" will make them stop to chase, then staying always on their spot, then always able to fire their Heavy Bolters. Note if your Sisters have Flamers, they have good accuracy on the move, then they can stay in "Hold Ground".

Canoness and Confessor are Melee Stance by default, but due to the lack of proper melee squad for retinue, it is not a bad idea to toggle them to Ranged Stance, particulary as most strategies include Inferno Pistol early purchase (either Tier 1.5 or early Tier 2).
General orders
Movement orders

There are 2 types of movements which dictates how the squad/unit reacts if it encounters an ennemy while it is going to your selected location. Just right-clicking anywhere but on an ennemy will be like using the "Move" order. Of course, clicking on an ennemy, be it with whatever order or without order, will make your squad/unit attacking your target. Then, the two following movement orders will impact the movement toward a selected location. Unlike previous stances, these are one-time orders.
Type
Hotkey
Perks
Move
Nothing or V
The squad/unit moves to the the targeted location, just firing at nearby ennemies if they are at range, but leaving combat to move until the point (where they'll apply their "idle" stance). The only difference with just righ-clicking on a location is if you want your troops to move to a point occupied by ennemies ; clicking on ennemies will make your troops attacking them ; clicking on them with this Move order will make your troops running to this point.
Attack Move
A
The squad/unit moves to the targeted location, but stops when encountering an ennemy, engaging and pursuing him instead going to the originally selected location. Useful for patroling and engaging ennemies you don't know where they are.

Other common single-time orders

Miscellaneous orders shared by most of units and squads. Like movements, they are used only once and aren't stances.
Type
Hotkey
Perks
Stop
Q
The squad/unit just stops whatever it is doing, and stays on the spot. It then instantly does what its "idle" stance dictates, meaning if there are ennemies around, it won't stop to attack them (unless you switched on "Cease Fire" or "Stand Ground" on melee units). This command / shortcut is a must have.
Attack Melee
Z
The squad/unit closes to the ennemy (indeed using ranged weapons if it has any in the process), whatever the battle stance is Melee or Ranged. It is an alternative to switch between the aformentioned stances.


Usage

These 4 orders are really important, and there is why.

The simple right-click (or V + left-click) is best to rush a location without being distracted by the ennemy, while the A + left-click is the go-to to order the squad to stop its progression and engage battle when encountering an ennemy, somewhat like if you clicked on ennemy squad. Typically, you should use the Attack Move order more than the standard left-click. Except if you want to reach a particular location or target.

The "Stop" order is very important because for some reason, when you click on ennemies, your units want to run towards them, resulting in both less damages due to fire on the move accuracy penalty and going melee altough you don't want it. Then if it happens, or whenever you judge your squad is close enough and shouldn't close more, just press Q .

The "Attack Melee" order (Z) is again very important for Sisters. A prime example of usage is letting Seraphims on their natural Ranged stances, but order them to engage Guardians, Fire Warriors or Shoota Boys at melee ; once the enney flees or is destroyed, or if you target another ennemy, your Seraphim will attack him, it or them with their ranged weapons only (unless, of course, these ennemies are, once again, at melee range). Since most of Sisters are average on all domains, you'll probably frequently use it on ranged sisters to tie in ennemies better at range but weaker at melee ; without jeopardizing your sisters' lives on a melee engagement preference against melee specialists.
Faith mechanics
Faith is a system comprised of several mechanisms, which allows for some units to use specific powers. This is a unique feature, only used by the SoB, which can make up for their overall weakness, and even win the game if used wisely.

Faith Resource

SoB have a 5 parts segmented gauge below the squad caps counter : it is the Faith gauge. This gauge starts at 0 Faith Points (FP) and 0 FP Max, meaning that you can' even earn FP right now. To gain FP, you first must expand FP Max capacity. For this, you need to capture a Strategic Point (SP), then to build a Listening Post (LP), then to upgrade it with a Holy Icon. Each Icon expand the gauge by one segment, allowing to store 20 FP. Then, 2 LP and Icons allow to store 40 FP, and you need 5 Posts and Icons to have the right to store the maximum amount possible : 100 FP. Needless to say, the best Acts of Faith require more FP than the basic ones. This means the SoB are more dependant on SP and LP than other races, as the more they have, the most FP they can stock, allowing to use several cheap Acts at once or to use the costly ones.

The second requirement is to generate Faith. This is done just by fielding Fervent units. Fervent units are Sisters with a golden halo (namely : all Superior Veterans, Seraphims, Celestians and the Living Saint). As long as they are alive, each one of them slowly generate FP. Of course, once the FP Maximum is reached, you can't earn more FP, hence the need to build Holy Icons. A prime example is to field the Canoness or Seraphims without having built any Holy Icon : you'll constat that the gauge won't fill.

Then, once you have enough FP, you can expand with one of the Faith users (Missionaries, Canoness and Confessor) to trigger special effects. Note that some Acts are always available while the other ones need to be researched first.

Faith generators

Here are all units who generate FP. Values are by second. Note that the gauge displayed in-game shows how many FP your army generates in ten seconds. Then, gauge-wise, the values are multiplied by ten.

HQ
Battle Sisters
Canoness
Seraphims
Celestians
Living Saint
Lone member
0,1
0
0,175
0,025
0,025
0,1
Initial 4-members Squad
-
0
-
0,1
0,1
-
Full Squad
-
0
-
0,2
0,1
-
Veteran Superior
-
0,06
-
0,035
0,035
-
Full Squad with Veteran Superior
-
0,06
-
0,235
0,135
-

Acts of Faith

Here is the list of the 6 Acts of Faith of the game for reference. More details and strategy for each one will be explained in later sections.

Tier
User
Research required
Holy Icons required
FP
Effect
Duration
Lay Hands
1
Missionary
No
1
15
Boost HP regeneration of Missionary and his squad by 20 points.
20 s.
Blinding Light
1
Canoness
No
2
25
Hits ennemies in an area around the Canoness on cast. Their accuracy, sight range and detection range are then temporarily shrinked.
20 s.
Emperor's Touch
2
Missionary
Yes
3
50
Boost ranged damages of Missionary and his squad and makes them effective against all armor types, including vehicles.
20 s.
Emperor's Wrath
2
Confessor
No
2
35
Deals damages in a small targeted zone.
-
Holy Edict
2
Confessor
Yes
2
25
Immobilize targeted squad (doesn't work on lone heroes nor vehicles).
15 s.
Divine Retribution
3
Missionary
Yes
4
70
Makes Missionary and his squad doing a fixed amount of retaliation damages each time they are attacked.
15 s.
Ascension
3
Canoness
Yes
5
85
Summons 4 invincible melee-oriented angels.
30 s.
STRUCTURES -------------------------------------------------------------
Ecclesiarchal Chapel
The Ecclesiarchal Chapel is the starting building. Like almost all other races, it is from where you build builders (Servirors), basic units (Missionaries) and secondary hero (Confessor). And like almost all other HQ, it allows to buy tier upgrades, to build 6 Plasma Generators and 6 Inferno Turrets per HQ, produces some Requisition (2 points per second), is limited to 5 HQ, and is required for many things (hence must be protected at all costs).

Building an additional Chapel costs 250 Req. and 150 Pow., or 450 Req. if there is none. Build time is 2:30.

For the particularities among other races' HQ, Chapel produces Faith (0,1 FP per second), provides Missionary's Tier 2 and 3 Acts of Faith, and can be equiped with Laud Hailers, which gives him a Morale spell helping defending it early game.

Recruitments
Resume
Requirements
Req. cost
Pow. cost
Squad Cap
Time
Limit
Ecclesiarchal Servitor
Builder
-
75
-
-
10 s.
4
Missionary
Scout, support
-
75
-
1
15 s.
-
Confessor
Secondary hero
Holy Reliquary (Tier 2)
245
60
-
50 s.
1


Laud Hailers

Once this ability has been bought at Pristine Sanctuary (on Tier 1), Chapels, Convents, Pristine Sanctuaries, Holy Reliquaries, Manufactorums and even Rhinos can use it. See the Pristine Sanctuary section for more information.


Ecclesiarchal Cathedral

This upgrades you to Tier 2. It needs either a Convent or a Pristine Sanctuary to be built, and then 300 Req., 125 Pow. and 1:30 mn.. Despite the name of the upgrade, and the visual enhancing of the building, it is still named "Chapel" in-game and doesn't get higher health or defense.


Emperor's Touch Research

This is a spell available to purchase at Tier 2. For 75 Req., 50 Pow. and 30 s., and then 3 Holy Icons and 50 Faith Points, it allows the Missionary to temporary turn a Battle Sisters Squad into a more powerful anti-everything shooting squad ! Buy it as soon as you have 3 HI ; as it is on Tier 2, Celestians and Superior Veterans give far enough Faith, then Holy Icons are the only real requirement.


Ecclesiarchal Citadel

This upgrades you to Tier 3. It needs Tier 2 and either a Manufactorum or a Holy Reliquary to be built, and then 340 Req., 340 Pow. and 1:40 mn.. Like the previous upgrade, it doesn't change the name in the game info box, defense nor health.


Divine Retribution Research

This is a spell available to purchase at Tier 3. For 100 Req., 75 Pow. and 35 s., and then 4 Holy Icons and 70 Faith Points, it allows the Missionary to temporary cause retaliation damages each time they receive damages. Don't buy this if you haven't 4 HI. Like the other Act of Faith, FP aren't much a limit at this point of the game.


Set Rally Point

This allow you to design where the upcoming recruits will go. It can be a location or another squad or unit, even an ennemy (providing it won't die or disappear in fog of war). For Servitors, targeting a building or a vehicle will make them go repair it, and targeting a building under construction will make them go and build it. You are not forced to click on this icon to set a rally point ; just select the Ecclesiarchal Chapel and right-click anywhere you want. If you click on this icon, then you have to left-click to set up the point.


Recruits' stance

Determines what stance upcoming units will have. By default, it is "Hold Ground". You can click on the icon until you have the stance you want to apply to future units. Of course you'll always be able to toggle stance of each units by clicking on it, whatever this option was toggled on at unit's creation.
╚ Ecclesiarchal Chapel's numbers
Construction
Pre-requisite
Base Requisition
Additional Requisition per existing HQ
Base Power
Additional Power per existing HQ
Seconds
Limits
-
450
+250
-
+150
150
5

Defense :
Hit Points
Morale Points
Armor type
Sight radius
Detection radius
6.000
-
Building High
25
-

Give access to :
Ecclesiarchal Chapel (T1) :
From
Adepta Sororitas Convent
Servitor
Inferno Turret (6 per HQ)
Servitor
Martyr's Gift
Holy Reliquary*
Plasma Generator (6 per HQ)
Servitor
Pristine Sanctuary
Servitor
Ecclesiarchal Cathedral (T2) :
From
Angelic Visage
Seraphims
Blessed Armor
Pristine Sanctuary
Celestians
Convent
Commander Veteran Upgrade
Holy Reliquary
Death-Cult Assassin
Convent
Escalate Engagement
Listening Post
Heavily Fortified Position
Listening Post
Heavy Bolters
Battle Sisters
Heavy Weapons Increase
Pristine Sanctuary
Holy Edict
Holy Reliquary
Holy Reliquary
Servitor
Krak Grenades
Convent
Manufactorum
Servitor
Master-Crafted Weapons
Pristine Sanctuary
Mistresses*
Repentias*
Multi-Melta Turret Upgrade
Inferno Turret
Superiors Veterans
Battle Sisters, Seraphims, Celestians
Strenghten Power Grid
Plasma Generator
Thermo Plasma Generator
Servitor
Ecclesiarchal Citadel (T3) :
From
Ascension
Holy Reliquary
Divine Retribution
HQ
Commander Hero Upgrade
Holy Reliquary
Exorcist
Manufactorum
Full Scale War
Listening Post
Improved Reactor Core
Manufactorum
Plasma Battery Storage
Plasma Generator
Psyocculum
Pristine Sanctuary
Reinforced Hull Plating
Manufactorum
Repentias
Convent
Shrine of the Living Saint
Servitor
Zealot Charge
Pristine Sanctuary

* : Note that you need a upper-tier building than HQ to buy this item. Meaning if you lose a Citadel or Cathedral, you can still buy it with a Cathedral or Chapel.

Ability :
Require
Cooldown
Effect
Laud Hailer
Laud Hailers (research)
90
For 15 sec., nearly infantry gets :
  • Allies : +100 Max. Morale and +25% Morale Regen..
  • Ennemies : Stunted Morale Regen. and -12 Morale per sec..

Recruit :
Pre-requisite
Requisition
Power
Population
Seconds
Limits
Overview
Ecclesiarchal Servitor
-
75
-
-
10
4
Builder
Missionary
-
75
-
1
15
-
Capper
Confessor
Holy Reliquary
245
60
-
50
1
Melee hero

Research :
Pre-requisite
Requisition
Power
Seconds
Overview
Act of Faith : Emperor's Touch Bolter
Tier 2
75
50
30
Unlocks this Missionary's skill
Act of Faith : Divine Retribution
Tier 3
100
75
35
Unlocks this Missionary's skill
Purgatus Mine Field
Buildable right from the beginning (it doesn't even need the HQ) for 25 Req., 25 Pow. and 20 s., this "structure" is a burning mines cluster. Once it is finished, it becomes invisible from the ennemy, unless he has units able to detect stealth units. And once the ennemy steps in, it detonates and creates a blazing zone, less powerful than other races' mines, but dealing more Morale damages, as usual with Sisters. There is no limit to the number of clusters you can build, and you can build them anywhere as long as you have the vision of the area (like the Ecclesiarchal Chapel, making the Mine Field the second of the 3 structures not limited to Control Areas).

The trick is that only the first mine the ennemy trips into will explode, and leaves a burning flame. The whole cluster just disappear at this instant. The initial explosion, centered on the triggered mine (and not on each mine nor the central mine) and with a radius of 5 units, deals around 75 damages to Heavy Infantry, 30 to Commanders, 150 to Light Vehicles and 100 to Morale. Secondly, each unit hit by the detonation suffer an additional total of 30 health and 18 morale damages over 6 s.. And finally, the burning zone deals around 7 damages to Heavy Infantry, 3,5 to Commanders, 2,1 to Light Buildings and 15 to Morale per half-second. The flame has a radius of 7 units and stills for 10 seconds.

This mine field can easily depletes the morale of an ennemy squad (the more members, the most effective ; it is far less effective against heroes), making it a good starting defense option. However, the problem is in the "only the touched mine burns the zone" rule limits their usefullness. For exemple, if you set a cluster next the Chapel, the cluster will have mines next its wall, and other mines farther. And of course, ennemy will detonate one of the farther ones. It will indeed take the initial explosion, and a bit of the persistent flame, but ennemy will just have to either move away or to attack the Chapel on melee mode, since the flame will be away of the Chapel.

Nonetheless, a mine will greatly shrinks a squad's morale, allowing to completely demoralize it with a Flamer or a Laud Hailer.
Listening Post
The nerve of war !

Listening Posts, or LP for short, don't need any building to be up (not even the HQ), but can only be built on a captured Strategic Point (SP) or Relic. Capturing these points rise your Requisition (Req.) income by 6 points, makes the area around visible (radius 35 for SP, 15 for Relic), detects stealth ennemies visible in radius 7 for both, and creates a Control Area in a radius of 20 units.

For information, Critical Locations give same income but give a sight radius 50 and a detection radius of 8, and can't welcome an LP. Then, it doesn't project any Control Area.

Building a LP on a SP or a Relic costs 100 Req. and 30 s., to add some defense to it, as the ennemies will have to destroy the LP before de-capturing (also known as "decap") the SP or Relic and then claim it their own. It also doubles its Req. earning rate. Like other races, LP can be upgraded several times. But, exclusive to Sisters, some upgrades allow them to use their Acts of Faith.


Holy Icon

The Sisters' exclusive LP upgrade. It adds some permanent light effects on the LP, allowing 2 things :
  • Extend the stealth detection range to match th sight radius of the LP or Relic.
  • Extend the Faith gauge, allowing to store 20 Faith Points for each Icon (HI) you have.
You can have a maximum of 5 HI at a time. Build time is always 30 s., but price increases as you have more HI, as such :
Req. cost
Pow. cost
Maximum Faith
Avaiable spells
1st Icon
25
0
20
Missionary's Lay Hands (15 FP)
2nd Icon
65
25
40
  • Canoness' Blinding Light (25 FP)
  • Confessor's Emperor's Wrath (35 FP)
  • Confessor's Holy Edict (25 FP)
3rd Icon
105
50
60
Missionary's Emperor's Touch (50 FP)
4th Icon
140
75
80
Missionary's Divine Retribution (70 FP)
5th Icon
180
100
100
Canoness' Ascension (85 FP)


Fortified Position Add-On

For 100 Req., 75 Pow. and 35 s., has the double effect to :
  • Add the Inferno Cannon. The LP becomes a fire beams turret. It has far lower DPS than other races' turrets (15,8 VS Medium Infantry, 17,6 VS Heavy Infantry and 5,3 VS Commander) but more Morale DPS (8).
  • Increase Req. production by third +6, so this point worth 18 Req. now.
    It takes 1:15 mn to gain back this investment.


Heavily Fortified Position Add-On

Once LP has been fortified, it can be upgraded at Tier 2. For 260 Req., 150 Pow. and 60 s., LP get these 4 effects :
  • Inferno Cannon damages are more than doubled : 39,6 VS Medium Infantry, 44 VS Heavy Infantry, 13,2 VS Hero. Morale damages are lightly boosted by 25%, to 10 DPS.
  • Inferno Cannon range is increased, from 25 to 35.
  • Increase Req. production by a fourth +6, so this point worth 24 Req. now.
  • Gains 1,250 HP, going from 2,800 to 4,050. The previous upgrade didn't boost health. The armor type stay low class.
It takes more than 7 minutes to get back the investment so it shouldn't be bought lightly.


Escalate Engagement Research

Available at Tier 2, it boosts the Req. global production by 15%, for 75 Req., 250 Pow. and 60 s.. You can and need to research this only once in the game, the bonus is then permanent until the end of the game, even if all LP are destroyed.


Full Scale War Research

Tier 3 version of the previous upgrade. Boost the Req. global production by another 20%, giving a final bonus of 38%, for 100 Req., 350 Pow. and 95 s..
Plasma Generator (SoB version)
Plasma Generators, or PG, produce the second resource of the game : the Power, or Pow.. It is mainly used to buy upgrades or higher units. Unlike LP, PG can be built everywhere near HQ or LP. It needs an HQ to be built, and then costs 135 Req., is built in 30 s. and gives 50 Pow. once is built, then 1 Pow. per second (boosting the Pow. counter by 10). You can have a maximum of 6 PG per HQ. When a PG is destroyed, the explosion hurts nearby units, allies or ennemies. PG has no differences whatever the race.


Strengthen Power Grid Research

The "Power version" of the LP research. Available at Tier 2, it boosts the Pow. global production by 33% (which is more than the "LP version"), for 200 Req., 40 Pow. and 60 s.. You can and need to research this only once in the game, the bonus is then permanent until the end of the game, even if all PG are destroyed.

As the boost is 33%, and the cost is heavier than a PG, it is best to buy this after having at least 4 PG.


Plasma Battery Storage Research

Tier 3 version of the previous upgrade. Boost the Pow. global production by another 20%, giving a final bonus of 59%, for 350 Req., no Pow. and 95 s..
Adepta Sororitas Convent
Convent is Sisters of Battle barracks, commonly abridged "rax". This is where all female troops are recruited. It also contains some researchs benefitting some sisters. It needs an HQ, 250 Req. and 45 s. to be built. Once Sisters are deployed, the Convent is no longer necessary to reinforce them or to recruit their Superior Veteran.

Recruitments

Resume
Requirements
Req. cost
Pow. cost
Squad Cap
Time
Limit
Canoness
Primary hero
-
200
40
0
55 s.
1
Battle Sisters Squad
Ranged infantry
-
140
0
2
16 s.
-
Seraphims Squad
Fast and mobile infantry
Pristine Sanctuary
200
20
3
28 s.
-
Celestians Squad
Anti-machines infantry
Tier 2
180
40
2
22 s.
-
Death-Cult Assassin
Stealth melee unit
Holy Reliquary
100
40
1
20 s.
-
Sisters Repentia Squad
Melee infantry
Tier 3
220
80
3
36 s.
3


Improved, Enhanced and Elite Field Logistics

Each one (available after another) increase Squad Cap by 3 points and reduces reinforce time (but not the build time) by 12%, for 140 Req. and 30 seconds each, without any requirements. Then, the reinforce time is reduced by 12%, then 23%, then 32% at total. As general upgrades, once one of the upgrade is bought, it remains until the end of the game, no matter if the Convent is destroyed.

However, it won't allow to reach 20 points of Squad Cap, but only 19. To achieve 20, you'll need either to deploy a Celestian Squad's Imagifer, or to deploy a Sister Repentia Squad's Mistress, and of course to keep her alive. More precisely, for each Imagifer or Mistress alive, the Squad Cap is extended by one unit. Building another Convent actually doesn't extend the Squad Cap. This is one of the oddities of SoB race. Either way the actual cap is still at 20.


Wargear : Phosphor Grenades

Needs a Pristine Sanctuary, 25 Req., 75 Pow. and 35 s.. Grants all Battle Sisters Squads to use the ability of the same name. Selected soldier and ennemy infantry in a very small area (6) around will suffer minor knockback (15-20 force) and a total of 85 health points and 60 morale points over 7 seconds. Despite being a grenade, it acts much more like a targeted, unavoidable and instant spell (albeit with a tiny AoE). Cooldown is 1:15 mn.. As general upgrade, once it is bought it remains for the rest of the game.


Laud Hailers

Once this ability has been bought at Pristine Sanctuary (on Tier 1), Chapels, Convents, Pristine Sanctuaries, Holy Reliquaries, Manufactorums and even Rhinos can use it. See the Pristine Sanctuary section for more information.


Wargear : Krak Grenades

Available at Tier 2, for 75 Req., 75 Pow. and 40 s., and need a Sanctuary to be researched. Grants all Seraphims and Celestians squads to use the ability of the same name. Selected vehicle or building will suffer an instant ~675 health points. Despite being a grenade, it acts much more like a targeted, unavoidable and instant spell. Cooldown is 2 mn.. As general upgrade, once it is bought it remains for the rest of the game.

They are IMO useful as they allow to kill waited anti-infantry vehicles faster. For example, a Dreadnought (4,780 HP) will lose 675 HP. If you recruit 2 Celestians (or Seraphims), you can engage battle with a 1,350 HP loss, so the third of its initial HP. 3 Celestians/Seraphims and you deal 2,025 HP loss, almost half HP ! Keep in mind they have a huge cooldown, so use them against real treats .


Set Rally Point

Like with Ecclesiarchal Chapel, this allow you to design where the upcoming recruits will go. It can be a location or another squad or unit, even an ennemy (providing it won't die or disappear in fog of war).


Recruits' stance

Like with Ecclesiarchal Chapel, determines what stance upcoming units will have. By default, it is "Hold Ground". You can click on the icon until you have the stance you want to apply to future units. Of course you'll always be able to toggle stance of each units by clicking on it, whatever this option was toggled on at unit's creation.
Pristine Sanctuary
Available right at the beginning (or at least, with a HQ) for 175 Req., 50 Pow. and 45 s., Pristine Sanctuary is the armoury of the SoB. As then, it allows numerous upgrades to be researched, and Seraphims Squad to be deployed. As upgrades are mandatory for frail Sisters and Seraphims are a must against certain ennemies, you can't reasonably skip this building, except in some precise strategies (like a Rhino rush).

Concerning Seraphims, you'll still be able to reinforce them if Pristine Sanctuary is destroyed, but you won't be able to recruit their Veteran Superior, nor to recruit fresh squads.

Concerning Battle Sisters, they can buy weapons (Flamer and/or Heavy Bolters) as long as there is at least one Sanctuary.

All other upgrades are permanent once they are bought, whatever the Sanctuary is destroyed or up.


Laud Hailers

This upgrade costs 75 Req., 50 Pow. and 30 s.. Once it has been bought, Chapels, Convents, Pristine Sanctuaries, Holy Reliquaries, Manufactorums and even Rhinos can use it.

It projects an AoE in a short range (20) for 10 seconds, giving 100 additional maximum Morale Points and 25% Morale regeneration rate to SoB and allies, and depletes 12 Morale points (then 120 in total) to all ennemies squad (regardless to how many members are actually in the AoE or the Morale resistance ratings) and prevent them to restore their Morale. Effects don't stack if multiple Laud Hailers are used at same time.

While it appears to be useless, this can be actually useful to help your first troops to reduce ennemy's attack through demoralization and then buy you some time to build or reinforce more Sisters. And later this effect will be "bringable" in battlefield through Rhinos.

With Flamers and Phosphor Grenade, Laud Hailers' stunning of Morale recovery helps a lot to keep ennemy demoralized, even if he gets into melee (where it gets only 10% Morale damages from Flamers).

Don't use several nor all Hailers at once as they don't stack in any maneer.


Wargear : Blessed Ammunition

For 100 Req., 75 Pow. and 45 s., it allows ALL race's "Bolt" weapons to reduces the damage reduction from cover ennemy units receive by 50%. I am not sure if :
  • it reduces the initial reduction by half (so, ennemies receive 87,5% damages instead 75% in light cover and 75% instead 50% in heavy cover) ;
  • negates the cover bonus (50% bonus defense in heavy cover minus 50% = 0%, 25% bonus defense in light cover minus 50% = below 0, then 0%) ;
  • or even negates the heavy cover bonus (50% - 50% = 0%) and deals more damages in light cover (25% - 50% = -25%, then actually deals 125% damages, turning light cover into malus zones for ennemies).

The "Bolt" weapons are :
  • Missionary's Bolt Pistol.
  • Battle Sisters unupgraded Bolters, and Heavy Bolters. Flamers don't benefit from this.
  • Seraphims' Dual Bolt Pistols.
  • Celestians' unupgraded Bolters. Melta Guns and Multi Meltas don't benefit from this.
  • All Superior Veterans' unupgraded ranged weapons (Bolt Pistols). Inferno Pistols don't benefit from this.
  • Canoness' unupgraded Bolt Pistol. Inferno Pistol don't benefit from this.
  • Confessor's unupgraded Bolt Pistol. Inferno Pistol don't benefit from this.
  • Rhino Transport's mounted Storm Bolter.


Wargear : Inferno Pistol

For 50 Req., 30 Pow. and 30 s., it replaces Canoness, Confessor and all Veteran Superiors' standard ranged weapon for this kick-ass gun. One of its great asset is his accuracy on the move, far higher than majority of weapons in the game, them dealing more damages on the move than the other units. The other one is the good damages against Light Vehicles. All in all, it is a valuable upgrade you should buy as soon as you have a Canoness or a Veteran Superior.


Wargear : Power Weapons

For 50 Req., 20 Pow. and 30 s., Wargear : Power Weapons replaces Canoness and all Veteran Superiors' standard melee weapon for more powerful ones. Namely :
  • Canoness' Power Sword is replaced by the Brasero of Holy Fire. In addition to boost her damages, it has the secondary effect to give a slight chance to disable the ennemy for a couple of seconds with each strike.
  • Veteran Superiors' Chainswords are replaced by Power Swords. A merciful side effect is that Power Swords are noiseless, then this upgrade ends the Chainswords' continuous buzz !


Wargear : Master-Crafted Weapons

At Tier 2, after having bought Wargear : Power Weapons, for the same price (50 Req., 20 Pow. and 30s.), Wargear : Master-Crafted Weapons doubles the damages dealt by Veteran Superiors and boost Canoness and Confessor ones. Note the Confessor benefit only from Master-Crafted Weapons, not from Power Weapons.


Heavy Weapons Increase

Available at Tier 2, for 75 Req., 75 Pow. and 20 s., it allows Battle Sisters Squad to equip 5 special weapons (Flamers or Heavy Bolters) instead of 3. Straight, simple, and definitively a must.


Wargear : Blessed Armor

Available at Tier 2, for 100 Req., 50 Pow. and 45 s., it doubles the health of Missionaries and boost the health of almost all Sisters (Battle Sisters, Seraphims, Celestians, Repentias, Veteran Superiors, Imagifers and Mistresses ; Canoness and Death Cult Assassins are excluded) by 25%. This is absolutely mandatory as Sisters are frail. I usually take this upgrade right as i hit Tier 2.


Zealot Charge Research

Only available at Tier 3, for 75 Req., 50 Pow. and 20 s., it bestows Seraphims and Repentias this passive trait. When they are on Assault Stance, these units automatically ram the ennemy in range, causing minor damages and knocking them. Of course, knocking force and damages are 4 times more powerful on Repentias than on Seraphims.


Wargear : Psyocculum

Only available at Tier 3, for 150 Req., 50 Pow. and 45 s., it increases the ranged capacities of several basic units :
Damages boost
Range boost
Missionary's Bolt Pistol
100%
20% (from 25 to 30)
BSS basic Bolters
35%
20% (from 25 to 30)
BSS Flamers
35%
0% (stay at 25)
BSS Heavy Bolters
20%
0% (stay at 35)
Seraphims' Dual Bolt Pistols
50%
0% (stay at 19)
Celestians' basic Bolters
0%
20% (from 21 to 26)

Note the Veteran Superiors don't benefit from this upgrade.
Inferno Turret
This one requires a HQ and either a Convent or a Sanctuary to be built, for 90 Req., 45 Pow. and 40 s.. Third and last defensive structure (with LP and Purgatus Mine Field) and unbound to Control Area structure (with HQ and Purgatus Mine Field), the Inferno Turret is an automatic sentry armed with the same fire-beam cannon that the LP has. Then, the eternal Sister's scheme "deals less health damages but more morale damages than other races" applies here once more. The stream of fire burns all ennemies around the target in a radius of 3,5 units. Like the other turrets, it detects all stealthed units in his whols sight radius (35 units), and you can have 6 of them per HQ.


Multi-Melta Turret Upgrade

Available at Tier 2 for 50 Req. and 30 s., it permanently turns the turret for an anti-vehicle version of itself, armed with lasers. As it is designed to damage vehicles, it deals next to no damages to infantry anymore. Then, if you want or need anti-infantry turrets, don't buy this upgrade on each Inferno Turrets.
Manufactorum
Now we are talking big ! First of the 3 structures to be available at Tier 2, it costs 200 Req., 125 Pow. and 40s. to be built. It is the factory which builds Sisters' vehicles. It also allows some upgrades to be researched... one weirdly also benefitting to non-vehicle Celestians Squads ! Last but not least, Manufactorum allows to research the Tier 3 upgrade at HQ. Each Manufactorum increases the Vehicle Cap by 5.

Recruitment
Resume
Requirements
Req. cost
Pow. cost
Vehicle Cap
Time
Limit
Rhino Transport
Transport, support
-
75
70
1
15 s.
3
Immolator
Tank
-
165
250
3
55 s.
-
Lightning Fighter
Aircraft
-
100
200
2
35 s.
5
Exorcist
Artillery, infantry disruption
Tier 3
100
225
4
30 s.
2
Penitent Engine
Walker mech
Shrine of the Living Saint
150
330
4
30 s.
2


Improved, Enhanced and Elite Mechanized Production Efficiency

Each one (available after another) increase Vehicle Cap by 5 points and reduces the vehicles build time by 10%, for 165 Req. and 30 seconds each, without any requirements. Then, the build time is reduced by 10%, then 19%, then 27,1% at total. As general upgrades, once one of the upgrade is bought, it remains until the end of the game, no matter if the Manufactorum is destroyed ; however, as a Manufactorum actually extends the Vehicle Cap by 5 points, losing a Manufactorum means losing 5 Vehicle Cap.


Conflagration Research

Needs no requirements but 100 Req., 75 Pow. and 45 s., to allow the Immolators (even the ones converted into anti-tanks) to use the very curious Conflagration skill.


Wargear : Reinforced Hull Plating

Available only at Tier 3 for 150 Req., 100 Pow. and 60 s., it boosts vehicles' health by 25%. Straigth and simple. Like Blessed Armor for infantry, this upgrade is a must-have and should be bought as soon as Tier 3 is hit (except if, for whatever reason, you don't use vehicles).


Wargear : Improved Reactor Core

Also available only at Tier 3 for a cheaper price of 75 Req., 50 Pow. and 40 s., it boosts the damages dealt by Melta and Multi Meltas of Celestians and Immolators by 20%. Sadly enough, upgraded Inferno Turrets don't benefit from this upgrade.


Set Rally Point

Same thing that for Ecclesiarchal Chapel and Convent. You know the deal.


Recruits' stance

Again, same thing that for Ecclesiarchal Chapel and Convent...
Holy Reliquary
Second of the 3 structures to be available at Tier 2, it costs 125 Req., 50 Pow. and 30s. to be built. It produces nothing by itself, but allows to recruit the heroic Confessor from HQ, the sneaky Death Cult Assassins from Convent and the durable Imagifers in Celestian Squads. Secondly, it contains some upgrades benefitting to Morale, Faith, Canoness and Confessor.

As it allows to research Tier 3 from HQ like Manufactorum, your choice in Tier 2 will often be to chose between Manufactorum and Holy Reliquary before teching to Tier 3. Manufactorum brings vehicles, Holy Reliquary is more infantry-oriented.


Martyr's Gift Research

Requires a Tier 1 HQ (Holy Reliquary being available on Tier 2, this is relevant only if your HQ has been destroyed after having built the Reliquary), 75 Req., 75 Pow. and 25 s.. Martyr's Gift is a passive effect which earns Faith Points whenever a fervent unit dies (Canoness, Seraphim, Celestian, any Veteran Superior and Living Saint).


Act of Faith : Holy Edict Research

Requires a Tier 2 HQ (Holy Reliquary being available on Tier 2, this is relevant only if your HQ has been destroyed after having built the Reliquary), 50 Req., 40 Pow. and 45 s.. It unlocks the Confessor's Holy Edict spell, which needs 2 Holy Icons and 25 Faith Points to stun a whole targeted squad. It is very situational, as no team will always have a Confessor, and the spell has a long cooldown of 2 mn and doesn't work on heroes (not verified on heroes rattached to squads) nor vehicles. But it can be priceless against elite melee squads, like Chaos Possesseds. More on this on Confessor's section.


Wargears : Chaplet Ecclesiasticus and Heart of Worship

Boosts the Morale of Missionaries, Battle Sisters, Seraphims, Celestians and Repentias, and boost the global Faith production rate. Values for each upgrades are listed here :
Chaplet Ecclesiasticus
Heart of Worship
Requirements
-
Shrine of the Living Saint (Tier 3)
Requisition
125
165
Power
50
75
Research time
35 s.
35 s.
Morale boost
+100
+100 (+200 from base)
FP production rate
+15%
+20% (+38% from base)


Commander Veteran and Commander Hero Upgrades


Boosts the health and health regeneration of Canoness and Confessor. It doesn't upgrade Superior Veterans. "Hero" version is available only once "Veteran" version has been bought. Values for each upgrades are listed here :
Veteran
Hero
Requirements
Tier 2 HQ
Tier 3 HQ
Requisition
100
100
Power
25
100
Research time
45 s.
45 s.
Canoness's HP (base =1,500)
+300 / +20% / =1,800
+350 (+650 from base) / +19,5% (+43,5% from base) / =2,150
Confessor's HP (base =1,200)
+400 / +33% / =1,600
+450 (+850 from base) / +28,5% (+70% from base) / =2,050
Health Regeneration per second (base =2)
3
4


Act of Faith : Ascension Research


Requires a Tier 3 HQ, 100 Req., 100 Pow. and 30 s.. It unlocks the Canoness' Ascension spell, which needs 5 Holy Icons and 85 Faith Points to summon 5 individual powerful but temporary melee angels. Much like the other Act of Faith, Holy Edict, it is very situational, as no team will always have 5 Holy Icons nor even a Canoness, and the spell has a very long cooldown of 3 mn.. However, it is very powerful, as expected from the ultimate Act of Faith. More on this on Canoness' section.
Thermo Plasma Generator (SoB version)
Last of the 3 structures available on Tier 2. It costs 275 Req., a whole minute and a Slag Deposit to be built. Slag Deposits are rare points on almost each map, which only purpose is to built these Thermo Plasma Generators (or TPG for short) atop. They are sort of super generators, earning more Power than normal ones (100 Pow. upon construction, then +40 Pow. on the counter, meaning 4 Pow. per second), and more durable, but once again able to be built only on specific locations (which don't require to be in your Control Area (like Purgatus Mine Fields and HQs ; albeit TPG can't be built where you want, unlike Fields and Hqs). They can't allow to research the PG upgrades (Strengthen Power Grid and Plasma Battery Storage Researchs) but of course benefit from it. A strange but welcome addition is the TPG projects a Control Area in a radius of 20 units.

Shrine of the Living Saint
11th and final structure of the Adepta Sororitas, only available at Tier 3. It costs 450 Req., 450 Pow., 1:40 mn. to build, and allows 3 things :
  • The research of Heart of Worship in Holy Reliquary.
  • The deployment of Penitent Engines at Manufactorum.
  • Last but not least : the deployment of The Living Saint, the ultimate Sisters of Battle hero, for another 400 Req., 400 Pow. and 1:10 mn.. It also requires at least a Tier 1 HQ and a captured Relic.


    Set Rally Point

    Like Ecclesiarchal Chapel, Adepta Sororitas Convent and Manufactorum, you can chose where, or with who, or against who, the Living Saint will go once you'll recruit her.


    Recruit' stance

    Again, same as Ecclesiarchal Chapel, Adepta Sororitas Convent and Manufactorum, but apply only to Living Saint since it is the only unit this building can recruit.
UNITS --------------------------------------------------------------------
Ecclesiarchal Servitor


This is Sisters of Battle's builder. A rather simple unit : he can't attack like Imperial Guard's builders, detect nor reinforce like Scarab builders, nor infiltrate like Gretchins.


Dismantle


This weird and unique ability allows Servitor them to deal around 725 damages points to a close building. Point is, Servitor stands still while channeling his ability. You need to order him to stop before assignating him another order. In this case, cooldown is not reseted and ability is still available.

Because Servitors are limited to 4, you can deal an average 2.900 damages point to a building each 70 seconds at maximum. So in theory 4 Servitors, (or less following the faction you face) can destroy any Tier 1 building in a concerted action, except HQ, Chaos Temple, Chaos Armoury, Soul Shrine, Path to Enlightenment, Forbidden Archive and Haemonculus' Laboratory ! An early raid on ennemy's base with one or two Sisters squad covering a 3 or 4 Servitors team can result in a mind-bomb attack. If you can gain military dominance over your ennemy and keep your Servitors alive, you will be victorious. Later, 4 Dismantles can destroy many other buildings (with notable exceptions of factories, except Da Mek Shop), but you'll get access to Celestians, so you'll likely don't use Servitors as buildings destroyers anymore.

Remember Servitors can also build Purgatus Mine Fields, quickly depleting ennemy's morale, and to a lesser extent Inferno Turrets, adding to their usefullness as "travelling builders".

For more details on Dismantle and needed uses on buildings, read the next section (Dismantle Chart).


Some numbers

Cost
Pre-requisite
Built from
Requisition
Power
Population
Seconds
Limits
-
HQ
75
-
-
10
4

Defense :
Hit Points
Morale Points
Armor type
Move Speed
Sight radius
Detection radius
375
150
Infantry Low
20
20
-

Attack :
None

Give access to :
Nothing

Abilities :
Require
Cooldown
Effect
Dismantle
-
60
After a 10-seconds animation is completed, deals around 725 damages points to targeted building.
Build
-
-
Building menu
Repair
-
-
Gradually restore vehicles and building's HP.

Builds :
Pre-requisite
Requisition
Power
Seconds
Limits
Overview
Ecclesiarchal Chapel
-
  • 450
  • +250 per existing HQ
  • 0
  • +150 per existing HQ
150
5
Tier 1 HQ
Listening Post
-
100
-
30
-
Resource point fortification. Can upgrade into Holy Icon and turret.
Purgatus Mines Field
-
25
25
20
-
Burning booby trap
Adepta Sororitas Convent
HQ
250
-
45
-
Barracks
Plasma Generator
HQ
135
-
30
6 per HQ (30 max)
Power source. Grants +10 Power Generation each.
Pristine Sanctuary
HQ
175
50
45
-
Primary armoury
Inferno Turret
HQ and either :
  • Adepta Sororitas Convent
  • Pristine Sanctuary
90
45
40
6 per HQ (30 max)
Anti-infantry flaming turret, can be upgrader into anti-vehicle turret
Manufactorum
Tier 2
200
125
40
-
Vehicles factory
Holy Reliquary
Tier 2
125
50
30
-
Secondary armoury
Thermo Plasma Generator
Tier 2
275
-
60
1 per Slag deposit
Power source with fixed location. Grants +40 Power Generation each.
Shrine of the Living Saint
Tier 3
450
450
100
1
Unlocks Heart of Worship, Penitent Engine and Living Saint.
..........╚ Dismantle chart
This chart details how much Dismantles are required to destroty buildings. Keep in mind it is based on an average number of 725 damages points, as Dismantle ranges from 650 to 800 damages points. However, if building is destroyed while a Servitor is channeling his ability, this one will not trigger, so it will be immediatly reusable.

Space Marines
Chaos
Eldar
Orks   
Imperial Guard
Tau
Necrons
Dark Eldar
Sisters of Battle
HQ
9
11
7
6-10*
9
7
7
7
9
Listening Post*
4-6
4-6
4-5
2-3-4
4-4-4
2-4
2-4
4-4
4-4-5-7**
Defense turret
2
2
2
-
2
-
2
-
2
Plasma Generator
3
3
2
2
3
2
3
2
3
Barracks
4
5
2
2
3
3
-
3
4
Armoury
4
5
6
2
4
5
5
5
4
Other T1 buildings***
-
-
2
2-3-4*
-
4
3
2
-
Thermo Plasma Generator
3
4
4
2
3
3
3
3
3
Factory
6
7
5
3
4
6
-
5
6
Secondary Tier 2 building
3
5
-
-
-
6***
5
4
3
Ultimate building
3
5
-
-
3
3
5
7
3

* : Linear upgrading adds HP to those structures ; values are for each structure's number of upgrades.
** : Upgrades are not linear on Sisters of Battle's Listenning Post. Values are : standard Listening Post (or upgraded), with Holy Icon only, with Heavily Fortified Position only, and both.
*** : See below for precise informations.

Buildings list
Power-armored Space Marines, Chaos Space Marines and Sisters of Battle
Space Marines
Chaos
Sisters of Battle
HQ
Stronghold
Desecrated Stronghold
Ecclesiarchal Chapel
Defense turret
Heavy Bolter Turret
Heavy Bolter Turret
Inferno Turret
Barracks
Chapel Barracks
Chaos Temple
Adepta Sororitas Convent
Armoury
Armoury
Chaos Armoury
Pristine Sanctuary
Factory
Machine Cult
Machine Pit
Manufactorum
Secondary Tier 2 building
Sacred Articact
Sacrificial Circle
Holy Reliquary
Ultimate building
Orbital Relay
Daemon Pit
Shrine of the Living Saint

Good squishy Eldars, Imperial Guards and Tau
Eldar
Imperial Guard
Tau
HQ
Webway Assembly
Field Command
Cadre Headquarters
Defense turret
Support Platform
Heavy Bolter Turret
-
Barracks
Aspect Portal
Infantry Command
Tau Barracks
Armoury
Soul Shrine
Tactical Control
Path to Enlightenment
Other T1 buildings
Webway Gate
-
Kroot Shaping Center
Factory
Support Portal
Mechanized Command
Vehicle Beacon
Secondary Tier 2 building
-
-
Kauyon / Mont'ka Command Posts
Ultimate building
-
Mars Pattern Command
Coalition Center

Baddy Orks, Necrons and Dark Eldars :
Orks
Necrons
Dark Eldars
HQ
Settlement
Monolith
Kabal Fortress
Listening Post
Da Listenin' Post
Obelisk
Tower of Loathing
Defense turret
-
Gauss Turret
Inferno Turret
Barracks
Da Boyz Hut
-
Hall of Blood
Armoury
Pile o' Gunz!
Forbidden Archive
Haemonculu's Laboratory
Other T1 buildings
Waaagh! Banner
Summoning Core
Slave Chamber
Factory
Da Mek Shop
-
Dark Foundry
Secondary Tier 2 building
-
Greater Summoning Core
Wych-Cult Arena
Ultimate building
-
Energy Core
Soul Cage

Listenings Posts always have this name, except with Orks, Necrons and Dark Eldars.
Plasma Generators and Thermo Plasma Generators always have these names, except with Orks whom have Generators and Bigga Generators.
However, these Listening Posts and Generators have same functions.
Missionary


Missionary is the first combat unit available and the designed caper of Sisters of Battle.

However, he is much more different than other races' cappers ; actually, he acts more of a frail attachable support to boost either the strength or the defense of his rattached squad through use of Acts of Faith than an early multi-units meat shield.


Basic informations


Requisition
Power
Time
Requirement
Recruit
75
0
15 s.
Ecclesiarchal Chapel (tier 1)
Reinforce
-
-
-
-

Squad Cap
Initial Squad
Maximum Squad
Limits
Limitations
1
1
1
None

Maximum
Regeneration
Armor type
Subdivision
Health
700 / 1400
1
Infantry
Infantry Medium

Maximum
Regeneration
Rally at
Death penalty
Morale
300 / 400 / 500
10
50
28

Mass
Speed
Sight range
Miscellaneous
22
16
30


Melee unit

Be it at range or at melee, Missionary's damages are lacking. At range because his Bolt Pistol is weak. And at melee because he has a tendancy to "disrupt" ennemy. Disruption is when you send your ennemy flying away. Missionary tends to be good at this. It is then good to knock off weak ennemies, in order to prevent them to reach your shooty sisters ; but then, as ennemy is away, Missionary won't deal him close range damages until it comes at melee again.

Versus heavier ennemies (which have a higher unit mass, a data not displayed in game), Missionary won't be able to disrupt, but then will deal his rather good melee damages (26 DPS against Medium Infantry, 13 VS High and Heavy Infantry, 6.5 VS Commanders) ; however, as he is fragile (700 HP, Infantry Medium armor), he won't deal these damages for long...


Secondary orientation : Ranged unit

Later on game, survivability will be a priority on Missionaries, as they'll be used as Acts of Faith users ; you would then be advised to switch them in Ranged Stance, to prevent them to go into fire. Of course, their ranged damages are neglectible : this stance is purely for defensive purpose. In addition, if Missionary uses Emperor's Touch, he will be more prone to use the enhanced ranged attack than to move the entire squad into a melee fight.

If you use the "turnover" tactic (use the Act(s) of Faith you want on a Missionary, then send him to death while recruiting a new Missionary, the new one not having any cooldown and then being able to use Act(s) of Faith right on the spot, providing you have enough Faith Points), don't forget to switch stance into Melee again ; you never know if he can disrupt some ennemies before dying.

..........╠ Missionary : Weapons and DPS
Missionary carry only two weapons, three if you count Emperor's Touch Bolter. There are divided as follow :


Staff

Melee weapon. Missionary swings a large slash with this hallebard-like weapon. Damages are meant to be good against Infantry only, but happens to disrupt ennemy quite often (with unknown force and frequency), and of course Missionary is a lone unit. In result, damage output is mediocre.


Bolt Pistol

Ranged weapon. Suprisingly enough, DPS are akin to DPS of a Battle Sister. The catch is, Battle Sister DPS is mediocre...


Emperor's Touch Bolter

This one is special. Should the Missionary use Emeperor's Touch Bolter, alone or within a squad, he and eventually all squad's members (including Veteran Superior) exchange their ranged weapons for the powerful Emperor's Touch Bolter for 20 s..


Psyocculum

Available at Pristine Sanctuary at Tier 3 for 50 Req., 20 Pow. and 30 s.. It boost Bolt Pistol following stats :
  • Range by 20 %.
  • Damages by 100 % (double damages).
Note Emperor's Touch Bolter don't benefit from this upgrade. The bonuses are useless on Missionary, but Psyocculum benefits for other units (and with better bonuses).


Weapon Statistics

Now that Missionary weapons have been briefly explained, let's see thir statistics.

Minimal base damage
Maximal base damage
Accuracy
Accuracy on the move
Refire rate
Range
Morale base damage
Morale DPS
Special Trait
Bolt Pistol
12 / 24 *
15 / 30 *
85%
15%
0.8 s.
25 / 30 **
4
2.1
-
Emperor's Touch Bolter
30 / 40 ***
40 / 52 ***
100%
50%
0.8 s.
40
8
5
-
Staff
35
40
65%
-
0.75 s.
-
5
2.2
-

Asterisks means :
* : Base values / with Leadership / with Psyocculum / with both.
** : Base values / with Psyocculum.
*** : Base values / with Leadership.


DPS

Now that all BSS weapons have been covered, let's see their statistics, courtesy of Relic Wiki.

Missionary's ranged statistics VS troops are :

Low
Medium
High
Heavy
Elite
Commander
Daemon
Daemon Relic
Bolt Pistol
5.7
5.7
5.7
5.7
4.3
3.6
4.3
2.2
Bolt Pistol + Psyocculum
11.4
11.4
11.4
11.4
8.6
7.2
8.6
4.4
Emperor's Touch Bolter
21,9
21,9
21,9
21,9
17,5
17,5
21,9
17,5
Emperor's Touch Bolter + Leadership
28,4
28,4
28,4
28,4
22,8
22,8
28,4
22,8

Missionary's ranged statistics VS machines are :

Low Vehicle
Medium Vehicle
High Vehicle
Aircraft
Building Low
Building Medium
Building High
Bolt Pistol
2.2
1.1
1.1
2.2
2.2
1.1
1.1
Bolt Pistol + Psyocculum
4.4
1.1
1.1
4.4
4.4
1.1
1.1
Emperor's Touch Bolter
21,9
19.7
15.3
21,9
17,5
13.1
8.9
Emperor's Touch Bolter + Leadership
28,4
25.6
19.9
28,4
22,8
17.1
11.4

Missionary's melee statistics VS troops are :

Low
Medium
High
Heavy
Elite
Commander
Daemon
Daemon Relic
Staff
26
26
13
13
4.9
6.5
13
4.9

Missionary's melee statistics VS machines are :

Low Vehicle
Medium Vehicle
High Vehicle
Aircraft
Building Low
Building Medium
Building High
Staff
4.9
2.6
2
0.9
7.2
4.9
2.6
..........╠ Missionary : Abilities

Stealth Detection (passive)


Don't mind this Chaos icon, i chose it because only to illustrate. Missionary is able to detect infiltrated units in his whole sight range (30 units), which is a bit longer than his shooting range (25 units).

This sole ability, along with the fact Missionary is the earliest and cheapest detector trooper, makes him invaluable against early stealthed ennemies (Tau Stealth Teams or Eldar Rangers come in mind). Later on, they are still valuable as the only living other detectors are Confessor and Death Cult Assassins, which require the "Holy Reliquary path" you won't necessarily take. You'll still have Holy Icons and Inferno Turrets, but they obviously won't be able to follow your army.


Join (hotkey : T)


Missionary can join a squad. Both parties will benefit from each other's abilities. Use this skill then right-click on the squad you want to rattach. Check the Rattachements section for an exhaustive vision of possible combinations and their implications.


Act of Faith : Lay Hands (hotkey : H)


Tier 1 Missionary's Act of Faith. Requires at least 1 Holy Icon and Canoness (or Seraphims on Tier 1,5, or other units in further tiers) to generate at least 15 Faith Points. It increase squad's HP regeneration by 20 HP/sec. for 20 s.. Then, each unit in the squad heals for a total of 400 HP over time.

Use it either to boast resilience of a melee squad to have an unkillable meat shield, or of a targeted ranged squad to win shootout. You can also detach Missionary and temporarily rattach him to a wounded squad after a battle. But best use is to rattach him on an attacked squad and heal it to ensure victory. As Lay Hands is the cheapest Act of Faith by far, and requires only one Holy Icon to be performed, it is the easiest Act to cast, and is limited by cooldown more than by Faith.


Act of Faith : Emperor's Touch (hotkey : P)


Tier 2 Missionary's Act of Faith. Requires a research in HQ (Tier 2, 75 Req., 50 Pow., 30 Sec.) and most of all, 3 Holy Icons and heavy 50 Faith Points. It changes ranged weapons of all units rattached to the Missionary (and of Missionary itself) for special weapons dealing good damages to ALL ennemies whatever their armor, in a 35 radius range and 80% accuracy on the move.

Simply put, the Sisters of Battle's largest squad, a 12 units Battle Sisters squad (including Veteran Superior and Missionary) will deal between around 200 and 334 DPS, for a total between 4000 and 6600 DOT (damages over time), depending on ennemy's type. In addition, each golden Bolter deals 5 MDPS at base, meaning 2.5 MDPS on most ennemies, then 30 Morale DPS for 12 units, then 600 Morale Damages over time. All of this at +50% range than normal and almost without accuracy penalty on the move.

For more information, check the Battle Sisters Squad section, as damages comparisons are easier when standard damages and BSS equivalent ennemies damages are listed in the same place, and BSS are by far the best (and should be the only one) squad to use this skill (as Repentias haven't ranged weapons and Celestians can only be 5 (6 with Missionary)).

This skill is as invaluable as Lay Hands, through it is much harder to pull out due to its requirements. If you can use both Lay Hands and Emperor's Touch, you'll probably have the best ranged squad of the game for 15 seconds.


Act of Faith : Divine Retribution (hotkey : D)


Tier 3 Missionary's Act of Faith. Requires a research in HQ (Tier 3, 100 Req., 75 Pow., 35 Sec.) and most of all, 4 Holy Icons and massive 70 Faith Points. For 15s., ennemies who dare attack the squad will take around 25 damages points, symbolized by brimstone rain. Don't get wrong : it doesn't grant any invulnerability, just retaliation damages.

Since close-combat-engaged ennemies are forced to deal damages, they will just take retaliation damage in addition to squad damages. If the engaged ennemy squad is supported by shooters firing at Missionary's squad, ennemy shooters will take damages too. In the other hand, if you use this spell to counter just a shooter ennemy, he'll just change target to stop taking retaliation damages. For these reasons, Divine Retribution should be used only on a squad targeted by melee ennemies ; the best use is probably on Celestians devoted to melee combat, or even better, on Repentias.

Paired with Lay Hands, you'll probably have, for 15 seconds, sort of invincible squad as ennemy will either avoid to hurt it or take heavy damages, while it will regenerates.


General passive upgrades


All of the following upgrades are available at the Pristine Sanctuary for the first 3, and at Holy Reliquary for the last 2, and apply to a lot of units when purchased, and not only to the Missionary. The benefits can also be different from an unit to another, so check the buildings sections if you want a more detailed description of each upgrade. For short :
Blessed Ammunition
Not very useful to Missionary, as he doesn't rely on ranged damages.
Blessed Armor
Doubles the hitpoints of the Missionary (going from 700 to 1400). Incredibly useful (mandatory, to be honest), but comes at Tier 2.
Chaplet Ecclesiasticus
Gives 100 Morale points ; Missionary has then 400 Morale points instead 300. Purchased at Holy Reliquary (so needs Tier 2).
Heart of Worship
Gives another 100 Morale points ; Missionary has then 500 Morale in the end. Needs Tier 3, a Holy Reliquary, a Shrine of the Living Saint and the Chaplet Ecclesiasticus upgrade.
..........╠ Missionary : Leading a squad
Remember Missionary has a double role : capper and support. By his own, the only support he provides is Detection. But if you team him with BSS, Celestians or Repentias (note each squad is available at each new tier), he will be able to bring them his awesome Acts of Faith. Don't forget the Acts of Faith WON'T apply if you use them BEFORE the Missionary is well integrated to the squad.

Of course, whatever the combination, the squad provides meat shield to Missionary, who else makes an easy target for ennemies. Potency of meat shield depends on the squad.

So, each party benefits to the other from this partnership. Some combinations are more powerful than the others, and good use of Missionaries shippings is one of the most important aspect to handle to win with Sisters of Battle.

Don't forget that this support role turns your 2-population cap squad (or 3 in case of Repentias Squad) into 3-population cap squad (or 4 with Repentias). So you'd better get the best out of it.


Join (hotkey : T (for Teaming))


Missionary can join 3 out of the 4 Sisters of Battle's squads (Seraphim Squad being the unjoinable one). Use this skill then right-click on the squad you want to rattach.

If you want to cap or decap a point, it is more advised to detach the missionary from the squad, then to order the Missionary to cap or decap, while the squad defends him. If you don't, the whole squad led by the Missionary will be inactive as they will all cap or decap the point.


Joining Battle Sister Squad


The Battle Sisters Squads, or BSS for short, are the primary joinable squads, as they are the first ones available, as soon as Tier 1.

Early game, BSS provides the meat shield Missionary needs to ensure Detection to your army. If Missionary is alone or walking along but outside the squad, the ennemy will be able to target him and take him down first if he wants. This is especially important if ennemy uses stealth units. For example, against Tau or Eldar, you are prone to face Stealth Teams or Rangers, who will simply be invisible and invincible without Missionary to reveal them.

On the other hand, Missionary can heal the whole squad with Lay Hands. Restoring 20 HP per second to all members during 20 seconds IS something early game. For example, you can use it to ensure survival of all your sisters until they break ennemy's morale, so even if healing wears off, ennemy will deal only little damages. Just note the Faith cost is 10 FP, meaning if you don't field any Seraphims or Canoness, you'll have to wait 1'40 after buying your first Holy Icon, and between each use.

As game progresses, Faith flows thanks to abundance of faithful units, and other Acts of Faith can be purchased. Sadly, Lay Hands becomes less potent, as ennemy as more soldiers with deadlier weapons, but still remains a very useful spell.

On Tier 2, Emperor's Touch is purchasable. For reminder, this spell gives a fixed damage boost against all targets to all members in a squad. As BSS are the squads with the most members (11), it is the perfect squad to use Emperor's Touch.

On Tier 3, Divine Retribution is purchasable. For reminder, this spell gives the squad retaliation damages to each ennemy who attack any member of the squad. Once again, as BSS are the squads with most members, it is reasonable to think they are the best squads to use this Missionary's spell, as ennemies will have more targets to hit, and then, they will suffer more retribution. But remember BSS are also the most fragile squads.


Joining Celestians


The Celestians are the second squads, available at Tier 2. They are the designed anti-machines infantry, but can be a little proficient in melee combat against non-melee specialists.

Missionary without Act of Faith offers little to Celestians, except versus Eldar, as the only infiltrated machines in the game are Eldar buildings (including Listening Post and weapon Platforms) under Shroud.

On their side, Celestians can recruit an Imagifer if Holy Reliquary is built. While she's alive, she boosts all squad members' health, including Missionary, for more resilience. But having a Holy Reliquary means Confessor will be available, who is a tougher detector. And Missionary is not well suited for direct combat. So, the interaction is limited here.

Lay Hands will be valuable for Celestians, as they'll draw heavy fire from machines, meaning tanks and turrets, and helmeted sisters having short range. Remember Sisters' LP and turrets deal far lower damages than the ones from other races, so don't expect Lay Hands to restore all the lost health or to make Celestians not losing health. On another hand, Celestians can be used as half decent close combat meat shields, as they are individually about half more durable than Battle Sisters ; here, Lay Hands is still loved.

Emeperor's Touch should be avoided on Celestians, as a full squad of them counts only 5 members (Imagifers don't carry weapons). Then the spell is only half as efficient as used on BSS. In addition, Celestians weapons deal more damages to machines than this spell.

Divine Retribution, available at Tier 3, works on machines, but the damage output is rather little compared to Meltas and Multi Meltas DPS. On another hand, it could be useful on a "melee" Celestian squad ; but at Tier 3, Repentias are available and far better at this role.


Joining Repentias


The Repentias are the last squads, available at Tier 3. As they are purely melee, they can use only Lay Hands and Divine Retribution. Plain and simple.

Repentias protect Missionary, in a better meat shield than Celestians (altough Missionary won't have health boost he can have with Celestians and Imagifer), then Missionary can bring its Detection further.

Lay Hands, healing only 20 HP/s., is weak at this late stage of the game. But it is still better than nothing, and it can counter the health draining effect of Righteous Fervor. The squad will then gain 12 HP/s. (+20-8=12) instead losing 8 HP/s..

Divine Retribution works wonder with Repentias. In this game, if you go to melee combat against an ennemy, he's forced to punch back (or to retreat or to target anyone else). Then, he's forced to trigger the retribution. This translate into adding a fine +25 DPS to Repentias !
..........╚ Missionary : Conclusion

Conclusion


All in all, Missionary is a unique and damn useful unit. You start with him as a cheap caper, as a detector, and as a fortune melee solo warrior whom task is to disrupt the ennemy as your Sisters gun down them. If you want some fun, you can even recruit a demi dozen of Missionaries to act as a very decent meat shield ; however, it consumes too much squad cap, and while the ennemies are flying everywhere, Missionaries' courtesy, they can't be targeted by anybody, so it is more to gain time than another thing.

Once Faith flows in, Missionary becomes a valuable caster, able to heal with Lay Hands or to boost with Emperor's Touch Bolter in Tier 2 and Divine Retribution in Tier 3. Once again, Lay Hands is useful on all squads throughout the whole game, Emperor's Touch Bolter should be reserved to Battle Sisters Squads, and Divine Retribution should be reserved to Repentias.

The Missionary is then so useful to the squad that it can overshadow the heroes, who'll act as lone units, but then will be targeted individually and then will be more vulnerable. You'll then have to have a good micro management skill to use the junctions at full extent : for example, rattaching a Missionary to a Repentias Squad, lead the charge using Lay Hands and/or Divine Retribution, then detaching the Missionary when the boost wears off, and attaching Canoness or Confessor to the squad in exchange. Why ? This is simple. Remember Missionary's best asset for a squad is his temporary buffs. Of course, in exchange, the squad provides a meat shield for the Missionary which acts as a detector of stealth units, but when Acts of Faith are on cooldown or can't be used because you have not enough Faith, Missionary is almost useless to the squad. Sp, better make it either cap a point or to go on melee duty. And then, rattach a Canoness or Confessor to the squad : better shield a hero than a Missionary on cooldown.

A slightly more advanced strategy with Missionaries is to "cycle" them. Meaning, having at least 2 Missionaries, attaching one if a squad, using his Acts of Faith, detaching him when his Acts are on cooldown (and, as you wish, rattach him to another squad or let him acting as a lone unit), picking the other Missionary and rattaching him to the very same squad : providing you have enough Faith (and second Missionary didn't use his skills), you will be able to use Acts of Faith once more. Practically, have 2 Missionaries with their abilities ready, shield one, rattach the other to for example a Repentias Squad, engage the ennemy using Lay Hands, detach the Missionary when Lay Hands is over, attach the second Missionary instead, and use Lay Hands again. It takes good micro (to handle both Missionaries) and macro (to manage Faith) skills to achieve this.

For as Missionaries are useful once you roll on Faith, should a Missionary is killed, immediately recruit a new one ; his Acts of Faith will be ready to use.

This can translate into an elaborate but hard to pull strategy i call the "turnover". Missionaries are cheap units and come quickly, then you can overwatch their production. Then cycle them as described above, and once the spell is on cooldown, send them to a suicide mission instead of a capping one or hiding him behinds your lines. By dying, the Missionary will free a squad slot, allowing your to recruit another fresh one, with spells ready to use.

Battle Sisters Squad


Battle Sisters (BSS for short) are your somewhat core unit. Tough they look a lot like a Space Marines or Chaos Marines squad, they are not nearly as powerful. They are rather sort of shooters with bad scores in shooting, and even worse in melee combat ! The deal is to use their ranged attack against melee ennemies (or weaker ranged foes) and their melee attack against most powerful ranged opponents. They are universally known to carry Flamers, and doing good job at it, a debatable point who often leads to the so wrong conclusion of "get mass BSS, give them Flamers, win, lol". Let's see in details...


Basic informations


Requisition
Power
Time
Requirement
Recruit
140
0
16 s.
Adepta Sororitas Convent (tier 1)
Reinforce
35
-
6 / 5.2 / 4.6 / 4 s.
?

Squad Cap
Initial Squad
Maximum Squad
Limits
Limitations
2
4
10
None

Maximum
Regeneration
Armor type
Health
290 / 363
1
Heavy Infantry

Maximum
Regeneration
Rally at
Death penalty
Morale
300 / 400 / 500
10
50
20
Mass
Speed
Sight range
Miscellaneous
18
16
25

Reinforce

Each squad starts with 4 sisters. Each additional sister costs 35 Req. and 6 s.. This means there is no cost difference between building 2 squads or reinforcing a squad up to 8 sisters. Each squad can have a maximum of 10 Sisters, for a total cost of 350 Req. and 49 s.. This doesn't count special weapons nor Veteran Superior.

For the same 280 Req. cost, you can then build 2 basic squads or 1 8-members squad, leading in both case to 8 sisters. So, for same cost, you get the same firepower, but having two distinct squad brings more mobility. Another advantage is building 2 squads is a quicker way to get 8 sisters, as it takes 32 s., while building a squad and reinforcing 4 sisters takes 40 s. Later in game, with Field Logistics upgrades, reinforce times are lowered to 5,28 s., 4,62 s. and 4,08 s., meaning reinforcing 4 sisters will eventually take 16,32 s., so will be comparable to building a new squad. Coupled with the fact you'll need both dancing and bringing special weapons, building more little squads is then a more viable option than reinforcing a single big squad.


Veteran Superior


Once Tier 2 is hit, the squad can spawn a Veteran Superior in its ranks, for 60 Req., 10 Pow. and 12 s.. She has 500 HP (625 HP with Blessed Armor), recovers 1 HP/s., and dons same armor type, move speed, mass and sight than regular Sisters.

However, she wields better weapons. Standard Bolt Pistol won't be covered here (but their stats are described in Weapons sections) as Veteran Superior comes at Tier 2 and upgrades which grant her better Inferno Pistol can be bought at Tier 1.5. Melee weapons upgrades, however (Power Sword and Master-Crafted Power Sword) are less important, due to shooty nature of Sisters, and melee work being devoluted to other units than BSS. Nonetheless, melee upgrades make Veteran Superior a very good melee fighter (altough she's the only melee fighter in her squad).

  • For Chainsword :
    • From 19.2 to 23.1 DPS between Infantry Medium and Heavy Infantry High.
    • 9.6 DPS VS Commanders.
    • 15.4 DPS VS turrets.
  • For Power Sword :
    • From 28.9 to 34.7 DPS between Infantry Medium and Heavy Infantry High.
    • 14.5 DPS VS Commanders.
    • 17.4 DPS VS turrets.
  • For Master-Crafted Power Sword :
    • From 57.9 to 69.5 DPS between Infantry Medium and Heavy Infantry High.
    • 28.9 DPS VS Commanders.
    • 34.7 DPS VS turrets.
  • For Inferno Pistol :
    • 10.4 DPS VS Heroes.
    • 14.5 DPS VS Heavy High ; you will be able to encounter some in Tier 2.
    • 16.6 VS all other Infantry.
    • 8.3 DPS VS Turrets.
    • A nice 9.1 DPS VS Low Vehicles (Land Speeders, Eldar Grav Platforms, Sentinels, stealth Devilfishes, Drones and Reaver Jetbikes).

The Veteran Superior is then an oddity within her squad : a melee specialist among shooters, even stronger than an Assault Terminator or a Possessed ! However, she's not as tough as ennemy squad leaders, and she's alone, so this melee ability is best used when paired with a commander. Think about this : a ranged squad is a juicy target for melee ennemies, then you'll have a Veteran Superior and a rattached Confessor or Canoness to protect it if you can't dance. In addition, her Inferno Pistol, while less powerful than Power Sword, remain a good ranged addition to the squad, being somewhat a double to triple powered-up Bolter with a far better accuracy on the move.

The killer ability of Veteran Superior is her hidden Leadership passive, which boosts, while she's alive, all the damages outputs from the squad by 30%. Statistics for Veteran Superior's weapons already take this bonus into account. It is unknown if this bonus also apply to rattached Missionary, Canoness and Confessor, or if it apply only to sisters.

The Veteran Superior's third gift is a 100 Morale points boost while she's alive.

The final addition of the Veteran Superior, after her weapons, her Morale and her Leadership, is her Faith. While she's alive, she boosts the Faith gauge by 0.6 points (meaning she gives 0.06 points per s.). And if she dies and the Martyr's Gift upgrade has been bought, her death earns you 3 Faith Points.

For these 4 reasons, Veteran Superior should always be the first thing to replace should you lose her and sisters with either Bolters or special weapons.
..........╠ BSS : Weapons overview
BSS come with a wide variety of weapons. There are divided as follow :


Knives


Regular sisters always carry these ones no matter what. The worst Sisters of Battle melee's weapon.


Bolters


Regular sisters carry these ones. A limited number of them can later be exchanged for Flamers or Heavy Bolter.


Flamers


Once a Pristine Sanctuary is bought, up to 3 (5 with Heavy Weapons Increase upgrade) Sisters can exchange their Bolter for a Flamer. Each one costs 30 Req., 10 Pow. and 12 s..

In addition to their high Morale damages, Flamers have a special trait : flames spread on a 20 degrees arc at range between 10 and 25 units, allowing them to hit several ennemies at once.


Heavy Bolters


Once Tier 2 is hit, and a Pristine Sanctuary is bought, up to 3 (5 with Heavy Weapons Increase upgrade) Sisters can exchange their Bolter for a Heavy Bolter. Each one costs 35 Req., 10 Pow. and 12 s..

Like Flamers, Heavy Bolters have a special trait : they have a setup time of 2 s., meaning the wielder (thus, the squad) needs to be immobile for 2 s. before being able to fire with this weapon.


Chainsword


Veteran Superior, which can be bought at Tier 2 for 60 Req., 10 Pow. and 12 s., carries this roaring sword if Power Sword upgrade hasn't been bought yet.


Bolt Pistol


Veteran Superior carries this gun if Inferno Pistol upgrade hasn't been bought yet.


Inferno Pistol


Once a Pristine Sanctuary is bought, a permanent upgrade replaces the Bolt Pistol by the much stronger Inferno Pistol, for 50 Req., 30 Pow. and 30 s.. It applies to all Superior Veterans and heroes, and is available at Tier 1 (where it applies to Canoness). You can then buy this upgrade before having Veteran Superior.

Inferno Pistol has a special trait : target takes 3 damages every second for 3 s. when it. Constant hits refresh the 3s..


Power Sword (and Master-Crafted Power Sword)


Once a Pristine Sanctuary is bought, a permanent upgrade replaces the Chainsword by the much stronger Power Sword, for 50 Req., 20 Pow. and 30 s.. It applies to all Superior Veterans and Canoness, and is available at Tier 1 (where it applies to Canoness, actually transforming her starting Power Sword into Brasero of Holy Fire). You can then buy this upgrade before having Veteran Superior.

On Tier 2, you can buy a similar upgrade, called Master-Crafted Weapons, providing you bought Power Weapons. It has the same cost (50 Req., 20 Pow. and 30 s.) and again applies to all Superior Veterans and Canoness, and also to Confessor, to boost their melee damages. On Veteran Superiors, damages are doubled (and on heroes, damages are boosted by 20%).


Emperor's Touch Bolter


This one is special. Should a Missionary use Emeperor's Touch Bolter on the squad, all its members (including Missionary and Veteran Superior) exchange their ranged weapons for the powerful Emperor's Touch Bolter for 20 s..


Leadership


This one isn't a weapon, but a cool bonus. While the Veteran Superior is alive, all damages from whatever weapons are 30% stronger. Without any cost or research. Veteran's weapons and charts always factor in this bonus, needless to say (this is why, for example, there is not a "Chainsword with Leadership" in further charts).


Heavy Weapons Increase


Straightforward upgrade available at Pristine Sanctuary at Tier 2 for 75 Req., 75 Pow. and 20 s.. It allows BSS to carry 5 special weapons (Heavy Bolters and/or Flamers) instead of 3. That's all. But it two more of these weapons add substantial punch to the squad, so it is advised to buy it when you can.


Psyocculum


Available at Pristine Sanctuary at Tier 3 for 50 Req., 20 Pow. and 30 s.. It boost weapons following stats :
  • Bolter's range by 20 %.
  • Bolter's damages by 35%.
  • Flamer's damages by 35%.
  • Heavy Bolter's damages by 20 %.
Veteran Superior and Emperor's Touch Bolter don't benefit from this upgrade.


Weapon Statistics

Now that BSS weapons have been briefly explained, let's see thir statistics.

Minimal base damage
Maximal base damage
Accuracy
Accuracy on the move
Refire rate
Range
Morale base damage
Morale DPS
Special Trait
Bolter
10 / 13 / 13,5 / 17,6 *
13 / 17,6 / 19 / 22,8 *
60%
15%
0.5 s.
25 / 30 **
4
2.4
-
Flamer
10 / 13 / 13,5 / 17,6 *
13 / 16,9 / 17,6 / 22,8 *
100%
70%
0.5 s.
25
12
12
Yes
Heavy Bolter
31 / 40,3 / 41,9 / 54,4 *
35 / 45,5 / 47,3 / 61,4 *
75%
-
0.4 s.
35
10
9,4
Yes
Emperor's Touch Bolter
30 / 39 ***
40 / 52 ***
100%
50%
0.8 s.
40
8
5
-
Knife
15 / 19,5 ***
20 / 26 ***
65%
-
1 s.
-
5
1,6
-
Bolt Pistol
26
31,2
85%
15%
0.8 s.
25
4
2,1
-
Inferno Pistol
45,5
52
85%
40%
1 s.
25
7
3
Yes
Chainsword
53,6
65
65%
-
1 s.
-
12
3,9
-
Power Sword
80,6 / 97,5 ****
161,2 / 195 ****
65%
-
1 s.
-
25
8,1
-

Asterisks means :
* : Base values / with Leadership / with Psyocculum / with both.
** : Base values / with Psyocculum.
*** : Base values / with Leadership.
**** : Base values / with Master-Crafted Weapons.
..........╠ BSS : Weapons DPS
Now that all BSS weapons have been covered, let's see their statistics, courtesy of Relic Wiki.

BSS ranged statistics VS troops are :

Low
Medium
High
Heavy
Elite
Commander
Daemon
Daemon Relic
Bolter
6,2
7,6
6,9
6,2
6,9
3,5
5,5
3
Flamer
11,5
16,1
11,5
13,8
10,4
6,9
6,9
2
Heavy Bolter
30,9
30,9
30,9
27,8
24,8
12,4
24,8
3,8
Emperor's Touch Bolter
21,9
21,9
21,9
21,9
17,5
17,5
21,9
17,5
Bolter + Leadership
8,1
9,9
9
8,1
9
4,6
7,2
3
Flamer + Leadership
15
20,9
15
17,9
13,5
9
9
2
Heavy Bolter + Leadership
40,2
40,2
40,2
36,1
32,2
16,1
32,2
3,8
Emperor's Touch Bolter + Leadership
28,4
28,4
28,4
28,4
22,8
22,8
28,4
22,8
Bolter + Psyocculum
8,4
10,3
9,3
8,4
9,3
4,7
7,4
3
Flamer + Psyocculum
15,5
21,7
15,5
18,6
14
9,3
9,3
2
Heavy Bolter + Psyocculum
41,7
41,7
41,7
37,5
33,5
16,7
33,5
3,8
Bolter + Both
10,9
13,3
12,1
10,9
12,1
6,1
9,7
3
Flamer + Both
20,2
28,3
20,2
24,2
18,3
12,1
12,1
2
Heavy Bolter + Both
54,2
54,2
54,2
48,8
43,5
21,8
43,5
3,8
Bolt Pistol
12,2
12,2
12,2
12,2
9,1
7,6
9,1
4,6
Inferno Pistol
16,6
16,6
16,6
16,6
14,5
10,4
16,6
8,3

BSS ranged statistics VS machines are :

Vehicle Low
Vehicle Medium
Vehicle High
Aircraft
Building Low
Building Medium
Building High
Bolter
3
3,5
3
3
5,5
3
3
Flamer
2
2
2
2
8,1
4,6
2
Heavy Bolter
6,2
3,8
3,8
6,2
12,4
6,2
3,8
Emperor's Touch Bolter
21,9
19,7
15,3
21,9
17,5
13,1
8,9
Bolter + Leadership
3
4,6
3
3
7,2
3
3
Flamer + Leadership
2
2
2
2
10,5
6
2
Heavy Bolter + Leadership
8,1
3,8
3,8
8,1
16,1
8,1
3,8
Emperor's Touch Bolter + Leadership
28,4
25,6
19,9
28,4
22,8
17,1
11,4
Bolter + Psyocculum
3
4,7
3
3
7,4
3
3
Flamer + Psyocculum
2
2
2
2
14,2
8,1
2
Heavy Bolter + Psyocculum
8,4
3,8
3,8
8,4
16,7
8,4
3,8
Bolter + Both
3
6,1
3
3
9,7
3
3
Flamer + Both
2
2
2
2
14,2
8,1
2
Heavy Bolter + Both
10,9
3,8
3,8
10,9
21,8
10,9
3,8
Bolt Pistol
4,6
2,7
2,7
4,6
4,6
2,7
2,7
Inferno Pistol
9,1
5,4
2,5
8,3
8,3
4,1
2,1

BSS melee statistics VS troops are :

Low
Medium
High
Heavy
Elite
Commander
Daemon
Daemon Relic
Knife
4,6
6,3
4,6
4,6
4,6
3,4
4,6
1,6
Knife + Leadership
6
8,2
6
6
6
4,4
6
1,6
Chainsword
17,3
23,1
19,2
21,1
19,2
9,6
19,2
0,7
Power Sword
26
34,7
28,9
31,8
28,9
14,5
20,3
9,8
Master-Crafted Power Sword
52,1
69,5
57,9
63,7
57,9
28,9
40,5
9,8

BSS melee statistics VS machines are :

Vehicle Low
Vehicle Medium
Vehicle High
Aircraft
Building Low
Building Medium
Building High
Knife
1,6
1,6
1,6
1,6
4,6
1,6
1,6
Knife + Leadership
1,6
1,6
1,6
1,6
6
1,6
1,6
Chainsword
1,9
1,9
0,7
0,7
15,4
3,8
0,7
Power Sword
20,3
14,5
9,8
9,8
17,4
9,8
9,8
Master-Crafted Power Sword
40,5
28,9
9,8
9,8
34,7
11,6
9,8
..........╠ BSS : Abilities

Phosphor Grenades

This ability is unlocked once you have bought it at Pristine Sanctuary for 25 Req., 75Pow. and 35 s.. With this, a unit tosses a grenade to an ennemy trooper or a location (you can't target vehicles nor buildings) within 25 units range (which is Bolter and Flamer range) which explode in a radius of 6 units. Cooldown is 1:15. Explosion deals :
  • Weak knockback (15-20 force).
  • 20-25 damage points on Daemons (both types), Heavy Elites and Commanders.
  • 18-22.5 damage points on any other infantry.
  • Additional 45 damage points over 7 seconds (9/s.).
  • 25 base morale damage points on explosion, then 35 additional points over 7 seconds (5/s.) to a total of 60 over 7 s..

Unlike Purgatus Mines, Phosophor Grenades don't leave a blazing zone ; only the units caught in initial explosion are affected. The Grenade IS useful to reduce both HP and Morale of ennemies, but keep in mind the damages are dealt over time, it is not like 60/65 points of damages/Morale on a blink, but a DOT (Damage Over Time) ability which won't do much on its own, but will help as it roughly equals a Flamer fired during 5 s.. for both HP and Morale damages, for each units ablaze. Burning 5 ennemies will probably result on ennemy's breakdown.

A problem is the knockback is so weak that it won't probably disrupt the ennemy... Theorically, it can potentially disrupt some standing ranged ennemies, but after several trials, it appeared to be able to knock down only still ennemies, and at random. So as far as i'm concerned, i don't count on knockback.

Once again, alone, this Grenade doesn't do much. For this, i wasn't positive on its purchase at first. But as support with Flamers, and why not Canoness' Purifying Light and Inferno Pistol, it can convince ennemy to postpone his attack. And weak Sisters need every help they can gather. So buying and using this Grenade is recommanded.


Emperor's Touch Bolter

This ability is actually a Missionary's Act of Faith, so it requires to have one rattached to the squad, Tier 2, then a research in HQ costing 75 Req., 50 Pow. and 30 s., and ultimately 3 Holy Icons and heavy 50 Faith Points (half the gauge) ! But since it is a spell clearly meant to be used with BSS, i detail it here.

When you use it, units exchange whatever weapons they have for the golden Emperor's Touch Bolters, boosting their damages, range (from 25 to 35) and accuracy on the move, from 15% for Bolters and Missionary's Bolt Pistol or 70% for Flamers to 80%.

Damages are :
Per unit without Veteran Superior
11-members squad without Veteran Superior
DOT
Per unit with Veteran Superior
Full 12-members squad
DOT
DPS VS all Infantry except Heavy High, plus Vehicles Low, Aircrafts and Daemons
21.9
240.9
4818
28.4
340.8
6816
DPS VS Heavy Infantry High, Commanders, Building Low and Daemons High
17.5
192.5
3850
22.8
273.6
5472
DPS VS Vehicle Medium
19.7
216.7
4334
25.6
307.2
6144
DPS VS Vehicle Heavy
15.3
168.3
3366
19.9
238.8
4776
Morale DPS
5
55
1100
5
60
1200

Simply put, the Sisters of Battle's largest squad, a 12 units Battle Sisters squad (including Veteran Superior and Missionary) will deal between around 238 and 340 DPS and 60 MDPS, for a total between 4776 and 6816 DOT (damages over time) and 1200 Morale DOT, depending on ennemies ! A well-timed Emperor's Touch will then be a heavy blow and the ennemy. A high cost for high reward spell. Sadly, both requirements and cooldown prevent a frequent use (except with "cycling" Missionaries, but the Faith cost limit remains)...


Other upgrades


This is all upgrades not described in Weapons sections that apply to BSS. Generally, they also apply to a lot of other units. The benefits can also be different from an unit to another, so check the buildings sections if you want a more detailed description of each upgrade. For short :
Improved / Enhanced / Elite Field Logistics
Each one of the 3 upgrades, available at Convent without conditions bur 140 Req. and 30 s., reduce the reinforcement time (by a second each).
Blessed Ammunition
Bolters, Bolt Pistols and Heavy Bolters pierce through a part of the damage reduction granted by landscape cover. This is good on BSS, as they can still benefit from cover and deny this bonus to ennemy. Bought at Pristine Sanctuary for 100 Req., 75 Pow. and 45 s..
Blessed Armor
Boost hitpoints by 25% (going from 290 to 363). Incredibly useful (mandatory, to be honest), but comes at Tier 2. Bought at Pristine Sanctuary for 100 Req., 50 Pow. and 45 s..
Chaplet Ecclesiasticus
Gives 100 Morale points ; squad has then 400 Morale points instead 300. Purchased at Holy Reliquary (so needs Tier 2) for 125 Req., 50 Pow. and 35 s..
Martyr's Gift
Only triggers whenever the Veteran Superior dies : grants 3 Faith Points. Purchased at Holy Reliquary for 75 Req., 75 Pow. and 25 s.. Curiously, BSS Veteran Superior is the only Veteran Superior who benefit from this bonus.
Heart of Worship
Gives another 100 Morale points ; squad has then 500 Morale in the end (600 if Veteran Superior is alive !). Needs Tier 3, a Holy Reliquary to be bought at, a Shrine of the Living Saint and the Chaplet Ecclesiasticus upgrade, and then, 165 Req., 75 Pow. and 35 s..
..........╠ BSS : Starting weapons focus
Right off the bat, Sisters are equipped with Bolters and Knives. Their costs and effectiveness are following.

  • A starting squad consisting of 4 sisters :
    • Costs 140 Req., needs 16 s. to be formed and has 1160 HP.
    • Deals those DPS at range :
      • 30.4 to medium infantry (7.6*4) ;
      • 24.8 to heavy infantry (6.2*4) ;
      • 14 to Commanders (3.5*4) ;
      • 9.6 to Morale (2.4*4).
    • Deals these DPS at melee :
      • 25.2 to medium infantry (6.3*4) ;
      • 18.4 to heavy infantry (4.6*4) ;
      • 13.6 to Commanders (3.4*4) ;
      • 6.4 to Morale (1.6*4).
  • A Tier 1 full squad consisting of 10 sisters :
    • Costs 350 Req., needs 52 s. to be full-fledged and boasts 2900 HP.
    • Deals these DPS at range :
      • 69 to medium infantry (6.9*10) ;
      • 62 to heavy infantry (6.2*10) ;
      • 35 to Commanders (3.5*10) ;
      • 24 to Morale (2.4*10).
    • Deals these DPS at melee :
      • 63 to medium infantry (6.3*10) ;
      • 46 to heavy infantry (4.6*10) ;
      • 34 to Commanders (3.4*10) ;
      • 16 to Morale (1.6*10).
  • A Tier 2 full upgraded BSS has 10 sisters, a Veteran Superior with Inferno Pistol, Master-Crafted Weapon, and Blessed Armor.
    • Costs 410 Req. and 10 Pow., needs 1:04 to be full-ready and boasts 4255 HP.
    • Deals these DPS, at range :
      • 115.6 to medium infantry (9.9*10+16.6)
      • 97.6 to heavy infantry (8.1*10+16.6)
      • 56.4 to Commanders (4.6*10+10.4)
      • 27 to Morale (2.4*10+3).
    • Deals these DPS, at melee :
      • 151.5 to medium infantry (8.2*10+69.5)
      • 123.7 to heavy infantry (6*10+63.7)
      • 72.9 to Commanders (4.4*10+28.9)
      • 24.1 to Morale (1.6*10+8.1).
  • A Tier 3 full upgraded BSS has same things plus Psyocculum, boosting all damages by 35% (except Morale damages and Inferno Pistols). So :
    • It deals these DPS at range :
      • 202.5 to medium infantry (13.3*10+69.5) ;
      • 125.6 to heavy infantry (10.9*10+16.6) ;
      • 71.4 to Commanders (6.1*10+10.4) ;

    Bolters and Knives have similar DPS, Bolters ones being slightly stronger. So, ranged stance should be the default stance of these troops.

    In another hand this "Jack of all trades, master of none" DPS distribution could be used on some precise situations. Use Melee Stance or better, Melee Order, to oppose the relative melee toughness to fragile but powerful ennemy shooters (like Tau's Fire Warriors).

    Note that BSS are the worst melee squad of the race in terms of damages. However, they can be healed by Missionaries, so can be a semi decent meat shield.

    As you can see, standard weapons are pretty boring. You have yet to rely on Flamers or Heavy Bolters. Sadly enough, if you can exchange Bolters for Flamers or Heavy Bolters, you can't trade knives.
..........╠ BSS : Flamers focus

Flamers


The Sisters of Battle's trademark weapon ! Available as soon as the Pristine Sanctuary is built, it doubles the damage of the carrying sis, and multiply her Morale damage 5 times, and allow her to hit multiple ennemies in a 20 degree arc at range 10.

From previous tables, we can draw the following informations :
  • A starting squad consisting of 4 sisters with 3 Flamers :
    • Costs 140 Req., needs 16 s. to be formed and has 1160 HP.
    • Deals those DPS at range :
      • 30.4 to medium infantry (7.6*4) ;
      • 24.8 to heavy infantry (6.2*4) ;
      • 14 to Commanders (3.5*4) ;
      • 9.6 to Morale (2.4*4).
  • A Tier 1 full upgraded BSS has 10 sisters and 3 Flamers.
    • It costs 440 Req. and 30 Pow., needs 1:28 to be full-fledged and boasts 2900 HP.
    • It deals these DPS :
      • 101.5 to medium infantry (7.6*7+16.1*3) ;
      • 84.8 to heavy infantry (6.2*7+13.8*3) :
      • 45.2 to Commanders (3.5*7+6.9*3) ;
      • 52.8 to Morale (2.4*7+12*3).
    • Should you attack ennemy's base, it deals these DPS on buildings :
      • 62.8 on LP and PG (5.5*7+8.1*3) ;
      • 34.8 on most buildings (3*7+4.6*3) ;
      • 27 on HQ (3*7+2*3).
  • A Tier 2 full upgraded BSS has 10 sisters, a Veteran Superior with Inferno Pistol, Blessed Armor and 5 Flamers.
    • It costs 560 Req. and 60 Pow., needs 2:04 to be full-ready and boasts 4255 HP.
    • It deals these DPS against Infantry :
      • 170.6 to medium infantry (9.9*5+20.9*5+16.6) ;
      • 146.6 to heavy infantry (8.1*5+17.9*5+16.6) ;
      • 78.4 to Commanders (4.6*5+9*5+10.4) ;
      • 75 to Morale (2.4*5+12*5+3).
    • Should you attack ennemy's base, it deals these DPS on buildings :
      • 96.8 on LP and PG (7.2*5+10.5*5+8.3) ;
      • 49.1 on most buildings (3*5+6*5+4.1) ;
      • 27.1 on HQ (3*5+2*5+2.1).
  • A Tier 3 full upgraded BSS has same things plus Psyocculum, boosting all damages by 35% (except Morale damages and Inferno Pistols).
    • So it deals these DPS against Infantry :
      • 224.6 to medium infantry (13.3*5+28.3*5+16.6) ;
      • 192.1 to heavy infantry (10.9*5+24.2*5+16.6) ;
      • 101.4 to Commanders (6.1*5+12.1*5+10.4) ;
      • 75 to Morale (2.4*5+12*5+3).
    • Should you attack ennemy's base, it deals these DPS on buildings :
      • 127.8 on LP and PG (9.7*5+14.2*5+8.3) ;
      • 59.6 on most buildings (3*5+8.1*5+4.1) ;
      • 27.1 on HQ (3*5+2*5+2.1).
    These observations don't take in account the time nor resources for upgrades, neither the reinforcement reduction time if you buy field logistics upgrades.

    Damages aren't that bad, and Morale damages are actually good. Flamer Sisters are the best "standard" ranged damage dealers of the race. They pack more punch than Seraphims, Celestians and even Immolators (which deal 49.5 DPS to Heavy Infantry for example). For other units of the race :
    • Heavy Bolter Sisters deal even (far) more damages, but require to be still to be able to fire.
    • Seraphims deal less damages, but are able to fire even when they kite.
    • Obviously, Immolators are more resilients to normal infantry.

    Sadly, other races have often better weapons (for example, Space Marines deal 121.2 DPS to Heavy Infantry with 4 Flamers versus 89.5 DPS for 5 Sister Flamers at Tier 2, not mentionning Plasma Guns...). This is why i'm not as absolutely positive as most guides about this weapon : it is of course a no-brainer empowerment without any downside, but ennemies will surely prove even more powerful (and this is where Missionary's Lay Hands come into equation...).

    However, don't forget Sisters of Battle lack decent melee units early game. You'll then probably build a Pristine Sanctuary very early to get Seraphims, to make up for this absence. You'll then have access to Flamers. And as said just before, on standard shootouts on early game, Flamers are the best Sister's weapons.

..........╠ BSS : Heavy Bolters focus

Heavy Bolters


On Tier 2 (and with a Pristine Sanctuary), Sisters can be equipped with these heavy machine guns. They are roughly 4 to 5 times more powerful than standard Bolters, with about a third more range. However, it requires the wielder (then, the whole squad) to remain still for at least 2 s. : it is just impossible to fire these weapons on the move.

From weapon tables, we can draw the following informations :
  • A Tier 2 with 5 sisters, 5 Heavy Bolters, a Veteran Superior with Inferno Pistol, and Blessed Armor costs 410 Req. and 60 Pow., needs 1:34 to be full-ready and boasts 2440 HP and 400 Morale. This is if you just want to buy the strict minimum squad to have the maximum Heavy Bolters and the Leadership passive.
  • A Tier 2 full upgraded BSS has 10 Sisters, 5 Heavy Bolters, a Veteran Superior with Inferno Pistol, and Blessed Armor costs 585 Req. and 60 Pow., needs 2:04 to be full-ready and boasts 4255 HP and 400 Morale.
  • They deal following DPS :
    DPS at range 35
    DPS at range 25
    Details
    Infantry Medium
    201
    267.1
    40.2*5+9.9*5+16.6
    Heavy Infantry Medium
    180.5
    237.6
    36.1*5+8.1*5+16.6
    Commanders
    80.5
    113.9
    16.1*5+4.6*5+10.4
    Morale
    47
    62
    9.4*5+2.4*5+3
    Building Low
    80.5
    124.8
    16.1*5+7.2*5+8.3

  • A Tier 3 full upgraded BSS has same things plus Psyocculum, boosting Bolters' damages by 35% and Heavy Bolters' damages by 20%, and Bolters' range from 25 to 30. So :

    DPS at range 35 (Heavy Bolters)
    DPS at range 30 (Bolters)
    DPS at range 25 (Inferno Pistol)
    Details
    Infantry Medium
    271
    337.5
    354.1
    54.2*5+13.3*5+16.6
    Heavy Infantry Medium
    244
    298.5
    315.1
    48.8*5+10.9*5+16.6
    Commanders
    109
    139.5
    149.9
    21.8*5+6.1*5+10.4
    Morale
    47
    59
    62
    9.4*5+2.4*5+3
    Building Low
    109
    157.5
    165.8
    21.8*5+9.7*5+8.3


    These observations don't take in account the time nor resources for upgrades, neither the reinforcement reduction time if you buy field logistics upgrades.

    Obivously, this is Sisters of Battle's killer ranged weapon. It is superceeded only by a full Repentias squad with Mistress (without Righteous Fervor) and Emperor's Touch Bolter. Of course, Repentias come only at Tier 3 and are only melee, and Emperor's Touch Bolters are temporary and need lots of Faith.

    In the other hand, you NEED to be still to fire with this weapon. It is then advised to set the squad on Stand Ground ("blue") stance to prevent it to chase the ennemy, ensuring Heavy Bolter-wielders hold their grounds and use their maximum range instead of chasing ennemy 2 meters then setting-up only to chase again 2 meters, and finally don't use Heavy Bolter at all. Henceforth, equipping this weapon on the squad transforms it into a somewhat living turret. The catch is then clear : sacrificing Bolters and/or Flamers mobility to deal from double to triple damages of a Flamer, and from 4 to 5 times damages of a Bolter, at 40% more range.

    On this range topic, note its range is 35 units, so it can fire beyond BSS' 25 units sight range, providing you have vision within Heavy Bolter's range thanks to another squad or unit.

    Regarding Morale damages, Flamers are better at first glance... But don't forget Heavy Bolters kill ennemies faster, thus inflict heavy Morale damages through Death Penalty on big squads.

    And speaking about Flamers, it is not advised to mix both Flamers and Heavy Bolters on a same squad, due to vastly different nature of them (Flamers deal less damages but have good accuracy on the move then are "mobile" weapons, while Heavy Bolters deal more damages but just can't be used on the move and need a setup time).

    Finally and as always with Sistahs, ennemies will aslo have similar and/or better weapons at this stage of the game. Nonetheless, it is a really welcomed addition to Sister's forces, and once again one of your best source of damages.
..........╠ BSS : As retinue
Battle Sisters can be joined by either a Missionary, the Canoness or the Confessor. Proper attachment is primordial. Whatever the choice, Battle Sisters provide a good meat shield to their leader, as they are all fragile.


Missionary's lead

Missionary is THE run-of-the-mill choice. It provides the meat shield Missionary needs, ensuring stealth detection ; without this meat shield, Missionary is easily targeted and killed, and stealth ennemies reign.

On the other side, Missionary brings 3 boosting skills which apply to each members of the squad, including himself. 2 of them are among the most powerful Sororitas' tools. Remember : they are limited in time. Without spell, Missionary brings only his stealth detection.


The first one is the healing Lay Hands. Already described in Missionary's section (as it is useful for all rattachable squads), it needs just a Holy Icon and 20 Faith Points to heal each units in the squad by 20 points for 20 s., meaning a 400 points healing over time per unit ! Cooldown is 1:30.

Universal is the word. Use it when you are in a shootout or even an uphill melee and at least one of your sisters is badly damaged. If you think you can handle it without healing but just by dying and reinforcing, then save this spell for when your Missionary is in dire condition. Don't forget the Missionary needs to be alive to initiate the healing of the whole squad, and the spell has a cooldown of 4.5 times its duration. In another hand, while the requirements are ridiculously low, it still needs Faith, then Seraphims to gather it faster in Tier 1 (Canoness generates Faith too, but more slowly). Of course, at Tier 2 onward, you'll get Celestians and all, and get Faith more easily.


The second one is the destructive Emperor's Touch. As it is good only with BSS, i develop its secrets here. It needs Tier 2, then a research in HQ costing 75 Req., 50 Pow. and 30 s., and ultimately 3 Holy Icons and heavy 50 Faith Points (half the gauge). When you use it, units exchange whatever weapons they have for the golden Emperor's Touch Bolters, boosting their damages, range (from 25 to 35) and accuracy on the move, from 15% for Bolters and Missionary's Bolt Pistol or 70% for Flamers to 80%.

Detailed damages are in previous section, but, simply put, a full squad (including Veteran Superior and Missionary) will deal between around 238 and 340 DPS and 60 MDPS, for a total between 4776 and 6816 DOT (damages over time) and 1200 Morale DOT, depending on ennemies ! A well-timed Emperor's Touch will then be a heavy blow and the ennemy. Sadly, both requirements and cooldown prevent a frequent use...


The last one is the retaliating Divine Retribution. It doesn't grant invincibility. Then, on normal circumstances it is rather a waste on Battle Sisters, as ennemy just have to flee or to target a non-invincible squad or unit. For more precise informations, check out the Missionary's section.


Canoness' lead

Adepta Sororitas' prime heroin gives a Morale and Morale regeneration boost. More precisely, Canoness alone has 500 Morale Points, and BSS has 300 Morale Points. When the two are paired, the obtained squad has 500 Morale Points. Indeed, without any Morale boost or upgrade. In addition, squad regenerates 2 Morale Points per second, going from 10 to 12, further boosting their Morale resistance.

It is of course better than nothing, but it is nothing the 3 Space Marines' heroes, Farseer, Big Mek and Warboss don't have. Chaos Lord even has a whooping +12 Morale Regeneration, meaning his squad quickly recovers Morale. Other attachable heroes (Apothecary, Mad Dok, Haemonculus) doesn't bring Morale bonuses, and Confessor grants Morale immunity (see below). Once a gain, Sisters get this "good thing, but others have it too, and sometimes better".

Miss Canny also has her two Acts of Faith. Purifying Light radiates from her, and decreases nearby opponents' accuracy, reducing their damages (and seriously shrinking detector's ranges), so it doesn't need her to be rattached to the squad to be used. Ascension summons temporary invincible melee units, which doesn't need to be rattached to a squad either. So the Acts don't benefit to the squad.

The synergy is then limited to the traditional meat shield for the Canoness. It is still better than nothing, and a more than viable choice when Missionaries' Acts are on cooldown (and you can put them in safety or don't need their detection ability). It also grants some muscle on the squad should it be targeted by melee jumpers because it contains Heavy Bolters... But won't beat a specialized melee squad.

In another - and specialized - hand, as Purifying Light and Ascension are both "contact" or short-ranged skills, having a meat shield to protect the Canoness while running to the heart of the battle is better than letting the heroin running alone (and getting shot to death). Following Celestians and Repentias are better for that, but if you are in Tier 1, BSS are the only joinable squads. If you pair Canoness with BSS for melee duty, i suggest to not buy weapons for the squad, as Sisters perform poorly at melee then are susceptible to die easily. But Phosphor Grenade is useful.


Confessor's lead

Sorority's second hero grants an unique Morale immunity to the squad ! Your BSS becomes unbreakable, and then the only unbreakable ranged squad with Chaos Obliterators, Necron Pariahs ; they are all Tier 3 squads, your BSS is a Tier 1 squad and Confessor is a Tier 2.5 unit. It is then a nifty bonus. But keep in mind at this point of the game, ennemy will have means to rally should they be broken, so don't expect to always have the Morale advantage (you have it on long term, but in short terms, an Ork Waaagh, a SM Rally or a GI Execute can temporary give sort of Morale immunity to the opponent).

In addition, Confessor grants nearby units 15% more damages, thanks to his unique permanent aura. It doesn't need Confessor to be in the squad to do this, but being rattached to the squad makes synchronization (moving along to benefit from the bonus) easier. And 15% on Heavy Bolters is a welcome bonus !

The third and last free and permanent bonus is the detection ability, like the Missionary. Not much more to say than Missionary about this. Like the buffing aura, it t doesn't need Confessor to be in the squad to apply, but being rattached to the squad makes synchronization easier, and can prevent sneak attacks.

Unlike Canoness, Confessor's Acts of Faith (damaging Emperor's Wrath and stunning Holy Edict) don't radiate from him, but are cast at short range. So, it is not mandatory to bring Confessor in heart of the battle to use them. It can then be detached from the squad. Note Holy Edict can be good for Heavy Bolters BSS, as it can paralyze a charging party of Possessed Marines ; as such, having Confessor rattached to BSS squad will put his Acts, including Holy Edict, directly in the squad's control pannel ; you'll then don't have to select Confessor beforehand.

The synergy then seems more beneficial than Canoness, and certainly is compared to Missionary (without Acts of Faith) since Confessor has detection like Missionary. Like Canoness, it also grants some muscle on the squad, roughly equal to Canoness, because despite having less damages than Canny, he buffs damages of nearby units and has the nifty Smite skill.
..........╠ BSS VS Scout Marines

Scout Marines in Tier 1

Req.
Pow.
Units
HP
DPS
MDPS
Time
Lone Sister
35
0
1
290
7.6
3.4
6 s.
Lone Scout
45
0
1
295
6.2
2.1
9 s.
Initial Sister Squad
140
0
4
1160
30.4
13.4
16 s.
Reinforce 4 Sisters
140
0
4
1160
30.4
13.44
24 s.
Initial Scout Marine Squad
100
0
2
590
12.4
4.2
12 s.
Reinforce 2 Scouts
90
0
2
590
12.4
4.2
18 s.
Full Sisters Squad
350
0
10
2900
76
33.6
52 s.
Full Scouts Squad
190
0
4
1180
24.8
8.4
30 s.

Note the Sisters Morale Damages factor in the +40% Morale Damage Scouts suffer.

Without any heavy weapon, a Sister is just a little stronger than a Scout, but also cheaper and faster to recruit.

Now let's try with Armoury and Pristine Sanctuary :

Req.
Pow.
Units
HP
Heavy Weapons
DPS
MDPS
Time
Lone Sister with a Flamer
65
10
1
290
1
16.1
16.8
18 s.
Lone Scout with a Flamer
75
10
1
330
1
3.7
25
20 s.
Initial Sister Squad with 3 Flamers
230
30
4
1160
3
55.9
53.8
52 s.
Initial Scout Squad with 2 Flamers
160
20
2
660
2
7.4
50
34 s.
Full Sisters Squad with 3 Flamers
440
30
10
2900
3
101.5
73.9
1:28
Full Scouts Squad with 2 Flamers
250
20
4
1320
2
19.8
54.2
52 s.

Then again, with Armoury / Pristine Sanctuary, Sisters win. Problem is Scouts have access to an health and morale upgrade as soon as Armoury is built, boosting it to 330 / 375, as opposed to 290 / 300 for Sisters.Strangely enough, Scouts deal less damages with Flamers than with Bolters. Note In another hand, most players don't buy Flamers on Scouts. It's more likely they'll buy more dangerous Sniper Rifles.

Req.
Pow.
Units
HP
Heavy Weapons
DPS
MDPS
Time
Lone Sister with a Flamer
65
10
1
290
1
16.1
16.8
18 s.
Lone Scout with a Sniper
85
20
1
295
1
16.6
6.7
29 s.
Initial Sister Squad with 3 Flamers
230
30
4
1160
3
55.9
53.8
52 s.
Initial Scout Squad with 2 Snipers
180
40
2
590
2
33.2
13.4
52 s.
Full Sisters Squad with 3 Flamers
440
30
10
2900
3
101.5
73.9
1:28
Full Scouts Squad with 2 Snipers
270
40
4
1180
2
45.6
17.6
1:20.

Problem is Snipers take 2.5 s. to setup, then deal their full power which are far higher than their DPS, then take 9 s. to reload. It means when a Sniper shoots, he actually deals about between 172 and 201 damages and 75 Morale damages ! ( (345+402)/2*0.5, since Heavy Medium Armor rating VS Sniper is 0.5, and assuming the shot connects, which is likely thanks to the 80% accuracy). 4 shots break BSS' Morale and kill at least 2 Sisters. If you try to run around to escape a Force Commander, and Scouts are shooting afar, you can easily predict the outcome...

Luckily enough, Canoness, thanks to her Commander Armor class, takes between 1 and 2 DPS from a Scout, be it with Bolter, Flamer or Sniper. Then she's the best answer to Scouts.


Tier 2

On Tier 2, Scouts can become a serious threat with the combination of :
* 2nd Bionics : 369 HP and 450 Morale.
* Heavy Weapons Increase : from 2 to 4.
* Plasma Guns : cost 40/5/15 each, has 34.6 DPS VS BSS, without setup ! For comparison, a BSS' Heavy Bolter costs 35/10/12, needs time to setup and has 30.9/40.2 DPS VS Scouts (without/with Leadership)...
* Permanent infiltration
* 2 Target Enhancers, upgrading Sniper damages to 25.1 DPS and damage on hit to 260-304 !

Then, Sisters must rely on their number superiority, altough a squad of 4 Snipers or 4 Plasma Scouts only cost 1 Population Cap... Giving Scouts an edge on Population Cap ratio.
..........╠ BSS VS Tactical Space Marines

Tactical Space Marines in Tier 1

Req.
Pow.
Units
HP
Heavy Weapons
DPS
MDPS
Time
Lone Sister
35
0
1
290
0
6.2
2.4
6 s.
Lone Marine
50
0
1
390
0
11.3
2.4
6 s.
Initial Sister Squad
140
0
4
1160
0
24.8
9.6
16 s.
Reinforce 4 Sisters
140
0
4
1160
0
24.8
9.6
24 s.
Initial Marine Squad
190
0
4
1560
0
45.2
9.6
26.4 s.
Reinforce 4 Marines
200
0
4
1560
0
45.2
9.6
36 s.
Full Sisters Squad
350
0
10
2900
0
62
24
52 s.
Full Marines Squad
400
0
8
3120
0
90.4
19.2
62.4 s.

Without any heavy weapon, TSM are almost twice as strong than SoB, and a third more durable. For a mere 15 Req. and 3 s.. Your only chance is to outnumber them. It will be very hard however, as a Scout costs just 25 Req. more (or a third) than Missionary, which is not even enough to recruit a single additional Sister.

Then, Sisters must rely on Flamers, as they can carry 3 Flamers instead of 2 for Marines, and there is a low chance SM player buy Flamers, rather saving Req. and slots for Tier 2 weapons.

Now let's try with Armoury and Pristine Sanctuary :

Req.
Pow.
Units
HP
Heavy Weapons
DPS
MDPS
Time
Lone Sister with a Flamer
65
10
1
290
1
13.8
12
18 s.
Lone Marine with a Flamer
90
10
1
390
1
20
16
21 s.
Initial Sister Squad with 3 Flamers
230
30
4
1160
3
47.6
38.4
52 s.
Initial Marine Squad with 2 Flamers
190
20
4
1560
0
45.2
9.6
24 s.
Full Sisters Squad with 3 Flamers
440
30
10
2900
3
84.8
52.8
88 s.
Full Marines Squad with 2 Flamers
470
20
8
3120
2
107.8
46.4
86.4 s.

Then again, with Armoury / Pristine Sanctuary, Marines win, and the saved Requisition in favor of Sisters isn't enough to tip the scale.

On Grenades' topic, Sisters' Phosphor Grenades deal around a total of 83 damages points (and 60 Morale damages) over time, but Marines' Frag Grenades deal around 100 damages points (and 20 Morale Damages) on the spot AND STUN your units for 3 s.. For same cost and same cooldown...

But as said before, most of the time Marines won't buy Flamers. Then in Tier 1 we can assume things will go as follow :

Req.
Pow.
Units
HP
Heavy Weapons
DPS
MDPS
Time
Lone Sister with a Flamer
65
10
1
290
1
13.8
12
18 s.
Lone Marine
50
0
1
390
0
11.3
2.4
6 s.
Initial Sister Squad with 3 Flamers
230
30
4
1160
3
47.6
38.4
52 s.
Initial Marine Squad
190
0
4
1560
0
45.2
9.6
26.4 s.
Full Sisters Squad with 3 Flamers
440
30
10
2900
3
84.8
52.8
88 s.
Full Marines Squad
400
0
8
3120
0
90.4
19.2
62.4 s.

Conclusion is fearsome : you NEED 3 Flamers on an initial squad to match the DPS of an initial TSM squad without any heavy weapon ! And even then, "Tacs" will have more HP.

Even worse : as soon as Space Marines have an Armoury (Pristine Sanctuary equivalent), they can enhance their HP by 12% to 436 HP with Bionics, meaning they have HALF more HP than Sisters...

Your only hope is either to demoralize ennemy (Phosphor Grenades help), or to fight near your turrets, and to use Lay Hands, then field the Canoness and / or Seraphims.


Tier 2

On Tier 2, things get awry : Tacs get another Bionics upgrade, boosting their HP to 488, while Blessed Armor boost Sis' HP to 363. Tacs are superior by 1/3. With Enhanced Target Finders, TSM Bolters deal 14.2 DPS, while with a Veteran Superior alive, SoB Bolters deal 8.1 DPS. Tacs have almost double damages !

On leaders' topic, TSM Sergeant has again more than 1/3 more ranged damages with Plasma Pistol (27.8) than SoB Veteran Superior with Inferno Pistol (16.6), but Veteran Superior's Master Crafted Power Sword is 20% more powerful (63.7) than Segeant's Power Fist (53.2). Naturally, Sergeant has a ton more HP (50% : 975 HP) than Veteran Superior (625 HP). Costs are 75 Req., NO POW. and 30 s. for Sergeant, 60 Req., 10 Pow. and 12 s. for Veteran Superior. Icing on the cake : Sergeant has Heavy Infantry High armor, while Veteran has Heavy Infantry "standard" armor.

And cherry on the icing ont the cake : Sergeant has the Rally ability, which restores the Morale of his squad, and gives it Morale immunity for 2 s.. Then, the TSM squad is always stronger and healthier than BSS, AND can stun it with Frag Grenades, AND can deny Morale break. Praise the Emperor...

On Heavy Weapons topic, TSM can have (in addition to Flamers covered above) Heavy Bolters and Plasma Guns. They deal roughly same damages to BSS : 48.7 DPS. Sisters' HB deal 36.1 DPS.. Again : SM are 1/3 more powerful. The only scenario in which Sisters have a slight advantage (10.9 DPS) is if, without Heavy Weapon increase, Sis' have 3 HB in their squad, SM have 2 HB in their squad and both shoot at the other one at long range, then only HB shoot in both teams. But in any other scenario (both teams are close enough to use also standard Bolters, or SM have 4 HB ans SoB have 5 and both shoot at long range), Sis are fu*ked. For example, if a full boosted BSS with Blessed Armor, Veteran Superior, Inferno Pistol and 5 HB, faces a full boosted Tac' with Bionics 2, Enhanced Target Optics, Sergeant, Plasma Pistol and 4 HB, SM have 1600 more HP and 70 more DPS ! Even with Lay Hands, it is a dire situation. Only "advantages" : SoB save 150 Req. and 36 s. compared to SM.

Then, if possible, try to have 50% more BSS than Tacs, and bring a Rhino with Laud Hailers against Rally.
..........╠ BSS VS Chaos Space Marine squad (CSMS)

Chaos Space Marines in Tier 1

Req.
Pow.
Units
HP
Heavy Weapons
DPS
MDPS
Time
Lone Sister
35
0
1
290
0
6.2
2.4
6 s.
Lone Chaos Marine
50
0
1
375
0
9.9
2.4
9 s.
Initial Sister Squad
140
0
4
1160
0
24.8
9.6
16 s.
Reinforce 4 Sisters
140
0
4
1160
0
24.8
9.6
24 s.
Initial Chaos Marine Squad
190
0
4
1500
0
39.6
9.6
26.4 s.
Reinforce 4 Marines
200
0
4
1500
0
39.6
9.6
36 s.
Full Sisters Squad
350
0
10
2900
0
62
24
52 s.
Full Marines Squad
500
0
10
3750
0
99
24
1:20

Without any heavy weapon, it is very similar to Tactical Space Marines. CSM are half stronger than SoB, and a third more durable ; they just have 15 HP less and 1.4 DPS less than TSM. Again, for a mere 15 Req. and 3 s.. Your only chance is to outnumber them. It will be even harder than with SM however, as a Heretic squad costs just 5 Req. more than a Missionary, AND CSM can have 10 units per squad, like BS. Ouch !

However, for 175 Req., you can have 5 Sisters, while Chaos have 4 Marines for 190 Req.. You are still at disadvantage, but a bit less (50 HP and 8.6 DPS). The saved Req. then must be spent elsewhere.

Now let's try with Armoury and Pristine Sanctuary :

Req.
Pow.
Units
HP
Heavy Weapons
DPS
MDPS
Time
Lone Sister with a Flamer
65
10
1
290
1
13.8
12
18 s.
Lone Marine with a Heavy Bolter
90
10
1
375
1
28
7.3
21 s.
Initial Sister Squad with 3 Flamers
230
30
4
1160
3
47.6
38.4
52 s.
Initial Marine Squad with 2 Heavy Bolters
270
20
4
1500
2
75.8
19.4
50.4 s.
Full Sisters Squad with 3 Flamers
440
30
10
2900
3
84.8
52.8
88 s.
Full Marines Squad with 2 Heavy Bolters
570
20
10
3750
2
135.2
33.8
104.4 s.

Then again, with Armoury / Pristine Sanctuary, Chaos wins, and the saved Requisition in favor of Sisters isn't enough to tip the scale.

The thing is, Chaos SM have access to the powerful Heavy Bolter right at Tier 1 ! It needs the squad to be still, but the power is tremendous. In addition, Heretics, Raptors, Chaos Lord and / or another CSM will probably charge you at melee, to prevent you to use Flamers.

Grenades comparison is exactly the same that with SM. CSM Grenades deal 100 damages point on the spot and stuns you for 3 s., while your Grenade deal less damages, but deal a whooping 60 Morale damages on each burnt units...

It is possible CSM won't buy HB, to save slots to buy a bit more powerful Plasma Guns in Tier 2 (and which doesn't require stillness and setup time), somewhat like SM. Then if you equip Heavy Weapons and Chaos doesn't :

Req.
Pow.
Units
HP
Heavy Weapons
DPS
MDPS
Time
Lone Sister with a Flamer
65
10
1
290
1
13.8
12
18 s.
Lone Marine
50
0
1
375
0
9.9
2.4
9 s.
Initial Sister Squad with 3 Flamers
230
30
4
1160
3
47.6
38.4
52 s.
Initial Marine Squad
190
0
4
1500
0
39.6
9.6
26.4 s.
Full Sisters Squad with 3 Flamers
440
30
10
2900
3
84.8
52.8
88 s.
Full Marines Squad
500
0
10
3750
0
99
24
80.4 s.

Same sad conclusion that with SM : even with 3 Flamers and no weapons on ennemy, it outdamages you (except on 4v4, then starting squads, but you pay 40 Req., 30 Pow. and 25.6 s. more than CSM) and outstall you (by 340 HP on 4v4, by 850 HP on 10v10).

"Luckily", CSM haven't Flamers, then the thing to do is clear : break CSM's Morale. Beware if Chaos Lord is rattached to the squad : squad's Morale is 450 and squad's Morale regeneration is an huge 22 points per second ! Almost the equivalent of 2 Sisters' Flamers !


Tier 2

CSM have almost no boost in Tier 2 and 3 except the ones provided by their leader, and Furious Charge upgrade which permanently boosts their movement speed and melee damages. Then, for HP, they stay at 390 HP, while Blessed Armor boost Sis' HP to 363. Chaos still has a 10% advantage. For weapons, Bolters stay at 11.3 DPS, while Leadership boosts Sis' Bolter DPS to 8.1. Even at Tier 3 with Leadership and Psyocculum, Chaos Bolters are still stronger (10.9 for Sis).

On Heavy Weapons' topic, with Heavy Weapon increase, a Chaos HB deals 56.1 DPS, while a SoB HB deals 27.8 DPS (36.1 with Leadership). And at maximum on Tier 3, it deals 48.8 DPS. Once again, Chaos is heavily favored here. And it is even worse if Chaos buy Plasma Guns.

On leaders' topic, Aspiring Champions boost each CSM's health by 125 points (with Purge the weak upgrade), and can temporarily grant 50% morale resistance for 10 s. (and boost damages by 40%, and received damages by 20%), with Berserk Fury skill. On the lol side, champion can have double Veteran Superior's HP and superior armor at Tier 2, and is stronger both at melee and at range, thanks to his armor.

Never engage CSM on melee ; they are as strong in melee as with Bolters ! And even more in Tier 2 with Furious Charge.

Once again, breaking Morale is the only way to overcome CSM, but with Furious Charge at T2, HB at T1 and overall possibility to charge and kill Sisters at melee, this is hard to achieve.
..........╠ BSS VS Shoota Boyz Squad (SBS)

Shootas in Tier 1

Req.
Pow.
Units
HP
Heavy Weapons
DPS
MDPS
Time
Lone Sister
35
0
1
290
0
6.9
2.4
6 s.
Lone Shoota Boy
35
0
1
235
0
8.2
1.7
6.5 s.
Initial Sister Squad
140
0
4
1160
0
27.6
9.6
16 s.
Reinforce 4 Sisters
140
0
4
1160
0
27.6
9.6
24 s.
Initial Shoota Boyz Squad
140
0
4
940
0
32.8
6.8
25 s.
Reinforce 4 Shoota Boyz
140
0
4
940
0
32.8
6.8
26 s.
Full Sisters Squad
350
0
10
2900
0
69
24
52 s.
Full Shoota Boyz Squad
280
0
8
1880
0
65.6
13.6
52 s.

Individually, without special weapons, Sisters are always stronger than Shoota Boyz, for same cost or just a bit higher. Problem is you'll face also Slugga Boyz, who'll destroy you at melee, supported by Shootaz.

Now let's try with Pile'o'gunz and Pristine Sanctuary. Let's assume Orks buy the Blastier (affect Big Shootas) but don't buy More Dakka (affect normal Shootas) (altough they could) researches :

Req.
Pow.
Units
HP
Heavy Weapons
DPS
MDPS
Time
Lone Sister with a Flamer
65
10
1
290
1
11.5
12
18 s.
Lone Ork with a Big Shoota
75
10
1
235
1
27.3
2
18.5 s.
Initial Sister Squad with 3 Flamers
230
30
4
1160
3
41.4
38.4
52 s.
Initial Shoota Boyz Squad with 3 Big Shootas
260
30
4
940
3
89.2
7.7
61 s.
Full Sisters Squad with 3 Flamers
440
30
10
2900
3
82.8
52.8
88 s.
Full Shoota Boyz Squad with 3 Big Shootas
400
30
8
1880
3
122
14.5
1:27

Then the favor swings to Orks, who have about 1/3 less health but +1/2 damage.

And again, Sluggas will be here to tie you to melee. Altough Orks don't have Grenades, it is likely that you'll use your Phosphore Grenades on Sluggas instead of on Shootas. One in one, you have to rely on Flamers and Phosophore Grenades to break them, as Orks are a "mob" race, and the more a squad has members, the more Morale damage it takes.

As Big Shootas are the only heavy weapons Shoota Boyz can have, and are really good guns, there is no reason to oppose Sisters with Flamers VS Shoota Boyz without Big Shootas. Orks require an Orky Pop Cap of 40 to have Pile'o'Gunz, Blastier research and Big Shootas, which comes pretty fast in the game.


Tier 2

In Tier 2, your Heavy Bolters can destroy Shoota Boyz easily. But then again, Orks will present another threats : Stormboyz, Nobz, Wartruks, Watracks...
..........╠ BSS VS Imperial Guardsmen

Tier 1

Req.
Pow.
Units
HP
DPS
MDPS
Time
Lone Sister
35
0
1
290
7.6
2.4
6 s.
Lone Guard
20
0
1
160
5.5
1.3
7 s.
Initial Sister Squad
140
0
4
1160
30.4
9.6
16 s.
Reinforce 4 Sisters
140
0
4
1160
30.4
9.6
24 s.
Initial Guardsmen Squad
160
0
5
800
27.5
6.5
20 s.
Reinforce 5 Guardsmen
100
0
5
800
27.5
6.5
35 s.
Full Sisters Squad
350
0
10
2900
76
24
52 s.
Full Guardsmen Squad
240
0
9
1440
49.5
11.7
48 s.

Sisters have a number of advantages : they are individually a bit stronger and tougher than Guardsmen, and can have an additional member at full squad. Be sure to have at least same number of units as the ennemy, and don't forget their squads start with 5 members and yours with 4 members. Then, reinforcing a fresh squad with 1 Sister to ensure 5v5 is a good idea. On a side note, Sisters take 1 second less than Guardsmen to reinforce (6 s. VS 7 s.), giving Sisters an additional advantage. As last resort, they are 50% more powerful than Guards at melee (6.5 DPS VS 4.2).

So Sis have general advantage except in range, where Guardsmen have a range 2 units bigger (25 VS 27) and economy (Sis cost more... but are more effective, except in range).

A Commissar can lead the squad, but at this stage, he just adds Morale to the squad. Do not engage him in melee, as he has 38 DPS Vs Heavy Infantry, which is roughly equal to Veteran Superior with Power Weapons.


Tier 1.5

Req.
Pow.
Units
HP
Heavy Weapons
DPS
MDPS
Time
Lone Sister with a Flamer
65
10
1
290
1
16.1
12
18 s.
Lone Guard a Grenade Launcher
40
15
1
160
1
21.7
2.5
21 s.
Initial Sister Squad with 3 Flamers
230
30
4
1160
3
55.9
38.4
52 s.
Initial Guardsmen Squad with 3 Grenade Launchers
220
45
5
800
3
76.1
10.1
1:02
Full Sisters Squad with 3 Flamers
440
30
10
2900
3
101.5
52.8
1:28
Full Guardsmen Squad with 3 Grenade Launchers
300
45
9
1440
3
98.1
15.3
1:30

Balance shifts in Guards' favor. Grenade Launchers have both immense range (40 units ! Sisters' Bolters have 25-units range), high damages on hit, high DPS, splash damage, knockback and no accuracy penalty when Morale is broken.

You can (and HAVE TO) prevent this by closing the ennemy : within 15 units range, Grenade Launchers can't be fired. An interesting note : the more Grenade Launchers a squad has, the less damages it can deal within 15 units range (as Lasguns are lost when Grenade Launchers are bought). If you don't, ennemy will constantly paralyse you from afar due to knockback, and quickly kill your units due to high damages.

Note Flamers can easily break Guardsmen's Morale, even faster with Phosphor Grenade, due to their poor Morale. But Morale break doesn't affect artillery weapons, then GL still have 100% accuracy.

Guardsmen haven't any grenade.


Tier 2

Guards get FAR more dangerous.

For themselves, they can boost their HP to 294 through several upgrades and Sergeant. And buy Plasma Guns (PG), which have less damages and range than GL and lack knockback, but can be fired on the move and within 15 units range, and deal 9.8 Morale DPS. Guards can also extend their Lasguns and Plasma PG range to 32.4 units. And boost GL damages to 43.3 DPS and PG to 34.4 DPS.

Commissars gain the Execute spell, which kills a unit of its own squad but double damages of ALL Guardsmen Lasguns (and Kasrkin Hellguns) around (range : 30), and restore their Morale, and give them Morale immunity, all for 10 s.. And it has no cooldown. Luckily enough, it doesn't apply to heavy weapons or other IG units.

Priest can be rattached to permanently give its squad a 125 point bonus to health, a 50 point bonus to morale, a 33% bonus to movement speed, and a WTF 50% bonus to damages ! For example, a PG with upgrade and Priest is 51.5 DPS on a 419 (294+125) HP unit. And by himself, Priest is barely as strong as Canoness with Master Crafted Weapon...

Then, a single full squad without heavy weapon but with a leader, a Priest, upgrades and under Execute, can deal around 120 DPS at 32 range. It roughly equals 4 BSS Heavy Bolters with Leadership passive. With 5 PG, they deal about 315 DPS on Sis armor. Yikes. When a full T2 BSS with 5 HB, a leader with Inferno Pistol and Confessor's damage buff deal about 307 DPS on Guards armor. And Guards have higher health too (419 VS 363 per BSS / Guardsman). And longer range.

Relievely, under Emp's Touch Bolter, Sis have advantage in all fields (340 DPS, 40 range) except Morale damages (5 VS 9.8). Flamers are still strong but won't break Morale until Commissars die, and never nerf Grenade Launchers. Heavy Bolters can be disabled by Grenade Launchers.

Then, with proper preparation, Guardsmen can become unbreakable PLUS very strong PLUS marksmen PLUS more durable than BSS. Clever ennemy will put GL in backline to pin you while avoiding you to come within 15 units, while frontline will use weaker but still tremendous PG, supported by Execute-enhanced Lasguns.
..........╠ BSS VS (Eldar) Guardians
Eldar have 3 shooters at T1 : Guardians, who are shooter scouts, Rangers, who have like half BSS damages and almost same health but huge Morale damages and range, and finally Dark Reapers who are specialized shooters.


Tier 1

Req.
Pow.
Units
HP
DPS
MDPS
Time
Lone Sister
35
0
1
290
7.6
2.4
6 s.
Lone Guardian
30
0
1
210
6
0.7
6.6 s.
Warlock
55
15
1
250
9.5
0.4
30 s.
Initial Sister Squad
140
0
4
1160
30.4
9.6
16 s.
Reinforce 4 Sisters
140
0
4
1160
30.4
9.6
24 s.
Initial Guardians Squad
130
0
4
840
24
2.8
16.8 s.
Reinforce 4 Guardians
120
0
4
840
24
2.8
26.4 s.
Full T1 Sisters Squad
350
0
10
2900
76
24
52 s.
9 Guardians Squad
270
0
9
1890
54
11.7
59.4 s.
Full Guardians Squad with Warlock
325
15
10
2140
63.5
12.1
1:294

Sisters have advantage here, thanks to their superior damages and HP.


Mysticism

Guardians can be boosted by Mysticism right at the beginning of the game, for 125/65/50 at HQ. It permanently boosts the squad while Warlock is alive, in terms and offense (120% damages inflicted) and defense (75% damages receveived) of the squad damages by 20% while Warlock is alive.

Req.
Pow.
Units
HP
DPS
MDPS
Time
Lone Sister
35
0
1
290
5.7
2.4
6 s.
Lone Guardian (theory)
30
0
1
210
7.3
0.7
6.6 s.
Warlock
55
15
1
250
9.5
0.4
30 s.
5 BSS
175
0
5
1450
28.5
12
22 s.
Initial Guardians Squad + Warlock
185
15
5
1090
38.7
3.2
46.8 s.
Full T1 Sisters Squad
350
0
10
2900
57
24
52 s.
Full T1 Guardians Squad with Warlock
325
15
10
2140
75.2
6.7
1:294

Sisters keep their advantage due to their higher resistance, for some equivalent price, but gap softens. In addition, Warlock gains Entanglement, a spell which prevents a squad to move, but not to shoot, and Embolden, a spell which boosts squad's Morale.


Tier 1.5

Req.
Pow.
Units
HP
Heavy Weapons
DPS
MDPS
Time
Lone Sister with a Flamer
65
10
1
290
1
16.1
12
18 s.
Lone Guardian (theory)
30
0
1
210
0
7.3
0.7
6.6 s.
Initial Sister Squad with 3 Flamers
230
30
4
1160
3
41.9
38.4
52 s.
Initial Guardian Squad + Warlock
185
15
5
1090
0
38.7
3.2
46.8 s.
Full Sister Squad with 3 Flamers
440
30
10
2900
3
76.1
52.8
1:28
Full Guardian Squad with Warlock
325
15
10
2140
0
75.2
6.7
1:29

Advantage tightens even more. Sisters keep the upper hand, but very slightly, and for a higher cost. In another hand, don't forget about Entanglement and Embolden. Embolden specifically is a way to counter the Morale break from the Flamers, as it adds 200 Morale and Maximum Morale Points for 20 s..


Tier 2

Guardians can get 25% ranged damages boost (7.6 DPS per model, 9.1 with Warlock ; 68.4 for full squad, 91.4 if it has a Warlock). On their side, Sisters have the 33% Leadership bonus, leading to 9.9 DPS per model withtout Warlock's damage reduction, or 7.4 with ; meaning 115.6 for full squad (with Inferno Pistol) without Warlock and 86.7 with. Eldar have a slight advantage, but you can equip special weapons to even the odds.

On Health topic, both teams get 25% boost, so Sisters keep their fair advantage here.

All in all, Sisters keep the upper hand. Just beware about Entanglement.
..........╠ BSS VS Dark Reapers
Eldar specialized T1 shooters, Dark Reapers have great DPS and great range. It is even better with some boosts from Soul Shrine, Eldar's Armoury equivalent. It takes just 50/0/10 from Aspect Portal (Barracks equivalent) to be allowed to recruit Dark Reapers and their Exarch (who boost squad's damages by 15%), without any other requirement.

Note that Reapers' DPS include the Exarch boost, as there is no requirement to build Exarch and no reason to not build it.

Tier 1

Req.
Pow.
Units
HP
DPS
MDPS
Time
Lone Sister
35
0
1
290
6.9
2.4
6 s.
Lone Reaper
70
0
1
450
13.2
3
9 s.
Exarch
80
30
1
645
14.1
3
10 s.
Initial Sister Squad
140
0
4
1160
27.6
9.6
16 s.
Reinforce 4 Sisters
140
0
4
1160
27.6
9.6
24 s.
Initial 3 Reapers Squad + Exarch
290
30
4
1995
53.7
12
34 s.
Reinforce 3 Reapers + Exarch
290
30
4
1995
53.7
12
37 s.
Full Sisters Squad
350
0
10
2900
69
24
52 s.
Full Reapers Squad + Exarch
430
30
6
2895
80.1
18
52 s.

Dark Reapers win over Battle Sisters individually. But full squad VS full squad, overall stats are even. Sis' have economic advantage, but as Reapers are tougher and stronger individually, they can decrease BSS' power more easily by killing its members.

By the way, Eldars can just use Fleet of Floot to back just enough for being out of Sisters' range (25) but within their own range (30) ; however, as Reapers have the common sight range of 25 units, they'll need something to spot Sisters between 25 and 30 range units.

So advantage goes to Dark Reapers, except in economic terms.


Tier 1.5

With Soul Shrine (which cost more than Pristine Sanctuary : 225/225/100 VS 175/50/45), Eldar can buy Improved Optics (100/50/60) to boost damages and Reinforced Armour (same cost and time) to boost HP. Here, Reapers' damages include bonuses from Exarch's boost and Improved Optics, and their health includes bonus from Reinforced Armor. Strangely, Exarch doesn't benefit from Improved Optics.

Req.
Pow.
Units
HP
Heavy Weapons
DPS
MDPS
Time
Lone Sister with a Flamer
65
10
1
290
1
11.5
12
18 s.
Lone Reaper
70
0
1
518
0
19.9
3
9s.
Exarch
80
30
1
806
14.1
3
10 s.
Initial Sister Squad with 3 Flamers
230
30
4
1160
3
41.4
38.4
52 s.
Initial Reaper Squad with Exarch
290
30
4
2360
0
73.8
12
34 s.
Full Sisters Squad with 3 Flamers
440
30
10
2900
3
82.8
52.8
1:28
Full Reapers' Squad with Exarch
430
30
6
3396
0
113.6
18
52 s.

Even with Phosphor Grenade VS no grenade, Reapers destroy Sisters. Plain and simple. In addition, Improved Optics extend gun's range to 35 (but Reapers' vision range is still 25). In another hand, Soul Shrine is harder to build than Pristine Sanctuary, due to heavy power requirement.


Tier 2

On Tier 2, Dark Reapers can gain another armor and optic boosts. Individual HP goes to 597 and 1008 for members and Exarch. VS 363 and 625 for Battle Sister and Superior Veteran. A full squad with Exarch deals 163.6 DPS (5*29.5+14.1). It is comparable to a full BSS with Inferno Pistol and 5 Flamers, or to 5 HB from afar with Leadership passive. Second Optic upgrade boost their shoot range to 40 units, which is farther than Sis' HB (35 units). Then, thanks to higher HP and range, Dark Reapers have still and always advantage.
..........╠ BSS VS early Tau units
Tau have 2 shooters at T1 : Stealth Suits, who are shooter scouts, and Fire Warriors, who are real ranged heavy damage dealers. Vespids are melee but can deal 5 DPS per model to Sisters (who deal 6.2 DPS in return) and have higher health ; but is likely ennemy will use them either to damage buildings or to charge at melee. Kroots are alike : melee DPS who can still inflict 4.7 DPS to Sisters at range, who inflict them 6.9 DPS at range in return. Avoid Kroots and Vespids at range.


Stealth Suits

They are primarily used as anti-machines stealthed jumping infantry, and deal low damages to troopers. However, their stealth ensure them to deal guaranteed damages without receiving, which can quickly add up. Even worse, with a T1 upgrade, they can deal more damages than Sis ! But as all 3 members of the squad can replace their weapons for anti-machines ones, it is rare... But it is possible.

Req.
Build time
DPS
Health
A Sister
35
6 s.
7.6
290
A Stealth
65
11 s.
2.6 / 7.8
250

As far as you have detection, Stealth are not a problem. Except if player buys the Enhancement upgrade, but as it applies only to basic anti-infantry weapons and not on heavy anti-machine weapons, it should be rare, even more as Tau have Fire Warriors. On later stages, Stealth are tougher (their leader boost their health), stronger, but dedicated to anti-machines work.


Fire Warriors

The main shooters of the Tau, and one of the best shooters of the game. Each model cost twice Req. and half more time to build, to have 1/6th more life and 2.5 times damages than Sis ! It is then advised to have twice or thrice more Sis than Fire Warriors. On melee, difference is only of 0.6 DPS. You can also try to demoralize them, but with only 6 members and 300 Morale, it can be hard.

Req.
Build time
DPS
Health
Melee DPS
Models
A Sister
35
6 s.
6.2
290
4.6
1
A Fire Warrior
70
9 s.
15.6
340
4
1
Fresh BSS
140
16 s.
24.8
1160
18.4
4
Fresh FWS
210
24 s.
46.8
1020
12
3
Full T1 BSS
350
52 s.
62
2900
46
10
Full T1 FWS
420
51 s.
93.6
2040
40
6

Like Eldar, Tau don't really have a Tier 1.5, but their armoury, which needs both HQ and barracks and costs 225/225/100, acts somewhat as T2. Then i'll compare here vanilla Warriors VS Flamers Sisters. For a little bit Req., some Pow. and double time, Flamer Sister barely reach FW's attack, and has still less health. It pays off if a Flamer hurts 2 or more FW. If not, perhaps having 2 vanilla Sisters is preferable to having 1 Flamer Sister.

Req.
Pow.
Build time
DPS
Health
Melee DPS
Max. models in a squad
A Sister with Flamer
65
10
18 s.
13.8
290
4.6
3
A Fire Warrior
70
0
9 s.
15.6
340
4
6

Lastly, T2 forces. Here, Sisters have Heavy Weapons Increase, Blessed Armor and Leadership passive from Veteran Superior, who have herself Inferno Pistol and Master Crafted Weapon. Total researches cost, Pristine Sanctuary included, is 500/245/200. FW have only Advanced Pulse Rifles which cost, Path to Enlightment included, 275/325/125. Only Sis advantage here is 80 Pow.. Improved Metallurgy boosts both HP and armor type, but is available only with Kauyon path, which is T3.

Strategy here is to approach FW with BSS hidden in Rhinos, to avoid long-range firepower and then unleash either HB or Flamers and Inferno Pistol at shorter range. Alternatively, at long range, all 5 HB under Leadership are as strong as the whole FW team.

Req.
Pow.
Build time
DPS
Health
Melee DPS
Ranged Morale DPS
Max. models in a squad
A Veteran Superior
60
10
12 s.
16.6
625
63.7
3
1
A vanilla Sister
35
0
6 s.
8.1
363
6
2.4
5~10
A Sister with Flamer
65
10
18 s.
17.9
363
6
12
5
A Sister with Heavy Bolter
70
10
18 s.
36.1
363
6
9.4
5
A Shas'Ui
70
20
20 s.
29.1
550
4
3.5
2
A Fire Warrior
70
0
9 s.
20.4
340
4
0.5
6

Req.
Pow.
Build time
DPS
Health
Melee DPS
Ranged Morale DPS
Max. models in a squad
Full Sisters squad with basic Bolters
410
10
1:04
97.6
4255
123.7
27
11
Full Sisters squad with Flamers
560
60
1:24
146.6
4255
123.7
75
11
5 Heavy Bolters from 25-35 range
410
60
1:34
180.5
2440
0
47
5
Full Sisters squad with Heavy Bolters
585
60
1:24
237.6
4255
123.7
62
11
Full Fire Warriors squad with 2 Shas'Ui
560
40
1:31
180.6
3140
32
8
8

..........╠ BSS VS Necrons Warriors

Tier 1

Req.
Pow.
Units
HP
DPS
MDPS
Time
Lone Sister
35
0
1
290
6.2
2.4
6 s.
Lone Necron
0
35
1
530
9.9
4
25 s.
Initial Sister Squad
140
0
4
1160
24.8
9.6
16 s.
Reinforce 4 Sisters
140
0
4
1160
24.8
9.6
24 s.
Initial Necrons Squad
0
0
3
1590
29.7
12
30 s.
Reinforce 3 Necrons
0
105
3
1590
29.7
12
1:15
Full Sisters Squad
350
0
10
2900
62
24
52 s.
Full Necrons Squad
0
175
8
4240
79.2
32
2:35

Note the Necrons are particuliar. First they have no Requisition resource, only Power. Second, they recruit time depends on how many Necrons are deployed in the battlefield. Formula is a bit complex, but basically, the lesser Necrons deployed, the faster to deploy.

Third, they have what i call a "sniper type" weapon, meaning they deal all their damages on the first millisecond they shoot, they don't deal any damage until refire rate cooldown is completed. If we divide a second in ten sections, damages are like this :

0.1
0.2
0.3
0.4
0.5
0.6
0.7
0.8
0.9
1 second
Sister
0.62
0.62
0.62
0.62
0.62
0.62
0.62
0.62
0.62
0.62
Total
0.62
1.24
1.86
2.48
3.1
3.72
4.34
4.96
5.58
6.2
Necron
8.4
0
0
0
0
0
0
0
0
0
Total
8.4
8.4
8.4
8.4
8.4
8.4
8.4
8.4
8.4
8.4

Add to this that Necrons are very tough, having 80% more Health (and 60% more DPS), and you'll understand BSS are NOT the ideal match for Necrons. Then you have to apply a different strategy, which is to avoid contact at best. This is facilitated by the fact Necrons are slow. In another hand, Seraphims opening is often better than Battle Sisters opening VS Necrons. But once again, if you go with BSS, avoid fightings at least during Tier 1 and 1.5.


Tier 1.5

Necrons can build the Summoning Core as soon they have 120 Power, then pay another 200 Power to get the Disruption Field passive which boosts Necron Warriors HP by 9.5% (+50) and ranged damages by 30% (+3).

Req.
Pow.
Units
HP
Heavy Weapons
DPS
MDPS
Time
Lone Sister with a Flamer
65
10
1
290
1
13.8
12
18 s.
Boosted Necron
0
35
1
580
0
12.9
4
25 s.
Initial Sister Squad with 3 Flamers
230
30
4
1160
3
47.6
38.4
52 s.
Initial Necrons Warriors squad with Disruption Field
0
0
3
1740
0
38.7
12
30 s.
Full Sisters Squad with 3 Flamers
440
30
10
2900
3
84.8
52.8
1:28
Full Necrons Warriors squad with Disruption Field
0
175
8
4640
0
103.2
32
2:35

Then again, with Summoning Core / Pristine Sanctuary, Necrons win. In another hand, with 400 Morale and at 52 MDPS, you can break Necrons's Morale in 8 s.. If each 3 Flamers hit 2 ennemies instead of one, it cuts the time to 4.5 s. ! Necrons' slowness prevent them to run away, even broken, normally allowing each Flamer to hit several Necrons at once. The catch is with Summoning Core, Necrons have access to Wraiths who can tie up your Sis.


Tier 2

On Tier 2, Necrons can build the Greater Summoning Core and get the Enhanced Disruption Field, giving a MASSIVE +290 HP for 870 HP ! (+50% from first upgrade) And +4.5 DPS (+35%) for 17.4 DPS. And range increase from 17 to 21, which is still less than Sisters' Bolters and Flamers (25). Heavy Bolters and Rhinos to keep them in long range (not counting Wraiths and Flayed Ones) are recommanded.
..........╚ BSS : Conclusion

Conclusion


Battle Sisters are somewhat problematic. They are designed to be shooters, with low damages and average range. Flamers boost their damages and morale damages, but again are outmatched by ennemies' special weapons. On their own, Sistahs are not very fearsome to ennemy. It's even worse when melee ennemies throw in. For this, Battle Sisters are IMO rather weak on Tiers 1.

Problem is : they are mandatory to act as meat shield for Missionary, as Missionary is fragile and is the only detector until late Tiers 2. So you are likely forced to field at least one Battle Sisters squad. They can also act as meat shield for Canoness, and later Confessor. Problem is, Sisters are less resistant than most of their counterparts. It is really more to avoid the leader to be targeted as an independant unit than to be a melee force. But Missionary provides also heal and huge attack boost to Battle Sisters through Lay Hands and Emperor's Touch Bolter, and this should never be phased, especially as Lay Hands have ridiculous requirements.

But as Acts of Faith are powerful, they are temporary only, and Sistahs soon revert to their "below average state". For this, they should be supported by Seraphims at Tiers 1 ; so, if they both need to escape, Seraphims deal damages while escaping. Similarily, Seraphims can finish low-health fleeing ennemies far easier than Battle Sisters, even Flamer-wielding ones.

"Heavy Bolter Sisters" are powerful but need to stay immobile. So they still need to be supported by other troops, especially jumping, stunning and teleporting ones. Another "Heavy Bolter squad" or a vehicle for cover, or some melee units thrown in the mix (sneaky Death Cult Assassins !) are fine.

Later on game, Immolators can replace "Flamer Sisters". But Heavy Bolters and Emperor's Touch Bolters on a 10-strong Sisters squad remain the Sororitas' highest ranged damages source. Once again, there is only one rule of thumb : don't mix Flamers and Heavy Bolters in the same squad.

For me, Battle Sisters squad should be used for those purposes :
  • Protect Missionary for him to detect stealth ennemies.
  • Eventually, protect Canoness or Confessor.
  • Early game, be an higher "stand still" ranged sources of damages than Seraphim with Flamers.
  • Since Tiers 2, be "turrets" with Heavy Bolters, with exception of squads led by Missionaries, in order to allow them to detect nearby ennemies.
  • Since Tiers 2 again, crush every ennemy with Missionary's Emperor's Touch Bolter.
Canonness


Canoness is the main heroïn of the Adepta Sororitas. Lorewise, it is a veteran Battle Sister who has risen through the ranks thanks to both her warrior, leadership and tactical skills, and her knoweldge and unwavering faith, in order to be able to handle an entire Convent, running from leading her Sisters in front of battles to oversee the day-to-day activities.

Gamewise, Canoness is, as numerous Sisters of Battle units, a low-to-average hero with a couple trumps cards you have to use wisely to turn balance in your favor. As she can have trouble even with basic ennemies, she can be essentially be resumed as a bigger Sister of Battle, but who favors melee instead ranged damages. A big sis !


Basic informations


Requisition
Power
Time
Requirement
Recruit
200
40
55 s.
Adepta Sororitas Convent (tier 1)

Squad Cap
Initial Squad
Maximum Squad
Limits
Limitations
-
1
1
1

Maximum
Regeneration
Armor type
Health
1500 / 1800 / 2150
1 / 2 / 3
Commander

Maximum
Regeneration
Rally at
Death penalty
Morale
500
12
50
150

Mass
Speed
Sight range
Miscellaneous
25
16
30


..........╠ Canoness : Weapons and DPS

Power Sword


Starting melee weapon. Despite bearing the special trait of having 50% chance to disable the target's movement for 2 s when struck, it lacks real power against Commanders. It is advised to upgrade as soon as you can if you want to deal some real damages.


Bolt Pistol


Starting ranged weapon. Same as Chainsword.


Inferno Pistol


Once a Pristine Sanctuary is bought, a permanent upgrade replaces the Bolt Pistol by the much stronger Inferno Pistol, for 50 Req., 30 Pow. and 30 s.. Later in Tier 2, it also applies to all Superior Veterans and Confessor. It doubles (even tripling against Low Vehicles and Morale) Canny's ranged damages, in addition to have far better accuracy on the move.

However, in terms of shooting still, Force Commander and Chaos Lord's Plasma Pistols and Tau Commander's Plasma Rifle (coming in Tiers 3) are still stronger. Tau Commander's Fusion Blaster (with or without Flamer) and Archon's Splinter Cannon are weaker against Heavy Infantry but better against Heroes. Inferno Pistol is then stronger than other prime commanders ranged weapons.

Thus, Inferno Pistol is rather a mid-rank weapon, but it is designed to, and either the best or the second best commander's ranged weapon in :
  • dealing Morale damage (altough second to Haemonculus' Destructor, which comes in Tier 2) ;
  • accuracy on the move (it is actually the only commander's weapon with a good accuracy on the move if Dark Eldar don't research Soulseeker Ammunition).
Inferno Pistol is also famous for being a good weapon versus Dark Eldar Jetbike rush strategy, as it deals fair damages to light and aerial vehicles.

Inferno Pistol has a special trait : target takes 3 damages every second for 3 s. when it. Constant hits refresh the 3s..


Brasero of Holy Fire


Once a Pristine Sanctuary is bought, a permanent upgrade replaces the Power Sword by this much stronger weapon, for 50 Req., 20 Pow. and 30 s.. Later in Tier 2, it also applies to all Superior Veterans, where it exchange their Chainswords for better Powerswords. If boost is light against Medium Infantry (22%) and Heavy Infantry Normal (12%),it is around 28% VS Commanders, 35% for other infantry and from 4 to 7 times against Vehicles, making it actually viable against them.

In addition, Brazier have following special traits, again triggering with each swing :
  • 25% chance to disable abilities for 3 s. ;
  • 50% chance to disable combat abilities for 4 s. ;
  • 50% chance to disable movement for 2 s. (like with former Power Sword).

Force Commander and Chaplain also have these passives once they purchase Force Weapons. They are the only units to have these passive abilities in the game. But once more, Force Commander and Chaplain are stronger thant Canoness.

On Tier 2, you can buy a similar upgrade, called Master-Crafted Weapons, providing you bought Power Weapons. It has the same cost (50 Req., 20 Pow. and 30 s.) and again applies to all Superior Veterans and Canoness, and also to Confessor, to boost their melee damages. From the previous upgrade, on Canoness (and Confessor), damages are all boosted by 20%, while on Veteran Superiors, damages are doubled.


Avenging Angel's Blade


In late game, Big Sis can be able to summon Avenging Angels. They are equiped with these only weapons.


Weapon Statistics and DPS


Now that Canoness weapons have been briefly explained, let's see thir statistics.

Minimal base damage
Maximal base damage
Accuracy
Accuracy on the move
Refire rate
Range
Morale base damage
Morale DPS
Special Trait
Bolt Pistol
65
80
85%
15%
0.8 s.
25
4
2.1
-
Inferno Pistol
150
167
85%
40%
1 s.
25
15
6.4
Yes
Power Sword
230
260
100%
-
1.5 s.
-
25
8.3
Yes
Brazier of Holy Fire
250/ 300 *
300/ 360 *
100%
-
1.5 s.
-
40
13.3
Yes
Avenging Angel's Blade
100
150
100%
-
1 s.
-
25
12,5
-

(*) : without / with Master-Crafted Weapons.

Missy ranged statistics VS troops are :

Low
Medium
High
Heavy
Elite
Commander
Daemon
Daemon Relic
Bolt Pistol
30.8
30.8
30.8
30.8
23.1
19.3
23.1
11.6
Inferno Pistol
53.9
53.9
53.9
53.9
47.2
33.7
53.9
26.9

Missy ranged statistics VS machines are :

Vehicle Low
Vehicle Medium
Vehicle High
Aircraft
Building Low
Building Medium
Building High
Bolt Pistol
13.9
7.7
4.6
11.6
11.6
6.2
3.1
Inferno Pistol
31
17.5
9.4
26.9
26.9
13.5
6.7

Missy melee statistics VS troops are :

Low
Medium
High
Heavy
Elite
Commander
Daemon
Daemon Relic
Power Sword
30.8
30.8
30.8
30.8
23.1
19.3
23.1
11.6
Brazier of Holy Fire
55
110
110
110
110
73.3
128.3
128.3
Master-Crafted Brazier of Holy Fire
66
132
132
132
132
88
154
154
Avenging Angel's Blade
75
75
75
75
56.3
50
75
50

Missy melee statistics VS machines are :

Vehicle Low
Vehicle Medium
Vehicle High
Aircraft
Building Low
Building Medium
Building High
Power Sword
32.7
24.5
8.2
0.7
32.7
16.3
16.3
Brazier of Holy Fire
137.5
110
64.2
16.7
45.8
27.5
18.3
Master-Crafted Brazier of Holy Fire
165
132
77
16.7
55
33
22
Avenging Angel's Blade
75
56.3
37.5
10
18.8
12.5
10
..........╠ Canoness : Abilities

Faithful unit (passive)


While Miss Canny is alive, she ups the Faith counter by 1.75 points, meaning she generates 0.175 Faith Points per second. She also generates 0.5 Faith Points upon her death once Martyr's Gift is purchased. Interistingly, Canoness is the only unit who both generate and spend Faith.


Join a squad (hotkey : T)


Like Missionary, Big Sis can lead her little sisters, transforming the two into a single more powerful entity. See the Rattachement section for exhaustive details of different possible combos.


Purifying Light (hotkey : D)


This ability is available right from the beginning and remain useful at all stages. It needs only 2 Holy Icons and 30 Faith Points. When cast, all ennemy troopers (from light infantry to commanders) in an area of 25 units (which is coveniently Canoness' range with either pistol) become "blinded" for 20 seconds, indicated by weak sparkles glowing from ennemies. They then suffer these nerfs :
  • Accuracy decreased by 60% (then they keep only 40% of their original accuracy).
  • Sight range and detection range (but NOT attack range) decresead by 90% (then, keep only 10% of original ranges).

Theorically, this spell more than halves damages through accuracy nerf. Basing on a basic Space Marine, and according to DPS formula :
Average damage * Armor rating * Accuracy / Reload
  • DPS without taking ennemy armor in account is (14.1+17.2)/2*1*60%/0.5=18.78 (1 stands for armor piercing, unknown at this point).
  • Against Heavy Infantry, DPS is 11.3. Then, to obtain Heavy Infantry armor piercing value, divide 11.3/18.78=0.6.
  • So complete formula is (14.1+17.2)/2*0.6*60%/0.5=11.2
  • Purifying Light decreases accuracy to 40% of its original value. Then accuracy becomes 60*40%=24%.
  • Then finally, a blinded Space Marine deals (14.1+17.2)/2*0.6*24%/0.5=4.5 DPS.

Add to this that if you are lucky, most of ennemy's attacks will miss and then don't hurt at all. So, you can use it in whatever situation. Keep in mind that it decreases accuracy of normal attacks, not the damages of skills. In addition, area of effect is limited to Canny's ranged attack range. Positioning is then very important, especially considering Canny is fragile, and this skill won't make her survive if she's not rattached to a squad.

The vision denying effect is far harder to pull, because ennemies outside range won't be blinded, and their own sight range will be used by blind ones. For example, blind a group ; ennemies at 26 range or more will be unaffected, and ennemies at 25 range, while blind, will benefit from the untouched ennemies sight range. In a reverse fashion, Canny can blind every shooters around and fight a commander in melee ; this commander will grant the vision of the Canoness to all blinded shooters.

On Tier 2, you can load Canoness in a Rhino and then carry her right into the target (and even demoralize ennemies with Laud Hailer), unload, blind, load again then go away and shoot blinded ennemies from afar.

In addition, this skill can greatly help to use Death-Cult Assassins, as it shrinks the detection range ; the ennemies won't either be able to spot their shadowy forms when they approach.

This excellent skill has sadly a cooldown of 3 minutes, so use it wisely. Canny can overcome a Force Commander with this... but the following Force Commander will only take 57 s. to hit the field.


Ascension (hotkey : C)


The ultimate Act of Faith. Available at Holy Reliquary, at Tier 3, for 100 Req., 100 Pow. and 30 s.. It needs the full set of 5 Holy Icons and 85 Faith Points. When cast, 5 Avenging Angels appear around Canny. They are invulnerable powerful melee-only independant units (and not a single squad) who last 30 s.. They have also 20 Move Speed, 25 Sight Radius and 25 Detection Radius. They deal these DPS :
Heavy High Infantry and Vehicle Medium
Commander and Daemon High
Vehicle High
Building Low
Building Medium
Aircraft and Building High
All the rest
An angel
56.3
50
37.5
18.8
12.5
10
75
All 5 angels
281.5
250
187.5
94
62.5
50
375

Avenging Angels are among the best (but not the best) melee infantry of the game. They just tear anything, from infantry to ultimate units, being individually even more powerful than upgraded Assault Terminators, Possesseds, Nobz, Pariahs and Repentias. They still deal less damages than Ogryns led by a Priest or Warp Beasts (except against Vehicles). Or than Seer Council, Mega Armored Nobz and Kroot Hounds, except VS Low Infantry, Commanders and Vehicles. Their only weak points are Aircrafts and Buildings.

By themselves, if they fight 25 s. over their 30 s. of existence, they deal 4.687 DPS to ultimate vehicles, destroying Killa Kans (3k HP), taking away almost half of Land Raiders, Baneblades and Restored Monoliths (10k HP), and more for Dais of Destruction which has less health (7k HP), and 6.250 DPS to both Commanders and ultimate daemons, killing any Commander (except Necron Lord in either Essence form which grants him invincibility), Daemon Prince and Living Saint (6k HP) and taking about half Bloodthirster's life (14k HP), a third of Avatar of Khaine's one (15k HP), and finally more than half of Squiggoth's (11k HP) and Greater Knarloc's ones (10.800 HP).

As an ultimate spell, it has a ultimate cooldown of 180 seconds. I then advise to use it when you are sure you face an valuable target (possibly a relic) who can't counter Angels, like Tau Commander's slowing trap, or Necron Lord's blinding light.


Other upgrades


This is all upgrades not described in previous sections that apply to Miss Canny. Generally, they also apply to a lot of other units. The benefits can also be different from an unit to another, so check the buildings sections if you want a more detailed description of each upgrade. For short :

Blessed Ammunition
Bolt Pistol pierce through a part of the damage reduction granted by landscape cover. Useless to Canoness, who is meant to use Inferno Pistol...
Commander Veteran / Hero Upgrade
Boosts Big Sis' health by 20% each time (to a total of 44%) : from 1500 to 1800 (+300), and 1800 to 2150 (+350 ; +650 from base HP). Also boost HP Regeneration by 1 point each. Available at Holy Reliquary for 100 Req., 45s. and :
  • For "Veteran" : 25 Pow..
  • For "Hero" : 100 Pow., Tier 3 and "Veteran" upgrade.
Also applies to Confessor.
..........╠ Canonness : DPS on Commanders focus


Data

Here is a Commanders' DPS comparison against each other.

State
Ranged Health Damage
Ranged Morale Damage
Range
Melee Health Damage
Melee Morale Damage
Health
Morale
Canoness
Base
19.3
2.1
25
57.2
8.3
1500
500
Maxed
33.7
6.4
-
88
13.3
2150
-
Confessor
Base
21.4
2.1
25
65.2
13.3
1200
Unlimited
Max
47.9
4.3
-
29.9
13.3
2675
-
Force Commander
Base
21.9
2.1
25
61.1
8.3
1875
700
Max
42.6
4
-
122.5
13.3
2675
-
Librarian
Base
14.9
2.1
25
26.4
25
1400
600
Max
28.2
3.3
-
48.3
-
2000
-
Chaplain
Base
28.1
2.1
25
59.4
-
1200
700
Max
37.5
4
-
94.1
13.3
1700
-
Chaos Lord
Base
22.3
2.1
25
65.5
30
1630
450
Max
46.9
3.3
25
90.3
30
2430
-
Chaos Sorcerer
Base
4.3
2.1
25
16.7
22.5
1000
400
Max
32.6
3.3
-
23
-
1600
-
Farseer
Base
7
0.4
25
54.3
37.5
1310
500
Max
-
-
-
75
-
2010
-
Seer Council
Base
2.1
0.4
35
18.1
2
600
1200
Max
18.9
3.6
-
162.9
18
5400
-
Big Mek
Base
46.1
0.7
25
155.7
31.3
1310
400
Max
26.9 (!)
4.5
30
214.8
31.3
1910
-
Warboss
Base
120.4
1.9
25
166.4
40
2240
500
Max
149.7
13
-
229.6
-
3040
-
Command Squad
Base
20
2
25
36.5
0
435
450
Max
55.3
4
25
218.2
5
1710
650
Vindicare Assassin
-
137.1
20
45
95.4
5
350
450
Tau Commander
Base
30.8
5.3
40
30.8
5.3
1000
500
Max
162.9
35.8
40
-
-
-
-
Ethereal
Base
0
0
0
15
1.3
950
300
Max
89.6
14
70
31
5.3
3750
-
Necron Lord
Base
20.7
1.1
25
85.9
20.8
1800
400
Max
-
-
-
-
-
4500
-
Archon
Base
13.1
1.5
22
68.8
15
1100
600
Max
80.9
7.8
-
247.8
50.8
3700
-
Haemonculus
Base
17.3
26.
22
23
35
1000
600
Max
22.4
34.1
-
36.5
36.3
1600
-
..........╠ Canonness : DPS on Heavy Infantry Normal focus
Here is a comparison of ranged DPS against Heavy Infantry Medium.

State
Ranged Health Damage
Ranged Morale Damage
Range
Melee Health Damage
Melee Morale Damage
Health
Morale
Canoness
Base
30.8
2.1
25
98
8.3
1500
500
Maxed
53.9
6.4
-
132
13.3
2150
-
Confessor
Base
34.2
2.1
25
97.8
13.3
1200
Unlimited
Max
47.9
4.3
-
117.3
13.3
2675
-
Force Commander
Base
45.6
2.1
25
103.8
8.3
1875
700
Max
69.8
4
25
183.9
13.3
2675
-
Librarian
Base
31.1
2.1
25
62.7
25
1400
600
Max
72
3.3
-
112.6
-
2000
-
Chaplain
Base
58.4
2.1
25
89.2
-
1200
700
Max
61.6
4
-
141.5
13.3
1700
-
Chaos Lord
Base
46.4
2.1
25
155.2
30
1630
450
Max
62.5
3.3
25
214.2
30
2430
-
Chaos Sorcerer
Base
7.2
2.1
25
99.8
22.5
1000
400
Max
56.1
3.3
-
137.8
-
1600
-
Farseer
Base
7.3
0.4
25
56.5
37.5
1310
500
Max
-
-
-
77.9
37.5
2010
-
Seer Council
Base
4.3
0.4
35
83
2
600
1200
Max
38.7
3.6
-
747
18
5400
-
Big Mek
Base
46.1
0.7
25
155.7
31.3
1310
400
Max
26.9 (!)
4.5
30
214.8
31.3
1910
-
Warboss
Base
120.4
1.9
25
166.4
40
2240
500
Max
149.7
13
-
229.6
-
3040
-
Command Squad
Base
20
2
25
36.5
0
435
450
Max
55.3
4
25
218.2
5
1710
650
Vindicare Assassin
-
137.1
20
45
95.4
5
350
450
Tau Commander
Base
30.8
5.3
40
30.8
5.3
1000
500
Max
162.9
35.8
40
-
-
-
-
Ethereal
Base
0
0
0
15
1.3
950
300
Max
89.6
14
70
31
5.3
3750
-
Necron Lord
Base
20.7
1.1
25
85.9
20.8
1800
400
Max
-
-
-
-
-
4500
-
Archon
Base
13.1
1.5
22
68.8
15
1100
600
Max
80.9
7.8
-
247.8
50.8
3700
-
Haemonculus
Base
17.3
26.
22
23
35
1000
600
Max
22.4
34.1
-
36.5
36.3
1600
-
..........╠ Canoness : Leading a squad
As said before, and like Missionary, the Canoness can join the same squads : a Battle Sisters Squad, a Celestians Squad and a Repentias Squad.

Whatever squad Big Sis joins, it gets 200 additional Morale Points, and 2 Morale Points Regeneration per second. And that's (not) nearly all... Tainted love !!! Canoness doesn't grant Morale immunity like Confessor or stealth detection him or Missionary.

Aditionally, her Acts of Faith don't benefit to the squad, unlike Missionary. Purifying Light radiates from her, and decreases nearby opponents' accuracy, reducing their damages (and seriously shrinking detector's ranges), so it doesn't need her to be rattached to the squad to be used. Ascension summons temporary invincible melee units, which doesn't need to be rattached to a squad either.

However, having a meat shield is ALWAYS better than nothing. Unless you have no choice and let Canoness tank ennemy while the squad behind shoots the ennemy. In addition, as Purifying Light and Ascension are both "contact" or short-ranged skills, having a meat shield to protect the Canoness while running to the heart of the battle is FAR better than letting the heroin running alone (and getting shot to death).

In addition to the meat shield, each one of the 3 squads can bring different boosts to Canoness.


Joining Battle Sisters


Note this topic has been aborded in BSS chapter.

Adepta Sororitas' prime heroin gives a Morale and Morale regeneration boost. More precisely, Canoness alone has 500 Morale Points, and BSS has 300 Morale Points. When the two are paired, the obtained squad has 500 Morale Points. Indeed, without any Morale boost or upgrade. In addition, squad regenerates 2 Morale Points per second, going from 10 to 12, further boosting their Morale resistance.

It is of course better than nothing, but it is nothing the 3 Space Marines' heroes, Farseer, Big Mek and Warboss don't have. Chaos Lord even has a whooping +12 Morale Regeneration, meaning his squad quickly recovers Morale. Other attachable heroes (Apothecary, Mad Dok, Haemonculus) doesn't bring Morale bonuses, and Confessor grants Morale immunity (see below). Once a gain, Sisters get this "good thing, but others have it too, and sometimes better".

Following Celestians and Repentias are better for that, but if you are in Tier 1, BSS are the only joinable squads. If you pair Canoness with BSS for melee duty, i suggest to buy Flamers for the squad, as they can be fired while charging ennemy... and then the ennemy will be easier to break.

In addition to this meatshield job, BSS can also provide an useful boost to Canoness in Tier 2. While Veteran Superior is alive, Canoness benefits from Leadership's passive. So, melee damages and ranged damages are boosted by 30%.

Sometimes, just keeping Canoness alone is also a good idea. You don't necessarily want to send your Flamers BSS in melee combat with Canoness, but rather keeping them firing whil Canoness is at close combat.


Joining Celestians


Canoness-Celestians combo is pretty decent for melee combat. Celestians are half good at close range due to their armor, damages, and health boost if Imagifer is alive.

Adepta Sororitas' prime heroin gives a Morale and Morale regeneration boost. More precisely, Canoness alone has 500 Morale Points, and Celestians have 400 Morale Points. When the two are paired, the obtained squad has 600 Morale Points. Indeed, without any Morale boost or upgrade. In addition, squad regenerates 2 Morale Points per second, going from 14 to 16, further boosting their Morale resistance.

Obviously, you aren't forced to buy Melta weapons to these Celestians, as the main goal of this team is to handle melee duty VS infantry. If Celestians die quickly, you may not want to invest into soon to be lost weapons. Then again, having a squad proefficient both against vehicles and against infantry is tempting.

Like with BSS, Celestians can also provide an useful boost to Canoness. While Veteran Superior is alive, Canoness benefits from Leadership's passive. So, melee damages and ranged damages are boosted by 30%.

In addition, while Imagifer is alive, all squad gets 23% more Health... including Canoness ! Collectively, it makes a better defense than a full BSS. And individually, this combo is the one which makes Canoness the most resilient. Note a visual bug can occur, showing Canoness with a depleted health gauge, while she has actually plenty (even full) health.

While the smallest squad out of the three, the Celestians' stats, the 30% damages boost and the 23% health boost makes the Canoness + Celestians squad a valuable one.


Joining Repentias


Pairing best melee heroin with best melee squad... enough said !

Adepta Sororitas' prime heroin gives a Morale and Morale regeneration boost. More precisely, Canoness alone has 500 Morale Points, and Repentias have 650 Morale Points. When the two are paired, the obtained squad has 850 Morale Points. Indeed, without any Morale boost or upgrade. In addition, squad regenerates 2 Morale Points per second, going from 10 to 12, further boosting their Morale resistance.

Repentias don't have Leadership passive, nor Imagifer. Then the squad gives nothing special to the Canoness. The exception is when Righteous Fervor is toggled ; Canoness will have her speed boosted by 30% and her damages by 50%, but will lose 8 HP/s., along the squad.
However, you'll have the most powerful melee squad Adepta Sororitas can offer.

As appealing as it sounds, don't forget Canoness can have a 30% damages boost with other squads without losing HP. But this 30% damages boost is indeed lower than the 50% one, and is lost if Veteran Superior is dead, while there is no condition with Repentias.

All in all, Repentias + Canoness squad is the best melee squad the faction has to offer. Not nearly as powerful as ennemy melee squads and/or heroes, but Purifying Light DOES give the edge. What you are supposed to do on cooldown is another story...
..........╚ Canoness : Conclusion (WIP)
Canoness can be recruited as soon as Convent is built. She is a balanced hero, with average ranged damages, average melee damages and average health.

In a duel, assuming no one use his skills, Canoness is only better both at melee and at range than Imperial Guard's Commander and Archon. She's better at range than Farseer, and has slightly higher damages than her at melee, but Farseer has so much melee morale damages that she'll break Canoness' morale pretty quickly. She's also better than Necron Lord at range, but is on par at melee with Necron Lord, due to her higher damages and his higher health and morale damage. She destroys Tau Commander at melee, and win in a gunfight with him if he's unupgraded due to her higher health ; however, he has far better range than her. Finally, she is beaten both at melee and at range by Force Commander, Chaos Lord and Big Mek.

On a side note, when Miss Canny strikes an ennemy with melee attack, she had a permanent 50% chances to disable his movement for 2 seconds. Note that Force Commander and Chaplain also have this passive, while Chaos Lord has 100% chances to halves movement speed for 4 seconds, and Archon gains 30% chances of disabling ennemy's movement for 3 seconds on strike when Agonizer is purchased.

Of course, war is not a duel, as you nor the ennemy will employ only heroes. However, her balanced nature makes, once again with Sisters of Battle, proper use of Canoness pretty hard. Using her as ranged unit is mandatory to keep her alive, and melee combat should be used only on range-based or broken ennemies. Finally, her only statistics doesn't justify her (unlike Force Commander for example), and she definitely must be used with her enhancements and spells and some support.

You'll have to use all her averages possibilities to max out her utility. Melee / tank job until Celestians are on the field and/or support shooters with Inferno Pistol, reduce blob damages with Purifying Light, and summon best temporary melee units endgame.

Early game, Miss Canny is the only decent tank Sisters have. Even more if you can use Purifying Light. But it needs Seraphims, since Canoness only doesn't generate enough Faith (or you'll have to wait a while). Sadly, before Celestians, Battle Sisters are incompetent at melee. They can just serve as meat shield. You have then several choices :
  • Join a BSS squad and go melee. Your Battle Sisters will do virtually nothing, but serve as meat shield, so Canoness will take less damages.
  • Go melee alone, supported by a BSS squad, preferably with Flamers. Canoness will probably takes heavy damages, as the martyr she wants to become. But the BSS damages will be far better.
  • Join a BSS squad and stay at range. Then you'll have a pretty shooting squad (especially with Inferno Pistol and Flamers), but won't be able to dance if you haven't another sauad.
  • Go ranged alone, supported again by a Flamer BSS Squad. You can then dance your units should you have to, but Big Sis is likely to be prioritized by the ennemy.

A popular (mandatory ?) choice is to buy Inferno Pistol as soon as you have the Canoness in Tier 1.5, and use her more as a ranged than as a melee hero.

A REPRENDRE
Seraphims

Seraphims are soaring angels of death, using wing-shaped jetpacks to fly across the battlefield either to support their fellow sisters or for raining bullet from their dual Bolt Pistols.

As humans don't understand angels, one can have hard time to understand how Seraphims work. They look like other assault infantry, ie. Assault Marines, Chaos Raptors and Stormboyz. However, they only share move speed and jump ability with them. Seraphims are actually weak at close combat. Problem is, they don't deal very high ranged damages either, altough they do slightly more damages than Battle Sisters, due to having better accuracy.

The truth is, Seraphims are excellent, and perhaps the best units in the game, at kiting the ennemy, due to two particularities : they lose few accuracy while moving, allowing them to deal almost their full damage, and they are able to fire in ALL directions even when backing ! In simple words, they are able to run from an ennemy while dealing him almost 75% of their standard damagesn while the ennemy, on most cases, deal 15% of his damages to Seraphims ! So, they excel at chasing and finishing escaping ennemies, as well as dealing with melee ennemies against who they only have to run from them while crippling them. Note that Battle Sisters with Flamers are able to deal same damage with AoE and increased morale damage while chasing ennemies, but they can't fire when fleeing.

The more the game progresses, the more Seraphims lose firepower usefullness, though they retain several support abilities.


Basic informations


Requisition
Power
Time
Requirement
Recruit
200
20
28 s.
  • Adepta Sororitas Convent (tier 1)
  • Pristine Sanctuary (tier 1)
Reinforce
50
5
11 / 9.68 / 8.52 / 7.5 s.
  • Nothing for Seraphims
  • Pristine Sanctuary for Veteran Superior

Squad Cap
Initial Squad
Maximum Squad
Limits
Limitations
3
4
8
None

Maximum
Regeneration
Armor type
Health
350 / 438
1
Heavy Infantry Medium

Maximum
Regeneration
Rally at
Death penalty
Morale
450 / 550 / 650
10
50
20

Mass
Speed
Sight range
Miscellaneous
18
24
25


Reinforce


Each squad starts with 4 sisters. Each additional sister costs 50 Req., 5 Pow. and 11 s.. This means there is no cost difference between building 2 squads or reinforcing a squad up to 8 sisters ; however, building a squad is faster than reinforcing 4 angels. Each squad can have a maximum of 8 Seraphims, for a total cost of 400 Req., 40 Pow. and 1m12. This doesn't count special weapons nor Veteran Superior.

Like Battle Sisters Squad, you can then have for the same cost, you can then build 2 basic squads or 1 full members squad, leading in both case to 8 Seraphims. So, for same cost, you get the same firepower, but having two distinct squad brings more mobility. But unlike BSS, building a Seraphim Squad takes 28 s. while reinforcing 4 Seraphims take 44 s.. So you have to make a choice : mobility or quickness to field.

Later in game, with Field Logistics upgrades, reinforce times are lowered to 9.68 s., 8.52 s. and 7.5 s., meaning reinforcing 4 Seraphims will eventually take 30 s., so will be comparable to building a new squad.

Then building 2 base squads is alway preferable to reinforce a squad to full strenght... except a single squad takes a hefty 3 Squad Pop, so fielding 2 squads takes 6 Squad Pop ! Your call.


Seraphim Veteran Superior


Once Tier 2 is hit, the squad can spawn a Veteran Superior in its ranks, for 70 Req., 15 Pow. and 15 s.. She has 500 HP (625 HP with Blessed Armor), recovers 1 HP/s., and dons same armor type, move speed, mass and sight than regular Seraphims.

Basically, she's much like BSS Veteran Superior, with better stats and Seraphims exceptionnal moving capacities.

So once again, she wields better weapons than her soldiers, the very same that of BSS Veteran Superior. So again standard Bolt Pistol won't be covered here (but their stats are described in Weapons sections).

  • For Chainsword :
    • From 24.5 to 29.4 DPS between Infantry Medium and Heavy Infantry High.
    • 12.3 DPS VS Commanders.
    • 19.6 DPS VS turrets.
  • For Power Sword :
    • From 37 to 44.4 DPS between Infantry Medium and Heavy Infantry High.
    • 18.5 DPS VS Commanders.
    • 22.2 DPS VS turrets.
  • For Master-Crafted Power Sword :
    • From 74 to 88.8 DPS between Infantry Medium and Heavy Infantry High.
    • 37 DPS VS Commanders.
    • 44.4 DPS VS turrets.
  • For Inferno Pistol :
    • 13.3 DPS VS Heroes.
    • 18.6 DPS VS Heavy High ; you will be able to encounter some in Tier 2.
    • 21.2 VS all other Infantry.
    • 12.2 DPS VS Turrets.
    • A nice 11.7 DPS VS Low Vehicles (Land Speeders, Eldar Grav Platforms, Sentinels, stealth Devilfishes, Drones and Reaver Jetbikes).

Like for BSS once again, the Seraphim Veteran Superior is an uxpected melee specialist in a ranged squad. But unlike Battle Sistahs, Seraphims can't be joined by a hero, and they can retreat far more easily. So the melee muscle she provides is useful if you ram into ranged ennemies : primarily for preventing them to use their powerful ranged sqaud, but ultimately to slash them hard. Once again of course, run away from melee specialists.

In another hand, the Inferno Pistol is deadly on Seraphim Veteran Superior's hand. The damages are a third higher than on BSS, and mostly, it can be fired even while kiting ennemies, with good accuracy, which is a unique Seraphims trait ! Dealing good damages while running away from ennemy is pretty awesome.

Again, Seraphim Veteran Superior comes with the hidden Leadership passive, which boosts, while she's alive, all the damages outputs from the squad by 30%. And once more, statistics for Veteran Superior's weapons already take this bonus into account.

Like for BSS, the Seraphim Veteran Superior's third gift is a 100 Morale points boost while she's alive.

Finally, this leader is as faithful as her comrade leader and her Seraphims troopers. While she's alive, she boosts the Faith gauge by 0.35 points (meaning she gives 0.035 points per s.), which is more than regular Seraphims, but less than BSS Veteran Superior. Probably due to a glitch, she doesn't benefit from Martyr's Gift upgrade, and then grants no faith upon her death.

For these 4 reasons, Veteran Superior should always be the first thing to replace should you lose her.
..........╠ Seraphim : Weapons
Seraphims can't upgrade their weapons, except their Veteran Superior, whose weapons are exactly the same as those of BSS Veteran Superior (altough with slightly different statistics). Then, the squad ends up using a total of 6 weapons (7 if you count the Master-Crafted Weapons upgrade).


Knives

Even more pathethic than with BSS, as Seraphim's knives deal exactly same damages, but lower Morale damages. In another hand, Seraphims are better suited to close the ennemy... but less suited to survive, as Seraphims can't be healed by a Missionary.


Dual Bolt Pistols

This is why the Seraphims are a unique squad. While dealing just a little more DPS than BSS Bolter, these battle angels (Alita <3) are able to fire in all directions, even when retreating, with a godly accuracy of 70%. It is the same accuracy on the move than Flamers' one... but Flamers can only be used on the move if BSS run towards ennemy, while Seraphims can fire their Dual Bolt Pistols while running towards, sidewards and even while running away from ennemy. This is, coupled with move speed, what makes Seraphim the anti-melee squad by excellence.

Of course, raw power is rather weak, but it quickly adds up. So you better don't use Seraphims on still ranged squads, but on moving squads (either ranged or indeed melee).


Chainsword

Veteran Superior, which can be bought at Tier 2 for 70 Req., 15 Pow. and 15 s., carries this roaring sword if Power Sword upgrade hasn't been bought yet. It is a little bit more powerful than BSS Veteran Superior's one.


Bolt Pistol

Veteran Superior carries this gun if Inferno Pistol upgrade hasn't been bought yet.


Inferno Pistol

Once a Pristine Sanctuary is bought, this permanent upgrade replaces the Bolt Pistol by the much stronger Inferno Pistol, for 50 Req., 30 Pow. and 30 s.. It applies to all Superior Veterans and heroes, and is available at Tier 1 (where it applies to Canoness). You can then buy this upgrade before having Veteran Superior.

Inferno Pistol has a special trait : target takes 3 damages every second for 3 s. when it. Constant hits refresh the 3s..


Power Sword (and Master-Crafted Power Sword)

Once a Pristine Sanctuary is bought, a permanent upgrade replaces the Chainsword by the much stronger Power Sword, for 50 Req., 20 Pow. and 30 s.. It applies to all Superior Veterans and Canoness, and is available at Tier 1 (where it applies to Canoness, actually transforming her starting Power Sword into Brasero of Holy Fire). You can then buy this upgrade before having Veteran Superior.

On Tier 2, you can buy a similar upgrade, called Master-Crafted Weapons, providing you bought Power Weapons. It has the same cost (50 Req., 20 Pow. and 30 s.) and again applies to all Superior Veterans and Canoness, and also to Confessor, to boost their melee damages. On Veteran Superiors, damages are doubled (and on heroes, damages are boosted by 20%).


Leadership

This one isn't a weapon, but a cool bonus. While the Veteran Superior is alive, all damages from whatever weapons are 30% stronger. Without any cost or research. Veteran's weapons and charts always factor in this bonus, needless to say (this is why, for example, there is not a "Chainsword with Leadership" in further charts).


Psyocculum

Available at Pristine Sanctuary at Tier 3 for 50 Req., 20 Pow. and 30 s.. It boost standard Seraphims' Dual Bolt Pistols by 50%.


Weapon Statistics

Now that BSS weapons have been briefly explained, let's see thir statistics.

Minimal base damage
Maximal base damage
Accuracy
Accuracy on the move
Refire rate
Range
Morale base damage
Morale DPS
Special Trait
Dual Bolt Pistols
15 / 19.5 / 22.5 / 29.3 *
20 / 26 / 30 / 39 *
85%
70%
0.8 s.
19
4
2.1
-
Knife
15 / 19,5 **
20 / 26 **
65%
-
1 s.
-
2,5
0,8
-
Veteran Superior's Bolt Pistol
19.5
26
85%
70%
0.8 s.
19
4
2,1
-
Inferno Pistol
57.2
67.6
85%
70%
1 s.
20
7
3
Yes
Chainsword
66.3
84.5
65%
-
1 s.
-
12
3,9
-
Power Sword
100.1/ 200.2 ***
200.2 / 254.8 ***
65%
-
1 s.
-
25
8,1
-

Asterisks means :
* : Base values / with Leadership / with Psyocculum / with both.
** : Base values / with Leadership.
*** : Base values / with Master-Crafted Weapons.
..........╠ Seraphims : DPS
Seraphims ranged statistics VS troops are :

Low
Medium
High
Heavy
Elite
Commander
Daemon
Daemon Relic
Dual Bolt Pistols
7.4
7.4
7.4
7.4
5.6
4.6
5.6
2.8
Dual Bolt Pistols with Leadership
9.6
9.6
9.6
9.6
7.3
6
7.3
3.6
Dual Bolt Pistols with Psyocculum
11.1
11.1
11.1
11.1
8.4
6.9
8.4
4.2
Dual Bolt Pistols with both
14.4
14.4
14.4
14.4
11
9
11
5.4
Veteran Superior Bolt Pistol
16.3
16.3
16.3
16.3
12.2
10.2
12.2
6.1
Inferno Pistol
21.2
21.2
21.2
21.2
18.6
13.3
21.2
10.6

The Seraphims speciality : ranged damages VS troops while moving.

Low
Medium
High
Heavy
Elite
Commander
Daemon
Daemon Relic
Dual Bolt Pistols
6.1
6.1
6.1
6.1
4.5
3.8
4.5
2.3
Dual Bolt Pistols with Leadership
7.9
7.9
7.9
7.9
5.9
4.9
5.9
2.9
Dual Bolt Pistols with Psyocculum
9.1
9.1
9.1
9.1
6.8
5.7
6.8
3.4
Dual Bolt Pistols with both
11.9
11.9
11.9
11.9
8.9
7.4
8.9
4.4
Veteran Superior Bolt Pistol
13.3
13.3
13.3
13.3
9.9
8.3
9.9
4.9
Inferno Pistol
17.4
17.4
17.4
17.4
15.2
10.9
17.4
8.7

Melee Seraphims DPS VS troops are :

Low
Medium
High
Heavy
Elite
Commander
Daemon
Daemon Relic
Knife
5.1
6.8
5.7
6.3
5.7
2.8
5.7
1.6
Knife with Leadership
6.6
8.8
7.4
8.2
7.4
3.6
7.4
1.6
Chainsword
22.1
29.4
24.5
27
24.5
12.3
12.2
6.1
Power Sword
33.3
44.4
37
40.7
37
18.5
25.9
9.8
Master-Crafted Power Sword
66.6
88.8
74
81.4
74
37
51.8
9.8

Seraphims ranged statistics VS machines are :

Vehicle Low
Vehicle Medium
Vehicle High
Aircraft
Building Low
Building Medium
Building High
Dual Bolt Pistols
2.8
2.7
2.7
2.8
5.8
2.8
2.7
Dual Bolt Pistols with Leadership
3.6
2.7
2.7
3.6
7.5
3.6
2.7
Dual Bolt Pistols with Psyocculum
4.2
2.7
2.7
4.2
8.7
4.2
2.7
Dual Bolt Pistols with both
5.4
2.7
2.7
5.4
11.3
5.4
2.7
Veteran Superior Bolt Pistol
6.1
3.5
3.5
6.1
11.4
5.7
3.5
Inferno Pistol
11.7
6.9
3.2
10.6
12.2
5.8
2.1

Seraphims melee statistics VS machines are :

Vehicle Low
Vehicle Medium
Vehicle High
Aircraft
Building Low
Building Medium
Building High
Knife
1.6
1.6
1.6
1.6
2.3
1.6
1.6
Knife with Leadership
1.6
1.6
1.6
1.6
3
1.6
1.6
Chainsword
2.5
2.5
0.7
0.7
19.6
4.9
0.7
Power Sword
25.9
18.5
9.8
9.8
22.2
9.8
9.8
Master-Crafted Power Sword
51.8
37
9.8
9.8
44.4
9.8
9.8

..........╠ Seraphims : VS builders, Listening Posts and Plasma Generators (WIP)
For 200 / 20 / 28, you have a squad which deals 29.6 DPS VS all infantry except Elite (22.4) and Commanders (18.4), and 24.4 DPS (or 18 or 15.2) VS same targets while moving. Against LP and PG, it deals 11.2 DPS. In every case, Seraphims cause more damages at range than at melee. They also earns 0.1 FP/s.. For same cost but more time (44 / 38 / 34 / 30 s., depending of Field Logistics upgrades), squad has double members power and faith.

Seraphims are always underpowered especially at Tier 1.5, so they have to be used cleverly, in hits and run tactics, making usage of their move speed, their jump and their accuracy on the move. Such tactics are :
  • Kite melee ennemies or running ranged ennemies.
    • Remember ennemies deal low ranged damages when they shoot while moving, except Eldars with Fleet of Foot. Seraphims are at advantage here.
    • In another hand, if ennemies shoot without moving, they will be stronger than Seraphims. You must avoid this.
    • A very good micro is required to keep ennemies running towards you while you are still, and quickly running away but still in range to shoot them, without ennemy stopping and shooting.
    • Remember : if damages on the move are high compared to rest of units and squads, they are still low in absolute value. Don't rely on this as main attack.
  • Tie up ranged ennemies to prevent them to shoot, to allow YOUR gunners to take advantage.
    • Remember Seraphims are NOT melee units, then they'll deal low damages, hardly killing any ennemy. They are even beaten by gunners who are good at melee, like Space Marines. This is why you NEED to have shooters around.
  • Chase and kill low HP fleeing ennemies.
  • Chase and kill builders.
    • Their health range from 100 (single Gretchin) to 675 (Builder Scarabs trio).
    • It takes then 28 s. at maximum to kill a running away Builder Scarabs trio with 4 Seraphims.
    • Or 9 s. to kill a Gretchin quintet without moving with 8 Seraphims.
    • Gretchins and Builder Scarabs' reinforce time are 25s. and 40 s..
    • A builder costs approximatively 75 / 0 / 10. ; a single Seraphim costs 50 / 5 / 11. Think about it if you are about to lose a Seraphim due to ennemy fire. Sacrifice or jump away.
  • Reach and destroy LP or PG.
    • Their health range from 100 (single Gretchin) to 675 (Builder Scarabs trio).
    • It takes then 28 s. at maximum to kill a running away Builder Scarabs trio with 4 Seraphims.
    • Or 9 s. to kill a Gretchin quintet without moving with 8 Seraphims.
    • Gretchins and Builder Scarabs' reinforce time are 25s. and 40 s..
    • A builder costs approximatively 75 / 0 / 10. ; a single Seraphim costs 50 / 5 / 11. Think about it if you are about to lose a Seraphim due to ennemy fire. Sacrifice or jump away.

The following table sums up how many time it takes to destroy resources building at Tier 1.5 with a starting squad of 4 Seraphims. Halves times if you have full squad.

Listening Post HP
Time to destroy with 4 Seraphims
Plasma Generator
Time to destroy with 4 Seraphims
Space Marines
2.812
251
1.500
134
Chaos
2.812
251
1.900
170
Eldar
2.250
201
1.200
107
Orks
1.125
101
750
67
Imperial Guard
2.500
223
1.500
134
Tau
2.000
179
1.400
125
Necron
2.000
179
1.600
143
Dark Eldar
2.250
201
1.200
107
Sisters of Battle
2.800
250
1.500
134

11.2
..........╠ Seraphims : Abilities

Faithful units (passive)


For each Seraphim alive, the Faith counter is upped by 0.25 points, meaning she generates 0.025 Faith Points per second. Each also generates 1 Faith Point upon her death once Martyr's Gift is purchased (at Holy Reliquary on Tier 2, for 75 Req., 75 Pow. and 25 s.).

For Seraphim Veteran Superior, gauge is upped by 0.35 points, meaning 0.035 Faith Points per second. Oddly enough, Martyr's gift doesn't give Faith upon her death.

Then, a full squad with Veteran Superior generates 0.235 Faith Points per second.


Jump (hotkey : J)


Like all assault units, Seraphims can jump over impassable terrain. They start with and can store a total of 2 jumps. A jump needs 45 s. to recover.


Angelic Visage (hotkey : G)


Available at Tier 2, without any research nor condition. When cast, Seraphims an nearby units (range 25) get the following effects for 24 s., with 2 minutes cooldown (1:36 after effect wears off) :
  • Morale fully restored.
  • Immunity to Morale damages.
  • Maximum damages of all weapons (no abilities) increased by 25%.
  • Gold sparks circle around buffed units to provide a visual indication that they are buffed.

Remember the damages bonus only affects the maximum damages, not the average damages. For example, buffing a Battle Sister with Leadership and Emperor's Touch Bolter change her minimal and maximal damages from 39-52 to 39-65, so the average damages from 45.5 to 52 (while 45.5 + 25% should give 56.8), so about 14%. In addition, it only applies to weapons, so Krak Grenades for example aren't affected (i tried it out).

Then, this ability is best used as a Morale heal and invulnerability than a burst spell. If you want to use it to buff damages, it is advised to use it on your strongest units in order to get a sizeable boost.


Krak Grenades (hotkey : K)


This ability is unlocked once you have bought it at Pristine Sanctuary at Tier 2 for 75 Req., 75 Pow. and 40 s.. With this, a unit tosses a grenade to an ennemy vehicle or building (you can't target trooper nor aircrafts nor ground) within 18 units range (which is a unit less than Dual Bolt Pistols' range) which explode in a radius of 6 units. Cooldown is 2 minutes. Explosion deals :
  • 450-526.5 damages to Low Vehicles and Low Buildings.
  • 600-750 damages to Medium Vehicles, High Vehicles and Medium Buildings.
  • 300-375 damages to High Buildings.

A single Seraphim squad throwing a single grenade won't do much, but several squads with grenades, Veteran Superiors and Inferno Pistols can destroy a vehicle. Of course, it is just a secondary role ; buildings and vehicles destruction are devoted to Celestians (who have access to Krak Grenades too) and Immolators. But if you have fielded some Seraphims in Tiers 1, they'll become better at decapping, being able to quickly destroy remote fortified learning posts, and gain a new role as supporting Celestians and Immolators.

However, as cooldown is 2 miutes, it is advised to use Krak Grenades in the 2 following cases instead of just decapping jobs :
  • Before Celestians are here, help Emperor's Touch Bolters buffed BSS to destroy ennemy vehicles.
  • Once Celestians are here, since Celestians are potent against machines, save Krak Grenades for real threats.


Zealot Charge (passive)


This upgrade is mainly meant for Repentias, but Seraphims benefit from it too. It is researched in Pristine Sanctuary at Tier 3 for 75 Req., 50 Pow. and 20 s.. Once researched, when on Melee Stance or when a Attack Melee order is used, Seraphim will automatically charge the enemy once in range (12 units) in form of a jump, causing 25 damages and TRYING to knock the target down (only 10 force).

This is rather useless for Seraphims, for the following reasons :
[liste]
  • They are better with Dual Bolt Pistols than with Knives (jumping on ennemies should be only to prevent ranged ennemies to use their ranged weapons) ;
  • At Tier 3 Repentias are available for melee combat (and also have this upgrade, with better stats).
  • The disruption force is too low to knock down anybody.

As said just before, Repentias also gain this ability once researched ; being available to Seraphims is just a niche addition.


Other upgrades


This is all upgrades not described in Weapons sections that apply to Seraphims. Generally, they also apply to a lot of other units. The benefits can also be different from an unit to another, so check the buildings sections if you want a more detailed description of each upgrade. For short :
Improved / Enhanced / Elite Field Logistics
Each one of the 3 upgrades, available at Convent without conditions bur 140 Req. and 30 s., reduce the reinforcement time (by a second each).
Blessed Ammunition
Dual Bolt Pistols and Veteran Superior's unupgraded Bolt Pistol pierce through a part of the damage reduction granted by landscape cover. This is good on Seraphims, as they can still benefit from cover and deny this bonus to ennemy. Bought at Pristine Sanctuary for 100 Req., 75 Pow. and 45 s..
Blessed Armor
Boost hitpoints by 25% (going from 350 to 438 for Seraphims, and from 550 to 688 for Veteran Superior). Incredibly useful (mandatory, to be honest), but comes at Tier 2. Bought at Pristine Sanctuary for 100 Req., 50 Pow. and 45 s..
Chaplet Ecclesiasticus
Gives 100 Morale points ; squad has then 550 Morale points instead 450. Purchased at Holy Reliquary (so needs Tier 2) for 125 Req., 50 Pow. and 35 s..
Heart of Worship
Gives another 100 Morale points ; squad has then 650 Morale in the end (750 if Veteran Superior is alive !). Needs Tier 3, a Holy Reliquary to be bought at, a Shrine of the Living Saint and the Chaplet Ecclesiasticus upgrade, and then, 165 Req., 75 Pow. and 35 s..
..........╚ Seraphims : Conclusion
For 200 / 20 / 28, you have a squad which deals 29.6 DPS VS all infantry except Elite (22.4) and Commanders (18.4), and 24.4 DPS (or 18 or 15.2) VS same targets while moving. Against LP and PG, it deals 11.2 DPS. In every case, Seraphims cause more damages at range than at melee. They also earns 0.1 FP/s.. For same cost but more time (44 / 38 / 34 / 30 s., depending of Field Logistics upgrades), squad has double members power and faith.

Seraphims are always underpowered especially at Tier 1.5, so they have to be used cleverly, in hits and run tactics, making usage of their move speed, their jump and their accuracy on the move. Such tactics are :
  • Kite melee ennemies or running ranged ennemies.
    • Remember ennemies deal low ranged damages when they shoot while moving, except Eldars with Fleet of Foot. Seraphims are at advantage here.
    • In another hand, if ennemies shoot without moving, they will be stronger than Seraphims. You must avoid this.
    • A very good micro is required to keep ennemies running towards you while you are still, and quickly running away but still in range to shoot them, without ennemy stopping and shooting.
    • Remember : if damages on the move are high compared to rest of units and squads, they are still low in absolute value. Don't rely on this as main attack.
  • Tie up ranged ennemies to prevent them to shoot, to allow YOUR gunners to take advantage.
    • Remember Seraphims are NOT melee units, then they'll deal low damages, hardly killing any ennemy. They are even beaten by gunners who are good at melee, like Space Marines. This is why you NEED to have shooters around.
  • Chase and kill low HP fleeing ennemies.
  • Chase and kill builders.
    • Their health range from 100 (single Gretchin) to 675 (Builder Scarabs trio).
    • It takes then 28 s. at maximum to kill a running away Builder Scarabs trio with 4 Seraphims.
    • Or 9 s. to kill a Gretchin quintet without moving with 8 Seraphims.
    • Gretchins and Builder Scarabs' reinforce time are 25s. and 40 s..
    • A builder costs approximatively 75 / 0 / 10. ; a single Seraphim costs 50 / 5 / 11. Think about it if you are about to lose a Seraphim due to ennemy fire. Sacrifice or jump away.
  • Reach and destroy LP or PG.
    • Their health range from 100 (single Gretchin) to 675 (Builder Scarabs trio).
    • It takes then 28 s. at maximum to kill a running away Builder Scarabs trio with 4 Seraphims.
    • Or 9 s. to kill a Gretchin quintet without moving with 8 Seraphims.
    • Gretchins and Builder Scarabs' reinforce time are 25s. and 40 s..
    • A builder costs approximatively 75 / 0 / 10. ; a single Seraphim costs 50 / 5 / 11. Think about it if you are about to lose a Seraphim due to ennemy fire. Sacrifice or jump away.

2812 1500
2812 1900
2250 1200
1125 750


---------


This "chasing and kitting" ability is reinforced by their Jump ability (J). They got 2 jumps, allowing them to cross about half a map in a matter of seconds. A single jump needs 45 seconds to recover. Use it either to lock a ranged squad or to fastly cap/decap requisition points.

Speaking about offense and defense, bear in mind a single Seraphim deals more damages than a Bolter Battle Sister, but less than a Flamer Battle Sister, both still and moving, and same apply for full upgraded squads : 7 "Bolter Sisters" and 3 "Flamer Sisters" deals more damages than 8 Seraphims. However, Battle Sisters can't fire backwards, while Seraphims can. However and once again, their ability to both escape and dealing damages at same time give them a serious edge.

However, Seraphims are not all-powerful, and lose against still ranged ennemies, who deal their full damages. Against such ennemies, there is two strategies : engage ennemies on melee, either by jumping on them or not, or run away to lure ennemies into a trap (for example, on still Flamers-wielder Battle Sisters). Some caution should be used to against ennemy Flamers, which have also great accuracy when moving, and Eldar's ability Fleet of Foot, which gives good accuracy on the move.

Another annoyance is Seraphims can't be joined, so if there are stealth ennemies, you have to bring a Missionary (or later, a Confessor or a Death-Cult Assassin), who will be prime targeted if coming alone because all your Seraphims don't let room for a Battle Sisters squad, or who will hinder your Squad Cap by 2 units, needing a Battle Sisters squad to ensure his safety.

For all these reasons, a Seraphim squad won't give you upper hand, but including some of them into a planned strategy is almost always worth. If you do so, i enjoin you to micro-manage them, and to bind a key for each squad ; having 2 or 3 squads moving in different directions (or even one squad moving, and other(s) shooting still) than a single blob will give much more hard time to ennemy.

Seraphims are also fervent, generating a good amount of Faith by their mere presence and their sheer number, easily fuelling Tiers 1 Act of Faiths : Missionary's Lay Hands and Canoness' Blinding Light.


Scaling

Angelic Visage is available as soon as you hit Tiers 2. When used, squad and allied units in vicinity rally, regain all their morale and get morale invulnerability and a 25% damage boost for 24 seconds. Obviously, multiple Angelic Visages don't stack, but the boost is pretty neat for this overall weak faction. However, it has a cooldown of 120 seconds, so use it wisely.

Veteran Superior can lead the squad in Tiers 2, increasing its damages by 30% while she's alive. On her own, she has decent melee damages. Then she can be upgraded with Inferno Pistol for high ranged damages and Power Swords for being effective at melee. But keep in mind that even with the Master Crafted Weapons, Seraphims and their Superior Veteran will lose against dedicated melee units, so this is used mainly to kill ranged ennemies faster when Seraphims jump on them. Veteran Superior with Inferno Pistol is a priority.

Krak Grenades, again in Tiers 2, are useful against both buildings and vehicles. A single Seraphim squad throwing a single grenade won't do much, but several squads with grenades, Veteran Superiors and Inferno Pistols can destroy a vehicle. Of course, it is just a secondary role ; buildings and vehicles destruction are devoted to Celestians and Immolators. But if you have fielded some Seraphims in Tiers 1, they'll become better at decapping, being able to quickly destroy remote fortified learning posts, and gain a new role as supporting Celestians and Immolators, escpecially if Krak Grenades are used under Angelic Visage boost. In some cases, an early Seraphim rush on the base with Krak Grenades can lead to a win in less than 10 minutes. But once again, Krak Grenade has a hefty cooldown of 120 seconds.

Zealot Charge at Tiers 3 gives automatic rush and knockback towards ennemy when Seraphim is in range. You have to purchase this upgrade and then turn Seraphims on Assault Stance to perform it. Note that Repentias also have this ability ; Seraphims are faster, but more fragile.


All in all, Seraphim are a good and fairly versatile unit : cap, decap, chase, finish, anti-melee by kitting, anti-ranged by jumping, fragile fleeeing units-killers, and even boosters. However, they need a Pristine Sanctuary and Energy to be fielded, takes up 3 Population capacity, and are fragile. Once again, they need good planification and careful micromanagement to become the poison which will painfully plague your ennemy. Hard to master, but worth it.

Celestians

Celestians are elite troops among Sisters of Battle. In Soulstorm, they are the braindead answer to vehicles and buildings, but can also provide a fortune meat shield, and so are likely to be core in any army.


Basic informations


Requisition
Power
Time
Requirement
Recruit
180
40
22 s.
  • Adepta Sororitas Convent
  • Ecclesiarchal Cathedral (Tier 2)
Reinforce
55
20
13 / 11.44 / 10.07 / 8.86 s.
  • Nothing for Celestians
  • Ecclesiarchal Cathedral (Tier 2) for Veteran Superior
  • Ecclesiarchal Cathedral (Tier 2) and Holy Reliquary for Imagifer
Squad Cap
Initial Squad
Maximum Squad
Limits
Limitations
3
4
4
None
Maximum
Regeneration
Armor type
Health
430 / 529 / 538 / 651
1
Heavy Infantry High
Maximum
Regeneration
Rally at
Death penalty
Morale
400 / 500
14 / 15
50
20
Mass
Speed
Sight range
Miscellaneous
25
20
30


Reinforce


Each squad starts at full strength with 4 sisters. Each replaced sister costs 45 Req., 10 Pow. and 8 s.. This means it invidually takes only more time to reinforce 4 Celestians (32 s.) than to build a squad (22 s.). Once you buy all Field Logistics upgrades however, reinforcement time is faster than recruit time per sister.


Celestian Veteran Superior


As long as a Tier 2 HQ is up, the squad can spawn a Veteran Superior in its ranks, for 65 Req., 15 Pow. and 25 s.. She has 540 HP (675 HP with Blessed Armor, 664 HP with Imagifer, 830 HP with both), recovers 1 HP/s., and dons same elite armor type, move speed and mass than regular Celestians. Curiously, she has lower sight (25 VS 30).

Basically, she's much like BSS Veteran Superior, with better stats.

So once again, she wields better weapons than her soldiers, the very same that of BSS and Seraphim Veteran Superiors. So again standard Bolter (yep, Celestian Veteran Superior handles a Bolter with a single hand) won't be covered here (but its stats are described in Weapons sections).

  • For Chainsword :
    • From 21.8 to 26.1 DPS between Infantry Medium and Heavy Infantry High.
    • 10.9 DPS VS Commanders.
    • 17.4 DPS VS turrets.
  • For Power Sword :
    • From 32.7 to 39.3 DPS between Infantry Medium and Heavy Infantry High.
    • 16.4 DPS VS Commanders.
    • 19.6 DPS VS turrets.
  • For Master-Crafted Power Sword :
    • From 65.4 to 78.6 DPS between Infantry Medium and Heavy Infantry High.
    • 32.8 DPS VS Commanders.
    • 39.2 DPS VS turrets.
  • For Inferno Pistol :
    • 21.4 DPS VS Heroes.
    • 30 DPS VS Heavy High ; you will be able to encounter some in Tier 2.
    • 34.3 VS all other Infantry.
    • 17.1 DPS VS Turrets.
    • 21.4 DPS VS Medium Vehicles (which is helpful facing vehicles).

Like for BSS and Seraphims, Celestian Veteran Superior is a melee specialist... The catch is, this time, Celestians, especially when healed by a Missionary, can be decent melee squads, as long as they don't face Tier 2 melee specialists (which limits options...). Celestian Veteran Superior is much more like BSS' one than Seraphims' one, due to the fact Seraphims have unparalleled moving and fire on the move capacities.

For the last time, Celestian Veteran Superior comes with the hidden Leadership passive, which boosts, while she's alive, all the damages outputs from the squad by 30%. And once more, statistics for Veteran Superior's weapons already take this bonus into account.

Like for the two others, the Celestian Veteran Superior's third gift is a 100 Morale points boost while she's alive.

Finally, this leader is as faithful as her fellow leaders and her Celestian troopers. While she's alive, she boosts the Faith gauge by 0.35 points (meaning she gives 0.035 points per s.), which is more than regular Celestians, but less than BSS Veteran Superior. Probably due to a glitch, she doesn't benefit from Martyr's Gift upgrade, and then grants no faith upon her death.

Unlike for BSS and Seraphims, Veteran Superior should not necessarily be the first resurrected unit in the squad, as she deals less damages to vehicles than a Melta-carrying Celestian.


Imagifer


As long as both a Tier 2 HQ and a Holy Reliquary are up, the squad can spawn an Imagifer in its ranks, for 75 Req., 15 Pow. and 15 s.. She has 861 HP (700 HP + her own 23% boost ; 1076 HP with Blessed Armor), recovers 1 HP/s., and dons same elite armor type, move speed, mass and sight than Celestians.

However, she doesn't carry any weapons, and is unable to fight at all ! She is like a living totem which increases the health of all units in the squad by 23%. It includes regular Celestians, the Veteran Superior, the Imagifer herself, and even the rattached Missionary, Canoness or Confessor ! Needless to say, making everyone in the squad 23% more durable is a nifty bonus.
..........╠ Celestians : Weapons
Celestians come with a wide variety of weapons, even if they are devoted to the sole role of anti-machines duty. There are divided as follow :


Celestian Chainswords


Both regular Celestians and their Veteran Superior carry Chainswords. However, Veteran Superior's one deals more damages than the ones of regular Celestians. Chainswords is the thing along Heavy Infantry High armor which makes Celestians barely potent at melee.


Bolters


Regular sisters carry these ones. Altough they deal more damages than the BSS' ones, Celestian can't upgrade their weapons against infantry, but against machines. And as Celestians are designed to wreck machines, it is unlikely you won't exchange all their 4 Bolters for 4 anti-machine weapons.


Meltas


Up to 2 out of 4 Sisters can exchange their Bolter for an anti-machine Melta Gun. Each one costs 15 Req., 5 Pow. and 10 s..


Multi Meltas


The remaining 2 Sisters can exchange their Bolter for Multi Melta Gun.

Multi Meltas have a special trait : they have no setup time, but the wielder (thus, the squad) needs to be immobile to fire with this weapon. Each one costs 30 Req., 15 Pow. and 14 s..


Veteran Superior's Chainsword


Like previous Veteran Superiors, Celestian's one carries this roaring sword if Power Sword upgrade hasn't been bought yet.


Bolt Pistol


Like previous Veteran Superiors, Celestian's one carries this gun if Inferno Pistol upgrade hasn't been bought yet.


Inferno Pistol


Once a Pristine Sanctuary is bought, a permanent upgrade replaces the Bolt Pistol by the much stronger Inferno Pistol, for 50 Req., 30 Pow. and 30 s.. It applies to all Superior Veterans and heroes, and is available at Tier 1 (where it applies to Canoness). You can then buy this upgrade before having Veteran Superior.

Inferno Pistol has a special trait : target takes 3 damages every second for 3 s. when it. Constant hits refresh the 3s..


Power Sword (and Master-Crafted Power Sword)


Once a Pristine Sanctuary is bought, a permanent upgrade replaces the Chainsword by the much stronger Power Sword, for 50 Req., 20 Pow. and 30 s.. It applies to all Superior Veterans and Canoness, and is available at Tier 1 (where it applies to Canoness, actually transforming her starting Power Sword into Brasero of Holy Fire). You can then buy this upgrade before having Veteran Superior.

On Tier 2, you can buy a similar upgrade, called Master-Crafted Weapons, providing you bought Power Weapons. It has the same cost (50 Req., 20 Pow. and 30 s.) and again applies to all Superior Veterans and Canoness, and also to Confessor, to boost their melee damages. On Veteran Superiors, damages are doubled (and on heroes, damages are boosted by 20%).


Emperor's Touch Bolter


This one is special. Should a Missionary use Emeperor's Touch Bolter on the squad, all its members (including Missionary and Veteran Superior) exchange their ranged weapons for the powerful Emperor's Touch Bolter for 20 s..


Leadership


This one isn't a weapon, but a cool bonus. While the Veteran Superior is alive, all damages from whatever weapons are 30% stronger. Without any cost or research. Veteran's weapons and charts always factor in this bonus, needless to say (this is why, for example, there is not a "Chainsword with Leadership" in further charts).


Psyocculum


Available at Pristine Sanctuary at Tier 3 for 50 Req., 20 Pow. and 30 s.. It boost regular Celestians Bolter's range by 20%. That's all. Pretty useless however as they are devoted to anti-machinery damages.


Improved Reactor Core


Available at Manufactorum at Tier 3 for 75 Req., 50 Pow. and 40 s.. It boosts Meltas and Multi Meltas damages by 20%. Also applies to Immolators. Very useful as Celestians are devoted to anti-machinery damages.


Weapon Statistics


Now that Celestians weapons have been briefly explained, let's see thir statistics.

Minimal base damage
Maximal base damage
Accuracy
Accuracy on the move
Refire rate
Range
Morale base damage
Morale DPS
Special Trait
Bolter
16 / 20.8 *
20 / 26 *
60%
15%
0.5 s.
21 / 25 **
4
2.4
-
Celestian's Chainsword
35 / 45.5 *
42 / 54.6 *
65%
-
1 s.
-
12
3.9
-
Melta
70 / 91 / 84 / 109.2 ***
80 / 104 / 96 / 124.8 ***
70%
25%
1 s.
21
10
3.5
-
Multi Melta
120 / 156 / 144 / 187.2 ***
135 / 175.5 / 162 / 210.6 ***
70%
-
1 s.
21
10
3.5
Yes
Bolt Pistol
50.7
58.5
85%
15%
0.8 s.
25
4
2.1
-
Inferno Pistol
91
110.5
85%
40%
1 s.
25
7
3
Yes
Veteran Superior's Chainsword
59.8
74.1
65%
-
1 s.
-
12
3,9
-
Power Sword
89.7 / 179.4 ****
111.8 / 223.6 ****
65%
-
1 s.
-
25
8,1
-
Emperor's Touch Bolter
30 / 39 *
40 / 52 *
100%
50%
0.8 s.
40
8
5
-

Asterisks means :
* : Base values / with Leadership (including for Veteran Superior in Emperor's Touch Bolter case).
** : Base values / with Psyocculum.
*** : Base values / with Leadership / with Improved Reactor Core / with both.
**** : Base values / with Master-Crafted Weapons.
..........╠ Celestians : Units DPS
Now that all Celestians weapons have been covered, let's see their statistics, courtesy of Relic Wiki.

Celestians ranged statistics VS troops are :

Low
Medium
High
Heavy
Elite
Commander
Daemon
Daemon Relic
Bolter
9.7
11.9
10.8
9.7
10.8
5.4
8.6
3.2
Bolter + Leadership
12.6
15.5
14
12.6
14
7
11.2
4.2
Melta
5.3
5.3
5.3
5.3
5.3
5.3
7.9
7.9
Multi Melta
8.9
8.9
8.9
8.9
8.9
8.9
13.4
13.4
Melta + Leadership
6.9
6.9
6.9
6.9
6.9
6.9
10.3
10.3
Multi Melta + Leadership
11.6
11.6
11.6
11.6
11.6
11.6
17.4
17.4
Melta + Improved Reactor Core
6.4
6.4
6.4
6.4
6.4
6.4
9.5
9.5
Multi Melta + Improved Reactor Core
10.7
10.7
10.7
10.7
10.7
10.7
16.1
16.1
Melta + Leadership + Improved Reactor Core
8.3
8.3
8.3
8.3
8.3
8.3
12.3
12.3
Multi Melta + Leadership + Improved Reactor Core
13.9
13.9
13.9
13.9
13.9
13.9
20.9
20.9
Bolt Pistol
23.2
23.2
23.2
23.2
17.4
14.5
17.4
8.7
Inferno Pistol
34.3
34.3
34.3
34.3
30
21.4
34.3
17.1
Emperor's Touch Bolter
21.9
21.9
21.9
21.9
17.5
17.5
21.9
17.5
Emperor's Touch Bolter + Leadership
28.4
28.4
28.4
28.4
22.8
22.8
28.4
22.8

Celestians ranged statistics VS machines are :

Vehicle Low
Vehicle Medium
Vehicle High
Aircraft
Building Low
Building Medium
Building High
Bolter
3
5.4
3
3.7
8.6
3
3
Bolter + Leadership
3
7
3
4.8
11.2
3
3
Melta
31.5
31.5
10.5
31.5
20
11.6
6.3
Multi Melta
53.6
53.6
17.9
53.6
33.9
19.6
10.7
Melta + Leadership
41
41
13.7
41
26
15
8.2
Multi Melta + Leadership
69.7
69.7
23.3
69.7
44.1
25.5
13.9
Melta + Improved Reactor Core
37.8
37.8
12.6
37.8
24
13.9
7.6
Multi Melta + Improved Reactor Core
64.3
64.3
21.5
64.3
40.7
23.5
12.8
Melta + Leadership + Improved Reactor Core
49.1
49.1
16.4
49.1
31.2
18.1
9.8
Multi Melta + Leadership + Improved Reactor Core
83.6
83.6
27.9
83.6
52.9
30.6
16.7
Bolt Pistol
17.4
11.6
2.7
8.7
14.5
8.7
2.7
Inferno Pistol
30
21.4
6.9
17.1
17.1
8.6
4.3
Emperor's Touch Bolter
21.9
19.7
15.3
21.9
17.5
13.1
8.9
Emperor's Touch Bolter + Leadership
28.4
25.6
19.9
28.4
22.8
17.1
11.4

Celestians melee statistics VS troops are :

Low
Medium
High
Heavy
Elite
Commander
Daemon
Daemon Relic
Chainsword
11.3
15
12.5
13.8
12.5
6.3
12.5
0.7
Chainsword + Leadership
14.7
19.5
16.3
18
16.3
8.2
16.3
0.7
Veteran Superior's Chainsword
19.6
26.1
21.8
23.9
21.8
10.9
21.8
0,7
Power Sword
29.5
39.3
32.7
36
32.7
16.4
22.9
9,8
Master-Crafted Power Sword
59
78.6
65.4
72
65.4
32.8
45.8
9,8

BSS melee statistics VS machines are :

Vehicle Low
Vehicle Medium
Vehicle High
Aircraft
Building Low
Building Medium
Building High
Chainsword
8.8
6.3
3
0.7
10
6.3
2.5
Chainsword + Leadership
11.4
8.2
3.9
0.7
13
8.2
3.3
Veteran Superior's Chainsword
2.2
2.2
0.7
0,7
17.4
4.4
0,7
Power Sword
22.9
16.4
9,8
9,8
19.6
9,8
9,8
Master-Crafted Power Sword
45.8
32.8
9.8
9.8
39.2
13.1
9,8
..........╠ Celestians : DPS per squad (WIP)
Celestians can fulfill several roles : ranged anti-machines, ranged anti-infantry (though not ideal), and melee anti-infantry. Then, i break down the squad's statistics here following their role.

Total health

Base
With Blessed Armor
With Imagifer's health boost
With both
Single Celestian
430
538
529 *
661 *
Veteran Superior
540
675
664 *
830 *
Imagifer
700 **
875 **
861
1.076
Starting squad
1.720
2.150
2.116 *
2.644 *
Squad with Veteran Superior
2.260
2.825
2.780 *
3.475 *
Squad with Imagifer
2.420 **
3.025 **
2.977
3.721
Squad with both
2.960 *
3.700 *
3.641
4.551

* : Theory only, as this number counts the Imagifer's boost, but Imagifer is absent in this configuration.
** : Theroy only, as Imagifer's boost apply to herself, then she's never without her health boost.

Then, a squad starts with 1.720 HP, and evolves to 2.150 with Blessed Armor, then to 2.825 HP with Veteran Superior, and finally to 4.551 HP with an additional Imagifer. All with Elite armor (Heavy Infantry High).


As melee squad

Basic (no Veteran Superior)
Squad with basic Veteran Superior
Squad with Veteran Superior with Power Sword
Maxed out (Master-Crafted Power Sword)
Total Health (with Blessed Armor)
2.152
2.827 (w/ Veteran)
3.680 (w/ Imagifer)(
4.510 (w/ both)
Infantry Low
45.2
78.4
88.3
117.8
Infantry Medium
60
104.1
117.3
156.6
Infantry High
50
87
97.9
130.6
Heavy Infantry
55.2
95.9
108
144
Elite
50
87
97.9
130.6
Commander
25.2
43.7
49.2
65.6
Daemon
50
87
88.1
111
Relic Daemon
2.8
3.5
12.6
12.6
Vehicle Low
35.2
47.8
68.5
91.4
Vehicle Medium
25.2
35
49.2
65.6
Vehicle High
12
16.3
25.4
25.4
Aircraft
2.8
3.5
12.6
12.6
BuildingLow
40
69.4
71.6
91.2
Building Medium
25.2
37.2
42.6
45.9
Vehicle High
10
13.9
23
23


As anti-infantry ranged squad

Low
Medium
High
Heavy
Elite
Commander
Daemon
Daemon Relic
Basic squad
38.8
47.6
43.2
38.8
43.2
21.6
34.4
12.8
With just Veteran Superior and Inferno Pistol
84.7
96.3
90.3
84.7
86
49.4
79.1
33.9
With just Melta weaponry
28.4
28.4
28.4
28.4
28.4
28.4
42.6
42.6
With Melta weaponry and Veteran Superior with Inferno Pistol
71.3
71.3
71.3
71.3
67
58.4
89.7
72.5
Tier 3 : with Melta weaponry and Improved Reactor Core
34.2
34.2
34.2
34.2
34.2
34.2
51.2
51.2
Tier 3 : with Melta weaponry, Improved Reactor Core and Veteran Superior with Inferno Pistol
78.7
78.7
78.7
78.7
74.4
65.8
100.7
83.5

If you want to use Celestians against infantry, there is 3 things to consider :
  • NOT buying Melta weapons is better than buying it, except versus Commanders and all Daemons.
  • Melta weapons deal "only" 15 DPS less than Bolters, allowing the Celestians to be even less effective against Infantry, but super effective against machines.
  • If you plan to use Celestians in close combat against Infantry, you won't need to buy ranged weapons.


As anti-machines ranged squad

Vehicle Low
Vehicle Medium
Vehicle High
Aircraft
Building Low
Building Medium
Building High
Basic squad
12
21.6
12
14.8
34.4
12
12
With just Veteran Superior and Inferno Pistol
42
49.4
18.9
36.3
61.9
20.6
16.3
With just Melta weaponry
170.2
170.2
56.8
170.2
107.8
62.4
34
With Melta weaponry and Veteran Superior with Inferno Pistol
251.4
242.8
80.9
238.5
157.3
89.6
48.5
Tier 3 : with Melta weaponry and Improved Reactor Core
204.2
204.2
68.2
204.2
129.4
74.8
40.8
Tier 3 : with Melta weaponry, Improved Reactor Core and Veteran Superior with Inferno Pistol
295.4
286.8
95.5
282.5
185.3
106
57.3
..........╠ Celestians : Abilities

Joinable squad (passive)


Not technically an ability, the Celestians can be joined by :
  • Missionary :
    • Is frail and weak.
    • Detects infiltrated ennemies.
    • Heals squad with the universally useful Lay Hands.
    • Offers some kick with Emperor's Touch Bolter. However, this Act is a waste on Celestians, as they have half units than BSS, and their anti-machines damages are higher with their Melta weaponry.
    • Makes squad inflict retaliation damages with Divine Retribution. As this Act is on store at Tier 3, you'll probably use it on Repentias (its best use). But you also can use it against turrets, who can't run away or focus another target. Then, it roughly adds 25 DPS against them (which is more powerful than any Melta weapon, except Mult Melta with Leadership and Improved Reactor Core).
  • Canoness :
    • Is the most solid and powerful character to attach.
    • Provides 200 Morale points and 2 Morale regeneration.
    • Decreases ennemies' range, detection range, accuracy and damages in a 25 radius units around her with Purifying Light ; provinding indirect defense to every ally around.
    • Summons 5 invincible melee angels with Ascension at Tier 3, greatly increasing squad's melee potency and / or allowing it to retreat a beat and fire Meltas again.
  • Confessor :
    • Is a little less solid and powerful than Canoness, but far more than Missionary.
    • Detects infiltrated ennemies.
    • Provides Morale immunity to his squad.
    • Provides a passive damage boost to every ally within 15 units range.
    • Has a small AoE damaging Act with Emperor's Wrath, helpful on tight melees.
    • Roots an entire squad with Holy Edict.

As Celestians are individually tougher than BSS (but less than Repentias), they can provide a good meat shield to whoever join them. If Imagifer is alive, they then become also collectively tougher than BSS ; in addition, the unit who joins the squad will benefit from Imagifer' health boost passive !


Faithful units (passive)


For each Celestian alive, the Faith counter is upped by 0.25 points, meaning she generates 0.025 Faith Points per second.

For Celestian Veteran Superior, gauge is upped by 0.35 points, meaning 0.035 Faith Points per second.

For Imagifer, gauge is upped by 0.6 points, meaning 0.06 Faith Points per second.

Then, a full squad with Veteran Superior generates 0.135 Faith Points per second.

If Martyr's Gift has been purchased (at Holy Reliquary on Tier 2, for 75 Req., 75 Pow. and 25 s.), you also gain 1 Faith Point each time a regular Celestian dies. It doesn't apply to Celestian Veteran Superior nor Imagifer (checked in game).


Krak Grenades (hotkey : K)


This ability is unlocked once you have bought it at Pristine Sanctuary at Tier 2 for 75 Req., 75 Pow. and 40 s.. With this, a unit tosses a grenade to an ennemy vehicle or building (you can't target trooper nor aircrafts nor ground) within 18 units range (which is a unit less than Dual Bolt Pistols' range) which explode in a radius of 6 units. Cooldown is 2 minutes. Explosion deals :
  • 450-562.5damages to Low Vehicles and Low Buildings.
  • 600-750 damages to Medium Vehicles, High Vehicles and Medium Buildings.
  • 300-375 damages to High Buildings.

These are the very same Krak Grenades Seraphims have. If you consider a Tier 2 squad fully equiped with the 4 special weapons and a Veteran Superior with Inferno Pistol deals around 242.8 DPS on standard vehicles, then a grenade worth almost 3 seconds of shooting. And depending on ennemy you face, this can be the difference between life and death. The fact the damage is instant, unlike Phosphor Grenades, is what makes Krak Grenades far more useful than Phosphor ones if you ask me. The fact Seraphims can toss them too is icing on the cake.

However, as cooldown is 2 miutes, it is advised to use Krak Grenades only for real threats, like a party of Defilers and Hell Talons, or better yet, a relic vehicle, and not just to take down a silly turret faster.


Other passives upgrades


This is all upgrades not described in Weapons sections that apply to Seraphims. Generally, they also apply to a lot of other units. The benefits can also be different from an unit to another, so check the buildings sections if you want a more detailed description of each upgrade. For short :
Improved / Enhanced / Elite Field Logistics
Each one of the 3 upgrades, available at Convent without conditions bur 140 Req. and 30 s., reduce the reinforcement time (by a second each).
Blessed Ammunition
Bolters and Veteran Superior's unupgraded Bolt Pistol pierce through a part of the damage reduction granted by landscape cover. This is useful only for unupgraded Celestians, but they will be equipped with Meltas, Multi Meltas and Inferno Pistol. Bought at Pristine Sanctuary for 100 Req., 75 Pow. and 45 s..
Blessed Armor
Boost hitpoints by 25%, going from 430 to 538 for Celestians, from 540 to 675 for Veteran Superior (checked in-game) and from 700 to 875 for Imagifers. Incredibly useful (mandatory, to be honest), even more because Celestians have short range and will be within ennemy's range. Bought at Pristine Sanctuary at Tier 2 for 100 Req., 50 Pow. and 45 s..
Chaplet Ecclesiasticus
Gives 100 Morale points ; squad has then 500 Morale points instead 400. Purchased at Holy Reliquary (so needs Tier 2) for 125 Req., 50 Pow. and 35 s..
Heart of Worship
Gives another 100 Morale points ; squad has then 600 Morale in the end (700 if Veteran Superior is alive !). Needs Tier 3, a Holy Reliquary to be bought at, a Shrine of the Living Saint and the Chaplet Ecclesiasticus upgrade, and then, 165 Req., 75 Pow. and 35 s..
..........╠ Celestians : As retinue
Like Battle Sisters, Celestians can be joined by either a Missionary, the Canoness or the Confessor. Proper attachment is primordial. Whatever the choice, Celestians provide a good meat shield to their leader ; they are less numerous than Battle Sisters, but tougher and more powerful at melee.

If Veteran Superior is alive, the leader benefits from Leadership's passive, like the rest of the squad. So, melee damages and ranged damages are boosted by 30%.

If Imagifer is alive within the squad, the rattached leader will in addition benefits from its +23% heal, which makes the Celestians squad the most beneficial to the leader. Note a visual bug can occur, showing leader with a depleted health gauge, while (s)he has actually plenty (even full) health.


Missionary's lead


Note the Missionary-Celestians combo has already been covered on the Missionary chapter.

Missionary without Act of Faith offers little to Celestians, except versus Eldar, as the only infiltrated machines in the game are Eldar buildings (including Listening Post and weapon Platforms) under Shroud.

Leadership and Imagifer's passives are not very useful to Missionary, as he's terrible in direct combat.

Lay Hands will be valuable for Celestians, as they'll draw heavy fire from machines, meaning tanks and turrets, and helmeted sisters having short range. Remember Sisters' LP and turrets deal far lower damages than the ones from other races, so don't expect Lay Hands to restore all the lost health or to make Celestians not losing health. On another hand, Celestians can be used as half decent close combat meat shields, as they are individually about half more durable than Battle Sisters ; here, Lay Hands is still loved.

Emeperor's Touch should be avoided on Celestians, as a full squad of them counts only 5 members (Imagifers don't carry weapons). Then the spell is only half as efficient as used on BSS. In addition, Celestians weapons deal more damages to machines than this spell.

Divine Retribution, available at Tier 3, works on machines, but the damage output is rather little compared to Meltas and Multi Meltas DPS. On another hand, it could be useful on a "melee" Celestian squad ; but at Tier 3, Repentias are available and far better at this role.


Canoness' lead


Note the Canoness-Celestians combo has already been covered on the Canoness chapter.

Canoness-Celestians combo is pretty decent for melee combat. Celestians are half good at close range due to their armor, damages, and health boost if Imagifer is alive.

Adepta Sororitas' prime heroin gives a Morale and Morale regeneration boost. More precisely, Canoness alone has 500 Morale Points, and Celestians have 400 Morale Points. When the two are paired, the obtained squad has 600 Morale Points. Indeed, without any Morale boost or upgrade. In addition, squad regenerates 2 Morale Points per second, going from 14 to 16, further boosting their Morale resistance.

Obviously, you aren't forced to buy Melta weapons to these Celestians, as the main goal of this team is to handle melee duty VS infantry. If Celestians die quickly, you may not want to invest into soon to be lost weapons. Then again, having a squad proefficient both against vehicles and against infantry is tempting.

Leadership and Imagifer's passives are useful to Canoness. Having a Big Sis 30% more powerful and 23% more durable IS something.

In another - and specialized - hand, as Purifying Light and Ascension are both "contact" or short-ranged skills, having a meat shield to protect the Canoness while running to the heart of the battle is better than letting the heroin running alone (and getting shot to death).

So, the Canoness + Celestians squad makes a very decent Tier 2 melee squad.


Confessor's lead


Sorority's second hero grants an unique Morale immunity to the squad ! Your Celestians becomes unbreakable. But keep in mind at this point of the game, ennemy will have means to rally should they be broken, so don't expect to always have the Morale advantage (you have it on long term, but in short terms, an Ork Waaagh, a SM Rally or a GI Execute can temporary give sort of Morale immunity to the opponent).

In addition, Confessor grants nearby units 15% more damages, thanks to his unique permanent aura. It doesn't need Confessor to be in the squad to do this, but being rattached to the squad makes synchronization (moving along to benefit from the bonus) easier. And 15% on Meltas or Chainswords is a welcome bonus !

The third and last free and permanent bonus is the detection ability, like the Missionary. Not much more to say than Missionary about this. Like the buffing aura, it t doesn't need Confessor to be in the squad to apply, but being rattached to the squad makes synchronization easier, and can be useful except versus Eldar, as the only infiltrated machines in the game are Eldar buildings (including Listening Post and weapon Platforms) under Shroud.

Confessor's Acts of Faith (damaging Emperor's Wrath and stunning Holy Edict) don't radiate from him, but are cast at short range. So, it is not mandatory to bring Confessor in heart of the battle to use them. It can then be detached from the squad. Note Holy Edict can be good for Heavy Bolters BSS, as it can paralyze a charging party of Possessed Marines ; as such, having Confessor rattached to BSS squad will put his Acts, including Holy Edict, directly in the squad's control pannel ; you'll then don't have to select Confessor beforehand.

Leadership and Imagifer's passives are useful to Confessor, like Canoness. Having a Pope 30% more powerful and 23% more durable IS something.

So, the Confessor + Celestians squad makes a very decent Tier 2.5 melee squad, like with Canoness. His passives can make the combination even better than the Canoness + Celestians one (with ponctual exception of Purifying Light).
..........╚ Celestians : Conclusion
Celestians come as ranged anti-infantry squad, like Battle Sisters, but their heavy weapons are Meltas and Multi-Meltas, designed to reduce ennemy's machines to slag. Meltas are weaker but able to fire on the move, while Multi-Meltas are stronger but require the squad to be immobile. You haven't really choice here : each squad can have only 2 Meltas and 2 Multi-Meltas, you can't change these limits. However, you don't need a Pristine Sanctuary to purchase these, and once these 4 weapons are equipped, Celestians deal good ranged damages to vehicle with their white/blue lasers (about 170 DPS against standard vehicles ; it is more than an upgraded Immolator, for much less Energy).

Of course, this has three downsides :
  • Melta weapons have short range, meaning Celestians will probably take damages before firing their weapons.
  • Celestians come without Melta weapons, meaning you have to spend some resources and time after recruiting the squad, or resurrecting a fallen member, before actually deal some damages to machines.
  • And as usual, some races does higher damages at better ranges, such as Tactical Space Marines, Necrons' Immortals and Dark Eldars' Scourges. But all in all, Celestians fare well.

Celestians have 2 options to boost their damages : the Veteran Superior and the Improved Reactor Core upgrade. The leader is available while the Ecclesiarchal Cathedral (Tier 2 HQ is up), and boosts the squad's damages by 30% as usual. However, her weapons are designed to face infantry, and standard Celestians, once upgraded of course, are once again meant to face machines. On Tier 3, Improved Reactor Core offers a 20% damages boost to Melta weapons. With both, the squad deals 56% more damages, culminating at 265.5 DPS to medium vehicles.

The damages are then as follow :

Vehicle Low
Vehicle Medium
Vehicle High
Aircraft
Building Low
Building Medium
Building High
All 4 Melta Weapons
170.2 (31.5*2 + 53.6*2)
170.2 (31.5*2 + 53.6*2)
56.8 (10.5*2 + 17.9*2)
170.2 (31.5*2 + 53.6*2)
107.8 (20*2 + 33.9*2)
62.4 (11.6*2 + 19.6*2)
34 (6.3*2 + 10.7*2)
All 4 Melta Weapons plus Veteran Superior (with Inferno Pistol)
251.4 (41*2 + 69.7*2 + 30)
242.8 (41*2 + 69.7*2 + 21.4)
80.9 (13.7*2 + 23.3*2 + 6.9)
238.5 (41*2 + 69.7*2 + 17.1)
157.1 (26*2 + 44.1*2 + 17.1)
89.8 (15.1*2 + 25.5*2 + 8.6)
48.5 (8.2*2 + 13.9*2 + 4.3)
All 4 Melta Weapons plus Improved Reactor Core
234.2 (37.8*2 + 64.3*2 + 30)
225.6 (37.8*1.3 + 64.3*2 + 21.4)
75.1 (12.6*2 + 21.5*2 + 6.9)
221.3 (37.8*2 + 64.3*2 + 17.1)
146.5 (24*2 + 40.7*2 + 17.1)
83.4 (13.9*2 + 23.5*2 + 8.6)
45.1 (7.6*2 + 12.8*2 + 4.3)
All 4 Melta Weapons plus both
295.4 (49.1*2 + 83.6*2 + 30)
286.8 (49.1*2 + 83.6*2 + 21.4)
95.5 (16.4*2 + 27.9*2 + 6.9)
282.5 (49.1*2 + 83.6*2 + 17.1)
185.3 (31.2*2 + 52.9*2 + 17.1)
106 (18.1*2 + 30.6*2 + 8.6)
57.3 (9.8*2 + 16.7*2 + 4.3)


In addition, Celestians are able to use Krak Grenades once they have been researched. This ability definitely worth its cost, as it is an instant 600-750 damages against medium machines and relic vehicles, which worth almost 3 seconds of fire with all 4 weapons. However, it has a huge cooldown, then save it for serious treats.

Oddly but luckily enough, Celestians have fairly good health and the second-to-best troop armor : heavy infantry high armor, meaning they take less damages than other units, and can take some punishment when they face vehicles or turrets.

If you can, buy an Imagifer (which requires a Holy Reliquary) to add 23 % health to the squad, and don't hesitate to heal the squad with a Missionary's Lay Hands. Again, Celestians are meant to face vehicles and turrets with short-ranged weapons, so needless to say, a Celestian squad with an Imagifer and a Missionary using Lay Hands is much less afraid by vehicles or turrets.

A side role of Celestians, due to their higher offense and defense than BSS and Seraphims (individually at first, then both individually and collectively with an Imagifer), is they can make semi-decent (not good) meat shields. If you plan to use them this way, for example as hero's retinue (as Battle Sisters gain much more benefit being rattached by a Missionary for his Emperor's Touch Bolter), don't upgrade their weapons, as standard Bolters deal more damage to troops than Melta weapons, and second Celestians are definitely not melee specialists, and so are prone to die on close combat.

Celestians can be rattached by the traditional heroes and Missionaries. Missionary is always useful to heal sisters under machine's fire with Lay Hands, but using Emperor's Touch Bolter on Celestians is a waste due to squad's units number. Later, Divine Retribution gives them 18 seconds of retaliation, but its high cost makes it rare to use, and it is generally better used on Repentias. However, beware the ranges : Missionary has better range than Celestians, resulting in some cases of Missionary firing at target while Celestians just watch. In this case, simply get closer to the target. Canoness gives a Morale regeneration boost, while Confessor gives a Morale immunity. Choice is yours.

The two valuable attachment strategies seems to be Missionary with Melta Celestians for healing under machine's fire, and/or Canoness or Confessor with Bolters Celestians to provide her or him a meat shield in order to close ennemies easily.


Against vehicles, 2 upgraded squads are usually enough. 3 are fine. 4 is nice if ennemy use lot of vehicles. For even more lethality, don't forget about Imagifers, Krak Grenades and Lay Hands.
Rhino Transport


Rhinos Transports are Sisters of Battle Armoured Personnal Carriers. Uncommon among this race, it is a great unit ! But faithful to the race, it shines when used as a strategic support. Like all vehicles, these METAL BOXES come at Tiers 2, once Manufactorum is built.


Basic informations


Requisition
Power
Time
Requirement
Recruit
75
70
15 / 13.5 / 12.1 / 10.9 s.
Manufactorum

Vehicle Cap
Health
Armor type
Limits
Health and Limitations
1
2000 / 2500
Vehicle Medium
-

Mass
Speed
Sight range
Miscellaneous
50
32
30


Storm Bolter


This gun is Rhino's only weapon.

Statistics are :
Minimal base damage
Maximal base damage
Accuracy
Accuracy on the move
Refire rate
Range
Morale base damage
Morale DPS
Special Trait
Storm Bolter
40
45
?%
?%
? s.
25
2
1.6
-

Then Rhino ranged DPS VS troops are :

Low
Medium
High
Heavy
Elite
Commander
Daemon
Daemon Relic
Storm Bolter
27.2
27.2
27.2
27.2
27.2
17
27.2
6.8

Rhino ranged DPS VS machines are :

Vehicle Low
Vehicle Medium
Vehicle High
Aircraft
Building Low
Building Medium
Building High
Storm Bolter
20.4
13.6
6.8
20.4
27.2
6.8
6.8

A Rhino then deals a little more than a 10-members BSS without upgrades nor Veteran Superior, or a 4-members BSS with 3 Flamers, no upgrades and no Veteran Superior, or a starting squad of Seraphims.


Unload


Rhinos are transport vehicles, and then have two slots to carry infantry. Note Celestians and Repentias take all slots, Seraphims can't hop aboard, and Missionary, Canoness and/or Confessor don't count if he's / she's / they're rattached to a squad.

For this, you just have to move the unit or squad to the Rhino. Then, transport them where you want and either use the unload capacity to disembark all squads, or click on the only squad you want to field. The later option allows the garrissonned units to be deployed instantly on the spot.

When a squad or unit enters in a Rhino, the in-squad upgrades (leaders and weapons) are paused, the cooldowns reload as normal, and the currently used Missionary's Acts of Faiths automatically cancel. If If Rhino is destroyed, garrissonned troups are scattered around, unharmed but brievly unable to move. Note that Seraphims (and Avenging Angels) are unable to be transported.

Continuously alterating between deploying your troops when ennemy is targeting the "metawl bawkse", then cowardly hiding them when ennemy focus them, is a common strategy to optimize both damages output and troopers' lifespan.


Laud Hailer (hotkey : H)


This is the very same skill that benefits to most structures of Sisters of Battle and which is bought at Pristine Sanctuary for 75 Req., 50 Pow. and 30 s..

It projects an AoE in a short range (20) for 10 seconds, giving 100 additional maximum Morale Points and 25% Morale regeneration rate to SoB and allies, and depletes 12 Morale points to all ennemies squad (regardless to how many members are actually in the AoE or the Morale resistance ratings) and prevent them to restore their Morale. Effects don't stack if multiple Laud Hailers are used at same time.

It deals same Morale damages than a Flamer in a zone all around the Rhino, altough it can't hit several ennemies in a same squad. And it strenghtens the Morale of nearby infantry. It can then be used to help to break Morale faster (by itself, Laud Hailer will never break the ennemy) AND to prevent your squads to be broken at same time. Which is nifty for a unit destined to transport troops.


Other upgrades


This is all passive upgrades not previously described that apply to Rhinos. Generally, they are bought at Manufactorum (except Blessed Ammunitions) and also apply to other vehicles. The benefits can also be different from an unit to another, so check the buildings sections if you want a more detailed description of each upgrade. For short :

Improved / Enhanced / Elite Mechanized Production Efficiency
Each one of the 3 upgrades, available at Manufactorum without conditions bur 165 Req. and 30 s., reduce the production time (by a roughly 1.5 s. each).
Blessed Ammunition
Bolters, Bolt Pistols and Heavy Bolters pierce through a part of the damage reduction granted by landscape cover. More useful for Seraphims and Heavy Bolters BSS, this is whatever a nice exotic bonus for Rhinos. Bought at Pristine Sanctuary for 100 Req., 75 Pow. and 45 s..
Reinforced Hull Plating
Boost hitpoints by 25% (going from 2000 to 2500). Incredibly useful, but comes at Tier 3. Costs 150 Req., 100 Pow. and 60 s..


Conclusion


Rhino is weak alone, but AWESOME in groups. It has low damage, but also low cost, low recruiting time and low vehicle cap, allowing to spam them. It is so easy that a one-shot strategy implies to fast tech to Manufactorum to spam them while ennemy is still in Tier 1. But even without this, you've got a unit which is fast, resistant to standard infantry, deals some damages, can inflict Morale damages and boost allies' Morale, and indeed is able to transport. Applications are limitless : from the above strategy to shuttle fresh Missionaries with Acts of Faiths ready to use from HQ to battlefield, including simpler strategies like carrying Celestians in dephth base or Repentias or DCA right in melee (supported by Laud Hailers). One of my fav is to build a second Manufactorum, solely dedicated to spam Rhinos, while i use the other Manufactorum for researches or other vehicles.

Its only default is its low HP, but giving the cost, the usefulness and the vehicle cap, more HP would have make Rhino OP. And Sisters are all but OP.
Immolator


Take a Rhino Transport, add a double heavy flamethrower on its top, open Rhino's round hatch and use it as a shield for the Sister who operate the flamers, invert top section and mid section colors, and here you have an Immolator !

Despite being based on Rhino, visually and according to the lore, Immolator is actually a completly different unit. It is in fact the assault tank of Sisters of Battle, being more powerful, slower and 25% tougher. Its initial flamers can be exchanged for anti-machine Melta guns, for an additional price and upgrade time. Somewhat like Inferno Turrets, the Immolator is then designed to hurt infantry, and if you upgrade it exchanges his anti infantry damages (and AoE) for anti machines damages.


Basic informations


Requisition
Power
Time
Requirement
Recruit
165
250
55 / 49.5 / 44.5 / 40 s.
Manufactorum

Vehicle Cap
Health
Armor type
Limits
Health and Limitations
3
2500 / 3125
Vehicle Medium
-

Mass
Speed
Sight range
Miscellaneous
50
24
35


Twin Heavy Flamers


Starting weapon, good VS infantry and morale. Even if it is a "twin" weapon, it acts as a single one. It covers a good area and deals massive morale damages.

In terms of power, Immolator is roughly equal to a BSS with only 4 members and Flamers, without any other upgrade nor Veteran Superior. For health damages, Immolator is a bit inferior, while for morale damages, it is slightly superior. Compared to Heavy Bolters, Immolator worth about 2 Heavy Bolters, still without any upgrade.


Multi Melta


Bought for 50 Req., 50 Pow and 20 s., it replaces the Twin Heavy Flamers. Transforms the Immolator in mono-target anti-vehicles tank. Curiously, this weapon deals more damages to Commanders (a little less than double) and Daemons High (6 times) than flamers.

Compared to the other anti-machines units, the Celestians, upgraded Immolator deals about 147 DPS and 4 Celestians with full weapons (and no upgrades nor Veteran Superior) worth 170 DPS. Grosso modo, the vehicle is as powerful as a squad with 2 Multi Meltas and 1 Melta. If Celestians have a Veteran Superior and full weapons, then they will be 50% more powerful than the Immolator.

So, like for unupgraded version, infantry squad does better, but again, Immolator resists much better than Celestians (even with Imagifer and Lay Hands) against anti-infantry turrets and knockbacks.


Wargear : Improved Reactor Core


Bought at Manufactorum at Tier 3 for 75 Req., 50 Pow and 40 s., it isn't a weapon but an upgrade which boosts Multi-Meltas (but also Celestians' Melta weapons) by 20%. No reason to not buy, especially when it also applies to the already good Celestians !


Weapons statistics and DPS


Weapons statistics :

Minimal base damage
Maximal base damage
Accuracy
Accuracy on the move
Refire rate
Range
Morale base damage
Morale DPS
Special Trait
Twin Heavy Flamers
30
36
100%
70%
0.5 s.
25
50
50
Yes
Multi Melta
300 / 360 *
400 / 480 *
70%
25%
1 s.
25
25
8.8
-

* : Without / with Improved Reactor Core upgrade.

Then Immolator ranged DPS VS troops are :

Low
Medium
High
Heavy
Elite
Commander
Daemon
Daemon Relic
Twin Heavy Flamers
29.7
56.1
36.3
49.5
39.6
16.5
66
6.6
Multi Melta
24.5
24.5
24.5
24.5
24.5
24.5
36.8
36.8
Multi Melta with Improved Reactor Core
29.4
29.4
29.4
29.4
29.4
29.4
44.2
44.2

Immolator ranged DPS VS machines are :

Vehicle Low
Vehicle Medium
Vehicle High
Aircraft
Building Low
Building Medium
Building High
Twin Heavy Flamers
9.9
9.9
2
2
33
13.2
19.8
Multi Melta
147
147
49
147
73.5
36.8
36.8
Multi Melta with Improved Reactor Core
176.4
176.4
58.8
176.4
88.2
44.2
44.2


Conflagration (hotkey : C)


Ability bought at Manufactorum for 100 Req., 75 Pow. and 45 s.. When cast, Immolator stays immobile for 9 s. and its turrets spin around itself, keeping firing, setting ablaze a short zone around itself (range : 10 units) and dealing 65 DPS VS infantry from Low to Heavy High, 16.3 DPS for Low and Medium Vehicles, 5.2 DPS to Low Buildings, 3.3 DPS to Medium and High Buildings, 32.5 DPS to Medium Daemons and 16.3 to High Daemons. It doesn't seem to harm Commanders and Aircraft. Deals also 20 Morale DPS. Cooldown is 2 minutes.

I'm mixed about this ability. Its goal is to deal from 65 to 585 DPS and from 20 to 180 Morale DPS from 1 to 9 s. to melee ennemies pummeling Immolator from all sides, either to kill them or to demoralize them, reducing incoming damages. Then, a defensive move. However in actual gameplay it never served me, although i find the animation silly and fun. Don't use it outside melee range, as 10 units is really short.


Other upgrades


This is all passive upgrades not previously described that apply to Immolators. They are bought at Manufactorum and also apply to other vehicles. The benefits can also be different from an unit to another, so check the buildings sections if you want a more detailed description of each upgrade. For short :

Improved / Enhanced / Elite Mechanized Production Efficiency
Each one of the 3 upgrades, available at Manufactorum without conditions but 165 Req. and 30 s., reduce the production time (by a roughly 5 s. each).
Reinforced Hull Plating
Boost hitpoints by 25% (going from 2500 to 3125). Incredibly useful, but comes at Tier 3. Costs 150 Req., 100 Pow. and 60 s..
..........╚ Immolator : Comparisons and conclusion
Immolator is Adepta Sororitas' assault tank. Available as soon as Manufactorum is built, you are legitimally tempted to buy some. But it has high cost, standard health, average damages (it is not a Tier 3 tank) and horrible build time. So it is wise to compare it to other units which assume its roles.


Anti-infantry health and morale damages

DPS
Morale DPS
Req.
Pow.
Time
Health
Immolator
49.5
50
165
250
55
2500
2 Rhinos
54.4
3.2
150
140
30
4000
BSS with just 4 members and 4 Flamers
55.2
48
260
30
52
1160
Full T2 Flamers BSS (10 members, a Superior Veteran with Inferno Pistol and 5 Flamers)
146.6
75
560
60
2:04
3400
2 BS shooting Heavy Bolter from afar
55.2
18.8
210
20
40
580
5 BS shooting Heavy Bolter from afar with Leadership passive
180.5
47
410
60
1:34
1950

Then, Immolator is not the best sources of damages, not even the best sources of morale damages. Infantry stills takes the pot. But Immolator has an advantage over infantry : Immolator 's damages don't decrease until Immolator is destroyed, while infantry's power decreases as members die one after another.

Compared to 2 Rhinos, Immolator is inferior in every aspect, except Area of Effect and Morale.

Compared to ennemy Tier 2 tanks :
  • Chaos Predator has 3 weapons which deal 34.2, 24.7 and 24.7 DPS to Heavy Infantry and 6.5, 9.8 and 9.8 Morale DPS to a single target. Then, concentred, it deals 83.6 DPS and 26.1 Morale damages to Heavy Infantry.
  • Wartrukk, while being an APC, has 2 weapons which deal 29.6 DPS to Heavy Infantry and 5.3 Morale DPS to a single target. Then, concentred, it deals 59.2 DPS and 10.6 Morale damages to Heavy Infantry. However, it can be boosted with researchs which also benefits to infantry, so it is likeley it will be boosted. Values are then 39.2 for single Big Shoota and 78.4 for both.
  • Wartrak with Bomb Chukka deals 46.3 DPS and 10.8 Morale DPS to Heavy Infantry.
  • Hellhound deals 15.8 DPS and 8 Morale DPS to Heavy Infantry. Let It Burn ability deals about 17 DPS and 0 Morale DPS.
  • Skyray Missile Gunship has 2 weapons which deal 22.4 DPS to Heavy Infantry and 7 Morale DPS to a single target. Then, concentred, it deals 44.8 DPS and 14 Morale damages to Heavy Infantry.
  • Destroyer deals 94.5 DPS and 3.3 Morale DPS to Heavy Infantry.
  • Raider, while being an APC, has a weapon which deals 10.9 DPS to Heavy Infantry and 4.3 Morale DPS to a single target. But if infantry is loaded, additional weapons are manned by infantry. Damages values vary depending on carried squad, but 6 Warriors add 6*17.1 DPS (with Soulseeker Ammunition) and 6*1 Morale DPS against Heavy Infantry. Then, at full, it deals 113.5 DPS and 10.3 Morale damages to Heavy Infantry.

Then, Immolator doesn't stand out either compared to ennemy brethren in terms of damages. It is slightly better than Skyray (but has less range and no disruption) and Wartrak (but Wartrak has heavy disruption),and outright better than Hellhound. If damages and range are lacking, as anti-morale tank, he reigns supreme.


Anti-turrets and vehicles damages


Building Low DPS
Vehicle Medium DPS
Req.
Pow.
Time
Health
Upgraded Immolator
73.5
147
215
300
1:15
2500
Base Immolator
33
9.9
165
250
55
2500
2 Rhinos
54.4
27.2
150
140
30
4000
Celestians (with full weapons, a Veteran Superior and an Inferno Pistol)
157.3
251.4
245
55
47
2260
5 BS shooting Heavy Bolter from afar with Leadership passive
80.5
19
410
60
1:34
1950

Compared to ennemy Tier 2 tanks :
  • Chaos Predator has 3 weapons who deal 42.1, 14.1 and 14.1 DPS to Medium Vehicles and 55.3, 17.7 and 17.7 DPS to Light Building. Then, concentred, it deals 70.3 DPS to vehicles and 89.5 DPS to turrets.
  • Wartrak with Bomb Chukka deals 57.1 DPS to Medium Vehicles and 48.3 DPS to turrets.
  • Sentinel deals 136.8 DPS to Medium Vehicles and 40.4 DPS to turrets (but has 1450 HP and Low Vehicle Armor).
  • Skyray Missile Gunship has 2 weapons who deal 44.8 DPS to Medium Vehicles and 22.4 DPS to turrets.to a single target. Then, concentred, it deals 89.6 DPS to Medium Vehicles and 44.8 DPS to turrets.
  • Heavy Destroyer deals 138.5 DPS to Medium Vehicles and 79.2 DPS to turrets.
  • Raider, while being an APC, has a weapon which deals 45.3 DPS to Medium Vehicles and 27.2 DPS to Low Buildings. But if infantry is loaded, additional weapons are manned by infantry. Damages values vary depending on carried squad, but the Archon adds 29 DPS (with Soulseeker Ammunition) against vehicles and 39.5 DPS against turrets. Then, the total deals 74.3 DPS to vehicles and 66.7 DPS to turrets.

Then, as surprising as it sounds, upgraded Immolator is a good anti-machines vehicle ! But watch out for Tier 3 vehicles who are still superior, like Predators, upgraded Chaos Predators and so on.


Conclusion


Immolator is rather simple to apprehend. It can fill 3 roles :
    * Anti-infantry AoE tank (altough low damages per ennemy) ;* Anti-morale AoE tank (which it's good, and later superceessed by Exorcist) ;* Anti-machines tank (which it's good until ennemy has Tier 3 tanks).
For single target infantry duty, 2 Rhinos or Heavy Bolter BSS are better suited. And overall, damages are lower in Immolator than in a full equipped infantry squad (Flamers BSS and Meltas Celestians), so you may favor squads. However, there are other factors to consider :
    * Immolator's damages don't decrease as health depletes, while squad's power diminishes with each death.* Obviously, Immolator resists to anti-infantry weapons, squads resist to anti-vehicles weapons. * Immolator can be repaired, squads can be reinforced.* Cost for cost, Immolator takes more resources than squads or 2 Rhinos.* Build time is shorter for Immolator than for full squad or 2 Rhinos.

Then, it is really your call. All in all, Immolator is a rather standard unit, hindered by its long build time and high cost, and possibly overshadowed by other, less costly options for same duties. It can stand out as Morale damage dealer (altough Exorcist excels too at this work)

I advise to get at least one Immolator to destroy anti-infantry turrets without exposing Celestians, who'll have hard time even with Lay Hands and Imagifer if ennemies are nearby. And ennemies will. For this, Immolator doesn't necessarily need to be upgraded, as its basic weapons deals respectable damages against turrets, and good damages against infantry ; then, all ennemies will take damages. But of course, the upgraded version solo-targeting helpless turret is a very good choice, and is good against ennemy vehicles.
Lightning Fighter


Lightning Fighters are Sisters of Battle aircrafts. Their usefulness is to quickly spot areas (either for vision or for Exorcist's attacks), due to the fact it passes over impassable terrain and speed (it is the fastest Adepta Sororitas unit by far) and to face ennemy aircrafts. Aside from that, Lightning Fighters are subpar units. Which is sad as the pilots are zealous as ♥♥♥♥ !


Basic informations


Requisition
Power
Time
Requirement
Recruit
75
70
35 / 31.5 / 28.3 / 25.5 s.
Manufactorum
Vehicle Cap
Health
Armor type
Limits
Health and Limitations
1
2100 / 2525
Aircraft
5
Mass
Speed
Sight range
Miscellaneous
500
55
30


Autocanon


This gun is Lightning Fighter's main weapon, used against almost every ennemy. It is roughly equal to a single BSS Heavy Bolter with Leadership and Psyocculum.


Lascannons


This gun has a special trait : it is used only against other airships. It is what ensure Lightning's superiority against other planes. Sadly, once again it can't be used against other targets.

Not that Lightning has actually 2 Lascannons ; so, he can either shoot at two different aircrafts, or focus on a single target for double damages.


Weapons statistics and DPS


Weapons statistics are :
Minimal base damage
Maximal base damage
Accuracy
Accuracy on the move
Refire rate
Range
Morale base damage
Morale DPS
Special Trait
Autocanon
95
115
85%
55%
0.8 s.
30
5
2.7
-
Lascannon
72 / 144 *
81 / 162
100 %
50 %
2 s.
30
10
2.5
Yes

* : With only one Lascannon / With both Lascannons.

Then Ligntning Fighter's ranged DPS VS troops are :

Low
Medium
High
Heavy
Elite
Commander
Daemon
Daemon Relic
Morale
Autocannon
44.6
44.6
44.6
44.6
33.5
33.5
33.5
22.3
2.7

Lightning Fighter's ranged DPS VS machines are :

Vehicle Low
Vehicle Medium
Vehicle High
Aircraft
Building Low
Building Medium
Building High
Autocannon
33.5
22.3
11.2
30.1
33.5
22.3
11.2
Single Lascannon
-
-
-
38.3
-
-
-
Double Lascannon
-
-
-
76.6
-
-
-


Upgrades


Lightning Fighter got only two upgrades. They are bought at Manufactorum and also apply to other vehicles. The benefits can also be different from an unit to another, so check the buildings sections if you want a more detailed description of each upgrade. For short :

Improved / Enhanced / Elite Mechanized Production Efficiency
Each one of the 3 upgrades, available at Manufactorum without conditions bur 165 Req. and 30 s., reduce the production time (by a roughly 3 s. each).
Reinforced Hull Plating
Boost hitpoints by 25% (going from 2100 to 2625). Incredibly useful, even if Lightning Fighter is fragile and situationnal, but comes at Tier 3. Costs 150 Req., 100 Pow. and 60 s..


Conclusion


Let's compare Lightning to other aircrafts.
  • Landspeeder Tempest have comparable damages with Frag Missiles, AND disruption, but less health.
  • Hell Talon is an anti-machines aircraft.
  • Fighta Bomma has double power and huge disruption power, and higher health, but high cost and vehicle cap.
  • Nightwing has far less power and health (it is designed to kill groups of low health ennemies with its AoE).
  • Marauder has less raw power but powerful abilities.
  • Barracuda is an anti-machines aircraft.
  • Attack Scarabs are melee-only powerful anti-air-only aircraft.
  • Raven has about 50% more damages and a vehicle-paralyzing ability.
In addition, Hell Talon, Fighta-Bomma and Marauder have more health than Lightning.

Then, Lightning is the only aircraft with no speciality ! It is just a braindead anti-infantry aircraft with average attack and immunity to melee damages. Besides, its overall weakness and fraility limit its usefullness. The obvious usage is to counter melee ennemies (Flayed Ones come in mind), as Sisters haven't decent melee units until Tier 3. Note that Fighta Bomma, Marauder are better at this role (Hella Talon and Barracuda are anti-vehicles). It can also be used to spot a target you want to attack with the long range of the Exorcist artillyer or Hunter Killer Missile, but as Exorcist's Missile won't kill any unit or building in one or two shots (Exorcists are limited to 2), this idea is short-lived. A possibility is to let several Lightnings in your base to defend it against deep struck Assault Terminators when you face Space Marines. All in all, a situationnal unit IMO.
Death-Cult Assassin


Heretic leaders often hide into shadows, only known by names but rarely seen. Then, brute force isn't enough, and the Imperium needs nimble and unseen agents to infiltrate unholy sects, find their leaders and dispose of them. This duty falls to Death Cult Assassins (DCA for short), solitary murderers trained in arts of infiltration, stealth and sword fight.

Lorewise, since the Unification Wars, the Emperor divided populations. He had ennemies, and he had also supporters... even in these crazy assassins cults. Actually, DCA are themselves divided into myriad of subfactions, for example some devoted to the Chaos god Khorne, and others worship the Emperor of Mankind, like many humans. The laters honour every bloodshed, every cut, every death as a necessity to enforce the law of the Emperor, for no one is above His justice, and the ones who break His law have then a blood debt to repay to the Emperor. However, Death Cults are not a clear organization, but a myriad of independant cells, once again with some who have same fate into the Emperor and into the art of murder. They are recruited by assassins among the orphans, and trained to the ways of their cells. Part of their training consist going in the vast world, to become assassins for hire. So, their existence is a common knoweldge. However, as they really worship the Emperor, the Imperium tolerate their existence. The most reknown DCA may be either hired by Inquisition to fight, or sent to the Officio Assassinorum, the official (and secretive) Imperium's assassin's organization. Either way, they favour blade weapons as they deeply believe that each variation of each cut or puncture has a religious signification.

Gamewise, DCA are independant stealthed melee-only units, fragile but able to cause heavy damages when well supported. However, they require a Holy Reliquary to be built.


Basic informations


Requisition
Power
Time
Requirement
Recruit
100
40
20 s.
  • Ecclesiarchal Cathedral (Tier 2 HQ)
  • Holy Reliquary
Squad Cap
Initial Squad
Maximum Squad
Limits
Limitations
1
1
1
-
Maximum
Regeneration
Armor type
Health
700
2.5
Infantry High
Maximum
Regeneration
Rally at
Death penalty
Morale
450
11
50
-
Mass
Speed
Sight range
Miscellaneous
16
20
30


Power Stiletto


This blade is DCA's only weapon. It deals VERY high damages to the best-armored infantry, low damages to other infantry, and almost no damages to machines.

It comes with an unique awesome special trait : if ennemy Infantry (from builders to commanders) has 40% HP or less, DCA has a good chance to kill him instantly every 1.5 s..

Statistics are :
Minimal base damage
Maximal base damage
Accuracy
Accuracy on the move
Refire rate
Range
Morale base damage
Morale DPS
Special Trait
Power Stiletto
80
92
100%
-
1 s.
-
5
2.5
Yes

Then DCA melee statistics VS troops are :
Low
Medium
High
Heavy
Elite
Commander
Daemon
Daemon Relic
Power Stiletto
21.5
43
43
43
86
86
60.2
34.4

Melee attacks against machines deal only 4.3 DPS (1 DPS VS Aircrafts), and DCA has no ranged weapons.


Stealth (passive)


DCA are stealthed / infiltrated, meaning they can't be targeted. However, they can still come under attack indirectly by artillery and special abilities that can target ground locations. If DCA is within any ennemy detector's range, she will be revealed, until detector is killed or she's outside his detection range. Note that DCA is the only Sisters of Battle's stealth unit.

Here is the list of detectors. Keep your DCA away from them ! Unless precised, the radius/range is 30 units.
  • All races : Captured Strategic Points (range 7), captured Relics (range 7), captured Critical Locations (range 8), and their evolutions with same range, and lone Turrets (range 40 for Imperial Guard, 35 for other races).
  • Space Marines : Librarian and Skull Probe.
  • Chaos : Cultists (with Unholy Sight ; range 25), Chaos Sorcerer and Chaos Lord's Tainted Auspex (range for Lord to cast : 15, and Auspex' AoE : 17 until destroyed ; Auspex is itself infiltrated after 5 s.).
  • Eldar : Guardians' Warlock, Harlequin (range 35) and Seer Council.
  • Orks : Big Mek (range 20, 30 with Kustom Gadgitz), Warboss (range 25) and Mega Armoured Nobz (range 25).
  • Imperial Guard : Psyker (either alone or in Command Squad) and Field Command's ability Long Range Scanner (infinite range to cast, and revelation AoE : 15 for 30 s.).
  • Necron : Builder Scarabs (range 35), Wraith (range 20) and Necron Lord's Solar Pulse (range for Lord to cast this green light pillar : 15, and Pulse's AoE : 20 for 20 s.).
  • Tau : Vespids, Pathfinders and Ethereal.
  • Dark Eldar : Haemonculus, Wych Squad and Piercing Vision global power (grants standard detection to selected squad).
  • Sisters of Battle : Missionary, Holy Icon (range 35), Death Cult Assassin, Confessor and Avenging Angel.


Stealth Detection (passive)


DCA is able to detect infiltrated units in his whole sight range (30 units). She's the only unit in the whole game to have both Stealth and Stealth Detection. A nifty bonus.


Agility (passive)


Don't mind this Eldar icon, i chosed it because this passive actually acts as a melee damages reduction by 33%. It helps a little as DCA has low health and defense, should she be revealed. Of course, she still receives full ranged damages.


..........╠ DCA : Focus on duels
DCA deal very high damages to both Heavy High Infantry and Commanders, and less damages as armor becomes inferior. Here is a chart of every races' high tier melee units' damages against infantry from Infantry High (and DCA, as she takes only 66% damages in melee) to Daemon High.

Squad size
HP
Detection
DCA
Infantry High
Heavy Infantry
Heavy Infantry High
Commanders
Daemons
Daemons High
Death-Cult Assassin
1
700
Yes
28.3
43
43
86
86
60.2
34.4
Grey Knight
6
800
No
29.7
45
45
40
30
100
100
Assault Terminators
8
1200
No
35.6
54
49.4
45.2
26.9
37.2
10
Force Commander
1
2675
No
121.3
183.9
183.9
183.9
122.5
214.6
214.6
Librarian
1
2000
Yes
62.8
95.2
112.6
96.5
48.3
123.3
134
Chaplain
1
1700
No
93.3
141.5
141.5
141.5
94.1
165
165
Khorne Berzerker
8
610
No
24
36.5
36.5
36.5
19.9
21.2
6.6
Possessed Squad
10
800
No
34.1
51.7
51.7
51.7
28.2
30.1
9.4
Chaos Commander
1
2430
Can
120.9
183.2
214.2
183.2
90.3
234.8
234.8
Chaos Sorcerer
1
1600
Yes
77.3
117.2
137.8
118.1
23
51.7
165.6
Harlequin
1
925
Yes
23.7
36
36
36
90
36
9
Farseer
1
2010
No
32.1
48.7
77.9
57.3
75
56.8
89.7
Seer Council
9
600
Yes
53.2
80.7
83
68.3
18.1
48.4
18.6
Nobz
10
1150
No
44.7
67.8
67.5
48.1
52.1
68.2
20.3
Mega Armoured Nobz
4
1300
Yes
60.3
91.4
107.5
92.1
45.2
117.5
117.5
Big Mek
1
1910
Yes
120.5
182.7
214.8
184.1
90.4
234.9
234.9
Warboss
1
3040
25
128.7
195.1
229.6
196.7
96.6
251.6
188.3
Squad Commander
1
535
25
40.6
61.6
54.7
48.8
46.4
54.7
35.8
Priest
1
500
30
93.7
142.1
125.8
112.2
58.1
126.5
55.9
Ogryn
7
840
-
72.1
109.3
131.1
101.2
50.8
114.8
49
Kroot Hound
8
924
-
69.3
105
84
63
31.5
42
8.4
Wraith
1
500
-
44.88
68
54.4
40.8
34
40.8
13.6
Flayed One
8
550
-
31
47
47
31.3
23.5
31.3
7.8
Necron Lord
1
2250
Can
56.6
85.9
85.9
85.9
45.8
34.4
114.6
Warp Beast
7
1000
-
54.5
82.7
82.7
66.2
49.6
74.4
57.9
Archon (without Incubi)
1
1700
-
96.5
146.3
146.3
146.3
146.3
146.3
146.3
Repentia (without Mistress)
7
875
-
37.6
57
62.7
57
39.9
51.3
28.5
Canoness
1
2150
Can
87.1
132
132
132
88
154
154
Confessor
1
2050
30
117.3
117.3
117.3
117.3
78.2
136.9
136.9

Grey Knights' Psychic Inquisition, Force Commander's Orbital Bombardment, Librarian's Smite, Chaos Sorcerer's Chains of Torment, Farseer's Eldricht Storm, Mad Dok's Burna Bomb and Confessor's Wrath of the Emperor deal AoE and DoT damages, which hurt DCA even stealthed.

In addition, Force Commander's Battlecry increase his damages (and allies around) by 40% for 10 s. ; Chaos Lord's and Daemon Prince's Daemon Strength boosts his own damages by 50% for 30 s. ; Farseer's Guide can boost her DPS and Seer's Council ones by 40% for 25 s. ; Priest passively boost his squad's damages by 50%.

Harlequin and Psyker have a direct highly damaging ability and also have detection (actually one-shooting for Harlequin).

Finally, Librarian, Mad Dok, and Priests have an ability to prevent their squads to die for 10 to 20 s.. In addition, they can detect DCA, so they can kill her while she can't kill them.
..........╚ DCA : Conclusion

Conclusion


DCA are often overlooked because of their low health, their solitary nature (no squad means no reinforcement on the spot), the need of a Holy Reliquary to build them (most players should prefer the "Manufactorum path") and the abundance of detectors (mainly : turrets and captured points).

However, i personnally find them very useful. Alone, a DCA as higher damages against Heavy Infantry High, Commander and Daemon High armors than many infantry, bar heroes. She has even better damages against high tier infantry than Repentias under Righteous Fervor ! Coupled with her Agility should she be revealed, she can outmelee almost all other units, except powerful heroes.

However and once again, she's a lonely unit, while Possessed for example are 8 by squad. So a lonely DCA easily kills a single ennemy, but ends overwhelmed by squads reinforcements.

For example, Heavy Bolters BSS are powerful at range, but fragile at melee, then easy preys to jumpers, teleporters, and tough enough ennemies to close them. Then, hiding an invisible DCA among the squad to defend it is a good idea as she'll be able to deal with them, especially backed up by the melee powerful Veteran Superior. Sadly, DCA and Veteran Superior are 2 against a whole ennemy squad, or a powerful commander, or both. It is then likely the ennemy squad will reinforce faster than you could kill them, and/or the ennemy commander would be able to decimate your squad in the process.

It is then advised to make several DCA to protect a valuable squad. Of course, it comes with the twin disadvantages of Squad Cap (if you make 4 DCA, then it takes 4 Squad Pop) and price (100 Req., 40 Pow. and 20 s. each). But remember DCA deals high damages and have a fair chance to kill the ennemy when he has less than 40% of health. So, the more DCA, the more chances for insta-kill.

Regarding this, mixing several offensive DCA in a Repentias Squad led by a Canoness is perhaps one of the best things to do. Repentias are the no-brainers for melee job. They provide good damages and somewhat meat shield to DCA, even if they are detected. Ennemy won't probably notice the DCA among the Repentias, and even if they do, the whole squad will deal tremendous damages and have high chance (higher the more DCA you have) to instakill ennemies, even Commanders. The role of the Canoness is to use Purifying Light to reduce ennemies' detection range to 10% of their original value, keeping them out of harm. This is especially useful against human players.

As DCA are available at Tier 2 with Holy Reliquary "path", they won't have Repentias to team up with. Celestians can do the job, as in Tier 2.5, ennemies will have powerful elites and commanders.

A third usage is to keep them at the base, to deal with deep strikes, ranging from Terminators or Horrors to Necrons teleporting around Necron Lord, as the ennemy will think the base is left without defense, and deep-stroke ennemies haven't detection.

A fourth usage is simply to load DCA in a Rhino, to drive Rhino to your target, then to unload DCA. Ennemy won't see them and would surely focus only on Rhino.

All in all, DCA is meant to go undetected against elite or commander in a duel. But she can do much more than that with a purposeful synergy that i consider them as one of the best Sisters of Battle unit. Just take away the detectors first, using Celestians and Immolators for turrets and Listenning Posts. If you can, decapture ennemy's points, at least the ones which are on the main battlefield.
Confessor


Confessor is the secondary hero of the Adepta Sororitas. At last, a male commander among an army of women !

Lorewise, Confessors are raised and trained in special shrines of Adeptus Ministorum (the clergy). Their role is to seek out and destroy heresy wherever it exists, be it undercover plots or large renokwn apostates leading entire worlds against the will of the Emperor. Confessors' training drive them fanatics, quick to anger, and even quicker to claim and burn whole populations as heretics. Their rage equal their knoweldge in holy texts, and their constant psalms bolster the fanaticism of fellow imperial citizens and warriors. Once their training is over, Confessors roam the worlds preaching Imperial Faith and purging the universe of any taint of heresy. Confessors do so by convincing citizens to confess their personnal unholy thoughts or mutations, and denouncing fellows as psykers or heretics. They are able to drive populations against local apostate dictators in religious frenzy, diametrically opposed to more meticulous Inquisitors who weave intricate networks of intelligence and relations to reveal untold treasons.

On this note, it is worth noting that in WH40K universe, "Inquisitor" doesn't mean "part of clergy", but rather "high ranked agent of Imperium secret police known as Inquisition". The goal of Inquisition is to seek and destroy every threat and ennemy to the Imperium of Man. As such, Inquisition is divided into three orders, including Ordo Hereticus, the order tasked to root out heresy, "the ennemy within". By its nature, Ordo Hereticus monitors Ecclesiarchy, the religious organization of Imperium. And Ecclesiarchy's armed force (dubbed "Chamber Militant") is the Adepta Sororitas. So, the Confessor is not a direct leader in the Adepta Sororitas, even if frontiers are blurred by the Conclave of Nehpilim. Sometimes, talented Confessors are sent to Schola Progenium, an elite clergy training organization. From there, they can be recruited by an Inquisitor to become part of his retinue. With experience, decades of serving and endorsement of several other Inquisitors, a Confessor can be appointed Inquisitor himself. Which is in total adequation with the solitary nature of Confessors' task, as Inquisitor are totally independants and have no superiors.

Such is the bold nature of Confessors that it isn't uncommon they unintentionnaly throw away years of work of more subtle Inquisitors ! Nonetheless, their fanaticism makes them fearsome, be it on the hive cities or on the battlefield. Because their unwavering faith in the Emperor and holy anger makes them able to face the most ferocious ennemies of mankind, only clothed in robes and Pope hat, and yet prevail ! They real question is, who is the most fanatical between Confessors and Sisters of Battle...

Gamewise, Confessor costs slightly more than Canoness and is a little less powerful and durable than Canoness. Except he's morale immune. On the other hand, he brings his own VERY useful abilities, both passives and actives. Namely :
  • Without anything :
    • Stealth detection.
    • Ecclesiarchal Mandate which gives a permanent damages buff (15%) to nearby allies.
  • Fearless which gives Confessor's natural Morale immunity to the squad he joins, should he join a squad.
  • And, providing you have at least 2 Holy Icons, he can cast these 2 Acts of Faith, which have a cooldown of 2 minutes :
    • Emperor's Wrath (35 FP), which causes from 300 to 800 damages in a small AoE to infantry (half for Commanders).
    • Holy Edict (25 FP), which stuns an entire infantry squad except heroes for 15 s..

Then, contrary to what most guides say, Confessor is not a "melee beast". Actually, he's weaker than Canoness in direct combat. It is the abilities which makes him a valuable support hero. None of his abilities actually need him to be rattached to a squad (much like Canoness, and unlike Missionaries), except Fearless. One of best ways to use him is to rattach him to a Repentias squad : it becomes Morale immune, gets damages boost, can severly damages non-heroic infantry in a tight cluster and paralyze either a superior close combat squad or a problematic shooter squad. Once again and of course, only Fearless actually needs the Confessor to be rattached to a squad ; you can then use Confessor unattached, walking among Repentias led by Missionaries (who will be able to use Lay Hands and Divine Retribution on them).

The only drawback is it comes at Tier 2.5 with the "infantry route". And most players will probably take the "vehicles route". Especially when Repentias come at Tiers 3. However, "infantry route" is a shorter and cheaper way to reach Tier 3 (Holy Reliquary takes 75 Req. and Pow. and 10s. less than Manufactorum).


Basic informations


Requisition
Power
Time
Requirement
Recruit
245
60
50 s.
Adepta Sororitas Convent (tier 1)

Squad Cap
Initial Squad
Maximum Squad
Limits
Limitations
-
1
1
1

Maximum
Regeneration
Armor type
Health
1200 / 1600 / 2050
2 / 3 / 4
Commander

Maximum
Regeneration
Rally at
Death penalty
Morale
Immune
-
-
125

Mass
Speed
Sight range
Miscellaneous
25
16
40


..........╠ Confessor : Weapons and DPS

Bolt Pistol


Starting ranged weapon. Slightly more powerful than Canoness' one. Chances are you have already bought Inferno Pistol upgrade when Confessor is out.


Mace of Dimmamar


Only melee weapon. Similar to Canoness' Brazier of Holy Fire, only less powerful. Luckily, Confessor starts with this weapon, without needing the Power Weapons upgrade. Strangely, it is as powerful against infantry than against medium vehicles.

The Mace has following special traits, again triggering with each swing :
  • 25% chance to disable abilities for 3 s. ;
  • 50% chance to disable combat abilities for 4 s. ;
  • 50% chance to disable movement for 2 s..


Inferno Pistol


You already know this one, for it is equiped to Canoness, BSS Veteran Superiors, Seraphim Veteran Superiors and Celestian Veteran Superiors, once a Pristine Sanctuary is bought, for 50 Req., 30 Pow. and 30 s..

It boosts damages against infantry by 40% (except against Heavy Infantry High where it is 63%), which is 13.7 more DPS than Bolt Pistol (16.2 for Heavy Infantry High and 8.5 for Commanders). Against machines, damage boost ranges from 65% (3 DPS) to 87% (12.1 DPS). Damages against Daemons are buffed by 86-87%, gaining 11.1 and 22.2 DPS. Strangely enough, Canoness is more powerful than Confessor when Inferno Pistol is bought, what it isn't the case when it isn't bought. Confessor's version also deals less Morale damages.

Same quirks than for Canoness and Veteran Superiors apply here : Morale damages and damages on the move. But as you guess : the more Inferno Pistols your army gets, the better.

Inferno Pistol has a special trait : target takes 3 damages every second for 3 s. when it. Constant hits refresh the 3s..


Master-Crafted Weapons


Available at Pristine Sanctuary since Tier is hit, for 50 Req., 20 Pow. and 30 s.. This upgrade simply boosts Confessor's melee damages by 20%. As always, this upgrade also applies to Canoness and Veteran Superiors, on a different scale. No reason to not buy this one.


Weapon Statistics and DPS


Now that Confessor's weapons have been briefly explained, let's see thir statistics.

Minimal base damage
Maximal base damage
Accuracy
Accuracy on the move
Refire rate
Range
Morale base damage
Morale DPS
Special Trait
Bolt Pistol
69
92
85%
15%
0.8 s.
25
4
2.1
-
Inferno Pistol
126.5
155.3
85%
40%
1 s.
25
10
4.3
Yes
Mace of Dimmamar
212.7 / 276 *
255.3 / 331.2 *
100%
-
1.5 s.
-
40
13.3
Yes

(*) : without / with Master-Crafted Weapons.

Then, old beard statistics VS troops are :

Low
Medium
High
Heavy
Elite
Commander
Daemon
Daemon Relic
Bolt Pistol
34.2
34.2
34.2
34.2
25.7
21.4
25.7
12.8
Inferno Pistol
47.9
47.9
47.9
47.9
41.9
29.9
47.9
23.9

Pope wannabe's ranged DPS VS machines are :

Vehicle Low
Vehicle Medium
Vehicle High
Aircraft
Building Low
Building Medium
Building High
Bolt Pistol
15.4
8.6
5.1
12.8
12.8
6.8
3.4
Inferno Pistol
27.5
15.6
8.4
23.9
23.9
12
6

Confessor's melee DPS VS troops are :

Low
Medium
High
Heavy
Elite
Commander
Daemon
Daemon Relic
Mace of Dimmamar
48.9
97.8
97.8
97.8
97.8
65.2
114
114
Master-Crafted Mace of Dimmamar
58.7
117.3
117.3
117.3
117.3
78.2
136.9
136.9

And, finally, Confessor's melee DPS VS machines are :

Vehicle Low
Vehicle Medium
Vehicle High
Aircraft
Building Low
Building Medium
Building High
Mace of Dimmamar
122.2
97.8
57
16.7
40.7
24.4
16.7
Master-Crafted Brazier of Holy Fire
146.6
117.3
68.4
16.7
48.9
29.3
19.6
..........╚ Confessor : Abilities
Confessor hides a lot of abilities, both active and passives, under his beard !


Stealth Detection (passive)


Like Missionaries and Death Cult Assassins, Confessor is able to detect infiltrated units, albeit in a little smaller range (30 units) than his sight range (40 units). It is far more durable than Missionaries and Assassins though.


Fearless (passive)


I have a knack for icons. This one comes from Imperial Guard's Priest's Fanaticism"s ability, which restores his squad's Morale and make it Morale immune for some time.

However, Fearless makes the squad which Confessor joins immune to Morale damages. In other terms, Confessor's squad becomes impossible to break, so never lose accuracy nor DPS because of being broken.

Needless to say, this is a really cool bonus when you factor in Adepta Sororitas doesn't have unbreakable squads on its own (unlike Chaos with Khorne Berserkers for example). Dealing Morale damages while not receiving is never to be understimated.


Ecclesiarchal Mandate (passive)


Confessor is such an inspiring leader that his mere presence boosts allie's damages by 15% in a radius of 15 units. It is completely free, permanent, and doesn't limit to the squad he's rattached to, but really buffes every unit around him. You can see it by the orange spike-shaped light under the affected units.


Join a squad (hotkey : J)


After Missionaries and Canoness, Confessor is the third and last unit able to join a squad, namely a BSS, a Celestian Squad or a Repentias Squad.

For all of them, Confessor brings :
  • His awesome Fearless passive. Already described above.
  • In addition, as Confessor will always be next to his squad, the squad benefits from his Detection and Ecclesiarchal Mandate passives. Note these two don't require the rattachment at all.
  • Confessor's Acts of Faith either damage a zone or root an ennemy squad, then rattaching Confessor to a spearing squad will make the ability easier to access (select the ability is easier than to have to select the Confessor before selecting then the ability).

In return, the squad acts as a meat shield to the Confessor, as always. after

Like for Canoness, best retinue is Repentias Squad (as they are both melee by nature, and Emperor's Wrath helps in tight melee), but Confessor can of course lead a BSS or a Celestians Squad, both for damages and Fearless.


Act of Faith : Emperor's Wrath (hotkey : W)


Available without any research, Emperor's Wrath is an Act Confessor can use with 2 Holy Icons and 35 Faith Points. It targets a selected point within a range of 30 units around the Confessor. Then, after about a second, a holy light beams from the sky, damaging all ennemies in a small zone of 5 units. Visually, it corresponds to the decorated circle around the Fleur de Lys. If ennemy is Infantry and stays another 2 seconds in the zone, it takes damages a second time, this time apparently on the full extent of the visor. Cooldown is 2 minutes. Damages are, for a single hit :
  • Most ennemies : 300 - 400.
  • Low Infantry and Low Buildings : 180 - 240.
  • Commanders : 150 - 200.
  • Aircrafts, Medium and High Buildings : 60 - 80.
It doesn't deal any Morale damages.

Used in a tight melee cluster, this can chew up from 300 to 800 HP to each non-Commander infantry unit.


Act of Faith : Holy Edict (hotkey : H)


Available at Holy Reliquary (necessary to recruit Confessor) for 50 Req., 40 Pow. and 45 s., Holy Edict is an Act Confessor can use with 2 Holy Icons and 25 Faith Points. Target an ennemy infantry unit or squad, except hero, in a range of 30 units from Confessor, and your victim will be stunned for 15 s.. Stuns include inability to move and inability to attack, except if you engage a unit in close combat. Still, reinforced ennemies spawn unstunned. Cooldown is 2 minutes.

Awesome ability, you can just stun THE elite squad the ennemy counts on to destroy you. Then you just have to mow it down with Heavy Bolters or Repentias.

Behaviour against squads led by a commander is currently unknown.


Upgrades


This is all upgrades not described in previous sections that apply to Confessor. They also apply to Canoness (and to a lot of other units for Blessed Ammunitions).

Blessed Ammunition
Bolt Pistol pierce through a part of the damage reduction granted by landscape cover. Useless to Confessor, who is meant to use Inferno Pistol...
Commander Veteran / Hero Upgrade
Boosts Confessor' health by 33% the first time (1200 + 400 = 1600), and 28% the second time (1600 + 450 = 2050), resulting in a total 71% HP boost (850 HP). Also boost HP Regeneration by 1 point each. Available at Holy Reliquary for 100 Req., 45s., and :
  • For "Veteran" : 25 Pow..
  • For "Hero" : 100 Pow., Tier 3 and "Veteran" upgrade.
Also applies to Canoness.
..........╠ Confessor : DPS on Commanders focus


Data

Here is a Commanders' DPS comparison against each other.

State
Ranged Health Damage
Ranged Morale Damage
Range
Melee Health Damage
Melee Morale Damage
Health
Morale
Canoness
Base
19.3
2.1
25
57.2
8.3
1500
500
Maxed
33.7
6.4
-
88
13.3
2150
-
Confessor
Base
21.4
2.1
25
65.2
13.3
1200
Unlimited
Max
47.9
4.3
-
29.9
13.3
2675
-
Force Commander
Base
21.9
2.1
25
61.1
8.3
1875
700
Max
42.6
4
-
122.5
13.3
2675
-
Librarian
Base
14.9
2.1
25
26.4
25
1400
600
Max
28.2
3.3
-
48.3
-
2000
-
Chaplain
Base
28.1
2.1
25
59.4
-
1200
700
Max
37.5
4
-
94.1
13.3
1700
-
Chaos Lord
Base
22.3
2.1
25
65.5
30
1630
450
Max
46.9
3.3
25
90.3
30
2430
-
Chaos Sorcerer
Base
4.3
2.1
25
16.7
22.5
1000
400
Max
32.6
3.3
-
23
-
1600
-
Farseer
Base
7
0.4
25
54.3
37.5
1310
500
Max
-
-
-
75
-
2010
-
Seer Council
Base
2.1
0.4
35
18.1
2
600
1200
Max
18.9
3.6
-
162.9
18
5400
-
Big Mek
Base
46.1
0.7
25
155.7
31.3
1310
400
Max
26.9 (!)
4.5
30
214.8
31.3
1910
-
Warboss
Base
120.4
1.9
25
166.4
40
2240
500
Max
149.7
13
-
229.6
-
3040
-
Command Squad
Base
20
2
25
36.5
0
435
450
Max
55.3
4
25
218.2
5
1710
650
Vindicare Assassin
-
137.1
20
45
95.4
5
350
450
Tau Commander
Base
30.8
5.3
40
30.8
5.3
1000
500
Max
162.9
35.8
40
-
-
-
-
Ethereal
Base
0
0
0
15
1.3
950
300
Max
89.6
14
70
31
5.3
3750
-
Necron Lord
Base
20.7
1.1
25
85.9
20.8
1800
400
Max
-
-
-
-
-
4500
-
Archon
Base
13.1
1.5
22
68.8
15
1100
600
Max
80.9
7.8
-
247.8
50.8
3700
-
Haemonculus
Base
17.3
26.
22
23
35
1000
600
Max
22.4
34.1
-
36.5
36.3
1600
-
..........╠ Confessor : Leading a squad (WIP)
As said before, and like Missionary and the Canoness, the wise Confessor can join the same squads : a Battle Sisters Squad, a Celestians Squad and a Repentias Squad.

Whatever squad the pope joins, it gets a bunch of bonuses :
  • Permanent Morale immunity. This is unique in the game. No other hero grants this to a squad in the game.
  • +15% damage boost. This is the Ecclesiarchal Mandate passive. It doesn't need the rattachement, as it is an aura around the Confessor. But since rattached squad will always be around Confessor, it will benefit from the bonus.
  • Stealth Detection, altough it doesn't need rattachement like Ecclesiarchal Mandate.

Aditionally, his Acts of Faith don't benefit to the squad, unlike Missionary, but are directly aimed at ennemy. For this, rattachement is not necessary for Confessor's Acts of Faith. But the rattachement makes micro management easier, as Confessor's Acts becomes squad's Acts, and these Acts are useful to all combinations.

Like Missionaries and Canoness, Battle Sisters, Celestians and Repentias squads provide different types of meat shields to Confessor.


Joining Battle Sisters


Your BSS becomes able to detect stealthed ennemies (like with Missionary), immune to Morale damage and 15% more powerful.

Confessor makes the BSS one of the only unbreakable ranged squad in the game, along Obliterators and Immortals. And one with 15% more damages than normal. And able to detect all ennemies. Coupled to Flamers or Heavy Bolters, you have a powerful and unbreakable shooting squad. Sadly, it is still fragile.

Emperor's Wrath deals a single blow to a massed ennemy. Holy Edict can either stop a melee ennemy before it comes to contact, or disable guns and movement of a ranged ennemy, ensuring your superiority.

In addition to meatshield job, BSS can also provide an useful boost to Confessor. While Veteran Superior is alive, Confessor benefits from Leadership's passive. So, melee damages and ranged damages are boosted by 30%.

As Confessor comes in late Tier 2, you would probably prefer to pair Confessor with more durable Celestians.


Joining Celestians


Confessor-Celestians combo is pretty decent for melee combat. Celestians are half good at close range due to their armor, damages, and health boost if Imagifer is alive.

Confessor makes the Celestians one of the only unbreakable squad in the game, along Possesseds, Obliterators, Flayed Ones and Pariahs. You have then either an unbreakable anti-machines shooter squad and/or an unbreakable mild melee force. And one with 15% more damages than normal. And able to detect all ennemies. This makes this combo potent.

In addition, Emperor's Wrath deals good damages on a tight clustered ennemy squad, giving you a welcome edge, and Holy Edict can stun either a melee specialist squad or a shooting squad, allowing you to reach it and to eviscerate it.

Obviously, you aren't forced to buy Melta weapons to these Celestians, as the main goal of this team is to handle melee duty VS infantry. If Celestians die quickly, you may not want to invest into soon to be lost weapons. Then again, having a squad proefficient both against vehicles and against infantry is tempting.

Note that against Eldar, Melta weapons are useful to destroy their stealthed turrets and gates once Confessor has detected them.

Like with BSS, Celestians can also provide an useful boost to Confessor. While Veteran Superior is alive, the man benefits from Leadership's passive. So, melee damages and ranged damages are boosted by 30%.

In addition, while Imagifer is alive, all squad gets 23% more Health... including Confessor ! Collectively, it makes a better defense than a full BSS. And individually, this combo is the one which makes Confessor the most resilient. Note a visual bug can occur, showing wannabe-pope with a depleted health gauge, while he has actually plenty (even full) health.

While the smallest squad out of the three, the Celestians' stats, the 30% damages boost for Confessor, the 15% damages boost for Celestians, and the 23% health boost for all makes the Confessor + Celestians squad a valuable one.


Joining Repentias


Adepta Sororitas' secondary hero makes the Repentias one of the only unbreakable melee squad in the game, along Possesseds and Flayed Ones. You have then an unbreakable unbreakable powerful melee force. And one with 15% more damages than normal. And able to detect all ennemies. This makes this combo very potent. Perhaps more powerful than with Canoness, due to the damage boost.

In addition, Emperor's Wrath deals good damages on a tight clustered ennemy squad, giving you a welcome edge, and Holy Edict can stun either a melee specialist squad or a shooting squad, allowing you to reach it and to eviscerate it.

Repentias don't have Leadership passive, nor Imagifer. Then the squad gives nothing special to the Confessor. The exception is when Righteous Fervor is toggled ; The Man will have his speed boosted by 30% and his damages by 50%, but will lose 8 HP/s., along the squad.
However, you'll have the most powerful melee squad Adepta Sororitas can offer.

As appealing as it sounds, don't forget Confessor can have a 30% damages boost with other squads without losing HP. But this 30% damages boost is indeed lower than the 50% one, and is lost if Veteran Superior is dead, while there is no condition with Repentias.

All in all, Repentias + Confessor squad is the best melee squad the faction has to offer, along with Repentias + Canoness. Not nearly as powerful as ennemy melee squads and/or heroes, but Acts of Faith DOES give the edge. Then, like with Canoness, what you are supposed to do on cooldown is another story...


Conclusion


Poppy Pope is a great hero you shouldn't phaze, as he's a melee powerhouse, albeit lower than Canoness. Luckily, he makes up thanks to his boatload of abilities. Place him as head of Celestians or Repentias to have a decent frontline. But don't forget as manly he is, he's still a SoB unit ; then, it remains fragile. If ennemy puts a strong opposition, you can keep Confessor and his squad behind, where he'll use the infamous Inferno Pistol, and will still be able to use his Acts of Faith. On this topic, Emperor's Wrath is free and Holy Edict needs a tiny upgrade in Holy Reliquary, and then both need 2 Holy Icons, which is a minimum at late Tier 2.

The only difficulty is Confessor needs the Holy Reliquary to be built, after hitting Tier 2. But you'll probably built Manufactorum instead, as it leads to the universal Rhino and to much needed Exorcist in next tier. To help your decision, Holy Reliquary also allow access to Death Cult Assassins, Imagifers, Morale bonus and Faith bonus.
..........╚ Confessor : Conclusion (WIP)

Conclusion


Confessor is a very useful unit.

He has a little less attack power and health than Canoness, but still enough to be employed in Commanders fights, with some support. He is also a welcomed addition to any Repentias or "melee" Celestians squad, as a powerful leader for an unbreakable (thanks to his Fearless passive) and (relatively speaking) powerful melee force (thanks to his Ecclesiarchal Mandate passive). In the heat of the battle (or not), Confessor hasn't Purifying Light to lower ennemies' damages, but he has Emperor's Wrath to deal a heavy blow to narrow ennemies. Even alone, Confessor projects an aura that boost allie's damages by 15%, just by his mere presence. And with a tiny research, he can stun an entire squad (except heroes) every 2 minutes, with just 2 Holy Icons and 25 Faith Points. Want to nullify that Assault Terminators squad ?

The only problem is it needs Holy Reliquary to be recruited. Which means you have to take the "infantry path" on Tier 2.5. So, you'll either have a Reliquary instead (or before) a Manufactorum, then better infantry but no vehicles, or either the Reliquary after the Manufactorum, which means the Confessor will come late. This is the big deal of Tier 2.5 : going infantry or going vehicles ? In addition to Confessor, Holy Reliquary allows to recruit Death Cult Assassins and Imagifers, and to boost Canoness and Confessor' health, and also to boost troopers' Morale and Faith production.

Once again, the best is to opt for whatever counters the ennemy. Don't forget Imagifers help Celestians a lot in their durability. And durable Celestians fare better against vehicles, but can be used as wannabe melee squad, helped by... Confessor and/or Death Cult Assassins. But in another hand, Manufactorum brings the ubiquitous Rhino... Choices !
Sisters Repentia Squad


AT LAST ! A melee squad !

Should a Sister of Battle sin, either in deed or in thought, she must refere it to her superior, which leads to a penance. But if the sin is too great, the culprit takes herself the decision to pronounce the oath of repentance. In this ceremony, her fellow squad members take her armor and weapons, leaving her with only remnants of robe to crudely clothe her. Then her hair is roughly cut with a knife, and she is given the solemn Eviscerator as sole weapon. Then the Sister, known as a Repentia, has to leave her Order, as she became an outcast to her peers.

Repentias then seek forgiveness through the heat of the battle, either by killing ennemies of mankind or martyring their own live while attempting it. As outcasts, Repentias band together to fulfill their redemption. Their devotion is without equal, as they have to face ennemies and their own inner demons alone. For that, even if Repentias are expelled from sisterhood's convents, they are still considered with awe to fellow sisters, for many of them envy their righteous zeal.

Gamewise, Repentias are the ONLY Sisters of Battle melee squad. Sadly, they are less powerful than other races dedicated melee squads.


Basic informations


Requisition
Power
Time
Requirement
Recruit
220
80
36 s.
  • Adepta Sororitas Convent
  • Ecclesiarchal Citadel (Tier 3)
Reinforce
55
20
13 / 11.44 / 10.07 / 8.86 s.
  • Nothing for Repentias
  • Convent and Ecclesiarchal Citadel (Tier 3) for Mistress

Squad Cap
Initial Squad
Maximum Squad
Limits
Limitations
3
4
7
3

Maximum
Regeneration
Armor type
Health
700 / 875
1
Heavy Infantry High
Maximum
Regeneration
Rally at
Death penalty
Morale
650
10
50
20

Mass
Speed
Sight range
Miscellaneous
25
16
25


Reinforce

Each squad starts with 4 sisters. Each additional sister costs 55 Req., 20 Pow. and 13-8 s.. This means there is no cost difference between building a fresh squad or reinforcing 4 Repentias (though Repentia Squads van only have 7 sisters). Concerning time, if a squad takes 36 s. to be built, it means a Repentia member worthes 9 s.. So, building a new squad takes less time that reinforcing 4 Repentias in a damaged squad, unless you have bought Elite Field Logistics (8 s.). Of course, it is purely hypothetical : as Repentias start as 4, and can be 7 at maximum, you'll always reinforce existing squads.


Mistress (hotkey : L)


The squad can spawn a Mistress in its ranks, for 70 Req., 30 Pow. and 30 s.. She has 850 HP (1063 HP with Blessed Armor), recovers 1 HP/s., and dons same armor type, move speed, mass and sight than regular Repentias.

However, she wields a better weapon ! the Twin Neural Whip. I don't fully understand its functionnement, as DPS observed in-game are in contradiction with official data. For example, Relic Wiki stated there are 2 weapons : Neural Whip and Neural Whip Twin, with respectively 1 s. and 0.75 s. refire rate, and more damages for second than for first. But when tried for 30 s. on an HQ, the medium value is equal to roughly 2/3 of Neural Whip and 1/3 of Neural Whip Twin.

Whatever, it is an awesome weapon, on par with Confessor's upgraded mace ! Except it does a lot less damages on vehicles.

Assuming this 2/3-1/3 thing, DPS are roughly :
  • From 103 to 124 DPS between Infantry Medium and Heavy Infantry High.
  • 72.3 DPS VS Commanders.
  • 51.6 DPS VS turrets.
  • 93 DPS VS Daemons standard.
  • 51.6 DPS VS Daemons High.

Unlike Veteran Superiors from Battle Sisters Squads, Seraphims Squads and Celestians Squads, Mistress is not a special unit different from her squad with special abilities, but a sort of braindead triple-powered Repentia with a remarkable burning hearth for crown. In addition to her damages, the whips can stun the ennemy, like heroes' weapons.

A weird bug occurs with Mistress : when she's alive, the Population Cap is upped by 1 point. This is the very same thing than with Celestian's Imagifer. Of course, the Pop. Cap can't go above 20 points.

For these damages and Pop. Cap reasons, Mistress should always be the first member to replace. Unless you only want meat shield, as Mistress doesn't have much more health than regular Repentias, but takes WAY more time to recruit.
..........╠ Repentias : Weapon and DPS
Repentias come with a little variety of weapons, all devoted to the sole role of anti-infantry close combat. There are divided as follow :


Eviscerators


The massive chainswords carried by regular Repentias.


Neural Whip and Neural Whip Twin


These Power Weapons are wielded by Mistress. As previously said, it is unclear how it exactly works. Mistress carries two Neural Whips, and swings them both with each attack. But trials against IA proves the Relic Wiki values don't help much. I'll then present three values : Relic Wiki's Neural Whip and Neural Whip Twin, and my extrapoloation of actual DPS.

Whips have a special trait : when ennemy is hit, the following effects may be triggered on him :
  • 3% chance to disable abilities for 4 s.
  • 20% chance to disable combat abilities for 4 s.
  • 3% chance to disable movement for 4 s.


Righteous Fervor (Hotkey : F)


Not technically a weapon, but a toggled ability. When active, the squad gains following buffs and nerfs :
  • +30% move speed.
  • +50% damages (both minimum and maximum).
  • Each unit in the squad loses 8 HP per s..

I list it as "weapon" because its main interest is to boost the damages. While active, Repentias become stronger than Assault Terminators, Possesseds and Flayed Ones, but still less than Seer Council, Nobz, Mega Armoured Nobz, Ogryns, Kroot Hound Packs and Warp Beast Packs. Use your judgement to determine if the health lose worths the damages (and speed) boost.


Weapon Statistics


Now that Repentias' weapons have been briefly explained, let's see thir statistics.

Minimal base damage
Maximal base damage
Accuracy
Accuracy on the move
Refire rate
Range
Morale base damage
Morale DPS
Special Trait
Eviscerator
85 / 127.5 *
105 / 157.5 *
80%
-
1 s.
-
15
6
-
Neural Whip
145 / 217.5 *
185 / 277.5 *
80%
-
1 s.
-
20
8
Yes
Neural Whip Twin
125 / 187.5 *
155 / 232.5 *
80%
-
0.75 s.
-
10
5.3
Yes

Asterisks means without and with Righteous Fervor.

Then Repentias DPS VS troops are :

Low
Medium
High
Heavy
Elite
Commander
Daemon
Daemon Relic
Eviscerator
38
45.6
38
41.8
38
26.6
34.2
19
Neural Whip
66
79.2
66
72.6
66
46.2
59.4
33
Neural Whip Twin
74.7
89.6
74.7
82.1
74.7
52.3
67.2
37.3
Mistress DPS with my theory
103.3
124
103.3
113.6
103.3
72.3
93
51.6
Eviscerator with Righteous Fervor
57
68.4
57
62.7
57
39.9
51.3
28.5
Neural Whip with Righteous Fervor
99
118.8
99
108.9
99
69.3
89.1
49.5
Neural Whip Twin with Righteous Fervor
112
134.4
112
123.2
112
78.4
100.8
56
Mistress DPS under Righteous Fervor with my theory
155
186
155
170.4
155
108.5
139.5
77.4

Repentias' DPS VS machines are :

Vehicle Low
Vehicle Medium
Vehicle High
Aircraft
Building Low
Building Medium
Building High
Eviscerator
26.6
15.2
4
4
15.2
7.6
4
Neural Whip
46.2
26.4
8
8
33
19.8
19.8
Neural Whip Twin
52.3
29.9
10.7
10.7
37.3
22.4
22.4
Mistress DPS with my theory
72.3
41.3
13.3
13.3
51.6
31
31
Eviscerator with Righteous Fervor
39.9
22.8
4
4
22.8
11.4
5.7
Neural Whip with Righteous Fervor
69.3
39.6
8
8
49.5
29.7
29.7
Neural Whip Twin with Righteous Fervor
78.4
44.8
10.7
10.7
56
33.6
33.6
Mistress DPS under Righteous Fervor with my theory
108.5
62
20
20
77.4
46.5
46.5
..........╚ Repentias : Abilities, Upgrades and Conclusion

Joinable squad (passive)


Not technically an ability, the Repentias can be joined by a Missionary, the Canoness or the Confessor. More on this on later section.


Zealot Charge (passive)


This upgrade is mainly meant for Repentias, but Seraphims benefit from it too. It is researched in Pristine Sanctuary at Tier 3 for 75 Req., 50 Pow. and 20 s.. Once researched, Repentias will automatically charge the enemy once in range (between 10 and 12 units ; doesn't work under 10 units) with great speed, causing 100 damages and knocking the target down (40-60 force).

It is a great remedy to Repentias' initial slowness, as it allow them to close the ennemy and cause him good damages. In another hand, against light ennemies, the knockback is so powerful that the ennemies are pushed far away. This is good for your shooters, but not necessarly for Repentias, as they'll have to chase again the targets.

Cooldown is 40 s..


Other passives upgrades


This is all upgrades not described in Weapons sections that apply to Seraphims. Generally, they also apply to a lot of other units. The benefits can also be different from an unit to another, so check the buildings sections if you want a more detailed description of each upgrade. For short :
Improved / Enhanced / Elite Field Logistics
Each one of the 3 upgrades, available at Convent without conditions bur 140 Req. and 30 s., reduce the reinforcement time (by a second and half each).
Blessed Armor
Boost hitpoints by 25%, going from 430 to 538 for Celestians, from 540 to 675 for Veteran Superior (checked in-game) and from 700 to 875 for Imagifers. Incredibly useful (mandatory, to be honest), even more because Celestians have short range and will be within ennemy's range. Bought at Pristine Sanctuary at Tier 2 for 100 Req., 50 Pow. and 45 s..
Chaplet Ecclesiasticus
Gives 100 Morale points ; squad has then 750 Morale points instead 650. Purchased at Holy Reliquary for 125 Req., 50 Pow. and 35 s..
Heart of Worship
Gives another 100 Morale points ; squad has then 600 Morale in the end (700 if Veteran Superior is alive !). Needs Tier 3, a Holy Reliquary to be bought at, a Shrine of the Living Saint and the Chaplet Ecclesiasticus upgrade, and then, 165 Req., 75 Pow. and 35 s..

..........╠ Repentias : As retinue
Like Battle Sisters and Celestians, Repentias can be joined by either a Missionary, the Canoness or the Confessor. Proper attachment is primordial. Whatever the choice, Repentias provide a good meat shield to their leader ; they are the sole dedicated melee squad, and a competent one.

If Righteous Fervor is active, the rattached leader, along the rest of the squad, loses 8 HP per second, but gains 30% movement speed (then, both Repentias, Missionary, Canoness and / or Confessor boost their speed from 16 to 20.8) and 50% damage boost (both melee and ranged). It is higher than the Leadership passive from BSS and Celestians, and doesn't need the squad leader (the Mistress for instance) to be alive, but don't neglect the health draining effect.


Missionary's lead


Note the Missionary-Repentias combo has already been covered on the Missionary chapter.

Missionary without Act of Faith offers little to Repentias : only detection (and a useless ranged attack and pitiful melee attack). Once again, in strength lies in his Acts of Faith.

Lay Hands will be valuable for Repentias, as they'll hop on the inferno of the battle and take a lot of damages. You can use it in conjunction with Righteous Fervor, to actually gain 12 HP /s. instead losing 8 HP /s., or just as a standard heal. Remember each model heal for a total of 400 HP. Over 875 HP per model with Blessed Armor, then Lay Hands heals for barely half Repentia's health. Once more and for the last time, Lay Hands prove to be useful on all squads, on all occasions.

Emeperor's Touch should never be used on Repentias, as they have no ranged weapons. It would be a pure waste of Faith.

Divine Retribution bestow your Repentias with a 25 damages automatic retaliation damages each time they are attacked. This is a perfect spell for Repentias : if ennemy fights back, which is automatic in melee combat, ennemy takes retaliation damages. And if ennemy doesn't want to suffer retaliation, he has to flee. But fleeing while pursued by a horde of half-naked nuns armed with monstruous chainsaws is easier said than done ! Assuming melee attacks have a refire rate of 1 s., this buff somewhat adds 25 DPS to Repentias.

In return, Repentias offer little to Missionary. They are the best meat shield, but they are designed to be in the heat of the battle, where Missionary will probably die. Righteous Fervor is equally useless to Missionary, as he's terrible in direct combat.


Canoness' lead


Note the Canoness-Repentias combo has already been covered on the Canoness chapter.

Pairing best melee heroin with best melee squad... enough said !

Adepta Sororitas' primary heroin gives a Morale and Morale regeneration boost. More precisely, Canoness alone has 500 Morale Points, and Repentias have 650 Morale Points. When the two are paired, the obtained squad has 850 Morale Points. Indeed, without any Morale boost or upgrade. In addition, squad regenerates 2 Morale Points per second, going from 10 to 12, further boosting their Morale resistance.

Repentias don't have Leadership passive, nor Imagifer. Then the squad gives nothing special to the Canoness. The exception is when Righteous Fervor is toggled ; Canoness will have her speed boosted by 30% and her damages by 50%, but will lose 8 HP/s., along the squad.
However, you'll have the most powerful melee squad Adepta Sororitas can offer.

As appealing as it sounds, don't forget Canoness can have a 30% damages boost with other squads without losing HP. But this 30% damages boost is indeed lower than the 50% one, and is lost if Veteran Superior is dead, while there is no condition with Repentias.

All in all, Repentias + Canoness squad is the best melee squad the faction has to offer. Not nearly as powerful as ennemy melee squads and/or heroes, but Purifying Light DOES give the edge. What you are supposed to do on cooldown is another story...


Confessor's lead


Note the Confessor-Repentias combo has already been covered on the Confessor's chapter.

Adepta Sororitas' secondary hero makes the Repentias one of the only unbreakable melee squad in the game, along Possesseds and Flayed Ones. You have then an unbreakable powerful melee force. And one with 15% more damages than normal. And able to detect all ennemies. This makes this combo very potent. Perhaps more powerful than with Canoness, due to the global damage boost.

In addition, Emperor's Wrath deals good damages on a tight clustered ennemy squad, giving you a welcome edge, and Holy Edict can stun either a melee specialist squad or a shooting squad, allowing you to reach it and to eviscerate it.

Repentias don't have Leadership passive, nor Imagifer. Then the squad gives nothing special to the Confessor. The exception is when Righteous Fervor is toggled ; The Man will have his speed boosted by 30% and his damages by 50%, but will lose 8 HP/s., along the squad.

As appealing as it sounds, don't forget Confessor can have a 30% damages boost with other squads without losing HP. But this 30% damages boost is indeed lower than the 50% one, and is lost if Veteran Superior is dead, while there is no condition with Repentias.

All in all, Repentias + Confessor squad is the best melee squad the faction has to offer, along with Repentias + Canoness. Confessor is less powerful than Canoness, but he gives 15% damages boost to Repentias. Not nearly as powerful as ennemy melee squads and/or heroes, but Acts of Faith DOES give the edge. Then, like with Canoness, what you are supposed to do on cooldown is another story...
..........╚ Repentias : Conclusion

Conclusion


Repentias may be THE Adepta Sororitas' melee squad (as Celestians are only halfway decent, as they can win only VS non-melee ennemies), they are not so powerful. The catch is, of course, they come at Tier 3. The rotten cherry on this sh*tcake is they are subpar when compared to ennemy Tier 3 melee squads. Hell, they are even weaker than Grey Knights, who are Tier 2 squad. In short, Repentias do less damages to infantry than others, and do little damages to machines (unlike Nobz with Power Claws for example). They are an equivalent to Necrons' Flayed Ones, without the deepstrike ability and the Morale damages.

To make up for their relative weakness (as usual with this race), Repentias are limited to 3 squads, where other elite squads are generally limited to 1 (Kroot Hounds Packs, Warp Beast Packs and Nobz are limited to 2, Flayed Ones are unlimited). They also can be joined by Missionaries, Canoness or Confessor, with the traditional benefits. Note coupling them with Confessor will make them Morale immune. And of course, they are meant to be supported by Acts of Faith. The best ones for them are :
  • Missionary's Lay Hands, the universal healing spell.
  • Missionary's Divine Retribution. Shooters will hesitate to focus Repentias, and melee ennemies would ever run away or fight back and take heavy damages.
  • Canoness' Purifying Light, to halves melee damages, and makes shooters impotent.
  • Confessor's Holy Edict, to paralyze either a shooter or a melee squad, and then deleting him.
  • Confessor's Wrath of the Emperor, to deal 300-800 damages to nearby infantry ennemies, half for Commanders. As most elite infantry HP ranges between 550 and 1200...

For these reasons, all the 3 "joiners" make a fine leader to the squad. IMO, the best order is :
  • Missionary with Lay Hands and / or Divine Retribution available. They give a real upper hand.
  • Confessor for Fearless. In addition, Detection and Ecclesiarchal Mandate will always apply to the squad, without taking the risk to split the Confessor appart the Repentias.
  • Canoness.
  • Missionary with Acts of Faith on cooldown. Detection is still a plus, but don't forget that even with his 1400 HP with Blessed Armor, Missionary has only "standard" Infantry High Armor, and low damages.

Again, only Missionary's Acts of Faith need him to be rattached to Repentias to be used on them. Both Canoness and Confessor have Acts that work well with Repentias, but they don't need the rattachement as they target either an ennemy squad or a ground zone.

For Righteous Fervor, note that Lay Hands heals 20 HP per s., while Righteous Fervor hurts for 8 HP per s.. Then, using both boost your damages by half and your HP by 12 points per s..

To finish, Zealot Charge is an appreciable bonus as it gives some burst of speed and damages.

Needless to say, even if they are weaker than analogous ennemies, Repentias are a vital part of any Sisters army, as they are their only real Melee squad.
Exorcist


Exorcists are Adepta Sororitas' artillery tank. Lorewise, there are 2 types : the Sanctorum Pattern Exorcist, which is akin to the Space Marine's Whirlwind, and the Prioris Pattern Exorcist, which is the highly ornated organ-like artillery canon we all know and love. Gamewise, Exorcist is probably, and for once in a while, the best artillery vehicle in the game ! It doesn't deal damages, but cause great disruption and Morale damages in ennemy ranks, without any friendly fire ! It is the only new vehicle available at Tier 3, but definitively worth it.


Basic informations


Requisition
Power
Time
Requirement
Recruit
100
225
30 / 27 / 24.3 / 21.8 s.
  • Manufactorum
  • Ecclesiarchal Citadel (Tier 3)
Vehicle Cap
Health
Armor type
Limits
Health and Limitations
4
1600 / 2000
Vehicle Medium
2
Mass
Speed
Sight range
Miscellaneous
50
24
35


Missile Launcher


Missile Launcher is Exorcist's only weapon, and is all about special traits :
  • It fires a salvo of 6 missiles every 10 s..
  • Missiles salvos cover a large area, allowing to hit several ennemies per shot.
  • Each missile has a radius of 8 units when it explodes.
  • High Knockback (40-60 force).
  • No friendly fire.
  • Has an accuracy offset of 20%, and blind offset of 30%. I don't know what it means. If someone knows...

Its statistics, per missile (maximum of 6 missiles), are :
Minimal base damage
Maximal base damage
Accuracy
Accuracy on the move
Refire rate
Range
Morale base damage
Morale DPS
Special Trait
Missile Launcher
85
100
100%, offset 20, blind offset 30
15%
10 s.
90
80
4
Yes

Then Exorcist's DPS VS troops are :

Low
Medium
High
Heavy
Elite
Commander
Daemon
Daemon Relic
Morale
Single missile
4.6
4.6
4.6
4.6
3.2
3.7
3.7
2.3
4
Theorically full salvo
27.6
27.6
27.6
27.6
19.2
22.2
22.2
13.8
24

Exorcist DPS VS machines are :

Vehicle Low
Vehicle Medium
Vehicle High
Aircraft
Building Low
Building Medium
Building High
Single missile
3.2
1.9
0.9
0
4.2
3.2
1.4
Theorically full salvo
19.2
11.4
5.4
0
25.2
19.2
8.4


Attack Ground (hotkey : G)


Exorcist repeatedly attack the ground zone you designate, whatever there are ennemies or not.

It is a good option to scout in the fog of war, since rockets can send a faraway ennemy right into your arms, indicating ennemy is here. You can also use it to cover your Sisters, as the Exorcist rockets don't disrupt the Sisters. Just remember to update the ground location as you progress (or to target an ennemy or to move the Exorcist to end the mode).


Hunter Killer Missile (hotkey : M)


Target any ennemy except Infantry and Aircraft, within a range of 1000 units (this range is wide enough to theorically focus anywhere on the map). Exorcist then fire a homing missile which deals high damages at once after several seconds. Cooldown is 3 minutes. Damages are :
  • Daemons (both normal and High) and Buildings High : 300 - 500.
  • Vehicles Low and Buildings Low : 450 - 750.
  • Vehicles Medium and High and Buildings Medium : 600 - 1000.


Upgrades


Exorcist get only two upgrades. They are bought at Manufactorum and also apply to other vehicles. The benefits can also be different from an unit to another, so check the buildings sections if you want a more detailed description of each upgrade. For short :

Improved / Enhanced / Elite Mechanized Production Efficiency
Each one of the 3 upgrades, available at Manufactorum without conditions but 165 Req. and 30 s., reduce the production time (by a roughly 3 s. each).
Reinforced Hull Plating
Boost hitpoints by 25% (going from 1600 to 2000). Not so useful on Exorcist, as it is meant to stay behind lines, but since it applies to all vehicles... Costs 150 Req., 100 Pow. and 60 s..
[/previewimg]


Conclusion


Exorcist comes late in the game (Tier 3), but kicks a*s ! It is simply the best artillery in the game (well, maybe second, due to Basilisk Earthshaker Round), which is uncommon for Sisters. Each 10 s., it has high chances to disrupt a large portion of ennemy's infantry, along dealing extreme Morale damages. 80 Morale damages in a AoE of 8 units, multiplied by 6 rockets IS such a thing, that is common to break a squad in a single salvo !

A slow tactic involve the inward disruption. Rockets send ennemy flying a so long way that 3 or 4 ennemies could be sent right into your massed armies with each salvo, allowing you to outnumber them with ease, and then to gnaw ennemy forces.

You can have 2 Exorcists at once, though it takes 8 slots of Vehicle Cap. As pricy as it is, you can reduce the cooldown reduction between each missiles volley. With luck, you can indefinitely knock off ennemy troopers ! AND keep them demoralized, reducing their damages.

A particular strategy to use is to attack a specific ground point with one of your Exorcists, to cover your army slowly advancing, and to keep the second one to shoot normally as soon as an ennemy is visible.

In addition, having two Exorcists allow to take away from 1200 to 2000 HP to a vehicle, even Relic vehicle ! Then from 12% to 20% of Baneblade, Land Raider and Restored Monolith' health, and from 17% to 28% of Dais of Destruction's HP. Relic Daemons have more health than Relic Vehicles and take half damages compared to Relic Vehicles, then Hunter Killer Missiles are far less useful against them.

For all these good reasons, i personnally always make 2 Exorcists, as it is the disruption tool the Sisterhood needs desperately.
Penitent Engine


When one has committed a sinful crime, he's often dispatched on the spot. But some can pledge their faith into the Emperor and seek redemption. As such, they throw they live in the name of the Emperor, by becoming Repentias for Sisters, and Arco-flagellants for others (they are drugged to the eyes and sent in front lines ; they are not present in game). Doing this, the repentant seeks redemption through death, being its own or the one of the ennemy. When repentant's crime is so heinous that even arco-flagellation is not punishment enough, he can be interred into a Penitent Engine. Penitent Engine are giant walkers, akin to Dreadnoughts or Wraith Lords. The penitent is permanently wired to his Engine, and fully exposed to the ennemy's fire, as it is admitted it is dor the Emperor to decide if the penitent will be sparred or reduced to honeycumb by ennemy shots.


Basic informations


Requisition
Power
Time
Requirement
Recruit
150
330
30 / 27 / 24.3 / 21.8 s.
  • Manufactorum
  • Shrine of the Living Saint (Tier 3)

Vehicle Cap
Health
Armor type
Limits
Health and Limitations
4
5500 / 6875
Vehicle Medium
2

Mass
Speed
Sight range
Miscellaneous
50
28
30


Heavy Flamers


The Engine is equiped with 2 Heavy Flamers. They can focus only one target, then count as a single "double" weapon.


Power Fist and Power Fist Twin


Probably a leftover of the Space Marine's Dreadnought, proving Sisters of Battle have probably been modeled from Space Marines (with the Servitors, the construction animations, the general organization of the units and buildings...). However, Penitent Engine can't trade one of its fists for an upgraded weapon. Then the two weapons can be counted as one.

I tested Engine's melee attacks against HQ (Building High) and Power Generator (Building Low). I figured out the ingame DPS are equal to the sum of the DPS of the two weapons, divided by 2, then multiplied by 1.5. As Power Fist normal and Twin have the same DPS, then it justs need to be multiplied by 1.5. And then I remarked this "(X+Y)/2*1.5" formula applies well to Mistress' DPS, hinting that is the correct calculation. Of course, i tested also with Canoness and Confessor on HQ, and it is the DPS from Narod / Relic Wiki.


Weapon Statistics


Now that Engines' weapons have been briefly explained, let's see thir statistics.

Minimal base damage
Maximal base damage
Accuracy
Accuracy on the move
Refire rate
Range
Morale base damage
Morale DPS
Special Trait
Heavy Flamer
42 / 84 *
50 / 100 *
100%
100%
0.5 s.
25
25 / 50 *
25 / 50 *
Yes
Power Fist
300
370
65%
-
1 s.
-
50
16.3
-
Power Fist Twin
230
300
65%
-
0.75 s.
-
25
8.1
-

Asterisks means with on and with both Heavy Flamer(s).

Then Engines' DPS VS troops are :

Low
Medium
High
Heavy
Elite
Commander
Daemon
Daemon Relic
Heavy Flamer
41.4
78.2
50.6
69
55.2
23
92
9.2
Both Heavy Flamers
82.8
156.4
101.2
138
110.4
46
184
18.4
Power Fist
98
76.2
76.2
87.1
76.2
43.6
87.1
65.3
Power Fist Twin
98
76.2
76.2
87.1
76.2
43.6
87.1
65.3
Engine's melee DPS with my formula
147
114.3
114.3
130.6
114.3
65.4
130.6
97.9

Penitents' DPS VS machines are :

Vehicle Low
Vehicle Medium
Vehicle High
Aircraft
Building Low
Building Medium
Building High
Single Heavy Flamer
27.6
18.4
9.2
2
46
18.4
27.6
Both Heavy Flamers
55.2
36.8
18.4
4
92
36.8
55.2
Power Fist
119.8
108.9
65.3
6.5
65.3
32.7
43.6
Power Fist Twin
119.8
108.9
65.3
8.7
65.3
32.7
43.6
Engine's melee DPS with my formula
179.7
163.3
97.9
11.4
97.9
49
65.4


Upgrades


Like many Sisterhood's vehicles, Penitent Engines get only two upgrades. They are bought at Manufactorum and also apply to other vehicles. The benefits can also be different from an unit to another, so check the buildings sections if you want a more detailed description of each upgrade. For short :

Improved / Enhanced / Elite Mechanized Production Efficiency
Each one of the 3 upgrades, available at Manufactorum without conditions but 165 Req. and 30 s., reduce the production time (by a roughly 3 s. each).
Reinforced Hull Plating
Boost hitpoints by 25% (going from 5500 to 6875). Incredibly useful. Costs 150 Req., 100 Pow. and 60 s..


Conclusion


The Penitent Engine are, for once with the Sisters of Battle, the second best (if not the best) walkers in the game. Their speed allow them to quickly catch their prey, which can be anything as they are powerful against any ennemy at melee, and can decimate groups of infantry with their Heavy Flamers. They win against every other walker in a 1 on 1 fight, except Krootox with its HP upgrade.

The only "strategy" here is to switch between Melee stance and Ranged stance, depending on who you face. Melee is the go-to, but against Infantry, it is often better to use flamers, as it deals roughly same health damages but in an Area of Effect. In addition, Heavy Flamers deal high Morale damages (50 DPS), far more than Power Fists.

It is sad that the Penitent Engines come at the end of the game (it needs a Shrine of the Living Saint, so a pre-requisite of 400 Pow. and Req.) and are limited to 2. But if you can afford it, buy them ! They are the ultimate frontline you need, and will spell ravage on ennemy's army if supported by infantry.
Living Saint

The ultimate hero of Adepta Sororitas. Unstoppable juggernauts of holy hatred, the Living Saints are extraordinarily devout servants of the Emperor, displaying seemingly miraculous abilities derived from their burning faith during their lifetime, the most "common" being resurrection. Living Saints draw their powers from the Warp, much like the Chaos. But unlike Chaos servants, the Living Saints are not psykers. It is actually their boundless faith into the reverred and immortal Emperor of Mankind that allows them to unconsciensously to syphon the Warp powers.

The fact that Living Saints are gigantic angels seems to be a specificity of the game and art, as in the lore texts, nothing hints the Living Saints are like this, and they are described as regular Sisters.


Basic informations


Requisition
Power
Time
Requirement
Recruit
400
400
70 s.
  • Ecclesiarchal Chapel (Tier 1)
  • Shrine of the Living Saint
  • Captured Relic

Squad Cap
Initial Squad
Maximum Squad
Limits
Limitations
-
1
1
1

Maximum
Regeneration
Armor type
Health
6000
4
Daemon High
Maximum
Regeneration
Rally at
Death penalty
Morale
Immune
-
-
-

Mass
Speed
Sight range
Miscellaneous
100
24
30


Only weapon : Ardent Blade


Like other Daemon Relic units, the Living Saint comes with only this melee weapon. It has a tiny special effect : when ennemy is struck, he takes 50 damages over 10 s. (5 points per s.).

Minimal base damage
Maximal base damage
Accuracy
Accuracy on the move
Refire rate
Range
Morale base damage
Morale DPS
Special Trait
Ardent Blade
360
440
90%
-
1 s.
-
100
45
Yes

Then Saint' DPS VS troops are :

Low
Medium
High
Heavy
Elite
Commander
Daemon
Daemon Relic
Ardent Blade
144
270
270
270
270
144
216
126

Saint's DPS VS machines are :

Vehicle Low
Vehicle Medium
Vehicle High
Aircraft
Building Low
Building Medium
Building High
Ardent Blade
144
144
144
144
144
108
90


Faithful unit (passive)


While the Living Saint is alive, she brings 1 point to the Faith gauge, generating 0.1 Faith Points per second. And should the Saint dies and Martyr's Gift is bought, this death brings 8 Faith Points.


Miraculous Intervention (passive)


When Saint dies and this ability is ready, she automatically resurrects on the spot after several seconds, with 2/3 of ther HP (4000). Cooldown is the longest of the game : 10 minutes !

Sadly, this skill is heavily bugged. While it is on cooldown, the Ecclesiarchal Servitor, Rhinos, Lightnings, Repentias, Exorcists and Penitent Engines hard caps are reduced by 1 ! You'll have either to wait the skill to be recharged or the Saint to die for good to fix this.


Jump (hotkey : J)


The Living Saint quickly flies over any intervening terrain to another location. At full charge the Living Saint will have almost 2.5 (2 4/9) jumps available, requiring 45 s. to recharge a jump, and a total of 110 s. total to recharge from empty.


Flame of the Ardent Blade (hotkey : ?)


Targets an ennemy in a range of 25 units. Then, the Saint shoots a fireball which burns all ennemies in its path, in the maximum range (25 units) and in a 30 degree arc. Damages dealt are 400-500 for health and 100 for Morale. Does not friendly fire.


Conclusion


Sadly, the Living Saint is probably the worst ultimate unit of the game. It is still a very good melee fighter on its own, but against her bethren, ironically, don't wait miracles from her.

Be cautious about Miraculous Intervention bug. Indead Miraculous Intervention boosts Living Saint's health up to 10000 HP (which is still less than Bloodthirster and Avatar of Khaine, but higher to Greater Knarloc [though it has twice attack power] and Dais of Destruction, and equal to other relic units), but in the final tier of her life (between her resurrection and her permanent death), some squads and/or units will be capped and unavailable.

A way to use Living Saint is to jump her straight into ennemy base, far from battlefield, and to wreak havoc. Base defenses or light resistance won't avoid the Saint to destroy some buildings (though Ardent Blade alone hardly kill any ennemy). This tactic works wonders on HQ maps in Campaign mode, where destroying a specifing building wins the game. Sadly, this is nothing the Bloodthirster can't do, and it does it better (his health "penalty" while outside combat makes him die after... 58 minutes [14.000/4/60]. Lol). Needless to say, if ennemy backs to save his base, take the opportunity to advance with your army and take some ennemy's Strategic Points.

Of course, there are two "natural" other ways to use Living Saint ; first to destroy turrets (but Penitent Engines are better for this IMO), or if ennemy has his ultimate unit, match him with your Saint AND your army. It is unikely she'll survive, but her tanking services will be mandatory.

Just don't hide the Saint if you build her : she's a valuable Faith generator, but you'll normally have plenty of other Faith generators. So, don't build her just for her Faith.
STRATEGY --------------------------------------------------------------
Junctions between squads and Missionary, Canoness and Confessor
Battle Sisters Squad
  • Meat shield worthing up to 2.900 HP at Tier 1 (10 Sisters) and to 4.255 at Tier 2 (10 Sisters + Veteran Superior + Blessed Armor), with standard armor.
  • Best shooting or morale breaker retinue.
  • Veteran Superior boosts leader (and squad)'s damages by 30%.
Celestians Squad
  • Meat shield worthing up from 1.720 HP (4 Celestians) to 4.550 (4 Celestians + Veteran Superior + Imagifer + Blessed Armor), with the best armor.
  • Acceptable melee retinue against non-melee-specialists.
  • Best (and only) anti-vehicles retinue when upgraded. Through no Sisters leader is designed to face vehicle.
  • Veteran Superior boosts leader (and squad)'s damages by 30%.
  • Imagifer boosts leader (and squad)'s health by 23%.
Repentias Squad
  • Best meat shield, from 4.900 HP (7 Repentias) to 7.188 (7 Repentias + Mistress + Blessed Armor), with the best armor like Celestians.
  • Best melee retinue.
  • Righteous Fervor boost leader (and squad)'s speed by 30% and damages by 50% in exchange of 8 HP/s..
Missionary
  • Weak*.
  • Stealth Detection*.
  • Acts of Faith applying to squad :
    • Lay Hands : heals the squad over time. Godly useful throughout the game.
    • Emperor's Touch : turns guns into kickass guns. Definitively designed for shooters.
    • Divine Retribution : grants some retaliation damages. Especially designed for melee combat.
Early game, this combo is mandatory, to ensure ability to detect stealthed ennemies without losing your detector, and to help the squad to stay alive with Lay Hands. As game goes by, the partnership reminds useful for both sides. At Tier 2, Emperor's Touch Bolter gives an awesome edge.
This combo is only useful for getting stalling power through healing IMO. Which is of course always a good thing. Additionnally, it is good to get rid of stealthed Eldar turrets.
This junction is really powerful, due to both detection, healing and retaliation. Lay Hands regens 20 HP/s., or 12 under Righteous Fervor. Boosting both damages and healing at same time makes the squad fearsome ! And Divine Retribution is, for the only time, helpful here : if ennemy runs away, Repentias can chase and cut them with Zealot Charge ; if ennemy fights back, it takes retaliation ! This combo then ranges from "just Repentias with detection" to "perhaps temporary best melee squad in the game" depending on Acts of Faith usage.
Canoness
  • Brings 200 Morale points to the squad.
  • Best damages (both ranged and melee)*.
  • Acts of Faith* :
    • Purifying Light nerfs nearby ennemies' damages, relatively granting nearby allies some survivability.
    • Ascension summons melee anti-infantry units for several seconds, effective against all ennemies except building and aircrafts.
The synergy between BSS and Canoness is limited to meat shield. Which is not necessarily bad in Tier 1. For battles against melee opponent, it could be a wise idea to detach the Canoness, even if it means let her alone to fight at melee, and make your BSS supporting her with their Flamers and Bolters. At Tier 2, don't forget Inferno Pistol also benefits from Veteran Superior's Leadership boost.
The synergy between Celestians (with Imagefer and Veteran Superior) and Canoness (with or without Acts of Faith) make it an acceptable T2 melee squad, for Celestians being semi competent at melee, Canoness being fully competent, Imagifer bringing health and Veteran Superior bringing muscle. At maximum (members and upgrades), damages revolves around 315.6 DPS VS Heavy Infantry (4*18 + 72 + 132*130%) .
One of the best melee combos for Adepta Sororitas. At maximum, squad has 7 Repentias, a Mistress and Master Crafted Weapon for Canoness, dealing approximatively 538 or 807 DPS VS Heavy Infantry (7*41.8 + 113.6 + 132) without and with Righteous Fervor. It is a little more defensive than with Confessor, due to Canoness' higher health and Purifying Light, and Canoness not having the damages boost aura. Keep in mind that individually, Canoness is stronger than Confessor.
Confessor
  • Stealth Detection*.
  • Makes squad unbreakable.
  • Second best damages (both ranged and melee)*.
  • Ecclesiarchal mandates boost nearby infantry damages by 15%*.
  • Acts of Faith* :
    • Wrath of the Emperor deals some damages on a tight zone, helpful if your troops are struggling at melee.
    • Holy Edict amazingly stuns a squad (not lone heroes).
The synergy between BSS and Confessor is limited to meat shield and Leadership boost, like with Canoness. As Confessor comes after Celestians are available, this combo is somewhat unlikely.
The Celestians-Confessor team is somewhat similar to Celestians-Canoness team. Total ashores 318 DPS VS Heavy Infantry (4*18*115% + 72*115% + 117.3*130%), which is a bit better (315 DPS with Canoness).
The best melee combo. At full, deals theorically 584 or 876 DPS VS Heavy Infantry (7*41.8*1.15 + 113.6*1.15 + 117.3) without and with Righteous Fervor. As a whole, it is more offensive than with Canoness, due to Fearless, Ecclesiarchal Mandate and Wrath of the Emperor. Holy Edict serves both attack and defense. Just don't forget that individually, Confessor is weaker and less durable than Canny.

* : Leader doesn't need to be rattached to a squad for this feature to be effective.
Planning a strategy

Sisters as a whole

Ok, now here we are. As you understood, the catch is the Sisters of Battle are an overall weak race, plagued by the combination of absence of decent melee soldiers and weak shooters. The best theory is to use :
  • At Tier 2, at least 3 Celestians with Imagifers to deal with turrets, Listening Posts, base and vehicles, Heavy Bolter Sisters to deal with infantry, and Missionaries for Lay Hands and potentially Emperor's Touch Bolter. All with Veteran Superiors and Inferno Pistols.
  • Bonuses for Tier 2 are Rhinos for transport, Canoness for damages and Purifying Light and Confessor for damages boost aura. An upgraded Immolator is useful against turrets, but cost a lot of resources and time and deals less damages than Celestians.
  • At Tier 3, add some Repentias to protect shooters should ennemy come close, and most importantly, Exorcists to dispatch ennemy and demoralize him quickly.
  • At "Tier 4", add the Penitent Engines for their outstanding speed, resistance and muscle, and Living Saint if you can for raiding base.

Of course, ideal scenario rarely happens, and you'll have to adapt to ennemy. For example, a heavy heroes user will call for a clever usage of Rhinos transporting Death Cult Assassins right on ennemy heroes.

You then have to juggle with everyone forces and weaknesses. It is not like "i rattach powerful Big Mek to a dedicated Slugga Boyz squad with Flamers and i teleport them into melee while i have two powerful Shoota squads covering them", or "my bazillion Lasguns terrorize them, my grenades launchers disorients them, Command Squad goes over the top and Heavy Weapons Teams support him". It is more like "all i have until Exorcists is crap, how do i manage this until then ?" Hence the battle planification.

Other thing to consider is : this is MY point of view on Sisters of Battle. I'm nowhere a good player, i beat the CPU in Expert but i'm somewhat afraid to play online to be honest ! But as i collected datas about Sisters (and other races) i came to this conclusion. But i'm not away from misleading myself. For example, i watched game where players fielded unupgraded Celestians without fielding any Heavy Bolter Battle Sister. Or players actually liking throwing Phosphor Grenades.

Sisters Tier 1 forces

Snowball IS a thing. The beginning is very important. Then, it is primordial to know how your early forces behave :
  • Missionaries :
    • Are cappers, not really suitable to fight, but for capping and detecting stealth ennemies. Marginally, a Missionary can be good against shooters, but he has to reach them first, and even them, Missionary is a lone unit, not a squad, then he'll be outnumbered.
    • Are useful to heal Battle Sisters with their 15 FP Lay Hands (1:30 cooldown).
  • Battle Sisters :
    • Without upgrades are subpart, even while they are considered to have a good ratio price / time to build / durability.
    • With Flamers are relatively good at range still but terrible at melee and require a Pristine Sanctuary and Power.
    • Can bolster their durability with a Missionary and Lay Hands, as seen above.
  • Canoness :
    • Is average. She is the only decent melee and/or tank option early game, though. Her Purifying Light needs 2 Holy Icons (90 Req. and 25 Pow.) and about 1m40 to earn the required Faith if you have no Seraphims (30 FP / [0.1+0.175] FP/s. = 109 s.).
    • Gains relatively good damages with upgraded weapons. But it requires Pristine Sanctuary and she's still less durable and less specialized than other heroes.
  • Seraphims have low damages (still higher than unupgraded BSS) but are able to damage ennemies while kitting, making them a counter to melee ennemies, but still dealing low damages.
  • Upgraded Listening Posts deal low damages, but better Morale damages than other LP (except other LP kill faster, then inflict Morale death penalties faster...).
  • Inferno Turrets behave the same way than upgraded LP.
  • Purgatus Mine Fields are somewhat problematic. Only one of them detonates, leaving a flame which deals good Morale damages, but which is easy to avoid once visible.
  • Ecclesiarchal Servitors CAN damages buildings with their Dismantle ability... but they will be busy building your base.

Early compositions

What to start with ?

Multiple BSS are the way to go. They have a good price / health ratio and allow to dance. They can buy Flamers later on for more damages. They can also be a sort of ponctual tank every 1:30 with Lay Hands. On Tier 2, they can be turned on somewhat mobile turrets with powerful Heavy Bolters.

A "front" unupgraded BSS with a healing Missionary to protect a "back" Flamers BSS can also be a good idea. But remember that ennemies engaged in close combat receive only 77% of ranged Health damages and a neglectible 10% of ranged Morale damages, so don't expect to relief your courageous melee sistahs by breaking engaged ennemies' morale.

An alternative is, of course, rattaching the Canoness to the "front" squad instead the Missionary. The sisters likely won't survive, but the squad (well, Canny) will deal a lot more damages. You can of course mix the two ideas, by rattaching the Missionary and letting Big Sis alone, but she'll become a vulnerable target.

Seraphims are good at kiting harassing builders and moving ennemies, and have better damage than unupgraded BSS. On Tier 2, they are good PG raiders and supporters with Angelic Visage and Krak Grenades. The Inferno Pistol is a real plus.

Fielding a lot of Missionaries to simulate a melee squad is just for fun, as for 8 Missionaries, you'll have to pay a whooping 600 Req.. And they can't reinforce.

Going Imperial Guard by fielding a lot of unupgraded BSS due to their relatively low cost leads to the risk of being out-teched. Or decimated, for example against a mass of Fire Warriors or Banshees.

Fielding a lot of Seraphims, lastly, cost a great deal of Power. This hinders your teching to Tier 2. Even worse, at Tier 2, Seraphims have a minor damage boost in form of Veteran Superior and Inferno Pistol. This is nothing compared to BSS Heavy Bolters... not to mention ennemies' weapons.

See what i said by "planification" and "juggling with weaknesses" ?
Starting Build Orders (BO)
As said before, writing down a "road sheet" can only but help you to follow your intended strategy. So, i give some of mines in later sections.

Starting shortcuts and queueing

It is not only about Build Order (BO), but also about shortcuts and Shift button. Shift allows to queue up future actions. For example, select a squad, right-click on a Strategic Point (SP) to capture it, and maintain Shift and right-click on another SP. Your squad will cap the first one, then the second one. This technique also apply to erect buildings into precise order with no time loss.

The prime example is the universal beginning.

Right when game starts, the Servitor is already selected. Just push B to Build, then C for Convent, then left-click anywhere to build it. Then just push B anew and either S for Sanctuary, or P for Plasma Generator, then maintain Shift and left-click where you want your second construction to be built. The funds are spent and the foundations are placed. If you do nothing more, the Servitor will complete the Convent first, then he'll complete the second building. But of course, you'll do something more.

Select the Ecclesiarchal Chapel, then press S for Servitors, or M for Missionaries. In the order and as many as you want. Right-click on a spot will direct the freshly recruited unit to it. Possibilities are :
  • If you click on a building in progress and the next unit(s) is a (or are) Servitor(s), he or they will directly work on it.
  • If you click on a damaged building (or later vehicle), and the next unit(s) is a (or are) Servitor(s), he or they will directly repair it.
  • If you click on a SP and the next unit(s) is (or are) able to cap (like Missionary), he or they will directly capture it.
  • If you click on one of your units, the next unit(s) will rally it.
  • If you click on an ennemy, the next unit(s) will fight it, if you don't lose its sight.
  • Whatever else, the next unit(s) will rally the location or building you selected.

Then, if the next unit is a Servitor, select the second building (it is more beneficial to have one Servitor working on each of the two first buildings than to have two Servitors to work togheter to finish Convent faster and second building after). If the next unit is a Missionary, select a SP. Change targets for each next unit (unless you want, for example, 3 Servitors with 1 on one building and 2 on the second one).

When you have 2 Servitors, select them both, press B to Build, P for PG or S for Sanctuary, hold Shift and right-cick on a location : this will be your 3rd building. The 1st Servitor will complete it when he finish the Convent, and the 2nd Servitor will help the 1st Servitor to complete it once he finish the 2nd building.

A tip : when 2 Servitors work on same construction, build time is reduced by 33%. More Servitors don't reduce build time anymore. Same thing apply to repair, both for buildings and vehicles.

My starting core

  • Right at beginning :
    • B > S > Right-click on map : build Convent.
    • B > C > Shift-right-click on map : prepare Sanctuary (same build time for both buildings).
    • Select HQ, then S > M > M > Click on Sanctuary's foundations : recruit a 2nd Servitor and 2 Missionaries, and order the future Servitor to build the Sanctuary.
  • Once the Servitor is out :
    • Click on the 1st SP : the future 1st Missionary will cap it.
    • Select both Servitors > B > P > Shift-right-click on map : prepare Plasma Generator.
  • Once the Missionary is out :
    • Select the Chapel > Right-click on the 2nd SP : the future 2nd Missionary will cap it.
    • Select the Missionary > Shift-right-click on a 3rd SP : he'll capture it after completing the capture of the 1st SP.
  • The Convent is now about to be complete : select it... and the rest depend on the BO.

Note even in this basic build, there is room to debate. For examples, certain builds forego Pristine Sanctuary to build Plasma Generator first (or instead), other builds want only Convent with no other buildings. Or some prefer to start with Missionaries before Servitor, etc.

I have myself to test starting with Missionaries first.
Single Seraphim

Yeah i know i already used this piece of art.

The goal is to tech as fast as possible to get Superior Veterans with Inferno Pistols and Leadership passive, and Heavy Bolters for BSS, to have a competitive anti-infantry. Not mentionning having Celestians against turrets and vehicles.

So, i want a minimal investment, but who can last long enough. Seraphims are not tough, but they can escape most situations, and lower ennemy's economy by killing builders or weak cappers

At some point, i have to make a decision : having a better economy with a 3rd LP or tech 20 s. sooner.


Build order :
  • Start :
    • B > C > Click.
    • Select Chapel > S, M, M.
    • Select Servitor > B > S > Shift-Click.
    • Select Chapel > Right-click on Sanctuary's foundations.
  • Servitor is out :
    • (Select Chapel >) Right-click on the first point to capture.
    • Select both Servitors > B > P > Shift-click.
  • Missionary is out :
    • Select Chapel > Right-click on a 2nd point to capture.
    • Select Missionary > Shift-click to a 3rd point.
  • 2nd Missionary is out :
    • Select him > Shift-click to a 4th point.
    • Convent is complete around 0:46 mark.
  • 0:50 mark :
    • Select Convent > Wait for Sanctuary (about 0:55) > S > Right-click on ennemy's base.
    • Both Servitors are running toward PG foundations :
      • Select one Servitor > Right-click next to first point > B > L > Wait for capture > Left-click, and then > Shift-click :
        • Next to 3rd point if you favor economy.
        • To safety if you plan to teach early.
      • Select other Servitor > Shift-click next to 2nd point.

Then, Seraphims are out around 1:23, flying toward ennemy's base. Select them and keybind. You have now to deal with harass, economy and possibly defense. From now on, things will be harder to perform in optimal conditions.

  • 1:27 : the PG is finished, Servitor is running toward 2nd point > Select him > B > L > Left-click.
  • 1:47 : the first LP is done, Servitor is running toward 3rd point, which is upon capture > Select him > B > L > Wait for complete capture (1:58) > Left-click.
  • 1:56 : the 3rd point is captured.
  • 2:08 : the 4th point is captured.
  • The following depends if you bought or not a 3rd SP.
    • If you bought it :
      • 2:11 : the 2nd LP is achieved. Servitor can help building the 3rd one.
      • 2:35 : you can tech. About 20 Pow. left.
      • 2:39 : the 3rd LP is achieved.
      • 2:49 : recruit a BSS.
      • 2:58 : 5th point is captured.
      • 3:10 : build a 2nd PG.
      • 3:22 : 2nd PG is complete.
      • 3:34 : BSS is out. Select a Missionary > T > Left-click on BSS.
      • 3:50 : Buy Inferno Pistol (it will be completed at 4:20, just right when your first Veteran Superior will be out).
      • 4:05 : you're in Tier 2.
    • If you didn't :
      • 2:11 : the 2nd LP is achieved. Servitor can be brought to safety.
      • 2:14 : you can tech. Almost no Pow. left.
      • 2:35: build the 3rd LP.
      • 2:57 : recruit a BSS. Right-click where you want them to go once they'll be built.
      • 2:59 : the 3rd LP is achieved. Build a 2nd PG.
      • 3:22 : BSS is out. Select a Missionary > T > Left-click on BSS.
      • 3:30 : Buy Inferno Pistol (it will be completed at 4:00, just right when your first Veteran Superior will be out).
      • 3:39 : the 2nd PG is achieved.
      • 3:44 : you're in Tier 2.
  • Recruit a Seraphim Veteran Superior.
  • Select BSS > Overwatch Heavy Bolters > Then overwatch Superior Veteran (to have HB first), and flip their stance on Hold Ground.
  • Buy Blessed Armor.
..........╠ Triple BSS (WIP)
This is a rather common start. As the Sisters are not as powerful or durable than, let's say, Orks, Chaos and Space Marines, the idea is to somewhat outnumber them, due to the (very) relatively lower cost.
..........╠ 1 Flamers BSS and 1 Seraphims Squad

Note how the sister on the left doesn't seem to enjoy my choice...

This BO is somewhat weak but balanced. Flamers deal twice damages than Seraphims, including on the move (toward the ennemy), and Seraphims assure to deal some damages when you run away. Not mentionning you'll have a Seraphims Squad ready with Inferno Pistol and Angelic Visage (and later Krak Grenade) as soon as you'll hit Tier 2.

Against computer, ennemy tends to chase Seraphims (as they cost more than vanilla BSS) ; so Seraphims run away from ennemy, dealing him damages, while your BSS, standing still, are dealing good damages to him with their Flamers. Humans are not so stupid, and will charge your pyromaniac nuns, while the Seraphims will deal low damages with their pistols, ultimately leading both squad to run away : then, the ability to run'n'gun with Seraphims while dancing will be appreciated.

As i mainly play against random computer, i don't know what team he has. So i want this flexible balance. A bit mobility of Seraphims, a bit Flamers power, and ability to use Lay Hands thanks to Faith. But not the full power of a double Flamers or the full mobility of double Seraphims.


This is how it ends if you just rely on the two squads : you'll be outnumbered by the ennemy. Kite him or lure him to a turret while you prepare your next move. Here, computer seems to favor shooters ; recruit Flamers sisters of tech to Tier 2 and recruit Heavy Bolters Sisters.


Build Order:
  • Start :
    • B > C > click on map : build Convent.
    • Select Chapel (no shortcut here) : S > M > M : queue up a builder (Servitor) and 2 Missionaries.
    • Select Servitor (;) > B > S > Shift-left-click : prepare the Sanctuary.
    • Select Chapel anew > Right-click on Pristine Sanctuary's foundations.
  • Once Servitor is out :
    • Right-click on the 1st SP.
    • Select the two Servitors > B > P > Shift-right-click : prepare Plasma Generator.
  • 1st Missionary is out :
    • Select Chapel and Right-click on 2nd SP.
    • Select the Missionary > Shift + Left-click on a 3rd SP.
  • 2nd Missionary is out (0:42) :
    • Select Convent (soon finished) > Right-click on either a 4th SP or a Missionary > wait for completion.
  • Convent is complete (0:46) :
    • Push B (BSS).
    • Select the fresh Missionary > Shift-click on a 5th SP.
    • Select Convent > wait for Sanctuary's completion and 200 Req..
  • Pristine Sanctuary is complete (0:55) :
    • As soon as you have 200 Req. > S for Seraphims > Right-click on BSS (who are just out at this time : 1:03).
  • BSS are out (1:03) :
    • Select BSS > keybind > right-click on Flamers > Orders Flamers overwatch (and link squad to a key). Don't forget to see if they are better to cap a point or to prevent a rush.
    • Select both Servitors > Shift-click to the location you'll build the first LP later.
  • 1st SP is taken (1:06) :
    • The first Missionary is going to the 3rd point > select him and Shift-click to a 6th SP.
  • PG is completed (1:19).
  • The 2nd point is captured (1:24).
    • Select the 2nd Missionary > Shift-Click on next objective (point, location, squad).
  • 1:30 : Seraphims are out :
    • Select them and keybind.
    • Either defend with both squads or harass with Seraphims.
    • If needed, queue an order for BSS who are capturing their point.
  • 1:50 : First Missionary has taken his 2nd point (your 3rd one).
    • He's going toward his 3rd point, but watch out if you have to def.
  • 1:53 : BSS has taken his point (your 4th one).
    • Watch out what they are doing next.
  • 2:02 : Press ";" > Build your first LP. Make other Servitor help.
  • 2:29 : LP is complete. Press ";" > Build your 2nd LP. Make other Servitor help.
  • 3:08 : Second Misionary has taken the Relic. Make him join your squads or take another point.
  • 3:10 : Depending on how far is the second LP from the first, it is finished. You ave the resources to tech.
  • Get Holy Icon on LP, to be able to use Lay Hands on BSS.
  • You can then tech or build more troops.


Economy :
If you don't spend more resources and build certain amount of LP, you can tech at...
  • 0 : 2:50 => 4:20. Provided you have +50/+10 economy due to 5 SP. You'll have 25 excedentary Pow. and hit Tier 2 at 4:30.
  • 1 : 3:00 => 4:30. Provided you have +56/+10 economy due to 4 SP and 1 LP. You'll have ?? excedentary Pow..
  • If you build 2 LP (and 1 HI), and spend no more resources, you can tech at ???
  • 3 : 3:16 => 4:46. Provided you have +62/+10 economy due to 2 SP and 3 LP. You'll have 40 excedentary Pow..
Double Seraphims start

This is a variation of single Seraphims start. Buying 2 squads allow the same firepower of 1 fully upgraded squad, but with twice mobility. The catches : it takes a hefty 6 Pop. Cap, then will force you to get Improved Field Logistics earlier, and it is as costly as a single full Seraphims squad.

The goal is the same that with single Seraphims start : kill builders and / or cappers, deny capping, keep ennemies on their toes while you get a bit of economy to upgrade to T2. You get more punch and / or more coverage with this BO, but less economy : 200 Req. (and 20 Pow.) equals 2 LP. For this, you'll need to be more agressive. The dancing will be easier, and Seraphims deal a bit more damages when they aren't moving.

The same Pristine Sanctuary deletion than in single Seraphims start can be applied. It can be a better choice than in the "single" start, as the 87/25 payback can help to build a LP, as you are short on Req.. In another hand, Inferno Pistols are a MUST on Seraphims, then the Sanctuary will be mandatory, then in the end you'll lose 86/25.

On the way to Tier 2, it is advised to buy Inferno Pistol (50/30/30) and Improved Field Logistics (140/0/30) to be able to field more than a Celestians Squad at T2. If you want a BSS (for HB for example), you can also recruit it now (140/0/16).

Once you hit Tier 2, the top priority are Veterans (65/15/25) for Inferno Pistols and Leadership boost. Then you deal respectable damages. Krak Grenades (75/75/40) are great to quickly destroy a PG or a LP in conjunction with Inferno Pistol, but remember they take 40 s. to be researched, and meanwhile you can't recruit any sisters. L

The flaws are :
  • You won't deal serious damages until Tier 2, because you are a delaying force.
  • If ennemy realizes the previous point, he will attack your base (specifically the PG and Servitors), ignoring your small defense. But you can play same game with his cappers and builders.
  • Because you'll have only one LP, you are prone to be decapped. In another hand, in order to decap, ennemy will have to stay immobile for some time, allowing Seraphs to quicky jump on the spot and punish him. If ennemy stop capping and attacks you, retreat. Again, this is harassing work, it is to early for 8 angels to kill ennemies.
  • Missionaries won't be protected due to absence of BSS. Until you make at least one, upon teching.

Out of curiosity, i tested this BO without any LP and with a single LP.
  • Without : i tech at 2:50, with +44/+10.
  • With : i tech at 2:58, with +50/+10.
The difference is just about 8 seconds, for better income (which allows to handle Tier 2 far more easily).


Starting :
  • B > S > Click on map : build Convent.
  • B > C > Shift-click on map : prepare Sanctuary (same build time for both buildings).
  • Select HQ, then S > M > M > Click on Convent's foundations : recruit a 2nd Servitor and 2 Missionaries, and order the future Servitor to build the Convent.
  • Once the Servitor is out > Click on the 1st SP : the future 1st Missionary will cap it.
  • Once the Missionary is out > Click on the 2nd SP : the future 2nd Missionary will cap it.
  • Then, Select both Servitors > B > P > Shift-click on map : prepare Plasma Generator.
  • Then, select the 1st Missionary > Shift-click on a 3rd SP : he will cap it after having capped the 1st one.
  • When the 2nd Missionary is out > Select him > Shift-click on a 4th SP : he will cap it after having capped the 2nd one.
  • Once the Sanctuary is done > Select Convent > S > Click on a further 5th SP : recruit Seraphims (you can overwatch) and order them to capture this point.
  • If you didn't overwatch Seraphims, command the 2nd squad as soon as you have 200 Req..
  • Build your first LP.

Time marks :
  • 1:00 : You can have 2 Missionaries capping 2 points, 2 Servitors building a PG, the Convent and the Pristine Sanctuary. The 1st Seraphims Squad is en route to be built.
  • 2:00 : You have the 2 squads, the 2 Missionaries, 1 LP, 1 nude SP, 3 additional SP capturing, 1 PG, and about 100 Req. and 100 Pow..
  • 3:00 : Tech to Tier 2.
  • 4:30 : You are in Tier 2.
Early game
Now, THIS is the thickiest part. You have a fair good start, but ennemy also plays meanwhile. You have to manage three essential points :
  • Economy
  • Offense and defense
  • Teching to Tier 2

In short, you have to amass enough resources to advance to Tier 2. For this, you have to work on your economy. Which means conquering new Strategic Points, defending your owns, building Listening Posts, upgrading them to turrets, etc..

As said before, your two squads are flexible but certainly not enough to face bigger forces. Let's see how economy works.
  • A Strategic Point gives +6.
  • A Listening Post gives another +6, but costs 100 Req.. Note 50 Req. is returned upon completion ; then, the LP pays itself after 1:15.
  • An upgraded LP gives a third +16, but costs another 100 Req. and additional 75 Pow.. This time the upgrade takes nearly 3 minutes just to pay for its requisition costs. But it adds a turret.

The priority is to establish a strong point where you would be able to retreat your weak and outnumbered troops safely. For this, you have to chose what SP you'll transform into an upgraded LP first. Building two SP cost less (half the Req. is refunded upon completion and it costs no Pow.) but bring no turret.

On this topic, Inferno Turret cost less than the turret LP upgrade (90 / 45, VS 100 / 75), and is more powerful, but of course brings no resource.

My obsession for turrets comes from the fact Sisters are weaker than most ennemies, and even more with my flexible little starting duet.

LORE -----------------------------------------------------------
TL;DR, Sisters are Emperor fanatics who were betrayed by Gorge Vandire, the man in charge at the time, who posed as Emperor's chosen one while he actually served only his own agenda...

Wait, does it mean mankind (other than bend to Chaos) is not faithful to the Emperor ? In a world where the single sinful thought leads to a BLAMing death ? So, what is exactly the Emperor ? And why, even in his zombie state, as leader Sisters saw by themselves, is he so important ? The more i found about it, the more questions it bringed (like why in 40th millenium, mankind is still limited to METAL BAWKSES to wage wars ?), and the more i got onto WH40K lore ! I'll then resume it here, altough it is mostly the story of mankind in general before the Sisters of Battle were created, than the story of Sisters themselves.

For a more direct history of Sisters of Battle, you can read from chapter 11 (raise of Imperial Cult and Age of Apostasy).
Lore 1 : Before the Emperor
The Old Ones

"In the grim darkness of the far" PAST, there was empty space, called the Materium, and the immaterial dimension known as the Immaterium. Incredibly powerful currents of raw energy roaming through galaxies gave birth to immense energy creatures who feeds on stars, drawing their energy to sustain themselves. These "star vampires" where the only beings to travel across the Materium, while Immaterium was a pure psychic energy-only world, inaccessible from the Materium dimension.

Then the Old Ones appeared. They were the first sentient race in whole universe, and the most advanced one, both in knoweldge and power. Their science known no equal. It allowed them to understand the very nature of the Immaterium : a dimension of raw energy which both affects and is affected by emotions. However, as they were very few sentient race at this time, Immaterium was calm. And presented a serious advantage : it allows to travel faster than light, from one point of the galaxy to a random other point, due to the flowing nature of Immaterium's streams. Using Immaterium to conquer the stars was then a risky idea. In order to avoid Immaterium's both influence and randomness, Old Ones studied it and built the Webway. Webway is both a parallel dimension and no dimension at all, both existing within the both the Immaterium and the Materium and existing in neither of them, and ultimately is a complex labyrinth of interdimensional threads between reality and Immaterium. Webway is accessed by another Old Ones' creation : Webway gates.

This allowed Old Ones to conquer almost entire universe, in an unusual pacific way. They believed that all life was useful. Even more : anywhere they passed, they spawned new species, and reshaped worlds. It is believed Old Ones were "fathers" of almost all beings in universe. And then, the closest to the real-life common conception of God.

The Necrontyr

As millenia passed, new races emerged, such as Necrontyr, while Old Ones reached a point that they became almost gods, having longevity which leans toward immortality, and incredible ease to conquer planets.

The Necrontyr particulary had a hard fate : they were flesh and bones beings, born in a hellish desert, radiated and scorched by a harsh sun, which plagued its inhabitants with various cancers and diseases, for homeworld. For this, Necrontyr emphasized its evolution both in building tomb-like cities, knowing they are short-lived, and in generations-long programs for colonizing outer star systems, as they found, after millenia of researches, that they won't be able to make their bodies resistant enough to their homeworld conditions and their only solution was to flee. But in their cursed world, their struggled hard, and while they could effectively space-travel, even with the unique living metal they developped, the Necrodermis, they probably had millenias working and researches to transform their world... knowing time is an issue for them. Such is the reason why the greatest Necrontyr buildings are for the dead, and not the living.

However, Old Ones and Necrontyr ultimately met. The difference between them seeds jealousy in later ones' hearts toward the former ones. At some point, Necrontyr asked to the Old Ones their immortality secret, which Old Ones refused, turning hard feelings into hate. Without these secrets, Necrontyr went on the internal Wars of Secessions, where various Necrontyr dynasties battled for the power within the race. Their ruling council, the Triarch (whose symbol, regardless of the dynasty, is the common Necron symbol in-game), came to the conclusion that the only way to unify Necrontyr is to have a common and external ennemy. The Old Ones were naturally designed, as they refused to share the secrets which could have ease their life. A war ensued, which Old Ones won once again, due to their mastery of the Webway. Necrontyr were then pushed back in their homeworld, in outer regions of space, where they could only resignated.

The Necrons

Over millions years, Necrontyr anger towards the Old Ones turned into a hate of all living. While this turned into another War of Secession, royal Necrontyr scientists continued to study suns, both their own and closest ones, now more in order to use its destructive nature against Old Ones than for designing ways to live with their baleful star. Somehow, they discovered a star vampire feeding on it. Upon study, Necrontyr realized it was a perfect weapon to use against Old Ones, due to its immaterial nature, impervious to Old Ones' conventional weaponry. Ultimately, Necrontyr and the star vampire managed to communicate at some level. As Necrontyr saw in this creature an overwhelmingly powerful being, able to get them their revenge against Old Ones, they named it the C'tan, which means "Star God", in Necrontyr's language. One thing appealing another, Necrontyr reclaimed other worlds, and other suns, "recruiting" other C'tans...

Note that is only a theory about how Necrontyr and C'tan met. There are another ones (such as a second War of Secession, which brought C'tan attention), but i find this one the most credible.

The C'tans proved to have immense knoweldge, on par with Old Ones. But in another hand, their immaterial nature made them totally ignorant of Materium's laws. So Necrontyr built them mechanical bodies from their Necrodermis. These now-tangible Star Gods then were worshipped, which pleased them... and made them discover concepts like pleasure, pain and slavery... and ultimately, enjoyed it, as all these material sensations were far more tasteful than just living by feeding on one sun to another.

One of them, known only by his fellow Star Gods as the Deceiver for obvious reason, told the king of Necrontyr that C'tans long ago fought against Old Ones, and lost the war. Since that day, they craved for allies to get their revenge. Should Necrontyr helped them, they woud have rewarded them with anything they desired. Namely, second War of Secession's end and immortality. The Triarch council agreed. Then the pact was made ; C'tans would gave Necrontyr immortality and wealth, and then Necrontyr would fight alongside C'tan against Old Ones. In order to give Necrontyr immortality, C'tans made Necrontyr build huge furnace-like buildings. The processus was horrible : Necrontyr walked in, their mind was stripped away, their flesh burned, and their life essence sucked away by C'tans, whose real ethereal forms floated above each furnace. On the end, Necrontyr's freewill was simply erased, and the very little few of spirit which remained transfeded into Necrodermis bodies. It is only when the king of Necrontyr emerged from this processus he understood the cruel reality, and what really were the C'tans : life force vampires who reverse engineered the process Necrontyr used to offer C'tans physical bodies to turn Necrontyr into souless robotic slaves, among only few retained a bit of free will, former Necrontyr lords. This day, humanoïd Necrontyr race disappeared, and the probably most OP race in the game born : the robotic Necrons.
Lore 2 : War in Heaven
War in Heaven

With their Necrodermis bodies, the life force they feasted on entire Necrontyr race and their legions of enslaved Necrons, who retained from their previous life the hatred for the living, C'tans decided to wage war against the Old Ones, the only threating race in the universe to them. This is known as War in Heaven. A universe-scaled conflict in which Old Ones mastery of the Immaterium travel hardly allowed them to resist to Necrons. The breaking point was when a C'tan (named The Burning One) understood the nature of Old One's Warp Gates, allowing him to build Dolmen Gates, which gave Necrons access to the Immaterium, thus giving them faster-than-light travel means. Then, they were able to turn Old One's greatest asset against them.

Knowing they were doomed, Old Ones tried a last, desperate and millenia-spanning plan. Knowing both Necrons and C'tans were material-only, they betted on Immaterium. Their knowledge in this area wasn't limited to the creation of Webway ; they understood the true nature of this dimension.

Then, combined their knowledge of both the Immaterium and the bio-engineering, Old Ones bred and spread the very first psychically-empowered races accross the galaxy, in hope they would mature to the point they would be able to channel the powers of the Immaterium in order to defeat the C'tans and Necrons. These races count, among others, the Kroks (presumably Orks ancestors) and the Eldar. Then the Old Ones were not heard again...

C'tans focused on harvesting living, started to bore as they knew no opposition, and ultimately battle between themselves, either was it for sport or because, as an Eldar legend says, the Eldar Laughing God (the same in-game Harlequin refers to) tricked the C'tan known as the Outsider into challenging his bethren in order to be the only ruler of the galaxy. As a result, C'tans killed themselves for millenia. Meanwhile, psychic races race maturated, and started to battle the Necrons, using their psychic powers they drew from the Immaterium. This can be assimilated to a war between psychic sorcerers and soulless Necrodermic puppets. As a result, psychic powers are devastating to material-only Necrons and C'tans.

The enslaver plague

As tides turned, C'tans ordered Necrons to build a new device to seal Materium away from Immaterium, in order to prevent psychic races to use Immaterium powers. It took the form of pylons, on the world of Cadia, acting as inhibitor fields. They together form the Cadian Gate, a zone which acts both as calm zone, a portal and a barrier between Materium and Empyrean. But before they achieved their plan, the collective flawed feelings of psychic races reflected in the Immaterium, severly altering it and bringing an ultimate cataclysm. A good metaphor would be the slime river which appears in the movie Ghostbusters 2 : a river which vincinity exacerbs negativity, and which is fueled by feelings of psychically-enhanced sentient beings. But unlike this movie, Immaterium is virtually everywhere, in another, parallel dimension. Second difference is chaotic energies dwelling in the Immaterium are extremely violent, like a maelstrom rather than like a river. As a result, Immaterium turned into a twisted version of itself, called the Warp. The immaterial negative feelings, pains and fears that dwelled in this dimension took real form, giving birth to powerful nightmarish predators. This probably explains why Old Ones didn't created psychic races before this, as it is a real Pandora's box.

The negative entities from the Warp started to access into Materium, through the connections psychic races have with the Warp and the Webway network. Among them were the Enslavers, able to possess the psychic-enhanced beings to do their bidding. Between the remaining C'tans, Necrons and Warp monsters, remaining Old Ones were ultimately defeated. Whether they were destroyed or they ran away to hide in some unknown part of galaxy is unknown. In another hand, remnant of their created races remained.

The end of the war

Once Old Ones were defeated, and C'tans diminished by the war, Silent King of Necrons immediately led his legions in a revolt against their masters. These star gods, decimated and totally confident in the fact Necrons were enslaved through their transformation, never thougth about such a thing, and then were unprepared for this. As result, Necrons won this war, not without millions casualties. C'tans can't die, so Necrons achieved to shatter them into thousands of shards.

The Silent King then took a harsh decision. C'tans and Old Ones were wiped out, but psychic races were still around, especially Eldars, who survived both C'tans and Enslavers. As Necrons were decimated both by psychic races and C'tans, they were too weak to match Eldars. The Silent King then decided to make his legions enter into a 60 millions-years slumber, presuming Warp creatures and Eldars would kill themselves in the future, pathing the way to new, less evolved races, easier to dominate. So the Silent King ordered Necrons to retreat into their Tomb Worlds, to erase all remaining lifeforms here to avoid Enslavers to detect them, and to enter in a near-eternal sleep, biding their time... When the day will come, these eternal metallic warriors would awake and destroy the weak fleshy beings to reclaim the galaxy...
Lore 3 : The New Man and Age of Technology
The New Man

Roughly 60 millions years after the War in Heaven, in the 8th millenium BC to be exact, on the planet Terra (our very own Earth), among primitive humans were some people granted with great knoweldge and psychic powers : the Shamans. They had, among other abilities, the possibility to reincarnate into another being after death. As humanity shyly develops, it began to feel anger, jealousy and other negative feelings... once again mirroring in the Warp, and menacing to create another cataclysm like the Enslavers' plague. In order to fight the unavoidable, all Shamans across Terra gathered and agreed on using their reincarnation ability to fuse all their souls and power into a single being. Then they commited collective suicide. A year later, their fusion born, from human parents : the "New Man".

The New Man was (and probably still is) the most potent psychic powers user, the most powerful Psyker. As he was born from countless Shamans' souls, he possess all their wisdom and abilities. While he was a child, his father was murdered by his uncle. The New Man has been aware of this through a vision he had when he approached the corpse to prepare funerals. He then avenged his father by telekinesically stopping his uncle's heart. He didn't feel any anger or joy doing it, but realized mankind needs law, order and guidance.

So, the New Man travelled all accross the Earth , spreading wisdom and benevolence, in order to free mankind it from ignorance and superstition, by slightly influencing society from times to times, be it by being a part of upper class here (some believe he actually was several historical figures, like Napoleon or one of the Christ' disciple), or just a commoner here, without being (nor ever wanting to be) a ruler or revealing his true identity.

However, his soft guidance wasn't enough against the negative emotions of the humankind, and even him couldn't prevent the birth of the three Chaos Gods by the end of Middle Age : the bloody Khorne, the ever-plotting Tzeentch and the plagueous Nurgle. Since then, it is believed that the New Man mainly stayed out of human's affairs, rather working on his powers to gain knowledge about the world and the nature of the Warp and Chaos, to find a way to battle against.

The Age of Technology

Whatever, humanity progressed, to a point it was able to colonize nearby (then further) planets by the 15th millenium. This is the beginning of the Age of Technology, a period where humanity's science reached its zenith. By the 18th millenium, Warp-drive technology is created : from now, spaceships can be equiped with huge engines able to allow the spaceship to enter into the Warp and emerge in another part of the material world, in form of somewhat quick "Warp jumps", then travelling at much faster speed than light, and faciliting exploration, colonization, terraforming and thus trades between planets. Science was then considered as God. On the way, humanity discovered xeno races, like Eldar and Orks, and have its first Alien Wars.

Biological science also made major discoveries. The first was the scientifical ability to prove the existence Psykers, circa 22nd millenium. Their number then started to increase dramatically, representing a potential Chaos time-bomb as humans lack the wisdom and knoweldge Shamans (and New Man) had. Why Psykers start to appear everywhere from this point on and why they weren't possessed by Chaos is still unexplained. A simple theory would be that Warp-drives exposed travellers to massive Warp radiations, then transforming lots of them on Psykers, or causing them to give birth to Psykers. An even simpler theory would be that Psykers were already numerous, but unaware from humanity and from themselves.

The second was, also circa 22nd millenium, the creation and development of the "navigator gene", allowing the creation of Navigators, mutants with the ability to see and fell the currents of the Warp, then allowing them to navigate spaceships through the Warp less hardly. The Warp-travel was still dangerous... but a bit less.

Meanwhile, the New Man continued his own way, amassing knoweldge about Warp and Chaos. Eventually, he discovered the planet Molech between 15th and 18th millenium, were he found a portal to Chaos realm. No one really knows what happened there, but it appears the New Man made a pact with Chaos Gods, who gave him Warpcraft, secrets knoweldge of Ruinous Powers (a synonym for Chaos Powers and knoweldge) in exchange of his promise to spread Chaos on mankind. On the contrary, the New Man returned on his homeworld, Terra, with many projects now possible with his Warpcraft, which he intended to use for guiding Mankind to enlightment... And possibly a foreseeing of what is about (in millenia terms) to be.

In the mean time, Eldar society reached its peak : it is all-powerful, Orks are kept in low number and can't stand against Eldar, humankind is not too developped (by Eldar standards) nor expanded nor virulent then is not a menace. In comparison to any other race, Eldar was the... master race. All their needs were satisfied, machines did all the work for them, nothing nor no one could treat them... They haved all they needed, imagined or desired. They lived in luxury. Some of their Seers predicted if they followed this path, it would lead the race to their demise. The most reasonable Eldars then exiled themselves from their homewolrds, while majority of them stayed in their worlds... and decadence. Which means, in WH40K, luxury, anger, self-arrogance, violence, need to fulfill ever-growing sexual and sadistic envies, and so on. Many cults spread, Eldar departed from their old believings, going on evermore sadistic pleasures, evermore violent murders, evermore corruption, and all excessivities you can imagine. Such negative emotions indeed had an effect on the Warp : Warp Storms increased in numbers and intensity all over the universe and over millenia !
Lore 4 : The Age of Strife and Unification Wars
The Age of Strife

Mankind also created Men of Iron, highly evolved artificial intelligences built to serve them. Naturally, like in about 90% of IA stories, Iron Men revolted against humanity in 23rd millenium, which led to the bloodiest war ever known to this day, and one of the biggest war in history : the Cybernetic Conflict. Cherry on the cake, Warp Storms erupted on outer space, then complicating coordination and space travels. Worlds were ravaged, suns were destroyed, planets were covered by plague-like nanomachines. In the end, mankind won, thanks to galactic union. It is unknown if this union was composed of only humans or humans and xenos. The Cybernetic Conflict left profound scars : countless billions of people died, majority of high-end technology was destroyed, and technology was no longer seen as a God, but as a terrifying menace, and then feared and rejected. A direct consequence was high-end technology was utterly lost forever. Then, this age of technology was dubbed the Dark Age of Technology, and this massive war marked the beginning (and was the first conflict) of the Age of Strife.

In the next two millenia, Psykers became more and more numerous, bringing fear of Chaos' possessions, Warp Storms tore space, then rending space travels dangerous until impossible, then isolating planets from each others, bringing famine to trade-dependant worlds, the developpement of even more Psykers who gone possessed by Chaos and the emergence of abhumans (beings who evolved from humans to mutants due to isolation, radiations and harsh life conditions, all brought by Warp Storms), such as Ogryns (playable in-game), and xenos attacks on helpless worlds.

The only relitavely spared human was Mars. Its people didn't turn their back on technology unlike Terrans, and a new religion, focused on technology's preservation, even emerged in the ravaged planet, who focus on the preservation of the technlolgy to survive : the Cult Mechanicus, believing in the Machine Spirit (a concept that machine's functionning or not depends of the disposition of its own spirit, and then that each machine has a spirit which needs to be pleased through prayers and ritual) and dedicated to the Machine God.

Terra went on a different way : its people regressed to a state where local warlords used scraps of what remained of technology as crude equipements, in a Mad Max style. Luckily, the New Man showed up...

Unification Wars

The ever-increasing intensity of Warp Storms was announcing the worst was about to come. Feeling this, the New Man reappered on Terra. As expected in an "Age of Strife", local "techno-barbarian" lords waged wars to conquer their own portion of what remained of planets and/or galaxies, including Terra. First thing so would be to conquer this planet. In order to do so, the New Man used Warpcraft and bio-engineering to create Thunder Warriors, genetically enhanced warriors factions with superior skills, endurance and power than the techno-barbarians who fought for lands' control.Thunder Warrior stomped opposition, while New Man's oratory skills (and repeated militaries victories) rallied some Terra's factions without bloodshed.

One objective of the New Man was to destroy all churches, as all religions failed so long to guide mankind and men needed a spiritual leader to bring them toward a new golden age, where they'll rule the stars. At some point in his conquest, the New Man met the powerful Psyker Malcador, who convinced him to conquer the world and to take the title of the Emperor. Which he did. The now self-proclamed Emperor then continued his wars for unifying Terra, crushing hostile ennemies, rallying wiser opponents, and spreading its philosophy and rules, which forbids religious beliefs and emphasizes in knoweldge and science, as religions has proven to bring more problems than solutions in History. This atheistic doctrine is called the Imperial Truth. 

As Thunder Warriors were designed to be superior in battle but berserks and short-lived, the Emperor had to rely on other soldiers. He recruited warriors noble families who chosed to follow him, and genetically and psychically enhanced them, turning them into super soldiers, perhaps less powerful than Thunder Warriors, but more reliable. Altough it can be up to debate. Whatever, these enhanced lieutenants became the Custodian Guard, the personal Emperor's bodyguards, his praetorian guard. 

In the end, Emperor saw Thunder Warrior were inferior to his Legio Custodes, and decided it was time to breed a new, more powerful generation of superhuman warriors. He then purged the Thunder Warrior at the end of the Massacre of Guadare, at Mount Ararat, thinking about breeding the next super warriors generation. Custodians were "safe", as Emperor valued Custodians unlike Thunder Warriors which he saw them as expandable pawns.

The Emperor then ruled Terra. Somehow, the Eldar decadence reach the climax approximatively at same time, giving birth to the fourth Chaos god, Slaanesh, in a never-seen Warp Storm. The fiend born shouting a devastating psychic cry, which couldn't be contained in the Warp, thus repercuted in almost every Eldar mind and nearly ended their entire race. Even some of Eldar gods were consumed by the Warp. The only rescaped were the exiled ones. This mind explosion was so violent it left a permanent scar in the universe where both reality and Warp co-exist : the Eye of Terror.

But in another hand, with this event, Warps Storms then almost disappeared. It was now time to conquer the stars and extend the realm of the humankind.
Lore 5 : The Great Crusade
The Emperor's projects

In order to do conquer the universe, the Emperor worked on several projects before launching his crusade.

Among them, a vast empire will need a performant communication system ; so the Emperor created the Astropath, a telepaths corps. It uses Psykers to use telepathy as way of fast long-range communication.

A stellar empire will also obviously need a political ruling corp. So, the Emperor created the War Council, with him as its head, and Malcador the Sigilite as second. As the Emperor would lead the Great Crusade personnally, Malcador was the real man in charge of the council, and de facto regent of Terra. The Sigilite then created an organization of imperial assassins, who would later evolve into the Officio Assassinorum.

To conquer the universe, Warp-travel is still the best way. But the disappearance of Warp Storms doesn't mean Warp travel is safe ; the further the destination, the more dangerous is the travel, even with Navigators. Thus, the Emperor built a new device on Terra, which (unknown to all but few initiates) focus his psychic energy to project a stable beam in the unstable Empyrean that Navigators can see and use to triangulate and determine their positions, allowing better precision and safety in Warp travels : the Astronomican. The psychical beam is sometimes called "the Emperor's light", an expression used by Sisters in-game. The Emperor also founded the Adeptus Astronomica, a secret organization dedicated to the functionning and the mainenance of Astronomican's machinery.

However, the Astronomican was intended to be only a temporary system, as Warp was dangerous by nature, even with the Astronomican, and then called for another, less perilous travel system. Luckily, at some unknown point in Unification Wars, the Emperor discovered, buried in an Asian desert, an unknown device which would allow to access to the Webway. This device would become Emperor's Golden Throne, a massive throne positionned over a 20 meters-height portal, which would act both as a throne, as a Webway access and as a psychic energy enhancer. But Webway nature and technology is even harder than Warp ones to understand and masterize. As such, no one knew at the time how to build a safe path within the Webway. Through the perspective of a system which would unite mankind from all over the universe, by a safer and faster travelling system than Warp travel, was a possibility with hard work, and the secret goal the Emperor would attend to, without sharing this project to anybody. But for starters, Warp travels with Astronomican would prove sufficient.

Of course, a conquest calls for warriors. As normal humans would form the Imperial Guard, superhumans would soon be needed. For this, the Emperor achieved, in year 30,750, genetically engineering the Primarchs, superhumans destined to lead his armies at his side in the reconquest of faraway worlds, through persuasion, diplomacy or force. The exact process is still a mystery in the 40th millenium, but it was found that Emperor first extracted his own genes, and then altered it in 20 different manneers, sometimes deleting some genetic sequences, sometimes adding non-human DNA (such canine DNA for the Primarch Leman Russ [which gives his name to the in-game Imperial Guard vehicle]), resulting in creating 20 Primarchs. A common point between them is the Emperor also used Warpcraft to create them, in order to make them as powerful psychically than they will be physically when they'll mature. Of course, making superhumans with Warp sorcery can only attract Chaos Gods' attention... The Emperor's wardings and caution about his Primarchs weren't enough against the Ruinous Powers (another name for Chaos). By an unexplainable achievement, Chaos opened a rift in the genetic vault... and just stole the Primarchs, still in their gestating pods !

The Emperor then shifted his ground. Instead of creating superhumans for scratch, he used the Primarchs gene-seeds to breed not superhumans, but various superhuman organs, in order to implement them on his best warriors and turn them, with also appropriate mental conditionning, into ultimate fighters. This is how Emperor created the Space Marines, around the year 30,780. Even if each legion of Space Marines is modeled after only one of the 20 specific Primarchs genes, it is still one of the most OP races of the game, i mean, come on, super strong Force Commander, lots of healings with Apothecaries and Chaplain, invincibility with Librarian, orbital bombardment, deep strike, basic troops who can upgrade against all targets, Terminators amongst the best elites in the game, durable and even dropable Dreadnoughts...

Treaty of Mars

Circa the year 30,798, the Emperor launched his Great Crusase, the campaign to reclaim the worlds which were lost since the the Age of Technology and reunite all humans under the same baneer and make humankind the master race of the universe.

One of the first steps was to ensure Mechanicum of Mars to rally Imperium. Actually, Mars didn't knew any Age of Strife, and then developped faster than Terra, colonized numerous planets outside of Milky Way after the Age of Technology, and even turned them into worldwide factories, known as Forge Worlds. This would be an invaluable asset to the Imperium ! The Emperor then travelled to Mars. Seeing him emerging from his Voidship, radiating with all his psychic glory, greatly impressed the Martian Techpriests, at the point they saw in him their Machine God, the Omnissiah.

Mars dirigeants and the Emperor agreed on some compromises : notably, autonomy on Mars and Forge Worlds, the permission to pursue the Cult Mechanicum, presenting the Emperor to Martians commoners as the true Omnissiah, forbidding some researchs, notably on artificial intelligence due to the Men of Iron war, and the promise Mars will build and maintain Imperium's machines. As Emperor sincerely wanted to forge an alliance without having to storm the planet, he accepted. The forbidding of the Cult Mechanicum as a false religion could wait the end of the crusade...

Then, the Treaty of Mars was sealed ; Terra and Mars remained independant one from another, and in same time retrieved a relationship lost since Age of Strife. It even went to the point the Emperor refashioned his symbol, the Palatine Aquila, from a stylized eagle to a two-headed eagle, symbolizing both Terra and Mars.
Lore 6 : The Primarch Lorgar
The Primarchs

With Mars' suppliance, the Emperor was ready to conquer the universe. It was the greatest campaign of the humankind. One of the major feats is the Emperor and his Space Marines actually retrieved the Primarchs, one after another, scattered all across the universe, on their adult age. It appeared Chaos stole the Primarchs to disperse them on remote planets, hoping to turn them into Chaos agents who would convert thousands of humans all across the galaxy. The future proved this point for some of them, but this is for later...

The first retrieved Primarch was Horus. As Emperor's genetical son, both men recognized each other as such ; this will occur for each further Primarch. As the second Primarch will be founded only 30 years later, Horus happened to be the most trained, the closest, and and ultimately the favorite of the Emperor. A fact Horus secretly hoped.

When the Emperor felt the nearby presence of a second lost Primarch, who was Leman Russ (which gave his name to the in-game Imperial Guard vehicle), he left the command of the Great Crusade to Horus, while he journeyed alone on a "side-mission" to retreive the Primarch. As Horus felt both honour to be in such charge and joy to retreive a genetic brother, he felt also some jealousy towards him, as he deeply loved to be at Emperor's side. Of course, when Leman was retreived, he and the Emperor reunited with Horus and the main Expeditionary Fleet.

Then, the Emperor repeated this scheme for all subsequent Primarchs. Then, each one of them, upon their discovery, was assignated a Space Marines legion, which comprise between 10,000 and 250,000 Space Marines each. It was on this time the legions received their specific names (like Blood Angels or Ultramarines), baptized by their Primarchs. An exception to this baptizing tradition is for Horus' Marines, the Luna Wolves, which were named after they vanquished Luna (the actual Moon), back in the Unification Wars. As time passed, more and more Primarchs were found, and Emperor's time and attention was even more divided. Horus was always promoted as the commander in chief, able to command to other legions, in Emperor's stead. This had for effects to hone Horus' skills as commander, to nurture more ressentiment of abandonment towards the Emperor, and to instill some rivalry between other Primarchs.

Together, Primarchs and Emperor led countless battles...

Primarch Lorgar

After his abduction from Emperor's labs, the gold-skinned infant Primarch known as Lorgar ended up on the planet of Colchis. This world is led by a religion dedicated to "Old Gods", who are actually the Chaos Gods, unknown to both Colchis people and priests. Legends differ about how Lorgar appeared : some say it appaered on a comet who stroke a temple, Diablo 3-style, and then the child asked to the local priests to teach him their ways. Whatever occured, Lorgar was taken in care of a local grand priest, Kor Phaeron. Years passed, Lorgar was a good student, and even gained many followers due to his natural charisma and oratory skills. Meanwhile, he developped a profound father-son bound with the high priest which trained him. However, Lorgar started to have more and more visions of the Emperor's coming. He then saw it at one of the real Colchis God coming. Altough a religion war occured between Lorgar's vision and the old faith, which saw Lorgar's side winning, Kor Phaeron admitted this incoming god was the most powerful of the Old Gods, then bounding the old faith to Lorgar's vision.

At Emperor's arrival, a year after Lorgar and its faction submitted Colchis to his and Kor ways, Lorgar instantly recognized him, kneeling to him, with all Colchis people. Lorgar gladly joined the Emperor, expressing his true desire to spread the the faith into the God-Emperor all accross the universe... Despite the Emperor explained the Imperial Truth banished all faith and was based only on science and reason. This intimately convinced Lorgar that the Emperor was a true god, as who else but a true god would claim that he wasn't a god ! The Emperor then gave Lorgar the control of the Space Marines' legion derived from his genes sequence, he then baptized Word Bearers. As he was profoundly attached to Kor Phaeron, the Emperor allowed him to stay at his side, even genetically enchancing him, in order to turn him into a simili-Space Marine. Kor then became the First Captain of the Word Bearers, then the second in command of this legion.

All of the Space Marines weren't active at same time. Actually, a Space Marine legion was based on the planet where his Primarch has been discovered. For example, the Marines created from Lorgar's gene-seed, the Word Bearers, were placed under Lorgar's command and established their base on Colchis. From their HQ planet, each legion then had to spread and conquer nearby worlds, while remaining Space Marines, under the command of the Emperor, travelled further to conquer further parts of the universe. The "named" legions then had some autonomy, and were more or less influenced by their Primarchs, as they shared the same genetic materials. And then, differences in philosophy, training, methods and whatever matter occured between each legion with time. For example, Lorgar created the Chaplains, high-ranked cleric-soldiers within the Marines whose objective is to ensure the faith of the troops on the "God Emperor" (and, on a side note, to be a pain in the a*s to battle with in-game, as it deals more damages than even Canoness, has a powerful passive healing aura and a skill which both slows, demoralizes and disables the skills of the target...). The highest ranked Chaplain was a Lorgar's gene-derived Marine named Erebus.

Other Lorgar's invention was the Lectitio Diviniatus, a religious book about the grandeur of the Emperor. This book, and its teachings, had a huge audience. Even if it is opposed to the Imperial Truth, numerous new cults adoring the Emperor born because of this book.

The Davin compliance

The Luna Wolves, led by Horus, and a detachment of Word Bearers, led by their first Chaplain, Erebus, conquered the world of Davin in year 30,941. However, the Davinites were a proud race who had a "warrior lodge" system, which acted like sort of brotherhood between different factions, which greatly impressed the Marines. Some of them even wanted to copy this parallel system, within the Legiones Astartes, acting as a shadow parallel chain of command. However, the Emperor disliked such institutions, as they were dangeroulsy analog to cults, then to religions... As such, the Space Marines from Terran origins were opposed to the lodges, while the later bred Space Marines were more open to them. Erebus, which was secretly devoted to Chaos Gods (though it is unknown why or since when), saw here an occasion to instill a secret parallel chain of command, which spanned over different legions. With this system, Word Bearers will tie bounds with Luna Wolves and probably other Marines from other legions, which would allow Erebus to manipulate these Marines his way some years later...
Lore 7 : Lorgar's fall and the Gorro Hollowing
Lorgar's fall

In the Great Crusade, all Marines are tasked to conquer their galactic sector. But Word Bearers were actually less effective than the other legions. This was due to the fact Lorgar (and then its gene-derived Word Bearers) was less martial than other Primarchs, and was more turned unto religious beliefs, believing faith was the pinnacle of human expression, and Emperor was of divine nature. This spent more time in building shrines dedicated to the "God Emperor" and educating the vanquished population into this cult, than in actually conquer worlds. However, the Imperial Truth strictly forbids any religious belief, even the worship of the Emperor, has religion has proven to slow human development and freedom, according the Emperor. And as this time was used on building temples and educating populations, it was not spent on conquest, which ultimately attracted the War Council offices. If Emperor tolerated this behaviour at first, the hinderance it cause to Lorgar's results ultimately disturbed him. The Marines' mission is to reunify mankind all accross the universe, not to preach the Emperor's godhood. As such, Emperor sent Ultramarines, led by Primarch Robout Guilliman and accompanied by Malcador, to destroy all buildings on Monarchia, the most zealous city of the Word Bearers' sector, on year 30,964. Angered by this destruction and punition, Lorgar beat the elder Malcador. The Emperor then instantly teleported in psychically forced the Word Bearers, including Lorgar, to kneel into the burning ashes, before him, Malcador and the Ultramarines, as a lesson that all religions are outlawed and a punition has he revealed to the legion that Word Bearers were the only one who failed their conquest and enlightening mission.

However, Lorgar believed that the Emperor was wrong to outlaw the natural instinct to seek after the mysteries of faith, which he called the Primodial Truth, not counting the grudge he held toward him after the Monarchia humiliation. Then, on the council of Kor Phaeron and his Chaplain, Erebus, both secretly devoted to Chaos, he started a pilgrimage, where he searched about gods worthy of worship. To cover his quest, as Emperor left some of his personnal Legio Custodes to watch Word Bearers' activities, Lorgar indeed continued to conquer space in the name of the Emperor. Information scrapped on Colchis led to Cadia... the same planet were Necrons built their pylons millions years ago, and the closest one to the Eye of Terror, this rift created by Slaanesh's birth, itself created by Eldar's fall. Then, Lorgar traveled here, and stayed in orbit, while he sent some of the Serrated Sun, a chapter within his Word Bearers legion, to investigate.

The Marines were greeted by barbaric natives, and Ingethel, a local priestess. Despite Custodians' protests, who probably called this "sorcery", the Serrated Sun actually entered in the Warp rift, on the demand of Ingethel, to let them know the very Primodial Truth. Here, Marines witnessed the lifeless former Eldar worlds, now called the Crone Worlds. Ingethel told to the Marines Eldars died because they refused to embrace the real gods of the Warp. More specifically, as Eldar society reached its climax, it gave birth to a new god of Pleasure, Slaanesh ; however, Eldars didn't feel joy or happiness for this event, and even ignored or feared him, which deeply grieved Slaanesh, what created the endless Warp Storm known as the Great Eye, where Marines are actually. Of course, this is an intentionnally deformed version of what really happened, to hide the malevolent nature of Slaanesh and "primordial" Gods... Serrated Sun Marines exited from the Warp, physically altered with demonic features and mentally aware of a new reality, and returned to Lorgar's ship to make their report. Lorgar then ordered the orbital bombardment of Cadia, in order to let no one but him and his legion to know Cadia abrit a portal to the Warp, which is believed to be a place where humans and Gods can meet.

Later, Lorgar decided to venture in this god realm himself. He was guided by Ingethel, who devised with him all along their trip about Warp, souls, life, death, afterlife, destiny and such... For example, that Warp was the soulless dimension, which immaterial inhabitants can be called "neverborns", unlike Materium, where all flesh-made creatures are born ensouled. And that Lorgar was born to be brought here, to learn about the Primordial Truth. Through the journey, the Warp provided twisted visions of the future which Ingethel explained it would be the fate the humankind will know if they ignore the Primordial Truth, like Eldars did. The first one was a war at the Imperial Palace, before the Eternity Gates, which lead to the Throne Room, between two parties of Astartes. In the vision, Lorgar recognized the Imperial Fists and his Word Bearers, though they were not more in grey armors, but in a new red color. Ingethel explained it was because in the future, his Marines won't bear the word of the Emperor, but the word of Lorgar. Then, one of Word Bearers transformed into a demonic creature who stormed on Imperial Firsts, before being slain by Rogal Dorn, Imperial Fists' Patriarch. Ingethel informed the demoniac Marine was Argel Tal, the most beloved genetic son of Lorgar. The second vision is of the Propspero battle : Prospero, as Lorgar sejourned there, is Magnus the Red, Primarch of Thousand Sons, homeworld. Howerver, it was utterly destroyed by... fellow Space Marines. Ingethel explained it is this future event which will led Magnus to "Primordial Truth". And then will start the war to bring the Primordial Truth to the Imperium ; a war Lorgar won't lead, but will start. Horrified by the visions and seduced by Ingethel's philosophy, Lorgar agreed that Primitive Gods seeks harmony between Warp and Materium, in a mutual "contract" in which humankind must embrace these "true" gods, which in return would preven humanity to know Eldar's fate. Of course, Lorgar didn't understand it was not benevolent Primitive Gods, but Chaos Gods. However, he came to the conclusion it was real divinities, worthy of worship, unlike the Emperor.

From this point on, Lorgar thinked more and more about the Primitive Truth. Kor Phaeron exploited this to instill in Lorgar's mind the fact these Gods are eager to be worshipped, and rewarded their more fervent followers... These words for one his closest friends, the rebuke of the Emperor, and what he saw in Warp, slowly but sureley made its road to Lorgar's soul. He'll later be the first Primarch to dedicate himself to Chaos. From this point on, he worked to a slow and subtle plan to convert humanity in Chaos' service, starting with the Space Marines of the man who is considered the number one Primarch : the Luna Wolves of Horus, which Erebus already started the work back in the Davin compliance...

The Gorro Hollowing

At some unrecorded point in the 30th millenium, humankind faced Orks in the faraway world of Gorro. It is here that he appeared through as powerful he was, the Emperor wasn't a god : the distance from Terra made the Emperor's maintenance of the Astronomican very exhausting, to the point he almost got killed by a powerful Ork Warboss there. Luckily, he was saved by Horus. But this proved, unknown to all but the Emperor, that both the Astronomican and the Emperor had their limits. Then, the Emperor planned to work on this in near future...
Lore 8 : The seeds of heresy
The Triumph of Ullanor

At the dawn of the 31st millenium, humankind led its greatest war against the Orks : the Ullanor Crusade, featuring no less than 100,000 Space Marines, 8 million Imperial Guards and 600 starships. The Orks were 5 times more numerous. This was the second greatest war against the Orks, after the Gorro one.

And it was a triumph, the biggest victory in humandkind history. The Emperor then felt it was time for him, after two centuries of Great Crusade and over 2 millions of planets complied into the Empire, to retreat. He never said to anybody why, but it was to start to work on his secret own Webway project, as the Gorro episode proved as mighty he was, he was not immortal, and through he'd perish, the Astronomican wouldn't work anymore, which would sign the humankind's end. In another hand, he didn't reveal anything of this project to anybody expect few Tech-priests who worked on the project, as it could be perceived as a threat by the politically powerful Navigators clans (which Webway would spell their obsolescence) and being targeted by Chaos forces, as the Webway is, like it was at Old Ones' age, a labyrinth both within and outside the Warp... or even by surviving Eldars !

The Emperor then just announced his retirement to Terra, to work in a project which will benefit to all mankid, not saying more on it, but that there was still lots of planets to conquer and reclaim. Then, the Great Crusade continues. And to succeed to him, he appointed Horus as the new and unique title of Warmaster, which gave him the absolute command of all Imperial Army, humans and Space Marines, and even Primarchs. They would continue to fight in Emperor's name. And speaking of name, the Emperor proposed to rename the Luna Wolves into "Horus Sons", which Horus refused.

In addition, Emperor created the Council of Terra. Indeed, as Primarchs are reunited, there is then no need for Terran Lords to rule the War Council ; this function is now devoluted to Warmaster Horus. Thus, Terran Lords, and the myriads of high-ranked notables through Imperium, direct now the newly created Council of Terra. It is focused on all day-to-day and administrative questions, including tithes.

These decisions were shocking for all Primarchs. Some reasoned, as Emperor's decisions are always good, some were jealous of Horus or Council, some were happy for Horus... Horus himself felt both honored... and abandonned. Why did the Emperor wanted to retreat from the Crusade ? Why did he abandonned his sons ? Why didn't he say a word on his famous secret project ? And, a feeling shared by all Primarchs : why the Emperor did let the Imperium governement to damn bureaucrats, who never fought, never shred their own blood for the empire, and don't even know honor ? Primarchs and soldiers fight in the name of the Emperor, then it is the glory of the Emperor, then civilians lead the Imperium ? This was an injustice for some Primarchs.

Ironically, this triumph sew the seeds of Chaos in many hearts. Primarchs are indeed almost god-like... but they still have human flaws. They were created with Warpcraft. The Chaos first touched them when it abducted them in their stasis pods. Some of them (like Lorgar) already fell to Chaos for various reasons, not revealing it to fellow Primarchs. And now, the Emperor's decisions throw confusion in Primarchs' souls...

The Edict of Nikaea

The constant war state all over galaxies reinforced Chaos Gods' powers. And Chaos cults spreads here and there. Increasingly number of Cultists (basic Chaos in-game troops) were proven to use psychic powers (sadly, they haven't any in-game), and of course to be temptated by Ruinous Powers, which is bad news. On the other hand, some of Primarchs, and their derived-genes Space Marines used psychic abilities rather than brute force to subdue ennemies. Among them, the Primarch Magnus the Red developped the first Librarians (which can grant invincibility to their allies in-game... balanced race !) within his Thousand Sons legion. The psychic affinities are so powerful in this legion, that a lot of Marines developped hideous mutations. Such is the nature of the Warp. But in another hand, this "psychic" legion was one of the more efficient in the Crusade. Quite the opposite to the slow Word Bearers, if you remember it. This is why Thousand Sons' way was tolerated by the Emperor. Even if a lot of fellow legions and Primarchs were uneasy alongside them, accusing these Psykers to be no more than sorcerers.

Then, the Emperor, even being the most powerful Psyker in the world, admitted there was a problem with Psykers. He then reunited all the Primarchs for a council on the world Nikaea (reminding of a city in Final Fantasy 6), circa year 31,001. Debates were intense, and resulted in the following things :
Psykers and sorcerers are defined as follow : a Psyker is no more than a being born with psychic powers ; a sorcerer is a Psyker who use his gift in favor of the dark gods, and therefore is an ennemy.
All psychic activities must be controlled. More specifically, only Astropaths and Navigators are allowed.
The non-sanctionned Psykers are seen as heretics, then as a treat and must be treated with proper consequences.
Librarians are, at this time, forbidden to use their powers, and no more Librarians are allowed to be recruited within Space Marines ranks.
Chaplains are made a common feature within chapters, but unallowed to use psychic abilities, and meant only to uphold Imperial Truth and help maintain the purity of Space Marines.
Magnus the Red was forbidden to pursue or use psychic knoweldge and abilities... which he agreed, bitterly.

Set appart from the Librarians forbidding, the rest of the edict remain until at least the 41st millenium.

The Anatheme Sword

The Great Crusade continues. Somewhere in year 31,001, contingents of Blood Angels, Emperor's Children and Luna Wolves conquered the world named Murder, which was infested by Mecharachnids. The campaign lasted six months, until a delegation of an unknown human race, the Interex, arrived in Murder. The delegation explained that Murder was an Interex prison planet for the dangerous Megarachnids. But the important information here is Interex was an highly evolved human race, unknown to the Empire since then, and based on the planet Xenobia.

In the same year, Horus had a meeting with the Interex in Xenobia. The Interex people were eager to make new alliances instead waging wars. On their own history, they allied with another highly evolved, but simian, civilization named the Kinebrach. Somehow, the Kinebrach created a sword that was dedicated to and been blessed by the Chaos God Nurgle, and named Anatheme. This is not to be confused to the nickname Chaos Gods give to the Emperor, "Anathema", as the Emperor is a champion of the order, and then a true anatheme to Chaos. Through the Interex were for fighting Chaos, they kept the sword in a museum called the Hall of Devices.

Then Erebus assaulted the museum and robbed the Anatheme, while Horus was in pourparlers with Interex leaders, and rigged the building to explode. The Interex were first suspicious about Space Marines, as they could have been Chaos agents ; now they were sure of the fact. Of course, neither them, Horus or his Luna Wolves were aware that it was Erebus who did it, nor he did it to fulfill its own agenda. A war ensued, which saw the extinction of the Interex and presumably of the Kinebrach.
Lore 9 : Horus Heresy
Horus fall

In year 31,004, Horus and the Luna Wolves had to clean the Davin's moon of its Chaos corruption ; its planetary governor, Eugen Temba, had turned to Ruinous Powers. Temba was equiped with the Anatheme Erebus stole some years ago (and gave to him), and managed to strike Horus with it ! The Luna Wolves Apothecaries (another wonderfully balanced Space Marine unit who multiplies the health recovery rate of close allies by 1,5, of joined squad members by 4 and of close joined squad members by 6... stackable with the Chaplain aura !) were unable to heal the injury it caused despite their technology and the Primarch's constitution. Horus was condemned. Erebus then asked the Luna Wolves warrior lodge (which at this time comprised, among Luna Wolves, half the Mournival, which was Horus close guard, composed of its best captains, like the infamous Abaddon) to allow him to take Horus to a local secret sect who were able to heal Horus. Which, in a desperate hope, they agreed. Erebus plan was now complete ! The Anatheme he stole and gave to Temba left Horus in the verge of death with no other options than to intend whatever it was possible, even the unimaginable, to save him. The unofficial obediance bounds he tied with the warrior lodges system he copied from Davinites, coupled with slow but steady corruption of this lodge, allowed Erebus to propose this unimaginable question to the closest lieutnants of Horus. And the very nature of the Astartes (from simple soldiers to high ranked lieutenants), which makes them feel far closer to their Primarch than to the Emperor and its precepts (like a chain relation : grandfather/Emperor, father/Primarch and son/Marine), made them accepting the proposal. Of course but unknown to all safe Erebus, this sect was in fact dedicated to the Chaos.

These sorcerers sent the spirit of the Warmaster into the Warp, where he witnessed a nightmarish future : the Imperium of Man would become a repressive and violent theocracy, where the Emperor and some Primarchs (but not Horus) would be worshipped as gods. Though as Chaos Gods swore they had no interest into the material world, the psychic-user Primarch, Magnus, felt what was about to happen, and travelled to the Warp to prevent Horus to listen the Ruinous Powers. He explained that it was only a possible future among others, and that Horus was the only one to be able to prevent it. But the Chaos exploited the seeds of jealousy, anger, betrayal and abandonment their agents sewed in the different events of Horus' life since even its abduction in Emperor's lab, and the apocalyptic vision did the rest. The pact was simple : Horus gives the Emperor to Chaos, and Chaos gives the galaxy to Horus. Horus accepted. Ruinous Powers then healed Horus and insuffled him Chaos energy, turning Horus into the greatest superhuman Chaos Undivided champion ! He then renamed his Luna Wolves into Sons of Horus, in a defiance of the Emperor's proposal at the Ulleanor Triumph, and planned about turning the maximum Astartes to his new cause.

Magnus fall

Desperate with Horus' decision, Magnus decided to use his powers to project an astral form of himself through the Warp to alert the Emperor that Horus was a traitor. This solution was forbidden by the Emperor as it implied use of psychic Warp abilities, but way faster than the "legal" use of Astropaths, and the situation was critical. Somehow, Magnus found in the Warp a Webway path leading to Terra, but sealed. An anonymous Warp entity offered additional power to the Primarch, to allow him to break the seal and contact the Emperor. Which Magnus accepted. Of course, what happened was this seal had been placed and psychically powered by the Emperor himself, while he was working on its Webway project. Now the seal was broken, Warp entities flowed into the Throne room, killing thousand of Mechanicus Adepts working on this project. Horrified, Magnus recalled its astral form to its real body. In the way through the Warp, the anonymous entity revealed it was Tzeentch, the Chaos God of destiny and change, and that the Magnus' fate was to serve Chaos.

The Emperor was furious because Magnus violated the rules of the Council of Nikea by using Warp powers, and that it resulted into numerous deaths and the damaging of the Emperor's Webway both secret project and devices. It led the Emperor to think Magnus was the traitor, not his beloved Horus. As such, the Emperor ordered the Primarch Leman Russ (deeply opposed to psychism and Magnus' ways) to bring Magnus before him. While Leman traveled to Magnus' homeworld, Prospero, Horus ordered Leman Russ to destory Magnus' Thousand Sons legion rather to simply bring Magnus to the Emperor on Terra. As Warmaster, Leman trusted Horus, as he was entitled by the Emperor himself, who would have simply changed his minds. He didn't know Horus turned to Chaos. Leman Russ then led his Space Wolves, along full contingents of Adeptus Custodes, Imperial Guards and even Sisters of Silence ! A word on them : the Sisters of Silence are absolutely unrelated to Sisters of Battle ; they are rather ugly female barbarians-knights who act as elite anti-Psyker witch hunters and originates from Luna. They were then the ideal opponents for the psychic-users Thousand Sons.

However, Magnus came to the conclusion Tzeentch merely used him as a pawn, in order to destroy two Loyalist legions (legions loyal to the Emperor) : its own Thousand Sons and the incoming Leman Russ' Space Wolves. Magnus then accepted its impending fate, and remained totally inactive, allowing Leman's forces to rampage Prospero. It was one of the vision Lorgar saw in his pilgrimage. However, while his world was burning, including the massive libraries housing tremendous knoweldge about Warp and psychism, Magnus came to the conclusion that nothing he had done deserved this destruction. He then decided to retaliate, and ultimately fought against Leman Russ. About to lose the battle and the life, Tzeentch offered to save both himself and all which he fighted for if he dedicated to Chaos. Magnus accepted to become the Tzeentch champion. Then, its city and his Thousand Sons were immediatly transported into the Eye of Terror, where Magnus became the Daemon Primarch of sorcery and change.

War within Webway

In addition to Magnus' heresy, the aftermath was known as the "wars within the Warp". The seal Emperor's put on his own starting Webway conduit has been broken by Malcador ; then, daemons (Warp denizens) could access to the Imperial Palace through the Golden Throne ! As such, countless warriors (including Sisters of Silence) were sent in the Webway since that day in order to fight the demons in the Webway before they could reach the Imperial Palace again. But the flow of daemons was too huge to be contained. The Emperor then used his psychic power not to protect his Webway conduit, but to remain it closed, to prevent invasion. The problem being as powerful the Emperor is, the tide is relentlessly growing, forcing the Emperor to stay in the Golden Throne, as no other Psyker could assume this task more than a few moments.

Then, the Golden Throne became the Emperor's jail, forbidding Him to go anywhere. The only two other men who would have presumed to be able to replace the Emperor were Magnus, who turned to Chaos, and Malcador the Sigilite, who was at this time on a mission ordered by the Emperor, to recruit elite individuals able to be trained to become what will becore the Imperial Inquisition, which task will be to seek and root out any trace of heresy. Without the Emperor's guidance and psychic help to help them, Horus won the numerous battle he led against the loyalist legions, making his way to Terra fight after fight.
Lore 10 : The end of the Emperor
The final battle

Horus forces battled against loyalists forces on Terra, on the war appropriately called the Battle of Terra. In a stunning move, Horus lowered the forcefield of his spaceship, as a provocation and a challenge to the Emperor. This is probably due to the fact Horus knew if the conflict lasted too long, remaining loyalist legions from accross the universe would come in reinforcement. It is unknown if Horus knew about the War within the Webway and its immobilization. The Emperor saw the provocation. He summoned Malcador, which presented his twelve members of the future Imperial Inquisition (comprized of mortal lords and Space Marines, which some of them would become the very first Grey Knights). Then, satisfied by Malcador's recruiting, he asked him to do the ultimate sacrifice : to take his place on the Golden Throne. Aware it could cost his life, Malcador allegedly accepted.

Then the Emperor teleported on Horus' spaceship, accompanied by the Primarchs Sanguinius and Rogal Dorn, and several companies of Imperial Fists and Blood Angels, to confront him personnally. Horus used his Chaos powers to scatter his ennemies all away throughout the massive spaceship, in order to weaken then. Sanguinis was the first one to reach Horus. Sadly Horus defeated him easily. As Sanguinis refused to embrace Chaos, Horus tortured him longly enough, unwillingly allowong the Emperor to reach them. The Emperor finally slew his son, but had also been mortally wounded. The loyalists won this war, but at a heavy price. Rogal Dorn finally made his way to this room, only to find the dying Emperor. He then carried him back to the Golden Throne.

The dead Emperor

Back to the Golden Throne, the Tech-Priests took away the consumed body of Malcador the Sigilite off the throne, to put again the Emperor on it. It was only a few hours since he took place on the throne, but Malcador was near death, his body burned by the intense psychic effort for maintening the Webway gate closed. Seeing the Emperor was also on the verge of death, Malcador gave him his last sparkle of life. Thanks to him, the Emperor had been able to give his last orders to the people present here : the Tech Priests, Rogal Dorn and another Primarch, Jaghatai Khan. He assured his psychics powers would return and remain as long as he remained wired to the survival systems built in the Golden Throne at the demand of Dorn. Thus, even while his body would never be able to heal and he would never be able to walk among men again, he would be able to maintain the Astronomican and to remain the Webway gate closed. It is now to his loyalists soldiers to lead the war against Chaos on the mortal plane, as it is said the spirit of the Emperor is fighting against Chaos on the Warp space.

Keeping the Emperor is then vital to the Mankind, either for fighting Chaos forces on Warp plane and to allow the Astronomican to lead human spaceships throught the Warp, as the Webway project will never be completed. Due to the nature of the Warp, it is also possible the collective thoughts about the Emperor empower him, and that individuals can be bestowed by Emperor's psychic might (which is one of important aspects of the Sisters of Battle... though they don't exist yet). The counterpart is the Emperor's psychic might has to be fueled by the sacrifice of thousand Psykers. They are recruited and trained by the Adeptus Astronomica for this end. A Psyker is "consumed" in few months, and 10,000 are needed at same time.

The restructuration

On His last words, the Emperor gave to Roboute Gulliman the title of Imperial Regent (much like He did with Malcador when he was at the head of Council of Terra while He led the Great Crusade), and the task to remodel the administration and armies of mankind. The Horus experience showed it was dangerous for a single man to control too many men, be it administrators or soldiers.

Then Roboute Gulliman reformated the Space Marines organization, subdividing the legions into smaller chapters of roughly 1,000 men each. This is called the Second Founding. Within each legion, only one chapter is allowed to keep its name, emblem and colours scheme. The remaining chapters of the disbanded legions have to find new names, emblems and colours schemes. In addition, Gulliman wrote the Codex Astartes, which is the "bible" of every Space Marines, containing all a Space Marine has to know, from doctrine to tactics and equipement.

He also dissolved the Council of Terra to form the Senatorum Imperialis, a council formed by the 12 highest ranked officials of the most powerful Adepta of the Imperium. Then, the governing body evolved from War Council to Council of Terra (after the Ullanor's Triumph), to this Senatorum Imperialis. It is compsed of at least 9 of the High Lords of Terra, the leaders of their own Adepta. Traditionnally, they are :
The Master of the Adeptus Administratum (the purely administrative division, to rule the day to day affairs of the Imperium) ;
The Representative of the Inquisition (created some years before the Senatorum Imperialis ; Inquisition is tasked to seek and destroy heresy, and its founding members were recruited by Malcador) ;
The Ecclesiarch of the Adeptus Ministorum (it wasn't expected at first, but gained Adepta status not long after Senatorum's founding) ;
The Fabricator General of the Adeptus Mechanicus (the Mars machines Tech-Priests) ;
The Grand Provost Marshal of the Adeptus Arbites (law enforcers, Judge Dredd style) ;
The Paternoval Envoy of the Navigators (the mutants able to see the Astronomican light in the Warp travels)
The Master of the Adeptus Astronomica (the ones dedicated to mainain the Astronomican functionnal)
The Grand Master of the Officio Assassinorum (founded by Malcador to oversee the Assassinorum Temples, assassins who originally acted on their own initiative to enact Emperor's vision of Mankind, and eliminate His ennemies in shadows who believed being in security not noticed, not feeling worthy of Emperor's thanks and attention, but later facing the need to found organizations [Assassinorum Temples] to pass on their skills and teachings to new generations, as their own death is unavoidable) ;
The Master of the Adeptus Astra Telepathica (the Psykers versed in long range telepathic communications).
Through history, things changed more or less, from more seats to having only one High Lord left alive. One odd and constant parameter is that there is no Adeptus Astartes (Space Marines) Primarch or representative.
Lore 11 : Rises of the Imperial Cult and Age of Apostasy
The God-Emperor and the Ecclesiarchy

Once more, the Emperor' Imperial Truth forbade all religious beliefs, but some cults dedicated to Him rose because of Lorgar's Lectitio Divinitatus decades ago. The most important of them was called the Temple of the Saviour Emperor, located on Terra itself and led by a respected Imperial Army officier who fought at the Battle of Terra, and calling himself Fatidicus. The followers, including himself, saw the Emperor's confinement to perpetually fight against Chaos in the Warp as an ascension into true godhood. It is why, from now until the 41st millenium, the Emperor is now called the God-Emperor. As Fatidicus fought himself the Chaos soldiers in the name of the Emperor, he was hugely respected by his followers. And this helped to spread this religious belief all accross Terra, and later in the galaxy, be it among commoners, Imperial Guards, or bureaucrats of Adeptus Terra. Other cults have been either absorbed or hunted down by fanatical mobs, though the Temple of the Saviour officially prohibited violence. In the 32nd millenium, the 2/3 of mankind followed the precepts of the Imperial Cult, also called Imperial Creed. The Imperial Truth (Emperor's original teachings) was then applied only by the Space Marines and the Adeptus Mechanicus of Mars.

Before the 33rd millenium, the High Lords of Terra recognized the Temple of the Saviour Emperor as the state religion of the Imperium of Man, due to its political power over the minds of men, and gained the status of Adepta (the highest administration unit) : the Adeptus Ministorum. With time, it will be also known as Ecclesiarchy. Naturally, as time pass, more and more people are converted to the Imperial Creed, believing in the now called God-Emperor, and Ecclesiarchy power rose along. Entire worlds even were converted to the Imperial Cult, becoming what is called Shrine Worlds. Somewhat, that dream of Lorgar about everyone worshipping the Emperor as a god came true... thanks to his book, and opposed as the Emperor's philosophy. It is ironic that the Emperor fought any religious belief, including His own, and that the first Primarch to fall to Chaos, Lorgar, was the origin of the zealous worship of the Emperor as a divinity !

Imperium knew then a millenium called the Time of Rebirth. It slowly recovered from the aftermaths of the Horus Heresy economically, politically and technologically. However, this was short-lived, as ancient xenos ennemies profited for the aftermaths to attack humankind. Among them were the Orks, who confront humanity in a conflict known as the War of the Beast. The battle had a massive scale, as Orks even developped a technology to create moons from asteroids and use them as vessels or even as weapons.

At the end of the conflict, other structural changes were made into the Imperium. For example, the Inquisition was created. It consisted into the Ordo Xenos (alien hunters, which Chamber Militant [its strike force] is the Death Watch, a gathering of the finest Space Marines of all chapters) and the Ordo Malleus (deamon hunters, which Chamber Militant is the Grey Knights, sorts of Space Marines specially designed and trained to face Warp creatures [in the game, Grey Knights can be recruited by Space Marines ; they are a semi-elite close combat squad, a real pain in the a*s for the Sisters]). The Inquisition is still separated from the Ecclesiarchy, which is near all-powerful.

The Age of Apostasy

In 34th millenium, Ecclesiarchy held almost total power on Imperium. Such situation fatally leads to jealousy, usurpations, mistakes, abusers, power anger, and so on. As such, various people and organisations held a grudge toward Ecclesiarchy, even if Ecclesiarchy is supposed to bear Emperor of Mankind's words. Such organisations counted Adeptus Astartes, Adeptus Mechanicus, Lords of Terra and Administratum.

During the 35th millenium, the Administratum managed to regain some of its former influence, but through a series of machinations which eroded Ecclesiarchy's power (including Lords of Terra electing weak Ecclesiarchs), and finally which were overall nocive to the Imperium. This is the starting point of the period known as the Age of Apostasy. 

The Ecclesiarch Benedin 4 decided tp move the Holy Synod -Ecclesiarchy's highest members- from Terra to the planet Ophelia 4, the wealthiest one after Terra and Mars, in order to escape Terra's High Lords and Administratum's machinations. There, Ecclesiarchy regained power, and became a force unto itself, able to raise an army, almost as powerful as conventional Imperium's forces. This "Ecclesiarchy's army" was known as Frateris Templar.

300 years after their escape from Terra, the current Ecclesiarch decided Holy Synod should return to their rightful homeworld, Terra. Only, this relocation program, and subsequent reconstruction of Ecclesiarchy's palaces on Terra, decided by another Eccesiarch, who succeded to the poisoned previous one, implied heavy taxes on people, letting some worlds litteraly starving. Then myridads of rebellions and sects sprouted. Some of them dedicated to Chaos (as people sees Ecclesiarchy is corrupted and unworthy of adoration), the others still dedicated to the Emperor, but in an unusual way, such as heavy repentance or recognition of the sole Emperor and not the Ecclesiarchy. Of course, repressions by Frateris Templar followed. Then, icing on the cake, the early 36th millenium saw an explosion of Warp Storms, those space anomalies that Chaos, Orks and Dark Eldars use to strike mankind. As such, humanity was plunged into war, anarchy, frenzy, death, despair and misery. 

In the hellish confusion, the cruel madman named Goge Vandire, 361st and current High Lord of the Administratum, who indeed view Ecclesiarchy as an ennemy, placed some of his men, through treachery and "supect" assassinations, on its higher ranks, including the weak Ecclesiarch Paulis 3. By such, Vandire controlled both Ecclesiarchy and Administratum, and became the most powerful man (with the exception of the Emperor, whose particular state doesn't permit to do anything) on the Imperium when he executed Paulis 3 to take Ecclesiarch mantle. As supposed, he "became" a tyrant, doing usual tyrant's stuff, like tortures, assassinations, heavy taxes, cruelty, corruption, ect., causing many people trying to escape Terra... But the Warp Storm around the planet just tears the spaceships appart. Vandire declare this to be a signal from the Emperor himself (which is indeed a lie) on how he is legit. Then began the age known as the Reign of Blood.
Lore 12 : The Reign of Blood
Daughters of the Emperor

Far from Terra and Vandire's Reign of Blood is the world of San Leor. It has indeed been complied in the Great Crusade, but for some unknown reason, this agricole and low-technology planet was kept secret from Ecclesiarchy, despite it houses a 500 members all-female secret cult dedicated to the worshipping of the Emeperor and the mastering of ancient battle skills, called Daughters of the Emperor. 

Vandire had a vast network of spies that notified him of cults that were not under his control. During one of his many briefings, Vandire learned about Daughters existence. Due to Vandire's nature, he was furious at this; people were worshipping the Emperor in a way he didn't control ! But on a second thought, Vandire had an idea about it. To sit his legitimation and then dominance even further, he will show to the Imperium, through broadcast, that even the most fanatical devouts to the Emperor on one of the most remote and forgotten worlds recognize him as the highest authority behind the Emperor. Vandire then travelled to San Leor with hudreds of Imperial Guards and notables, not harmed by any Warp Storm. There, he started a huge procession, indeed preceeded by Guards who forced all natives to go in streets and show respect to Vandire, of course menaced off-screen. Natives were even provided with gifts to present to Vandire whenever he passes. All of this broadcasted to the entire galaxy. A standard propaganda.

The procession arrived at Daughters of the Emperor's temple. However, Daughters don't open doors to men, as they are dedicated only to the God-Emperor. Vandire then convinced them to demonstrate that he's imbued with Emperor's authority, being authorized to enter into the convent with a single bodyguard. Then, he showed Emperor's will is upon him, as he exhibited his Rosarius, and asked his bodyguard to shoot him. The result was a blinding flash, from which Vandire remained unharmed. Daughters saw a miracle here, and then vowed alliegeance to Vandire, as represantant of Emperor's will. Indeed, Daughters, secluded in their convent, never saw a Rosarius before, and didn't know it was this tool which emitted a force field, and not Emperor's spirit ; Vandire betted on this to subjugate them. As such, Vandire changed Daughters name into "Brides of the Emperor". 

Brides, lead by Alicia Dominica, became its personnal bodyguard and enforcer corps, gaining finest training and equipment, as well as personnal tasters to prevent poisoned food and even more... exotic "auxiliaries" (and hell, who wouldn't have an all-female bodyguard force ? I'm looking at you Kadhafi !), and also a symbol of his legitimation as Ecclesiarchy's head. However, Ecclesiarchy's Cardinals couldn't stand Vandire's madness anymore. They tried to assassinate Vandire, but their agents were slain in return by the Brides.

Sebastian Thor

Vandire's sanity degraded even further over the decades after the San Leor episode. He secluded himself in the city-sized Ecclesiarchal Palace, covered in darkness and dust, silence only broken by Bride's footsteps during their patrols. However, taxes, rebellions and repressions still continued. 

At some point, the preacher Sebastian Thor, native from a Schola Progenium (ecclesiarchal academy) on the world of Dimmamar, dared to declare Vandire heretic and traitor to humanity. As such, he led the Confederation of Light, a Dimmamar-native Imperial Cult, into a reconquista, and claimed over 80 planets from Vandire's influence, either by his oratory skills who rallied millions men to his cause, or by Confederation's military superiority over Frateris Templar, who presumably wasn't used to face military forces since too long. 

On his way to Terra, Thor found allies in Ecclesiarchy's old ennemies, notably Adeptus Astartes and Adeptus Mechanicus, which were kept distant to the madness due to Warp Storms. Confederation saw these worlds as bastions of the old and true faith, while Space Marines and Machines Cults saw Confederation was right. As such, Gastaph Hediatrix, Fabricator-General of Adeptus Mechanicus, ordered Senatorum Imperialis (the Lords of Terra assembly) to put Vandire out from power. Vandire answered by dissolving Senatorum Imperialis and declare Adeptus Mechanicus and Adeptus Astartes heretics and traitors, and thus sent his remaining Imperial Guards and Frateris Templars against them. Indeed, this got too far for Space Marines, which turned from defiance to straight ennemies towards Vandire.

The Terran Crusade

(Note : there is a second Terran Crusade in the lore, in year 41.999, led by the Primarch Roboute Gulliman of the Ultramarines, leading to the time known as Era Indomitus. It has nothing to do with this present Terran Crusade.)

Some Space Marines units composed of Imperial Fists, Fire Hawks, Soul Drinkers and Black Templars, launched an attack on Vandire's HQ, the Ecclesiarchal Palace, backed up by Hediatrix support. This is known as "the Terran Crusade". However, while Space Marines expected to encounter zealous but comparatively weak Frateris Templar and/or Imperial Guards, they faced fanatical and powerful Brides of the Emperor, armed with Bolters and Power Armours. The siege lasted months. 

If Ecclesiarchal Palace is Ecclesiarchy and Vandire's HQ, Terra also houses the Imperial Palace. Deep into its bowels is the Sanctum Imperialis, the most securized location on Terra, cut appart from the world in order to prevent the God-Emperor (or what remains of him, depending on point of view), who lies on his Golden Throne, from the menaces of the outside world. Here, the eternal vigil of Adeptus Custodes (Emperor's praetorian guard) is disturbed when they become aware of the Space Marines and Adeptus Mechanicus attack on Vandire, which revealed Vandire's treachery to their eyes. Custodes and Astartes had secret meetings, in which Space Marines revealed the situation to praetorians. Custodes asked to Space Marines to continue their assaults, as they will do whatever they can. 

Custodes, led by their Centurion Longinus, travelled through secrets underground passage they know to emerge in the dephths of the Ecclesiarchal Palace, where they soon found Dominica. Unarmed, calling from a temporary ceasefire and a parley, he tried to convince women they were not serving the God-Emperor, but an imposter. Of course, Brides are not fooled by sweet talk, and need proofs. Then, the Centurion let Custodes as hostages to Brides, and took Dominica and her closest companions, Arabella, Katherine, Lucia, Mina and Silvana, before the Golden Throne, where the God-Emperor lies. No one know what happened there, Brides being bound by secret and no records existing about this event. But one can assume Dominica and her companions found truth about Vandire. Then Dominica, infuriated, informed her fellow Brides, marched on Vandire's audience chamber, found him affaired on a gigantic galactic map and vocifering about all and nothing. Here, Dominica's speech, in front of the 4.000 remaining Brides, has been recorded : 

"You have committed the ultimate heresy. Not only have you turned your back on the Emperor and stepped from his light, you have profaned his name and almost destroyed everything he has striven to build. You have perverted and twisted the path he has laid for Mankind to tread. As your own decrees have stated, there can be no mercy for such a crime, no pity for such a criminal. I renounce your lordship, you walk in the darkness and cannot be allowed to live. Your sentence has been long overdue and it is now time for you to die."

Vandire's last words were "I don't have time to die, i'm too busy". Dominica then beheaded him with her Power Sword, cutting through his Rosarius, which didn't deployed force field this time. With Vandire's death, the Reign of Blood is over.
Lore 13 : The Adepta Sororitas
Thorian Reformations

With Vandire's death, the Reign of Blood is over. To erase Vandire's doings, the Brides revert to their original names of Daughters of the Emperor. Ecclesiarchy's throne is then vacant. The High Lords of Terra naturally asked Thor to fill the vacance. However, Thor refused, arguing he prefered to preach the word of the Imperor from planet to another. After several additional requests, Lords feel insulted and sued him, accusing him of being a traitor. Trial lasted months, and in the end, the Captain-General (the chief) of the Adeptus Custodes himself delivered the verdict : Thor was innocent of every charge. The verdict was indeed universally well-received. However, Lords requested again, and Thor refused once again, infuriating Lords even further. Then, Captain-General took Thor appart, and whispered an unknown message into his ear, and then Thor accepted, at some conditions including having free hands to proceed on reforms. It is heavily supposed that Captain-General threatened Thor with death if he refused again...

Then Thor unwillingly became the 292nd Ecclesiarch. As such, he profoundly restructured the institution, in order to prevent anyone to gain such power and control as Vandire had, and then to prevent another Age of Apostay and its consequences. 

His probably most important reform was the Decree Passive, in year 36,288. As the High Lords of Terra feared another Reign of Blood, they exerced some pressure on Thor to forbid the Ecclesiarchy to have any men under arms, in order to leave military power to sole Administratum, and avoiding interrupting their continued rule. As such, remaining Frateris Templar was disbanded. However (and this is where the gag occurs), Daughters of the Emperor are not "men", but women, and so remain a religious military force, because even if it is against Decree Passive's spirit, it is not against its terms ! This loophole was of course intended by Thor, as he realized Daughters could fill the double role of a powerful military force, able to hold their own against Space Marines, to defend Ecclesiarchy's interests, and of an internal regulator as they are totally devoted to the Emperor, and somewhat connected to him due to the Sanctum Imperialis event (and also used to be fooled by power-hungry madman, then able to detect and prevent another Vandire), and on a constant quest for purity. With 4.000 survivors of Reign of Blood, and remaining women on San Leor, Daughters are now over 10.000, with Dominica at their head. 

To complete this, Thor created the Synod Ministra on Ophelia 4, in order to split Terra's Holy Synod power, and to have a counter-power, should the need arise, far from Terra. The whole Adepta Sororitas is then divided into two organizations called Convents : the Convent Sanctorum (on Ophelia 4) and the Convent Prioris (on Terra). Each Convent is actually both a somewhat administrative division and a mighty fortress housing thousands of Sisters. Each Convent was then subdivided into 4 factions :
  • Orders Militant : the traditional women at arms. Although all Sisters (including from non-Militant Orders) are trained in the ways of war, the Sisters from Order Militant are by far the best in the battlefield, as warfare is their prime objective.
  • Orders Hospitalier : focus on healing allies on the battlefield, aid the poor in the streets, sooth the sick in imperial hospitals... and torture ennemies on Inquisition's dungeons !
  • Orders Dialogous : focus on communications, artefacts studies, xenos traductions, and sacred text exegesis. They often team up with Missionaries on discovery of new worlds or reclaims of lost ones.
  • Orders Famulous : the strangest Orders. Their task is more "civilian" but vital : they provide servants, diplomates and chamberlains in the noble households, secretly overseeing, creating or broking alliance between prestigious and devoted families... all for the greater good of the Imperium. Their access to great families archives can even lead them to trace some families tendancies for heresy, and even uncover conspirancies.

Then, at this time, there were 8 Orders : Order Militant of Convent Prioris, Order Militant of Convent Sanctorum, Order Hospitalier of Convent Prioris, Order Hospitalier of Convent Sanctorum, and so on.

From here, Sisters of Battle led countless Wars of Faith, on the behalf of the Ecclesiarchy, to reclaim the planets lost since the Horus Heresy, always for the Emperor.

The Ordo Hereticus

The Ordo Hereticus is the third and latest branch of the Inquisition. Its origin, excepting the foundig of the whole Inquisition by the twelve persons gathered by Malcador at the end of the Horus Heresy, remains unknown. Its goal has always been to prevent another crisis, like Horus Heresy or Age of Apostasy. As the Ordo Malleus is dedicated to fight daemons (Warp spawns) and the Ordo Xeno is designed to fight aliens (such as Orks, Eldars, etc...), Ordo Hereticus is meant to watch over mankind and fight within, to prevent any sign of treason, should it be heresy or power hunger. Ordo Hereticus decided to reveal itself some time after the Age of Apostasy, arguing that being a well known police (and menace) would be more effective than a hidden faction people could think as a mere fable. Why they didn't act during the Age of Apostasy is a mystery...

Like the two other Ordos, Ordo Hereticus is independant of any other Adepta, and composed of Inquisitors, who are nearly all-powerful to request any imperial citizen or soldier, including informers, infiltrators, Imperial Guards or even Space Marines, to help them in their investigations or battles. Because indeed, facing internal menaces means uncovering and confronting Chaos-blessed worshippers (awarding this Ordo the often used nickname "Witch Hunters"), madmen with personnal armies eager to usurp Emperor's authority, and so on. They have also the power to declare anybody traitor and bring anybody to justice. Shortly said, they have authority overs almost all Imperium, except Adeptus Custodes who are untouchable, Ordo Xeno and Ordo Malleus which are their equals, and Senatorum Imperialis, they are tasked to watch over, but not control.

As Adeptus Ministorum became the most powerful Adepta of the Imperium, and the Age of Apostasy just ended, Ordo Hereticus primarily focused on Ecclesiarchy's watch, acting as another Ecclesiarchy's external regulator. With time, their anti-heresy role would expand greatly, for example in genetic researches about Chaos tendancies, and the extermination of any threat to human souls...

Convocation of Nephilim

It quickly came to a conclusion that Daughters and Ordo Hereticus had a similar religious regulator role (the girls within Ecclesiarchy and the Inquisitors outside Ecclesiarchy). It was then decided to bind them together on the military question. As such, Daughters of the Emperor had to become Inquisition's Chamber Militant (the military force composed of finest Ordo's warriors ; much like Death Watch and the Grey Knights) . This solemn codification led to a pact between Ordo Hereticus and Daughters, in front of the Golden Throne itself, known as Convocation of Nephilim. This was then the second time Dominica walked on Sanctum Imperialis. And for the second time, what really happened here remains unknown except fot the concerned to this day.

The only sure thing is since them, the Sisters of Battle are the strike force of the "heretic" branch of the Inquisition, facing the same menaces as their fellow imperial soldiers, Space Marines and Imperial Guard. Then, even if they were originally meant for anti-heresy purpose, they don't fight only Chaos traitors, but every other menaces, be it squishy Eldars or monstruous Tyranids. They fight a zeal and efficiency last seen in Great Crusade.


Lore 14 : Sisters of Battle's current organization
Current organization

With time, Sisters grew in numbers. This is due to their own successes : they prove by themselves they are worthy warriors, then Imperium wants to have more of them, then female orphans are brought to Schola Progeniums to be raised and trained as Sisters of Battle, then Sisters numbers grow.

Thor's successor, the Ecclesiarch Alexis 22, decreed that all 8 orders would be subdivided in two smaller ones. For example, Order Militant of Convent Sanctorum was divided on the Order of the Fiery Heart and the Order of the Valorous Heart ; Order Hospitaler of Convent Prioris was divided on the Order of the Cleansing Water and the Order of the Torch. Then, Adepta Sororitas counted 16 orders at this time.

Later again, in mid of 39th millenium, the Ecclesiarch Deacis 6 created one more Order Militant for each Convent : Order of the Bloody Rose and Order of the Sacred Rose.

Currently, in 41st millenium, the Adepta Sororitas is organized as such :
  • Convent Sanctorum, based on Ophelia 4 :
    • Orders Militant :
      • Order of Our Martyred Lady
      • Order of Valourous Heart
      • Order of Bloody Rose (founded later)
    • Orders Hospitalier :
      • Order of the Eternal Candle
      • Order of Serenity
    • Orders Dialogous :
      • Order of the Holy Word
      • Order of the Quill
    • Orders Famulous :
      • Order of the Key
      • Order of the Gate
  • Convent Prioris, located on Holy Terra :
    • Orders Militant :
      • Order of the Ebon Chalice
      • Order of the Argent Shroud
      • Order of the Sacred Rose (founded later)
    • Orders Hospitalier :
      • Order of Cleansing Water
      • Order of the Torch
    • Orders Dialogous :
      • Order of the Sacred Oath
      • Order of the Lexicon
    • Orders Famulous :
      • Order of the Holy Seal
      • Orderd of the Sacred Coin

In addition, on some worlds Sisters conquered, they established smaller convents (rather of the game's size than the "real" Convents) to maintain a presence. With centuries and millenia, these minors groups developped their own habits and patterns, somewhat different to the order they originally came (but still remaining their core principles, such as loyalty and worship toward the Emperor). They are known as Minor Orders. They are far less developped in the lore, only being barely mentionned in some Games Workshop more or less obscure books, to the point even the Convent which they belong isn't precised. Examples include :
  • Order Sabine : tasked in infiltrating new primitive worlds to introduce elements of the Imperial Cult to the natives.
  • Orders Pronatus : tasked in recovering relics and sacred items, they are subdivised in at least 3 Orders (Order of the Eternal Gate, whose responsability lies in retrieval of relics ; Order of the Blessed Enquiry, who collected Chaos Gods artefacts, and are rumored both to have discover Slaneesh's true name and perished at Chaos' hands ; and Order of August Vigil, specialized in guarding and defending the recovered artifacts).
  • Order of the Shining Path : a minor Order Famulous, only mentionned in two pages of the 2011 rulebook Dark Heresy : Daemon Hunter.
  • Order of the Blue Robe : a minor Order Militant, part of Convent Sanctorum, who participated on the Second Abonian Genocide in year 40,688.
  • Order Vespila : grey-shrouded Sisters specialized in clergy burial ceremonies.
Army Painter
Dawn of War comes with 8 preselectionned colour schemes.

Armour
Clothes
Armour linings and insignias
Weapons
Minor Details
Saint
Convent
Ardent Flame
Gold
White
Red
Black
White
-
-
Argent Shroud
Silver
White
Lighter silver
Red
Gold
Silvana
Prioris
Bloody Rose
Red
Black
Gold
Black
White
Mina
Sanctorum
Ebon Chalice
Black
White
White
Silver
White
Alicia Dominica
Prioris
Fervent Heart
Red
Red
White
Silver
Gold
-
-
Our Martyred Lady
Black
Red
Gold
Silver
Blue
Katherine
Sanctorum
Sacred Rose
White
Black
Silver
Black
White
Arabella
Prioris
Valorous Heart
Black
Black
White
Black
Red
Lucia
Sanctorum


Ardent Flame and Fervent Heart

These sets are creations for the game, to score 8 colour schemes. Then, they haven't any background.
..........╠ Convent Prioris' original Orders
Those are the 2 Orders established on Terra by the Ecclesiarch Alexis 22 in the 36th Millennium, when each Orders of both Convents were split in two.


Argent Shroud, the silent kamikazes
This order was founded in honour of Saint Silvana, who was notorious for acting instead of speaking, and for her many heroic acts of self sacrifice. Alas, her altruistic spirit and stoic faith didn't prevent her to be poisonned by an ennemy Death Cult Assassin in 36th millenium, even before she had a chance to lead any holy crusade. Her corpse was veiled in a shroud and kept in the Inner Sanctum of the Convent Prioris. About a week later, the body mysteriously vanished, but the ghostly image of her skeleton was imprimed on the shroud. Hence the symbol of this Order.

The Sisters of the Argent Shroud likewise rarely speak, and they are famed for their selfless acts of heroism. This "i don't speak, i do" attitude leads them to jump unto the fray, spear-heading assaults, shouting Silvana and God-Emperor names, for they are protecting them, but without concerting with their allies, much to their dismay. Altough they are lucky Argent Shroud Sisters willingly throw their lives if needed to emulate the example of Saint Silvana. This behaviour is due to these Sisters believing more in Emperor and their patron Saint guidances than concerting plans with faillible men. As result, their battlecries are almost the only time they are heard, outside the traditional prayers. Even their loss are mourned in silence, contrary to other Orders which chant for their fallen comrades and swear revenge upon their ennemies. As such, Sisters of the Argent Shroud are often cut off from support, which lead them being frequently outnumbered, but against all odds, their Faith allow them to return for battles which were considered as impossible to win.

Then, this Order has naturally developped a knack for hit and run skirmishes. This naturally makes the Order fielding a high number of highly faithful sisters, namely Celestians and Seraphims (pre-V8 Codex lore) and Dominions (in lore and talbetop game : Flamers or Meltas-carrying Sisters which are part of "Fast Attack" army list ; in video game, SoB with Flamers). Ultimately, the Sisters of Argent Shroud are known as somewhat silent kind kamikazes, to go frontlines, gladly giving their lives like their Matriarch if needed, and to let their actions speak instead words.

Notable campaigns include persecution of Angels Vermillion (Space Marines suspected of heresy due to being created from original Blood Angels gene-seed, then carrying their chaotic flaw), the Gyre Crusade (against Iron Warriors, Space Marines traitor legion), Exorcism of the Infected (a thousand Sisters cleansed whole planets infected an inhabited by Death Guard Chaos Space Marines, one by one) and third war of Armageddon (all Imperium VS the biggest Waaagh ! ever seen).


Ebon Chalice, the vanilla ones
This order was founded in honour of Saint Alicia Dominica, who was at the same time the chief of the Brides of the Emperor back in Reign of Blood, and the one who ended it by beheading Gorge Vandire. As such, she is considered as the supreme leader of Adepta Sororitas. She led her bethren on countless wars of Faith through several centuries, until she met her end at the Scourging of Frideswide's World. It was recorded that she survived literally hundreds of wounds before one lasgun blast finally found a weakness in her armor and pierced her heart in year 36.650. At some point before her death, Dominica was declared a Living Saint.

The Order of the Ebon Chalice represents the original and oldest Order Militant, the direct continuation of the original founding as the Daughters of the Emperor, with combat and religious doctrine, like their uniforms, unchanged for four thousand years. Though the Schola Progenium proffers a constant stream of new recruits, only the most promising are accepted into the order, and of those only a small percentage prove themselves in the gruelling initiation rites to become Battle-Sisters. It is said that the highest ranked members of the Order learn the truth that Dominica learned before the Golden Throne.

The Order's symbol is a flaming black chalice, which is an actual relic held by Alicia Dominica. It symbolizes the terrible knowledge imparted to Dominica when she was brought before the Golden Throne. A truth never reaveled to us, of course. But one can assume it is a terrible one, judging by the fact the grail is filled by human skulls on Order's banneers. The Ebon Chalice itself is loaded with tremendous power, allowing Alicia Dominica to perform terryfing Acts of Faith on the battlefield, like set every Psyker on a planet ablaze by merely brandishing it. Its whereabouts are unknown.

While the other Orders battle in the far reaches of the Imperium, the Ebon Chalice dedicates itself to safeguarding Terra and Segmentum Solar. They have become renowned for moving across worlds in the Segmentum, rooting out Mutant conclaves, servants of Chaos, traitors, and Xenos infestations.

One in one, Order of Ebon Chalice is the both the "rootest" and the most demanding one.
..........╠ Convent Sanctorum's original Orders
Those are the 2 Orders established on Ophelia 4 by the Ecclesiarch Alexis 22 in the 36th Millennium, when each Orders of both Convents were split in two.


Our Martyred Lady, the vengeful postergirls
This order has a more complex story than the others. It was originally founded in honour of Saint Katherine, but was named Order of the Fiery Heart. Actually, Katherine was known as a fierce, vengeful yet collected warrior, and was Alicia Dominica's second in command. Even before heading her own Order, she led many successful campaigns against the forces of heresy and Warpcraft. Her order then was named after her nature, hence the name of the Fiery Heart. With her fellow Sisters, back then clad in completely black outfit and red weaponry, much like the Order of Valorous Heart, Katherine led and won numerous Wars of Faith. Her deeds and Faith were so high she earned the title of Living Saint within her lifetime. This title is honorific, she didn't become the giant angel there is in game. But it is a feat, since sainthood is decided after one's death. Then, Saint Katherine became the first Living Saint. It didn't prevent her of ultimately falling against a witch cult called Mnessteus. Untold to anyone, soon before her final days, she hide her golden Power Armour and her Ardent Blade, which would be discovered centuries later by the Repentia Celestine, who would become from on Saint Celestine...

The death of Saint Katherine was a shocking loss to every Sister of Battle, but Sisters of Fiery Heart channeled their grief into an endless quest for retribution and took the name of Order of Our Martyred Lady, the lady being undoublty Katherine. They remained the feared warriors they have always been and continued to seek vengeance since. Later, in the beginning of the massive Third War of Armageddon, circa 41.998, they slightly changed their colours scheme, exchanging black cloaks for red ones, reminiscent of the blood shed by Katherin. The rest or their colours remain unchanged.

Sisters of Our Martyred Lady are somewhat the overused Sisters of Battle in fluff, merchandising, etc.. Like Ultramarines or Blood Angels for Space Marines. As such, they combine some aspects of other Orders : they emphazise on strategy (and manifest a good flexibility at changing tactics when needed) and willingly give their lives like Argent Shroud, but not necessarily spearhead assaults, and they welcome allies like Sacred Rose (and as opposed as Argent Shroud). In fact, they even include fallen allies in the litanies they sing to honour the dead. Lastly, their strive for repentance is second only to Valorous Heart. Ultimately, they are best known for seeking revenge and martyrdom.


Valorous Heart, the masochistic ones
This order was founded in honour of Saint Lucia by the Ecclesiarch Alexis 22 in the 36th Millennium, when each Orders of both Convents were split in two.

Saint Lucia was the youngest of Dominica's companion, and the most regretful about Sisters' "original sin" : having served Goge Vandire as the Brides of the Emperor. As such she teached heavy feeling of guilt on her Order. Lucia was captured and tortured over long solar months by a heretic sect, which attempted to break her spirit and make her recant her faith in the Emperor through heavy torture. Lucia's eyes were gouged out, and she was forced to listen to the screams of a thousand innocents as they themselves were tortured to death. The sect even captured, tortured and killed fellow Valorous Heart Sisters, but the none of the holy warriors uttered a sound as they endured their torments, so as not to cause their Matriarch any more pain than she had already suffered. Lucia finally died, and the recidivists claimed loudly that they had shattered her resolve. But over the following solar decade, the Order of the Valorous Heart tracked down and captured every last member of the sect, all of whom confessed to lying about the Matriarch's lapse of faith. What became of those Heretics is not known outside the order... only that a contingent of Sisters Hospitaller from the Order of the Silent Vow has been seconded to the Valorous Heart ever since that time, and have been putting their knowledge of life extension and pain enhancement to use deep beneath the sanctuary of Lucia's Reprisal.

Valorous Heart Sisters wear all black equipement, much like all Sisters of Convent Sanctorum prior to splitting its Orders in two, and much like the now-reformed Order of Fiery Heart (which became the Order of Our Martyred Lady). Their insignia may represent the guilt deep into their heart while their banner display a blindfolded female Saint, with blood dripping from the blindfold : it represents the martyrdom Saint Lucia suffered.

Sisters of this Order are universally reknown for seeking repentance, more heavily than any others. To achieve this noble but masochistic goal, they self-inflict much more punishment than any other Sisters, and they rely on a particular strategy in the battlefield : war of attrition. At the outset of battle, the Sisters pray to the Emperor and their Matriarch for the strength to endure the horrors to come. They then launch offensives to cut off their foe's supply routes and lines of retreat. The ennemy has then no other choice than go all-out ! It is a win-win strategy for this Order : ennemy support is denied, giving Sisters an edge, and as the ennemy has then nothing to lose, it will fight the final battle more furiously, giving a chance to Sisters to endure a maximum of pain. For them, the more they suffer, the more they are closing to Saint Lucia's martyrdom and expiating Adepta Sororitas' sins. Gruesome scars are common marks of valor and dedication among Imperium forces, but even more in Order of Valorous Heart, and these Sisters even refuse numbing medicines, even when amputation or surgery is needed, once again in a goal of emulation and expiation. They go as far as considering the loss of an eye or two as a blessing, as it helps to understand what Saint Lucia suffered, and consider it helps them to see the true path of Faith. Their tactics of detroying supply lines before leading the final assault make them forming lots of Retributors (who hear the heartbeating of Saint Lucia through Bolters' shots) and Exorcists, while their eternal seeking of repentance ultimately lead a huge amount of Sisters becoming Repentias, far more than any other order.
..........╚ Latest ("Rose") Orders
With time, even two Orders for each Convent became insufficient to house so many Sisters. Then, in the 38th Millenium, Ecclesiarch Deacis 6 decided to found an additional Order for each Convent : the Sacred Rose and the Bloody Rose.


Sacred Rose, the collected ones
This order was founded on Terra (Convent Prioris) in honour of Saint Arabella, who was known as a particularly serene, even-tempered sister, renowned for her calm nature in the face of adversity and fear. She is said to have been instrumental in the negotiations that led to Dominica accepting the plan of the Adeptus Custodes toward the end of Reign of Blood. Arabella's quiet temper is such an exemple for Sisters that they pray her for liberation from doubt and rash action at times when a cool head is required. This inspiring behaviour has earned her the honorific title "Liberator".

Sadly, she never commanded her own Order. After Saint Mina died in late 36th millenium, Saint Arabella mysteriously vanished. It is unknown if she died from old age or from attack, as her fate is unknown to anybody. So she disappeared more than a millenium before the founding of the Order dedicated to her.

Altough never having been led by Arabella, the Order of the Sacred Rose follow her example of clearing their mind to take the best decisions. As such, this order's Retributors (Sisters carrying Heavy Bolters ; this appellation doesn't appear in the game) are perhaps the most accurate and deadly Retributors of the Adepta Sororitas.

But their cold demeanor doesn't prevent the Faith to burn ardently in their heart. If calmness is their style, Faith is is their guide. The order teaches that victory comes from faith and faith alone, as the slaughter of their foes has been preordained. Even when one of their number falls, they know that this too is part of the Emperor's plan. A single martyr can spark a fire in a thousand souls, giving rise to an inferno of faith that can never be extinguished.

This perfect purity of both mind and heart is symbolized by the pure white rose which ornate their insignias. The Order's banner also features a silver gauntlet holding the rose, and the word "Fides".

It gives them somewhat an air of devout serenity, and help them to advance in perfect tactical harmony and discipline, adapting fluidly to the shifting tides of battle. They combine their discipline and faith with physical prowess, creating miracles where they may suddenly burst into speed or see foes spontaneously combust. As such, they draw attention of Ecclesiarchy warriors, who want to help them in the battlefield to witness their miracles. Unlike Argent Shroud Sisters, they accept to cooperate with allies, as they believe that Emperor's will can manifest through even the lowliest of His servants. However, they are not above purging anyone who expresses doubt in the security of the Imperium, as they did in some events occuring in the time known as the Era Indomitus. Ultimately, Sacred Rose Sisters are reknown for their unwavering Faith.

In Campaign Mode, Sisters of Battle belong to this Order, led by Canoness Selena Agna.


Bloody Rose, the violent ones
This Order was founded on Ophelia 4 (Convent Sanctorum) to honour Saint Mina, who was known as a dark, brooding, quick to anger and deadly sister. Some consideded her as Dominica's champion. Legend says she even duelled with Longinus during the Reign of Blood's Terran Crusade, and that the two fought to a standstill before words of an alliance were finally spoken. Her solitary nature made her frequently pray alone. It was then no surprise she was, one day in late 36th millenium, praying alone on a small shrine in the world called Hydraphur. Chaos cultists exploited it to ambush her. She fought back fiercely, killing at least 20 opponents on her own, their blood splattered on the walls and floor, but finally fell.

To honor her memory, the fiercest Sisters of Battle who formed the retinue of the Abbess of the Adepta Sororitas took the name of Order of Bloody Rose. The thorns and legend "Ferox Pious" represent her nature (ferocity and devotion) while the red on the rose and the swords behind represent her bloody matryrdom. Finally, Ecclesiarch Deacis 6 ordenned the creation of a full-fledged Order dedicated to Saint Mina in 39th millenium : Order of the Bloody Rose. This means that Saint Mina actually never led the Order of the Bloody Rose, as it was founded long after her death, in a similar manner than Order of Sacred Rose.

Its Sisters are known to be quick to anger and bring a swift and violent ending to their ennemies, be it with Flamers, Chainswords, Bolters, Knives, and even punches and kicks or forcefully bashing their heavy Bolters in the skull of their foes. Ennemies of Mankind is an abomination that fuel their holy rage. Then, the Order of the Bloody Rose is reknown both for its rageful Sisters and for abundance of Dominions, who are Sisters carrying special weapons like Flamers.

An example of this ferocity is Saint Aspira, the 18th Canoness of the Order, who earned fame for reclaiming about a hundred of worlds, with only a thousand warriors. Her cloak is a reverred relic in lore which also appears as wargear in Campaign Mode.
BSS VS Dark Eldar early units (WIP)
Dark Eldars have several options to start with. Mandrakes are the starting squad, built in HQ, who are only melee but strong and can be infiltrated ; Warriors are ranged soldiers built from Barracks / Convent equivalent ; and Jetbikes are speedy melee light vehicles, built in Dark Foundry, which can be built at Tier 1.


Mandrakes

Dark Eldar starters. They move faster than most units (20 Speed, BSS have only 16 Speed), deal a whooping 15.6 DPS, and receive only 7.6 DPS from BSS Bolters (and only 6.3 DPS on melee). A squad costs 2 Pop Cap, 150 Req., takes 27 s. to recruit and give 3 Mandrakes with 325 HP each and standard Infantry Medium armor. A single Mandrake takes 45 Req. and 11 s. to form, and a squad can have up to 6 members.

In addition, Mandrakes can buy an upgrade which turn then permanently stealthed, from their Barracks equivalent at Tier 1. At Tier 1.5, they can buy Poisonous Blade, which cause 20 damages in 20 s. (1 hp/s.) if Mandrake strikes (if a unit is already poisoned, damages don't stack, the 20 s. counter restart ; it works like burning from Inferno Pistol). In Tier 2, damages and HP can also be boosted.

Then, Mandrakes are melee beasts. They are somewhat comparable to Celestians with Leadership (but without the leader) in terms of damages and movespeed. Try to escape them, which is hard due to their movespeed.

Mandrakes


Tier 1[/h1]

Req.
Pow.
Units
HP
DPS
MDPS
Time
Lone Sister
35
0
1
290
6.9
2.4
6 s.
Lone Warrior
50
0
1
250
13.2
0.8
10 s.
Initial Sister Squad
140
0
4
1160
27.6
9.6
16 s.
Reinforce 4 Sisters
140
0
4
1160
27.6
9.6
24 s.
Initial Warriors Squad
150
0
3
750
39.6
2.4
21 s.
Reinforce 3 Warriors
150
0
3
750
39.6
2.4
21 s.
Full Sisters Squad
350
0
10
2900
69
24
52 s.
Full Warriors Squad
300
0
6
1500
79.2
4.8
51 s.

Warriors have then about 15% less health than sisters, but inferior armor (Infantry High VS Heavy Infantry Medium) and almost twice damages. In addition, they deal more melee damages (6.5 DPS VS 4.6) It is then strongly advised to have twice Sisters than Warriors. Alternatively, you can field 50% more Sis than Wariors and engage them at melee, but they can easily run away thanks to their higher speed (20 VS 16).


Tier 1.5

Warriors can gain a general damages upgrade and a powerful leader (Sybarite) as soon as they have the Haemonculus Laboratory (Pristine Sanctuary equivalent).

Req.
Pow.
Units
HP
Heavy Weapons
DPS
MDPS
Time
Lone Sister with a Flamer
65
10
1
290
1
11.5
12
18 s.
Boosted Warrior
50
0
1
250
0
17.1
1
10 s.
Initial Sister Squad with 3 Flamers
230
30
4
1160
3
41.4
38.4
52 s.
Initial boosted Warriors squad
150
0
3
750
0
51.3
3
21 s.
Full Sisters Squad with 3 Flamers
440
30
10
2900
3
82.8
52.8
1:28
Full boosted Warriors squad
300
0
6
1500
0
102.6
6
51 s.
Warrior Sybarite (leader)
70
15
1
320
0
26.3
2
10 s.
Full boosted Warrior squad with Sybarite
370
15
7
1820
0
128.9
8
1:01

Dark Eldar Warriors damages go even further, both individually and as a squad. You can't cont on Flamers demoralization either, cause Sybarite has Terrorfex Grenade, which deals a total of 70.5 Morale damages per sister hit over 29 s.. (12.5 on spot then 2 per half second during 29 s.), on a 8-unit area. In addition, it shrinks sight and detection radius by 90% for 30s. ; it's like Canoness' Purifying Light, but 10s. longer, without the accuracy debuff, and with shorter cooldown.


Tier 2

On Tier 2, Necrons can build the Greater Summoning Core and get the Enhanced Disruption Field, giving a MASSIVE +290 HP for 870 HP ! (+50% from first upgrade) And +4.5 DPS (+35%) for 17.4 DPS. And range increase from 17 to 21, which is still less than Sisters' Bolters and Flamers (25). Heavy Bolters and Rhinos to keep them in long range (not counting Wraiths and Flayed Ones) are recommanded.
38 Yorum
Karl VII Karling 6 Haz 2023 @ 15:13 
I only have one question at the moment and that is how can you counter a rush against an eldar player, I have practiced against the AI and it always sends me two squads of guardians that kill the battle sisters.
damascus_fr  [yaratıcı] 6 Haz 2023 @ 14:17 
Thx JST Luigi and Karl.
I must admit i didn't updated for a long time, i'll fix that once my broken ankle/arm will be healed.
Karling you can but i warn you my prime intention was to save data from the relic wiki cause i saw it striked once, then i don't want those datas to be lost.
Of course comments and usages are my own, but i'm not the best strategist.
Karl VII Karling 31 May 2023 @ 16:58 
one of the best guides I've seen :diplomacy:, although I don't know if you would mind asking if you can give me some extra tips.
J.S.T.- Luigi 20 Kas 2022 @ 17:56 
It's always cool to come back to looking at your guide and see the new information you add and put into it, keep it up man. :steamthumbsup::steamsunny:
damascus_fr  [yaratıcı] 14 Eyl 2021 @ 11:17 
Etage 2 ? Are you french ? On a multiplayer map, experiened players tend to say to rush T2 for Celestians blob. Don't know about it tbh. Celestians are really the go-to. Problem is if you get rushed, you're doomed. Early Seraphims can help a lot. TBH i'm FAR too inexperienced to give tips on this. My guide is on constant evolution. The "strategy" section is more a draft than any other thing. For example, rushing with next to no LP is interesting for testing, but a fatal mistake in actual game. Problem is i'm currently comparing BSS and equivalent squads in other races, it is not exactly a thrill, then it slows me lol.

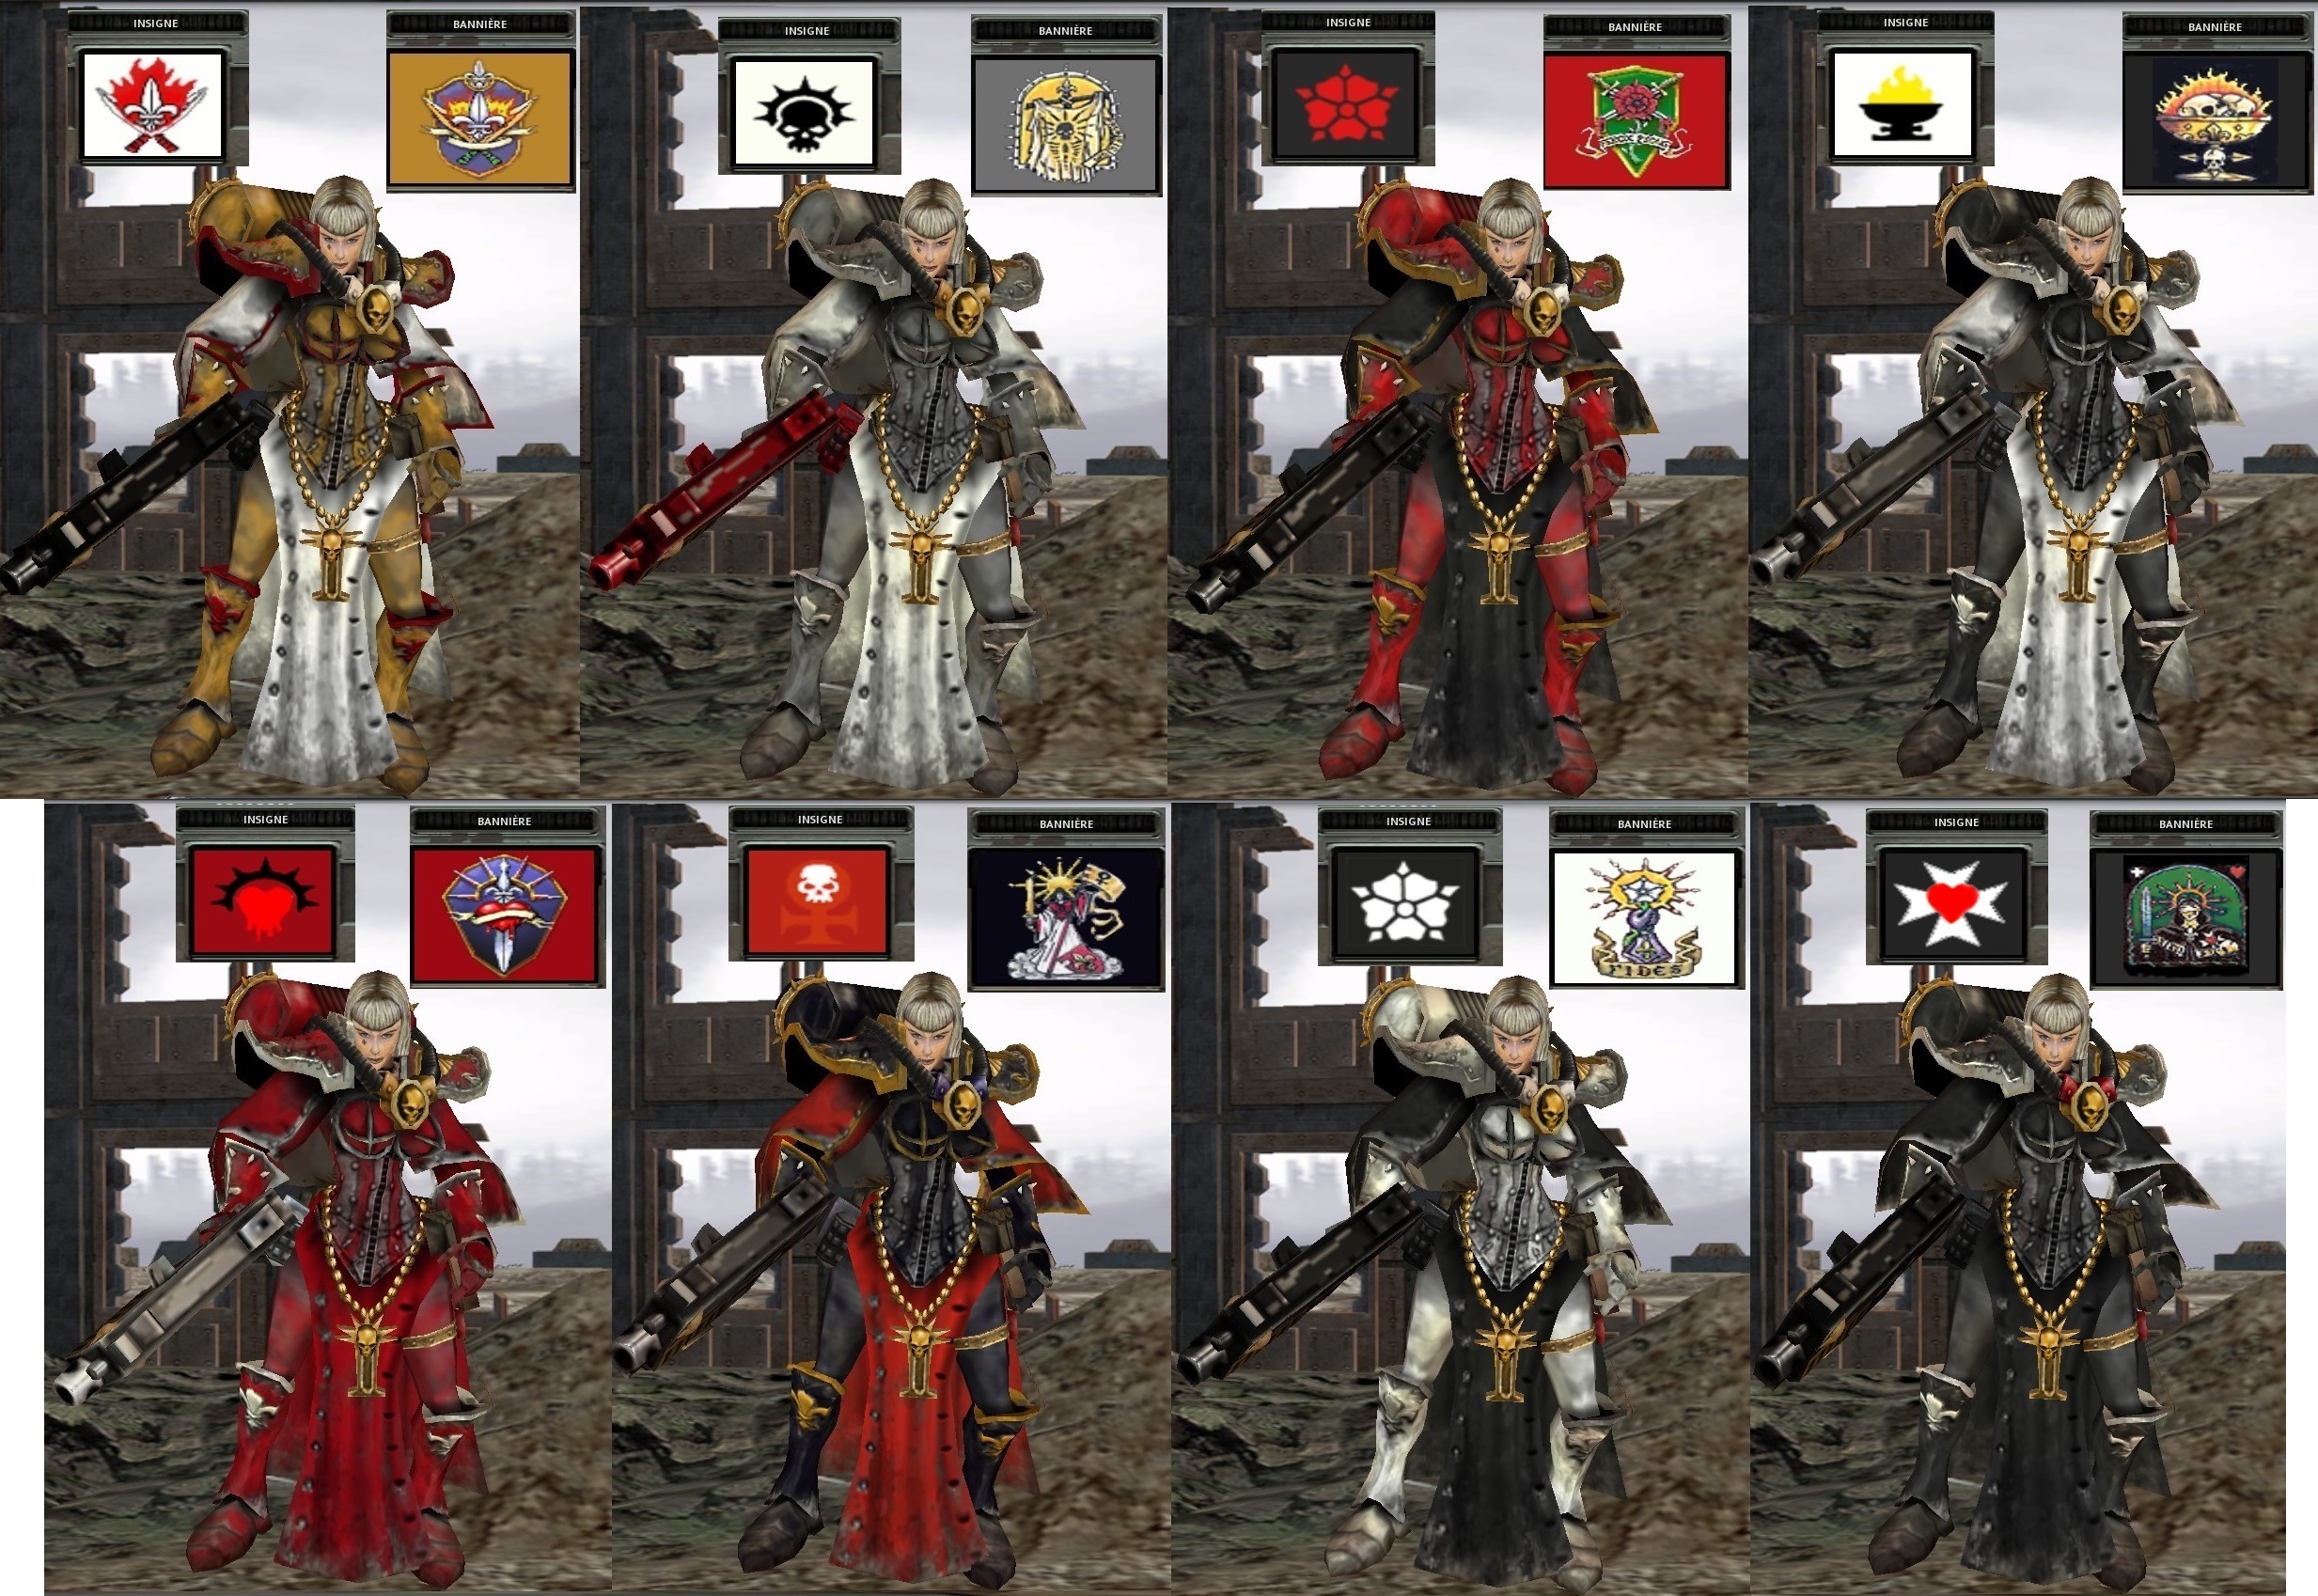
MMMM CANDY : 2 or 3 Missios is a recurring topic. But it is of course better for Missios to cap and for Sisters to cover them... or to cap even more points !
Techhead7890 13 Eyl 2021 @ 8:50 
Ya you can probably go up to 3 or 4 on a 2v2 map without being punished too much for it candy. I know SM does 4 scout builds in a high rush configuration but scouts are a little diff obvs.

Being actual combat squads with gun upgrades, scouts are a little more sustainable, rather than the missionary being the ability commanders more like the comissars in purpose (if not the power cost).

Since august I definitely want to try using more celestians for Etage 2 melee com build :)
Dermot 2 Eyl 2021 @ 15:42 
tip: spam missionary for a headstart to capture points, not battle sister squads
damascus_fr  [yaratıcı] 23 Ağu 2021 @ 13:24 
Thanks guys, but the more i dig, the more i find there is a lot of work !
Techhead7890 13 Ağu 2021 @ 21:01 
Very detailed guide, thanks (et merci) for posting!
Definitely_Not_Me 30 Nis 2021 @ 17:42 
I know I'm VERY late to the party, but the insights are still much appreciated!