The Escapists

The Escapists

225 ratings
Escaping all Prisons: Step by Step Guide (Includes Escape Route Maps)
By Louis
A Step by Step Guide to escaping from Center Perks, Stalag Flucht, Shankton State Pen, Jungle Compound, San Pancho and HMP Irongate. Each guide includes a full, annotated map detailing the escape route, a full list of equipment and step by step guides on how to get out. Hope it helps!
5
   
Award
Favorite
Favorited
Unfavorite
Prison 1: Center Perks
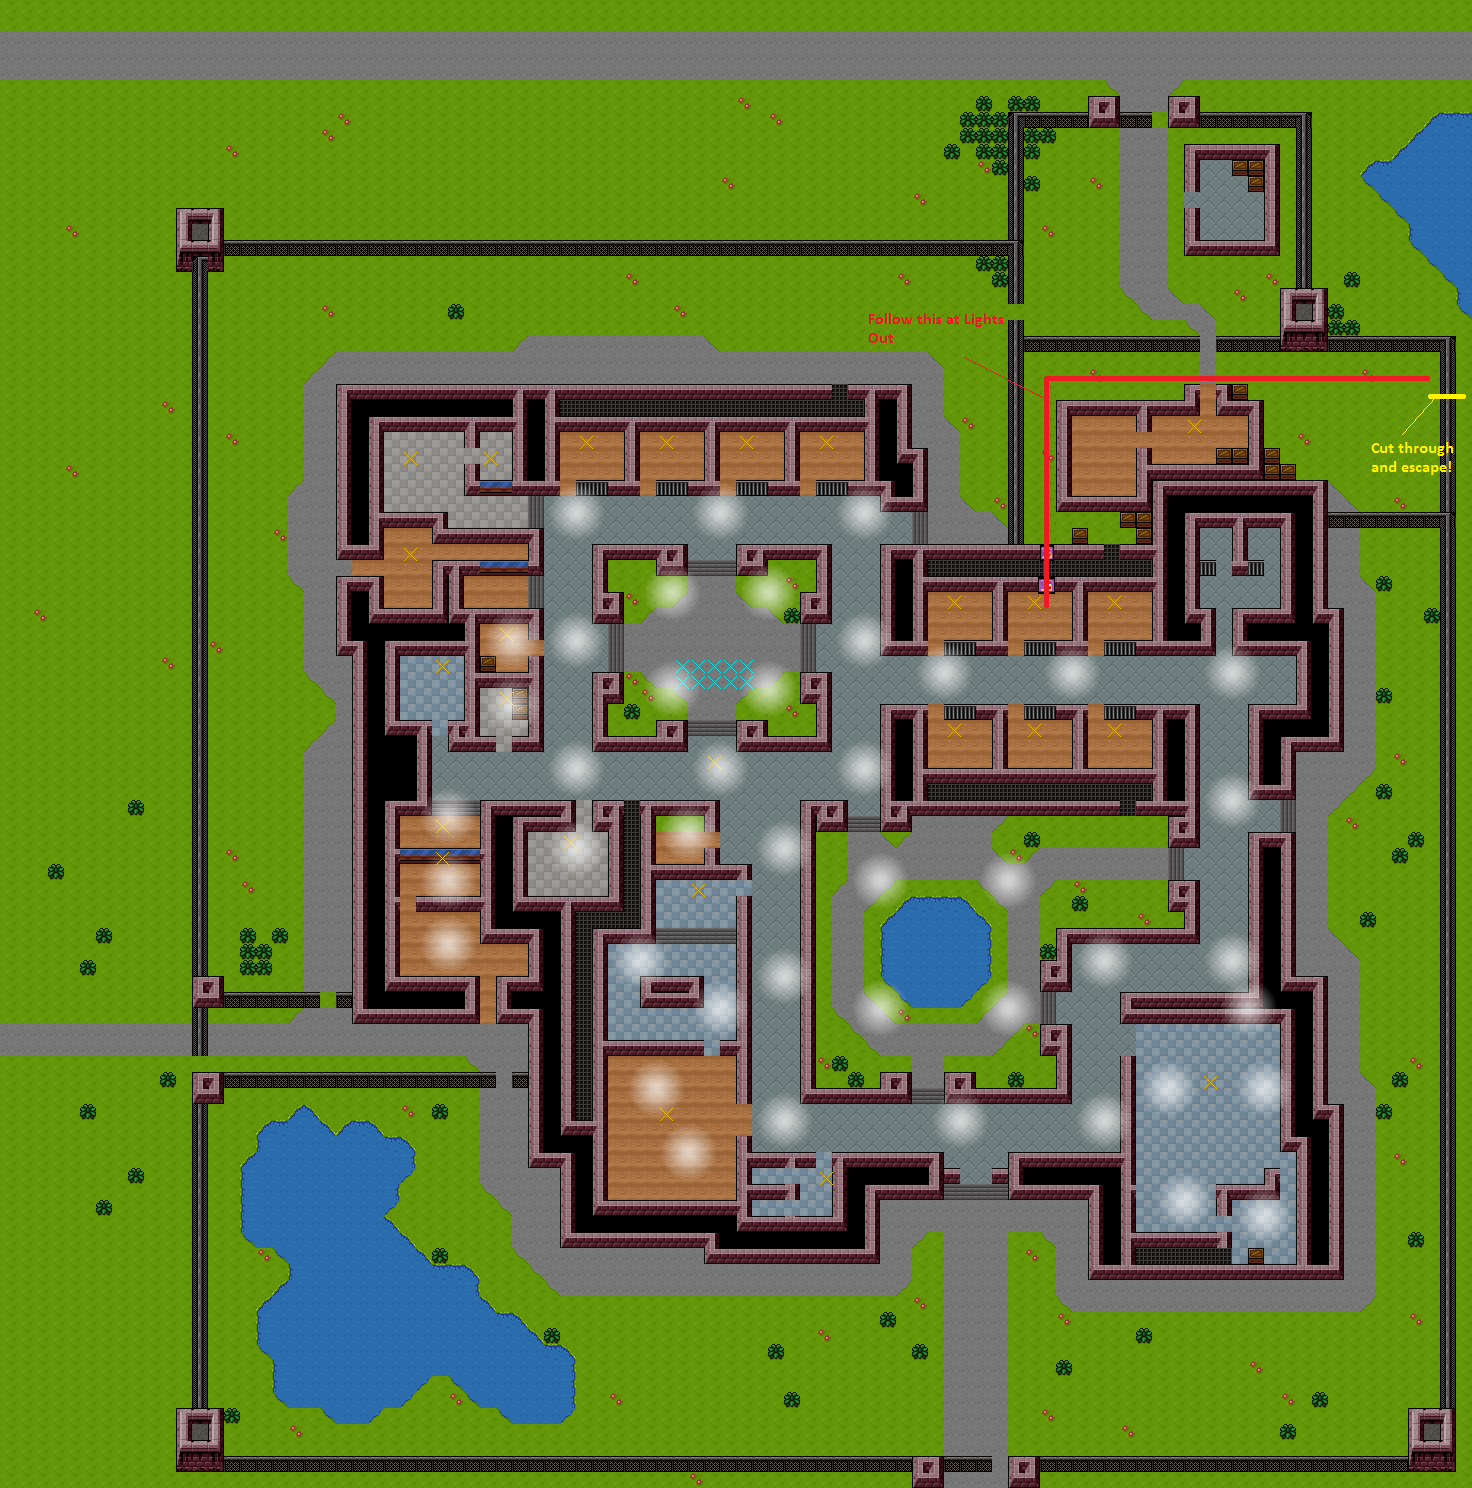
How to escape the first prison: Center Perks

Step 1: Get All your Items:
You will need:
1) Fork/Pickaxe - Forks can be found in the blue canteen tray or inmates' desks. Pickaxes are made using a Crowbar, Tool Handle and Duct Tape. Pickaxes require high intellect to craft, so forks are handier.

2) 2 lots of Poster/Fake Wall Block - A poster can be crafted using a magazine and duct tape, and requires low intellect. A Fake Wall Block can be crafted with 2x Paper Mache (Toilet Paper + Superglue = 1 Paper Mache) and a Jar of Ink. A poster is probably the better choice.

3) Guard Outfit - There are 4 Ways to aquire a guard outfit in the prison: 1, the easiest, is to buy one for around 40-50 dollars from another inmate. 2. Since you start with the laundry job, finish your job. Then, take a guard outfit from the laundry box and wash it. Wear this and keep your prison outfit in your hotbar. Walk through the metal detector without setting it off as you are wearing the contraband, then, on the other side, switch into your inmate outfit. 3. You can craft a gaurd outfit using Bleach, Inmate clothes and a Jar of Ink. Combine the Inmate clothes with bleach to get the (contraband) Infirmary Overalls, then combine the overalls with the Ink to get a guard outfit. 4. Finally, you can beat down an officer. There are many ways to do this. Sometimes (Rarely) the officer fights inmates and gets taken down. You can take his outfit and baton. Or, you can find a guard in a lonely spot (Like the library) and take him out in there. This requires high Speed/Strength Stats and a good weapon.

4) File/Cutters/Knives - The easiest to come by is a knife, and they are found in abundance in the canteen blue tray. The second easiest is a File, which can be used alone on a fence. You can also aquire 2 files and duct tape to make flimsy cutters, and then can upgrade these to lightweight then sturdy by combining the cutters, another file and duct tape. As the difficulty of finding the item gets higher, so does the efficiency.

5) Bed Dummy - A bed dummy ensures that even if guards look into your cell when you are out at lights out, they don't notice you aren't in there. You can craft this by taking two pillows and one bed sheet and using the craft tab. This is contraband so be careful!

Step 2: Chip Away! Find a wall piece at the back of your cell and chip away using either the pickaxe or the fork. Be sure to have the Poster/Fake Wall Block on your person, and be ready to place it down quickly on the opening when finished. Be careful not to confuse the Fake Wall Block and the regular wall block you get from chipping the wall! Once you have one of these two decoys in place, find a good time to jump into the maintenance corridor behind the cell. Be sure to aquire the Prisoner Stash next to the ladder. Once you are in and the poster has been replaced on the cell wall, begin to chip away at one of the outer walls of the corridor. Beyond this, you will see a room filled with green beds. This is the guards quarters. Once you have chipped away at both walls and put posters/wall blocks up, go back to the prison and wait it until lights out.

Step 3: Escape! Get all your gear on your person. Wear your guard outfit and put your inmate outfit in your desk. Place the bed dummy in the bed by left clicking on the dummy and then on your bed. Take your fence cutting tool and, if you're using knives, some food to lower fatigue. Once your cell door has locked, the snipers are gone and you have free reign. Go up past the left hand side of the guard quarters and then turn right past the Staff Door. Keep going right until you come across the fence. Cut through this fence and run to the edge of the map, and ultimately, to freedom!

Hopefully this guide helped you!

Prison 2: Stalag Flucht
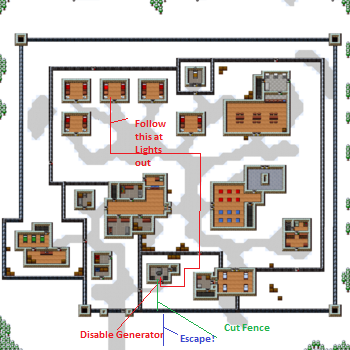
Stalag Flucht, the second prison, includes a new challenge. An electric fence!

Step 1: Acquire your tools! You will need some tools to escape:

1) A Weapon - To take out guards which is a requirement for this escape, you will need HIGH STATS and a good weapon. To check the strength of a weapon, hold shift key and hover over the item. This will give a /5 rating. There are many types of weapons. The most common is a comb shiv, which is 2/5 but easy to come across. In every desk you will find a regular comb, and if you select it and then select a nearby wall, it scrapes the comb across and turns it into a comb shiv. Easy? Another good one is a Sock Mace. This is easy to craft: A bar of soap and a sock gives a 3/5 weapon. You can also go the whole hog and craft a whip or nunchucks, which are 5/5. Nunchucks are 2x Timber and Wire, and a Whip is 1 Timber, Wire and a Razor Blade. Both of these require a high intellect.

2) A Guard Outfit - As with every escape, you need a guard outfit. You can either beat down a guard with your weapon and take the outfit, buy one or craft one (Bleach+Inmate Outfit = Overalls, Overalls + Jar of Ink = Guard Outfit).

3) A Plastic Staff Key - To get a plastic cell key, you need to craft a Wad of Putty and Molten Plastic. (Wad of Putty: Toothpaste + Talcum Powder) (Molten Plastic: Lighter + Comb/Toothbrush)
Once you have these in your hotbar, you can proceed to take down a guard. Make sure you do this out of sight and indoors away from snipers. If they have: Entrance Key, Work Key or Utility Key, leave them (But take their Baton and their outfit if you need!). If they have the Staff Key (Red), quickly take it, combine it with your Wad of Putty, which gets you a Key Mold. Then, quickly put the key back on the guard and run. Once out of the way, combine the Key Mold with the Molten Plastic to get your Plastic Staff Key. Beware: The guard you beat down will get revenge!

4) Plastic Cell Key/ Pickaxe/ Forks/ Poster/ Fake Wall Block - As with all escapes, you need a way out of your cell at night. You can either do the above (/\/\/\) but with a cell key and get out, or chip through your cell walls. If you choose the latter, you will need either forks (Blue Canteen Tray) or a pickaxe (Crowbar, Tool Handle and Duct Tape). Once you have chipped through the wall, you need either a Poster (Magazine + Duct Tape) or a Fake Wall Block (2x Paper Mache + Jar of Ink. [Paper Mache = Superglue + Toilet Paper]).

5) Files/Cutters - Files are fairly easy to come by, and are put into use when cutting through the fences. You will need either Sturdy Cutters or 2-3 Files. (2x Files + Duct Tape = Flimsy Cutters. Flimsy Cutters + File + Duct Tape = Lightweight Cutters. Lightweight Cutters + File + Duct Tape = Sturdy Cutters)

6) Bed Dummy - Used for tricking guards into thinking you haven't left your cell. Craft using 2x Pillows and a Bed Sheet.

Step 2: Wait until lights out and get out of your cell! Place the bed dummy in your bed and carry your Staff Key and Files/Cutters, and wear your Guard Outfit. If you chose files, take food to lower fatigue. Then, either open your cell door using your Cell Key or escape using your wall hole. Follow the path down to the excersize room. Keep going south past the excersize room doors until you find the fence with the Staff Door. Open the door and then you will see the generator room. Go to the south of the generator room and open the Staff Door. Click on the generator and run south to the outer fence. Cut through this fence as fast as possible, but listen out for the GENERATOR DINGING! This signals the generator is back on and the fence is re-electricuted. If this happens, stop cutting and go and turn it off again. Once through the fence completely, run south and into the woods to freedom!
Prison 3: Shankton State Pen
The halfway point in the journey, Shankton!

Step 1: Gather your Equipment!

1) Plastic Staff Key - To get a Plastic Staff Key, you need to combine a Staff Key (Found on a guard) with a Wad of Putty. To beatdown a guard, you need to have high enough stats and a good 3/5+ weapon. (Check weapon stats by holding shift and hovering over the weapon.) Once he is down, you grab the key quickly and combine it with the putty to make a Key Mold. Then, put it back on the guard. From here you can also take his baton and clothing! To make the key itself, you need to combine the Key Mold with Molten Plastic (Comb/Toothbrush + Lighter = Molten Plastic).

2) Guard Outfit - You can either buy one, do the above (/\/\/\) or craft a guard outfit. To craft one, you combine a Tub of Bleach with an Inmate Outfit to create Infirmary Overalls. You then combine these with a Jar of Ink to get a guard outfit.

3) Shovel/Trowels - This is to dig under the outer wall once outside of the prison grounds. A shovel is the best, and can be crafted (Flimsy) by combining a Tool Handle (File+Timber), Duct Tape and a Sheet of Metal. You will need at least a Lightweight shovel to dig all the way. To craft this, you get a Flimsy Shovel + Sheet of Metal + Duct Tape. You can repeat this to get a much more efficient Sturdy Shovel. The second option is trowels. These aren't sold, but can be frequently found in desks and more so on unconscious inmates (Left Click a knocked out Inmate to loot). You are likely to 2 trowels.

4) Bed Dummy - 2x Pillow + Bed Sheet = Bed Dummy. Used to trick guards into thinking you are still in your cell.

5) Timber Brace To support the tunnel. 2x Timber makes a timber brace.

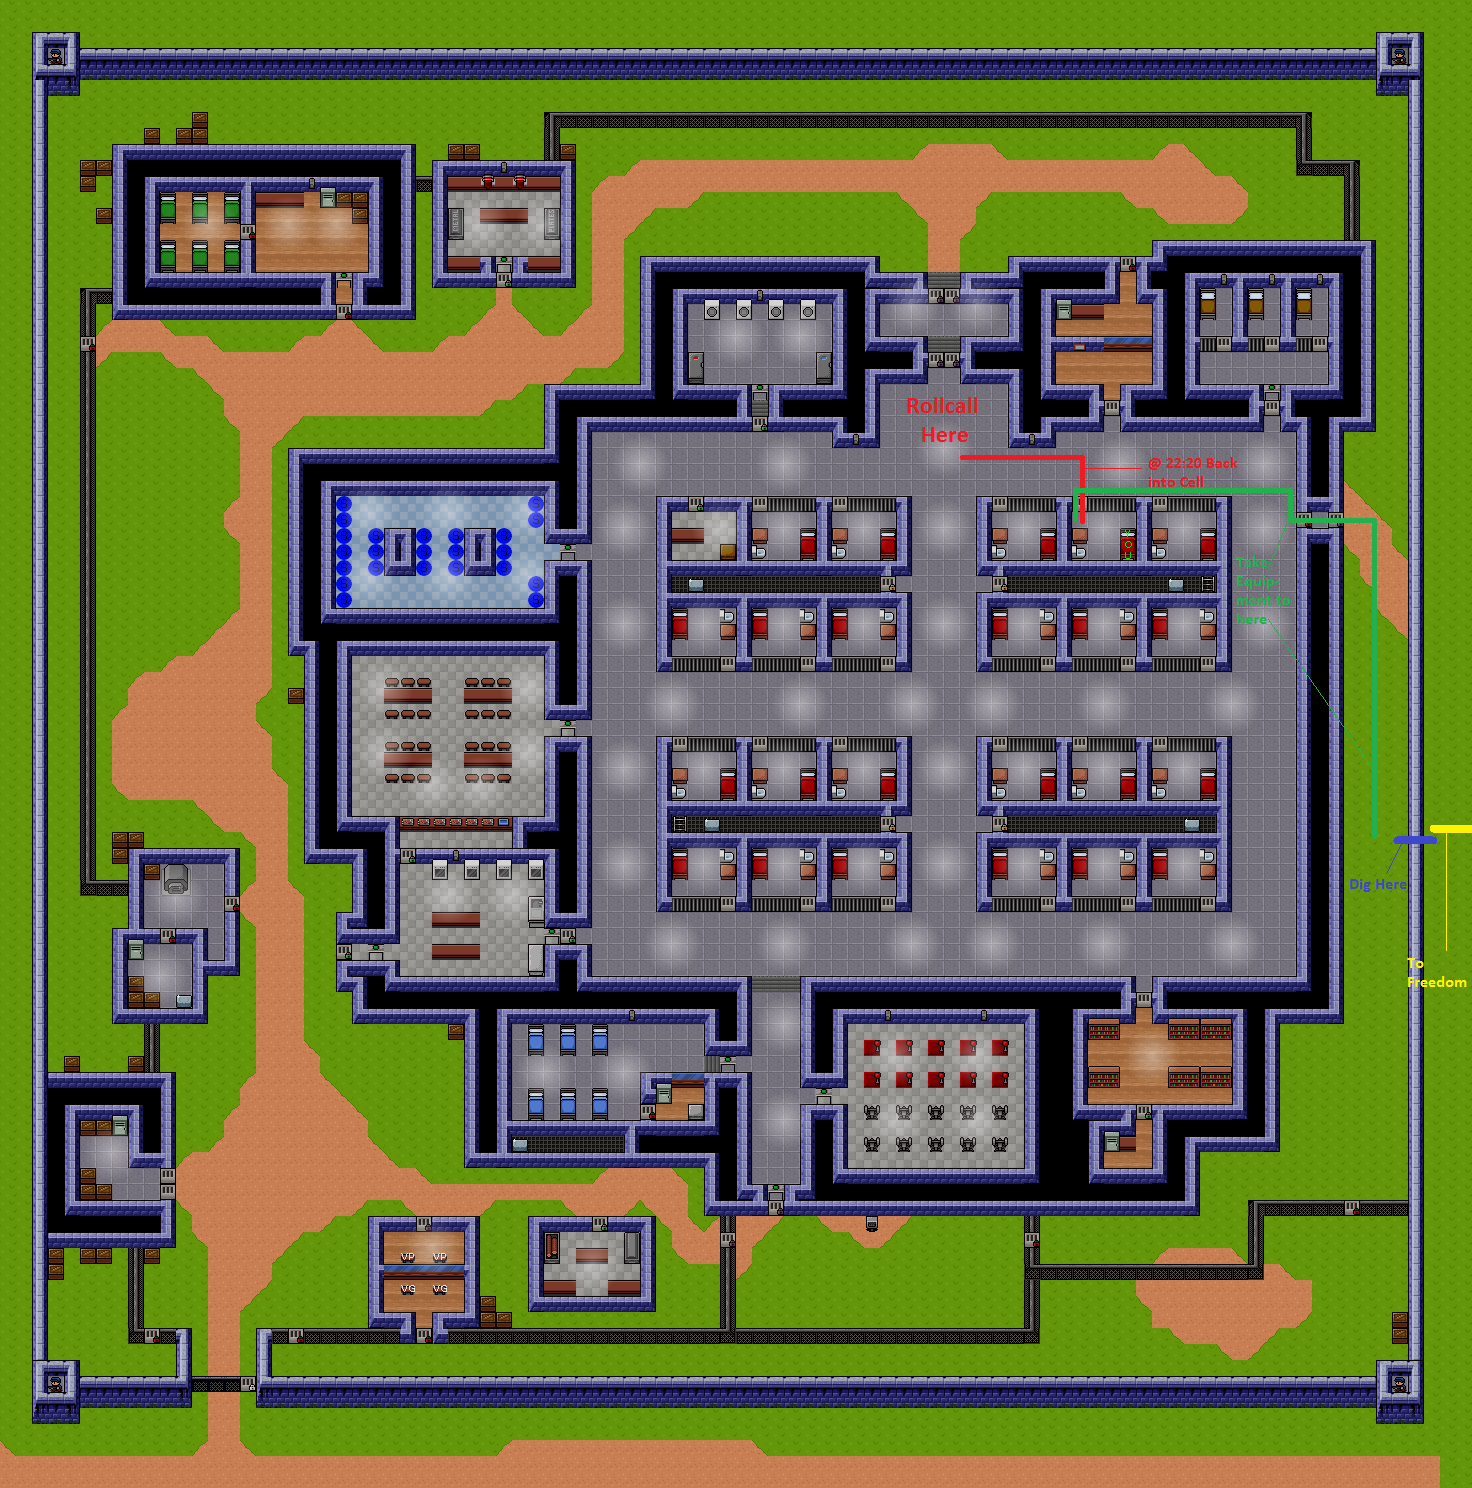
Step 1: Wait until halfway through evening rollcall. This allows you to take all required items and stops the outer Entrance door from locking so you only need 1 key. Wear the guard outfit, take either 2 Trowels or your shovel, your Staff Key and the Timber Brace. Place the Bed Dummy in the bed and take any food with you to relieve fatigue. Come out of your cell and turn right. Keep going eastwards until you come across 2 doors, one Staff and one that should still be open if you have got there quick enough. Go through the Staff door using your key and then quickly out of the other door.

Step 2: Dig. Hug the outer wall and go South for about 20 Blocks. This makes it harder for the guards to spot you as their patrols are less frequent here. Start digging next to the outer wall. Once you have dug a full hole, jump in quickly and select the dirt you gained. Click on the hole to fill it in. This means that the guards will not find the hole. Place the timber brace (Left Click it then left click to place it) on the square you are currently on. Then, dig one square to the right. You are now directly under the wall. Dig one more square to the right and then dig up on this tile. Once you are safely on the other side of the wall, fill in the hole and run eastwards. You're free!
Prison 4: Jungle Compound
Ah, the Jungle! Ready to break out?

Step 1: Gather Supplies! To break out of the Jungle Compound you will need:

1) Guard Outfit - To obtain a guard outfit, you either need to steal it from a downed guard, buy it or craft it. The first option will usually require you to get your stats up and get a good weapon to stand a chance of fighting the guard, but sometimes other inmates may overpower them too! The second option is simple: Buy the outfit from a prisoner and smuggle it through the metal detector by wearing it and then taking it off as you go through. You can also craft it: Bleach + Inmate Outfit = Infirmary Overalls. Infirmary Overalls + A Jar of Ink = Guard Outfit.

2) Exotic Feather/Ink - These two are crucial for escape in this prison. The exotic feather can be found in desks, on bodies or bought from an inmate. It isn't contraband. The Jar of Ink is frequently found on downed inmates and in desks, although it can be bought too.

3) Plastic Cell Key - To get through center gate on the night of the breakout, you need a Plastic Cell Key. This can be obtained by combining a Cell Key Mold and Molten Plastic. To make the Cell Key mold you need to first have a Wad of Putty (Talcum Powder + Toothpaste), and then you need to beat down a guard who has a Cell Key. Combine the two and you get the Mold. Combine the Mold with Molten Plastic (Lighter + Toothbrush/Comb) and you get a plastic cell key.

4) Pickaxe/Forks - To break through the wall as shown below, you will need either a pickaxe or forks. Your best bet are forks, as they aren't contraband and are found in the canteen tray. If you go for the pickaxe, you will need to combine a Crowbar, Duct Tape and a Tool Handle (File + Timber = Tool Handle).

5) Trowels/Spade - Trowels are easier to come by, but the spade is more effective. Try get the trowels (If you choose this approach) On the west side of the fence, otherwise you will have a tough time getting it through center gate. These can be found on inmates bodies and in desks.
The Spade can be crafted using a Sheet of Metal (Find infinite supply of Timber and Metal below), a Tool Handle and duct tape. To reinforce this, you will need an extra piece of Metal, an Extra piece of Duct Tape and combine them with the original spade. You will need to do this twice.

6) Bed Dummy - 2x Pillows and a Bed Sheet. Used to trick guards into thinking you are in your cell at night.

7) 2x Posters - Used for covering holes in walls. Duct Tape + Magazine creates a Poster, which isn't contraband.

8) Contraband Pouch - To get your key past centre gate detector on the night of the breakout. Craft by combining Foil and Duct Tape.

9) Staff Key Use the technique above (No. 3: Cell Key) to create a Plastic Staff Key.

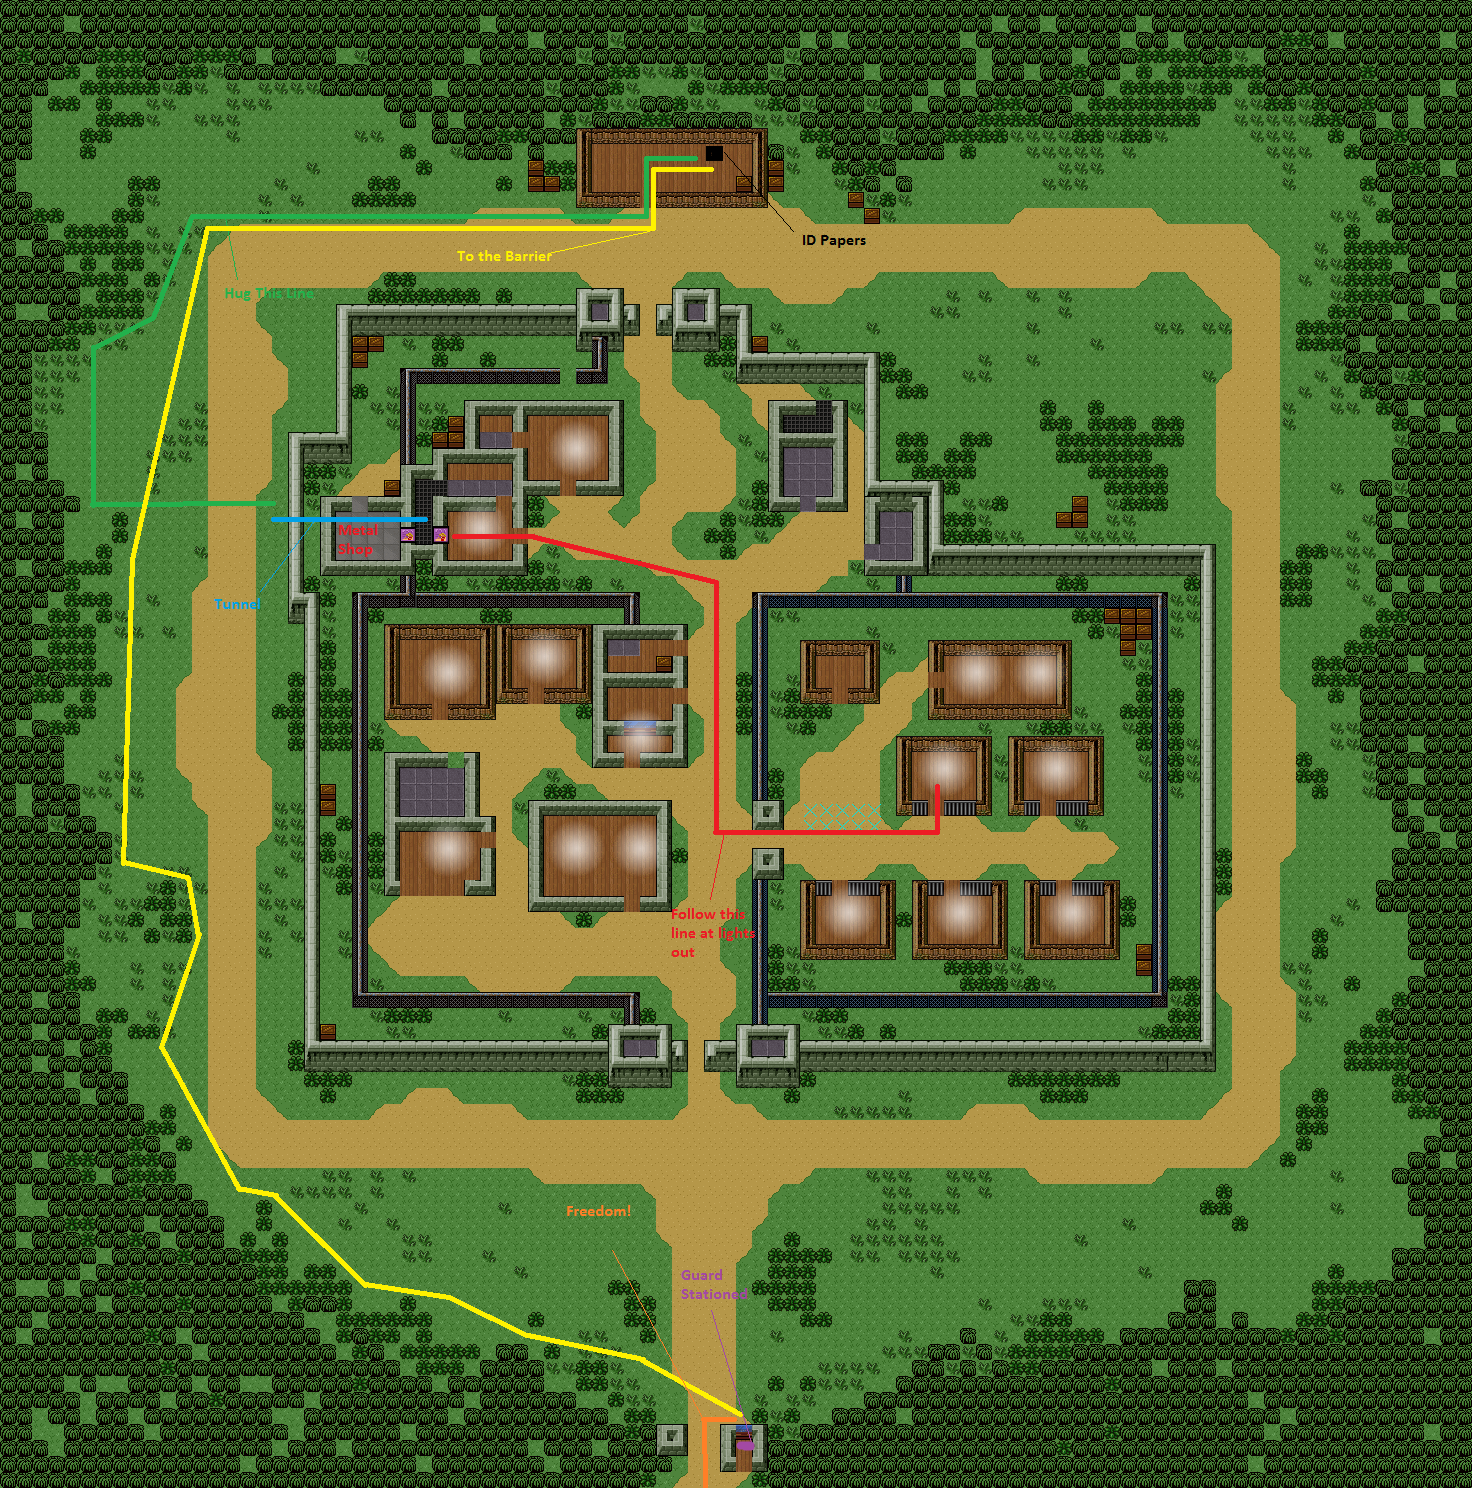
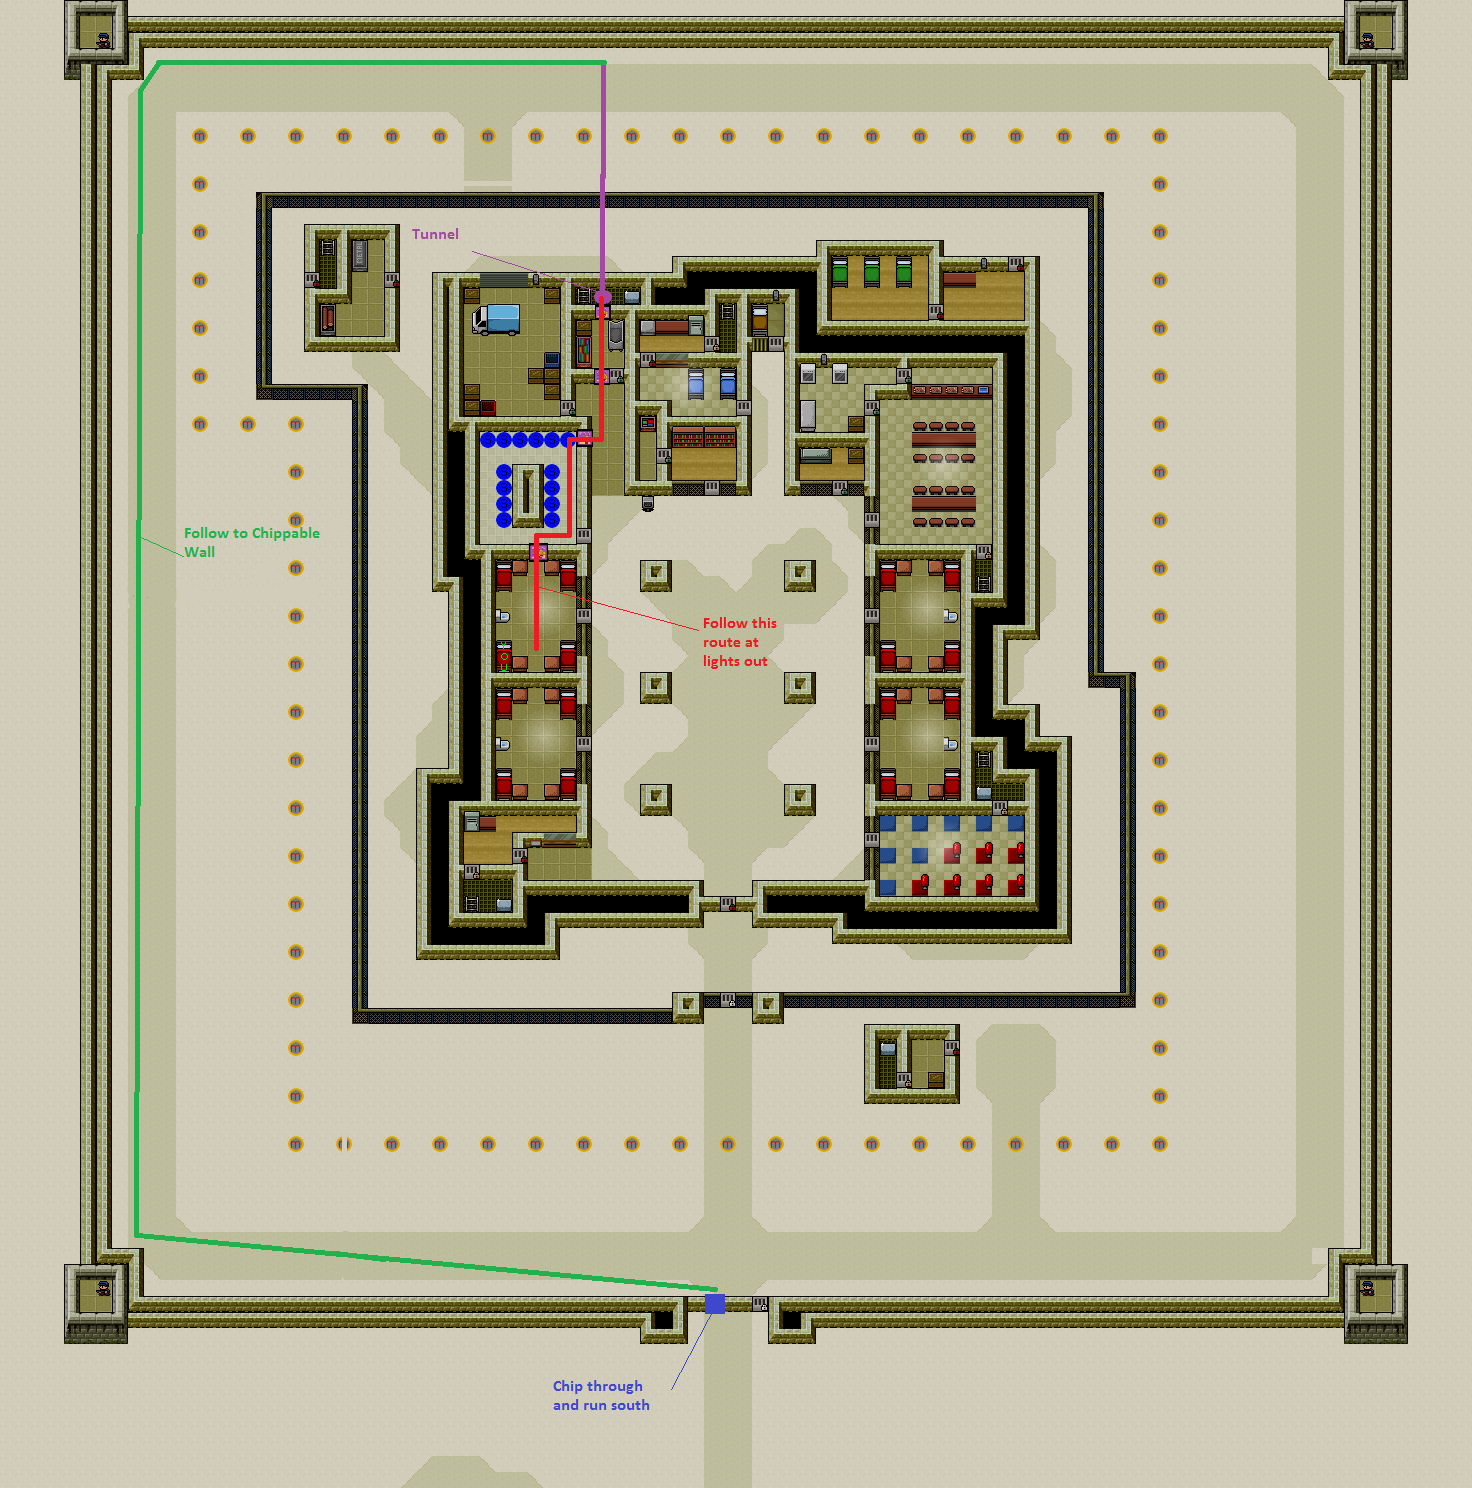
Step 2: Chip the walls. Near the north of the complex on the west side of the fence, there is the library and infirmary. Go into the library and you will see that the westmost wall (Next to the bookshelf) is separating the library from a maintenance corridor and a Staff Metalshop. Chip through the wall that is covered by a poster on the picture at the top of the screen (/\/\/\) and cover it with a poster. Then, chip through the wall piece that isn't blocked by a Metalshop Object and gain access to the Metalshop. You now have an accessway to the Metalshop and the Utility Corridor. Stash all contraband bar the Cell Key and Guard Outfit in this corridor.

Step 3: Dig a Tunnel! Start your tunnel in the maintenance corridor between your two posters. Dig 9 Tiles to the left and leave the tunnel there. You will need to craft timber braces, which are 2x Timber combined. This is easy as you have unlimited Metal and Timber from the Metalshop you have access to.

Step 4: Escape! At lights out, place your dummy in your bed and wear the guard outfit. Then, place your Contraband Pouch, the Staff Key and the Cell Key in your hotbar, along with the Jar of Ink and the Exotic Feather. Then, Leave your cell and go to the library using your Cell Key. Enter the tunnel you have excavated and stand at the end with your digging tool you have stashed in the corridor. Wait until you hear an engine sound, and as soon as it goes start digging upwards. As soon as you are out of the tunnel, fill in the hole so the Jeep can't spot it. Cross the road and stay tight to the bank of plants. Go north until the end of the map and then turn right, and follow it until you come across the Guard Barracks. Use your Staff Key to enter, and then find the unsigned ID Papers on the bench in the room. Combine these with your Exotic Feather and your Jar of Ink and you get ID Papers. Leave the room and come back the way you came, but follow the plant bank as far as you can Southbound. Once you get to the bottom of the map, turn Eastwards. Keep following the plants and you will come across a barrier with a guard station. Walk up to the guard in the cabin and select the ID Papers. Give him them by left-clicking on him and he will raise the barrier and say a message. You can then run to freedom!
Prison 5: San Pancho
Mexico! Dorito! Pancho! Escape-o!

Step 1: Acquire Stuff!

1) Guard Outfit - You can either beat down a guard and steal his outfit, but this is hard as only three guards are inside the ground at certain times and they always stick together. The second option, perhaps easier in this prison, is to combine Bleach with an Inmate Outfit to create overalls, and then a Jar of Ink with the Overalls to create a guard outfit. You can also buy one off of another prisoner.

2) Forks/Pickaxes - This escape method requires you to chip through 5 walls, which takes around 20 Forks. Using forks is a harder approach as you will need to quickly scrape through an outer wall. To create a pickaxe, you will need a Crowbar, a tool handle and some duct tape. You can strengthen this by combining the Flimsy Pickaxe, Timber and Duct Tape. 2 Sturdy Pickaxes will be enough to break through all 5 required walls.

3)4 Posters - To cover up the 4 wall gaps you will need to create posters. You do not need to hide the last wall opening as you will have escaped within seconds of it breaking. Posters are made with Duct Tape and a Magazine.

4)Lots of Trowels/Spades/Spoons - You need to dig (Roughly) 8 squares, plus the number of diversions you will need to make for the landmines! Spades can be crafted by combining Sheet Metal, a Tool Handle and Duct Tape. You can further strengthen these spades by combining them with more Sheet Metal and Duct Tape. You will need about 3 Sturdy Shovels, 5-6 Trowels or 20-30 Spoons! Spoons are fairly easy to come by, and can be found in the blue canteen tray. You can also find them in desks. Trowels can be found in desks or on bodies.

5)Cutters - To cut through the electric fence that runs underground, you will need to cut fast and efficiently to avoid two trips to the oddly-placed generator. This is why you need a pair of Sturdy Cutters. To craft these, you need to combine 2 Files and Duct tape to create Flimsy Cutters, and combine these with another File and Duct Tape to create Lightweight Cutters, and then again with the Lightweight Cutters with yet another file and duct tape to make Sturdy Cutters.

6)Grapple Hook - To create this for your rooftop adventure, you need to first create a grapple head. This is 2x Crowbars and Duct Tape. You then combine the Grapple Head with a Length of Rope to create the grapple hook.

7)Sheet Rope - 2x Bedsheets creates a sheet rope, which gets you down from the generator area on the roof.

8) 5 Timber Braces - A Timber Brace can be made by combining 2x Timber. These allow you to carry on digging your tunnel every 2 squares.

9)Bed Dummy - 2x Pillows and a Bed Sheet creates a Bed Dummy. This tricks any wandering guards into believing you are still in your cell.

Step 2: Chip the Walls! Use your Pickaxe/Forks to chip through the wall between the two desks in your cell and the shower room and place a poster. From here, chip the top right shower wall (As shown in picture) and place a poster. Then, chip through the wall to the left of the Tailor's door and place another poster. Finally, chip through the wall opposite this to gain access to the maintenance corridor and place a poster in the gap.

Step 3: Dig a Tunnel: Directly in front of the poster in the maintenance corridor is the best place to begin your tunnel. Dig down in this spot and continue forward, placing braces as and when you are told to. Eventually, you will come across landmines! If this is the case, take extra-special care when you dig around them and be sure not to accidentally stand on one!

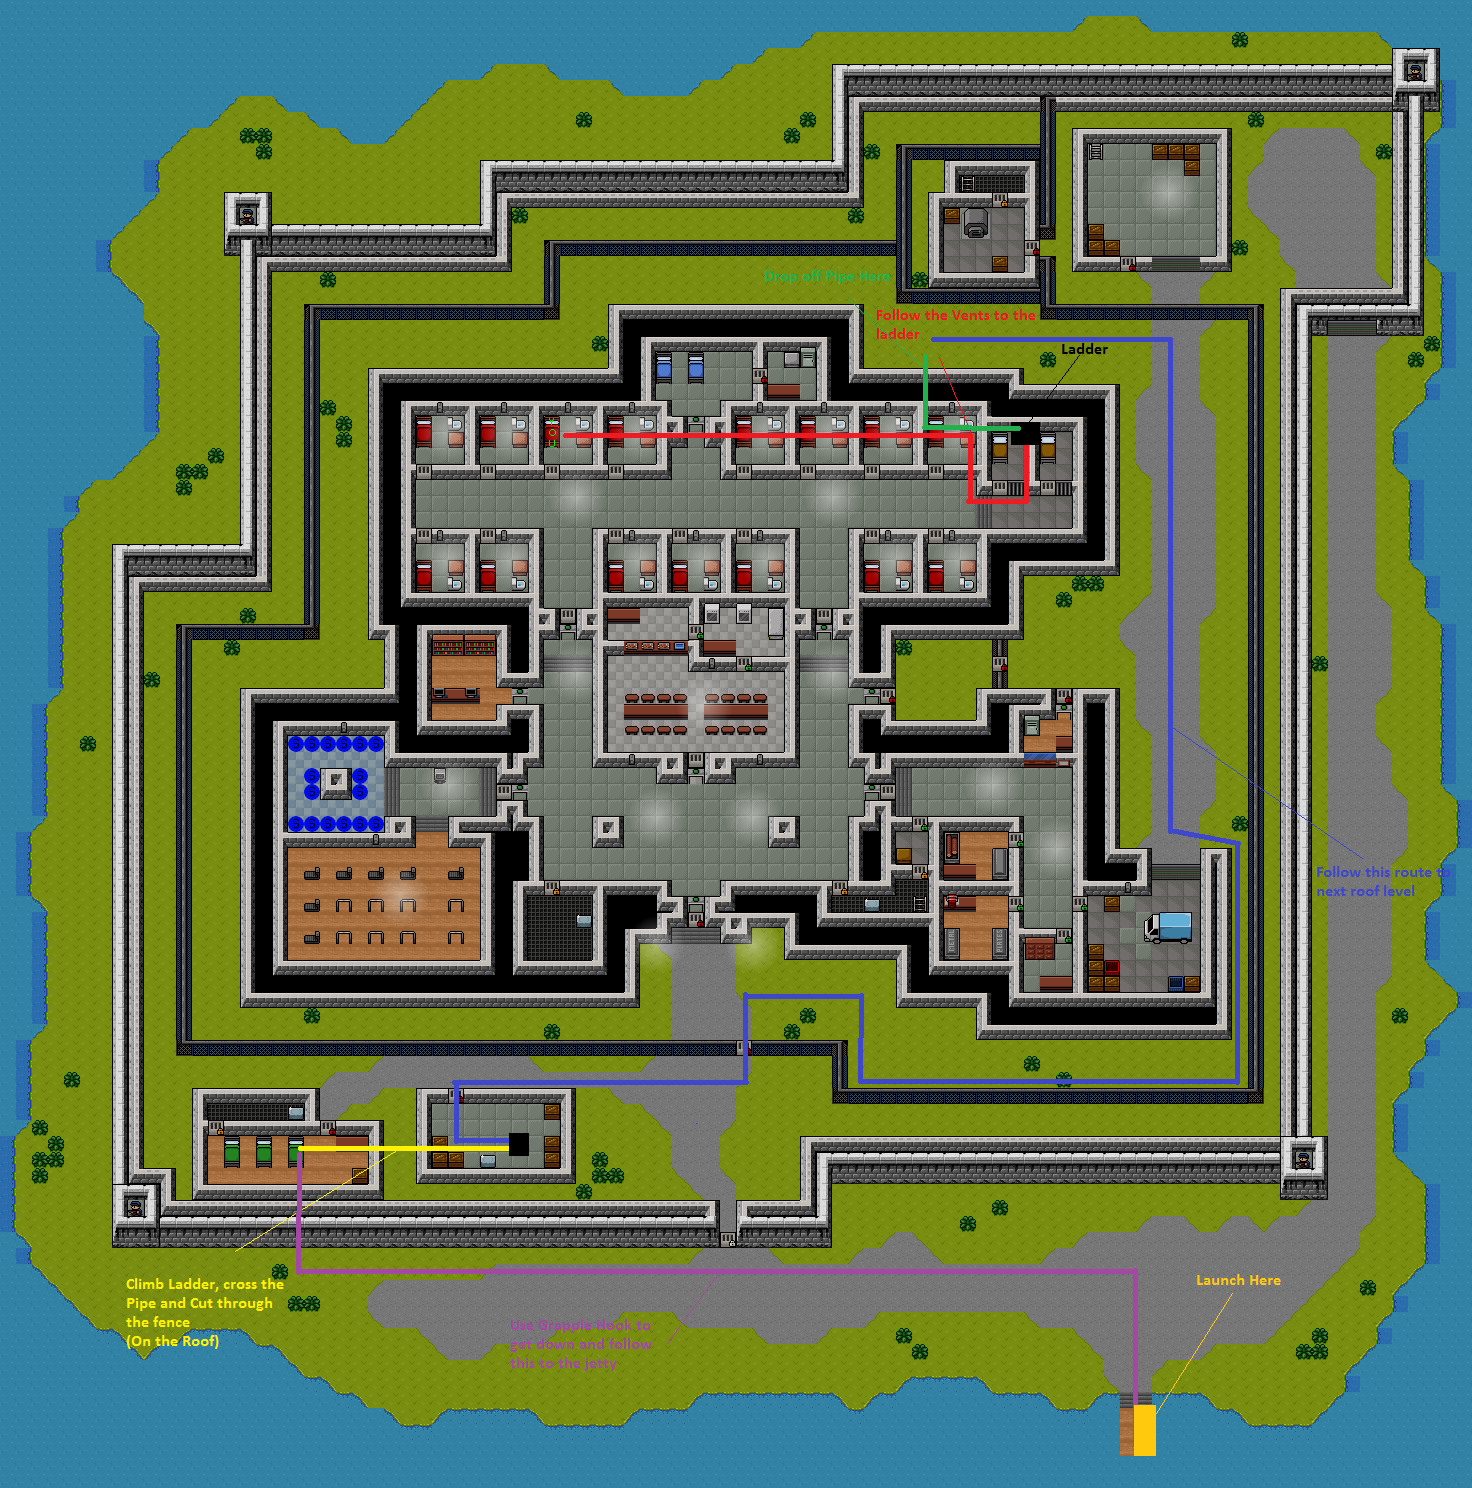
Step 4: Cut the Fence! Once you get about 7-8 squares north of where you started tunneling, you will notice a blue-coloured fence that runs underground. This is electricuted. To cut through, you will first need to disable a rather oddly-placed generator on the roof! To get to it, you need to climb the ladder in the maintenance corridor (In your guard outfit at night, be sure to place the bed dummy!) to reach the roof. Once there, go east 5 blocks and you'll see a wall and then another level of roof. Select your sheet rope and left-click on the wall separating the two and you will descend to the next level. Keep going east until you find the generator encased in a fence. Cut the fence with either a file or cutters and quickly left-click the generator to turn it off. Then, use your grapple hook to get back to the previous level and descend your ladder. As fast as you can and being careful of the mines, slice through the now deactivated electric fence in the tunnel. Now, you are past the fence and you can carry on digging. Once you manage to get all the way to the outer wall and dodge the mines, you will see a reinforced wall. Don't worry, just follow the next step.

Step 5: The Breakout is upon us! Wear your guard outfit and make your way to the end of your tunnel. Place the bed dummy in the bed before you leave. Take your pickaxe with you. Wait for a rumbling engine noise to come and go and then start digging. As soon as you surface on the other side of the fence, fill in the hole with the dirt now in your hotbar. Follow the fence west, then south. Once you come to the end of the east-side fence, carry on going south until you come to the outer wall. Then head east until you find a single, chippable wall which is home to the white key door. Chip through this using your pickaxe and run to freedom!
Prison 6: HMP Irongate
Step 1: Gather your Equipment
To get off Alcatr- mhmm, I mean Irongate, you will need the following:

1) Cup of Molten Chocolate - A cup of hot chocolate - or molten chocolate as they say here - you need to combine a lighter, a cup and a bar of chocolate. This cannot be drunk, but is the best weapon in the game as it can one-shot the all powerful guards. To use this against a guard, you left-click on the item and then on a nearby guard.

2) Plastic Staff Key - To get a plastic Staff Key, you need to combine a Staff Key found on an unconscious guard with a Wad of Putty, before quickly replacing the original key on the body. To create the Putty you need Talcum Powder and Toothpaste. You then combine the result, the Staff Key Mold, with Molten Plastic to create the plastic staff key. (Molten Plastic = Lighter + Comb/Toothbrush).

3) Guard Outfit - The best way to acquire this item is, once you have taken down the guard to get his key molded, you can then also take his outfit.

4) Flimsy Cutters - There is only one fence to cut through in this prison, and for this, you just need a pair of Flimsy Cutters. These can be made using Duct Tape and 2 Files.

5) Contraband Pouches - Due to the numerous Metal Detectors in Irongate you will need a way of getting your contraband safely into your cell. You will need a couple of these! Foil + Duct tape makes a Contraband Pouch.

6) Knives/File - To get into the vent system, you will first need to cut through the vent cover directly above your cell. To do this, you will need to disable the camera using SHAVING CREAM, move your desk under the vent and start cutting away. Note: you need to craft a fake vent cover as shown below (\/\/\/)

7) Fake Vent Cover - To stop guards from noticing the gaping hole in your vent system, you need to cover it up with one of these. To create a Fake Vent Cover, you need to combine 2x Paper Mache. Paper Mache can be made using Superglue and Toilet Paper.

8) Makeshift Raft - To escape from HMP Irongate, you will need to sail out on a Makeshift Raft. To make a Raft, you need a Raft Base, A Sail and a Length of Rope. To Make the Raft Base, you need 2x Balsa Wood and a Length of Rope. To make the sail, you need Timber and a Bed Sheet.

9) Bed Dummy - 2x Pillow and a Bed Sheet makes a Bed Dummy, to be placed in your cell bed to confuse guards.

10) Grappling Hook - To make a grappling hook, you need to attach a grapple head to a Length of Rope. To make the grapple head, combine 2x Crowbars with Duct Tape.

11) Shaving Cream/Toothpaste - Used to disable the cameras. Shaving Cream lasts longer and disables cameras for more time, but is harder to come by than toothpaste.

Step 2: Get through your Vents. Use either Knives or a file to cut away at your Vent Cover. You can access the vent cover by first disabling the camera using either Shaving Cream or Toothpaste, then moving your desk until it is directly under the vent cover. As you slice, be careful of guards patrolling and how long the camera has left. When finished, place your fake vent cover in the hole and replace your desk. If you go eastward when inside the vent, you will notice that there are two lots of slats between you and the ladder the roof. You also need to use either knives or a file to get through those.

Step 3: Escape Night! Place your bed dummy in your bed, wear your guard outfit and cover the camera. Take with you your Raft, Flimsy Cutters, Grappling Hook and Plastic Staff Key. Then, get up into the vent and go eastwards, then go south about 4 squares until you see the vent making a right turn. Follow this turn and you will find yourself at a ladder. Climb the ladder and you will see that just north of you there is a roof pipe you can walk across. Go halfway then drop down to ground level. Go eastwards until you find the path, and then follow that south until you come to the deliveries garage. Go past this using the small alleyway next to it and hug the fence until you come to a Staff Door. Open this door and then go west until you come to another Staff Door into a building. Go into the building and climb the ladder, then cross the small roof pipe onto the adjacent building. Cut through the middle fence piece using your cutters and then go to the outer wall that you should now see. Use your grapple hook on a piece of the outer wall (Left click the Hook, then the wall piece) and you will find yourself on the outside of the grounds!
You will now see a pathway. Follow this and you come across the Jetty. Stand on the edge of the jetty and select the raft. Then use it on yourself and you have escaped! Congratulations!
Extra Bits that you might wanna read!
Hi! I really hope you enjoyed reading this and it helped you. The Escapists is a truly beautiful game and I would love to do more prison guides but I haven't got the money to play the DLC and whatnot. Thanks for your support!
60 Comments
Dalkinn Sep 18, 2023 @ 6:51pm 
Dig when you're not being watched. If you've made a hole, cover it up (or dig in a spot no one patrols).
Roadbobek Sep 17, 2023 @ 3:49am 
whenever i start digging i get busted like 10 seconds after, how do i dig without getting reset?
setingher Jul 11, 2023 @ 1:28am 
edit: Just gift the dirt to inmates xD
setingher Jul 11, 2023 @ 12:44am 
What do I do with all the dirt from the jungle camp?
I can only dig 3tiles then i cant put more dirt in the corridor.
Also cant just place them on the ground, cuz that will get me caught. And they are contraband, so cant take them to toilet to flush
Dalkinn Oct 16, 2022 @ 8:26am 
I'm not so sure the Shankton State Pen method works as described. The outer door locks at 22:00 so you'd need two keys to get through.
Kittygamer1514 May 5, 2022 @ 5:35pm 
Marzz you need to escape right after cutting.
Papyrus Gaming Jul 25, 2021 @ 1:23pm 
i beat two prisons in one day thanks to this
Sir Rivet Jun 18, 2020 @ 5:23pm 
This is the easy way to beat prisons. remeber you can choose whatever route you want.
Toasty Roasty Mar 22, 2020 @ 7:05pm 
Thanks so much for making this guide i managed to beat HMP Irongate! :Access:
KingStarSearcher Mar 10, 2019 @ 11:46am 
no they dont i think