Patrician IV: Rise of a Dynasty

Patrician IV: Rise of a Dynasty

Ocen: 133
Patrician IV Guide
Autorstwa: Heraclitus
Guide covering basic gameplay info and instructions for beginners and also offers tips and stategies for advanced play.
2
4
   
Przyznaj nagrodę
Ulubione
Ulubione
Usuń z ulubionych
Introduction
The first time I tried to play Patrician IV, I was immediately overwhelmed by everything. The game has very little help for new players and you are left to make sense of it all on your own. After about 20 minutes, I still didn't have a clue even how to make a purchase or sail to a different city, so I gave up and played some more Skyrim. Thankfully, I later came back to Patrician IV, watched a lot of Youtube videos, and was soon on my way to becoming the Robber Baron of the Baltic Sea.

My hope in writing this guide is to help you avoid many of the frustration I experienced so you can enjoy the game too. Because of this, most of this guide will be aimed to explain how the game works.

I also want to share some strategies and tips I've discovered to help you succeed in the game, but to prevent spoiling the challenge for those who do not want them, I will only put them in the "Strategies and Tips" section or hide them behind spoiler bars.

Enjoy,
Heraclitus


Update: I have also published a guide covering how to mod Patrician IV. If you're already familiar with the game and are ready for a different experience, give it a look.

https://steamcommunity.com/sharedfiles/filedetails/?id=1788651794
Play Options
Campaign
Rise through the ranks of the Hanseatic League. Game settings are determined for you: Hometown is Lubeck, 20 cities, normal difficulty, historic production, and 2000 average starting population.

For first-time players, I recommend playing the campaign long enough to understand how the game works, then restarting and playing on whatever game mode and settings you prefer.

Free Play
Gives you freedom to adjust the settings of your game.

Difficulty level has a number of effects, including the amount of profit gained from trading, the opponent AI. The biggest difference, though, is that certain cities will become unavailable during winter months when their harbor freezes over. Make sure these cities are prepared before winter and do not make them your central trading hubs!

The production option affects what each city produces. You would rather a Lubeck that produces clothing instead of metal goods? Then try random instead of historic.

Scenarios
[Relatively] short games that focus on accomplishing specific tasks such as expanding cities or eliminating pirates within a set amount of time. Harder difficulty challenges must be unlocked.

For the 'double your money' challenge, hemp will be in huge demand throughout the scenario. I hadn't been able to overproduce it. Also, if you are having trouble meeting the goal, don't forget that you can liquidate your assets; on your last day or so, sell your ships, your factories, houses, and all of your goods, even if not for a 'profit'.

Coop-Mode
Create a multiplayer game or join an existing game. Must be logged in. Can play either online or on a LAN. Gameplay is cooperative; there are no competitive multiplayer options.
City Screen and World Map
City Screen
(click to zoom in)
Press CTRL to toggle the building labels--a serious time saver.

Right-click to enter building screen

Left-click on people to see their thoughts about the city.

When you have a ship or convoy in dock, you will see it in the harbor in the City view. Note, if there are too many convoys in the harbor at once, you may not see every one. Reduce the number of docked convoys, exit the city view, re-enter, and they should appear.

To trade, you must have a convoy selected that is docked in the city's harbor.

World Map
(click to zoom in)

You can select a convoy by left-clicking on it or by choosing it in the list of convoys. Another way to select a convoy only works if it is manually controlled: click on the anchored or the sailing buttons just beneath the mini-map to cycle through your respective convoys. Auto-route ships will not appear in the cycle.

To travel, select convoy [scroll on right will unfurl], go to world screen, and right-click on travel destination. You can also send a ship out while still in city screen by toggling the mini-map from city to world mini-map and then right-clicking on the appropriate city.

When you have a manual convoy docked at a city, there will be two additional icons beneath the city on the World Map: an 'i' button that gives you some info on the city, and a ship button that conveniently automatically selects the docked ship and opens that city's market window.

As you sail around the World Map, you will occasionally see random opportunities show up near your convoys. They include lost cargo, shipwreck survivors, treasure map pieces, treasures, and pirate bases. They each provide special opportunities. Cargo gives you free goods, survivors become crew members who will join the next city that you dock at, treasure map pieces help you locate treasures, which are hard-to-find hoards of goodies, and eliminating pirate bases will decrease the local pirate activity.

You will always be able to see the cities available to you, but you will not be able to see other ships or the random opportunities until one of your own convoys are close by.
Managing Convoys
Creating Convoys
To open the Organize ships screen, click twice on a docked convoy.

You can add or remove ships from an existing convoy by dragging them back or forth between the Harbor or the Convoy column.

To create a new convoy, click on an unassigned ship in the harbor, then click "Build a convoy."

If you remove too many ships while the convoy contains cargo, you may end up with your convoy being overloaded. You must fix the situation before the convoy can set sail again.


Setting Escorts for a Convoy
You may only have up to three ships defending a convoy at once. These are your escort ships.

To add or remove a ship to the escort, first click on the convoy, then click on the "Ship list" button on the convoy scroll, then click on the ship you want to add or remove. A detailed scroll about that particular ship will show up, and on that scrolls is a toggle button to add or remove the ship from the convoy. If you already have three ships set as escort, you will not be able to add another before first removing one.

As you add or remove ships from the escort, your crew will automatically balance themselves between the entire escort. Unfortunately, you cannot have all of your crew operating a single ship while the other two are set as decoys (more on naval combat later).


Navigator Scroll
The navigator button on the convoy scroll provides useful information about the captain of the convoy. Here, you can see the captain's various experience levels:

Type
Purpose
Gained through
Combat XP
+2% cannon damage/point
Combat
Navigation XP
+2% travel speed/point. Level 3 required for expeditions
Sailing
Trade XP
-10% time spent trading while on auto-trade route
Trading
Repair XP
-5% time needed to repair
Performing repairs


Wagon Convoys
As you unlock land routes, you will be able to build wagons and create wagon convoys. These act almost identically to ship convoys and routes.

While there is no land combat for you to manage, you do need to protect your wagon convoys from attack. You can hire guards for your convoys just as you would hire sailors for your ships in the tavern.

I may be wrong about this, but I believe that most--if not all--of the time, the guys attacking your wagons are soldiers of the local ruler. For some reason, he gives you the right to use the land routes, then raids your convoys, and then his reputation drops if you defend yourself. Bunch of jerks, if you ask me.
Buildings--Market Hall/Harbor Cranes
Trade Screen
Each commodity in each city has a supply and demand indicator of four diamonds. Four red diamonds means extreme shortage and four green diamonds means extreme surplus. The greater the demand, the higher the price.

The numbers under the barrel show the quantity of each commodity available, the numbers under the scale are the current prices, and the numbers under the dashed circle and coin show the average price per barrel you paid for the commodities you are carrying.

Each city produces specific commodities, as indicated by the gear symbol in the lower right corner of the commodity picture. In general, it is best to purchase a commodity from a city that produces it and sell to cities that do not.

The quantity of available goods fluctuate over time. All of the commodities of a city are consumed over time—the higher the city population, the quicker the city will consume commodities. Commodity quantities will also change based on your—or competitors—purchases and sales to the city. Finally, each city will have an increased consumption of specific commodities based on what second or third tier commodities the city produces. For example, if a city produces metal tools, it will need raw metal in order to produce the metal tools. The more metal tools output the city is capable of, the more raw metal the city will need.

This screen allows you to transfer goods in between the city, your storage, your ships docked in the harbor, and (once you have land routes) wagons. Toggle the transfer options with the (<>) button on the screen. Note that transferring goods from or to the city is how you buy or sell goods, but transferring between your storage, ships, or wagons is free. To transfer a commodity, click-and-hold on that commodity's row and move the mouse left or right to select the quantity you wish to transfer. Notice that when you buy or sell a commodity, the supply and demand for that commodity shifts, and, as a result, the price. Note that the game treats buying or selling in one large purchase the same as if you purchase in multiple smaller quantities; in other words, you won't lose money by selling 200 bricks at once and dropping the market price from 57 to 43 vs selling 200 bricks 10 at a time causing the price to fall more slowly.


List of Goods Screen
This screen displays the 10-day production, demand, and city ownership of each commodity. Note that your goods in storage are not included, but your production and demand are.

A red cell indicates an anticipated shortage for the 10-day period. For example, if Lubeck currently has 44 wood, but the cell is red and states 206, then the city needs an extra 162 wood over the same period of time. If the commodity in shortage is needed for production, then production will halt. If the shortage is for a food item, the city may eventually experience a famine.


City Info Screen
This screen displays: your reputation level in the city; prosperity level and trends; number and influx of beggars; the city population; number of homes; housing occupancy; the number of poor, well-to-do, and rich burgers; the number of businesses; the city's produced goods; whether you have a counting house in the city or not.

While the term 'beggars' may carry negative connotations, for a businessperson such as you, they are effectively people looking for work. You can recruit them to operate your ships or hire them to work in your businesses.

A burgher is a working-family member, but it is not the same thing as an employed person. Specifically one working family member will support exactly four people. You can think of it as one adult supporting a spouse and two children, or two adults supporting six children. Any way you think of it, it means you should expect a 1:4 ratio of workers to burghers. Furthermore, this is different from how beggars are counted; if a city has 50 beggars, then there are 50 people you can hire, but if there are 1000 burghers, that does not mean that the city has 1000 employed workers. I have not seen any evidence to suggest that there is any sort of 1:4 ratio with beggars and general population. AFAIK, one beggar increases the population by only one.
Buildings--Counting House
Personal Screen
Lists your family, home city, and gives you the option to move to the city.

Once married, this screen will display family information such as your spouse, your wedding date, and your children.

In one playthrough, I was married on May 31, 1372, and our first child was born on Dec. 20, 1372. Apparently SOMEONE has some explaining to do.


Balance Screen
Provides a 30-day and 10-day review of income and expenditures, as well as the number of buildings, employees, and tenants you have. Very helpful screen for troubleshooting "leaks" in your finances.


Warehouse Screen
Lists details such as storage space available, the daily costs of maintaining storage, and gives you the option of setting the number of guards to protect your warehouses from sabotage.


Goods Screen
Looks a lot like the Market Hall: Lists of Goods Screen, but do not get them confused. This screen shows the daily [not 10-day] inventory, consumption, and production of commodities within your counting house and businesses. Red cells indicate a deficit and yellow indicates a surplus. Extremely important screen for managing city production.

If you pay attention to the screen, you can see the input-output ratio for various 2nd or 3rd tier goods. For example, if your grain is in deficit and lists 20 available, and your listed beer production is 10, then you know that it takes two barrels of grain to produce one barrel of beer. The same information can be found by exploring your production buildings, but it is oftentimes easier to locate your counting house than your production buildings.


Administrator Screen
Initially allows you to hire an administrator, but afterwards, it becomes one of the most critical screens in the entire game. The administrator allows you to buy and sell commodities from the city market at fixed prices and up to fixed quantity levels.

For example, let's say you want Lubeck to grow, which means that you need to ensure that it has at least one level of availability (one green diamond) for all, or most of all, of the commodities in the city market. In that case, set trading rules so that your administrator will sell your chosen commodities to the city at the one-diamond price (minus one coin, due to the way the game mechanics work). For grain on normal difficulty, the one-diamond price range is 58-40. To ensure that the city has adequate grain, you would want to set your sell rule to something like "grain: 0 quantity, minimum price 57." You could set the price lower, but then you would not be making as much of a profit per barrel. Likewise, you could set the minimum quantity higher, but then you are holding on to grain despite an excellent sell price being available. Although not necessary, I would also recommend setting a purchase rule such as "grain: 300 quantity, max price 41." This will make the administrator purchase grain from the city market whenever the price is lower than 41 until there are 300 barrels stored in the counting house. Just as with selling, you need to include a one-coin difference in your set prices, and with purchases, you need to add one instead of subtract. With these rules set up, as long as your counting house is able to maintain its own supply of commodities (through production, administrative purchases, or transfers from convoys), the city will never see shortages.

Consider yourself warned! Faulty counting house rules are the rue of novice traders! For example, if you set up a pair of rules such as "purchase grain: 300 quantity, max price 50" and "sell grain: 0 quantity, minimum price 40", you will repeatedly be buying expensive grain and then selling it for cheap. Your funds will melt before your eyes. Similarly, if your rules are "purchase grain: 300 quantity, max price 40" and "sell grain: 500 quantity, max price 50", you won't lose money, but you will hit a wall where your administrator only buys up to 300 grain, but never sells the grain because your rules prohibit any grain sales as long as the grain quantity is less than 500. This later scenario could be part of a larger strategy involving replenishment convoys, but the point is to be aware of exactly what you are telling your administrator to do or you can seriously cause yourself problems.

Adding to the complexity of the administrator tools, you can also 'lock in' a specified quantity of a commodity, preventing it from being picked up by convoys on auto-trade routes. Notice that you cannot set your lock-in quantity independently—it has to be either the minimum quantity listed under the "Sale of Goods" selection or the maximum quantity of the "Purchase of Goods" selection.

In the "Rise of a Dynasty" edition, there is also a save and load feature in the Administrator screen that allows you to save one city's administrative rules so that you can load them in another city without having to re-enter all of the data. A great time-saver, but will generally require fine-tuning adjustments afterwards. No two cities are identical, so they could benefit from specialized rules, such as keeping a higher minimum quantity of honey in a city that you have mead production buildings.

Another helpful tip is when you are in the Administrator screen, you can press Tab to cycle through all of your counting houses. This makes it much easier to save and load administrative rules from one city to another as well as make general comparisons between city administrators.
Buildings--Guild
Membership/Privileges Screen
Gain Guild reputation to get permission to build within the city. Different types of buildings require different levels of approval

Privileges include: 1) building houses and your counting house, 2) build production businesses, 3) build production businesses for the city's special commodity, 4) right to perform expeditions (only need to acquire this once)


Trader Screen
Lists the Guild reputation of various merchants and allows you to run for Guild office. They are your competition, especially when you are vying for the Guild position of Alderman.


Statistics Screen
Shows many, many various modifiable graphs.

Can compare up to four city's quality of life or populations over time, or even compare them to the entire set of cities (aka The Hanseatic League).

Can also compare the profitability (goods prices ÷ production price) of up to four goods either in a chosen city or as an aggregate average of the entire Hanseatic League.

Also lists production details of a particular commodity in each city that can produce it. For example, select "wine" and it will show you every city that produces wine, those city's population numbers, the number of wineries built in the city, and how many barrels of wine the city produces per day. Very helpful screen—I discovered it much later than I wish I had.

Can also list every city, their current populations, and current prosperity level


Expeditions Screen
Shows the different Mediterranean ports discovered in your current game (five max per game). Displays each of those city's size, what it will buy, and what it will sell.

This screen is NOT how you embark on an expedition. To do that, you must send a convoy to the Expedition Arrow in the lower-left corner of the World Map.


Measures Screen
Lists the currently available Guild quests.


Official Duties Screen
As Alderman, this screen allows you to dole out selected quests for the entire Guild--quests you can immediately turn around and accept in the Measures screen.

The quests are responses to various problems or opportunities, and sometimes there are more than one way to handle the situation. You may dislike one response but love another.
Buildings--City Hall
Ratskeller Screen
Tells the meal of the day for the town. Just for flavor and has no impact on the game.


Notice Screen
Lists city quests, such as opportunities to get married


Burgher Screen
Shows the ranking of the most reputable people with the town. Also shows the current mayor, next election date, and gives you the opportunity to run for mayor.

Being mayor gives you special privileges in the development of the town.


City Council Screen
If you are mayor, this screen displays the city's 10-day financial balance, and it gives you the options to transfer funds in and out of the city treasury, set the head tax rate, or set price guarantees for commodities.

Price guarantees artificially inflate the buy and sell prices of a commodity until the city receives the quantity you select for the commodity. You pay for the difference in price out of the city treasury. Useful option when you need a specific good quickly and you do not want to manage rounding up the resources yourself.

If you are not mayor, this screen allows you to finance the building of various projects for the city. It generally takes a lot more money to "encourage" the city to build your pet project than the project itself costs. Government at its finest, folks!


Patrol Screen
Allows you to provide or remove convoys to defend the harbor from pirates. The convoy must be three of fewer ships, have a total of at least 28 cannons, and full crews.

Providing a patrol will raise your reputation with that town.
Buildings--City Gate
To access the City Gate, you need to be Councilman level rank or higher, and have a city reputation of 70% or higher.

Region Screen
Shows the regional ruler, their happiness level, and how many troops they have ready to maraud the cities in their region if they become too unhappy.


Accounts Receivable
Regional ruler quest page. Complete these to make the local ruler happy. If the ruler's happiness is extremely high, you may receive a quest to unlock a land route, a new city, or even an opportunity to buy-out a portion (5% increments) of the ruler's right to the cities.

Perhaps the hardest unwritten objective in the game is to achieve 100% possession of each region, but once you reach 100% in any region, you no longer need to worry about that ruler beseiging cities (though they will still attack wagons).


Overview
Lists all of the different regions, their ruler's happiness, your current possession level of the region, and how many of the potential land routes you have unlocked so far.
Buildings--Architect
Production Screen

Allows you to build houses, warehouses, and businesses in the city. Each building requires time, money, and commodities. If the city does not have the available commodities, production will halt. Note that the commodities must be in the city market, not in storage or on a convoy.

Each building you create belongs to you. You will generate rent from inhabited houses, and the production from your businesses will go directly to your counting house. Workers' wages are paid by you.

Warehouses give you extra storage space for your counting house. More space means you can store more goods for production or wait and sell goods when prices are high.


City Screen

Build various city enhancements. Again, building requires both money and available commodities.

Wells are important for preventing diseases and undesirable fires from spreading.

Squares increase the prosperity of the surrounding area. Higher prosperity means higher rents paid.


Mayor Screen

Allows you to build special buildings and provide upgrades for the city. Buildings require time, money, and available commodities.

Many of the buildings and upgrades available here are also available through the City Hall: City Council screen, although there you do not have as much freedom to choose what to build and no ability to choose where to place the buildings.
Buildings--Tavern
Sailors Screen
Allows you to hire beggars to join your ships or release sailors to become beggars into the city.


Guests Screen
Offers various quests, loans, training opportunities, and less-than-honest ways to sabotage your opponents.


Pirates Screen
Lists known pirates, their known locations, and previously defeated pirates.
Buildings--Shipyard
Construction Order Screen
Allows you to purchase new ships. Different models have different characteristics. Each ship requires money, time to build, and a minimum number of available commodities in the city's market. If the city does not have the available commodities, production on the ship will halt. Note that the commodities must be in the city market, not in storage or on a convoy.

'Maneuverability' is turning speed in combat and 'Speed' is the speed which the ship travels in a straight line, whether in combat or on the world map.

'Drag' is a simple green up arrow or red down arrow which indicates whether the ship is capable of traveling on rivers. Note: if you want to be able to trade with cities located down rivers (such as Cologne or Novgorod), every ship in the convoy must be able to travel on rivers.


Buy Screen
Purchase a pre-built ship. It costs more money, but worth it when you find yourself in a pinch and need another boat immediately.


Sales Screen
Sell ships to the shipyard for a quick shot of cash. IMO very few situations warrant this option.


Repairs Screen
Allows you to repair damaged ships. Your ship will be out of commission while undergoing repairs.


Upgrade Screen
Allows you to exchange cargo space for more cannons. Upgrades are immediate. Very important for your combat ships, but be careful as you cannot undo an 'upgrade'. Unadvisable for non-combat ships. Remember: only three ships per convoy can be used in combat.


Order List
Lists the current workload for the shipyard with estimated completion dates.
Buildings--Minster
Pray Screen
You can pray for the family or for the business. I have not noticed or heard of it affecting anything particularly, but rumors suggest that there are hidden affects. In any case, prayer is free, so why not?


Donate Screen
Donations are an easy way to raise your reputation in the city. The option is repeatable with a maximum amount permitted per day.


Meal For The Poor Screen
You can donate various sets of commodities to the poor. Donating meals will increase the influx of beggars.


Indulgences
You can purchase indulgences to repair your reputation after damaging it through underhanded tactics like committing piracy or sabotage.
Auto-Trade
Creating Auto-trade convoys
Eventually, it will become unreasonably complicated to manage all of your convoys at once. At this point, you will want to create automated trade routes.

To set a convoy to auto-route:

1) Select the convoy and go to its Route options (far right button on convoy scroll).

2) Either create a new trade route or load a previously created route

3) When creating a new route, click on the cities you want your route to visit, in order (18 cities max).

4)Go to the "Trade" tab and set the desired trading rules and parameters (more on this below).

4b) If you want to remove a city from the route, you can click and drag the city off of the list. You can also re-arrange the order of the cities by clicking and dragging them to where you want. Pay attention: the click-and-drag function is pretty sensitive. Many times, I have accidently screwed up my trade routes by unknowingly moving a city out of order.

5) Exit Trade Route screen and set convoy to "Activate."


Auto-trade functions:

You can choose if the convoy undergoes repairs when it docks in a city, or bypass a city from the designated route.

You can copy the trading rules from the previous stop on the route. For example, in a Lubeck—Aalborg—Oslo route, if you create rules of "automatically trade all commodities, no repair" in Lubeck, then click on Aalborg, then click on the copy settings button, then Aalborg would be set to "automatically trade all commodities, no repair" as well. Notice: the copy button will replicate the "no repair" selection, but it will not copy the "repair" selection. I assume this is a bug instead of intentional.

Setting a commodity to "automatically trade" gives the captain the power to buy and sell that commodity as they see fit. They will try their best to buy low and sell high. A very effective and easy method to do routes, especially if you send the route to cities with different commodity productions.

"Trade according to specific" allows you to give clear rules of what your convoy will do with selected commodities. You can tell the captain to load or unload a specific quantity of the commodity either to/from the counting house or the city market. If you select counting house, you only set the quantity, but if you select city market, you also have to set the purchase and/or sale price. For example, if you set wood at "sell 50, min 45", then your captain will sell up to 50 wood, but no more than 50, as long as they can get at least 45(+1) gold per barrel. If they can only get 45(+1) gold for 40 wood, then it will hold on to the other 10 and continue on the route.

Notice: If, for whatever reason, your captain is incapable of following your orders, the ship will immediately de-activate the auto-route and wait for further instructions. An example would be if the convoy is fully loaded and is unable to complete a "Load 50 wood" rule.

Notice: When selecting cities on the "Route" tab, it will not let you choose the same city twice in a row, but you can have it on your trading list multiple times ("Lubeck-Rostock-Lubeck-Aalborg-Lubeck-Malmo" is ok, but "Lubeck-Lubeck-Rostock" isn't). You can circumvent this restriction by creating a permitted route, going into the "Trade" tab, and re-order the cities so you visit the same city twice in a row. While this may seem pointless at first, it becomes helpful due to the limitations of the game system's auto-trading rules and parameters. For example, you may want to specify that the captain is to unload all goods into the counting house, but then you want them to load up via "automatically trade." You cannot create this set of rules with a single visit to a town—you will need back-to-back visits to get the desired result.
Production Tiers
A "First-Tier commodity" is one that has no requirements (other than workers). A "Second-Tier" is one that only requires first-tier commodities, and a "Third-Tier" is one that requires second-tier commodities and, occasionaly, first-tier ones as well. Spice is a Zero-Tier good as no Hanse city produces it.

The following is a list of all commodities and what other commodities are needed to produce one barrel of them:

First-Tier
Commodity
Wood
Brick
Grain
Hemp
Wool
Raw Metal
Honey
Cheese
Wine

Second-Tier
Commodity
First raw material
Second raw material
Salt
0.25 Wood
Metal Goods
1 Raw Metal
0.5 Wood
Pitch
0.5 Wood
Mead
1 Honey
Cloth
1 Wool
Beer
0.25 Grain

Third-Tier
Commodity
First raw material
Second raw material
Pelts
0.5 Hemp
0.5 Metal Goods
Meat
1.5 Salt
Clothing
1 Cloth
Stockfish
0.5 Salt
1 Hemp
Combat
Beginning Combat
To initate combat, select a convoy and right-click on the convoy you wish to attack. You can always attack a pirate, but if you want to attack a competitor ship, you must first raise the Jolly Roger under your Ship Info scroll.

As you approach, your target may begin to run away. If they get too far and you lose sight of them, your ship will immediately halt and you've likely lost them. They may also flee to their pirate base, which helps you if you are on a quest to eliminate the base.

Once you engage the enemy, you will see a display showing the strength of both you and the enemy ships, and you are given the option to fight manually, automatically, or to cancel the attack (if you were attacked, there will instead be an option to try to flee).


FIGHT!
Overview
Once you click "Manual", you will immediately be thrust into combat. You will have up to three of your ships vs up to three of theirs.

There is no 0-speed setting in combat. If you need to pause, press ESC.

Each ship in combat has three bars: Hull Strength, Crew, and Sails. There are also three types of cannon shot: Round, Grapeshot, and Chain. Round shot focuses damage on Hull Strength, Grapeshot on Crew, and Chain on Sails. Notice that even though each shot does primary damage to one of the three bars, they all do some damage to the other two as well.

As a ship loses Crew, it will reload its cannons slower. As it loses sails, it will drastically slow down. As it loses Hull Strength, it will also slow down (it's taking on water, after all) and if competely lost, the ship will sink.

You can capture one ship per battle: to do so, you must sink all but one of the opponent's ships, then demoralize the remaining ship by eliminating their entire crew and all but completely destroy the hull.

Once you sink all of the opponent's ships and/or capture the last ship, you are victorious and are taken to a plunder screen, much like a trade screen, that allows you to take whatever goods the opponent had in their ships.


Controlling the Battle
(click to zoom-in)
You can only control one ship at a time; to choose a ship, either left-click on it, its picture on the right of the screen, or press its corresponding 1-2-3 number.

To set the direction for your ship, right-click in the direction relative to the selected ship to set that heading. You will see a green arrow pointing out from the ship showing the direction it will sail. If you would rather simply let the AI control your navigation, you can right-click on an opponent ship and the AI will try to keep that ship within shot range.

You have two sets of stationary cannons on each ship--one for the port and the other for the starboard--and they shoot and load independently. You can adjust the type of shot by either clicking on the picture of the type you want, or by pressing F1, F2, and F3.

To fire the cannons, left-click practically anywhere, but for it to work, you must first have your cannons loaded and you must be in range of a target.

As the cannons are stationary, they are only capable of shooting broadside (i.e. you cannot shoot ahead or behind you).So, to get a target within range, you must move in close and in such a way that the target ship is approximately 75-90° from you.

Cannon shot is surprisingly slow, so you will have to get used to timing your shots so they don't miss. Because of this, it is a bad idea to shoot at a target that is close to 90° from you but is not right next to you. By the time your cannon balls get there, the opponent will have moved out of the way. Lead your targets by shoting where they are going to be, not where they currently are.

For your other ships, they will be set to autopilot, following orders as best as possible based on their AI setting.

The AI settings for your ships are:
Command
Effect
Defend My Ship
Ship attacks ships that are targetting the player-controlled ship
Flee From Battle
Ship heads away from battle as best as it can
Fight Alone
Ship selects a target independent of whatever you may be doing
Leave The Objective As Is
Ship avoids attacking your target
Seize The Objective
Ship targets same target as the player

Well, those at least MAY be the AI commands, but, more often than not, the AI will completely ignore your orders and just do whatever it wants anyways. Thankfully, the Flee command is fairly reliable.

You can also somewhat control the AI by selecting a ship, setting a target, then going back to your original ship. SOMETIMES the ship will maintain the target you selected for it, but usually it will select its own target after a short while.
Politics
Trader Ranks
Rank
Requirement
Benefits
Grocer
Starting Rank
1 Ship, 1 Counting House
Trader
80,000 Wealth, 1 Counting House
Town Hall missions
Wholesaler
150K Wealth, 2 Ships, 1 Counting House
Create Basic Buildings and Production Buildings, Can Set City Patrols, Can Join Guilds, 2nd Counting House Allowed, Pirates Start to Appear
Merchant
300K Wealth, 2 Ships, 1 Counting House, 25 Workers
Access City Council, Can Build Regional Goods, Can Get Married
Traveling Merchant
500K Wealth, 4 Ships, 1 Counting House, 100 Workers
Can Send Expeditions, Pirate missions, 3rd Counting House Allowed
Grand Merchant
800K Wealth, 6 Ships, 2 Counting Houses, 200 Workers
4th Counting House Allowed, Underhanded missions at Tavern
Councilman
1.1M Wealth, 10 Ships, 3 Counting Houses, 400 Workers
Permits Interactions with Local Ruler at City Gate, Can Propose Council Actions, 5th Counting House Allowed, Can Champion a City Council Project
Council Chairman
1.5M Wealth, 15 Ships, 5 Counting Houses, 600 Workers
Can Run for Mayor, Unlimited Counting Houses Allowed
President
2.2M Wealth, 20 Ships, 7 Counting Houses, 800 Workers
Guild missions
Patrician
3.2M Wealth, 25 Ships, 10 Counting House
Can Run for Alderman
Strategies and Tips (Settings and Trade)
Settings Tips
It appears that the in-game calculations for rules and parameters are based on the '<' and '>' inequality symbols, instead of the '≤' and '≥' symbols. This means that when selling, you will want to subtract an extra coin and when you purchase, add an extra coin. Thus, if you want your adminstrator or captain to buy all bricks up to and including the 40 coin price, you will need to set the max price to 41, and if you want to sell all bricks down to and including the 59 coin price, you will need to set the minimum price to 58.

Set the time to 0, and advance time only when you want to by pressing and holding space bar. Don't give your opponents "free time".

You can switch between Full Screen and Windowed mode in the Options. In windowed mode, you can adjust the window to run split screen (in Windows 7 or later, pull the title bar all the way to the left or right, or press Win+left/right arrow). The game plays normally, and I have found this very helpful by running the game on one half and a spreadsheet on the other half.

Piracy is already very aggressive, and combat is largely considered one of the worst features of the game; I recommend setting the Pirate Activity in the Options to Low.

Trade Tips
Try to get counting houses in all of the cities as quick as possible. Counting houses are able to take advantage of every dip or rise in prices. Between you, your auto-trade ships, and counting houses, the counting house is BY FAR the most effective trader in the game.

Building production businesses are a mixed strategy. The production cost of a good are much lower than practically anything you'll see in the city market, so, if handled well, you can absolutely wreck the competition and watch the money pour in as you can get greater profit margins. If you cannot get the goods distributed out quick enough, they will accumulate in your counting house, overflow your warehouses, and require you to rent ever-increasing space to hold goods that aren't earning you any money.

Be very wary of being in debt. If you have no cash, then you cannot make any purchases, which means your auto-trade routes will not be able to buy goods, effectively making them deadweight. This means that it is much, much harder to go from -10,000 coin to +10,000 coin than it is to go from 10,000 to 30,000.

Keep an eye out for the "Principality of X needs Y" quests in the Taverns. They offer you a decent (not great, not even a good) price for as much of one commodity as you can muster in a specified time. What makes these quests to great isn't that they give you a huge cash reward, but because they create an infinite demand at a profitable price. Here's how I take advantage of the situation: Go throughout as many cities as you can, buy AS MUCH AS POSSIBLE of the commodity at the guaranteed price, then dump it at your appropriate counting house (you may need to disable the Administrator's trade rules for that commodity for the time being). As you buy out all the excess of that commodity from the Hanse, you will create a shortage, thus raising the sell price of that good. In short, you get to benefit twice from the quest--once from the quest reward and once from the increased prices once you get back to trading that commodity. This is expecially beneficial when you have an overproduction of that commodity in your cities (I tend to grow too much bricks and hemp), and it is causing you to have to rent extra storage.
More Strategies and Tips (Distribution)
Distribution Centers
One of my preferred trading methods is to have three main distribution centers: One for the Baltic Ocean (such as Visby), one for the North Sea (Edinburg), and one for the Kattegat (Lubeck). I build much more than normal warehouse space in those cities.

I use my counting houses to do all of my trading, which frees up my convoys to do what they do best--lugging cargo from point A to point B. I create auto-trade routes that start at the local distribution center, load up entirely on one or two commodities, then have them go out to the other cities covered by that distribution center.

I have found two effective ways of distributing the goods locally. The first is to create an auto-trade route where at each city you set the specific rules of "x commodity: Unload max to counting house, load max from counting house." This, together with proper counting house rules that have trade-locks set, means that your convoy will drop off all their cargo, then pick it all back up, minus whatever the counting house keeps.

The second and more effective but more complicated method is to figure out how long a convoy will take to make a complete round-trip, compare that to the 10-day projected need for each city (located in the Market House screen), and then write your auto-trade routes to drop off the needed amount in each city. I would recommend over-supplying because as cities grow, their consumption grows.

So let me give an example: let's say it takes 14 days for my Baltic brick convoy [coincidentally named "Bricks East"--keep life simple] to make a round-trip. My cities do not have a "14-day projection" for brick, though, so I need to calculate their 14-day need based on their 10-day projections. So I look at Stockholm's 10-day brick need--250--and I see that it is also projected to produce 50 bricks in the same period. That means it has a net demand of 190 bricks per 10 days. That is 1.9 bricks per day (190 ÷ 10) or 26.6 bricks for 14 days (1.9 * 14). I would write all of these numbers down in a spreadsheet and repeat the steps for each city on the route. I would typically also round up the numbers of need, so 26.6 would become 28 or 30. I would then add up the total number of needed bricks per round trip, make sure my convoy has enough cargo space to hold that much, and then write up the route. The route would start at my distribution center (Visby), pick up the exact number of needed bricks for the trip, then drop off the specific amount in each city. Just for error-proofing myself, I would also have written into my Visby stop "Unload to counting house: All commodities, max". This final step allows me to use my auto-traders to pick up the occasional abandoned cargo without messing up the entire route. Finally, I would make sure that each city has proper administrator rules in set. For Stockholm, the brick rules would be "Sell: 0 minimum quantity, 58 minimum price" and "Buy: 100 [or whatever you want, bigger than 30 though] maximum quantity, 40 maximum price, Trade-locked". This would take care of all of the city's brick needs!

For cities where you have second or third tier goods, then you also want to calculate your commodity needs to keep your production businesses running. Again, using a spreadsheet, write down the numbers of needed commodities, based on the daily production and consumption charts (located in Counting House screen), calculate the round-trip projected needs, then add that amount to the administrator minimum quantity buy and sell values. So, if you were to have a "Sell: raw metal 0 minimum quantity" and "Buy: raw metal 100 maximum quantity" for the city needs, but you project a personal need for 25 raw metal for one round trip, then the new values should be "Sell: raw metal 25 minumum quantity" and "Buy: raw metal 125 maximum quantity."

The most important factor to the distribution center model is to make sure that the distribution centers stay fully stocked. That means you need to come up with a way to get excess goods back to the local distribution center (such as using the fist method of "Unload/Load Max" described above).

The bigger problem is how to solve the problem of not having a commodity produced by any city within a distribution center's area, such as there being no cheese anywhere in the North Sea area. One solution is to have designated convoys transport local specialties in between the multiple distribution centers. So for a cheese, fur, beer, meat, cloth, wine re-distribution route, it would look something like this: Start in Visby, drop off 1/2 cloth and wine, drop off remaining beer and meat, pick up cheese and furs; go to Lubeck, drop off 1/2 cheese and furs, drop off remaining cloth and wine, pick up beer and meat; go to Edinburg, drop off remaining cheese and furs, drop off 1/2 beer and meat, pick up wine and cloth; go back to Visby.

With your counting houses doing the brute selling and buying and your convoys transporting goods, that frees you, the player, to go pirate hunting, quest completing, treasure seeking, business building, city growing, or expedition leading. Have fun!

Regardless of how you set up your trade network, you will need to check periodically for holes. Check out your overall balances, your counting house stock, and city demands.
Even More Strategies and Tips (Suggested Auto-Trade Buy/Sell Prices)
The following table lists the purchase prices and the recommended buy and sell prices for each commodity based on your game's difficulty level. If you set your Counting House Administrators' rules to the following, then, granted you keep ample supply, you will keep the city at a one-diamond supply of every good and thus ensuring prosperity and eliminating famine.

***Remember--the game works on a '<' and '>' system, not on '≤' and '≥', so you will need to subtract 1 from the sell prices and add one to the buy prices.***

Level
Normal
Advanced
Professional
Commodity
Production Price
Buy Price
Sell Price
Buy Price
Sell Price
Buy Price
Sell Price
Wood
29
40
59
40
52
36
46
Brick
29
40
59
40
52
36
46
Grain
29
40
59
40
52
36
46
Hemp
29
40
59
40
52
36
46
Wool
44
60
90
60
80
55
70
Raw Metal
44
60
90
60
80
55
70
Honey
44
60
90
60
80
55
70
Salt
51
70
104
70
92
63
81
Metal Goods
146
200
301
200
365
183
233
Mead
131
180
270
180
240
165
210
Cloth
131
180
270
180
240
165
210
Beer
66
90
135
90
120
82
105
Stockfish
113
155
232
155
205
141
180
Clothing
306
420
630
420
560
385
490
Cheese
88
120
180
120
160
110
140
Pitch
102
140
211
140
187
128
163
Pelt
263
360
540
360
480
330
420
Meat
252
346
518
345
460
316
403
Wine
350
480
720
480
640
440
560
Spices
600
900
600
800
550
700

{Credit for table contents originally goes to Bagaluth and their post at Kalypso Media Patrician 4 Forum[forum.kalypsomedia.com]. Now available at Patrizier IV Fansite[patrizier4-fansite.de].}
Yet Still Even More Strategies and Tips! (Combat and Cities)
Combat Tips
When on a pirate quest, you can try to follow a pirate ship back to its base. Be careful not to get in a fight before they get there.

While the combat system is a pain-in-the-neck, a skilled player can usually capture a ship from the enemy. To do so, you must first sink all but one of the enemy's ships. Then, on the remaining ship, you need to kill all of its gunners with grapeshot and almost entirely destroy the hull with basic shot. Be careful about getting the hull too damaged before targeting the crew—even though grapeshot targets the crew, it also will do some damage to the hull, and if you sink the ship before killing the entire crew, you'll lose your prey.

Since you can capture pirate ships and pirates are so plentiful, you will hardly ever need or want to buy ships yourself. Throughout a single game where I amassed over 200 million gold and 380 ships, I had only purchased about 6 ships, and most of those were because I specifically wanted River Cogs without having to wait to find some in battle.

For much more in-depth tips on combat, read Patrician IV: RoaD Naval Combat Guide[forum.kalypsomedia.com]


City Tips
No city produces spices: the two most reliable ways of getting spice is through expeditions and by checking periodically with Bruges, Cologne, and Thorn, which get them through trade. I don't know why they do—maybe because they are closer to the Mediterranean?

Try to save city space by placing wells in between existing buildings. You can also strategically place wells so that they only protect your own buildings from fire. Then, if a fire just happens to start, your buildings are relatively safe while your opponent's buildings are nothing but tinder.

Any city you establish automatically grants you mayorial rights.

A successful mid-late game strategy involves growing cities by hiring beggars as sailors, moving your convoy to another city, then turn them into beggars by releasing them from your convoy. You can do the same thing with the occasional tavern quest to relocate people to a new city. These strategies work especially well when you are on a Guild mission to establish a new town.
Compiled Community Tips
From George Mallory:

*Hanseatic Cogs, River Cogs, and Caravels can't fight, meaning that if you make a convoy out of ONLY Hanseatic Cogs/River Cogs/Caravels it will NEVER have problems with pirates (you also can NEVER capture them because of this) [Author note:You will not enter combat, but your convoy captains will automatically give tribute to pirates when engaged]. Caravels are the fastest, carry the most, and have the most health of any kind of ship. Their only drawbacks are that they can't go up rivers and it takes a LOT of work to unlock their ship type (they probably won't show up until you're mayor of a city with a university and do the research yourself).

*Using only Crayers is the easiest way not to lose much to pirates at the start of the game.

*You can only have 3 active escort ships in a convoy, but you can have as many escort capable ships as you want. Switch out the ships as they get damaged to stay out longer (good for pirate hunting).

*You can enter a city if you have a convoy docked there. This is a good use for otherwise useless ships early on.

*Right before you are about to engage a pirate, pause the game and search all the taverns to see if anyone's willing to pay you to kill him.

*Don't accept the "kill a convoy of pirate X" quest until you are about to engage pirate X , because FINDING a convoy owned by pirate X becomes harder with the quest active.

*Save before you start combat or do anything risky, like arson/quests/hoisting the JR. [Author's note: I also create a save file right before making a major change, such as re-organizing my entire fleet trade routes. That way I don't need to waste time undoing the change if it doesn't work out.]

*Save before accepting a marriage proposal in case you wind up not having enough goods and then save again before the marriage (game randomizes wife's stats/dowry).

*Always keep at least 2 main save files and alternate using them so you have an "undo" button.

From Andromalis (check out his own PAT4 guide for tips on setting up distribution routes):

There is an exploit in the game that allows you to build outside of the town walls in situations you normally would not be able to do. Basically, you need to force the game to extend the road outside of the city walls. You can do this by building next to the primary roads, then demolishing buildings and immediately building new ones to extend the road, as it is presented on the picture[i.imgur.com].
Conclusions
Thank you for reading this guide. I hardly consider myself a master of the game; I still have many questions about the game myself, but I hope I have helped you to enjoy Patrician IV for yourself. I wouldn't consider Patrician IV my favorite, but it is definitely a unique game with some really cool features.

Please leave a comment letting me know you've stopped by. I would be happy to try to answer any questions and would appreciate any feedback.
Komentarzy: 84
swmackin 3 listopada 2024 o 19:13 
@Dorander The AI can see your max sailors and max cannons, but not how many you actually have. You can see the same when you click on AI fleets. Pirates will eventually end up with 3 hulk fleets. Also, "Unknown Pirates" have L2 upgrades on their ships, so beware. You are correct that funding sailors is not an issue in the late game. Money in general is not an issue then and the game becomes more about logistics.

I have recently learned to fight using just 1 or 2 crayers (after reading about it on an old German forum) and it is by far the best method. Though it can be time consuming. I made a post in a pirate thread in the forums here if interested. Not enough room here.
Dorander 21 października 2024 o 7:59 
@Heraclitus, I'm playing with Pirates set to 'High', most of my trading fleets still run with 3 fully upgraded Cogs but instead of full crews, they have 0 sailors. Pirate fleets, even ones with Hulks, nearly always leave them alone. I have a few weaker trading fleets doing minor jobs and they're always the ones that get hit by pirates, and then my pirate hunting fleet comes along and just takes the stuff back so I barely notice any losses.

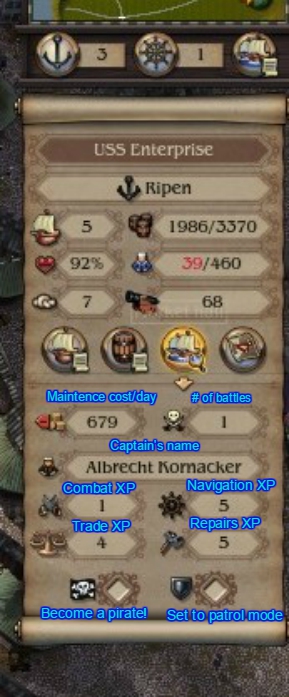
I don't know if the AI even considers sailors when determining combat capability, I didn't notice an actual difference in their attacks. I don't know if pirates ever get to the point of 3-hulk fleets but if so I expect that to be late-game and by then funding sailors won't be an issue anymore.
Heraclitus  [autor] 20 października 2024 o 20:20 
@Dorander Thank you so much! I am proud to have been able to be a part of this niche community and contribute as I can.

I have mixed feelings about sailors; I agree that they're an easy way to get a negative income flow, but I don't know how that sunk cost compares to the loss of cargo from pirates. I do think you're right, though, it deserves mentioning.
Dorander 20 października 2024 o 3:18 
@Heraclitus this guide is pretty great, it really helped me get started. Do you happen to know what guard towers are actually for? Do they reduce siege durations?

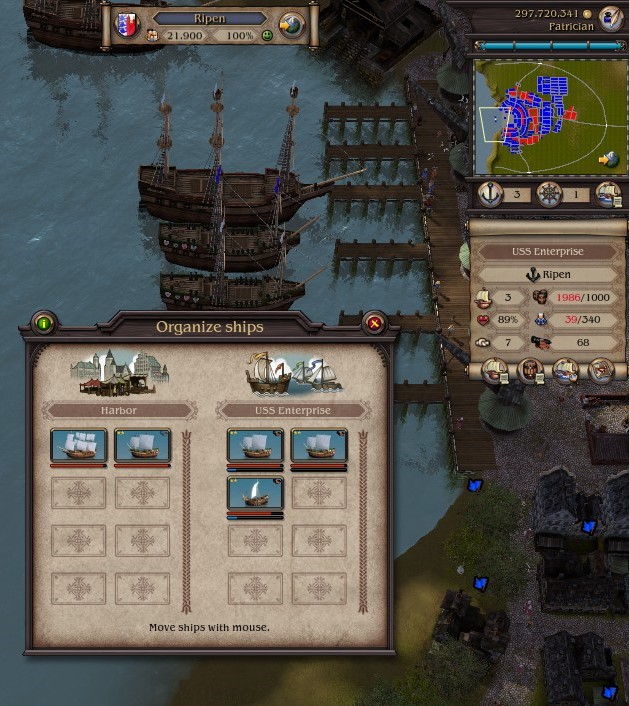
Also perhaps a tip to include for newer players: Sailors cost money. I didn't realize this at first, thinking I'd protect my trade convoys with fully crewed combat ships. I was struggling with money until I saw that my fleets were costing around 2k per day each. When I dumped the sailors maintainance prices dropped to baseline and suddenly my profits skyrocketed. Sailors are a bit of a noobtrap that way since you can only see the daily convoy cost on the convoy 'captain' screen.
Dorander 20 października 2024 o 3:14 
@GandGolf, there are no further campaign requirements for counting house locations. You don't hurt yourself if your second is build elsewhere than Aalborg, in fact it's better for profit IMHO if it's Malmo or Oslo. Bricks are really important to build and expand, so is wood, and wood turns to salt which you need to sell effectively in Aalborg to get meat production going.

The campaign is just a glorified tutorial, I made the same 'mistake', it takes a bit longer to complete the Aalborg counting house mission but you'll be completing the next steps faster because you're already up one counting house and a bunch of profits. You can rank up independent of the campaign to unlock more counting houses, your real constraint is money. You'll be fine.
swmackin 14 października 2024 o 18:32 
@GandGolf when I played the campaign I opened Malmo and Oslo before Aalborg. Based on my experience with Patrician 2/3 I wanted to produce a lot of wood and bricks. It turned out wood and bricks are even more important in this game.

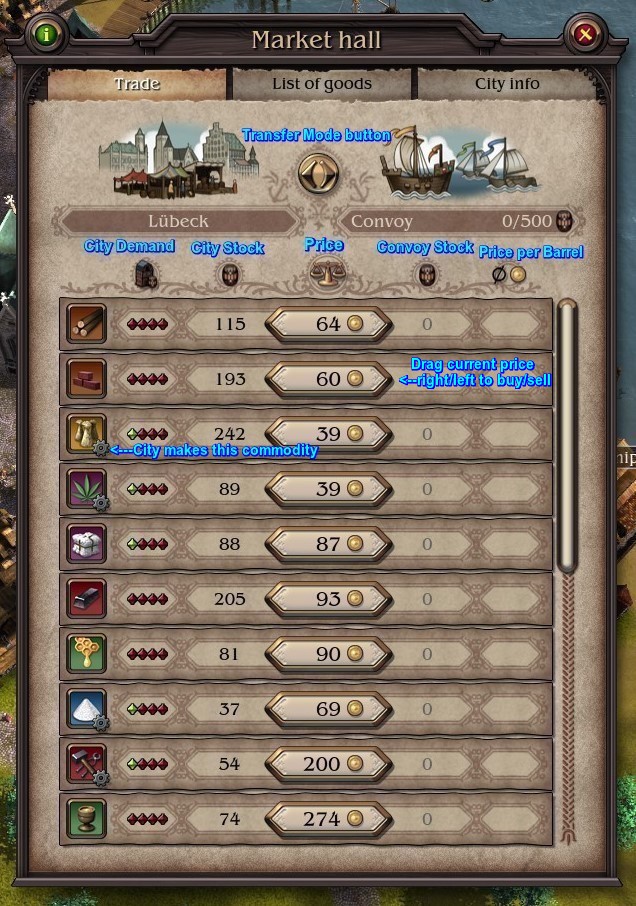
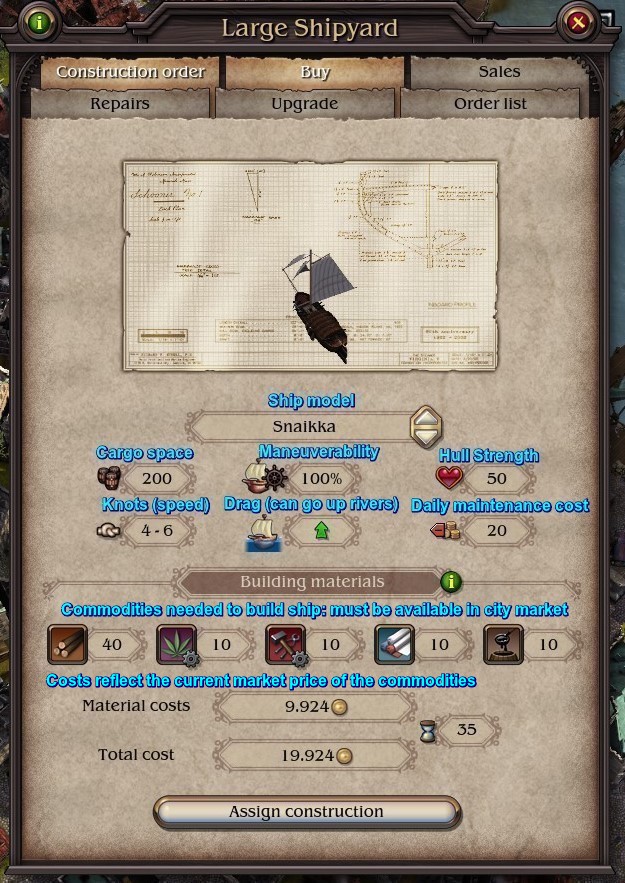
You need to produce these or you will have to sail from town to town buying them. You need to produce an abundance of wood and bricks and keep increasing production, even when you think you have too much. Eventually housing space runs out and you have to build them yourself. And wait until a town decides to build a cathedral and nothing else can be built there until they get 1000 brick and 500 wood to build it.

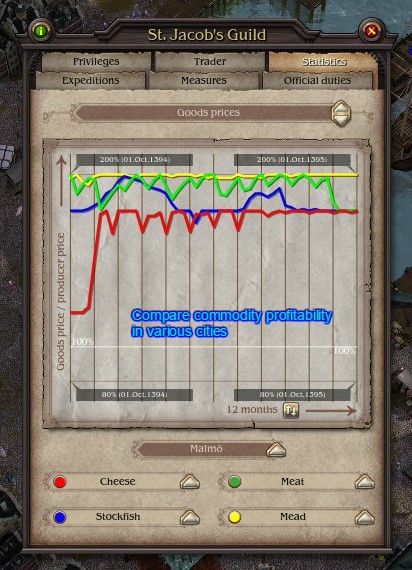
Also, meat is a poor investment early as it produces slowly and the price drops fast as you sell it. Beer and metal goods are your best money makers early while fish and grain are key to avoiding famine :)
GandGolf 11 października 2024 o 19:22 
Well technically you CAN build the counting house in another city, but then you will not be able to progress in the campaign until the house in Aalborg is built. And since the number of counting houses you can build is tied to your rank this could make progression rather difficult if you build it elsewhere.
Heraclitus  [autor] 11 października 2024 o 18:40 
@GandGolf Sorry, I don't recall. I don't even remember the campaign requiring you to build the second in Aalborg. In other words, if there were any such impositions, they were never severe enough or long-term enough for it to really make much of an impact on me--so I guess that's good; keep at it and it'll open up soon enough.
GandGolf 10 października 2024 o 22:14 
In the Campaign which cities require counting houses? The second one MUST be built in Aalborg. Do you have to build the third one in a specific city as well or can you build it anywhere?
swmackin 7 lipca 2024 o 7:23 
@Heraclitus thank you, I have played the campaign, continuing on when it ended and now am mayor of Lubeck. Most of the changes from Patrician 2/3 I like though there are a couple I do not. Expeditions were a lot better before and the sea battles move to fast for me. Also, the eastern Baltic is so sparsely populated it makes Novgorod pointless.

Some other changes are interesting. Leather used to be produced along with meat and some fisheries also produced whale oil. They also got rid of the high and low efficiency ratings for goods which is mostly positive.

I have also started playing Port Royale 3 and it is interesting to note that they have synced up the way the two games operate. There are a lot more similarities in terms of game mechanics than there used to be.