StarBreak

StarBreak

121 ratings
A New Spark's Guide to Starbreak
By Pidgeot
A guide for new players starting the game and not sure what to do.
   
Award
Favorite
Favorited
Unfavorite
Intro
First up, lets get the common questions out of the way.

This game is permadeath. When you die, your character, your character's stats, and all your equipped items, inventory and even your hat is gone.

You do have a storage in your home where you can store items to use later incase you die. You have one stash unlocked by default and it's in the bottom right side of your home.


EC is the blue currency under your portrait is the game's currency. You can buy gear with EC in the shop to the right of the main hub.

UC is the yellow currency under your portrait. This type of currency can only be found in Star Cathedral. Every player starts off with 20 UC, which is really only enough to buy a couple hats. Storage and Character slots can be bought with larger amounts of UC.

Hats are lost on death.

All loot you find is universal. This means if you're in a mission with 20 other players in the room and you find an HP drop, a Stat Booster and a gun that shoots 3 bullets that bounce off walls, that means everyones else can get that same HP Drop, Stat Booster, and that gun that shoots 3 bullets that bounce off walls. You don't have to worry about people ninja looting your stuff. Items and chests can disappear if you leave them on the ground for too long.

There is no trading and no item vendors to sell your junk equipment.

You can Level up by completing Missions. You also gain exp upon death.

There is a Friend/Faction system in place. Type ' /help ' in-game for more info.

If the game is laggy, turn down your graphics settings in the options menu, or you can use the ' [ ' and ' ] ' keys to change your graphics quickly. The ' O ' button by default toggles fullscreen.
Getting Started
So you probably finished the Intro level and are now in the main lobby, or Eschaton Station. You may be wondering...


What am I supposed to do?

Well If you want to get right into the action, go to this portal, which will be either the Fire Forest Portal or the Frozen Blight Portal and press the interact key. They're the easiest dungeon in the game and the first place a new player should go to. Go wild.


After you're done, press [H] to go home and we can take a look around the Eschaton Station.
Controls
You probably went through the tutorial already, but incase you need a refresher, here are the basic controls. (Assuming using default keyboard controls)

You can jump using the [Space] or [F] key. To attack with your Main weapon, press the [D] key. To use Secondaries, press [S]. Holding a direction while pressing the [D] or [S] key will allow you to aim or change what kind of attack you will do. Some objects can be used, and you can use the Interact key, which is [A], to interact with the object.

One thing that the tutorial doesn't explicitly teach you is how to use your Special. You can hold the [Shift] key and press any direction to use your shell-specific Special.

The [Tab] key will open your inventory and character window.

The [C] key will open your Stat window. This shows what stats your character currently has from picking up Stat Boosters.

[ESC] will open the game menu.

The [H] button will let you home back to safety, however, you must wait 10 seconds for Home to work, and if you move or take damage while homing, your Home action will be canceled.

The [O] key will let you change the window from windowed to fullscreen.

[Enter] will let you chat with other players in the current room.

The numbers [1] through [0] at the top of your keyboard will let you do emotes. Players in the same room can see your emotes, even if you're off screen.
Gameplay Basics
At the top left of your screen is your portrait.

The Green Icon shows your Current HP and your Max HP, also represented by your Blue Bar. If your HP hits 0, your shell will be destroyed and you will lose your character.

The Orange icon shows your Current Ammo and your Max Ammo. Ammo is used for your Secondary Weapon and if your Current Ammo hits 0, you will be unable to use Secondary Attacks.

The Blue icon shows your EC. EC is in-game currency, which you can use to buy equipment in shops. You can find EC dropped by enemies or from chests.

The Yellow icon shows your UC. UC is real money currency, and can only be obtained by using real money defeating enemies in Star Cathedral. All players start off with 20 UC when they start the game.

The Top Right of the screen shows your equipment.

This shows your currently equipped items.

Note that the Implant Slot can be unlocked by picking one up from a chest dropped from a boss.

Pressing the [TAB] key will open your Inventory.
You'll notice that some items you pick up have stats in Green. These are items that have modifiers on them that change or enhance the equipment's qualities. The amount of modifiers an item can have is based on it's prefix.

Stock (no prefix): No modifiers
Modified: 1 modifier
Custom: 2 modifiers
Experimental: 3 modifiers
Prototype: 4 modifiers

The amount of modifiers that you can find on a piece of gear is dependant on the enemy that drops the item and whether you're in a Regular or Elite mission.

Regular Chests: Stock and Modified (Modified and Custom in Elite missions)
Miniboss Chests: Modified and Custom (Custom and Experimental in Elite missions)
Boss Chests: Custom and Experimental, Stock and Experimental Exotic Gear (Experimental and Prototype, Modified and Prototype Exotic Gear in Elite missions)

Exotic items are unique items that can only drop from certain bosses. They're different from the standard items you can find from other chests, and they function differently from regular gear. An example of this is the Kantikoy Repeater and the Arblast. The repeater is a common weapon for a wildfire that can be found in any chest, while the Arblast shoots differently like a shotgun, and has a chance to drop specifically from the Fire Forest boss.

You will also see your character info on the left while your inventory is open.


Name is your current name. If you haven't registered, you will be shown as New Spark to other players. People that you have marked with ' /friend ' will have their name show up in green.

Level is your current level, and is shown next to your name. Your Level increases when you die with a high enough score, or (in the future) from completing missions.


Max Level is how high your level can go. You can increase your Max Level by completing missions that you have not yet completed before.
Shell is the current character that you're playing as.
MK is rough indication of how powerful your shell is. This goes up when all of your stats become maxed to a certain point.
Armor reduces the damage you take from attacks.
Movement Speed is how fast your character moves left and right.
Jump Height is how high your character can jump.
Damage Bonus increases the amount of damage you do with all your attacks.
Crit Chance increases the chance of doing a Critical Hit.
Crit Damage increases the damage of your Critical Hits when they occur
Air Jumps determine how many times you can jump in the air.
Knockback Resist makes your character not get knocked back as far when you get hit.

As you progress through a mission, you may see enemies drop different kinds of items. One thing to keep to eye on are stat boosters. These will increase your character's stats and will persist until you die.


Pick them up by running over them!


You can view your current stats that your character has boosted with the [C] key.


They may be minor boosts, but they are crucial to your shell's progress. And in a permadeath game, every little bit helps.


You may notice that your stats only go up to a certain amount. This is because the stat boosts that drop in a mission can only go up to a specific tier. To boost your stats even further, you'll have to collect them from harder missions.

The corresponding missions are the tiers which you can collect boosters for higher stats

Tier I - Fire Forest, Frozen Blight
Tier II - Fungus Cave, Vanquished
Tier III - Strands, Underground Base
Tier IV - Temple of the Lost, Graveyard
Tier V - Star Cathedral

Some missions only drop certain stat boosts as well. Below is a list of dungeons that each stat can drop in.


MAX HP - Fire Forest, Frozen Blight, Fungus Cave, Strands, Temple of the Lost, Star Cathedral
MAX AMMO - Fire Forest, Frozen Blight, Vanquished, Strands, Graveyard, Star Cathedral
DAMAGE - Fire Forest, Frozen Blight, Vanquished, Underground Base, Graveyard, Star Cathedral
ARMOR - Fire Forest, Frozen Blight, Vanquished, Underground Base, Graveyard, Star Cathedral
SPEED - Fire Forest, Frozen Blight, Fungus Cave, Strands, Temple of the Lost, Star Cathedral
JUMP HEIGHT - Fire Forest, Frozen Blight, Fungus Cave, Underground Base, Graveyard, Star Cathedral
CRIT CHANCE - Fire Forest, Frozen Blight, Fungus Cave, Underground Base, Temple of the Lost, Star Cathedral
CRIT DAMAGE - Fire Forest, Frozen Blight, Vanquished, Strands, Temple of the Lost, Star Cathedral

The higher tiered missions also drop equipment that are stronger than the lower tiered missions do, often having more of a difference in the damage or armor they increase.

By the way, all loot that drops in the game is the same thing that drops for every other player with you. This includes Equipment, Stat Boosters, Ammo and Health Pickups, and even chest contents.

A Wildfire calling out Health using the [2] key for his friends.


You can't sell any extra equipment that you pick up. There's also no trading between players.
Your Home
When you press [H] you will go back to your home. There are a couple things you can do here before you head back out.

In the bottom right corner of your home is where your Stash is located. You can store items in your stash that you don't need, which you will keep even if you die. Very useful for giving you a bigger start on your next Shell. You have 1 stash unlocked by default.


Above your Stash is the Shell Manifest area. When you die and become a spark, you can fly over to one of these capsules and Manifest into a new Shell.


There is also Shell Storage at the top, which can be bought for UC, which drops from enemies in Star Cathedral. This lets you store your current shell and switch between your existing shells as you please.


Once you're done looking around, you can head over to this tube looking object here to return back to Eschaton Station.

Eschaton Station
When you go out of your home there are a couple other things in Eschaton.

To the left is the UC shop and Hat shop. You can buy cosmetic hats with UC which can only be found in the Star Cathedral mission.

Just as a warning, Hats are lost on death.


To the right is the Star Cathedral portal.


The Star Cathedral is one of the hardest dungeons in the game.


As a new player, you don't need to worry about this for now.


Further to the right is an EC shop, where you can use in-game currency to buy gear and boosts.


There's also a training dummy at on top of the EC shop, where you can test your weapons and new gear on.


You'll notice that there are two different coloured portals for missions.

Blue portals are Regular Missions
Red portals are Elite Missions, which are much harder than their normal counterpart.


You should probably avoid Elite dungeons for now, they are very difficult for new players, and even good players have a hard time in Elite dungeons.

When you or someone opens a portal, it'll announced to everyone on the server. Your mission portal stays up for about a minute or two, but after a certain amount of people enter, the portal will close after a short amount of time. You'll notice that portals that have 10+ or more people will close rather quickly.
Conclusion
Anyways, I hope this guide helped you figure out the game a bit easier. Don't worry too much about dieing a lot in the beginning. Starbreak is a very difficult game, but remember, you're not fighting alone. You have your friends and comrades at your side.

If you still have any questions or have a suggestion on what to add to the guide, leave a comment below.

Until then, have fun playing Starbreak, beating bosses, and getting cool loot. You never know what you might find.

21 Comments
amhui12345678 Aug 5, 2020 @ 11:46pm 
Good guide!
Pidgeot  [author] Jul 7, 2020 @ 2:52am 
Hi, as I don't play Starbreak anymore, I probably won't be making or updating guides here very often.

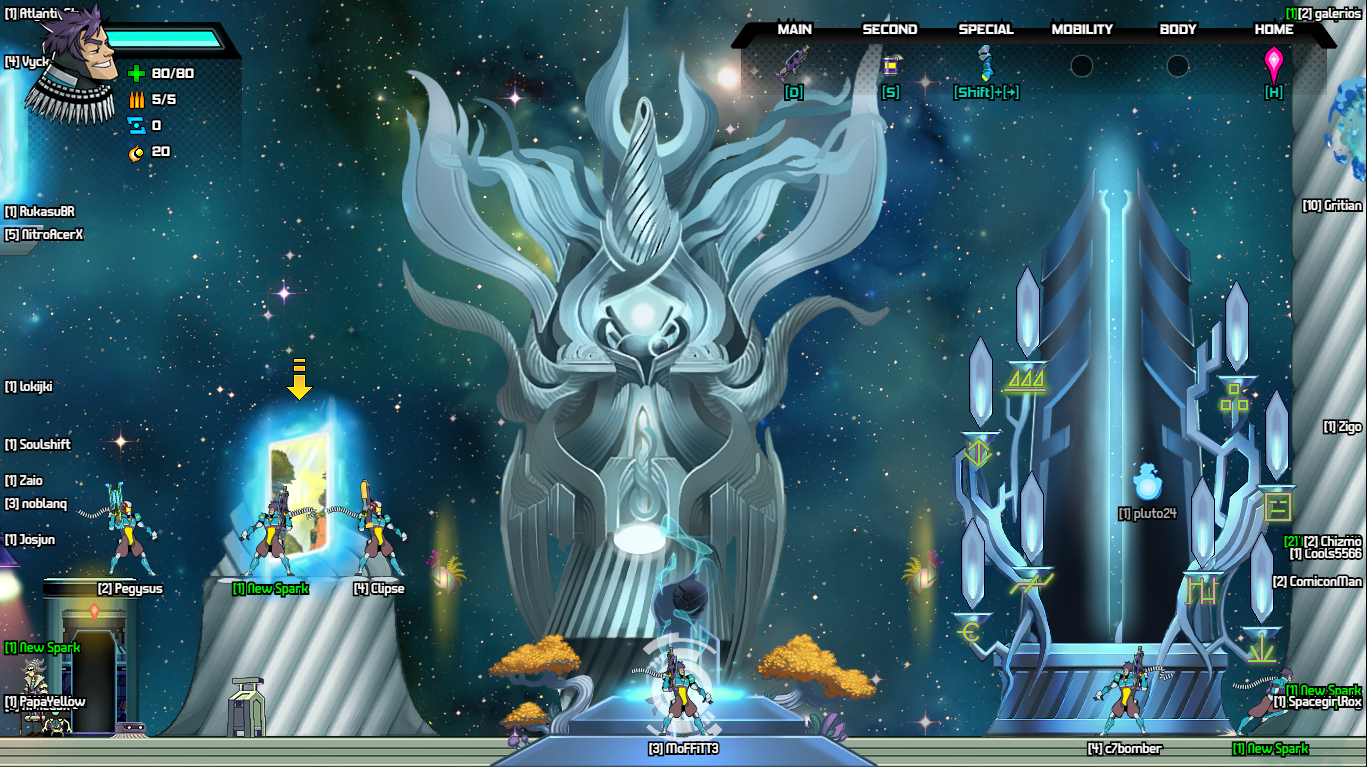
At any rate, I went to go update the guide with adding Frozen Blight for locations where boosters drop.
Lil_Man_Jess Feb 16, 2020 @ 11:12am 
I used to be able to play it but now my screen is all glitchy, anyone have answers for why?
f2P Nov 4, 2019 @ 5:27am 
very useful
Ace Jul 9, 2018 @ 5:41pm 
just skipped the tutorial on accident and im happy you made this. THANKS
Saya Mar 16, 2018 @ 3:02pm 
Oh and you forgot Frozen Blight.
Saya Mar 16, 2018 @ 3:01pm 
Great guide! You should update it at least once, though. Check /r/Starbreak.
Brock ThunderCock<<AD>> Jan 15, 2018 @ 7:35pm 
well done! thank you!
HighFunctioningInsomniac Feb 20, 2017 @ 4:11am 
I appreciate that you took the time to make this guide and even include pictures. You're a swell fellow!:2016gameingame:
QuaestComm Nov 19, 2016 @ 4:15pm 
Since the initial creation of the guide, another tier 1 zone was added, the Frozen Blight (an Elite variant was added as well), which sometimes has its portal appear where the formerly-guaranteed Fire Forest portal appears.

All the boosts that can be acquired in Fire Forest can also be acquired in Frozen Blight, but the Frozen Blight boss drops a different set of exotic gear from the Fire Forest boss.

As well, if you die in Fire Forest or Frozen Blight and you are not in a boss or midboss room, you can respawn without having to go back to your home first - this is helpful early on, when you're still figuring out the first two zones.