MELTY BLOOD Actress Again Current Code

MELTY BLOOD Actress Again Current Code

93 ratings
H-Satsuki/Hatsuki Beginners Guide
By wendigo
Covers normals+specials,pressure,combos and other stuff you may need to know about Half Moon Satsuki.
6
2
   
Award
Favorite
Favorited
Unfavorite
Intro
What is Hatsuki?

Hatsuki/H-Satsuki is a fairly straightforward rushdown character that happens to have access to a few command grabs(They aren’t entirely central to her kit but it’s better to think of them as complementing her). She has a step dash(not a run). Her pressure is pretty good and she’s easy to pick up, but will require some crafty play against stronger opponents. She gets decent damage off of most confirms and really good damage on counterhit with a good starter. Play her if you’re scared of Catsuki execution / want access to h-moon mechanics (5a6aa,Shield Bunker,Shield Counter) / have hipster syndrome / like characters with cool j.[C]s.
Forewarning this guide is assuming you have an understanding of basic numpad notation [www.dustloop.com]and the games system mechanics[wiki.mizuumi.net]. This guide contains a mixed bag of personal input as well as stuff from the mizuumi wiki Hatsuki page[wiki.mizuumi.net] (so thanks to whomever filled that out). I tried my best to keep things simple as possible for the influx of "new new" players but if you have any suggestions,comments or questions feel free to post away as the feedback is more than welcome. I am by no means a self proclaimed Hatsuki god(the good ones are linked below) or even anything beyond mediocre at this game and I don’t want to be spreading misinformation, just thought I'd give back and share what I've learned. That being said I wouldn’t post this without some degree of confidence in what’s been mentioned.

I'd highly reccomend match footage to both study and watch. Here are 2 high level Hatsuki JP players(but be sure to watch other anonymous players as well, never know what you might see). If you're having trouble with a specific matchup aswell you can filter by character on this website and overall its a good tool!
Players to watch: Ura(うら)[www.meltydb.com], Aya(あや)[www.meltydb.com]
Normals
Normals: Satsuki has access to fairly good normals though they are a bit on the slower side.

5A(Mid)
Active on Frame 4. Alright twitch anti air and catching bad air techs+jump outs. It’s a melty 5a, so it’s important in whiff cancelling as well. Stagger this normal to see success. Hits crouchers too which is nice.


5A>6A(mid)
Second normal in your h-moon exclusive 5a>6aa chain. Not too much to say about either of these as they’re largely combo filler. This one can be cancelled into 5[c] though for a frame trap if it hasn’t been used prior. Has some forward momentum but you never wanna end pressure on this normal so cancel into something else.


5A>6AA(mid)
I know what you’re thinking. “EAT YOUR HEART OUT ELPHELT c.S”. Hitboxes in a vacuum without game context always look dope but aren’t always as cool as they seem and this is a prime example. Sadly this move is largely combo fodder or a pressure filler(mostly ender) as it sends you back to the other hemisphere. Safe though at the very least on block(neutral). Can only special and super cancel it on block if that helps.


5B(mid)
This normal is your new best friend. Get used to it. Has forward momentum and is staple in your pressure and combos. Decent meaty and good at punishing ground techs due to its momentum. Dash>5b will make people scared. First Active on frame 9. Be careful on whiff or vs aerial opponents as it has a decent amount of recovery and you’ll fly under them.


5C(mid)
Another one of your friends. Has some clash frames(yellow box) near satsuki's head but don’t go too crazy trying to AA or catch jump ins with this(still a good button nonetheless especially for keeping those IAD’ing at your face in check), it's still a 5c so you can't throw it out in neutral as carelessly as a 5a due to startup(In general though you should never be hitting buttons without specific intent). Used in both combos and pressure. Moves her a teensy bit forward.


.png]
5[C](mid)
Blow edge version, which is neutral on block and is fairly fast for a blow edge normal, On hit it causes grounded opponents to be launched a bit. On normal hit doesn’t provide too much aside from getting a hard knockdown after going into 623(a/b/c). On counterhit though you can really lay down some hurt(see combos).You can set up frame traps really easy with this normal. Overall good all things considered.


2A(low)
Standard melty 2a, active on frame 4. Important in rebeat whiff stuff. Hits low though which is nice. Not too much to say. Pretty good for stagger pressure.


2B(mid)
I don’t know about this one. It’s definitely not as cool as 5b as it’s pretty stubby. Mostly filler(when you’re in close range). It’s +1 on block though at least apparently..


2C(low)
Satsuki's sweep. Your farthest reaching normal. Staple in combos and rebeat(5a/2a whiff) pressure. Does its job but just be sure to cancel it into other things on hit or block. Only the second hit makes them airborne so if you knick someone with it from a distance make sure you’ve actually achieved both hits before you try autopilot your combo. Has alot of green before its active so be careful.2 Hits.

(1).png]
2[C](low)
It’s really slowwwwwwwwwwww. Blow Edge version adds an additional hit, cranks out some damage to their guard bar and pushes you back a decent distance. Mostly combo filler, you’ll get to use infrequently if people start respecting. 3 Hits.

(2).png]


(3).png]


3C(low)
Moe Moe Ankle Tackle. Low profiles stuff but still largely combo filler outside of “HARD READS”. It has a lot of green before its active so you will be punished if they see it coming in neutral. If it's blocked be sure it’s cancelled into something or you will be punished...........Abunai.


.png]
3[C](low)
☆★!!~SUPER MOE MOE ANKLE TACKLE~!!★☆. Extremely niche normal. Tonnes of startup, still has lots of green during the travel. Safe on block but this should never be blocked anyways. Only use this if you’re really confident in your punishes. Pops them up super high on hit.


j.A(mid)
It’s a j.A. Its pretty speedy. Again it’s one of those buttons that kinda feel like filler or catching stuff with hella startup.


j.B(high)
Another highlight button with lots of utility. This will be your primary Air-to-Air engage button but also works fine as a jump in(can be used to fuzzy). Also comes in a Blowedge version j.[ B ] which sends a sonic boom looking projectile a short distance outwards(great for cherry picking air counter hits and controlling space). Important to note that it stops her momentum and air stalls her a bit then sends her back a bit(so you can also do stuff like call out anti airs). The blowedge version always hits mid. Get used to this button and taking advantage of both versions.


j.C(high)
Unga Unga Satsuki smash. A great jump in button against grounded opponents but a decent Air-to-Air as well if you have time to put it out there. That being said it's on the slower side so don’t go flailing your arms willy nilly. Great starter on hit btw.


.png]
j.[C](high)
Slam Jam Thank You Ma’am aka IKU YO. HELLA REWARD ON HIT and combos with it look dope. Pretty slow to come out but once its out its out. Treat it the way you would j.C but even more conservatively. You can also do cool stuff like late blowedge while in the air/close to the ground then land to cancel it before its active and go for low/throw.


Ground Throw: Hard knockdown, Can throw them forward and back. Not too much to say. Interesting to note though is she can cancel her dash early with throw(she can’t cancel into a normal or special until the end of her dash typically). So if you’re having a tough time opening people up microdash>throw and is very good option to consider. The damage isn't the greatest but a knockdown is a knockdown.


Air Throw: Hard Knockdown, not a whole lot of advantage after. You can dodge cancel the recovery for 50 meter and get some mixups going though!(see later)
Specials
214A/Lunge Punch A(mid)
Very important special.Your launcher in combos and pressure tool. Jump Cancellable on both hit and block so you have a lot of options after worst case scenario. Usually safe. Also shares the same frames as your shield bunker.


214B/Lunge Punch B(high)
Pretty much the same as your 214A but longer startup and hits overhead. It’s alright to throw you every once in awhile but don't let it become your crutch, this isn’t the staple of your mixup.


214C/ EX Lunge Punch(mid)
Ghetto Reversal. Startup Invuln but it ends on frame depicted. Worst case scenario you trade and they get btfo to the other side of the screen. Safe on block. Won’t see too much use. Your H-Moon Shield bunker is a much better reversal for the meter anyways and is largely risk free.


623A
“anti air command grab” but you won't be using it for this so much. It has a bit of startup invuln at about her chest level but I wouldn't rely on it. Due to that it’s mostly a combo ender, Air Unblockable. Hard Knockdown which is nice.


623B
Same story as 623a but a lot slower and less usable in neutral. Still gives hard knockdown on hit but allows for otg so some combos will use it.


623C/Tornado Throw
The creme de la creme A.K.A “Don’t Jump” hella fast,goofy hitbox,Air Unblockable. If they’re in the air they probably got hit, and if they were hitting a button you’re sucking in their green. Leads to good combo on hit and can be used in the middle of her BnB as well. Ground bounces on it. Overall great special, abuse the ♥♥♥♥ out of it as this is where most of your meter should be going.


63214C/Just One Bite!
Your third "actual" command grab. Very fast with decent range but no invuln. Gives hard knockdown and heals satsuki for the damage dealt. Image is to just show how far it reaches. Set this up with tic throws or once you know your opponent is gonna respect. Satsuki on the right is performing the special


236A
Hitgrab. Satsuki does a quick duck and slide and reaches out for the opponent and chokeslams them into the ground for hard knockdown. This is blockable!! Safe on block but not your best pressure ender. On that note though it is good for preemptively calling out those you think are going to dodge(since it's a hitgrab it won't whiff!) or mash or even jumps! Low Effort Low Reward. Also a combo ender.


236B
Your meterless command grab. It’s not that great to be frank, it doesn't have the speed of 236a and anyone with decent reactions will jump/mash and punish you accordingly. It’s alright to throw out once in awhile but don’t treat it like its Sol’s Wild Throw or anything as cool. Allows for OTG after like 623b.


236C
The “I ♥♥♥♥♥♥ up my 623c input” special. Nothing worth mentioning here. It’s still blockable, it travels the 236a distance(still slower than 236a too) but has 623c properties on hit. You could treat it like a 236a with a combo on hit but IMO its a waste of meter and a pretty big gamble. Oh this will pick up stuff usually so don't panic if you got this instead of 623c you’ll suffer a bit less damage though as punishment. Can be comboed into from 22b hits

41236C(HEAT ONLY)
Satsuki's Arc Drive. Looks goofy, a bunch of startup invuln. Can be jumped post superflash so not too great. Good for catching newbies and people sleeping. Does a decent chunk to their health. Can’t be combo'd into sadly.


No images of these three because the projectile is on a seperate hitbox than Satsuki. It's POWAH WAVE.

22A
Satsuki slams the ground and sends an energy blast across the floor. Slower to startup but it's a safe pressure ender. If they’re respecting dash in and continue. Also they’re all air unblockable(all versions)

22B
Faster startup and reaches a teensy bit farther than 22a. You’re gonna be punishable though if you’re breathing your opponent's air and in general it's not very safe. It is ex cancellable though(looking at you 623c) so you can can call them out if they try jump at your face and you have meter. It launches grounded opponents aswell if for some reason they get hit (in which case cancel into 623c or 236c for a combo depending on the distance you are. 236 for far hits 623c for close hits.)

22C
Fast startup like the B version but does both sets of waves and is plus on block so you can use it to extend pressure if really need be. Doesn’t see too much use unless you feel like burning meter.
Pressure
I won’t spend too much time talking about this due to the inherent nature of melty blood. The game is very freeform when it comes to pressure especially in the case of H+C moons. There isn’t a blockstring you should go for a 100% of the time. But to provide some direction your basic string will stem from something like:

1. 5a/2a/5b>5c>2c>3c>22a

2. 5a/2a/5b>2c>5a/2a(whiff)

3.2aa>2b>5b>5c>2c(1)>5a6aa>214a>jump cancel>(neutral begins now)Followups
  • 9>j.B/j.C
  • 9>66>j.B/j.C
  • IAD>j.B/j.C
  • 7>66 j.B/j.C
  • 7>j.[ B ]

All of these enders though reset you to neutral meaning your opponents can jump/dash/mash out. As endless as melty pressure seems there are gaps in certain points and it's your job to both adapt to and exploit your opponent's behavior! For example in string 3 if you had started with a 5a in your chain and continued onwards you could not reverse beat into 6aa later or if in string 2 you had started with 2a you couldn’t whiff cancel your 2c with 2a at the end again. It’s important to keep track of which buttons you have used in pressure due to instances like that. Like mentioned previously experiment around a bit but the tldr version is this:
  • 5a/2a/5b starter
  • filler with stuff here
  • 22a / 5a6aa / 214a(jump cancel and assess)/ 236a / 2c(5a/2a whiff) are your go to enders.

if you want a good explanation on why we would whiff cancel a normal there is a very good video on it here
Frametraps
AKA “If you mash here I get a free combo” I’m not going to go over every variation but these should be enough to get you started. You can practice these in training mode by setting the dummy enemy status: crouch and then in the enemy settings menu...Enemy Action: Recover A,Enemy Defense: All Guard. If you do them right you should be getting a counter hit for your starter. Once again these aren't things you want to be autopiloting or people will pick up real fast on when not to mash.

5b/2b>5[c] (lodsofdamage)
5a6a>5[c] (ditto)
2a>2b>5c>2c>5a6a(5a should whiff)
2aa>slight delay>5b
2b>2c>(delay)>5b
2a>214a (pick this up with 5a>bnb its tight so be wary)

Honestly a little delays here and there go a long way. This character gets lots of mileage out of stagger pressure once you’ve established respect with your opponent. Experiment yourself a bit in training mode as well.
Combos
Legend:
{ }=optional
jc=jump cancel
AT=airthrow
CH=counter hit
Everything was done on vsion. If you're testing it and the numbers seem different Characters have different different damage modifiers[wiki.mizuumi.net]. There is also reverse beat penalty potentially aswell. Turn on attack data in training mode settings to see more.

Your bread and butter combo is:
{5aa/2aa}>5b>5c>2c>3c>214a>j.B>j.C>jc>j.B>j.C>AT
4440 Damage:+59.1% Meter


100 Meter version
{5aa/2aa}>5b>5c>2c>3c>623c>2c>3c>214a>jc>j.B>j.C>jc>j.B>j.C>AT
5015 Damage:-54.8 Meter


Alternatively you can do(H-Moon Chain):
{2aa}>5b>5c>5a6aa>2c>3c>214a>j.B>j.C>jc>j.B>j.C>AT
4823 Damage:+72.3% meter

You have to delay the 2c a bit to get both hits otherwise you only end up getting
4576 Damage:+69.5 Meter

If you have meter and tack on 623c after the 3c again…...
{2aa}>5b>5c>5a6aa>2c>3c>623c>2c>3c>214a>jc>j.B>j.C>jc>j.B>j.C>AT
5313 Damage:-41.7 Meter


It's not too hard to get the timing down just do whichever one you can hit more consistently, but extra damage for minimal effort is always good.

You can also always end combos with hard knockdown if you wish at the cost of damage…
{5aa/2aa}>5b>5c>2c>3c>236a/623a
3409 Damage:+24.8 Meter


So remember that frame trap from earlier if you get something like 5[c]CH Starter you’re in for a treat.
CH 5[c]>j8.[c]>j9.[c]>2[c]>3c>623c>2c>3c>236a
Requires: 100 Meter, 5[c] counter hit. 6510 Damage!

The closer you are to the corner the better. If you don't think you’ll be close enough for 2[c] you can 66(dash) and 2c and continue at the cost of lower damage.This will go from corner to corner, you can do the 2[c] version from about midscreen

If you want to stay midscreen and sideswap/style for whatever reason you can do
CH 5[c]>j9.[c]>j9.[c]>2c>3c>623c>2c>3c>236a
6026 Damage

The sooner you cancel your first j9.[C] the better you should have crossed over them by that point and should be hitting them. The combo should look weird.

If you don't have meter you can do
CH 5[c]>j8.[c]>j9.[c]>2[c]>3c>236a/623a
5648 Damage

Same rules apply if you wanna do the midscreen alternative just swap the ender

j.[C] Starter


Air Throw(gold) Starter:
AT(Gold)>2c>3c>214a>jc>j.B>j.C>jc>j.B>j.C>AT
2885 Damage:+54.6% Meter


5D Starter(Shield Counter):
5D>Delay>2c>3c>214a>jc>j.B>j.C>jc>j.B>j.C
2843 Damage:+56.5% Meter

Or
Midscreen Variant
5D>j.[C]>SuperJump Cancel 9 j.[C]>66(dash)>2c>3c>623a
3378 Damage:+44.6% Meter

do this if you think you won't reach the corner;it will carry them a good distance though
Or
Corner Variant
5D>j.[C]>SuperJump Cancel 9 j.[C]>2[C]>5[C]>623a
4054 Damage:+51.2% Meter

This in itself is absurd damage for a shield counter meterless...if you have meter to spare though..
5D>j.[C]>SuperJump Cancel 9 j.[C]>2[C]>5[C]>623c>2c>3c>623a
4972 Damage:-43.7% Meter

Requires 100 Meter and Corner to get blow edge 2[C]+5[C],you could probably tack the 623c in midscreen variant aswell but it doesn't boost the damage by that much so theres no point unless its going to kill

special shoutouts to magikarp9 for telling me about the 5D>j.[C] routes, wasn't aware of them before.


214B Starter
214B>jc>j.B>j.C>jc>j.B>j.C
3409 Damage:+43.4% Meter


623c Starter
623C>2c>3c>214a>jc>j.B>j.C>jc>j.B>j.C>AT
4578 Damage:-79.7% Meter


Air Counter Hit Starter:
Land>2[c]/2c>3c>214a>jc>j.B>j.C>jc>j.B>j.C>AT
Or
Land>5b>5c>jc>j.B>j.C>jc>j.B>j.C>AT
Or
j.B>j.C>jc>j.B>j.C>AT

You can honestly kinda do whatever for air counterhit starters, you should be improvising those anyways for the most part depending on your situation. They're in an untechable state until they hit the ground so you got some time to think.

These should be enough to get you started. TLDR Version
  • Step 1: stuff>2c>3c
  • Step 2 Option 1: 214a>jc>j.B>j.C>jc>j.B>j.C>AT (Standard Route)
  • Step 2 Option 2: 623c>2c>3c>214a>Air Combo (Damage Route:Requires 100 Meter)
  • Step 2 Option 3: 623a(Nearby Knockdown Route)
  • Step 3: Rinse and repeat


Again check out the Hatsuki Mizuumi Wiki Page[wiki.mizuumi.net] if you want more in depth stuff on character specific routes etc etc
Mixups+Oki
So as mentioned before Hatsuki isn’t particularly a vortex monster,her strengths in opening people up mainly come from staggers/low/command grabs/throw/623c. IAD j.B/j.C are your only "real" overhead options(and risky ones at that). She does however have access to mix up options both midscreen and in the corner if she uses 623c as an ender. I won’t get too much into detail as I’m not too versed with it myself but once again I’ll refer you to the mizuumi wiki[wiki.mizuumi.net] where you can find a better writeup on it.

Fuzzy Overhead
I will mention this since it's really easy to understand once you get the hang of it.
iad/deep j.B>9>j.C (hold 9 so you don't get super double jump;you’ll notice if you messed it up)
or
j.C>j.B>9>j.C (Ditto;Nero Specific)

You can do it with j.C as well but it's much harder. Essentially what's happening is because your opponent is still stuck in standing blockstun(assuming the blocked the first hit)even if they crouch immediately after, their hurtbox is still their standing one meaning they’ll get tagged by your followup j.C. TLDR: It looks like they were hit standing when they were blocking low. It makes a lot more sense when you can visualize it so I put this together here(watch the inputs on the left and their stance when j.C hits. Note you can’t do this on every character(miyako is the first one that comes to mind).

Air Throw Dodge Cancel Safejump/Oki
Another thing you can do is after air throw! I was only made aware of this as an option after watching some of Ura’s play. This option requires meter and is only made possible after an air throw ender. If you hit 2ab after an airthrow and you have atleast 50 meter Satsuki will do a weird stall and have visual effect, from there you can (4/6)drift or airdash(since you would have used your prior movement option of 2 jumps in the combo and they only reset on landing. If you only do 214a>jc>j.B>j.C>AT you would have one jump and an airdash etc etc). You can do some really grimy stuff off of this especially on those aren’t suspecting anything after your air throw. It works best in the corner but can work midscreen. So after an airdash you have to make a decision on what you’re going to do.

Update: I've been informed its a safejump! So yes it does work against C-arc 22b and the likes. So input your j.C as j.1C! It's a bit trickier because you have to adjust the timing on certain slow risers to its doable nonetheless. So far I've found out C-Roa EX DP is too fast to safejump not sure on any others. May redo this video entirely since it's needs to be redone in hindsight.

What's a safejump you ask?
When you throw out that j.C one of 4 things will happen: it will hit the opponent (starting a combo with a great starter),the opponent will block it (allowing you to start pressure) or you will land and go into a blocking state (which in turn if they dp'd, you successfully baited it allowing you to punish them in their recovery frames; with exceptions of course). In specific situations though you may actually get hit, again C-Roa EX DP for example, since its faster than your standard reversal you will get hit before you recover and they won't get hit by the j.C due to invulnerability etc. Instances like this are few and far between as not many characters always have access to options like that to beat it. It's still a great option if you have the meter and understanding of your opponents character as it covers various wakeup options without too much risk. Additionally it can help with your meter management as it's fairly cheap and efficient way to expend meter on top of being a way to establish respect/instill fear post air throw.


This can include:
  • Airdash>meaty j.C/j.B (beats mash/low block)
  • Airdash>Empty>Throw (beats shield)
  • Airdash>Empty>2a (Beats high block)
  • Airdash>Late j.[C]>(landing cancels the move)>low/throw (beats high block/shield)
  • Airdash>j.[C] (Beats low block)
  • Airdash>Choice>5b (should beat backdash)
  • Airdash>Deep j.D (beats dps ayyy lmao)(dont do this)

Like every other thing in this game it's important to not exhaust your options by autopiloting the same thing every time. I know all these options sound good on paper but they are not the be all end all.
Closing notes + Additional Resources
With that comes the end of the guide! I hope you managed to find something of use in here. Remember practice makes perfect! Not everything is going to come in your first 5 minutes of play just set small goals and work your way up. Getting good at fighting games is definately an investment. SO GET TO WORKING IN THE LAB(ontop of playing matches)!

Again as mentioned previously feel free to drop a comment on here with any questions/feedback (how was the layout, any additional info you'd want?, "my dude this guide was straight booty") as I'd be more than glad to read them and hopefully answer. I can still update the guide if theres anything that you would like to see/any corrections need to be made etc. Depending on how people take to this one I wouldn't mind putting one together for another character like h-miyako or h-kohamech if people are actually interested. It was a learning experience for me aswell and theres always room for improvement.

On that note though do your own outside research! It's good to get things explained to you but even more rewarding if you figure things out on your own.The Mizuumi wiki[wiki.mizuumi.net] though a mixed bag of barren and crammed is always a good place to start. From there Melty Bread[www.meltybread.com] is always a good backup to check. I can't stress enough the importance of watching match footage so I'm going to tell you about meltydb[www.meltydb.com] again, as well as to encourage you to watch your own match footage. Butterfree did a good writeup here[whensmeltyblood.blogspot.ca] on the type of stuff you should be looking for (also has other good stuff on there too give it a glance over at the least). If you are interested there is a large Melty Blood discord channel here[discordapp.com] with both new players and vets alike, so if you ever wanna ask questions or look for games etc be sure to give it a look they dont bite. Also be sure to check the stickied thread in the discussions page.

Lastly I'd like to give shoutouts to all the vets and community in general for putting together the resources among other things and having a welcoming attitude. As a new player myself (8 months) I don't think I would have stuck around had there not been so much at my disposal, so thanks!


now go and learn c satsuki
8 Comments
stinko Feb 13, 2024 @ 8:05pm 
i love h-sacchin
JonyShark359666 Jan 13, 2022 @ 12:55pm 
maybe he montage on photo hitbox - Doctor Jans
:lunar2020thinkingtiger:
Doctor Jans Jan 25, 2017 @ 1:10pm 
Question how do you display the character's hit and hurt boxes?
Makimoke May 13, 2016 @ 8:36am 
Addendum to my previous post:

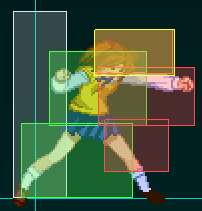
Works on Aoko, Tohno, Nanaya, Arima, Ciel, Sion, Sion Tatari, Warachia, Roa, Hisui, Akiha, Arcueid, WArc, Mech Hisui, Seifuku, Satsuki, Len, Nero, NekoNero, Kohaku, Neko Arc.
Semi-works with Ries, Hime, PowCiel, VAkiha, Ryougi, WLen.
Doesn't work on Kouma.

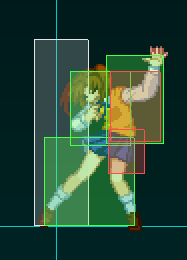
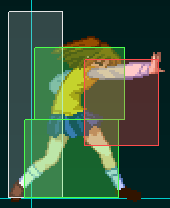
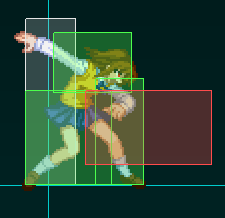
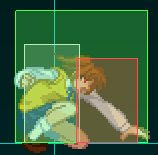
For Riesbyfe, use a 2C and not a 2[C] after j.5[C]x2, as 2[C] won't hit all 3 hits, and make your 623C whiff after the 5[C] in most cases. You should try this on Hime, PowCiel, Ryougi, WLen, and VAkiha too if you have problems hitting all hits from 2[C].

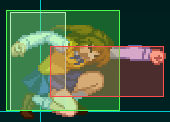
For Kouma, use 3[C] j.5[C] dj j.5[C] delay 5[C] 623B 2C 623C delay 5[C] 623B 2C 623C 5[C] 623B. Reason for this is that 2C/2[C] won't hit him while in midair. At ALL. Not even one hit, wat.

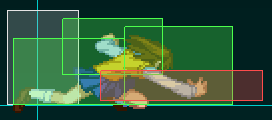
For VAkiha, timing for OTG 2C and juggle 2C is harder, but still doable. Semi-works because it's really harder to do with even slightly more latency to your hits.
Makimoke May 11, 2016 @ 11:04am 
On corner : 3[C] j.5[C] dj j.5[C] 2[C] 5[C] 623B 2C 623C 2C 5C 623B (2C 623C 2C 623B) xx.
200 meter, 7.1k damage, plus possibility to trap using 2A to bait a tech, a 214A OTG to continue pressing.
Could be character specific, the timing from j.5[C]x2 to 2[C] differs for each character.
You can also not use the second 623C and remove the part in brackets : 100 meter, 6.3k damage. It'll let you have meter to use a 236A/214A trap 63214C if you want to use a 2A 236A/214A OTG after the 623B.
Jack Rost Apr 20, 2016 @ 1:35pm 
Ou, sorry then
wendigo  [author] Apr 20, 2016 @ 1:34pm 
H-Satsuki has no 421 special, her 214b can't be cancelled by holding B, 623a can't be charged. You're getting her confused with C-Satsuki lol.
Jack Rost Apr 20, 2016 @ 1:29pm 
You miss 412 special. 214B special is cancelable if you hold B. 623A looks diffrent and can be charged.