Mystik Belle

Mystik Belle

Not enough ratings
Speedrunning Simplified
By Celeste Enfer
A simple route for managing item collection to beat the game in under an hour with plenty of time to spare.
3
   
Award
Favorite
Favorited
Unfavorite
Preface
The Speedrunner achievement for this game is actually fairly simple as far as speed running is concerned. My first attempt with no planning whatsoever only missed it by about a minute, and with the route I'm going to outline for you I beat it in 47 minutes on my first attempt even with three unexpected deaths and plenty of platforming mistakes. There are a few things to keep in mind while doing this run.

The timer stops when you pause the game or when you open the item menu.
This can be really useful for checking the route or just taking a break. The pause menu also shows your current time.

Play on easy and ignore most enemies.
If you play on the easier setting, you can run through most of the enemies in the game. Contact will kill them and they drop hearts frequently enough that you'll be fine through most of the game. Level ups and boss kills both heal you to full as well.

The game only saves when you load a room.
This includes death, so unfortunately you can't save yourself there, but if you have a particularly bad time with a room you can quit and reload to try again, just make sure to quit before you switch rooms. This is particularly helpful in the worm room if you miss a cycle, or if you lose too much health running through the caves.

Dashing is significantly faster than walking.
While the controls for it can be a bit fickle, dashing across a flat room is about 1/3 faster than just walking. If you're having trouble getting the dashes to go off, try waiting a bit longer in between presses (at least that works for me). It's not necessary to dash through rooms, but it can shave a fair bit of time off your total.

With those tips in mind, let's get on to the run. I've split it into eight sections, each section has a target time listed. You should have about 15 minutes to spare throughout this route, so if you go over a bit in any one section, don't fret. However, if you ever find that your split times are more than 15 minutes over the target for a section, then you've probably blown the run and will need to start over. Let's get to it.
Split 1: Talk to the Doc
Start the game as normal, skip the cutscene at the beginning and blow through the dialog as fast as possible. You can hit the item menu button to skip the scrolling time on any text box, and for the entire run you're going to want to do that every time you encounter dialog.

Target Time: 5:00
  1. Get Hall Pass
  2. Exit Start
  3. Get Empty spray pump
  4. Use Empty spray pump on poison tank to get Toxic weedkiller
  5. Use Toxic weedkiller on plant to get Stinky leaf
  6. Get Flimsy chain
  7. Use Stinky leaf on dumpster to get Fly magnet
  8. Get Glass jar
  9. Get Durable crowbar
  10. Use Fly magnet on lunch lady to get Smelly fish head & Shiny copper foil
  11. Use Durable crowbar on door
  12. Drop Smelly fish head in tower mirror room
  13. Get Sharp saw and talk to doctor
  14. Warp to school mirror
Split 2: Ride the Lightning
Target Time: 12:00
  1. Drop Metal scrap at the bottom of the shaft to the right of the mirror room
  2. Talk to emo girl
  3. Use Sharp saw to get Brass rod
  4. Drop Flimsy chain by the cat
  5. Kill all books in library to get Science tome
  6. Take library shortcut to return to emo girl
  7. Use Science tome on emo girl
  8. Get chain at the cat, which completes the Leyden jar
  9. Use Leyden jar on cat to get Charged jar
  10. Warp to tower mirror
  11. Get Smelly fish head
  12. Use Charged jar on monster
  13. Kill monster, acquire lightning spell
  14. Talk to doc to get Sledgehammer
Split 3: The Professor's Secret
Target time: 20:00
  1. Use Hall Pass on creature to get Sturdy Box
  2. Kill Science Ninja, acquire Dash spell
  3. Get Some copper wire
  4. Use tower mirror to warp to school mirror
  5. Drop Smelly fish head and Some copper wire at the bucket
  6. Use Flimsy saw on mop to get Orange mop head
  7. Use Sledgehammer to open drawbridge
  8. Use Sturdy box on sand, leave it
  9. Get Horseshoe
  10. Drop both Metal scraps under Horseshoe
  11. Get Smelly fish head and Some copper wire
  12. Use Orange mop head on bald girl to get Wooden gear part
  13. Head through dungeon to get Garden trowel
  14. Use Smelly fish head to summon worm
  15. Get Can of gear oil
  16. Use Some copper wire on elecromagnet to get Bolt cutters
  17. Use Can of gear oil on lever
  18. Drop Bolt cutters
  19. Talk to professor twice
  20. Get second Wooden gear part
  21. Use dungeon mirror to warp to school mirror
Split 4: Cutting the Claw
Target time: 25:00
  1. Drop Gardening trowel and get Metal scrap
  2. Get the Sandbox you left behind, which will complete the Gear mold
  3. Get the two Metal scraps you dropped earlier
  4. Put all three Metal scraps and the Gear mold into the furnace, then pump it 10 times
  5. Get Metal gear
  6. Use school mirror to warp to dungeon mirror
  7. Use Metal gear on lever
  8. Defeat the werewolf, acquire double jump
  9. Get and use Bolt cutters on werewolf to get Werewolf claw
  10. Use dungeon mirror to warp to school mirror
Split 5: Lumberjacking
Target time: 32:00
  1. Use Werewolf's claw on teacher to turn werewolf back into professor
  2. Get the Gardening trowel that you dropped
  3. Exterminate rat, acquire transformation spell
  4. Get Sack of flour
  5. Get Old bucket
  6. Use transformation spell to get Green orb
  7. Use forest mirror to warp to school mirror
  8. Jump into the moat to turn Old bucket into Bucket of water
  9. Use school mirror to warp to forest mirror
  10. Use Bucket of water, Gardening trowel, and Old bucket on Bloom of Twilight
  11. Fell tree, acquire bubble spell
  12. Use forest mirror to warp to school mirror
Split 6: Coloring Time
Target time: 38:00
  1. Drop Bloom of Twilight in school mirror room
  2. Open door in starting room and head to dorms
  3. Get Thick rope
  4. Get Tarnished key
  5. Use tower mirror to warp to dungeon mirror
  6. Drop Sack of flour in dungeon mirror room
  7. Get Screw-in hook
  8. Use Tarnished key on chest to get Red orb
  9. Use dungeon mirror to warp to forest mirror
  10. Go through cave into water area
  11. Use Screw-in hook and Thick rope on rock to open passage
  12. Use Red orb and Green orb on elevator (Red Green Blue, from left to right)
  13. Don't die, navigate through caves to get Blue orb
  14. Put Blue orb into elevator, inspect cave in
  15. Use cave mirror to warp to dungeon mirror
  16. Talk to professor to get Empty flask
  17. Use dungeon mirror to warp to cave mirror
Split 7: The Biggest Buddy
Target time: 43:00
  1. Use Empty flask under leak to get Sulfuric acid
  2. Die to the traps to warp back to the starting room
  3. Get Paper tube from the dorms
  4. Head back through the starting room to get the Bag of fertilizer
  5. Use the school mirror to warp to the dungeon mirror
  6. Get the Sack of flour you dropped here earlier
  7. Use Sack of flour, Bag of fertilizer, Paper tube, and Sulfuric acid on professor
  8. Get Stick of dynamite
  9. Use dungeon mirror to warp to cave mirror
  10. Go down the elevator and use the Stick of dynamite on the rubble
  11. Get Dragon's scale
  12. Smash spider buddy, get brick breaker spell
  13. Use cave mirror to warp to school mirror
Split 8: Down the Hatch
Target time: 47:00
  1. Get Bloom of Twilight you dropped here
  2. Use Bloom of Twilight and Dragon's scale on teacher to get Brew
  3. Use school mirror to warp to dungeon mirror
  4. Travel to final room, watch the cutscene, check time right as the screen pans down
Summary & Video
And there you have it. That's the most efficient route I could come up with for a speed run for this game, and even if you aren't big into speed running it still has enough wiggle room that you should have no problems getting in under an hour. The biggest time waster in this game is item management, and this will keep you from having to backtrack or search for items. I've put my latest attempt at the bottom of this video to use as a reference point if you get lost or don't know where something is.

You'll also notice that I only have the paths drawn out for the first section. I'm not sure if they're really all that helpful and they take a long time to make, so let me know in the comments if you prefer the path images, or if the video is more helpful. Either way, best of luck getting that achievement.

4 Comments
YuuGiJoou[VT] Dec 3, 2017 @ 9:01pm 
Just wanted to say that this is a good resource for people like me who don't really speedrun much, but still wanted to take a crack at the last achivement. The game is just that neat and wouldn't let me go!

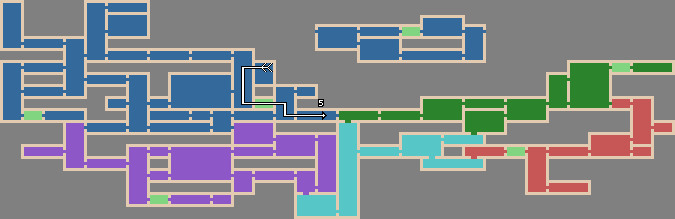
Between this and the wonderful map in the Community Artwork section, I got through in about 50 minutes, even with some pretty big mistakes that forced me to backtrack or take longer routes because I forgot something here or there. (Or occasionally thought I had a bright idea how I could "do better"... only to find "oh, right... THAT's why we don't do that yet..." :3)

I probably wouldn't speedrun it again, because I like to take a nice and leisurely stroll through the atmosphere and really absorb all the flavor (my original file ran about 4 hours before I'd finally decided that I poked at enough stuff and could let it take a rest)... but I'm still all the more impressed that there's more than one way to play and enjoy this game.

Thanks for your hard work and for sharing this!
KayKayBanaynays May 13, 2016 @ 3:21am 
I'll also throw my thanks in for your guide. I just used it to get the last three cheevos I needed.

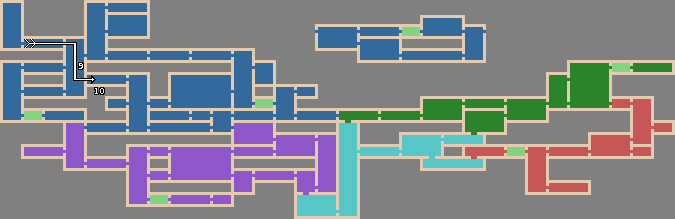
I kept restarting because your recommended times were so much smaller than what I was managing to do. But I eventually beat it with only a little more than a minute more than your times. Woo!
Celeste Enfer  [author] Feb 9, 2016 @ 8:19am 
Congratulations on finishing the run, I'm glad the guide helped!
EZSPECIAL Feb 8, 2016 @ 6:35pm 
Thanks for the guide! Finally decided to 100% achievements this game, hadn't played in a very long time, did a casual run first to do some cleanup and remember the game and then got it 2nd try thanks to your guide, 1st run died 8m in so not too bad