Don't Starve Together

Don't Starve Together

127 ratings
How to setup dedicated server with cave on Linux
By ToNiO and 1 collaborators
This guide is for helping step by step to installed a dedicated server for don't starve together with cave on Linux

----

I want to clarify that I will show my method to create a server on linux,
maybe it's not the best method,but at least it works fine, there are lots of ways to do this,

you can even make your own scripts, I just want to explain the installation with maximum information,
I give just one example but you can customize your install as you wish

----

This guide is making on Debian 8 64 Bits,

I use VMware Workstation for make this guide

this software can virtualize any system on your computer without change your current system

so I don't use FTP client to transfer files as Filezilla or Flashfxp

but you can very well do for cluster.ini, server.ini, worldgenoverride.lua and other file.
2
   
Award
Favorite
Favorited
Unfavorite
Summary
Install the dependencies required to run SteamCMD
Here are the commands for the differents distributions on Linux

you need to installing some packages for your server works correctly:

if you have Ubuntu/Debian 64-Bit:

  • apt-get install lib32gcc1

if you have RedHat/CentOS 32 Bit:

  • yum install glibc libstdc++
  • yum -y install glibc.i686
  • yum install libcurl.so.4
  • yum install libstdc++.so.6

only if you have error with libcurl.so.4 (RedHat/CentOS):

  • cd /usr/lib
  • ln -s libcurl.so.4 libcurl-gnutls.so.4

if you have RedHat/CentOS 64-Bit:

  • yum install glibc.i686 libstdc++.i686

so im on Debian 64 bits:

  • apt-get install lib32gcc1

Create your user for your server Don't Starve Together
  • adduser dst

You need install some dependencies for your server Don't Starve Together:
  • dpkg --add-architecture i386 # If running a 64bit OS
  • apt-get update
  • apt-get install lib32gcc1 # If running a 64bit OS
  • apt-get install lib32stdc++6 # If running a 64bit OS
  • apt-get install libgcc1 # If running a 32bit OS
  • apt-get install libcurl4-gnutls-dev:i386

Now you can login with your user and download SteamCMD:

Now you can installing SteamCMD:
  • ./steamcmd.sh
  • login anonymous
  • force_install_dir /home/dst/server_dst
  • app_update 343050 validate
  • quit

Start server Overworld and Cave
you need to create two scripts for start two instances for each of the servers
(start.sh and start2.sh)


so i use text editor nano, but you can use other without problem

when you are in nano, just write your text and for save and quit press CTRL + X and Y for valid

this is for server Overworld:

  • cd /home/dst/server_dst/bin
  • nano start.sh
  • ./dontstarve_dedicated_server_nullrenderer -console -cluster MyDediServer -shard Master


this is for server Cave:
  • nano start2.sh
  • ./dontstarve_dedicated_server_nullrenderer -console -cluster MyDediServer -shard Caves


here the option list for command line:

-persistent_storage_root

  • Change the directory that your configuration directory resides in. This should be an absolute path. The full path to your files will be <persistent_storage_root>/<conf_dir>/ where <conf_dir> is the value set by -conf_dir. The default for this option depends on the platform:

  • Windows: <Your documents folder>/Klei
  • Mac OSX: <Your home folder>/Documents/Klei
  • Linux: ~/.klei

-conf_dir

  • Change the name of your configuration directory. This name should not contain any slashes. The full path to your files will be <persistent_storage_root>/<conf_dir> where <persistent_storage_root> is the value set by the -persistent_storage_root option. The default is: "DoNotStarveTogether".

-cluster

  • Set the name of the cluster directory that this server will use. The server will expect to find the cluster.ini file in the following location: <persistent_storage_root>/<conf_dir>/<cluster>/cluster.ini, where <persistent_storage_root> and <conf_dir> are the values set by the -persistent_storage_root and -conf_dir options. The default is "Cluster_1".

-shard

  • Set the name of the shard directory that this server will use. The server will expect to find the server.ini file in the following location:<persistent_storage_root>/<conf_dir>/<cluster>/<shard>/server.ini, where <persistent_storage_root>, <conf_dir>, and <cluster> are the values set by the -persistent_storage_root, -conf_dir, and -cluster options. The default is "Master".

-offline

  • Start the server in offline mode. In offline mode, the server will not be listed publicly, only players on the local network will be able to join, and any steam-related functionality will not work.

-console

  • Allow lua commands to be entered in the command prompt or terminal that the server is running in.

-bind_ip <bind_ip>

  • Change the address that the server binds to when listening for player connections. This is an advanced feature that most people will not need to use.

-port <port_number>

  • Valid values: 1..65535
  • The UDP port that this server will listen for connections on. This option overrides the [NETWORK] / server_port setting in server.ini. If you are running a multi-level cluster, this port must be different for each server. This port must be between 10998 and 11018 inclusive in order for players on the same LAN to see it in their server listing. Ports below 1024 are restricted to privileged users on some operating systems.

-players <max_players>

  • Valid values: 1..64
  • Set the maximum number of players that will be allowed to join the game. This option overrides the [GAMEPLAY] / max_players setting in cluster.ini.

-steam_master_server_port <port_number>

  • Valid values: 1..65535
  • Internal port used by steam. This option overrides the [STEAM] / master_server_port setting in server.ini. Make sure that this is different for each server you run on the same machine.

-steam_authentication_port <port_number>

  • Valid values: 1..65535
  • Internal port used by steam. This option overrides the [STEAM] / authentication_port setting in server.ini. Make sure that this is different for each server you run on the same machine.

-backup_logs

  • Create a backup of the previous log files each time the server is run. The backups will be stored in a directory called "backup" in the same directory as server.ini.

-tick <tick_rate>

  • Valid values: 15 .. 60
  • This is the number of times per-second that the server sends updates to clients. Increasing this may improve precision, but will result in more network traffic. This option overrides the [NETWORK] / tick_rate setting in cluster.ini. It is recommended to leave this at the default value of 15. If you do change this option, it is recommended that you do so only for LAN games, and use a number evenly divisible into 60 (15, 20, 30).
Start and stop both servers, that's going create settings folder Master (Server Overworld) and Caves (Server Caves)
that's for server Overworld:

  • sh start.sh
when you see in end of log: "Your Server Will Not Start"
press CTRL+C for stop server


that's for server Cave:

  • sh start2.sh
when you see in end of log: "Your Server Will Not Start"
press CTRL+C for stop server

You need to settings both servers with cluster_token.txt, server.ini, worldgenoverride.lua
For find your token you just need to launch your game and go in your account info:
  • Go in Play

  • Go in account info


now you can see your token (Klei Dedicated Server Token)

if you don't see your token, you just need to add in the white box Klei Dedicated Server Token and click on Generate Server Token

note and keep your token for use to the next step
Put your token in cluster_token.txt
the token is mandatory without him your server can not be online, it allows for Klei to have the option to remove the server in case of violation or problem with this server
put your token and press CTRL + X and Y for valid


Add worldgenoverride.lua on both servers
worldgenoverride.lua represents the settings to generate the world for don't starve together, so you can adjust the season, monsters, or biomes and more

Server Overworld:
copy the code lua in the link below and paste in your worldgenoverride.lua:
worldgenoverride.lua for server Overworld[pastebin.com]

after that press CTRL + X and Y for save and quit


Server Cave:
copy the code lua in the link below and paste in your worldgenoverride.lua:
worldgenoverride.lua for server Caves[pastebin.com]

after that press CTRL + X and Y for save and quit


List of option for cluster.ini and server.ini
cluster.ini have settings for both servers (server name, slots, gametype)

here the option list for cluster.ini:

[MISC]

max_snapshots

  • Default: 6
  • Maximum number of snapshots to retain. These snapshots are created every time a save occurs, and are available in the “Rollback” tab on the “Host Game” screen.

[SHARD]

shard_enabled

  • Default: false
  • Enable server sharding. This must be set to true for multi-level servers. For single-level servers, it can be omitted.

bind_ip

  • Overridable in server.ini
  • Default: 127.0.0.1
  • Required: If shard_enabled = true and is_master = true
  • This is the network address the master server will listen on for other shard servers to connect to. Set this to 127.0.0.1 if all of your servers in your cluster are on the same machine, or 0.0.0.0 if the servers in your cluster are on different machines. This only needs to be set for the master server, either in cluster.ini, or the master server's server.ini.

master_ip

  • Overridable in server.ini
  • Default: none
  • Required: If shard_enabled = true and is_master = false
  • This is the I.P. address that a non-master shard will use when trying to connect to the master shard. If all servers in a cluster are on the same machine, set this to 127.0.0.1

master_port

  • Overridable in server.ini
  • Default: 10888
  • This is UDP port that the master server will listen on, and that a non-master shard will use when trying to connect to the master shard. This should be set to the same value for all shards by having a single entry in cluster.ini, or omitted completely to use the default.

cluster_key

  • Overridable in server.ini
  • Default: none
  • Required if shard_enabled = true
  • This is a password used to authenticate a slave server to the master. If you are running servers on different machines that need to connect to each other, this value must be the same on each machine. For servers running on the same machine, you can just set this once in cluster.ini.

[STEAM]

steam_group_only

  • Default: false
  • When set to true, the server will only allow connections from players belonging to the steam group listed in the steam_group_id setting.

steam_group_id


steam_group_admins

  • Default: false
  • When this is set to true, admins of the steam group specified in steam_group_id will also have admin status on the server.

[NETWORK]

offline_server

  • Default: false
  • Create an offline server. The server will not be listed publicly, and only players on the local network will be able to join, and any steam-related functionality will not work.

tick_rate

  • Default: 15
  • This is the number of times per-second that the server sends updates to clients. Increasing this may improve precision, but will result in more network traffic.

whitelist_slots

  • Default: 0
  • The number of reserved slots for whitelisted players. To whitelist a player, add their Klei UserId to the whitelist.txt file (Place this file in the same directory as cluster.ini)

cluster_password

  • Default: none
  • This is the password that players must enter to join your server. Leave this blank or omit it for no password.

cluster_name

  • The name for your server cluster. This is the name that will show up in server browser.

cluster_description

  • Default: empty
  • Cluster description. This will show up in the server details area on the “Browse Games” screen.

lan_only_cluster

  • Default: false
  • When set to true, the server will only accept connections from machines on the same LAN

cluster_intention

  • Default: Varies, depending on game mode.
  • The cluster’s playstyle. This field is the equivalent of the “Server Playstyle” field on the “Host Game” screen. Valid values are cooperative, competitive, social, or madness.

[GAMEPLAY]

max_players

  • Default: 16
  • The maximum number of players that may be connected to the cluster at one time.

pvp

  • Default: false
  • Enable PVP.

game_mode

  • Default: survival
  • The cluster’s game mode. This field is the equivalent of the “Game Mode” field on the “Host Game” screen. Valid values are survival, endless or wilderness

pause_when_empty

  • Default: false
  • Pause the server when there are no players connected.

vote_kick_enabled

  • Default: false
  • Set to true to enable the “Vote to Kick” feature.

server.ini have settings for each server (server ports,steam port,activated master or slave):

here the option list for server.ini:

[SHARD]

is_master

  • Default: none
  • Required: If shard_enabled = true
  • Sets a shard to be the master shard for a cluster. There must be exactly one master server per cluster. Set this to true in your master server’s server.ini, and false in every other server.ini.

name

  • Default: none
  • Required: if shard_enabled = true and is_master = false
  • This is the name of the shard that will show up in log files. It is ignored for the master server, which always has the name [SHDMASTER].

id

  • Default: Randomly generated number.
  • This is field is automatically generated for non-master servers, and is used internally to uniquely identify a server. Altering this or removing it may cause problems on your server if anybody’s character currently resides in the world that this server manages.

[STEAM]

authentication_port

  • Default: 8766
  • Internal port used by steam. Make sure that this is different for each server you run on the same machine.

master_server_port

  • Default: 27016
  • Internal port used by steam. Make sure that this is different for each server you run on the same machine.

[NETWORK]

server_port

  • Default: 10999
  • The UDP port that this server will listen for connections on. If you are running a multi-level cluster, this port must be different for each server. This port must be between 10998 and 11018 inclusive in order for players on the same LAN to see it in their server listing. Ports below 1024 are restricted to privileged users on some operating systems.
Create and configure cluster.ini and server.ini
now I'll just going give sample configuration about settings for both servers

cluster.ini:
add this

[GAMEPLAY]
game_mode = survival
max_players = 10
pvp = false
pause_when_empty = true

[NETWORK]
cluster_name = TEST Server
cluster_description = Welcome
cluster_password =
cluster_intention = social
autosaver_enabled = true
enable_vote_kick = false

[MISC]
console_enabled = true

[SHARD]
shard_enabled = true
bind_ip = 127.0.0.1
master_ip = 127.0.0.1
master_port = 11001
cluster_key = dst

and press CTRL + X and Y for save and quit


server.ini for server Overworld:
and add this:

[NETWORK]
server_port = 10999


[SHARD]
is_master = true


[STEAM]
master_server_port = 12346
authentication_port = 12345

and press CTRL + X and Y for save and quit


server.ini for server Caves:
and add this:

[NETWORK]
server_port = 11000


[SHARD]
is_master = false
name = Caves


[STEAM]
master_server_port = 12348
authentication_port = 12347

and press CTRL + X and Y for save and quit


Use Screen, it's terminal multiplexer
he is ability to attach and detach a session

so if you don't have screen on your dedicated server, you need install package screen:
  • exit (come back with root)
  • apt-get install screen


Make script for restart server Overworld and Cave
make new script restart.sh for server Overworld:
  • su - dst
  • nano /home/dst/server_dst/bin/restart.sh
and add this:

#!/bin/sh
# launch of server Overworld

#Path Directory
name_folder="/home/dst/server_dst/bin"

#Command line
start_overworld="sh start.sh"

#Start or Restart the server
screen -dr dst_server1 -X -S quit
cd ${name_folder}
screen -dmS dst_server1 ${start_overworld}

and press CTRL + X and Y for save and quit


make new script restart2.sh for server Cave:
  • nano /home/dst/server_dst/bin/restart2.sh
and add this:

#!/bin/sh
# launch of server Cave

#Path Directory
name_folder="/home/dst/server_dst/bin"

#Command line
start_cave="sh start2.sh"

#Start or Restart the server
screen -dr dst_server2 -X -S quit
cd ${name_folder}
screen -dmS dst_server2 ${start_cave}

and press CTRL + X and Y for save and quit


Testing both servers
  • sh /home/dst/server_dst/bin/restart.sh
  • sh /home/dst/server_dst/bin/restart2.sh


if you see the message "No screen session found"

because the script try to kill screen,

so when you launch both scripts for first time, it's start both servers

if you make again sh restart.sh or sh restart2.sh, it's going restart the server


you can see your log, if it's server start correctly:

(for stop this command press CTRL + C)

(for stop this command press CTRL + C)


if you have this error '[200] Account Failed (6): "E_EXPIRED_TOKEN"'

it's look like problem with token:

Do not simply copy and paste the contents of this file from one machine to another. Move the actual file from one machine to another.

The cluster_token.txt is a null byte terminated ASCII file (no line endings). If the GSA attempts to copy-paste the contents of the token file, the null byte will be omitted and a line ending will be appended to the end. The dedicated server software will not be able to properly parse the cluster_token.txt file in this case.
Check if servers running correctly, and make a schedule task
we need check if server Overworld and server Cave works correctly

launch your game and check if you server is online:


now we will schedule a task for update the server every day at 6:00 am :

so you need make simple script for update the server:
  • nano /home/dst/server_dst/bin/update.sh
and add this:
  • #update of server
  • screen -dr dst_server1 -X quit
  • screen -dr dst_server2 -X quit
  • cd /home/dst
  • ./steamcmd.sh +login anonymous +force_install_dir /home/dst/server_dst +app_update 343050 validate +quit
  • sleep 10
  • sh /home/dst/server_dst/bin/restart.sh
  • sh /home/dst/server_dst/bin/restart2.sh

and press CTRL + X and Y for save and quit


so we can test update.sh for see if it's works correctly:
  • sh /home/dst/server_dst/bin/update.sh
We going used crontab, this service allows to create scheduled tasks on Linux
  • crontab -e
when you see this:


choose 1

now you need to add this in crontab:


  • 0 6 * * * sh /home/dst/server_dst/bin/update.sh

and press CTRL + X and Y for save and quit


your server will be restarted and updated daily at 6:00 am
If you want stop both servers, you can use htop on Linux
htop it's just monitor system processes on linux
  • login on root (exit for come back with root)
  • apt-get install htop
  • su - dst
  • htop -u dst
    select the screen of you want kill with the directional arrows
    press F9 and enter for kill the screen (that's going stop the server)
    if you want start server, make again sh restart.sh and sh restart2.sh


I hope this guide is good for you and especially to help you in installation of server DST on linux :)
FAQ - How to reset the map on dedicated server?
when you are in your server DST:

- Press TAB
- Click on Server Actions
- Click on Regenerate World


FAQ - How to make rollback on dedicated server?
when you are in your server DST:

- Press TAB
- Click on Server Actions
- Click on Rollback

this function allows returns to the previous day


FAQ - How banned player if he is not on my dedicated server?
if some players report troll have destroy camp on your server but he is not on the server right now!

you can banned him with SteamID

so you just need name of player and find him in your server_log.txt:


now you need copy this SteamID in blocklist.txt

create blocklist.txt here:


just put the SteamID in blocklist.txt:


now restart your dedicated server

  • sh /home/dst/server_dst/bin/restart.sh


check if your blocklist.txt is loaded correctly:


nano /home/dst/.klei/DoNotStarveTogether/MyDediServer/Master/server_log.txt


you need to find this in your server_log.txt:


so now if player try to join the server, he can't because he is banned!

i have make this test with my SteamID and you can see im banned on my server:


so that's can works for all players
FAQ - How add admin on your dedicated server?
so for add new admin on your server

you need to create adminlist.txt here:


you need to find KU_****** of player in log of your server:


( KU_***** matches its identifier on server don't starve together as SteamID on steam )


now you need to add KU_***** in your adminlist.txt:


restart your server:

  • sh /home/dst/server_dst/bin/restart.sh


check now if your adminlist.txt is loading correctly on your server:


you need to find this in your server_log.txt:


so now you can test with your friend if he have admin permission

you can see if your friend is admin on your server like the following screenshots:


FAQ - How to reserved slots on your dedicated server?
this allows to reserve a number of slots for your friends or an admin of server,

this based on number slots of your server example if you reserved 5 slots and you have 15 slots on your server only 10 players from public can connect on the server

so for my example i going put 2 slots on my server and going put 2 KU_***** in my whitelist.txt

you need to create whitelist.txt here:


as adminlist.txt you need to find KU_***** in log.txt of your server:


now you need to add KU_***** in your whitelist.txt:


(i have add also another KU_***** of other friend for make this test)

so you need also to add this option in your cluster.ini:

below of [NETWORK] add this:


  • whitelist_slots = 2


now restart your server:

  • sh /home/dst/server_dst/bin/restart.sh


check now if your whitelist.txt is loading correctly on your server:


you need to find this in your server_log.txt:


so now you can test with your friend if reserved slots works

my friend connect on the server before me on the server and then when I try to connect:


that's mean your reserved slots work fine now

this was just an example, but you can change the number of slots as you want
74 Comments
Catoverflow Jan 4 @ 12:22am 
Thanks! I made a dockerized script based on your guide. Hope this would simplify the process a little bit.
My scripts at https://github.com/Catoverflow/dst-server
Joku Suomalainen Apr 2, 2023 @ 12:47pm 
Please just use a linux systemd service for the server startup.
CatLemon Mar 31, 2022 @ 4:30am 
I successfully start a server with cave, but they all show in my server list. Though the cave server cannot enter directly, but this is kind of annoying. Is there any method to fix this problem?
redcathode Jan 28, 2022 @ 5:59pm 
komp's solution works equally well
redcathode Jan 28, 2022 @ 5:58pm 
For people on arch (btw):
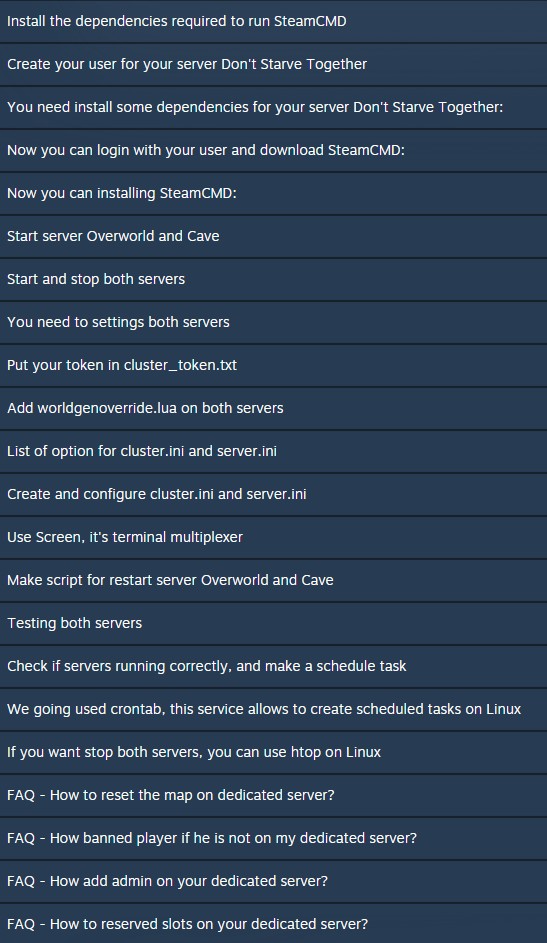
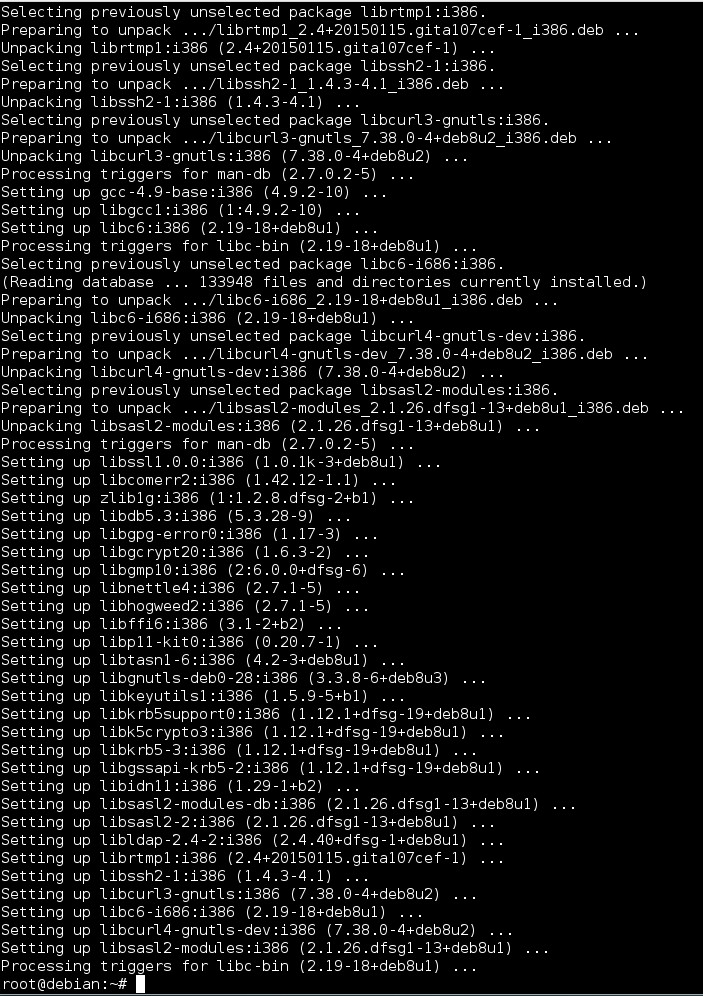
Install the dependencies via
`yay -Syu lib32-gcc-libs lib32-libcurl-gnutls lib32-glibc lib32-libidn2 lib32-libssh2 lib32-libpsl lib32-nettle lib32-gnutls lib32-zlib lib32-libunistring lib32-openssl lib32-p11-kit lib32-libtasn1 lib32-gmp lib32-libffi steamcmd`
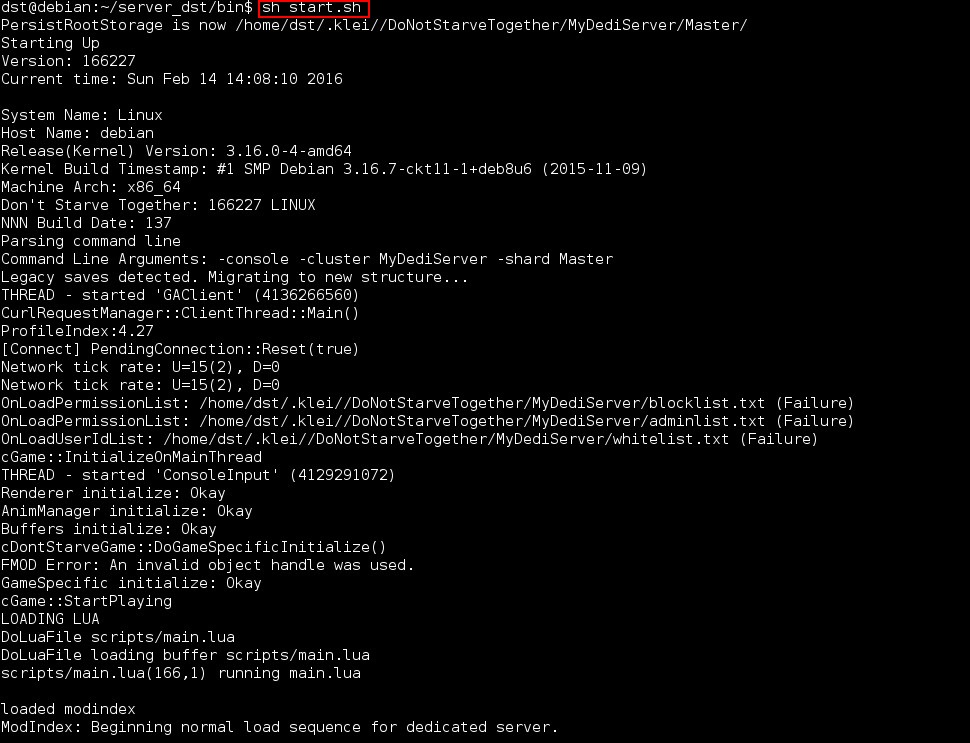
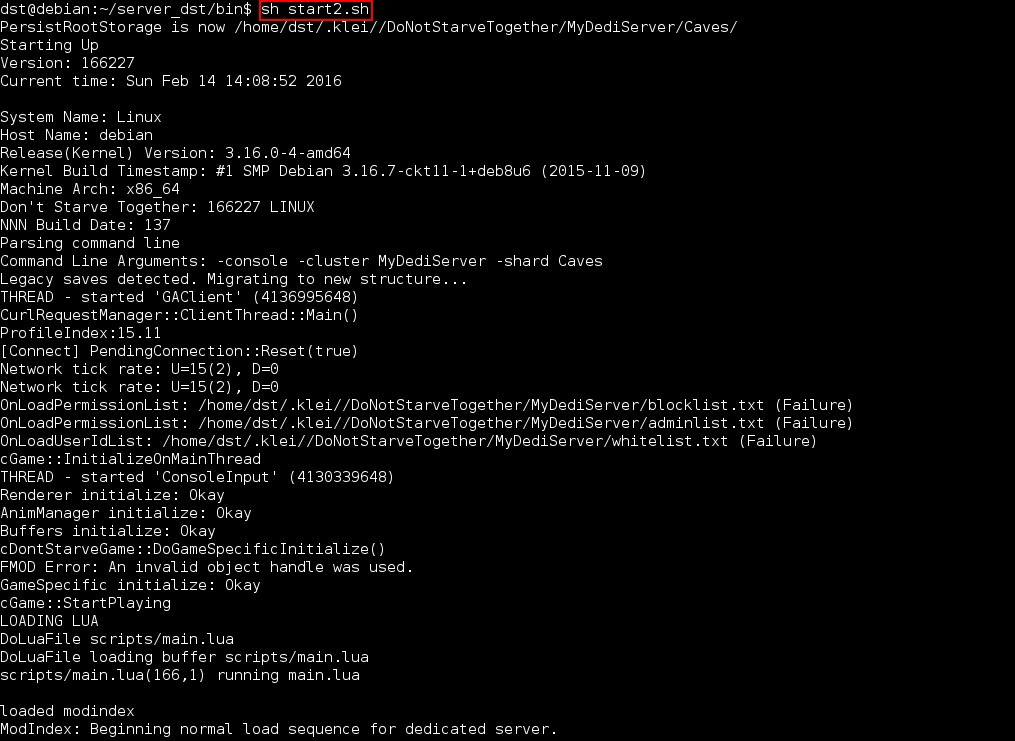
Also, for proper server shutdown that doesn't terminate the server without saving (put this in a .sh file and `chmod +x` it):
#!/bin/bash
screen -S dst_server1 -p 0 -X stuff "c_shutdown()^M"
screen -S dst_server2 -p 0 -X stuff "c_shutdown()^M"
Eco-Friendly Wood Venneer Dec 27, 2021 @ 7:27pm 
just go afk for a whole day instead of doing this stuff
komp Jun 6, 2020 @ 11:39am 
For correct server shutdown you should replace
screen -dr dst_server1 -X -S quit
with:
screen -S dst_server1 -p 0 -X stuff "^C"
Prince of Knights - Ferdi Telci May 10, 2020 @ 7:06pm 
Adam anlatmış be. On numara Guide.
Dannyan Apr 9, 2020 @ 7:13pm 
I'm trying to make my server start at OS startup. How do I do that?
ghmodius777 Jan 16, 2020 @ 1:59am 
For people getting error info on Ubuntu 16.08 / 18.08 (I'm not quite sure about other versions), try using the following command for installation of SteamCMD:

apt-get install steamcmd

(add sudo if needed)